

Bushnell VIDEOSCOPE 73-7000V User Manual
Videoscope
Instruction Manual
Model # 737000V
Lit.#: 981065/0908

INDEX
Instruction Manual
Manuel D’instructions
Manual de Instrucciones
Bedienungsanleitung
Manuale di istruzioni
Manual de Instruções
English..................... 3
Français ..................18
Español ................... 34
Deutsch ..................50
Italiano ................... 65
Português................ 80

WARNING: The mounted Videoscope should never be used as a substitute
for a standard video or still camera, as it may result in your inadvertently
pointing the gun at another person. Before using the Videoscope, always
remember that all rearm safety precautions apply when it is mounted on a
rearm. Please read the safety instructions for your rearm before installing
and using the Videoscope. When handling rearms, always keep the muzzle
pointed in a safe direction. Always treat your rearm as if it were loaded. For
your safety and others, you must remove the Videoscope from your rearm
before playing back or downloading the stored videos. Please be responsible
and join Bushnell in supporting and following safe, responsible hunting and
shooting sport guidelines and practices at all times.
ENGLISH
3

Congratulations on your purchase of the Bushnell® Videoscope™! The unique Videoscope
digital video camera mounts right onto your riescope, allowing you to capture high quality
videos (with audio) of the highlights from your hunting trips, simply by pressing the record
button before taking aim at your target. Up to 30 minutes of high quality video can be held
in the Videoscope’s internal memory, ready for instant playback on the onboard 1.5” color
TFT-LCD, or downloading to your computer (compatible with Windows 2000, XP, Vista or
Mac OS X). The videos remain safely stored in the camera’s memory when it’s turned off,
or you can delete and replace them with new videos, as often as you like -without the need
to purchase a special memory card, or a video tape that could become worn or broken.
Before using your new Videoscope, please read the instructions contained in this manual
and take time to familiarize yourself with the camera’s operation and features.
Warning: Use care during handling to avoid touching the camera lens
to prevent degrading the image quality. Clean the camera lens only with
dry lens tissue or microfiber cloth. DO NOT use liquids of any type.
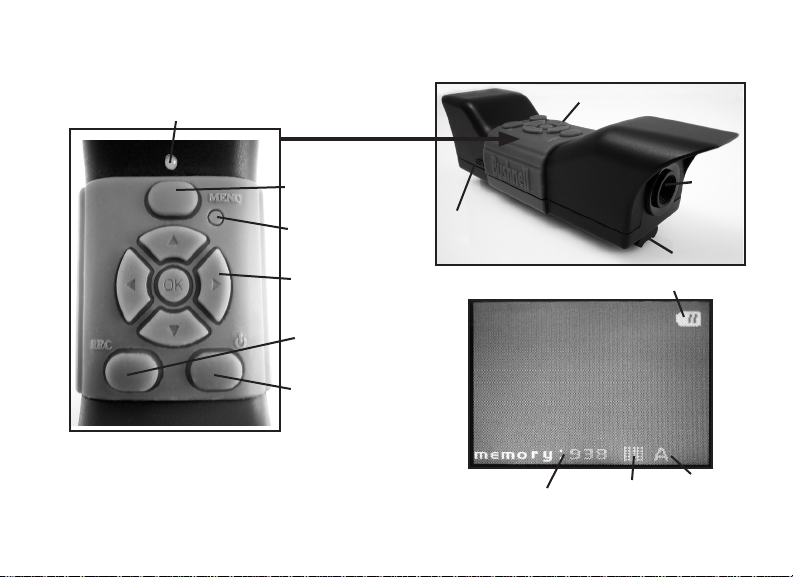
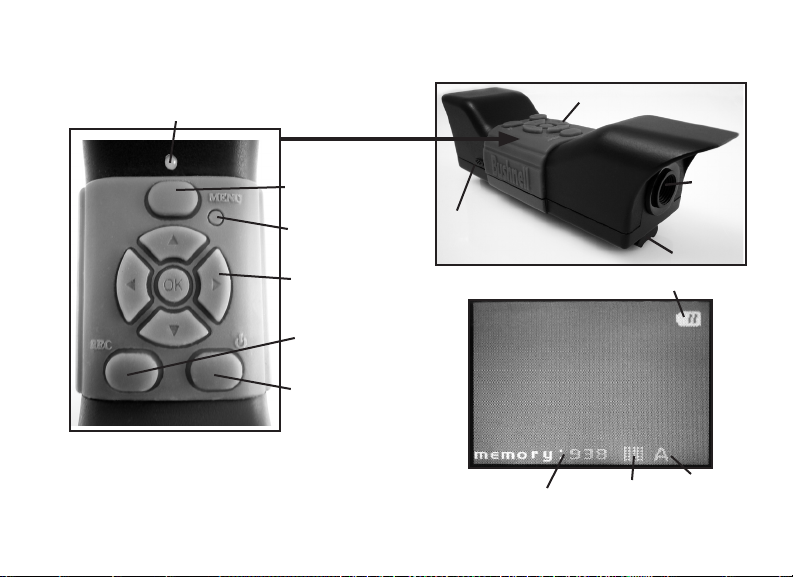
Parts, Controls, and Display Guide
Status LED
Menu Button
Reset Button
Circular Keypad
w/ OK Button
Record
Button
Power
Button
Note: All mounting parts are shown in
the section “Mounting the Videoscope”
USB
Port
Microphone
Battery Indicator
Camera
Lens
Mounting
Rail
Remaining
Internal Memory
(seconds of video )
Resolution
White
Balance
(Auto)
5
CHARGING THE VIDEOSCOPE
The Videoscope is powered by an internal, rechargeable lithium-ion battery. Before using
the Videoscope for the rst time, it needs to be charged for approximately 10 hours (future
charge times should be shorter).
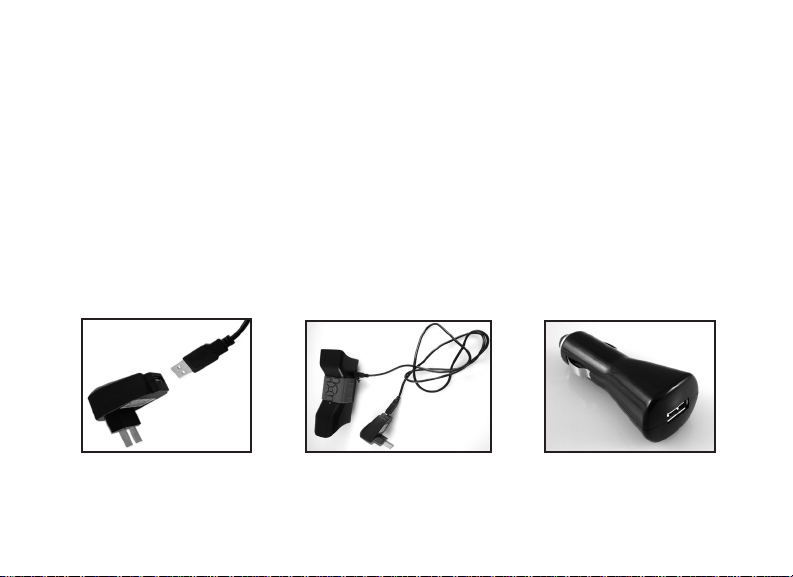
1. Plug the supplied USB cable into the AC Adapter (using the large, standard rectangular USB
plug), then insert the other end of the cable into the USB Port on the side of the Videoscope.
2. Plug the AC Adapter into a wall outlet. The Status LED on top of the Videoscope will
glow red, turning green when the battery is fully charged (the light on the AC adapter is just a
power indicator and will remain red). You may want to simply let the battery charge overnight-it
will not overcharge if left plugged in for longer than 10 hours. 3. The AC adapter can then be
unplugged, and the USB cord removed from the Videoscope.
AC Adapter+USB Cable
6
AC Adapter Connected to Videoscope
Car Lighter Plug

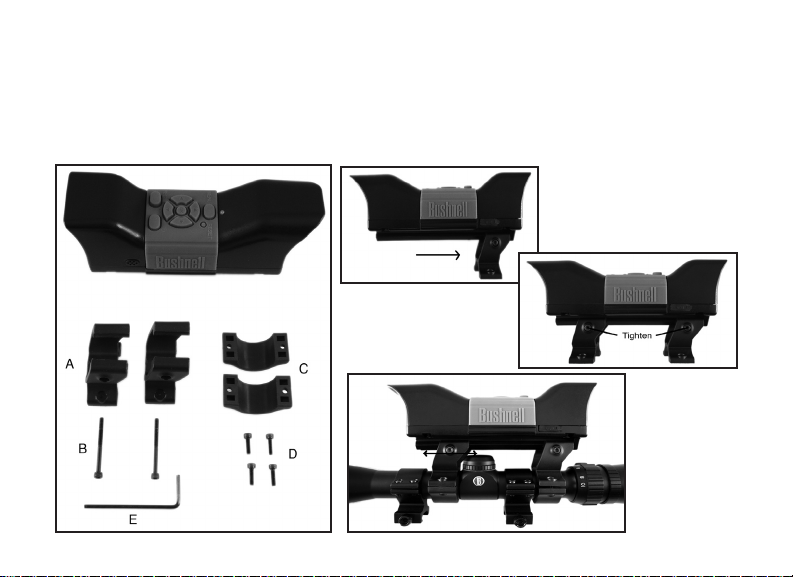
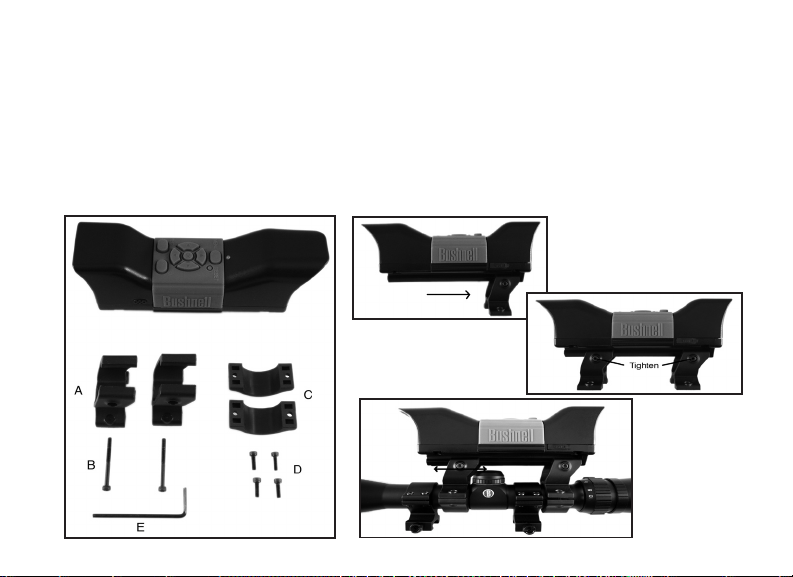
MOUNTING THE VIDEOSCOPE
Mount the Videoscope on your riescope using the provided mounting hardware (see Fig. 1).
1. Slide one of the supplied mounting brackets (Fig. 1-A) onto the front of the mounting rail
(end closest to the lens) at the bottom of the Videoscope, moving it all the way down to the
display end of the rail until it stops (Fig. 2).
2. Insert one of the long allen head bolts (Fig. 1-B) through the hole in the side of the bracket,
then use the provided allen wrench (Fig. 1-E) to tighten the bolt into the threaded hole at the
other side of the bracket until the bracket can no longer be moved along the rail.
3. Repeat this process with the other mounting bracket, determining the position for this front
bracket by holding the Videoscope in place over the top of your riescope, moving the front
bracket back and forth on the rail until you nd a position that will not interfere with the
mounting rings which attach your riescope to your rearm. You may want to put the bolt
through the bracket rst, and tighten it just enough so that the bracket doesn’t fall off the rail,
but can still be slid freely along the rail. Once you nd the best position for the front bracket,
tighten it fully onto the rail (Fig. 3).
4. Slip the “U” shaped half-rings (Fig. 1-C) under your riescope so they are located below the
bottom of the Videoscope’s mounting brackets, and insert the supplied short bolts (Fig. 1-D)
through the top holes on the bracket into the half-rings, then tighten them until the Videoscope
is securely mounted onto the riescope tube (Fig 4). .
7
MOUNTING THE VIDEOSCOPE
5. Once this mounting process has been completed, the Videoscope can be removed to view or
download the videos on your computer, or to recharge the battery, by simply loosening the two
side (long) allen bolts slightly so that the Videoscope can be slid out of the mounting brackets
(which can remain in place on your riescope).
Fig. 2
Fig. 3
Fig. 4
8
Fig. 1
8

RECORDING A VIDEO
1. Turn on the Videoscope, by pressing and holding the Power button until the green
status LED light and the LCD display screen comes on.
2. Before beginning a new recording, check the battery indicator icon at the top of the
display to make sure you have a fully or at least partly charged battery.
3. The display will show a “live” preview of the image from the camera lens. To begin
a video recording, simply press the Record button. The display will indicate that you
are recording (red video camera icon appears) and a counter showing the elapsed time
since the recording began will be visible at the top of the display.
4. Press the Record button again to stop recording. You may stop and start as often as
you like, recording videos of various lengths, until the memory is full. The memory
will hold a maximum of approximately 30 minutes of video-you are free to record one
long half hour video or any quantity of shorter videos-each time a new recording is
started then stopped, it will be saved in the internal memory as a separate video le
(.avi format).
5. To turn off the power, press and release the Power button-the display and the status
LED will go out and no power will be drawn from the internal battery.
9
9

PLAYING BACK A VIDEO
1. Press the OK button in the center of the circular keypad. You will see “thumbnail”
images of all the video clips that have been recorded, with the last one you shot
highlighted with a blue frame. You can select a different video for playback by using
the Up or Down arrow keys to highlight it.
2. To playback the currently highlighted video, press the OK button.
3. Press OK again to stop playback and return to the video clip thumbnails screen.
4. From the playback thumbnails screen, press the Left arrow key to return to the live
preview screen if you want to record a new video.
DELETING A VIDEO
To delete a previously shot video that you don’t wish to keep, rst make sure the video
thumbnail preview is selected (highlighted by a thin blue frame around it)-if it isn’t, use the
up/down arrow keys to select it.
1. To delete the selected video, press Menu, then choose “Delete” (currently the only
option in the Playback menu as of this writing).
2. Press the Right arrow key to see the Delete options: this image, all images, or
format.
10
10

DELETING A VIDEO
3. Select “this image” if you only want to delete the single video you selected earlier,
or, if you want to delete all the videos currently stored in the camera’s memory (make
sure you have downloaded and saved any you wanted to keep on your computer rst),
use the Down arrow key to select “all images” from the Delete menu
4. Press OK, select “Yes” (this extra step helps prevent accidentally erasing a video),
and press OK again. The selected video (or all videos) will be deleted from the internal
memory, so that more space is now available for recording new videos.
USING THE VIDEO MENU (Options & Settings)
The Videoscope comes already set up ready to use with the most commonly used default
settings for each option in the menu. However, there may be situations when you wish to
change these settings based on personal preferences, or to adjust the quality of the video to
better suit a specic situation. All the menu settings may be restored to the factory defaults
at any time by pressing the Reset button.
1. To see the options menu, press the Menu button. The “Video Menu” will be displayed
on the LCD screen. Please refer to the “Video Menu Options/Settings” table.
2. Use the Up or Down arrow keys (on the circular keypad) to highlight the menu
option you want to set or change.

USING THE VIDEO MENU (Options & Settings)
3. After highlighting a menu option, press the Right arrow key to see the available
settings. Use the Up or Down button to highlight the setting you want (the default
setting will already be highlighted), then press the OK button in the center of the
circular keypad to conrm that setting. The display will return to the Video Menu
screen.
4. Repeat steps 2 & 3 if you want to change the settings for other options, or press
the Left arrow key when the Video Menu is displayed to return to the normal “live
preview” screen (you will again see the image from the camera’s lens).
5. The current settings for resolution (more or fewer “pixel” dots) and white balance
(“A” for Auto, “Cloud” symbol, etc) are indicated by icons at the bottom of the live
preview screen.
Please refer to the “Video Menu Options/Settings” table on the next page.

VIDEO MENU OPTIONS/SETTINGS TABLE (default settings in Bold):
Menu Item Settings Description
Resolution 640x480 or 320x240
WB (White
Balance)
Power Off 1, 3, 5, 10 Minutes or off Sets the delay time before the camera automatically turns
Language English, French, German,
Date &
Time *
(pixels per frame)
Auto, Daylight, Cloudy,
Tungsten, Fluorescent
Spanish, Italian, Chinese,
simplified Chinese, Japanese
Fields: Month, Date, Year, Hour,
Minute
* NOTE: the date and time will not be imprinted on the video clips, but are recorded
as part of the video’s “file properties” data for future reference on your PC.
Selects high or low resolution. Choose 640x480 for the
best video quality, or 320x240 if you need to record more
or longer videos at lower quality.
Ensures that colors have an accurate appearance, based
on the type of lighting. If “Auto” does not produce good
results, try using a setting that matches the light source,
such as “Fluorescent” in an indoor target range or shooting
gallery.
off (to conserve battery life). Select “off” to prevent auto
shutoff completely (the camera will remain on until
manually turned off).
Selects your preferred language for all Video and Playback
menu items.
Use the Up/Down arrow keys to change the month, then
press OK to move to the date field, continuing until all
fields have been set correctly. After setting the minutes, the
display will return to the live preview screen.

CONNECTING TO A COMPUTER/DOWNLOADING YOUR VIDEOS
At some point, you will no doubt want to view your videos on a larger display than the
built in 1.5” LCD, save one or more videos to a hard drive so you can delete them from
the Videoscope’s memory and shoot new ones, or perhaps email your most impressive
Videoscope clip to a friend so you can prove how you brought down that game animal or
hit the center of the target. Even if you’re not “a computer geek”, it’s easy to do, as the
Videoscope uses the “USB Mass Storage” standard, so it will be seen by your computer
(with Windows 2000, XP or Vista, or Mac OSX) the same as any external hard drive or
ash drive with video les stored on it. It will be identied as a “Removable Disk” or new
drive in Windows Explorer, “My Computer” (PC) or on the desktop (Mac). Just follow
these steps:
1. For safety, be sure to remove the Videoscope from your rearm rst by slightly
loosening the allen bolts on the side of the mounting brackets and sliding the
Videoscope straight out.
2. Connect the supplied USB cable from the USB jack on the Videoscope (located
behind the rubber cover labeled “USB” on one side of the Videoscope) to a USB port
on your computer. We recommend using one of the rear panel or “main” USB ports on
the computer or a USB hub that is plugged into an AC adapter. The Videoscope may
not work when connected to some front panel USB ports or unpowered USB hubs.

CONNECTING TO A COMPUTER/DOWNLOADING YOUR VIDEOS
3. If your PC is running Windows XP or Vista, you should see a window pop up with
options such as “Play”, “Open folder to view les”, “Take no action”, etc, soon after
the Videoscope is connected (allow a brief period for the camera to be recognized after
it has been connected for the rst time). Select “Open folder…” and click OK.
4. On Windows 2000, you will need to go to “My Computer” in the Start menu and
double click the new “Removable Disk” (this is the Videoscope’s internal memory)
you will see listed along with your computer’s hard drive (“C” drive), CD-ROM drive,
etc. On Mac OSX, a new (unnamed) drive icon will appear on the desktop soon after
the Videoscope is connected-double click this icon.
5. You should now see the contents of the “Removable Disk” (the Videoscope’s internal
memory) in the form of one or more folders. Double click the “DCIM” (Digital Camera
Internal Memory) folder to open it, then double click the “100MEDIA” folder inside
it. You will now see a list of les (or icons or thumbnails, depending on your computer
system) with le names such as “PIC_0001.AVI”, “PIC_0002.AVI” etc-these are your
video clips.
6. What you choose to do with the video le(s) at this point is up to you. Depending
on your computer system, you may be presented with options to play, copy, email,
or open the videos with various programs already installed on your computer. Or,
on some systems, you will need to double click on a video le to open it, or use the

CONNECTING TO A COMPUTER/DOWNLOADING YOUR VIDEOS
standard copy and paste commands (or simply drag the les) to copy it to the folder of
your choice on your hard drive. Regardless of your computer’s operating system, we
recommend that you copy all (or only the desired) video les from the Videoscope’s
memory to your hard drive before playing, opening or doing anything else with them.
This will allow you to disconnect and power down the Videoscope, thereby conserving
its battery charge. Also, your videos are immediately safely backed up on your hard
drive so you don’t have to worry about accidentally erasing one you wanted to keepand they will then be ready to email, edit, or whatever else you want to do with them
in the future. To download all of the videos stored on your Videoscope at once, use
Edit>Select All so that the names or icons of all the video les are selected at once,
then copy or drag them all to your chosen hard drive folder.
7. Once you are done downloading (copying) the videos from the Videoscope to a
folder on your computer’s hard drive (such as “My Pictures”, “Movies”, a new folder
named “Bob’s Hunt-Aug 08”, etc), you can safely disconnect the Videoscope from
your computer. On Windows 2000 and Mac OSX, you should “eject” the “Removable
Disk” before disconnecting the Videoscope. After making sure the les have all been
successfully downloaded to your hard drive (you may want to play them on your
computer to verify this), you can now delete the old videos from the Videoscope’s
memory, so you have room again to record new ones. Be sure you have turned off the
16
Videoscope’s power before putting it away.
TWOYEAR LIMITED WARRANTY
Your Bushnell® electronic product is warranted to be free of defects in materials and workmanship for two
years after the date of purchase. In the event of a defect under this warranty, we will, at our option, repair
or replace the product, provided that you return the product postage prepaid. This warranty does not cover
damages caused by misuse, improper handling, installation, or maintenance provided by someone other than a
Bushnell Authorized Service Department.
Any return made under this warranty must be accompanied by the items listed below:
1) A check/money order in the amount of $10.00 to cover the cost of postage and handling
2) Name and address for product return
3) An explanation of the defect
4) Proof of Date Purchased
5) Product should be well packed in a sturdy outside shipping carton, to prevent
damage in transit, with return postage prepaid to the address listed below:
IN U.S.A. Send To: IN CANADA Send To:
Bushnell Outdoor Products Bushnell Outdoor Products
Attn.: Repairs Attn.: Repairs
8500 Marshall Drive 25A East Pearce Street, Unit 1
Lenexa, Kansas 66214 Richmond Hill, Ontario L4B 2M9
For products purchased outside the United States or Canada please contact your local dealer for applicable
warranty information. In Europe you may also contact Bushnell at:
Bushnell Germany GmbH
European Service Center
Mathias-Brüggen-Str. 80
GERMANY
D- 50827 Köln
Tel: +49 221 995568-0
Fax: +49 221 995568-20
This warranty gives you specific legal rights.
You may have other rights which vary from country to country.
©2007 Bushnell Outdoor Products
FCC Note:
is equipment has been tested and found to comply
with the limits for a Class B digital device, pursuant
to Part 15 of the FCC Rules. ese limits are designed
to provide reasonable protection against harmful
interference in a residential installation. is equipment
generates, uses and can radiate radio frequency energy
and, if not installed and used in accordance with the
instructions, may cause harmful interference to radio
communications. However, there is no guarantee that
interference will not occur in a particular installation. If
this equipment does cause harmful interference to radio
or television reception, which can be determined by
turning the equipment off and on, the user is encouraged
to try to correct the interference by one or more of the
following measures:
· Reorient or relocate the receiving antenna.
·
Increase the separation between the equipment and receiver
· Connect the equipment into an outlet on a circuit
different from that to which the receiver is connected.
· Consult the dealer or an experienced radio/TV
technician for help.
e shielded interface cable must be used with the
equipment in order to comply with the limits for a digital
device pursuant to Subpart B of Part 15 of FCC Rules.
Specifications and designs are subject to change
without any notice or obligation on the part of the
manufacturer.
.

18
FRANÇAIS
AVERTISSEMENT : Une fois installé, le Videoscope ne doit jamais
être utilisé en remplacement d’une caméra vidéo ou d’un appareil photo
standard car cela peut vous amener à pointer l’arme par inadvertance
vers une personne. Avant d’utiliser le Videoscope, rappelez-vous
toujours que toutes les précautions de sécurité relatives aux armes à
feu s’appliquent lorsqu’il est installé sur une arme à feu. Veuillez lire
les instructions de sécurité relative à votre arme à feu avant d’installer
et d’utiliser le Videoscope. Lors de la manipulation des armes à feu,
maintenez toujours la bouche pointée dans une direction ne présentant
aucun danger. Traitez toujours votre arme à feu comme si elle était
chargée. Pour votre sécurité et celle des autres, vous devez déposer le
Videoscope de votre arme à feu avant de visionner ou de télécharger
les vidéos stockées. Veuillez agir de façon responsable et joignez-vous
à Bushnell pour soutenir et respecter à tout moment des directives et
des pratiques responsables pour la chasse et le tir.

Félicitations pour l’achat de votre Bushnell® Videoscope™ ! La caméra vidéo numérique
Videoscope unique se monte directement sur la lunette de visée de votre fusil, vous
permettant de capturer des vidéos de haute qualité (avec audio) des événements marquants
de vos chasses, en appuyant simplement sur le bouton d’enregistrement avant de viser
votre cible. La mémoire interne du Videoscope peut retenir jusqu’à 30 minutes de vidéo
de haute qualité, prête à être visionnée instantanément sur l’écran incorporé TFT-LCD de
1,5 pouce ou téléchargée sur votre ordinateur (compatible avec Windows 2000, XP, Vista
ou Mac OS X). Les vidéos restent stockées en toute sécurité dans la mémoire de la caméra
lorsqu’elle est à l’arrêt, ou vous pouvez les effacer et les remplacer par de nouvelles vidéos
aussi souvent que vous le souhaitez - sans qu’il ne soit nécessaire d’acheter une carte
mémoire spéciale ou une bande vidéo qui peut s’user ou se casser.
Avant d’utiliser votre nouveau Videoscope, veuillez lire les instructions contenues
dans ce manuel et prendre le temps de vous familiariser avec le fonctionnement et les
caractéristiques de la caméra.
Avertissement : Manipulez avec précaution pour éviter de toucher l’objectif
de la caméra afin de ne pas dégrader la qualité de l’image. Nettoyez
l’objectif de la caméra uniquement avec un papier optique ou un chiffon
en microfibres sec. N’utilisez PAS de liquides de quelque type que ce soit.
19
Guide des pièces,
des contrôles et de l’affichage
DEL d’état
Bouton de menu
Bouton de
réinitialisation
Clavier circulaire
avec bouton OK
Bouton Record
(enregistrement)
Bouton Power
(marche/arrêt)
Remarque : Toutes les pièces de montage sont présentées
dans la section « Installation du Videoscope »
Port
USB
Objectif de la
Microphone
Témoin de batterie
caméra
Rail de
montage
20
Mémoire interne
restante (en secondes
de vidéo)
Résolution
Équilibre
des blancs
(Auto)

CHARGE DU VIDEOSCOPE
Le Videoscope est alimenté par une batterie interne rechargeable à ions de lithium. Avant
d’utiliser le Videoscope pour la première fois, celui-ci doit être chargé pendant environ 10
heures (les temps de charge ultérieurs peuvent être plus courts).
1. Branchez le câble USB fourni dans l’adaptateur secteur (en utilisant la che USB standard
rectangulaire de grande taille), puis insérez l’autre extrémité du câble dans le port USB sur le
côté du Videoscope.
2. Branchez l’adaptateur secteur sur une prise murale. La DEL d’état située sur le dessus du
Videoscope émettra une lumière rouge, puis passera au vert lorsque la batterie est complètement
chargée (le témoin de l’adaptateur secteur n’est qu’un indicateur d’alimentation et reste rouge).
Si vous le souhaitez, vous pouvez laisser la batterie en charge pendant une nuit - elle ne subira
pas de charge excessive si vous la laissez branchée pendant une durée supérieure à 10 heures.
Remarque : Une prise pour allume-cigare 12 V est également fourni pour une recharge pratique
sur le terrain ; cependant, la charge complète initiale doit être effectuée à l’aide d’une prise
secteur. Il est préférable d’utiliser la prise pour allume-cigare pour remettre la batterie en
pleine charge lorsqu’elle est faible ou simplement partiellement déchargée.
3. L’adaptateur secteur peut alors être débranché et le câble USB retiré du Videoscope.
Adaptateur secteur
Adaptateur secteur
Chargeur de voiture
21

INSTALLATION DU VIDEOSCOPE
Installez le Videoscope sur la lunette de visée de votre arme à l’aide du matériel de montage fourni
(voir Fig. 1).
1. Glissez l’un des supports de montage fournis (Fig. 1-A) sur l’avant du rail de montage
(extrémité la plus proche de l’objectif) à la partie inférieure du Videoscope, le poussant
complètement vers l’extrémité afchage du rail jusqu’à ce qu’il arrive en butée (Fig. 2).
2. Insérez l’un des longs boulons à six pans (Fig. 1-B) dans le trou situé sur le côté du support,
puis utilisez la clé Allen fournie (Fig. 1-E) pour serrer le boulon dans le trou leté de l’autre côté
du support jusqu’à ce que ce dernier ne puisse plus être déplacé sur le rail.
3. Répétez ce processus pour l’autre support de montage, déterminant la position de ce support
avant en maintenant le Videoscope en place au-dessus de la lunette de visée, déplaçant le support
vers l’avant et vers l’arrière sur le rail jusqu’à ce que vous trouviez une position qui n’interfère
pas avec les bagues de montage qui xent la lunette de visée à l’arme à feu. Vous pouvez aussi
placer le boulon au travers du support d’abord et le serrer juste assez pour que le support ne
tombe pas du rail mais puisse encore glisser librement le long du rail. Une fois que vous avez
trouvé la meilleure position pour le support avant, serrez-le complètement sur le rail (Fig. 3).
4. Glissez les demi-bagues en « U » (Fig. 1-C) sous la lunette de visée de façon à ce qu’elles
soient situées sous la partie inférieure des supports de montage du Videoscope et insérez les
boulons courts fournis (Fig. 1-D) au travers des trous supérieurs du support et dans les demibagues, puis serrez-les jusqu’à ce que le Videoscope soit xé solidement sur le tube de la lunette
de visée (Fig 4). Dans certains cas rares, il peut s’avérer nécessaire de déposer temporairement
22
INSTALLATION DU VIDEOSCOPE
la lunette de l’arme à feu, de xer d’abord les supports du Videoscope sur la lunette, puis de
remonter cette dernière sur l’arme à feu.
5. Une fois que ce processus d’installation a été accompli, le Videoscope peut être déposé pour
visionner les vidéos ou les télécharger sur votre ordinateur, ou pour recharger la batterie ; il suft
pour cela de desserrer légèrement les deux boulons à six pans latéraux (longs) de façon à ce que
le Videoscope puisse être glissé hors des supports de montage (qui peuvent rester en place sur
votre lunette de visée).
Fig. 2
Fig. 3
Fig. 4
Fig. 1
23

ENREGISTREMENT D’UNE VIDÉO
1. Allumez le Videoscope en appuyant sur le bouton Power (marche/arrêt) et en le maintenant
appuyé jusqu’à ce que la DEL d’état émette une lumière verte et que l’écran LCD s’allume.
2. Avant de commencer un nouvel enregistrement, vériez l’icône du témoin de batterie à la
partie supérieure de l’écran pour vous assurer que vous disposez d’une batterie pleinement ou
au moins partiellement chargée. Vous pouvez régler la date et l’heure à l’aide des options du
menu (voir « Utilisation du menu vidéo ») car ces informations sont stockées dans les « File
Properties (propriétés de chier) » de chaque vidéo que vous lmez. Il n’est pas nécessaire de
régler à nouveau la date et l’heure sauf si la batterie se décharge complètement.
3. L’écran afchera une prévisualisation « en direct » de l’image provenant de l’objectif de la
caméra. Pour commencer un enregistrement vidéo, il suft d’appuyer sur le bouton Record
(enregistrement). L’afchage sur l’écran indique que vous êtes en train d’enregistrer (une
icône rouge de caméra vidéo apparaît), et un compteur indiquant le temps écoulé depuis le
début de l’enregistrement est visible à la partie supérieure de l’écran.
4. Appuyez à nouveau sur le bouton d’enregistrement pour arrêter l’enregistrement. Vous
pouvez arrêter et démarrer aussi souvent que vous le souhaitez, en enregistrant des vidéos
de diverses longueurs, jusqu’à ce que la mémoire soit pleine. La mémoire peut contenir au
maximum environ 30 minutes de vidéo - vous pouvez enregistrer une vidéo longue d’une
demi-heure ou une quantité quelconque de vidéos plus courtes — chaque fois qu’un nouvel
enregistrement est commencé, puis arrêté, il est sauvegardé dans la mémoire interne comme
chier vidéo distinct (format .avi).
5. Pour mettre le Videoscope à l’arrêt, appuyez sur le bouton Power (marche/arrêt) et
relâchez-le - l’écran et la DEL d’état s’éteignent, et aucun courant n’est tiré de la batterie.
24

VISIONNEMENT D’UNE VIDÉO
1. Appuyez sur le bouton OK au centre du clavier circulaire. Vous verrez des « vignettes »
(thumbnails) de tous les clips vidéo qui ont été enregistrés, le dernier lmé étant entouré d’un
cadre en surbrillance bleu. Vous pouvez sélectionner une vidéo différente pour la visionner en
utilisant les touches échées vers le haut ou vers le bas pour la mettre en surbrillance.
2. Pour visionner la vidéo actuellement en surbrillance, appuyez sur le bouton OK.
3. Appuyez à nouveau sur OK pour arrêter le visionnement et retourner à l’écran des vignettes
de vidéos.
4. À partir de l’écran des vignettes, appuyez sur la touche échée vers la gauche pour retourner
à l’écran de prévisualisation en direct si vous souhaitez enregistrer une nouvelle vidéo.
EFFACEMENT D’UNE VIDÉO
Pour effacer une vidéo lmée précédemment que vous ne souhaitez pas conserver, assurez-vous
d’abord que la vignette de cette vidéo est sélectionnée (mis en surbrillance avec un mince cadre bleu)
- si ce n’est pas le cas, utilisez les touches échées vers le haut ou vers le bas pour la sélectionner.
1. Pour effacer la vidéo sélectionnée, appuyez sur Menu, puis choisissez « Delete » (effacer)
(actuellement la seule option du menu de visionnement à la date de publication).
2. Appuyez sur la touche échée vers la droite pour consulter les options d’effacement : this
image, all images, format (cette image, toutes les images ou formater).
25

EFFACEMENT D’UNE VIDÉO
3. Sélectionner « this image (cette image) » si vous souhaitez effacer uniquement la vidéo que
vous avez sélectionnée auparavant ; si vous souhaitez effacer toutes les vidéos actuellement
stockées dans la mémoire de la caméra (assurez-vous que vous avez d’abord téléchargé et
enregistré celles que vous souhaitez conserver sur votre ordinateur), utilisez la touche échée
vers le bas pour sélectionner « all images (toutes les images) » dans le menu d’effacement.
4. Appuyez sur OK, sélectionnez « Yes (oui) » (cette étape supplémentaire permet d’éviter
d’effacer accidentellement une vidéo) et appuyez à nouveau sur OK. La vidéo sélectionnée (ou
toutes les vidéos) sera effacée de la mémoire interne, de sorte que plus d’espace est maintenant
disponible pour enregistrer de nouvelles vidéos.
UTILISATION DU MENU VIDEO (Options Et Réglages)
Le Videoscope est livré prêt à l’emploi avec les réglages les plus communément utilisés par défaut
pour chaque option du menu. En revanche, il peut y avoir des situations où vous souhaitez modier
ces réglages en fonction de préférences personnelles ou pour ajuster la qualité de la vidéo pour une
situation spécique. Tous les réglages du menu peuvent être remis sur les valeurs d’usine par défaut
à tout moment en appuyant sur le bouton de réinitialisation.
26

UTILISATION DU MENU VIDEO (Options Et Réglages)
1. Pour visualiser le menu d’options, appuyez sur le bouton Menu. Le « Menu Vidéo » s’afchera
sur l’écran LCD. Veuillez vous référer au « tableau des options/réglages du Menu Vidéo ».
2. Utilisez les touches échées vers le haut ou vers le bas (sur le clavier circulaire) pour mettre en
surbrillance l’option de menu que vous souhaitez régler ou modier.
3. Après avoir mis en surbrillance une option de menu, appuyez sur la touche échée vers la droite
pour visualiser les paramètres disponibles. Utilisez le bouton vers le haut ou vers le bas pour mettre
en surbrillance le réglage que vous voulez (le réglage par défaut est déjà en surbrillance), puis
appuyez sur le bouton OK au centre du clavier circulaire pour conrmer ce réglage. L’afchage
retournera à l’écran du Menu Vidéo.
4. Répétez les étapes 2 et 3 si vous souhaitez modier les réglages pour d’autres options, ou
appuyez sur la touche échée vers la gauche lorsque le Menu Vidéo s’afche pour retourner à
l’écran normal de prévisualisation en direct (vous verrez à nouveau l’image provenant de l’objectif
de la caméra).
5. Les réglages actuels pour la résolution (plus ou moins de « pixels ») et d’équilibre des blancs («
A » pour automatique, le symbole « nuage », etc. ) sont indiqués par des icônes au bas de l’écran
de prévisualisation en direct.
Veuillez vous référer au tableau des options/réglages du Menu Vidéo à la page suivante.
27

OPTIONS/RÉGLAGES DU MENU VIDÉO (Réglages Par Défaut En Caractères Gras) :
Élément de
menu
Resolution 640x480 ou 320x240
WB
(équilibre
des blancs)
Arrêt 1, 3, 5, 10 Minutes ou arrêt Règle le temps de retard avant que la caméra ne s’éteigne
Langue Anglais, français, allemand,
Date et
heure *
28
Paramètres Description
(pixels par image)
Auto, lumière du jour, temps
nuageux,
tungstène, lumière
fluorescente
espagnol, italien, chinois,
chinois simplifié, japonais
Champs : mois, jour, année,
heure, minute
Sélectionne une résolution élevée ou basse. Choisissez 640x480
pour la meilleure qualité de vidéo ou 320x240 si vous devez
enregistrer des vidéos plus nombreuses ou plus longues à une
qualité inférieure.
Assure que les couleurs ont l’aspect correct, selon le type
d’éclairage. Si « Auto » ne donne pas de bons résultats, essayez
d’utiliser un paramètre qui correspond à la source de lumière, tels
que « fluorescent » dans un pas de tir en intérieur.
automatiquement (pour préserver la durée de la batterie).
Sélectionnez « Off » (arrêt) pour prévenir complètement l’arrêt
automatique (la caméra reste sous tension jusqu’à ce qu’elle soit
mise à l’arrêt manuellement).
Sélectionne votre langue préférée pour tous les éléments des
menus vidéo et visionnement.
Utilisez les touches fléchées vers le haut et vers le bas pour
modifier le mois, puis appuyez sur OK pour passer au champ du
jour, en continuant jusqu’à ce que tous les champs aient été réglés
correctement. Après le réglage des minutes, l’affichage repasse à
l’écran de prévisualisation en direct.
* REMARQUE : La date et l’heure ne sont pas reportées sur les clips vidéo mais sont enregistrées dans le
cadre des données de propriétés de fichier pour future référence sur votre PC sous les « File Properties »

BRANCHEMENT À UN ORDINATEUR/TÉLÉCHARGEMENT DE VOS VIDÉOS
Un certain moment, il ne fait aucun doute que vous souhaiterez visionner vos vidéos sur un
écran plus grand que l’écran LCD incorporé de 1,5 po (38 mm), enregistrer une ou plusieurs
vidéos sur un disque dur de façon à pouvoir les effacer de la mémoire du Videoscope et en lmer
de nouvelles ou peut-être envoyer par courrier électronique à un ami vos clips Videoscope les
plus impressionnants pour pouvoir prouver comment vous avez abattu ce gibier ou atteint le
centre de la cible. Même si vous n’êtes pas un « fou de l’informatique », cela est facile à faire
car le Videoscope utilise la norme de « stockage de masse USB », et il sera donc perçu par votre
ordinateur (sous Windows 2000, XP ou Vista ou Mac OSX) de la même façon que n’importe
quel disque dur externe ou unité de stockage à mémoire ash sur lequel sont stockés des chiers
vidéo. Il sera identié comme étant un « Removable Disk (disque amovible) » ou un nouveau
lecteur dans l’Explorateur Windows, « My Computer (Mon ordinateur) » ou sur le bureau du
Mac. Il suft d’effectuer ces étapes :
1. Pour des raisons de sécurité, veillez à déposer d’abord le Videoscope de votre arme en
desserrant légèrement les boulons à six pans sur le côté des supports de montage et en faisant
glisser le Videoscope pour le sortir.
2. Connectez le câble USB fourni entre la che USB du Videoscope (située derrière le
capuchon en caoutchouc marqué « USB » sur un côté du Videoscope) et un port USB de
l’ordinateur. Nous conseillons l’utilisation de l’un des ports USB du panneau arrière ou «
principaux » de l’ordinateur ou d’un concentrateur USB qui est branché sur un adaptateur
secteur. Il se peut que le Videoscope ne fonctionne pas lorsqu’il est connecté à certains ports
29
 Loading...