

Page 1

SolarBook™
Quick Start Guide
04-13Model # PP1085/PP1060
Page 2

IMPORTANT SAFETY INFORMATION
Please read this manual in its entirety before operating your Bushnell POWERSYNC™ product. It contains
important information concerning the setup, operation and maintenance of the product. Keep this
manual for future reference.
• WARNING: This product should only be used with the supplied charging unit and accessories
(not included with all models). Use of a charger or accessories not recommended or supplied by
Bushnell may result in product damage, re, electrical shock or injury, and will void your product
warranty.
• CAUTION: Do not use the product to charge an external device at the same time as the internal
battery is being charged (by the AC wall charger or by the solar panels).
• CAUTION: Do not operate the product in an environment where temperatures exceed 112o F/45o C
• CAUTION: Do not submerge the product in water, or attempt to operate the product after it has
been exposed to water.
• CAUTION: Do not attempt to open the product. There are no user serviceable internal parts.
Disassembling the product will void your warranty. The rechargeable battery must be replaced
by a qualied technician.
• CAUTION: Check adaptors for correct t and compatibility before using the product to charge
electronic devices. Improperly used adaptors can be a shock hazard and may damage the
electronic device.
• CAUTION: Before operating the product or connecting it to any other device, check to ensure that
all cables are not damaged. Extreme heat, water, petroleum products and sharp edges all have
the potential to damage cables. Do not use any cable with exposed wiring.
• CAUTION: Charge your connected devices in an area away from the direct sun if possible.
• WARNING: EXPLOSION HAZARD! - Do not incinerate any Bushnell POWERSYNC product, or
attempt to use it in a microwave oven.
• WARNING: Bushnell POWERSYNC products are not intended for powering any medical
equipment, life support devices, or any other critical equipment.
• CAUTION: Do not clean your Bushnell POWERSYNC product with anything other than a damp rag.
The use of cleaning chemicals or other products may harm the unit and will void your warranty.
• Do not dispose of any Bushnell POWERSYNC product as you would normal household trash.
Please contact your local government authority for directions regarding the proper disposal of
products containing a Lithium Ion battery.
PACKING LIST
This POWERSYNC model includes the following items:
• SolarBook (Model PP1085 or PP1060)
• USB Cable
• AC Wall Charger
• Quick Start Guide
2
AC Wall Charger
(with USB cable connected)
Page 3

HOW THE SOLARBOOK WORKS
The SolarBook™ uses an advanced solar panel technology that is exible,
water resistant and durable. An on-board dual lithium ion battery stores
electrical energy collected by the solar panel, so it can be used to recharge
your portable electronic devices even at night or on a cloudy day. The
SolarBook battery can also be charged from an AC outlet, ready to provide
immediate power on demand. After the battery power is depleted, fold out
the solar panel and let the sun charge it during the day, so you can recharge
your devices anytime.
FROM CHARGER USB PORT
(standard USB plug)
TO SolarBook
INPUT PORT
(micro USB plug)
INPUT-Used for charging the SolarBook
internal battery from wall charger.
LEDs indicate charge status.
POWERSYNC POWER GAUGE
(LED Battery Status Indicators)
OUTPUT-Used for charging your device(s)
from the SolarBook’s internal battery (once
charged via solar energy or wall charger)
FROM SolarBook
OUTPUT PORT
(standard USB plug)
A
Power
Button
TO PORTABLE DEVICE
CHARGING PORT*
(micro USB plug)
* Use USB charging cable included with your
device if this connector is not compatible.
B
3
Page 4

CHARGING THE SOLARBOOK FROM THE WALL CHARGER
Connect USB cable to micro-USB INPUT port (A) from the USB port on the
supplied AC charger (pg. 2), and plug it into a wall outlet (100-240v). Press the
Power button. All four LEDs on the Power Gauge (Fig. 1) will light up (for 10
min.) when the SolarBook’s internal battery has been fully charged (you may
leave it connected to the charger overnight without risk of overcharging), and
you’re ready to connect and charge your device.
CHARGING THE SOLARBOOK FROM THE SUN
Flip open the two clamps at the front end of the SolarBook and open the
lid (C). Unfold all the solar panels out to full length. Place the SolarBook in
a location where all the solar panel surfaces will be exposed to as much
direct sunlight as possible (D). The hang tabs on the battery cylinder of the
SolarBook (E) can be used to stake it to the ground to keep it securely in place
on a windy day, or hang it from a tree or your backpack with carabiners.
Allow up to 4 hours (PP1085) or 6 hours (PP1060) to solar charge the internal
battery from a fully discharged condition. The Power Gauge LEDs near the
INPUT port will monitor the charge level (Fig. 1). All four LEDs on the Power
Gauge will light up (for 10 min.) when the SolarBook’s internal battery has
been fully charged, and you’re ready to connect and charge your device.
CHARGING YOUR DEVICE FROM THE SOLARBOOK
Press the power button on the INPUT end of the battery cylinder (A) to check
the SolarBook’s charge status, then connect the supplied USB cable from the
OUTPUT port (B) of the SolarBook to your device to recharge it. If your device
uses a non-standard type of connector, use the cable that came with it to
connect to the SolarBook’s OUTPUT port. Check the charge indicator on your
device to determine when it’s ready to use.
STORING & TRANSPORTING THE SOLARBOOK
Fold the solar panels back up, starting at the end, with the solar side facing
inward. Fasten the lid in place to help keep the panels protected from
accidental damage when you are charging your device from the SolarBook’s
battery, and anytime you transport the SolarBook to a new location. Cover
the INPUT and OUTPUT ends of the battery cylinder with the attached caps
when storing or transporting the SolarBook, to help keep dirt and debris out
of the USB ports.
4
Page 5
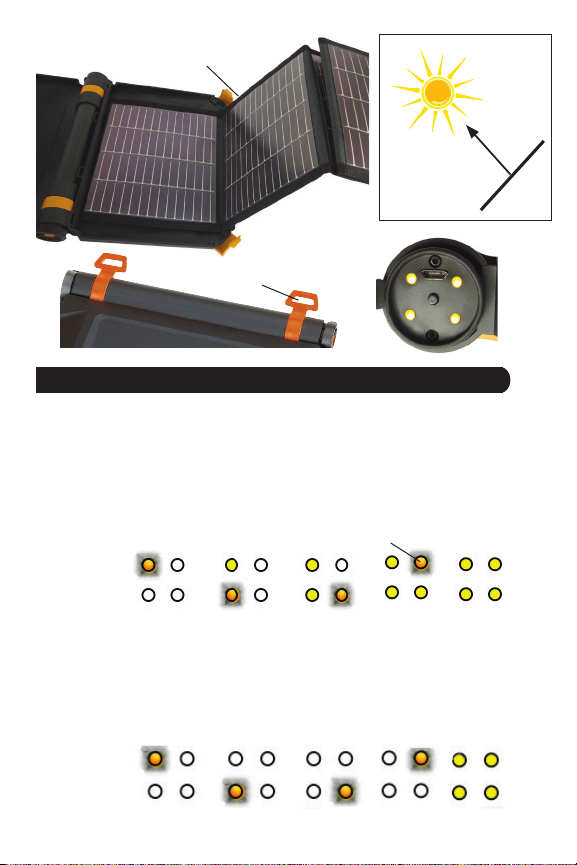
C
Solar panel surface
facing the sun
D
E
F
UNDERSTANDING THE POWERSYNC POWER GAUGE
The 4 LED charge indicators on the INPUT end of the battery cylinder (F)
allow you to monitor the status of the SolarBook’s internal battery. While the
battery is charging from the AC wall charger or the solar panels, the LEDs
will light up in sequence to show the charge level as shown in Fig. 1. The LED
indicating the current battery level will blink rapidly while charging. When
charging is complete, all LEDs remain on for 10 min., then shut o until the
Power button is pressed.
Fig. 1
Charging
In from AC/
Solar
>25% >50% >75% >90% FULL
Blinking
While the SolarBook is charging your connected device (Power button must
be pressed), the LEDs will monitor the SolarBook’s battery level as shown in
Fig. 2, with a single LED blinking once every 15 sec. (indicates active charging
but conserves battery power).
Fig. 2
Charging Out
to Device
<25% <50% <75% <90% FULL
5
Page 6
UNDERSTANDING THE POWERSYNC POWER GAUGE
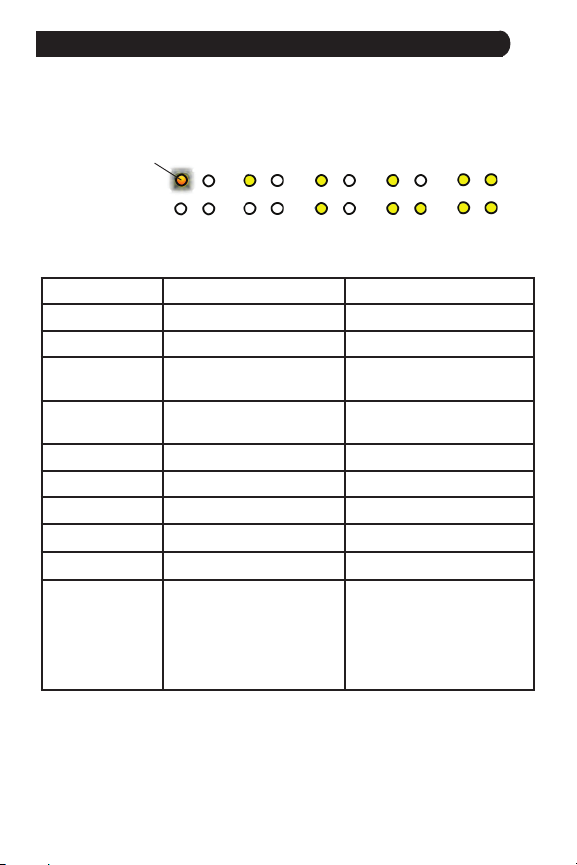
You can also check the current level of the SolarBook’s battery charge
anytime by pressing the Power button, even when it is not connected to
the charger or an external device. The LEDs will glow steadily to indicate the
charge level % as shown in Fig.3., then shut o after 10 seconds.
Blinking
Fig. 3
Checking
Charge Level
<25% >25% >50% >75% FULL
TECHNICAL SPECIFICATIONS
Model PP1085 (SolarBook 850) PP1060 (SolarBook 600)
Weight 24 oz / 680 g 23 oz / 652 g
Size 9.25 x 8.3 in. (53.25 in. fully extended) 9.25 x 8.3 in. (47.25 in. fully extended)
Charge Time (Wall
Charger)
Charge Time (via solar
panel)
Power Output 5 volts, 1 amp (1000 mA) 5 volts, 1 amp (1000 mA)
Internal Battery Type Dual Lith Ion Dual Lith Ion
USB Inputs / Outputs 1 / 2* 1 / 2*
Operating Temp. Range
Storage Temp. Range
Recommended
Devices/# of Charges**
(from fully charged
internal battery)
* Two devices may be charged simultaneously. They will not charge any slower than if only one device was connected, however the SolarBook’s
internal battery charge will be depleted more rapidly.
** Rechargeable batteries in electronic devices charge at dierent rates, depending on many factors including temperature, age and circuit
design. Bushnell provides examples of charges per device, based on typical product use and are not intended to be specic to any single device.
ATTENTION!
ThePP1085/PP1060 is protected from static shock.
If the unit does not turn on after depressing power button, please hold down power button for 2 seconds or until light activates.
6
Specications and designs are subject to change without any notice or obligation on the part of the manufacturer.
approx. 6-8 hrs. approx. 6-8 hrs.
approx. 4-6 hrs. (variable due to
weather conditions, position, etc.)
o
F (-20~44o C) -4 ~ 112o F (-20~44o C)
-4 ~ 112
-4 ~ 140o F (-20~60o C) -4 ~ 140o F (-20~60o C)
Cell Phones (inc Smartphones)/2x,
MP3 Players/3x, Digital Cameras/5x,
Tablet/0.5x. Note: Tablets and other
devices have higher power requirements
and may not attain a full charge from
the SolarBook battery.
approx. 4-10 hrs. (variable due to
weather conditions, position, etc.)
Cell Phones (inc Smartphones)/2x,
MP3 Players/3x, Digital Cameras/5x,
Tablet/0.5x. Note: Tablets and other
devices have higher power requirements
and may not attain a full charge from the
SolarBook battery.
Page 7

Your Bushnell® POWERSYNC product is warranted to be free of defects in materials and workmanship for one year after the date of purchase.
In the event of a defect under this warranty, we will, at our option, repair or replace the product, provided that you return the product
postage prepaid. This warranty does not cover damages caused by misuse, improper handling, installation, or maintenance provided by
someone other than a Bushnell Authorized Service Department.
Any return made under this warranty must be accompanied by the items listed below:
1. A check/money order in the amount of $10.00 to cover the cost of postage and handling
2. Name and address for product return
3. An explanation of the defect
4. Proof of Date Purchased
5. Product should be well packed in a sturdy outside shipping carton, to prevent damage in transit, with return postage prepaid
to the address listed below:
IN U.S.A. Send To: IN CANADA Send To:
Bushnell Outdoor Products Bushnell Outdoor Products
Attn.: Repairs Attn.: Repairs
9200 Cody 25A East Pearce Street, Unit 1
Overland Park, Kansas 66214 Richmond Hill, Ontario L4B 2M9
For products purchased outside the United States or Canada please contact your local dealer for applicable warranty information. In
Europe you may also contact Bushnell at: Bushnell Germany GmbH
European Ser vice Centre
Mathias-Brüggen-Str. 80
D-50827 Köln
GERMANY
Tél: +49 221 995568-0
Fax: +49 221 995568-20
ONE YEAR LIMITED WARRANTY
This warranty gives you specic legal rights.
You may have other rights which vary from country to country.
©2013 Bushnell Outdoor Products
FCC Compliance Statement
This device complies with Part 15 of the FCC interference limits for Class B digital devices FOR HOME OR OFFICE USE. These limits are
designed to provide reasonable protection against harmful interference in a residential installation, and are more stringent than “outdoor”
requirements.
Operation of this device is subject to the following conditions; (1) This device may not cause harmful interference, and (2) this device must
accept any interference received, including interference that may cause undesired operation.
This equipment generates, uses and can radiate radio frequency energy and, if not installed and used in accordance with the instructions,
may cause harmful interference to radio communications. However, there is no guarantee that interference will not occur in a particular
installation. If this equipment does cause harmful interference to radio or television reception, which can be determined by turning the
equipment o and on, the user is encouraged to try to correct the interference by one or more of the following measures:
• Reorient or relocate the receiving antenna.
• Increase the separation between the equipment and receiver.
• Connect the equipment into an outlet on a circuit dierent from that to which the receiver is connected.
• Consult the dealer or an experienced radio/TV technician for help.
The device does not contain any user-serviceable parts. Repairs should only be made by an Authorized Bushnell repair center. Unauthorized
repairs or modications could result in permanent damage to the equipment, and will void your warranty and your authority to operate
this device under Part 15 regulations.
The shielded interface cable which is provided must be used with the equipment in order to comply with the limits for a digital device
pursuant to Subpart B of Part 15 of FCC Rules.
Page 8

Customer Service: (800) 423-3537
www.bushnell.com
©2013 Bushnell Outdoor Products
 Loading...