

Page 1
Instruction manual
WI-1810
Page 2

Contents
You’ll soon be enjoying your new Internet Radio with Bluetooth.
It all begins here, with your instructions. Don’t worry, there’s
nothing too technical coming up. Just simple, step-by-step
guidance to get you up and running quickly. Sound good? Then
let’s get started.
Help and Guidance
We’re here to help you get the most from your Internet Radio with Bluetooth. Should you
require any guidance, a simple solution can often be found online at:
www.bush-support.com
If you still require further assistance, call one of our experts on 0345 600 3021.
Safety information
1
General safety information 8
Power source 8
Ventilation 9
Heat sources and flames 9
Getting to know your Internet Radio with Bluetooth
2
Your Internet Radio with Bluetooth 12
Connection 15
Initial set-up 15
Connect to a Bluetooth device 18
Power on 19
Power off (Standby) 19
Change the mode 19
Adjusting the volume 20
Using headphones 20
Using your Internet Radio with Bluetooth
3
Internet Radio mode 24
Storing Internet radio station presets 25
Bluetooth mode 27
Listening to Music/Audio using Bluetooth 28
UPnP mode 28
Setting up your Windows computer to allow access to your audio files 29
Playing audio files using UPnP mode 29
Menu options 30
If you require any technical guidance or find that your product is not operating as intended, a simple solution can often be found in the
Troubleshooting
section of these instructions, or online at www.bush-support.com If you still require further assistance, call one of our experts on 0345 600 3021.
3
Page 3

Contents
Other information
4
Technical specification 36
Product support
5
Troubleshooting 40
Your Bush Guarantee 44
This page is left intentionally blank
If you require any technical guidance or find that your product is not operating as intended, a simple solution can often be found in the
4
Troubleshooting
section of these instructions, or online at www.bush-support.com If you still require further assistance, call one of our experts on 0345 600 3021.
Page 4

This page is left intentionally blank
1Safety information
Page 5

Safety information
Safety information
Important - Please read these instructions fully before
installing or operating
General safety information
Keep the product and all its parts out of reach of small children.
This product is not intended for use by persons (including children) with reduced physical,
sensory or mental capabilities, or lack of experience and knowledge, unless they have
been given supervision or instruction concerning the use of the appliance by a person
responsible for their safety.
• Do not attempt to open the product. This product does not contain any user
serviceable parts. Unauthorised handling of the device may damage it and will void
your warranty.
• Do not use your Radio near emergency/intensive care medical equipment or during
an electrical storm.
To avoid possible hearing damage, do not listen to this radio at high volume
levels for long periods of time. Always keep the volume within reasonable
limits.
Power source
• Only use the power supply that came with the product. Using an unauthorised power
supply will invalidate your guarantee and may irrecoverably damage the product.
• Disconnect your Radio from the mains power supply during thunderstorms.
• Always check that you have completely switched off your Radio, before you change
or disconnect the power supply.
• Where the mains power plug or an appliance coupler is used as the disconnect
device, the disconnect device shall remain readily operable.
• If the Radio will not be used for a long period of time, make sure that the mains power
is unplugged.
Important - Please read these instructions fully before
installing or operating
Positioning the Internet Radio with Bluetooth
It is important that you consider carefully in advance where your Radio will be situated and
make sure that it is:
• on a flat and stable surface.
• within 1.2 metres of a power socket. Please ensure that the mains power lead is not a
trip hazard.
• at least 1 metre away from other electrical appliances to avoid interference.
• where it will be within range of your router for WiFi connectivity.
• where it will be in range of the connected or ‘paired’ bluetooth device (e.g. iPod/
iPhone/iPad/Android/other phone/computer, which is about 10 metres or less (33 feet
or less) in line of sight.
• Never place your Radio directly onto antique or polished surfaces.
Moisture and water
• Keep it dry. Avoid exposure to precipitation, humidity and liquids which could all affect
the product circuitry.
• Do not leave it in low temperatures as moisture can form inside the product, which
may damage the circuit board.
Ventilation
• Do not block or cover slots, holes or openings on the product by placing on soft
furnishings such as carpets, rugs or beds as these are provided for functionality and/or
ventilation to ensure safe operation of the product.
Heat sources and flames
If you require any technical guidance or find that your product is not operating as intended, a simple solution can often be found in the
8
Safety information
Troubleshooting
• Do not leave it in high temperatures as electronic devices and plastic parts may warp
in heat.
• Keep it away from bright sunlight or heat sources, such as a radiator.
• Never place any type of candle or naked flame on top of, or near the product.
section of these instructions, or online at www.bush-support.com If you still require further assistance, call one of our experts on 0345 600 3021.
Safety information
9
Page 6

Getting to know your Internet
This page is left intentionally blank
Radio with Bluetooth
2
Page 7
Getting to know your Internet Radio with
Getting to know your Internet Radio with
Bluetooth
You’ll be up and running in no time
Ready? Let’s begin...
Please read these instructions carefully. They contain important information which will
help you get the best from your product and ensure safe and correct installation and
operation.
If you require any further assistance, our technical experts are happy to help. For full
details, refer to the product support section at the end of these instructions.
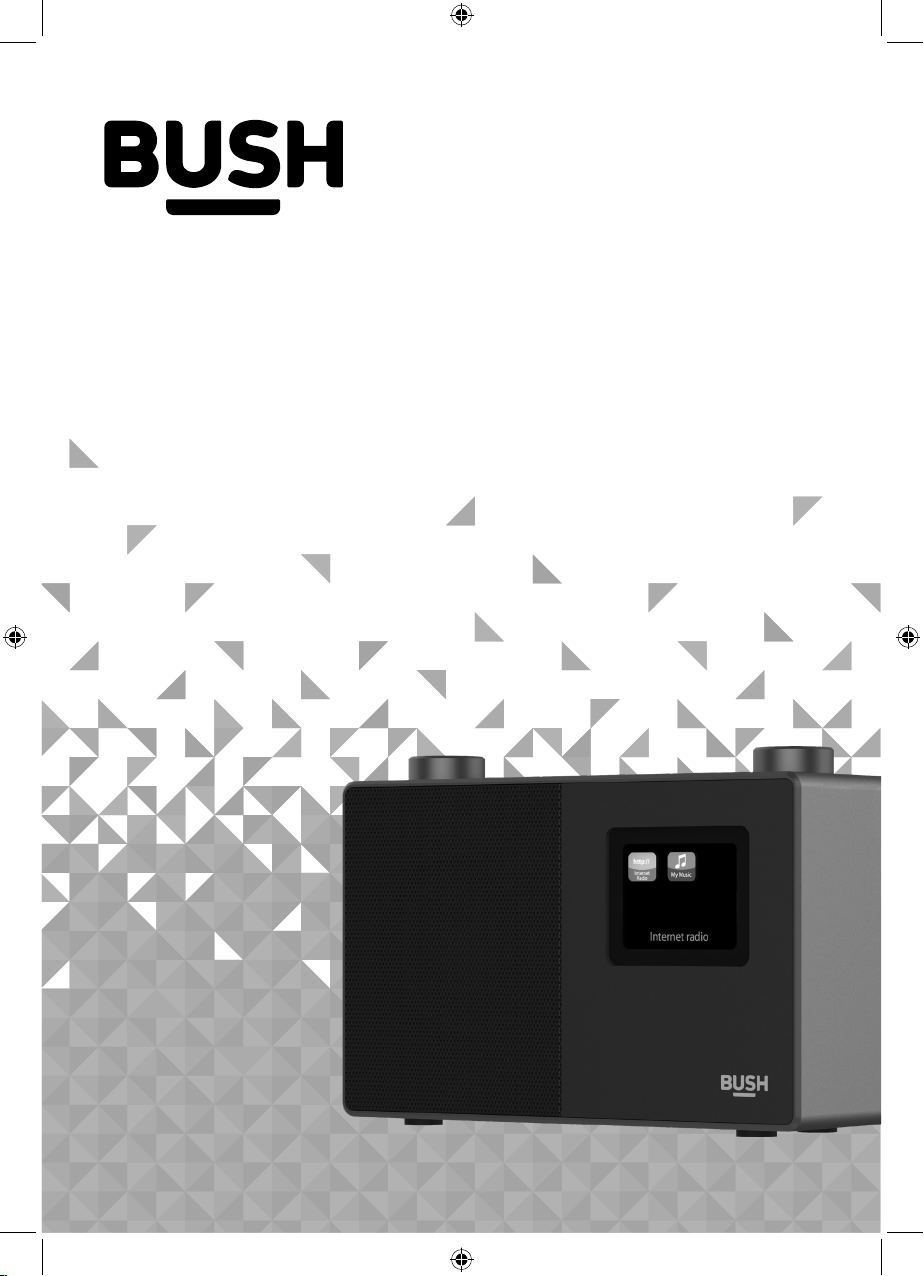
Your Internet Radio with Bluetooth
1
Fig 1.
2 3 4 5 6 7 8 9 10 11
12
Bluetooth
You’ll be up and running in no time
1. Rotary Navigate/Select control
• Rotate to scroll and highlight
options on screen
• Press to Select an option
• When the alarm sounds, press to
Snooze for 5 minutes
• In Bluetooth mode: Press to
disconnect the current device and
search for new devices.
2. Power
• Short press to Power on/off
(Standby)
3. Mode
• Short press to change the mode
(Internet radio/Bluetooth/UPnP)
4. Menu
• Short press to display the Menu
options (Local radio/Internet radio/
Media Centre/Information Centre/
Bluetooth/Configuration)
• Long press to connect to your
router using WPS.
5.
• Skip back/Scroll left on screen
6.
• Skip forward/Scroll right on screen
7. Preset (Internet radio)
• Short press: Radio preset recall
• Long press: Radio preset store
8. Radio preset 1 (Favourite)
• In Internet radio mode: Long press
to store a preset (favourite)
• In Internet radio mode: Short press
to recall a preset (favourite)
9. Radio preset 2 (Favourite)
• In Internet radio mode: Long press
to store a preset (favourite)
• In Internet radio mode: Short press
to recall a preset (favourite)
10. Radio preset 3 (Favourite)
• In Internet radio mode: Long press
to store a preset (favourite)
• In Internet radio mode: Short press
to recall a preset (favourite)
• In Bluetooth mode: Short press to
Play/Pause
11. Radio preset 4 (Favourite)
• In Internet radio mode: Long press
to store a preset (favourite)
• In Internet radio mode: Short press
to recall a preset (favourite)
• In Bluetooth mode: Short press to
Stop
12. Rotary Volume control
• Clockwise to increase the volume
• Anti-clockwise to decrease the
volume
If you require any technical guidance or find that your product is not operating as intended, a simple solution can often be found in the
12
Getting to know your Internet Radio with Bluetooth
Troubleshooting
section of these instructions, or online at www.bush-support.com If you still require further assistance, call one of our experts on 0345 600 3021.
Getting to know your Internet Radio with Bluetooth
13
Page 8
Getting to know your Internet Radio with
Getting to know your Internet Radio with
Bluetooth
You’ll be up and running in no time
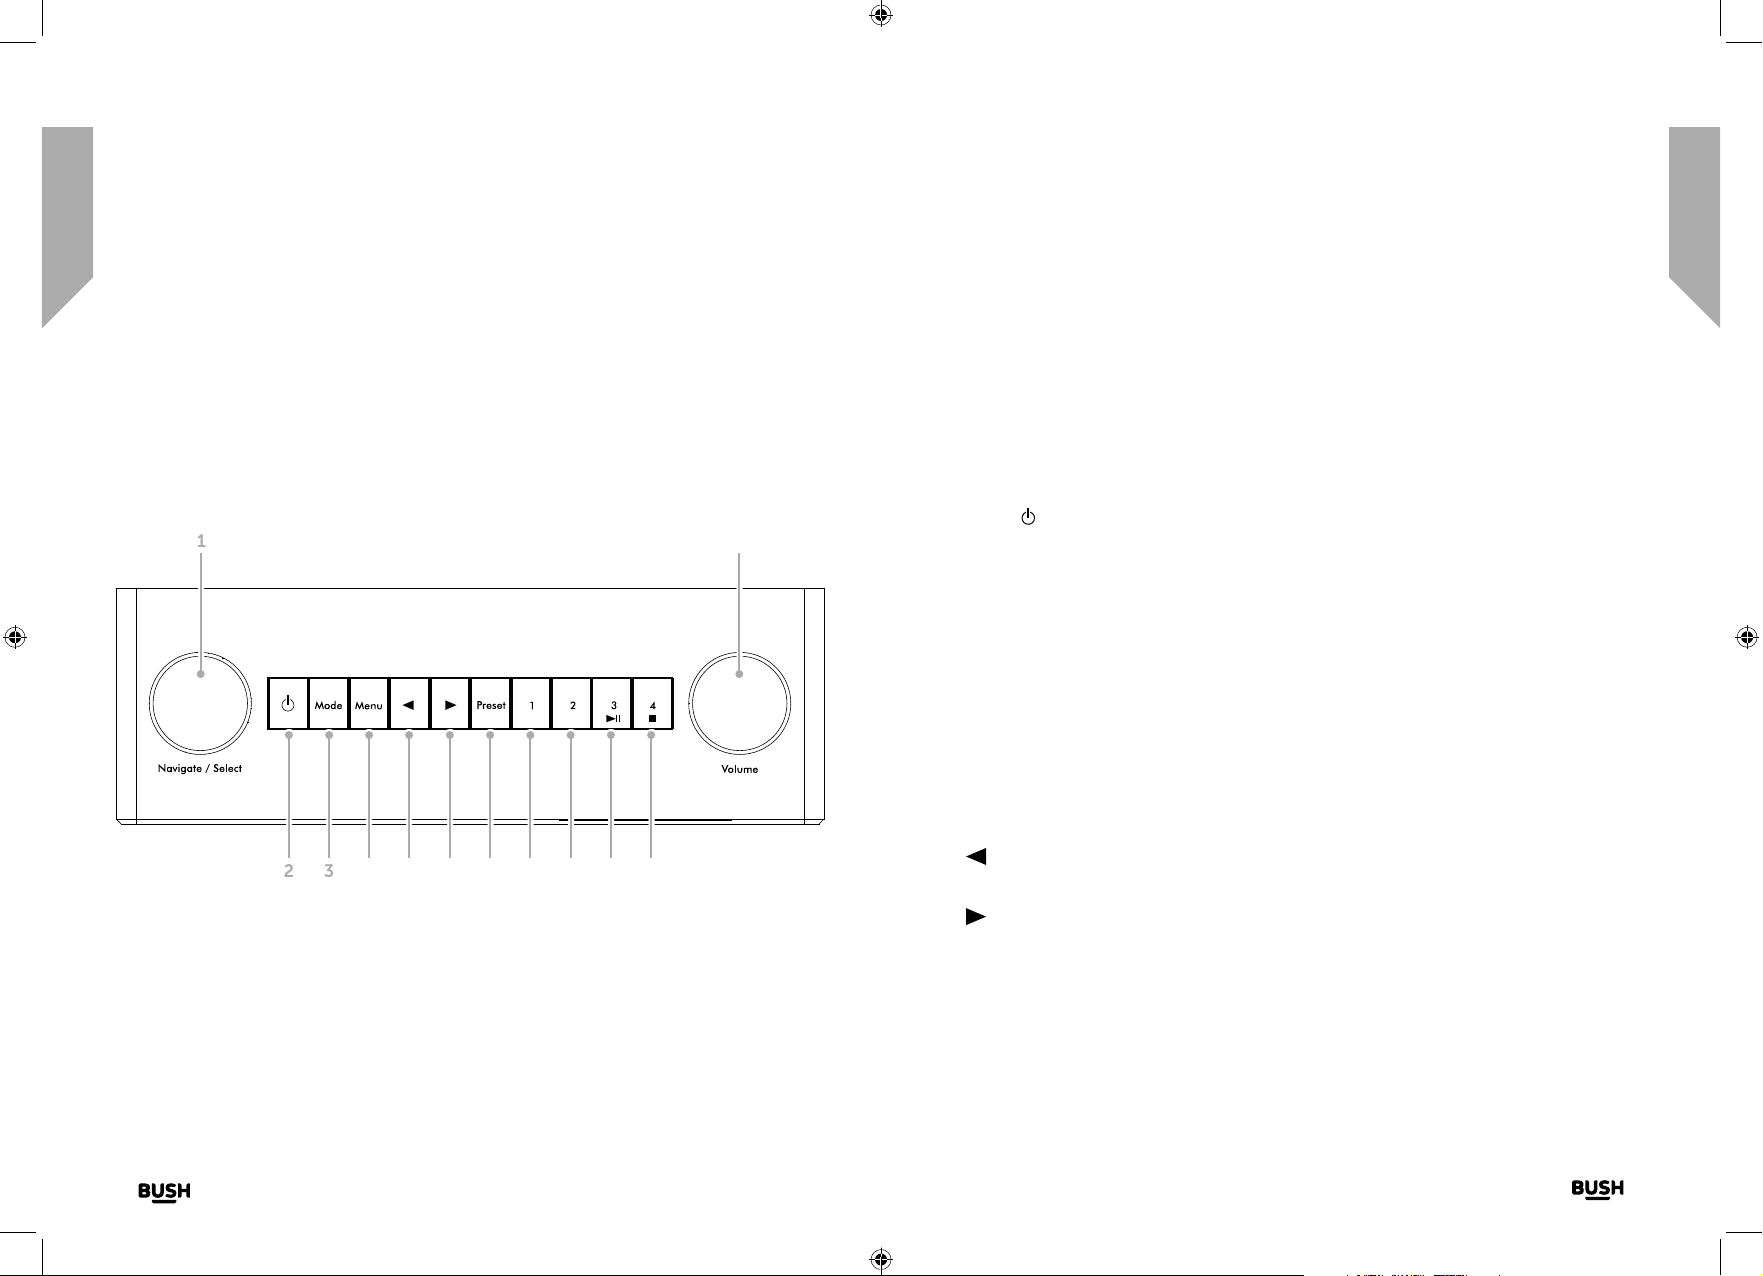
13. Colour display
14. Power socket
15. Headphone socket
Fig 3.
13
Bluetooth
You’ll be up and running in no time
Connection
1. Connect the mains power lead into the socket on the back of the Radio.
2. Plug the power adaptor into the mains power wall socket and
switch on. The Radio will switch on, the BUSH logo and Internet
Radio will be displayed for a few seconds. Please wait.
3. The Network Configuration screen will then be displayed, with
the options for you to Select ‘YES’ to enter the settings manually,
‘Yes (WPS)’ for you to quickly and simply connect using the
WPS Push button service if your router has this option or ‘NO’ to skip the Network
configuration settings now and to enter these later.
Note: If you skip the Network Configuration screen you will only be able to use your
product with a Bluetooth connection, until you enter the settings required to connect
to your home router for WiFi internet Radio access later.
Initial set-up
On first use your Radio will display the Network Configuration screen for you enter the
settings to connect to your home router for WiFi internet Radio access. We recommend
that you do proceed with this Setup and we have included the steps to do this below.
Fig 2.
If you require any technical guidance or find that your product is not operating as intended, a simple solution can often be found in the
14
Getting to know your Internet Radio with Bluetooth
14 15
Troubleshooting
Alternatively, if you would prefer to enter the Network Configuration details to connect to
your router later, use the rotary Navigation/Select control to highlight ‘NO’ and press to
select. The main menu screen for your radio will then be displayed.
Connecting to your router using WPS (WiFi Protected Setup)
The easiest way to connect to your router is by using the WPS (WiFi Protected Setup) push
button. Please check on your router to see if it has this option.
1. When the Network Configuration screen is displayed, use the left hand Navigation/
Select rotary control to highlight ‘Yes(WPS)’ and press to Select.
2. On your router, press the WPS button within 120 seconds.
section of these instructions, or online at www.bush-support.com If you still require further assistance, call one of our experts on 0345 600 3021.
Getting to know your Internet Radio with Bluetooth
15
Page 9

Getting to know your Internet Radio with
Getting to know your Internet Radio with
Bluetooth
You’ll be up and running in no time
3. After a few moments the display on your Internet radio will change to ‘Connecting to
Network...’ Please wait.
4. The main menu screen is then displayed with Internet Radio as the first option. You are
now connected via your router to the internet.
5. Press the left hand Navigation/Select rotary control to select Internet radio. You can
now use the left hand Navigation/Select rotary control to scroll through the options
available and press to select.
Connecting to your router by scanning for available WiFi networks
If your router does not have a WPS Push Button option, then your radio can scan for
available WiFi networks.
1. When the Network Configuration screen is displayed, use the left hand Navigation/
Select rotary control to highlight ‘YES’ and press to Select.
2. ‘Scanning for Wireless Network...’ will be displayed, whilst your radio scans for available
WiFi networks.
3. After a few seconds a list of the Network Names (also know as SSIDs), for the WiFi
networks found during the scan will be displayed.
4. Use the Navigation/Select control to highlight the WiFi Network that the Radio should
connect to and press to Select.
Note: If your WiFi network is not listed, if may be because your router has been set not
to broadcast its Network Name or SSID. Please check your router settings; you can opt
to change your router to broadcast its network name so that it can be found during a
WiFi network scan by your Radio
Note: If your router is set to broadcast its Network name or SSID, but it has not been
found, please first try to scan again for WiFi networks. If your network is still not found,
please try moving your Radio closer to your router and then scan for WiFi networks
again.
Bluetooth
You’ll be up and running in no time
5. If your router requires a wireless password or an encryption key you will need to enter
this now to enable it to connect to your router. Some wireless routers already have an
encryption key or password that has been set by the manufacturer, this will be shown
either on the router itself or within the documentation provided with it.
6. ‘Enter Password’ will be displayed and a highlighted capital ‘A’ will be displayed on the
next line.
Note: To enter the wireless password or encryption key, use the left hand Navigation
rotary control to scroll through the letters and numbers and the or buttons to
move to the next or previous letters. Do not press the left hand rotary control to Select,
until you have entered your complete password or key and checked that it is correct.
7. To enter the wireless password or encryption key into your radio, use the Navigation/
Select rotary control to display the first letter or number of your password.
Note: You must enter the letters and numbers of your wireless password or encryption
key exactly, as they appear on your router or router documentation, including upper or
lower case letters, to enable your radio to connect successfully to your router.
8. Use the button to move one space to the right to enter the next letter or number.
Use the Navigation/Select rotary control to display the second letter or number of
your password.
9. Continue to use the button and the Navigation/Select rotary control until all the
letters and numbers of your password or encryption key have been entered correctly.
10. Please check it carefully. If you need to go back and make a correction, please use the
button and then re-enter the letters and numbers as above.
11. Once you are sure that you have entered the password or encryption exactly as it
appears n your router. Press the left hand Navigation/Select rotary to confirm.
12. ‘Connecting to Network...’ will be displayed. Please wait.
13. The main menu screen is then displayed with Internet Radio as the first option. You are
now connected via your router to the internet.
If you require any technical guidance or find that your product is not operating as intended, a simple solution can often be found in the
16
Getting to know your Internet Radio with Bluetooth
Troubleshooting
section of these instructions, or online at www.bush-support.com If you still require further assistance, call one of our experts on 0345 600 3021.
Getting to know your Internet Radio with Bluetooth
17
Page 10

Getting to know your Internet Radio with
Getting to know your Internet Radio with
Bluetooth
You’ll be up and running in no time
14. Press the left hand Navigation/Select rotary control to select Internet radio. You can
now use the left hand Navigation/Select rotary control to scroll through the options
available and press to Select.
Connect to a Bluetooth device
Check that your radio is in Bluetooth mode. If you are not already in Bluetooth mode,
short press the Mode button until you are in Bluetooth mode (check the display). Your
radio will begin to search for Bluetooth devices.
In Bluetooth Mode:
1. Your radio will search for Bluetooth devices.
2. On the device that you would like to connect to your radio (e.g. iPhone/iPad/Android/
other phone/Tablet/Computer), turn on Bluetooth connectivity and ensure that it is
‘discoverable’.
Note: If necessary, refer to the instructions for your device to add or set up Bluetooth.
3. Select to ‘Add new device’, if necessary.
Note: Some products will automatically search for a new device and so the ‘Add new
device’ option is not available.
4. When found, your radio will be displayed as ‘BUSH WI-1810’. Select the device name
to begin pairing.
5. When pairing is complete ‘Bluetooth Connected’ will be displayed.
6. Now that you have paired your device with the radio, it will connect to it when it is
within range, which is about 10 metres or less (33 feet or less), line of sight.
7. Your device will remain paired with the radio unless you decide to disconnect or
‘unpair’ it.
Note: You can press the Navigation/Select rotary on the top of your radio to unpair
your current device and search for new devices.
Bluetooth
You’ll be up and running in no time
Power on
Short press the Power button.
Power o (Standby)
Short press the Power button. The Standby screen will be displayed with the current date
and time.
Weather location
When you are in Standby mode, you can also set a Weather location
1. Short press the or button. ‘Set location (Weather) is displayed.
2. Press the Navigation/Select rotary control. A list of countries is displayed.
3. To set for the UK, use the Navigation/Select rotary control to highlight Europe and
press to Select.
4. Use the Navigation/Select rotary control to highlight United Kingdom and press to
Select.
5. Use the Navigation/Select rotary control to highlight England, Northern Ireland,
Scotland or Wales as required, and press to Select.
6. Use the Navigation/Select rotary control to highlight a Town and press to Select. The
current weather information will be displayed. You can use the Navigation/Select
rotary to scroll through the available weather information.
7. Your radio will now switch between the Weather information and the current date and
time when in Standby mode.
Change the mode
Short press the Mode button to change the mode, there are 3 options available: Internet
Radio, Bluetooth and UPnP.
If you require any technical guidance or find that your product is not operating as intended, a simple solution can often be found in the
18
Getting to know your Internet Radio with Bluetooth
Troubleshooting
section of these instructions, or online at www.bush-support.com If you still require further assistance, call one of our experts on 0345 600 3021.
Getting to know your Internet Radio with Bluetooth
19
Page 11

Getting to know your Internet Radio with
Bluetooth
You’ll be up and running in no time
Adjusting the volume
• Turn clockwise to increase the volume.
• Turn anti-clockwise to decrease the volume.
Using headphones
You can connect headphones with a 3.5mm plug (not included) to your radio. The
headphone socket can be found on the back of the Radio next to the power socket.
When you have headphones connected the Radio speaker is switched off and all sound is
via the headphones.
Note: Always keep the volume within reasonable limits.
This page is left intentionally blank
If you require any technical guidance or find that your product is not operating as intended, a simple solution can often be found in the
20
Getting to know your Internet Radio with Bluetooth
Troubleshooting
section of these instructions, or online at www.bush-support.com If you still require further assistance, call one of our experts on 0345 600 3021.
Page 12

Using your Internet Radio
This page is left intentionally blank
with Bluetooth
3
Page 13

Using your Internet Radio with Bluetooth
Using your Internet Radio with Bluetooth
Let’s get started
Internet Radio mode
Check that you are in Internet radio mode. If you are not already in Internet radio mode,
short press the Mode button until you are in Internet Radio mode (check the display).
With your BUSH Internet Radio you can listen to thousands of radio stations from
around the world; you just need to connect to your home router via WiFi for an Internet
Broadband connection.
If you didn’t enter your Network Configuration details when you first powered on your
radio, you can press and hold the Menu button in internet radio mode to connect to
your router using the WPS (WiFi Protected Setup) push button, this is the easiest way to
connect. Please check on your router to see if it has this option and then follow the steps
on page 15 and 16.
Alternatively your radio will attempt to connect and then scan for wireless networks when
you select an internet radio station. You can then follow the steps on page 16 to connect
to your router.
Selecting an Internet radio station
There are several different ways of selecting Internet Radio stations to listen to on your
radio. Such as:
• Global Top 20
• Genre
• Country/Location
• Highlighted stations
In internet radio mode:
1. Use the Navigation/Select rotary to highlight ‘Radio Station/Music’ and press to Select.
2. Use the Navigation/Select rotary to highlight one of the displayed options and press to
Select.
Let’s get started
3. Continue to use the Navigation/Select control to highlight each option you would
like and press to Select. When you select an Internet radio station to tune in and listen
to, ‘Connecting...’, followed by ‘Buffering...’ with a percentage will be displayed. After a
short delay the station should start to play.
Storing Internet radio station presets
Your Radio can store up to 250 Internet radio stations in its preset memories for instant
access to your favourite stations. Presets 1-4 can be stored and quickly recalled using the
one-touch access buttons on the top of your radio.
Note: When you store Internet radio station presets, these are also automatically stored
under the ‘My Favourite’ option within the Internet radio menu.
Storing the one-touch presets 1-4.
In internet radio mode:
1. Tune your radio to the Internet station that you wish to preset.
2. Long press the one-touch button (1-4) on the top of your radio, that you would like to
store the Internet station to. A folder icon will appear in the top line of the display to
confirm that the preset has been stored.
Note: If there is already an existing Internet station stored under a preset, it will be over
written when you store the new station.
Recall a stored one-touch preset 1-4.
In internet radio mode:
1. Short press the one touch button on the top of your radio (1-4), where the station you
would like to listen to has been stored.
If you require any technical guidance or find that your product is not operating as intended, a simple solution can often be found in the
24
Using your Internet Radio with Bluetooth
Troubleshooting
section of these instructions, or online at www.bush-support.com If you still require further assistance, call one of our experts on 0345 600 3021.
Using your Internet Radio with Bluetooth
25
Page 14

Using your Internet Radio with Bluetooth
Using your Internet Radio with Bluetooth
Let’s get started
2. Your radio will connect to that station and begin to play.
Note: If no Internet station has been stored under the preset button, the number of
the preset store will be displayed, followed by the preset list and ‘empty’ next to that
location.
Storing Internet station presets 1-250
Note: When you store a radio station to Preset location 1-4 using this method, this will
also be saved under the 1-4 one-touch buttons on the top of your radio.
1. Tune your radio to the Internet station that you wish to preset.
2. Long press the Preset button. Your radio will place the station to be stored in the next
available preset location and the preset list will be displayed.
3. Whilst the preset list is displayed, press the Navigation/Select rotary to confirm the
preset location; or you can use the Navigation/Select rotary control to move the
station to a different numbered location and then press the Navigation/Select rotary to
confirm the preset store.
4. A folder icon will appear in the top line of the display to confirm that the preset has
been stored.
Note: If there is already an existing Internet station stored under a preset, it will be over
written when you store the new station.
Recalling Internet station presets 1-250
Let’s get started
Bluetooth mode
Check that your radio is in Bluetooth mode. If you are not already in Bluetooth mode,
short press the Mode button until you are in Bluetooth mode (check the display). Your
radio will begin to search for Bluetooth devices.
In Bluetooth Mode:
1. Your radio will search for Bluetooth devices.
2. On the device that you would like to connect to your radio (e.g. iPhone/iPad/Android/
other phone/Tablet/Computer), turn on Bluetooth connectivity and ensure that it is
‘discoverable’.
Note: If necessary, refer to the instructions for your device to add or set up Bluetooth.
3. Select to ‘Add new device’, if necessary.
Note: Some products will automatically search for a new device and so the ‘Add new
device’ option is not available.
4. When found, your radio will be displayed as ‘BUSH WI-1810’. Select the device name
to begin pairing.
5. When pairing is complete ‘Bluetooth Connected’ will be displayed.
6. Now that you have paired your device with the radio, it will connect to it when it is
within range, which is about 10 metres or less (33 feet or less), line of sight.
7. Your device will remain paired with the radio unless you decide to disconnect or
‘unpair’ it.
In internet radio mode:
1. Short press the Preset button. Use the Navigation/Select rotary control to move to the
Preset location and station that you would like to listen to (1-250).
2. Press the Navigation/Select control. The radio will tune to that station and begin to
play.
If you require any technical guidance or find that your product is not operating as intended, a simple solution can often be found in the
26
Using your Internet Radio with Bluetooth
Troubleshooting
Note: You can press the Navigation/Select rotary on the top of your radio to unpair
your current device and search for new devices.
section of these instructions, or online at www.bush-support.com If you still require further assistance, call one of our experts on 0345 600 3021.
Using your Internet Radio with Bluetooth
27
Page 15

Using your Internet Radio with Bluetooth
Using your Internet Radio with Bluetooth
Let’s get started
Listening to Music/Audio using Bluetooth
In Bluetooth mode:
1. Select and start the music or audio that you wish to listen to on your paired Bluetooth
device, it will now be heard through the radio speaker. Adjust the volume on the
connected device and/or your radio.
2. You can use the controls on your paired Bluetooth device as well as those on your
radio.
3. Controls available on your radio:
• Play/Pause
Short press the ‘3’ button.
• Skip back:
Short press the button.
• Skip forward:
Short press the button.
• Stop
Short press the ‘4’ Stop button.
UPnP mode
If you are not already in UPnP player mode, short press the Mode button until you are in
UPnP mode (check the display).
UPnP media sharing enables your radio to play music from a shared media library. If you
are using a suitable server system such as a computer with Windows Media Player 10 or
later (WMP), and your music library is well tagged, only the UPnP server needs to be set
up.
Note: If you are an Apple Mac user, iTunes does not currently work as a UPnP media
server, but there are add-ons available to work with an iTunes library, such as Plex
Media Server. These are not covered within this guide.
Let’s get started
In order to play the audio files on your radio, you must first ensure the following:
• Your computer is connected to the same router and network as your radio.
• The audio files are stored in the correct location on your computer.
• The audio files are not ‘protected’.
• Your computer has the correct type of audio files and playlists stored on a networked
computer.
• Your computer has file sharing turned on.
• The audio files can be shared on the network.
• You know the name of your computer.
Setting up your Windows computer to allow access to your
audio files
1. Ensure that your computer is connected to the same router and network as your
radio.
2. On your computer, in the Windows Media Player, add to the media library the audio
files and folders that you would like to share with your radio.
3. In Windows Media Player, enable media sharing, select Library > Media sharing.
4. Ensure that your radio will be able to access the shared media by selecting it within the
Windows Media Player and clicking ‘Allow’. You can also choose a name for the shared
media in ‘Settings’. Click ‘OK’ to close the dialogue boxes.
5. Your computer is now ready to stream the music to your radio.
Playing audio files using UPnP mode
In UPnP mode:
Your radio will load and display the names of the computer(s) on your network that have
shared media available. Use the Navigation/Select rotary control to highlight and select
the computer which has the audio files that you would like to play.
If you require any technical guidance or find that your product is not operating as intended, a simple solution can often be found in the
28
Using your Internet Radio with Bluetooth
Troubleshooting
section of these instructions, or online at www.bush-support.com If you still require further assistance, call one of our experts on 0345 600 3021.
Using your Internet Radio with Bluetooth
29
Page 16

Using your Internet Radio with Bluetooth
Using your Internet Radio with Bluetooth
Let’s get started
1. The menus presented to you on your radio are now generated by the media server,
such as the Windows Media Player. Your radio can play Music and Playlists and there is
also a search option available.
2. Use the Navigation/Select rotary control to highlight and press to select to play your
music choices
3. You can also use the skip back, skip forward, Play/Pause and Stop buttons
on your radio, when streaming music from your computer.
Menu options
There are a range of features and settings available to you within the Menu of your radio.
You can access the Menu when the radio is on (not in Standby mode), from any mode.
To use the Menu:
1. Short press the Menu button.
2. Use the Navigation/Select rotary control to scroll and press to select. Use the or
buttons to move across the screen e.g.: when setting an alarm time.
3. A list of features and options will be displayed. Use the Navigation/Select rotary control
to scroll and highlight a feature or option and press to select or confirm. You can short
press the button if you need to go back a step.
Available features and options in the Menu are:
• Local radio
• Internet Radio
» My Favourite
» Radio Station/Music
» Local Radio
» Sleep Radio
» History
» Service
If you require any technical guidance or find that your product is not operating as intended, a simple solution can often be found in the
Troubleshooting
Let’s get started
• Media Centre
» UPnP
» My Playlist
» Clear My Playlist
• Information Centre
» Weather information
» Financial information
» System information
• Bluetooth mode
• Configuration
» Time Display
» Manage my MediaU
» Network
» Date & Time
» Alarm - Press the Power button to stop the alarm.
Press the Navigation/Select rotary control to Snooze for 5 minutes.
» Timer
» Language
» Dimmer
» Display
» Power Management
» Sleep Timer
» Buffer
» Weather
» Local Radio Setup
section of these instructions, or online at www.bush-support.com If you still require further assistance, call one of our experts on 0345 600 3021.
30
Using your Internet Radio with Bluetooth
Using your Internet Radio with Bluetooth
31
Page 17

Using your Internet Radio with Bluetooth
Let’s get started
» Playback Setup
» Device
» Equaliser
» Resume When Power On
» Software Update
» Reset to Default - Restores the original factory default settings
Note: All of the radio settings, including your internet radio router settings, Internet
radio station presets and Bluetooth connection will be deleted when you Factory reset
your radio.
This page is left intentionally blank
If you require any technical guidance or find that your product is not operating as intended, a simple solution can often be found in the
Using your Internet Radio with Bluetooth32
Troubleshooting
section of these instructions, or online at www.bush-support.com If you still require further assistance, call one of our experts on 0345 600 3021.
Page 18

This page is left intentionally blank
Other information 4
Page 19

Other information
Helpful technical information
Technical specification
Power adaptor. Output DC 6V 1A
Input AC 100-240V, 50/60Hz, 0.3A max.
Audio output: 1 x 3W RMS
WiFi: 802.11 b/g/n. Supports WEP and WPA/WPA2 encryption
Bluetooth:
Frequency: 2.4GHz-2.480GHz
Pairing name: BUSH WI-1810
Headphone socket: 3.5mm
This page is left intentionally blank
If you require any technical guidance or find that your product is not operating as intended, a simple solution can often be found in the
Other information36
Troubleshooting
section of these instructions, or online at www.bush-support.com If you still require further assistance, call one of our experts on 0345 600 3021.
Page 20

This page is left intentionally blank
Product support 5
Page 21

Product support
Product support
Help is always at hand
Troubleshooting
Unable to connect wirelessly to your router:
• Check that you are able to connect successfully to your router using WiFi with another
device, such as a computer, tablet or mobile phone.
• Ensure that your Radio is within range of your router for WiFi connectivity, move it
closer to the router, if necessary.
• Check that you do not have other electrical or WiFi products too close to your Radio,
which could interfere with the WiFi signal.
• Check that you have entered the encryption key or passphrase for your router, exactly
as it appears, including upper and lower case characters.
• Check that your router has not been set up to restrict access to specific MAC
addresses. The person who set up your network will be able to advise if you need
to enter the MAC address of your radio to the list of allowed devices on your router.
You can find the MAC address of your radio within the Menu, under Information
Centre>System information>Wireless info.
• Check that your network’s firewall is not blocking the connection from your Radio.
Some internet radio stations are not available:
• The station may not be broadcasting at the time of day that you have tried to listen to
it. (Depending on the particular radio station if may be in a different time zone)
• The station may have too many people trying to connect to its servers and their server
capacity may not be enough to enable everyone to connect.
• The station is not broadcasting any more.
• The internet connection between the server (often located in another country) and
you is slow. Some Internet Service Providers may fail to provide service in some
geographical areas. You could use a computer to check if the internet radio station
can be received.
• If the radio station connection is intermittent or keep stopping. Check your internet
Help is always at hand
broadband connection and speed.
• If you are experiencing an intermittent service or high error rate on your broadband
connection your radio will not be able to continuously connect and play in internet
radio mode.
Unable to pair with a Bluetooth device:
• Check that you are in Bluetooth mode.
• Ensure that you are within range of the radio for Bluetooth functionality, 10 metres or
less (33 feet or less).
• Move the radio and Bluetooth device away from other Bluetooth devices/electrical
equipment.
• If possible, turn off other nearby Bluetooth devices or disable their Bluetooth
functionality.
No sound / power:
• Adjust the volume.
• You may have headphones connected. Please unplug the headphones or use them to
listen to your radio.
The function buttons do not respond:
• Check that the mains power lead is connected at the back of your radio and the mains
power wall socket is switched on. Press and release the Power button.
• Try a reset to factory defaults.
Note: All of the radio settings, including your internet radio router settings, Internet
radio station presets and Bluetooth connection will be deleted when you Factory reset
your radio.
If you require any technical guidance or find that your product is not operating as intended, a simple solution can often be found in the
40
Product support
Troubleshooting
section of these instructions, or online at www.bush-support.com If you still require further assistance, call one of our experts on 0345 600 3021.
Product support
41
Page 22

Product support
Product support
Help is always at hand
Help and assistance
If you require any technical guidance or find that your Internet Radio with Bluetooth is
not operating as intended, a simple solution can often be found in the Troubleshooting
section of these instructions or online at www.bush-support.com
If you still require further assistance, call one of our experts on 0345 600 3021*. To help
give us give you a fast and efficient service please have the following information ready:
You can find these
on the rating plate - a
Model Ref.
Serial number
Date of purchase
small information
panel (usually a sticker
or metal plate) on the
base or rear of your
product.
This will be shown on
your receipt
Help is always at hand
Disposal
• Disposal of your old product. Your product is designed and manufactured with
high quality materials and components, which can be recycled and reused.
• When this crossed out wheeled bin symbol is attached to a product it means
the product is covered by the European Directive 2012/19/EC.
• Please make yourself aware of the local collection system for electrical and
electronic products.
• Please act according to your local rules and do not dispose of your old
products with your normal household waste.
• The correct disposal of your old product will help prevent potential negative
consequences for the environment and human health.
This product is intended for use within the UK. This equipment complies with the essential
requirements of the Radio Equipment Directive 2014/53/EU.
Declaration of Conformance
Local call rates applies*
Lines open 8am-7pm Monday to Saturday and
10am-4pm Sunday.
*Calls to Bush enquiry lines may attract a charge and set up fee from residential lines depending on
your call plan/tari. Mobile and other providers costs may vary, see www.bt.com/pricing for details.
For security and training purposes, telephone calls to and from customer service centres may be
recorded and monitored. Calls from Republic of Ireland will attract international call charges.
If you require any technical guidance or find that your product is not operating as intended, a simple solution can often be found in the
42
Product support
Troubleshooting
Hereby, Argos Ltd, declares that this Internet Radio with Bluetooth WI-1810 is in
compliance with the essential requirements and other relevant provisions of the Radio
Equipment Directive 2014/53/EU. The complete declaration of conformity can be
obtained by contacting http://www.bush-support. com/
section of these instructions, or online at www.bush-support.com If you still require further assistance, call one of our experts on 0345 600 3021.
Product support
43
Page 23

Product support
Help is always at hand
Call us now and register your 12 month guarantee
Thank you for choosing Bush. Your new product is guaranteed against faults and breakdowns for 12 months.
Don’t forget to register it with us today so we can provide you with our best possible after-sales service and
useful updates.
www.bushregistration.co.uk
FREEPHONE*
0800 597 8548
Lines are open 8am - 8pm, 365 days a year. *Calls may be recorded and monitored.
Your Bush Guarantee
This product is guaranteed for twelve months from the date of original purchase. Any defect that arises due to
faulty materials or workmanship will be repaired free of charge (or if applicable the product will be replaced or the
purchase price refunded) where possible during this period by the dealer from who your purchased the unit.
The guarantee is subject to the following provisions:
• The guarantee does not cover accidental damage,
misuse, cabinet parts, knobs or consumable items.
• The product must be correctly installed and
operated in accordance with the instructions
contained in the manual.
• It must be used solely for domestic purposes. The
guarantee will be rendered invalid if the product is
Important Data Protection Information
To find out how we and Domestic & General Insurance Plc use your data please refer to the guarantee registration
material or visit www.bushregistrations.co.uk.
re-sold or has been damaged by inexpert repair.
• Specifications are subject to change without
notice.
• Bush disclaim any liability for loss or damage arising
from the breakdown of the product.
• This guarantee is in addition to and does not
diminish your statutory or legal rights.
This page is left intentionally blank
Guarantor: Argos Limited - 489 - 499 Avebury Blvd. - Milton Keynes - MK9 2NW
If you require any technical guidance or find that your product is not operating as intended, a simple solution can often be found in the
Product support44
Troubleshooting
section of these instructions, or online at www.bush-support.com If you still require further assistance, call one of our experts on 0345 600 3021.
Page 24

This page is left intentionally blankThis page is left intentionally blank
Page 25

Contact:
www.bush-support.com
Helpline: 0345 600 3021
 Loading...