

Bush LED32K1 Instruction Manual
32in HD Ready Digital LED LCD TV
INSTRUCTION MANUAL
Customer helpline:0845 604 0105

BUSH | HD Ready LED LCD | User Manual | Customer Helpline 0845 604 0105
P.01
CONTENTS
IMPORTANT SAFETY INSTRUCTIONS ......................................... P.02
REMOTE CONTROL ....................................................................... P.04
KNOW YOUR MACHINE ................................................................. P.07
WALL MOUNTING ........................................................................... P.09
ANTENNA CONNECTION ............................................................... P.11
TUNING MENU OPTIONS ............................................................... P.12
OTHER CONNECTIONS ................................................................. P.14
BASIC OPERATION ........................................................................ P.19
MENU OPERATION ......................................................................... P.23
TELETEXT ....................................................................................... P.36
COMMON INTERFACE MODULE ................................................... P.38
OAD OPERATION ........................................................................... P.40
TROUBLESHOOTING ..................................................................... P.41
SPECIFICATIONS ........................................................................... P.42
APPENDIX ....................................................................................... P.43
INFORMATION ................................................................................ P.45
PRODUCT GUARANTEE ................................................................ P.47
P.02
BUSH | HD Ready LED LCD | User Manual | Customer Helpline 0845 604 0105
IMPORTANT SAFETY INSTRUCTIONS
Read all instruction before use and keep for future
reference.
WARNING
• Misuse or modication of this appliance may result in breakdown or injury.
• To reduce the risk of re or electric shock, do not expose this appliance to rain or moisture.
IMPORTANT INFORMATION
• The appliance is intended for household use only.
• The appliance should always be turned to OFF before plugging or unplugging from socket.
Never yank cord to disconnect from socket; instead, grasp plug and pull to disconnect.
• Check that the Voltage on the rating plate of your product corresponds with your local electricity supply which must be A.C. (Alternating Current).
• If the mains sockets in your home are not suitable for the plug supplied with this product,
check with a qualied electrician for replacement.
FOR OPTIMUM PERFORMANCE
• Do not use in environments which are extremely hot, cold, dusty or humid.
• Keep the unit free from dust and clean with a dry cloth.
• Do not use in areas exposed to direct sunlight or where it can become extremely hot.
• Keep away from sources of strong magnetism - such as speakers.
• Avoid placement where there is a lot of movement, vibration or on an unstable surface.
• To reduce the risk of re or electric shock, the equipment shall not be exposed to rain or
moisture and objects lled with liquids, such as vases, shall be placed on the apparatus.
• The equipment shall not be exposed to dripping or splashing.
• To avoid re, no naked ame source, such as lit candles, should be placed on or around the
unit.
• For ventilation, leave at least 10 cm free all around the TV. Do not place the TV on a carpet.
• The ventilation holes must be kept clear from obstructions.
• In case of smoke, or unusual noises or smells coming from the unit, switch it off, unplug it
from the wall socket and contact your dealer or service center.
• Place the TV in such a position that the screen is not exposed to direct sunlight. It is best to
have soft indirect lighting whilst watching TV. Avoid dark environments and screen reection
as these may cause eye fatigue.
• When the TV has been moved from a cold place, it will need time for the moisture from inside
to evaporate.
• The appliance coupler is used as the disconnect device of this apparatus, the disconnect
device shall remain readily operable.
BUSH | HD Ready LED LCD | User Manual | Customer Helpline 0845 604 0105
P.03
FOR SAFETY
DO NOT:
• Attempt to disassemble this unit or carry out repairs.
• Attempt to modify the unit in any way.
• Make sure that foreign objects do not get inside the unit.
• Place naked ame sources - such as lit candles on or near the unit.
• Place objects lled with liquids - such as vases, on or next to the unit.
• Cover the unit - allow the unit to be well ventilated.
• Drop the unit or subject it to strong shocks.
• Attempt to service this product yourself as opening or removing covers may expose you to
dangerous Voltage or other hazards. Refer all servicing to qualied service personnel.
CHILDREN
• Children do not always understand the dangers associated with operating electrical appliances. Never allow children to use this appliance.
POWER SUPPLY
• If the unit uses a mains supply, ensure that the plug is securely inserted into the mains
socket, and it is easily accessible.
• Protect the power lead from sharp objects, excessive heat and damp or wet locations. Check
the power lead periodically, and replace if damaged.
• If the unit uses batteries, please ensure that they are inserted correctly - observing the polarity (+/-).
• Do not mix new and used batteries.
• Please make sure that used batteries are disposed of correctly. Do not burn or incinerate.
• Check that the Voltage on the rating plate of your product corresponds with your local electricity supply which must be A.C. (Alternating Current).
• Any repairs should only be carried out by a fully qualied electrician or an authorised service
agent.
LISTENING WITH EARPHONES
• Listen at moderate Volumes to avoid hearing damage.
• If you hear no sound during playback, do not turn the Volume up as the music may suddenly
begin at a high Volume. Excessive sound pressure from earphones and headphones can
cause hearing loss.
• To avoid damaging your ears, adjust the Volume to the lowest level before playback, and turn
up to the desired level when playback has started.
CAUTION: TO REDUCE THE RISK OF ELECTRIC SHOCK DO NOT REMOVE
COVER (OR BACK), THERE ARE NO USER SERVICEABLE PARTS INSIDE,
REFER SERVICING TO QUALIFIED SERVICE PERSONNEL.
The equipment shall be used at maximum ambient temperature of 35°C .
P.04
BUSH | HD Ready LED LCD | User Manual | Customer Helpline 0845 604 0105
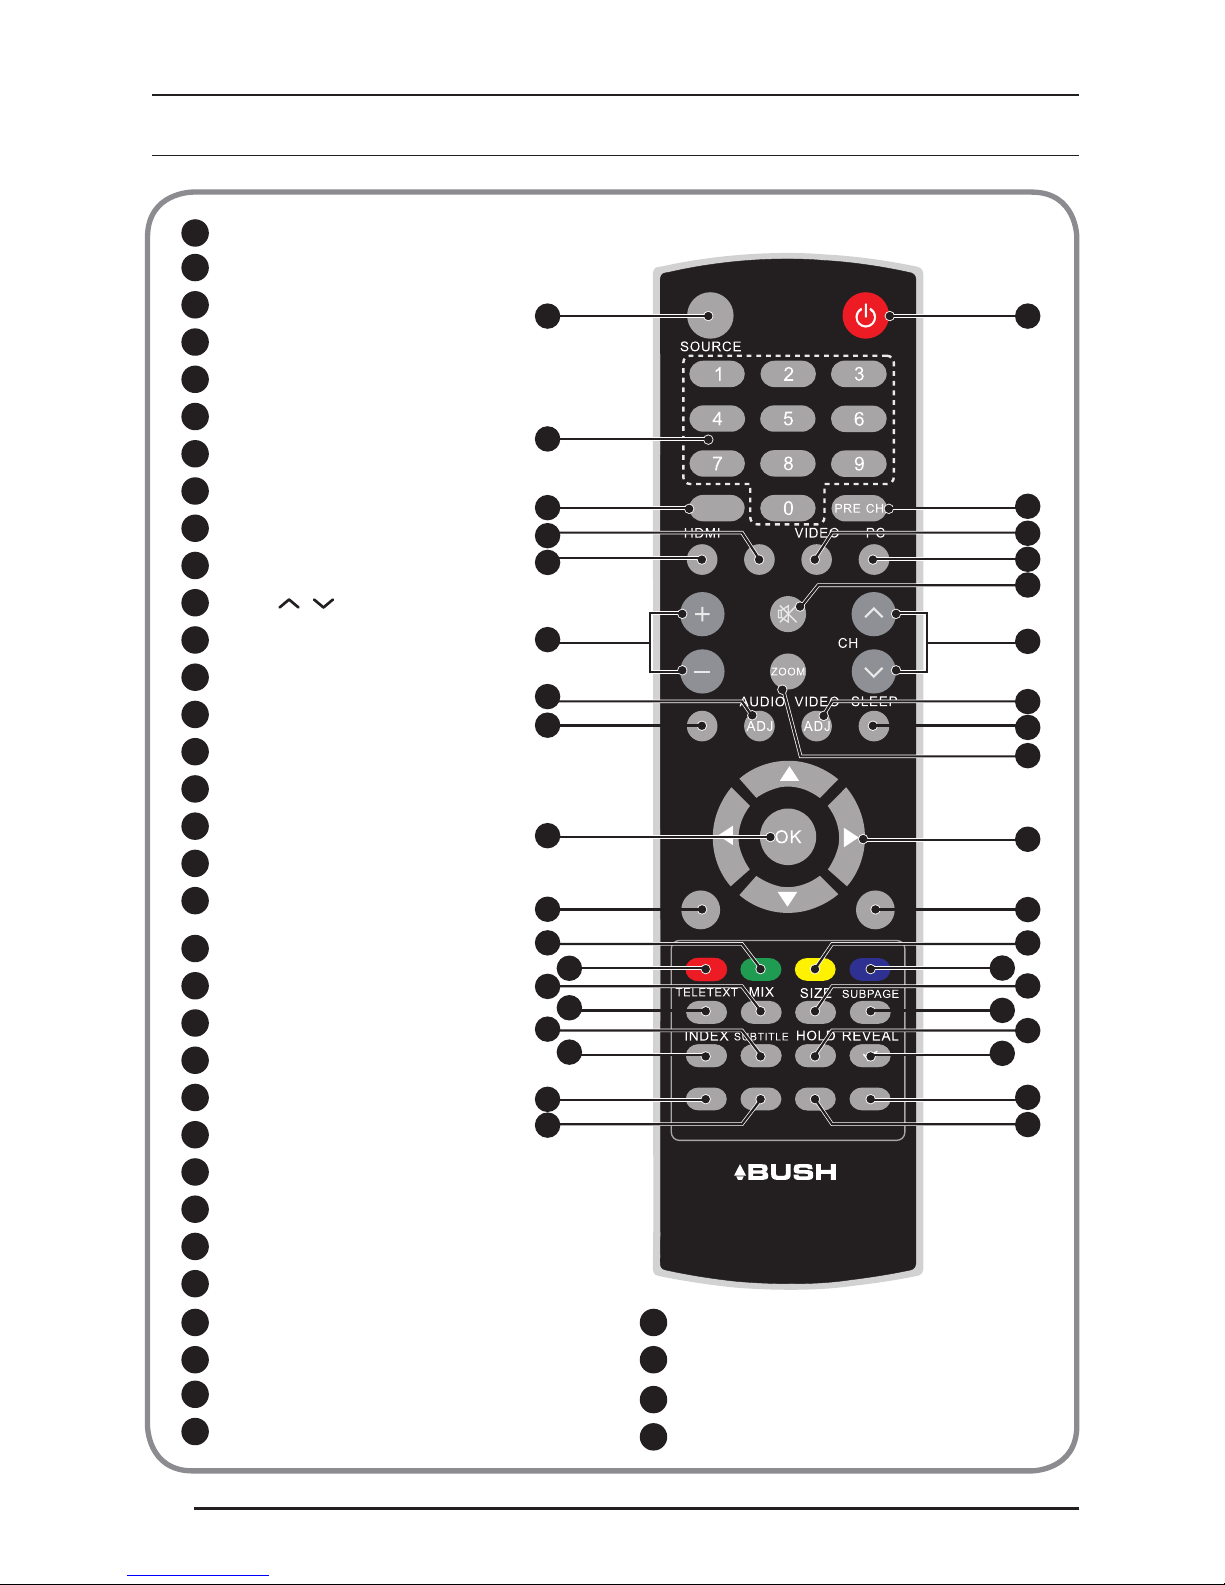
REMOTE CONTROL
FAV
DUAL
EPG
YPbPr
CH-LIST USB FREEZE
MENU
/EXIT
INFO
Vol
D
A
F
J
H
K
M
O
Q
X
a
c
g
e
i
m
k
o
q
B
C
E
G
L
I
P
N
d
h
l
p
x
Y
b
f
j
n
A
POWER
B
SOURCE
C
Numerical Keys
D
PRE CH
E
EPG
F
VIDEO
G
YPbPr
H
PC
I
HDMI
J
MUTE
K
CH
.
L
Vol + -
M
VIDEO ADJ
N
AUDIO ADJ
O
SLEEP
P
DUAL
Q
ZOOM
X
CURSOR
Y
OK
a
INFO
b
MENU/EXIT
c
Yellow Button
d
Green Button
e
Blue Button
f
Red Button
g
SIZE
h
MIX
i
SUBPAGE
j
TELETEXT
k
HOLD
l
SUBTITLE
m
REVEAL
n
INDEX
o
FREEZE
p
FAV
q
USB
x
CH-LIST
BUSH | HD Ready LED LCD | User Manual | Customer Helpline 0845 604 0105
P.05
NOTES:
- Please read the important safety
instructions before use.
REMOTE CONTROL
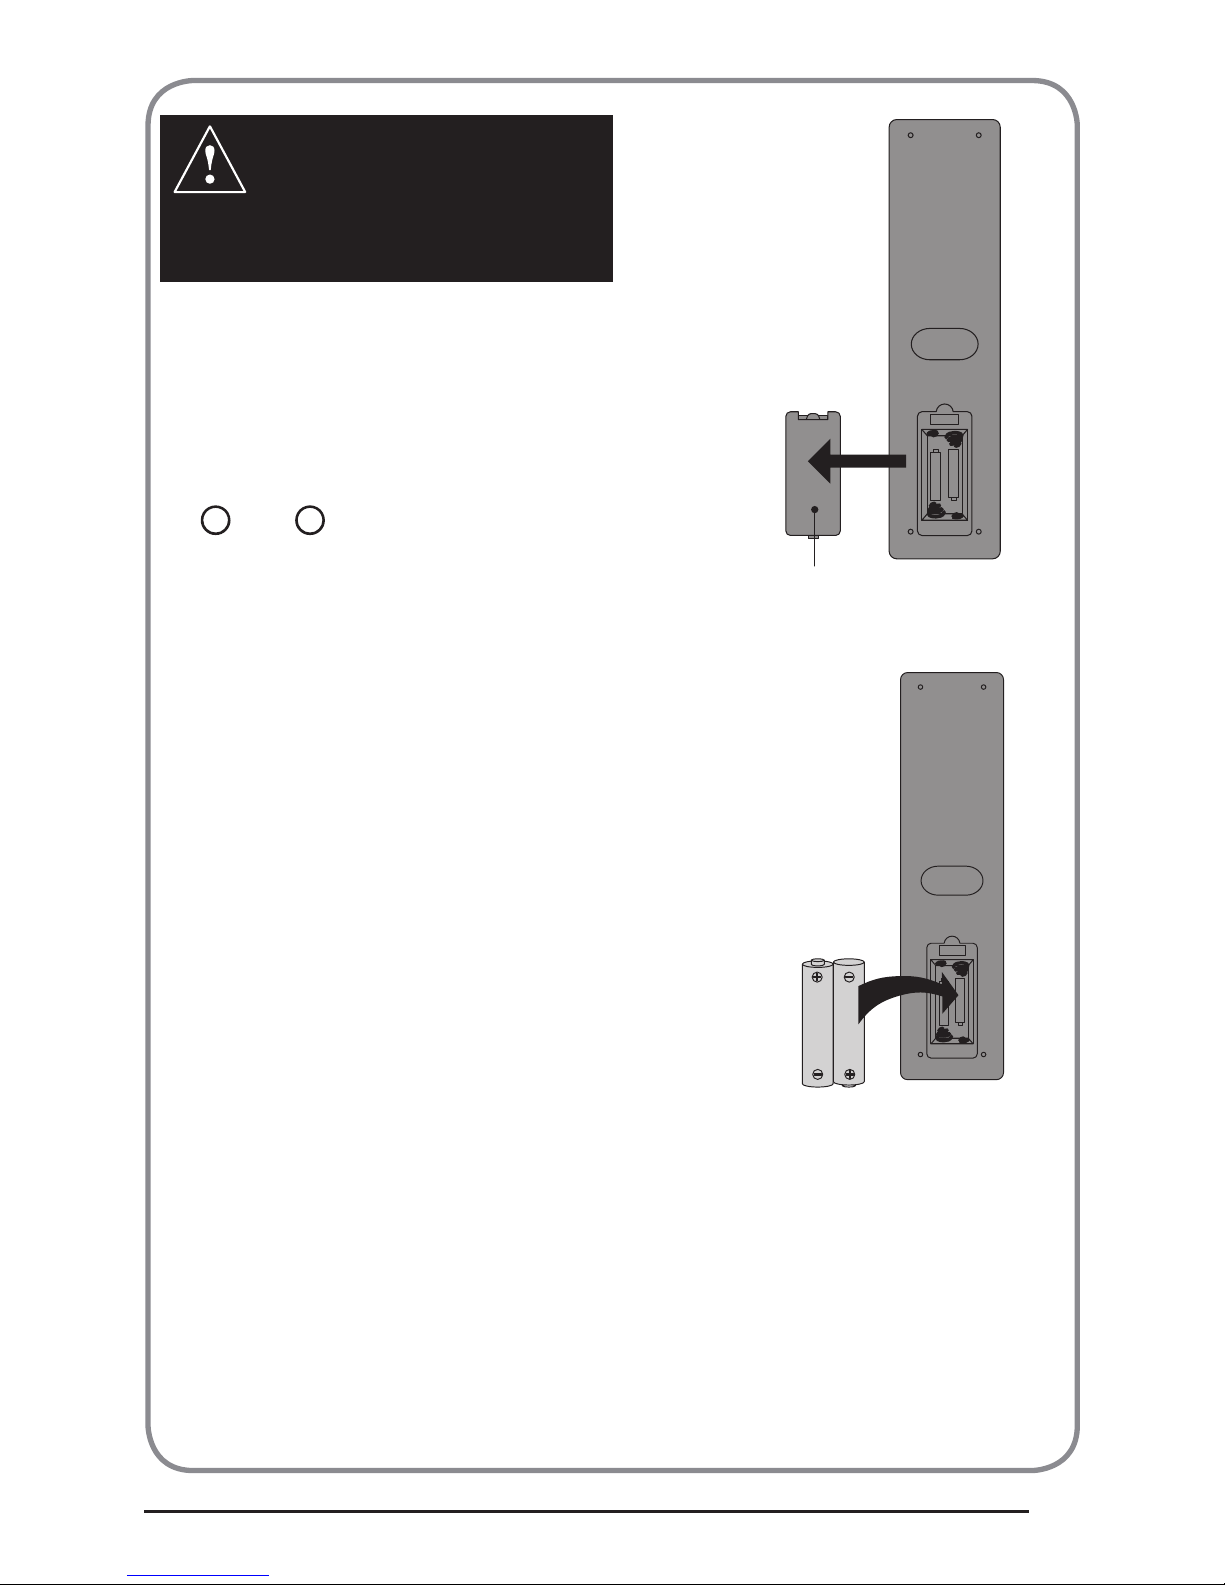
1. Unclip the Battery Cover from the Remote Control.
See g. 1.
2. Insert two new 1.5V size AAA Batteries with the
+
and – marks correctly aligned.
See g. 2.
HANDLING THE REMOTE CONTROL
Do not use caustic cleaners (porcelain, stainless
steel, toilet, or oven cleaner etc.) on the remote, as it
may suffer damage:
• Never mix used and new batteries in the device.
• Replace all the batteries in a device at the same
time.
• Remove the batteries if the remote control is not
working.
• To avoid possible failure, read the following instructions and handle the remote cont.
• Do not drop or cause impact to the remote control.
• Do not spill water or any liquid on the remote
control.
• Do not place the remote control on a wet object.
• Do not place the remote control under the direct
sunlight or near heat sources.
Remove the battery from remote control handset
when it is not to be used for a long period. Otherwise it could cause corrosion or battery leakage and
may result in physical injury and/or property damage
including re.
fig. 1
Battery
Compartment
Cover
fig. 2
2 x AAA Battery

P.06
BUSH | HD Ready LED LCD | User Manual | Customer Helpline 0845 604 0105
3. Carefully close the Battery Cover.
See g. 3.
PRECAUTIONS:
To obtain the best performance from your
remote control, please consider the following:
• Ensure there is no obstruction between
remote control and TV set.
• Bright sunlight may affect the remote
control performance.
• Always ensure that both batteries are
replaced at the same time.
fig. 3
BUSH | HD Ready LED LCD | User Manual | Customer Helpline 0845 604 0105
P.07
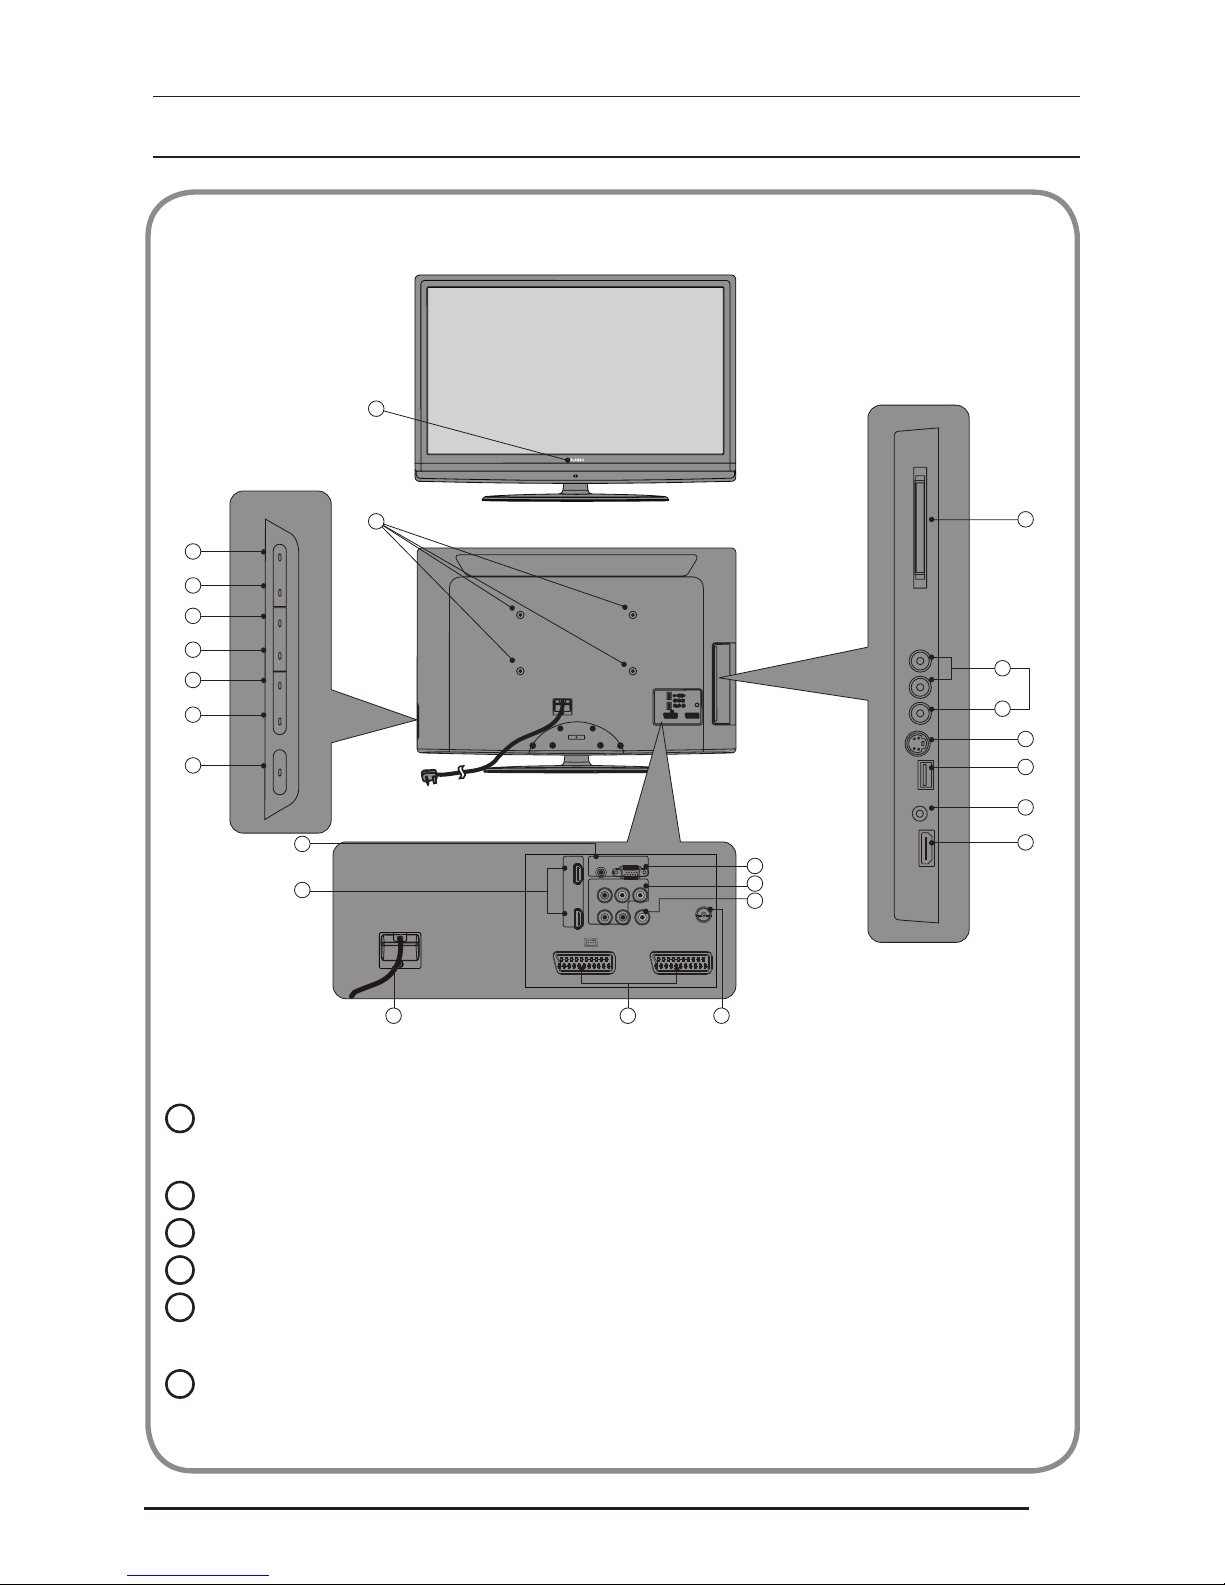
KNOW YOUR MACHINE
A
C
D
E
F
G
H
B
1 x LCD TV
Front View
Side Connections
Rear View
Control Panel
Rear Connections
I
W
X
V U
T
Q
R
S
J
K
L
M
N
O
P
A
Power LED: If the LED color is Blue, means the TV set is power on. If
the LED color is Red, which means this TV set is in standby mode.
B
Wall Mount Hole: For wall mount use only.
C
Source: Use this button to toggle between video input sources.
D
MENU: Press to open the on-screen menu.
E
Vol +: Press to increase the Volume. In Menu mode, functions as the
right arrow to go to the next menu or increase a setting.
F
Vol -: Press to decrease the Volume. In Menu mode, press to decrease
a setting.
P.08
BUSH | HD Ready LED LCD | User Manual | Customer Helpline 0845 604 0105
G
CH +: Press to go to the next higher channel. In Menu mode, functions
as the up arrow.
H
CH -: Press to go to the next lower channel. In Menu mode, functions as
the down arrow.
I
Power Button: Use this button to switch your LCD TV on/off.
J
Common Interface Slot: Function when PC Card or ExpressCard is in
COMMON INTERFACE slot of the set. Please refer to your plug-in card
manual for detail information.
K
/L AV input: connect the VIDEO recorders or DVD players with stan-
dard composite output and audio output signal.
M
S-video Input: Connect the video for a S-Video device to this jack, and
compatible with composite/audio input.
N
USB Input: This TV set can support Multi media input for .MP3 and
.JPEG le.
O
Headphone Output: Connect to headphones (32Ω).
P
HDMI Input: High Denition Multimedia Interface. Connect to devices
with digital signals and can be used with PC or HDTV video signals.
Q
VGA Input: Connect to VGA analog signals sources.
R
Component Input: The YPbPr video signal can be used if connecting
through the component video port. For example Progressive Scan DVD
players, Hiscale HDTV Decoders, and satellite receivers, obtain video
with maximum resolution using YPbPr and L/R audio signals.
S
SPDIF: SPDIF is highly recommended for high quality digital sound
output.
T
Antenna Input: Connects to TV RF signals (antenna/CATV).
U
SCART: The left one is Full SCART with transmits RGB,S-Video and
CVBS in and CVBS tuner out,the right one is half SCART which transmits S-Video or CVBS in and CVBS monitor out.
V
Power Connector: Connect the power cord into the AC IN socket found
at the back of the TV.
W
PC Audio Input: PC audio supports 3.5mm Jack.
X
HDMI Input: High Denition Multimedia Interface. Connect to devices
with digital signals and can be used with PC or HDTV video signals.

BUSH | HD Ready LED LCD | User Manual | Customer Helpline 0845 604 0105
P.09
WALL MOUNTING
NOTES:
- Please read the important safety
instructions before use.
WALL MOUNTING (Optional)
IMPORTANT: When drilling into walls always check that there are no
hidden wires or pipes etc. Make sure that the screws and wall plugs
supplied are suitable for supporting the unit. Consult a qualied
tradesperson if you are not sure.
NOTE: It would be useful to ask someone to help you at this stage.
For 32” TV
1. Put the unit face down on a safe, at surface that is covered by a smooth
cloth. Remove the screws of the stand. See g 4 and 5
Stand
fig. 4
Screws
fig. 5
2. Use 4 Wall Mount Holes B and
Screws (not included) to mount the
TV on the Bracket (not included).
See g. 6.
B
g.6
P.10
BUSH | HD Ready LED LCD | User Manual | Customer Helpline 0845 604 0105
3. For the Wall Bracket - Refer to the user instructions supplied with the wall
bracket (not included).
See g. 7
W
H
TV Screen
Size (inches)
VESA-Compatible
Wall bracket
(W x H mm)
Screw Type
32” 200 x 200 mm Metric 4 x 14 mm
g. 7
BUSH | HD Ready LED LCD | User Manual | Customer Helpline 0845 604 0105
P.11
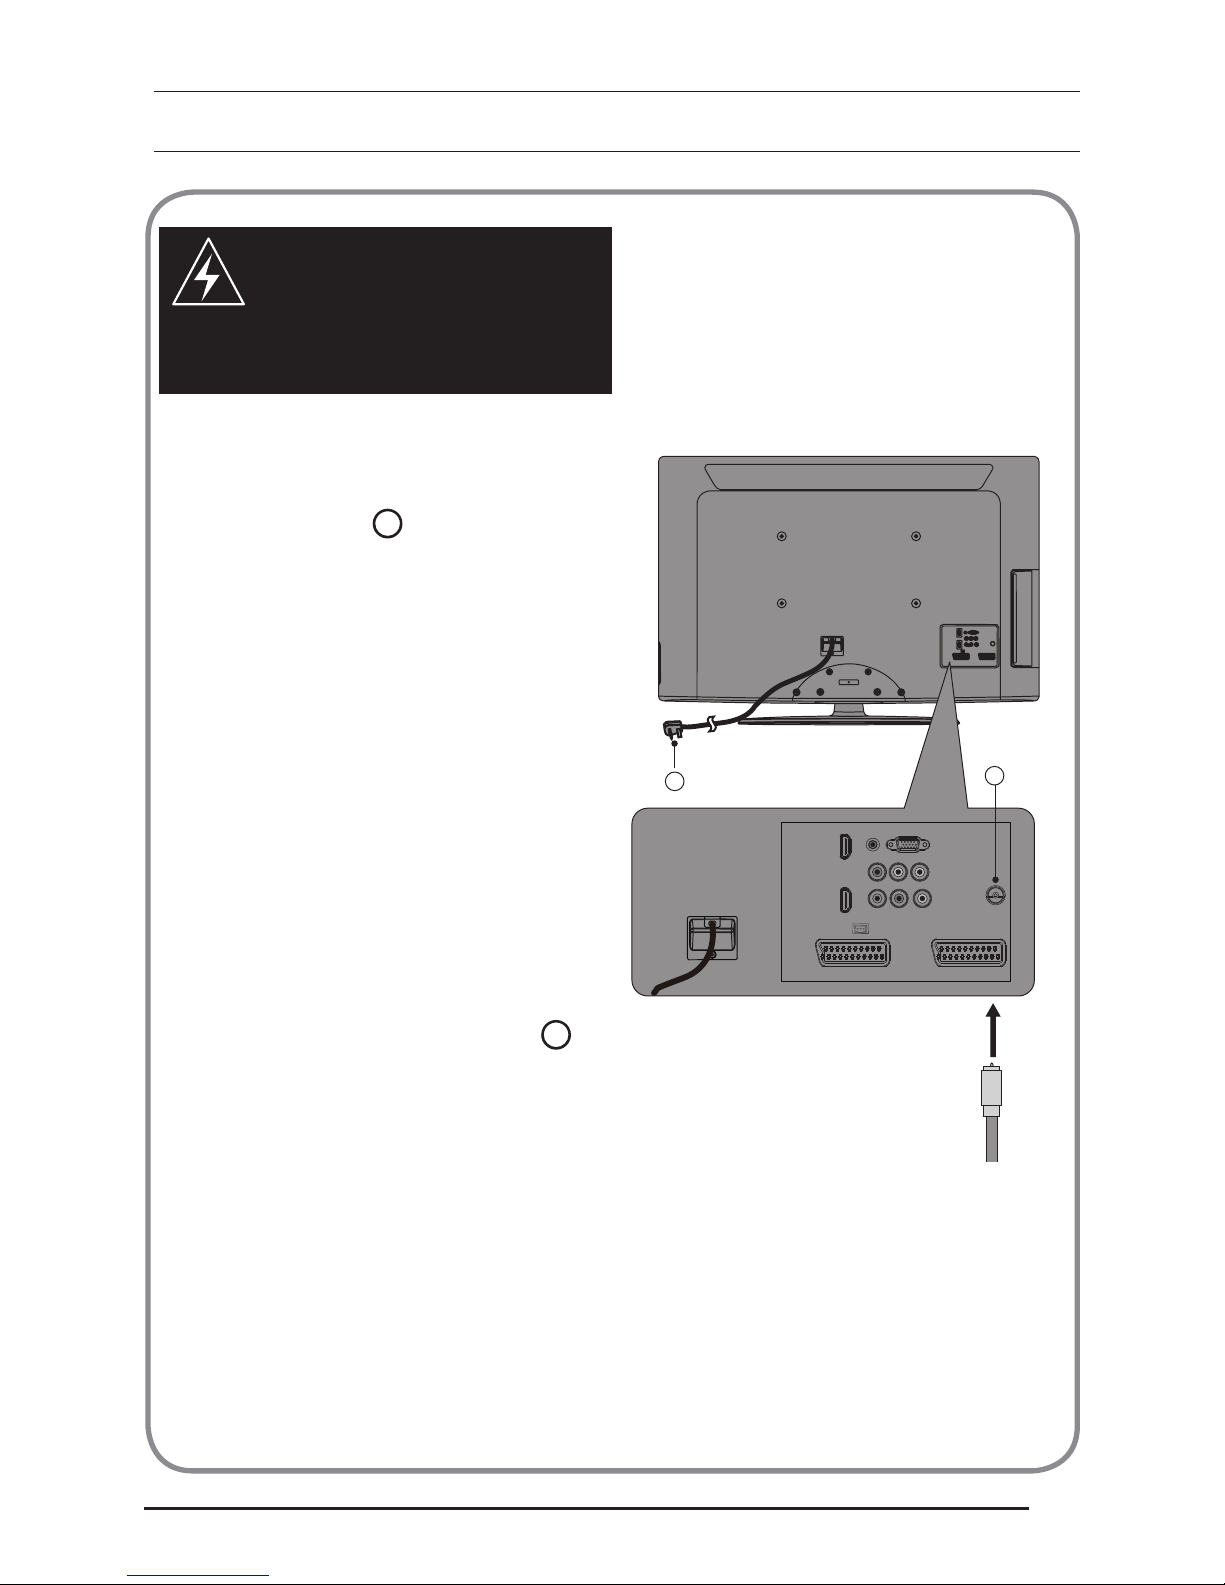
ANTENNA CONNECTION
WARNING:
- Switch off the TV before
connecting any external device.
CONNECTING THE ANTENNA
1. Connect the Antenna Plug to the
Antenna Input
T
located at the
rear of the TV.
See g. 8.
2. For optimum picture quality, adjust
antenna direction if needed.
3. To improve the picture quality in a
poor signal area, you may use a
signal amplier (not included).
AC POWER CORD CONNECTION
NOTE: Make sure your local Voltage
is 230V/240V~, 50Hz.
1. Connect the AC Power Cord
a
to
the mains socket.
See g. 8
Antenna Plug
fig. 8
a
T
P.12
BUSH | HD Ready LED LCD | User Manual | Customer Helpline 0845 604 0105
TUNING MENU OPTIONS
TURN ON THE LED LCD-TV
1. When the POWER
I
is
pressed, the TV will be turned on
and the Power LED
A
on the
front of the TV will change from
red to blue.
See g. 9.
2. When the LED LCD-TV is turned
off, using the POWER I, the
LED LCD-TV will go into standby
mode and the Power LED A will
turn to red.
See g. 9.
FIRST TIME INSTALLATION
1. This display will appear on the
screen when the TV is turned on
for the rst time.
See g. 11.
NOTE: If you can not nd this
screen, you may press MENU
b
.
Then use the Cursor X to select
the Reset Default in Features
menu.
See g. 10.
2. Press the OK Button Y to proceed
with the installation.
See g. 10.
g. 9
A
I
g. 10
FAV
DUAL
EPG
YPbPr
CH-LIST USB FREEZE
MENU
/EXIT
INFO
A
X
b
Y
Vol
g. 11
Welcome to use the Wizard for
Initial Setup !!
Initial Setup
WELCOME!
Next
OK
Please press [OK] to start the
wizard.
BUSH | HD Ready LED LCD | User Manual | Customer Helpline 0845 604 0105
P.13
3. Use Up or Down Cursor
X
to select
your language. Then press Right
Cursor X or OK Button Y to continue.
See g. 12, 13.
4. Use Up or Down Cursor
X
to select
your country. Then press Right Cursor X or OK Button Y to continue
or press Left Cursor
X
to go back.
See g. 14.
5. Select Scan to start channel scan
or select Skip Scan to skip this
step.
See g. 15.
NOTE: If you skip this step, the
channel scan could be performed in
Menu
6. System searching may take few
minutes to complete.
See g. 16.
7. A message will be displayed when
the search is complete. Press the
OK Button Y to exit the setup wizard. The LED LCD TV will display
the rst channel found.
See g. 17.
NOTE: If you skip this page.It will
be performed when you turn on the
TV next time.
MENU
/EXIT
INFO
fig. 12
X
Y
Please select your language:
Initial Setup
Language
ExitBack Select Next
EXIT
English
Français
Español
Português
Nederlands
Italiano
Deutsch
fig. 13
Please select your country:
Initial Setup
Country
ExitBack Select Next
EXIT
Austria
Bulgaria
Czech Republic
Denmark
Finland
Croatia
Belgium
fig. 14
First, please connect antenna.
Start channel scan now ?
If you skip this step, the channel
scan could be performed in Menu.
Initial Setup
Channel Scan
ExitBack Select Next
EXIT
Scan
Skip Scan
0%
fig. 15
fig. 16
The channel scan may take a while
to complete.
Status: Scanning..
Analog Channels: 0
Digital Channels: 10
Initial Setup
Channel Scan
Cancel
EXIT
10%
fig. 17
Congratulations !!
Completed Initial Setup.
Initial Setup
Completed
Exit
OK
Please press [OK] to exit the
wizard.
Back
P.14
BUSH | HD Ready LED LCD | User Manual | Customer Helpline 0845 604 0105
OTHER CONNECTIONS
WARNING:
- Switch off the TV before
connecting any external device.
SCART INPUT
- To connect external devices such
as DVD players, set top boxes or
games consoles.
1. Plug the scart lead from the
external device into TV SCART
Socket
U
.
See g. 18.
2. SCART 1 - Full SCART, which
transmits RGB, S-Video and
CVBS in and CVBS tuner out.
3. SCART 2 - Half SCART, which
transmits S-Video or CVBS in
and CVBS monitor out.
4. Press the VIDEO
F
or SOURCE
B
to select the SCART 1 or
SCART 2.
See g. 19.
fig. 20
SCART 2
SCART1
SCART Lead
U
g. 18
DUAL
EPG
YPbPr
fig. 19
B
F
Vol
 Loading...