

Page 1

Instruction manual
LE-32GKA
Page 2

You’ll soon be enjoying your new TV.
It all begins here, with your instructions. Don’t worry,
there’s nothing too technical coming up. Just simple,
step-by-step guidance to get you up and running
quickly. Sound good? Then let’s get started.
Help and Guidance
We’re here to help you get the most from your TV. Should you require any guidance, a
simple solution can often be found online at:
www.argos-support.co.uk
If you still require further assistance, call one of our experts on 0345 604 0105
If you require any technical guidance or find that your TV is not operating as intended, a simple solution can often be found in the Troubleshooting section of these instructions,
Page 3

Contents
Safety information
1
Safety information
Getting Started
2
TV Features
Accessories included
Installing/Removing the BaseStand
Viewing remote control - TV
TV - Control buttons (Right side)
Aerial connection
Power connection
Remote control - Inserting batteries
Switching the TV On and Off
Operation using TV control buttons
Connections
3
Left side connections explained
Left bottom connections explained
HDMI Connections
SCART Connections
First time setup
4
First time setup
How to use your TV
5
Selecting Input Source
Using The Electronic Programme Guide(EPG)
Viewing Teletext
Using The Time Shift Function
Recording DTV Programmes
Using The Programme Timer
Watching Recorded Programmes
10
10
12
14
14
14
15
15
16
20
21
22
22
26
30
30
32
33
34
35
37
11
TV systems management
6
6
Picture Menu
Sound Menu
Channel Menu
Lock Menu
Time Menu
Network
Setting Menu
Entertainment Features
7
Using The Usb Features
Viewing Movies
Listening to music
Viewing photos
Other information
8
Specifications
Digital reception 64
Plug replacement - UK and Ireland only
Energy label
Trouble shooting
Supported file formats
Disposal information
Product Support
9
Trouble shooting
Supported file formats
Disposal information
Help and assistance 70
Disposal 71
Guarantee 72
42
43
44
48
49
51
51
56
57
58
59
64
65
65
44
45
45
68
69
69
or online at www.argos-support.co.uk If you still require further assistance, call one of our experts on 0345 604 0105
3
Page 4

Page 5

Safety information 1
5
Page 6
Safety information
Important - Please read these instructions fully before
installing or operating
CAUTION
RISK OF ELECTRIC SHOCK
DO NOT OPEN
CAUTION:
The lightning flash with arrowhead symbol, within
an equilateral triangle, is intended to alert the user
to the presence of uninsulated “dangerous
voltage” within the product’s enclosure that may
be of sufficient magnitude to constitute a risk of
electric shock of persons.
The exclamation point within an equilateral
triangle is intended to alert the user to the
presence of important operating and
maintenance (servicing) instructions in the
literature accompanying the appliance.
TO REDUCE THE RISK OF ELECTRIC SHOCK,
DO NOT REMOVE COVER (OR BACK).
NO USER-SERVICEABLE PARTS INSIDE.
REFER SERVICING TO QUALIFIED SERVICE
PERSONNEL.
Power cord and plug
• The power cord plug should be easily accessible. In
• Do not place the TV, furniture, etc. on the power cord
• Handle the power cord by the plug, do not unplug the
• Never touch the power cord/plug with wet hands as
• Never make a knot in the power cord or tie it with other
• Power cords should be placed in such away that they
• A damaged power cord/plug can cause fire or give you
case of storms and lightning, when going on holiday,
or when the TV is not used for a long period of time
disconnect the power cord from the mains power
socket.
or pinch the cord.
TV by pulling the power cord.
this could cause a short circuit or electric shock.
cords.
are not likely to be stepped on or driven over.
an electric shock. When damaged it must be replaced,
this should only be done by qualified personnel.
Power source
• The TV should be operated only from a 100-240V AC,
50 Hz outlet.
• Warning: Do not leave your TV in standby or operating
mode when you leave your house.
Positioning the TV
• For ventilation, please leave a clear space of at least
10cm all around the TV.
10cm
10cm
10cm
• Do not block the ventilation openings.
• Do not place the TV on sloping or unstable surfaces,
the TV may tip over.
• To prevent damage to the TV, do not place any objects
on top of the TV.
• Only use the TV in moderate climates.
If you require any technical guidance or find that your product is not operating as intended, a simple solution can often be found in the Troubleshooting section of these instructions,
Moisture and Water
• Do not use this TV in a humid or damp place (avoid
bathrooms, the sink in the kitchen, and near the
washing machine).
• Do not expose this TV to rain or water, as this may be
dangerous.
• Do not place objects filled with liquids, such as
flower vases, on top of the TV. Avoid from dripping or
splashing.
• If any solid object or liquid falls into the cabinet, unplug
the TV and have it checked by qualified personnel
before operating it any further.
Ventilation
• The slots and openings on the TV set are intended for
ventilation and to ensure reliable operation.
• To prevent overheating, these openings must not be
blocked or covered in anyway.
6
Safety information
Page 7

Safety information
Important - Please read these instructions fully before
installing or operating
Heat sources and Flames
• Do not expose the TV to direct sunlight or other heat
sources.
• The TV should not be placed near to open flames and
sources of intense heat such as an electric heater.
• Ensure that no open flame sources, such as lighted
candles, are placed on top of the TV.
Headphone volume
• Excessive sound pressure from earphones and
headphones can cause hearing loss, please take care.
Wall mounting (optional)
To prevent injury, this TV must be securely attached to the
wall in accordance with the installation instructions (if the
option is available).
LCD Screen
• The LCD screen is a very high technology product
with about a million thin film transistors, giving you
fine picture details. Occasionally, a few non-active
pixels may appear on the screen as a fixed blue, green
or red point. Please note that this does not affect the
performance of your product.
• Take care not to scratch the screen with fingernails or
other hard objects
.
Replacement parts
When replacement parts are required, make sure that
the service technician has used replacement parts,
which are specified by the manufacturer or have the
same specifications as the original one. Unauthorised
substitutions may result in fire, electrical shock or other
hazards.
Servicing
• Warning: Risk of exposure to radiation from class 1/
• Warning: Risk of electric shock, do not attempt to
appliance. It has been designed in such a way that it
does not require a safety connection to electrical earth.
• Warning: To prevent the spread of fire,
class 3b visible and invisible laser beams. Do not open
the TV and stare directly into beam.
repair, service or modify this TV yourself. Contact the
manufacturer, their approved service agent or the
Customer Helpline: 0345 604 0105 .
This equipment is a Class II or double insulated electrical
keep candles or other open flames
away from this product at all times.
Cleaning
• Before cleaning, unplug the TV from the wall socket.
• Do not use liquid or aerosol cleaners. Only use a soft,
dry cloth.
Batteries
• Warning: Incorrect installation of batteries may cause
battery leakage and corrosion, resulting in damage to
the remote control.
• Do not mix old and new batteries, or
batteries of different types.
• Do not dispose of batteries in a fire.
• Do not dispose of batteries with normal household
waste, take to a local recycling centre.
or online at www.argos-support.co.uk If you still require further assistance, call one of our experts on 0345 604 0105.
Safety information
7
Page 8

Page 9

Getting Started 2
9
Page 10
Getting Started
You’ll be up and running in no time
TV - Features
• Remote controlled colour LCD TV.
• Fully integrated digital TV (DVB-T).
• HDMI connectors for digital video and audio. This
connection is also designed to accept high definition
signals.
• USB input.
• 100 programmes from VHF, UHF (analogue).
• 400 programmes for digital mode (DTV).
• OSD menu system.
• Scart socket for external devices (such as video, video
games, audio set, etc.).
• Stereo sound system.
• Teletext, fastext, TOP text.
• Headphone connection.
• Automatic programming system.
• Forward or backward manual tuning.
• Sleep timer.
• Child lock.
• AVL (Automatic Volume Limiting).
• PLL (Frequency Search).
• PC input.
• Plug & Play for Windows 98, ME, 2000, XP, Vista.
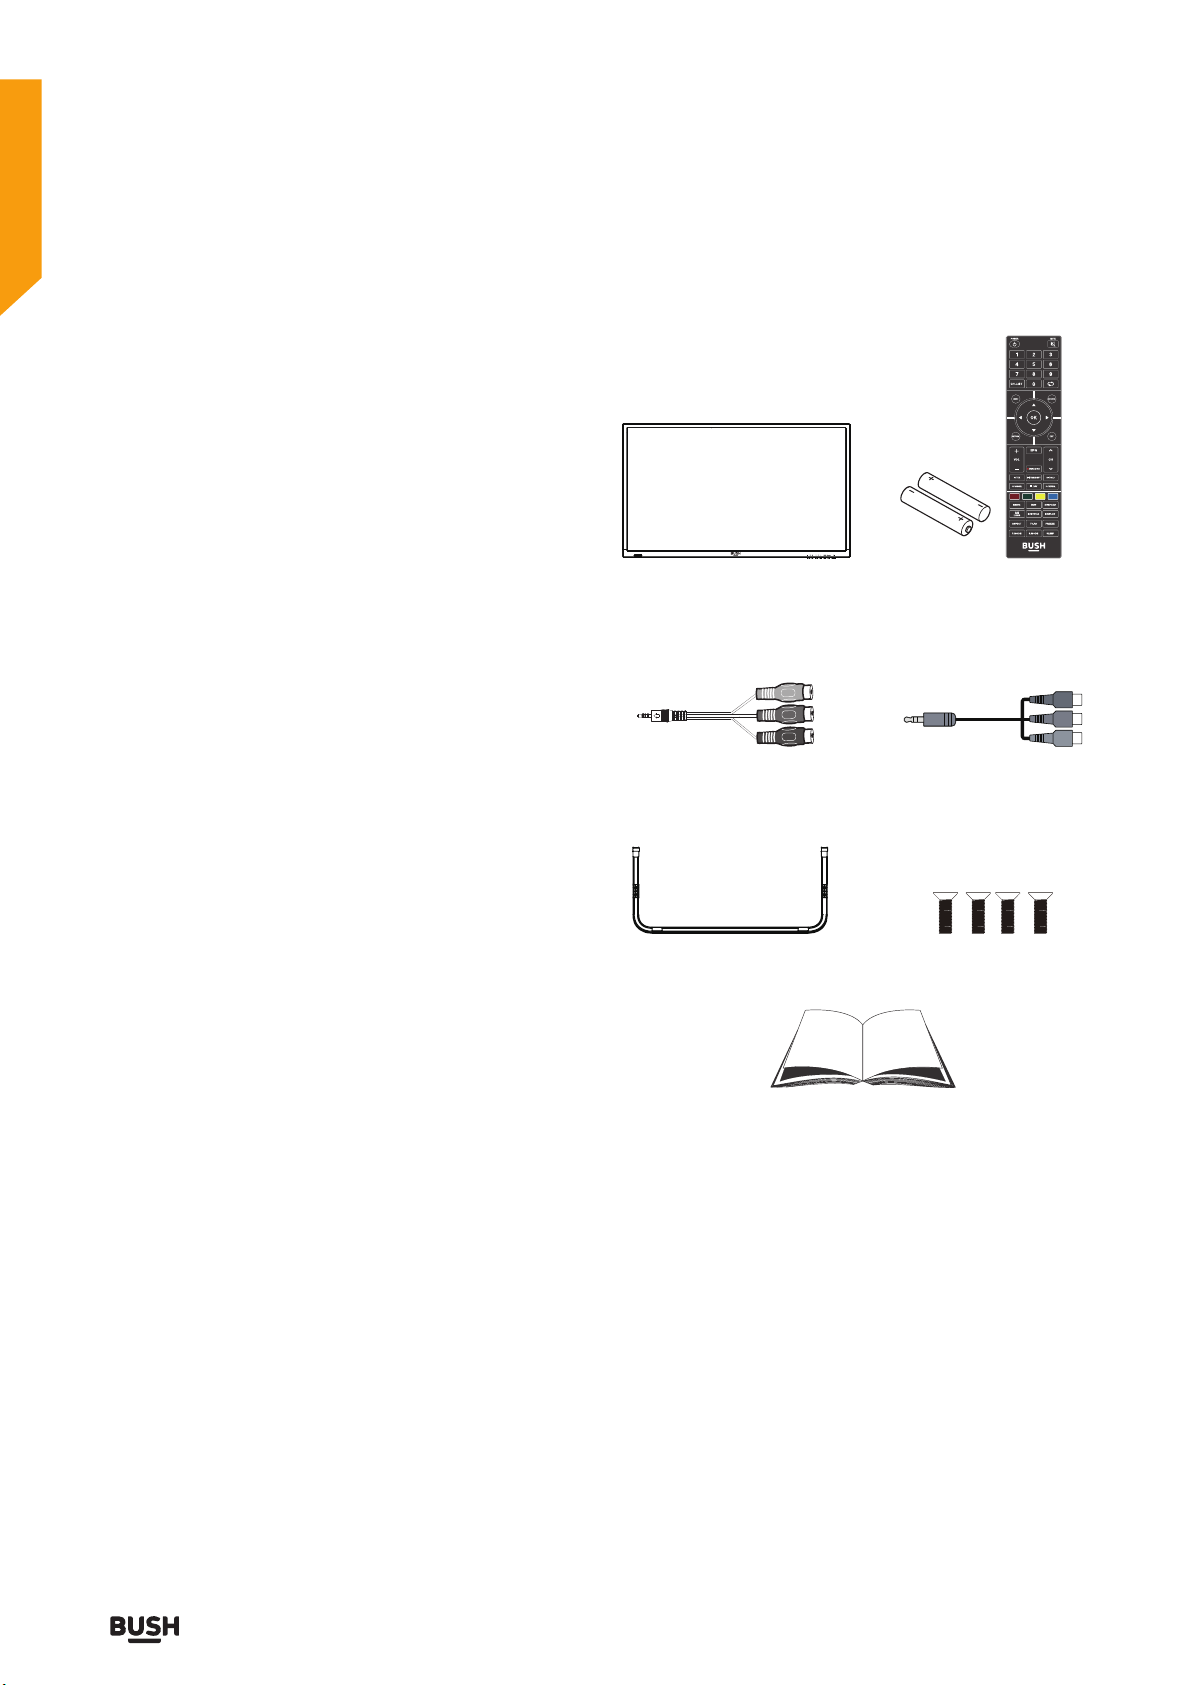
Accessories included
TV Remote Control
Batteries: 2 x AAA
MINI YPBPR Cable MINI AV Cable
Stand Base Screws (4PCS)
10
Instruction Book
If you require any technical guidance or find that your product is not operating as intended, a simple solution can often be found in the Troubleshooting section of these instructions,
Getting Started
Page 11
Getting Started
You’ll be up and running in no time
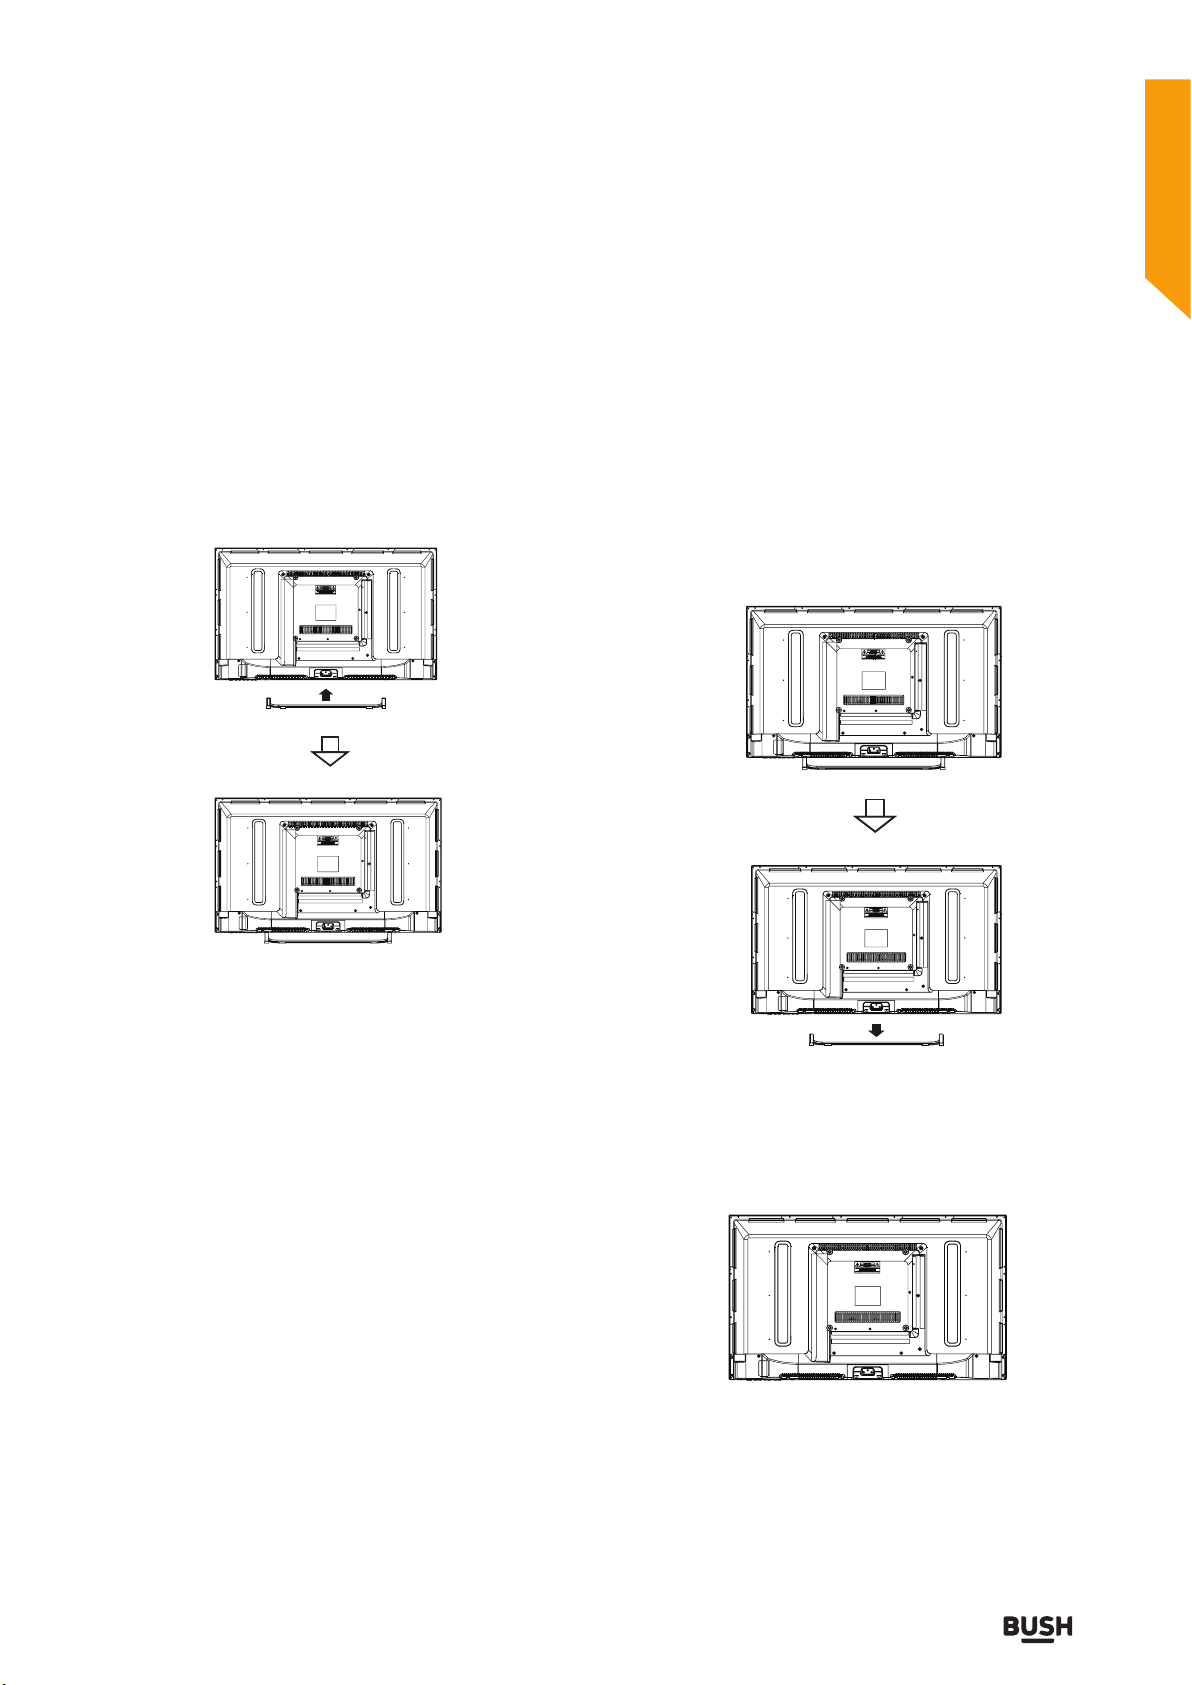
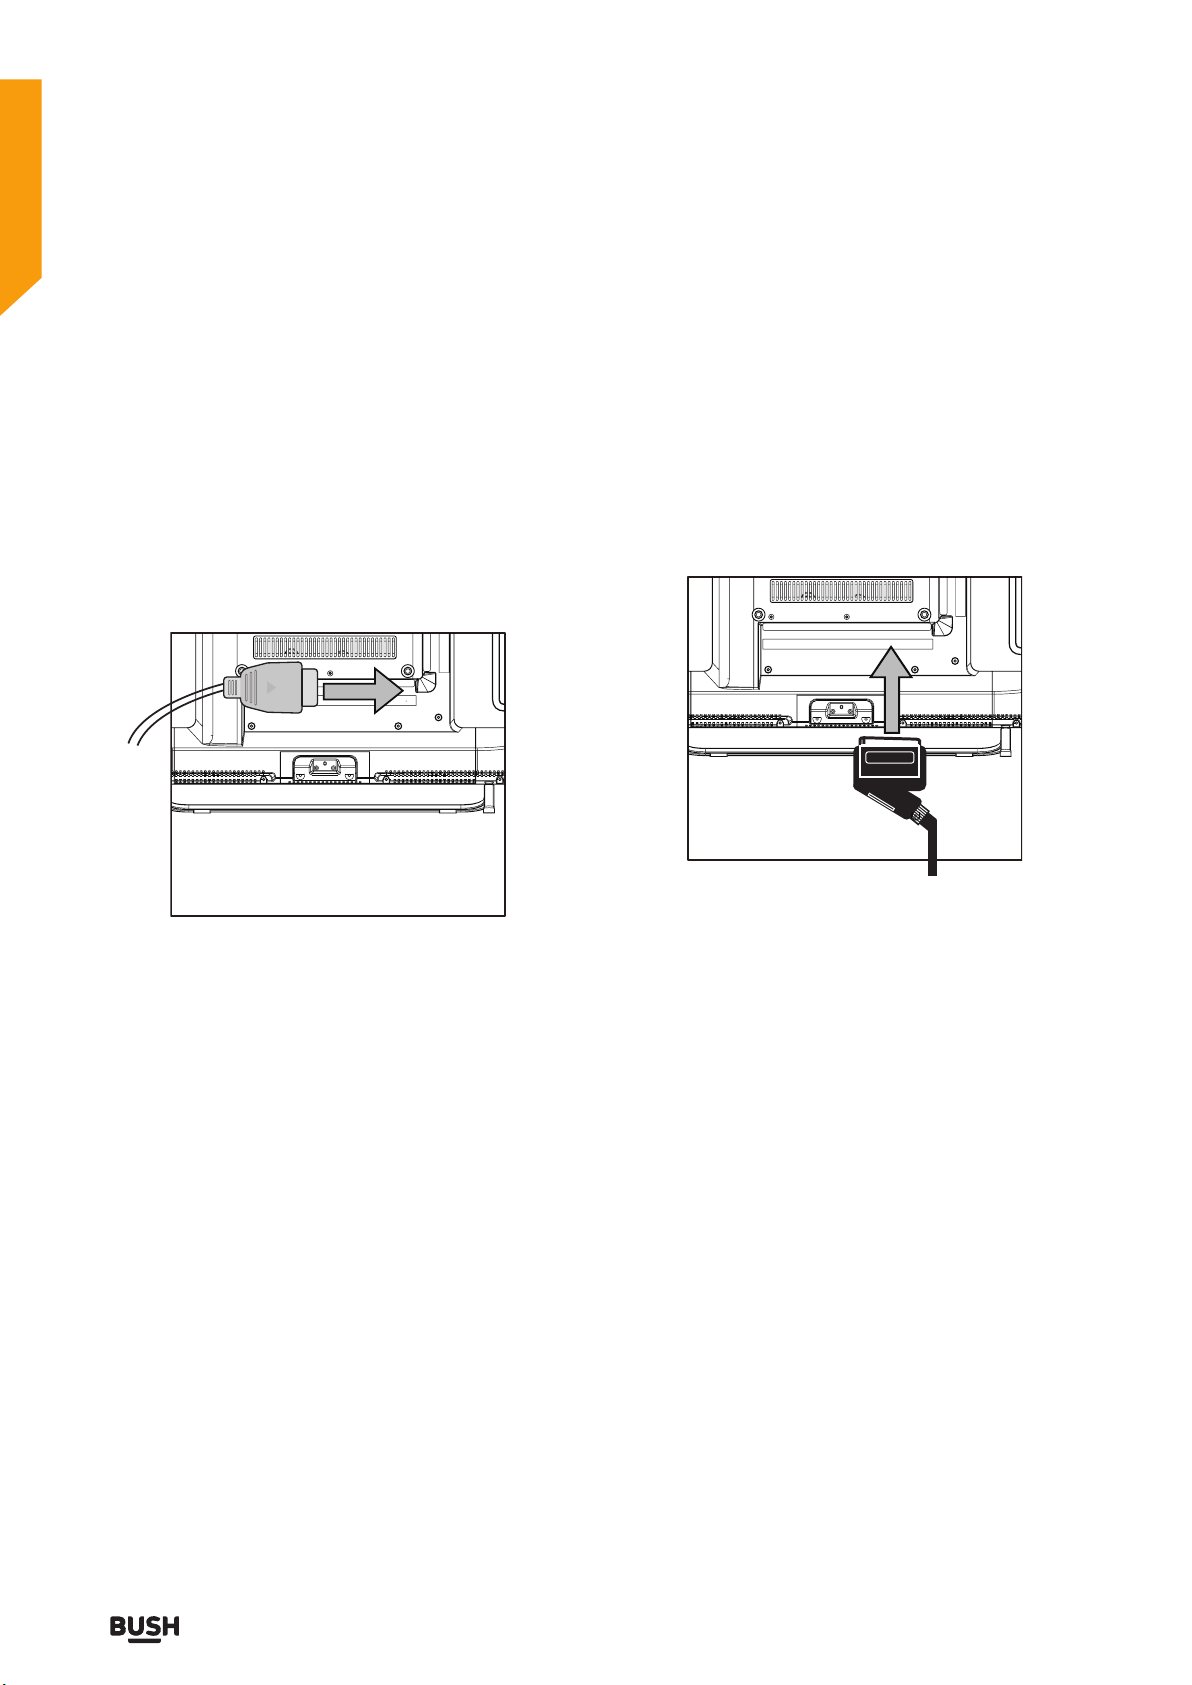
Installing / Removing the Base Stand
Base Stand Assembly Instruction
1. Place the TV with the display side down on a flat
surface.Use a cloth to protect. Locate the bottom at
the stand.
2. Fix the stand base to the TV with the 4PCS provided
screws.
WALL MOUNTING INSTALLATION GUIDELINES
This television can be wall mounted as follows:
1. Place the LED LCD Television onto a solid surface.
Please place some soft material over the front of the
screen to protect it from any damage.
2. Remove the screws (4PCS) from the lower part of the
television, where the base joins to the TV, and take
away the stand (put the stand somewhere safe for
future use).
INSTALLATION NOTES
This TV can be connected to an AC 100-240 Volts, 50/60
Hz power supply. Never connect straight to a DC power
supply.
Locate the TV in a room where light does not strike the
screen directly. Total darkness or a reflection on the
screen can cause eyestrain. Soft and indirect lighting is
recommended for comfortable viewing.
Allow enough space between the TV and the wall to
permit ventilation.
Avoid excessively warm locations to prevent possible
damage to the cabinet or premature component failure.
3. Use the 4PCS provided screws to fix the TV onto a
wall mounting bracket (not included) via the four
VESA standard holes on the back of the television.
200 x 200mm VESA mount
or online at www.argos-support.co.uk If you still require further assistance, call one of our experts on 0345 604 0105.
Getting Started
11
Page 12
Getting Started
You’ll be up and running in no time
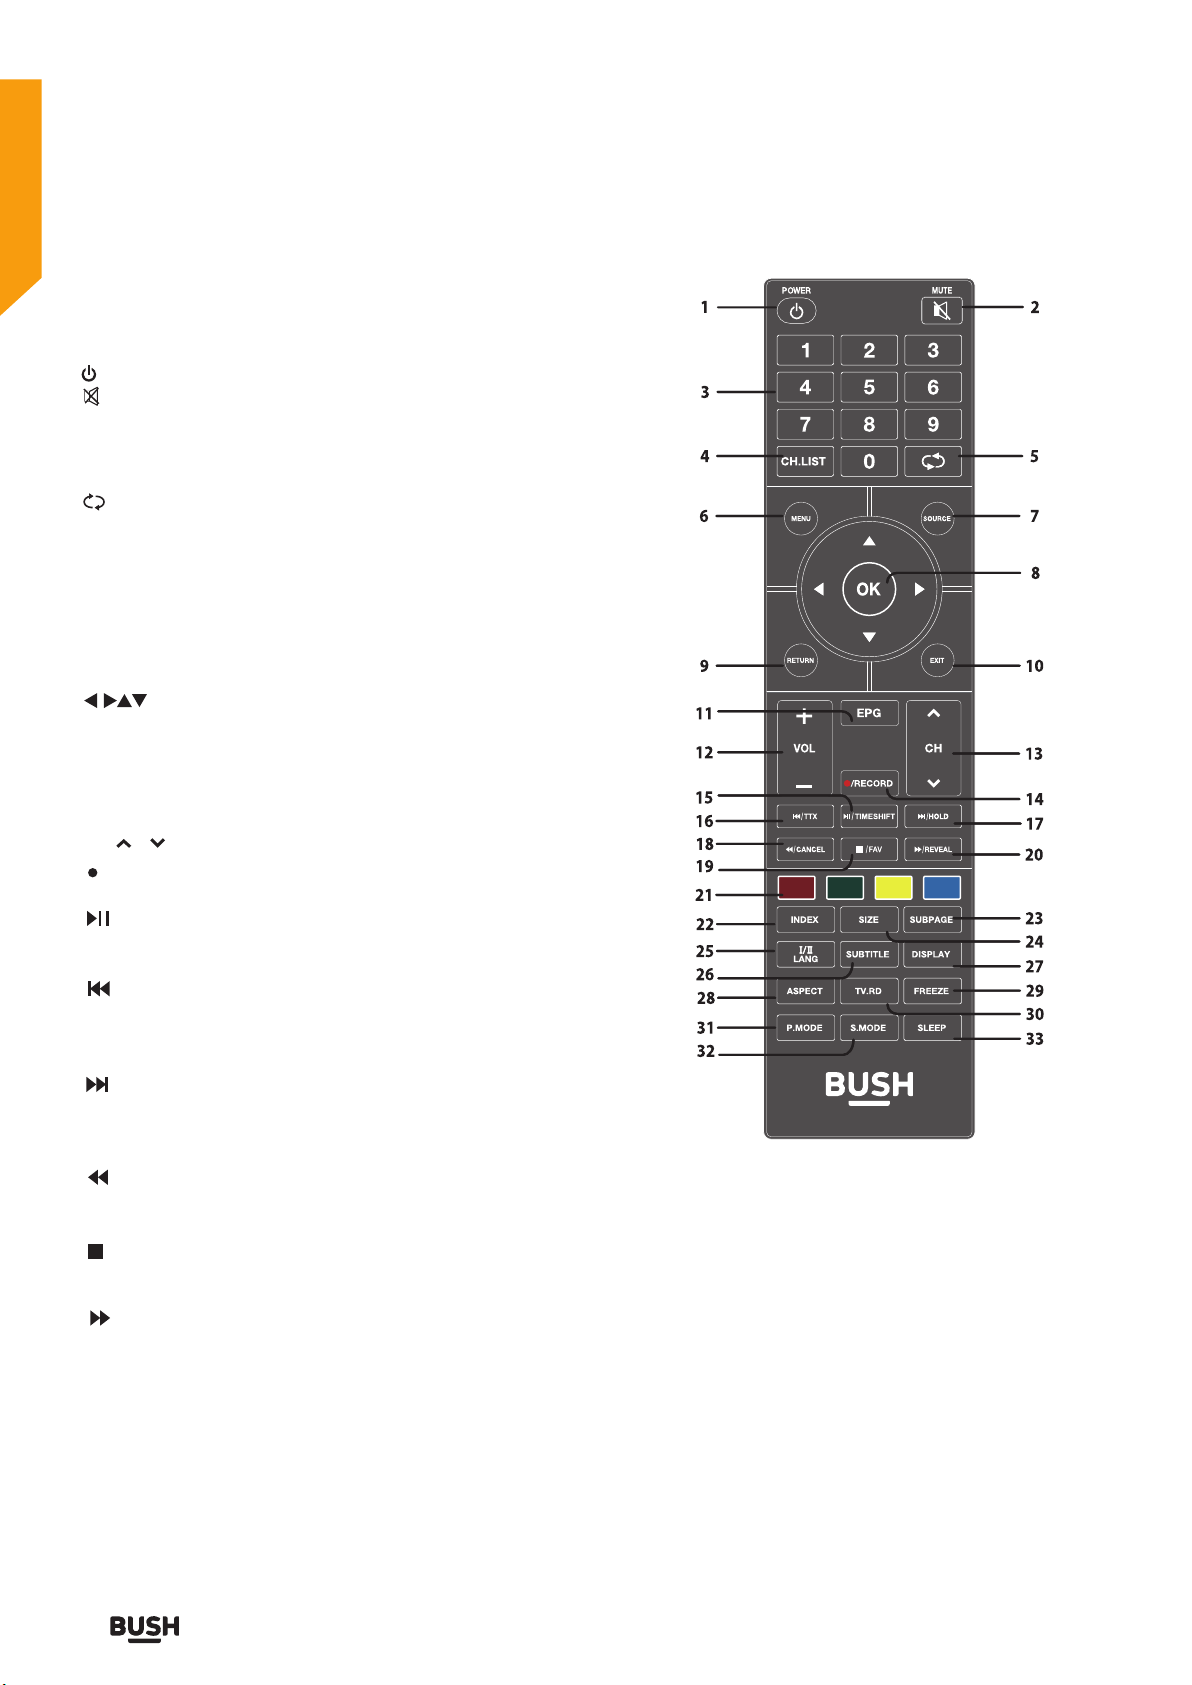
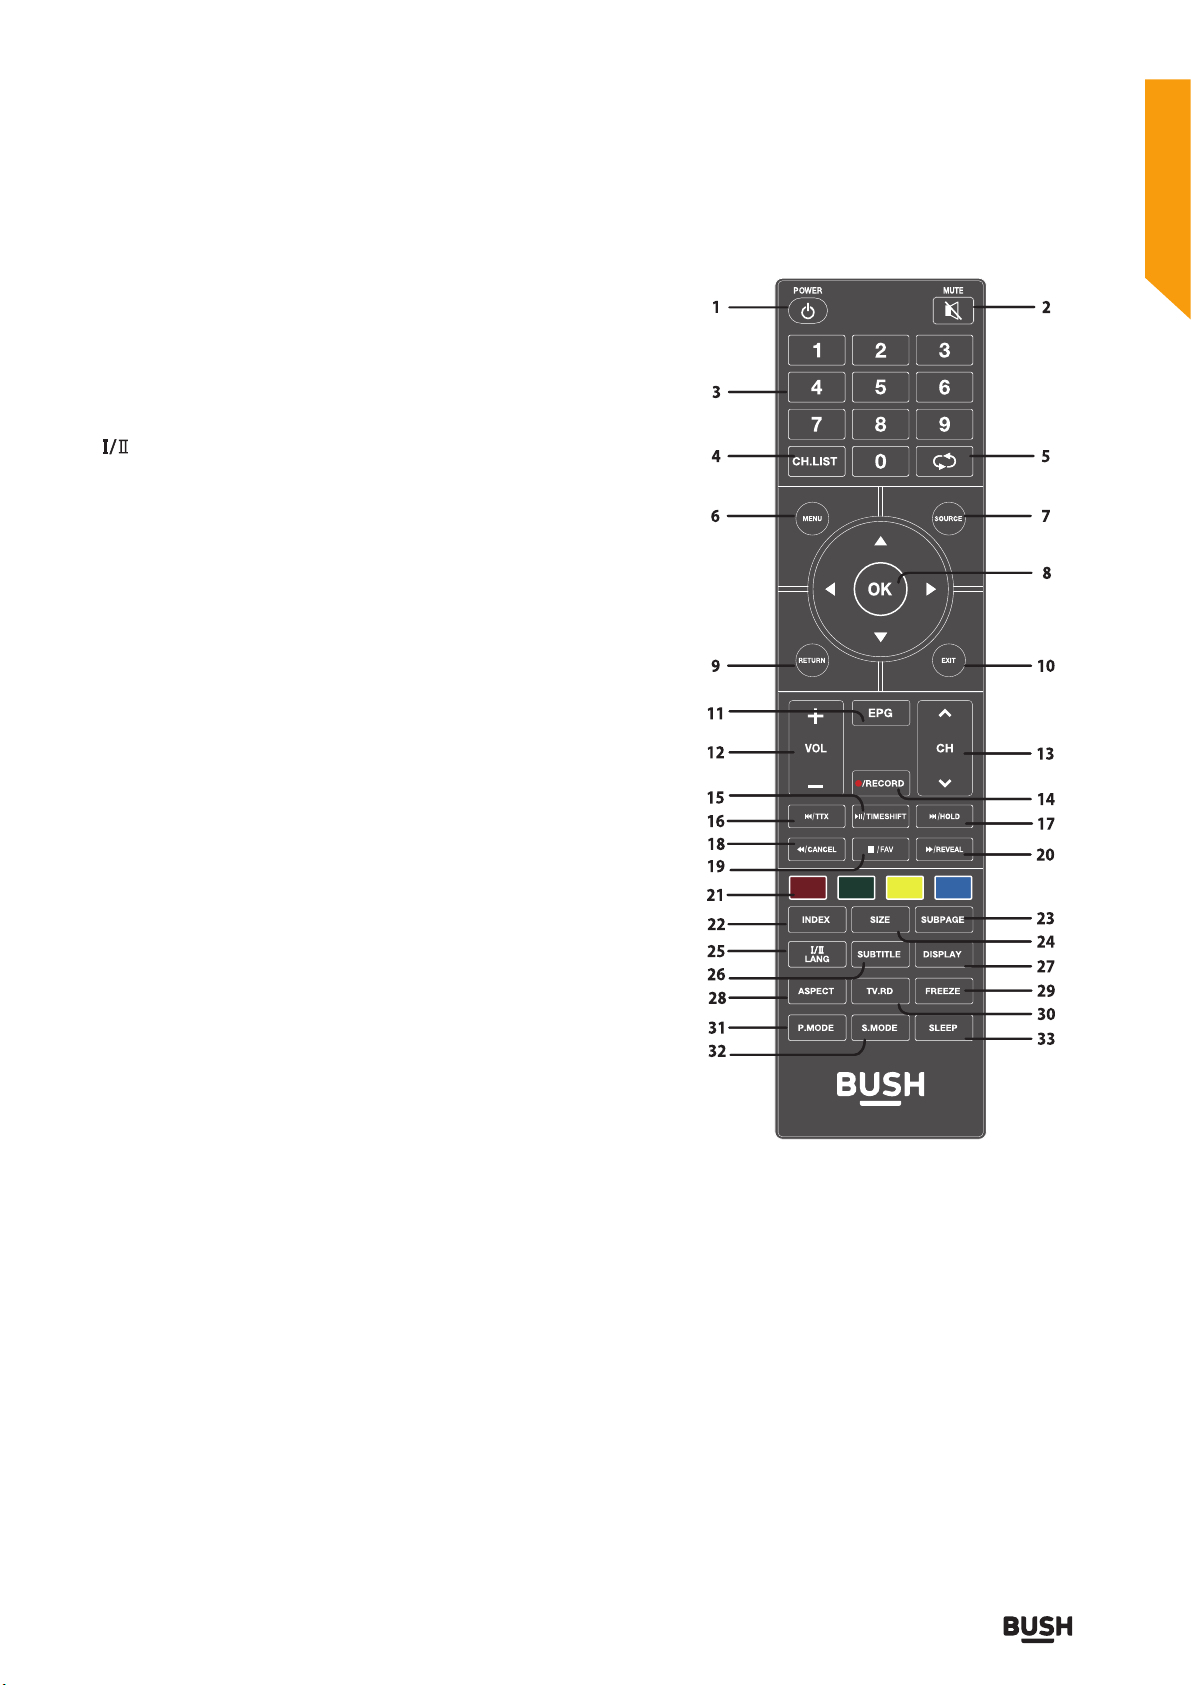
Viewing remote control - TV
1 . :Switch the TV between on and standby mode.
2 . MUTE:Mutes and restores your TV sound.
3 . 0-9 Number Button:Use to select a programme.
(ATV/ DTV mode)
4. CH.LIST:Display programme list. (ATV / DTV mode)
5. :Go back to the previous viewing channel.
(ATV/ DTV mode)
6. MENU:Display the main menu
7. SOURCE:Select among the dierent input signal
sources:DTV / Analogue TV / Composite/AV / SCART/
Component /YPbPr / HDMI 1 / HDMI 2 / HDMI 3 /
HDMI 4.
8. OK:Confirm the selection.
:Allows you to navigate through the OSD
menu and adjust the TV ‘s settings to your preference.
9. RETURN:Return to previous menu.
10. EXIT:Exit the OSD menu.
11. EPG:Display the Electronic Program Guide (DTV mode).
12. VOL+/-:Adjust the volume.
13. CH / :Select a channel.
14. /RECORD:One button recording function,press
to record current program (DTV mode).
15. : Start or pause playback (USB / DTV modes).
TIMESHIFT: Press to turn the timeshift function on and
o (DTV mode).
16. : Press to skip to the beginning of the previous
chapter or track (USB / DTV modes).
TTX: Turn on and o the teletext function.
(ATV/DTV Modes)
17. :
18. : Press to fast rewind (USB / DTV modes).
19. : Press to stop playback (USB / DTV /ATV modes).
20. : Press to fast forward (USB / DTV modes).
21. RED / GREEN / YELLOW / BLUE: Use these buttons
to select corresponding function shown on screen and
in menus.
22. INDEX: Press to select the page number of the index
from Teletext (DTV mode).
23. SUBPAGE: Press to display the subpage on the Teletext
screen (DTV / AV / SCART modes).
Press to skip to the beginning of the next
chapter or track (USB / DTV modes).
HOLD:
on screen (DTV / AV / SCARTmodes).
CANCEL: Press to cancel the Teletext mode
(DTV / AV / SCART modes)
FAV: Press to show your Favourite Channels list
(DTV / ATV modes).
REVEAL: Press to reveal hidden information such as
answers to aquiz on Teletext(DTV /AV / SCART modes) .
Press to freeze a multi-pageTeletext passage
12
If you require any technical guidance or find that your product is not operating as intended, a simple solution can often be found in the Troubleshooting section of these instructions,
Getting Started
Page 13
Getting Started
You’ll be up and running in no time
Viewing remote control - TV
24. SIZE:Press to enlarge the picture on the TV Teletext
(DTV / AV / SCART modes).
25. LANG:Select the DTV audio language (DTV mode).
:Press to switch between dierent audio languages
(only applicable when the broadcast supports this
function).
26. SUBTITLE: Press to display information about the
current screen such as current channel or input source.
27. DISPLAY:Press to show information about the current
screen such as current chanel or input source.
28. ASPECT:Select from the following settings:
Auto/ 4:3 / 16:9 / Zoom 1 / Zoom 2.
29. FREEZE:Freeze the picture.
30. TV.RD:Press to select between TV and Radio
programs(DTV mode).
31. P.MODE:Press to select picture mode.
32. S.MODE:Press to select select sound mode.
33. SLEEP:Press to set TV’s sleep timer.
or online at www.argos-support.co.uk If you still require further assistance, call one of our experts on 0345 604 0105.
13
Getting Started
Page 14
Getting Started
You’ll be up and running in no time
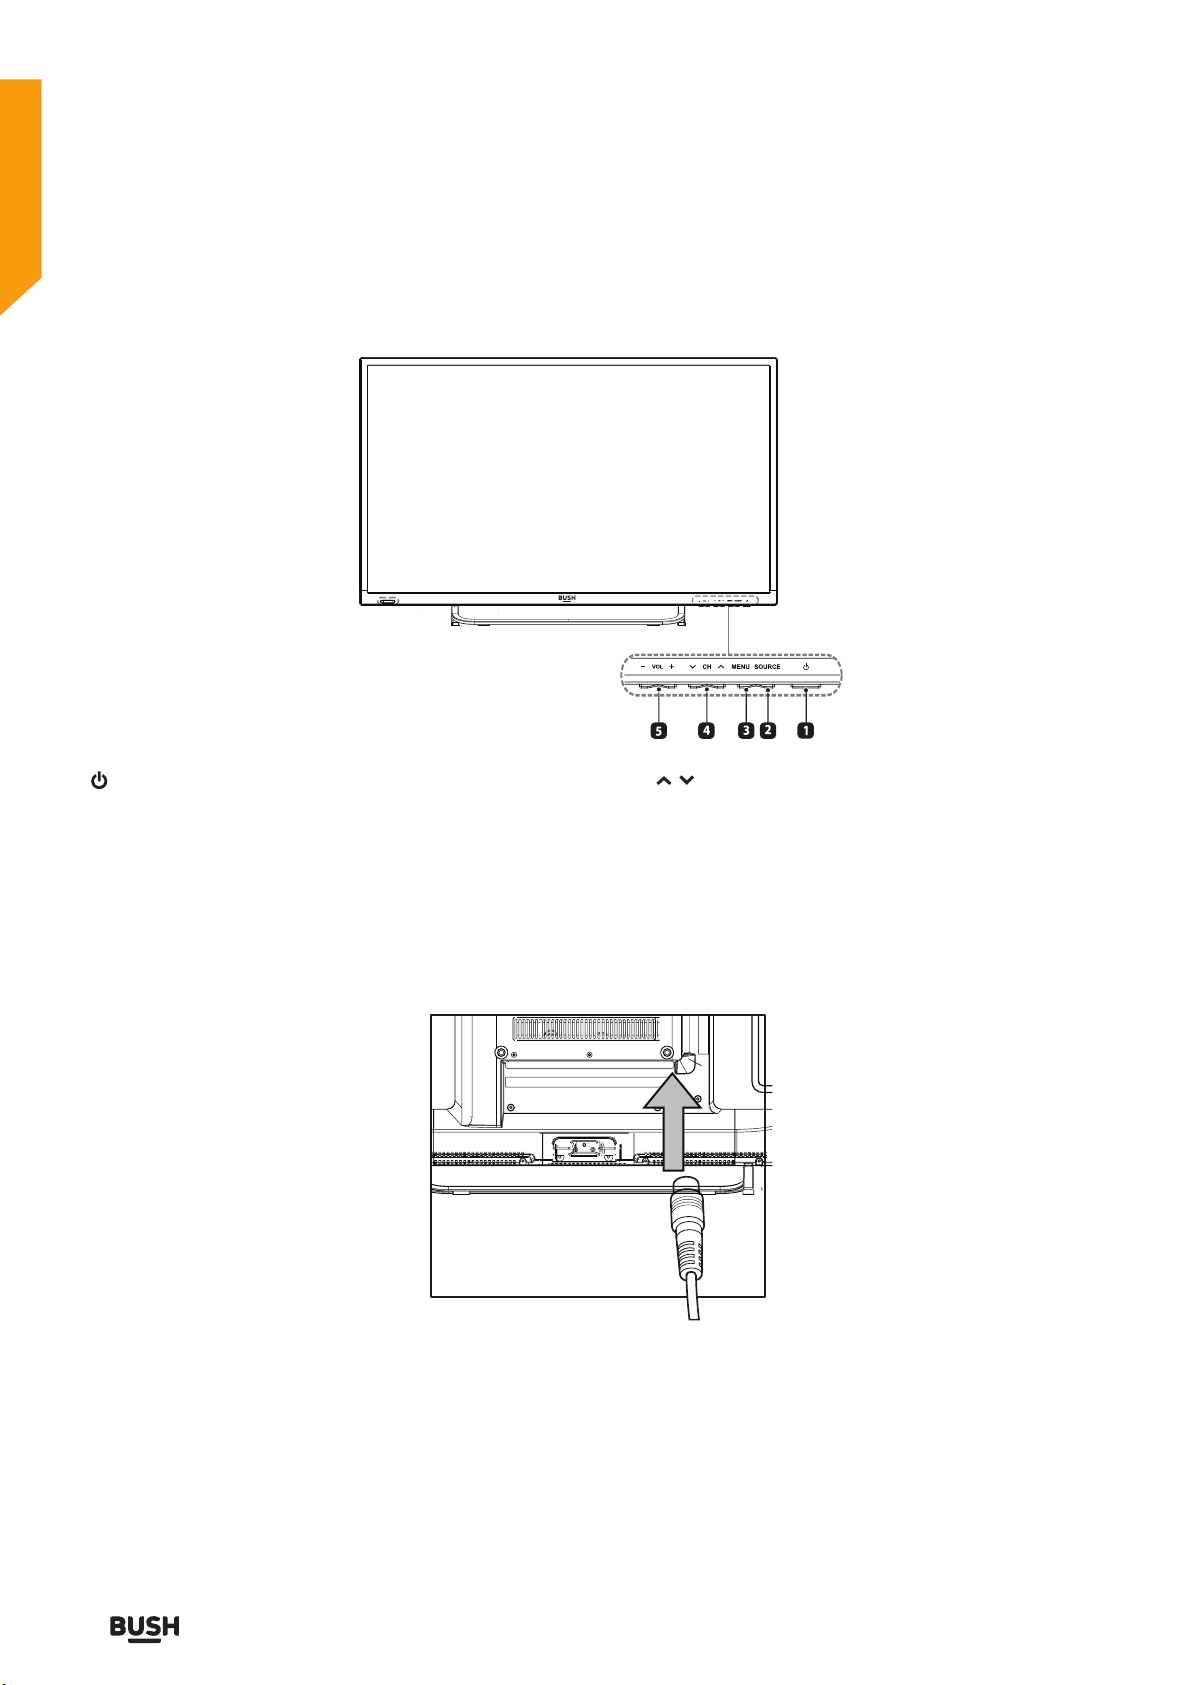
TV - Control buttons (Right side)
1. ( )button
Switch the TV between On / Standby mode.
2. SOURCE button
Press to select among different input signal sources.
3. MENU button
Display the OSD (on screen display) menu.
4. CH / button
Press to select a channel.
5. VOL +/- button
Press to adjust the volume.
Aerial connection
Connect the “aerial” or “cable TV” plug to AERIAL INPUT
(ANT.) socket located on the back of the TV .
If you require any technical guidance or find that your product is not operating as intended, a simple solution can often be found in the Troubleshooting section of these instructions,
14
Getting Started
Power connection
Please note: After unpacking, allow the TV to reach
ambient room temperature before connecting the TV to
the mains power socket.
Connect the power cord plug to the mains power socket.
Page 15
Getting Started
You’ll be up and running in no time
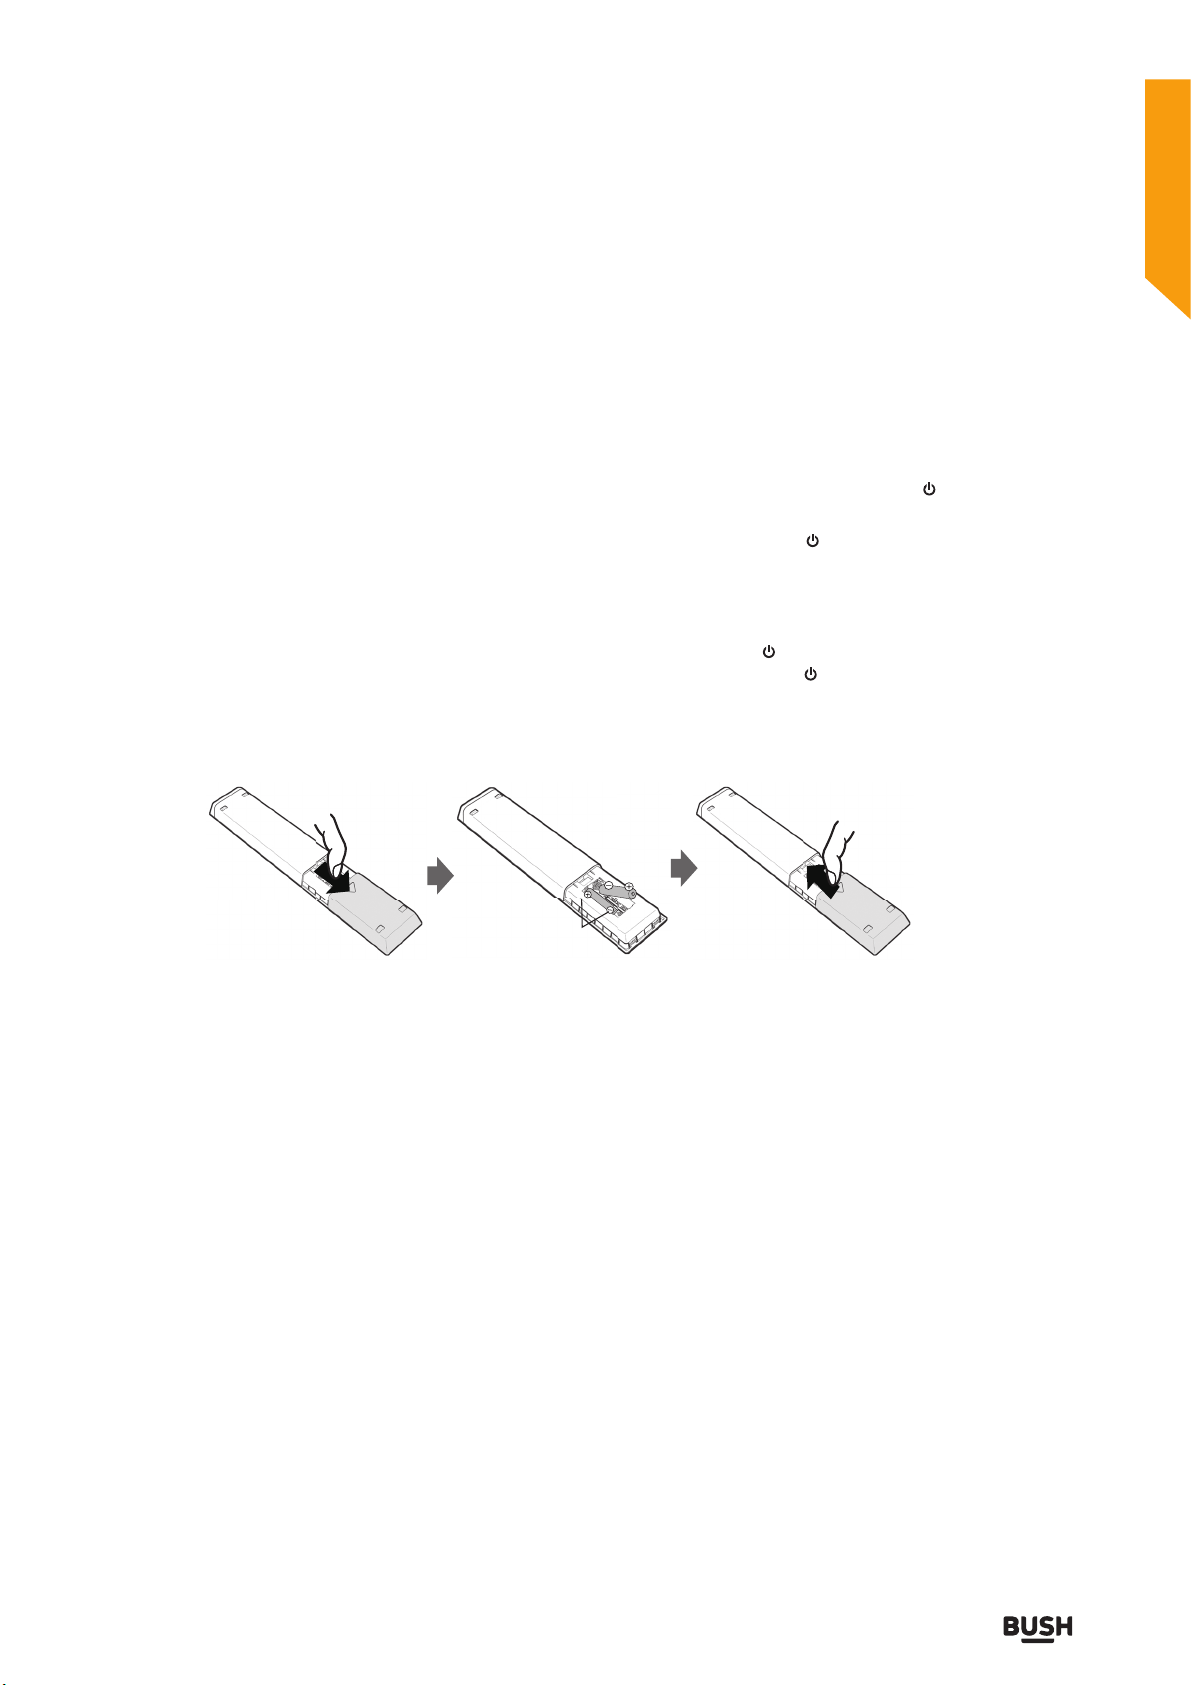
Remote control - Inserting batteries
Remove the battery cover on the back of the remote
control, gently push down and pull backwards at the
same time as shown.
Insert two AAA/R3 or equivalent type batteries. Ensure
the batteries are inserted the correct way and replace the
battery cover.
Note: When the remote control is not going to be used
for long periods of time, the batteries should be removed.
Otherwise the remote control may be damaged, caused
by battery leakage and corrosion.
Push open
Switching the TV On and Off
Switching the TV On
With power cord plug connected to the mains power
socket and TV in ‘Standby’ mode.
To switch the TV on from standby mode, either:
a: The Remote control; Press the “ ” button.
b: The TV; Press the “ ” button at the
bottom of the TV.
Switching the TV Off
Either press the “ ” button on the remote
control or press the “ ” button at the bottom of the TV,
the TV will then switch to standby mode.
Close
Note the correct
polarity (+ or -).
or online at www.argos-support.co.uk If you still require further assistance, call one of our experts on 0345 604 0105.
Getting Started
15
Page 16

Getting Started
You’ll be up and running in no time
Operation using TV control buttons
The VOL+/VOL- buttons will function as volume up/
down as default. Even if you set other functions for these
buttons, the VOL+/VOL- buttons will return to volume
control after a short while.
Volume Setting
Press VOL+/VOL- buttons to increase or decrease
volume.
Programme Selection
Press CH+/CH- buttons to select the next or previous
programme.
The remote control is designed to control all the functions
of the model you selected.
Volume Setting
Press VOL+ button to increase the volume. Press VOL-
button to decrease the volume. A volume level scale (slider)
will be displayed on the screen.
Programme Selection (Previous or Next Programme)
Press CH- button to select the previous programme.
Press CH+ button to select the next programme.
Programme Selection (Direct Access)
Press number buttons on the remote control to select
programmes between 0 and 9. The TV will switch to the
selected programme.
16
If you require any technical guidance or find that your product is not operating as intended, a simple solution can often be found in the Troubleshooting section of these instructions,
Getting Started
Page 17

Page 18

Page 19

Connections 3
19
Page 20
Connections
Bringing it all together
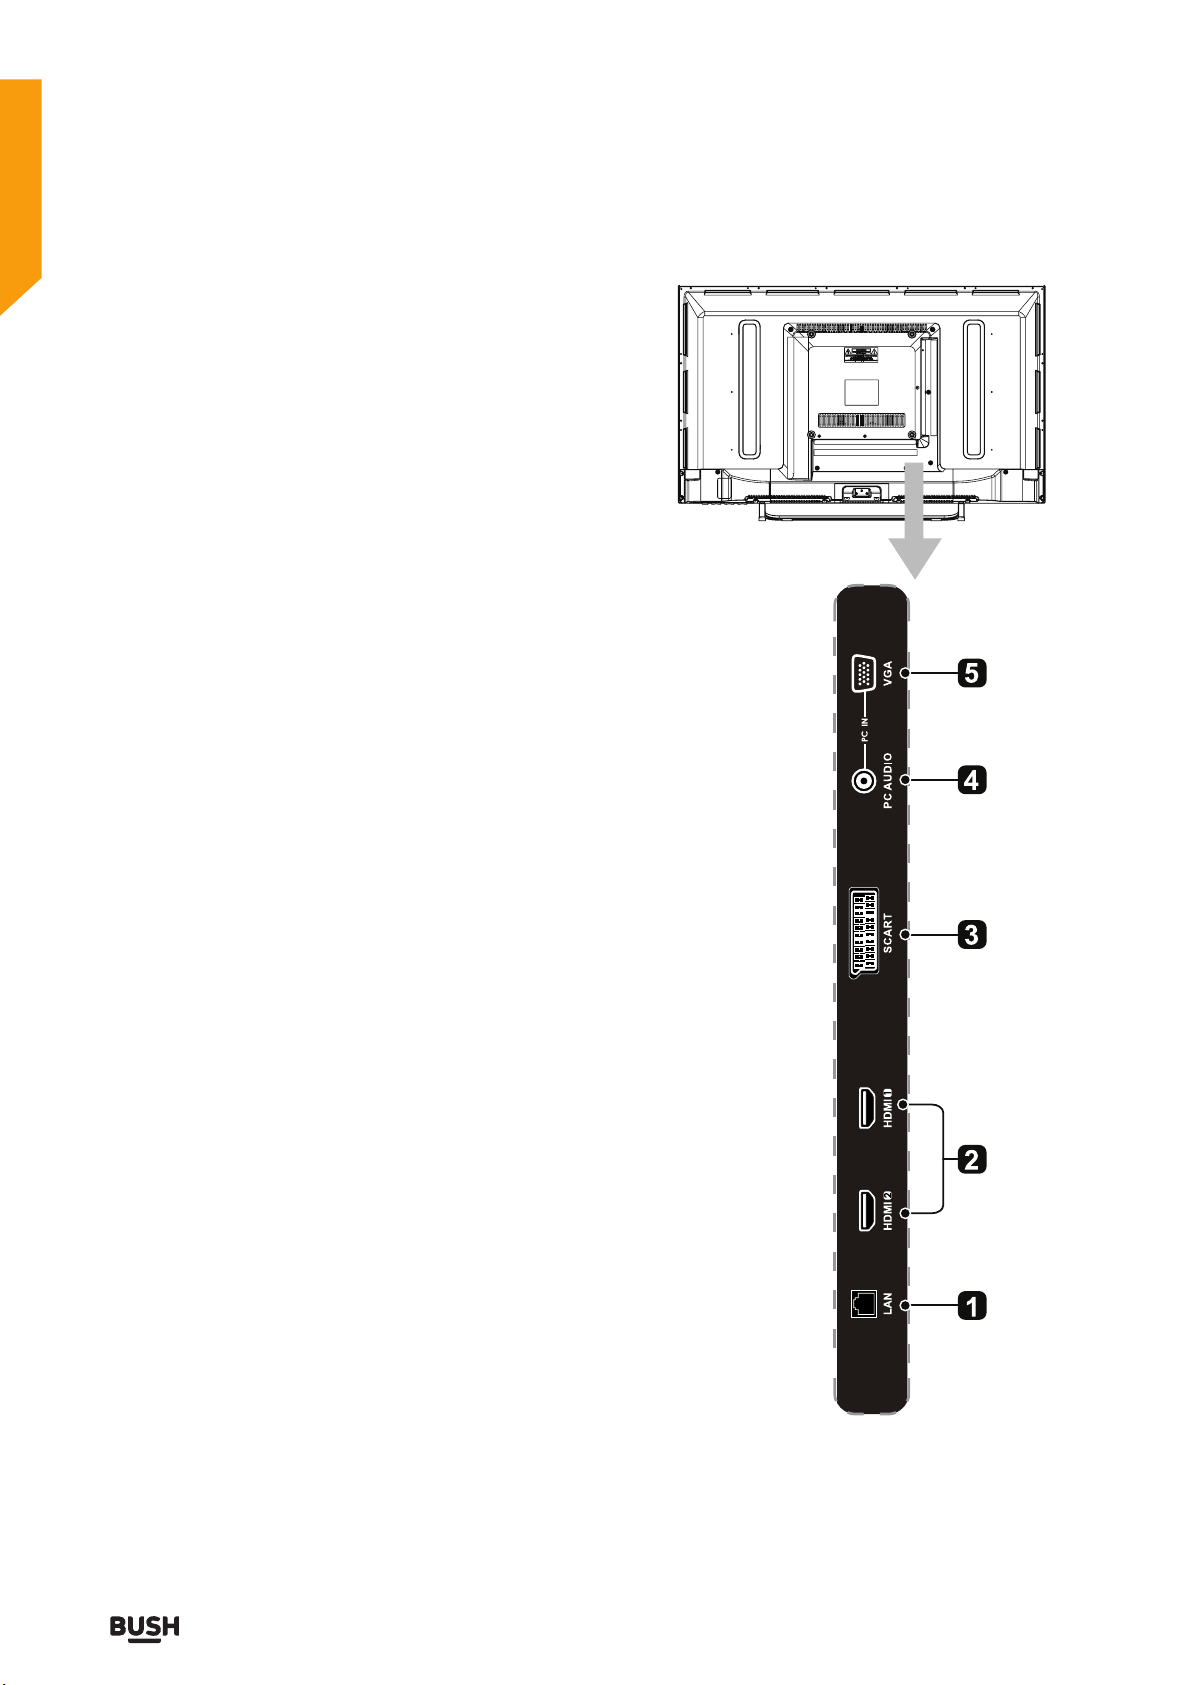
Left side connections explained
1. LAN
Network connection port.
2. HDMI Inputs
Connect to a High-Definition(HD) signal output device.
3. SCART Socket
Connect to SCART cable between the SCART socket
on the TV and the SCART socket on the external device
(decoder,or DVD player).
4. PC AUDIO Input
Connect to a computer audio output.
5. VGA Input
Connect to a computer or other devices with a VGA
interface.
20
If you require any technical guidance or find that your product is not operating as intended, a simple solution can often be found in the Troubleshooting section of these instructions,
Connections
Page 21
Connections
Bringing it all together
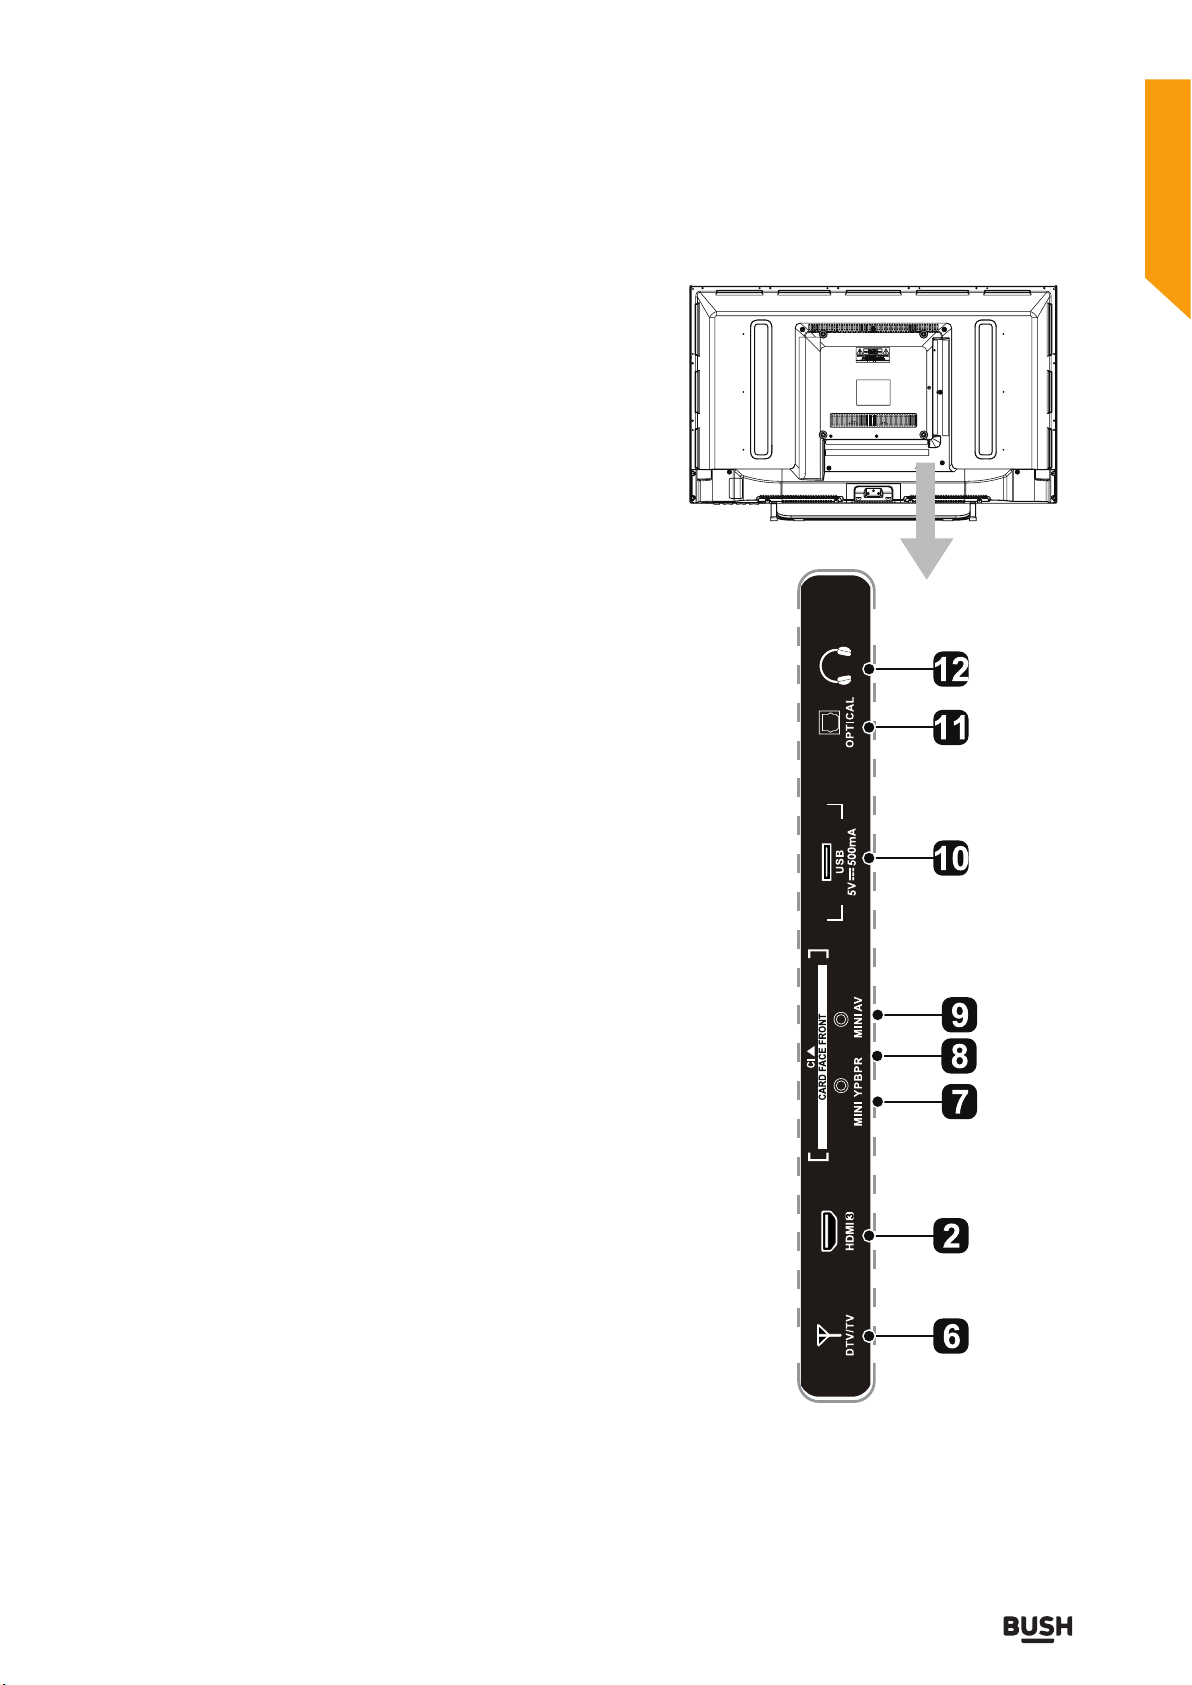
Left bottom connections explained
6. DTV/TV Input
Connect to the antenna (75Ω VHF/UHF) socket with
the RF coaxial cable.
7. MINI YPBPR
Connect to AV devices with component (Y/Pb/Pr)
video and audio output sockets. COMPONENT and
VIDEO share with AUDIO IN (L/R) subscribe to.
8. CI Slot
Used to insert a CI card.A CI card allows you to view
all the channels that you subscribe to.
9. MINI AV
Connect to the composite VIDEO and AUDIO(L/R)
output sockets on external video devices.
10. USB Port
Connect to a USB storage device to play compatible
video,audio,photo and text files.(USB mode)
11. OPTICAL Digital Audio Output
Connect to the audio socket on the digital audio
system.
12. Headphone Socket
Connect to the Headphone.
or online at www.argos-support.co.uk If you still require further assistance, call one of our experts on 0345 604 0105.
Connections
21
Page 22
Connections
Bringing it all together
HDMI Connections
HDMI lets you enjoy high definition digital images and
high quality sound by connecting the TV to external
devices such as DVD players, set top boxes or gaming
equipment.
Power off both the TV and the device before making any
connections.
For more information, refer to your device’s own
instruction book.
When connecting, switch “Source” to “HDMI”. See, “Input
Selection” section.
Note: HDMI cable is not supplied.
SCART Connections
Most devices support SCART connection. You can
connect a DVD recorder, VCR or decoder to the TV using
the SCART socket.
Power off both the TV and the device before making any
connections.
For more information, refer to your device’s own
instruction book.
Note: The Scart cable is not supplied.
22
If you require any technical guidance or find that your product is not operating as intended, a simple solution can often be found in the Troubleshooting section of these instructions,
Connections
Page 23

Page 24

Page 25

First time setup 4
25
Page 26

First time setup
Let’s get started
First time setup
1. Connect one end of an RF coaxial cable (not
supplied) to the aerial socket in your wall. Connect
the other end of the cable to the RF (75)socket in the
bottom connection panel on the back of the TV.
2. Attach all other devices to the TV following the advice
given in the instructions supplied with them.
3. Slot the plug on the TV’s mains cable into a wall
socket and turn the power on if required.
4. In standby mode, press the button on the right side
of the TV or press the button on the remote
control to turn the TV on. The red LED indicator on
the front of the TV will turn blue.
5. After pressing the OK button you will go to the First
Time Installation menu.
First Time Installation
Language English
Country
Tuning Mode
UK
DTV
6. Language is preset to English.
7. Next press the button on the remote control to
select Country. Use the buttons on the remote
control to select the country you are tuning the TV
in.
8. Now press the button on the remote control to
select Tuning mode. Use the buttons on the
remote control to select either ATV + DTV (analogue
and digital channels), DTV (digital channels only) or
Analogue TV (analogue channels only).
9. Press the button on the remote control to select
Environment. Use the buttons on the remote
control to select between Home Mode or Store
Mode. If you select to change to store mode, a
warning screen will appear asking if you do, press
the button to continue
Note: Store Mode should only be used if the TV is
to be used as a display in a shop.
10. Once you have completed all of the preliminary
settings press the button on the remote control
then the button to begin Auto Tuning.
Channel Tuning
TV : 0
DTV : 0
Radio : 0
Data : 0
19
%... UHF CH 30 DTV
Skip Exit
Programme
Programme
Programme
Programme
26
Environment
Home Mode
Auto Tuning
AdjustMove
BackSelect
If you require any technical guidance or find that your product is not operating as intended, a simple solution can often be found in the Troubleshooting section of these instructions,
First time setup
Page 27

Page 28

Page 29

How to use your TV 5
Standard features
29
Page 30

How to use your TV
Let’s get started
SELECTING INPUT SOURCE
You can connect multiple devices to your TV to improve
your watching and listening pleasure.
1. Press the SOURCE button on the TV or remote control
to open the source menu.
USING THE ELECTRONIC PROGRAMME
GUIDE (EPG)
Digital TV (DTV) channels only
Your TV has an Electronic Programme Guide (EPG) to
help you navigate through all your possible viewing
options. The EPG supplies information such as
programme listings, start and end times for all available
services. In addition, detailed information about the
programme is often available in EPG (the availability and
amount of programme information will vary,depending
on the particular broadcast).This function can only be
used when the information is broadcast by the
broadcasting companies.The EPG displays the
programme details for the next 7 days.
1. Press the EPG button on the remote control to open
the Electronic Programme Guide window.
2. Use the buttons on the remote control to select
the source you wish to watch or listen to.
Note: Not all sources will be displayed when the menu
is open. You will need to use the buttons to scroll
through the list to view all of the sources.
3. Press the OK button on the remote control to open
the selected source.
2. Use the buttons to select the station you wish
to watch or listen to, then press the OK button to tune
to that station. Press the EPG button again to close
the Electronic Programme Guide window.
30
If you require any technical guidance or find that your product is not operating as intended, a simple solution can often be found in the Troubleshooting section of these instructions,
How to use your TV
Page 31

How to use your TV
Let’s get started
3. You can also look through all of the programmes
available over the next 7 days by pressing the
button to enter the programmes listings. Use the
buttons to scroll through the programmes, a
brief description will be shown in the window near
the top of the window.
At the bottom of the window there are additional feature
buttons you can use.These are accessed using the
coloured buttons on the top of the remote control.
RED button: Record.
Press this button to record programmes to a USB drive
attached to the USB port on your TV, see page 39 for
more information.
GREEN button: Prev.
Press the green button to scroll through the previous 7
days of programmes.
Note: This only works if the broadcaster supports this
function.
YELLOW button: Next.
Press the yellow button to scroll through the next 7 days
of programmes.
Note: This only works if the broadcaster supports this
function.
BLUE button: Remind.
Reminder Setting
10 ITV3
Minute 45
Hour 10
Month Sep
Date 19
Week Fri.
Mode Once
OK
Back
Press the BLUE button to go back to the EPG menu.
Your TV will now automatically turn its self on (if in
standby mode) and tune to the programme when it
starts.
Press this button to open the Reminder Setting window.
To set the reminder, scroll to the programme you want
to set the reminder for on the EPG menu using the
buttons.
Press the BLUE button on the remote control to open
the Reminder setting menu.
Adjust the settings of the menu using the buttons.
When you have adjusted the menu, press the
OK button to save the settings.
or online at www.argos-support.co.uk If you still require further assistance, call one of our experts on 0345 604 0105.
How to use your TV
31
Page 32

How to use your TV
Let’s get started
VIEWING TELETEXT
Digital TV (DTV) channels only IMPORTANT: Before
you can view Teletext you will need to turn the Subtitle
function off if it is switched on.
Note: Before turning Teletext on, check that the TV
channel you are watching transmits Teletext. If it does
not, NO Teletext will be shown on the screen.
1. Press the /TTX button on the remote control to
open the Teletext menu.
Thursday 25 Dec
News Index
Sports Home
Weather
In Parliament
Lottery Results
Christmas Concert
CBeebies
Merry Christmas from
BBC Red Button
To exit press TEXT
2. Follow the information on the Teletext page to access
the page you want to view. You can also use the 0 to 9
buttons on the remote control to enter the page
number you want to view.
3. You can also press the RED buttonn on the remote
control instead of the /TTX button when the red
Teletext logo is shown on the TV screen.
4. Press the /TTX button again to close the Teletext
menu.
102
503
400
500
555
150
How to select a page of text
1. Find the number of the page you wish to view and
enter it in the search panel using the 0 to 9 buttons on
the remote control then press the OK button.
2. The page counter will search for your page you wish
to view. When the page is found it will automatically
be displayed.
3. To move to the next or previous page use the
buttons on the remote control.
4. To return to the index page, enter 100 into the search
panel using the 0 to 9 buttons on the remote control
and press the OK button or press the INDEX button.
How to use Fast Text
At the bottom of the Teletext page there is a row of
subject headings coloured in Red, Green, Yellow and
Blue.
To access these pages, simply press the correspondingly
coloured button on the top of the remote control.
32
If you require any technical guidance or find that your product is not operating as intended, a simple solution can often be found in the Troubleshooting section of these instructions,
How to use your TV
Page 33

How to use your TV
Let’s get started
USING THE TIME SHIFT FUNCTION
Digital (DTV) channels only
This function lets you quickly record the TV programme
you are watching if you have to leave the room.
IMPORTANT: You must have a USB storage device
attached to your TV to use the Time Shift function.
IMPORTANT: If the transfer rate of the attached USB
storage device is too slow for the Time Shift function, a
warning statement will be shown on the TV’s screen. If
this happens, please upgrade your USB storage device.
IMPORTANT:Time Shift mode may not work if the
stations signal strength is too weak.
NOTE:Always stop the Time Shift function by pressing the
button before switching to another input source.
Using the Time Shift function
1. To start Time Shift, press the TIMESHIFT button on
the remote control to pause the programme you are
watching. The Time Shift symbol will be displayed in
the top left of
2. When you wish to resume watching the programme,
press the II button on the remote control to show
the PVR Time Shift progress bar.
3. Use the buttons to select the button on the
progress bar then press the OK button to start
watching the programme. will be displayed in the
top left of the TV screen showing you are watching a
programme in Time Shift.
4. Press the button to stop the Time Shift recording
and return to the live TV broadcast.
Alternatively: You can press the (red dot) button on
the remote control to display the PVR Time Shift
progress bar and then use the buttons to select
II on the bar then press the OK button to start playback.
Note: There may be a slight delay with the video and
the sound may be slightly out of sync for a few seconds
when you start watching the recorded programme. This
will soon stop and the programme will play correctly.
Wildlife on OneCH 1 BBC ONE Yorks
00:00
00:00 00:14 Used space: 4%
Recorder
Play Stop Pause FB FF SlowTimePlay BackwardForward
1
5
3
7
4
2
8910
6
12
11
The Time Shift progress bar
Use the buttons to navigate through the progress
bar. Once you have selected the feature you wish to use
press the OK button.
1. Shows the channel and name of the recorded
programme.
2. PLAY: Select to play your recording.
3. STOP: Select to stop play back.
4. PAUSE: Select to pause the recording.
5. FB:Select to rewind your recording at x2 / x4 / x8 / x16
/ x32 speed.
6. FF: Select to fast forward the recording at x2 / x4 / x8 /
x16 / x32 speed.
or online at www.argos-support.co.uk If you still require further assistance, call one of our experts on 0345 604 0105.
How to use your TV
33
Page 34

How to use your TV
Let’s get started
7. Slow: Select to view the recording in slow motion.
Press the OK button multiple times choose between
2 /4 / 8 / 16 / 32 playback speeds..
8. Time Play: Select to enter a time you wish to view
the recording from using the 0 to 9 buttons on the
remote control.
9. Backward: Select to move the recording backwards
30s of the recording.
10. Forward: Select to move the recording forwards 30s
of the recording.
11. Shows the amount of playback time the recording
has remaining.
12. Shows the amount of memory remaining on your
USB drive.
Using the remote control with
Time Shift
You can use the buttons on the remote control to
control playback in Time Shift.
II Press to start and pause playback.
Press repeatedly to rewind at x2 /
x4 / x8 / x16 / x32 speed.
Press repeatedly to fast forwards
at x2 / x4 / x8 / x16 / x32 speed.
Important: To return to normal playback press the
II button.
RECORDING DTV PROGRAMMES
Digital (DTV) channels only
You can record digital TV programs onto a USB drive
using either direct recording by pressing the red dot
button or using the program timer function.
IMPORTANT: You must have a USB storage device
attached to your TV to use the recording function.
IMPORTANT: If the transfer rate of the attached USB
storage device is too slow for the recording function, a
warning statement will be shown on the TV’s screen. If
this happens, please upgrade your USB storage device.
IMPORTANT:Recording mode may not work if the
stations signal strength is too weak.
Instant recording
This option is used to record the program you are
watching.
1. Press record button on the remote control to record
the programme you are currently watching.
Wildlife on OneCH 1 BBC ONE Yorks
00:00
00:00 00:14 Used space: 4%
Recorder
Play Stop Pause FB FF Slow TimePlayForward Backward
I Press to jump backwards approximately 30s of the
recording time.
I Press to jump forwards approximately 30s of the
recording time.
Press to stop the Time Shift recording.
If you require any technical guidance or find that your product is not operating as intended, a simple solution can often be found in the Troubleshooting section of these instructions,
34
How to use your TV
The recording progress bar will be displayed, press
the EXIT button to close recording progress bar. The
recording symbol in the top left of the screen will still
bevisible showing that the TV is still recording. If you
want to view the recording progress bar again, press the
button on the remote control.
Page 35

How to use your TV
OK
Back
Let’s get started
2. When the programme has finished and you want to
stop the recording,simply press the button.
USING THE PROGRAMME TIMER
Digital TV (DTV) channels only
The programme timer is used to schedule program
recordings.
Note: There may be a small delay when the program
starts recording. Always ensure a USB drive is inserted
into the USB slot in the back of the TV. If not, a warning
message will appear on the TV screen.
Using the programme timer
1. Press the EPG button on the remote control to open
the Electronic Programme Guide menu.
Recorder
10 ITV3
Start Time
Minute 0
Hour 10
Month Sep
Date 21
End Time
Minute 0
Hour 11
Month Sep
Date 21
Mode Once
2. Use the button then the buttons to select the
programme you want to record then press the RED
button to open the Record menu.
3. Use the buttons to change the settings in the
menu if you need to.
Channel: Use the buttons to select the channel
you want to record.
Start Time: Use the buttons to select either
Minute / Hour / Month / Date. Use the buttons to
adjust the settings.
End Time: Use the buttons to select either Minute
/ Hour / Month/ Date. Use the buttons to adjust
the settings.
Mode: Use the buttons to select either Once /
Every Day /Weekly.
4. After making all of your adjustments press the OK but
your settings. The Timer was saved Successfully
screen will appear.
or online at www.argos-support.co.uk If you still require further assistance, call one of our experts on 0345 604 0105.
How to use your TV
35
Page 36

How to use your TV
Let’s get started
Timer was saved Successfully
(2014) 08/19 19:30
E4+1
1. The Schedule List will now appear at the bottom of
the screen showing all of your scheduled recordings.
Schedule List 17:33 19 Aug
Time
18:00--18:30
19:00--20:00
Edit Sort by Time/Channel Name Delete
Date Programme Title Channel Name
Tue. 19 Aug2014
Wed. 20 Aug2014
E4+1How I Met Your Mother
E4+1The Big Bang Theory
2. You can use the colour buttons on the top of the
remote control to change, organise and delete items
in the schedule list. Press the EXIT button to close the
menus.
Note: When the preset time is reached the TV will start
recording automatically. If the recording starts when the
TV is in standby mode the LED indicator on the front of
the TV will flash bule.
36
If you require any technical guidance or find that your product is not operating as intended, a simple solution can often be found in the Troubleshooting section of these instructions,
How to use your TV
Page 37

How to use your TV
Let’s get started
WATCHING RECORDED PROGRAMMES
You can play a recorded programme from the recorded
programme list orn from the USB storage device.
Prompt
The USB founded, Open it now?
Yes
Note: When a USB storage device is inserted into one
of the USB ports in your TV a message will be displayed
when you turn your TV on or when you insert the device
asking if you want to go directly to the MultiMedia menu.
Use the buttons to select either Yes or No and press
the OK button to confirm.
1. To open the MultiMedia menu whilst using the TV,
press the MENU button on the remote control or on
bottom of the TV. Use the buttons to select
the MultiMedia menu and press the OK button to
comfirm.
2. Press the OK button to select MOVIE, then use the
buttons to select your USB storage device. Finely
press the OK button to open the movie menu.
No
1
Movie Music Photo File
Device Found:0
3. Use the buttons to select _MSTPVR OK
button to open.
1
/usb/sda1/_MSTPVR
15_Film4_20... 15_Film4_20... 15_Film4_20... 29_E4+1_20... 29_E4+1_20...
Movie Music Photo File
15_Film4_20... 15_Film4_20... 29_E4+1_20... 29_E4+1_20...15_Film4_20...
Press “Menu” to control the Tool Bar
Directories: Files: 5 Total: 10 1/1
Device Found:0
4. Use the buttons to select the recorded
programme you wish to watch.
Note: When you highlight a film to watch, after a few
seconds a few seconds a thumbnail movie will appear on
the screen.
5. If you have a lot of movies stored in the file you can
press the MENU button to open the tool bar. This will
help when looking through the files in your _MSTPVR
folder.
6. When you have found film you want to watch, press
the OK or II button to play the recording in full
screen mode.
7. Press the MENU button to display the function bar
at the bottom of the screen. Use the buttons to
navigate through the functions then press the OK when
you have highlighted the one you require. See over the
page for a full list of the function bars list of functions.
or online at www.argos-support.co.uk If you still require further assistance, call one of our experts on 0345 604 0105.
How to use your TV
37
Page 38

How to use your TV
Press “Menu” to Show/Hide Function Menu
Let’s get started
Repeat: ALL
00:00:01 / 00:29:58
Play
Previous Next Pause Stop FB FF Repeat TimePlay Enlarge
List of functions
Play: Press to play the programme.
Previous: Press to watch the previous programme in the
playlist.
Next: Press to watch the next programme in the play list.
Pause: Press to pause the programme.
Stop: Press to play back of the programme.
FB: Press repeatedly to rewind at x2 / x4 / x8 / x16 / x32
speeds.
FF: Press repeatedly to fast forwards at x2 / x4 / x8 / x16 /
x32 speeds.
Repeat: Press to select the repeat function you want.
Choose form NONE / ONE / ALL / RANDOM.
TimePlay: Allows you to select a time to start watching
the programme from.
Enlarge: Allows you to enlarge the screen image
programme. Use the buttons to move around the
enlarged image.
Shrink: Allows you to shrink the screen image of the
programme.
Playlist: Shows you a full list of films you can watch. Press
the EXIT button to close the submenu.
Info: Shows information about the programme you are
watching. Press the EXIT button to close the submenu.
Info0%PlaylistShirnk
8. Press the EXIT button to return to the previous
menus.
38
If you require any technical guidance or find that your product is not operating as intended, a simple solution can often be found in the Troubleshooting section of these instructions,
How to use your TV
Page 39

Page 40

Page 41

TV systems management 6
41
Page 42

TV systems management
Let’s get started
PICTURE MENU
This menu allows you to select the best preset picture
mode or change them yourself.
Note: The menu shown in the diagram has been
extended to show all available options. You will need to
use the buttons to scroll through the menu to view all
of the options.
PICTURE
Picture Mode
Contrast
Brightness
Saturation
Sharpness
Colour Temp
Aspect Ratio
Noise Reduction
MEMC
Standard
50
50
50
50
Standard
Auto
On
Off
4. Use the buttons to change the selected sub
menu.
5. Press the MENU button on the remote control to
return to the main PICTURE menu.
6. After you have made all of the changes, press the
EXIT button on the remote control to close the
PICTURE menu.
What the sub menus do
Picture Mode: Choose between Dynamic / Standard /
Mild / Personal modes.
Contrast: Adjusts the difference between light and dark
levels in the picture.
Brightness: Increases or decreases the amount of white
in the picture.
Saturation: Control the intensity of the colour.
Sharpness:Adjust the level of crispness in the edges
between light and dark areas of the picture.
Colour Temp: Choose between Standard / Warm / Cool.
The colour temp changes the amount of blue and red in
your picture.
Aspect Ratio: Choose to view the TV picture in various
formats. Choose from AUTO / 4:3 / 16:9 / Zoom 1 /
Zoom 2.
Noise Reduction:Choose between On or Off. Noise
reduction reduces the amount of picture noise (speckles
and lines etc.) of any connected device.
AdjustMove
ExitBack
1. Press the MENU button on the remote control.
2. Use the buttons to select the PICTURE menu
then press the OK button to open.
3. Use the buttons to navigate through the menu to
select the item you wish to change.
If you require any technical guidance or find that your product is not operating as intended, a simple solution can often be found in the Troubleshooting section of these instructions,
42
TV systems management
Page 43

TV systems management
Let’s get started
SOUND MENU
This menu allows you to select the best preset sound
mode or change them yourself.
Note: The menu shown in the diagram has been
extended to show all available options. You will need to
use the buttons to scroll through the menu to view all
of the options.
SOUND
Sound Mode
Treble
Bass
Balance
Auto Volume Level
DTS TruSurround
Digital Output
AD Switch
AD Volume
Standard
50
50
0
On
On
Auto
Off
30
AdjustMove
ExitBack
4. Use the buttons to change the selected sub
menu.
5. Press the MENU button on the remote control to
return to the main SOUND menu.
What the sub menus do
Sound Mode: Choose between Standard / Music / Movie
/ Sport / Personal modes.
Treble: Use to adjust the amount of treble in the TV’s
sound.
Bass: Use to adjust the amount of bass in the TV’s sound.
Balance: Use to adjust the relative volume of the speakers
in a multiple speaker system.
Auto Volume Level: Turn on to automatically adjust
volume levels (e.g. volume levels in adverts are generally
louder than programmes).
DTS TruSurround
Switches the virtual surround sound feature on or off.
Digital Output: Use when a digital audio connection is
attached to your TV. Select between PCM / Auto / Off.
AD Switch: Audio Description is an auxiliary audio
function that provides an additional audio track for
visually impaired people. This function handles the Audio
Stream for the AD (Audio Description) when it is sent
along with the main audio from the broadcaster. Use the
buttons to choose between On or Off.
Set to Off: You will receive normal broadcast sound from
the TV’s speakers.
Set to On: You will receive the additional Audio
Description sound channel if available.
1. Press the MENU button on the remote control.
2. Use the buttons to select the SOUND menu
then press the OK button to open.
3. Use the buttons to navigate through the menu to
select the item you wish to change.
or online at www.argos-support.co.uk If you still require further assistance, call one of our experts on 0345 604 0105.
TV systems management
43
Page 44

TV systems management
Let’s get started
AD Volume: Use the to set the volume of the audio
description.
Note: If you want to change the sound mode, repeatedly
press S.MODE button on the remote control until you
find the one you want.
CHANNEL MENU
This menu allows you to retune, edit your channel list,
check your signal information, check your recorded and
schedule lists and update your TV’s software using the
over air download system.
Auto Tuning
Analogue Manual Tuning
Digital Manual Tuning
Channel Edit
Signal Information
3. Use the buttons to navigate through the menu to
select the item you wish to change.
4. After you have made all of the changes, press the EXIT
button on the remote control to close the CHANNEL
menu.
Auto Tuning
1. Select the Auto Tuning submenu and press the OK
button to open it.
Channel Tuning
Tuning Mode
Country
Auto Tuning
DTV
UK
CI Information
Recorded List
Schedule List
OAD
On
AdjustMove
ExitBack
Note: The menu shown in the diagram has been
extended to show all available options. You will need to
use the buttons to scroll thought the menu to view all
of the options.
1. Press the MENU button on the remote control.
2. Use the buttons to select the CHANNEL
menu then press the OK button to open.
AdjustMove
BackSelect
2. Select the tuning type using the buttons, you can
choose between DTV + ATV / DTV / Analogue TV.
Press the button and choose the country you are
tuning the TV in using the buttons.
3. Press the button and select Auto Tuning and press
the or OK button to start the tuning process.
4. Once the tuning has finished you can set the Country,
Region and Secondary Region using the buttons,
confirm your selections by pressing the OK button.
Once you have completed all of the settings the menu
will close automatically.
44
If you require any technical guidance or find that your product is not operating as intended, a simple solution can often be found in the Troubleshooting section of these instructions,
TV systems management
Page 45

TV systems management
Let’s get started
Analogue Manual Tuning
IMPORTANT: This feature is not available in the UK as
analogue signals are no longer broadcast.
1. Press the button to select Analogue Manual Tuning
and press OK on the remote control.
Frequency 867.875 MHz
Move
Adjust
2. The Analogue Manual Tuning menu will now open.
3. Select the storage location of the channel using the
buttons.
4. Press the button to select SYSTEM, then press the
buttons to choose between I / DK / L / M / BG.
5. Press the button to select SEARCH then
Back
Manual Tuning and press OK on the remote control to
open the submenu.
Digital Manual Tuning
UHF CH 47
DTV
Radio
Data
Press OK to search
Frequency 490 MHz
Normal GoodBad
Adjust
0
0
0
Back
2. The Digital Manual Tuning menu will now open.
3. Press the buttons to select the desired UHF
channel.
4. Press the OK button and the search for available
stations on that channel will begin.
5. Once the signal has been tuned the signal strength will
be displayed on the screen.
6. The menu will close and the tuned channel will be
shown on your TV screen.
press the button to search through the different
frequencies until you find the program you want.
6. After the search, press the button to select
FINE-TUNE you can now do small adjustment to
improve the signal using the buttons.
7. Press the MENU button on the remote control to save
the channel.
IMPORTANT:If the number about to save is the same
as a channel that is already being used, the manually
adjusted channel will replace the existing channel.
Digital Manual Tuning
1. Use the button to select Digital
or online at www.argos-support.co.uk If you still require further assistance, call one of our experts on 0345 604 0105.
TV systems management
45
Page 46

TV systems management
Let’s get started
Channel Edit
Allows you to edit TV channel information in the Channel
List.
1. Press the MENU button to open the CHANNEL menu.
Channel Edit
1 BBC ONE Yorks
2 BBC TWO
3 ITV
4 Channel 4
5 Channel 5
6 ITV2
7 BBC THREE
8 Made in Leeds
9 BBC FOUR
10 ITV3
Delete
Favorite
2. Press the button to select Programme Edit and
press the OK button on the remote control to open
DTV
DTV
DTV
DTV
DTV
DTV
DTV
DTV
DTV
DTV
SkipMove
BackSelect
Signal Information
Allows you to view the signal strength of the selected
channel TV signals.
Use the button to select Signal Information from the
menu then press the OK button. To close the submenu,
press the MENU button.
CI (Common Interface)
Digital TV channels only
This function allows you to view the common interface
module information.
1. Use the button to select CI Information from the
menu then press the button to open the submenu.
2. The Common Interface main menu will now open.
Press the buttons to select the items and press
the OK button to comfirm.
3. Press the EXIT button to close the menu.
The common interface allows the use of a Common
Access Module to enable you to unscramble (pay to
view) services. These services are provided by other
service providers than free to view TV channels.
the submenu.
Delete: Highlight the channel you want to delete using
the buttons. Press the RED button on the top of the
remote control to delete the programme from the EPG
menu.
Move: Use the buttons to highlight the channel you
want to move in the EPG menu and press the YELLOW
button on the remote control. Move the channel to the
position you want it in and press the yellow button again.
Skip: Use the buttons to highlight the channel you
want to skip in the EPG menu and press the BLUE button
on the remote control.
Fav: Select the channels you want to add to your
favourites list using the buttons then press the FAV
button on the remote control to confirm.
Common
Access
Module
Important: Do not keep removing and retting the
Common Access Module as it could damage the
interface and cause a malfunction.
46
If you require any technical guidance or find that your product is not operating as intended, a simple solution can often be found in the Troubleshooting section of these instructions,
TV systems management
Page 47

TV systems management
Let’s get started
Fitting the Common Access Module
Note: This feature is not available in all countries.
1. Before you inset the Commonv Access Module (CAM)
into the CI slot in the side of the TV, ensure the TV is
switched off at the mains and the viewing card has
been correctly inserted into the CAM in accordance
with the service providers instructions.
2. Insert the Common Access Module into the slot in the
side of the TV. If you feel resistance when inserting the
CAM, turn it over and try again.
3. Turn the TV back on at the mains and switch on. You
will now be able to access the encrypted channels
from the service provider.
Removing the Common Access Module
1. Before removing the CAM ensure the TV is switched
off at the mains.
2. Pull the CAM out of the CI slot in the side of the TV.
3. Switch the TV back on at the mains.
Recorded List
Use the button to select Recorded List from the menu
and press the OK button to open the menu.
LCN Channel Program / Service
20 Drama Steptoe and Son
20 _ Drama_Steptoe_and_Son_20140919_130000.ts
Delete Ascend
Index
Steptoe and Son
00:16
Crossed Swords: Sitcom about father and son rag and
bone men. Albert gets locked in the outside loo while
Harold finds a rare piece of porcelain and decides to put it
up for auction. [S]
OK
You can now see a full list of all of the programmes
recorded on your USB drive.
Date
2014 09/19 13:00
00:30:03
You can interact with the list using the coloured buttons
on the top of your remote control.
Note: If there is no USB storage device
fItted to the TV a warning message No USB Detected will
be show, press the EXIT button on the remote control to
close the Recorded List menu.
Scheduled List
Use the button to select Scheduled List from the menu
and press the OK button to open the menu.
Schedule List 17:33 19 Aug
Time
Date Programme Title Channel Name
Tue. 19 Aug2014
18:00--18:30
Wed. 20 Aug2014
19:00--20:00
Edit Sort by Time/Channel Name Delete
E4+1How I Met Your Mother
E4+1The Big Bang Theory
You can now see a full list of all of the programmes you
have scheduled. You can interact with the list using the
coloured buttons on the top of your remote control.
If there is no USB storage device fitted to the TV a
warning message No USB Detected will be shown,
press the EXIT button on the remote control to close the
Recorded List menu.
OAD (Software Update)
(Over Air Download)
Digital TV (DTV) channels only
The TV auto detects the latest firmware update through
the DTV signal and allows you to accept or refuse the
firmware upgrade service.
1. Press the MENU button on the remote control, use the
button to select the CHANNEL menu.
or online at www.argos-support.co.uk If you still require further assistance, call one of our experts on 0345 604 0105.
TV systems management
47
Page 48

TV systems management
Let’s get started
1. Use the buttons to select Software Update (OAD).
Press the OK button to select either On or Off.
2. Press the MENU button to return to the main menu.
3. Press the EXIT button to exit the menu.
4. During normal DTV viewing, if the TV detects an
update to the fimware from the DTV signal, the Over
Air Download screen will appear. Use the buttons
to select either Yes or No.
Note: If you do not press any button within 1 minute, the
Over Air Download screen will disappear. The Over Air
Download screen will appear next time you switch to
viewing a DTV channel.
LOCK MENU
Lock System
You will have to enter your password or the default
password is 0000 before you can change any of the
settings in the lock menu.
4. The main SETUP menu may closeand the selected
items sub menu may appear. Use the and OK
buttons to change the settings.
5. Press the MENU button on the remote control to
return to the LOCK menu.
6. After you have made all of the changes, press the
EXIT button on the remote control to close the LOCK
menu.
LOCK
System Lock
Set Password
Channel Lock
Parental Guidance
Key Lock
Off
Off
Off
Please enter password
1. Press the MENU button on the remote control.
2. Press the buttons to select the LOCK menu.
3. Use the buttons to navigate through the menu
and press the OK button to select the item you wish to
change.
AdjustMove
ExitBack
Set Password
Use the button to select Set Password then press the
OK button. Use the 0 to 9 buttons on the remote control
to enter your password or the default 0000 password.
Press the button and enter your new password using
the 0 to 9 buttons.Press the button and enter you new
password again using the 0 to 9 buttons.
Your new password has now been saved and the
submenu will close.
48
If you require any technical guidance or find that your product is not operating as intended, a simple solution can often be found in the Troubleshooting section of these instructions,
TV systems management
Page 49

TV systems management
ExitBack
Let’s get started
Note: 0000 is the master password and can always be
used.
Block Program
Use the button to select Block Program then press the
OK button. Scroll through the list of available channels
using the buttons.
When you have highlighted the channel you wish to
lock press the GREEN button on the top of the remote
control.
Note: The locked channels will no longer appear in the
EPG menu.
Parental Guidance
Use the button to select Parental Guidance then press
the OK button. Parental guidance is used to set an age
rating for programmes on the TV before the password is
required to watch the program.
Scroll through the list of available ages using the
buttons.
Choose the age rating you want and press the OK button
to confirm.
Key lock
Use to lock the remote control, you must enter the
password before the remote control will function.
Turn key lock on and off by pressing the OK button.
TIME MENU
1. Press the MENU button on the remote control.
2. Press the button to select the TIME menu.
3.Use the buttons to navigate through the menu and
press the OK button to select or change the item.
4. The main TIME menu may close and the selected
5. Press the MENU button on the remote control to
return to the TIME menu.
6. After you have made all of the changes, press the EXIT
button on the remote control to close the TIME menu.
TIME
Auto Sync
Clock
Off Time
On Time
Sleep Timer
OSD Timer
Auto Standby
Time Zone
Auto Sync
When Auto Sync is switched on the TV will take the time
from signals received by the TV through the broadcast
signals.
Use the buttons to switch the Auto Sync On or Off.
Clock
You can only use the clock feature if Auto Sync is set to
Off.
On
08:21
Off
20 S
4 H
London GMT
AdjustMove
items sub menu may appear. Use the and NOK
buttons to change the settings.
Highlight Clock using the buttons then press the OK
button. You will now
enter the Clock submenu.
Use the buttons to navigate through the menu.
or online at www.argos-support.co.uk If you still require further assistance, call one of our experts on 0345 604 0105.
TV systems management
49
Page 50

TV systems management
Let’s get started
Set the Year / Month / Day / Minute using the buttons
then press the OK button confirm and return to the main
menu.
Off Time
This feature will automatically turn then the TV off at a
specified time and on specified days.
Use the button to select Off Time then press the OK
button, the sub menu will now open.
Use the buttons to choose between Off / Once /
Everyday / Mon.~Fri. / Mon.~Sat. / Sat.~Sun./ Sun.
Press the button and set the hour using the
buttons.
Press the button and set the minutes using the
buttons.
After you have finshed setting the Off Time,press the
MENU button to return to the TIME menu.
On Time
This feature will automatically turn the TV on at a
specified time.
Use the button to select On Time then press the OK
button, the sub menu will now open.
Use the buttons to choose between Off / Once /
Everyday / Mon.~Fri. / Mon.~Sat. / Sat.~Sun. / Sun.
Press the button and set the hour using the
buttons.
Press the button and set the minutes using the
buttons.
Press the button and select the input source using the
buttons. Choose between DTV / Analogue TV / Radio
/Data / SCART / Component / YPbPr / HDMI 1 / HDMI 2 /
HDMI 3 / HDMI4 /Composite /AV.Press the button and
select a channel for TV or Radio using the buttons. Press
the button and
set the volume using the buttons.
After you have finished setting the On Time press the
MENU button to return to the main TIME menu.
Sleep Timer
This feature will automatically turn the TV into sleep
mode after a set time if no control buttons are pressed.
Use the buttons to choose between Off
/10/20/30/60/90/120/180/240 minues.
After you have finished setting the sleep timer, press the
MENU button to return to the main TIME menu.
OSD Timer
This feature how long the On Screen Display will be
shown for.
Use the buttons to choose between off / 5 / 15 / 30 /
60 seconds.
After you have nished setting the sleep timer, press the
MENU button to return to the main TIME menu.
Auto Standby
This feature will automatically turn the TV off and into
standby mode if no control or button is pressed. Choose
from Off / 3 Hours / 4 Hours / 5 Hours using the
buttons.
After you have finished setting the Auto Standby, press the
MENU button to return to the main TIME menu.
Time zone
This feature can only be used if Auto Sync is set to On.
Use to set the time zone the TV is being used in.
Use the button to select Time Zone then press the OK
button.
The Time zone submenu will now open. Use the
buttons to select the local time zone then press the OK
button.
50
If you require any technical guidance or find that your product is not operating as intended, a simple solution can often be found in the Troubleshooting section of these instructions,
TV systems management
Page 51

TV systems management
Let’s get started
Network
Use the ▼ button to select Network then press the
OK button.
Network
Network
Configuration
IP Config
Network Info
Network Test
Cable
Network Info
Press either the button or the OK button to view all the
relevant information concerning your network setup.
Network test
Press either the button or the OK button to open the
submenu. Once the menu is open you can check if your
network is working.
SETTING MENU
Note: The menu shown in the diagram has been
extended to show all available options. You will need to
use the buttons to scroll thought the menu to view all
of the options.
AdjustMove
ExitBack
Network Configuration
This is preset to cable and cannot be changed.
IP Config
Press or OK button to enter the sub menu and select
either Auto or manual setup using the buttons.
or online at www.argos-support.co.uk If you still require further assistance, call one of our experts on 0345 604 0105.
TV systems management
51
Page 52

TV systems management
Let’s get started
1. Press the MENU button on the remote control.
2. Press the buttons to select the SETTING menu
then press the OK button.
3. Use the buttons to navigate through the menu
and press the OK button to select the item you wish to
change.
4. The main SETUP menu may close and the selected
items sub menu may appear. Use the and OK
buttons to change the settings.
5. Press the MENU button on the remote control to
return to the SETTING menu.
6. After you have made all of the changes, press the
EXIT button on the remote control to close the
SETTING menu.
Language
The on screen display language is set to English and can
be changed.
Audio Language
Audio Language is the language certain items are played
in, depending on availability.
Press the button to select the Audio Language. Press
the OK button to the sub menu, then use the
buttons to select either Primary or Secondary then press
the button.
Press the button to select the Audio Language. Use the
buttons to select either Primary or Secondary then
press the button.
Select your preferred language from the selection using
the buttons, press the OK button to confirm.
Press the MENU button to return to the SETTING menu.
Hearing Impaired
Shows additional information for people with impaired
hearing when switched on (if supported by the
broadcaster). Use the button to select Hearing Impaired
then use the OK button to switch On or Off.
Blue Screen
Blue screen is used when there is no signal or during a
weak signal.
Use the button to select Blue Screen then use the OK
button to switch On or Off.
PVR File System
Use the button to select PVR File System then press the
OK button to open the PVR File System submenu.
Select Disk: Lets you select the USB drive you wish to
check using the buttons. You can then select which
disk to check using the buttons.
Timeshift Size: This lets you choose the amount
of memory the Timeshift function can use on a
connected USB device. Choose between 512MB / 1GB
/ 2GB / 4GB using the buttons.
Select your preferred language from the selection using
the buttons, press the OK button to confirm.
Press the MENU button to return to the SETTING menu.
Subtitle Language
Subtitle Language is the language certain items are
played in, depending on availability.
If you require any technical guidance or find that your product is not operating as intended, a simple solution can often be found in the Troubleshooting section of these instructions,
52
TV systems management
Page 53

TV systems management
Let’s get started
Format Start: Use this to reformat the USB drive, press
the OK button to start.
IMPORTANT: If you reformat the USB drive you will
loose all of the data on it. Always backup the drive
before reformatting it.
Speed Check: Use this feature to check the speed of
your USB drive by pressing the OK button.
First Time Installation
Use the button to select First TimeInstallation then
press the OK button.
This will now re scan all available TV and radio channels,
see pages 17 and 18 for more information.
Software Update (USB)
Insert the USB drive with the update on it into one of the
USB ports on your TV then turn your TV on by pressing
the power button. Follow the on screen information to
update your TV.
Restore Factory Default
Use the button to select Restore Factory Default then
press the OK button.
A warning window will open asking ‘Are you sure’, if you
wish to rest the TV to the factory settings press the
button. If you do not want to reset the TV press the
button.
HDMI CEC
Turn on Consumer Electronics Control (CEC) so that
you can control up-to 15 CEC-enabled devices that are
connected through HDMI directly from one remote
control.
Please note: CEC also allows for individual CEC-enabled
devices to command and control each other without
your intervention.
or online at www.argos-support.co.uk If you still require further assistance, call one of our experts on 0345 604 0105.
TV systems management
53
Page 54

Page 55

Entertainment Features 7
Page 56

Entertainment Features
Let’s get started
USING THE USB FEATURES
1. Always switch the TV off before attaching a USB
storage device to your TV.
2. Connect the USB storage device to one of the USB
ports on your TV.
3. Press the button on the remote control or TV to
turn the TV on.
4. Press the Menu button on your remote control. Use
the buttons to select MultiMedia from menu
then press the OK button to open.
Your TV screen will go temporarily blank when you
start recording as it takes a few seconds to stabilize the
connection to the USB storage device.
Always disconnect the USB storage device if it is not
going to be used for extended periods.
IMPORTANT: Some portable USB hard disks may require
more power than the TVs USB port can supply. To
ensure the correct operation of the USB hard disk please
use an appropriate power adapter with the hard disk.
If you are using a USB Hub, please ensure its mains
adapter is connected to the mains supply as the
total current consumption may exceed 500mA, the
maximum the TV can supply.
The maximum supported storage space the TV can read
is 1TB.
The file system only supports FAT32 format.
If you want to keep recorded DTV programmes the
transfer rate of the storage device must not be less
than 5MB/s, otherwise the picture and sound of the
programme will be affected and a warning statement
will be shown on the TVs screen. If this happens please
upgrade your USB storage device.
56
If you require any technical guidance or find that your product is not operating as intended, a simple solution can often be found in the Troubleshooting section of these instructions,
Entertainment Features
Page 57

Entertainment Features
Let’s get started
Viewing Movies:
Use the buttons to select Movie folder then press
the OK button.
1
Movie Music Photo File
Device Found:0
2
Use the buttons to select the USB device you want
to look in (if more than one device is connected to your
TV) then press the OK button.
Use the buttons to navigate to the Folder or file
and press the OK button to open.
/usb/sda1/_MSTPVR
15_Film4_20... 15_Film4_20... 15_Film4_20... 29_E4+1_20... 29_E4+1_20...
15_Film4_20... 15_Film4_20... 29_E4+1_20... 29_E4+1_20...15_Film4_20...
Directories: Files: 5 Total: 10 1/1
List of functions
Repeat: ALL
00:00:01 / 00:29:58
Play
Previous Next Pause Stop FB FF Repeat TimePlay Enlarge
Info0%PlaylistShirnk
Press “Menu” to Show/Hide Function Menu
Play: Press to play the programme.
Previous: Press to watch the previous programme in the
playlist.
Next: Press to watch the next programme in the play list.
Pause: Press to pause the programme.
Stop: Press to play back of the programme.
FB: Press repeatedly to rewind at x2 /x4 / x8 / x16 / x32
speeds.
FF: Press repeatedly to fast forwards at x2 / x4 / x8 / x16 /
x32 speeds.
Repeat: Press to select the repeat function you want.
Choose form NONE / ONE / ALL / RANDOM.
TimePlay: Allows you to select a time to start watching
the programme from.
Press “Menu” to control the Tool Bar
Use the buttons find the movie you watch press
the OK or II button to begin watch it in full screen.
Note: If you want to delete the movie press the RED
button on the remote control.
If you want to copy the movie press the BLUE button on
the remote control once to copy and again to paste.
If you press the menu button on the remote control
when the movie is playing the Movie Function Bar will
be displayed.
Use the buttons to select the different functions
available on the function bar, press the OK button to
select the function.
Enlarge: Allows you to enlarge the screen image
programme.
Shrink: Allows you to shrink the screen image of the
programme.
Playlist: Shows you a full list of films you can watch. Press
the EXIT button to mclose the submenu.
Info: Shows information about the programme you are
watching. Press the EXIT button to close the submenu.
or online at www.argos-support.co.uk If you still require further assistance, call one of our experts on 0345 604 0105.
Entertainment Features
57
Page 58

Entertainment Features
Let’s get started
Listening to music:
Use the buttons to select Movie folder then press
the OK button.
1
Movie Music Photo File
Device Found:0
Use the buttons to select the USB device you want
to look in (if more than one device is connected to your
TV) then press the OK button.
Use the buttons to navigate through the folders
and press the OK button to open the folder.
/usb/sda1
.fseventsd _MSTPVR .Trashes .Spotlight-V1... 01 Livin’ On...
01 Back in the...09 Blaze Of G. 03 Long Way...
Directories: Files: 4 Total: 8 1/1
List of functions
Repeat: ALL
00:00:05 / 00:04:11
Play
Repeat: ALL
Previous Next Pause Stop FB FF Repeat
Info1%Playlist
Press “Menu” to Show/Hide Function Menu
Play: Press to play the track.
Previous: Press to skip to previous track.
Next: Press to move to next track.
Pause: Press to pause the track.
Stop: Press to stop the track.
FB: Press to rewind the track.
FF: Use to fast forward the track.
Repeat: Press to select the repeat function you want.
Choose from NONE / ONE / ALL / RANDOM.
Playlist: Shows you a full play list. Press EXIT button to
close.
Info: Shows information about the track. Press EXIT
button to close.
Press the MENU button to hide and show the function
bar.
Press “Menu” to control the Tool Bar
When you find the music track you want to listen to
press the OK or II button to begin listening to it.
Note: If you want to delete the track press the RED
button on the remote control.
If you want to copy the track press the BLUE button on
the remote control once to copy and again to paste.
If you press the menu button on the remote control
when the movie is playing the Movie Function Bar will
be displayed.
Use the buttons to select the different functions
available on the function bar, press the OK button to
select the function.
Press the EXIT button to go back to the main USB menu.
58
If you require any technical guidance or find that your product is not operating as intended, a simple solution can often be found in the Troubleshooting section of these instructions,
Entertainment Features
Page 59

Entertainment Features
Press “Menu” to Show/Hide Function Menu
Let’s get started
Viewing photos
Use the buttons to select Photo folder then press
the OK button.
1
Movie Music Photo File
Device Found:0
Use the buttons to select the USB device you want
to look in (if more than one device is connected to your
TV) then press the OK button.
Use the buttons to navigate through the folders
and press the OK button to open the folder.
/usb/sda1
_MSTPVR .Trashes .Spotlight-V1... Poppy BD C...
Rosie NHGS...HHGS.JPG Rosie BD...
Press “Menu” to control the Tool Bar
When you find the photo you want to see to press the
OK or II button to view it.
Note: If you want to delete the photo press the RED
button on the remote control.
Directories: Files: 4 Total: 8 1/1
Poppy BD L...
List of functions
Play
Repeat: ALL
Previous Next Pause Stop Rotate - Rotate + Enlarge
90º 90º
MoveShrink Repeat Music InfoPlaylist
Play: Press to view the image.
Previous: Press to view the previous photo.
Next: Press to view the next photo.
Pause: Press to pause the photo.
Stop: Press to go back to the menu.
Rotate –: Press to rotate clockwise.
Rotate +:Press to rotate anti clockwise.
Enlarge: Press to shrink the image.
Move: Use the buttons to move around the image.
Press the EXIT button to close
Repeat: Press to select the repeat function you want.
Choose from NONE / ONE / ALL / RANDOM.
Music: If you have music on the USB drive it will be
played when viewing the photos.
Play List: Shows a list of all available photos. Press EXIT to
close the sub menu.
Info.: Press to view information about the photo you are
viewing. Press EXIT to close the sub menu.
Press the MENU button to hide and show the function
bar.
Press the EXIT button to go back to the main USB menu.
If you want to copy the track press the BLUE button on
the remote control once to copy and again to paste.
If you press the menu button on the remote control
when the movie is playing the Movie Function Bar will
be displayed.
Use the buttons to select the different functions
available on the function bar, press the OK button to
select the function.
or online at www.argos-support.co.uk If you still require further assistance, call one of our experts on 0345 604 0105.
Entertainment Features
59
Page 60

Entertainment Features
Let’s get started
Viewing photos
Use the buttons to select File folder then press the
OK button.
1
Movie Music Photo File
Device Found:0
Use the buttons to select the USB device you want
to look in (if more than one device is connected to your
TV) then press the OK button.
Use the buttons to navigate through the folders
and press the OK button to open the folder.
/usb/sda1
Directories: Files: 4 Total: 8 1/1
.fseventsd _MSTPVR .Trashes .Spotlight-V1... 01 Livin’ On...
Poppy BD C...
01 Back in the...09 Blaze Of G. 03 Long Way...
Rosie BD...
Rosie NHGS...
Press “Menu” to control the Tool Bar
Poppy BD L...
HHGS.JPG
When you find the music or photo file you want to see
to press the OK button.
Note: If you want to delete the photo press the RED
button on the remote control.
You will now be taken automatically to the photo or
music browser.
See the instructions for using the music and photo
browsers on pages 40 and 41 in these instructions for
more information.
Press the EXIT button to go back to the main USB
menu.
60
If you require any technical guidance or find that your product is not operating as intended, a simple solution can often be found in the Troubleshooting section of these instructions,
Entertainment Features
Page 61

Page 62

Page 63

Other information 8
Page 64

Other information
Helpful technical information
Specifications
Panel Size 31.5 inch diagonally
Display Type LED
Panel Technology TFT
Panel 60 Hz Vs. 120 Hz 60 Hz
Display Resolution 1366 x 768 Pixels
Panel Resolution 1366 x 768 Pixels
Aspect Ratio 16:9
Dynamic Contrast Ratio-Panel 1000:1
Brightness (Centre Typ.) Cd/M² 180 Cd/M²
Response Time (G To G) 8 ms
Lamp Life (Typ. Hours) 30,000 hours
Horizontal Viewing Angle (At CR>10) 176°
Vertical Viewing Angle (At CR>10) 176°
Wall-mount(LxW-mm/inch) 200*200(mm)/7.9’’x7.9”
We apologise for any inconvenience caused by any minor inconsistencies in these instructions, which may occur as a
result of product improvements and development.
64
If you require any technical guidance or find that your product is not operating as intended, a simple solution can often be found in the Troubleshooting section of these instructions,
Other information
Page 65

Other information
Helpful technical information
Plug replacement - UK and Ireland only
Should you need to replace the plug; the wires in the power
cable are coloured in the following way:
Blue – Neutral ‘N’
Brown – Live ‘L’
As the colours of the wires in the power cable may not
correspond with the coloured markings identifying the
terminals in your plug, and proceed as follows:
The blue wire must be connected to the terminal that is
marked with the letter N.
The brown wire must be connected to the terminal that is
marked with the letter L.
If the power lead is damaged, it must be replaced by a
qualified electrician.
Connect
brown lead
to ‘L’ - Live
i
5
Connect
blue lead
to ‘N’ Neutral
k
Energy label
This is called the product Fiche – the information needs to
be presented in the following order, also this maybe in the
form of a copy of the label, in colour or black and white –
the label however must display all the information below:
• Supplier’s name or trade mark
• Supplier’s model product model no.
• The energy effi ciency class of the model
• The visible screen diagonal in centimetres and in inches
• The on-mode power consumption
• The annual energy consumption
• The screen resolution in physical horizontal and vertical
pixel count
or online at www.argos-support.co.uk If you still require further assistance, call one of our experts on 0345 604 0105.
Other information
65
Page 66

Page 67

Product support 9
67
Page 68

Product support
Help is always at hand
Trouble shooting
Image persistence - ghosting
Please note that ghosting may occur while displaying a
persistent image (still or paused image). LCD TVs’ image
persistence may disappear after a short time. Try turning off
the TV for a while. To avoid this, do not leave the screen in
still picture mode for extended periods.
No power
If your TV has no power, please check the power cord plug
is connect to the mains power socket.
Poor picture
1. Have you selected the correct TV system?
2. Is your TV or house aerial located too close to a nonearthed audio equipment or neon lights, etc.?
3. Mountains or high buildings can cause double pictures or
ghost images. Sometimes you can improve the picture
quality by changing the direction of the aerial. Is the
picture or teletext unrecognisable?
4. Check if you have entered the correct frequency.
5. Please retune the channels.
6. The picture quality may degrade when two devices are
connected to the TV at the same time. In such a case,
disconnect one of the devices.
No picture
1. No Picture means that your TV is not receiving a
transmission. Have you selected the correct button on
the remote control? Try once more. Also make sure the
correct input source has been selected.
2. Is the aerial connected properly?
3. Are the plugs connected tightly to the aerial socket?
4. Is the aerial cable damaged?
5. Are suitable plugs used to connect the aerial?
6. If you are in doubt, consult your dealer.
No sound
1. Has the TV been set to mute? To cancel mute, press the “
” button, or increase the volume level.
2. Sound is coming from only one speaker. Is the balance
set to one extreme?
Remote control - does not operatea
Your TV no longer responds to the remote control. The
batteries may be exhausted, if so you can still use the
control buttons on the left side of the TV.
Input sources - can not be selected
1. If you cannot select an input source, it is possible that no
device is connected.
2. Check the AV cables and connections if you have tried to
connect a device.
Wrong OSD language
1. Select the language in the setup menu.
2. The language for the sound or subtitles on a DVD disc
cannot be changed.
3. Multilingual sound and/or subtitles are not recorded on
the DVD disc.
4. Try to change the sound or subtitles using DVD’s title
menu. Some DVD’s do not allow the user to change
these settings without using the disc’s menu.
68
If you require any technical guidance or find that your product is not operating as intended, a simple solution can often be found in the Troubleshooting section of these instructions,
Product support
Page 69

Product support
Help is always at hand
Supported file formats
Media
Movie
Music
Photo
File Extension
Video Audio
MPEG-1 MPEG-1 Layer 2/3
.mpg/.dat/.vob
MPEG-2 MPEG-2 Layer3
.mp3 -
.jpg
Format
MPEG-1 Layer3
MPEG-2 Layer3
Baseline Mode
Progressive Mode
Disposal information
Instructions for waste disposal:
Packaging and packaging aids are recyclable and should
principally be recycled. Packaging materials, such as foil
bag, must be kept away from children.
Information for Users on Disposal of old
Equipment and Batteries (European Union
only)
These symbols indicate that equipment with these symbols
should not be disposed of as general household waste.
If you want to dispose of the product or battery, please
consider the collection systems or facilities for appropriate
recycling.
Notice: The sign Pb below the
symbol for batteries indicates that
this battery contains lead.
Supported (Maximum resolution/Bit rate etc.)
Bit Rate: up to320Kbps
Sample Rate:32KHz,44.1KHz,48KHz
72x72<Baseline resolution<7680x4320
Progressive Mode Size<=1280x1024 File
Size<=10MB
The cold cathode fl uorescent lamp in LCD PANEL contains
a small amount of mercury; please follow the local laws or
regulations for disposal.
Information for Users in European Union
Countries
This symbol on the product or on its packaging means that
your electrical and electronic device should be disposed of
at the end of its service life separately from your household
wastes. There are separate collection systems for recycling
in EU.
For more information, please contact the local
authority or the dealer where you purchased
the product.
or online at www.argos-support.co.uk If you still require further assistance, call one of our experts on 0345 604 0105.
Product support
69
Page 70

Product support
Help is always at hand
Help and assistance
If you require any technical guidance or find that your TV is not operating as intended, a simple
solution can often be found in the Troubleshooting section of these instructions or online at
www.argos-support.co.uk
If you still require further assistance, call one of our experts on 0345 604 0105* . To help give us give you a fast and
efficient service please have the following information ready:
Model Ref.
You can find these on
the rating plate - a small
information panel (usually
Serial number
a sticker or metal plate) on
the rear of your product
Date of purchase
Local call rates applies*
This will be shown on
your receipt
Lines open 8am-7pm Monday to Saturday and 10am-4pm Sunday.
*Calls to Argos enquiry lines may attract a charge and set up fee from residential lines depending on your call plan/tariff.Mobile and other
providers costs may vary, see www.bt.com/pricing for details.
For security and training purposes, telephone calls to and from customer service centres may be recorded and monitored. Calls from Republic
of Ireland will attract international call charges.
70
If you require any technical guidance or find that your product is not operating as intended, a simple solution can often be found in the Troubleshooting section of these instructions,
Product support
Page 71

Product support
Help is always at hand
Disposal
• Ria sere nitempo rescien imiliae
rsperumquos volorio blam, oditate
corehent destibus aut est, si.
• dolestest am, que excestiis dio et, solore
parita dolorem ea dolectiam diam quibus
min pedi
• omniatenim aut qui tem quis et pelitistium
et audae. Equo ea idendes cimagna
temperchic te nonseque nonecate est
ommoluptatem doluptatur anis sint latior
serum volorec epelest omnihicate etus ilita
• delest, arion corem volupta tiuntis pratis
doluptatet volorro videmped essequid
essimpos di te volorum que sequides
moditatem veliti test, cum solorrum
• fugiasit ma nam idunt opta sapidic
iendigenit vendio dolupti num volorem
fugiani maximagnieni dolum audit dolore
aborum fuga. Ga. Ficidelit facimin.
For DTS patents,see http://patents.dts.com. Maunfactured
under license from DTS Licensing Limited.DTS,the
Symbol,DTS and the Symbol together are registered
trademark,and DTS TruSurround is a trademark of DTS,I nc.
DTS, Inc.All Rights Reserved.
©
If you are creating instructions, you
may find the following links helpful:
www.environmentlaw.org.uk
www.hse.gov.uk/waste/waste-electrical
or online at www.argos-support.co.uk If you still require further assistance, call one of our experts on 0345 604 0105.
Product support
71
Page 72

Product support
Help is always at hand
Call us now and activate your 12 month guarantee
Thank you for choosing Bush. Your new product is guaranteed against faults and
breakdowns for 12 months. Don’t forget to register it with us today so we can provide you
with our best possible after-sales service and useful updates.
www.bushregistration.co.uk
FREEPHONE*
0800 597 8548
Lines are open 8am - 8pm, 365 days a year. *Calls may be recorded and monitored.
Your Bush Guarantee
This product is guaranteed for twelve months from the date of original purchase. Any defect that arises due to
faulty materials or workmanship will be repaired free of charge (or if applicable the product will be replaced or the
purchase price refunded) where possible during this period by the dealer from who your purchased the unit.
The guarantee is subject to the following provisions:
• The guarantee does not cover accidental damage,
misuse, cabinet parts, knobs or consumable items.
• The product must be correctly installed and
operated in accordance with the instructions
contained in the manual.
re-sold or has been damaged by inexpert repair.
• Specifications are subject to change without notice.
• Bush disclaim any liability for loss or damage arising
from the breakdown of the product.
• It must be used solely for domestic purposes. The
guarantee will be rendered invalid if the product is
Important Data Protection Information
If you provide us with information about another
person, you confirm that they have appointed you
to act for them, to consent to the processing of their
personal data including sensitive personal data and
that you have informed them of our identity and the
purposes (as set out in the Important Data Privacy
notice displayed overleaf) for which their personal data
will be processed.
You are entitled to ask for a copy of the information
we hold about you (for which we may charge a small
fee) and to have any inaccuracies in your information
corrected.
Guarantor: Argos Limited - 489 - 499 Avebury Blvd. - Milton Keynes - MK9 2NW
If you require any technical guidance or find that your product is not operating as intended, a simple solution can often be found in the Troubleshooting section of these instructions,
72
Product support
• This guarantee is in addition to and does not
diminish your statutory or legal rights.
For quality control and training purposes, we may
monitor or record your communications with us.
If your personal details change, if you change your
mind about any of your marketing preferences or if you
have any queries about how we use your information,
please let us know by contacting our Data Protection
Officer, Domestic & General, Leicester House
17 Leicester Street, Bedworth, Warwickshire
CV12 8JP.
Page 73

Contact:
www.argos-support.co.uk
Helpline: 0345 604 0105
73
 Loading...