

Page 1
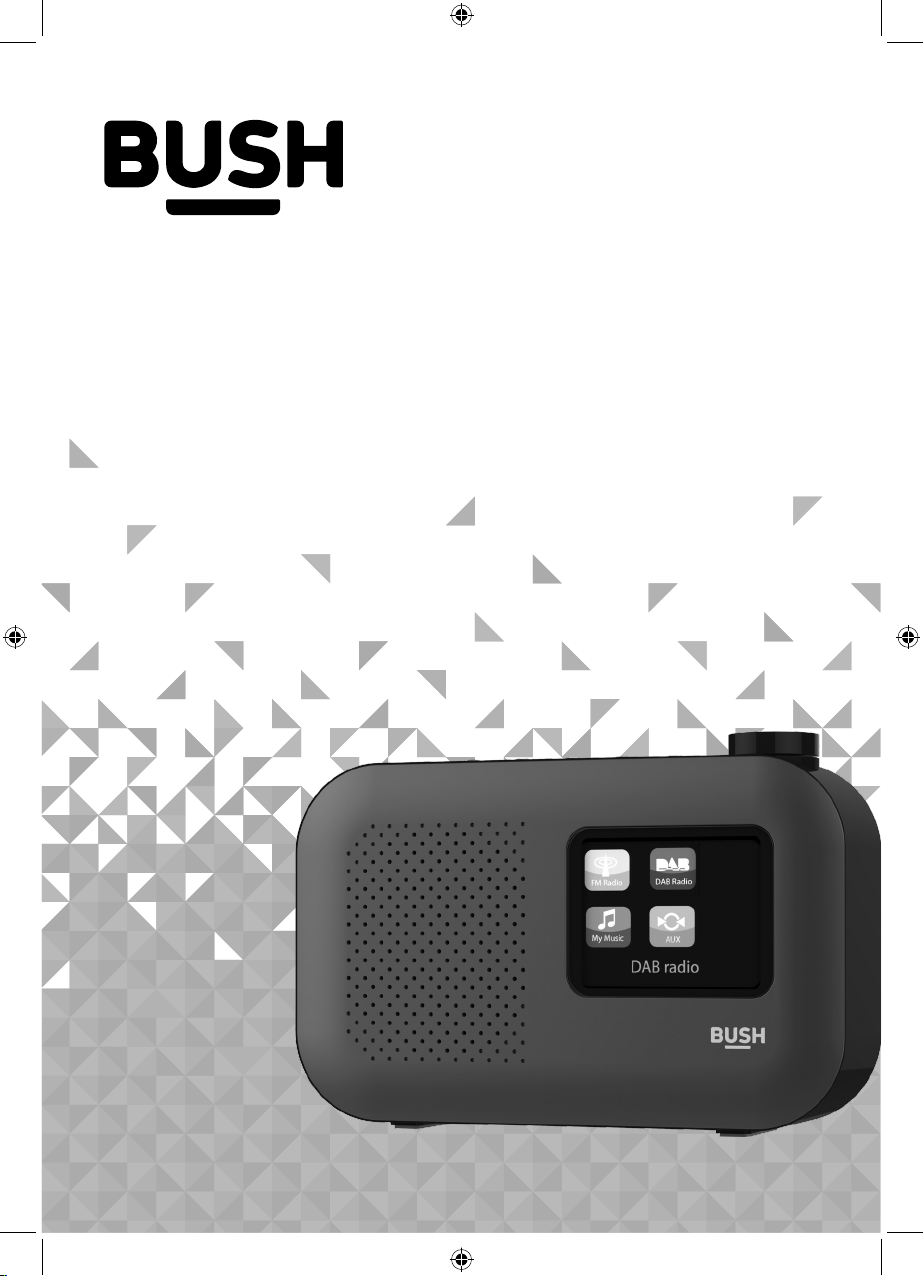
Instruction manual
DAB-182
Page 2
If you require any technical guidance or find that your product is not operating as intended, a simple solution can often be found in the
Troubleshooting
You’ll soon be enjoying your new DAB FM radio with colour screen.
It all begins here, with your instructions. Don’t worry, there’s
nothing too technical coming up. Just simple, step-by-step
guidance to get you up and running quickly. Sound good? Then
let’s get started.
Help and Guidance
We’re here to help you get the most from your DAB/FM radio with colour screen. Should
you require any guidance, a simple solution can often be found online at:
www.argos-support.co.uk
If you still require further assistance, call one of our experts on 0345 600 3021.
Page 3
section of these instructions, or online at www.argos-support.co.uk If you still require further assistance, call one of our experts on 0345 600 3021.
Contents
Safety information
1
Help and Guidance 2
General safety information 8
Moisture and water 9
Ventilation 9
Heat sources and flames 9
Getting to know your DAB FM radio
2
Positioning your DAB/FM Radio 14
Power connection 14
Inserting the batteries (optional) 14
Using your DAB FM radio
3
Telescopic aerial 18
Switch on 18
Adjusting the volume 18
Change the mode 18
Time and date 19
Using headphones 20
DAB Radio mode 20
Changing DAB stations 20
Scanning for DAB stations 20
Prune DAB stations 21
Storing a DAB station preset 21
Tune to a DAB station preset 22
DAB display information 22
Dynamic range control (DRC) 23
3
Page 4
If you require any technical guidance or find that your product is not operating as intended, a simple solution can often be found in the
Troubleshooting
Contents
FM Radio mode 24
Tuning to an FM station 24
Changing the Scan setting 24
Audio mode 25
Storing an FM station preset 25
Tune to an FM station preset 26
FM display information 26
Setting the alarm 27
Stop the Alarm 27
Snooze 28
Turn off the Alarm 28
Sleep timer 28
Cancel the Sleep timer 28
Display backlight timeout 29
Display language 29
Other information
4
Software version 32
Factory reset 32
Technical specification 33
Product support
5
Troubleshooting 36
Help and assistance 37
Disposal 38
Your Bush Guarantee 39
4
Page 5
This page is left intentionally blank
section of these instructions, or online at www.argos-support.co.uk If you still require further assistance, call one of our experts on 0345 600 3021.
Page 6
This page is left intentionally blank
Page 7

1Safety information
Page 8
Safety information
If you require any technical guidance or find that your product is not operating as intended, a simple solution can often be found in the
Troubleshooting
Safety information
Important - Please read these instructions fully before
installing or operating
General safety information
• Keep the product and all its parts out of reach of small children.
• This product is not intended for use by persons (including children) with reduced
physical, sensory or mental capabilities, or lack of experience and knowledge, unless
they have been given supervision or instruction concerning the use of the appliance
by a person responsible for their safety.
• Do not attempt to open the product. This product does not contain any user
serviceable parts. Unauthorised handling of the device may damage it and will void
your warranty.
• Do not use your radio near emergency/intensive care medical equipment or during an
electrical storm.
To avoid possible hearing damage, do not listen to this radio at high volume
levels for long periods of time. Always keep the volume within reasonable limits.
Power source
• Only use the power supply that came with the product. Using an unauthorised power
supply will invalidate your guarantee and may irrecoverably damage the product.
• Disconnect your radio from the mains power supply during thunderstorms.
• Always check that you have completely switched off your radio, before you change or
disconnect the power supply.
• Where the mains power plug or an appliance coupler is used as the disconnect
device, the disconnect device shall remain readily operable.
• If the radio will not be used for a long period of time, make sure that all of the batteries
are removed from the battery compartment and the mains power is unplugged.
• Only use recommended batteries or those of the same or equivalent type.
• Do not mix old and new batteries or batteries of different types.
• Batteries are to be inserted with the correct polarity.
• The supply terminals are not to be short-circuited.
8
Page 9
Safety information
Important - Please read these instructions fully before
installing or operating
Safety information
section of these instructions, or online at www.argos-support.co.uk If you still require further assistance, call one of our experts on 0345 600 3021.
• Remove the batteries from the radio if they will not be used for an extended period of
time.
• Never throw batteries in a fire or attempt to open the outer casing.
• Batteries are harmful if swallowed, so keep away from young children.
Moisture and water
• Keep it dry. Avoid exposure to precipitation, humidity and liquids which could all affect
the product circuitry.
• Do not leave it in low temperatures as moisture can form inside the product, which
may damage the circuit board.
Ventilation
• Do not block or cover slots, holes or openings on the product by placing on soft
furnishings such as carpets, rugs or beds as these are provided for functionality and/or
ventilation to ensure safe operation of the product
Heat sources and flames
• Do not leave it in high temperatures as electronic devices and plastic parts may warp
in heat.
• Keep it away from bright sunlight or heat sources, such as a radiator.
9
Page 10
This page is left intentionally blank
Page 11

2
Getting to know your DAB FM
radio with colour screen
Page 12
If you require any technical guidance or find that your product is not operating as intended, a simple solution can often be found in the
Troubleshooting
Getting to know your DAB FM radio
You’ll be up and running in no time
Ready? Let’s begin...
Please read these instructions carefully. They contain important information which will
help you get the best from your product and ensure safe and correct installation and
operation.
If you require any further assistance, our technical experts are happy to help. For full
details, refer to the product support section at the end of these instructions.
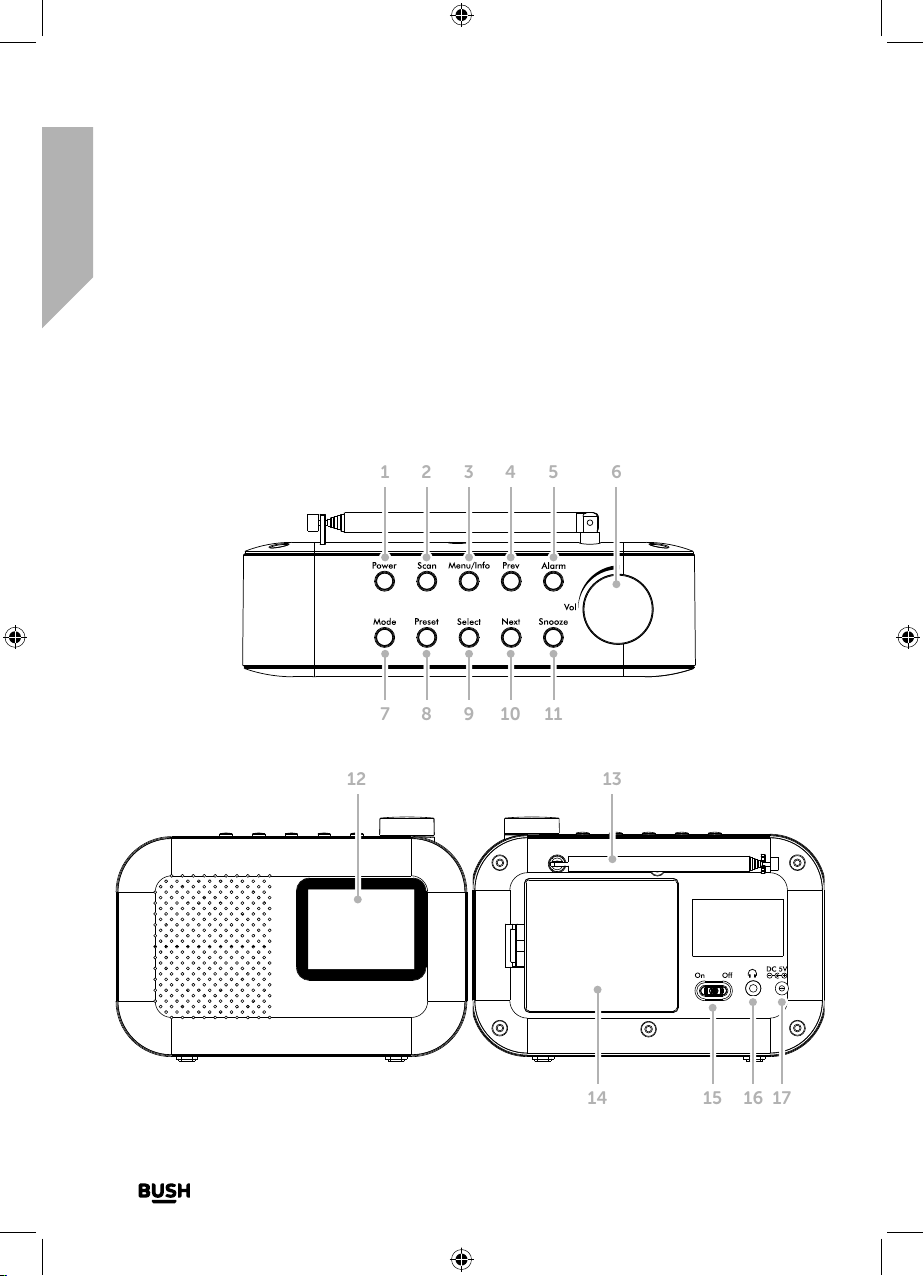
1 2 3 4 5 6
Fig 1.
7 8 9 10 11
12 13
Fig 2.
Fig 3.
14 15 16 17
12
Getting to know your DAB FM radio
Page 13
section of these instructions, or online at www.argos-support.co.uk If you still require further assistance, call one of our experts on 0345 600 3021.
Getting to know your DAB FM radio
You’ll be up and running in no time
1. Power on/standby
• Short press: Power on
• Short press Standby (Mains
power only)
• Short press: Power off
(Batteries only)
2. Scan for radio stations
3. Menu/Info
• Short press: Station information
• Long press: Enter the Menu options
• Short press (within the Menu):
Steps back and exits the Menu
4. Prev
» Short press:
• In DAB mode: Move up the
DAB station list
• In FM mode: Move down the
frequency band by 0.05MHz
• In the Menu: Move through the
Menu options
» Long press:
• In FM mode: Scan down the
frequency band
5. Alarm:
• Short press: Alarm options
6. Rotary volume control
7. Change the Mode (DAB/FM)
8. Radio presets
9. Select
10. Next
» Short press:
• In DAB mode: Move down the
DAB station list
• In FM mode: Move up the
frequency band by 0.05MHz
• In the Menu: Move through the
Menu options
» Long press:
• In FM mode: Scan up the
frequency band
11. Snooze
12. Backlit colour display
13. Telescopic radio aerial
14. Battery compartment
15. Power On/Off switch
16. Headphone socket
17. Power lead socket
Getting to know your DAB FM radio
13
Page 14
If you require any technical guidance or find that your product is not operating as intended, a simple solution can often be found in the
Troubleshooting
Getting to know your DAB FM radio
You’ll be up and running in no time
Positioning your DAB/FM Radio
Please consider carefully in advance where your radio will be situated and make sure that
it is:
• on a flat and stable surface.
• within 1.4 metres of a power socket (if using mains power). Please ensure that the
mains power lead is not a trip hazard.
• at least 1 metre away from other electrical appliances to avoid interference.
• where you can fully extend the telescopic aerial.
• never place your radio directly onto antique or polished surfaces.
Power connection
1. Connect the mains power lead into the socket on the back of the radio and fully
extend the telescopic aerial in a vertical position to obtain the maximum signal
strength.
2. Plug the power adaptor into the mains power wall socket and switch on.
3. Slide the On/Off power switch on the back of the radio to On. The product display
will light up, ‘Welcome to Digital Radio’ will be displayed and then your radio will go to
Standby mode.
Note: When you are using batteries to power your radio, slide the On/Off power switch
on the back of the radio to On, press and release the Power button, then the product
display will light up, ‘Welcome to Digital Radio’ will be displayed and then your radio
will immediately scan for DAB stations. There is no Standby mode when you are using
battery power.
Inserting the batteries (optional)
1. Before installing the batteries (not included) please ensure that the radio is switched off
(slide the power switch on the back to Off) and is unplugged from the mains power
supply.
14
Getting to know your DAB FM radio
Page 15
section of these instructions, or online at www.argos-support.co.uk If you still require further assistance, call one of our experts on 0345 600 3021.
Getting to know your DAB FM radio
You’ll be up and running in no time
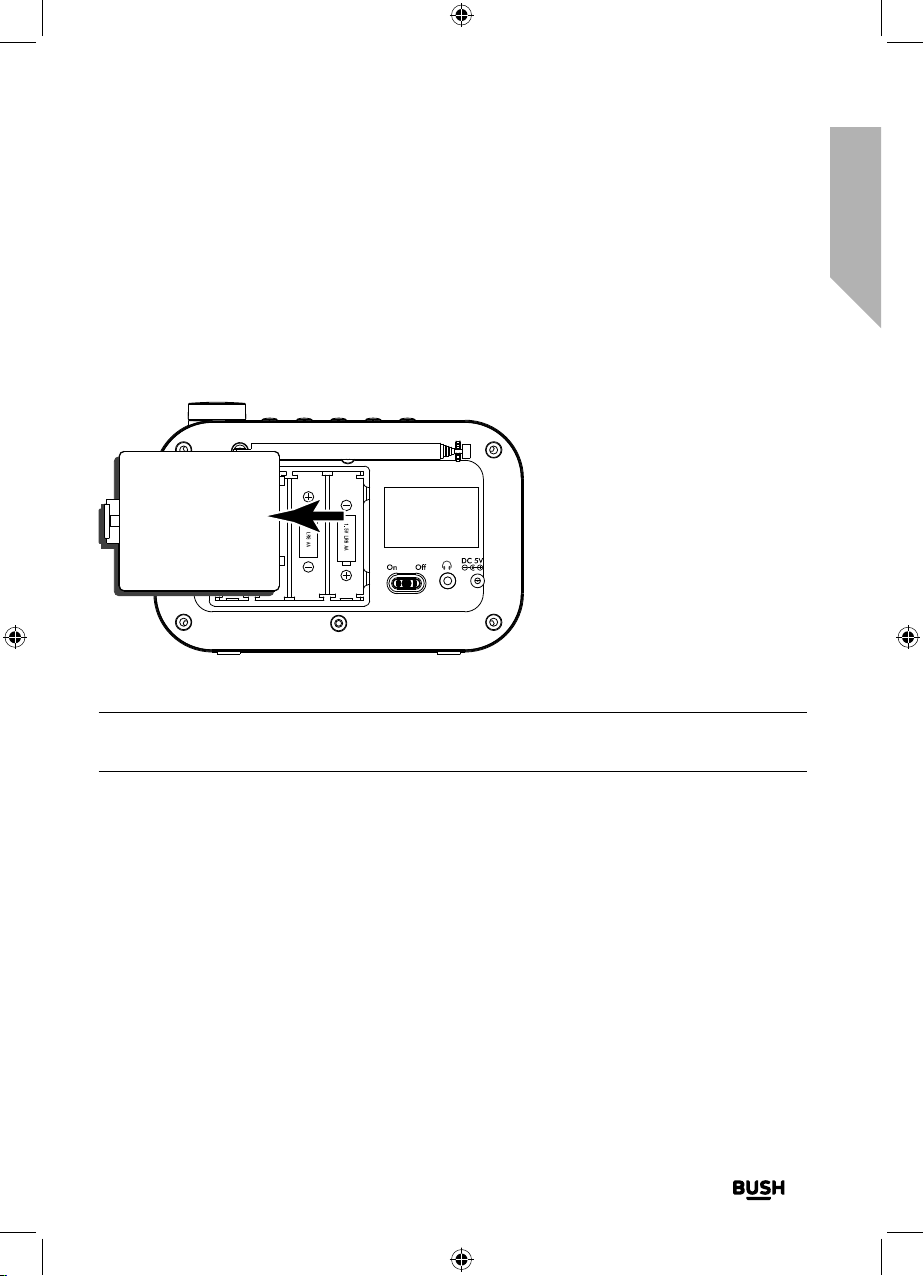
2. On the back of the radio, push in the tab to release and remove the battery
compartment cover.
3. Insert 4 x 1.5V AA-size (also known as LR6) batteries, making sure to note the ‘+’ and ‘-‘
markings and position the batteries the correct way around..
4. Replace the battery cover, making sure it ‘clicks’ shut.
Note: For battery operation, please ensure that the mains power is switched off and
remove the mains power plug from the socket, on the back of the radio.
Getting to know your DAB FM radio
15
Page 16
This page is left intentionally blank
Page 17

3
Using your DAB FM radio
with colour screen
Page 18

If you require any technical guidance or find that your product is not operating as intended, a simple solution can often be found in the
Troubleshooting
Using your DAB FM radio
Let’s get started
Telescopic aerial
Please make sure that the aerial is fully extended before you switch on your radio and
attempt to tune to a DAB station (a vertical position is recommended). This will ensure that
the maximum signal strength is available when the radio begins to scan. Extending the
aerial also ensures the best possible sound quality.
Switch on
1. Press and release the Power button on the top of your radio. Your radio will switch on
and begin an automatic scan for DAB stations. A progress bar will show the progress
of the scan and the number of stations found during the scan will also be displayed.
Note: When using battery power, your radio will scan for DAB stations after you slide
the On/Off power switch on the back of the radio to On. There is no Standby mode
when you are using battery power.
2. When the scan is complete your radio will select the first available station and begin to
play. Stations are listed in numerical and then alphabetical order by default.
Note: The DAB radio station list is stored in the memory and so the next time you
switch your radio on, the station search does not take place. It is possible to scan
manually for stations by pressing and releasing the Scan button.
Adjusting the volume
• Turn clockwise to increase the volume.
• Turn anti-clockwise to decrease the volume.
• Check the display, which will confirm the volume setting.
Change the mode
Press and release the Mode button to change between DAB and FM modes. Please check
the display, which will confirm the mode.
18
Using your DAB FM radio
Page 19
section of these instructions, or online at www.argos-support.co.uk If you still require further assistance, call one of our experts on 0345 600 3021.
Using your DAB FM radio
Let’s get started
Time and date
The first time you listen to DAB radio, the time and date of your product will be
synchronised automatically to that broadcast by the DAB service in 24 hour mode; which
is in line with daylight saving, so there is no need to set the time and date manually.
If you do wish to set the time and date manually, turn on the radio and follow the steps
below:
1. Press and hold the Menu/Info button to enter the menu options.
2. Press and release the Next button to scroll to System Settings. Press and release the
Select button.
3. Press and release the Next button to scroll to Time/Date. Press and release the Select
button. Set Time/Date is displayed. Press and release the Select button.
4. The day will flash. Press and release the Prev or Next button to scroll to the correct
day. Press and release the Select button.
5. The month will flash. Press and release the Prev or Next button to scroll to the correct
month. Press and release the Select button.
6. The year will flash. Press and release the Prev or Next button to scroll to the correct
year. Press and release the Select button.
7. The hour digits will flash. Press and release the Prev or Next button to scroll to the
correct hour. Press and release the Select button.
8. The minutes will now flash. Press and release the Prev or Next button to scroll to the
correct minutes. Press and release the Select button. ‘Time Saved’ is displayed and
the display returns to the Time/Date options.
You can now use the Prev and Next buttons, together with the Select button, as you did to
set the time and date to change the settings for:
• Auto Update to update the time from the DAB signal, FM signal, DAB or FM signal or
no update.
• Set 12/24 Hour clock display
• Set Date Format, DD-MM-YYYY or MM-DD-YYYY
Using your DAB FM radio
19
Page 20

If you require any technical guidance or find that your product is not operating as intended, a simple solution can often be found in the
Troubleshooting
Using your DAB FM radio
Let’s get started
Using headphones
You can connect headphones with a 3.5mm plug (not included) to your radio. The stereo
headphone socket can be found on the back of the radio at the bottom. When you
have headphones connected the radio speaker is switched off and all sound is via the
headphones.
Note: Always keep the volume within reasonable limits.
DAB Radio mode
Check that your radio is in DAB mode. If you are not already in DAB mode, press and
release the Mode button until you are in DAB mode (check the display).
The first time you use the Radio or if the station list is empty, your radio will automatically
begin to scan for DAB radio stations. A progress bar will show the progress of the scan
and the number of stations found during the scan will also be displayed.
If you were listening to a DAB station when you switched the radio off, then this station
will automatically be selected when you switch the radio back on.
Changing DAB stations
1. Press and release the Next and Prev buttons to scroll through the available stations.
2. When the station that you would like to listen to is displayed, press and release the
Select button to confirm. There will be a short delay whilst your radio tunes to your
selected station.
Scanning for DAB stations
With DAB radio, additional stations and services regularly become available so it’s a good
idea to carry out a manual scan every now and then to make sure that you have the most
up to date station listing stored within the memory of your Radio. If you have moved your
Radio to another location, e.g.: if you go on holiday, then it’s also a good idea to carry out
a manual scan.
20
Using your DAB FM radio
Page 21
section of these instructions, or online at www.argos-support.co.uk If you still require further assistance, call one of our experts on 0345 600 3021.
Using your DAB FM radio
Let’s get started
In DAB mode:
1. Press and release the ‘Scan’ button to begin a search for stations. The display will
change to ‘Scanning...’. A progress bar will show the progress of the scan and the
number of stations found during the scan will also be displayed.
Prune DAB stations
You can remove the DAB stations in the station list that cannot be received in your area.
These are listed with a ‘?’ prefix.
In DAB mode:
1. Press and hold the Menu/Info button to enter the menu options.
2. Press and release the Next button to scroll to Prune Invalid. Press and release the
Select button.
3. Proceed to prune the invalid stations Yes No is displayed. Press and release the Prev
button to scroll to Yes. Press and release the Select button to confirm and prune the
station list. Stations with a ‘?’ prefix will now no longer be displayed.
Storing a DAB station preset
Your radio can store up to 10 DAB radio stations in its preset memories for instant access
to your favourite stations.
1. Tune the Radio to the DAB radio station that you wish to preset.
2. Press and hold the Preset button for approximately 2 seconds until Save to Preset and
the numbered preset list is displayed.
3. Press and release the Prev or Next button to scroll to the preset location that you
would like to store the radio station to (1-10).
4. Press and release the Select button to confirm. Preset X saved, where ‘X’ is the number
of the preset (1-10), will be displayed.
Note: If there is already an existing DAB station stored under a preset, it will be over
written when you store the new station.
Using your DAB FM radio
21
Page 22

If you require any technical guidance or find that your product is not operating as intended, a simple solution can often be found in the
Troubleshooting
Using your DAB FM radio
Let’s get started
Tune to a DAB station preset
In DAB mode:
1. Press and release the Preset button. Preset Recall is displayed together with the
numbered preset list and the name or frequency of the station stored there, or (Empty)
if no previous station has been stored.
2. Press and release the Prev or Next button to scroll to the preset location and station
that you would like to listen to (1-10).
3. Press and release the Select button to confirm. The radio will instantly tune to that
station and begin to play.
Note: If no DAB station has been stored under the preset button, ‘! Preset Empty’ will be
displayed, then the radio will revert to the previously selected radio station.
DAB display information
When listening to a DAB station you can change the information that will appear on the
display. There are several different types of information that are sent by the broadcaster.
• Dynamic Label Segment (DLS) - this is text information supplied by the broadcaster.
Information could be the name of an artist or music title, DJ’s name, contact details
for the radio station etc.
• Program Type (PTY) - such as ‘Rock’, ‘Pop‘, Talk’ or ‘News’
• Multiplex Name - displays the broadcasting area and collection of radio stations on
this frequency e.g.: BBC National DAB, Digital 1 Network.
• Channel and Frequency - e.g.: 12B 225.648 MHz
• Signal error and Strength - the signal error is displayed as a number between 0-99. It
would not be possible to satisfactorily listen to a ratio station with a signal error rate of
30 or above. The signal strength is displayed as a row of solid rectangles. Two black
lines within the solid rectangles indicate the minimum signal strength for acceptable
listening. The stronger the signal, the further to the right the row of solid rectangles will
be. Try adjusting the aerial or relocating your radio to improve reception.
22
Using your DAB FM radio
Page 23
section of these instructions, or online at www.argos-support.co.uk If you still require further assistance, call one of our experts on 0345 600 3021.
Using your DAB FM radio
Let’s get started
• Signal information - the data rate at which the signal is being transmitted.
• Power source - mains or Battery power.
• Time and date - supplied by the broadcaster.
1. Repeatedly press and release the Menu/Info button to cycle through the different
information options.
Dynamic range control (DRC)
In DAB mode:
The dynamic range for each radio programme is set by the broadcaster for each radio
station and may be different for the types of programme broadcast, such as pop or
classical music or a chat show. The dynamic range control signal is transmitted in parallel
with the audio signal for each programme and with your radio you can use this control
signal to expand or compress the dynamic range (the difference between the loudest and
quietest sounds) of the reproduced audio signal. Changing the dynamic range can affect
the ‘loudness’ and/or ‘quality of sound’ of the programme that you hear so that it will be
more suited to your listening conditions and your own personal listening requirements.
e.g. in a noisy environment, where quiet sounds might be swamped, setting the
compression to maximum will ‘boost’ the quiet sounds, whilst keeping the loudest sounds
at their original level.
There are 3 levels of compression:
• DRC off - no compression. This is the default setting.
• DRC low - medium compression.
• DRC high - maximum compression.
1. Press and hold the Menu/Info button to enter the menu options.
2. Press and release the Next button to scroll to DRC. Press and release the Select
button. The current DRC setting will be highlighted.
3. Press and release the Next button to scroll through the options available and press and
release the Select button to confirm.
Using your DAB FM radio
23
Page 24
If you require any technical guidance or find that your product is not operating as intended, a simple solution can often be found in the
Troubleshooting
Using your DAB FM radio
Let’s get started
FM Radio mode
If you are not already in FM mode, press and release the Mode button to go to FM mode
(check the display).
If you were listening to an FM station when you switched the radio off then this station will
be automatically selected when you switch the radio back on.
Tuning to an FM station
• Press and hold the Next button to scan up the frequency band.
• Press and hold the Prev button to scan down the frequency band.
• Press and release the Next or Prev button to fine tune each frequency in 0.05MHz
steps.
Note: If reception is still poor try moving the radio to another location.
Changing the Scan setting
In FM mode:
1. Press and hold the Menu/Info button to enter the menu options.
2. Press and release the Next button until FM Scan setting is displayed. Press and release
the Select button. The current Scan setting will be highlighted.
There are two different options to choose from:
• Strong Stations Only - The scan will only stop when a strong signal strength is
received which should also result in a better audio quality. It is possible that the
station you are scanning for may be missed using this option.
• All Stations - The scan will stop for every station it receives, even if the signal
strength is poor.
3. Press and release the Next button to choose from the two options available and press
and release the Select button to confirm.
24
Using your DAB FM radio
Page 25
section of these instructions, or online at www.argos-support.co.uk If you still require further assistance, call one of our experts on 0345 600 3021.
Using your DAB FM radio
Let’s get started
Audio mode
The radio will automatically switch between Stereo and Mono, depending on the quality
of the signal being received but you can override this function and manually switch
between ‘Forced Mono’ and ‘Stereo Allowed’.
Note: As this is a Mono radio, you may wish to only select the ‘Stereo Allowed’ option if
you are listening to your radio using headphones.
1. Press and hold the Menu/Info button to enter the menu options.
2. Press and release the Next button to scroll to Audio Setting. Press and release the
Select button.
There are now two options of Stereo Allowed and Forced Mono displayed. The
current setting will be highlighted.
3. Press and release the Next button to choose from the two options available. Press and
release the Select button to confirm.
Storing an FM station preset
Your radio can store up to 10 FM radio stations in its preset memories for instant access to
your favourite stations.
1. Tune the radio to the FM radio station that you wish to preset.
2. Press and hold the Preset button for approximately 2 seconds until Save to Preset and
the numbered preset list is displayed.
3. Press and release the Prev or Next button to scroll to the preset location that you
would like to store the radio station to (1-10).
4. Press and release the Select button to confirm. Preset X saved, where ‘X’ is the number
of the preset (1-10), will be displayed.
Note: If there is already an existing FM station stored under a preset, it will be over
written when you store the new station.
Using your DAB FM radio
25
Page 26

If you require any technical guidance or find that your product is not operating as intended, a simple solution can often be found in the
Troubleshooting
Using your DAB FM radio
Let’s get started
Tune to an FM station preset
In FM mode:
1. Press and release the Preset button. Preset Recall is displayed together with the
numbered preset list and the name or frequency of the station stored there, or (Empty)
if no previous station has been stored.
2. Press and release the Prev or Next button to scroll to the preset location and station
that you would like to listen to (1-10).
3. Press and release the Select button to confirm. The radio will instantly tune to that
station and begin to play.
Note: If no FM station has been stored under the preset button, Preset Empty will be
displayed, then the radio will revert to the previously selected radio station.
FM display information
When listening to an FM station you can change the information that will appear on the
second line of the display.
• Radiotext (RT) - This is text information supplied by the broadcaster. Information could
be the name of an artist or music title, DJ’s name, contact details for the radio station
etc.
• Program Type (PTY) - Such as ‘Rock’, ‘Pop‘, Talk’ or ‘News’
• Station name or frequency - Such as BBC R4 or 93.30MHz.
• Audio mode – Stereo or Mono.
• Power source - Mains or Battery power.
• Time and date - supplied by the broadcaster.
1. Repeatedly press and release the Menu/Info button to cycle through the different
information options.
26
Using your DAB FM radio
Page 27
section of these instructions, or online at www.argos-support.co.uk If you still require further assistance, call one of our experts on 0345 600 3021.
Using your DAB FM radio
Let’s get started
Setting the alarm
Note: Check that the radio has the correct time and date before you set an alarm.
With your radio switched on (not in Standby mode):
1. Press and release the Alarm button.
2. Alarm 1 and .Alarm 2 are displayed. Use the Next button to highlight the alarm that
you’d like to set.
3. Press and release the Select button to display the Alarm information and options
available.
4. Use the Prev or Next button to scroll to each Alarm option in the list. Press the Select
button. Use the Prev or Next button to change each setting and press the Select
button to confirm.
Note: Remember to set the alarm radio volume to one that will wake you. The alarm
volume will increase progressively until it reaches the alarm volume you have set.
5. Check that you have selected to turn the Alarm ‘On’ before you exit the Alarm menu.
6. When an alarm has been set, an alarm clock symbol will appear at the bottom of the
display, when the radio is on. In Standby mode (Mains Power only), the time you have
set for each alarm (Alarm 1 and/or Alarm 2) will also be displayed.
Stop the Alarm
When the alarm sounds, press and release any button, Alarm off is displayed. Alternatively,
you can press and release the Snooze button (see Snooze function below).
Note: The alarm symbol will remain in the display and the alarm will sound again at the
same time the next day, unless it was set for ‘Once’ only.
Using your DAB FM radio
27
Page 28
If you require any technical guidance or find that your product is not operating as intended, a simple solution can often be found in the
Troubleshooting
Using your DAB FM radio
Let’s get started
Snooze
When the alarm sounds you can press and release the Snooze button to snooze for 10
minutes. A snooze time countdown will be displayed until the alarm sounds again.
Turn o the Alarm
1. Press and release the Alarm button. Use the Next button to highlight the alarm (1 or 2),
that you would like to turn off. Press and release the Select button.
2. Alarm is highlighted. Press and release the Select button to turn the alarm off (or on
again). ‘Off’ will now be displayed next to the alarm clock symbol in Standby mode.
Sleep timer
You can set your radio to turn off automatically using the sleep timer. You can choose
from Sleep off, 15, 30, 45, 60 and 90 minutes.
With your radio switched on (not in Standby mode):
1. Press and hold the Menu/Info button to enter the menu options.
2. Press and release the Prev or Next buttons to scroll to System Settings. Press and
release the Select button.
3. Sleep is highlighted. Press and release the Select button.
4. Press and release the Prev or Next buttons to scroll through the available sleep timer
options (Sleep off, 15, 30, 45, 60 and 90 minutes). Stop when the sleep time you
would like is displayed and press and release the Select button.
5. The sleep time half moon symbol together with the minutes that you have selected
will be displayed at the bottom of the radio display and will countdown until the radio
switches off.
Cancel the Sleep timer
With your radio switched on (not in Standby mode), follow the steps to set the Sleep timer,
as above, and select ‘Sleep Timer Off’ in step 4.
28
Using your DAB FM radio
Page 29

section of these instructions, or online at www.argos-support.co.uk If you still require further assistance, call one of our experts on 0345 600 3021.
Using your DAB FM radio
Let’s get started
Display backlight timeout
You can adjust the display backlight timeout. Options of permanently On, 10, 20, 30, 45,
60, 90, 120, and 180 seconds are available.
With your radio switched on (not in Standby mode):
1. Press and hold the Menu/Info button to enter the menu options.
2. Press and release the Prev or Next button to scroll to System Settings. Press and
release the Select button.
3. Press and release the Next button to scroll to Backlight. Press and release the Select
button.
4. Timeout is highlighted. Press and release the Select button. Press and release the Prev
or Next buttons to scroll to the backlight timeout option you would like. Permanently
On, 10, 20, 30, 45, 60, 90,120 or 180 second options are available. Press and release
the Select button.
You can now use the Prev or Next buttons to scroll and the Select button to confirm, as
you did to set the Backlight timeout, to change the settings for the backlight brightness for
the On level and Dim level. There are 3 options available, High, Medium and Low and the
current setting will be highlighted.
Display language
You can change the display language of your radio, there are 4 options available; English,
German, French and Italian. The current setting will be highlighted.
With your radio switched on (not in Standby mode):
1. Press and hold the Menu/Info button to enter the menu options.
2. Press and release the Prev or Next buttons to scroll to System Settings. Press and
release the Select button.
3. Press and release the Prev or Next button to scroll to Language. Press and release the
Select button.
4. Press and release the Prev or Next buttons to scroll to the language you would like.
Press and release the Select button to confirm.
Using your DAB FM radio
29
Page 30
This page is left intentionally blank
Page 31

Other information 4
Page 32

Other information
If you require any technical guidance or find that your product is not operating as intended, a simple solution can often be found in the
Troubleshooting
Other information
Helpful technical information
Software version
You can check the software version of your radio.
With your radio switched on (not in Standby mode):
1. Press and hold the Menu/Info button to enter the menu options
2. Press and release the Prev or Next buttons to scroll to System Settings. Press and
release the Select button.
3. Press and release the Prev or Next buttons to scroll to Software Version. Press and
release the Select button.
The software version will be displayed and you may wish to make a note of it here:
...................................................................................
Factory reset
You can reset your radio and restore all of the original factory settings.
Note: All of your settings, including stored radio station presets and the station list will
be deleted when you reset your radio.
With your radio switched on (not in Standby mode):
1. Press and hold the Menu/Info button to enter the menu options.
2. Press and release the Prev or Next buttons to scroll to System Settings. Press and
release the Select button.
3. Press and release the Prev or Next buttons to scroll to Factory Reset. Press and release
the Select button. Factory Reset Yes No will be displayed.
4. Press and release the Prev button to highlight Yes. Press and release the Select button.
32
Page 33

Other information
Helpful technical information
Other information
section of these instructions, or online at www.argos-support.co.uk If you still require further assistance, call one of our experts on 0345 600 3021.
5. Restarting... will be displayed. After a few seconds the display will change to ‘Wecome
to Digital Radio’ and will then go to Standby mode. When you next power on your
radio from Standby mode, it will begin an automatic scan for DAB stations. A progress
bar will show the progress of the scan and the number of stations found during
the scan will also be displayed. When the scan is complete your radio will select
the first available station and begin to play. Stations are listed in numerical and then
alphabetical order by default.
Technical specification
Power adaptor: Output DC 5V 1A
Input AC 100-240V 50/60Hz 0.2A
Batteries:
(Optional, not supplied): 4 x 1.5V AA size (LR6)
Audio output: 1 x 3W RMS
Frequency range:
DAB: Band III, 174 MHz to 240 MHz
FM: 87.5 MHz to 108 MHz
33
Page 34
This page is left intentionally blank
Page 35

Product support 5
Page 36
Product support
If you require any technical guidance or find that your product is not operating as intended, a simple solution can often be found in the
Troubleshooting
Product support
Help is always at hand
Troubleshooting
No sound / power:
• Adjust the volume.
• Check that the mains power wall socket is switched on and the power switch on the
back of the radio is On. Press and release the Power button on the top of the radio.
• If you have batteries fitted, they may be exhausted and need to be replaced. Please
use only good quality AA size batteries.
• You may have headphones connected. Either use the headphones to listen to your
radio or unplug the headphones.
Radio reception is poor:
• Fully extend the telescopic aerial to get the best reception and sound quality.
• Retune for radio stations, see pages 20 and 24.
• Try moving your radio to another location to see if reception improves.
• Check that you do not have other electrical equipment too close to your Radio,
causing interference.
• Visit www.digitalradionow.com for information about DAB reception in your area.
The function buttons do not respond:
• Check that the mains power wall socket is switched on and the power switch on the
back of the radio is On. Press and release the Power button on the top of the radio.
• If you are using batteries, they may be exhausted and need to be replaced.
• Try a reset to factory defaults. See page 32.
Note: All of your settings, including stored radio station presets and the station list awill
be deleted when you reset your radio.
36
Page 37

Product support
section of these instructions, or online at www.argos-support.co.uk If you still require further assistance, call one of our experts on 0345 600 3021.
Product support
Help is always at hand
Help and assistance
If you require any technical guidance or find that your DAB FM radio with colour screen is
not operating as intended, a simple solution can often be found in the Troubleshooting
section of these instructions or online at www.argos-support.co.uk
If you still require further assistance, call one of our experts on 0345 600 3021*. To help
give us give you a fast and efficient service please have the following information ready:
You can find these
Model Ref.
Serial number
on the rating plate - a
small information
panel (usually a sticker
or metal plate) on the
rear of your product.
Date of purchase
Local call rates applies*
This will be shown on
your receipt
Lines open 8am-7pm Monday to Saturday and
10am-4pm Sunday.
*Calls to Argos enquiry lines may attract a charge and set up fee from residential lines depending on
your call plan/tari. Mobile and other providers costs may vary, see www.bt.com/pricing for details.
For security and training purposes, telephone calls to and from customer service centres may be
recorded and monitored. Calls from Republic of Ireland will attract international call charges.
37
Page 38
Product support
If you require any technical guidance or find that your product is not operating as intended, a simple solution can often be found in the
Troubleshooting
Product support
Help is always at hand
Disposal
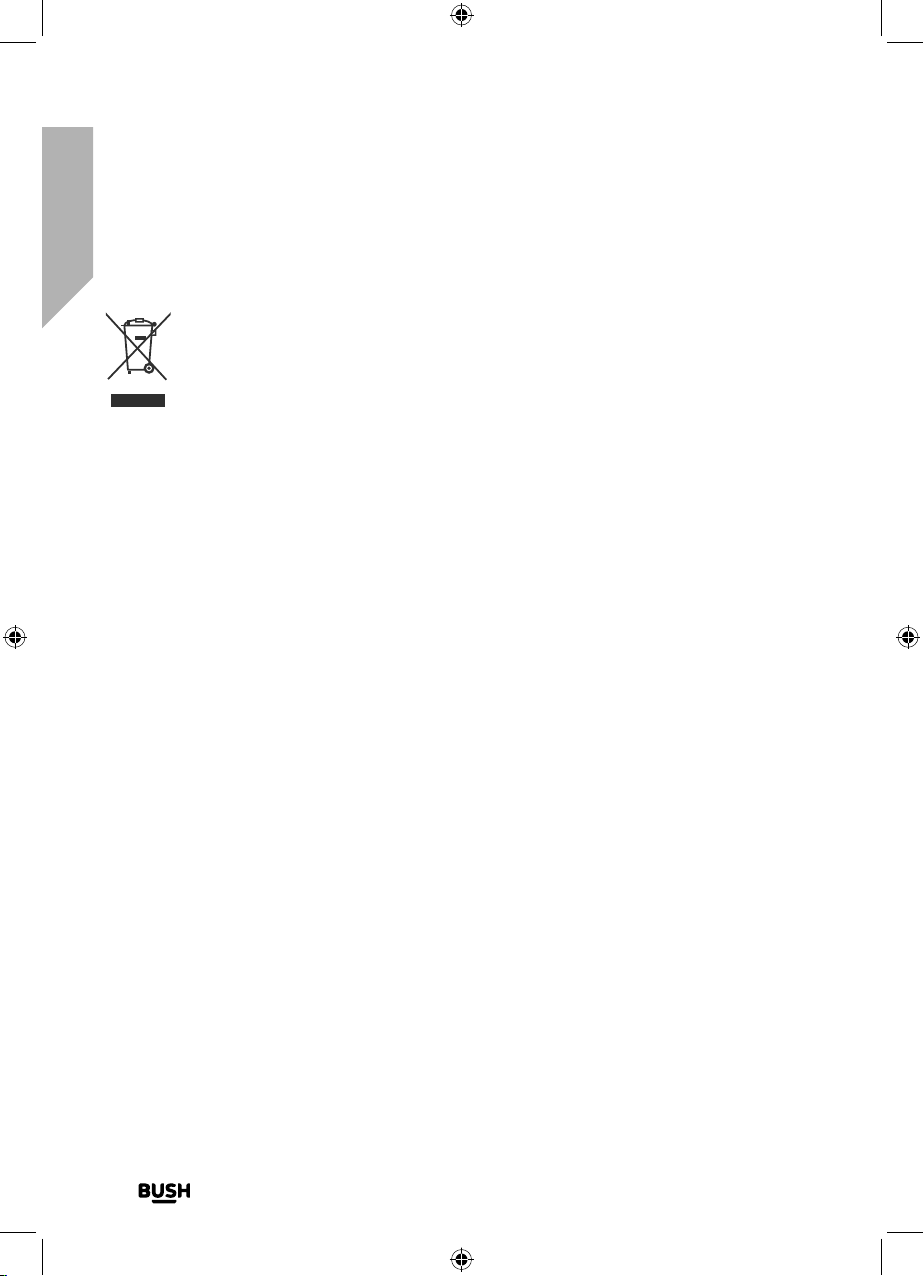
• This product should not be treated as normal household waste and it should
be recycled. Please take it to your nearest collection facility or for further
details contact your local council or visit www.recycle-more.co.uk
• Batteries contain substances that may be harmful to the environment and
human health. Keep out of the reach of children and seek immediate medical
help if swallowed.
• Batteries should not be disposed of in the normal household waste but taken
to appropriate local recycling facilities, where and when these are available.
• Never throw batteries in a fire or attempt to open the outer casing.
38
Page 39
Product support
section of these instructions, or online at www.argos-support.co.uk If you still require further assistance, call one of our experts on 0345 600 3021.
Product support
Help is always at hand
Call us now and activate your 12 month guarantee
Thank you for choosing Bush. Your new product is guaranteed against faults and breakdowns for 12 months.
Don’t forget to register it with us today so we can provide you with our best possible after-sales service and
useful updates.
www.bushregistration.co.uk
FREEPHONE*
0800 597 8548
Lines are open 8am - 8pm, 365 days a year. *Calls may be recorded and monitored.
Your Bush Guarantee
This product is guaranteed for twelve months from the date of original purchase. Any defect that arises due to
faulty materials or workmanship will be repaired free of charge (or if applicable the product will be replaced or the
purchase price refunded) where possible during this period by the dealer from who your purchased the unit.
The guarantee is subject to the following provisions:
• The guarantee does not cover accidental damage,
misuse, cabinet parts, knobs or consumable items.
• The product must be correctly installed and
operated in accordance with the instructions
contained in the manual.
• It must be used solely for domestic purposes. The
guarantee will be rendered invalid if the product is
Important Data Protection Information
If you provide us with information about another person,
you confirm that they have appointed you to act for
them, to consent to the processing of their personal
data including sensitive personal data and that you have
informed them of our identity and the purposes (as
set out in the Important Data Privacy notice displayed
overleaf) for which their personal data will be processed.
You are entitled to ask for a copy of the information
we hold about you (for which we may charge a small
fee) and to have any inaccuracies in your information
corrected.
Guarantor: Argos Limited - 489 - 499 Avebury Blvd. - Milton Keynes - MK9 2NW
re-sold or has been damaged by inexpert repair.
• Specifications are subject to change without
notice.
• Bush disclaim any liability for loss or damage arising
from the breakdown of the product.
• This guarantee is in addition to and does not
diminish your statutory or legal rights.
For quality control and training purposes, we may
monitor or record your communications with us.
If your personal details change, if you change your mind
about any of your marketing preferences or if you have
any queries about how we use your information, please
let us know by contacting our Data Protection
Officer, Domestic & General, Leicester House
17 Leicester Street, Bedworth, Warwickshire
CV12 8JP.
39
Page 40
Contact:
www.argos-support.co.uk
Helpline: 0345 600 3021
 Loading...