

Page 1
Instruction Manual
CBB193MP3S
CBB193MP3PINK
CBB193MP3PURPLE
Page 2
Contents
Safety Information 2-3
Safety precautions 2
Mains plug information 3
Disc handling 3
Accessories included 4
Functions & Controls 4
User Instructions 5-6
Battery installation 5
AC operation 5
General operation 5
CD/MP3CD operation 5-7
Radio operation 7
AUX operation 7
Care and Maintenance 8
Troubleshooting 8
Technical Specications 9
Disposal information 9
Guarantee 10
PLAY
POWER
ECO
PWR
REP.
REP.PRG./10+
FM ST.
PROG./10+
Product Codes
CBB193MP3
Page 1
Page 3
Safety Information
Important – Please read these instructions fully before installation
Safety Precautions
CAUTION: TO REDUCE THE RISK OF ELECTRIC
SHOCK, DO NOT REMOVE ANY COVER. NO
USER-SERVICEABLE PARTS INSIDE, REFER
ANY SERVICING TO QUALIFIED SERVICE
PERSONNEL.
• Please read this owner’s guide
• Please take the time to follow the instructions in this
owner’s guide carefully. It will help you set up and
operate your system properly and enjoy all of its
advanced features.
• Please save this owner’s guide for future reference.
• The product label is located on the back of the
product.
• This product must be used indoors. It is neither
designed nor tested for use outdoors, in recreation
vehicles, or on boats.
• Heed all warnings - on the product and in the
owner’s guide.
• Do not use this apparatus near water or moisture.
Do not use this product near a bathtub, washbowl,
kitchen sink, and laundry tub, in a wet basement,
near a swimming pool, or anywhere else that water
or moisture is present.
• Only use at tachments/ac cessories specied by the
manufacturer.
• Unplug this apparatus during lightning storms or
when unused for long periods of time - to prevent
damage to this product.
• Refer all servicing to qualied service personnel
• Servicing is required when the apparatus has
been damaged in any way: such as liquid has been
spilled or objects have fallen into the apparatus; the
apparatus has been exposed to rain or moisture,
does not operate normally, or has been dropped -
Do not attempt to ser vice this product yourself.
Opening or removing covers may expose you to
dangerous voltages or other hazards.
• To prevent risk of re or electric shock, avoid
overloading wall outlets, extension cords, or integral
convenience receptacles.
• Use proper power sources - Plug the product into a
proper power source, as desc ribed in the operating
instructions or as marked on the product.
• The mains plug is used as the disc onnect device, the
disconnect device shall remain readily accessible
CAUTION
RISK OF ELECTRIC SHOCK!
DO NOT OPEN!
This symbol means that this unit is double insulated. An
earth connection is not required.
CAUTION : CLASS 1 LASER PRODUCT
Use of contents or adjustments of performance of
procedures other than those specied Herein may
result in hazardous radiation exposure.
LASER SAFETY
This unit employs a laser, only qualied ser vice personnel
should attempt repair.
DANGER: Invisible laser radiation when open
and interlock failed or defeated avoid direct
exposure to beam.
CAUTION: hazardous laser radiation when open and
intelock defeated.
Page 2
Page 4
Safety Information
Important – Please read these instructions fully before installation
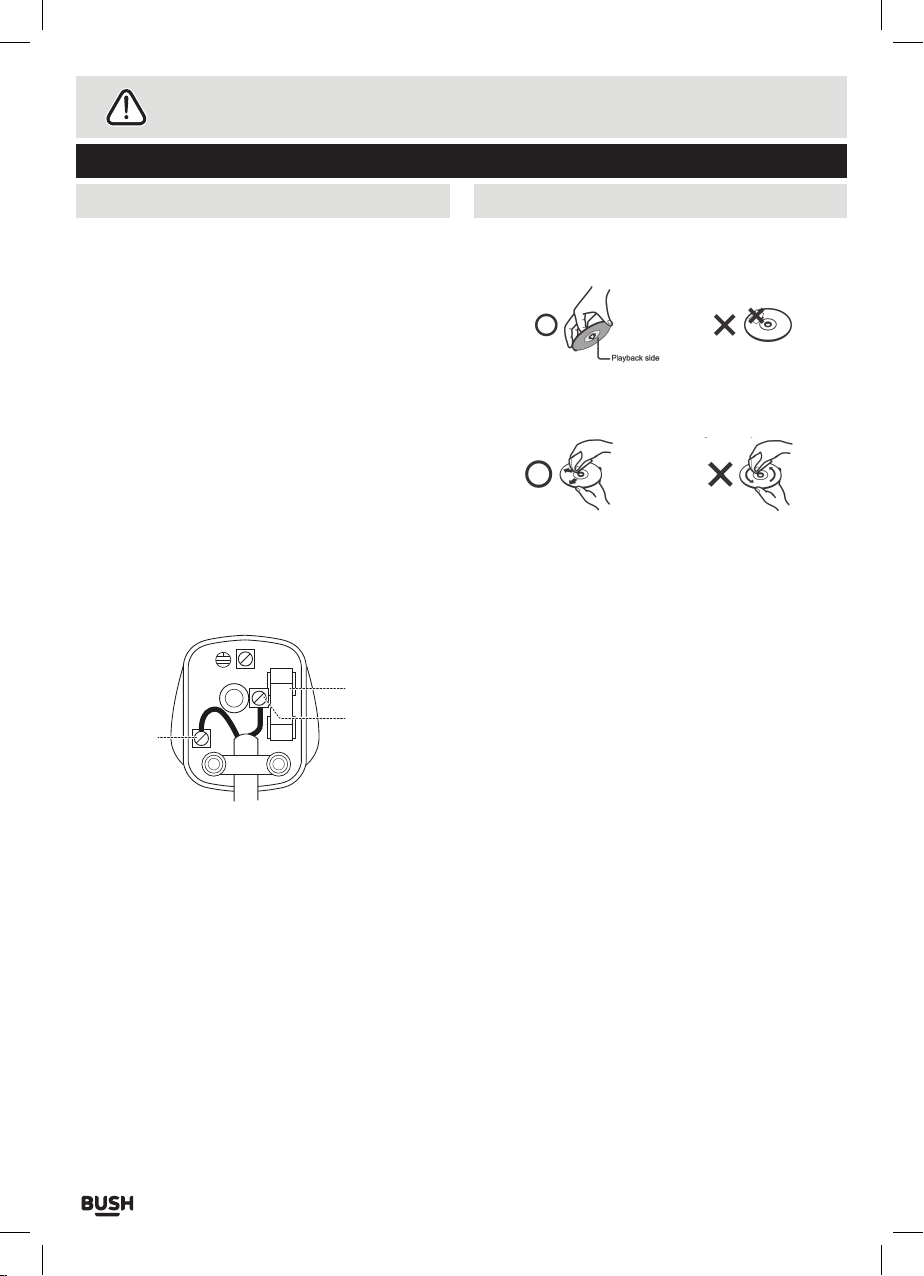
UK Mains plug information Disc handling
• Do not touch the playback side of the disc.
For your convenience a mains plug with a fuse
(3 Amp) has been tted to this appliance.
For your safety please observe the following
information.
• The unit is designed to operate on AC mains
supply 230 volts, 50 Hz.
• The wires in the mains lead are coloured in
accordance with the following code:
BLUE - NEUTR AL
BROWN - LIVE
• Under no circumstances should Neutral or Live
wires be connected to the ‘E’ (Earth) terminal.
E
L
N
BLUE TO
FUSE
BROWN TO
LIVE
NEUTRAL
• Do not att ach paper or tape to disc.
• Fingerprints and dust on the disc cause picture and
sound deterioration. Wipe the disc from the c entre
outwards with a soft cloth. Always keep the disc
clean.
• If you cannot wipe of f the dust with a sof t cloth, wipe
the disc lightly with a slightly moistened soft cloth
and nish with a dry cloth.
• Do not use any t ype of solvent such as thinner,
benzene, c ommercially available cleaners or
antistatic spray for vinyl. It may damage the disc.
• Do not store discs in a place subject to direct sunlight
or near heat source.
• Do not store discs in a place subject to moisture and
dust such as a bathroom or near a humidier.
• Store discs vertically in a case, stacking or placing
object on discs outside or their case may cause
warping.
Page 3
Page 5

Functions & Controls
TUNING
23
TUNING
OPEN/CLOSE
FM ST. MW
OFF CD RADIO
AUX
1
2
3
23
5
6
4
20
18
FM ST. MW
OFF CD RADIO
AUX
2
3
23
5
4
If you have damaged or missing parts,
call th e Customer Helpline: 0870 600 3030
Please familiarize yourself with the parts and accessories listed below
Accessories included
● 1 x CBB193MP3 Boombox ● 1 x Mains cable ● 1 x Instruction manual
Overview of controls
17
4
8
9
7 7
22
5
6
23
13. REPEAT indicator
14. REP. button
15. F. F W D b u t to n
16. PLAY/PAUSE/PWR resume button
17. Telescopic antenna
18. PLAY indicator
19. LED display
20. POWER indicator
21. AC MAINS input
22. VOLUME control
23. TUNING control
3
2
OFF CD RADIO
FM ST. MW
AUX
OPEN/CLOSE
1
MIN. MAX.VOLUME
21
1. CD compartment
2. AUX input
3. FUNCTION switch
4. Carry handle
5. BAND selection switch
6. OPEN/CLOSE latch
7. SPEAKERS
STOP button
8.
9. REW button
10. PRG./10+ button
11. PROG. indicator
12. FM ST. indicator
POWER
FM ST.
PROG./10+
11 121913
PLAY
ECO
PWR
REP.
REP.PRG./10+
TUNING
16
15
14
Page 4
Page 6

User Instructions
Battery installation Power supply
Follow the below instructions to install
batteries into the CBB193MP3 unit.
1. Open the battery compartment on the bottom of
the unit by applying pressure to the OPEN
symbol and sliding off in the direction indicated.
(see diagram below).
2. Insert 8 x C size batteries taking care to match
the + & - polarity symbols to the engraved
diagram inside the battery compartment.
3. Replace the batter y compartment cover.
AC OPER ATION
This unit is supplied with a mains cable.
To connect the power insert the figure 8 shaped
end into the rear of the unit (20).
Insert the UK plug into a household power socket,
and switch the power ON.
1. You will need to set the FUNCTION switch (3) to
either CD or AUX/RADIO for operation. Set to
the OFF position to turn the unit OFF.
AUTO STANDBY
Due to new ECO regulation requirements this
product incorporates a power saving feature.
When in CD mode or AUX mode, once audio
playback has ceased and the unit has stood
idle for approximately 15 minutes it will switch
into a ‘power-down’ power saving mode and the
POWER indicator will go off.
THIS IS NOT A FAULT.
To wake the unit up, press the P L AY/ PAU SE/
PWR button (15).
NOTE: The mains cable must be
detached from the AC socket of the player for
the batteries to power the unit.
Leaking batteries may damage the battery
cabinet and the player as a whole, so they should
be removed from the cabinet when becoming
flat or when the player is not to be used with
batteries for some time.
General operation
VOLUME CONTROL
1. Rotate the VOLUME control (22) clockwise to
increase the volume level.
2. Rotate the VOLUME control (22) anti-clockwise
to decrease the volume level.
CD/MP3CD operation
LOAD A DISC (CD/MP3CD)
1. Open the CD lid using the CD OPEN latch (6).
2. Load a disc onto the disc tray with the label side
facing up.
3. Close the CD door.
PLAY A DISC (CD/MP3CD)
1. Slide the FUNCTION (3) switch to the CD
position.
2. Follow the steps above to load a disc (if not
already loaded).
3. The player begins to read the disc immediately.
Page 5
Page 7

User Instructions
CD/MP3CD operation CD/MP3CD operation
4. When the disc is successfully read, the total
number of the tracks on the disc will appear on
the LED display (19) and playback follows with
the first track.
5. Press the PLAY/PAUSE/PWR button (15) once
to PAUSE the music playback, the track number
ashes to indicate the player is in Pause mode;
press the STOP button (8) to cease music
playback. The LED shows the total number of
tracks again.
SKIP TR ACKS AND SEARCH FOR A SPECIFIC
POINT TO PLAY (CD/MP3CD)
1. Press the
playback to skip to the next track. To skip to a
specic track ahead, press this button several
times until you reach the track number required.
2. Press the REW button (9) once during
playback to return to the beginning of the current
track. Press the REW button (9) twice
repeatedly to skip to the previous track. To skip
back to a specic track, press this button several
times.
3. Hold the F.FW D button (15) during playback
to fast forward the current track.
4. Hold the REW button (9) during playback to
fast rewind the current track.
5. Press the PROG./10+ button (10) once during
playback to skip 10 tracks ahead, twice to skip 20
tracks ahead. You can reach the last track of the
disc using this button.
PROGRAMMED PLAY (CD/MP3CD)
To program an alternative playback order of tracks
follow the below steps.
1. Make sure the unit is not playing anything.
2. Press the PROG./10+ button (10) once. The
program sequence “P01” ashes on the LED
display and the PROG. indicator (11) will ash.
3. Select the first track to be programmed using
F.FWD / REW (9,15 ) buttons.
4. Press the PROG./10+ button (10) again to store
and advance to the next programmed track.
The program sequence indication changes to
“P02” waiting for your next input.
5. Repeat the steps above to program more tracks.
A maximum of 20 tracks for CD and 99 tracks for
MP3CD can be programmed.
Page 6
F.F W D button (15) once during
NOTE: The letters ‘FUL’ will appear on the display
when no more tracks can be added to the program
sequence.
6. Press the PL AY/PAU S E button (3) to begin the
programmed playback in the preferred order. The
PROG. indicator (11) will illuminate.
7. Press the STOP button (8) to stop playback.
In program STOP mode, press the STOP button
again to clear the programmed sequence or
press the P L AY/PAU S E button to begin the
programmed playback again.
MP3CD PLAYBACK
While this unit is capable of playing MP3CDs there
are a few points of note.
MP3 tracks can be stored inside a single folder
or on the root of the disc. For example
FOLDER1 can store MP3’s but FOLDER2
inside FOLDER1 wont be readable.
See diagram below.
MP3
MP3
MP3
NOTE: It takes longer for the player to read an
MP3-CD than it does a CD -DA disc.
After an MP3CD is successfully read, the total
number of folders and tracks are shown on the LED
disp lay. A second later, playback begins from the
first track of the disc.
REPEAT SINGLE/ALL TRACK(S) (CD/MP3CD)
To repeat a track follow the steps outlined below.
1. During playback press the R E P. button (14)
once, you will see the R EPE AT indicator (13)
flash. This indicates the current track will repeat
until the STOP button (8) is pressed.
MP3
MP3
MP3
MP3
MP3
MP3
Page 8

User Instructions
CD/MP3CD operation AUX operation
2. During playback press the R E P. bu tto n (14)
twice, you will see the RE P E AT indicator (13)
illuminate steadily. This indicates that all the
tracks of the current disc will repeat until the
STOP button (8) is pressed.
3. To turn off the R E PEAT function press the R E P.
button (14) until the REP E AT indicator (13) goes
OFF.
Radio operation
OFF CD RADIO
FM ST. MW
AUX
OPEN/CLOSE
1. Slide the FUNCTION (3) switch to the AUX/
RADIO position.
2. Set the desired band with the BAND selection
switch (5).
3. Tune to the required station by rotating the
TUNING control (23).
4. The built-in AM antenna and external FM
telescopic antenna (17) are directional.
● When receiving an FM broadcast, fully extend
the telescopic antenna and angle it for the best
reception.
● For MW broadcasts, vary the position of the unit
until the best reception is located.
5. Adjust the volume to a comfortable listening level
using the volume control (22).
6. To turn off the unit, set the FUNCTION switch.
(19) to the OFF position.
AUX operation
NOTE: AUX SOCKET DOES NOT SUPPORT
HEADPHONE USE.
It is possible to connect an external audio source
like an MP3 player using a 3.5mm audio cable (not
supplied).
NOTE: When a 3.5mm cable is inser ted into
the AUX input socket (2), the RADIO audio will
be muted.
3. Press P L AY on the external audio source
EG:-MP3 playe r.
NOTE: the volume output is effected by the
volume level on the source EG: MP3 player so
make sure that is set to about 70-80% ( not too
loud to avoid distortion ).
4. Adjust the VOLUME control (22) on the unit to
the required listening level.
1. Connect one end of the cable to the MP3 players
headphone output and the other end to the AUX
input (2) on the top left of the unit.
2. Slide the FUNCTION (3) switch to the AUX/
RADIO position.
Page 7
Page 9

Care & Maintenance
Impor tant: Always unplug the appliance from the power socket during cleaning and
maintenance.
• Never use any sharp instruments or abrasive substances, soap, household cleaner, detergent or wax
polish for cleaning.
• Clean the external sur faces with a damp soft cloth only. Never use abrasive products or solvents as it
may damage the appliance.
Troubleshooting
In the unlikely event of difculties with your appliance please follow the trouble shooting guide below.
If the problem persists, contact the retailer if the machine is still under guarantee.
Customer helpline: 0870 600 3030
Problem Reason(s) Solution(s)
No Power ● Power cable not co nnected to wall so cket
● Power soc ket is not sw itched o n
● Auto Sta ndby mode a ctive
No Soun d CD/MP 3CD
No Soun d from AUX i nput
Sound i s disto rte d
Sound i s disto rte d from AUX i nput
Unabl e to Play ● No disc in t he tray
Static Sound ● Poor rec eptio n ● Re -loc ate the antenna (FM) or unit (M W)
● Volume is to o low
● 3.5mm audio cable is connecte d to the
AUX input (2).
● AUX sourc e volume i s too low
● Volume is to o high
● AUX sourc e volume i s too high
● Disc not l oaded properly
● Disc is di rty
● Make sure t he plug is c onnec ted
● Switch the power on
● Press th e PLAY/PAUSE/PWR button .
See page 5 ‘AUTO STANDBY’ se ction .
● Increa se the vol ume
● Remove the cable to a llow non AUX playbac k.
● Increa se the out put volu me of the AUX s ource.
● Reduce t he volum e
● Reduce t he outpu t volume of the AUX sou rce.
● Inser t a compatible di sc
● Check the disc lo aded
● Clean th e disc
Page 8
Page 10

Technical Specications
General
Power AC: 230-240V ~ 50Hz
Power Consumption AC: 12 Watts
Dimensions Approx. 258mm(L) x 200mm(W) x 115mm(H)
Tun e r
MW 540 - 1600 KHz
FM 88 - 108 MHz
CD Player
Playback system Compact Disc Digital Audio System
DAC 1 bit D/A converter With 8 times over sampling digital lter
Frequency response 100Hz -15KHz
S/N ratio >50dB
Dynamic range 90dB
Audio
Output Power 1W x 2 (RMS)
Speaker impedance 8 ohms
Disc Compatibility
Di s c Typ e CD-DA/CD-R/CD-RW/MP3-CD
Size 12cm & 8cm
MP3 Compatibility
Max Bitrate Up to 320kbps
Format VBR, CBR
DC: 12V UM-2 /”C” x 8pcs
We apologise for any inconvenience caused by any minor inconsistencies in these instructions,
which may occur as a result of product improvements and development.
This appliance complies with the following EEC directives: 2006/95/EEC Low voltage directive /
2004/108/EEC EMC directive
Disposal Information
The symbol on the product or its packaging indicates that this product may not be treated
as household waste. Instead it should be handed over to the applicable collection point for
the recycling of electrical and electronic equipment. By ensuring this product is disposed of
correctly, you will help prevent potential negative consequences for the environment and human
health, which could otherwise be caused by inappropriate waste handling of this product. For
more detailed information about recycling this product, please contact your local council ofce,
your household waste disposal service or the shop where the product was purchased.
Page 9
Page 11

Guarantee
PRODUCT GUARANTEE
This product is guaranteed against manufacturing defects for a period of
Year
This product is guaranteed for twelve months from the date of original purchase.
Any defect that arises due to faulty materials or workmanship will either be replaced,
refunded or repaired free of charge where possible during this period by the dealer from
whom you purchased the unit.
Page 10
The guarantee is subject to the following provisions:
The guarantee does not cover accidental damage, misuse, cabinet parts, knobs or
consumable items.
The product must be correctly installed and operated in accordance with the instructions
contained in this manual.
It must be used solely for domestic purpose.
The guarantee will be rendered invalided if the product is re-sold or has been damaged by
inexpert repair.
Specifications are subject to change without notice.
The manufacturer disclaims any liability for the incidental or consequential damages.
The guarantee is in addition to, and does not diminish your statutory or legal rights.
Guarantor: Argos Limited
489 - 499 Avebury Boulevard
Central Milton Keynes
MK9 2NW
 Loading...