

Page 1
Instruction manual
MODEL:CAB-91667
Page 2

Important Safety Instructions
CAUTION: TO REDUCE THE ELECTRIC SHOCK, DO NOT REMOVE THE
COVER (OR BACK). NO USER SERVICEABLE PARTS INSIDE. REFER
SERVICING TO QUALIFIED SERVICE PERSONNEL.
DANGEROUS VOLTAGE: The lighting flash with arrowhead symbol within an
equilateral triangle is intended to alert the user to the presence of uninsulated
“dangerous voltage” within the product’s enclosure that may be of sufficient
magnitude to constitute a risk of electric shock to persons.
ATTENTION: The exclamation point within an equilateral triangle is intended to
alert the user to the presence of important operating and maintenance (servicing)
instructions in the literature accompanying the appliance.
2
Page 3

Important Safety Instructions
Before using the unit, be sure to read all operating instruction carefully, please note that
these are general precautions and may not pertain to your unit. For example, this unit may
not have the capability to be connected to an outdoor antenna.
1. Read these instructions – All the safety and operating instructions should be read
before the appliance is operated.
2. Keep these instructions – The safety and operating instructions should be kept for
future reference.
3. Heed
4. Follow all instructions – All operation and use instructions should be followed.
5. Clean only with dry cloth – The appliance should be cleaned only as recommended
6. Do not block any ventilation openings. Install in accordance with the manufacturer’s
7. Do not install near any heat sources such as radiators, heat registers, stoves, or
8. Do not defeat the safety purpose of th
9. Protect the power cord from being walked on or pinched particularly at plugs,
10. Only use attachments / accessories specified by t
11. Use only with a cart, stand, tripod, bracket, or table specified by the
12. Unplug this apparatus during lightning storms or when unused for long periods of
13. Refer all servicing to qualified service personnel. Servicing is required when the
14. Power Sources – The appliance should be connected to a power supply only of the
15. Battery shall not be exposed to excessive heat such as sunshine, fire or the like.
16. Danger of
17. Do not attempt to dismantle, open or repair this product yourself. If a fault occurs,
18. Caution marking and nameplate are located on back or bottom of product.
all warnings – All warnings on the appliance and in the operating instructions
should be adhered to.
by the manufacturer.
instructions. The appliance should be situated so that its location or position does not
interfere
situated on a bed, sofa, rug, or similar surface that may block the ventilation
openings; or placed in a built-in installation, such as a bookcase or cabinet that may
impede the flow of air through the ventilation openings.
other apparatus (including amplifiers) that produce heat.
plug has two blades and a third grounding prong. The wide or the third prong are
provided for your safety. If the provided plug does not fit into your outlet, consult an
electrician for replacement of the obsolete outlet.
convenience receptacles, and the point where they exit from the apparatus.
manufacturer, or sold with the apparatus. When a cart is used, use
caution when moving the cart/apparatus combination to avoid injury
from tip-over.
time.
apparatus has been damaged in any way, such as power-sup
damaged, liquid has been spilled or objects have fallen into the apparatus, the
apparatus has been exposed to rain or moisture, does not operate normally, or has
been dropped.
type described in the operating instructions or as marked on the appliance. Do not
overload wall outlet.
equivalent type.
seek advice from your local qualified service technician or contact the distributor via
the telephone number at the back of this instruction manual.
with its proper ventilation. For example, the appliance should not be
e polarized or grounding-type plug. A polarized
he manufacturer.
ply cord or plug is
explosion if battery is incorrectly replaced. Replace only with the same or
3
Page 4
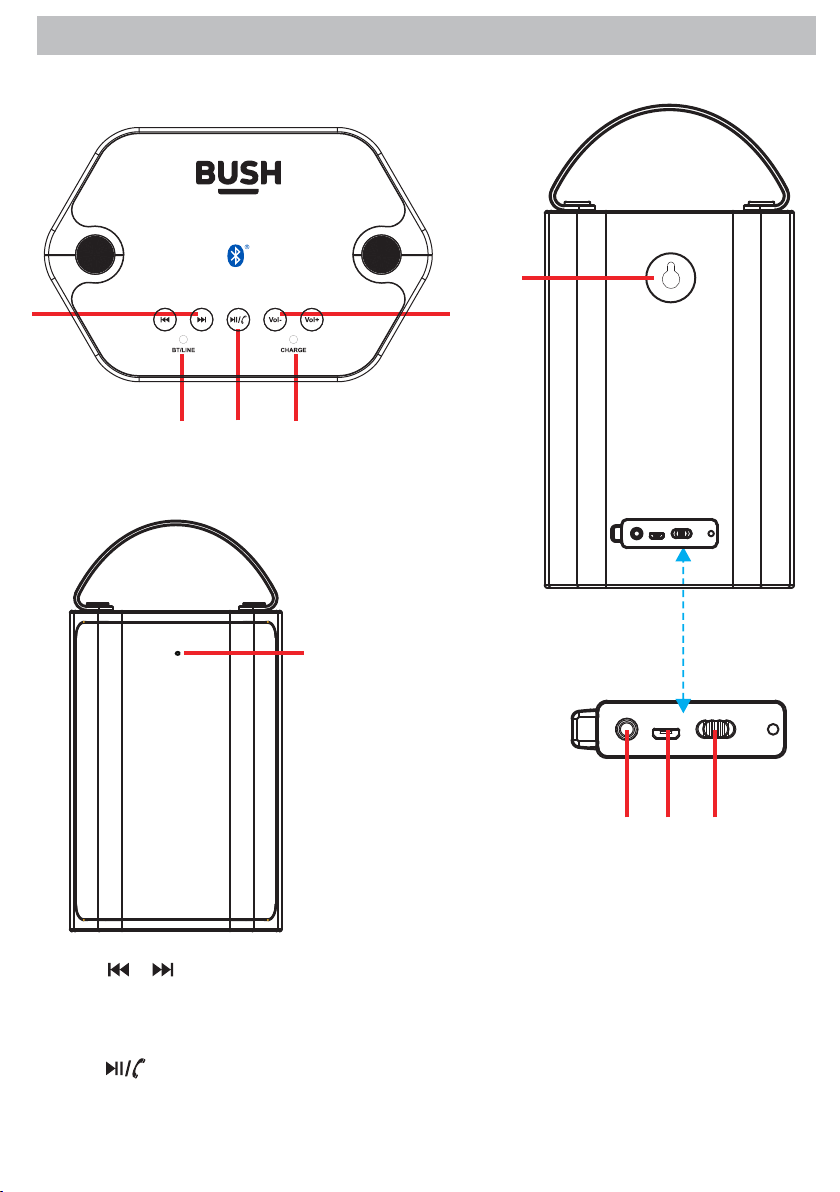
PRODUCT OVERVIEW
TOP VIEW
1
FRONT VIEW
REAR VIEW
7
2
4
3
5
ON OFF
DC IN
LINE IN
6
1. / (Previous/Next) Button
2. Vol - / Vol + (Volume Down / Volume Up) Button
3. BT/LINE Indicator
4. (Play/Pause/Hands-free) Button
5. Charge Indicator
4
ON OFF
DC IN
LINE IN
9
8
10
6. Built-in Microphone
7. Mounting Hole
8. LINE IN Jack
9. DC IN Port
10. Power ON/OFF Switch
Page 5
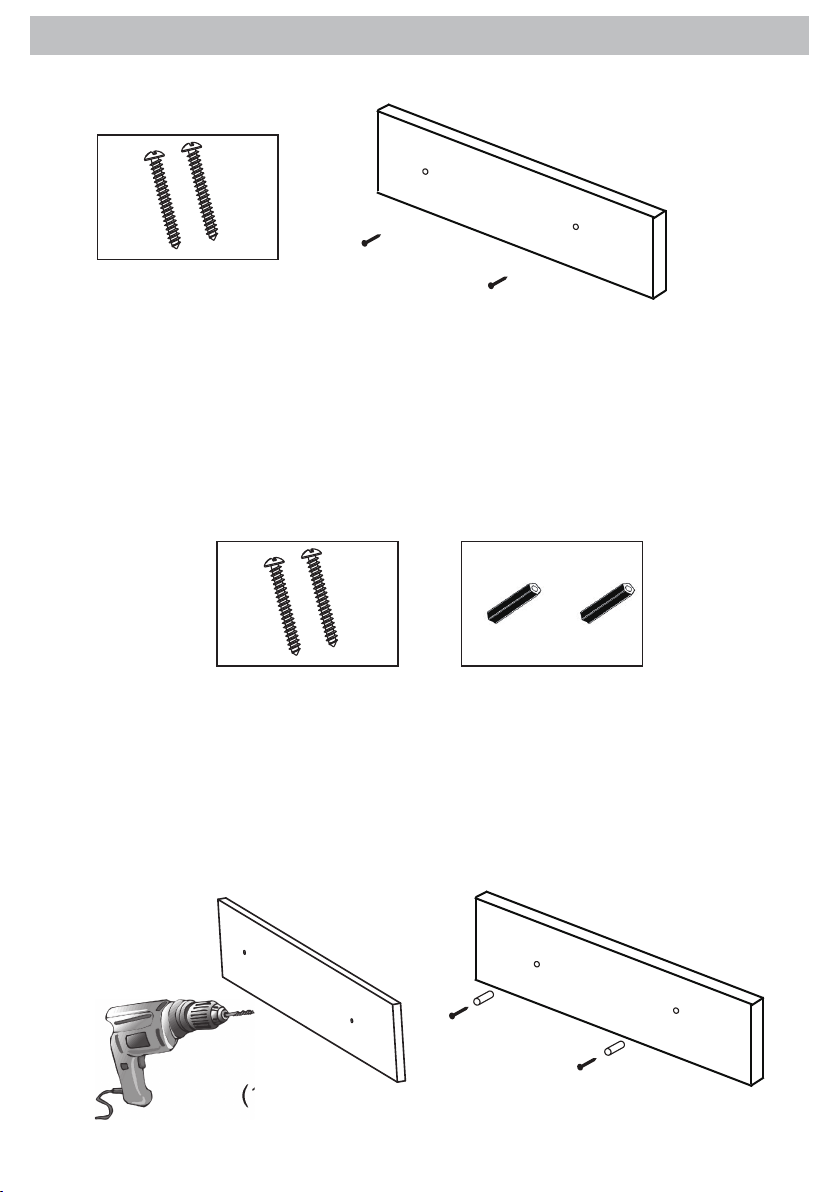
MOUNTING
A. Mounting On The Wooden Wall
A. Mounting On The Wooden Wall
2 pieces screws
1. Mark the position of the mounting screws on the wall using a pencil.
2. Drill the screws(not supplied) directly into the marks that you have made on the wall
and leave approx. 0.3 inch length to hook.
3.Put the two units on the mounting screws. Make sure they are firm and stable.
B: Mounting On The Brick Wall
B: Mounting On The Brick Wall
2 pieces screws
1. Mark the position of the mounting screws on the wall using a pencil.
2. Drill 2 x 7/32 inch diameter holes by a powerful electric drill ( Not Supplied ).
3. Insert the plastic inserts(not supplied) into the holes by hammer(Not Spplied)
4. Secure the screws into the plastic insert (not supplied) and leave approx. 0.3 inch
length to hook.
5.Put the two units on the mounting screws. Make sure they are firm and stable.
(1 )
2 pieces plastic inserts
(2)
5
Page 6

BATTERY CHARGING
1.Connect Micro-USB cable to DC-in Jack on rear panel.
2.Connect the USB plug to a free USB port on a computer or a 5V USB AC adapter (not
supplied).
During charging, the charging indicator will turn red, and it will turn off after fully charged.
LINE IN OPERATION
1.Connect media player via 3.5mm Audio cable to the LINE IN jack on the rear panel of the unit
by the supplied Audio Connection Cable as the figure below:
Audio
Player
2. Push the power switch to "ON" position to power on the unit.
3. Power on the connected external player and start playback as usual.
ON OFF
DC IN
LINE IN
Rear View of the Unit
6
Page 7

BLUETOOTH PAIRING AND CONNECTION
NOTE:
Before pairing, make sure the LINE IN cable is not plugged into the LINE IN jack.
If the two units were connected and paired before, the two units will connect and pair with each
other automatically.
FIRST TIME PAIRING
1. Push the power switch to "ON" position to power on both units, the two units will send a sound,
and the BT/LINE indicator will flash.
2. Touch and hold " " button on one of the two units, then touch and hold " " button on
another unit at the same time, the two units will search and pair with each other.
The unit from which the " " button being touched will be the main unit.
3. After successful pairing and connection, a chime will be heard and the BT/LINE indicator on
main unit will flash. (the BT/LINE indicator on deputy unit will stay lit).
4. Open the bluetooth on bluetooth enabled audio player or mobile phone and try to search and
pair with the main unit, the pairing name "CAB-91667
5. After successful connection, the BT/LINE indicator on main unit will stay lit.
6. Play track on bluetooth enabled audio player or mobile phone as usual.
NOTE:
NOTE:
Repeat the operation of STEP 2 to switch the main unit before pairing with bluetooth enabled
audio player or mobile phone.
If the main unit had been switched before connected with the bluetooth enabled audio player
or mobile phone, the bluetooth enabled audio player or mobile phone must search the main
unit again although there is "CAB-91667" listed on pairing name list.
" will appear, select and
make connection.
During playing:
A:Touch or button to skip to previous or next track.
B:Touch button to pause, touch again to resume playing.
C:Touch VOL + or VOL - button to increase or decrease the volume.
The A, B, C operation above are simutaneous during playing.
For example, touch VOL + button on one of the two units, the volume on both units will increase.
DISCONNECTION:
Holding the button on main unit to cut off connection between main unit and bluetooth
enabled audio player or mobile phone.
Holding the button on deputy unit to cut
unit. (To reconnect the deputy unit, please pause playing on main unit, and restart deputy unit.
After reconnection with main unit again, touch VOL - to set to minimum volume, then touch
VOL + to set to the desired volume.)
NOTE:
The two units will enter standby mode without any audio output or operation after about 30 minutes.
Please restart two units and make connection again when unsuccessful connnection happen in
some special circumstance.
off connection between main unit and the deputy
7
Page 8

INCOMING CALLING DURING PLAYING IN BT MODE
An incoming call received during playing in bluetooth mode, operate as the followings:
Touch " " button on the main unit to answer the incoming call.
Touch " " button on the main unit again to end the call after conversation.
Holding the " " button on the main unit to refuse the call.
Double press " " button on the main unit to redial the last called number.
NOTE:
Deputy unit is out of function in calling mode.
BT/LINE Indicator Mode
Red Line In Mode
Flash Blue Bluetooth Pairing
Blue Bluetooth Connected
Blue
Calling Mode
Charge Indicator
Red Charging
Off Fully Charged
Mode
8
Page 9

TROUBLESHOOTING GUIDE
Check the followings before requesting service
SYMPTOM POSSIBLE CAUSE POSSIBLE SOULTION
No power
No sound
Sound distortion
/rattle
Bluetooth
reception failure
The power is consumed
Volume in minimum position
The paired/connected device
is not in payback mode
Volume level too high
The external device is far from
the unit
Have not paired
Recharge the unit.
Raise volume level by pressing the VOL
(Volume) + button.
Play music/movie in the paired/connected
device as usual
volume level of it is in high level.
Reduce the volume level by pressing
the
VOL (Volume ) - button.
Reduce the volume level of the paired/
connected device.
Put the external BT device close to the
unit.
Pair the unit with the BT Device as the
procedures stated in this manual.
and make sure the
9
Page 10

SPECIFICATION
Speaker output power..............................................................................................2X5W
Built-in battery............................................................................................3.7V,2500mAh
Charging power........................................................................DC 5V 1000mA
Bluetooth working range........................................................approximately 33 feet (10m)
Playing time.................................................................around 5 hours (with 50% volume)
is a trademark on a registered trademark of Bluetooth
SIG Inc. All other trademarks and trade names are
those of their respective owners.
ACCESSORY
1 X Instruction manual
1 X Micro USB charging cable
1 X 3.5 mm LINE IN cable
10
Page 11

Product support
Help is always at hand
Disposal
The symbol on the product or its packaging indicates that this product may not be treated
as household waste. Instead it should be handed over to the applicable collection point for
the recycling of electrical and electronic equipment.. By ensu
correctly, you will help prevent potential negative consequences for the environment and
humanhealth,which chould otherwise be caused by inappropriate waste handling of this
product.. For more detailed information about recycling this products ,please contact
product was purchased.
This product is intended for use within the UK. This equipment complies with the
essential requirements for the Radio Equipment Directive 2014/53/EU
ring this product is disposed of
Declaration of Conformance
Hereby, Argos Ltd, declares that this Band II LPD device is in compliance with the
essential requirements and other relevant provisions of Directive 2014/53/EU
The complete declaration of conformity can be obtained by contacting
http://www.argos-support.co.uk.
If you require any technical guidance or find that your product is not operating as intended, a simple solution can often be found in the Troubleshooting
11
Page 12

Product support
Help is always at hand
Help and assistance
If you require any technical guidance or find that your Bluetooth CD Boombox is not
operating as intended, a simple solution can often be found in the Troubleshooting
section of these instructions or online at www.argos-support.co.uk
If you still require further assistance, call one of our experts on . To help 0345 604 0105
give us give you a fast and efficient service please have the following information ready:
You can find these
Model Ref.
Serial number
on the rating plate - a
small information
panel (usually a sticker
or metal plate) on the
rear of your product.
Date of purchase
Local call rates applies*
This will be shown on
your receipt
Lines open 8am-7pm Monday to Saturday and
10am-4pm Sunday.
*Calls to Argos enquiry lines may attract a charge and set up fee from residential lines depending on
your call plan/tariff. Mobile and other providers costs may vary, see www.bt.com/pricing for details
For security and training purposes, telephone calls to and from customer service centres may be
recorded and monitored. Calls from Republic of Ireland will attract international call charges.
section of these instructions, or online at If you still require further assistance, call one of our experts on .www.argos-support.co.uk 0345 604 0105
12
Page 13

Product support
Help is always at hand
Call us now and activate your 12 month guarantee
Thank you for choosing Bush. Your new product is guaranteed against faults and breakdowns for 12 months.
Don’t forget to register it with us today so we can provide you with our best possible after-sales service and
useful updates.
www.bushregistration.co.uk
FREEPHONE*
0800 597 8548
Lines are open 8am - 8pm, 365 days a year. *Calls may be recorded and monitored.
Your Bush Guarantee
This product is guaranteed for twelve months from the date of original purchase. Any defect that arises due to
faulty materials or workmanship will be repaired free of charge (or if applicable the product will be replaced or the
purchase price refunded) where possible during this period by the dealer from who your purchased the unit.
The guarantee is subject to the following provisions:
• The guarantee does not cover accidental damage,
misuse, cabinet parts, knobs or consumable items.
• The product must be correctly installed and
operated in accordance with the instructions
contained in the manual.
• It must be used solely for domestic purposes. The
guarantee will be rendered invalid if the product is
Important Data Protection Information
If you provide us with information about another person,
you confirm that they have appointed you to act for
them, to consent to the processing of their personal
data including sensitive personal data and that you have
informed them of our identity and the purposes (as
set out in the Important Data Privacy notice displayed
overleaf) for which their personal data will be processed.
You are entitled to ask for a copy of the information
we hold about you (for which we may charge a small
fee) and to have
corrected.
section of these instructions, or online at www.argos-support.co.uk If you still require further assistance, call one of our experts on 0345 604 0105.
any inaccuracies in your information
Guarantor: Argos Limited - 489 - 499 Avebury Blvd. - Milton Keynes - MK9 2NW
re-sold or has been damaged by inexpert repair.
• Specifications are subject to change without
notice.
• Bush disclaim any liability for loss or damage arising
from the breakdown of the product.
• This guarantee is in addition to and does not
diminish your statutory or legal rights.
For quality control and training purposes, we may
monitor or record your communications with us.
If your personal details change, if you change your mind
about any of your marketing preferences or if you have
any queries about how we use your information, please
let us know by contacting our Data Protection
cer, Domestic & General, Leicester House
O
17 Leicester Street, Bedworth, Warwickshire
CV12 8JP.
13
Page 14

 Loading...