

Page 1
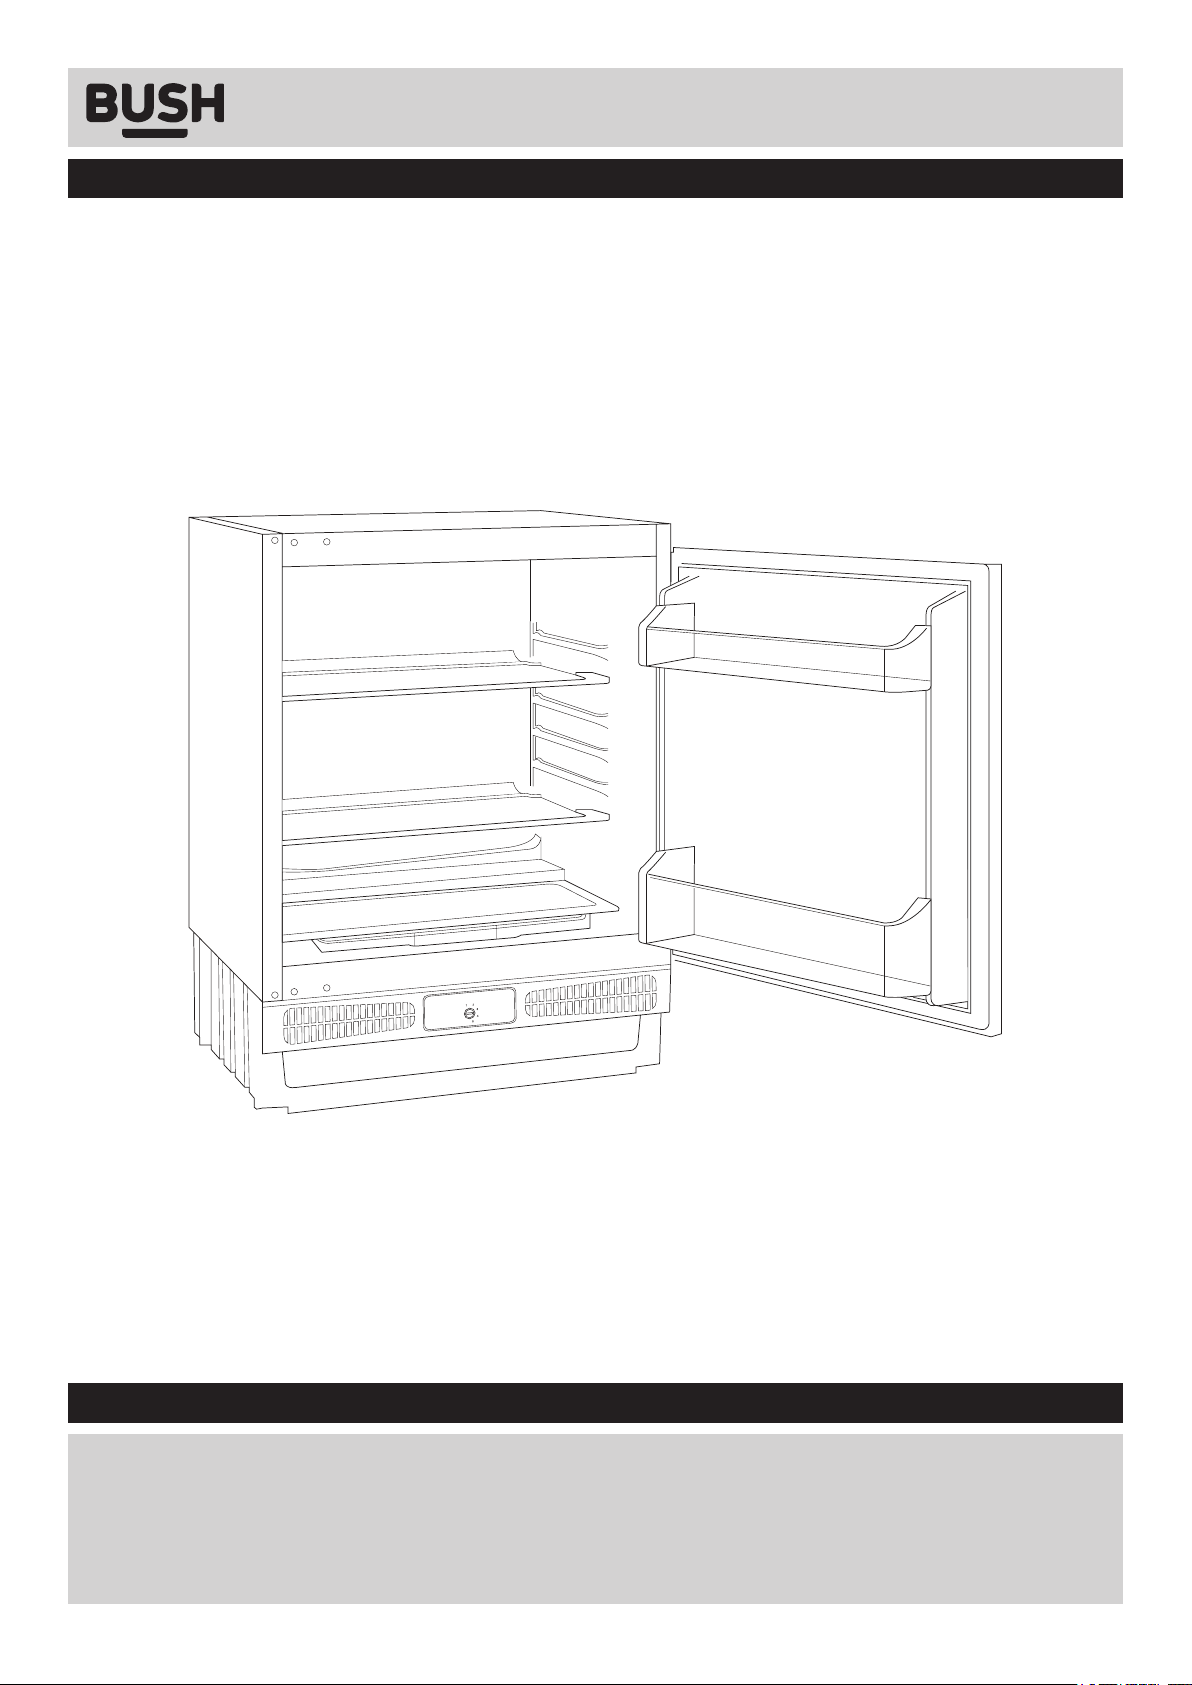
BUILT IN LARDER
Installation & User Instructions - Please keep for future reference
BUCL6082
Important - Please read these instructions fully before installing or using
These instructions contain important information which will help you get the best from your appliance
and ensure safe and correct installation, use and maintenance.
If you need help or have damaged or missing parts, call the Customer Helpline: 0345 257 7271
Issue 1 - 05/01/2015
Page 2

Contents
DESCRIPTION OF PRODUCTS &
CONTENT ...................................................3
BEFORE USING THE APPLIANCE ...........4
General warnings ........................................ 4
Old and out-of-order fridges ........................ 5
Disposal of your old appliance .................... 5
Safety warnings ........................................... 5
Installing and operating your fridge ............. 6
Before using your fridge .............................. 6
Electrical Connection (For UK type plug) 6
INSTALLATION ..........................................8
Installation kit contents ................................ 8
Tools required .............................................. 8
Dimensions for installation .......................... 9
Installing top bracket.................................... 9
Fitting the door gasket ................................ 10
Height adjustment ....................................... 10
Position the larder ....................................... 11
Securing the larder ..................................... 11
Fitting the cabinet door ............................... 12
Installing the plinth ...................................... 14
Reversing the door ..................................... 15
Customer Helpline: 0345 257 7271
USER INFORMATION ...............................16
Thermostat settings .................................... 16
Warnings for temperature settings ............. 16
ARRANGING FOOD IN THE APPLIANCE 17
CLEANING AND MAINTENANCE ............. 18
Defrosting ................................................... 18
Replacing the light bulb .............................. 18
SHIPMENT AND REPOSITIONING ........... 19
BEFORE CALLING YOUR AFTER SALES
SERVICE ...................................................20
Tips for saving energy ................................ 20
TECHNICAL SPECIFICATIONS ................ 21
GUARANTEE .............................................22
Product code
BUCL6082
2
Page 3
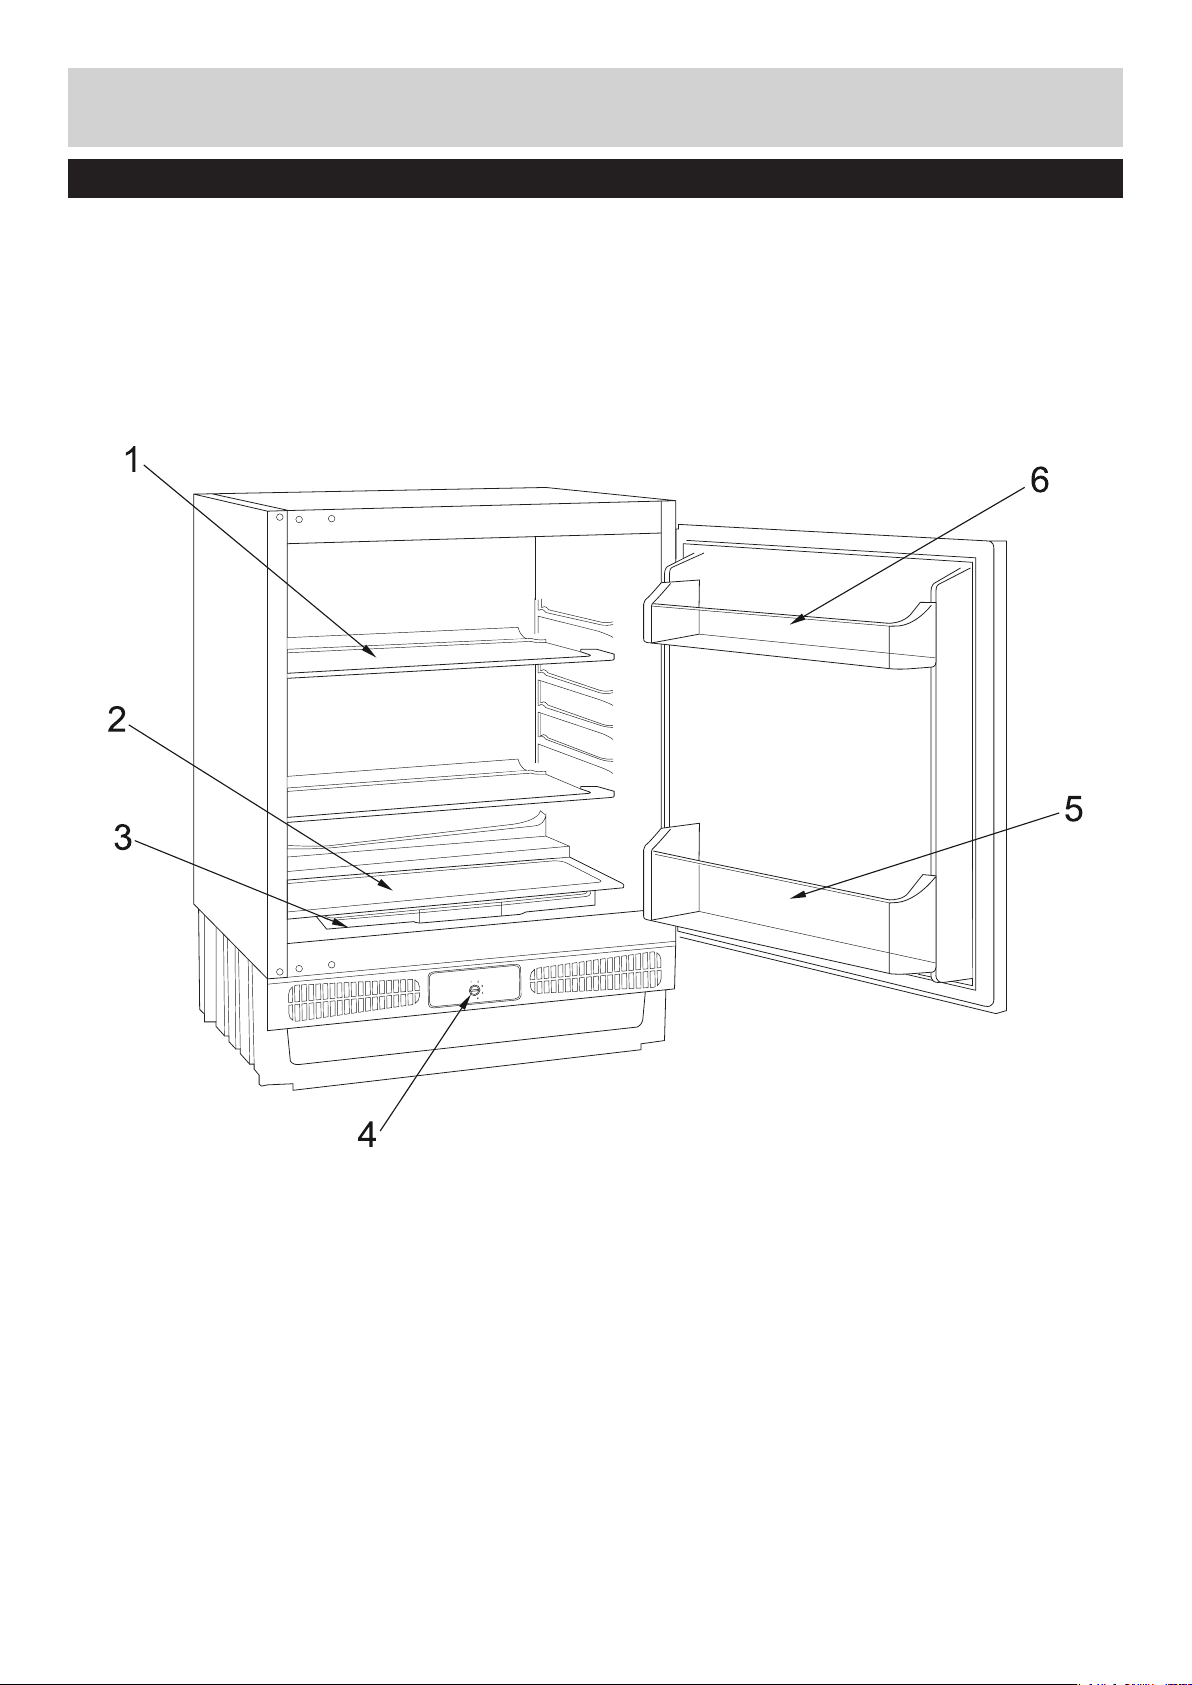
DESCRIPTION OF PRODUCTS & CONTENT
Customer Helpline: 0345 257 7271
1. Larder shelf
2. Crisper cover/safety glass
3. Crisper
4. Thermostat button
5. Bottom shelf
6. Butter shelf
3
Page 4

BEFORE USING THE APPLIANCE
Important - Please read these instructions fully before installation
Customer Helpline: 0345 257 7271
General warnings
WARNING: Keep ventilation openings, in the
appliance enclosure or in the built-in structure,
clear of obstruction.
WARNING: Do not use mechanical devices
or other means to accelerate the defrosting
process, other than those recommended by
the manufacturer.
WARNING: Do not use electrical appliances
inside the food storage compartments of
the appliance, unless they are of the type
recommended by the manufacturer.
WARNING: Do not damage the refrigerant
circuit.
WARNING: To avoid a hazard due to the
instability of the appliance, it must be fixed in
accordance with the instructions.
•If your appliance uses R600a as a refrigerant
– you can learn this information from the
label on the cooler- you should be careful
during shipment and installation to prevent
your appliance’s cooler elements from
being damaged. Although R600a is an
environmentally friendly and natural gas. As
it is explosive, in the event of a leak due to
damage to the cooler elements, move your
fridge from open flame or heat sources and
ventilate the room where the appliance is
located for a few minutes.
•While carrying and positioning the fridge, do
not damage the cooler gas circuit.
in order to avoid a hazard.
•This appliance is not intended for use by
persons (including children) with reduced
physical, sensory or mental capabilities, or
lack of experience and knowledge, unless they
have been given supervision or instruction
concerning use of the appliance by a person
responsible for their safety. Children should
be supervised to ensure that they do not play
with the appliance.
•A specially grounded plug has been connected
to the power cable of your refrigerator. This
plug should be used with a specially grounded
socket of 16 amperes. If there is no such
socket in your house, please have it installed
by an authorized electrician.
•This appliance can be used by children aged
from 8 years and above and persons with
reduced physical, sensory or mental capabilities
or lack of experience and knowledge if they
have been given supervision or instruction
concerning use of the appliance in a safe way
and understand the hazard involved. Children
shall not play with the appliance. Cleaning
and user maintenance, shall not be made by
children without supervision.
•If the supply cord is damaged, it must be
replaced by the manufacturer, its service agent
or similar qualified persons in order to avoid
a hazard.
•Do not store explosive substances such as
aerosol cans with a flammable propellant in
this appliance.
•This appliance is intended to be used in
household and similar applications such as;
- staff kitchen areas in shops, offices and other
working environments
- farm houses and by clients in hotels, motels
and other residential type environments
- bed and breakfast type environments;
- catering and similar non-retail applications
•If the socket does not match the refrigerator
plug, it must be replaced by the manufacturer,
its service agent or similarly qualified persons
4
Page 5

BEFORE USING THE APPLIANCE
Old and out-of-order fridges
Customer Helpline: 0345 257 7271
•If your old fridge has a lock, break or remove
the lock before discarding it, because children
may get trapped inside it and may cause an
accident.
•Old fridges and freezers contain isolation
material and refrigerant with CFC. Therefore,
take care not to harm environment when you
are discarding your old fridges.
Notes:
•Please read the instruction manual carefully
before installing and using your appliance. We
are not responsible of the damage occurred
due to misuse.
•Follow all instructions on your appliance and
instruction manual, keep this manual in a safe
place to resolve any problems that may occur
in the future.
•This appliance is produced to be used in
domestic households only. It is not suitable
for commercial use. Such use will cause the
guarantee of the appliance to be cancelled
and our company will not be responsible for
the losses that may occur.
•This appliance is produced to be used
in domestic households and it is only
suitable for cooling / storing foods. It is not
suitable for commercial use and/or for storing
substances except for food. Our company is
not responsible for the losses that may occur
by incorrect use.
Disposal of your old appliance
domestic waste annihilation service or the shop
you have purchased the product.
Please ask your municipal authority about the
disposal of the WEEE for the reuse, recycle and
recovery purposes.
Safety warnings
•Do not use extension leads when connecting
this appliance.
•Do not plug in damaged, torn or old plugs.
•Do not pull, bend or damage the cord.
•This appliance is designed for use by adults,
do not allow children to play with the appliance
or let them to hang on the door.
•Do not insert or remove the plug from the
socket with wet hands. Electrocution and or
injury may occur.
•Do not place glass bottles or cans in the
freezer compartment. Bottles or cans may
explode.
•Do not place explosive or flammable material
in your fridge for your safety. Place drinks with
higher alcohol content vertically and by closing
their necks tightly in the fridge compartment.
•When taking ice made in the freezer
compartment , do not touch it, ice may cause
ice burns and/or cuts.
•Do not touch frozen goods with wet hands! Do
not eat ice-cream and ice cubes immediately
after you take them out of the freezer
compartment!
This symbol on the product or package
implies that the product should not be
treated as domestic waste. Instead, it
should be delivered to applicable waste
collection places recycling electrical
and electronic equipment. You will
contribute to avoid potential negative results
regarding environment and human health,
which will arise due to wrong waste procedure
for the product by ensuring that this product
is annihilated properly. Recycling materials
will help natural resources be preserved. For
more detailed information regarding recycling of
this product, please contact local municipality,
•Do not re-freeze defrosted items. This may
cause health issues like food poisoning.
•Do not cover the body or top of fridge. This
affects the performance of your fridge.
•Ensure the accessories are secured during
transportation to prevent damage.
5
Page 6
BEFORE USING THE APPLIANCE
Customer Helpline: 0345 257 7271
Installing and operating your fridge Before using your fridge
Before starting to use your fridge, you should
pay attention to the following points:
•Operating voltage for your fridge is 220-240
V at 50Hz.
•We do not take the responsibility of the
damages that occur due to ungrounded usage.
•Do not place your appliance in direct sunlight.
•Your appliance should be at least 50 cm away
from stoves, Gas ovens and heaters, and
should be at least 5 cm away from electrical
ovens.
•Your fridge should never be used outdoors or
left out in the rain.
•When your fridge is placed next to a deep
freezer, there should be at least 2 cm between
them to prevent humidity on the outer surface.
•Do not place anything on your fridge, and
install your fridge in a suitable place so that
there is at least 15cm clearance at the top.
•The adjustable front legs should stabilise in
an appropriate height to allow your fridge to
operate in a stable and proper way. You can
adjust the legs by turning them clockwise (or
in the opposite direction). This should be done
before placing food in the fridge.
•Before using your fridge, wipe all parts with
warm water, and then rinse and dry. Place all
parts back in the appliance after cleaning.
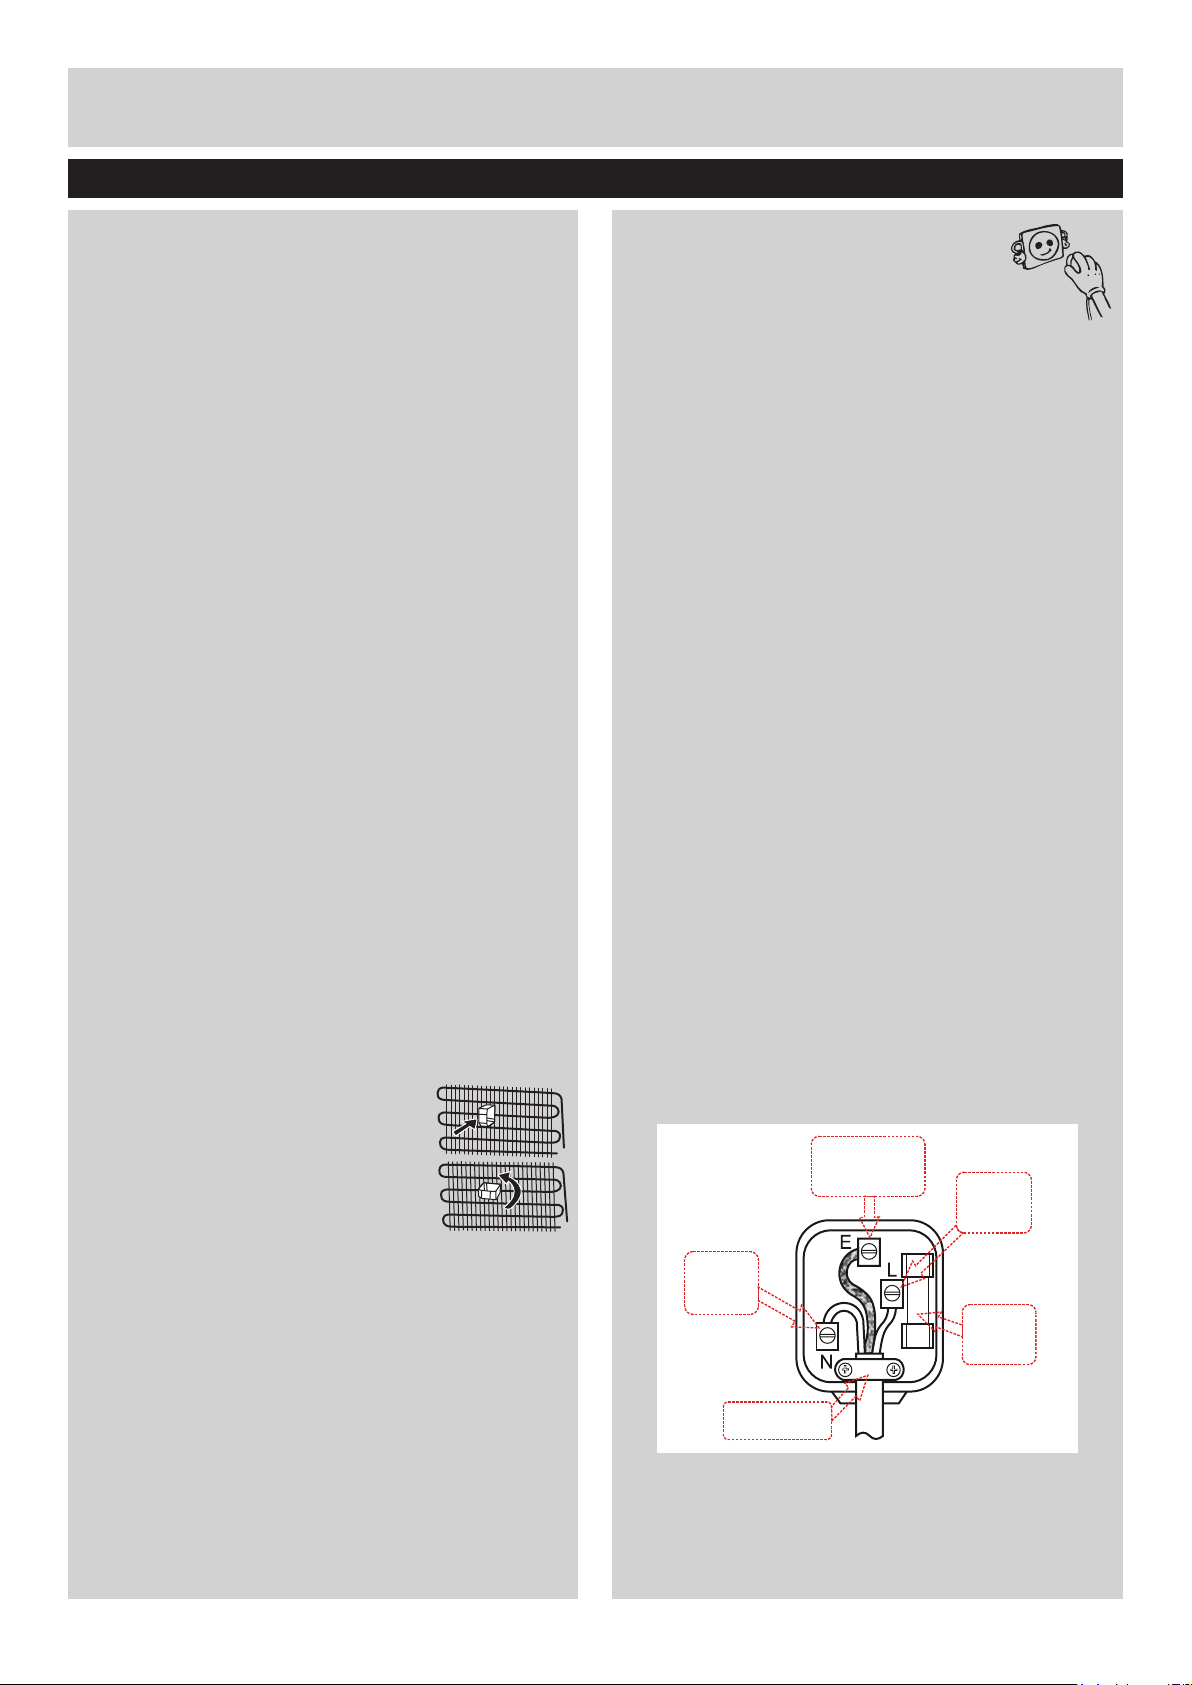
•Install the distance adjustment
plastic (the part with black vanes
at the rear) by turning it 90o as
shown in the figure to prevent
the condenser from touching the
wall.
•Refrigerators should be placed against a wall
with a free distance of at least 75mm.
•Before switching on your appliance
for the first time, ensure it is
positioned in it’s desired final
location and is in it’s upright position
for at least 3 hours before plugging
in and switching on the power. Otherwise you
may damage the compressor.
•You may experience a odour from the
appliance when it is operated for the first
time. This is normal and will fade when your
appliance starts to cool.
Electrical Connection (For UK type plug)
For your safety please read the following
information
Warning: This appliance must be earthed.
This appliance operates from 220-240 volts
and should be protected by a 13 amp fuse in
the plug.
The appliance is supplied with a standard 13
amp 3-pin mains plug fitted with a 13-amp fuse.
Should the fuse require replacement, it must
be replaced with a fuse rated at 13 amp and
approved to BS1362.
If the mains plug which is fitted is unsuitable for
the socket outlet in your home or is removed for
any other reason, please follow the instructions
below on how to wire a 13 amp 3 pin plug..
How to wire a 13 amp plug.
Important
Green / Yellow
Earth
Brown
Live
Blue
Neutral
FUSE
13 Amps
Cord Clamp
6
Page 7
BEFORE USING THE APPLIANCE
The wires in the mains lead on this appliance
are coloured in accordance with the following
code:
Green and Yellow – Earth
Blue – Neutral
Brown – Live
As the colours may not correspond with the
markings identifying the terminals in your plug
proceed as follows.
The green and yellow wire must be connected
to the terminal in the plug which is marked
with the letter E or with the earth symbol or
coloured green and yellow.
The blue wire must be connected to the terminal
marked N.
Customer Helpline: 0345 257 7271
The brown wire must be connected to the
terminal marked L.
You must make sure the lead is firmly secured
under the cord clamp.
7
Page 8
INSTALLATION
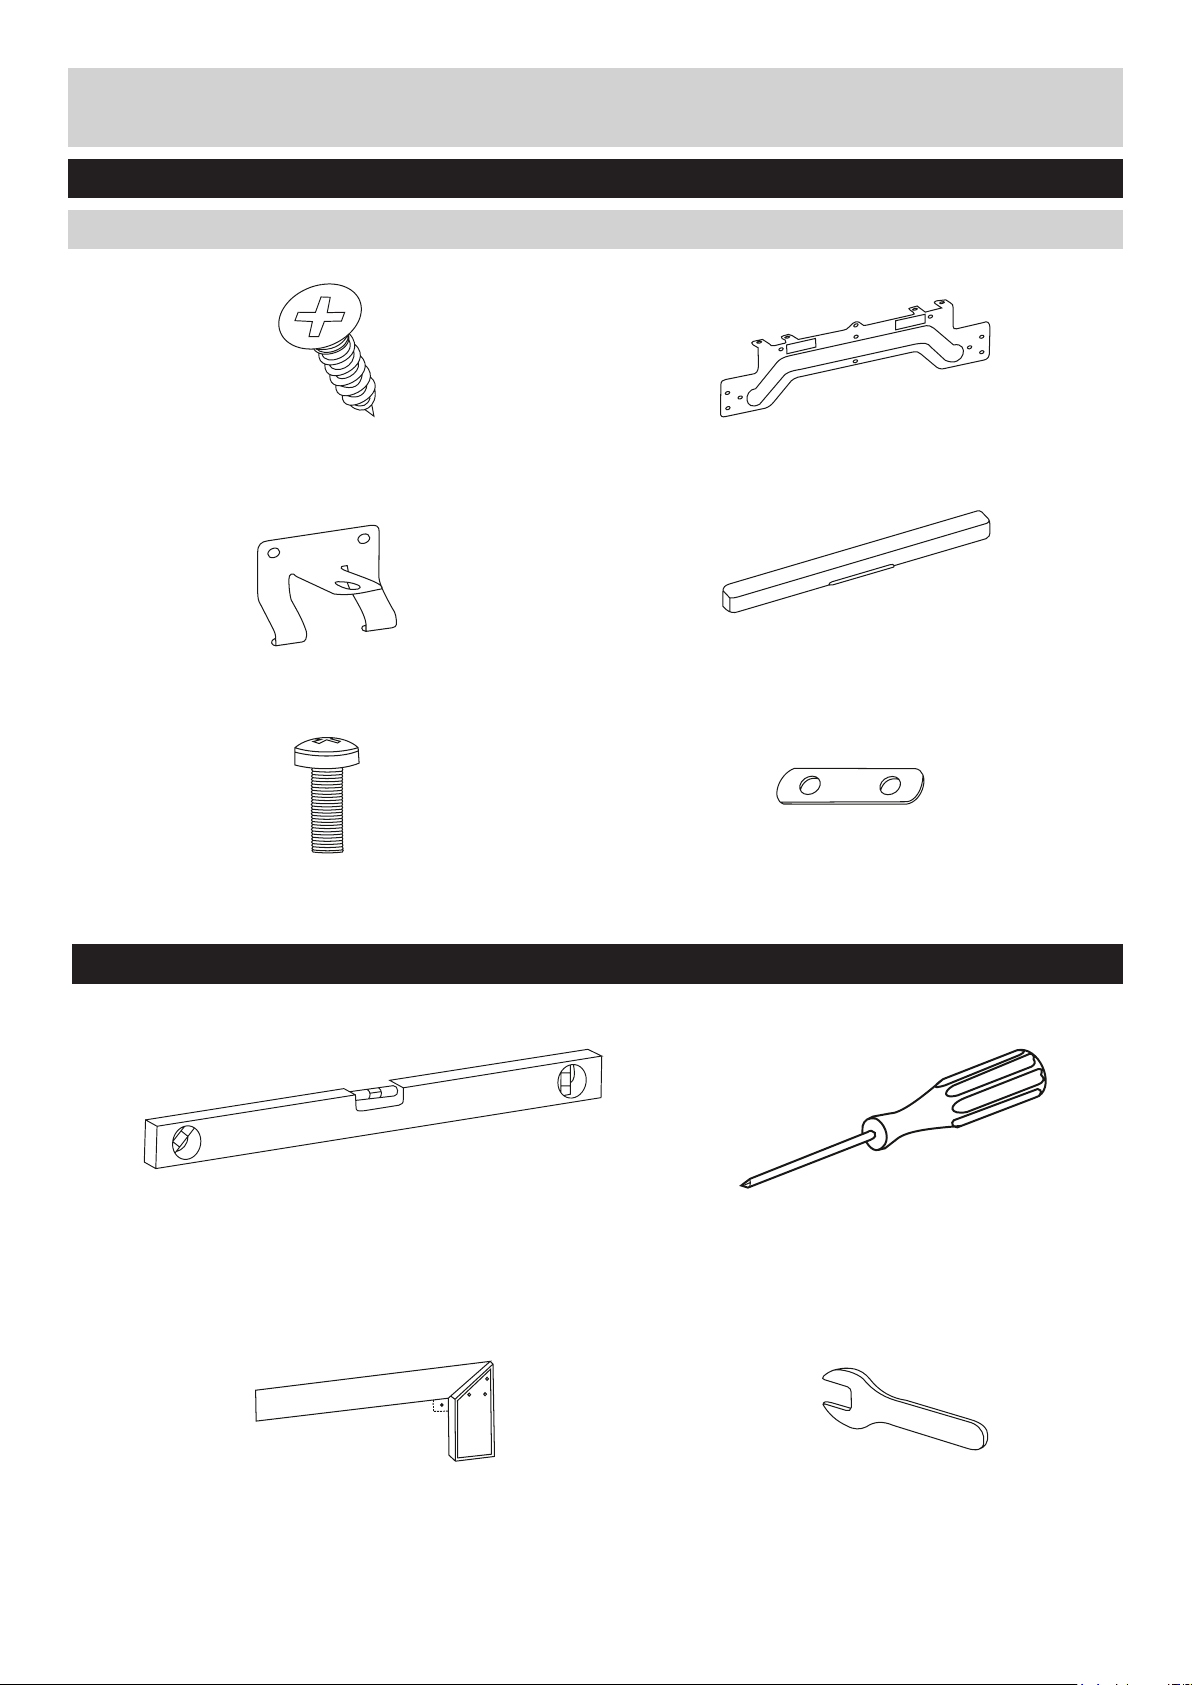
Installation kit contents
Please check you have all of the parts listed below
A. Wood screw x17 B. Door hang
C. Door Bottom Fixings x2 D. Hang cover
Customer Helpline: 0345 257 7271
Tools required
E. Screw F. Top bracket
Spirit level Screwdriver
Setsquare Wrench
8
Page 9

INSTALLATION
1
Dimensions for installation
Customer Helpline: 0345 257 7271
Caution: 2 people are required to
unpack and handle the larder. It is
recommended that gloves are worn.
a: Carefully remove all packaging materials and
dispose of correctly.
b: Make sure that the space available for the
larder is large enough as per the dimensions
(1).
Installing top bracket
a: Remove the screw (E) on top of the larder,
place the top bracket (F) in position and fix
with the screw (E).
1
2
E
F
9
Page 10

INSTALLATION
3
G
G
Fitting the door gasket
Customer Helpline: 0345 257 7271
a: Take out the gasket (G) located on the side
panel, and remove the protective tape.
b: Stick the gasket (G) on the larder side panel,
on the opposite side to the door hinges, as
shown (3).
3
G
G
Height adjustment
a: If necessary, the height of the larder can be
adjusted, by loosening the locking nuts on
the adjustable feet and screwing the feet in
or out to the desired height. A wrench may
be required to undo the locking nuts.
b: When the desired height is reached, re-
tighten the locking nuts using the wrench to
lock the adjustable feet in position.
4
Spirit
level
10
Page 11

INSTALLATION
5
Setsquare
Position the larder
Customer Helpline: 0345 257 7271
Caution: The larder may require 2
people to handle it when pushing it into
position.
a: Check behind the larder to make sure there
are no tools or obstructions that may cause
damage.
b: Carefully slide the larder into position until
the hinge surface is aligned with the front
surface of the kitchen unit.
c: Check that the larder is square using the
setsquare.
Securing the larder
a: Secure the larder to the kitchen units using
screws (A), through the top bracket (F)
and through both the upper and lower door
hinges as shown (6).
5
Setsquare
6
A
A
11
Page 12

INSTALLATION
7
7
8
B
A
Fitting the cabinet door
Customer Helpline: 0345 257 7271
a: Unscrew and remove the nuts and washers
from the appliance door.
b: Place door hang on the appliance door by
inserting the holes to adjustment bolts.
c: Dimensions
B= Measure from the underside surface of
kitchen unit to the bottom of door hang.
Dimension
C= Measure from the underside surface of
kitchen unit to the top of next unit door.
d: Subtract C from B and place door hang (B)
using this dimension for vertical position and
place to the centre for horizontal position.
7
8
A
e: Screw the door hang (B) using screws (A).
f: Place the cabinet door onto the appliance
door by inserting adjustment bolts into the
slots on the door hang.
g: Place the washers and screw the nuts onto
the adjustment bolts.
B
9
12
Continued on next page
Page 13

INSTALLATION
10
Customer Helpline: 0345 257 7271
h: Close the door and check the alignment with
the other cabinet doors.
i: Make the adjustment of the unit door by
screwing or unscrewing the adjustment bolts
for vertical adjustment and by the help of the
slots on the door hang for other directions.
j: Tighten the nuts to fix the bracket.
10
k: Remove the screws at the bottom of the
appliance door.
l: Place the door bottom fixings (C) and screw
the fixings to the appliance door and the
cabinet door using screws (A).
11
A
C
13
Page 14

INSTALLATION
12
D
Customer Helpline: 0345 257 7271
m: Slide the hang cover (D) onto the door hang
(B).
Installing the plinth
a: Position the plinth providing minimum 25
mm gap between the cabinet door and fix it.
12
D
13
14
Page 15

INSTALLATION
Reversing the door
Customer Helpline: 0345 257 7271
a: Unscrew the screws on the front surface of
the appliance door. Take the appliance door
to a safe place.
b: Move the hole plugs on the appliance door’s
front surface, to the holes on the reverse
side.
c: Open the door upper hinge and door lower
hinge, disassemble them.
d: Move the hole plugs to opposite side.
e: Assemble the door upper hinge and door
lower hinge to the opposite corners of their
original position.
f: Assemble the appliance door.
14
15
Page 16

USER INFORMATION
Customer Helpline: 0345 257 7271
Thermostat settings Warnings for temperature settings
•The ambient temperature, temperature of the
freshly stored food and how often the door is
opened, affects the temperature in the fridge.
If required, change the temperature setting.
•It is not recommended that you operate your
fridge in environments colder than 10 oC in
terms of its efficiency.
The thermostat automatically regulates the
inside temperature of the larder. By rotating the
knob from positions 1 to 5, colder temperatures
can be obtained.
Important note: Do not try to rotate knob
beyond 1 position it will stop your appliance
•For the short-term storage of food, set the
larder knob between the minimum and
medium position (1-3).
•For the long-term storage of food, set the
larder knob to the medium position (3-4).
•Note that the ambient temperature (temperature
of the freshly stored food and how often the
door is opened) affects the temperature in
the larder if required, change the temperature
setting.
•When you first switch on the appliance, you
should ideally run it without any food for 24
hours and not open the door. If you need to
use it straight away, try not to put too much
food inside.
•If the unit is switched off or unplugged, you
must allow at least 5 minutes before restarting
to avoid damaging the compressor.
•The thermostat setting should be done
by taking into consideration how often the
fresh food door is opened and closed, how
much food is stored in the fridge, and the
environment in which the fridge is located.
•Your fridge should be operated up to 24
hours according to the ambient temperature
without interruption after being plugged in to
be completely cooled. Do not open doors of
your fridge frequently and do not place much
food inside it in this period.
•A 5 minute delaying function is applied to
prevent damage to the compressor of your
fridge, when you take the plug off and then
plug it on again to operate it or when an energy
breakdown occurs. Your fridge will start to
operate normally after 5 minutes.
•Your fridge is designed to operate in the
ambient temperature intervals stated in the
standards, according to the climate class
stated in the information label. It is not
recommended that your fridge is operated in
the environments which are out of the stated
temperature intervals in terms of cooling
efficiency.
16
Climate Class Ambient Temperature oC
T
ST
N
SN
Between 16 and 43 (oC)
Between 16 and 38 (oC)
Between 16 and 32 (oC)
Between 10 and 32 (oC)
Page 17

ARRANGING FOOD IN THE APPLIANCE
•To reduce humidity and consequent increase of
frost never place liquids in unsealed containers
in the fridge. Frost tends to concentrate in the
coldest parts of the evaporator and in time will
require more frequent defrosting.
•Never place warm food in the fridge. Warm
food should be allowed to cool at room
temperature and should be arranged to ensure
adequate air circulation in the fridge.
•Nothing should touch on the back wall as it will
cause frost and the packages can stick on the
back wall. Do not open the refrigerator door
too frequently.
•Arrange the meat and cleaned fish(wrapped
in packages or sheets of plastic) which you
will use in 1-2 days, in the bottom section of
the refrigerator (that is above the vegetable
holder) as this is the coldest section and will
ensure the best storing conditions.
Customer Helpline: 0345 257 7271
•You can place fruit and vegetables unwrapped
in the vegetable holder.
17
Page 18

CLEANING AND MAINTENANCE
Customer Helpline: 0345 257 7271
Replacing the light bulb
•Make sure you unplug the fridge before
starting to clean it.
•Do not pour water directly over your appliance.
•You can wipe the inner and outer sides with a
soft cloth or a sponge using warm soapy water.
•Remove parts individually and clean by hand
with soapy water. Do not place in dishwashers.
•Never use flammable, explosive or corrosive
material for cleaning your appliance
•You should clean the condenser periodically to
keep your appliance running efficiently.
Make sure your appliance is unplugged
before cleaning.
Defrosting
•Defrosting occurs automatically in the
larder during operation. The defrost water is
collected by the evaporating compartment and
evaporates automatically.
When replacing the bulb of the larder:
1. Unplug the unit from the power supply.
2. Press the hook in front of the light cover to
remove it (see Figure 1 and Figure 2).
3. Replace the light bulb with a new one;
maximum power 15w.
4. Replace the light cover then wait 5 minutes
before inserting plug back into the power supply.
Figure 1
•The defrost water drain hole should be cleaned
periodically along with the defrost drain plug
to prevent water from collecting on the bottom
of the larder instead of fl owing out.
•You can also pour glass of water into the drain
hole to clean it inside.
Figure 2
Replacing The Light Led (If the
illumination is occured via LED
strip)
18
Please call the service helpline
Page 19

SHIPMENT AND REPOSITIONING
•Original package and foam may be kept for
re-transportation (optionally).
•You should fasten your fridge with thick
package, bands or strong cords and follow the
instructions for transportation on the package
for re-transportation.
•Remove movable parts (shelves, accessories,
vegetable bins etc.) or fix them into the
fridge against shocks using bands during repositioning and transportation.
Carry your fridge in the upright position.
Customer Helpline: 0345 257 7271
19
Page 20

BEFORE CALLING YOUR AFTER SALES SERVICE
Customer Helpline: 0345 257 7271
If your appliance is not working correctly, before
calling the service helpline check the following:
What to do if your refrigerator does
not operate ;
Check that ;
•Is there power to the appliance?
•Check your fuse box to see if it has tripped out.
•Thethermostatsettingison«•»position,
•Check the power socket is working by plugging
in another appliance.
What to do if your refrigerator performs
poorly ;
Check that ;
•You have not overloaded the appliance ,
•The doors are closed correctly ,
•There is no dust on the condenser ,
If there is noise ;
The cooling gas which circulates in the refrigerator
circuit may make a slight noise(bubbling sound)
even when the compressor is not running. Do
not worry this is quite normal. If these sounds
are different check that ;
•If the appliance is not used for a long time (for
example during the summer holidays)defrost
and clean the refrigerator leaving the door
open to odours developing.
Tips for saving energy
1– Install the appliance in a cool, well ventilated
room, but not in direct sunlight or near heat
sources (radiators, cooker, etc....).
2– Allow warm food and drinks to cool down
before placing in the appliance.
3– When placing liquids in the appliance they
must be covered.
4– When placing food and drinks, open the
appliance door as briefly as possible.
5– Door seals should be kept clean and
undamaged.
•The appliance is well level
•Are the shelves or the plates on the shelves of
your appliance vibrating? If so rearrange the
shelves accordingly.
If there is water in the lower part of
the refrigerator ;
Check that ;
The drain hole for defrost water is not
clogged(Use defrost drain plug to clean the
drain hole)
Recommendations
•In order to increase space and improve the
efficiency, the « cooling section » of this
appliance is positioned inside the back wall
of the refrigerator compartment. When the
appliance is running, this wall is covered with
frost or water drops. Do not worry. This is quite
normal. The appliance should be defrosted
only if an excessively thick layer forms on the
wall.
20
Page 21

TECHNICAL SPECIFICATIONS
Supplier's name or trade mark
Customer Helpline: 0345 257 7271
Model / Item
Type of appliance
The energy efficiency class
Voltage
Power
Energy consumption
Net storage volume of fresh food
Net storage volume of frozen food
Star rating of frozen food storage compartment
Power cut failure safe storage (-18ºC to -9ºC)
Freezing capacity
Climate class
Size (mm) (W x D x H)
Noise
BUCL6082
BGSN1700DOD
A+
220-240V / 50 Hz
74 W
0,316 kWh/24h - 115 kWh/year
133 lt.
- lt.
-
-
- Kg
SN (10ºC - 32ºC)
595 x 548 x 818
44 dB (A)
We apologise for any inconvenience caused
by minor change or inconsistencies in these
instructions that may occur as a result of
product improvements and development.
Conformity Information
•This equipment is designed for use at an
ambient tem-perature within the 10 oC - 32 oC
range.
•The appliance is designed in compliance with
the IEC60335-1 / IEC60335-2-24, 2004/108/
EC standards.
21
Page 22

GUARANTEE
Guarantee
This product is guaranteed against manufacturing defects for a period of
Customer Helpline: 0345 257 7271
Product Guarantee
Year
This product is guaranteed for twelve months from the date of original purchase.
Any defect that arises due to faulty materials or workmanship will either be replaced,
refunded or repaired free of charge where possible during this period by the dealer
from whom you purchased the unit.
The guarantee is subject to the following provisions:
6$!#1.*0!! +!/*+0+2!.% !*0( )#!)%/1/!%*!0,.0/'*+/
or consumable items.
6$!,.oduct must be correctly installed and operated in accordance with the
instructions contained in this manual.
60)1/0!1/! /+(!(5"+. +)!/0%,1.,+/!
6$!#1.*0!!3%((!.endered invalided if the product is re-sold or has been
damaged by inexpert repair.
6,!%"%0%+*/.e subject to change without notice.
6$!)*1"01.er disclaims any liability for the incidental or consequential damages.
6$!#1.*0!!%/%* %0%+*0+* +!/*+0 %)%*%/$5+1./0010+.5+.(!#(.%#$0/
6*0$!!2!*0+",.oblem with the product with in the guarantee period call the
Customer Helpline: 0845 600 4632.
0345 257 7271
.
22
Guarantor: Argos Ltd
489 - 499 Avebury Boulevard
Central Milton Keynes
MK9 2NW
Page 23

Customer Helpline: 0345 257 7271
23
Page 24

52168712
 Loading...