

Page 1

Dual Alarm Clock Radio
For iPod
INSTRUCTION MANUAL
The Gold Technical Support Line: 1902 215 259
Personal Product Support
(Charges will apply at $2.95 per minute)
BCR002IP
Page 2

Dual Alarm Clock Radio For iPodBCR002IP
Introduction
Thank you for buying this Bush product, which is designed to give you many years
of trouble-free service.
You may already be familiar with using a similar unit, but please take time to read
these instructions. They are designed to familiarise you with the unit’s many
features and to ensure you get the very best from your purchase.
For Your Safety
When disconnecting the DC power cord from a socket, pull the plug out. Never try
to remove the plug from the socket by pulling the cord. Never handle the DC power
plug with wet hands - this can cause electric shock.
WARNING
• Servicing should be carried out by qualified personnel only.
• To reduce the risk of fire or electric shock, do not expose this appliance to rain
or moisture.
• Dangerous high voltages are present inside the unit; do not try to open it.
• To prevent risk of fire or electric shock, do not leave any objects filled with liquids,
near the product, such as vases.
• Never put lighted candles near the unit.
WARRANTY
• In the unlikely event that your product fails to work normally, please call the below
free phone number to discuss the problem with one of our qualified service engineers.
Australia
Bush Warranty: 1800 509 394
New Zealand
Bush Warranty: 0800 450 259
2
Page 3
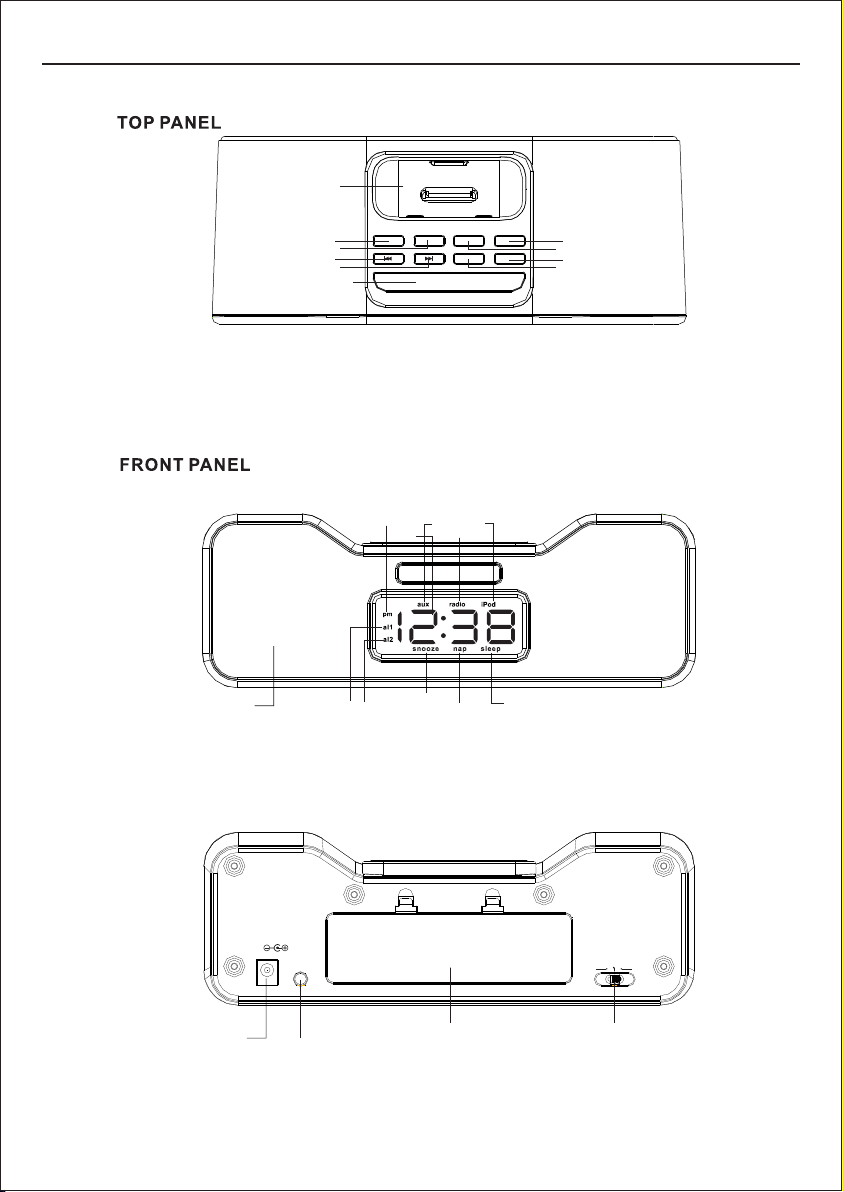
Universal dock connector
Dual Alarm Clock Radio For iPodBCR002IP
① Dimmer: backlight adjusting
② Alarm1/Alarm2: alarm on/off
③ Time set: alarm setting /time setting
④ Function: aux-radio-iPod and power on/off
⑤ Down: tune radio station, time setting &
alarm clock setting
speaker
BACK PANEL
1
2
5
down up vol- vol+
6
9
pm indicator
time
alarm indicator
snooze indicator
alarm1/alarm2dimmer
time set function
Snooze/Nap/Sleep
⑥
UP: tune radio station, time setting &
alarm clock setting
⑦ Vol-: volume down
⑧ Vol+: volume up
⑨ Snooze/Nap/Sleep
working mode
indicator
nap indicator
sleep indicator
4
3
8
7
DC JACK
DC
LINE IN
LINE IN
BATTERY COMPARTMENT COVER
iPod radio buzzer
slide here to select the alarm mode
3
Page 4

Dual Alarm Clock Radio For iPodBCR002IP
BATTERY INSTALLTION FOR PLAYAND TIME MEMORY
1. Remove the battery cover before operation
2. Put 6x1.5V(aa-size) battery into the compartment
Noted: ensure that (+) and (-) symbol are respected
3. Put the battery compartment cover back in position
FUNCTION
1. To switch on the unit, press and release the function button
2. To turn off the unit, press & hold the function button for 2 seconds, then release it
3. Without iPod on the dock, the default play mode order is: aux-radio
4. With the iPod on the dock, the default play mode order is: aux-radio-iPod
iPod OPERATION
1. Put the iPod into the dock
2. Press the function button to reach iPod mode
3. Press the “Vol-” and “Vol+” buttons to decrease/increase the volume sound
4. Press the down or up button to select the desired song
RADIO OPERATION
1. Press function button to select the radio mode
2. To press the down or up button for 2 seconds, the unit will automatically scan
and store radio station
3. Press the down or up button to fine tune radio station
ALARM SETTING
1. To enter Alarm1, press the Alarm1/Alarm2 button once, Alarm1 appears on the display
2. To set Alarm1, press the Time Set button once the alarm hour flashes
3. Press the up or down button until you reach the desired hour
4. To confirm and enter Alarm Minutes mode, press the Time Set button again. The alarm minutes will flash on the display
5. Press the up or down button until you reach the desired minute
6. To confirm, press the Alarm Set button
7. To enter Alarm2, press the Alarm1/Alarm2 button again. Alarm2 will appear on the display
8. To set Alarm2, repeat steps 2-6
9. Please find the different Alarm mode (iPod, radio, buzzer) at the back of the unit
SETTING THE CLOCK
1. To enter hour mode, press the time set button for 2 seconds, the hour flashes on the display
2. To set the hour, press the up or down button until you reach the desired time
3. To confirm and enter minute mode, press the time set button again, the minute will flash on the display
4. To set minutes, press the up or down button until you reach the desired time
5. To confirm and exit, press the Time Set button again
SNOOZE NAP SLEEP SETTING
1. Snooze/nap/sleep button have 3 functions
2. Snooze: to activate the snooze function, press the snooze/nap/sleep button when the alarm sounds. The alarm turns off
and snooze appears on the display, the alarm sounds again after 9 minutes
3. Nap: to select a nap period of 15,30,45,60 minutes when the power is off, press the snooze/nap/sleep button 1,2,3,4 times,
respectively. The alarm sounds automatically at the time selected. To switch off the nap function, press the
snooze/nap/sleeep/button again
4. Sleep: to select a sleep period of 15,30,45 or 60 minutes, press the snooze/nap/sleep button 1,2,3,4 times, respectively.
The music playing turns off automatically at the time selected
CHARGING iPod BATTERY
1. Connect the iPod to Dock connector and plug the AC adapter
CONNECT TO YOUR MP3 OR MP4
1. Press the FUNCTION button to the AUX mode
2. Put one end of the AUX Jack cable into the MP3 or MP4
Frequency: FM87.5-108MHz
Antenna FM: Wire Antenna
Power required: DC 9V, 6x1.5V AA/UM3 battery for play and time memory
Adapter:
DC9V 1000mA
Max Power Outpower: 1.6W
10% THD Power Outpower: 1.5W
4
Page 5

Troubleshooting
Dual Alarm Clock Radio For iPodBCR002IP
SYMPTOM
No electricity
Start the unit
No sounds when playing
iPod cannot be charged
Distortion
CAUSE
The adapter plug may be loose
on the unit or the outlet
Power button not working
properly or incorrect operation
The audio source may be mute
or not connected properly
The iPod may be not docked
properly
Poor audio source or strong
audio signal interference
REMEDY
Unplug the adapter and re-plug to
the AC outlet
Use the remote control to start the
unit or read the user manual again
Check if the audio source is mute.
Check the audio source's wire
connection
Unplug the iPod and then dock the
iPod again
Adjust the volume level or
use another audio source
Remote control does
not function properly
Remote range out of receiving
range or battery power is low
5
Replace the battery or reduce the
distance between the remote control
and main unit
Page 6

Dual Alarm Clock Radio For iPodBCR002IP
Warranty
Please keep your receipt as proof of purchase. This product is under warranty for any
defects in materials or workmanship for one year after the original date of purchase.
This product is for normal domestic and office use only. This warranty does not
cover damage from misuse or neglect, accidental damage, vermin infestation,
excessive voltages such as lightning, power surges or any alterations that affects
the performance or reliability of the product.
In the unlikely event that your product fails to work normally, please contact the
Bush Warranty Helpline 1800 509 394 (Australia) or 0800 450 259 (New Zealand)
and have your receipt of purchase on hand.
This guarantee is subject to the following provisions:
• It is only valid within boundaries of the country of purchase
• The product must be correctly assembled and operated in accordance with the
instructions contained in this manual
• This product must be used solely for domestic purposes
• This guarantee does not cover accidental damage
• This guarantee will be rendered invalid if the product is resold or has been
damaged by inexpert repair
• The manufacturer disclaims any liability for incidental or consequential
damaged
This guarantee is in addition to, and does not diminish, your statutory or
legal rights.
PO BOX 6287
Silverwater NSW 1811
www.bushaustralia.com.au
Bush Warranty: 1800 509 394 Australia
Bush Warranty: 0800 450 259 New Zealand
6
Page 7

Page 8

Dual Alarm Clock Radio For iPodBCR002IP
PO BOX 6287
Silverwater NSW 1811
www.bushaustralia.com.au
 Loading...