

Page 1
Instruction manual
Built-in Double Oven
BUSH AWBBDFO
BUSH AWBSDFO
Page 2

If you require any technical guidance or find that your product is not operating as intended, a simple solution can often be found in the Troubleshooting section of these instructions,
You’ll soon be enjoying your new Built-in Oven
It all begins here, with your instructions. Don’t worry,
there’s nothing too technical coming up. Just simple,
step-by-step guidance to get you up and running
quickly. Sound good? Then let’s get started.
Help and Guidance
We’re here to help you get the most from your Built-in Oven
guidance, a simple solution can often be found online at:
www.bush-support.com
If you still require further assistance, call one of our experts on 01759 487838.
. Should you require any
Page 3

or online at www.bush-support.com If you still require further assistance, call one of our experts on 01759 487838
Contents
Safety information
1
Safety information
Getting to know your Built-
2
in Oven
Ready? Let’s begin
Accessories
Installing your
3
Built-in
Oven
Cabinet installation
Electrical Connection
Using your Built-in Oven
4
Controls
Oven functions
Programming overview
General oven and Cooking tips
10
11
14
15
18
19
20
21
Care and Maintenance
5
6
Cleaning
Replacing the lamps
Technical specification
Product support
6
Troubleshooting
Help and assistance
Declaration of conformance to
product standards
Disposal
Guarantee
26
27
28
30
31
32
32
33
3
Page 4

Page 5

1
Safety information
Page 6

Safety information
Safety information
If you require any technical guidance or find that your product is not operating as intended, a simple solution can often be found in the Troubleshooting section of these instructions,
Important - Please read these instructions fully before
installing or operating
INSTALLATION WARNINGS
IMPORTANT: Prior to Installation ensure that the local
supply conditions (electricity voltage and frequency)
are compatible with the requirements of your built-in
oven.
IMPORTANT: Carefully unpack and examine the
appliance for any damage. If you think there is a
defect, do not use the appliance and contact BUSH
Product Support on 01759 487838. Packaging
materials should be collected together and disposed of
immediately as they may be harmful to children.
IMPORTANT: Keep the electrical cable (not supplied)
of your built-in oven away from the hot areas of your
appliance, do not let the cable touch the appliance.
Keep the cable away from sharp edges and heated
surfaces.
IMPORTANT: Ensure that the electric supply cable is
not trapped or damaged during installation.
IMPORTANT: In the event that the cable connecting
your built-in oven becomes damaged, it must be
replaced by a suitably qualified person. This cable
must not be replaced by an unauthorised person.
IMPORTANT: Protect your built-in oven against
atmospheric effects. Do not expose your oven to
effects such as sun, rain, snow etc.
IMPORTANT: The materials surrounding the appliance
(cabinets) must be able to withstand a minimum
temperature of 100°C.
IMPORTANT: When using your oven for the first time
your built-in oven may give off an unusual odour from
the heating elements and insulation materials. This is
normal for cooking appliances. To eliminate this odour
run the oven at 250 degrees for 40-60 mins with the
oven empty.
DURING USAGE
IMPORTANT: This appliance can be used by children
aged from 8 years and above and persons with
reduced physical, sensory or mental capabilities or
lack of experience and knowledge if they have been
given supervision or instruction concerning use of the
appliance in a safe way and understand the hazards
involved. Children shall not play with the appliance.
Cleaning and user maintenance shall not be made by
children without supervision.
WARNING: The appliance and its accessible parts
become hot during use. Care should be taken to avoid
touching heating elements. Children less than 8 years
of age shall be kept away unless continuously
supervised.
WARNING: NEVER try to extinguish a cooking fire
with water. Instead switch off the appliance and cover
flame e.g. with a lid or a fire blanket.
CAUTION: Do not allow children in the kitchen when
cooking or after, as the parts may still be hot. Many
parts of the oven will become hot and present a
considerable hazard to children.
CAUTION: When the oven is hot never touch the
oven glass by hand or with tools.
CAUTION: Before starting to use your appliance,
ensure curtains, paper or flammable items are kept
away from your appliance. Do not keep flammable
materials inside of or around your oven.
CAUTION: Take care when closing the oven door that
there is nothing obstructing it from closing as this may
break the glass door.
IMPORTANT: When using the grill the oven door must
be kept closed.
WARNING: Before obtaining access to terminals, all
supply circuits must be disconnected.
6
Page 7

Safety information
Safety information
or online at www.bush-support.com If you still require further assistance, call one of our experts on 01759 487838
Important - Please read these instructions fully before
installing or operating
IMPORTANT: Make sure the oven control knobs are
all in the off position when not in use.
IMPORTANT: If you do not intend to use your built-in
oven for a long period of time turn off the electric
supply to the oven.
GENERAL SAFETY WARNINGS
IMPORTANT: This appliance has been designed for
non-professional, domestic use only. Do not use this
oven for commercial use or any other application e.g.
room heating.
WARNING: Danger of fire: do not store flammable
items on or near the cooking surfaces or inside the
oven.
IMPORTANT: Do not try to lift or move this appliance
by pulling on the door handle.
WARNING: Ensure that the appliance is switched off
before replacing the lamp to avoid the possibility of
electric shock.
IMPORTANT: Your appliance is produced in
accordance with all applicable local and international
standards and regulations.
IMPORTANT: Maintenance and repair work must only
be performed by authorised service technicians.
Installation and repair work that is carried out by
unauthorised technicians is dangerous and could
invalidate your guarantee.
IMPORTANT: When the door of the oven is open, do
not hang or lean anything on it. You may unbalance
your appliance or damage the door or door hinges.
IMPORTANT: Do not hang towels, dishcloths or
clothes from the built-in oven or its handles.
CLEANING AND MAINTENANCE
IMPORTANT: Always turn the appliance off before
operations such as cleaning or maintenance. You can
do this by switching the built-in oven off using cooker
isolation switch.
IMPORTANT: Do not remove the control knobs to
clean the control panel.
WARNING: Do not use harsh abrasive cleaners or
sharp metal scrapers to clean the oven door glass
since they can scratch the surface, which may result in
shattering of the glass.
TO MAINTAIN THE EFFICIENCY AND SAFETY
OF YOUR APPLIANCE, WE RECOMMEND YOU
ALWAYS USE OUR AUTHORISED SERVICE
AGENTS AND ORIGINAL SPARE PARTS.
FOR ASSISTANCE CALL BUSH PRODUCT
SUPPORT 01759 487838.
7
Page 8

Page 9

Getting to know your
Built-in Oven
2
Page 10

Getting to know your Built-in Oven
If you require any technical guidance or find that your product is not operating as intended, a simple solution can often be found in the Troubleshooting section of these instructions,
Getting to know your Built-in Oven
You’ll be up and running in no time
Ready? Let’s begin...
Please read these instructions carefully. They con
important information which will help you get the best
from your Built-in Oven and ensure safe and
correct installation and operation.
If you require any further assistance, our technical
experts are happy to help. For full details, refer to
the product support section at the end of these
instructions.
tain
10
Page 11
Getting to know your Built-in Oven
You’ll be up and running in no time
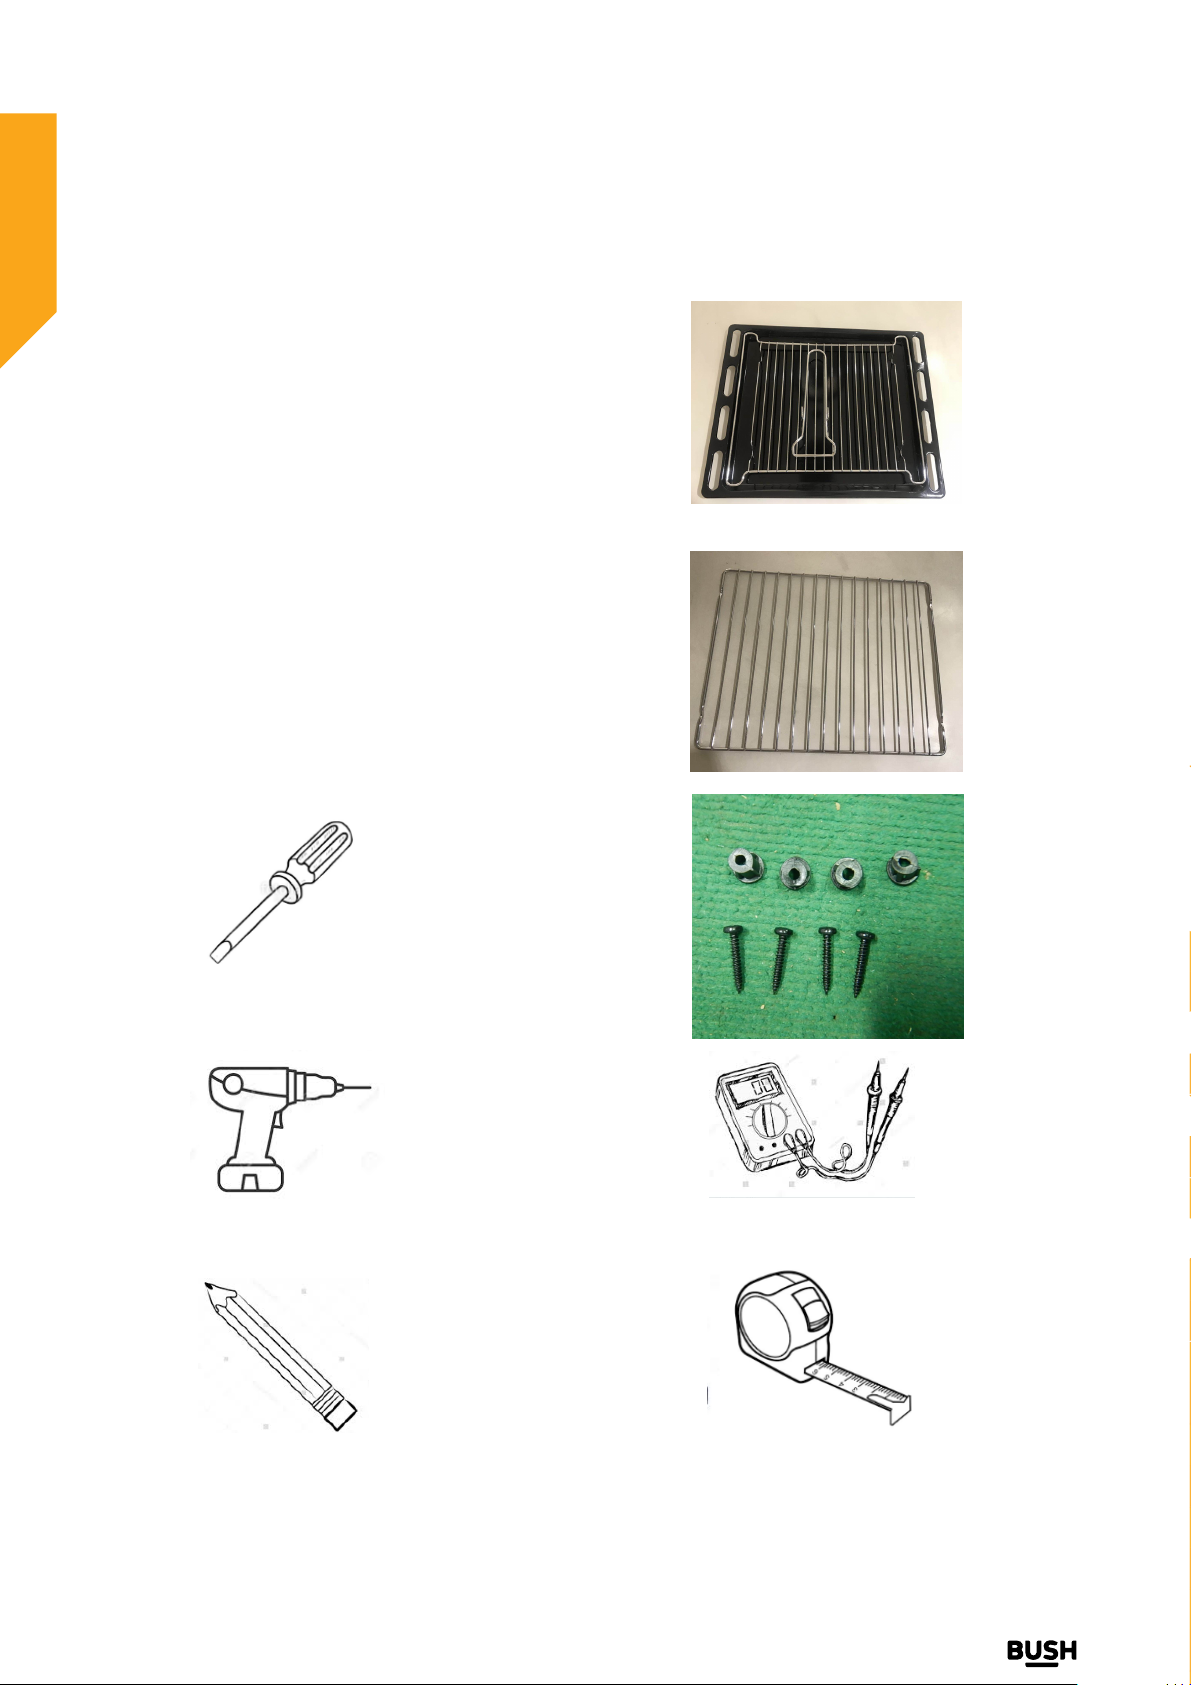
Built-in Oven Accessories
1 x Baking tray
1.
1 x Grill insert
2.
1 x Grill pan handle
3.
2 x Chrome shelf
4.
5. 1 x User Manual
6. 1 x Fixing kit
Tools needed for installation
3
1
2
4
Cross head screwdriver
Electric drill
Pencil
6
Multimeter tool for electrical safety checking
Tape measure
or online at www.bush-support.com If you still require further assistance, call one of our experts on 01759 487838.
Installing your Built-in Oven
11
Page 12

Page 13

Installing your
Built-in Oven
3
Page 14

Installing your Built-in Oven
RISK OF ELECTRIC SHOCK
DO NOT OPEN
CAUTION
CAUTION:
TO REDUCE THE RISK OF ELECTRIC
SHOCK, DO NOT REMOVE COVER
(OR BACK). NO USER-SERVICEABLE
PARTS INSIDE. REFER SERVICING TO
QUALIFIED SERVICE PERSONNEL.
RISK OF ELECTRIC SHOCK
DO NOT OPEN
CAUTION:
TO REDUCE THE RISK OF ELECTRIC SHOCK,
DO NOTREMOVE COVER (OR BACK).
NO USER-SERVICEABLE PARTS INSIDE.
REFER SERVICING TO QUALIFIED SERVICE
PERSONNEL.
Bringing it all together
Installation
This appliance should be installed by a competent person or qualified electrician in a accordance with the
regulations in force (All relevant British Standard/ Codes of Practice/relevant Building/IET regulations)and in
a well ventilated space. Please read instructions before installing and using this appliance.
Important: - The power supply to the appliance must be cut off before any adjustments or maintenance work is
carried out.
Installation of Built-in Ovens
In order to ensure that the built-in appliance functions properly, the cabinet containing it must be appropriate .The
figure below gives the dimensions of the cut-out for installation under the counter or in a wall cabinet unit.
14
When installing you Built-in Double Oven, please make sure there is a minimum of 560mm depth for ventilation
which is required for this product..
T
he underside of the cabinet should be opened to allow for the correct air circulation.
If installing a base panel leave a space as indicated the
l
eft-hand image to allow for air circulation.
If you require any technical guidance or find that your product is not operating as intended, a simple solution can often be found in the Troubleshooting section of these instructions,
Installing your Built-in Oven
Page 15

Installing your Built-in Oven
Bringing it all together
Provision for Ventilation
The appliance housing used must provide adequate ventilation.
For built-in installation, a minimum ventilation space of
85 – 90mm x 40mm must exist between the rear of the appliance and the back of the housing
or an adjacent wall.
If a tall housing is to be installed flush with the ceiling, a 20cm² ventilation cut-out must be
provided at the top of the housing.
*NQPSUBOU
15
1
2
3
4
5
N
L
Connection of
(refer to diagram 4)
diagram 1
diagram 2
diagram 3
diagram 4
Installing your Built-in Oven
Bringing it all together
Provision for Ventilation
The appliance housing used must provide adequate ventilation.
For built-in installation, a minimum ventilation space of
85 – 90mm x 40mm must exist between the rear of the appliance and the back of the housing
or an adjacent wall.
If a tall housing is to be installed flush with the ceiling, a 20cm² ventilation cut-out must be
provided at the top of the housing.
*NQPSUBOU
'
JUUJOHPOB1PXFS4VQQMZ$BCMF
$POOFDUJOHBQQSPQSJBUFQPXFSTVQQMZUPUIFUFSNJOBMCPBSEDPOOFDUPSCMPDL
0QFOJOHUIFUFSNJOBMCPBSEDPOOFDUPSCMPDL(refer to diagram 2):
6TJOHUIFGMBUIFBEPGBTDSFXESJWFSVOIPPLVOMBUDIUIFQMBTUJDDPWFSPGUIFUFSNJOBMCPBSECZVOMBUDIJOH
QPJOUT"BOE#1MFBTFSFGFSUPEJBHSBN'SPNIFSFZPVXJMMCFBCMFUPPQFOUIFQMBTUJDDPWFSGSPNUIF
UFSNJOBMCPBSE
To install the cable, proceed as follows (refer to diagram 3):
Remove the wire clamp screw and the three contact screws L(4)N(5)
Fasten the wires beneath the screw heads using the following color scheme :Blue (N) Brown (L) Yellow-
Green-Fasten the supply cable in place with the clamp and close the cover of the terminal board.
Installing your Built-in Oven
Bringing it all together
The appliance housing used must provide adequate ventilation.
For built-in installation, a minimum ventilation space of
85 – 90mm x 40mm must exist between the rear of the appliance and the back of the housing
or an adjacent wall.
If a tall housing is to be installed flush with the ceiling, a 20cm² ventilation cut-out must be
provided at the top of the housing.
Important:
relevant local building and installation regulations.
all
'
JUUJOHPOB1PXFS4VQQMZ$BCMF
'JUUJOHPOB1PXFS4VQQMZ$BCMF
$POOFDUJOHBQQSPQSJBUFQPXFSTVQQMZUPUIFUFSNJOBMCPBSEDPOOFDUPSCMPDL
$POOFDUJOHBQQSPQSJBUFQPXFSTVQQMZUPUIFUFSNJOBMCPBSEDPOOFDUPSCMPDL
0QFOJOHUIFUFSNJOBMCPBSEDPOOFDUPSCMPDL(refer to diagram 2):
Electrical connections must be carried out by a suitable qualified person and in accordance with
0QFOJOHUIFUFSNJOBMCPBSEDPOOFDUPSCMPDL(refer to diagram 2):
6TJOHUIFGMBUIFBEPGBTDSFXESJWFSVOIPPLVOMBUDIUIFQMBTUJDDPWFSPGUIFUFSNJOBMCPBSECZVOMBUDIJOH
6TJOHUIFGMBUIFBEPGBTDSFXESJWFSVOIPPLVOMBUDIUIFQMBTUJDDPWFSPGUIFUFSNJOBMCPBSECZVOMBUDIJOH
QPJOUT"BOE#1MFBTFSFGFSUPEJBHSBN'SPNIFSFZPVXJMMCFBCMFUPPQFOUIFQMBTUJDDPWFSGSPNUIF
QPJOUT"BOE#1MFBTFSFGFSUPEJBHSBN'SPNIFSFZPVXJMMCFBCMFUPPQFOUIFQMBTUJDDPWFSGSPNUIF
UFSNJOBMCPBSE
UFSNJOBMCPBSE
To install the cable, proceed as follows (refer to diagram 3):
To install the cable, proceed as follows (refer to diagram 3):
Remove the wire clamp screw and the three contact screws L(4)N(5)
Remove the wire clamp screw and the three contact screws L(4)N(5)
Fasten the wires beneath the screw heads using the following color scheme :Blue (N) Brown (L) Yellow-
Fasten the wires beneath the screw heads using the following color scheme :Blue (N) Brown (L) Yellow-
Green .Fasten the
supply cable in place with the clamp and close the cover of the terminal board.
supply cable in place with the clamp and close the cover of the terminal board.
Provision for Ventilation
4
5
diagram 3
diagram 1
Warning: Connections must be in accordance with the relevant local building and installation regulations.
Connection of
diagram 2
3
2
1
(refer to diagram 4)
.
.
.
L
N
www.bush-support.com If you still require further assistance, call one of our experts on 01759 487838.
.
or online at www.bush-support.com If you still require further assistance, call one of our experts on 01759 487838.
Installing your Built-in Oven
Installing your Built-in Oven
15
Page 16

Page 17

Using your Built-in Oven
4
Page 18

Using your
,
Using your Built-in Oven
C D E F G
A
B
Top oven
A.
Bottom oven
B.
Top oven temperature control knob
C.
Top oven function control knob
D.
3 Button timer
E.
Bottom oven function control knob
F.
Bottom oven temperature control knob
G.
C
E
C
D
If you require any technical guidance or find that your product is not operating as intended, a simple solution can often be found in the Troubleshooting section of these instructions
Page 19

Using your Built-in Oven
Getting the most from your appliance
Oven functions
Top oven functions
Oven light
Grill
Bottom oven functions
Fan oven
Defrost
Top and bottom element
Bottom Element only
Oven light-The oven light will operate on all oven functions
Grill-The top central heating elements comes on .The extremely high and direct temperature of the grill
makes it possible to brown the surface of meats and roasts while locking the juices in to keep them tender.
The grill is also highly recommended for dishes that require a high temperature on the surface: beef steaks,
veal, rib steak, fillets, hamburgers etc.
Top and bottom element-Hot air comes from the upper and lower element in the oven. This is the
conventional cooking method that cooks your food equally. Joints of meat will benefit using this cooking
function, and any roasted items.
Bottom element only-Bottom element cooking is used for foods that typically need cooking from the
underneath side. Cakes and bread as an example can be cooking using this function mode.
Fan oven-When set to Fan oven mode, the fan element and the fan operate providing a delicate heat
distributed uniformly throughout the oven. This mode is ideal for baking and cooking delicate foods on
multiple shelves, especially cakes that Swiss rolls and small portions of vegetables, etc.
Defrost-When set to ‘Defrost’ mode, the fan located at the back of the oven circulates room temperature air
around the food. This is recommended for the defrosting of all types of food, but in particular for delicate
types of food which do not require heat, for example: ice cream cakes, cream or custard desserts, fruit
cakes, etc. By using ‘Defrost’ mode, the defrosting time is approximately halved. In the case of meat, fish and
bread, it is possible to accelerate the process by selecting ‘Multi Cooking mode’ and setting the temperature
between 0°c to 100°c.
Using your appliance for the first time
The first time you use your appliance, we recommend that you set the temperature setting to the
highest mark. Set the cooking mode selection knob to a cooking mode and leave the oven on for about half
an hour with nothing in it and the oven door shut. Then, open the oven door and allow the oven to cool. Any
odour that may be detected during this initial use is due to the evaporation of substances used
to protect the oven during storage.
or online at www.bush-support.com If you still require further assistance, call one of our experts on 01759 487838
19
Page 20

Using your Built-in oven
Getting the most from your appliance
Programming overview
Setting the clock
The clock is preset to 12:00, and will revert to this after a
power failure. Press Menu (7) and press repeatedly until the
clock indicator flashes (5), while the clock indicator flashes,
touch ‘-’ (6) or ‘+’ (8) to set the time. When you set the correct
time, the clock will set after approximately five seconds delay
and the indicator will disappear.
Minute minder
The minute minder can be used when the oven is switched on
or off. It can be set for up to 23 hours and 59 minutes.
To set the minute minder:
1. Press Menu (7) and press repeatedly until the until the
minute minder indicator (5), (2) flashes (Fig. 4.2).
2. Then press either the ‘-’ (6) or ‘+’ (8) to select the
required duration for the minute minder (2). When you have
set the duration, touch Menu (7) or wait for approximately five
seconds. The minute minder indicator (5) will stay on to
confirm the minute minder is on.
3. When the countdown is complete, there will be an
alarm which will continue for two minutes and the minute
minder indicator will flash. To switch off the alert beep, touch
any key.
Note: The alarm will cut off after two minutes if it is not
switched off manually.
At the end of the countdown, the minute minder will not
switch off the oven. Remember to turn off the oven manually.
Semi-automatic cooking
The lower oven can be set to switch off automatically with a preset time of 10 hours.
This features works by knowing the cooking duration. For example if the time is 13:30 and
the food is required to bake for 45 minutes, the lower oven will stop working at 14:15.
1. Select your desired oven function and temperature (the oven will switch on).
2. Press Menu (7) and press repeatedly until the cooking time indicator flashes .
3. Then press either the ‘-’ (6) or ‘+’ (8) to select the required duration to set the semiautomatic cooking. When you have set the duration, wait for approximately five seconds.
The cooking time indicator will light up to confirm the semi-automatic program is on.
4. When the cooking time is complete, the oven will emit an alarm, switch off the
function and oven light. The alarm will continue for two minutes and the cooking time
indicator will flash. To switch off the alarm, press any button.
20
At the end of the cooking programme, remember to turn off the oven manually
If you require any technical guidance or find that your product is not operating as intended, a simple solution can often be found in the Troubleshooting section of these instructions,
Using your Built-in Oven
Page 21

General oven and cooking tips
General Oven Tips
The wire shelves should always be pushed firmly to the back of the oven.
Baking trays with food cooking on them should be placed level with the front edge of the
oven’s wire shelves. Other containers should be placed centrally. Keep all trays and
containers away from the back of the oven, as over-browning of the food may occur.
For even browning, the maximum recommended size of a baking tray is 340 mm (13½”) by
340 mm (13½”).
When the oven is on, do not leave the door open for longer than necessary, otherwise the
knobs may get very hot.
• Always leave a ‘‘finger’s width’’ between dishes on the same shelf. This allows the heat
to circulate freely around them.
• To reduce fat splashing when you add vegetables to hot fat around a roast, dry them
thoroughly or brush lightly with cooking oil.
• Where dishes may boil and spill over during cooking, place them on a baking tray.
Using the Grill
Use the ‘Grill’ mode with the oven door closed, place the food on the center of the grill pan, insert
and fit the grill pan on either the 3rd or 4th shelf from the bottom. Note: only the central part of the
top heating element operates for grilling.
When using ‘Grill’ mode, we recommend you set the temperature to the highest setting. However,
this does not mean you cannot use lower temperatures, simply adjust the temperature knob to the
desired temperature.
or online at www.bush-support.com If you still require further assistance, call one of our experts on 01759 487838
Using your Built-in Oven
21
Page 22

Using your Built-in Oven
If you require any technical guidance or find that your product is not operating as intended, a simple solution can often be found in the Troubleshooting section of these instructions,
General oven and cooking tips
Baking cakes
When baking cakes, always place them in a preheated oven. Make sure you wait until the
oven has been preheated thoroughly (the indicator light will turn off). To prevent heat loss
and the cake from dropping, do not open the oven door during baking.
In general...
... if pastry is too dry
Increase the temperature by 10°C and reduce the cooking time.
... if pastry has dropped
Use less liquid or lower the temperature by 10°C.
... if pastry is too dark on top
Place it on a lower shelf, lower the temperature, and increase the cooking time.
... if cooked well on the inside but sticky on the outside
Use less liquid, lower the temperature, and increase the cooking time.
... if the pastry sticks to the pan
Grease the pan well and sprinkle it with a dusting of flour or use greaseproof paper.
... if I used multi shelf cooking and one shelf is more cooked
Use a lower temperature setting next time. It is not necessary to remove the food from all
the racks at the same time.
Cooking pizza -Suggested cooking function
For best results when cooking pizza:
• Preheat the oven for at least 10 minutes.
• Use a light aluminum pizza pan, placing it on the shelf supplied with the oven. Don’t
use the dripping pan since this will extend the cooking time, making it difficult to get a crispy
crust.
• Do not open the oven door frequently while the pizza is cooking;
• If the pizza has a lot of toppings (three or four), we recommend you add the
mozzarella cheese on top halfway through the cooking process.
• For best results, only use one shelf at a time, but if you want to cook on two shelves,
use the 2nd and 4th racks from the bottom with a temperature of 220°c and swap them
halfway through cooking.
22
Page 23

General oven and cooking tips
Cooking fish and meat-Suggested cooking function
When cooking white meat, fowl and fish, use a temperature setting from 180°C to
200°c.
For red meat that you want well done on the outside while tender and juicy in the
inside, it is best to start with a high temperature setting
(200°C-220°C) for a short time, then turn the oven down afterwards.
In general, the larger the roast, the lower the temperature setting. Place the meat on
the centre of the shelf and place the dripping pan beneath it to catch the fat.
Make sure that the shelf is inserted so that it is in the centre of the oven. If you would
like to increase the amount of heat from below, use a lower shelf height. For savoury
roasts (especially duck and wild game), dress the meat with lard or bacon on the top.
or online at www.bush-support.com If you still require further assistance, call one of our experts on 01759 487838
Using your Built-in Oven
23
Page 24

Page 25

Care and maintenance
5
Page 26

Care and maintenance
If you require any technical guidance or find that your product is not operating as intended, a simple solution can often be found in the Troubleshooting section of these instructions,
Care and maintenance
Looking after your appliance
Cleaning
WARNING! Isolate the power supply to the appliance and make sure that the oven is
cool.
Before cleaning your oven or performing maintenance, make sure that the cooking
mode selection knob and the cooking temperature selection knob is set to ‘OFF’. To
extend the life of your oven, it must be cleaned frequently.
The inside of the oven should preferable be cleaned immediately after use, when it is
still warm (but not hot), with warm water and
soap. The soap should be rinsed away and the interior dried thoroughly. Avoid using
abrasive detergents, scourers, acidic cleaners such as lime scale remover, etc, as
these could damage the enamel, and can result in development of rust and
corrosion. If stains are particularly tough to remove, use cleaners specifically
recommended to clean ovens and follow the instructions provided with the cleaner.
Never use steam cleaner for cleaning inside the oven.
Do not clean using caustic creams, abrasive cleaning powders, thick wire wool or
hard tools. Enamelled parts of the oven can be damaged
if excess cleaning liquids are not immediately removed.
After cleaning the interior parts of the oven with a soapy cloth, rinse it and then dry
thoroughly with a soft cloth.
Clean the glass surfaces with special glass cleaning agents.
Never use flammable agents like acid, thinner or petrol when cleaning your oven.
Do not clean your oven with a steam cleaner.
Do not wash any part of your oven in a dishwasher.
Enamelled Parts:
In order to keep enamelled parts as new, it is necessary to clean them frequently with
mild warm soapy water and then dry with a cloth. Do not wash them while hot and
never use abrasive powders or abrasive cleaning materials. Do not leave anything
spilled onto enamelled parts for long periods of time.
Stainless Steel:
Stainless steel parts must be cleaned frequently with mildly warm soapy water and a
soft sponge and then dried with a soft cloth. Do not use abrasive powders or abrasive
cleaning materials. Do not leave anything spilled onto stainless steel parts for long
periods of time.
26
Page 27

Care and maintenance
or online at www.bush-support.com If you still require further assistance, call one of our experts on 01759 487838
Replacing the oven lamps
WARN
ING: Ensure that the appliance is switched off before replacing the lamp to avoid
the possibility of electric shock.
Remove the glass cover of the lamp-holder as shown below.
Remove the lamp and replace with a lamp resistant to high temperatures (300°C) with
the following characteristics:
- Voltage: 220-240V
- Wattage: 25W
- Type: E 14
Replacement lamps are available from our Support Team. Replace
he glass cover and reconnect the oven to the mains power supply.
t
WARNING: Please do not use screwdrivers or other utensils to
remove the light cover. This could damage the enamel of the oven
or the lamp holder lamp holder.
PLEASE NOTE: The bulb replacement is not covered by your
guarantee.
27
Page 28

Care and maintenance
Looking after your appliance
Technical Specifications
Model
Voltage and frequency
Oven energy rating
Top oven usable capacity (L)
Bottom oven usable capacity (L)
Upper oven power (W)
Lower oven power (W)
Total power (W)
Energy fiche
AWBBDFO/ AWBSDFO
220-240V AC 50Hz
A
31
57
2090-2520
1660-2020
3750-4540
Model
Type of Oven ELECTRIC
Mass kg
Energy Eciency Index - conventional
Energy Eciency Index - fan forced
Energy Class A
Energy consumption (electricity) - conventional kWh/cycle
Energy consumption (electricity) - fan forced kWh/cycle
Number of cavities
Heat Source ELECTRIC
Volume l
This oven complies with EN 60350-1
Energy Saving Tips
Oven
- Cook the meals together, if possible.
- Keep the pre-heating time short.
- Do not elongate cooking time.
AWBBDFO
AWBSDFO
58.5(+/-2)
Top: 86.8 Bottom: /
Top: / Bottom:93.7
Top: 0.59 Bottom: /
Top: / Bottom:0.74
2
Top:31 Bottom:57
- Do not forget to turn-o the oven at the end of cooking.
- Do not open oven door during cooking period.
If you require any technical guidance or find that your product is not operating as intended, a simple solution can often be found in the Troubleshooting section of these instructions,
8
Care and maintenance
Page 29

Product support
6
Page 30

Product support
If you require any technical guidance or find that your product is not operating as intended, a simple solution can often be found in the Troubleshooting section of these instructions,
Product support
Help is always at hand
Troubleshooting
PLEASE DO NOT attempt to repair this
appliance yourself please contact the BUSH
support contact centre on 01759 487838 or
a qualified electrician
30
Page 31

Product support
or online at www.bush-support.com If you still require further assistance, call one of our experts on 01759 487838
Product support
Help is always at hand
Help and assistance
If you require any technical guidance or find that your Built-in Fan Oven is not operating as intended, a simple
solution can often be found in the Troubleshooting section of these instructions or online at
www.bush-support.com
If you still require further assistance, call one of our experts on 01759 487838*. To help give us give you a fast and
efficient service please have the following information ready:
Model Ref.
Serial number
Date of purchase
Local call rates applies*
You can find these on
the rating plate - a small
information panel (usually
a sticker or metal plate) on
the rear of your appliance
This will be shown on
your receipt
Lines open 8am-7pm Monday to Saturday and 10am-4pm Sunday.
*Calls to Bush enquiry lines may attract a charge and set up fee from residential lines depending on your call plan/tariff. Mobile and other
oviders costs may vary, see www.bt.com/pricing for details.
pr
For Security and training purposes, telephone calls to and from customer service centres maybe recorded and monitored. Calls from
Republic of Ireland will attract international call charges.
31
Page 32

Product support
If you require any technical guidance or find that your product is not operating as intended, a simple solution can often be found in the Troubleshooting section of these instructions,
Declaration of conformance to
product standards
This appliance conforms to all relavant standards
applicable to domestic appliances sold in the UK
Disposal
This appliance/fitting is marked
according to the European directive
2012/19/EU on Waste Electrical
and Electronic Equipment (WEEE).
By ensuring this product is disposed of
correctly, you will help prevent potential
negative consequences for the environment
and human health, which could otherwise be
caused by inappropriate waste handling of
this product.
The symbol on the product, or on the
documents accompanying the product, the
crossed out wheelie bin symbol, indicates
that this appliance/tting may not be treated
as household waste. Instead it shall be
handed over to the applicable collection point
for the recycling of electrical and electronic
equipment.
Disposal must be carried out in accordance
with local environmental regulations for waste
disposal.
For more detailed information about
treatment, recovery and recycling of this
product, please contact your local authority,
your household waste disposal service or the
retailer where you purchased the product.
32
Page 33

Product support
or online at www.bush-support.com If you still require further assistance, call one of our experts on 01759 487838
Call us now and activate your 12 month guarantee
Thank you for choosing Bush. Your new product is guaranteed against faults and
breakdowns for 12 months. Don’t forget to register it with us today so we can provide
you with our best possible after-sales service and useful updates.
www.bushregistration.co.uk
FREEPHONE*
0800 597 8548
Lines are open 8am - 8pm, 365 days a y
ear. *Calls may be recorded and monitored.
Your Bush Guarantee
This product is guaranteed for twelve months from the date of original purchase. Any defect that arises due to
faulty materials or workmanship will be repaired free of charge (or if applicable the product will be replaced or the
purchase price refunded) where possible during this period by the dealer from who your purchased the unit.
The guarantee is subject to the following provisions:
• The guarantee does not cover accidental damage,
misuse, cabinet parts, knobs or consumable items.
• The product must be correctly installed and
operated in accordance with the instructions
contained in the manual.
• It must be used solely for domestic purposes. The
guarantee will be rendered invalid if the product is
re-sold or has been damaged by inexpert repair.
• Specifications are subject to change without notice.
• Bush disclaim any liability for loss or damage arising
from the breakdown of the product.
• This guarantee is in addition to and does not
diminish your statutory or legal rights.
Important Data Protection Information
If you provide us with information about another
person, you confirm that they have appointed you
to act for them, to consent to the processing of their
personal data including sensitive personal data and
that you have informed them of our identity and the
purposes (as set out in the Important Data Privacy
notice displayed overleaf) for which their personal data
will be processed.
You are entitled to ask for a copy of the information
we hold about you (for which we may charge a small
fee) and to have any inaccuracies in your information
corrected.
Guarantor: Argos Limited - 489 - 499 Avebury Blvd. - Milton Keynes - MK9 2NW
For quality control and training purposes, we may
monitor or record your communications with us.
If your personal details change, if you change your
mind about any of your marketing preferences or if you
have any queries about how we use your information,
please let us know by contacting our Data Protection
Officer, Domestic & General, Leicester House
17 Leicester Street, Bedworth, Warwickshire
CV12 8JP.
33
Page 34

Page 35

Page 36

Contact:
www.bush-support.com
Helpline: 01759 487838
 Loading...