


CC 9068 APP
Index
Introductory information |
2 |
|||
|
|
|
||
|
1. |
General |
2 |
|
2. |
Security guidelines |
2 |
||
Installation of the hands-free car kit |
4 |
|||
|
3. |
Scope of supply |
4 |
|
4. |
Positioning and mounting |
6 |
||
5. |
Charging the phone in the cradle |
8 |
||
6. |
Connections on the electronics box |
9 |
||
|
7. Starting the BURY ChargingCradle Universal |
12 |
||
8. |
Inserting and removing the mobile phone |
16 |
||
|
9. Rotating the cradle |
18 |
||
10. |
Initialising the BURY ChargingCradle Universal |
18 |
||
Operating guidelines |
19 |
|||
|
11. CC 9068 App software installation |
19 |
||
12. |
Handling possibilities |
20 |
||
13. |
Voice control |
20 |
||
|
14. Handling via Touch screen |
21 |
||
15. |
Establishing a Bluetooth connection |
22 |
||
16. |
Menu navigation |
23 |
||
|
17. Accepting, making, ending calls |
38 |
||
18. |
Transferring Calls |
39 |
||
|
19. Conference Mode |
39 |
||
20. |
Different smartphone’s specific features |
41 |
||
Further Information |
42 |
|||
|
21. |
Service |
42 |
|
|
22. Appropriate use of this system |
43 |
||
|
23. Approvals and declaration of conformity |
43 |
||

2 |
Introductory information |
1. General
Dear customer,
Congratulations on purchasing a BURY hands-free car kit. You have chosen a high quality product that is extremely easy to use.
Please read the operating manual carefully so that you can fully enjoy your BURY hands-free car kit. If you have any further questions concerning installation or operation of your car kit, please contact your dealer. He will be happy to give you reliable advice.
You can also contact our hotline. Our phone and fax numbers are listed in the chapter Service at the end of the operating instructions.
Have a good trip!
2. Security guidelines
Installation - who should do it
The installation of this system can be carried out by yourself but please observe the installation requirements of the automotive manufacturer (VAS 1978). During the installation, park the car at a place where the road traffic is not impaired. We recommend to let a specialised workshop perform the installation.
Power supply
This system has been designed for the use in vehicles with an on-board supply system of 12 volts (passenger car). If you intend to install the device in a vehicle with an on-board supply system of 24 volts (lorry), please use a voltage converter. If you have queries regarding this subject, please contact our hotline.
Position, volume
Install the components of the device in the vehicle so that your field of vision is not impaired and the components are not mounted in the impact zone of the passenger compartment or in the airbag inflation zones. The removal of coverings (with and without airbags) or components of the dashboard requires – in some cases – special tools and special knowledge.

3
Intended use
We shall not be liable for damages or malfunctions due to improper use of the hands-free system. Therefore, do not expose the device to moisture, extreme temperatures or shocks and carefully follow the procedure described in the installation and operating guidelines.
Note:
XXCC 9068 APP works with touch controlled smartphones only!
Use while driving
Operate the system only when the situation allows it and when you do not endanger, harm, constrain, or annoy other road users. The volume of the device has to be set in a way that exterior noise is still audible.
Faults
Do not commission the device if you detect or assume a defect. In this case, contact a Bury specialised dealer or our hotline. Improper repair efforts can be dangerous for you. Therefore, only skilled personnel may perform inspections.
Important:
XXThe driver is ultimately responsible for the safe operation and control of their vehicle at all times. You should never use a hand held phone, including sending or reading text or picture messages, while driving.
XXResearch indicates that there is a risk to safety when the driver of a motor vehicle is distracted and using a mobile phone while driving can be a distraction.
XXThe manufacturer strongly recommends that you use a hands-free solution when driving.
Avoid exposure to long periods of direct sunlight when vehicle is parked as this can cause, among others, damage to the readability of the display. The sound functioning of the display is guaranteed up to a maximum temperature of 60° C.

4Installation of the hands-free car kit
3.Scope of supply
8 |
10 |
11 |
12 |
13 |
|

5
The CC 9068 APP is supplied with different combinations of components, depending on the sales regions (countries). The operating manual refers to all versions.
Description of the components:
1)Electronic Box
2)Cradle
3)Set of tips for specific mobile phone models
4)Dash Mount Adapter for installation on the dashboard or console
5)Little Flat antenna with fakra-connection
6)Microphone
7)ISO cable harness
8)Extension cord
9)Micro USB charging cable
10)AUX IN cable
11)Quick user guide
12)Mobile phone and Smartphone-specific charging cable (does not occur in the kit, is available as an accessory)
13) External loudspeaker
Version 1:
-without external loudspeaker
Version 2:
-with external loudspeaker
Note:
XXIf certain components are added or omitted you will receive the corresponding information on a separate enclosure.
6Installation of the hands-free car kit
4.Positioning and mounting
Important:
XXWhen positioning the cradle please take care that the device does not impair the view onto the road, that it will not be installed in the impact zone of the passenger compartment (amongst others in the airbag inflation zones) and that the cable may be laid without any problems.
XXPlease avoid direct sunlight on the device or high internal temperatures, which can be rapidly reached in parked vehicles. In such cases, remove the cradle and put it in the car glove pocket or glove box for instance.
Step 1:
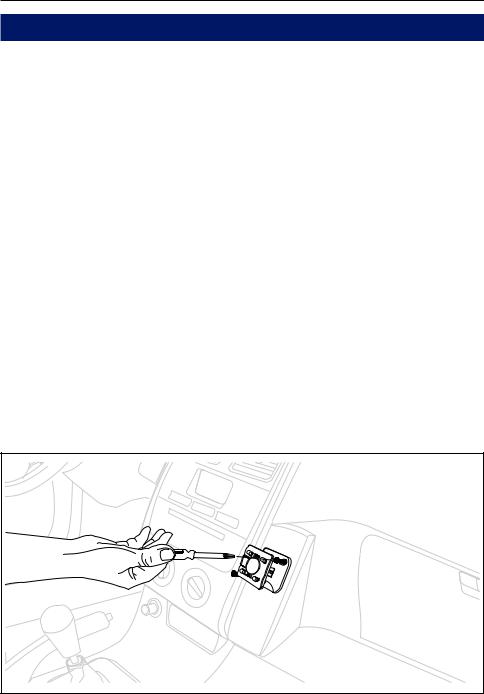
Attaching the Dash Mount Adapter.
Variant A:

7
Variant B:
For the fixing of the Dash Mount Adapter, depending on the type and brand of your car, specific attachment systems (consoles or other assembly aids) can be purchased from local retailers.
Step 2:
Connecting the BURY ChargingCradle Universal with the Dash
Mount Adapter.
Push the BURY ChargingCradle Universal in the Dash Mount Adapter until you can feel it click into place.
8 Installation of the hands-free car kit
Note:
XXYou will find the same snap-in mechanism on the Window Mount as you do on the Dash Mount Adapter.
Step 3:
The Little-Flat Antenna mounting.
The preferred position for on-glass antenna is either on the upper right side or upper left side of the windshield, opposite from the driver´s seat.
Important:
XXEnsure the antenna is located at least 20 cm away from driver and passengers.
XXTo avoid audio interference, do not thread the antenna cable close to the microphone cable.
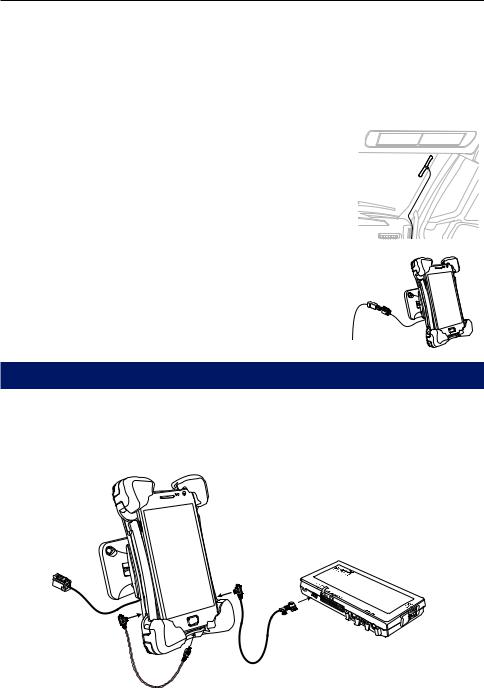
5. Charging the phone in the cradle
If a corresponding cable is connected to the telephone, the smartphone that is positioned in the BURY ChargingCradle Universal cradle will be supplied with electrical power (please refer to the picture). The conduction of the electricity supply occurs from the electronic box.

9
6. Connections on the electronics box
The other components of the hands-free car kit are connected to the electronic box. You can find the following connections:
Connection possibilities:
1CHARGING PORT: Micro USB socket to connect the extension cable - the charging cable or an optional update cable can be connected
there
2PWR/LSP/LINE OUT: 24-pin socket for the connection of the molex jack from the ISO cable harness, used as power supply of the
hands-free car kit outputs music and voice (telephone)
3MICROPHONE: Connection for external microphone
4LINE IN: Connection for AUX-IN cable for inputting of music
5DISPLAY: Connection for display (if present)
6REMOTE CONTROL: Connection for remote control with 3 buttons display (if present)
1 - CHARGING PORT
An extension cable with safety pin for BURY ChargingCradle Universal is connected to connection no. 1 (micro USB socket). The other end of the cable can be connected to both micro USB sockets of the holder BURY ChargingCradle Universal.
2 - PWR/LSP/LINE OUT
The hands-free car kit in the vehicle is connected to the car radio with the ISO cable harness. If the radio has ISO socket at its backside, the installation can be done without additional installation material. If not, certain adapters, e.g. ISO2CAR or AUDIO2CAR, can be ordered from an authorised dealer for the respective radio or vehicle make.

10 Installation of the hands-free car kit
Using the ISO cable harness, you can input music and voice signals (telephone) of different types into the radio or play them back via the radio. If the present radio has a LINE-IN or AUX-IN input at the front side or backside, the four open LINE cables of the ISO cable harness can be connected to them using appropriate adapters (e.g. 3.5 mm stereo jacks or cinch connectors). The radio amplifier is used for music playback in that case. Please observe the notes in the instruction manual of the radio concerning „AUX input“. Generally, voice signals are only output in the two front loudspeakers while music is played back on all four loudspeakers (front and rear). Different installation options can be selected with the hands-free car kit for that purpose.
Toggling between the installation options 1, and 2 is done in the menu. You must open the options in the menu in order to toggle between the installation options:
Menu -> Settings -> Audio -> Installation -> Option 1 and 2
Option 1 is the standard setting upon delivery of the hands-free car kit. Music and voice are output via the loudspeakers using the ISO jacks. The amplifiers of the hands-free car kit are used for playback.
Option 2 feeds music to the radio via the four LINE cables, and voice signals are fed to the loudspeakers via the ISO jacks.
Installation of the hands-free car kit
Step 1:
Pull the ISO jacks at the back of the radio off and replace them with the jacks at the ISO cable harness. Connect the now free ISO jacks with both sockets from the ISO cable harness (see picture).
11
If you want music or voice signals to be fed via the four LINE cables, you must adjust them accordingly to the respective type of radio and its connections (PHONE-IN or AUX-IN). Appropriate adapters are available from specialists shops.
Step 2:
The hands-free car kit supports the radio mute function, if this function is also supported by the radio. The mute signal is then fed to the radio via the yellow cable of the ISO cable harness. The cable is labelled with „mute“ and must be connected to one of the three sockets (mute1, mute2, mute3). Please observe the notes on this topic in the instruction manual of the radio concerning „Pin allocation for mute / radio mute“. Then, connect the mute cable to the corresponding socket.
Step 3:
Insert the 24-pole molex jack (A) into the connection of the electronic box (see picture).

12 Installation of the hands-free car kit
Connection diagram for ISO cable harness
 - Micro Molex 24 - ISO - connection to the electronic box (HFCK)
 - connection to the vehicle’s speakers
 - connection to the vehicle’s power supply
 - connection to the car radio
  - connection to the car radio
|
|
|
|
|
|
|
|
|
|
|
|
|
|
|
|
|
|
|
|
|
|
|
|
|
|
|
|
|
|
|
|
|
|
1 - Mute 3 |
|
|
|
|
|
|
|
|
|
|
|
|
|
|
|
|
|
|
|
|
|
|
|
|
|
|
|
|
|
|
|
|
|
|
|
|
|
|
|
|
|
|
|
|
|
|
|
|
|
|
|
|
|
|
|
|
|
|
|
|
|
|
|
|
|
|
|
|
|
2 - Mute 2 |
|
|
|
|
|
|
|
|
|
|
|
|
|
|
|
|
|
|
|
|
|
|
|
|
|
|
|
|
|
|
|
|
|
|
|
|
|
|
|
|
|
|
|
|
|
|
|
|
|
|
|
|
|
|
|
|
|
|
|
|
|
|
|
|
|
|
|
|
|
3 - Mute 1 |
|
|
|
|
|
|
|
|
|
|
|
|
|
|
|
|
|
|
|
|
|
|
|
|
|
|
|
|
|
|
|
|
|
|
|
|
|
|
|
|
|
|
|
|
|
|
|
|
|
|
|
|
|
|
|
|
|
|
|
|
|
|
|
|
|
|
|
|
|
4 - Ignition |
1 |
- C RR- |
|
|
|
13 - C RR+ |
|
|
|
||||||||||||||||||||||||||
|
|
|
|
|
||||||||||||||||||||||||||||||
|
|
|
|
|
|
5 - Antenna |
||||||||||||||||||||||||||||
2 |
- C RF- |
|
|
|
14 - C RF+ |
|
|
|
||||||||||||||||||||||||||
|
|
|
|
|
|
6 - Illumination |
||||||||||||||||||||||||||||
3 |
- C LF- |
15 |
|
- C LF+ |
|
|
|
|||||||||||||||||||||||||||
|
|
|
|
7 - Power |
||||||||||||||||||||||||||||||
4 |
- C LR- |
16 |
|
- C LR+ |
|
|
|
|||||||||||||||||||||||||||
|
|
|
|
8 - Ground |
||||||||||||||||||||||||||||||
5 |
- R LR- |
17 |
|
- R LR+ |
|
|
|
|||||||||||||||||||||||||||
|
|
|
|
|
||||||||||||||||||||||||||||||
6 |
- R LF- |
18 |
|
- R LF+ |
|
|
|
|
||||||||||||||||||||||||||
7 |
- R RF- |
19 |
|
- R RF+ |
|
|
|
|
||||||||||||||||||||||||||
8 |
- R RR- |
|
|
|
20 - R RR+ |
|
|
|
|
|||||||||||||||||||||||||
9 |
- LINE R+ |
21 |
|
- LINE R- |
|
|
|
|
||||||||||||||||||||||||||
10 - LINE L+ |
22 |
|
- LINE L- |
|
|
|
|
|||||||||||||||||||||||||||
11 - R-Mute |
23 |
|
- Ignition |
|
|
|
|
|||||||||||||||||||||||||||
12 - Ground |
24 |
|
- Power |
|
|
|
|
|||||||||||||||||||||||||||

13
3 - MICROPHONE
This is where you plug in the microphone jack. This ensures that neither of the jacks is able to loosen as a result of vibrations.
4 - LINE IN
To connect external music players.
5 - REMOTE CONTROL
14Installation of the hands-free car kit
7.Starting the BURY ChargingCradle Universal
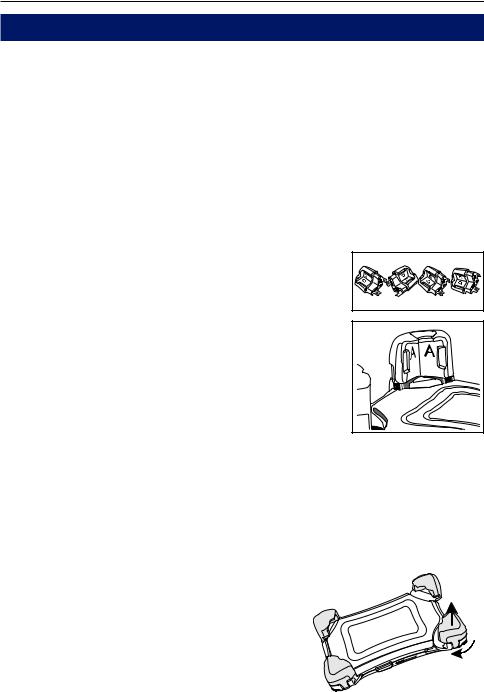
Step 1:
Adjusting corner fasteners to wide ranging models of mobile phone.
To be able to select the suitable type of corner fastener for a certain model of mobile phone / smartphone, please familiarize yourself with the corresponding compatibility list. This list is available on our internet site in the download area for the product at www.bury.com.
Important:
XXEvery corner fastener set is equipped with a letter notation which is positioned on the interior side of the corner fastener.
Adjusting the corner fasteners: |
|
1. Turn the corner fastener with the rotary knob (1) in a clockwise |
|
direction. |
|
2. Detach the corner fastener in the direction of the arrow (2). |
2 |
3. Fit the correct ending for the corner fastener and tighten it by |
|
turning it anticlockwise. |
|
4. Repeat the above steps with the remaining three corner fasten- |
|
ers. |
|
 Loading...