

Page 1
As an ENERGY STAR
nonoitamrofnignikeesnehW.rotcartnocgnitaehruoyllac,reliobotsriaperroecivresroF
.lebaLgnitaRnonwohssarebmuNlaireSdnarebmuNledoMrelioBedivorp,reliob
rebmuNledoMrelioB
GVP
rebmuNlaireSrelioB etaDnoitallatsnI
rotcartnoCgnitaeH rebmuNenohP
sserddA
DNAGNITAREPO,NOITALLATSNI
ROFSNOITCURTSNIECIVRES
™GVP
RELIOBDERIF-SAG
STAR® guidelines for energy efciency established by the United States Environmental Protection Agency (EPA).
®
Partner, Burnham Hydronics has determined that the PVG Series meets the ENERGY
8140708R8-8/08
Price - $5.00
Page 2
IMPORTANT INFORMATION - READ CAREFULLY
NOTE: The equipment shall be installed in accordance with those installation regulations enforced in the area where the
installation is to be made. These regulations shall be carefully followed in all cases. Authorities having jurisdiction
shall be consulted before installations are made.
All wiring on boilers installed in the USA shall be made in accordance with the National Electrical Code and/or local regulations.
All wiring on boilers installed in Canada shall be made in accordance with the Canadian Electrical Code and/or local regulations.
The New York City Department of Buildings has approved the PVG™ Series boiler: Approval No. MEA 5-06-E Vol. II.
The City of New York requires a Licensed Master Plumber supervise the installation of this product.
The Massachusetts Board of Plumbers and Gas Fitters has approved the PVG™ Series boiler. See the Massachusetts Board of
Plumbers and Gas Fitters website, http://license.reg.state.ma.us/pubLic/pb_pre_form.asp for the latest Approval Code or ask
your local Sales Representative.
The Commonwealth of Massachusetts requires this product to be installed by a Licensed Plumber or Gas Fitter.
The following terms are used throughout this manual to bring attention to the presence of hazards of various risk levels,
or to important information concerning product life.
DANGER
Indicates an imminently hazardous situation
which, if not avoided, will result in death, serious
injury or substantial property damage.
WARNING
Indicates a potentially hazardous situation which,
if not avoided, could result in death, serious injury
or substantial property damage.
Indicates a potentially hazardous situation which,
if not avoided, may result in moderate or minor
injury or property damage.
Indicates special instructions on installation,
operation, or maintenance which are important
but not related to personal injury hazards.
CAUTION
NOTICE
DANGER
DO NOT store or use gasoline or other ammable vapors or liquids in the vicinity of this or any other
appliance.
If you smell gas vapors, NO NOT try to operate any appliance - DO NOT touch any electrical switch or use
any phone in the building. Immediately, call the gas supplier from a remotely located phone. Follow the gas
supplier’s instructions or if the supplier is unavailable, contact the re department.
2
Page 3
WARNING
This boiler requires regular maintenance and service to operate safely. Follow the instructions contained
in this manual.
Improper installation, adjustment, alteration, service or maintenance can cause property damage, personal
injury or loss of life. Read and understand the entire manual before attempting installation, start-up
operation, or service. Installation and service must be performed only by an experienced, skilled, and
knowledgeable installer or service agency.
This boiler must be properly vented.
This boiler needs fresh air for safe operation and must be installed so there are provisions for adequate
combustion and ventilation air.
The interior of the venting system must be inspected and cleaned before the start of the heating season
and should be inspected periodically throughout the heating season for any obstructions. A clean and
unobstructed venting system is necessary to allow noxious fumes that could cause injury or loss of life
to vent safely and will contribute toward maintaining the boiler’s efciency.
Installation is not complete unless a pressure relief valve is installed into the tapping located on top of
appliance. - See the Water Piping and Trim Section of this manual for details.
This boiler is supplied with safety devices which may cause the boiler to shut down and not re-start
without service. If damage due to frozen pipes is a possibility, the heating system should not be left
unattended in cold weather; or appropriate safeguards and alarms should be installed on the heating
system to prevent damage if the boiler is inoperative.
This boiler contains very hot water under high pressure. Do not unscrew any pipe ttings nor attempt
to disconnect any components of this boiler without positively assuring the water is cool and has no
pressure. Always wear protective clothing and equipment when installing, starting up or servicing this
boiler to prevent scald injuries. Do not rely on the pressure and temperature gauges to determine the
temperature and pressure of the boiler. This boiler contains components which become very hot when
the boiler is operating. Do not touch any components unless they are cool.
Boiler materials of construction, products of combustion and the fuel contain alumina, silica, heavy metals,
carbon monoxide, nitrogen oxides, aldehydes and/or other toxic or harmful substances which can cause
death or serious injury and which are known to the state of California to cause cancer, birth defects and
other reproductive harm. Always use proper safety clothing, respirators and equipment when servicing
or working nearby the appliance.
Failure to follow all instructions in the proper order can cause personal injury or death. Read all instruc-
tions, including all those contained in component manufacturers manuals which are provided with the
boiler before installing, starting up, operating, maintaining or servicing.
Keep boiler area clear and free from combustible materials, gasoline and other ammable vapors or
liquids.
All cover plates, enclosures and guards must be in place at all times.
NOTICE
This boiler has a limited warranty, a copy of which is printed on the back of this manual. It is the responsibility
of the installing contractor to see that all controls are correctly installed and are operating properly when the
installation is complete.
3
Page 4
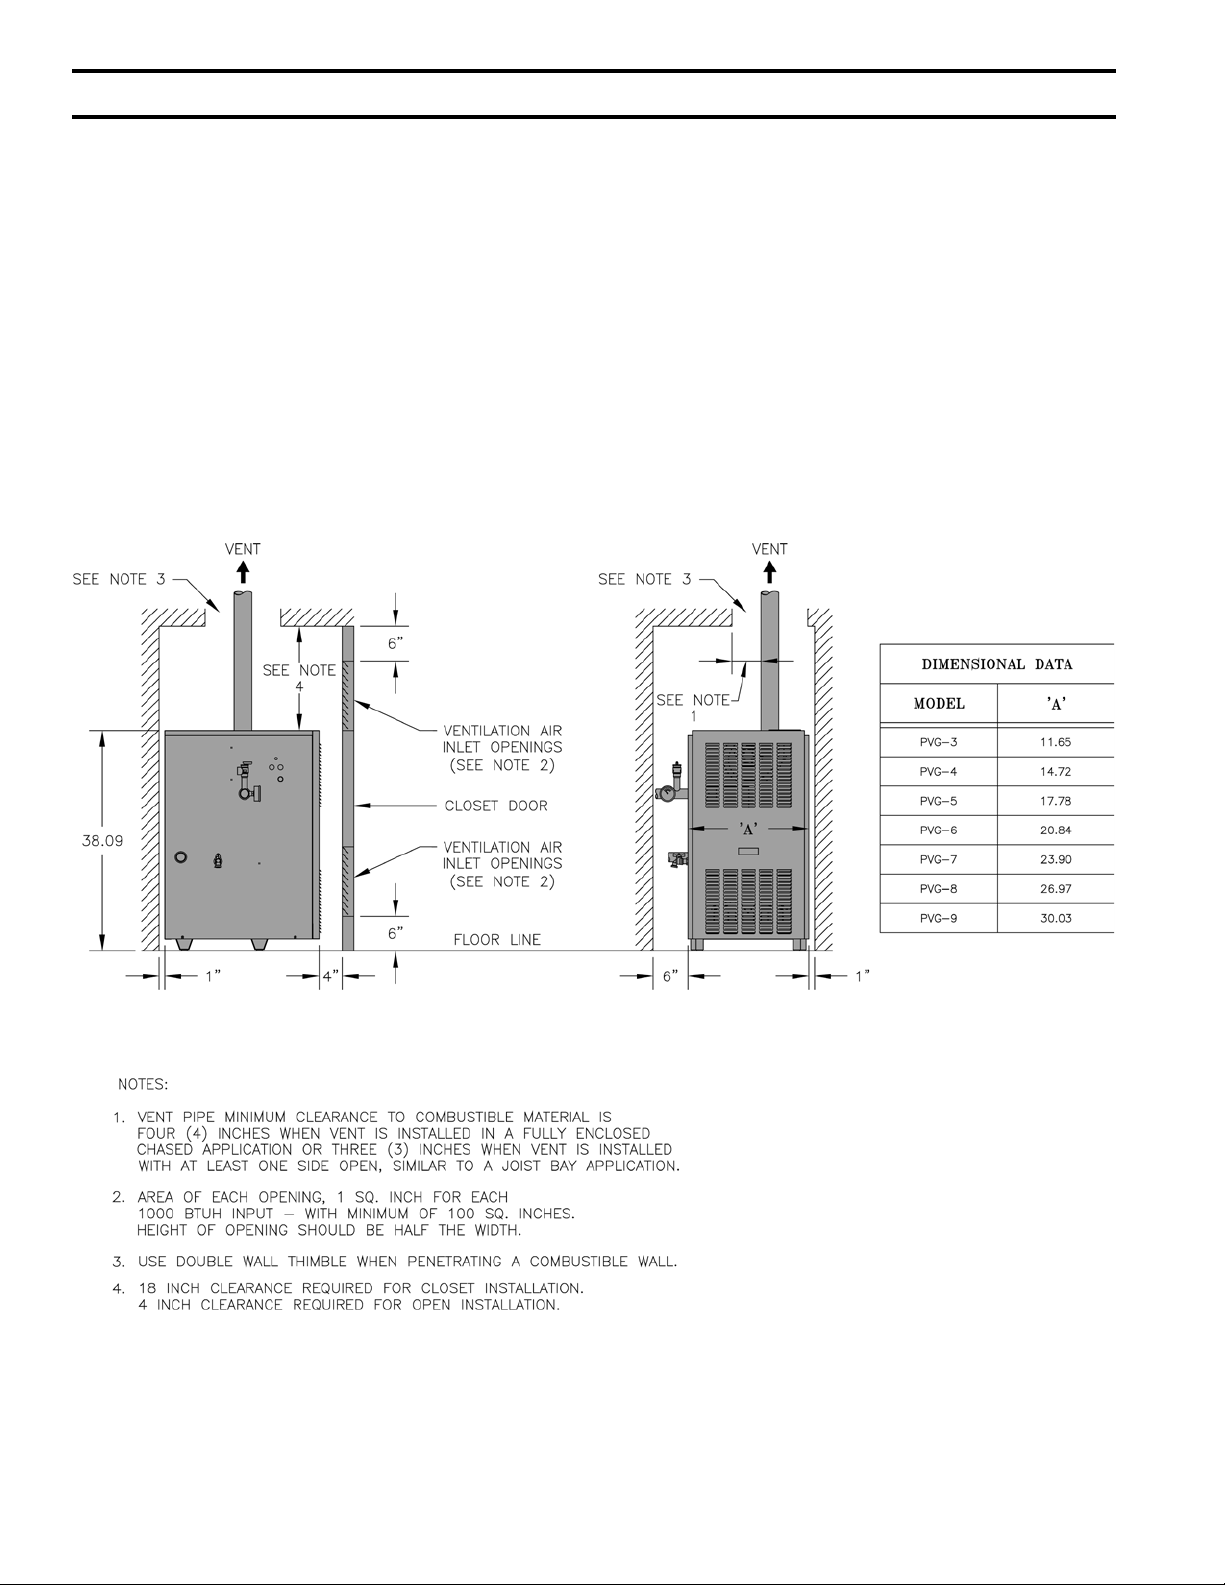
Table of Contents
I. Pre-Installation ...............................6
II. Unpack Boiler ................................
III. Venting ...........................................8
IV. Water Piping and Trim .................
V. Gas Piping ....................................
20
25
VI. Electrical .......................................28
7
VII. Modular Installation ....................
VIII. System Start-up ............................
IX. Service .......................................... 46
X. Repair Parts ..................................
37
39
52
Figure 1: Minimum Clearances to Combustibles
4
Page 5
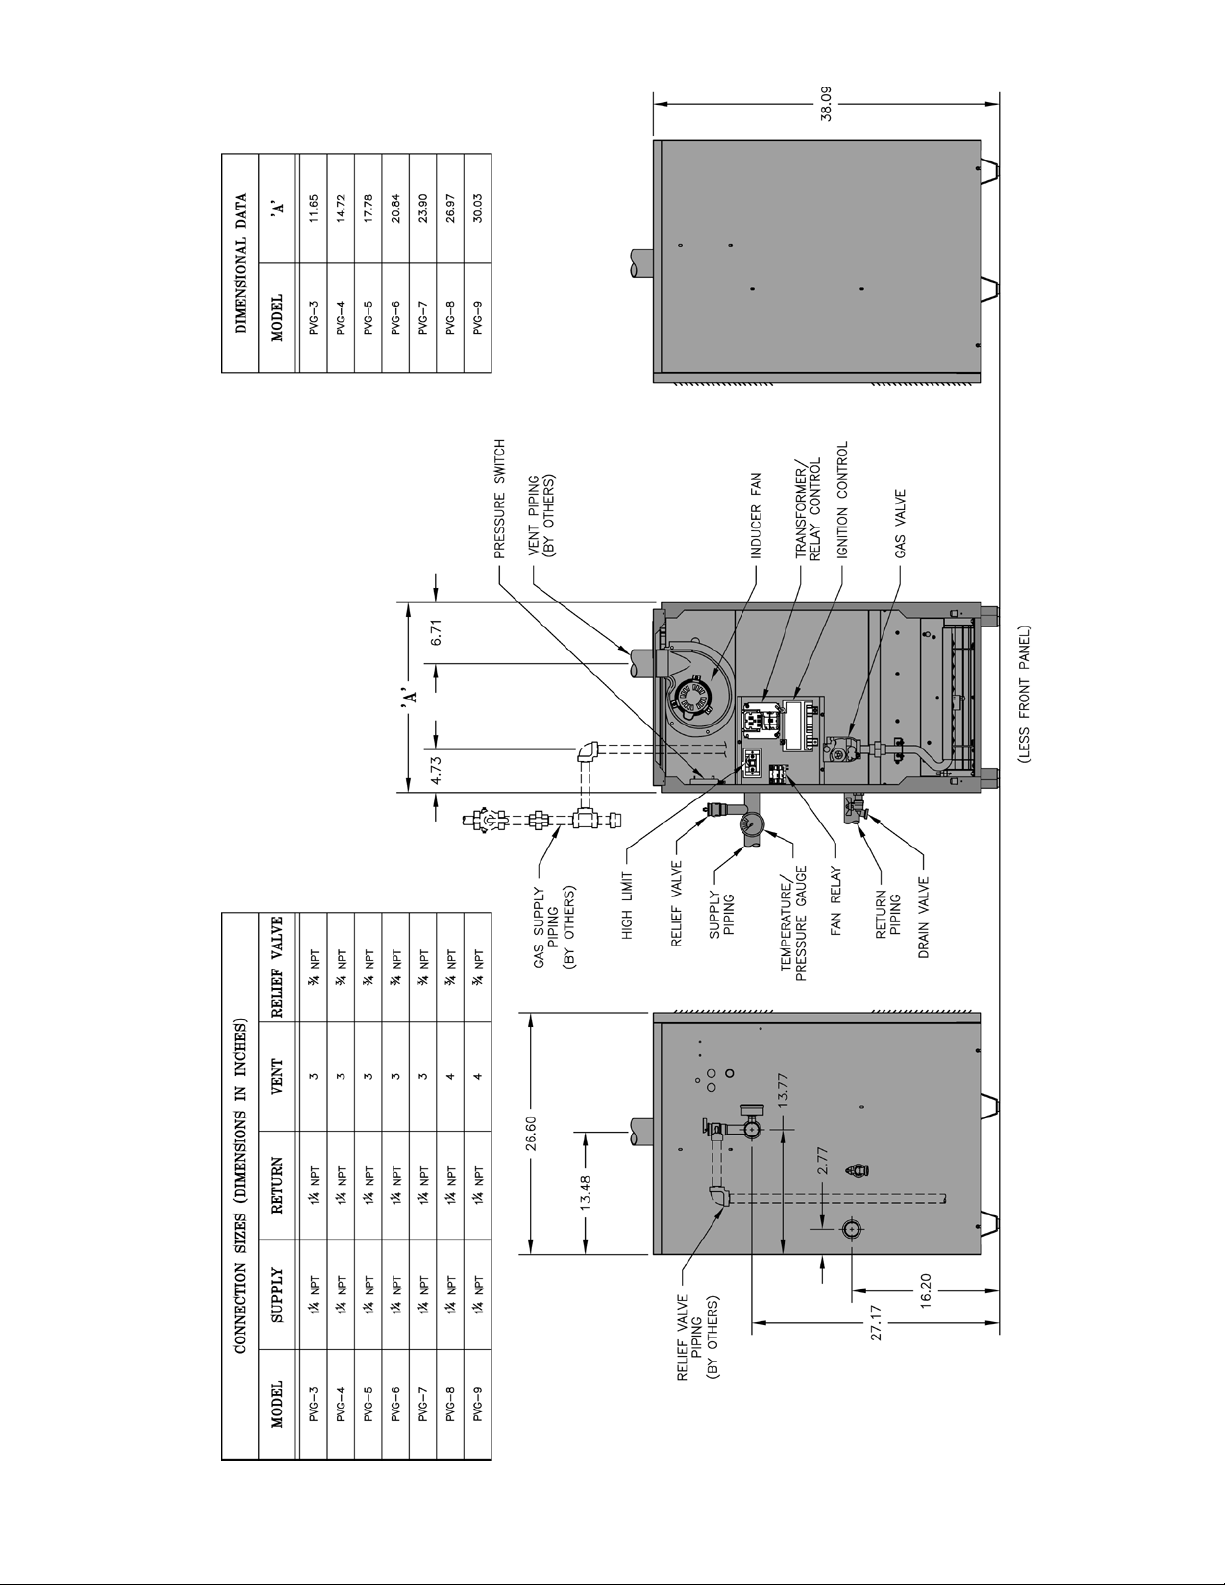
Figure 2: Dimensions
5
Page 6
I. Pre-Installation
WARNING
If you do not follow these instructions exactly,
a re or explosion may result causing property
damage or personal injury.
DANGER
Do not install boiler where gasoline or other
ammable vapors or liquids, or sources of
hydrocarbons (i.e. bleaches, cleaners, chemicals,
sprays, paint removers, fabric softeners, etc.) are
used or stored.
NOTICE
Due to the low water content of the boiler, missizing of the boiler with regard to the heating
system load will result in excessive boiler cycling
and accelerated component failure. Burnham
DOES NOT warrant failures caused by mis-sized
boiler applications. DO NOT oversize the boiler to
the system. Modular boiler installations greatly
reduce the likelihood of boiler oversizing.
A. Installation must conform to the requirements of the
authority having jurisdiction. In the absence of such
requirements, installation must conform to the National
Fuel Gas Code, NFPA 54/ANSI Z223.1, and/or CAN/
CSA B149.1 Installation Codes.
B. Appliance is design certied for installation on
combustible ooring. Do not install boiler on
carpeting.
C. Provide clearance between boiler jacket and
combustible material in accordance with local re
ordinance. Refer to Figure 1 for minimum listed
clearance from combustible material. Recommended
service clearance is 24 inches from left side, right
side and front. Service clearances may be reduced to
minimum clearances to combustible materials.
D. Install on level oor. For basement installation provide
solid base such as concrete, if oor is not level or if
water may be encountered on oor around boiler. Floor
must be able to support weight of boiler, water and all
additional system components.
E. Protect gas ignition system components from water
(dripping, spraying, rain, etc.) during boiler operation
and service (circulator replacement, condensate trap,
control replacement, etc.).
F. Provide combustion and ventilation air in accordance
with applicable provisions of local building codes,
or: USA - National Fuel Gas Code, NFPA 54/ANSI
Z223.1, Air for Combustion and Ventilation;
Canada - Natural Gas or Propane Installation Code,
CAN/CSA-B149.1.
WARNING
Adequate combustion and ventilation air must
be provided to assure proper combustion.
The following guideline is based on the National Fuel Gas
Code, NFPA 54/ANSI Z223.1.
1. Determine volume of space (boiler room). Rooms
communicating directly with space (through
openings not furnished with doors) are considered
part of space.
Volume [ft³] = Length [ft] x Width [ft] x Height [ft]
2. Determine Total Input of all appliances in space.
Round result to nearest 1,000 Btu per hour (Btuh).
3. Determine type of space. Divide Volume by Total
Input.
a. If result is greater than or equal to 50 ft³ per
1,000 Btuh, space is considered an unconned
space.
b. If result is less than 50 ft³ per 1,000 Btuh, space
is considered a conned space.
4. Determine building type. A building of unusually
tight construction has the following characteristics:
a. Walls and ceiling exposed to outside atmosphere
have a continuous water vapor retarder with a
rating of 1 perm or less with openings gasketed
and sealed, and;
b. Weather-stripping has been added on openable
windows and doors, and;
c. Caulking or sealants applied in joints around
window and door frames, between sill plates and
oors, between wall-ceiling joints, between wall
panels, at plumbing and electrical penetrations,
and at other openings.
5. For boiler located in an unconned space in a
building of other than unusually tight construction,
adequate combustion and ventilation air is normally
provided by fresh air inltration through cracks
around windows and doors.
6. For boiler located within unconned space in
building of unusually tight construction or within
conned space, provide outdoor air through two
permanent openings which communicate directly or
6
Page 7
by duct with the outdoors or spaces (crawl or attic)
freely communicating with the outdoors. Locate one
opening within twelve (12) inches of top of space.
Locate remaining opening within twelve (12) inches
of bottom of space. Minimum dimension of air
opening is three (3) inches. Size each opening per
following:
a. Direct communication with outdoors. Minimum
free area of one (1) square inch per 4,000 Btu per
hour input of all equipment in space.
b. Vertical ducts. Minimum free area of one (1)
square inch per 4,000 Btu per hour input of all
equipment in space. Duct cross-sectional area
shall be same as opening free area.
c. Horizontal ducts. Minimum free area of one (1)
square inch per 2,000 Btu per hour input of all
equipment in space. Duct cross-sectional area
shall be same as opening free area.
Alternate method for boiler located within
conned space. Use indoor air if two permanent
openings communicate directly with additional
space(s) of sufcient volume such that combined
volume of all spaces meet criteria for unconned
space. Size each opening for minimum free area
of one (1) square inch per 1,000 Btu per hour
input of all equipment in spaces, but not less than
100 square inches.
7. Combustion Air/Ventilation Duct Louvers and
Grilles. Equip outside openings with louvers to
prevent entrance of rain and snow, and screens to
prevent entrance of insects and rodents. Louvers and
grilles must be xed in open position or interlocked
with equipment to open automatically before burner
operation. Screens must not be smaller than ¼ inch
mesh.
Consider the blocking effect of louvers, grilles and
screens when calculating the opening size to provide
the required free area. If free area of louver or grille
is not known, assume wood louvers have 20-25
percent free area and metal louvers and grilles have
60-75 percent free area.
CAUTION
Avoid operating this boiler in an environment where saw dust, loose insulation bers, dry wall dust, etc.
are present. If boiler is operated under these conditions, the burner interior and ports must be cleaned and
inspected daily to insure proper operation.
II. Unpack Boiler
CAUTION
Do not drop boiler. Do not bump boiler jacket
against oor.
A. Move boiler to approximate installed position.
B. Remove all crate fasteners.
C. Lift and remove outside container. Save two of the
wooden slats from the container sleeve for use in Steps
E and F.
D. Remove all boiler hold-down fasteners.
Installation of this boiler should be undertaken
only by trained and skilled personnel from a
qualied service agency.
E. Tilt the boiler to its front side or back side and slide a
wooden slat under the three raised feet.
F. Tilt the boiler in the opposite direction and slide
another wooden slat under the three raised feet.
G. Slide the boiler left or right off the skid using the two
wooden slats as runners.
WARNING
H. Move boiler to its permanent location.
7
Page 8
III. Venting
WARNING
Do not use this boiler with galvanized, Type 304 or Type 316 stainless steel, non metallic or any other
non AL29-4C® based vent systems.
Do not use a barometric damper or drafthood with this appliance.
Do not use vent dampers with this boiler.
Moisture and ice may form on surfaces around termination. To prevent deterioration, surfaces should
be in good repair (sealed, painted, etc.).
This appliance needs fresh air for safe operation and must be installed so there are provisions for
adequate combustion and ventilation air.
Read, understand and follow combustion air instruction restrictions contained in the Pre-Installation
instructions of this manual.
Do not operate appliance where gasoline or other ammable vapors or liquids, or sources of hydrocarbons (i.e. bleaches, cleaners, chemicals, sprays, paint removers, fabric softeners, etc.) are used,
stored and/or present in the air.
When installing vent pipe through chimney, no other appliance can be vented into the chimney.
Do not exceed maximum vent lengths. Refer to Table 4.
Table 1: Vent System Options
Option Description
1. Horizontal
2. Vertical
Power Vent (air from within building) the vent pipe terminates
horizontally (through a sidewall).
Power Vent (air from within building) the vent pipe terminates
vertically (through the roof).
Additional
Vent Kit
Required
No F.
No G.
Installation
Drawing and
Specication
(See Section)
Table 2: Vent System Components Included with Boiler
Vent System Components Part Number
Gasketed Vent Terminal 3” -Horizontal PVG-3 thru PVG-7) 8110701
Gasketed Vent Terminal 4” -Horizontal (PVG-8 & PVG 9) 8110702
8
Page 9
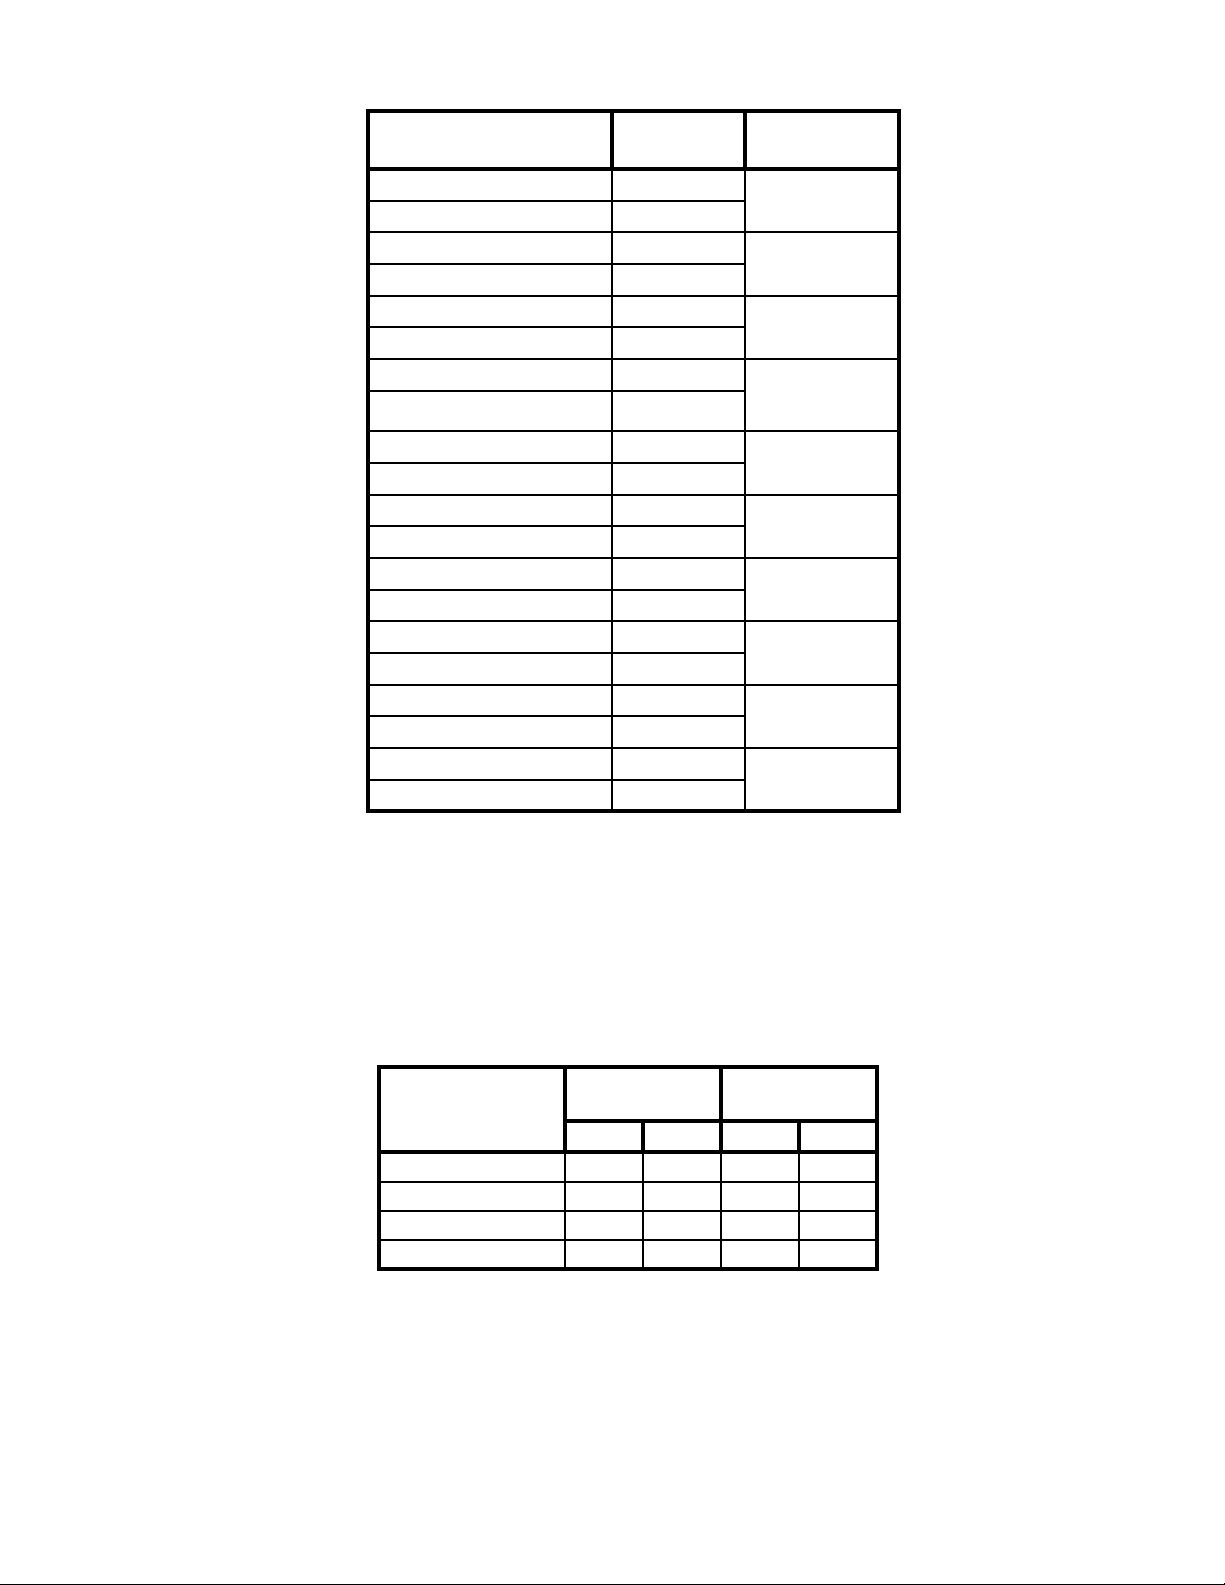
Table 3: Burnham Vent System Components
Vent System Component Part Number
3” Dia. Pipe x 1 Ft 8116296U
4” Dia. Pipe x 1 Ft 100176-01
3” Dia. Pipe x 3 Ft 8116298U
4” Dia. Pipe x 3 Ft 100177-01
3” Dia. Pipe x 5 Ft 8116300U
4” Dia. Pipe x 5 Ft 100178-01
3” Dia. Pipe x Adjustable 8116319U
4” Dia. Pipe x Adjustable 100179-01
3” Dia. 90° Elbow 8116294U
4” Dia. 90° Elbow 100180-01
3” Dia. 45° Elbow 8116292U
4” Dia. 45° Elbow 100181-01
3” Dia. Horizontal Drain Tee 8116302U
4” Dia. Horizontal Drain Tee 100182-01
3” Dia. Vertical Drain Tee 8116304U
4” Dia. Vertical Drain Tee 100183-01
3” Single Wall Thimble 8116116
4” Single Wall Thimble 100184-01
3” Double Wall Thimble 8116115
4” Double Wall Thimble 100185-01
Equivalent
Feet of Pipe
1
3
5
Equal to
Installed Length
(1.06 TO 1.64)
5
5
2
7½
---
---
Table 4: Vent Length
Model
3” Vent Pipe
(Equiv. Ft.)
4” Vent Pipe
(Equiv. Ft.)
Min. Max. Min. Max.
PVG-3 & PVG-4 8 50 --- --PVG-5 & PVG-6 8 50 --- ---
PVG-7 8 50 --- ---
PVG-8 & PVG-9 --- --- 8 40
9
Page 10

A. Vent Guidelines Due to Removal of an Existing
Boiler
For installations not involving the replacement of an
existing boiler, proceed to Step B.
When an existing boiler is removed from a common
venting system, the common venting system is likely
to be too large for proper venting of the remaining
appliances. At the time of removal of an existing
boiler, the following steps shall be followed with each
appliance remaining connected to the common venting
system placed in operation, while the other appliances
remaining connected to the common venting system are
not in operation:
1. Seal any unused openings in the common venting
system.
2. Visually inspect the venting system for proper
size and horizontal pitch and determine there is no
blockage or restriction, leakage, corrosion, and other
deciencies which could cause an unsafe condition.
3. Insofar as is practical, close all building doors and
windows and all doors between the space in which
the appliances remaining connected to the common
venting system are located and other spaces of the
building. Turn on clothes dryers and any appliance
not connected to the common venting system.
Turn on any exhaust fans, such as range-hoods and
bathroom exhausts, so they will operate at maximum
speed. Do not operate a summer exhaust fan. Close
replace dampers.
4. Place in operation the appliance being inspected.
Follow the Lighting (or Operating) Instructions.
Adjust thermostat so appliance will operate
continuously.
5. Test for spillage at the draft hood relief opening
after ve (5) minutes of main burner operation. Use
the ame of a match or candle, or smoke from a
cigarette, cigar or pipe.
6. After it has been determined that each appliance
remaining connected to the common venting system
properly vents when tested as outlined above, return
doors, windows, exhaust fans, replace dampers and
any other gas burning appliance to their previous
conditions of use.
7. Any improper operation of the common venting
system should be corrected so the installation
conforms with the National Fuel Gas Code, NFPA
54/ANSI Z223.1. When resizing any portion of the
common venting system, the common venting
system should be resized to approach the minimum
size as determined using the appropriate tables in
Part II in the National Fuel Gas Code, NFPA 54/
ANSI Z223.1.
B. General Guidelines
1. Vent system installation must be in accordance
with National Fuel Gas Code, NFPA 54/ANSI
Z221.3 or applicable provisions of local building
codes. Contact local building or re ofcials about
restrictions and installation inspection in your area.
2. Refer to the appropriate drawings in this section of
this manual to determine the proper conguration of
venting system. See Table 1.
3. This appliance requires a Special Gas Vent. The
product is designed to use Burnham supplied AL29-4C
Stainless Steel vent system components. The following
manufacturers offer similar AL 29-4C® components
and are approved for use with this product. Heat-Fab
Inc. - Saf-T-Vent (800-772-0739); Flex-L International
Inc. - Star-34 (800-561-1980); Z-Flex U. S., Inc.
- Z-Vent (800-654-5600); and Protech Systems, Inc.FasNSeal™ (800-766-3473) or equivalent. The use
of these alternate manufacturer’s venting systems will
require adapters to connect to the Burnham supplied
vent connector and vent terminal. These adapters are
not supplied with this unit and should be obtained from
the supplier of the alternate manufacturer’s venting
system. See Table 3 for complete list of Burnham
Vent System Components.
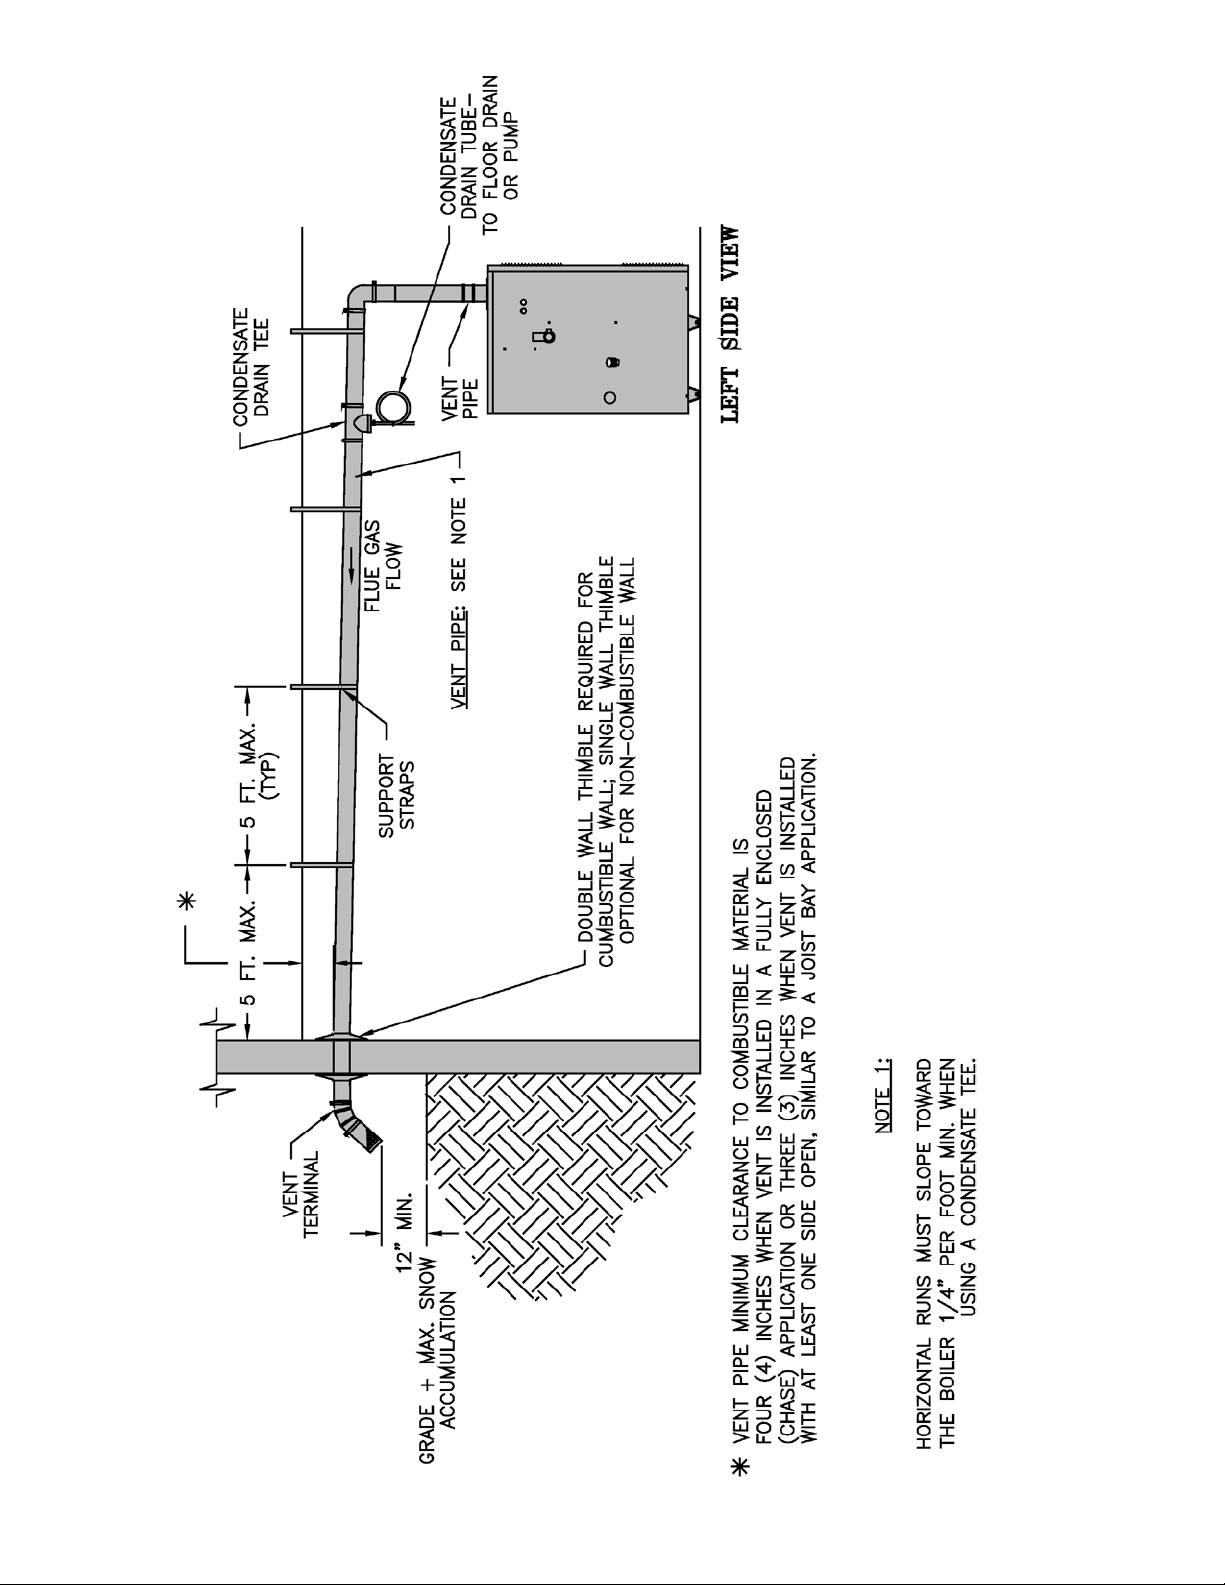
4. Horizontal vent pipe must maintain a minimum ¼
inch per foot slope away from boiler.
5. Use noncombustible ¾ inch pipe strap to support
horizontal runs and maintain vent location and
slope while preventing sags in pipe. Do not restrict
thermal expansion or movement of vent system.
Maximum support spacing is ve (5) feet. Do not
penetrate any part of the vent system with fasteners.
6. Vent length restrictions are based on equivalent
length of vent pipe (total length of straight pipe
plus equivalent length of ttings). Maximum
vent lengths are listed in Table 4. Do not exceed
maximum vent lengths. Table 3 lists equivalent
lengths for ttings. Do not include vent terminals in
equivalent feet calculations.
7. Provide and maintain vent pipe minimum clearances
to combustible materials. Vent pipe minimum
clearance to combustible material is four (4) inches
when vent is installed in a fully enclosed (chase)
application or three (3) inches when vent is installed
with at least one side open, similar to a joist bay
application. Use double wall thimble [Burnham
Part No. 8116115 (3”), 100185-01 (4”)] when
penetrating a combustible wall.
8. Do not install venting system components on
the exterior of the building except as specically
required by these instructions. The vent termination
location is restricted as follows:
®
10
Page 11
a. Minimum twelve (12) inches above grade plus
normally expected snow accumulation level, or
seven (7) feet above grade if located adjacent
to public walkway. Do not install over public
walkway where local experience indicates
appliance ue gas vapor or condensate creates a
nuisance or hazard.
b. Minimum three (3) feet above any forced air
inlet located within ten (10) feet.
c. Minimum four (4) feet below, four (4) feet
horizontally from, or four (4) feet above any
door, window, or gravity air inlet.
d. Minimum four (4) feet horizontally from electric
meters, gas meters, regulators, and relief valves.
This distance may be reduced if equipment is
protected from damage due to condensation or
vapor by enclosure, overhangs, etc.
e. Minimum twelve (12) inches from overhang or
corner of building.
9. Enclose vent passing through occupied or
unoccupied spaces above the boiler with material
having a re resistance rating of at least equal to the
rating of the adjoining oor or ceiling. Maintain
minimum clearances to combustible materials. See
Figure 1.
Note: For one or two family dwellings, re
resistance rating requirement may not need to be
met, but is recommended.
10. Plan venting system to avoid possible contact with
plumbing or electrical wires. Start at vent connector
on top of boiler and work towards vent terminal.
11. Once a vent pipe manufacturer and system is chosen
never mix and match vent systems.
12. If a non-standard length pipe is required:
Gasketed Vent System: The use of the adjustable
length pipe (P/N 8116319U) is recommended to
complete a non-standard pipe length. This pipe
requires a minimum installed length of 12¾ inch
and can adjust across a 7 inch gap up to a maximum
of 19¾ inch long. (Note for the adjustable pipe
the installed length should be measured from the
centerline of the bead on the male end of the rst
pipe to the end of the female pipe excluding the
locking band of the second pipe with a single
gasket.) Only in the event the adjustable length pipe
is not sufcient a standard length pipe may be cut
using the procedure outlined below for the GasketLess Vent System.
WARNING
Never exceed maximum installed length of 19¾
inches for adjustable length pipe.
Risk of ue gas leakage is possible.
NOTICE
Cut must be square with pipe and led or
sanded smooth before joining. Carefully ensure
roundness of cut pipe by hand with gloves before
installing. Seal joint with RTV specied in this
manual.
C. Install Vent Pipe, Burnham Gasketed Vent System.
1. Procedure for Joining Burnham Gasketed Vent Pipe
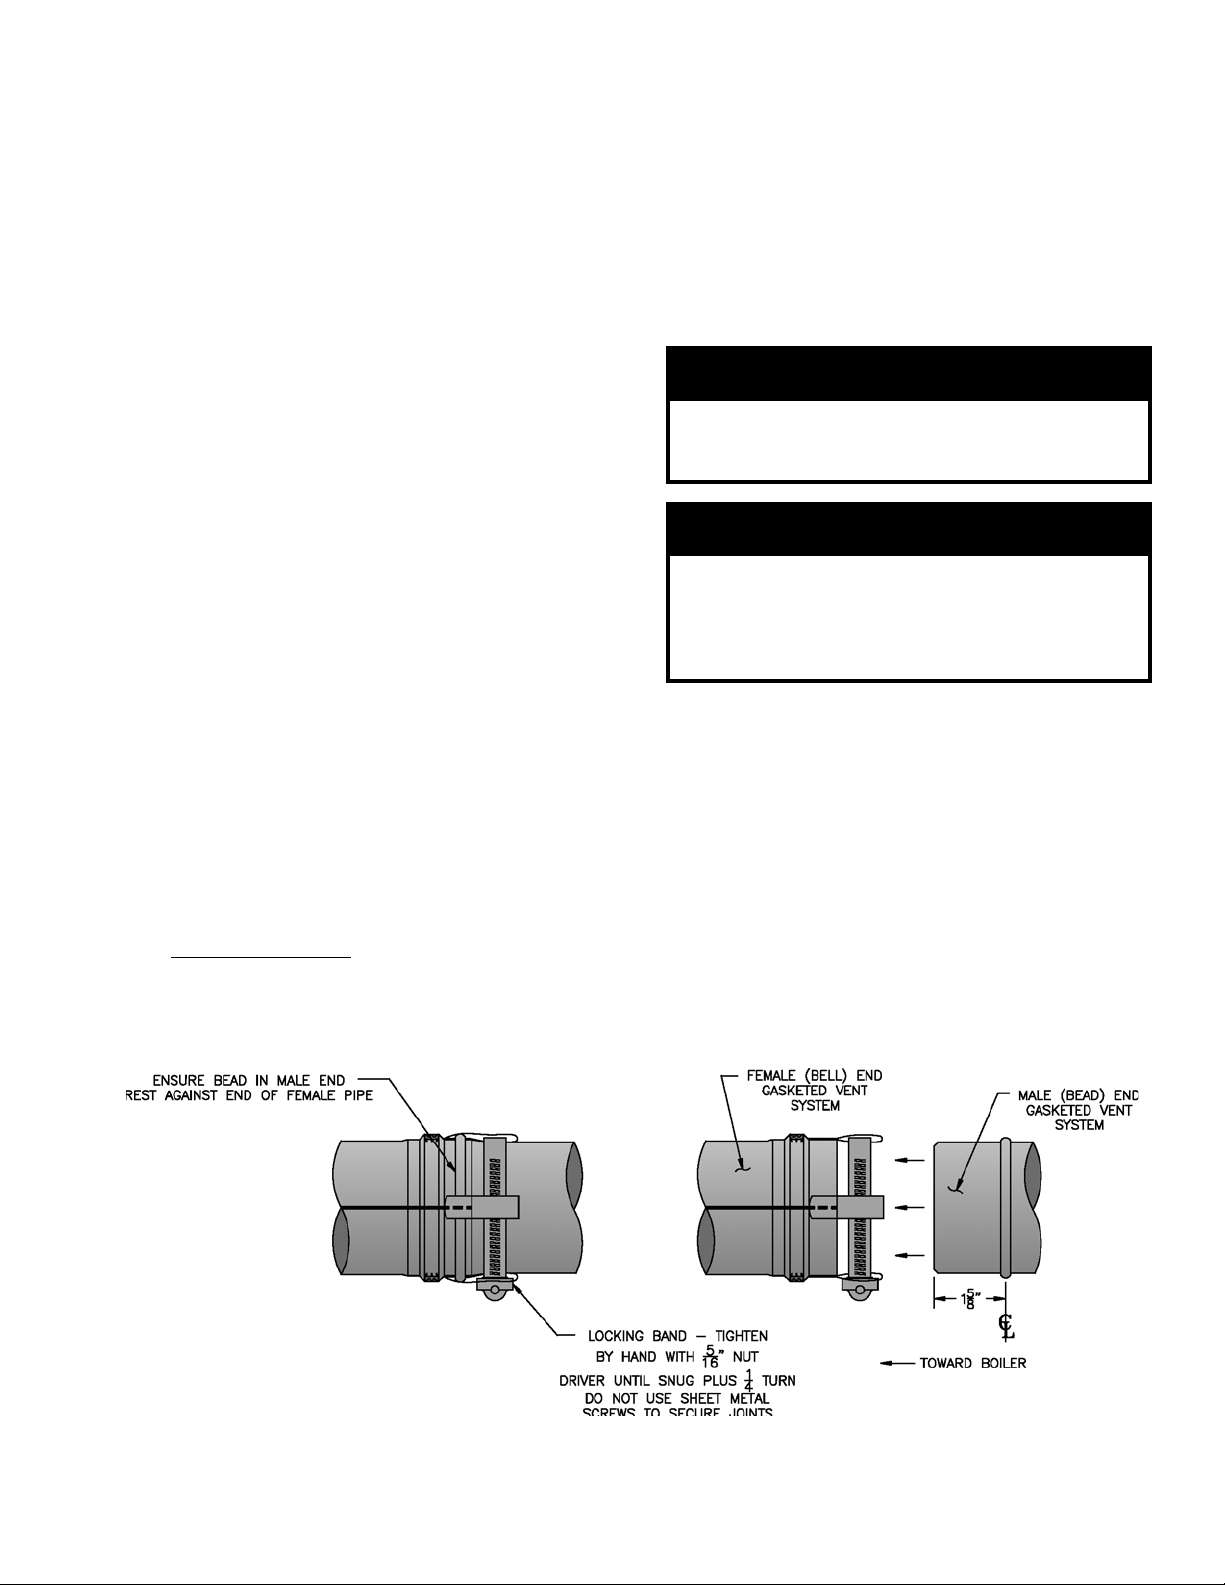
and Fittings. See Figure 3.
a. Wipe the male end of each joint using an alcohol
pad to remove any dirt and grease.
b. Align weld seams in pipes and use a slight
twisting motion to FULLY insert male end into
female end of joint. Ensure bead in male end
of pipe is below locking band and rest against
the end of the female pipe. Verify the factoryinstalled gasket is not dislodged or cut.
Figure 3: Burnham Gasketed Vent Joint Detail
11
Page 12

c. Tighten locking band by HAND with a 5/16”
nut driver until snug plus ¼ turn. DO NOT
SECURE JOINTS WITH SHEET METAL
SCREWS OR POP RIVETS. DO NOT
PUNCTURE THE VENT SYSTEM!
d. Once the installation is complete, operate
appliance and inspect all joints to ensure that ue
gases and/or liquid condensate will not escape.
D. Horizontal Venting System. See Figures 4, 4A and 5.
Vent Piping –
1. This boiler is supplied with components as standard
equipment for installation of the separate horizontal
venting system.
2. Do not exceed maximum vent lengths. Refer to
Table 4.
3. Recommended horizontal installation consists of
vent being sloped down ¼ inch per foot away from
boiler. See Figures 4 and 4A.
4. Use appropriate designed thimbles when passing
through combustible walls (thimble use optional for
noncombustible walls). Insert thimble through wall
from outside. Secure outside ange to wall with
nails or screws, and seal ID, OD and vent holes with
sealant material. Install inside ange to inside wall,
secure with nails or screws, and seal with sealant
material.
5. For noncombustible wall application when thimble
is not used, size opening such that bell with locking
band attached cannot pass through.
6. Join vent terminal to vent pipe. See Figure 5.
7. Insert vent pipe through thimble/opening from
outside and join to vent system. Apply sealant
between vent pipe and opening/thimble to provide
weathertight seal.
12
Page 13
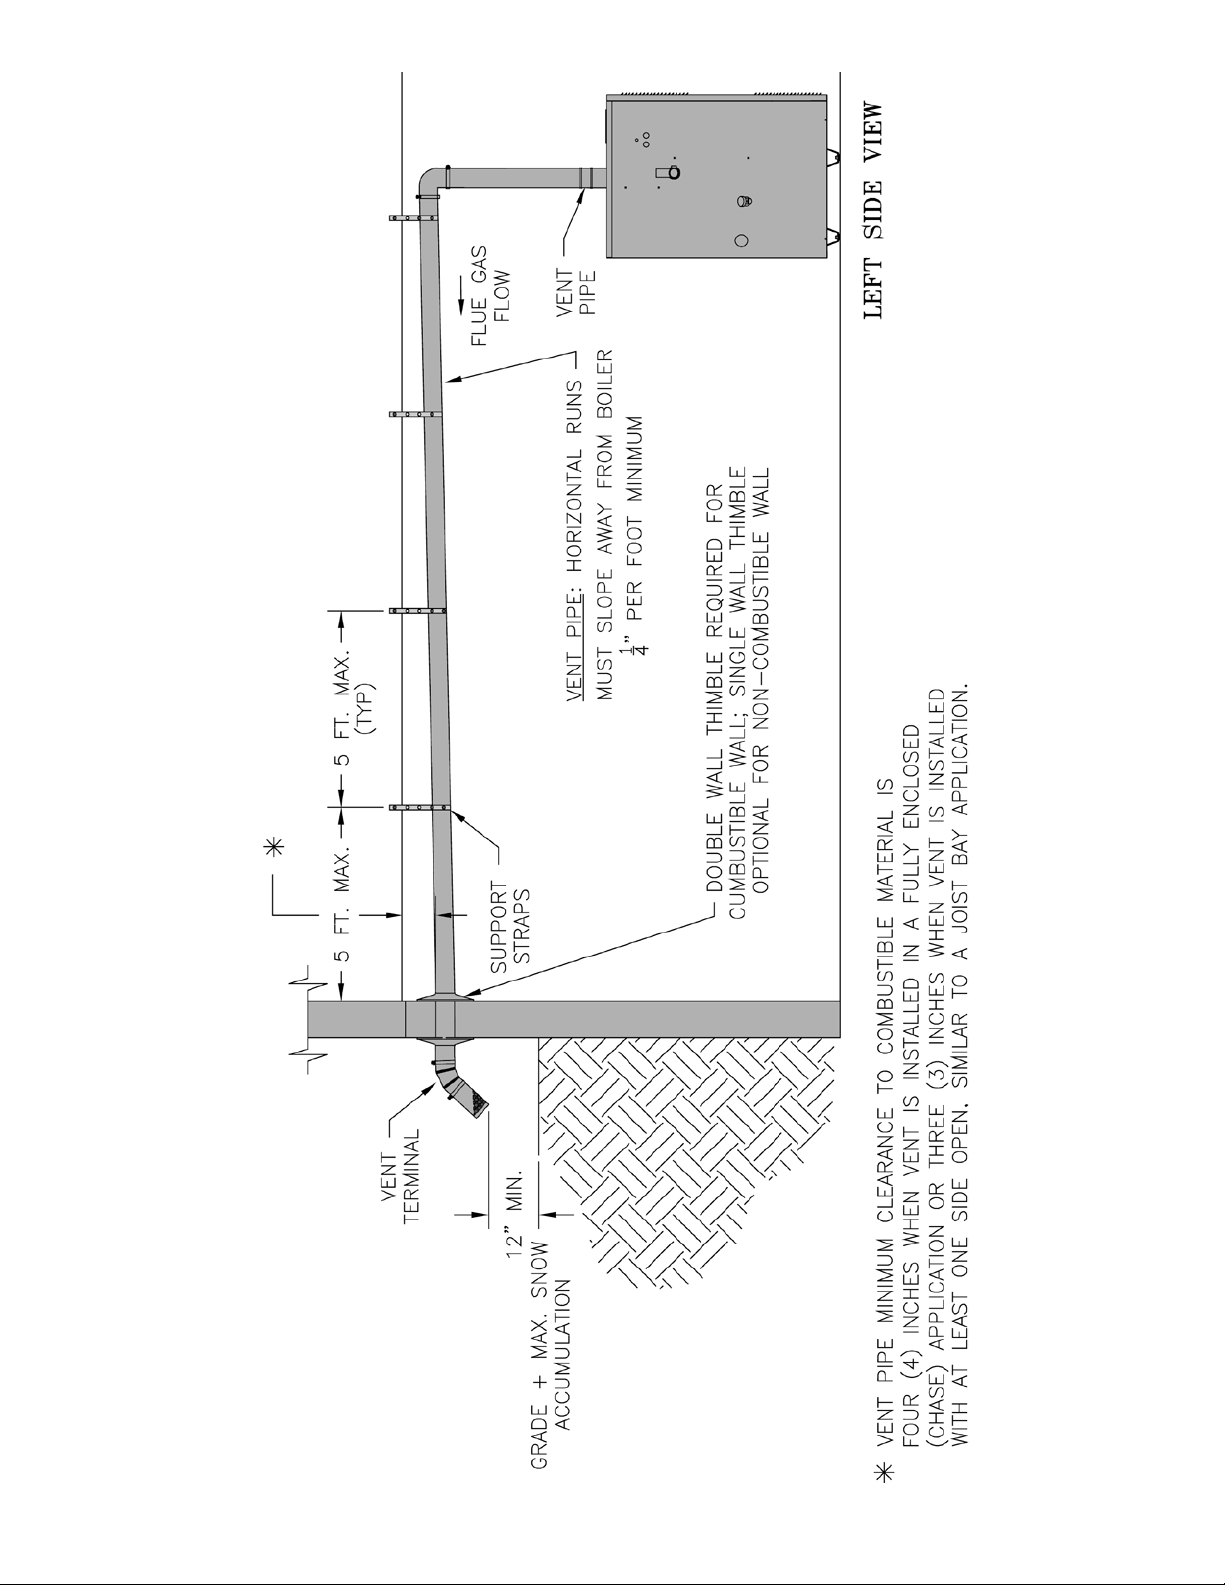
Figure 4: Recommended Horizontal – Vent Installation
13
Page 14
14
Figure 4A: Alternate Horizontal – Vent Installation
Page 15
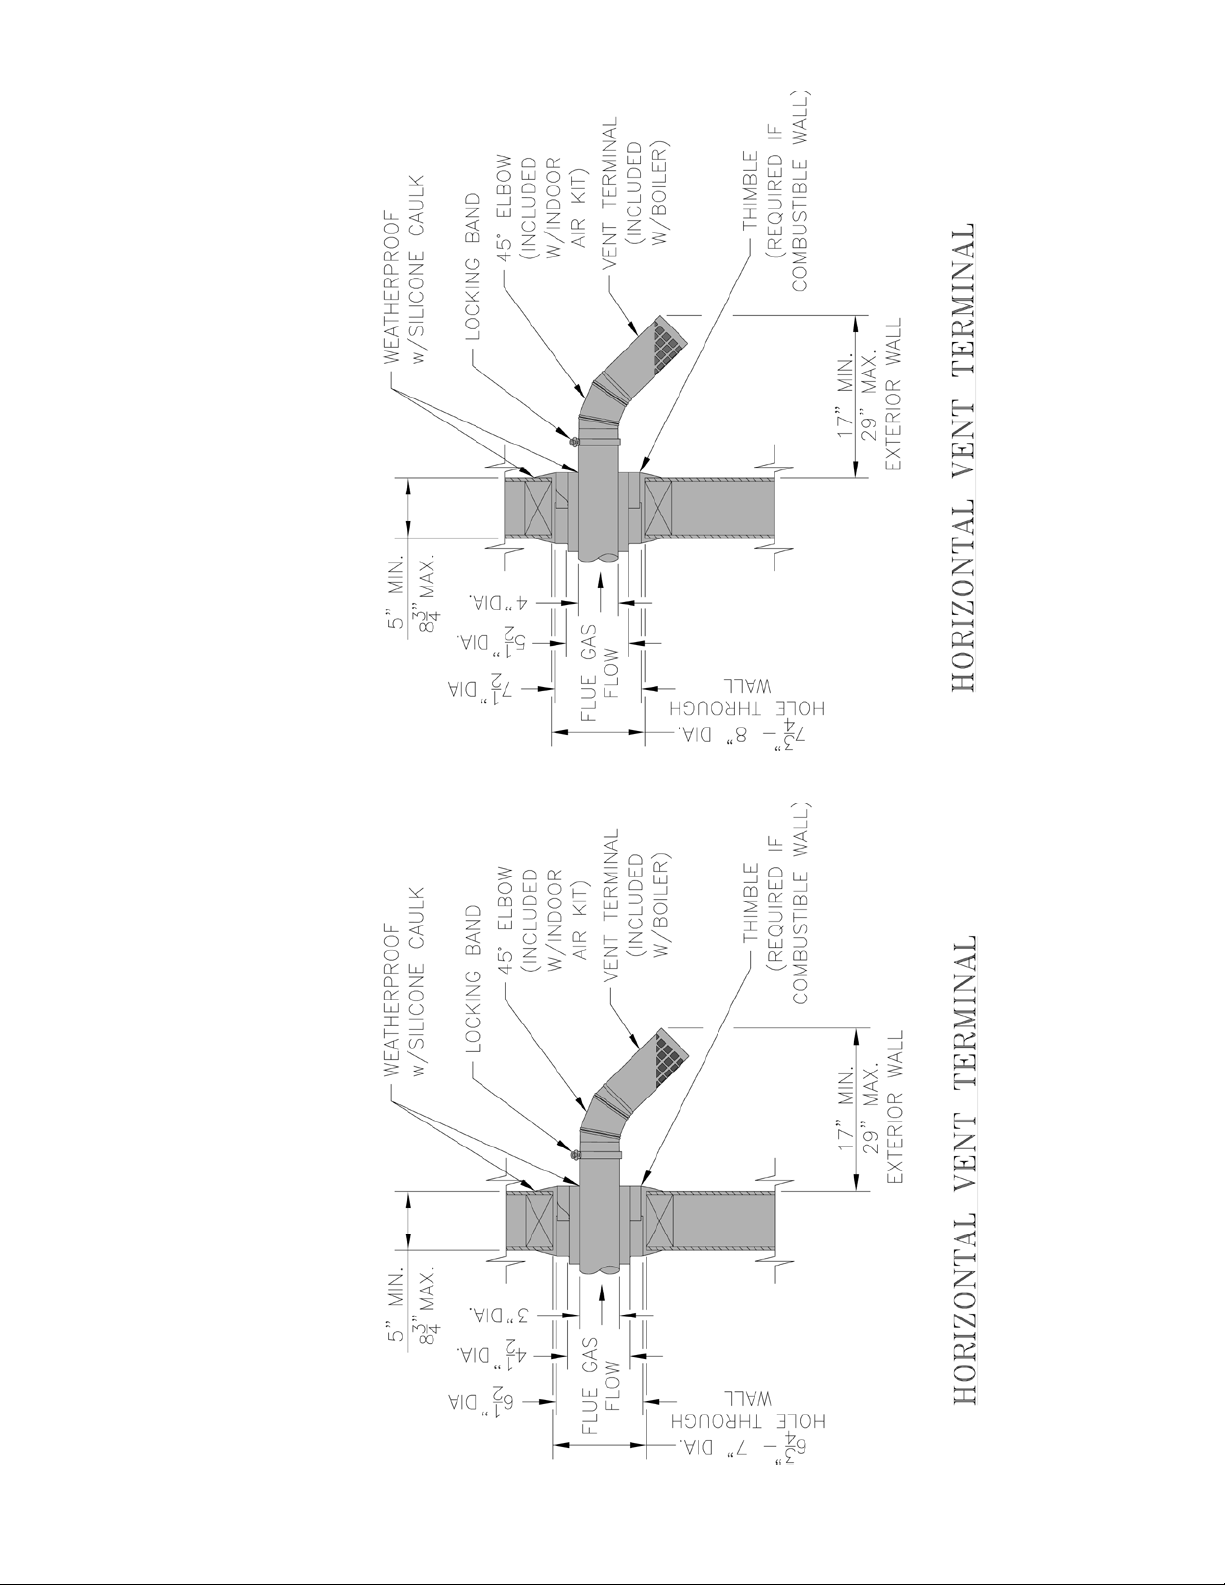
15
Figure 5: Horizontal – Vent Terminal Conguration (3” or 4” Vent)
Page 16

E. Vertical Venting System - See Figures 6, 7 and 8.
Roof penetrations require the use of roof ashing
and storm collar - not supplied with boiler.
NOTICE
Vent Piping –
1. Do not exceed maximum vent lengths. Refer to
Table 4.
2. Installation of a vertical vent tee 8116304U is
required on all vertical vent applications. See
Figures 6 and 7. Attach vertical vent drain tee
directly to elbow or horizontal pipe from an elbow
immediately after vent connector.
3. Slope horizontal runs minimum ¼ inch per foot.
Slope towards vertical vent drain tee. Position weld
seams in vent pipes, in all horizontal runs, at the top
to avoid condensate from lying on the seams.
4. Install re stops where vent passes through oors,
ceilings or framed walls. The re stop must close
the opening between the vent pipe and the structure.
5. Whenever possible, install vent straight through
the roof. Refer to Figure 7 if offset is necessary.
Maintain minimum clearance to combustible
materials.
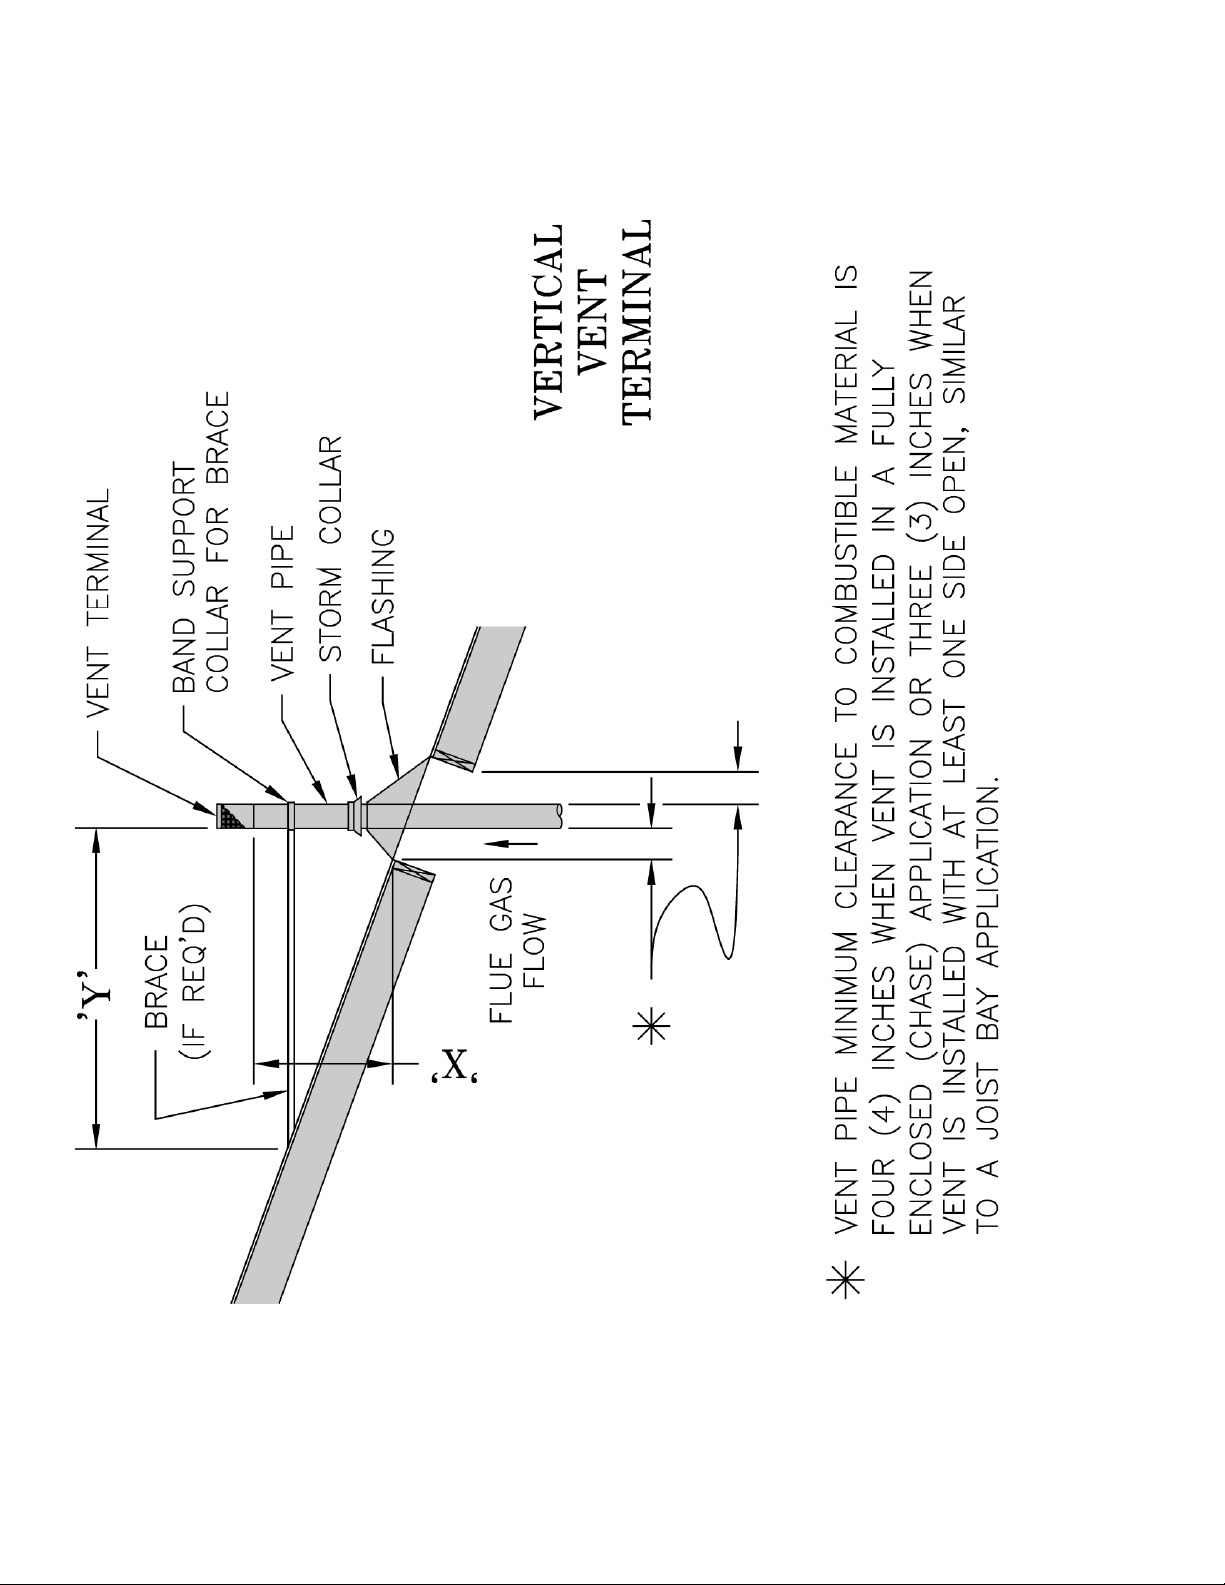
6. Install Vent Terminal.
a. Size roof opening to maintain minimum
clearance from combustible materials.
b. Extend vent pipe to maintain minimum vertical
and horizontal distance of twelve (12) inches
from roof surface. Allow additional vertical
distance for expected snow accumulation.
Provide brace as required. Refer to Figure 8.
c. Install storm collar on vent pipe immediately
above ashing. Apply Dow Corning Silastic 732
RTV Sealant between vent pipe and storm collar
to provide weathertight seal.
d. Attach vent terminal.
16
Page 17
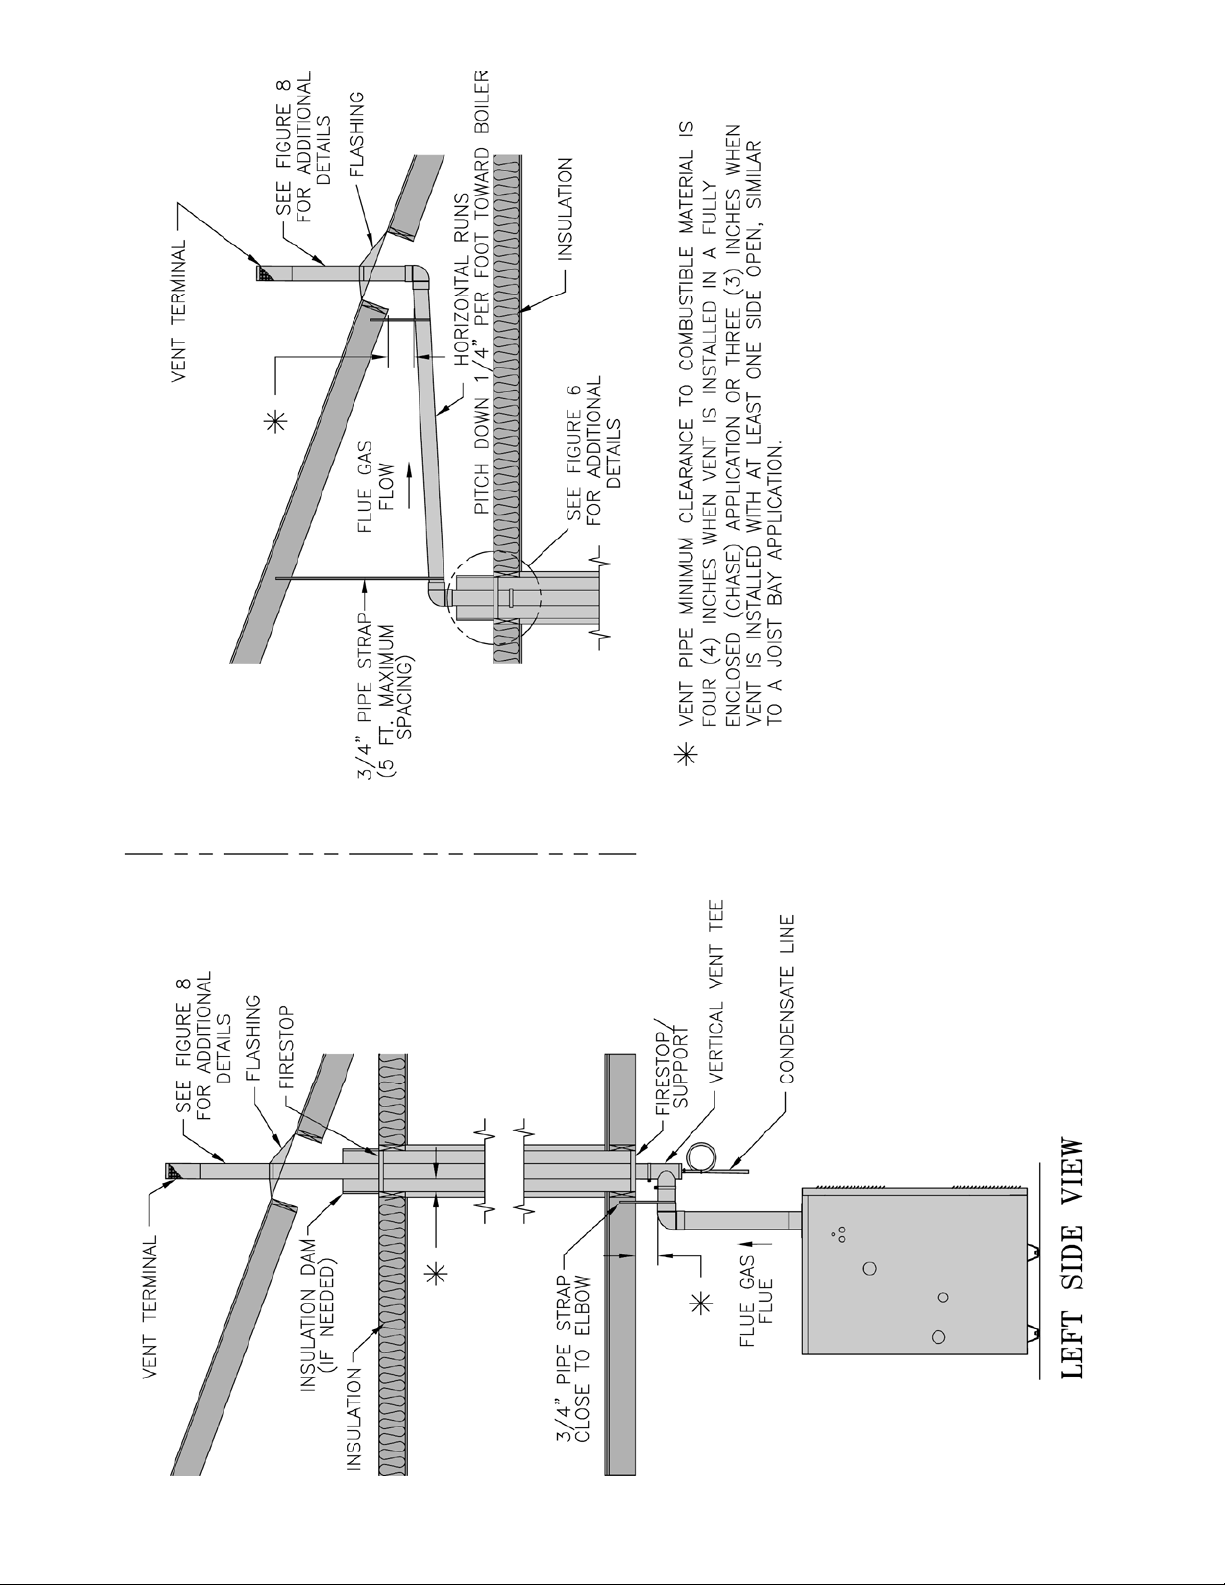
Figure 7: Attic OffsetFigure 6: Vertical Vent Installation
17
Page 18
18
Figure 8: Vertical Vent Termination
Extend Vent Piping to maintain minimum vertical (“X”) and minimum horizontal (“Y”) distance of twelve (12) inches from roof sur-
face. Allow additional vertical (“X”) distance for expected snow accumulation.
Page 19
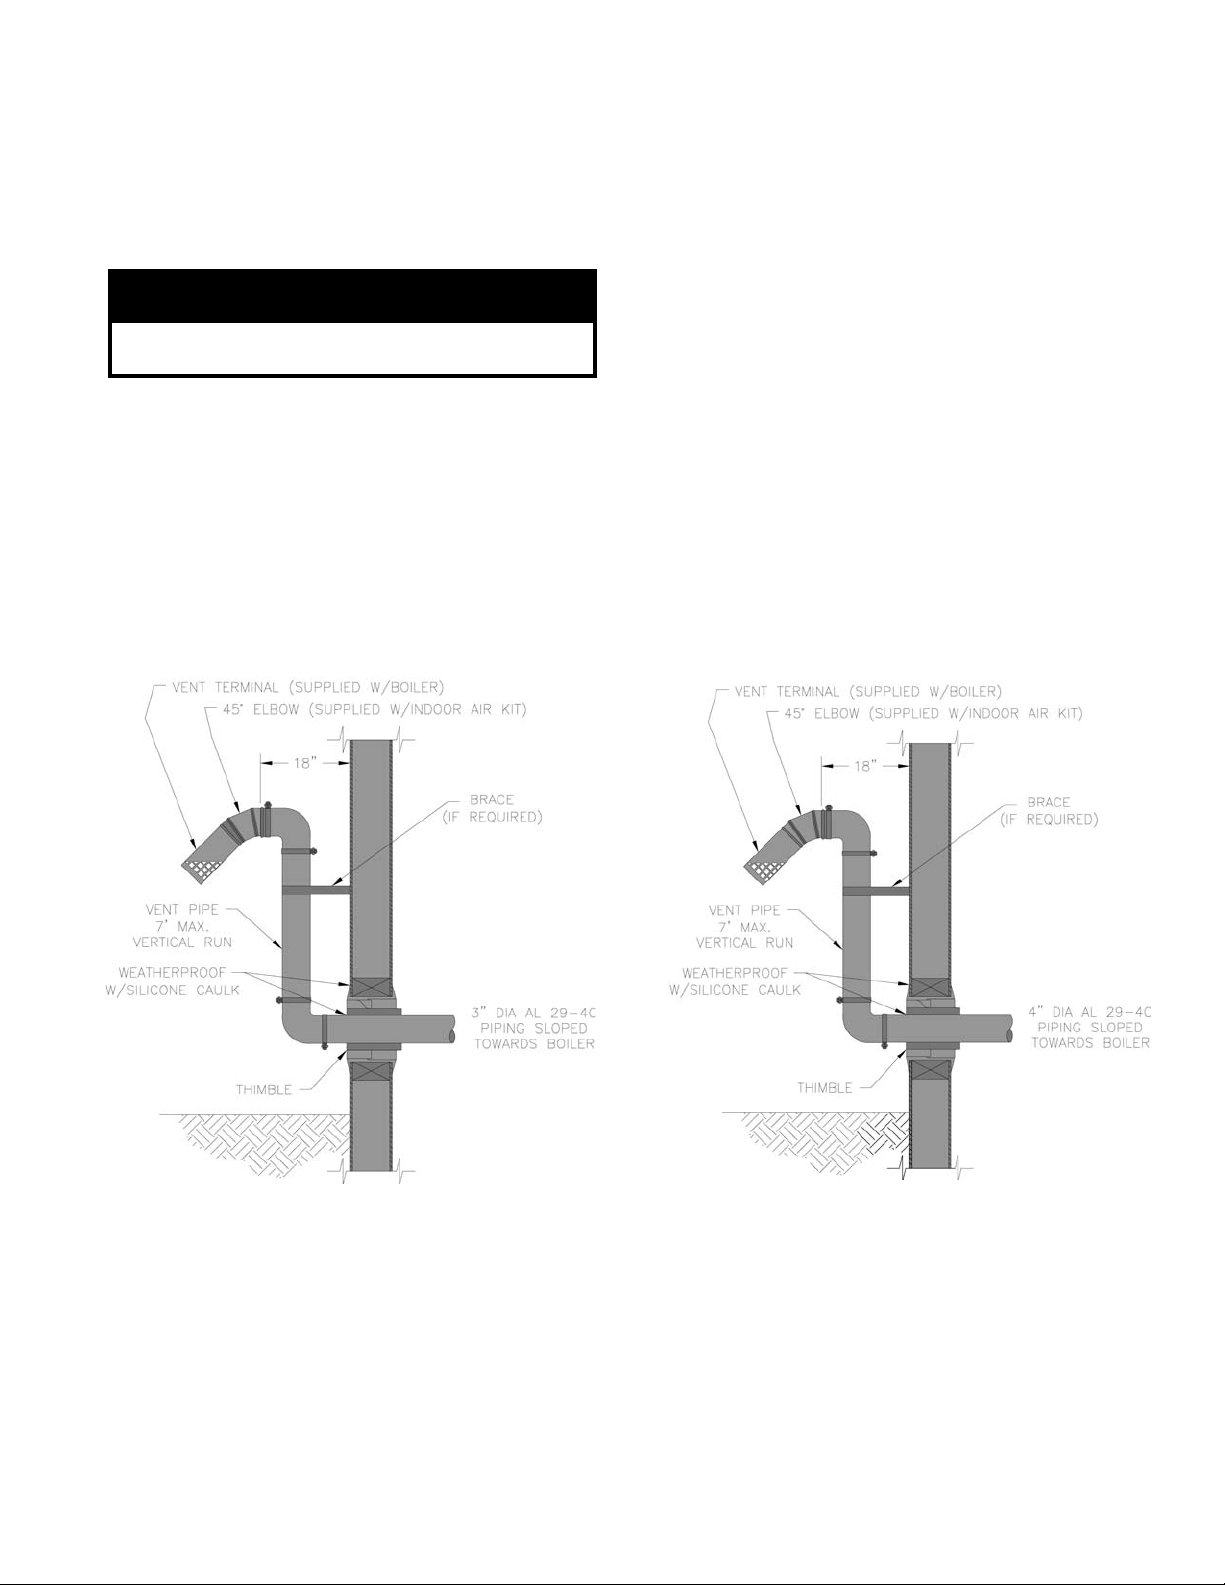
F. Optional Exterior Separate Horizontal Vent Terminal Mounting – See Figure 9.
1. Do not exceed maximum vent lengths. Refer to
Table 4.
2. This installation will allow a maximum of seven
(7) feet vertical exterior run of the vent piping to be
installed .
NOTICE
Exterior run to be included in equivalent vent
lengths.
3. Install vent piping.
a. Install vent piping for desired venting system.
Refer to specic section for details for vent pipe
installation.
b. After penetrating wall/thimble, install an
AL 29-4C® 90° elbow so that elbow leg is in the
up direction.
c. Install maximum of ve (5) feet of AL 29-4C
vent pipe. Refer to Sections C through E for
proper procedures for joining vent pipe and
ttings.
d. Install AL 29-4C® 45° elbow to upper AL 29-4C®
90° elbow so that leg of 45° is in down direction
(see Figure 9).
f. Install vent terminal.
g. Brace piping if required.
®
Figure 9: Horizontal Vent Terminal Installation (3” Vent [left view] or 4” Vent [right view])
19
Page 20
IV. Water Piping and Trim
WARNING
Failure to properly pipe boiler may result in improper operation and damage to boiler or structure.
Oxygen contamination of boiler water will cause corrosion of iron and steel boiler components, and
can lead to boiler failure. Burnham’s Standard Warranty does not cover problems caused by oxygen
contamination of boiler water or scale (lime) build-up caused by frequent addition of water.
A. Design and install boiler and system piping to
prevent oxygen contamination of boiler water and
frequent water additions.
1. There are many possible causes of oxygen
contamination such as:
a. Addition of excessive make-up water as a result
of system leaks.
b. Absorption through open tanks and ttings.
c. Oxygen permeable materials in the distribution
system.
2. In order to insure long product life, oxygen sources
must be eliminated. This can be accomplished by
taking the following measures:
a. Repairing system leaks to eliminate the need for
addition of make-up water.
b. Eliminating open tanks from the system.
c. Eliminating and/or repairing ttings which allow
oxygen absorption.
d. Use of non-permeable materials in the
distribution system.
e. Isolating the boiler from the system water by
installing a heat exchanger.
f. Use properly designed and operating air
elimination devices in water piping.
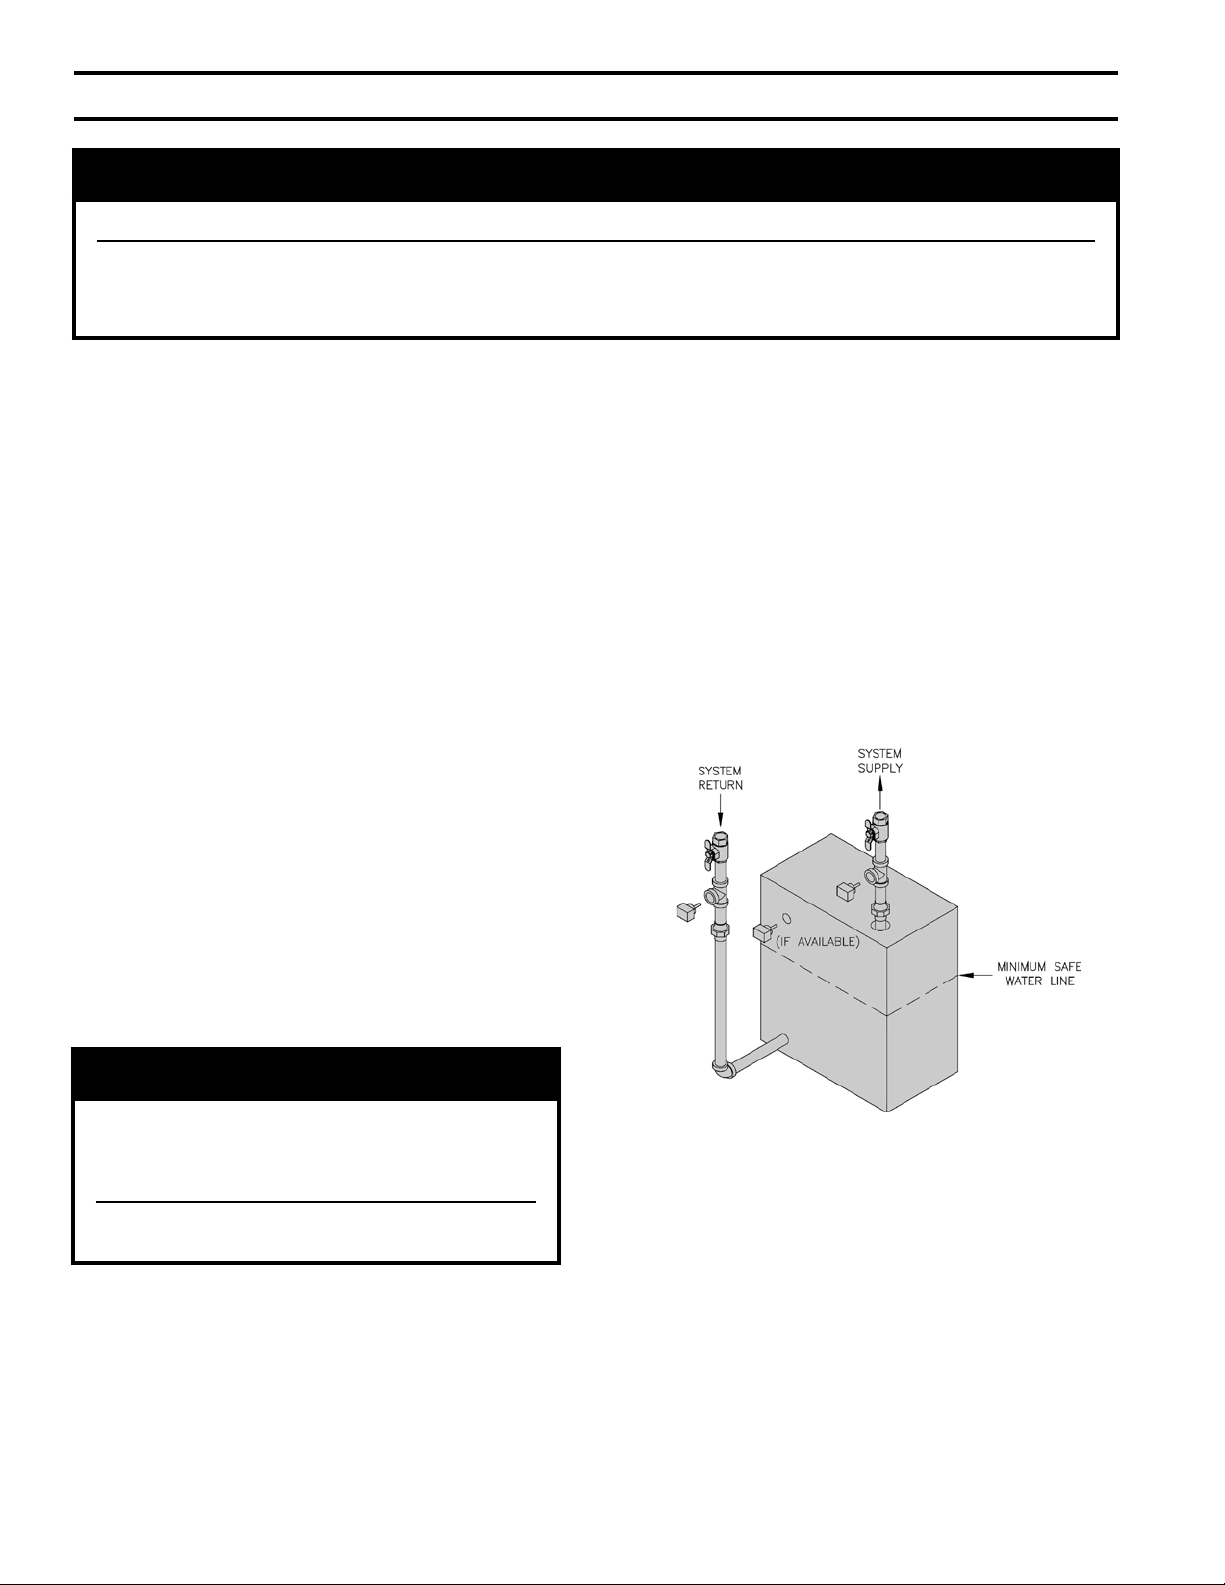
B. Low Water Cut Off (LWCO) on Hot Water Boilers
(Optional)
Where
The universal location for a LWCO on both gas and oil
hot water boilers is above the boiler, in either the supply
or return piping. The minimum safe water level of a
water boiler is at the uppermost top of the boiler; that is,
it must be full of water to operate safely.
What Kind
The PVG boiler is designed to accept the wiring of the
Safgard Model 1100-H4 LWCO (P/N 100592-01). This
is a probe type LWCO. The factory wiring is designed
to allow simple “Plug-in” installation of the wiring.
How to Pipe
A “tee” is commonly used to connect the probe LWCO
to the supply or return piping, as shown below.
WARNING
DO NOT ATTEMPT to cut factory wires to
install an aftermarket Low Water Cut Off
(LWCO). Only use connections specically
identied for Low Water Cut Off.
In all cases, follow the Low Water Cut Off
(LWCO) manufacturer’s instructions.
When
A low water cutoff is required to protect a hot water
boiler when any connected heat distributor (radiation)
is installed below the top of the hot water boiler (i.e.
baseboard on the same oor level as the boiler). In
addition, some jurisdictions require the use of a LWCO
with a hot water boiler.
20
LWCO Location
Select the appropriate size tee using the LWCO
manufacturer’s instructions. Often, the branch
connection must have a minimum diameter to prevent
bridging between the probe and the tee. Also, the run
of the tee must have a minimum diameter to prevent
the end of the probe from touching or being located too
close to the inside wall of the run of the tee.
Ideally, manual shutoff valves should be located
above the LWCO and the boiler to allow for servicing.
This will allow probe removal for inspection without
draining the heating system. Many probe LWCO
manufacturers recommend an annual inspection of the
probe.
Page 21

How to Wire
Ensure power is turned off to boiler.
Locate the LWCO jumper wire in the factory wiring
harness. Remove the jumper wire and install
the LWCO wiring from LWCO Model 1100-H4
(P/N 100592-01) into the plug of the PVG factory
wiring.
How to Test
Shut off fuel supply. Lower water level until water
level is BELOW the LWCO. Generate a boiler demand
by turning up thermostat. Boiler should not attempt to
operate. Increase the water level by lling the system.
The boiler should attempt to operate once the water
level is above the LWCO.
NOTICE
Ensure the location of the LWCO in the piping will
allow for connection of the LWCO wiring harness
to the factory wiring of the PVG.
C. Connect system supply and return piping to
boiler. See Figures 11 and 12. Maintain minimum ½
inch clearance from hot water piping to combustible
materials.
WARNING
Pressure relief valve discharge piping must be
piped such that the potential of severe burns
is eliminated. DO NOT pipe in any area where
freezing could occur. DO NOT install any shut-off
valves, plugs or caps. Consult Local Codes for
proper discharge piping arrangement.
F. Space heating and domestic water heating with
Alliance™ water heater. Install Alliance water heater as
a separate heating zone. Refer to Alliance Installation,
Operating and Service Instructions for additional
information.
G. If boiler is used in connection with refrigeration
systems, boiler must be installed with chilled medium
piped in parallel with the heating boiler using
appropriate valves to prevent chilled medium from
entering boiler, see Figure 10.
H. If boiler is connected to heating coils located in
air handling units where they may be exposed to
refrigerated air, boiler piping must be equipped with
ow control valves to prevent gravity circulation of
boiler water during operation of cooling system.
NOTICE
Burnham recommends sizing the system
circulator to supply sufcient ow (GPM) to allow a
20°F temperature differential in the system. When
sizing the system circulator, the pressure drop of
all radiators, baseboard and radiant tubing and all
connecting piping must be considered.
D. Install circulator with anges, gaskets and bolts
provided. Circulator harness allows circulator to be
mounted on supply or return. Connect harness to
circulator and secure any excess conduit.
E. Install supply manifold, pressure/temperature gauge
and pressure relief valve.
See Figure 10A. Pressure Relief Valve must be installed
with spindle in vertical position. Installation of the
relief valve must comply with the ASME Boiler and
Pressure Vessel Code, Section IV.
Figure 10: Recommended Piping for Combination
Heating & Cooling (Refrigeration) System
I. Use a boiler bypass if the boiler is to be operated
in a system which has a large volume or excessive
radiation where low boiler water temperatures may be
encountered (i.e. converted gravity circulation system,
etc.).
21
Page 22

Figure 10A: Supply Water Manifold Piping
Install pipe tee between circulator and boiler return
along with second tee in supply piping as shown in
Figure 11 or 12. Bypass should be same size as the
supply and return lines with valves located in bypass
and supply outlet as illustrated in Figure 11 or 12 in
order to regulate water ow to maintain higher boiler
water temperatures.
After the boiler is operational (reference Section VIII.
System Start-Up) set by-pass and boiler supply valves
to half throttle position to start. Operate boiler until
system water temperature reaches normal operating
range.
Adjust valves to provide 180° to 200°F supply water
temperature. Opening the boiler supply valve will raise
system temperature, while opening the by-pass valve
will lower system supply temperature.
J. After the boiler and system have been cleaned and
ushed, and before relling the entire system add
appropriate water treatment chemicals, if necessary, to
bring the pH between 7 and 11.
K. If it is required to perform a long term pressure
test of the hydronic system, the boiler should rst be
isolated to avoid a pressure loss due to the escape of air
trapped in the boiler.
To perform a long term pressure test including the
boiler, ALL trapped air must rst be removed from the
boiler.
A loss of pressure during such a test, with no visible
water leakage, is an indication that the boiler contained
trapped air.
22
Page 23

Figure 11: Recommended Boiler Piping For Circulator Zoned Heating Systems
23
Page 24

24
Figure 12: Recommended Water Piping for Zone Valve Zoned Heating Systems
Page 25

V. Gas Piping
WARNING
Failure to properly pipe gas supply to boiler may
result in improper operation and damage to the
boiler or structure. Always assure gas piping is
absolutely leak free and of the proper size and
type for the connected load.
An additional gas pressure regulator may be
needed. Consult gas supplier.
A. Size gas piping. Design system to provide adequate gas
supply to boiler. Consider these factors:
1. Allowable pressure drop from point of delivery to
boiler. Maximum allowable system pressure is ½
psig. Actual point of delivery pressure may be less;
contact gas supplier for additional information.
Minimum gas valve inlet pressure is stamped on
the rating label located in the boiler’s vestibule
compartment.
2. Maximum gas demand. Refer to the boiler’s input as
printed on its rating label. Also consider existing and
expected future gas utilization equipment (i.e. water
heater, cooking equipment).
3. Length of piping and number of ttings. Refer to
Table 7 for maximum capacity of Schedule 40 pipe.
Table 8 lists equivalent pipe length for standard
ttings.
4. Corrections for the specic gravity of natural gas
can be found in Table 6.
Table 6: Specic Gravity Correction Factors for
Natural Gas
Specic
Gravity
--- --- 0.85 0.81
--- --- 0.90 0.82
0.60 1.00 1.00 0.78
0.65 0.96 1.10 0.74
0.70 0.93 1.20 0.71
0.75 0.90 1.30 0.68
0.80 0.87 1.40 0.66
For materials or conditions other than those listed
above, refer to National Fuel Gas Code, NFPA54/ANSI
Z223.1, or size system using standard engineering
methods acceptable to authority having jurisdiction.
Correction
Factor
Specic
Gravity
Correction
Factor
Table 5: Gas Ratings
Boiler
Model
Number
PVG-3
PVG-4
PVG-5
PVG-6
PVG-7
PVG-8
PVG-9
Natural/LP
Maximum
Gas Pressure
(in. w.c.)
14 4.5 11.5 3.5 10.5
Minimum Natural
Gas Pressure
(in. w.c.)
Inlet to Gas Valve
Minimum LP
Gas Pressure
(in. w.c.)
Inlet to Gas Valve
Natural
Manifold
Pressure
(in. w.c.)
LP
Manifold
Pressure
(in. w.c.)
NOTICE
PVG boilers built for altitudes greater than 4,999 feet above sea level need to be specially oriced to adjust for
changes in atmospheric conditions. The PVG boiler “H” Model has been certied to operate in atmospheric
conditions from 5,000 to 10,000 feet above sea level. Input is derated by 10% for applications at 5,000 feet
above sea level, and 20% for applications at 10,000 feet above sea levels. Derate is based on 2% reduction
per 1000 feet.
The PVG boiler is available in two (2) altitude Models: The “S” Model 0 to 4,999 feet above sea level, and the
“H” Model 5,000 to 10,000 feet above sea level.
For applications above 10,000 feet, consult the manufacturer.
25
Page 26

Table 7: Maximum Capacity of Schedule 40 Pipe in CFH* For Natural Gas Pressures of 0.5 psig or Less
Length
[Feet]
10 132 278 520 1,050 175 360 680 1,400
20 92 190 350 730 120 250 465 950
30 73 152 285 590 97 200 375 770
40 63 130 245 500 82 170 320 660
50 56 115 215 440 73 151 285 580
60 50 105 195 400 66 138 260 530
70 46 96 180 370 61 125 240 490
80 43 90 170 350 57 118 220 460
90 40 84 160 320 53 110 205 430
100 38 79 150 305 50 103 195 400
½ ¾ 1 1¼ ½ ¾ 1 1¼
0.3 inch w.c. Pressure Drop 0.5 inch w.c. Pressure Drop
* 1 CFH of Natural Gas is approximately equal to 1 MBH; 1 CFH of LP is approximately equal to 2.5 MBH; contact your gas supplier for the actual heating value of your gas.
B. Connect boiler gas valve to gas supply system.
2. Use thread (joint) compounds (pipe dope) resistant
to action of liqueed petroleum gas.
WARNING
3. Install sediment trap, ground-joint union and manual
shut-off valve upstream of boiler gas control valve
Failure to use proper thread compounds on all
and outside jacket. See Figure 13.
gas connectors may result in leaks of ammable
gas.
WARNING
Gas supply to boiler and system must be
absolutely shut off prior to installing or servicing
boiler gas piping.
1. Use methods and materials in accordance with local
plumbing codes and requirements of gas supplier. In
absence of such requirements, follow National Fuel
Gas Code, NFPA 54/ANSI Z223.1.
Figure 13: Recommended Gas Piping
Table 8: Equivalent Lengths of Standard Pipe Fittings & Valves
VALVES FULLY OPEN
Pipe
Size
½” 0.622 0.35 18.6 9.3 4.3 1.6 0.78 1.0 3.1
¾” 0.824 0.44 23.1 11.5 5.3 2.1 0.97 1.4 4.1
1” 1.049 0.56 29.4 14.7 6.8 2.6 1.23 1.8 5.3
1¼” 1.380 0.74 38.6 19.3 8.9 3.5 1.60 2.3 6.9
I.D.
Inches
Gate Globe Angle
Swing
Check
90°
Elbow
45°
Elbow
90° Tee, Flow
Through Run
Through Branch
90° Tee, Flow
26
Page 27

4. All above ground gas piping upstream from manual
shut-off valve must be electrically continuous and
bonded to a grounding electrode. Do not use gas
piping as grounding electrode. Refer to National
Electrical Code, NFPA 70.
C. Pressure test. The boiler and its gas connection must
be leak tested before placing boiler in operation.
1. Protect boiler gas control valve. For all testing over
½ psig, boiler and its individual shutoff valve must
be disconnected from gas supply piping. For testing
at ½ psig or less, isolate boiler from gas supply
piping by closing boiler’s individual manual shutoff
valve.
2. Locate leaks using approved combustible gas
detector, soap and water, or similar nonammable
solution.
DANGER
Do not use matches, candles, open ames or
other ignition source to check for leaks.
27
Page 28

VI. Electrical
DANGER
Positively assure all electrical connections are unpowered before attempting installation or service of
electrical components or connections of the boiler or building. Lock out all electrical boxes with padlock
once power is turned off.
WARNING
Failure to properly wire electrical connections to the boiler may result in serious physical harm.
Electrical power may be from more than one source. Make sure all power is off before attempting any
electrical work.
Each boiler must be protected with a properly sized over-current device.
Never jump out or make inoperative any safety or operating controls.
The wiring diagrams contained in this manual are for reference purposes only. Each boiler is shipped with
a wiring diagram attached to the front door. Refer to this diagram and the wiring diagram of any controls
used with the boiler. Read, understand and follow all wiring instructions supplied with the controls.
A. General. Install wiring and electrically ground boiler
in accordance with authority having jurisdiction or, in
the absence of such requirements, follow the National
Electrical Code, NFPA 70, and/or CSA C22.1 Electrical
Code.
B. A separate electrical circuit must be run from
the main electrical service with an over-current
device/disconnect in the circuit. A service switch is
recommended and may be required by some local
jurisdictions. Install the service switch in the line
voltage “Hot” leg of the power supply. Locate the
service switch such that the boiler can be shut-off
without exposing personnel to danger in the event of
an emergency. Connect the main power supply and
ground to the three (3) boiler wires (black, white and
green) located in the junction box at the inside top of
the boiler jacket. If a low water cutoff is to be used,
connect the low water cutoff so that all 120V power
to boiler is interrupted if the low water cutoff’s switch
opens.
C. Refer to Figures 14 and 15 for details on the internal
boiler wiring.
NOTICE
This boiler is equipped with a high water temperature limit located inside the internal wiring of the boiler.
This limit provides boiler shutdown in the event the boiler water temperature exceeds the set point of the
limit control. Certain Local Codes require an additional water temperature limit. In addition, certain types
of systems may operate at temperatures below the minimum set point of the limit contained in the boiler.
If this occurs, install an additional water temperature limit (Honeywell L4006 Aquastat) located in the system
piping as shown in the Water Piping and Trim Section of this manual. Wire as indicated in the Electrical
Section of this manual.
NOTICE
All wire, wire nuts, controls etc. are installer supplied unless otherwise noted.
28
Page 29

Figure 14: Internal Boiler Wiring Schematic Diagram
29
Page 30

NOTICE
If an additional system limit is used, install in series with the auxiliary limit jumper shown in the drawing
below.
30
Figure 15: Internal Boiler Wiring Ladder Diagram
Page 31

D. System Controls and Wiring
1. Refer to National Electric Code or Local Electric Codes for proper size and type of wire required. Follow Code.
2. Use anti-short bushings on all wiring passing through boiler jacket, junction boxes and/or control boxes.
3. Use armored cable (BX) over all exposed line voltage wiring.
4. If an Alliance™ indirect water heater is used, use priority zoning except for Hydro-Air Systems.
Single Zone Heating System – Refer to Figure 16 of this manual for the electrical diagram for this type of system.
5.
Set the thermostat heat anticipator to 0.60 amps.
6. Single Zone Heating System with Alliance™ Water Heater - Refer to Figure 17 of this manual for the electrical diagram
for this type of system.
Set the thermostat heat anticipator to 0.60 amps.
Conventional Circulator Zoned System – Refer to Figure 18 of this manual for the electrical diagram for this type of
7.
system.
Read, understand and follow all of the instructions provided with the Honeywell R8888 control.
Connect the thermostat of each zone and the circulator for that zone to R8888 panel. If an Alliance™ indirect water
heater is used, connect the Alliance™ thermostat and circulator to the Zone 1 terminals of the R8888.
Set the thermostat heat anticipator to 0.12 amps.
NOTICE
The Honeywell R8888 Control is available in a three (3) zone Model (R8888A) and a four (4) zone Model
(R8888B). Up to four (4) R8888’s may be used together to provide control for up to twelve (12) individual
zones. Only one (1) zone, the rst zone of the main control, will provide priority circulation. If more than
four (4) zones are required, connect additional R8888’s by wiring the A, B, and C terminals of each control
together. Each R8888 requires a 120 volt power supply. If more than one (1) R8888 is used, set the panel
type switch to “main” on the rst R8888 and set the panel type switch to “expansion” on the second, third
or fourth R8888.
8.
Conventional Zone Valve Zoned System – Refer to Figure 19. Wiring to the most popular models of zone valves is given
in Figure 20.
Connect the thermostat of each zone and the zone valve for that zone to the R8889 control. If an Alliance™ indirect water
heater is used, connect the Alliance™ thermostat and zone valve to the “zone 1” terminals of the R8889.
Set the thermostat heat anticipator to 0.12 amps.
NOTICE
The Honeywell R8889 Control is available in two three (3) zone models and two four (4) zone models.
Burnham recommends using Model R8889A for three (3) zone systems and Model R8889B for four (4) zone
systems. Models R8889C and R8889D have less load capacity and may not operate with certain types of
zone valves. Up to four (4) R8889’s may be used together to provide up to sixteen (16) individual zones.
Only one (1) zone, the rst zone of the main control will provide priority zoning for the Alliance indirect
water heater. If more than four (4) zones are required, connect additional R8889’s by wiring the A, B and
C terminals of each control together. Each R8889 requires a 120 volt power supply. If more than one (1)
R8889 is used, set the panel type switch to “main” on the rst R8889 and set the panel type switch to
“expansion” on the second, third or fourth R8889.
31
Page 32

32
Figure 16: Single Heating Zone Only Wiring Schematic
Page 33

NOTICE
If an additional system limit is used, install in series with the auxiliary limit jumper shown in the drawing
below.
Figure 17: Single Zone System with Packaged Alliance™ Water Heater Wiring Schematic
33
Page 34

34
Figure 18: Circulator Zoned System Wiring Schematic
Page 35

Figure 19: Zone Valve Zoned System Wiring Schematic
35
Page 36

36
Figure 20: Different Manufacturer’s Zone Valve Connections to Honeywell R8889
Page 37

VII. Modular Installation
A. General Guidelines
1. Read and follow all venting, combustion air,
water piping, gas piping and electrical instructions
contained in this manual unless otherwise instructed
in this section.
2. Consult Local Building Codes or National Fuel Gas
Code, NFPA 54/ANSI Z222.3 for restrictions and
instructions on modular boiler installations.
B. Module Sizing
Burnham recommends sizing each boiler in a modular
system to provide 20 % of the combined heating load
where ever possible.
C. Venting
1. Each boiler must have an individual vent pipe.
Refer to Venting Section of this manual for venting
guidelines and options.
WARNING
Do not manifold vent pipes together.
2. The maximum vent length for each boiler is fty
(50) equivalent feet.
3. The minimum horizontal distance between vent
terminations is one (1) foot. Additional horizontal
distance is desirable to avoid frost damage to the
building. Vent terminations must be at least twelve
(12) inches above the ground plus the expected
snow accumulation.
E. Gas Piping
1. Refer to National Fuel Gas Code, Local Codes and
Tables 7 and 8 for gas pipe sizing.
Table 9: Modular Boiler Water Manifold Sizing
Combined Output
(MBH)
< 166 1¼”
< 260 1½”
< 550 2”
< 900 2½”
< 2000 3”
2. Each boiler must be piped as shown in Figure 13.
Recommended Minimum
Common Water Manifold
Size (NPT)
WARNING
If gas pressure in the building is above ½ psig,
an additional gas pressure regulator is required.
Using one additional regulator for multiple
boilers may result in unsafe boiler operation.
The additional regulator must be able to properly
regulate gas pressure at the input of the smallest
boiler. If the regulator cannot do this, two or
more additional regulators are required. Consult
regulator manufacturer and/or local gas supplier
for instructions and equipment ratings.
CAUTION
Installing multiple vent terminations close
together promotes frost buildup on buildings.
To minimize this possibility, extend the distance
from the building to the end of the vent
termination and increase the horizontal distance
between terminations.
4. Multiple vertical vent pipes may be piped through
a common conduit or chase so that one roof
penetration may be made. Each vent termination
must be one (1) foot from other terminations.
D. Water Piping (See Table 9 and Figure 21)
Installing a low water cutoff in the system piping of
modular systems is strongly recommended and may be
required by Local Codes.
F. Electrical
1. Each boiler must be provided with a fused
disconnect and service switch.
2. Install wiring in accordance with requirements of
authority having jurisdiction. In the absence of such
requirements, follow the National Electric Code,
NFPA 70 and/or CSA C22.1 Electric Code.
G. Modular Boiler Control Systems
Contact a controls manufacturer such as Honeywell or
Tekmar to properly apply a modular control system.
Common systems may use outdoor temperature, return
water temperature or both to stage the boilers.
37
Page 38

38
Figure 21: Modular Boiler Piping
Page 39

VIII. System Start-up
A. Safe operation and other performance criteria were
met with gas manifold and control assembly provided
on boiler when boiler underwent tests specied in
American National Standard for Gas-Fired LowPressure Steam and Hot Water Boilers, ANSI Z21.13.
B. Verify that the venting, water piping, gas piping and
electrical system are installed properly. Refer to
installation instructions contained in this manual.
C. Conrm all electrical, water and gas supplies are
turned off at the source and that vent is clear of
obstructions.
D. Conrm that all manual shut-off gas valves between
the boiler and gas source are closed.
WARNING
Completely read, understand and follow all
instructions in this manual before attempting
start up.
E. Fill entire heating system with water and vent air
from system. Use the following procedure on a Series
Loop or multi-zoned system installed as per Figure 11
or 12 to remove air from system when lling.
4. Starting with one circuit at a time, open zone valve
or shut-off valve in system supply and return piping.
5. Open hose bib.
6. Open ll valve (Make-up water line should be
located directly after full port ball valve in system
supply piping between air scoop and expansion
tank).
7. Allow water to overow from bucket until discharge
from hose is bubble free for 30 seconds.
8. Close the opened zone valve or shut-off valve for
the zone being purged of air, then open the zone
valve or shut-off valve for the next zone to be
purged. Repeat this step until all zones have been
purged. At completion, open all zone valves or
shut-off valves.
9. Close hose bib, continue lling the system until the
pressure gauge reads 12 psi. Close ll valve.
(Note - If make-up water line is equipped with
pressure reducing valve, system will automatically
ll to 12 psi. Follow ll valve manufacturer’s
instructions).
10. Open isolation valve in boiler supply piping.
11. Remove hose from hose bib.
WARNING
The maximum operating pressure of this boiler
is 30 psig. Never exceed this pressure. Do not
plug or change pressure relief valve.
NOTICE
If it is required to perform a long term pressure
test of the hydronic system, the boiler should
rst be isolated to avoid a pressure loss due to
the escape of air trapped in the boiler.
To perform a long term pressure test including
the boiler, ALL trapped air must rst be removed
from the boiler.
A loss of pressure during such a test, with no
visible water leakage, is an indication that the
boiler contained trapped air.
1. Close full port ball valve in boiler supply piping.
2. Isolate all zones by closing zone valves or shut-off
valves in supply and return of each zone(s).
3. Attach a hose to the vertical hose bib located prior to
the full port ball valve in the system supply piping.
(Note - Terminate hose in ve gallon bucket at a
suitable oor drain or outdoor area).
F. Conrm that the boiler and system have no water
leaks.
G. Prepare to check operation.
1. Obtain gas heating value (in Btu per cubic foot)
from gas supplier.
2. Connect manometer to pressure tap on gas valve.
Use 1/8 NPT tapping provided.
3. Temporarily turn off all other gas-red appliances.
4. Turn on gas supply to the boiler gas piping.
5. Conrm that the supply pressure to the gas valve is
14 in. w.c. or less. Refer to Table 5 for minimum
supply pressure.
6. Open the eld installed manual gas shut-off valve
located upstream of the gas valve on the boiler.
7. Using soap solution, or similar non-combustible
solution, electronic leak detector or other approved
method. Check that boiler gas piping valves, and
all other components are leak free. Eliminate any
leaks.
DANGER
Do not use matches, candles, open ames or
other ignition source to check for leaks.
8. Purge gas line of air.
39
Page 40

40
Figure 22: Operating Instructions
Page 41

H. Operating Instructions
1. Follow Operating Instructions to place boiler in
operation. See Figure 22.
2. Electronic Ignition Modules with LED indicators.
Table 10 cross-references the ignition module
terminal designations to the ignition terminal
numbers in the wiring ladder diagrams. The yellow
LED indicates the status of the ame, see Table 11.
The green LED indicates the status of the system,
see Table 12. See Figure 23 for LED locations. See
Figure 24 for Troubleshooting Guide.
Table 10: Ignition Module Terminal
Cross-Reference
Ignition Module
Terminal Designation
MV 1
MV/PV 2
PV 3
GND 4
24V (GND) 5
24V 6
Figure 23: LED Locations
TABLE 11: Yellow LED Flame Codes
Yellow LED
Flash Code
a
Indicates Recommended Service Action
SPARK 9
Heartbeat Normal Flame Signal N/A
Weak Flame Signal -
System will operate reliably but ame signal is
2
less than desired.
Note: This indication may ash temporarily
during or shortly after lightoff on some appli-
cations.
Marginal Flame Signal (less than 1.1 µA) -
System may not operate reliably over time.
1
Service call recommended.
Note: This indication may ash temporarily
during or shortly after lightoff on some appli-
cations.
OFF
Below minimum threshold for system opera-
tion.
a
Flash Code Descriptions
No Flame or Flame Signal -
Perform routine maintenance to
assure optimum ame signal.
Check gas supply, pilot burner, ame
sense wiring, contamination of ame
rod, burner ground connection.
Wiring Ladder Diagram
Terminal Number
N/A
- Heartbeat: Constant ½ second bright, ½ second dim cycles.
- The ash code number signies that the LED ashes X times at 2Hz, remains off for two
seconds, and then repeats sequence.
41
Page 42

Table 12: Green LED Status Codes
Green LED
Flash Code
(X + Y)
Flash Fast
Heartbeat Normal operation N/A None
a
Flash Code Descriptions:
a
OFF No “Call for Heat” N/A None
Startup - Flame sense
calibration
5 minute Retry Delay-
2
3
4
7
8
6 + 2
6 + 3
6 + 4
ON
- Flash Fast: rapid blinking
- Heartbeat: Constant ½ second bright, ½ second dim cycles.
- A single ash code number signies that the LED ashes X times at 2Hz, remains off for two seconds, and then
- X + Y ash codes signify that the LED ashes X times at 2Hz, remains off for two seconds, ashes Y times at 2
Pilot ame not detected
during trial for ignition
Recycle- Flame failed
during run
Flame sensed out of
sequence
Flame sense leakage to
ground
Low secondary voltage
supply- (below 15.5 Vac)
5 minute Retry DelayOn every third retry on
same “Call for Heat”
On every 6th ame
failure during run on the
same “Call for Heat”
Flame sensed out of
sequence- longer than
10 seconds
Soft lockout due to error
detected during self
check sequences
repeats the sequence.
Hz, remains off for three seconds, and then repeats the sequence.
Indicates Next System Action Recommended Service Action
N/A None
If system fails to light on next trial
for ignition check gas supply, pilot
Initiate new trial for ignition after retry
delay completed.
Initiate new trial for ignition. Flash
code will remain through the ignition
trial until ame is proved.
If situation self corrects within 10
seconds, control returns to normal
sequence. If ame out of sequence remains longer than 10 seconds, control
goes to Flash code 6+4 (see below)
Control remains in wait mode. When
the fault corrects, control resumes nor-
mal operation after a one minute delay.
Control remains in wait mode. When
the fault corrects, control resumes nor-
mal operation after one minute delay.
Initiate new trial for ignition after retry
delay completed.
5 minute retry delay, then initiate new
trial for ignition.
Control waits until ame is no longer
sensed and then goes to soft lockout.
Flash code continues. Control auto
resets from soft lockout after one hour.
Control auto resets from soft lockout
after one hour.
burner, spark and ame sense wiring, ame rod contamination or out
of position, burner ground connection.
If system fails to light on next trial
for ignition check gas supply, pilot
burner, ame sense wiring, ame
rod contamination, burner ground
connection.
Check for pilot ame. Replace gas
valve if pilot ame present. If no
pilot ame, cycle “Call for Heat.” If
error repeats, replace control.
Check ame sense lead wire for
damage or shorting. Check that
ame rod is in proper position.
Check ame rod ceramic for cracks,
damage or tracking.
Check transformer and AC line for
proper input voltage to the control.
Check with full system load on the
transformer.
Check gas supply, pilot burner, spark
and ame sense wiring, ame rod
contamination or out of position,
burner ground connection.
Check gas supply, pilot burner, ame
sense wiring, contamination of ame
rod, burner ground connection.
Check for pilot ame. Replace gas
valve if pilot ame present. If no
pilot ame, cycle “Call for Heat.” If
error repeats, replace control.
Reset by cycling “Call for Heat.” If
error repeats, replace the control
42
Page 43

Honeywell Electronic Ignition Troubleshooting Guide
Figure 24: Troubleshooting Guide
43
Page 44

Figure 26: 1 Inch Main Burner ame
Figure 27: Pilot Burner Flame
L. Check thermostat operation. Raise and lower
temperature setting to start and stop boiler operation.
M. Check ignition control module shut-off. Disconnect
pilot lead wires from gas valve. If burners do not
shutdown, determine cause of malfunction. Replace
necessary items and check operation.
Figure 25: Sequence of Operation
I. Sequence of Operation. See Figure 25. If boiler fails
to operate properly, see Troubleshooting Tree in Section
IX: Service.
J. Check pilot burner ame. See Figure 27. Flame
should be steady, medium hard blue enveloping 3/8 to
½ inch of sensing probe.
K. Check main burner ame. See Figures 26. Flame
should have clearly dened inner cone with no yellow
tipping. Orange-yellow streaks should not be confused
with true yellow tipping.
44
N. Check low water cutoff (if so equipped).
1. Adjust thermostat to highest setting.
2. With boiler operating, open drain valve and slowly
drain boiler.
3. Main burners and pilot burner will extinguish and
blower will stop when water level drops below low
water cutoff probe. Verify limit, thermostat or other
controls have not shut off boiler.
4. Adjust thermostat to lowest setting. Rell boiler.
O. Check limit.
1. Adjust thermostat to highest setting.
2. Observe temperature gauge. When temperature is
indicated, adjust limit to setting below observed
Page 45

temperature. Main burners and pilot burner should
extinguish, and blower should stop.
3. Adjust limit to setting above observed temperature.
Ignition sequence should begin.
4. Adjust thermostat to lowest setting. Adjust limit to
desired setting.
P. Adjust gas input rate to boiler.
1. Adjust thermostat to highest setting.
2. Check manifold gas pressure. See Table 5 or rating
label located in the boiler’s vestibule compartment.
Adjust gas valve pressure regulator as necessary
(turn adjustment screw counterclockwise to
decrease manifold pressure, or clockwise to increase
manifold pressure). If pressure cannot be attained,
check gas valve inlet pressure. If less than minimum
indicated in Table 5 or boiler’s rating label, contact
gas supplier for assistance.
3. Clock gas meter for at least 30 seconds. Use Table
13 to determine gas ow rate in Cubic Feet per
Hour.
WARNING
Failure to properly adjust gas input rate will result
in over ring or under ring of the appliance.
Improper and unsafe boiler operation may result.
4. Determine Input Rate. Multiply gas ow rate by gas
heating value.
5. Compare measured input rate to input rate stated on
rating plate.
a. Boiler must not be over red. Reduce input rate
by decreasing manifold pressure. Do not reduce
more than 0.3 inch w.c. If boiler is still overred,
contact your Burnham distributor or Regional
Ofce for replacement Gas Orice.
b. Increase input rate if less than 98% of rating
plate input. Increase manifold gas pressure no
more than 0.3 inch w.c. If measured input rate is
still less than 98% of rated input:
i. Remove Main Burners per procedure in
Section IX: Service.
ii. Remove gas orices. Drill one (1) drill size
larger (drill size is stamped on orice, or see
Section X: Repair Parts).
iii. Reinstall gas orices and main burners.
Measure input rate.
6. Recheck Main Burner Flame.
7. Return other gas-red appliances to previous
conditions of use.
Q. Review User’s Information Manual and system
operation with owner or operator.
Table 13: Gas Flow Rate in Cubic Feet
Per Hour
Seconds
for One
One-Half
Revolution
30 60 120 240
32 56 113 225
34 53 106 212
36 50 100 200
38 47 95 189
40 45 90 180
42 43 86 172
44 41 82 164
46 39 78 157
48 37 75 150
50 36 72 144
52 35 69 138
54 33 67 133
56 32 64 129
58 31 62 124
60 30 60 120
Size of Gas Meter Dial
One
Cu. Ft.
Cu. Ft.
Two
Cu. Ft.
45
Page 46

IX. Service
DANGER
This boiler uses ammable gas, high voltage electricity, moving parts, and very hot water under high
pressure. Assure that all gas and electric power supplies are off and that the water temperature is cool
before attempting any disassembly or service.
Do not attempt any service work if gas is present in the air in the vicinity of the boiler. Never modify,
remove or tamper with any control device.
WARNING
This boiler must only be serviced and repaired by skilled and experienced service technicians.
If any controls are replaced, they must be replaced with identical models.
Read, understand and follow all the instructions and warnings contained in all the sections of this
manual.
If any electrical wires are disconnected during service, clearly label the wires and assure that the wires
are reconnected properly.
Never jump out or bypass any safety or operating control or component of this boiler.
Read, understand and follow all the instructions and warnings contained in ALL of the component
instruction manuals.
Assure that all safety and operating controls and components are operating properly before placing
the boiler back in service.
A. General. Inspection and service should be conducted
annually. Turn off electrical power and gas supply while
conducting service or maintenance. Follow instructions
TO TURN OFF GAS TO APPLIANCE. See Figure 22.
B. Low water cutoff (if so equipped).
Probe Type (Annual Service). Probe type LWCO
should be removed once a year, examined and
cleaned of any dirt accumulations to assure proper
operations. Do not attempt to repair mechanisms in the
eld. Complete replacement mechanisms, including
necessary gaskets and installation instructions, are
available from the manufacturer.
C. Vent System. Inspect for obstructions, soot
accumulation, proper support, and deterioration of pipe,
ttings, and joints.
1. Clean terminal screens. Terminals must be free of
obstruction, undamaged, with screens securely in
place.
2. Terminal and wall thimbles (if used) must be
weathertight.
3. Pipe must be full round shape, and show no damage
from impact or excessive temperature.
4. Pipe must be supported at minimum ve (5) foot
intervals and must not sag.
5. All vent joints must be secure and watertight.
6. All joints must be secure and airtight. Horizontal
vent tee drain or vertical vent tee drain (if used)
must have minimum 6 inch trap and allow
condensate to ow freely. To Clean:
a. Disconnect drain tube from drain tting.
b. Flush drain tube with water. Fill trap with water.
c. Securely fasten drain tube to drain tting,
providing gas-tight and watertight seal.
7. If pipe must be disassembled for removal of
obstructions or resealing of joint, see Section III,
Paragraph C.
D. Boiler Flue Passages. Inspect for blockage or soot
accumulation.
1. Remove Main Burners. See Figure 30.
a. Remove front door.
b. Disconnect pilot tubing and pilot lead wires at
the gas valve.
c. Remove wires to Flame Roll-out Switch.
d. Remove Burner Access Panel.
46
Page 47

e. Mark location of Main Burner with Pilot Bracket
on gas manifold.
f. Hold Main Burner on throat. Lift front of
burners to clear orice. Burner which holds
pilot can be removed by lifting the burner
adjacent to its right rst.
2. Disconnect Vent Connector and Vent Pipe from
Blower Outlet.
3. Remove Jacket Top Panel.
4. Disconnect the Black and Gray Silicone Tubing
from the Canopy.
5. Disconnect Wiring Harness from Blower Motor.
6. Remove Canopy/Blower Assembly.
a. Loosen the (4) screws from Canopy.
7. Remove Flue Gas Bafes. Inspect Flue Gas Bafes
for deterioration.
8. Inspect ue passages. Clean with ue brush. See
Figure 30.
9. Inspect heating surface in combustion chamber.
Clean with straight handle wire brush.
10. Install Flue Gas Bafes.
11. Replace Canopy Assembly and seal.
12. Connect Silicone Tubing between Pressure Fittings
on Canopy Assembly and Pressure Switch. Route
through bushings in Vestibule Panel . See Figure
28.
13. Install Jacket Top Rear Panel.
14. Connect vent system. See Figure 29.
15. Connect Blower Motor Wiring Harness
Figure 29: Blower Vent Connector Assembly
E. Main Burners and Firebox.
1. Vacuum rebox. Exercise care - do not damage base
insulation.
2. Clean main burners. Brush top of burners with soft
bristle brush. See Figure 30. Vacuum to remove any
dirt and lint.
3. Vacuum tip of pilot burner.
4. Check gas orices for lint and dirt. Clean as
necessary.
5. Install main burners by reversing procedure to
remove burners.
a. Pilot burner must be installed in original
location. See Table 14.
b. Main burners must be properly secured in burner
tray slot at rear of rebox and over gas orice.
See Figure 30.
c. Pilot gas supply and pilot lead wires must be
reconnected.
d. Burner access panel must be securely in place.
e. Reconnect Flame Roll-out wires.
F. Check operation. Follow steps G through P from
Section VIII: System Start-up.
Figure 28: Silicone Tubing Assembly
G. Procedure for measuring differential pressure (See
Figure 31).
1. With boiler off, remove Gray and Black Hoses at
differential pressure switch.
2. With tees and ¼ inch aluminum stubs, connect water
manometer as shown with additional tubing.
47
Page 48

48
Figure 30: Flue and Burner Cleanout, 1” Burner
Page 49

Table 14: Pilot Burner Location
Boiler Model Main Burner with Pilot Bracket Pilot Burner Located Between Main Burners *
PVG-3 2 2 & 3
PVG-4 3 3 & 4
PVG-5 4 4 & 5
PVG-6 5 5 & 6
PVG-7 6 6 & 7
PVG-8 7 7 & 8
PVG-9 8 8 & 9
* Main burners numbered left to right as viewed from front of boiler.
3. Start boiler and read Pressure on Manometer
when boiler water temperature reaches operating
temperature. Refer to Table 15 for minimum
readings.
NOTE: If switch drops-out before boiler reaches
temperature or if pressure differential readings are
below minimums shown in Table 15, check for
cracks in hose or contact your nearest Burnham
representative.
4. Stop boiler, remove manometer and reconnect hoses
to differential pressure switch. See Figures 28 and
31.
Table 15: Differential Pressure Switch Settings
Boiler Model
PVG-3 1.32” w.c. .80” w.c.
PVG-4 1.17” w.c. .65” w.c.
PVG-5 1.17” w.c. .65” w.c.
PVG-6 .88” w.c. .35” w.c.
PVG-7 .80” w.c. .30” w.c.
PVG-8 .88” w.c. .35” w.c.
PVG-9 .88” w.c. .35” w.c.
Sea Level to 4,999 Ft. 5,000 - 10,000 Ft. Elevation
Figure 31: Differential Pressure Measurement
Minimum Differential Pressure
49
Page 50

505152
Page 51

Page 52

XI. Repair Parts
All PVG Repair Parts may be obtained through your local Burnham Wholesale distributor. Should
you require assistance in locating a Burnham distributor in your area, or have questions regarding
the availability of Burnham products or repair parts, please contact Burnham Customer Service at
(717) 481-8400 or Fax (717) 481-8408.
Page 53

Key
No.
Description
PVG-3 PVG-4 PVG-5 PVG-6 PVG-7 PVG-8 PVG-9
[Quantity] Part Number
1. CASTING ASSEMBLY
1 Section Assembly 61707031 61707041 61707051 61707061 61707071 61707081 61707091
1A Left End Section 71707001
1B Center Section
1C Right End Section 71707002
1D Slip Nipple, #3
1E Flue Gas Bafe
1F Tie Rod, ¼” -20
1G Hex Nut, ¼” -20 [4] 80860407
[1]
71707003
[4]
806600009
[2]
71107002
[2]
100109-01
[2]
71707003
[6]
806600009
[3]
71107002
[2]
100108-05
[3]
71707003
[8]
806600009
[4]
71107002
[2]
100108-07
[4]
71707003
[10]
806600009
[5]
71107002
[2]
100108-13
[5]
71707003
[12]
806600009
[6]
71107002
[2]
100108-14
[6]
71707003
[14]
806600009
[7]
71107002
[2]
100108-15
[7]
71707003
[16]
806600009
[8]
71107002
[2]
100108-16
53
Page 54

54
Page 55

Key
No.
Description
PVG-3 PVG-4 PVG-5 PVG-6 PVG-7 PVG-8 PVG-9
[Quantity] Part Number
2. BASE ASSEMBLY
2A Base Wrapper 71807031 71807041 71807051 71807061 71807071 71807081 71807091
2B Base Tray 71807032 71807042 71807052 71807062 71807072 71807082 71807092
2C Burner Tray Assembly 61807031 61807041 61807051 61807061 61807071 61807081 61807091
2D Base Front Panel 71807035 71807045 71807055 71807065 71807075 71807085 71807095
2E Burner Access Panel 71807036 71807046 71807056 71807066 71807076 71807086 71807096
2F Cerafelt Gasket 1/2” x 2” 6206002
2G Cerafelt Gasket 1/2” x 2” 6206002
2H Base Side Insulation [2] 72007001
2J Base Rear Insulation 72007031 72007041 72007051 72007061 72007071 72007081 72007091
2K Base Front Insulation 72007032 72007042 72007052 72007062 72007072 72007082 72007092
2L Base Leg Assembly [4] 6186001
2M Self Tapping Screw, 1/4” -20 x 1/2” [18] 80860700
2N Flame Roll-out Switch 80160044
2P Sheet Metal Screw, #8 x 3/4” 80860030
2Q Self Tapping Screw, 10-32 x 3/8” [5] 80860705 [6] 80860705 [7] 80860705
Self Tapping Screw Hex Cap,
2R
5/16 - 18 x 1-1/4”
[4] 80860717
55
Page 56

Key
No.
Description
PVG-3 PVG-4 PVG-5 PVG-6 PVG-7 PVG-8 PVG-9
[Quantity] Part Number
3. BASE ASSEMBLY
3A Burner Cover (Natural Gas Only) 102033-03 102033-04 102033-05 102033-06 102033-07 102033-08 102033-09
3B Manifold Support Bracket 718070001
3C Sheet Metal Screw, #8 x 1/2” [2] 80860000
3D Self Tapping Screw, 10-32 x 3/8” [6] 80860705
56
Page 57

Key
No.
Description
PVG-3 PVG-4 PVG-5 PVG-6 PVG-7 PVG-8 PVG-9
[Quantity] Part Number
4. FAN/CANOPY ASSEMBLY
Canopy Assembly - Sea Level 61107031 61107041 61107051 61107061 61107071 61107081 61107091
4A
Canopy Assembly - High Altitude 61107032 61107042 61107052 61107062 61107072 61107082 61107092
4B Cerafelt 9206005
4C U-Clip [4] 80861512
4D Sheet Metal Screw, #10 x 1” [4] 808600141
4E Fan Gasket 8206085
4F Fan 81161512
4G Lock Washer, #10 [4] 80860636
4H Machine Screw, #10-24 x 2-1/2” [4] 808608982
57
Page 58

58
Page 59

Key
No.
Description
5. BURNER ASSEMBLY
[Quantity] Part Number
PVG-3 PVG-4 PVG-5 PVG-6 PVG-7 PVG-8 PVG-9
Gas Valve (Natural Gas),
Honeywell VR8204P1171
Gas Valve (Natural Gas),
Honeywell VR8304P4496
5A
Gas Valve (LP Gas),
Honeywell VR8204C3015
Gas Valve (LP Gas),
Honeywell VR8304P4280
Nipple, ½” NPT x Close 806600040 N/A
5B
Nipple, ¾” NPT x Close N/A 806600022
Union, ½” NPT 806604023 N/A
5C
Union, ¾” NPT N/A 806604001
½” Gas Manifold 82207031 82207041 82207051 82207061 --- --- ---
5D
¾” Gas Manifold --- --- --- --- 82207071 82207081 82207091
Burner Orices - Natural Gas #47
5E
Burner Orices - LP Gas 1.20 mm
Pilot Assembly - Natural Gas 8236163
5F
Pilot Assembly - LP Gas 8236164
[4]
822710
[4]
822792
81660282 N/A
N/A 81660283
81660146 N/A
N/A 81660181
[6]
822710
[6]
822792
[8]
822710
[8]
822792
[10]
822710
[10]
822792
[12]
822710
[12]
822792
[14]
822710
[14]
822792
[16]
822710
[16]
822792
5G Pilot Burner 100147-01
5H Main Burner
5J Pilot Tubing 8236122
5K Self Tapping Screw, ¼ - 20 x ½” [6] 80860700
[3]
100146-01
[5]
100146-01
[7]
100146-01
[9]
100146-01
[11]
100146-01
[13]
100146-01
[15]
100146-01
59
Page 60

Key
No.
Description
PVG-3 PVG-4 PVG-5 PVG-6 PVG-7 PVG-8 PVG-9
[Quantity] Part Number
6. CONTROL PANEL ASSEMBLY
6A Limit, Honeywell L4080D 100189-01
Transformer/Relay, Honeywell
6B
R8285D
Ignition Module, Honeywell
6C
S8670E3003
Blower Relay, Honeywell
6D
R8222U1006
Differential Pressure Switch
Sea Level 0’ - 4999’
6E
High Altitude - 5000’ - 10,000’ 80160759 80160763 80160764 80160765 80160764
6F Junction box 8136259
80160762 80160761 80160760 80160759 80160760
80160155U
100959-01
80160096U
60
Page 61

Key
No.
Description
PVG-3 PVG-4 PVG-5 PVG-6 PVG-7 PVG-8 PVG-9
[Quantity] Part Number
7. JACKET PARTS
7A Left Side Panel 60407002
7B Right Side Panel 60407001
7C Rear Panel 60407033 60407043 60407053 60407063 60407073 60407083 60407093
7D Vestibule Panel 60407034 60407044 60407054 60407064 60407074 60407084 60407094
7E Top Panel 60407032 60407042 60407052 60407062 60407072 60407082 60407092
7F Front Door 101354-03 101354-04 101354-05 101354-06 101354-07 101354-08 101354-09
7G Jacket Cover Plate 80407001
7H Handle 8056184
7J Door Clip [2] 7041921
7K Bushing 8136048
7L Burnham Logo 81460099
61
Page 62

Key
No.
Description
PVG-3 PVG-4 PVG-5 PVG-6 PVG-7 PVG-8 PVG-9
[Quantity] Part Number
8. MISCELLANEOUS PARTS CARTON
8A Water Manifold 80607001
8B Temperature/Pressure Gauge 8056169
8C Circulator Wiring Harness 6130701
8D Safety Relief Valve 81660363
8E Boiler Drain Valve 806603061
8F Vent Terminal 8110701 8110702
8G Vent Connector 8110703 8110704
62
Page 63

Important Product Safety Information
Refractory Ceramic Fiber Product
Warning:
The Repair Parts list designates parts that contain refractory ceramic fibers
(RCF). RCF has been classified as a possible human carcinogen. When
exposed to temperatures about 1805°F, such as during direct flame contact,
RCF changes into crystalline silica, a known carcinogen. When disturbed as a
result of servicing or repair, these substances become airborne and, if inhaled,
may be hazardous to your health.
AVOID Breathing Fiber Particulates and Dust
Precautionary Measures:
Do not remove or replace RCF parts or attempt any service or repair work
involving RCF without wearing the following protective gear:
1. A National Institute for Occupational Safety and Health (NIOSH)
approved respirator
2. Long sleeved, loose fitting clothing
3. Gloves
4. Eye Protection
• Take steps to assure adequate ventilation.
• Wash all exposed body areas gently with soap and water after contact.
• Wash work clothes separately from other laundry and rinse washing
machine after use to avoid contaminating other clothes.
• Discard used RCF components by sealing in an airtight plastic bag. RCF
and crystalline silica are not classified as hazardous wastes in the United
States and Canada.
First Aid Procedures
:
• If contact with eyes: Flush with water for at least 15 minutes. Seek
immediate medical attention if irritation persists.
• If contact with skin: Wash affected area gently with soap and water.
Seek immediate medical attention if irritation persists.
• If breathing difficulty develops: Leave the area and move to a location
with clean fresh air. Seek immediate medical attention if breathing
difficulties persist.
• Ingestion: Do not induce vomiting. Drink plenty of water. Seek
immediate medical attention.
63
Page 64

Limited Warranty
sraeY
ecivreSnI
01-1 11 21 31 41 51 61 71
egrahCecivreS
fo%sa
ecirPliateR
oN
egrahC
5 01 51 02 52 03 53
sraeY
ecivreSnI
81 91 02 12 22 32 42
dna52
evoba
egrahCecivreS
fo%sa
ecirPliateR
04 54 05 55 06 56 07 57
FOR RESIDENTIAL CAST IRON WATER BOILERS
Subject to the terms and conditions set forth below, U.S. Boiler™
Co., Inc. Lancaster, Pennsylvania hereby extends the following limited
warranties to the original owner of a residential grade water boiler
manufactured and shipped on or after July 1,1991:
ONE YEAR LIMITED WARRANTY
ON RESIDENTIAL GRADE WATER BOILERS
U.S. Boiler Co., Inc. warrants to the original owner that its residential
grade water boilers comply at the time of manufacture with recognized
hydronic industry standards and requirements then in effect and will be
free of defects in material and workmanship under normal usage for a
period of one year from the date of original installation. If any part of a
water boiler is found to be defective in material or workmanship during
this one year period, U.S. Boiler Co., Inc. will, at its option, repair or
replace the defective part.
LIFETIME LIMITED WARRANTY ON HEAT EXCHANGER
U.S. Boiler Co., Inc. warrants to the original owner that the heat
exchanger of its residential grade water boilers will remain free from
defects in material and workmanship under normal usage for the
lifetime of the original owner at the original place of installation. If a
claim is made under this warranty during the rst ten years from the
date of original installation, U.S. Boiler Co., Inc. will, at its option, repair
or replace the heat exchanger. If a claim is made under this warranty
after the expiration of ten years from the date of original installation,
U.S. Boiler Co., Inc. will, at its option and upon payment of the pro-rated
service charge set forth below, repair or replace the heat exchanger.
The service charge applicable to a heat exchanger warranty claim is
based upon the number of years the heat exchanger has been in service
and will be determined as a percentage of the retail price of the heat
exchanger model involved at the time the warranty claim is made as
follows:
NOTE: If the heat exchanger model involved is no longer available
due to product obsolescence or redesign, the value used to establish
the retail price will be the published price as shown in the Burnham
Hydronics Repair Parts Price Sheet where the heat exchanger last
appeared or the current retail price of the then nearest equivalent heat
exchanger.
ADDITIONAL TERMS AND CONDITIONS
1. Applicability: The limited warranties set forth above are extended
only to the original owner at the original place of installation within the
United States and Canada. These warranties are applicable only to
water boilers designated as residential grade by U.S. Boiler Co., Inc. and
installed in a single or two-family residence and do not apply to steam
boilers of any kind or to commercial grade boilers.
2. Components Manufactured by Others: Upon expiration of the
one year limited warranty on residential grade water boilers, all boiler
components manufactured by others but furnished by U.S. Boiler Co.,
Inc. (such as oil burner, circulator and controls) will be subject only to the
manufacturer’s warranty, if any.
3. Proper Installation: The warranties extended by U.S. Boiler Co., Inc.
are conditioned upon the installation of the residential grade water boiler
in strict compliance with U.S. Boiler Co., Inc. installation instructions.
U. S. Boiler Co., Inc. specically disclaims liability of any kind caused by
or relating to improper installation.
4. Proper Use and Maintenance:The warranties extended by U.S. Boiler
Co., Inc. conditioned upon the use of the residential grade water boiler
for its intended purposes and its maintenance accordance with U. S.
Boiler Co., Inc. recommendations and hydronics industry standards.
These warranties will be inapplicable if the residential grade water boiler
is used or operated over its rated capacity, is subjected to unauthorized
modication, or is damaged as a result of being otherwise improperly
operated or serviced including, but not limited to, damage from any of the
following: operation with insufcient water, allowing the boiler to freeze,
subjecting the boiler to ood conditions, and operation with unapproved
water or fuel additives which cause deposits or corrosion.
5. Removal and Installation: These warranties do not cover expenses
of removal or reinstallation. The owner is responsible for the cost of
removing and reinstalling any defective part and its replacements and all
labor and material connected therewith.
6. Exclusive Remedy: U.S. Boiler Co., Inc. obligation for any breach
of these warranties is limited to the repair or replacement of its parts in
accordance with the terms and conditions of these warranties.
7. Limitation of Damages: Under no circumstances shall U.S. Boiler Co.,
Inc. be liable for incidental, indirect, special or consequential damages
of any kind whatsoever under these warranties, including, but not limited
to, injury or damage to persons or property and damages for loss of use,
inconvenience or loss of time. U.S. Boiler Co., Inc. liability under these
warranties shall under no circumstances exceed the purchase price paid
by the owner for the residential grade water boiler involved. Some states
do not allow the exclusion or limitation of incidental or consequential
damages, so the above limitation or exclusion may not apply to you.
8. Limitation of Warranties: These warranties set forth the entire
obligation of U.S. Boiler Co., Inc. with respect to any defect in a
residential grade water boiler and U.S. Boiler Co., Inc. shall have no
express obligations, responsibilities or liabilities of any kind whatsoever
other than those set forth herein. These warranties are given in lieu of all
other express warranties.
ALL APPLICABLE IMPLIED WARRANTIES, IF ANY, INCLUDING
ANY WARRANTY OF MERCHANTABILITY OR FITNESS FOR A
PARTICULAR PURPOSE ARE EXPRESSLY LIMITED IN DURATION
TO A PERIOD OF ONE YEAR EXCEPT THAT IMPLIED WARRANTIES,
IF ANY, APPLICABLE TO THE HEAT EXCHANGER IN A RESIDENTIAL
GRADE WATER BOILER SHALL EXTEND TO THE ORIGINAL
OWNER FOR THE LIFETIME OF THE ORIGINAL OWNER AT THE
ORIGINAL PLACE OF INSTALLATION. SOME STATES DO NO ALLOW
LIMITATION ON HOW LONG AN IMPLIED WARRANTY LASTS, SO
THE ABOVE LIMITATION MAY NOT APPLY TO YOU.
PROCEDURE FOR OBTAINING WARRANTY SERVICE
In order to assure prompt warranty service, the owner is requested to
complete and mail the attached Warranty Card within ten days after the
installation of the boiler, although failure to comply with this request will
not void the owner’s rights under these warranties.
Upon discovery of a condition believed to be related to a defect in
material or workmanship covered by these warranties, the owner should
notify the installer, who will in turn notify the distributor. If this action is
not possible or does not produce a prompt response, the owner should
write to U.S. Boiler Co., Inc., Burnham Hydronics, at P.O. Box 3079,
Lancaster, PA 17604, giving full particulars in support of the claim.
The owner is required to make available for inspection by U.S. Boiler
Co., Inc. or its representative the parts claimed to be defective and, if
requested by U.S. Boiler Co., Inc. to ship these parts prepaid to U.S.
Boiler Co., Inc. at the above address for inspection or repair. In addition,
the owner agrees to make all reasonable efforts to settle any disagreement arising in connection with a claim before resorting to legal remedies
in the courts.
THIS WARRANTY GIVES YOU SPECIFIC LEGAL RIGHTS AND
YOU MAY ALSO HAVE OTHER RIGHTS WHICH VARY FROM STATE
TO STATE.
03/03
64
 Loading...