

Page 1
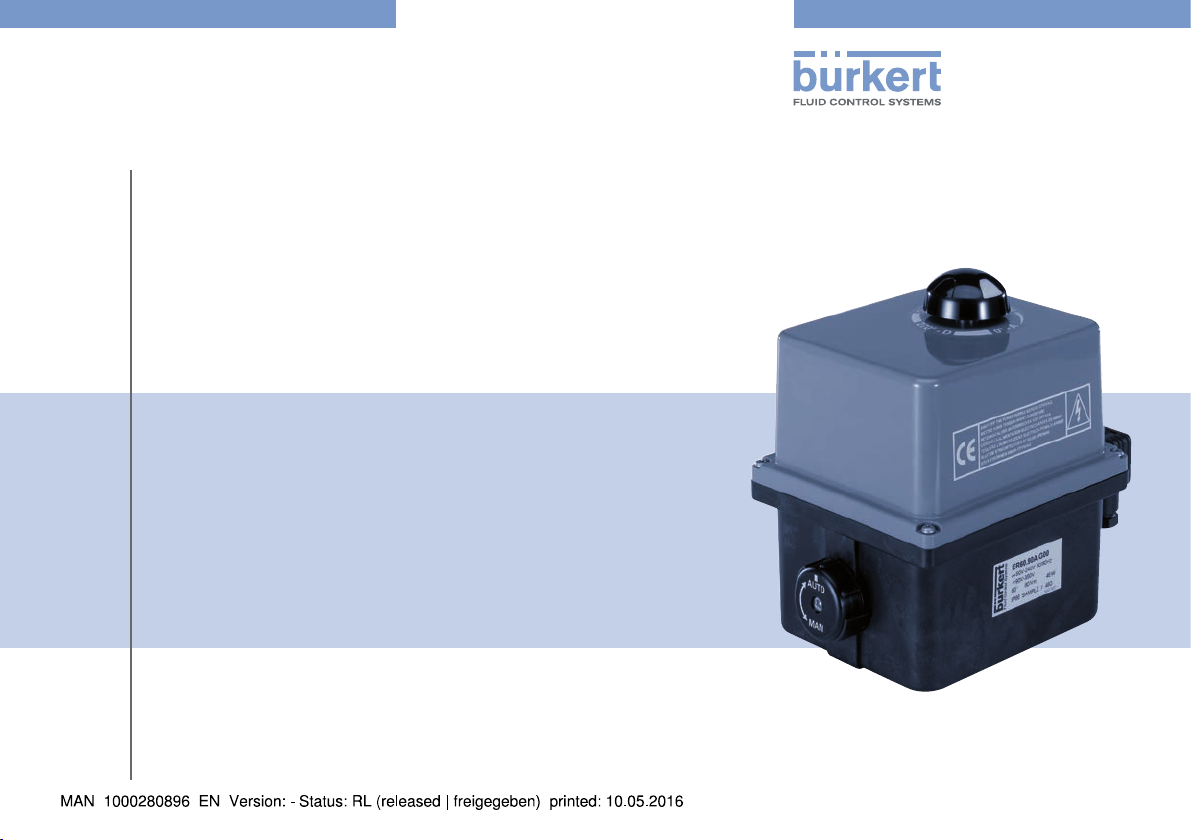
Type 3003
Electrical rotary Open/ClOse actuator
Elektromotorischer Drehantrieb Auf/Zu
Actionneurs électriques Ouvert/fermé
Quickstart
English Deutsch Français
Page 2

We reserve the right to make technical changes without notice.
Technische Änderungen vorbehalten.
Sous réserve de modifications techniques.
© 2011 - 2016 Bürkert Werke GmbH
Operating Instructions 1601/02_EU-ML_00809485 / Original DE
Page 3

Type 3003
Contents
1 QUICKSTART
1.1 Definition of the term “device” ................................................4
2 SYMBOLS
3 INTENDED USE .............................................................................................5
3.1 Restrictions ................................................................................. 5
4 GENERAL SAFETY INFORMATION .....................................................5
5 GENERAL INFORMATION ........................................................................7
5.1 Contact address ........................................................................ 7
5.2 Warranty ...................................................................................... 7
5.3 Informations in the Internet ...................................................... 7
6 SYSTEM DESCRIPTION ............................................................................7
6.1 Intended area of application ...................................................7
6.2 General description ..................................................................7
6.3 Marking ........................................................................................ 7
6.4 Type label ....................................................................................8
7 TECHNICAL DATA ........................................................................................8
7.1 Conformity ................................................................................... 8
7.2 Standards .................................................................................... 8
7.3 Operating conditions ................................................................ 8
7.4 Electrical data ............................................................................. 8
7.5 Electrical circuit diagrams .......................................................9
..................................................................................................4
.........................................................................................................4
8 INSTALLATION
8.1 Safety information....................................................................11
8.2 Power and control connections ...........................................11
8.3 Connecting the additional limit switches (optional) ........11
8.4 Setting the limit switches ......................................................12
8.5 Circuit board for actuator with standard signal input .....13
8.6 Specify position of the plug-in jumpers .............................14
8.7 Parameterization steps ...........................................................14
8.8 Normal operation .....................................................................16
9 ROTARY ACTUATORS WITH INTEGRATED EMERGENCY
RESET .............................................................................................................16
9.1 Technical data ..........................................................................16
9.2 Electric wiring ...........................................................................16
9.3 Circuit board .............................................................................17
10 OPERATING
10.1 Safety information....................................................................18
10.2 Manual operation of the rotary actuator .................................................. 18
10.3 Returning from manual to automatic operation ................19
11 TRANSPORT, STORAGE, DISPOSAL ..............................................19
............................................................................................ 11
.................................................................................................. 18
english
3
Page 4
Type 3003
Quickstart
1 QUICKSTART
The operating instructions describe the entire life cycle of the device.
Keep these instructions in a location which is easily accessible to
every user and make these instructions available to every new owner
of the device.
Important Safety Information!
Read Quickstart carefully and thoroughly. Study in particular the
chapters entitled “General safety information” and “Intended use”.
▶ Quickstart must be read and understood.
The Quickstart explains, for example, how to install and start-up the
device.
A detailed description of the device can be found in the operating
instructions for Type 3003.
1.1 Definition of the term “device”
In these instructions, the term device always refers to the electrical
rotary actuator Type 3003.
2 SYMBOLS
The following symbols are used in these instructions.
DANGER!
Warns of an immediate danger!
▶ Failure to observe the warning may result in a fatal or serious
injury
WARNING!
Warns of a potentially dangerous situation!
▶ Failure to observe the warning may result in serious injuries or death.
CAUTION!
Warns of a possible danger!
▶ Failure to observe this warning may result in a moderately severe
or minor injury.
NOTE!
Warns of damage to property!
Important tips and recommendations.
Refers to information in these operating instructions or in
other documentation.
→ designates a procedure which you must carry out.
4
english
Page 5
Type 3003
Intended use
3 INTENDED USE
Non-authorized use of the electromotive rotary actuator type
3003 may be dangerous to people, nearby equipment and the
environment.
▶ The device may be used outside.
▶ During use observe the authorized data, the operating conditions
and conditions of use specified in the contract documents and
in the operating instructions. These are described in the chapter
entitled “Technical data”.
▶ The device may only be used in connection with third-party devices
and components recommended or approved by Bürkert.
▶ Requirements for safe and proper operation are proper trans-
port, storage and installation as well as careful operation and
maintenance.
▶ Only use the device as intended.
3.1 Restrictions
Observe any existing restrictions that apply to the device to be exported.
4 GENERAL SAFETY INFORMATION
This safety information does not cover:
• Haphazard situations that can arise during installation, operation and
maintenance of the use.
• Locally applicable safety regulations which the operator and installation personnel are obligated to follow.
Hazard due to electrical voltage!
Intervention in the device poses an acute risk of injury.
▶ Before starting work, be sure to switch off the supply voltage and
secure it to prevent restarting.
▶ Always connect multiple electrical rotary OPEN/CLOSED
actuators with phase isolation via a switch.
▶ Observe all applicable accident protection and safety guidelines
for electrical equipment.
Unintentional operation or impermissible damage can lead to
generally dangerous situations as well as physical injury!
▶ Take appropriate measures to prevent the possibility of uninten-
tional activation of the device!
The general rules of technology apply to the planning and
operation of the device!
▶ Observe the general rules of technology!
english
5
Page 6

Type 3003
General safety information
General hazardous situations.
To prevent injury, ensure:
• The electrical rotary actuator Type 3003 may not be used in potentially explosive atmospheres (in this case please use type 3004).
▶ Do not put any loads on the body (e.g. by placing objects on it
or standing on it).
▶ Do not make any external modifications to the device body. Do
not paint the body parts or screws.
▶ Do not install the actuator with the cover facing down (head first).
• When installing the actuator, observe a minimum distance of
30 cm to electromagnetic sources of interference.
▶ Installation and repair work may be carried out by authorized
technicians only and with the appropriate tools.
▶ After an interruption in the power supply or pneumatic supply,
ensure that the process is restarted in a defined or controlled
manner.
▶ The device may be operated only when in perfect condition and
in consideration of the operating instructions.
▶ The general rules of technology apply to application planning
and operation of the device.
NOTE!
Electrostatically sensitive components / modules!
The device contains electronic components that react sensitively
to electrostatic discharge (ESD). Contact with electrostatically
charged persons or objects will endanger these components. In
the worst case, they will be immediately destroyed or will fail after
commissioning.
▶ Observe the requirements according to EN 61340-5-1 in order
to minimise or avoid the possibility of damage through sudden
electrostatic discharge.
• You should also ensure that the electronic components do not
come into contact with nearby operating voltage.
6
english
Page 7

Type 3003
General information
5 GENERAL INFORMATION
5.1 Contact address
Germany
Bürkert Fluid Control Systems
Sales Center
Christian-Bürkert-Str. 13-17
D-74653 Ingelfingen
Tel. + 49 (0) 7940 - 10-91 111
Fax + 49 (0) 7940 - 10-91 448
E-mail: info@de.buerkert.com
International
Contact addresses are found on the final pages of this operating
manual.
And also on the Internet under: www.burkert.com
5.2 Warranty
The warranty is only valid if the electromotive rotary actuator type
3003 is used as intended in accordance with the specified application
conditions.
5.3 Informations in the Internet
The operating manual and the data sheets on Type 3003 can be found
on the Internet under: www.burkert.com
6 SYSTEM DESCRIPTION
6.1 Intended area of application
The electrical rotary OPEN/CLOSED actuator type 3003 (referred to
as rotary actuator in the following) is designed for ball or flap valves.
6.2 General description
Due to its modular construction, the basic device can be extended
with many options.
Options for expanding the basis device are found in the
operating manual.
The rotary actuator is designed for direct or alternating current with a
varied rating and available for torques of 20, 35, 60 or 100 Nm. The
materials used guarantee maintenance-free operation and ensure a
low thermal load.
All rotary actuators are equipped with a standard emergency manual
control and two additional limit switches and are tested by the manufacturer. The limit switches are set for a 0 ... 90° operating range.
6.3 Marking
The rotary actuator is fitted with a type label which enables clear identification and provides the most important technical data.
english
7
Page 8

Type 3003
Technical data
Do not remove the type label from the rotary actuator!
It is extremely important for identification during installation
and maintenance.
The warranty is void without the type label.
6.4 Type label
Operating voltage
Type, Identification number
3003 / 225431
~ 24 V 50/60 Hz
24 V
90° 20 Nm 15W
IP66 OF N°460050/79
Fluid Control Systems
Protection class, Serial number
(internal)
Torque, Rating
Operating voltage
Fig. 1: Location and description of the type label
10/11 S46
7 TECHNICAL DATA
7.1 Conformity
The electromotive rotary actuator Type 3003 conforms to the EC
Directives according to the Declaration of Conformity.
7.2 Standards
The applied standards, which verify conformity with the EC Directives,
can be found on the EC Type Examination Certificate and/or the EC
Declaration of Conformity.
7.3 Operating conditions
Ambient temperature: -10 ... +55 °C
-10 °C ... +40 °C (Emergency reset)
Permissible areas
of application: 0 ... 2000 m altitude
Permissible humidity: < 81 % to 31 °C (88 °F) with linear
decrease as far as 50 % at 40 °C
(according to EN 61010-1)
Protection class: IP66 with cable plug
7.4 Electrical data
Electrical connections: Cable plug according to EN 175301-803
Cable gland ISO M20
Limit switches: 4 adjustable (2 for the motor and 2 addi-
tional ones for feedback signal) -
max. 250 V AC / 5 A
Range of movement: 90° ± 5° (optional 180°, 270°)
Duty rating: 50 % at max. torque
8
english
Page 9

Type 3003
Technical data
7.5 Electrical circuit diagrams
3-point mode
N
-
TP/PE
2
1
3
Ph
+
On Off
On-Off-Mode
N
-
TP/PE
1
3
Ph
+
Off
On
2
4 5 6 7
FC1
Symbol Description
FCO Limit switch ON
FCF Limit switch OFF
FC1 Additional limit switch 1
FC2 Additional limit switch 2
Feedback
8 9
FC2
Fig. 2: Open/Closed version
If voltage is applied simultaneously to terminals 2 and 3, terminal 2 is the leading one and the actuator moves to the OPEN position.
NOTE!
Make certain in 3-point mode that the pulse duration of a controller lasts for at least 1 second. A pause time of at least 500 ms is required
before controller activation is repeated. Observe the duty cycle specified on the type label.
Please note the circuit board must remain power supplied to allow heating resistances working.
english
9
Page 10

Type 3003
Technical data
N
-
1
1
1
15V-30V 50/60 Hz (12V-48V DC)
100 V-240 V 50/60 Hz
(100 V-350 V DC)
TP/PE
17
18
17
18
P6 POSI
13 14 15 16
+ +- -
Output
signal
0-20 mA / 4-20 mA /0-10 V
TP/PE
2
3
2
3
2 3
Input
signal
Ph
+
Fig. 3: Version with analog signal input
D1
D2
A
B
Error feedback
(24V DC/3A max)
A B
Motor
=
FCO
Feedback
4 5 6 7
FCF
~
+
~
FC1
FC2
8 9
The resolution of the control mode is about 1°
The input resistance for control 0-10 V is 10 kΩ
The input resistance for control 0-20 mA / 4-20 mA is 100 Ω
10
english
Page 11

Type 3003
Installation
8 INSTALLATION
8.1 Safety information
DANGER!
Hazard due to electrical voltage!
▶ Always switch off the power and secure it to prevent restarting
before removing the cover, or using the lever.
▶ Always connect multiple rotary actuators with phase isolation via
a switch!
▶ Protect electrical rotary actuators by using a mains-dependent
safety!
▶ Observe all applicable accident protection and safety guidelines
for electrical equipment!
WARNING!
Hazard due to improper installation!
▶ Installation may only be carried out by authorised technicians
using appropriate tools!
▶ Before installation, ensure that the manual lever can move freely.
Danger due to unintentional activation of the device!
Unintended actuation of the device during installation can lead to
injury and damage to property.
▶ Take appropriate measures to prevent the possibility of uninten-
tional activation of the device.
8.2 Power and control connections
Procedure:
→ Disconnect the rotary actuator from the power supply.
→ Remove the position indicator from the axis.
→ Loosen the cover screws with a screwdriver and lift the cover off.
→ Disconnect the cable connector ISO20 and insert the cable.
→ Wire the connections according to the circuit diagram figures (see
“7.5 Electrical circuit diagrams”).
Use cables with a diameter of 7 ... 12 mm for the ISO20
cable fitting.
→ Set the cover in place and screw it tight.
→ Reinstall the position indicator.
8.3 Connecting the additional limit switches (optional)
In the standard variant, the rotary actuator has 2 additional limit switches
(for 90º range of motion). Connect these as follows.
Procedure:
→ Disconnect the rotary actuator from the power supply.
→ Remove the position indicator from the axis.
→ Use a screwdriver to loosen the cover screws.
→ Lift the cover off.
english
11
Page 12

Type 3003
Installation
→ Wire the connections of the additional limit switches (FC1 and FC2)
according to the circuit diagram figures (see “Fig. 2” and “Fig. 3”).
→ Tighten the cable gland after connecting the terminals.
→ Set the cover in place and screw it tight.
→ Reinstall the position indicator.
Only use 4 or 6 conductor cable with a diameter of
7 ... 12 mm for the ISO20 cable fitting.
Ensure that the cable in the ISO20 cable fitting is completely
sealed when tightening the union nut.
8.4 Setting the limit switches
The rotary actuator is supplied with the following factory
settings:
• The CLOSED limit switches are activated with the cams 2
and 4 (closed position).
• The OPEN limit switches are preset at a 90° rotation
angle.
The procedure for setting the limit switches is shown in “Fig. 4” and
“Fig. 5”.
Electronic card
Motor
Shaft
Body
Wrench (00679946)
Fig. 4: Setting the limit switches. Limit switches max. 250 V / 5 A
Cams
CLOSED
CLOSED
Setting in
Cam No. 4
Additional limit
black
switch CLOSED
OPEN
Cam No. 3
Additional limit
white
switch OPEN
Cam No. 2
Motor limit
black
switch CLOSED
OPEN
Cam No. 1
Motor limit
white
switch OPEN
clockwise direction
Wrench
or setting in
counter clockwise
direction
Adjustment
direction
12
Fig. 5: Setting limit switches in counter clockwise and clockwise
directions
english
Page 13

Type 3003
Installation
8.5 Circuit board for actuator with standard signal input
N
L
G
H
B
C
A
M
Fig. 6: Circuit board
A Electrical power supply
24 V AC/DC
B Connection terminals of
the input signal
C Connection terminals of
the feedback
H K2 plug-in jumper
I K3 plug-in jumper
J Green and red LED
D MEM push-button K LED yellow: Indicates the
power supply
D
E CLOSE push-button L Potentiometer
F OPEN push-button M Motor connection
E
F
G K1 plug-in jumper N Heat resistor connection
To prevent electromagnetic interference, shielded cables
must be used.
J
Procedure:
→ Loosen the cable gland and feed the cable through.
K
I
→ Wire the signal transducer between terminals 15 and 16. Terminal
15 is the negative pole (-) and terminal 16 the positive pole (+).
→ Wire the position feedback sensor between terminals 13 and 14.
Terminal 13 is the positive pole (+) and terminal 14 the negative
pole (-).
→ Re-attach the cable gland.
If the connection voltage is 100 V to 240 V, a fuse must be
provided in the power supply.
english
13
Page 14

Type 3003
Installation
8.6 Specify position of the plug-in jumpers
ONOFF
Fig. 7: Plug-in jumper
0-20 mA 0-10 V OFF ON ON OFF OFF
0-20 mA 0-20 mA OFF ON OFF ON OFF
0-20 mA 4-20 mA OFF ON OFF ON ON
4-20 mA 0-10 V OFF ON ON OFF OFF
4-20 mA 0-20 mA OFF ON OFF ON OFF
4-20 mA 4-20 mA OFF ON OFF ON ON
K1 / K2
Signal
trans-
ducer
0-10 V 0-10 V ON OFF ON OFF OFF
0-10 V 0-20 mA ON OFF OFF ON OFF
0-10 V 4-20 mA ON OFF OFF ON ON
Feed-
back
Fig. 8: Plug-in
jumper K3
OFF
Plug-in jumper K1Plug-in jumper K2Plug-in
A B A B
Fig. 9: Plug-in
jumper K3
ON
jumper
K3
8.7 Parameterization steps
Specify direction of rotation of the shut-off valve
Normal direction of rotation (preset)
→ Press <OPEN> push-button and switch on
the card (hold down push-button).
G
The GREEN LED lights up.
→ Release <OPEN> push-button and dis-
connect the card from the power supply.
Reverse direction of rotation
→ Press <CLOSE> push-button and switch on
the card (hold down push-button).
R
The RED LED lights up.
→ Release <CLOSE> push-button and dis-
connect the card from the power supply.
Specify control signal type
Control signal when voltage 0 – 10 V
→ Press <MEM> push-button and switch on the
card (hold down push-button).
R
The RED LED lights up 3x.
→ Release <MEM> push-button and disconnect
the card from the power supply.
14
english
Page 15

Type 3003
Installation
Control signal when current 0 – 20 mA
→ Press <MEM> and <OPEN> push-
button and switch on the card (hold
down push-button).
R
Control signal when current 4 – 20 mA (preset)
The RED LED lights up 3x.
→ Release <MEM> and <OPEN> push-
button and disconnect the card from
the power supply.
→ Press <MEM> and <CLOSE> push-
button and switch on the card (hold
down push-button).
The RED LED lights up 3x.
R
→ Release <MEM> and <CLOSE>
push-button and disconnect the card
from the power supply.
Learning mode
Specify end positions
G R
R
R
G
R
→ Press <OPEN> and <CLOSE>
push-button and switch on the card
(hold down push-button). The RED
and the GREEN LEDs light up.
→ Release <OPEN> and <CLOSE>
push-button.
Both LEDs go out.
Learning mode is selected.
→ Press <CLOSE> push-button to
move the shut-off valve into the
closed position.
The RED LED lights up.
→ Press <MEM> and <CLOSE> push-
button to save the closed position.
The RED LED lights up 2x.
→ Press <OPEN> push-button to
move the shut-off valve into the open
position.
The GREEN LED lights up.
→ Press <MEM> and <OPEN> push-
button to save the open position.
The GREEN LED lights up 2x.
english
15
Page 16

Type 3003
Rotary actuators with integrated emergency reset
Specify end positions
All positions are now saved.
→ Disconnect the card from the power
supply.
8.8 Normal operation
Display normal operation
→ Switch on card.
G
G
R
G
G R
The GREEN LED lights up 3x to indicate that the
start process has been implemented correctly.
In normal operation the GREEN LED lights up
when the rotary actuator opens the shut-off valve.
The RED LED lights up when the rotary actuator
closes the shut-off valve.
If neither of the LEDs is lit, the actuator is not
R
actuated.
The RED and the GREEN LEDs light up if the
torque is too high and the rotary actuator stops.
→ Change direction of rotation of the rotary
actuator or switch over the voltage OPEN/
CLOSED to restart the rotary actuator!
9 ROTARY ACTUATORS WITH
INTEGRATED EMERGENCY RESET
9.1 Technical data
Voltage 18 V DC
Currant nominal 0.8 A
Max. current 2.4 A
Charging time max. 14 h
Feedback relay for charge state 24 V DC - 1 A max
Permitted ambient temperature -10 °C - +40 °C
9.2 Electric wiring
Battery block
Wire colour
F+
red
Wire colour
E-
black
Load state
feedback
Actuator
wiring
Suggestet customer
wiring
KM1 - Customer
contactor switch
On / Off Mode
F+
E-
65
66
Fig. 10: Electric wiring
Safety block
Loaded battery: closed
contact
24 V
AC/DC
N
Total security mode
17
18
Control and power
supply card
17
100V-240V 50/60 Hz
(100V-350V DC)
18
15V-30V 50/60 Hz
(12V-48V DC)
B
1 2 3 1 2 3
N
A1
Open
KM1
A2
Ph
B
D1
D2
A
Open
N
Ph
A
16
english
Page 17

Type 3003
Rotary actuators with integrated emergency reset
Configuration A or B
A-standard mode: If the actuator is controlled with a programmable
controller, the feedback of the charge state can be connected to it.
B-mode - increased safety (if the feedback relay is used, terminals
65 and 66): The actuator does not actuate the valve unless the safety
block is loaded.
9.3 Circuit board
D
B
C
Fig. 11: Diagram: Circuit board
E
A
A 18 V DC connection D Green LED*
B Battery block connection E Red LED **
C Connection for feedback
(charge state)
Description of the LED:
Green
LED
Off Blinks
Red
LED
Description
Battery off or out of service
/ Off /
Blinks
On Blinks Battery loading cycle in progress
(max. 14 h)
On Off Battery loading cycle finished
Blinks
rapidly
Off Blinks
Off Actuator electrical supply during 3 min.
(failure mode)
Microcontroller failure
rapidly
english
17
Page 18

Type 3003
Operating
10 OPERATING
10.1 Safety information
DANGER!
Hazard due to electrical voltage!
Intervention in the device poses an acute risk of injury.
▶ Turn off the power before manually servicing the rotary actuator.
WARNING!
Hazard due to improper servicing!
Improper servicing can result in personal injury and in damage to
the device and its surroundings.
▶ The operating personnel must be aware of and fully understand
the operating instructions.
▶ Pay attention in particular to the safety information and the
intended use.
▶ The device may only be serviced by properly trained personnel.
Hazardous situation due to manual intervention!
During manual intervention the process can change into an undefined state which can lead to hazardous situations.
▶ Ensure a defined and controlled restarting of the process fol-
lowing manual intervention!
10.2 Manual operation of the rotary actuator
The rotary actuator can be operated manually if there is a power failure.
To do this, the hand wheel must be turned to „MAN“ (see “Fig. 12”).
Procedure:
→ During manual operation ensure that the rotary actuator is not
activated in automatic mode.
→ Remove the position indicator from the axle.
→ Turn the hand wheel from “AUTO” to “MAN”.
→ Using a wrench, turn the actuator shaft into the required position.
In doing so, hold the hand wheel.
Hand wheel
For manual operation turn
the mark downwards
Fig. 12: Switching the rotary actuator from automatic to manual operation
Position indicator
Wrench
18
english
Page 19

Type 3003
Transport, Storage, Disposal
10.3 Returning from manual to automatic
operation
Returning to automatic operation:
→ Let go off the hand wheel to switch back into automatic operation.
The spring force automatically resets it to the „AUTO“ position.
→ Replace the position indicator.
The marking should now show the set position.
11 TRANSPORT, STORAGE, DISPOSAL
NOTE!
Transport damages!
Inadequately protected equipment may be damaged during transport.
• During transportation protect the device against wet and dirt in
shock-resistant packaging.
• Avoid exceeding or dropping below the permitted storage
temperature.
Incorrect storage may damage the device!
• Store the device in a dry and dust-free location!
• Storage temperature: -10 … +55 °C.
Damage to the environment caused by device components
contaminated with media!
• Observe applicable regulations on disposal and the environment!
• Observe national waste disposal regulations.
english
19
Page 20

www.burkert.com
 Loading...