

Page 1
QUICK REFERENCE GUIDE FOR OPERATION AND MAINTENANCE
MODEL:
BUNN ULTRA 2
EQUIPMENT SETUP GUIDE
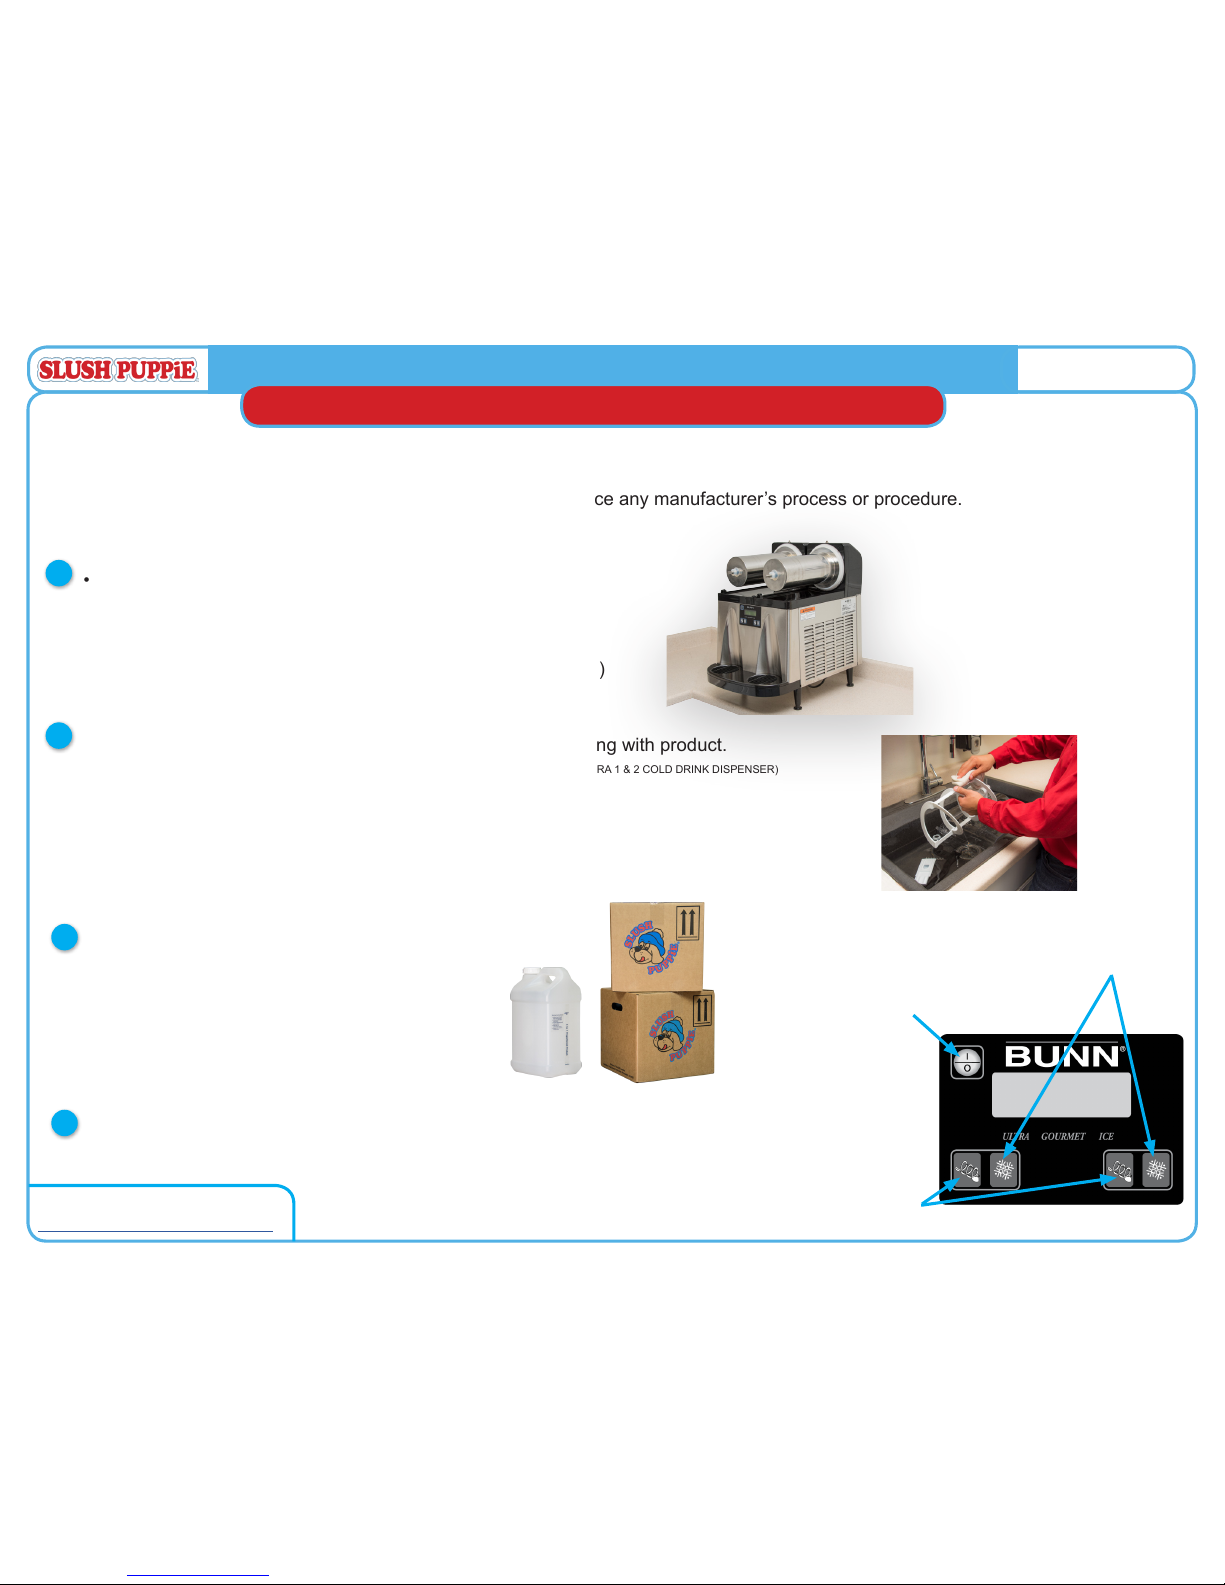
• Unbox Bunn Ultra2 and place on counter top.
• Ensure 6” of space around machine for ventilation.
• Plug into dedicated 110v circuit.
• Do not use an extension cord.
(See “Initial Setup” of the BUNN Installation & Operating Guide)
1
2
3
4
Rinse and sanitize hoppers and hopper components prior to lling with product.
(See Steps 11 - 13 of the “Disassembly & Cleaning” section of the “USE & CARE INSTRUCTIONS FOR ULTRA 1 & 2 COLD DRINK DISPENSER)
Follow the provided “ASSEMBLY” section of the “USE & CARE INSTRUCTIONS FOR ULTRA
1 & 2 COLD DRINK DISPENSER” to complete the dispenser installation.
Add 5 parts water 1 one part concentrate to mixing jug.
Shake and pour into Hopper (s).
Power on Bunn Ultra. Press Auger button to activate auger. Press temperature button and set to “ICE”
Read and follow the BUNN ULTRA Installation & Operating Guide included with your kit.
This Equipment Setup Guide is not intended to replace any manufacturer’s process or procedure.
POWER
AUGER
TEMPERATURE
The ICEE Company, Ontario, CA 91761
92801932_SP_IQRG_BUNN
CUSTOMER SERVICE: 1-800-423-3872
For more Setup help, click or go to:
http://slushpuppie.com/store/kit-setup/
Page 2
QUICK REFERENCE GUIDE FOR OPERATION AND MAINTENANCE
MODEL:
BUNN ULTRA 2
SIGNAGE SETUP GUIDE
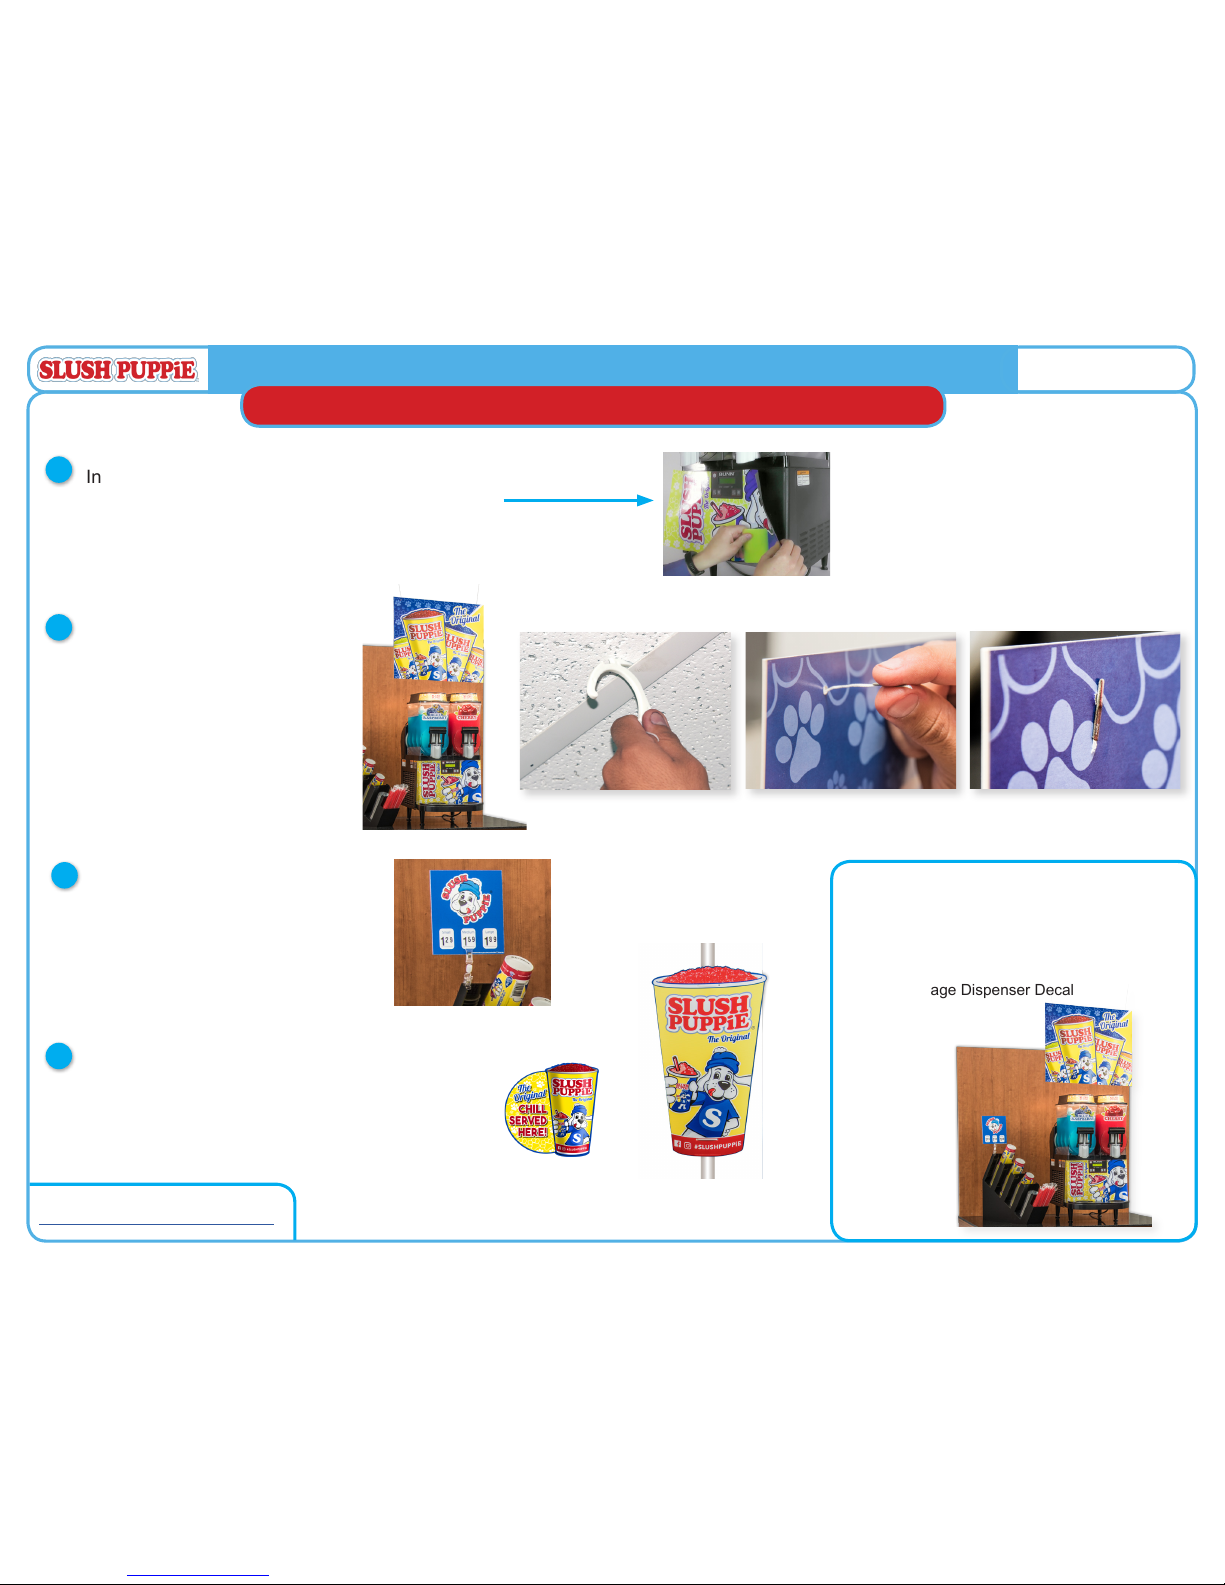
Install the SLUSH PUPPiE graphic to the BUNN ULTRA.
Click the image to watch the instructional video.
(Your BUNN ULTRA may already have the SLUSH PUPPiE decal applied.)
1
2
3
4
Hang the SLUSH PUPPiE Mobile
above the dispenser
using the provide C-Clips.
• Apply pricing to the Pricing Easel.
(We recommend: $1.19 12oz, $1.59 16oz and $1.99 24oz)
• Attach Pricing Easel to Cup
Dispenser with 2 sided clip.
When complete, your SLUSH PUPPiE
program should include:
• Hanging Mobile Sign
• Cup Dispenser
• Pricing Sign
• Beverage Dispenser Decal
Apply 2 sided Window Sign to window and Pole Cup
Sign to outside pole using zip ties to advertise your
SLUSH PUPPiE program and encourage customer
impulse purchases.
(Pole Cup Sign may not be included in some kits.)
Window Decal
Pole Cup SIgn
The ICEE Company, Ontario, CA 91761
92801932_SP_IQRG_BUNN
CUSTOMER SERVICE: 1-800-423-3872
For more help, click or go to:
http://slushpuppie.com/store/kit-setup/
Page 3

QUICK REFERENCE GUIDE FOR OPERATION AND MAINTENANCE
MODEL:
BUNN ULTRA 2
BASIC OPERATIONS and SETTINGS
Pour pre-mixed
product into hopper
and install lids.
Press the ON / OFF
button to power unit on.
Press the AUGER
button to activate the
auger.
Press and release the
TEMPERATURE button
to cycle through options
and set to “ICE”.
1
2
2
1
3 3
4 4
4
3
Press ULTRA (-) to decrease the current YEAR value.
Press ICE (+) to increase the current YEAR value.
Press GOURMET (NEXT) to move forward to MONTH,
DAY, HOUR, MINUTE and SECOND screens.
Press the I|O button (BACK) to move to the previous
screen if needed.
Press the Ultra button to decrease
the current value.
Press the ICE button to increase
the current value.
Press the GOURMET button to
proceed to the next screen.
Press ICE (YES) to set the date and time.
Press and hold the GOURMET button for
5 secs. When the screen reads : “Cleaning
Guide?” Press and release the gourmet
button to advance through screens until you
reach “SET DATE TIME?”
Press and hold the GOURMET button for
5 secs. When the screen reads : “Cleaning
Guide?” Press and release the gourmet
button to advance through screens until you
reach “SET NIGHT TIME”
Use the GOURMET
button to move
to the NEXT screen.
DATE AND TIME:
NIGHT AND DAY TIME:
SET DATE TIME?
NO YES
YEAR 2017
(-) NEXT (+)
SET NIGHT TIME
(-) OFF (+)
SET DAY TIME
(-) OFF (+)
The setting of the Day/Night mode allows the dispenser to “power down” during off hours. The bottom corners displaying “ICE” will change to “CHILL” during the night mode. During night
mode, the product will be kept chilled below 35°F. “ICE” reading will return after night mode elapses. With “OFF” representing 12:00 AM, the operator can scroll to the times desired for the
night time mode to begin and end.
The ICEE Company, Ontario, CA 91761
92801932_SP_IQRG_BUNN
CUSTOMER SERVICE: 1-800-423-3872
For more help, click or go to:
http://slushpuppie.com/store/maintenance/
Page 4

QUICK REFERENCE GUIDE FOR OPERATION AND MAINTENANCE
1
5
8
2
6
9
3
7
4
MODEL:
BUNN ULTRA 2
10
CLEANING
11
12
This guide is for quick reference only and is not intended to replace the information in the Operation Manual or Local Health Regulations!
TURN COOLING TO OFF SELECTION. EMPTY ALL PRODUCT FROM HOPPER(S). TURN AUGER TO OFF SELECTION.
Unplug the hopper
lamp cord(s) and
remove the hopper
lid(s).
Depress the
hopper lock
plunger, lift slightly.
Pull the hopper
assembly forward
and remove.
Pull the auger from
the cooling drum.
Remove the
hopper seal from
the ange on the
cooling drum.
CAUTION: Faucet valve
is under spring tension.
Spread one side of the
handle rst, then the
other and disconnect from
hopper.
Carefully slide
valve up to remove
spring and faucet
seal. Extra care
should be taken
when handling the
seal to prevent
damage.
Remove the auger
nose bushing from
inside the front of the
hopper. NOTE: Do not
scratch this surface
when cleaning. Deep
scratches could cause
leakage around the
seal.
Place all parts in a clean sink with mild hot water (120°F) and sanitizer solution.
Allow all parts to soak for at least 5 minutes. Carefully wash all components
with a clean wash cloth in the hot water and sanitizer solution. Use a clean,
soft bristle brush as needed for the smaller components and tight areas. Do
not immerse hop-per lids. Use a commercial sanitizer that has 100 ppm of
available chlorine with a concentration level of at least 3% available chlorine
(KAY-5 Sanitizer). Follow the sanitizer’s mixing instructions to ensure 100 ppm of
available chlorine.
9. Remove the drip
tray and cover.
Wash the drum(s), hopper drip tray(s), top cover(s), and outer enclosure
using a clean wash cloth that has been dampened in the hot water and
sanitizer solution. Pay particular attention to the shaft area and make sure it is
thoroughly cleaned and sanitized.
Thoroughly rinse all surfaces with a clean wash cloth that has been dampened
with hot water. Wipe dry with a clean dry wash cloth before reassembling the
dispenser.
NOTE – Although most parts are dishwasher safe, they may be affected by the chemicals in some commercial sanitizing agents. Do not place the hopper nor hopper
lids in a dishwasher. Rinse thoroughly before assembly.
The ICEE Company, Ontario, CA 91761
92801932_SP_IQRG_BUNN
CUSTOMER SERVICE: 1-800-423-3872
For more help, click or go to:
http://slushpuppie.com/store/maintenance/
Page 5

QUICK REFERENCE GUIDE FOR OPERATION AND MAINTENANCE
MODEL:
BUNN ULTRA 2
ASSEMBLY
8
9
11
12
1
2 3 4
5
6
7
10
Replace the auger nose
bushing inside the front of
the hopper.
Install the hopper seal over
the ange at the rear of the
cooling drum as shown.
Align the auger shafts
with the augers. Push the
augers as far as they will
go and rotate them so the
at face of the auger shaft
is aligned with the at face
of the auger nose.
Install the hopper over the
auger and cooling drum and
slide it into place. Push down
until the hopper lock plunger
snaps into place.
Set the hopper lid on the
hop-per with lamp cord at the
back.
Plug in the hopper lid lamp
cord.
Position the faucet seal and
the return spring in the faucet
valve.
Slide the faucet valve
assembly into place on the
hopper.
Turn ON augers and cooling function to desired settings.
All product must be thoroughly mixed BEFORE adding it
to the hoppers.
Press down on the valve to
compress the spring. Position
the faucet handle over the
faucet valve one side at a
time and snap into place on
the hopper.
Install the drip tray and cover.
The ICEE Company, Ontario, CA 91761
92801932_SP_IQRG_BUNN
CUSTOMER SERVICE: 1-800-423-3872
For more help, click or go to:
http://slushpuppie.com/store/maintenance/
Page 6

PROBLEM REASON SOLUTION NOTES
Lid lights ash on and off Beverage levels low Rell beverage hopper with premixed product
Product not freezing
Ambient temperature too high
Be sure there is a minimum of 6 inches of air space at the
top, back and sides of the dispenser.
Maximum ambient temperatures not to
exceed 90 degrees
Temperature setting set to “Off”
or “Chill”
Set temperature setting to “ICE”
Consistency set too low
Set the Consistency setting to a higher value. See
SETTINGS portion of this guide.
Default value is 10
Possible range (01 - 16)
Insufcient power to
compressor
Be sure the power receptacle is properly rated for your
dispenser.
Dirty Filter
1. Remove lter from back of unit.
2. Soak lter in hot soapy water.
3. Rinse, Dry and Replace lter.
Faucet Leakage
Faucet seal misaligned or
damaged or misaligned
• Follow the recommended cleaning guide to remove
and inspect the faucet seal.
• If the faucet seal was misaligned, realign the seal,
reassemble and recheck for leaks.
• If damaged - call for service.
DO NOT LUBRICATE the faucet seal
Product leaking below the hopper
Rear drum seal misaligned or
damaged.
• Follow the recommended cleaning guide to remove
and inspect the rear drum seal.
• If the drum seal was misaligned, realign the seal,
reassemble and recheck for leaks.
• If damaged - call for service.
The tapered end of the seal must face to the
front of the dispenser
DISPLAY MESSAGE:
“FILTER CLEANING REQUIRED”
Preventive Maintenance
Reminder
1. Remove lter from back of unit.
2. Soak lter in hot soapy water.
3. Rinse, Dry and Replace lter.
4. Hold ULTRA button for 3 seconds to reset message
Dirty Filter
Insufcient air ow
DISPLAY MESSAGE:
*
SENSOR ERROR
VARIOUS
All display messages containing:
“SENSOR ERROR” require a call for service.
All sensor errors should be evaluated and
repaired by a qualied service technician.
QUICK REFERENCE GUIDE FOR OPERATION AND MAINTENANCE
MODEL:
BUNN ULTRA 2
TROUBLE SHOOTING GUIDE
Before you call for service...
The ICEE Company, Ontario, CA 91761
92801932_SP_IQRG_BUNN
CUSTOMER SERVICE: 1-800-423-3872
For more help, click or go to:
http://slushpuppie.com/store/maintenance/
 Loading...