

Bunn Gourmet Ice Use & Care Manual
BUNN
®
Gourmet Ice
Gourmet Ice USE & CARE
28615.0000B 2/00 © 1998 Bunn-O-Matic Corporation
NOTICE – This guide is for quick reference only and is not intended to replace the information in the Operating & Service Manual!
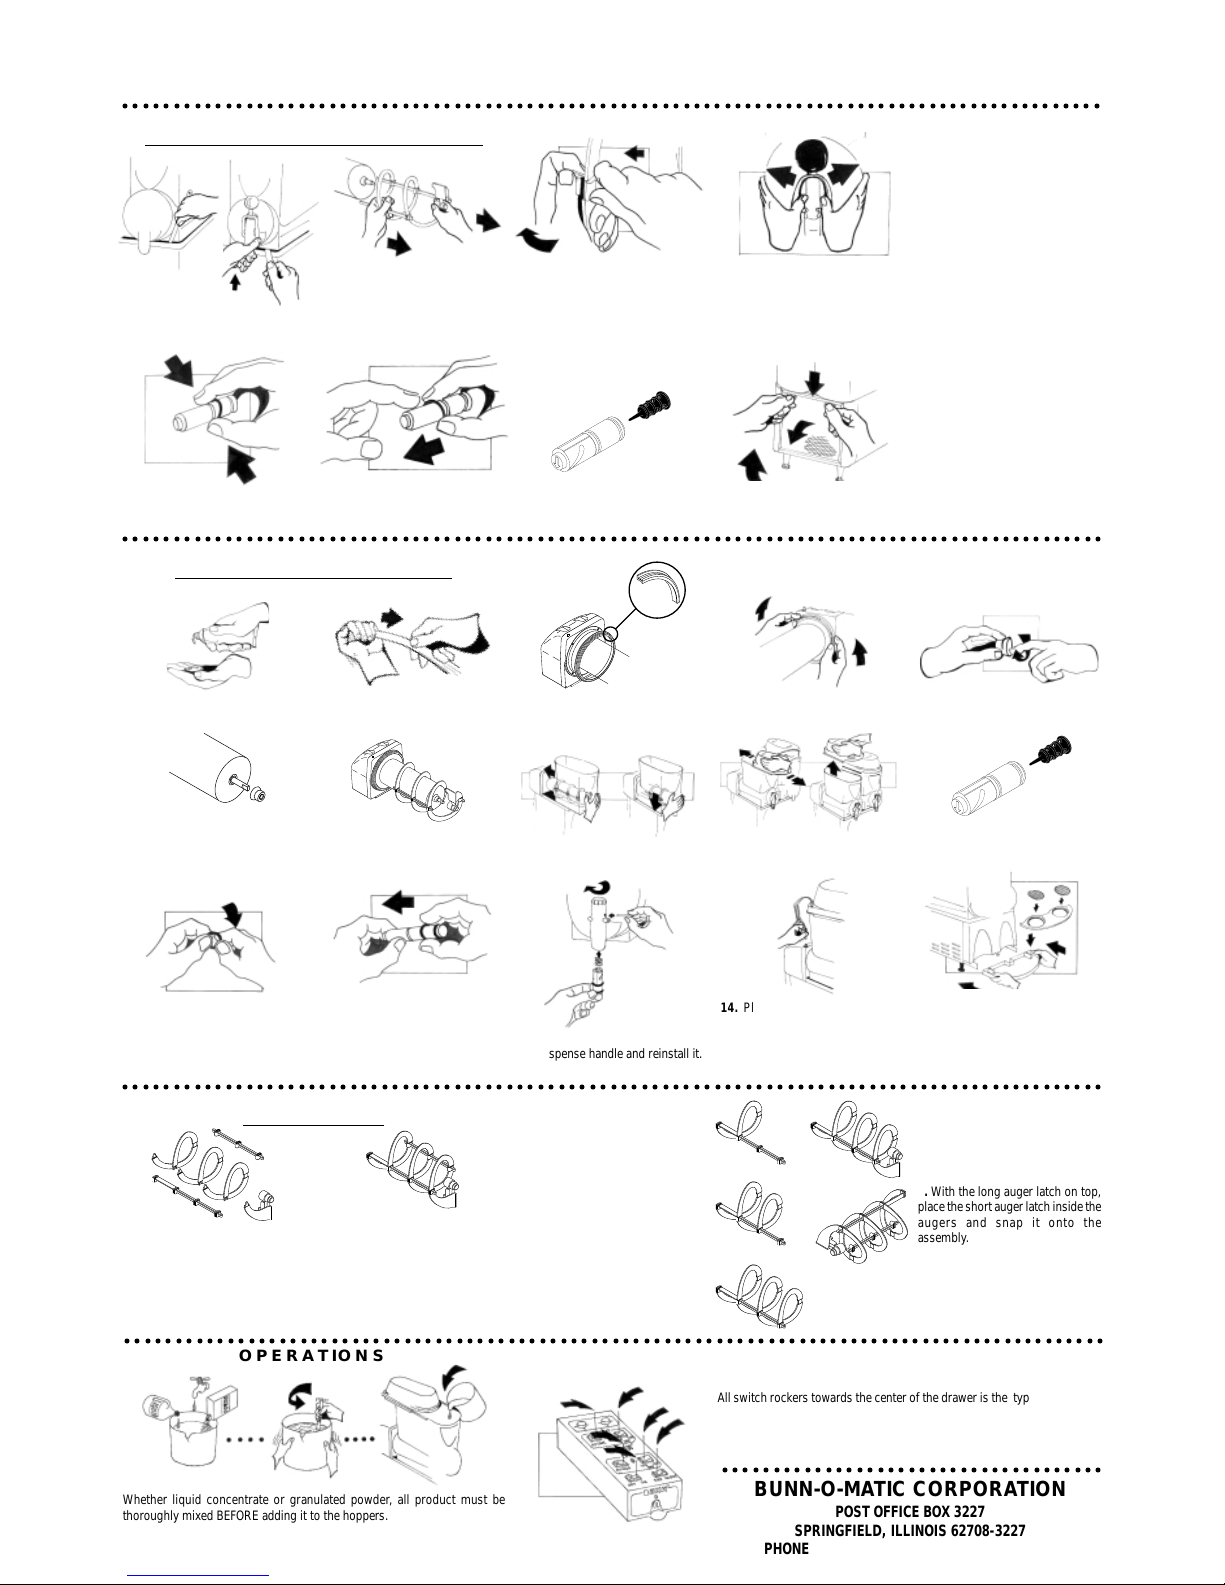
6. Squeeze the O-rings to free them
from the grooves in the faucet spool.
NOTE - Wash all parts, the air filter,
and the hoppers by hand! The use
of automatic dishwasher chemicals
may damage the plastic. Do not
immerse the hopper lid
assemblies. Rinse thoroughly
before lubrication & assembly.
DISASSEMBLY & CLEANING
Empty all product from the hoppers before proceeding!
2. Pull the auger from the cooling
drum.
3. Disassemble the auger for
cleaning by spreading apart the
latches and removing each piece.
4. Spread the sides of the dispense
handle and pull it off to remove the
faucet pieces.
5. Push the metal pin out through the
faucet. Unscrew the plastic cap, and
push the faucet spool and spring out
the bottom.
LUBRICATION & ASSEMBLY
Lubricate after cleaning & before reassembly.
(Refer to product literature for Bunn approved lubricant.)
1. Squeeze some lubricant into hand.
6. Install the seal on the auger shaft.
7. Roll the O-rings off of the faucet
spool.
8. Remove the black plug from the
faucet spool for cleaning. Do not use
tools to remove this.
2. Apply a thin film of lubricant to the
cooling drum seal.
3. Install the seal over the flange at
the rear of the cooling drum as
shown.
4. Press the seal firmly into place.
12. Slide the O-rings onto the spool.
7. Align the auger shaft with the flat
fin of the auger. Push the auger as
far as it will go and rotate it so the
flat fin is pointing up.
8. Install the hopper over the cooling
drum with auger. Slide it into place
and push it down as far as it will go.
○○○○○○○○○○○○○○○○○○○○○○○○○○○○○○○○○○○○○○○○○○○○○○○○○○○○○○○○○○○○○○○○○○○○○○○○○○○○○○○○○○○○○○○○○○○○○○○
○○○○○○○○○○○○○○○○○○○○○○○○○○○○○○○○○○○○○○○○○○○○○○○○○○○○○○○○○○○○○○○○○○○○○○○○○○○○○○○○○○○○○○○○○○○○○○○
Whether liquid concentrate or granulated powder, all product must be
thoroughly mixed BEFORE adding it to the hoppers.
OPERATIONS
All switch rockers towards the center of the drawer is the typical operating
position for an ice product in each hopper.
At night, simply place the DAY/NIGHT switch in the night position
AUGER ASSEMBLY
(For early augers only.)
There are six pieces that snap together to make up the auger assembly.
They should be taken apart for cleaning and then reassembled for use.
BE CAREFUL, DON’T GET PINCHED!
○○○○○○○○○○○○○○○○○○○○○○○○○○○○○○○○○○○○○○○○○○○○○○○○○○○○○○○○○○○○○○○○○○○○○○○○○○○○○○○○○○○○○○○○○○○○○○○
○○○○○○○○○○○○○○○○○○○○○○○○○○○○○○○○○○○○○○○○○○○○○○○○○○○○○○○○○○○○○○○○○○○○○○○○○○○○○○○○○○○○○○○○○○○○○○○
1. Snap one of the auger sections to
the long auger latch.
2. Snap another auger section in
place.
3. Snap the third auger section in
place.
4. Snap the auger nose onto the last
section installed.
5. With the long auger latch on top,
place the short auger latch inside the
augers and snap it onto the
assembly.
BUNN-O-MATIC CORPORATION
POST OFFICE BOX 3227
SPRINGFIELD, ILLINOIS 62708-3227
PHONE: (217) 529-6601 FAX: (217) 529-6644
○○○○○○○○○○○○○○○○○○○○○○○○○○○○○○○○○○○○○
1. Lift the hopper up
slightly, then use a hard
plastic utensil to pry it up. Pull
forward to remove.
5. Apply a thin film of lubricant to
the inside of the auger shaft seal.
9. Set the lid on the hopper. Slides
front-to-back or lifts off for filling.
11. Apply a thin film of lubricant to
the faucet spool O-rings.
13. Reinstall
the plastic cap,
spring, spool, and metal pin. Spread
the dispense handle and reinstall it.
14. Plug-in the hopper lid lamp
cable.
9. Pull down, then out on the air filter
at the rear of the dispenser.
10. Reinstall the black plug into the
faucet spool. Do not lubricate the
plug.
15. Assemble the drip tray.
16. Reinstall the air filter.
USO Y CUIDADO DEL BUNN
®
Gourmet Ice
Gourmet Ice
© 2000 Bunn-O-Matic Corporation
Aviso - ¡Esta guía solamente se debe usar como una referencia breve y no para reemplazar la información del Manual de operación y servicio!
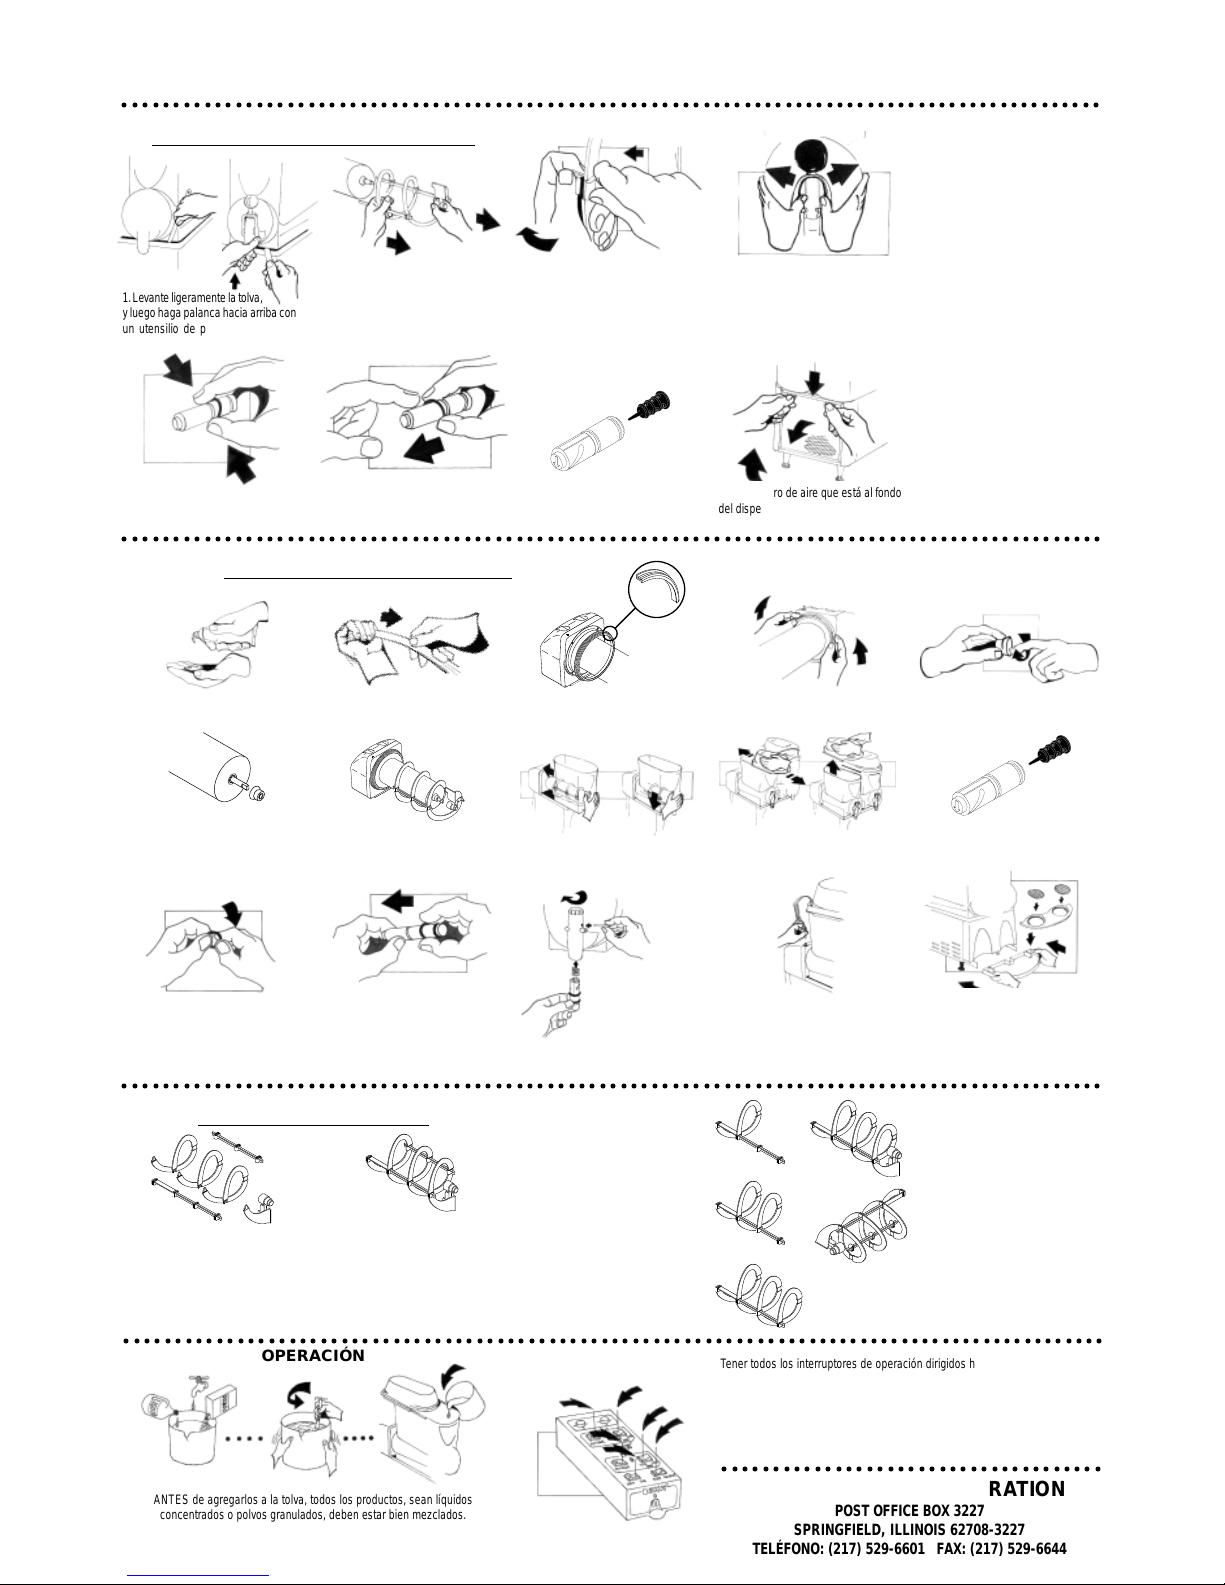
6. Apriete los anillos en "O" (juntas
tóricas) para desprenderlos de las
ranuras del carrete del grifo.
NOTA - Lave a mano todas las piezas,
el filtro de aire y las tolvas. Si usa los
detergentes químicos de la lavadora de
vajilla se puede dañar el plástico. No
sumerja las partes de la tapa de las
tolvas. Enjuague todo bien antes de
lubricar y ensamblar las piezas.
DESMONTAJE Y LIMPIEZA
¡Antes de proceder, vacíe todos los productos de la tolva!
2. Saque el espiral del tambor de
enfriamiento.
3. Desarme el espiral para limpiarlo,
para lo cual, abra los cerrojos y saque
las piezas
4. Separe los costados del asa del
dispensador y jálela para sacarla a fin
de poder retirar las piezas del grifo.
5. Empuje el pasador a través del grif o,
destornille la cubierta de plástico y
mueva el carrete y resorte del grifo para
que salgan por abajo.
LUBRICACIÓN Y ENSAMBLADO
Lubrique después de limpiar y antes de ensamblar.
(Consulte la literatura del producto para ver los lubricantes aprobados por Bunn).
1. Póngase un poco de lubricante en la
mano.
6. Instale el sello en el eje del espiral.
7. Ruede los anillos en "O" (juntas
tóricas) y sáquelos del carrete del grifo.
8. Remuev a el tapón negro del grifo para
su limpieza.
No utilice herramientas
para sacar el tapón.
2. Aplique una capa fina de lubricante
al sello del tambor de enfriamiento.
3. Instale el sello sobre el reborde que
está en la parte posterior del tambor de
enfriamiento, como se muestra.
4. Presione firmemente el sello en su
sitio.
11. Aplique una capa fina de lubricante
a las ranuras para los anillos en "O"
(juntas tóricas) que hay en el carrete
del grifo.
7. Alinee el eje del espiral con la aleta
plana del espiral. Empuje el espiral tanto
como se pueda y gírelo para que la aleta
plana quede hacia arriba.
8. Instale la tolva sobre el tambor de
enfriamiento con el espiral. Deslícelo
para que quede en su sitio y presiónelo
hacia abajo hasta donde se pueda.
○○○○○○○○○○○○○○○○○○○○○○○○○○○○○○○○○○○○○○○○○○○○○○○○○○○○○○○○○○○○○○○○○○○○○○○○○○○○○○○○○○○○○○○○○○○○○○○
○○○○○○○○○○○○○○○○○○○○○○○○○○○○○○○○○○○○○○○○○○○○○○○○○○○○○○○○○○○○○○○○○○○○○○○○○○○○○○○○○○○○○○○○○○○○○○○
ANTES de agregarlos a la tolva, todos los productos, sean líquidos
concentrados o polvos granulados, deben estar bien mezclados.
OPERACIÓN
Tener todos los interruptores de operación dirigidos hacia el centro del panel de
control de la caja es la posición correcta de operación para obtener un producto
congelado en cada tolva.
Durante la noche, coloque simplemente el interruptor DAY/NIGHT (DÍA/NOCHE)
en la posición “night” (noche).
ENSAMBLADO DEL ESPIRAL
(Para espirales desarmables solamente.)
Hay seis piezas que encajan entre sí para formar el espiral
ensamblado. Se deben desarmar para limpiarlas y volver a
ensamblar para usarlas.
¡TENGA CUIDADO, NO SE VAYA A LASTIMAR!
○○○○○○○○○○○○○○○○○○○○○○○○○○○○○○○○○○○○○○○○○○○○○○○○○○○○○○○○○○○○○○○○○○○○○○○○○○○○○○○○○○○○○○○○○○○○○○○
○○○○○○○○○○○○○○○○○○○○○○○○○○○○○○○○○○○○○○○○○○○○○○○○○○○○○○○○○○○○○○○○○○○○○○○○○○○○○○○○○○○○○○○○○○○○○○○
1. Encaje una de las secciones del
espiral en el cerrojo largo del espiral.
2. Encaje otra sección del espiral en su
sitio.
3. Encaje la tercera sección del espiral
en su sitio.
BUNN-O-MATIC CORPORATION
POST OFFICE BOX 3227
SPRINGFIELD, ILLINOIS 62708-3227
TELÉFONO: (217) 529-6601 FAX: (217) 529-6644
○○○○○○○○○○○○○○○○○○○○○○○○○○○○○○○○○○○○○
1. Lev ante ligeramente la tolva,
y luego haga palanca hacia arriba con
un utensilio de plástico duro, y jálela
hacia adelante para sacarla.
5. Aplique una capa fina de lubricante
dentro del sello del eje del espiral.
9. Coloque la tapa sobre la tolva. Se
desliza de adelante hacia atrás ó se
levanta para llenar.
14. Enchufe el cable de la lámpara de
la cubierta de la tolva.
9. Jale el filtro de aire que está al f ondo
del dispensador, primero hacia abajo y
luego hacia fuera.
10. Inserte el tapón negro dentro del
grifo.
No lubrique el tapón.
12. Deslice los anillos en "O" (juntas
tóricas) para que queden en su sitio del
carrete.
13. Vuelva ai ns ta lar la
cubierta de plástico, el
resorte, el carrete y el
pasador metálico.
Separe el asa del dispensador y vuelva
a instalarla.
15. Ensamble la bandeja de goteo.
16. Vuelva a instalar el filtro de aire.
4. Encaje la nariz del espiral en la última
sección que haya instalado.
5. Con el cerrojo largo en la parte de
arriba, coloque el cerrojo corto dentro
del espiral y encájelo en el ensamblado.
 Loading...