

Page 1

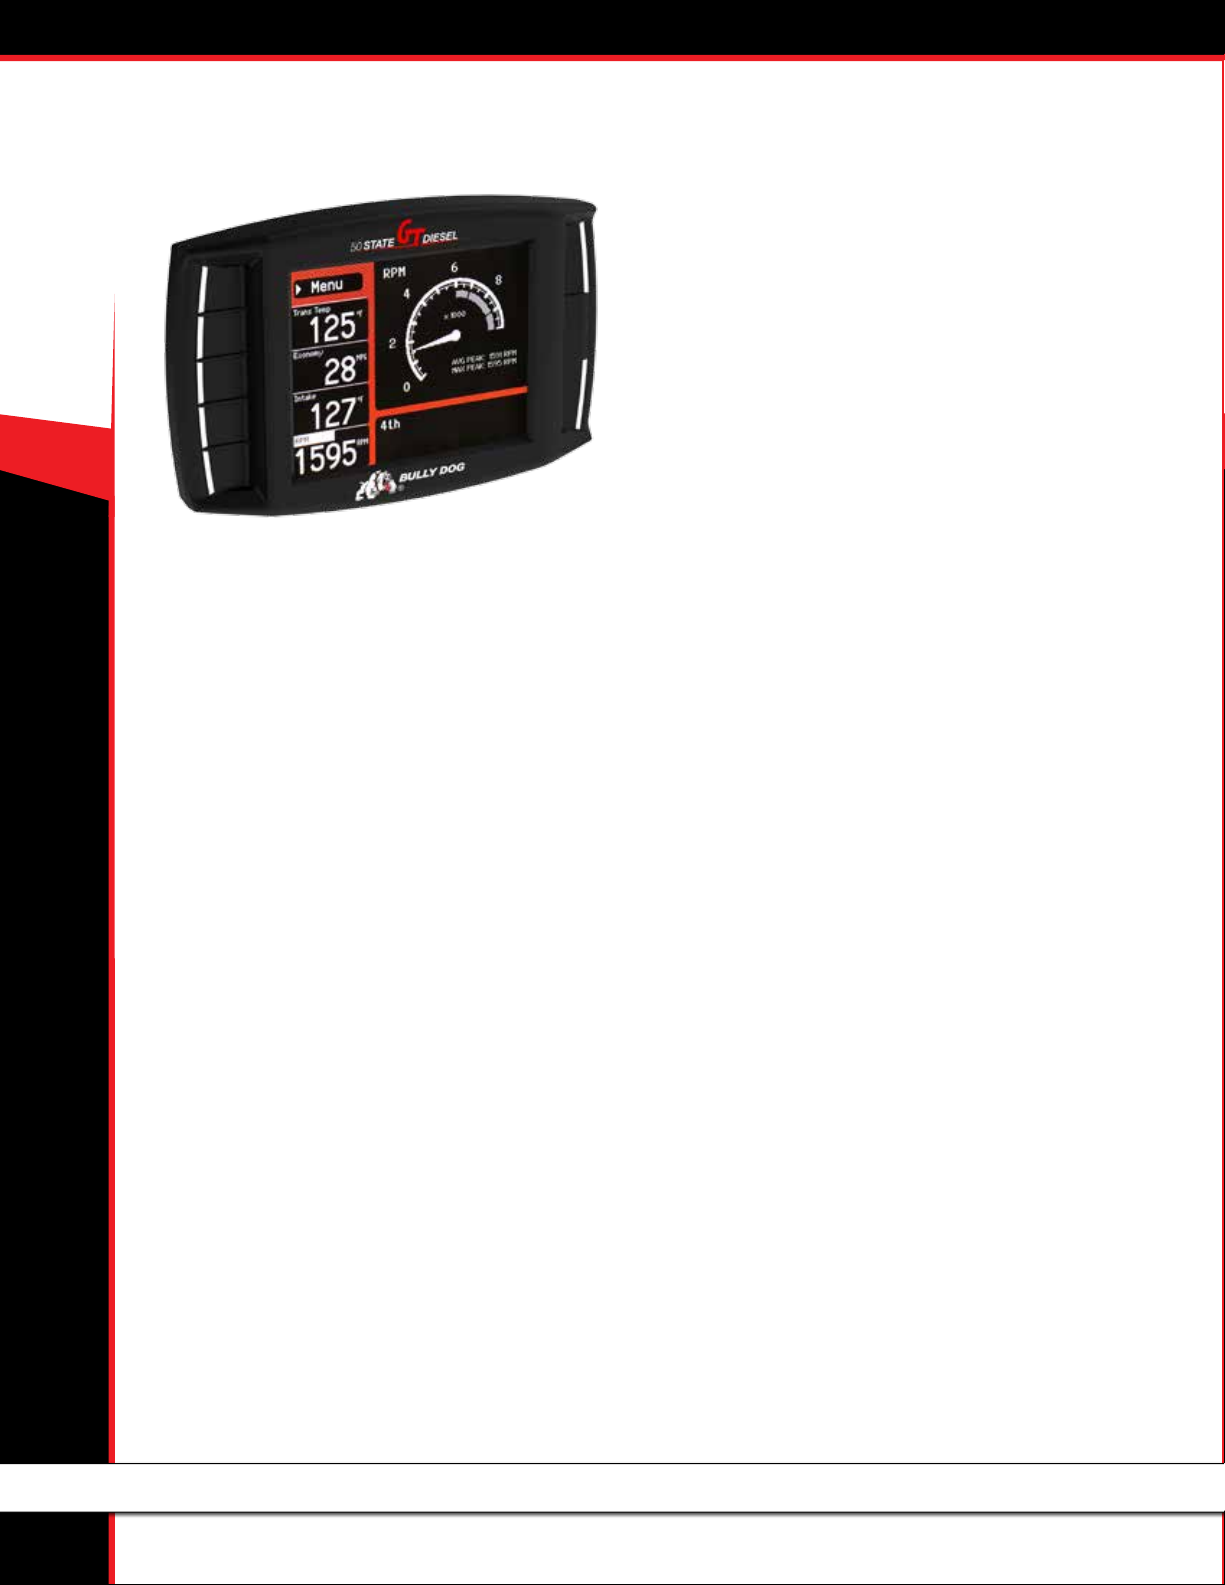
50 STATE GT DIESEL
Doc. 40425-99 v1.2
i
Page 2
50 STATE GT DIESEL
CONTENTS
About the GT ......................................................... 2-16
Preview of Basic Installation Steps .............................................2
Tuning Information .................................................................... 2
Vehicle Applications ...................................................................2
California Emissions Regulations ............................................... 2
Parts List .................................................................................... 3
Parts Description .................................................................... 4-5
Button Navigation .....................................................................6
The Main Screen.........................................................................7
Available Options – All Models .............................................8-15
Change Vehicle ..............................................................................................8
Install Download ...........................................................................................8
Gauge Setup .............................................................................................. 8-9
Performance Testing ....................................................................................10
Special Functions ........................................................................................10
Diagnostics ..................................................................................................10
Driving Coach Setup ..............................................................................11-13
Vehicle Setup ...............................................................................................14
User Options ................................................................................................14
Show Settings .............................................................................................15
Uninstall Download ....................................................................................15
Update Firmware .........................................................................................15
Special Functions..................................................15-16
Dodge ...................................................................................... 15
Vehicle Specific Download Features ............................16
Speed Limiter ..........................................................................16
Calibrate Speedometer ............................................................16
Important Warranty Information ...............................16
Updating the GT .................................................. 17-24
Overview .................................................................................17
FAQs about Updating ..................................................................................17
Basic Steps to Update (Short Version) ........................................................18
What You Need to Update the GT ...............................................................18
Updating (Detailed Steps for Windows) ..............................19-22
Troubleshooting Updating Problems ........................................ 23
Updating (Detailed Steps for Apple) ........................................24
Physical Installation ................................................. 25
Brief Preview ...........................................................................25
Detailed Instructions ...........................................................26-27
Using the Universal Windshield Mount .................................... 27
Additional GT Mounting Options ..............................................28
Installing the Tune ...............................................29-32
Important Preparation Steps...............................................29-30
How to Install the Tune ............................................................31
Troubleshooting Installation Problems ....................................32
Uninstalling - Returning to Stock ..........................33-35
What does this mean? .............................................................33
When to Return to Stock ..........................................................33
What if I Don’t Return to Stock? ............................................... 33
How to Return to Stock ............................................................34
How Do I Know if the GT is (Still) Installed? ..............................35
More Information .................................................36-47
Pyrometer Calibration ..............................................................36
Reset Fee .................................................................................36
Performance Testing Software ................................................. 36
Windows Update ................................................................37-43
Contacting Technical Suppor t ...................................................44
USB Mode ................................................................................ 44
FAQs/Troubleshooting .........................................................45-47
1
Page 3
ABOUT THE GT
Preview of Basic Installation Steps
1. Update the GT. This step is very important!!! See page 17 for more information.
2. Physically install the GT. See page 26 for more information.
3. Install the tune to your vehicle. See page 29 for more information.
IMPORTANT NOTE: You MUST uninstall your Bully Dog engine tune before taking your vehicle in for ANY type of service. There are also other important times to
uninstall the tune. Please see page 33 for more information.
See pages 3-5 for a complete list and description of the items included with your GT.
Tuning Information
The results we have provided are typical – variations do occur between vehicles. Some vehicles do not have the extreme power level
setting available or On-The-Fly horsepower adjustability.
50 STATE GT DIESEL
SETTING PEAK HORSEPOWER PEAK TORQUE
Extreme Up to 120+ Up to 250+
Performance 75+ 125+
Tow/Economy 50+ 100+
Stock Power Stock Stock
VEHICLE APPLICATIONS
This vehicle application list is current for GT software version 1.1.4.0. Check the GT product page at
www.bullydog.com to check for new applications.
DODGE
RAM
2007-2010 6.7L Cummins Ram Pickup Trucks Only
(EO# D-512-5)
California Emissions Regulations
The 50 State Diesel GT meets the requirements of CARB Executive Order (EO) listed in the application list. An EO identication label
is required to pass the Smog Check inspection.
2
Page 4
50 STATE GT DIESEL
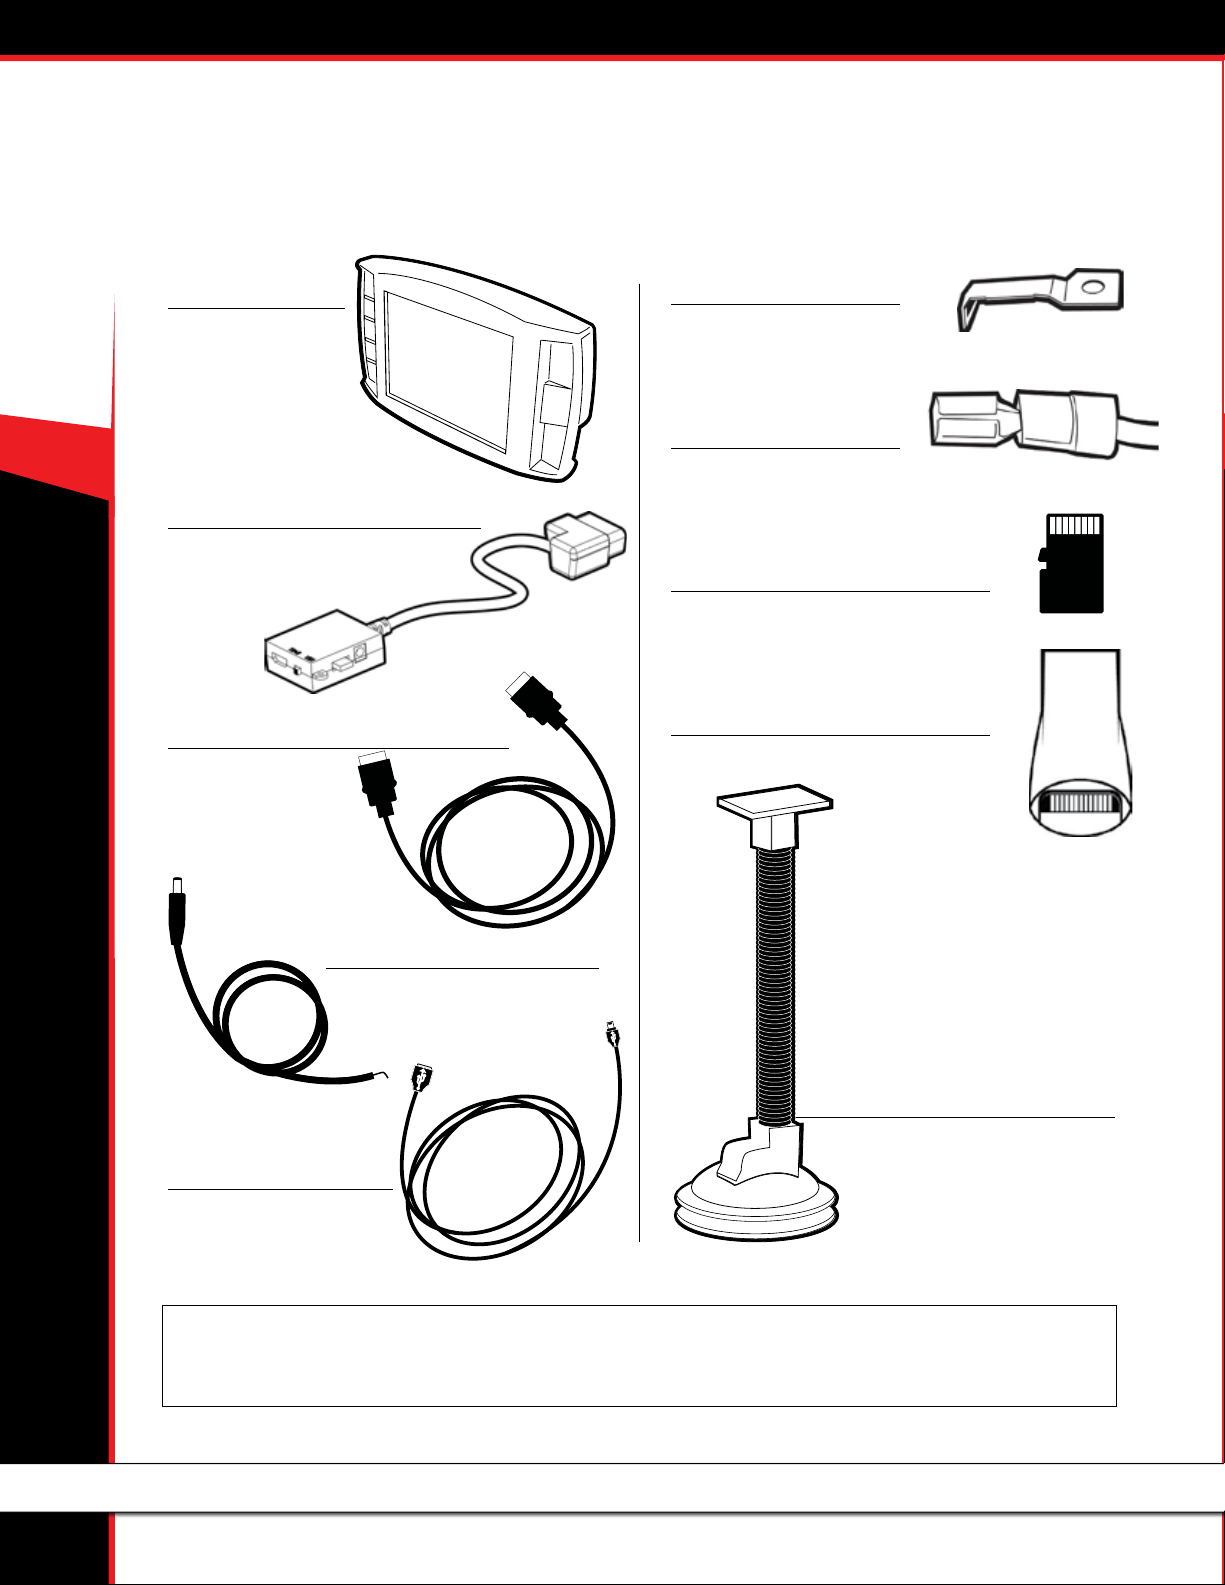
PARTS LIST
Your GT package should include the following items:
1. The GT Head Unit
Part Number: 40425-1
2. OBDII Adapter Plug
Part Number: 40400-105
3. HDMI Cable
Part Number: 40400-100
5. Fuse Tap
6. Fuse Spade
7. Micro SD Card
Part Number: 40410-10
8. Micro SD Card Reader
Part Number: 40410-10
4. Power Wire
Part Number: 40400-101
8. Windshield Mount
Part Number: 40400-102
4. Mini USB
Part Number: 40400-103
You may also want to have the items listed below available when you are installing the GT:
Tools Needed
• Fuse Puller
• Voltage Meter (optional)
3
• Alternative Mounting Solution (See page 28 for more information.)
Extra Parts (Optional)
• Battery Charger
Page 5
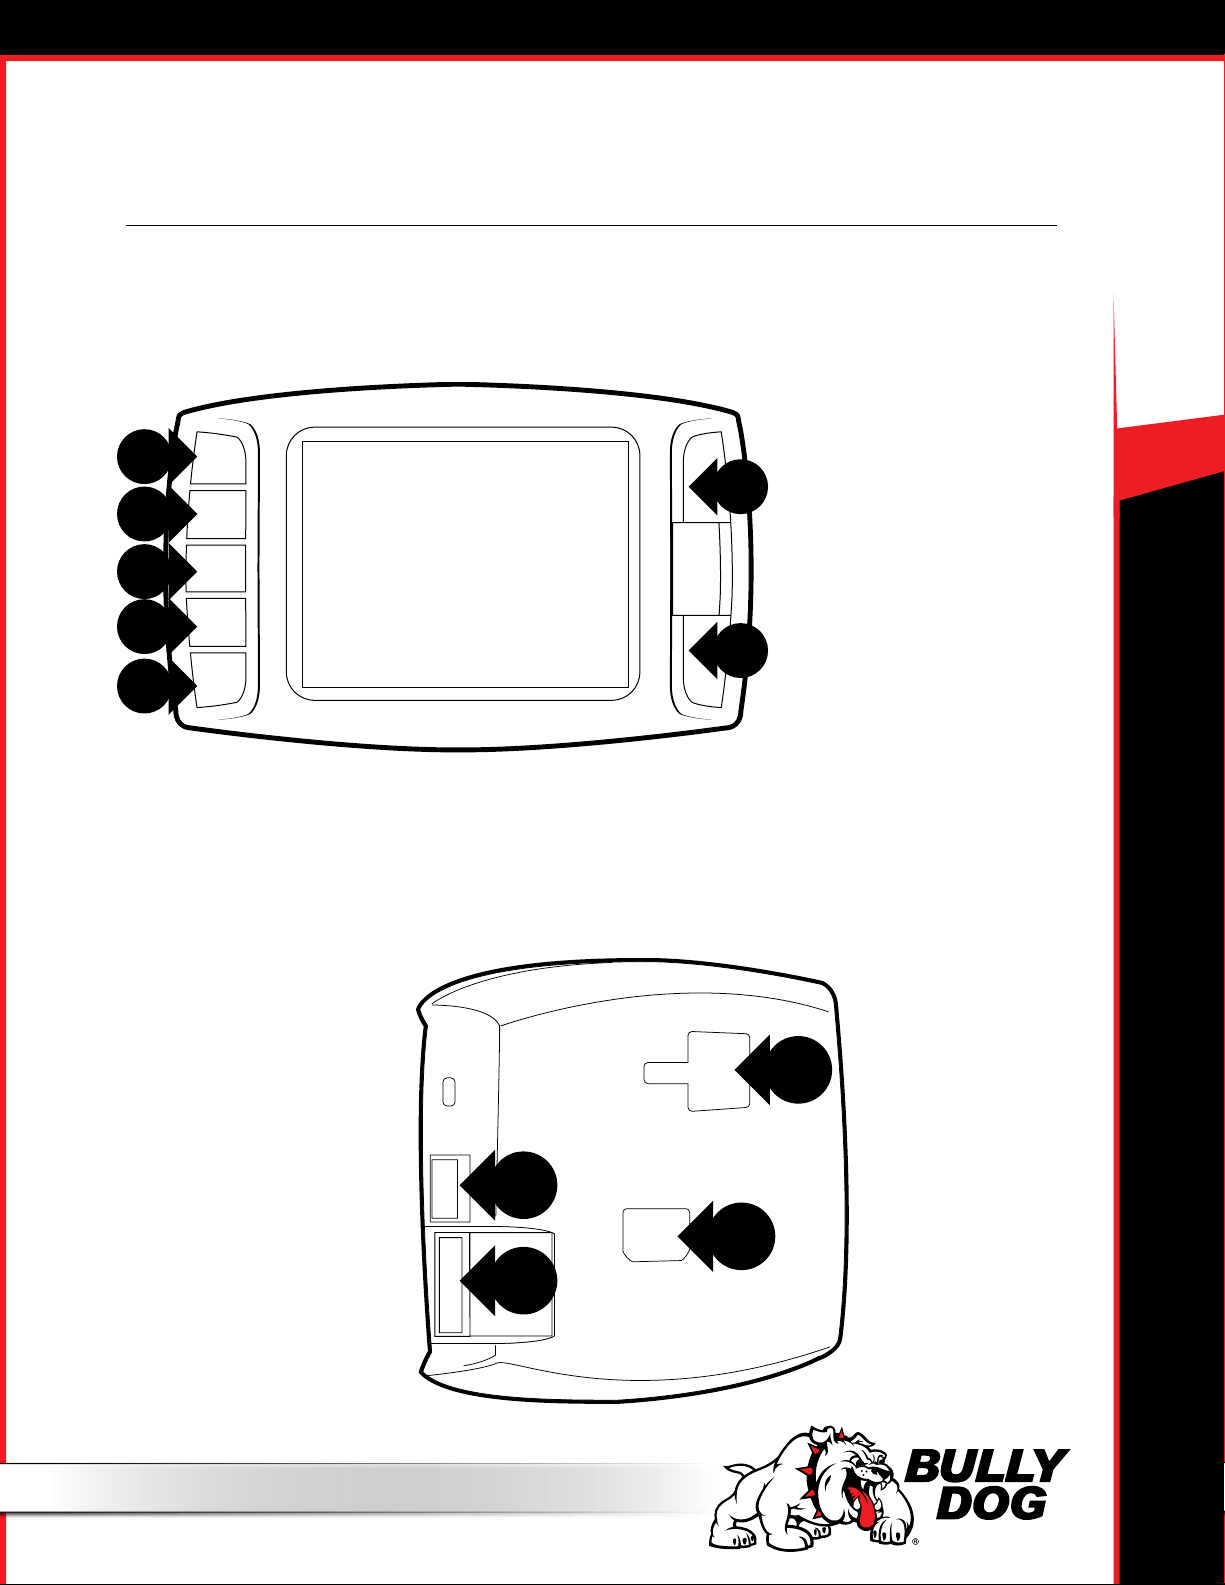
PARTS DESCRIPTION
The GT Head Unit
The main component of the Gauge Tuner is the head unit. It has the screen and the buttons that allow you to access all of the
functions and features of the tuner.
GT Front Side:
The GT has seven capacitive touch buttons. Capacitive touch is a button style
that is sensitive to the presence of your
nger. Capacitive buttons do not need to
be pushed, only touched to activate. The
front of the GT head unit features a 2.4”
LCD screen.
50 STATE GT DIESEL
GT Back Side:
1. T-Slot Mount Socket, which allows you to use the GT with dierent mounting options.
2. HDMI port
3. Micro SD card port
4. Mini-USB port
4
3
1
2
4
Page 6
50 STATE GT DIESEL
PARTS DESCRIPTION
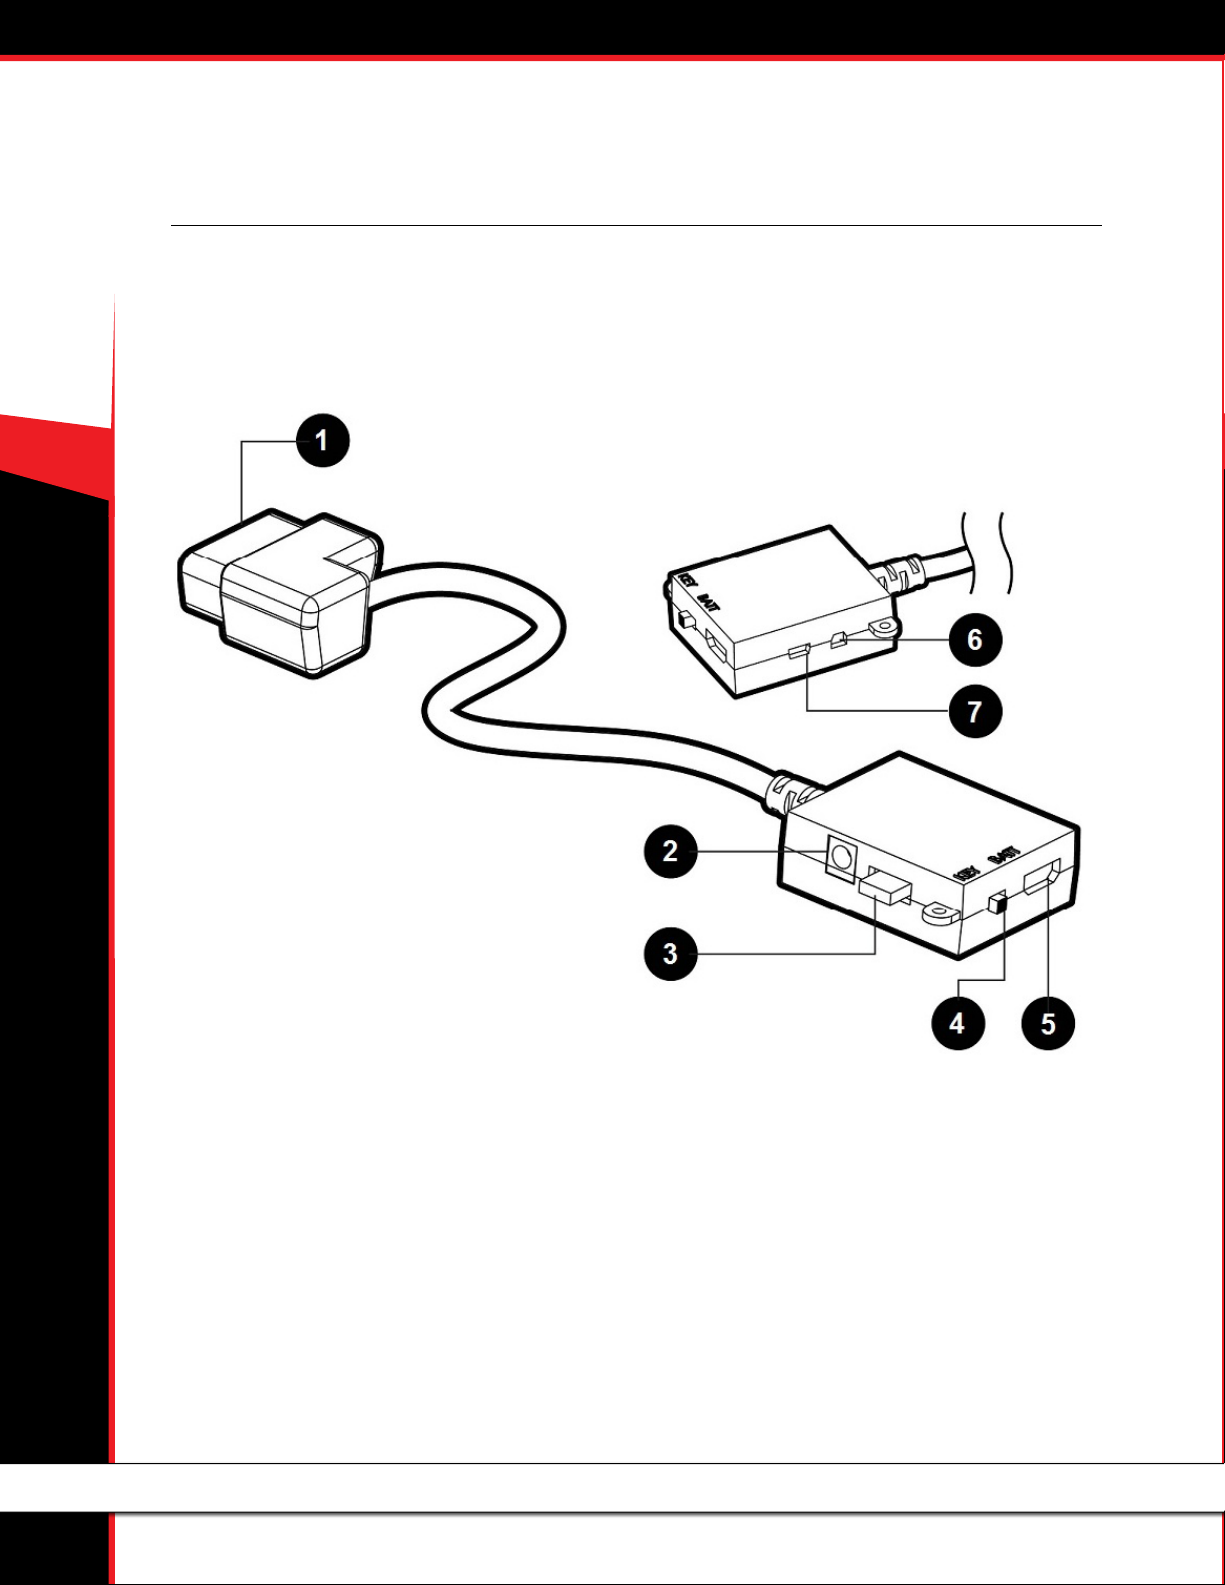
The OBDII Adapter Plug
The GT assembly connects to your vehicle through the diagnostic port, which is located under the dash on the driver’s side. The OBDII
Adapter Plug connects to the diagnostic port on your vehicle and has a connection for the HDMI cable that plugs into the back of the GT
Head Unit. The illustration and numbered list below contain more information about the other parts of this important piece of the GT
assembly.
1. OBDII Male End: Connects to the vehicle diagnostic port.
2. Power Wire Port: Connects the GT to the power wire and the vehicle fuse box. Allows the
GT to turn on and o with the key.
3. Fuse: The adapter plug fuse protects the GT from being damaged by unexpected power surges.
4. Power Switch: Changes the active power source of the GT.
The two options are: 1) KEY: this pulls energy from the fuse box through the power wire and allows the GT to automatically turn on and o
based on the vehicle’s ignition key position; and 2) BATT: This provides continuous battery power to the GT directly through the vehicle’s
diagnostic port.
5. HDMI Port: Connects the OBDII adapter plug to the GT Head Unit.
6. Pyrometer/Sensor Docking Station Port: Connects the GT to optional sensors including pyrometers or the Bully Dog Sensor Docking Station.
7. Future Peripherals: Not currently in use – may be used to connect additional devices in the future
5
Page 7
BUTTON NAVIGATION
FUNCTION 1: Press the top left button to enter the Main Menu, also use this button to exit menus.
50 STATE GT DIESEL
FUNCTION 2: Press any of the four buttons on the
left side of the GT adjacent to one of the vehicle parameters on the screen will display that parameter in
the large gauge area.
FUNCTION 3: Continuously hold any of the four
buttons to change the Large Gauge style, there are
four dierent styles that pop up.
NOTE: The GT buttons are Capacitive Touch. This means that a light touch is all that is needed to choose different options.
You do not need to push hard or get the buttons to move down or in for the GT to work for you.
FUNCTION 4: Only for On-the-Fly Vehicles
Power Level Up
Power Level Down
Use the power level buttons to control power levels
on-the-y only while in the main screen.
FUNCTION 5: Use these buttons to scroll up and
down when GT is in a menu screen.
6
Page 8
50 STATE GT DIESEL
1. 2.
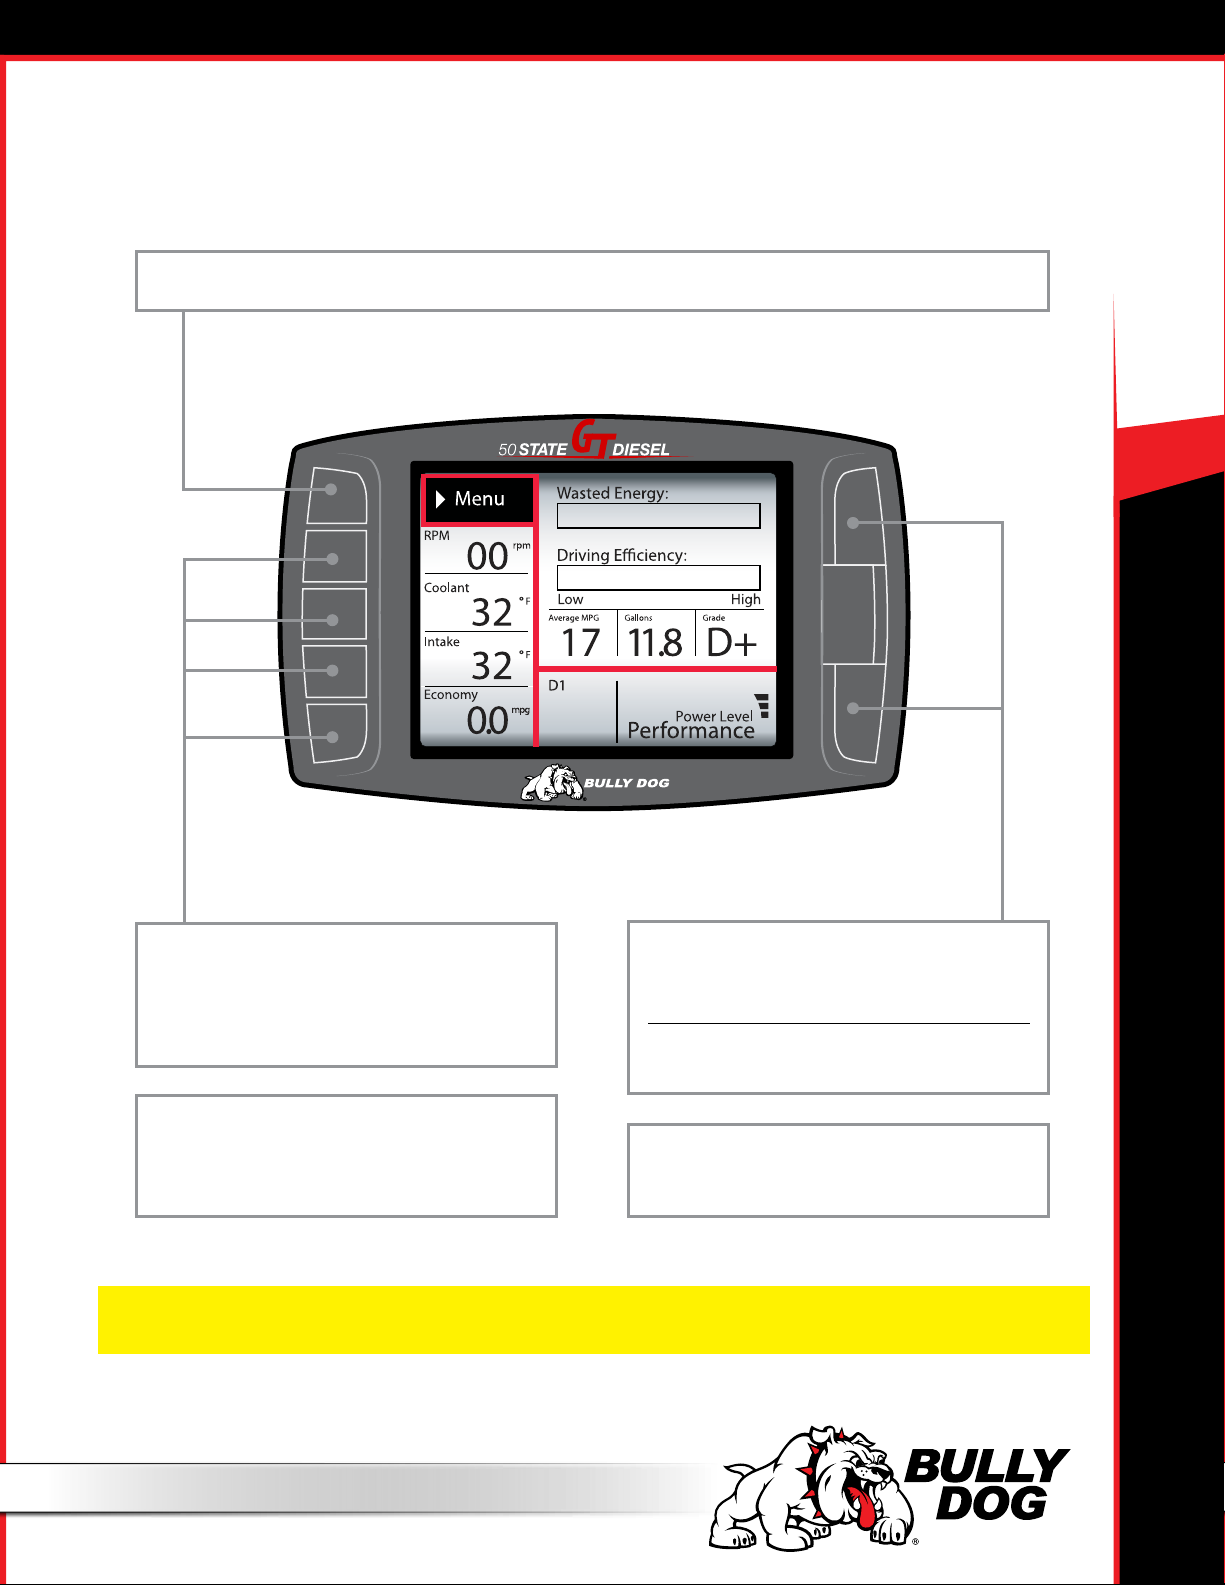
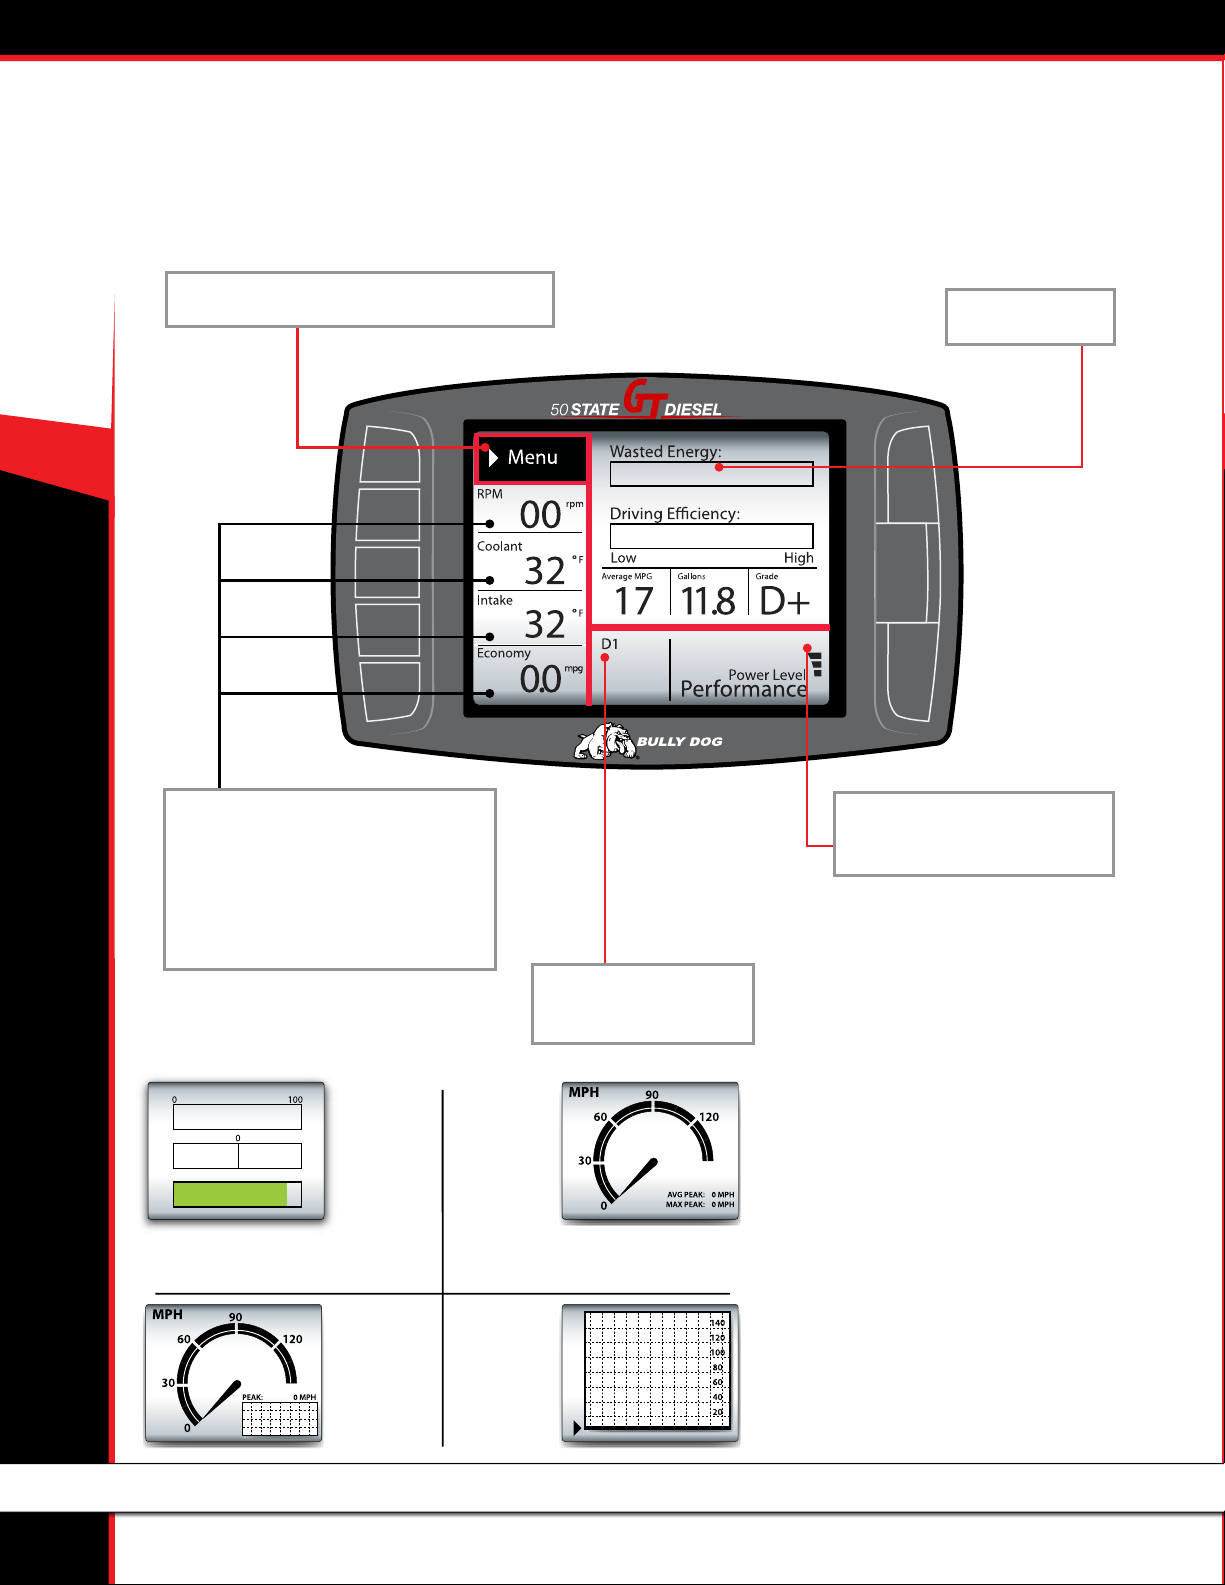
THE MAIN SCREEN
This picture of the GT main screen has the Driving Coach selected for the Large Gauge option. You can change which gauge is
featured in the upper right corner of the main screen by holding down one of the buttons on the left side of the GT until the gauge
type that you want is shown.
Menu button: press to enter the main menu.
Large Gauge area
Vehicle parameters: To change which
vehicle parameter is displayed in the
large gauge area simply press one of the
four buttons next the preferred vehicle
parameter.
Instant Economy
Dec. Acc.
B
The Driving
Coach
Report Card:
3. 4.
Analog gauge
with mini graph
Analog gauge
with average
and max peaks
Large real time
graph
Power bar: indicates power level,
but only on diesels.
Automatic transmission
gear indicator
See page 8 for more information
about changing the information shown
on the main gauge screen.
7
Page 9

AVAILABLE OPTIONS ALL MODELS
These options are presented in the order they appear on the Main Menu. If options are missing in your Main Menu, you
should update your GT. See pages 17-24 for more information on updating your GT.
Change Vehicle
This option allows you to choose the type of vehicle that the GT will be used with. If the tune has already been installed, the Change Vehicle
option cannot be used. Pages 33-35 have more information about how to uninstall the tune and how to check to see if the tune has
been successfully removed.
Install Download
This option allows you to install the tune to the engine computer in your vehicle. If the tune is already installed, this option will allow you to
change certain settings that can only be changed by writing a new tune to the engine computer. Pages 16 & 33 have more information
about the download options and returning to stock.
Gauge Setup
50 STATE GT DIESEL
This option will allow you to change which gauges are being displayed on the main gauge screen. Denitions for each type of gauge option
available are listed on the next page.
Changing the Information on the General Display
1. Choose Gauge Setup from the Main Menu.
2. Press the button on the left side of the GT to highlight the gauge slot you would like to change.
Go Back
Speed
Set Gauge 1
Boost
Set Gauge 2
RPM
Set Gauge 3
Coolant
Set Gauge 4
3. Use the buttons on the right side of the GT to scroll through the dierent functions and highlight the one you want shown on the General
Display.
4. When you are done, use the top left button to go back to the Main Menu and General Display.
GAUGE SETUP
Gauge 1
Use the Up & Down Arrows to
Change the Tranny Tune
Pyro 2
Speed
Boost
®
NOTE: All of the gauge types may not be available through your vehicle’s diagnostic port (OBDII port). This fact is out of the control of Bully Dog; however, Bully
Dog offers a range of add-on automotive sensors and sensor interface equipment. Contact Bully Dog or a Bully Dog dealer to learn more.
8
Page 10

50 STATE GT DIESEL
Gauge Setup (continued)
Pyro 1 & 2
Both pyro 1 and pyro 2 measure exhaust gas temperature. The only
dierence between them is the location of the temperature sensor.
These temperature readings are used for defuel and warning level
settings, which can help protect your engine from heat damage.
The availability and location of factory installed pyrometers vary
according to vehicle make and year. All ’07.5 and newer diesel
pickups that are equipped with OEM diesel particulate lters also
include factory installed pyrometer sensors. For all other vehicles,
pyrometer kits are available for purchase from www.BullyDog.com.
Speed
This option shows the current vehicle speed. Monitoring this information can help you ensure that the speed displayed on the GT and
the vehicle speedometer match the actual vehicle speed. Other important numbers, like the odometer and fuel eciency, are based
on this information. If the speed is displayed incorrectly on the GT,
it can easily be corrected. See page 12 for more information.
Boost
This option shows the turbo boost pressure.
RPM
This option shows the number of revolutions per minute of the
engine. This will help you protect your vehicle and improve performance by watching and ensuring that the RPMs stay within the
optimal operating range for your engine.
Coolant
This option shows the coolant temperature. The temperature information is used in defuel and warning level settings to help prevent
damage to the engine.
Throttle
This option shows the throttle position measurement – it is
displayed as the percent open.
The throttle position information is used by the Driving Coach
to indicate where changes can be made to driving habits to
maximize fuel eciency.
Intake
This option shows the intake air temperature.
Air temperature aects combustion temperature and engine
performance. Adding a Bully Dog Rapid Flow Intake (RFI) closed
air system will lower this temperature, improve performance,
and increase horse power. The Gauge Tuner (GT) is designed to
work with the RFI to get the most out of your engine.
ICP
This option shows the injection control pressure (ICP). The ICP
aects correct fuel injection, and this information is used by the
engine computer to adjust other settings like fuel ow to achieve
optimum engine performance and increase horse power.
Trans Temp
This option shows the transmission temperature.
The transmission temperature is used in defuel and warning level
settings to help prevent damage to the transmission.
MAF
This option displays information from the Mass Airow Sensor.
It is used by the Engine Control Module (ECM), aka: the engine
computer, to determine how much air is going into the engine.
The ECM then sends the correct amount of fuel for optimum
engine performance.
Fuel Econ.
This option displays a real-time measurement of the vehicle’s fuel
economy, shown in miles per gallon.
This information will help you to determine when your fuel
eciency peaks or dies to improve your driving habits and your
bottom line when visiting the pump.
Fuel Flow
This option displays the amount of fuel being used at any given
time; it is shown in gallons per hour.
The following gauge options are provided to allow the GT to
monitor additional sensors that are only available with the
Bully Dog Sensor Docking Station.
AUX 1, 2 & 3
This gauge option shows the information from sensors connected to
the 0-5V auxiliary inputs on the Bully Dog Sensor Docking Station.
AUX Temp
This gauge option shows the information returned to the Sensor
Docking Station by an optional temperature sensor. The port for
this sensor is marked as 5V out.
Frequency
This gauge option shows the information from a pulsing type of
sensor, like an on-board speed sensor or another optional sensor
that operates on the 0-5kHz 5V pulse range. The port on the Bully
Dog Sensor Docking Station for this gauge option is marked as FN.
9
Page 11

Performance Testing
This feature oers drag racers the ability to complete the 1/4 Mile and 0-100 KPH performance tests.
You can also download saved tests from your GT to your computer and analyze it using the Bully Dog Performance Testing Software. The software
is available by free download from www.bullydog.com. See page 36 for more information about the Performance Testing Software.
SPECIAL NOTE: Street racing is illegal and extremely unsafe. The performance testing feature should only be used on a sanctioned 1/4 mile drag racing track.
There are two dierent styles available for both tests. The GT will show dierent test screens based on the style of test that is currently
selected in the Performance Testing Setup Menu.
Speed Sensitive Performance Test
Once this test is begun, the GT will show instructions to the user to rst bring the vehicle to a stop. Once the vehicle is at zero miles per hour, the test is
ready. The test will automatically start once the vehicle begins to move.
Race Tree Performance Test
Before initiating the Race Tree style performance test it is important that the vehicle should already be at a complete stop. Once the test is begun, the
GT will display a classic race tree on the screen. As soon as the lights on the tree turn green, the GT will begin to record the vehicle’s time. In this style of
test, the GT will not wait for the vehicle to start moving before it starts recording performance data.
50 STATE GT DIESEL
1/4 Mile Performance Test
This option will test the vehicle’s performance until the vehicle has
traveled 1/4 mile.
- View Test Results
View the results for the last performance test that was run.
- Save Previous Test to SD Card
Save the results of the last run to the SD card in the GT. All runs
that are saved to the SD Card can be transferred to your computer
using our Performance Testing Analysis Software. For more information on our Performance Testing Analysis software, see page 41
or visit our website: www.bullydog.com
- Fastest Times
View the results for the quickest 1/4 mile ever recorded.
0-100 KPH Test.
This option will test the vehicle’s performance until the vehicle has
reached a speed of 100 kilometers per hour, which is about the same
speed as 62 miles per hour.
Special Functions
These options vary from vehicle to vehicle. See page 15 for more information.
Diagnostics
This option reads the Diagnostic Trouble Codes (DTCs) from your vehicle engine. You can also erase these codes from here.
To look up the DTC codes, the following website is very helpful: http://engine-codes.com/
You can also search for more information about DTC codes online using your favorite search engine.
IMPORTANT NOTE: Most DTCs indicate a problem with the engine, not with the tune or the tuner itself. If you want to know if a DTC is being caused by the
GT or not, uninstall the tune and drive your vehicle for about one week. If the DTC comes back, there is a problem with the vehicle and you should take it to
a trusted mechanic. If the DTC doesn’t come back, reinstall the tune and test drive for another week – if the DTC comes back while the tune is reinstalled,
contact technical support. Be sure to have your tuner, vehicle, and a computer with internet access available when contacting technical support. See page
44 for more information about contacting technical support.
10
Page 12

50 STATE GT DIESEL
Driving Coach Setup
The Driving Coach is a special feature designed to be your fuel economy dashboard and information center. It provides real-time visual and audio
feedback about driving eciency and where energy is being lost. The driving coach will help you understand the optimal conditions for your
particular vehicle through real-time observation, giving you the power to maximize your vehicle’s fuel economy.
Two hidden bonuses of driving more eciently are: saving money on fuel and helping the environment!
Before the Driving Coach can give you accurate information, it is important to make sure that the GT is showing the correct speed. In the
sections below, you will nd specic instructions for using the Driving Coach to become the best driver you can be.
Set Economy Goal
This option will allow you to select a fuel economy goal. The Driving Coach will use the economy goal to calculate your driving grade.
It is very important to select an economy goal that is realistic for both your vehicle and the kind of driving you will be doing. If you will be driving mainly
in the city or on the highway, choose a goal that is very close to the advertised fuel eciency for your vehicle in that type of environment. If you will be
doing a mixture, choose an economy goal between the advertised city and highway mileage for your car.
Reset Average Economy
This option will clear the values stored in the GT for the average fuel economy, the number of gallons used, and the grade in the Driving Coach.
Adjust Acceleration
This option will allow you to select the GT sensitivity for the acceleration and deceleration for your vehicle.
Coach Sound Setup
This option will allow you to turn the Driving Coach sounds on or o.
Showing/Hiding the Driving Coach
The driving coach is always running, even if you choose not to have the information displayed. You can show or hide the driving coach on the Main
Display by holding one of the four bottom left buttons until the display cycles through to the gauge style that you want.
11
Page 13
Driving Coach Setup (continued)
Checking Speedometer Accuracy
First: Change the Gauge Setup to have the Speed displayed on the main display screen. See page 7 for more information about changing the
information displayed on the main display screen.
Next: Go to a safe place with little to no trac where you can perform a speed test. Make sure the speed limit is at least 60 mph. Here are two dierent
ways to nd out your vehicle’s actual speed:
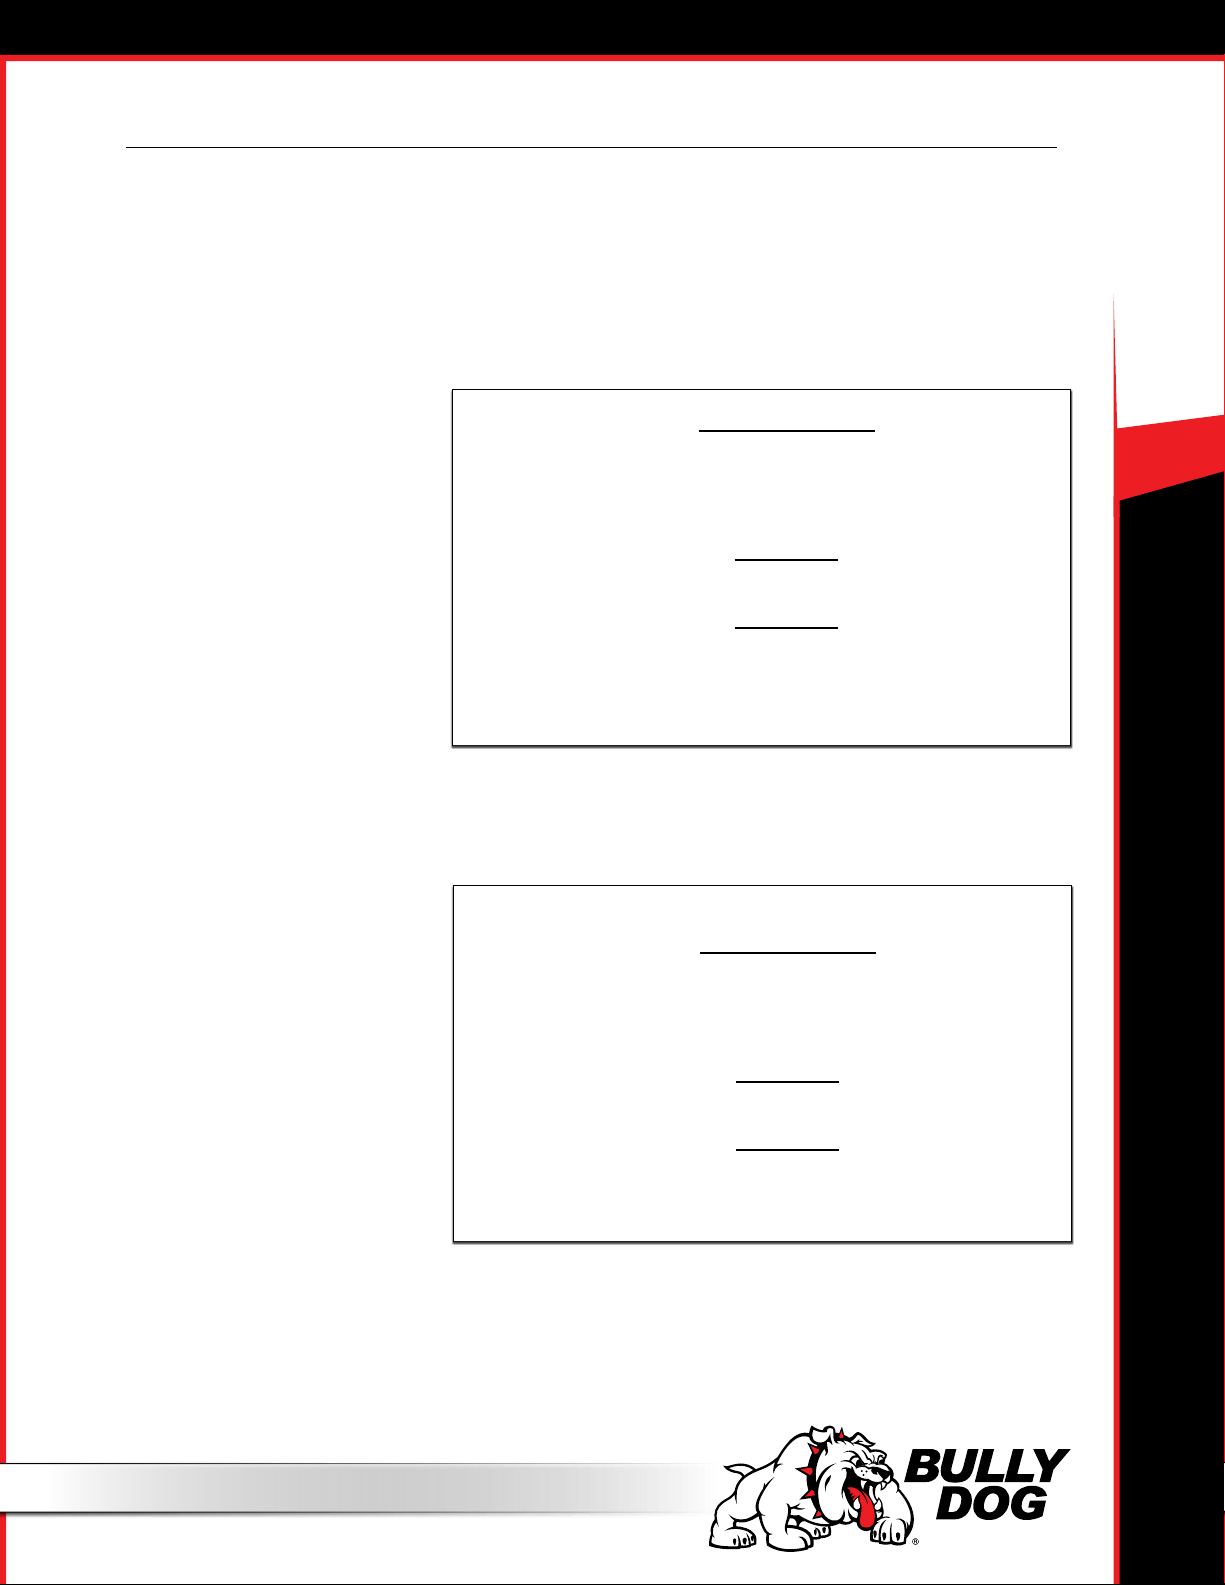
Method 1: GPS
1. Use a GPS device to compare your actual speed and the speed displayed on the Bully Dog.
2. Calculate the Percent Difference by using
this formula:
Percent dierence =
Example 1: A GPS device reads 65 mph and the GT reads 62 mph for one single moment.
GT speed - GPS Speed
GPS Speed
50 STATE GT DIESEL
Step 1. Percent dierence =
Step 2. Percent dierence =
Step 3. Percent dierence = .046 or 4.6% then round up 5%
62 - 65
65
-3
65
Method 2: Stopwatch
1. Use a Stop Watch to measure how long it takes to travel one mile while traveling at 60 mph according to the GT.
Accelerate up to a speed of 60 mph (as shown on the GT)
While traveling at that constant speed, record the amount of time in seconds that it takes to travel exactly one mile.
*Use highway mile markers to ensure that your one mile measurement is correct.
2. Record the time.
3. Calculate the Percent Difference.
If it takes 60 seconds to travel one mile
at 60 mph, then the GT is accurately
reading your vehicle speed.
If it takes 2 seconds more or less than
60 seconds to travel one mile, then use
the formula to the right to calculate the
Percent Dierence.
Once you have calculated the Percent Dierence, you can use that information to adjust
the speed display as described below
To calculate the percent dierence use this formula:
Percent dierence =
Example 1: Using a stop watch the actual time it took to drive one mile while traveling at
60 mph according to the GT was 63 seconds.
Step 1. Percent dierence =
Step 2. Percent dierence =
Step 3. Percent dierence =
Recorded Time - 60 seconds
60 seconds
63 - 60
60
3
60
.05 or 5.0%
Adjusting the Speed Display
1. Use one of the methods described in the previous section to determine the exact percentage dierence between the GT and your actual speed.
2. Choose the opposite percentage in the Adjust Speed Display menu.
For example, if the dierence between your actual speed and the speed displayed on the GT was 5%, you should choose -5% (negative ve percent).
12
Page 14
50 STATE GT DIESEL
Driving Coach Setup (continued)
Checking Average Fuel Economy
It is important to check the accuracy of the average economy readout on the GT at least once every changing season. There are many reasons to check
and adjust the average fuel economy, here is one example: The fuel delivered to gas stations during the winter contains an average of 1.3% less energy
than the fuel delivered in warmer seasons. That means that the same amount of liquid is going into the tank, but it is 1.3% less eective, on average.
There are many similar factors that aect your fuel eciency that you cannot control and the GT cannot sense or adjust for. That is why it is important to
adjust the fuel economy of the GT every once in a while.
To adjust the Average Fuel Economy displayed by the GT, follow these steps:
1. Go to the gas station and get a full tank of gas.
2. Reset both of the following gauges before driving away from the gas station:
- The Average Economy on your GT.
- The trip odometer on your vehicle.
4. Drive the vehicle for an entire tank (or two)
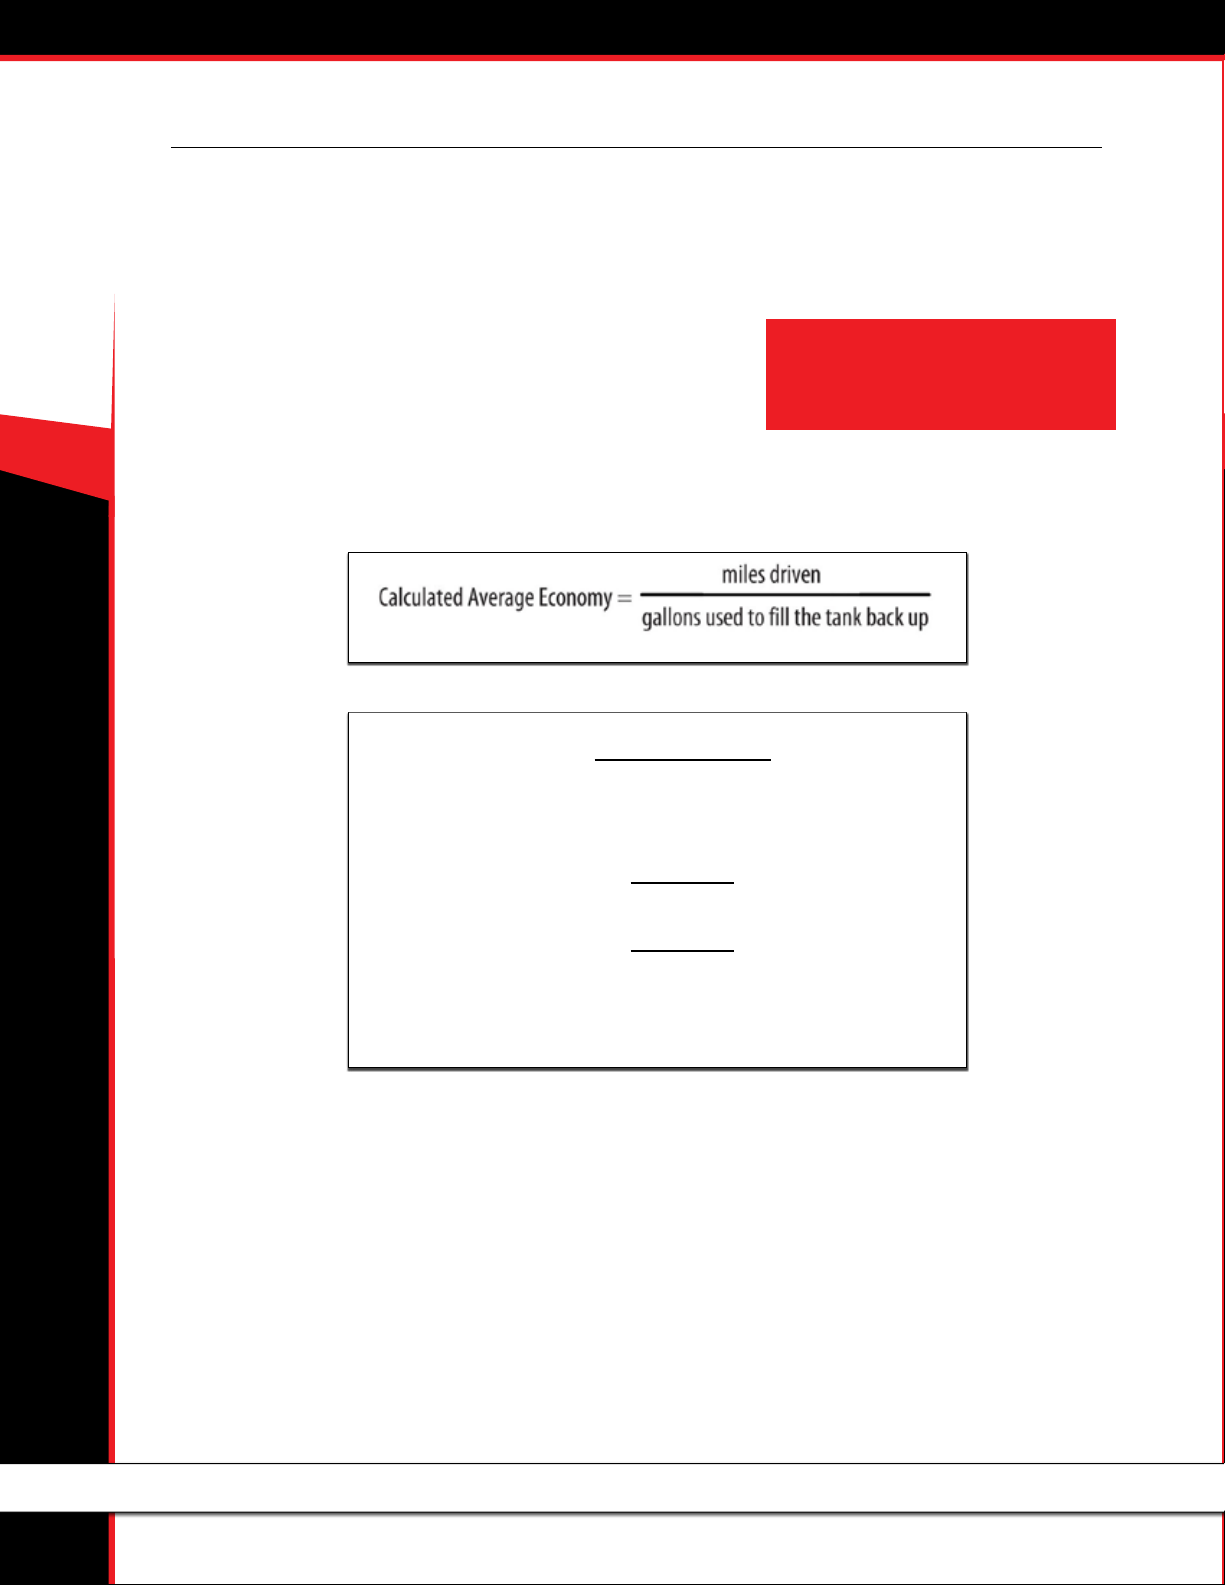
5. Calculate your vehicle’s average fuel economy by hand using the following equation:
GT Average Economy - Calculated Average Economy
Percent dierence =
Calculated Average Economy
Example 1: Assume the GT Average Economy is 24 mpg and the Calculated Economy is 21.
Step 1. Percent dierence =
Step 2. Percent dierence =
24-21
21
3
21
• NOTE: If the speedometer on the vehicle is not accurate,
then the odometer will also be incorrect. You will need
to be able to calculate the exact number of miles driven
before your next refill.
Step 3. Percent dierence = .142 or 14.2% round down to 14%
6. Use the equation below to calculate the Percent Difference between the average fuel economy that you have calculated and the average fuel economy that is displayed by your GT.
Adjust the Average Fuel Economy
Follow the steps listed below to change the average fuel economy that is displayed by the GT:
1. Go to the Main Menu
2. Choose Vehicle Setup
3. Choose Adjust Economy Display
4. Use the buttons on the right to move up and down the percentages
5. Choose a percent value that is the opposite sign of the Percent Difference that you calculated using the equation above.
- For example, if you determine that the Percent Difference is 14%, you should choose -14%.
13
Page 15
Vehicle Setup
Select Pyro Source
Choose either factory installed or Bully Dog pyrometers.
Set Defuel Levels
Set the temperature level at which the extra power level settings on your GT are automatically turned o to protect your engine from damage.
NOTE: The defuel option is only available on vehicles that can adjust horsepower levels on the y. For vehicles that cannot adjust power levels on the y, on screen
warnings are available in place of automated defueling.
It is also possible to turn each of these settings completely o. This is appropriate if the sensor for that setting is not available or if you do not wish to
have that setting controlled by the GT.
See the Pyrometer Calibration section on page 36 for help in determining the correct temperatures for the defuel settings:
Adjust Economy Display
Change the miles per gallon shown by the GT.
This setting should be changed if the GT is showing incorrect fuel mileage. See page 12 for more information about how to do this.
Adjust Speed Display
Change the vehicle speed shown by the GT.
This setting should be changed if the GT is showing an incorrect vehicle speed. See page 12 for more information on how to do this.
50 STATE GT DIESEL
Pyro 1 Temperature Level
Pyro 2 Temperature Level
Engine Coolant Temp Level
Boost Level
Turn this setting o or add a Bully Dog boost sensor if your vehicle does not
have a factory turbo boost.
Transmission Temperature
Turn this setting o or add a Bully Dog boost sensor if your vehicle does
not have a factory transmission temperature sensor.
Startup Coolant Temp Level
This option was included to ensure that the vehicle is warmed up
properly before the GT tuning options that provide additional power
are available to be used.
NOTE: If the GT is stuck in Engine Warm Up mode, change this
setting to a lower temperature or turn the feature o.
User Options
Set Background Theme
Change the display colors on your GT.
Adjust Backlight
Change the brightness for both the day and the night operating modes of the GT.
To change between night and day mode, hold both the right buttons (the up and down buttons) while you are in the general gauge display.
Set Animation Preferences
Turn the Wave Eect on or o. This eect creates a ripple on the screen whenever you press a button.
English/Metric Units
Switch between miles/kilometers and gallons/liters.
Reset to Default
Change the user preferences back to the original Bully Dog default settings.
This option does not change other GT features to default settings.
14
Page 16

50 STATE GT DIESEL
Show Settings
The Show Settings screen will show you information about your vehicle, the GT, and your current vehicle settings. This screen will also indicate if
the GT tune is currently installed or not installed on a vehicle.
Uninstall Download
This option will allow you to uninstall the tune from your vehicle. This process is very similar to installing the tune, so be sure to take the same
precautions listed on pages 29-30.
You can nd more information about uninstalling the download on page 33.
Update Firmware
This option will update the software on the GT itself from the les on the Micro SD card. This is an important nal step to the update process. See
pages 17-24 for more information about updating your GT.
SPECIAL FUNCTIONS
Dodge
Mobile Desoot (2007 – 2010)
The Mobile Desoot feature will send a request to the vehicle to start the
desoot process of the diesel particulate lter. Follow the on-screen
instructions provided by the GT when using this feature.
NOTICE! The Mobile Desoot should only be used if absolutely necessary. If
the diesel particulate filter clogs often on a particular vehicle there may be
an issue with the filter itself, which would need to be serviced by an OEM
dealer.
Auto Door Lock (2007-2009)
Enabling this feature will cause all doors to lock once the vehicle
reaches a speed of 15 mph. Once the vehicle comes to a complete
stop, if the driver’s door is the rst to open all of the other doors will
automatically unlock.
Head Lamp Delay
Use this feature to set the amount of time that the head lamps remain
on after the vehicle has been turned o. Use the up/down arrows on
the tuner to scroll in 5 second increments between 0 and 80 seconds.
Fog Lamp
Enabling this feature will allow the fog lights and high beams to operate at the same time. This feature is for O-road use only.
Horn Chirp on Lock
Enabling this feature will sound a horn chirp each time the doors are
locked when using a remote door lock system.
Optical Chirp on Lock
Enabling this feature will ash the hazard lights each time the doors are
locked when using a remote door lock.
Seat Belt Minder Chime
Enabling this feature will remind the driver to buckle their seat belt
with an audio chime each time the vehicle is put into drive and the
driver’s seat belt is not buckled.
Accessory Delay
Use this feature to set the amount of time that the accessory items in
the vehicle will remain on after the vehicle has been shut o as long as
the doors remain closed. Accessory items include the radio, cigarette
lighter, etc. Use the up/down scroll buttons on the tuner to choose
between the following settings: 0 seconds, 45 seconds, 5 minutes, 10
minutes, 30 minutes, or 60 minutes.
Unlock Driver Door (2007-2009)
Enabling this feature will aect the way the doors unlock when using a
remote door lock. If enabled, the rst time the remote unlock button is
pressed only the driver door will unlock, the second hit will unlock the
passenger doors. If disabled, all doors will unlock on the rst press of
the remote unlock button.
Daytime Headlights:
Use this new option to turn daytime running lights on or o while
driving.
15
Page 17

VEHICLE SPECIFIC DOWNLOAD FEATURES
These options cannot be adjusted OTF (On the Fly). This means that once they are set during the install download process, they can only be changed by starting that
process again and choosing to Change Settings when prompted by the GT.
The following features are not available for all vehicles. Our engineers are also working to add even more applications, so
check our website for a complete list of which features are available for specific vehicles.
Speed Limiter
This changes the top speed that the car will reach before the engine automatically limits the power needed to go faster.
Calibrate Speedometer
This feature will adjust the speed displayed by the factory installed speedometer on your vehicle. This can be useful to correct an inaccurate speedometer caused by a change in tire size.
Calibrating for any tire size over 35” may cause the on-dash ABS light to turn on.
50 STATE GT DIESEL
IMPORTANT WARRANTY INFORMATION
Vehicle Warranty
You can access information about your vehicle warranty and your rights as an owner to use aftermarket products without voiding the
warranty at the following SEMA (Specialty Equipment Market Association) website:
http://www.bipac.net/page.asp?content=warranty&g=semaga
GT Warranty
A new GT is covered for one year after the date of purchase. This warranty covers repairs for factory defects; it does not cover accidental
damage or reset services. See page 36 for more information about GT resets and the required fee. For pricing information and assistance in having a damaged GT unit repaired, contact technical support. See page 44 for more information about contacting technical
support.
You can nd more specic warranty information at the following page on the Bully Dog website:
http://www.bullydog.com/warranty.php
16
Page 18

50 STATE GT DIESEL
UPDATING THE GT
OVERVIEW
FAQs about Updating
Why do I have to update my GT?
Because it’s very important! These are just some of the reasons:
1. Vehicle manufacturers regularly change the part numbers and other information that the GT needs to know in order to communicate eectively
with your engine computer. If the GT doesn’t have updated information, it may not work correctly with your vehicle. Bully Dog releases updates
when necessary to keep up with any changes that vehicle manufacturers make and give our customers the best support possible.
2. Our technical support team gathers information about any problems experienced by customers and works with the engineers to x them as soon as
possible. If these xes can help other people avoid similar problems, our engineers include them in the updates that we release for everybody. One
of the most important troubleshooting steps we take when someone encounters a problem is to make sure they have the most recently released
software version. This often immediately xes the problem!
3. Bully Dog engineers are constantly working to expand the features and vehicles that the GT is able to support. Once a new vehicle or option is
unlocked, they make sure it is available to everyone by including it in the updated software version.
Do I have to update my brand new GT?
Yes! There is no way to know how long your particular GT may have been waiting on the shelf for you.
How often should I update?
Updates are released regularly, so you should check for them at least four times a year. A good rule of thumb is to check once
every three months.
It is also a good idea to update the GT if you have uninstalled the tune for any reason, like taking your vehicle in for service. This will
help you avoid any problems during the reinstall if the engine computer has been flashed and has new part numbers (this is very common, even for a routine vehicle service).
What is included in updates?
Updated part numbers and other information from vehicle manufacturers, tested fixes for problems customers may encounter,
and any additional features or support for new vehicles that our engineers have developed.
How can I tell which software version I currently have?
1. Go to the Main Menu.
2. Choose the Show Settings option.
The software version is listed under System Info, next to Version. It is labeled SW.
How can I use the Update Agent to check for updates?
Start the Update Agent application and connect the Micro SD card to your computer using the card reader that came with your
GT. If you have an older model of GT and did not receive a card reader, you can purchase one online at www.bullydog.com. There
are also many local retailers who carry card readers that are capable of supporting the Micro SD card format.
The Update Agent should automatically recognize the Bully Dog device, check the current software, and let you know if an
update is available.
See page 23 if your SD card is not automatically recognized by the Update Agent.
17
Page 19

UPDATING THE GT
Basic Steps to Update (Short Version)
You can find a more detailed description of this process on page 22.
1. Run the Update Agent.
2. Connect the Micro SD card to your computer.
3. Choose the vehicle application and let the Agent search.
4. Click the Update button.
5. When the Update is nished, put the Micro SD card in the GT.
6. Update the GT from the SD card by choosing Update GT Software on the Main Menu.
What You Need to Update the GT
1. A computer with internet access.
• Currently, it is most convenient to update if you have a Microsoft Windows computer.
• If the only computer that you have access to is an Apple, you can nd information for how to
use this type of computer to update on page 24.
50 STATE GT DIESEL
2. A way to connect the Micro SD card to the computer.
There are two dierent options:
• A Micro SD card reader to connect it directly to the
computer.
• A USB cable to connect the GT to the computer (with
the Micro SD card installed in the GT).
Note: Do not try to connect the HDMI cable or the OBDII adapter plug to update the GT.
18
Page 20

50 STATE GT DIESEL
UPDATING THE GT
DETAILED STEPS FOR WINDOWS
The following instructions are intended for Microsoft Windows computers.
Please see page 24 for Apple computer instructions.
Uninstall the tune from your vehicle
1. If the tune is not yet installed, skip to step 2.
2. For information about uninstalling the tune, see page 33.
3. For information about checking to see if the tune is installed, see page 35.
Connect your Micro SD card to a computer with internet access
1. Connect the Micro SD card using a card reader.
OR
2. Connect the GT with the Micro SD card installed by using a USB cable. Do not use the HDMI cable or the OBDII adapter plug to update the GT.
3. Download and install the Update Agent application.
• If it is already installed, skip to step 5. You can see if it is already installed by checking your Start Menu under All Programs. The Update Agent will
be listed under the Bully Dog Technologies folder:
Windows XP
Windows 7
Note: If you don’t have the Update Agent installed see the next page for details on
how to download and install it from the internet.
Windows
Vista
19
Page 21

UPDATING THE GT
DETAILED STEPS FOR WINDOWS
The following instructions are intended for Microsoft Windows computers.
4. You can download the installation le at http://www.bullydog.com/update_agent.php
• Save the le rst, then run it.
(If you try to run the le without saving, your computer will generate an error message.)
(Mozilla Firefox® and Google Chrome web browsers may automatically download the le.)
50 STATE GT DIESEL
• If you get pop-up messages asking for permission to install, click the buttons to let your computer nish installing the Update Agent.
20
Page 22

50 STATE GT DIESEL
UPDATING THE GT
DETAILED STEPS FOR WINDOWS
5. Run the application.
• If you have just installed it, the Agent may already be running.
- You can show the Update Agent by right-clicking the icon in the system tray at the bottom right corner of your screen, and then clicking Show Agent.
- Or you can stop the previous instance of the Update Agent and open a new one – either option is a winner.
• If you have already installed the application in the past, it should be listed under Bully Dog Technologies in your computer’s list of All Programs. Just
double-click the Update Agent icon in that folder to let it start.
5. Choose the correct application
from the list for your vehicle and
click Select Vehicle Application.
6. Let the Update Agent search and
download available update les.
7. Click the Update Button and let it write the update to the SD card.
21
Page 23

UPDATING THE GT
DETAILED STEPS FOR WINDOWS
8. NOTE: This step varies depending on how you have connected the Bully Dog to your computer.
• If you have the Micro SD card connected to the computer:
- Disconnect it from the computer and put it in the GT.
- Then turn the GT on by connecting it to a computer or to a vehicle and turning the key to the Run position.
• If you have the GT connected to the computer:
- Press the second key from the top on the left side to get out of USB mode.
OR
- Disconnect the GT from the computer, plug it in to your vehicle, and turn the
key to the Run position.
50 STATE GT DIESEL
9. Go to the Main Menu on your GT.
10. Go to the bottom of the menu and choose Update GT Software.
• If the Update GT Software option is not available on the Main Menu:
- Choose Update GT Firmware.
OR
- Scroll to the top and choose Change Vehicle, then select your vehicle from the list.
11. Conrm that you want to load the le.
12. Let the GT load the le and reboot. Do not disconnect it or turn it o during this part of the process.
The GT has now been updated!
22
Page 24

50 STATE GT DIESEL
TROUBLESHOOTING UPDATING PROBLEMS
The Update Agent Won’t Install
Q . Why does my computer open a window
full of weird symbols when I try to install the
Update Agent?
A. Your computer is not up to date and you
need to run Windows Update first. See page
37 for more information about running
Windows Update.
The Update Agent Won’t Recognize my Micro SD card
Q . Why isn’t the Update Agent recognizing that the Micro SD card is connected to my computer?
A. The SD card is missing an important file. You can get the file and fix the problem by following these steps:
1. Go to the Bully Dog website.
2. Click on the link for the Update Agent page.
3. Click on the GT Diesel card le link.
4. Find the downloaded le on your computer and copy it to your SD card.
• Your computer will most likely not be able to open this le. This is not a problem; all you need to do is copy the le to the SD card.
• The name of the le is GTDIDF.bin
5. Restart the Update Agent application and it should recognize the SD card.
23
Page 25

UPDATING YOUR GT
DETAILED STEPS FOR APPLE
1. Return your vehicle to stock. See page 33 for detailed instructions on this process.
2. Connect your Micro SD card to your computer.
• Connect the Micro SD card using a card reader.
OR
• Connect the GT with the Micro SD card installed by using a USB cable. Do not use the HDMI cable to update the GT.
3. Format your Micro SD card to the FAT file system.
4. Go to the Bully Dog website and click on the link for Update Agent.
• There are two locations for this link:
• Under Quick Links, on the lower right side of the home page
• Under Download, in the black toolbar on the upper right side of the home page.
5. At the bottom of the page, under the heading for MACINTOSH USERS ONLY, click the link for GT Diesel. This will allow you to
download the zipped file labeled GTDFiles.zip.
50 STATE GT DIESEL
6. Find where your computer saved the file (it will most likely be in your Downloads folder).
7. Extract all the files in the GTDFiles.zip file.
8. Copy the contents of the extracted file directly onto your SD card.
9. Install the Micro SD card in your GT unit.
10. Connect your GT unit to your vehicle.
11. Choose the Update GT Software option from the Main Menu.
• If the Update GT Software option is not available:
- Choose Update GT Firmware.
OR
- Scroll to the top of the Main Menu and choose Change Vehicle, then choose your vehicle from the list.
12. Confirm that you want the GT to load the file.
13. Let the GT finish loading the file and rebooting – be sure not to disconnect it or interrupt power in any other way during this
part of the process.
The GT has now been updated!
24
Page 26

50 STATE GT DIESEL
PHYSICAL INSTALLATION
Be sure to check the list and description of included parts on pages 4-6.
Brief Preview
This is a quick list of the basic installation steps. You can find more specific information about each step in the next section.
1. Connect the OBDII adapter plug to the port under the dash.
2. Plug in the power cable to the fuse box and connect it to the adapter plug.
3. Run the HDMI cable under the dash.
4. Mount and connect the GT.
The illustration below shows how to install the power wire if there is no fuse box available inside the cab of the vehicle. If a fuse box is available inside the cab, there
is no need to run the power wire through the firewall into the engine bay.
Fuse Box
GT & Windshield Mount
Fire wall grommet
Power Wire
OBDII Adapter Plug
OBDII Port
25
Page 27

PHYSICAL INSTALLATION
Detailed Instructions
1. Connect The OBDII Adapter Plug to the OBDII Port. See page 6 for a detailed description of the different parts of the OBDII
adapter plug.
• Find the OBDII port in your vehicle. As shown in the illustration, the specic location of the port can vary between dierent vehicles, but it is always
somewhere under the driver’s side dash. The OBDII port will
have the same shape as the end of the adapter plug.
• Once you have found the port, simply connect the adapter
plug to it.
2. Connect The Power Cable. The power cable is not
really optional if you want to enjoy the originally
designed functions of the GT. It is only optional under
one of the following circumstances:
You do not want to keep the GT permanently installed and
plan on disconnecting it when you are not actively using the
unit.
You want the GT to remain on at all times, regardless of
the eect that this could have on your car battery
You prefer physically switching the GT on and o and do
not want it to automatically power down when you turn
the key to the o position.
OBDll Port Location
All OBDll ports are located under the
dash on the drivers side of the vehicle.
OBDII Plug
50 STATE GT DIESEL
Otherwise, in order for the GT to work as originally designed, it is very important for the power cable to be installed as described below:
1. Locate an ignition fuse.
• An ignition fuse is one that is controlled by the position of the key.
• Sometimes we call this a “key-on” or “key-o” fuse.
• The fuse that controls the front windshield wiper is usually perfect, but any fuse that turns o when the key is turned o will work just ne.
• Every vehicle is dierent. There is no way to provide wiring diagrams for all vehicles. You will be able to nd the information for your vehicle
in the owner’s manual or online.
• Some vehicles have a fuse box inside the cab. If your
vehicle does not have a fuse box inside the cab, you will
need to locate the re wall and connect the power cable
to the fuse box under the hood.
2. Connect the power cable to the fuse.
• You may have received a fuse tap with your GT. See below
for an illustration and instructions on using the fuse tap to
install the power cable.
• You can also simply put the power cable into the fuse box
along with the fuse that is normally installed in that location. See the diagram and picture for more information.
• If you did not receive a fuse tap, but prefer to use one to
install your power cable, you can purchase one at your
local auto parts store. Be sure to ask for installation
instructions if none are included with the fuse tap.
Using the Fuse Tap and Spade
1. Find and pull the fuse that you are going to use to insert the GT Power Cable.
2. Slip the fuse tap over the prong on the fuse.
3. Fit the spade over the fuse tap and crimp them together with pliers.
4. Put the tapped fuse back into the fuse box.
26
Page 28

50 STATE GT DIESEL
PHYSICAL INSTALLATION
Detailed Instructions (Continued)
3. Run the HDMI cable under the dash.
This step helps you install the HDMI cable in a way that is discreet, stylish, and that helps to protect the GT
1. Plug one end of the HDMI cable into the port on the OBDII adapter plug.
2. Run the middle of the cable up through the dash on the driver’s side so that the end of the cable comes out near the A-pillar.
• It may be necessary to temporarily remove the weather stripping and dash panel to successfully hide the HDMI cable under the dash.
3. Make sure that there is enough slack in the cable to connect the GT when it is in the mount.
4. Connect and Mount the GT
1. Install the mount that you have chosen. If you are using the Universal Windshield Mount included with the GT, see the installation instructions
in the next section.
2. Connect the HDMI cable to the GT.
3. Secure the GT to the mount.
Using the Universal Windshield Mount
IMPORTANT NOTE: Safety is your first and most important responsibility as a driver. Safety is also your first and most important concern when placing your GT.
Make sure the GT does not create blind spots or distract the driver.
1. Locate the T-shaped socket on the back of the GT.
2. Place the square top of the Universal Windshield Mount into the square part of the Tshaped socket on the GT.
3. Slide to the left to secure the GT to the mount.
4. Place the suction cup against the windshield and use the lever to secure the mount to the
windshield.
You will find information about alternative mounting options on the following pages.
27
Page 29

ADDITIONAL MOUNTING OPTIONS
Bully Dog has created alternative mounting solutions which will allow you to mount your GT in even more convenient
locations.
RAM Mirror-Mate
Part Numbers: 31600 and 33600
The RAM Mirror-Mate mounting kit will allow you to mount your GT directly
beneath your rearview mirror. This heavy-duty mounting solution provides
easy and intuitive access to your GT without blocking the driver’s view.
You can find more information about the Mirror Mate by clicking the link below:
http://www.bullydog.com/product_listing.php?prodlist=RAM%20Mounts
50 STATE GT DIESEL
RAM Suction Cup Mounting Kit
Part Number: 30600
This kit is the best suction cup mount on the market. The amazing holding power
will allow you to mount your GT to multiple surface materials in any vehicle – which
means that you can try different places and find the best place for your GT to be at
any time.
You can find more information about the RAM Suction Cup Mounting Kit by clicking the link
below:
http://www.bullydog.com/product_listing.php?prodlist=RAM%20Mounts
Pillar Mount Gauge Pods
Bully Dog also offers gauge pods, which will allow you to mount the GT on the
pillar of your vehicle.
The gauge pods are vehicle specific, so you will need to get the part number
that matches your vehicle make and year.
Visit our website at http://www.bullydog.com/product_listing.php?prodlist=Gauge%20Pods
for more information.
28
Page 30

50 STATE GT DIESEL
INSTALLING THE TUNE
In order to enjoy additional horsepower and other advantages of tuning your vehicle, you need to use
the Install Download feature.
The process is basically the same when you are installing, changing settings, or returning to stock.
CAUTION! This option actively reprograms the engine computer in your vehicle – if the process is interrupted because of poor prepa-
ration you will have problems which could prevent you from using the GT or even being able to drive your vehicle for a few days.
In order to have the best installation experience possible, it is important to review the instructions and pay close attention to the
preparation steps listed below:
Important Preparation Steps
Choosing an Appropriate Time and Place to Install
Do NOT install if you will need to use the vehicle to get somewhere soon.
DO set aside at least an hour for this part of installation.
Under optimal circumstances the installation can be completed in less than 30 minutes.
If you encounter any problems, you will need at least an hour to resolve the problem.
Do NOT install if the vehicle is in a remote location.
DO make sure that you have access to a phone and a computer with internet access.
DO update the GT online by using the Update Agent before you try to install.
You might need to connect to a computer to get special les from technical support if you encounter problems during the install.
Do NOT install if you do not have a way to contact technical support.
DO make sure that you can contact Bully Dog technical support.
Technical support is open Monday-Friday, 8 a.m. – 5 p.m., Mountain Standard Time.
If you decide to install on Friday evening and encounter problems, you might not be able to use your vehicle until you are able to contact technical
support on Monday.
See page 44 for more information about contacting technical support.
Managing Other Electronics
DO turn o all factory installed electronics inside the vehicle. This includes:
Headlights, heater, air conditioning, stereo, DVD players, etc.
Failing to turn o all electronics can prevent a successful download.
DO disconnect additional electrical appliances. Remove any chargers or electrical devices connected to:
Cigarette lighters, USB ports, or other types of electrical outlets in the vehicle
DO disconnect any other aftermarket electronic device. This includes:
Trailer brakes, stereo, alarm, CB, remote start, DPF delete, Sirius/XM satellite radio, etc.
Any electrical device that was installed after the vehicle was released from the factory.
Disconnect these items from the fuse box, or other power connection. You do not have to completely physically uninstall them; just make sure they
are not getting power.
Note: It is important to make sure that electrical devices are turned off or disconnected as described above during you are installing the GT tune to your vehicle.
Once the download is installed, you can reconnect and turn on all of the electronics that you normally use.
IMPORTANT NOTE: It is not recommended to use the GT with any other electronic tuner designed to increase horsepower.
29
Page 31

INSTALLING THE TUNE
Important Preparation Steps (Continued)
Make SURE that the Battery is Charged
DO make sure that your batteries are fully charged before beginning any download.
It is a good idea to have a battery charger ready to connect to your vehicle if the batteries begin to lose their charge while you are installing the
download.
IMPORTANT NOTE: It is very important that the tuner is not interrupted while it is writing to your engine computer – if the batteries die and the tune is inter-
rupted, it could prevent you from being able to start your vehicle.
Make SURE the Tuner is Ready
DO complete an online update with the Bully Dog Update Agent.
This is a free application available on the Bully Dog website.
This requires a computer with internet access.
See pages 20-27 for instructions on updating the GT.
DO make sure that the tune has not already been installed.
1. Go to the Main Menu on the GT.
2. Choose the Show Settings option.
3. Check what is showing next to Download
If the GT shows Installed
- Connect the GT to the original vehicle and uninstall the tune.
- If this cannot be done, contact technical support for a reset – there is a mandatory fee for this service. See page 36 for more information.
If the GT shows Not Installed you can continue with your preparations to install the download to your vehicle.
If the GT shows Recovery, contact technical support for further assistance. See page 44 for more information about contacting technical support.
50 STATE GT DIESEL
30
Page 32

50 STATE GT DIESEL
INSTALLING THE TUNE
1. Complete the Pre-install steps
• Update GT using Update Agent -pages 17-24.
• Physical Installation -pages 27-28.
• Install tune preparations -pages 29-30.
2. Turn your key to the Run position. (DO NOT start the engine)
3. Go to the Main Menu
4. Choose Install Download
5. Follow the instructions on your GT screen, which will include the following steps:
• You will need to turn your key to dierent positions and then press Continue.
Do NOT start the engine when turning the key to the Run position, or at any other time when you are installing the tune.
• You may be prompted with choices for certain settings like the speed limiter. Many of these are vehicle specic.
See page 16 for more information on these settings.
• If there is a problem or the GT displays an error message, do not change anything and contact technical support immediately.
See page 44 for more information about contacting technical support.
IMPORTANT NOTE: There are certain times when disconnecting or interrupting power to the GT can interfere with the engine computer programming process. If
the engine write is interrupted, the programming on your engine computer can be corrupted. This can cause your vehicle not to start and possibly even require the
ECM to be replaced. The illustration below is an example of one of the times during the installation when it is vital that the power is not disturbed.
Note: There may be times when our technical support team will instruct you to disconnect the tuner even though the screen tells you not to unplug.
6. The GT will indicate when it is finished & then reboot to the Main Gauge Display
• Once the tuner has rebooted to the Main Gauge Display, you can start and use your vehicle like normal.
31
Page 33

INSTALLING THE TUNE
Troubleshooting Installation Problems
Error During Installation
1. Make note of the code number and all information displayed on the screen.
2. Disconnect and update your GT. See page pages 17 for instructions.
3. Make sure that you have disconnected all aftermarket electronics and completed all of the important preparation steps. See pages
29-30 for more information.
4. Try to install the download again.
5. If the error occurs again, contact technical support. See page 44 for more information about contacting technical support.
This troubleshooting procedure applies to all errors, including the following code numbers: 0, 141, 325 (on a 2011 Duramax), 358, 393
Gets Stuck on “Turn Key to Run”
1. Make sure that the key is turned as far as possible without turning the engine on.
2. Turn the key to the O position, then turn it back to the On position.
3. Jiggle the key.
4. Disconnect the GT.
5. Update if this has not already been done. See pages 17-24 for more information.
6. Reconnect the GT.
7. Make sure that all aftermarket electronics are disconnected from the vehicle.
8. Try installing a battery charger to maintain voltage. (This step can solve many problems, even if your battery is new and fully charged).
See page 33 for more information.
9. Try to install the download again.
10. If the error occurs again, contact technical support.
50 STATE GT DIESEL
GT Freezes in the Middle of the Download.
Try installing a battery charger to maintain voltage. (This step can solve many problems, even if your battery is new and fully charged).
See page 30 for more information.
32
Page 34

50 STATE GT DIESEL
UNINSTALLING RETURNING TO STOCK
What does this mean?
“Uninstalling the tune” and “returning to stock” are different ways to describe the same thing: writing the original (stock)
information to the engine computer so it uses the settings that it used before you installed your GT. Doing this also sends a
signal to the GT to let it know that it is no longer installed on a vehicle, which will allow you to install the tune at a later time.
The GT will not allow you to install if the tune has already been installed on a vehicle.
When to Return to Stock
You should return to stock in ALL of the following situations:
• EVERY TIME you take your vehicle in for any type of service. It is a very common practice for the engine computer to be “ashed” (reprogrammed) during all types of service, even routine maintenance. If the tune from the GT still installed when the engine computer is
ashed, it can cause problems when you want to use your GT in the future. See page 40 for more information.
• If you want to install the GT on a dierent vehicle. For instance
If you have a second vehicle and want to try the GT on it. The GT can only be used on one vehicle at a time.
If you want to let a friend try the GT.
If you have decided to sell the GT to someone else.
• If the battery is having problems and could possibly go dead.
• If you need to disconnect the battery for any reason.
IMPORTANT NOTE: If you do not return your vehicle to stock, you may have to call in to technical support to have your GT reset. There is a mandatory fee for this
service. See pages 36 and 44 for more information about the reset fee and contacting technical support.
What if I Don’t Return to Stock?
Here are some common examples:
• If you take your vehicle in for service, they will “ash” the engine computer. Even if you ask them not to, any dealer or shop will do this
automatically – it is standard procedure for any vehicle they see and they really can’t help themselves from following this ingrained
habit. What they are doing is actually writing an updated le over any information that is currently saved in your engine computer. This
includes the tune from your GT, so basically the tune is no longer installed and you will not be able to use the power level settings or any
other options – but the GT doesn’t know that, it still thinks that the tune is saved to your engine computer. Unless you go through the
uninstall process with your GT, it will still show as installed and will not allow you reload the tune on your vehicle or on any other vehicle.
The only way to resolve this problem is to contact technical support and have the GT reset – there is a mandatory fee for this service. See
page 36 for more information about the reset and fee.
• If you sell or trade-in your vehicle you will not be able to install your GT on another one without calling technical support to have the GT
reset. See page 36 for more information about the required fee for the reset service.
• If you sell the GT to another person without uninstalling the tune from your vehicle rst, they will not be able to use it. You will probably
have negative consequences like an upset buyer, having to refund the purchase price or cover the cost of a reset, a negative review, and
bad karma. See page 36 for more information about resetting the GT and the mandatory fee.
By now, you may have noticed a pattern: if you do not return your vehicle to stock and something happens to your engine computer, you
will need to call and pay the fee in order to have the GT reset. Page 36 has more information about the reset process and the required
fee.
33
Page 35

UNINSTALLING RETURNING TO STOCK
How to Return to Stock
There are two ways to return your vehicle to stock.
IMPORTANT NOTE: Both methods are very similar to installing the tune to your vehicle, so you should make the same preparations and take the same precautions.
This means choosing a good time and place, making sure the battery is charged, pulling fuses (if necessary), disconnecting aftermarket electronics, etc.
See pages 29-30 for more information.
IMPORTANT NOTE: There are certain times when disconnecting or interrupting power to the GT can interfere with the engine computer programming process.
If the engine write is interrupted, the programming on your engine computer can be corrupted. This can cause your vehicle not to start and possibly even require
the ECM to be replaced.
This illustration is an example of one of the times
during the uninstallation when it is vital that
the power is not interrupted and the tuner is not
disconnected from the vehicle.
50 STATE GT DIESEL
Note: There may be times when our technical support team will instruct you to disconnect the tuner even though the screen tells you not to unplug.
Uninstall Download
1. Choose the Uninstall Download option from the Main Menu.
2. Follow the instructions shown on the GT screen.
3. When the GT gives you a message that the tune has been removed, disconnect the GT from your vehicle.
4. Check to make sure the tune has been removed from your vehicle. See page 35 for instructions on how to do this.
5. Test your vehicle to make sure that it starts. If not, see the troubleshooting FAQ on page 46.
If this option is not listed on the Main Menu, use the option described on the next page.
Install Download > Return to Stock
1. Choose the Install Download option from the Main Menu.
2. Follow the instructions shown on the GT screen.
3. Choose “Return to Stock” when the GT gives you the option between “Change Settings” or “Return to Stock”.
4. Follow the instructions shown on the GT screen.
5. Check to make sure the tune has been removed from your vehicle. See page 35 for instructions on how to do this.
6. Test your vehicle to make sure that it starts. If not, see the troubleshooting FAQ on page 46.
34
Page 36

50 STATE GT DIESEL
UNINSTALLING RETURNING TO STOCK
How Do I Know if the GT is (Still) Installed?
There are two ways to check if the tune is currently installed:
Main Screen
1. Look at the lower right corner of the main display screen.
2. If there is a box that reads “Power level setting not available until download is installed” the tune is not installed.
• If there is anything else in this part of the main screen, the tune is probably installed. You can double check by using the method described below.
Show Settings Screen
1. Go to the Main Menu.
2. Scroll down.
3. Choose Show Settings.
4. Check to see what the GT shows next to “Download”.
5. If it shows:
• Installed – the tune is still loaded on the engine computer.
• Not Installed – the tune has been uninstalled and the vehicle is returned to stock.
• Recovery – there is a problem and you should contact technical support. See page 49 for more information.
35
Page 37

MORE INFORMATION
Pyrometer Calibration
What is Pyrometer Calibration?
Pyro calibration is a way to nd the best temperature to use for the GT defueling or warning setting for your vehicle. This will help you
prevent heat damage to your engine.
How to Calibrate Your Pyrometer
1. Return your truck to stock by uninstalling the tune. See page 33 for more information.
2. Find a steep hill with a long road and a high speed limit.
3. Wait for a hot day.
4. Set up a heavy load on your vehicle.
5. Haul the load to the top of the hill.
6. Check the pyrometer temperature.
7. Add 150°F.
8. Change the defuel setting (or the setting to display a warning) to the new temperature.
50 STATE GT DIESEL
Reset Fee
Why is This Policy in Place?
In the past, our technical support department has been ooded with people needing to reset their tuners. Because of this, we were not
able to support the other people who needed help. The extra calls were coming for two dierent reasons:
1. Despite our best attempts to educate customers about the importance of uninstalling the tune before selling their vehicle or having it serviced,
people did not remember or did not take seriously the requirement of returning their vehicle to stock and were calling in repeatedly.
2. Some dishonest people were installing the tune on multiple vehicles and calling in to have the unit reset in between each tune. The tuners are
designed to only be installed on one vehicle at a time.
Once the policy for the reset fee was created, the number of calls to request tuner resets was signicantly reduced and we were able to
improve our support to everybody.
The reset process is relatively simple and a technician can help you complete the reset over the phone. See page 44 for more information about contacting technical support.
Performance Testing Software
This software allows you to download saved Performance Testing data from your GT (see page 10 for more information) to your computer and display the information as a graph for easy analysis.
You will be able to get graphs and raw Excel data for: speed, RPM, horsepower, and torque. You can print drag racing time slips, save and rename
tests, and download up to 20 tests from your GT at one time.
Visit www.bullydog.com/performance_testing.php to download this free software
36
Page 38

50 STATE GT DIESEL
MORE INFORMATION
Windows Update
Windows XP
1. Click the Start button.
2. Click All Programs
3. Click Windows Update
4. Windows Update will check to see if you have the current version of the updating software:
37
Page 39

MORE INFORMATION
Windows Update (continued)
Windows XP
5. If your computer doesn’t have the most recent update software, your browser will display a pop-up bar like the one shown below:
If your computer shows that
message, click on the bar and
then click Install ActiveX
Control:
If your computer doesn’t show
that message, skip to step 9.
50 STATE GT DIESEL
6. When the Internet Explorer Security Warning pops up, click Install:
7. Click the Install Now button.
8. Windows will then automatically
download and install the latest Update
Software.
38
Page 40

50 STATE GT DIESEL
MORE INFORMATION
Windows Update (continued)
Windows XP
9. At this point, you have two choices:
• Express: Choose this option if you prefer an automatic update and have the time to wait for all of the updates to nish downloading and install-
ing. Depending on how many updates are required, this could take several hours. It is also likely that you will have to restart your computer in the
middle of the process and may even have to run the Express Update more than once before your computer is completely up to date.
• Custom: Choose this option if you prefer to manually locate and install the update that your computer needs to be able to install and run the Bully
Dog Update Agent.
NOTE: Because the Express update is relatively automated and quite time consuming, these instructions will only show you how to update using the Custom
option. Either option will work; however, some of the updates completed during the Express update cannot be uninstalled, so you should be sure before
choosing that option.
10. Windows will check your computer for updates:
NOTE that this could take several seconds or several minutes
Your computer
might generate an
Internet Explorer
pop up message
about information and privacy. Click Yes. (You might also want to check the box as
shown in the picture to prevent your computer from showing the pop up again.)
11. Your computer might prompt you to upgrade
some components of Windows Update. If you see the
screen below, click Download and Install Now, as
shown below. If your computer does not display this
screen, skip to step 14.
39
Page 41

MORE INFORMATION
Windows Update (continued)
Windows XP
12. Your computer will then download and install the updates for the Windows Update software.
50 STATE GT DIESEL
When your computer has nished downloading and
installing the updates, you will be prompted to restart
your computer. You must restart in order to proceed to
the next step in the update process.
13. Once your computer has restarted, repeat steps 1,2,3, and 9 (open Windows Update and click Custom).
40
Page 42

50 STATE GT DIESEL
MORE INFORMATION
Windows Update (continued)
Windows XP
14. After checking for the latest
updates for your computer,
Windows Update will display a
list of updates that are available.
First, scroll down and clear any
of the High Priority updates that
may already be selected.
15. Once you have cleared the
other updates, click on Software,
Optional.
16. Click the box to select the
Microsoft .NET Framework
3.5 Service Pack 1 and .NET
Framework 3.5 Family Update
(KB951847) x86.
41
Page 43

MORE INFORMATION
Windows Update (continued)
Windows XP
17. Once the .NET Framework 3.5 Service Pack is selected, click on Review and Install Updates.
50 STATE GT DIESEL
18. Make sure that the .NET
Framework is the only update
selected, then click Install
Updates.
42
Page 44

50 STATE GT DIESEL
MORE INFORMATION
Windows Update (continued)
Windows XP
19. Windows will download the .NET Framework 3.5 Service Pack
update.
Windows will also automatically initialize the installation of the
update. This step could take a few minutes and it might seem like
your computer is stuck, but this is normal and your computer will
continue the process automatically when it is ready.
20. Once the .NET installation is complete, click Restart Now.
21. Once your computer has restarted, the update process is
Complete!
You can now install and run the Bully Dog Update Agent and
update your GT.
For more information about updating your GT, see pages
17-24.
Then, your computer will begin installing the update. Again,
this process can take several minutes to get started.
Eventually, your computer will move forward with installing
the .NET Framework update.
43
Page 45

CONTACTING TECHNICAL SUPPORT
Technical Support is open Monday-Friday, 8 a.m. – 5 p.m., Mountain Standard Time.
The phone number to contact technical support is (940)783-9915.
You should have all of the following items available when contacting technical support:
• Your GT tuner
• Your vehicle
• A computer with internet access
USB MODE
When you connect your GT to your computer via a USB cable, it enters USB Mode.
In order to use the Update Agent, keep the GT in USB Mode.
If you want to use your computer to power the GT and allow you to access some of the GT’s functions when it is not connected to your
vehicle, you can Abort USB Mode. In order to Abort USB Mode, press the second key from the top on the left side, as shown in the picture
below:
50 STATE GT DIESEL
44
Page 46

50 STATE GT DIESEL
FAQS/TROUBLESHOOTING
Engine Warm-Up Mode
Q. My engine is stuck in warm-up mode and I can’t change the power level. What is going on and how can I fix this?
A. This is a feature that we have included with the GT to help people, particularly fleet managers, ensure that their vehicles are
properly warmed up before additional power level settings can be used. In some vehicles, this option doesn’t turn off when it
should, either because the sensor is not present or the setting is too high.
How to fix this problem:
1. Go to the Main Menu.
2. Choose Vehicle Setup.
3. Choose Set Defuel Levels.
4. Scroll down to the bottom of the list.
5. Choose Startup Coolant Temp Level
6. Turn this setting o.
7. Go back to the Main Display screen.
My GT Won’t Turn Off
Q. I have turned my vehicle off and removed the key – everything else has turned off. Why won’t my GT turn off?
A. The power switch on the OBDII adapter plug is in the “wrong” position. If you want the GT to turn on and off along with the rest
of your vehicle, you will need to make sure that the power switch is in the “correct” position and that the power cable is installed
correctly. See page 26 for more information about installing the power cable.
My Vehicle Won’t Start after I installed the Download
Q. My truck won’t start after I installed the download, what happened and how do I fix this?
A. The GT encountered a problem when it was writing to the engine computer. Follow these steps to resolve the problem:
1. Return the truck to stock. See page pages 33 for more information about this step. Test to see if the engine starts.
2. Update the GT. See pages 17-24. for more information about this step.
3. Install the download again. Test to see if the engine starts.
4. Contact technical support if the problem persists. See page 44 for more information about contacting technical support.
45
Page 47

FAQS/TROUBLESHOOTING
My Vehicle Won’t Start after Returning to Stock
Q. My truck won’t start after I uninstalled the tune. How do I fix this?
A. Follow these steps to get your truck running with the tune uninstalled:
1. Make sure that you have completed all of the preparation steps on page pages 29-30.
2. Go to the Main Menu on the GT.
3. Scroll down and choose the Show Settings Option.
4. Check what the GT is showing next to Download.
• Recovery: go to step 4.
• Installed or Not Installed: Contact technical support – see page 44 for more information about contacting technical support.
5. Go back to the Main Menu
6. Choose the Install Download option
7. Conrm that you want to complete the Recovery.
8. Follow the onscreen instructions.
9. Once the recovery is complete, try to start your vehicle.
50 STATE GT DIESEL
10. If your vehicle still will not start, contact technical support – see page 44 for more information about contacting technical support.
Note: If the Recovery process completes successfully, your truck is returned to stock. You will not need to do another step to uninstall the tune or return the
truck to stock. If the Show Setting screen still shows Recovery next to Download, contact technical support to have the unit reset
(there will not be a charge to reset from Recovery Mode).
My Vehicle isn’t Listed under Change Vehicle
Q. Why isn’t my vehicle included in the list under the Change Vehicle option?
A. Chevrolet owners should choose the GMC option that matches the year of their vehicle. If your vehicle is very new or very old, it
may not be supported yet.
What Kind of Increased Performance Can I Expect?
Q. How much extra horsepower will my vehicle get? What can I expect for fuel efficiency improvements?
A. See page 2 for information about additional horsepower. Many people do find that the increased horse power helps them
get the most mileage out of their fuel as possible. However, since fuel efficiency varies so much between different vehicles and
drivers, there is no way to accurately predict fuel mileage increases. To get the best gas mileage possible, make sure to calibrate
and use the Driving Coach to improve your driving habits. See pages 11-13 for more information about the Driving Coach.
46
Page 48

50 STATE GT DIESEL
FAQS/TROUBLESHOOTING
DPF Delete
Q. Will the GT delete my DPF?
A. No. Bully Dog does not offer DPF delete. Bully Dog will never offer DPF delete.
Crazy Larry
Q. Can I get the Crazy Larry tune on my GT?
A . No. Crazy Larry is no longer available. Due to EPA regulations, it will not be offered again.
I Don’t Feel Extra Power
Q. Why can’t I feel the extra horse power?
A. If your vehicle was just returned from the dealer, you might have forgotten to return the vehicle to stock. See pages 33-35
for more information on returning to stock. See page 35 for more information on checking to see if your vehicle was returned
to stock and what to do if it was not returned to stock. If you can’t feel the extra horse power after installing the tune, contact
technical support. See page 44 for more information on contacting technical support.
PTO
Q. What is the PTO option during GT setup?
A. The PTO option is a power take-off option. If this hardware option is installed on your truck, it will allow you to use your en-
gine to provide power to external devices. This option is not available on most vehicles, which is why the GT will most likely only
give you the “No” option during the install process.
47
 Loading...