

Buffalo TeraStation WSS WSH5010N6 User Manual
Network Attached Storage
TeraStation WSS WSH5010N6
User Manual
Please make sure to read this manual before using and follow the procedures. If you have any inquiries about
the product, contact the number on the warranty statement or the packing box. Do not discard this manual, the
warranty statement, or the packing box.
Americas: www.buffaloamericas.com
Europe: www.buffalo-technology.com
Asia Pacific: www.buffalo-asia.com
35021340-01
May, 2018

Contents
Chapter 1 Getting Started .............................................5
Diagrams ...........................................................................................5
Opening Windows Storage Server ..................................................7
Changing Settings ...........................................................................7
Configuring Date and Time ....................................................................... 7
Creating a Shared Folder ........................................................................... 8
Turning the TeraStation On and Off............................................. 13
Installing Antivirus Software ....................................................... 13
Chapter 2 Preinstalled Software ................................ 14
RAID Builder .................................................................................. 14
Buffalo Dashboard ........................................................................ 15
Errors and Statuses on Buffalo Dashboard ............................................ 16
Email Notification ......................................................................... 17
Buffalo Replication ....................................................................... 18
TeraStation Backup & Replication Folder Settings ..................... 18
Chapter 3 Storage Management ................................ 20
Working with Volumes .................................................................. 20
Notice When Creating Volumes ..............................................................20
Volume Types ...........................................................................................20
Creating a Volume ......................................................................... 20
1

Chapter 4 Backup and Replication ............................. 22
Backing Up in Windows Storage Server ...................................... 22
Preparing a Backup Destination ............................................................. 22
Recovering Backup Data .........................................................................27
Configuring Replication ............................................................... 31
Differences Between Buffalo Replication and DFS Replication ...........31
Before Using Replication ......................................................................... 32
Buffalo Replication ..................................................................................32
DFS Replication ........................................................................................ 35
Chapter 5 Additional Settings .................................... 61
Changing Server Name, Workgroups, and Domains .................. 61
Changing the Password ................................................................ 63
Administrator’s Password .......................................................................63
Passwords for Other Users ......................................................................64
Adding a User ................................................................................ 65
Connecting with Standard Accounts ........................................... 66
Adding a Group ............................................................................. 70
Enabling Email Notification ......................................................... 72
Configuring Email Server ........................................................................72
Specifying TeraStation Reports ..............................................................74
Specifying Windows Event Logs .............................................................76
Acquiring Windows Event Logs .................................................... 77
Chapter 6 Drive Replacement ..................................... 78
LEDs ................................................................................................ 78
Drive Replacement Procedure ..................................................... 78
2

“ONE DRIVE DOWN” Is Displayed on the LCD Panel .............................. 79
“TWO DRIVE DOWN” or “MULTIPLE DOWN” Is Displayed on the LCD
Panel .........................................................................................................81
“SYSTEM DOWN” Is Displayed on the LCD Panel ................................... 85
Replacing a Non-Malfunctioning Drive .................................................90
Chapter 7 Utilities ........................................................ 91
NAS Navigator2 for Windows ....................................................... 91
Changing the IP Address .........................................................................93
NAS Navigator2 for macOS .......................................................... 93
Changing the IP Address .........................................................................95
NovaBACKUP ................................................................................. 95
Chapter 8 Troubleshooting ......................................... 96
The TeraStation Becomes Unaccessible ...................................... 96
Shared Folders Suddenly Do Not Open ....................................... 97
Unable to Access the Shared Folder or the System Becomes
Unstable ......................................................................................... 97
Drive Status Cannot Be Found ..................................................... 97
LCD Panel Displays a Different IP Address .................................. 97
Resynchronization Regressed When TeraStation Was Restarted
While Resynchronizing ................................................................. 97
TeraStation Does Not Boot ........................................................... 97
Notice Before Recovery ...........................................................................97
Recovering Windows Storage Server .....................................................98
3

Chapter 9 Appendix .................................................... 99
Default Settings ............................................................................ 99
Errors on the LCD Panel ................................................................ 99
Error Messages ......................................................................................... 99
Characters Added When “ONE DRIVE DOWN” or “SYSTEM DOWN”
Occurs .....................................................................................................101
Specifications .............................................................................. 101
4
Chapter 1 Getting Started
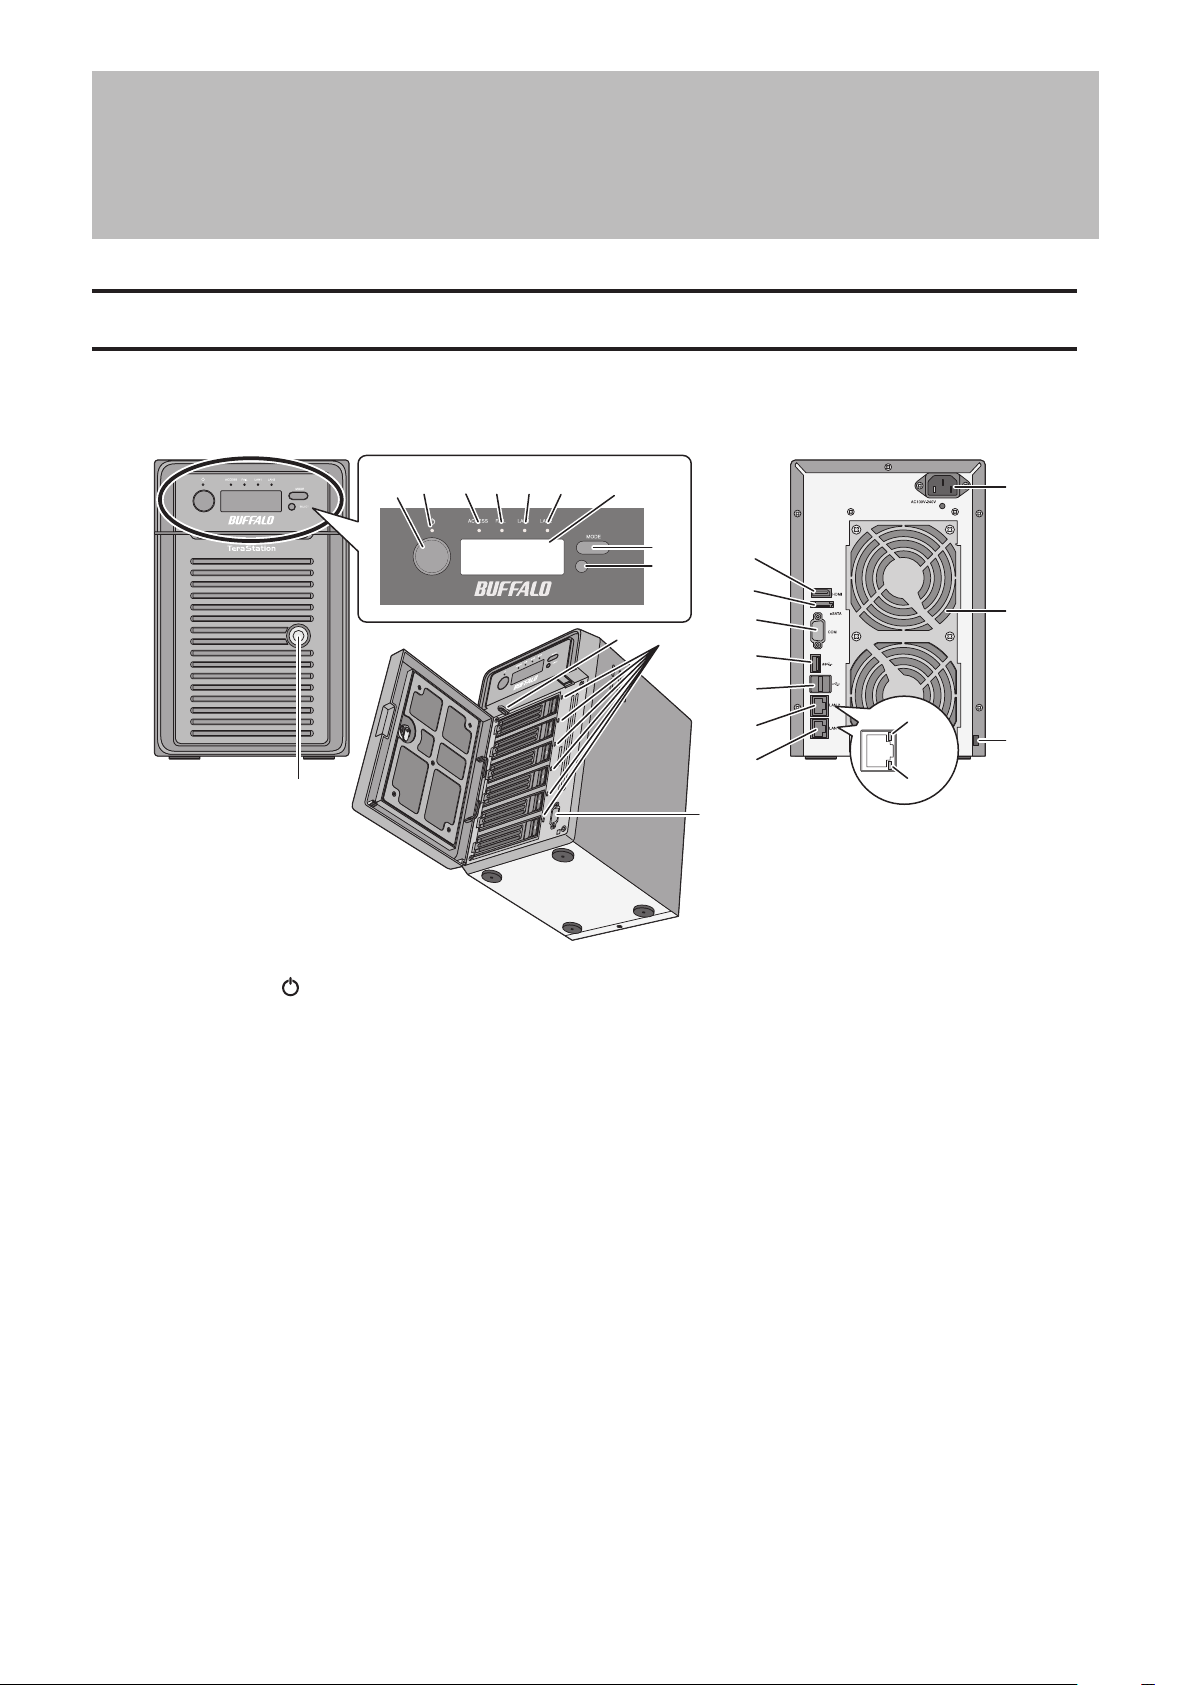
Diagrams
WSH5610DN6
17
10
34 562
8
9
11
12
13
14
15
16
17
18
19
20
24
25
1 Power Button ( )
To power on, connect the power cable and wait for 10 seconds, then press the power button. To power off,
press the power button.
21
22
23
2 Power LED
The LED glows blue when power is on.
3 Access LED
Shows network activity. This LED blinks green when hard drives are being accessed.
4 Fail LED
If there is an error on the drives, this LED glows amber.
Open Buffalo Dashboard to see error messages.
5 LAN1 LED
When LAN port 1 is connected, this LED glows green. It blinks when the connection is active.
6 LAN2 LED
When LAN port 2 is connected, this LED glows green. It blinks when the connection is active.
7 LCD Panel
This display shows the status of many TeraStation settings.
5

8 Mode Button
Not in use normally; if the TeraStation beeps, press this button to stop the beeping.
9 Select Button
Not in use normally.
10 Drive Lock
Open the front panel with the key to replace hard drives or press the reset button.
11 Reset Button
To shut down and reboot the TeraStation, press and hold this button. Do not use this button normally.
12 Status LEDs
Normally, these LEDs blink green when hard drives are accessed. If a drive fails or dismounts, its LED will turn
amber.
13 VGA Port
You can connect a VGA monitor to this port. Connecting a monitor directly to the TeraStation is only supported
for monitoring the progress of Windows Update.
14 HDMI Port
You can connect a HDMI monitor to this port. Connecting a monitor directly to the TeraStation is only
supported for monitoring the progress of Windows Update.
15 eSATA Port
eSATA-compatible hard drives are available with this port. Turn the TeraStation off before connecting the
drives.
16 UPS Port
Connect to a UPS.
17 USB 3.0 Port ( )
Compatible Buffalo USB 3.0 hard drives, USB memory devices, and USB UPSs can be connected. USB hubs are
not supported.
18 USB 2.0 Port ( )
Compatible Buffalo USB hard drives, USB memory devices, and USB UPSs can be connected. USB hubs are not
supported.
19 LAN Port 2
This second Ethernet port may be used for network redundancy or backup. You may connect a second
TeraStation directly to this port for backup.
20 LAN Port 1
Use an Ethernet cable to connect this port to your network.
21 Power Connector
Use the included power cable to connect to an UPS, surge protector, or outlet.
22 Fan
Spins to avoid overheating inside. Do not block the fan.
23 Anti-Theft Security Slot
Use this slot to secure your TeraStation with a cable lock (not included).
6

24 Link LED
Glows amber when the TeraStation is connected to a network.
25 Act LED
This LED shows network activity. It blinks amber when the TeraStation is accessed over the network.
Opening Windows Storage Server
To connect Windows Storage Server, follow the procedure below.
Note: If using macOS, download and install “Microsoft Remote Desktop” from the Mac App Store.
1 Double-click the NAS Navigator2 icon ( ) to start NAS Navigator2.
2 Right-click your TeraStation’s icon and select Open Remote Desktop. For macOS, select the TeraStation’s icon
while holding down the control key, then select Open Remote Desktop.
If the message “The identity of the remote computer cannot be verified. Do you want to connect anyway?” is
displayed, click Yes or Continue.
3 Enter the admin username and password and press the Enter key. The default username and password are
“Administrator” and “password”.
Windows Storage Server will open in the remote desktop.
Changing Settings
Configuring Date and Time
1 Click the time in the system tray of Windows Storage Server.
7
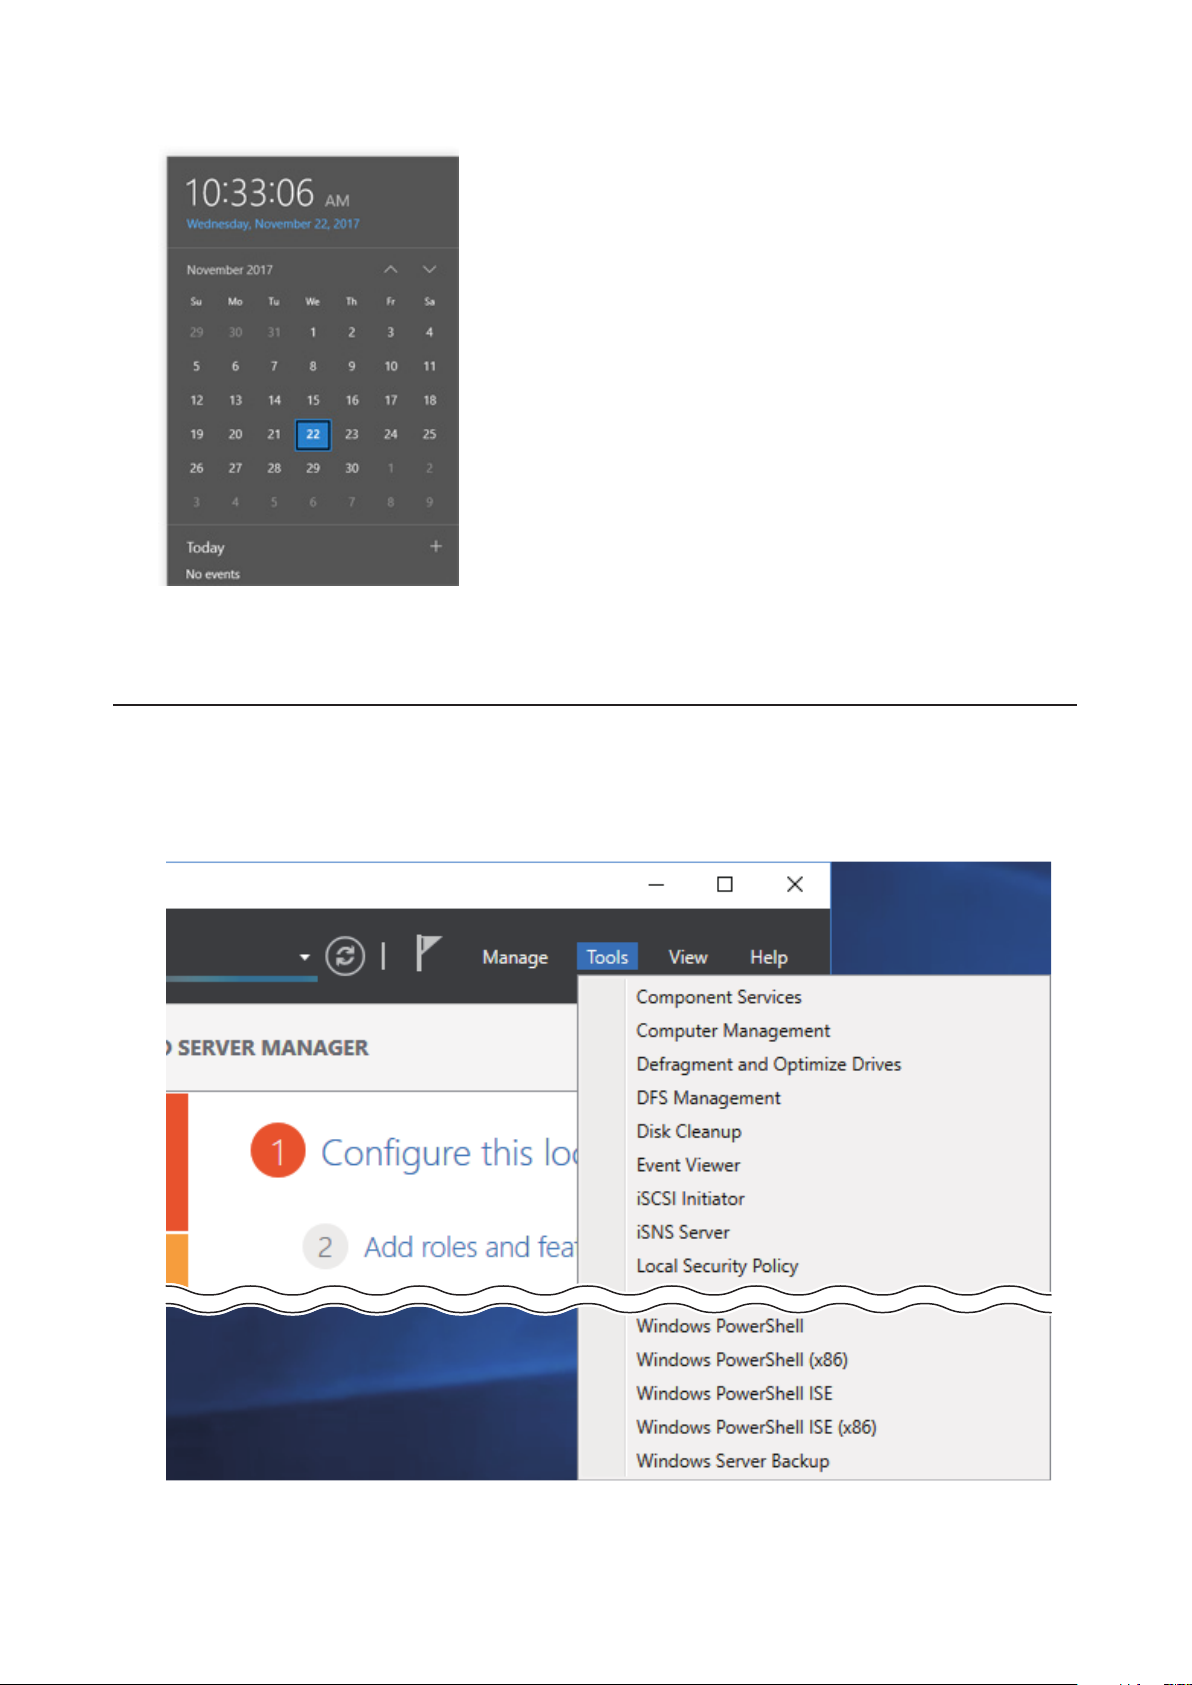
2 Click Change date and time settings > Change date and time, select the current date and time, and click OK.
Note: From the Internet Time tab, click Change settings, then select Synchronize with an Internet time server. The date
and time can be obtained automatically.
Creating a Shared Folder
No shared folders are configured by default. Before using the TeraStation, follow the procedure below to create one
or more shared folders.
This is an example to create a shared folder, named “Share” in drive D, which anyone can access.
1 From Server Manager, click Tools > Computer Management.
2 Click Shared Folders.
8
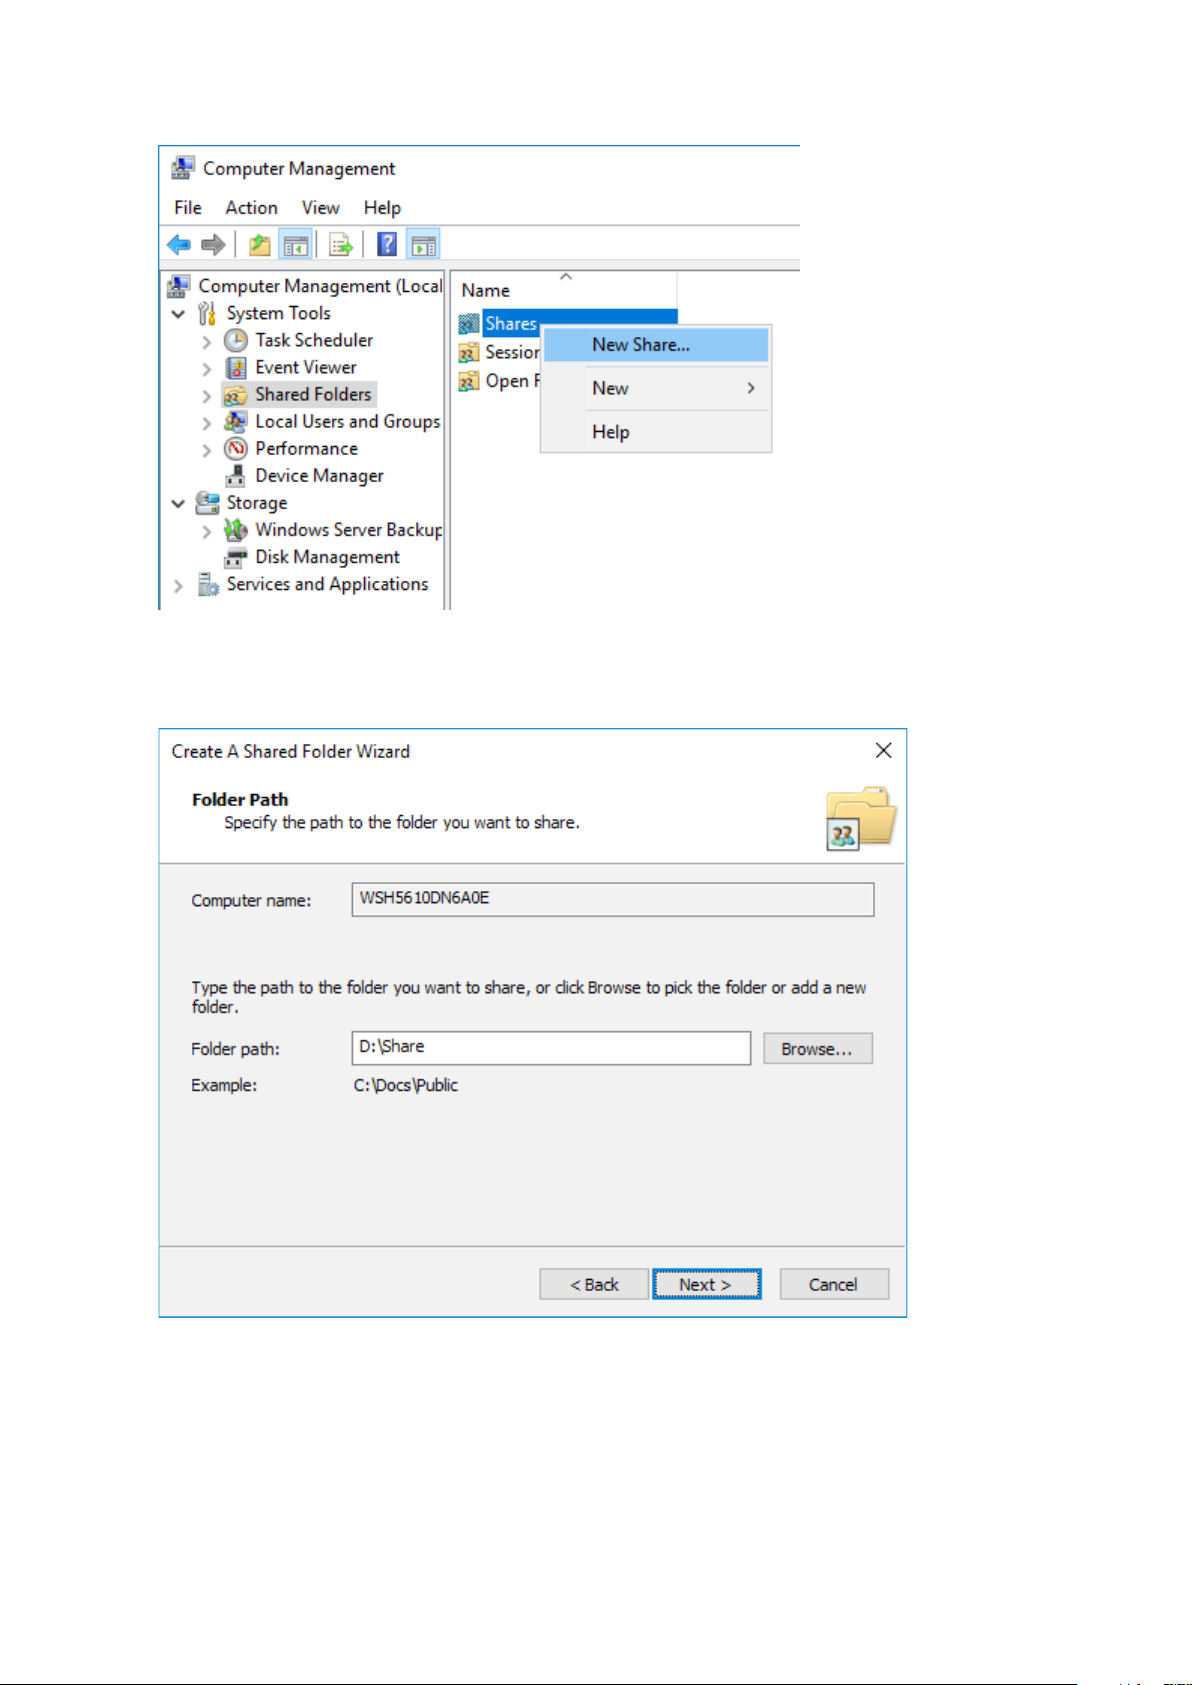
3 Right-click Shares and click New Share.
4 Click Next.
5 Enter the path of an existing folder or a new folder, then click Next.
Notes:
• Enter “D:\Share” into the folder path to create the shared folder for the first time.
• If the message “The system cannot find the specified path. Do you want to create it?” is displayed, click Yes.
9
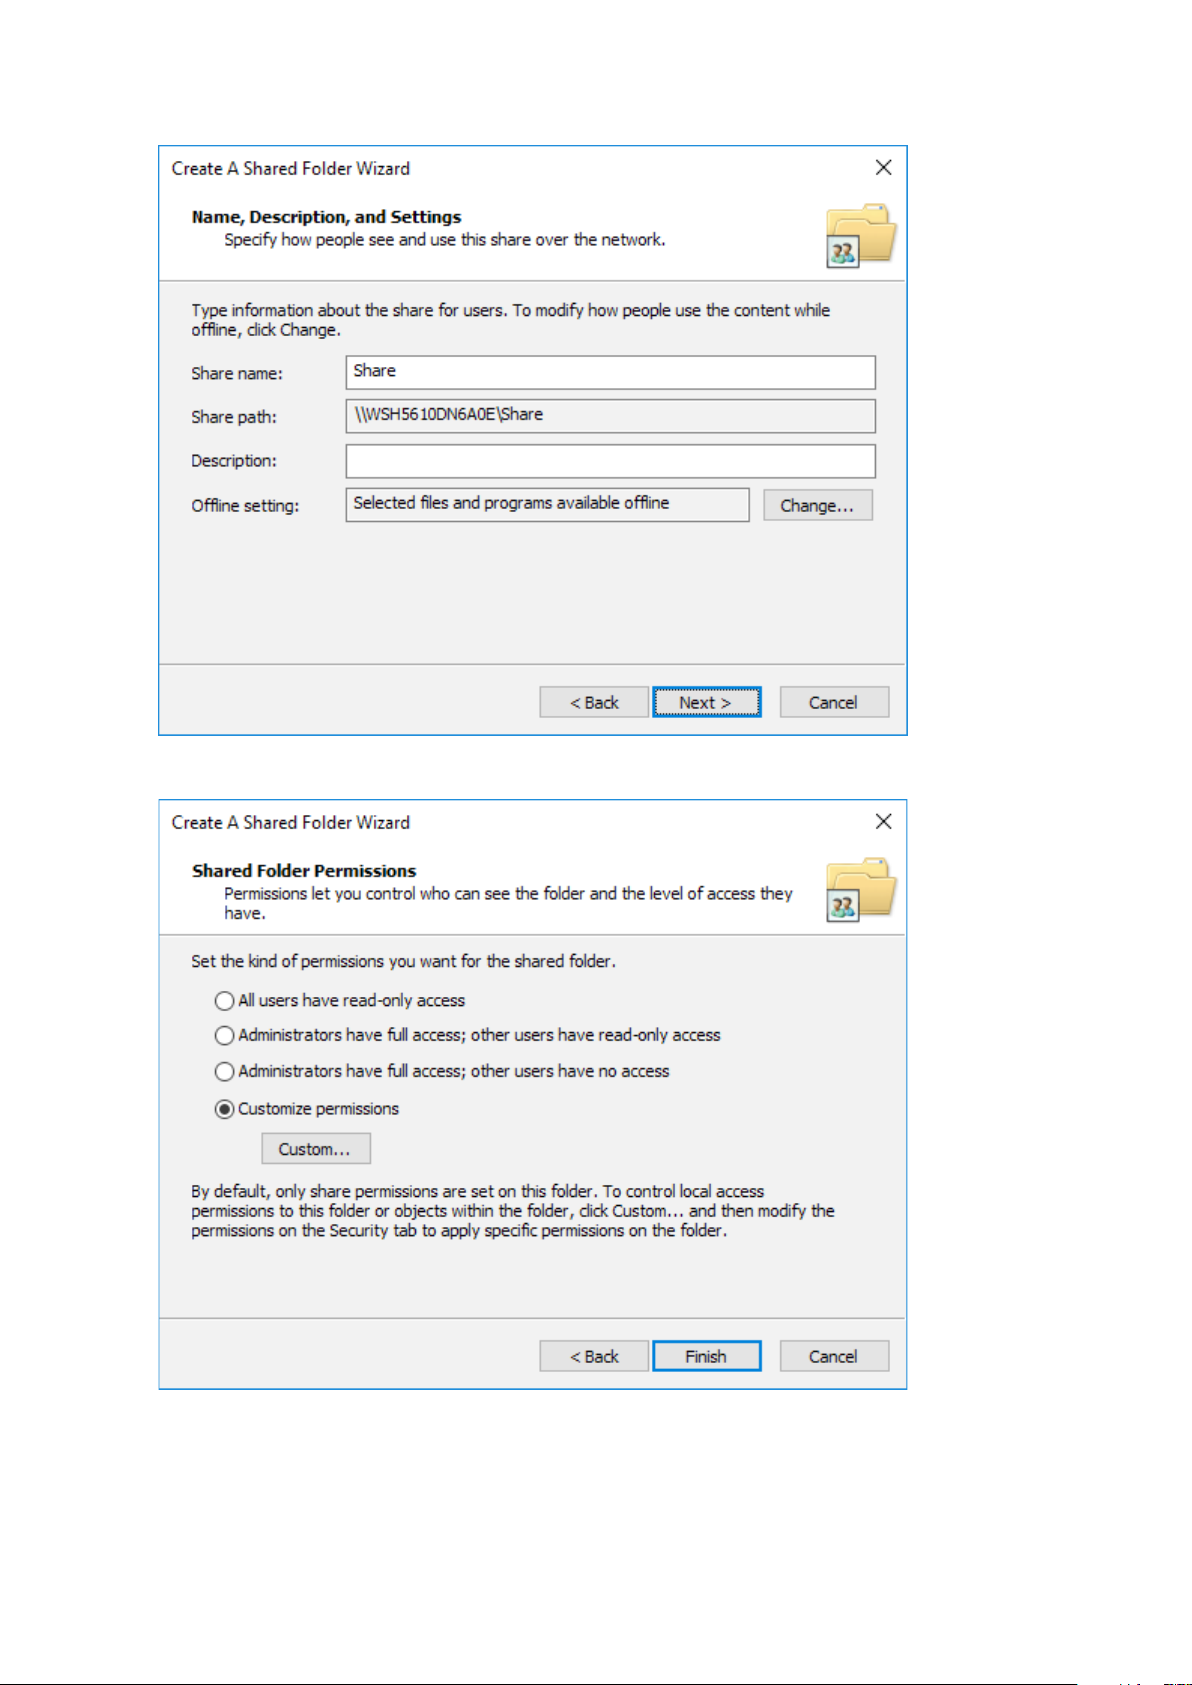
6 Enter a name for the share and a description (optional), then click Next.
7 Select “Customize permissions”, then click Custom.
10
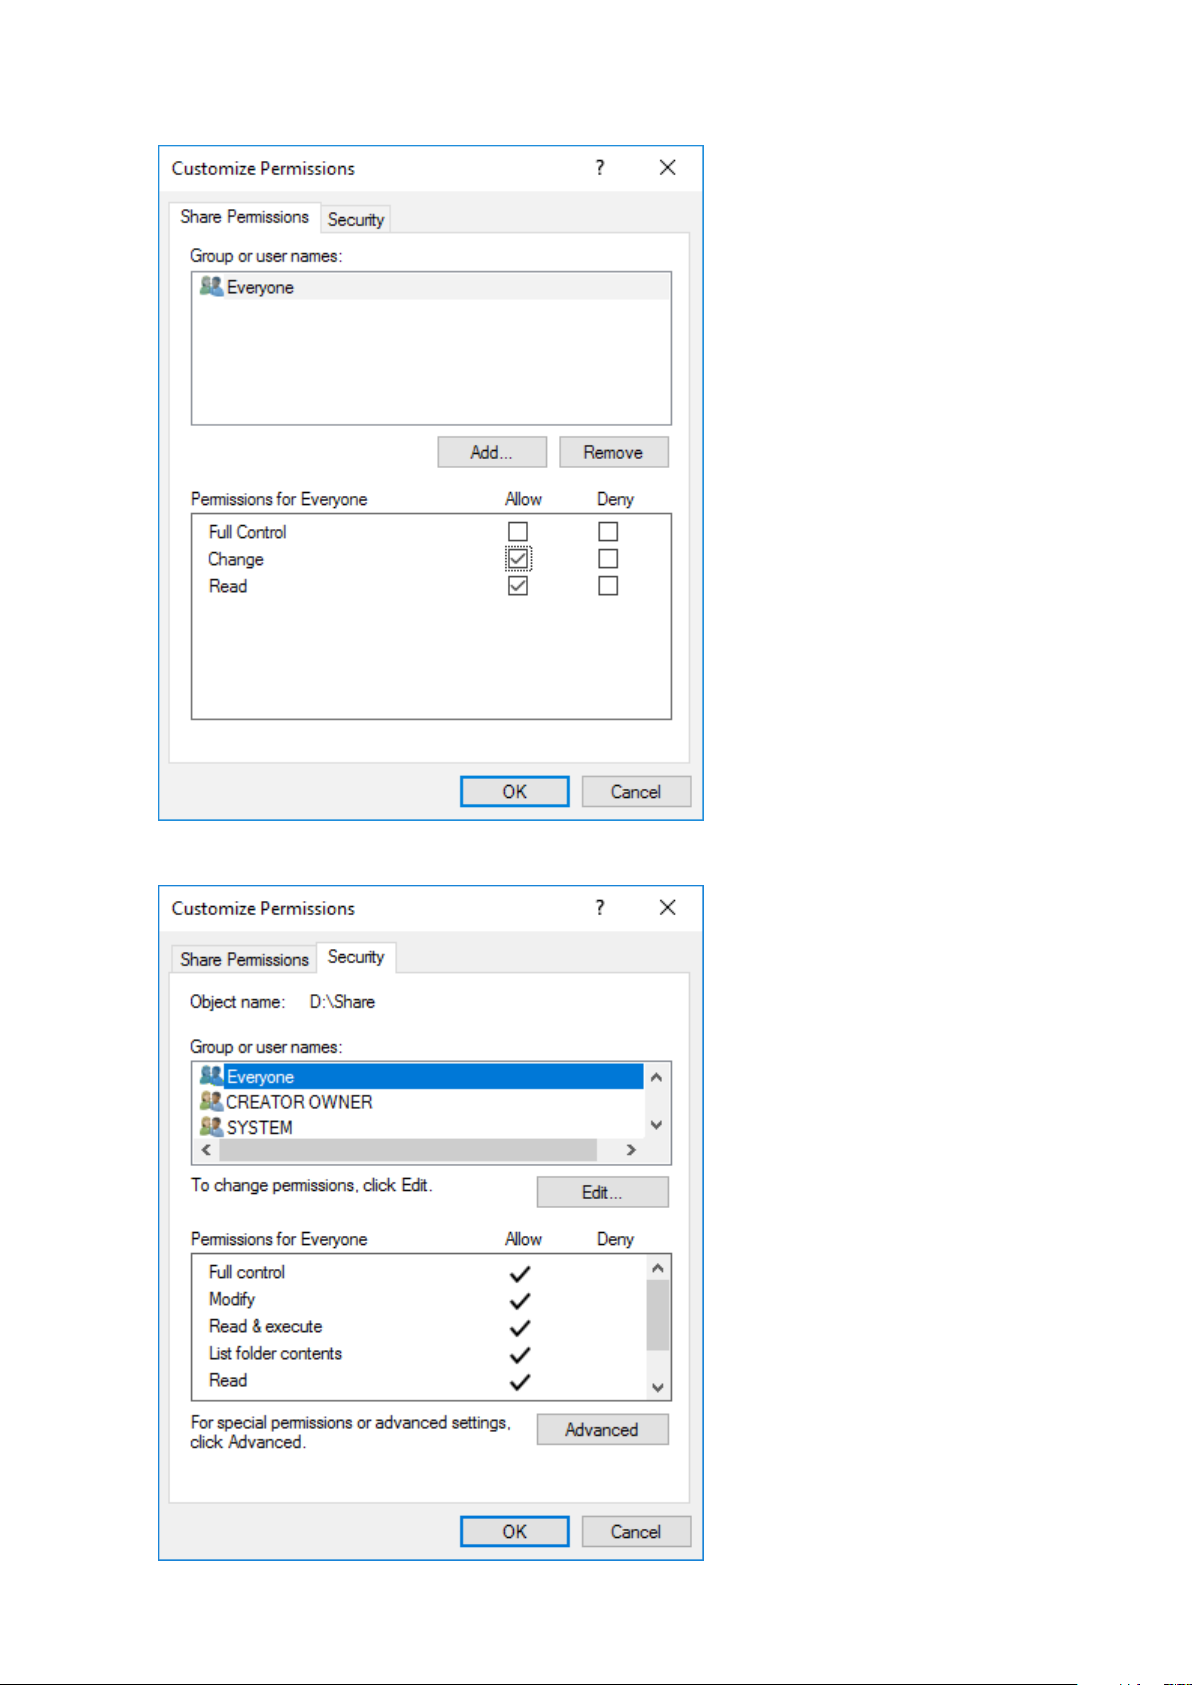
8 Choose Everyone and select the “Allow” checkbox for “Change”.
9 From the Security tab, click Edit > Add.
11
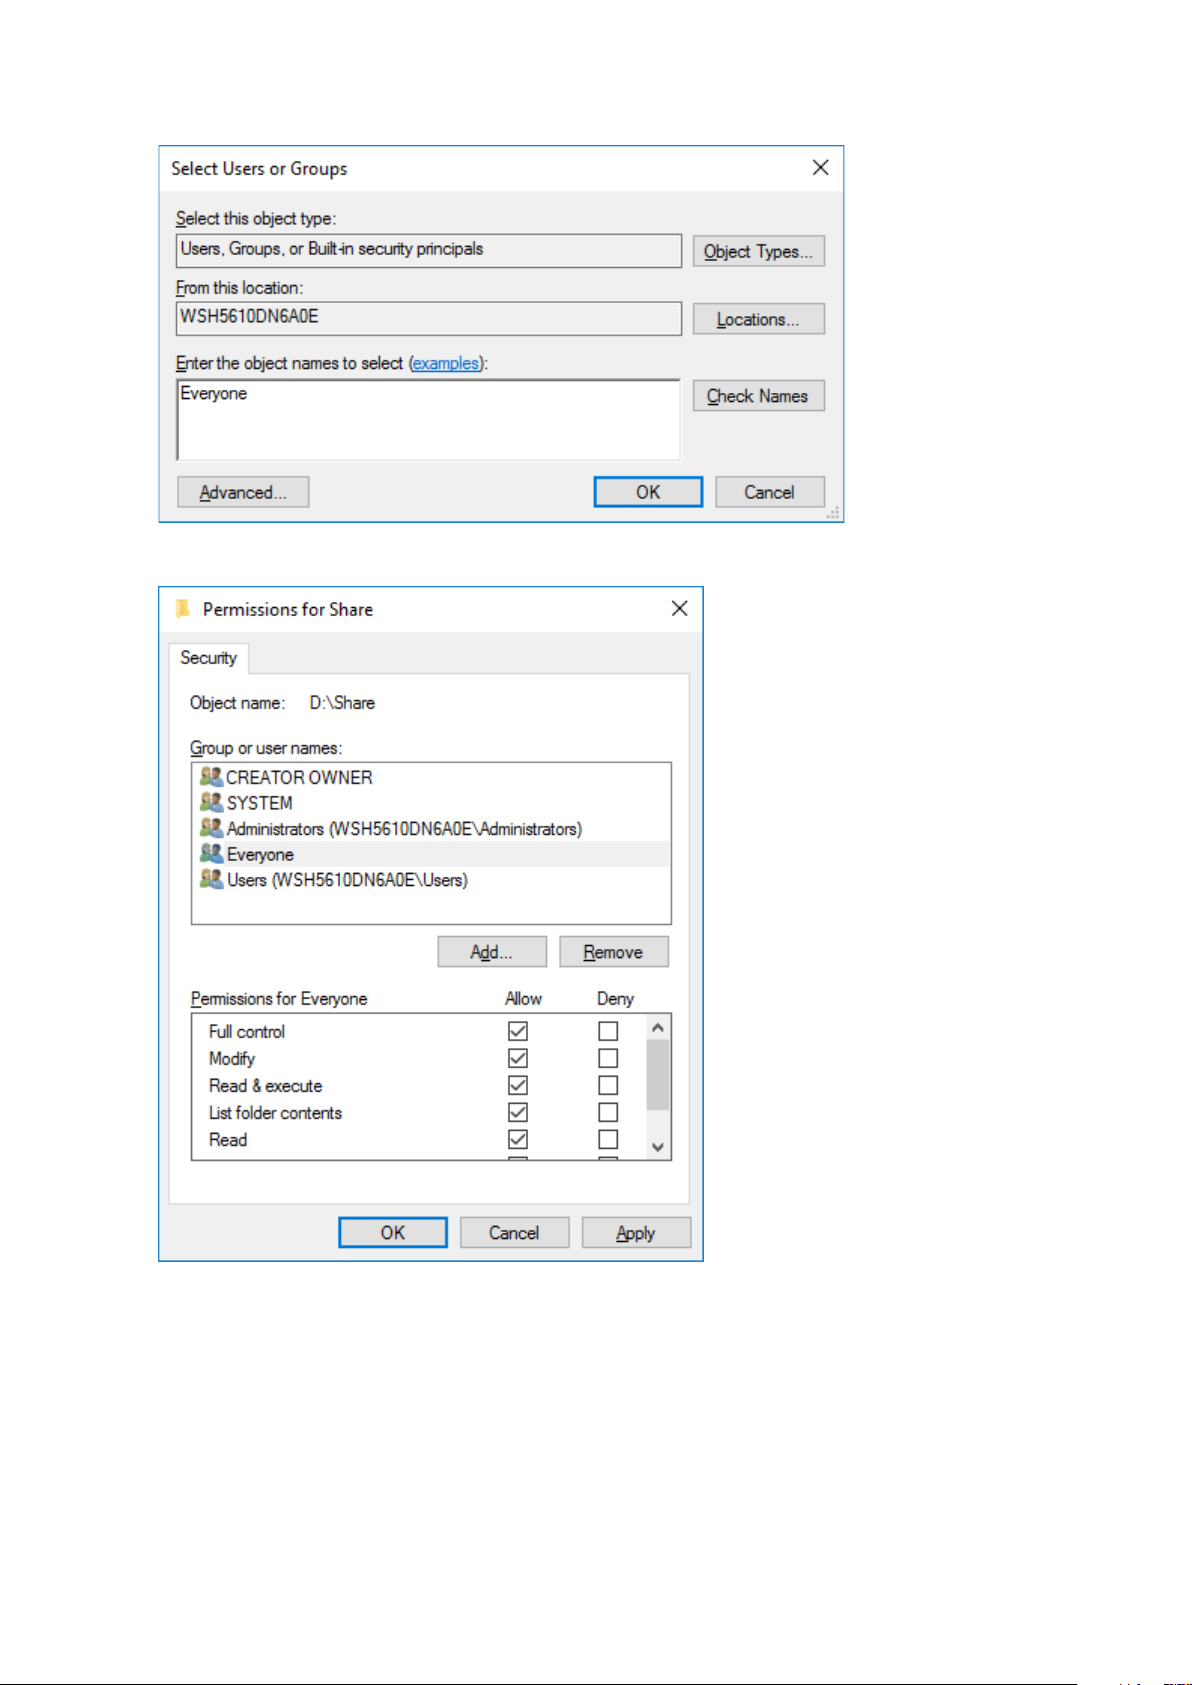
10 Enter “Everyone” under “Enter the object names to select”, then click OK.
11 Choose “Everyone”, then select the “Allow” checkbox for Modify.
12 Click OK > OK > Finish > Finish.
Notes:
Enable a guest account:
(1) From Server Manager, click Tools > Computer Management.
(2) Click Local Users and Groups.
(3) Double-click Users > Guest.
(4) From the General tab, clear the “Account is disabled” checkbox, then click OK.
Enable access permissions:
12
(1) From Server Manager, click Tools > Computer Management.
(2) Click Shared Folders.
(3) Double-click Shares, then double-click the desired shared folder.
(4) From the Security tab, click Edit.
(5) From the Local Users and Groups list, add the users or groups that will be allowed access (the groups and users
must be created beforehand). To allow access for all users, add a guest and change Administrator’s “Access
Permission” to “Full Control”.
Turning the TeraStation On and Off
Press the power button on the TeraStation to turn it on and off. Or you can turn off your TeraStation by following the
procedure below.
1 Click the Start button.
2 Click the icon, then Shut down.
3 Select the reason why you want to shut down, then click Continue.
When the power LED on the front of the TeraStation turns off, the shutdown process is complete.
Note: Always shut down the TeraStation before unplugging it. The TeraStation can be damaged if it is suddenly
unplugged without being powered down first.
Installing Antivirus Software
Installing antivirus software on the TeraStation is strongly recommended. The installation process may vary
depending on which antivirus software you use.
13
Chapter 2 Preinstalled Software
The following software is preinstalled on the TeraStation.
• RAID Builder
• Buffalo Dashboard
• Email Notification
• Buffalo Replication
• TeraStation Backup & Replication Folder Settings
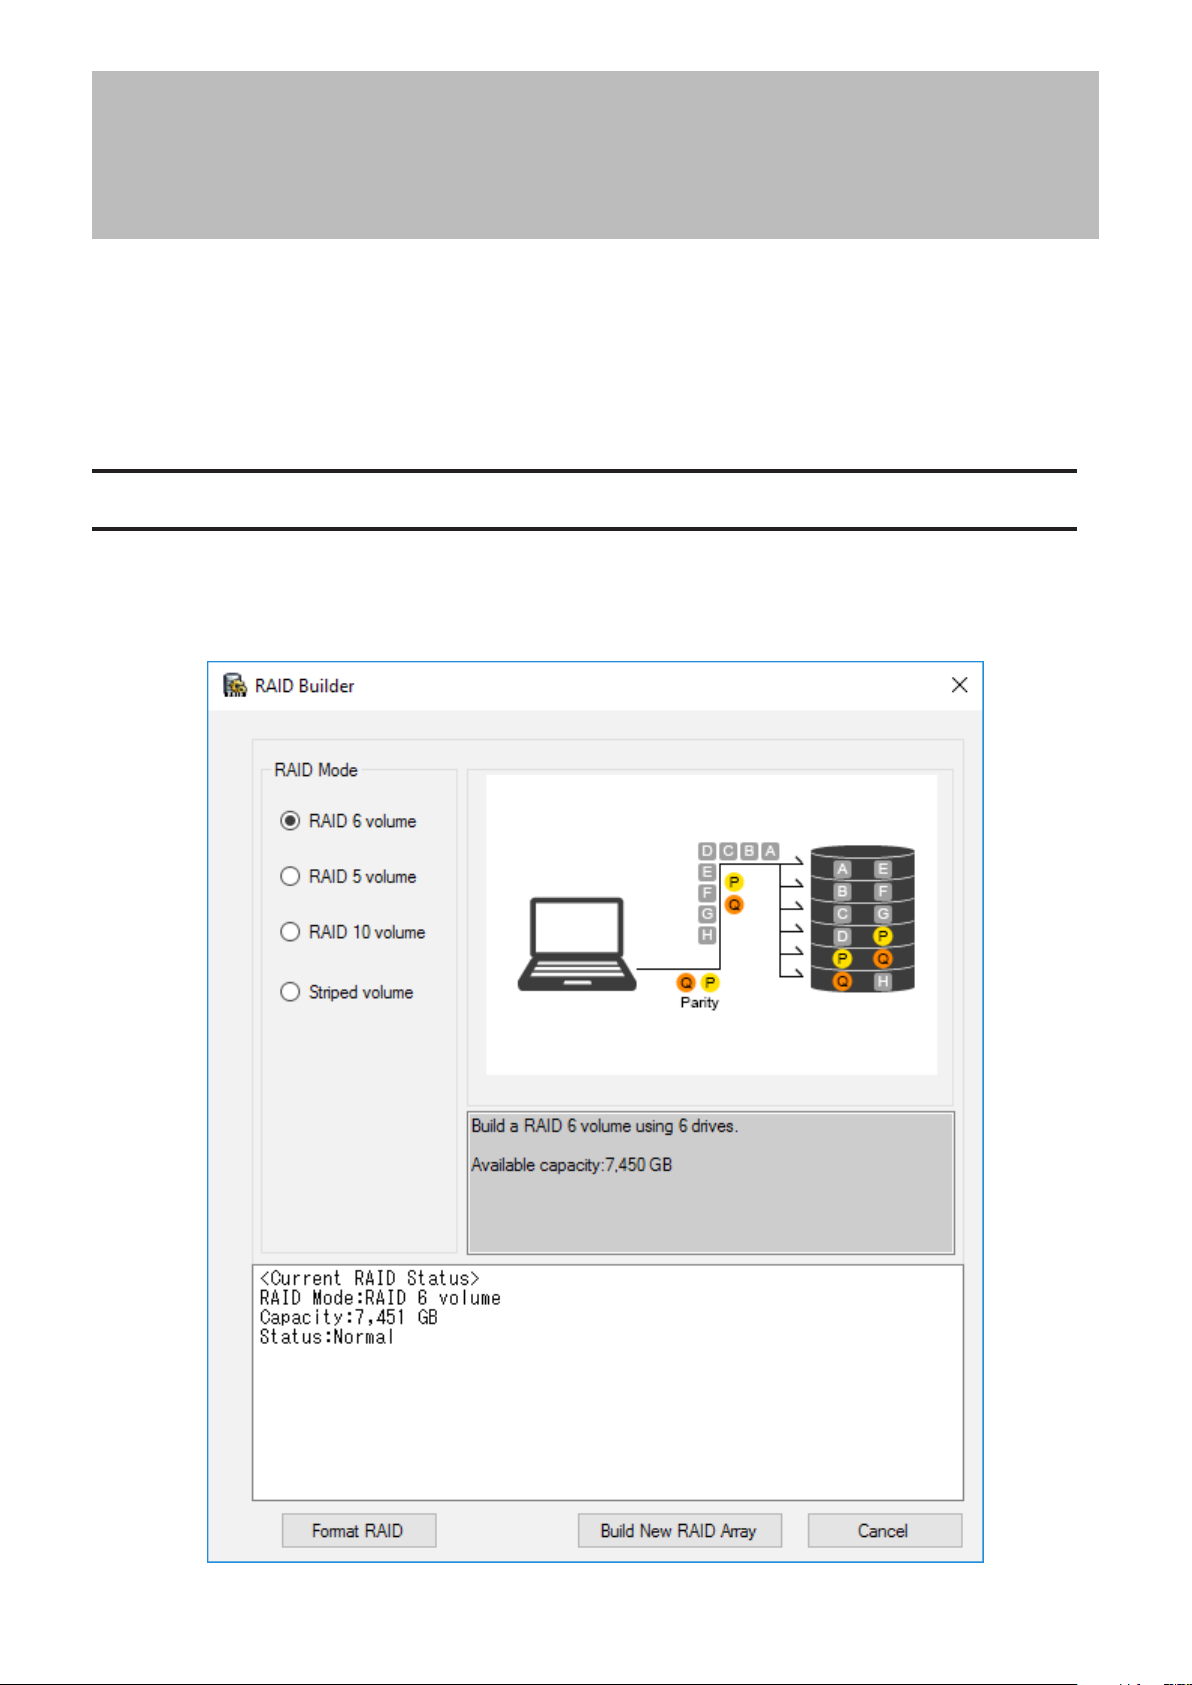
RAID Builder
RAID Builder is used to create RAID volumes. See the “Storage Management” chapter for more details. To launch
RAID Builder, you must be logged in as a member of the Administrators group in Windows Storage Server.
Note: This software cannot be accessed by multiple users at the same time. Before launching it, make sure that it is
not being used by another user.
14
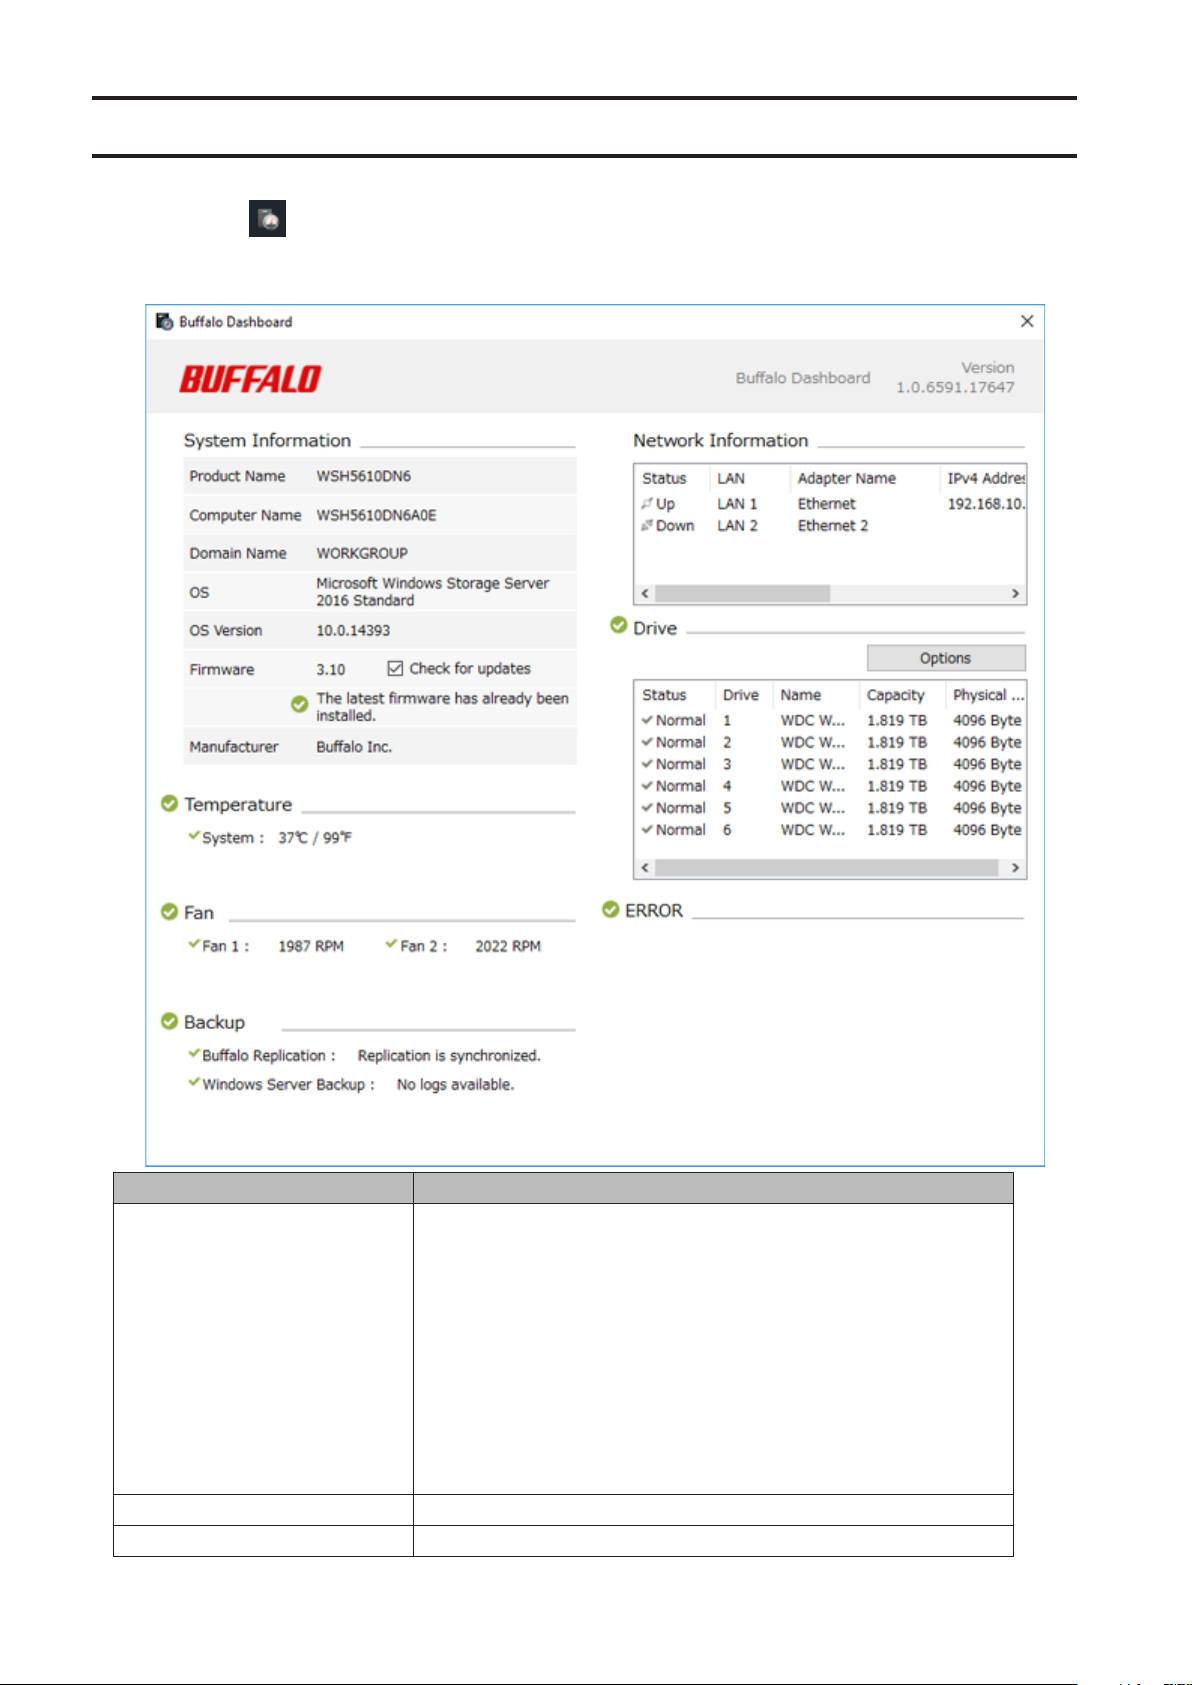
Buffalo Dashboard
Buffalo Dashboard displays system information and dismounts drives. To launch it, double-click the Buffalo
Dashboard icon in the system tray.
Note: This software cannot be accessed by multiple users at the same time. Before launching it, make sure that it is
not being used by another user.
Items Descriptions
Product Name: Displays the model name of the TeraStation.
Computer Name: Displays the hostname of the TeraStation.
Domain Name: Displays the type of domain that the TeraStation is a
member of.
OS: Displays the type of Windows installed on the TeraStation.
System Information
Temperature Displays the temperature of the system.
Fan Displays the fan rpm.
OS Version: Displays the version of the OS.
Firmware: Displays the firmware version of the TeraStation.
Check for updates: Enables or disables checking for new firmware
releases. When a new firmware version is available, you will be
notified here.
Manufacturer: Displays “Buffalo Inc.”.
15
Items Descriptions
Backup Displays the status of backup and replication.
Network Information
Drive
ERROR
Note: “Options” and “Check for updates” functionalities are only available when logged in as an administrator.
Displays IP addresses, subnet masks, default gateways, LAN port
numbers, link speed, and status.
Displays the status, drive numbers, names, capacity, and physical
sector sizes of each drive.
Options:
Shut down the TeraStation when the temperature of the drive
becomes abnormally high: The TeraStation will automatically shut
down if the drive gets too hot.
Displays error or information codes. For more detail information, refer
to the “Errors and Statuses on Buffalo Dashboard” section below.
Errors and Statuses on Buffalo Dashboard
Note: The “x” in the message is a number of drive or assigned drive letter where an error or information event occurs.
Message Description Corrective Action
Check that no foreign objects or dust are
clogging the fan. If any foreign objects or
SYSTEM Error E11
Fan Failure
SYSTEM Error E12
Cooling Failure
HDx Error E16
HDx Not Found
HDx Broken E30
Replace the DISK
SYSTEM I10
TOO HOT !
Operation I12
DEGRADE MODE
RAID I18
x Drive Rebuilding
Replication I33
Replicate Failure
New Firmware I52
Available
An error occurred in the fan speed.
A rise in the system temperature
may have exceeded the allowable
safety value.
Unable to find the drive.
An error occurred, so the drive was
removed from the volume.
A rise in the system temperature
may have exceeded the allowable
safety value.
Operating in degraded mode.
Resynchronizing the volume.
Note: Transfer speeds are slower
during the resynchronizing process.
An error occurred during
replication.
A new firmware version has been
released.
dust are found, use a pair of tweezers, air
duster, or other tools to remove them. If
the error is displayed again, contact Buffalo
technical support for assistance.
Do not place objects in the area around the
TeraStation. Also, move the TeraStation to a
cool location. Make sure that the TeraStation’s
fan is working normally.
The drive may be disconnected or may have
failed.
Replace the drive.
Move the TeraStation to a cool location. Do
not place objects in the area around the
TeraStation.
Check the drive where the error occurred
and replace it with a new drive. For the
replacement method, refer to chapter 6,
“Drive Replacement”.
Wait until resynchronization finishes. It will
take about 8–12 hours per terabyte for a
RAID 5 volume and 3–6 hours per terabyte
for a mirrored volume. This message will
disappear when resynchronization finishes.
From Buffalo Replication, click Sync to
execute resynchronization. If the error is
displayed again, contact Buffalo technical
support for assistance.
Update the firmware.
16
Message Description Corrective Action
Make sure that the backup job is configured
correctly. Make sure that the NAS is on and
I54
Backup Failure
The backup job failed.
not in standby mode. If the backup job still
fails, check the status of NAS, the network,
and the backup source and destination. Also,
check the backup log to see if any errors
were recorded.
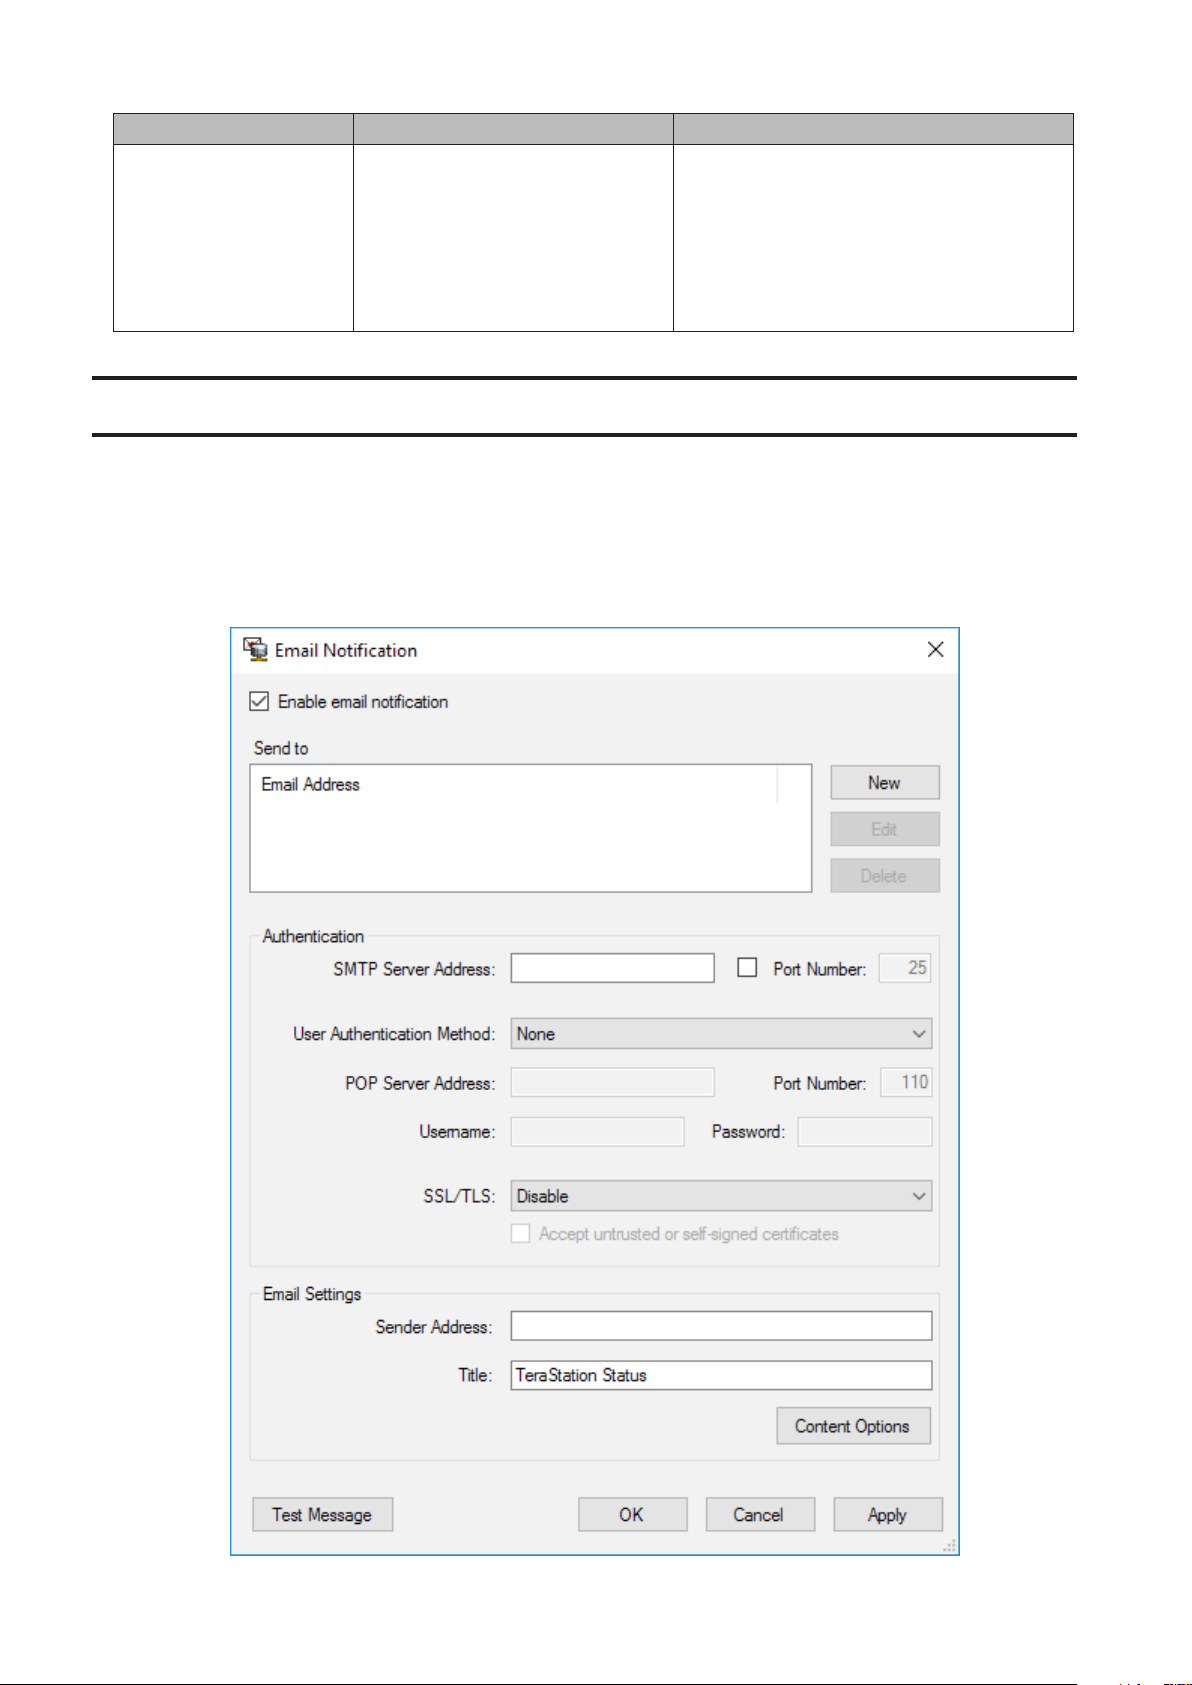
Email Notification
Your TeraStation can send you email reports when settings are changed or an error occurs. See the “Enabling Email
Notification” section in chapter 5 for more details.
To launch Email Notification, you must be logged in as a member of the Administrators group in Windows Storage
Server.
Note: This software cannot be accessed by multiple users at the same time. Before launching it, make sure that it is
not being used by another user.
17

Buffalo Replication
Your TeraStation can be synchronized with another TeraStation, replicating most data. See the “Configuring
Replication” section in chapter 4 for more details.
To launch Buffalo Replication, you must be logged in as a member of the Administrators group in Windows Storage
Server.
Note: This software cannot be accessed by multiple users at the same time. Before launching it, make sure that it is
not being used by another user.
TeraStation Backup & Replication Folder Settings
Before using it as a backup device on the network, configure your TeraStation in “TeraStation Backup & Replication
Folder Settings”.
To launch TeraStation Backup & Replication Folder Settings, you must be logged in as a member of the
Administrators group in Windows Storage Server.
Note: This software cannot be accessed by multiple users at the same time. Before launching it, make sure that it is
not being used by another user.
18
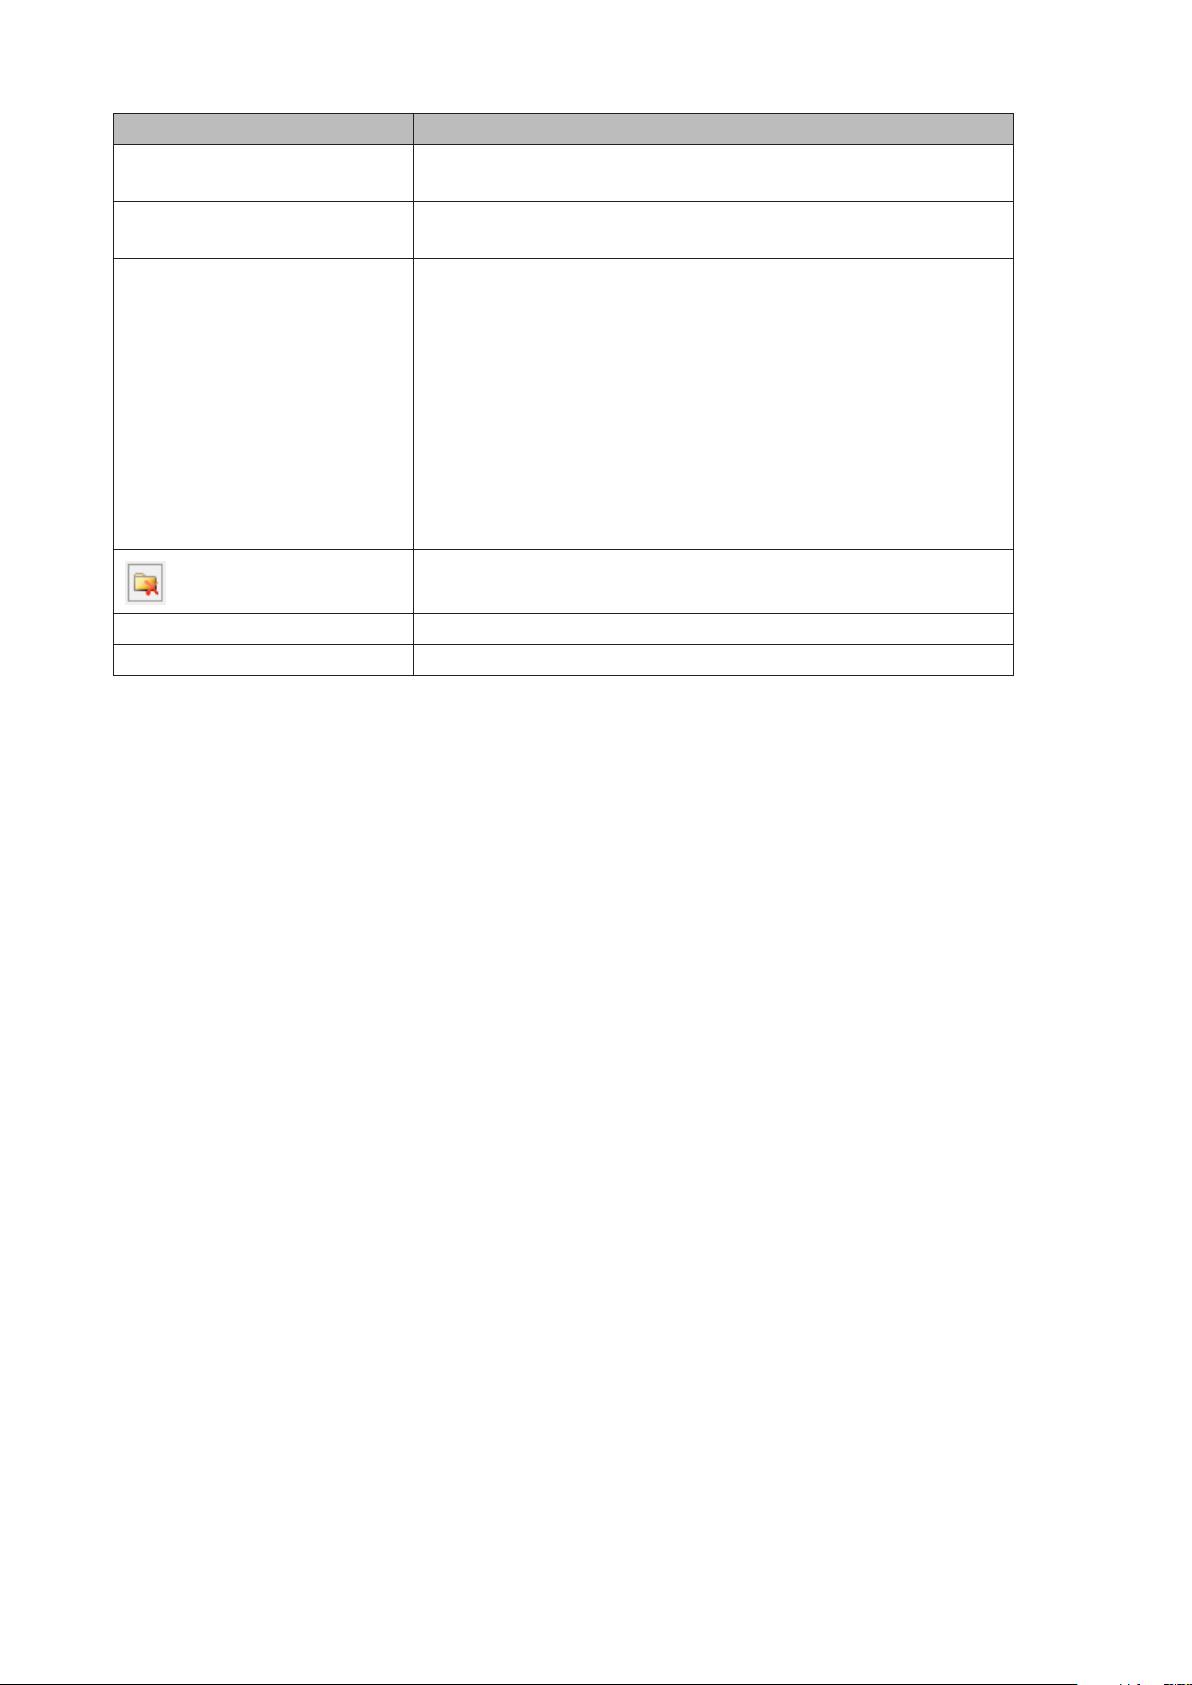
Items Descriptions
Label
Folder
Backup Device Access Key
Save Saves the settings.
Close Exits TeraStation Backup & Replication Folder Settings.
Enter a name for the backup or replication destination. When you
search for backup devices on the network, this name will appear.
Specify a shared folder where backup data will be stored. Do not
select the root directory where the shared folder is created.
Enter the desired characters for a backup device access key. The
backup device access key may contain up to 8 alphanumeric
characters, hyphens (-), and underscores (_). The first character should
not be a symbol.
You may leave this field blank if you do not want a backup device
access key, but for security reasons we highly recommend entering
one for the shared folder. If a backup device access key is configured
for the shared folder, that folder will not show up as a target for
the replication destination or backup source or destination when
configuring a backup job on another Buffalo device unless it’s
entered.
To remove a folder from the list of available backup targets, select the
folder and click this button.
19

Chapter 3 Storage Management
Working with Volumes
Notice When Creating Volumes
• To create a volume, use RAID Builder instead of the Disk Management option in Windows Storage Server.
• When volumes are deleted, formatted, or changed to another volume type, all data stored on the volumes is
erased. Before executing these operations, back up any important data.
• In this manual, “recover” means reverting the TeraStation (including data) to its former state prior to the drive
failure. It doesn’t refer to reading data from a failed drive.
Volume Types
RAID 6 Volumes
RAID 6 distributes two parity blocks when writing data. The usable space is equal to the sum of the capacity of four
drives. If two drives in a RAID 6 volume fail, data on the volume can be recovered after the failed drives are replaced.
However, if three or more drives fail, all data is lost.
RAID 5 Volumes
RAID 5 distributes a parity block when writing data. The usable space is equal to the sum of the capacity of the five
drives. If one drive in a RAID 5 volume fails, data on the volume can be recovered after the failed drive is replaced.
However, if two or more drives fail, all data is lost.
RAID 10 Volumes
Mirrored pairs of drives in RAID 1 volumes are combined into a RAID 0 volume. The usable space is equal to the
capacity of three drives. The same data is written to multiple drives so that if one drive from either or both RAID 1
volume fails, data on the volume can be recovered after the failed drives are replaced. However, if two drives on the
same RAID 1 volume or three drives in total fail, all data is lost.
Striped Volumes
RAID 0 stripes data across the multiple drives, but lacks parity blocks like RAID 5 or RAID 6. The usable space is equal
to the capacity of all drives on the TeraStation. RAID 0 doesn’t have any redundancy so data cannot be recovered if
even a single drive fails.
Creating a Volume
To create a volume, follow the procedure below. Successfully following the procedure will erase all data stored on
the volumes.
1 Click the Start button and click RAID Builder.
20
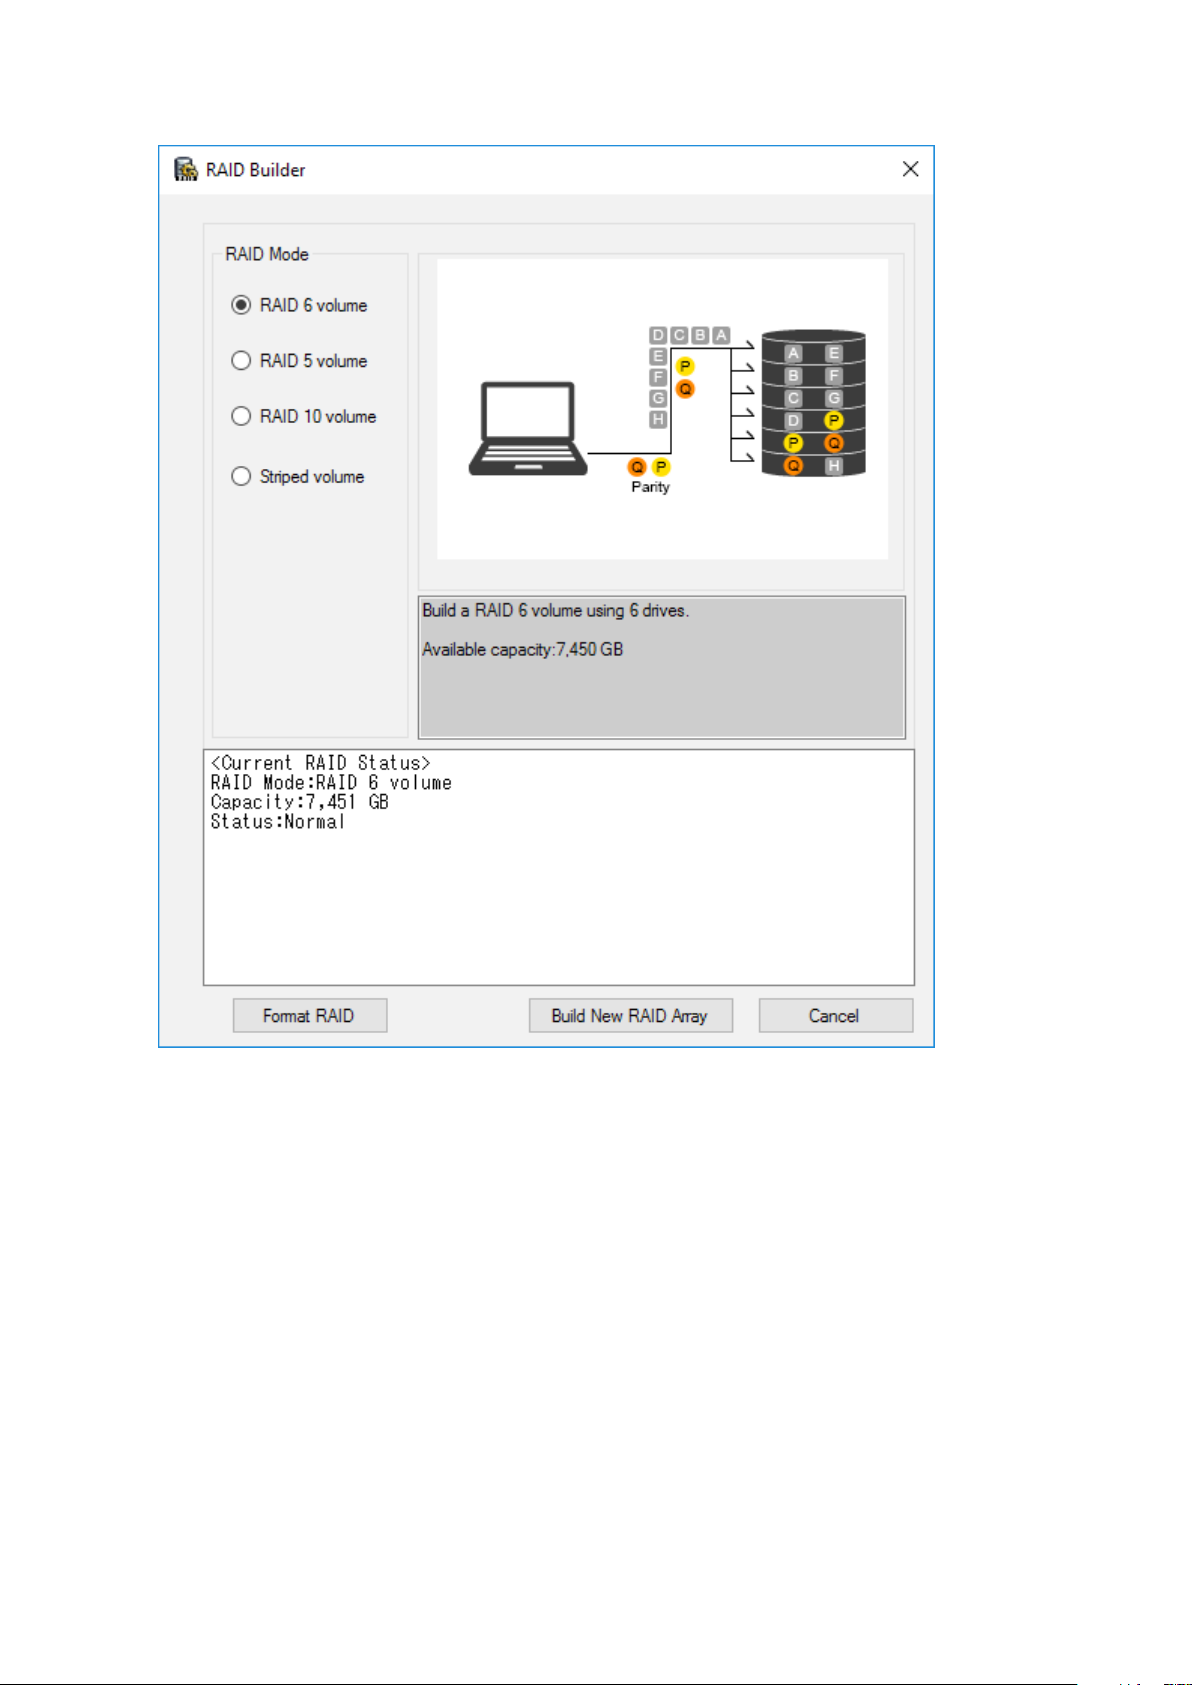
2 Select the desired volume type under “RAID Mode” and click Build New RAID Array.
3 Click OK when a warning message is displayed.
4 Click OK again. Creating the volume will begin. The TeraStation will shut down automatically after about a
minute.
5 When the power LED is distinguished, press the power button on the TeraStation to turn it on.
6 Connect Windows Storage Server via the remote desktop.
7 Click the Start button and click RAID Builder.
8 Click Format RAID and click OK.
After creating the volume is completed, refer to chapter 1 to create a shared folder.
Notes:
• If the I18 message is displayed under “ERROR” on Buffalo Dashboard, the volume has not been created yet. Wait
until the message disappears and try from the step 7 again.
• You can also format the volume using the “Format RAID” button on RAID Builder.
21
Chapter 4 Backup and Replication
Data stored in the TeraStation may be lost through drive failure or wrong operation. To avoid losing data
accidentally, back up your data regularly.
You can back up data using the following functions:
• Windows Server Backup
• Buffalo Replication
• DFS Replication
Backing Up in Windows Storage Server
Preparing a Backup Destination
Follow the procedure below to set your backup schedule.
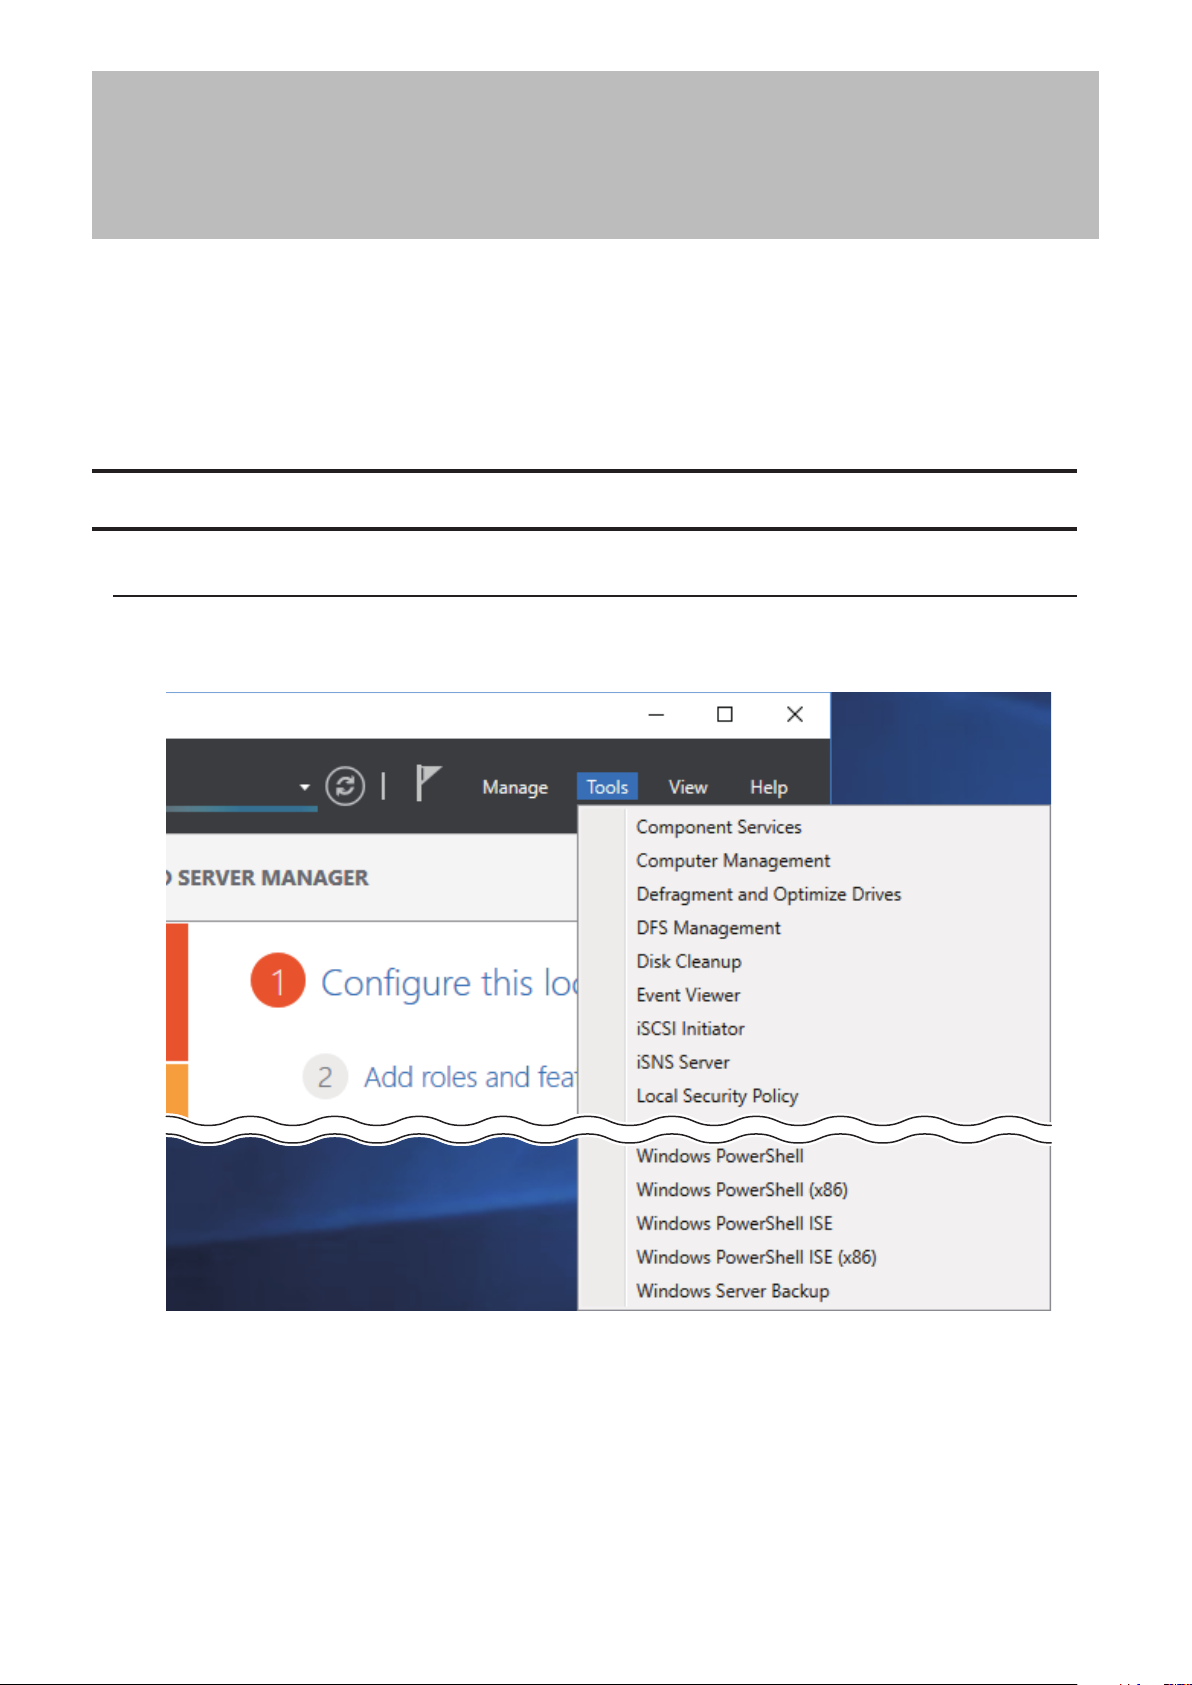
1 From Server Manager, click Tools > Windows Server Backup. The “Windows Server Backup” wizard will start.
22
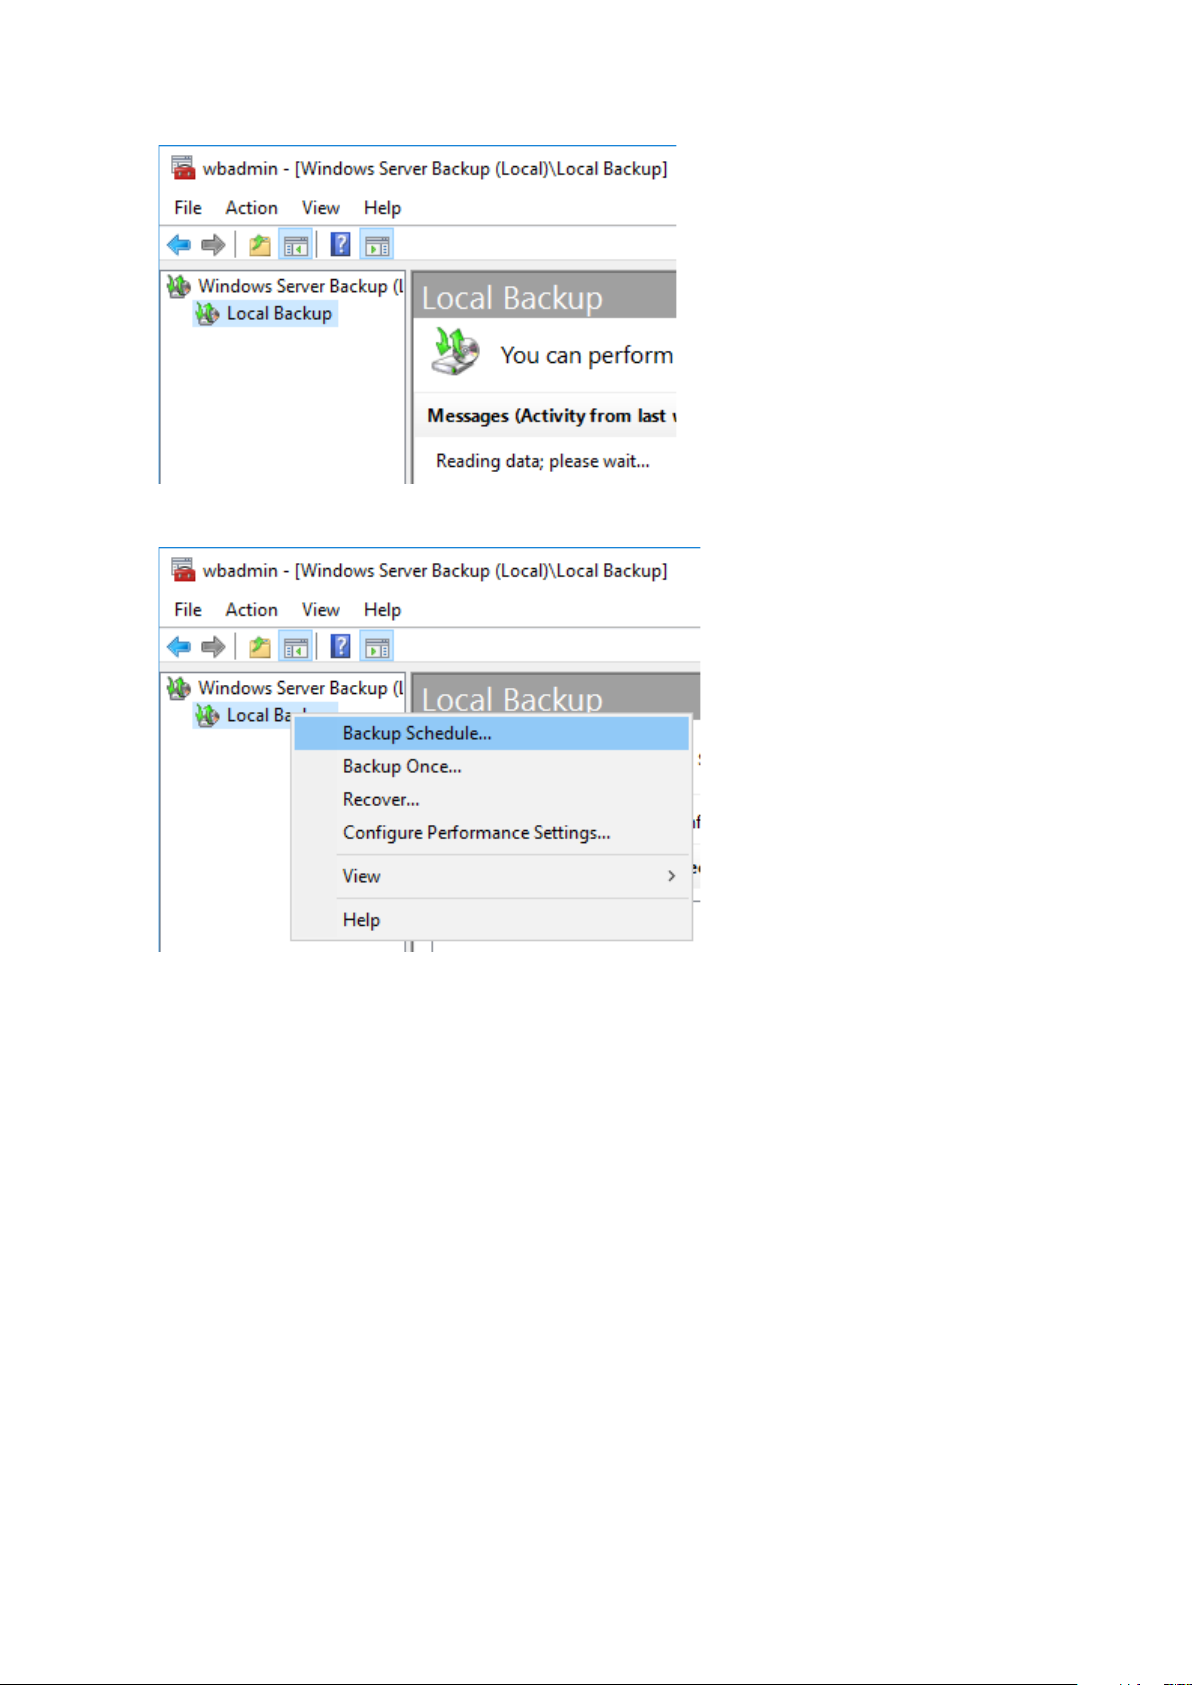
2 Click Local Backup. If “Reading data; please wait...” is displayed, please wait until any messages disappear.
3 Right-click on “Local Backup” and select Backup Schedule.... The “Backup Schedule Wizard” will start.
4 Click Next.
23
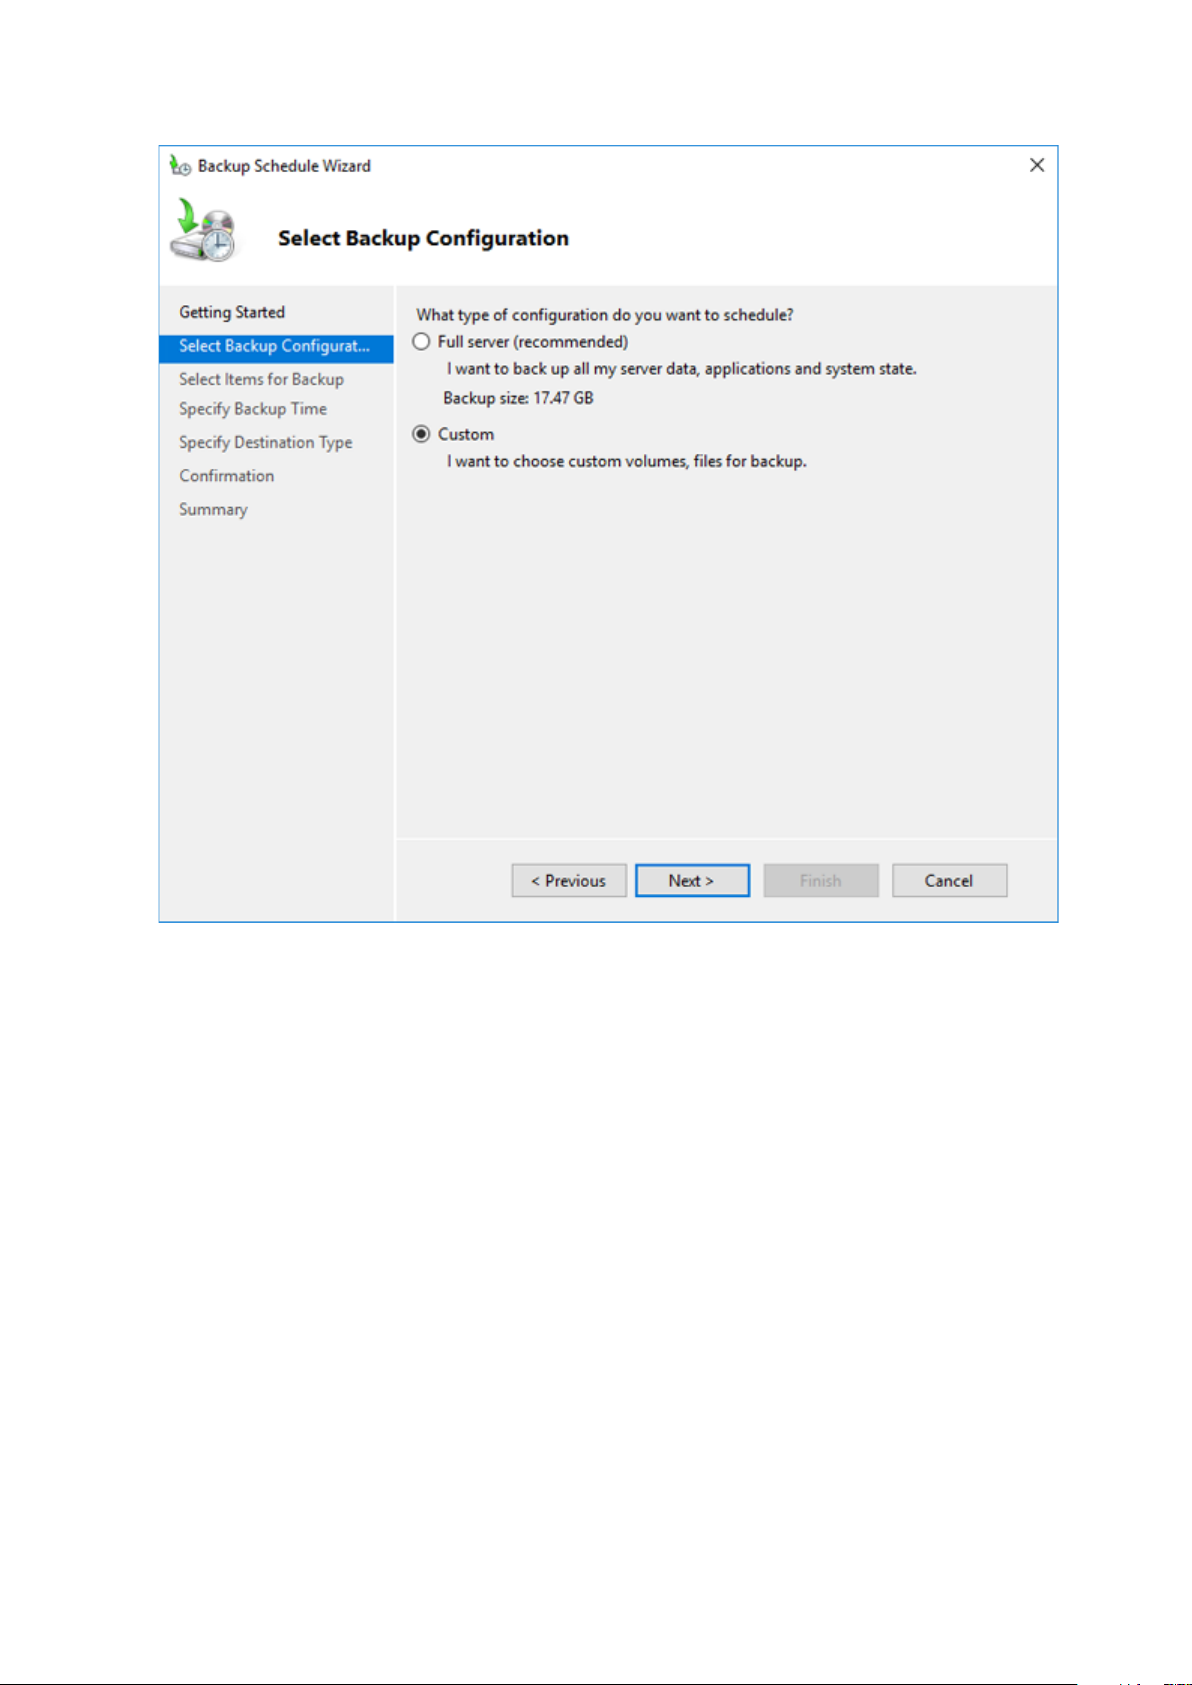
5 Select “Custom” and click Next.
6 Click Add Items.
24
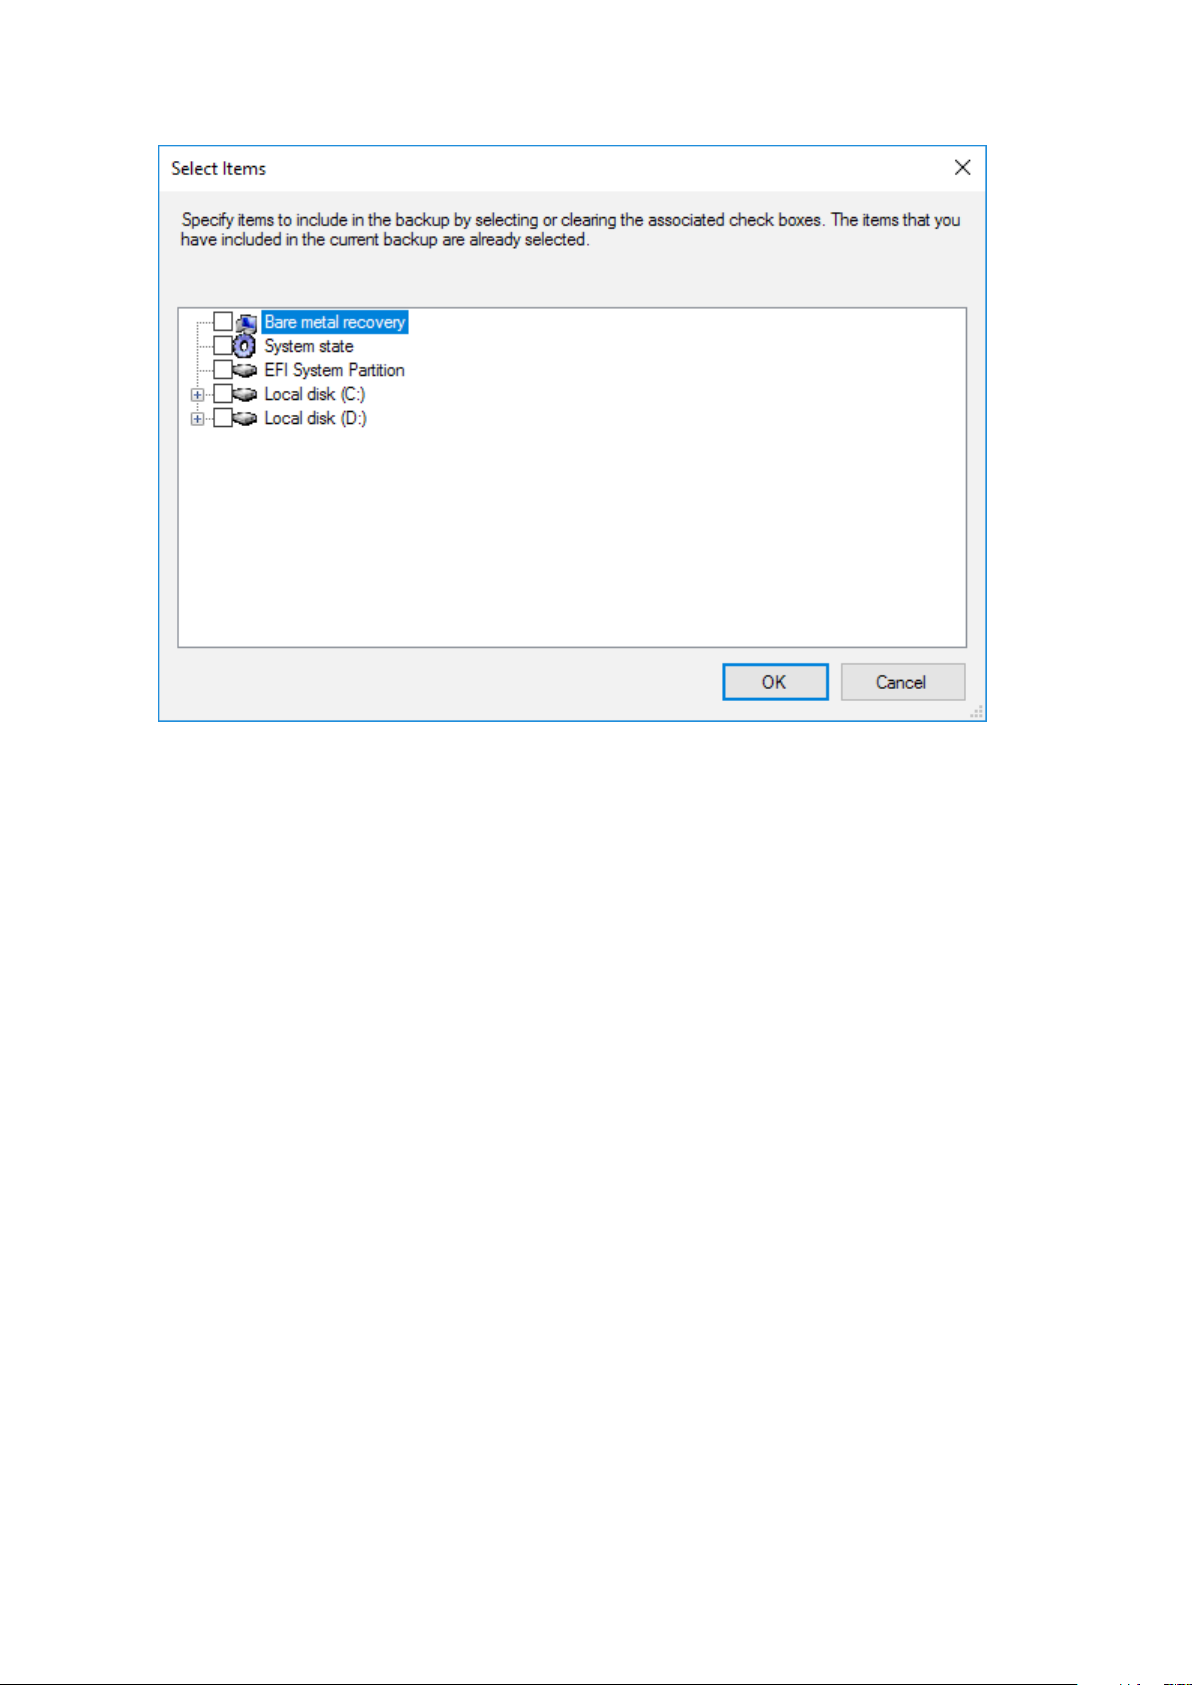
7 Select the backup source folders or drives and click OK.
8 Click Next.
25
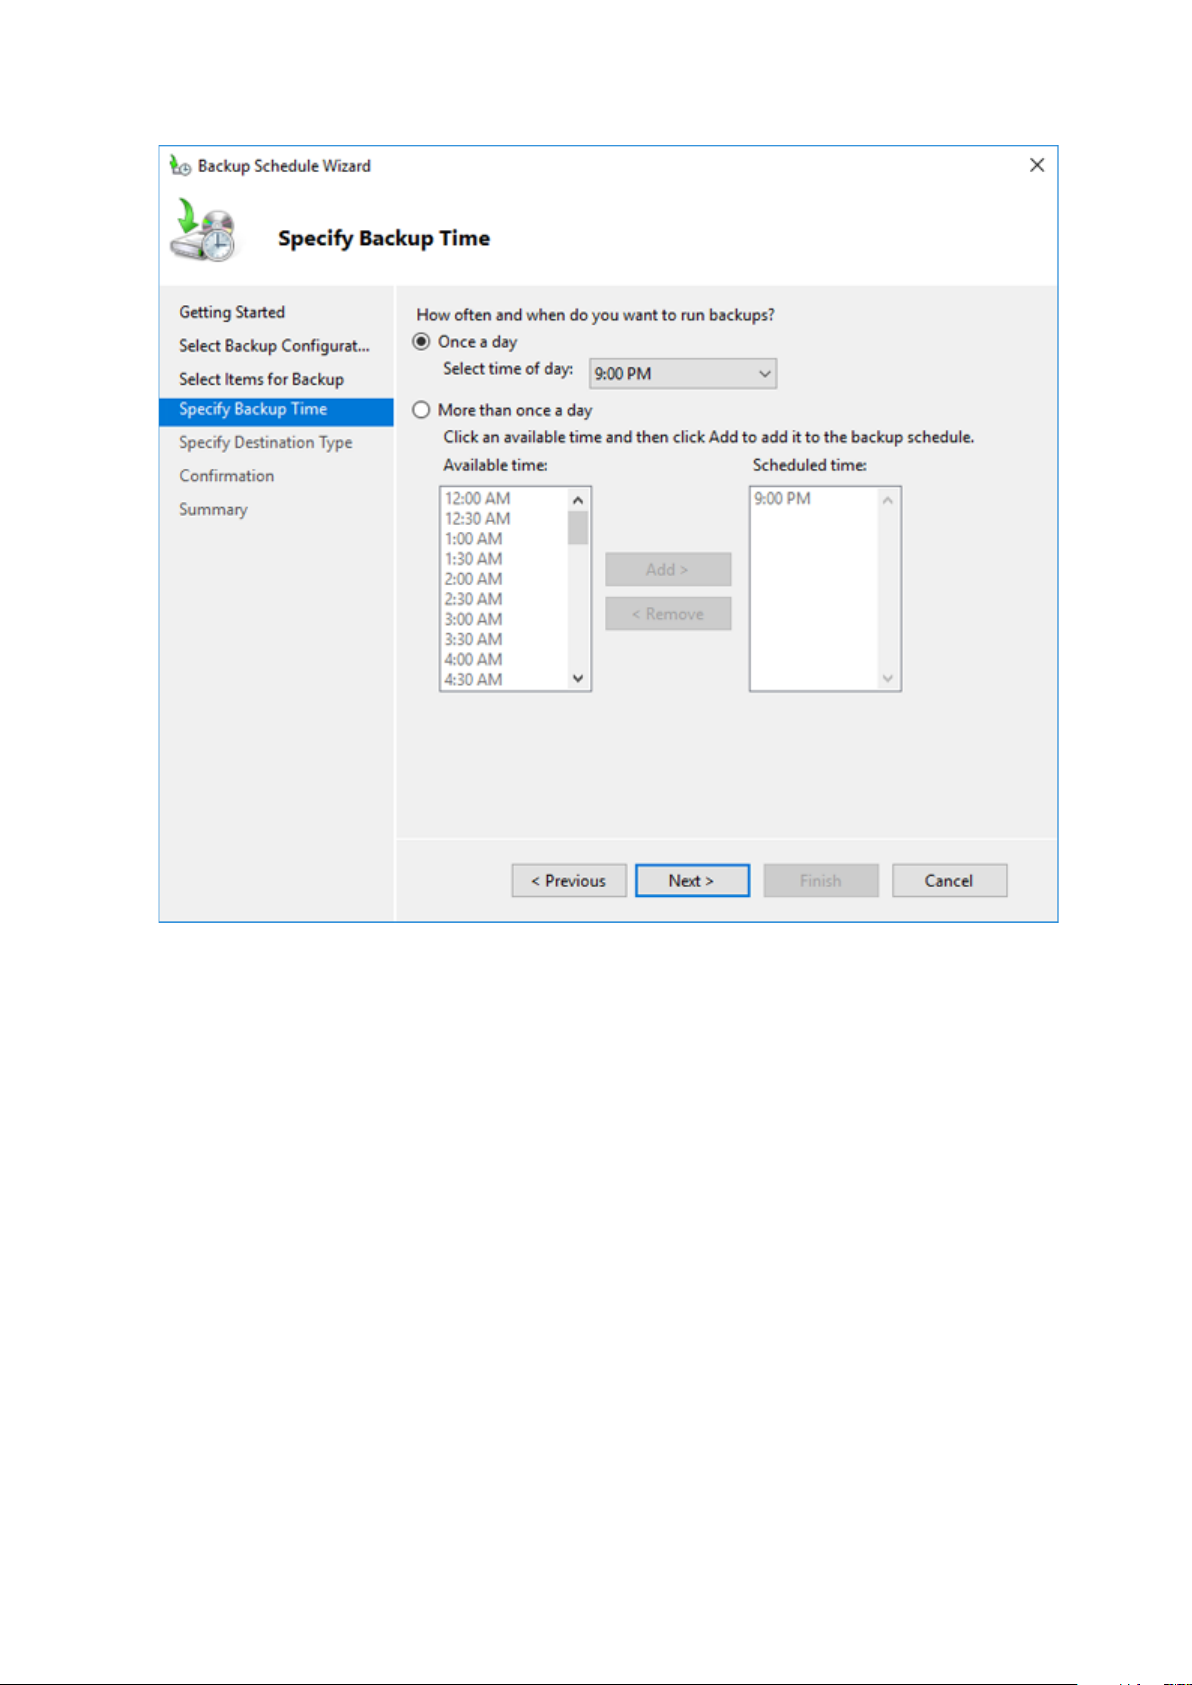
9 Specify the schedule to run the backup and click Next.
26
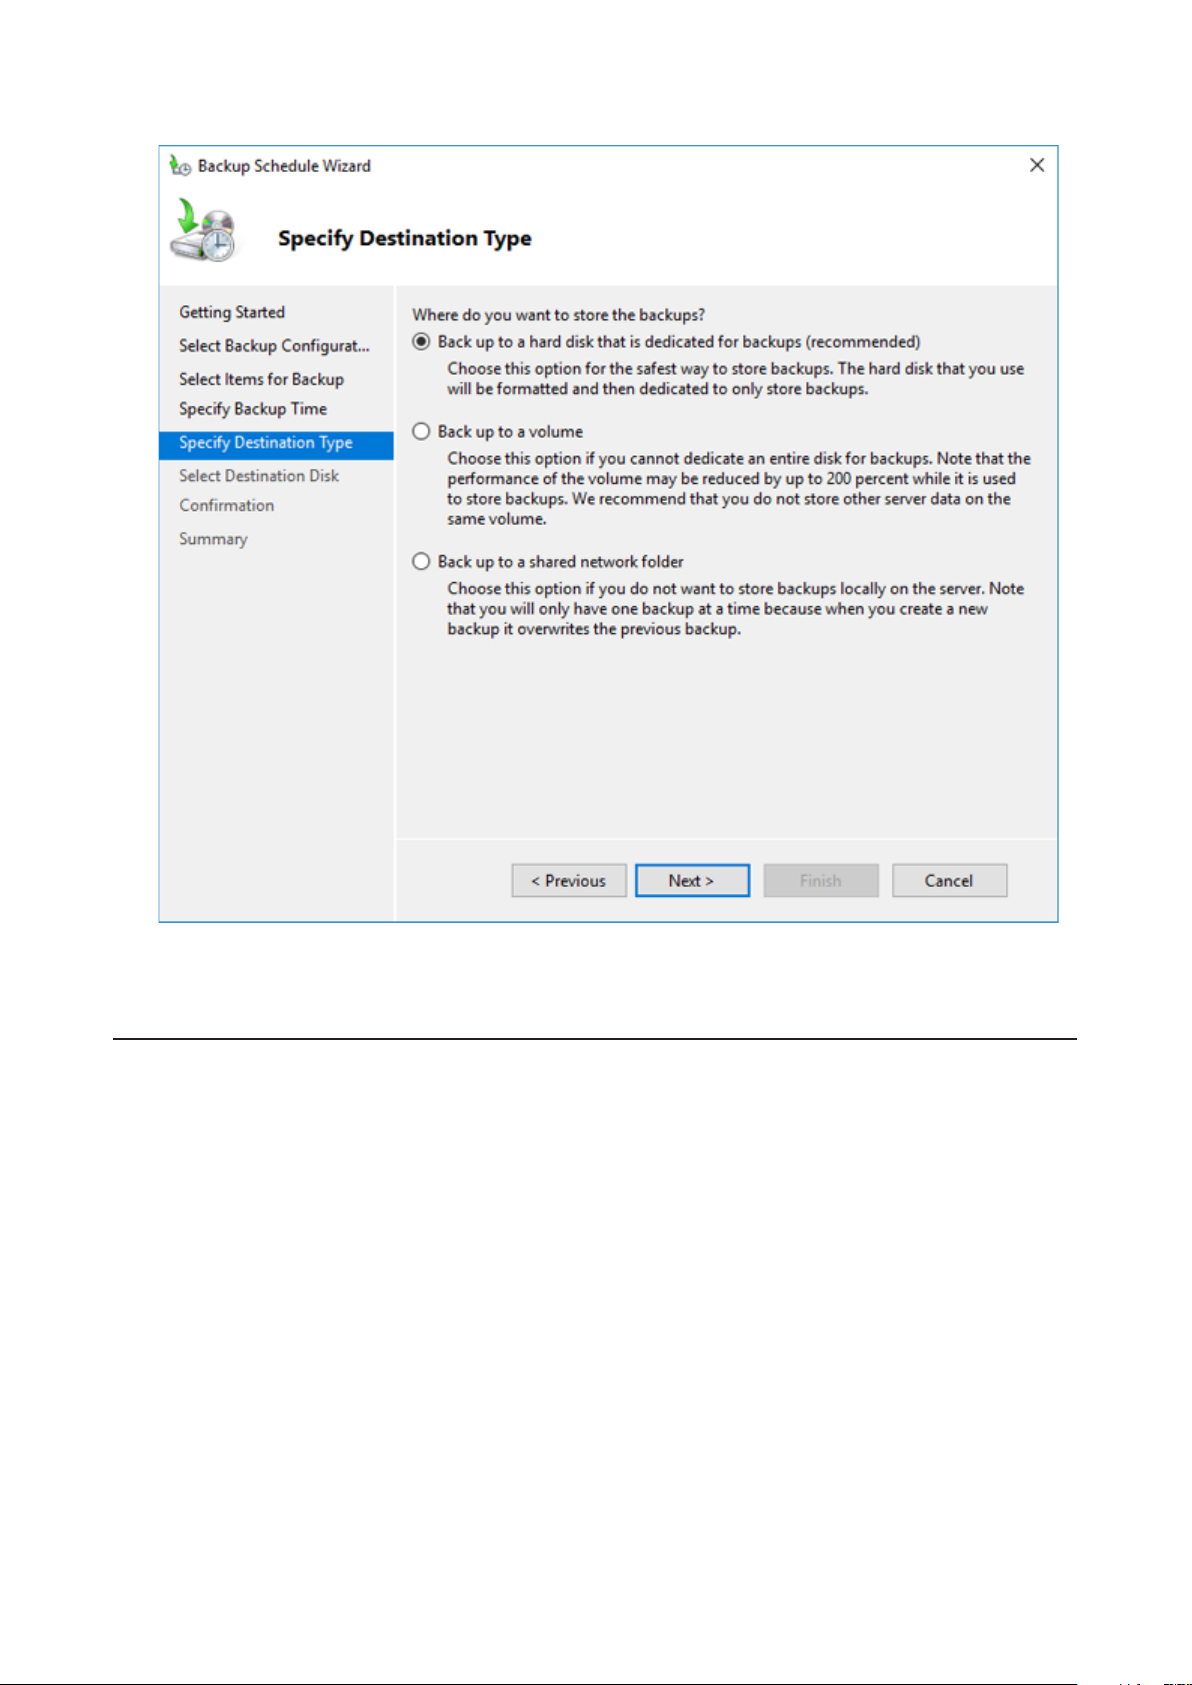
10 Select the backup destination and click Next.
11 Step through the wizard to finish.
Recovering Backup Data
Follow the procedure below to recover the backup data to the TeraStation.
Note: Bare-metal recovery is not supported for the backup data stored using the backup function of Windows
Storage Server.
27
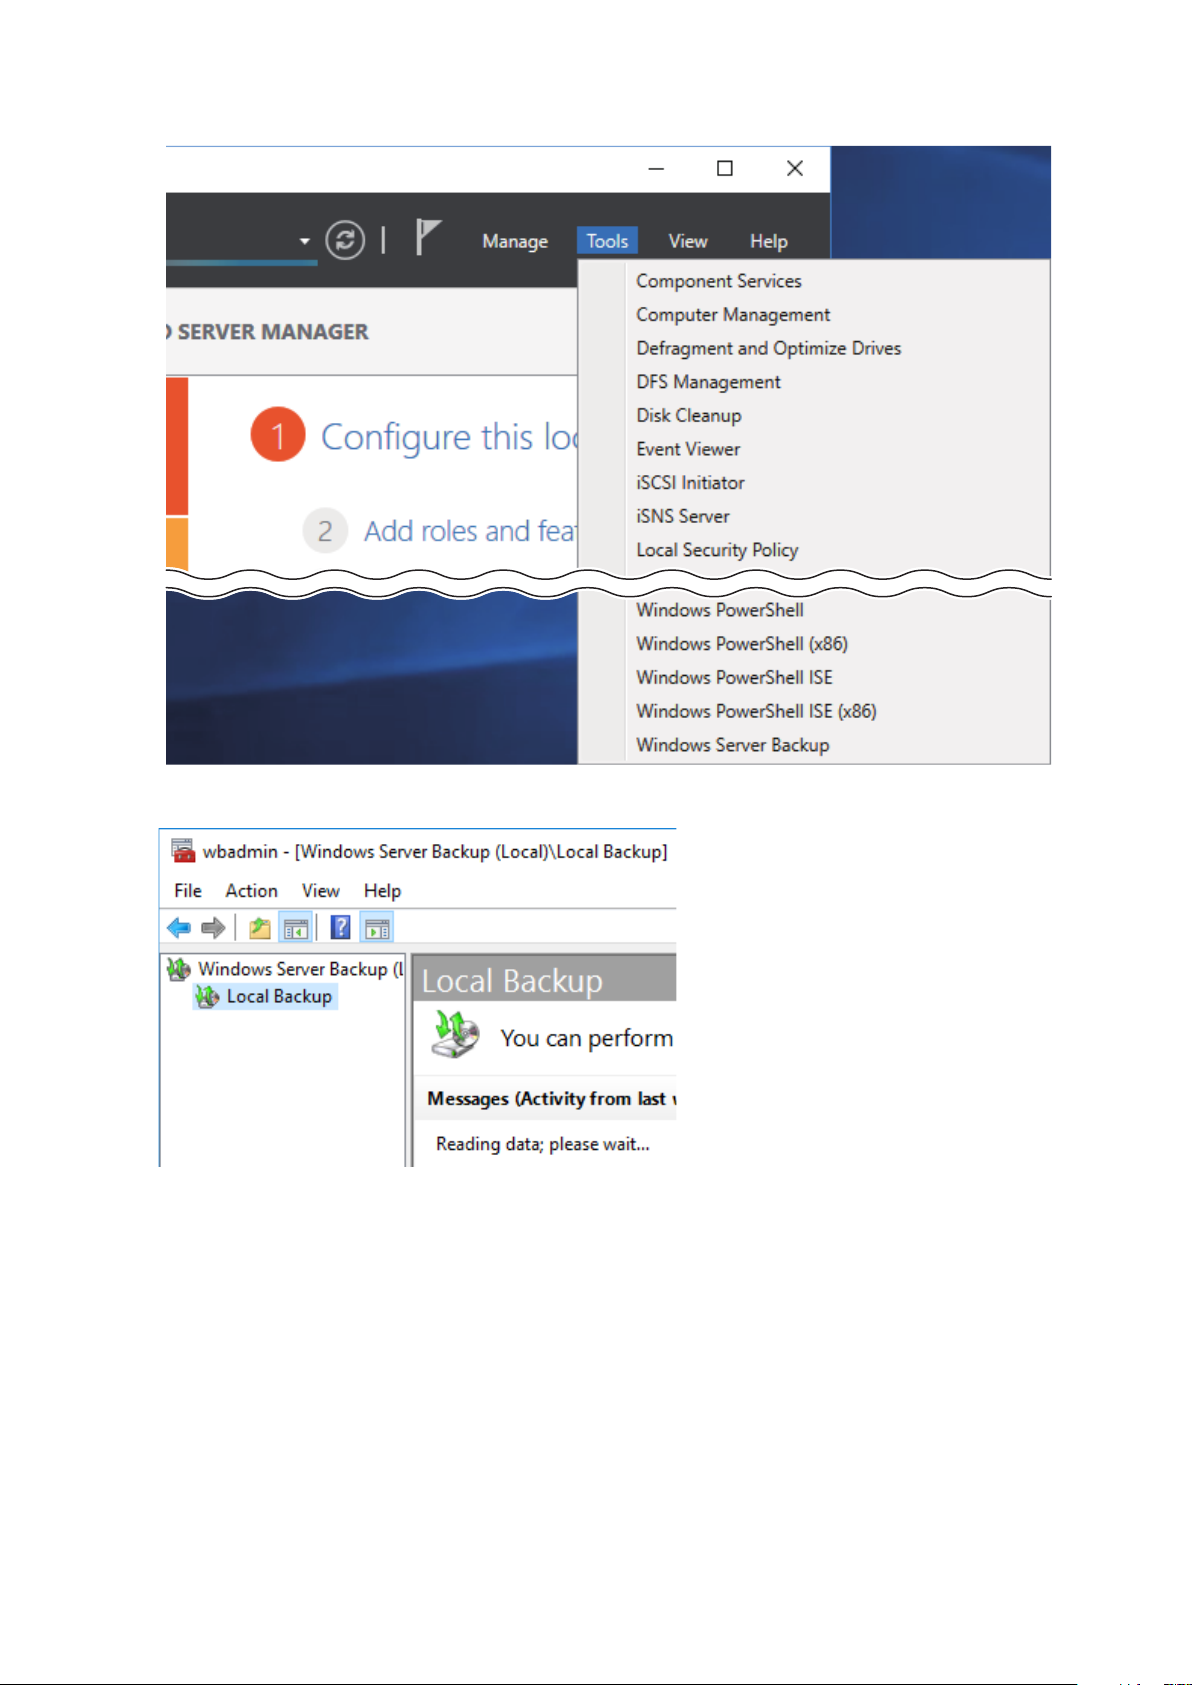
1 From Server Manager, click Tools > Windows Server Backup. The “Windows Server Backup” wizard will start.
2 Click Local Backup. If “Reading data; please wait...” is displayed, please wait until any messages disappear.
28
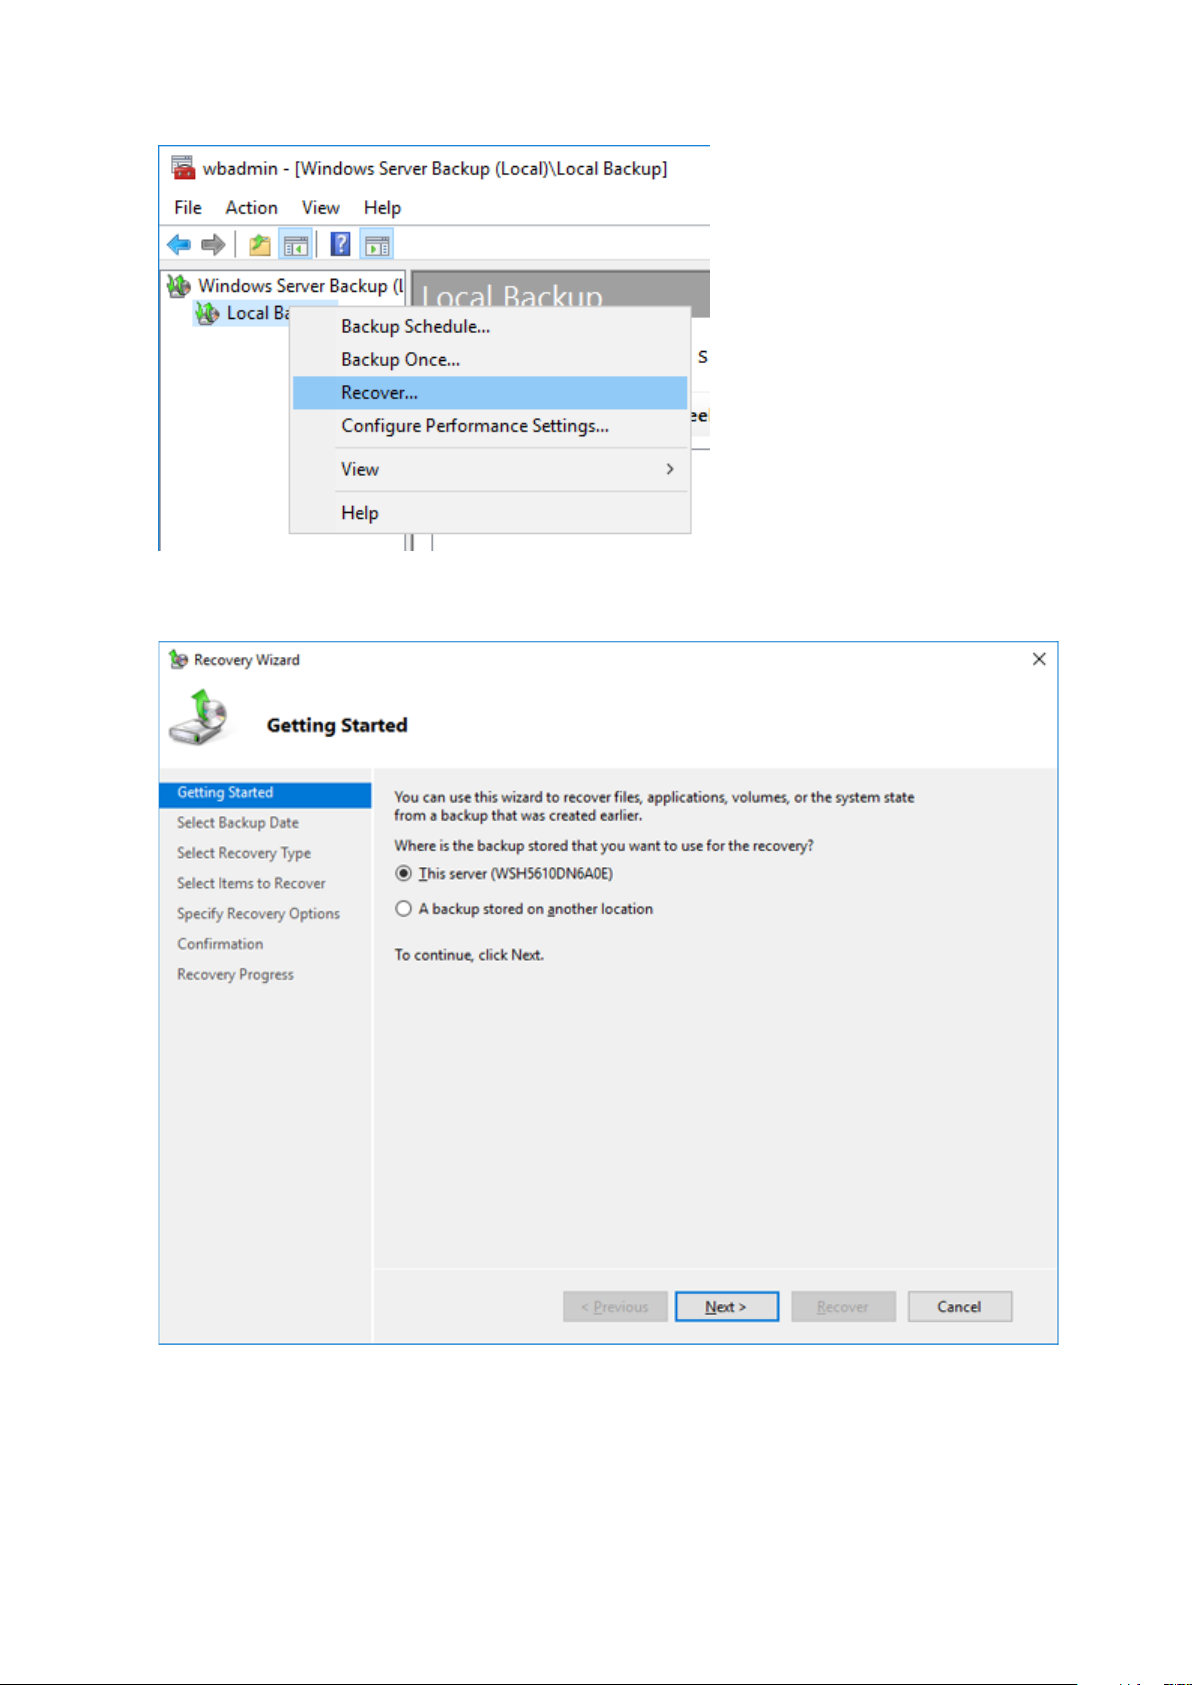
3 Right-click on “Local Backup” and click Recover.... The recovery wizard will start.
4 Select where the backup data is saved and click Next. When “A backup stored on another location” is selected,
specify the folder of the backup data in the next page.
29
 Loading...