

Buffalo TeraStation TS5800D, TeraStation TS5600D, TeraStation TS5400D, TeraStation TS5200D User Manual
TeraStationUserManual
35012627 ver.02

1
Contents
Chapter1Installation...................................................9
Installation.......................................................................................9
TurningontheTeraStation...........................................................14
TurningofftheTeraStation..........................................................14
ChangingthePassword................................................................15
Chapter2Configuration.............................................18
OpeningtheWebAdminInterface..............................................18
OpeningtheEasySetupScreenintheWebAdminInterface....19
Chapter3AccessRestrictions....................................22
ConfiguringAccessRestrictionsonUsersandGroups...............22
AddingaSharedFolder..............................................................................................22
Restrictions.......................................................................................................................24
AddingUsers................................................................................................................... 26
AddingGroups...............................................................................................................28
AccessRestrictions........................................................................................................29
AccessRestrictionsonActiveDirectory.......................................30
Restrictions.......................................................................................................................32
AccessRestrictionsonanNTDomain..........................................32
Restrictions.......................................................................................................................34
AccessRestrictionsbyDelegatingAuthoritytoanExternalSMB
Server.............................................................................................35
Restrictions.......................................................................................................................37

2
Chapter4ManagingyourStorage............................39
RAIDArrays....................................................................................39
UsingNormalMode......................................................................................................41
ChangingRAIDMode..................................................................................................41
ConfiguringaHotSpare.............................................................................................43
RMM(RAIDModeManager)......................................................................................44
RAIDScanning................................................................................................................46
AddinganExternalHardDrive.....................................................46
ConnectanExternalDrive..........................................................................................46
FormattingExternalDrives........................................................................................47
AccessRestrictionsonExternalDrives..................................................................47
RemovingHardDrives..................................................................47
DismountingwiththeFunctionButton...............................................................48
DismountingfromtheWebAdminInterface....................................................48
Restrictions.......................................................................................................................49
CheckingDrives.............................................................................49
FormattingDrives.........................................................................50
EncryptingDrives..........................................................................52
MediaCartridgeSystem................................................................52
EraseDataontheTeraStationCompletely..................................53
DiskQuotas....................................................................................54
DiskSpaceQuotasforUsers...................................................................................... 54
DiskSpaceQuotasforGroups..................................................................................58
LimitsonAvailableSizeforEachVolume............................................................ 63
UsingtheTeraStationasaniSCSIDevice.....................................66
Introduction..................................................................................................................... 66
UsingtheiSCSIHardDiskConnectionTool........................................................72
CreatingandExpandingVolumes..........................................................................75

3
SettingAccessRestrictions........................................................................................77
HardDriveReplacementProcedure.............................................79
Notes:..................................................................................................................................80
HardDriveReplacementExamples........................................................................81
Chapter5Backup........................................................87
BackUpfromtheTeraStation......................................................87
PreparingaBackupLocation....................................................................................87
ConfiguringaBackupJob..........................................................................................92
Restrictions.......................................................................................................................94
UsingTeraStationBatchBackup..................................................95
Replication.....................................................................................95
Restrictions.......................................................................................................................97
Failover...........................................................................................98
Configuration............................................................................................................... 102
BackingUpYourMacwithTimeMachine.................................104
BackingUpDatafromaUSBDevice..........................................108
AmazonS3(AmazonSimpleStorageService)..........................109
Chapter6RemoteAccess.........................................112
UsingWebAccess.........................................................................112
WhatisWebAccess?.................................................................................................. 112
Configuration............................................................................................................... 112
FTPServer....................................................................................116
Restrictions.................................................................................................................... 118

4
Chapter7BitTorrent.................................................119
DownloadingFilesUsingBitTorrent..........................................119
WhatisBitTorrent?..................................................................................................... 119
HowItWorks................................................................................................................ 119
Configuration............................................................................................................... 120
Chapter8Multimedia...............................................122
DLNA.............................................................................................122
WhatisDLNA?.............................................................................................................. 122
Configuration............................................................................................................... 122
ConnectingtotheTeraStationandFilePlayback.......................................... 124
ConnectedDLNA-compatibleDevices.............................................................. 124
StreamingtoDLNA-compatibleDevices.......................................................... 125
DisablingPlaybackfromSpecificDevices........................................................ 126
IfYourDLNAClientDeviceDoesn'tRecognizetheTeraStation.............. 127
WhenFilesCannotBePlayedBack...................................................................... 127
UsingiTunesServer.....................................................................128
WhatisiTunesserver?............................................................................................... 128
Configuration............................................................................................................... 128
UsingSqueezeboxServer...........................................................129
WhatisSqueezeboxServer?.................................................................................. 129
Configuration............................................................................................................... 129
Chapter9SurveillanceCamera................................132
Overview......................................................................................132
WhatisSurveillanceCameras?.............................................................................. 132
RequiredItems............................................................................................................. 132
InitialSetup..................................................................................133

5
InstallingtheClientToolsonYourComputer................................................. 133
ConnectingDevicestotheNetwork................................................................... 133
EnablingtheSurveillanceCamera....................................................................... 134
EnablingtheFreeLicense....................................................................................... 135
RegisteringtheRecordingPolicyoftheNetworkCamera......................... 137
CheckingRecording.................................................................................................. 141
EmailNotificationofErrors..................................................................................... 142
Configuration...............................................................................142
Viewingsavedvideo................................................................................................. 142
ExportingRecordedDataasaMOVVideoFile............................................... 143
ViewingVideothatisCurrentlyBeingRecorded........................................... 145
MovingRecordedVideoDatatoAnotherTeraStation................................ 145
BackingUpRecordedVideotoAnotherTeraStation................................... 146
AutomaticallyDeletingOldRecordedVideoDatawhenAvailableSpace
BecomesLow............................................................................................................... 147
ChangingtheTeraStationwhereRecordedVideoIsSaved...................... 149
OverviewofClientUtilities.........................................................150
CameraPolicies........................................................................................................... 150
LiveViewer.................................................................................................................... 150
DataServicePolicies.................................................................................................. 151
VaultAdmin.................................................................................................................. 152
SurveillanceVideoManager................................................................................... 152
NetworkActivity.......................................................................................................... 153
MiniVaultStats............................................................................................................ 154
AdditionalLicenseActivationProcedure..................................154
WhentheTeraStationisConnectedtotheInternet.................................... 154
WhentheTeraStationIsNotConnectedtotheInternet............................ 156
Troubleshooting..........................................................................159

6
Chapter10AdvancedFeaturesandAddingHardware
.....................................................................................162
AntivirusSoftware.......................................................................162
ActivatingVirusScanning....................................................................................... 162
OpeningTrendMicroNASSecuritySettings................................................... 162
ConnectingthroughaProxyServer.................................................................... 163
RegisteringtheLicense,orExtendingtheLicensePeriod......................... 164
Updating........................................................................................................................ 165
ExcludingaSpecificFolderfromAntivirusScanning................................... 166
VirusScanning............................................................................................................. 167
CheckingtheLog........................................................................................................ 168
OpeningtheOnlineHelp........................................................................................ 168
EmailNotification........................................................................169
SleepMode..................................................................................171
WakeonLAN................................................................................173
UPS(UninterruptiblePowerSupply).........................................174
PortTrunking...............................................................................175
ConnectingaPrinter...................................................................177
SettingupaPrinteronWindows7orWindowsVista................................. 177
SettingupaPrinteronWindowsXP................................................................... 178
TeraSearch(TextSearch)............................................................179
OfflineFiles..................................................................................181
DFS(DistributedFileSystem).....................................................184
AccessingfromaNFS(NetworkFileSystem)Client.................186
EncryptingDataTransmission....................................................190
EncryptingDataintheWebAdminInterface................................................. 190
EncryptingFTPTransferData................................................................................. 190
SSLKey............................................................................................................................ 191

7
WebServer...................................................................................191
MySQLServer...............................................................................193
SNMP............................................................................................194
SavingandRecoveringSettings.................................................194
SavingSettings............................................................................................................ 195
RecoveringSettingsfromtheWebAdminInterfaceDuringTeraStation
Operation....................................................................................................................... 196
RecoveringbyChangingtheBootModeSwitchontheRearPanelWhen
StartingtheTeraStation........................................................................................... 197
CheckingtheTeraStationLogs...................................................198
RestoringFactoryDefaults.........................................................199
OnlineUpdate..............................................................................199
Name,Date,TimeandLanguage...............................................200
BeepAlerts...................................................................................202
LCDandLEDs...............................................................................202
JumboFrames..............................................................................203
ChangingtheIPAddress.............................................................204
Chapter11Utilities...................................................206
NASNavigator2(Windows)........................................................206
AssignasNetworkDrive.......................................................................................... 209
NASNavigator2(MacOSX).........................................................209
MountingasaNetworkDrive................................................................................ 210
iSCSIHardDiskConnectionTool(Windows).............................211
Menu................................................................................................................................ 213
TurboCopy(Windows)................................................................214

8
TurboPC(Windows).....................................................................214
Chapter12Appendix................................................215
DiagramsandLayout..................................................................215
TS5800D......................................................................................................................... 215
TS5600D......................................................................................................................... 215
TS5400D......................................................................................................................... 215
TS5200D......................................................................................................................... 216
LCDMessageList.........................................................................218
NormalDisplay............................................................................................................ 218
StatusDisplay............................................................................................................... 218
ErrorDisplay,WarningDisplay.............................................................................. 222
DefaultSettings...........................................................................223
Specifications...............................................................................225
ComplianceInformation.............................................................226
FCCWarning................................................................................................................. 226
CEMarkWarning........................................................................................................ 226
EnvironmentalInformation.................................................................................... 227
KC...................................................................................................................................... 227
BSMI................................................................................................................................. 227
CCC................................................................................................................................... 227
9
Chapter 1 Installation
Installation
1
Insert the TeraNavigator CD into your computer.
TeraNavigator will launch.
2
Click [Begin Installation].
Notes:
• If TeraNavigator does not launch automatically in Windows, open the CD and double-click the
icon.
• If you are using Windows 7 or Vista, the autoplay screen may appear. Click [Run LSNavi.exe]. If "Do you want to
allow the following program to make changes to this computer?" is displayed by Windows 7, click [Yes]. If "A
program needs your permission to continue" is displayed by Windows Vista, click [Continue].
• If your computer does not have a CD drive, you may download the TeraNavigator software from www.
buffalotech.com.
• For Mac OS X, double-click on the TeraNavigator icon in the TeraNavigator CD.
• If you have problems installing, temporarily disable your antivirus software and software firewall. After setup is
complete, re-enable the software.
3
Follow the steps on the screen to connect the TeraStation's Ethernet and power cables and turn it on.
TS5800D
10
TS5600D
TS5400D
TS5200D
Note:
Use LAN port 1 for initial setup. After setup, you may connect a second cable to LAN port 2. If used, con gure the IP
address of LAN port 2 at [Network] - [IP Address] in the TeraStation's Web Admin interface or NAS Navigator2.
4
Follow the steps on the screen to install NAS Navigator2.
5
Click [Complete].
NAS Navigator2 will start.
Notes:
• To start NAS Navigator2 after the initial setup, perform the operations below.
For Windows, double-click the
icon on the desktop.
For Mac OS X, click the
icon in the Dock.
• To install additional software, click [Software Installation].
11
6
Right-click on your TeraStation's icon, then click [Properties].
Note:
For Mac OS X, click the TeraStation icon while holding down the control key, then click [Con gure].
7
Click the [IP Settings] tab, enter the desired settings, and click [OK].
Notes:
• If you don't know how to configure these settings, check [Obtain IP address automatically via DHCP]. For Mac
OS X, check [Use DHCP].
• If you are prompted to enter the administrator's password, enter the TeraStation's password (it is set to
"password" by factory default).
12
8
The Web Admin interface will open.
Note:
The Web Admin interface is compatible with Internet Explorer 9 or later, Firefox 8 or later, Google Chrome 15 or
later, and Safari 5 or later.
9
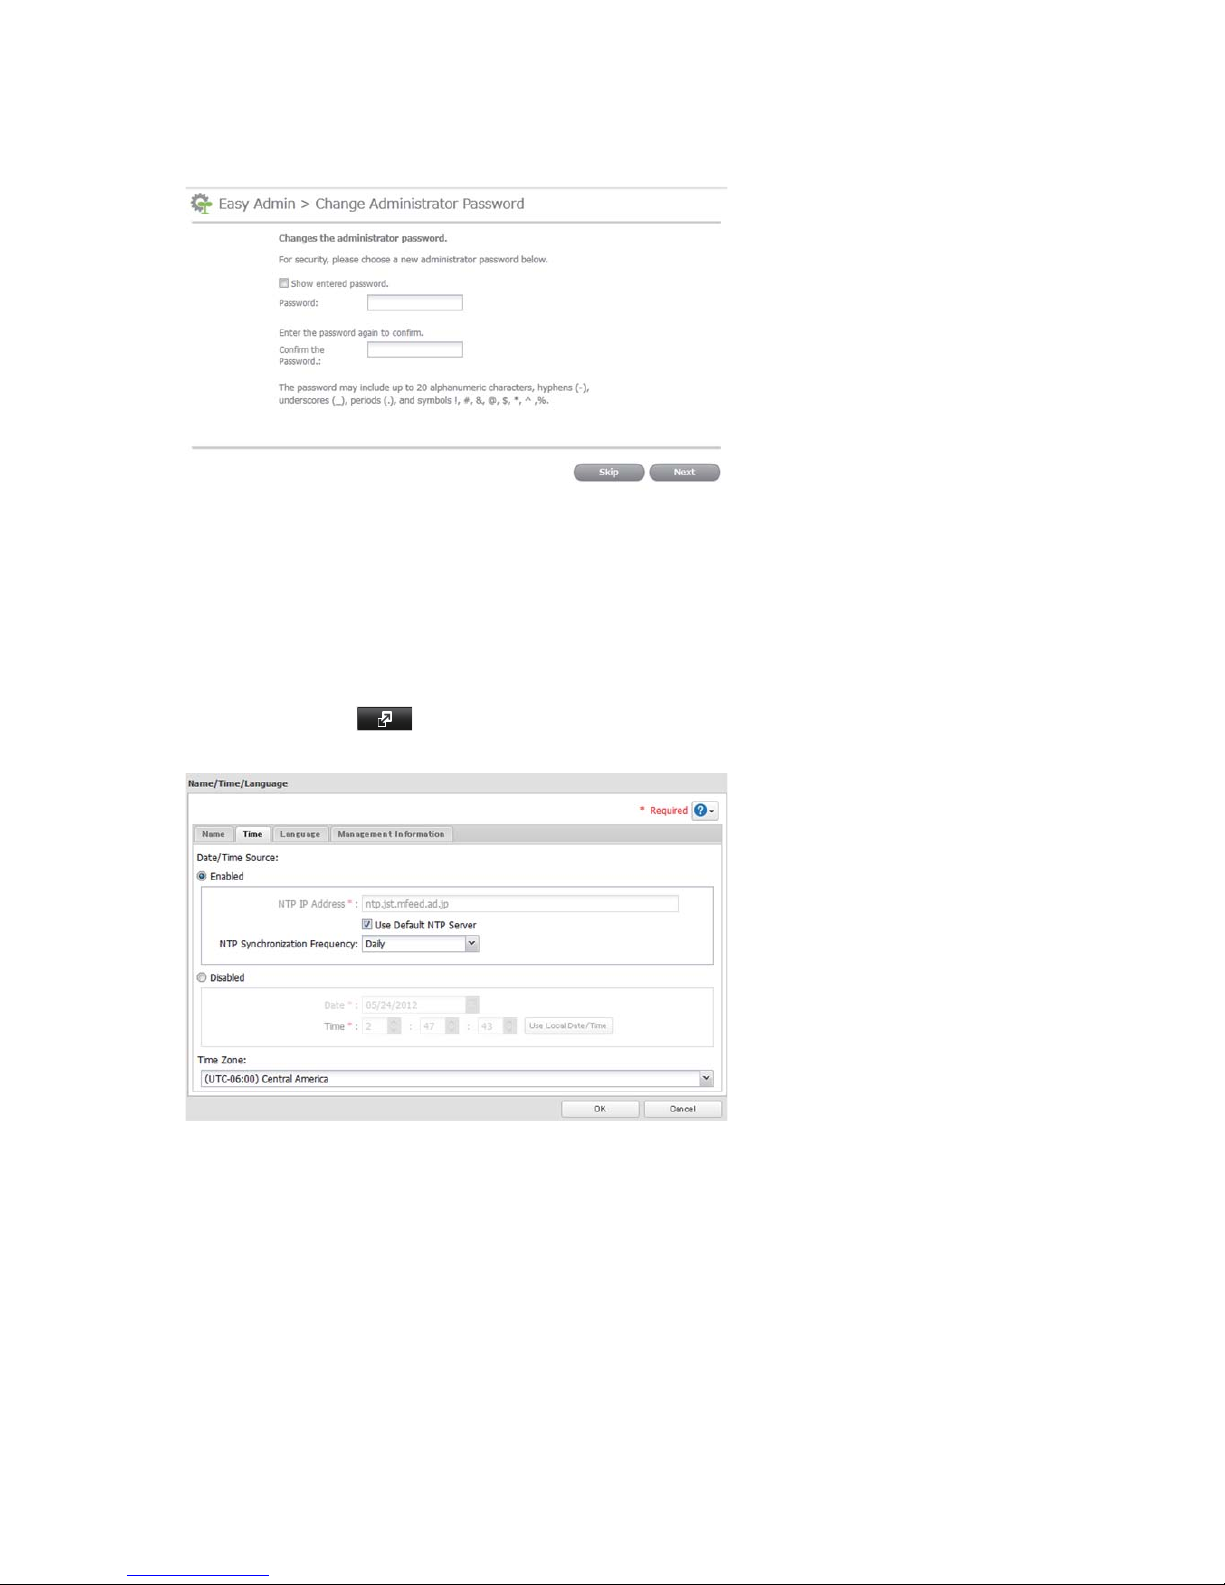
Change the administrator password in the displayed screen.
Note:
The default username and password are "admin" and "password" respectively.
1 0
Click [Management] - next to [Name/Time/Language] - [Time] - [Edit], then con gure the TeraStation's clock
with the Web Admin interface.
Notes:
• By default, the TeraStation adjusts its clock automatically by using an NTP server. The internal clocks of the
TeraStation and other devices on your network may run at slightly different speeds. Over a long period of time
your network devices may show somewhat different times, which can cause network problems. If clocks on
your network vary by more than 5 minutes it may cause unexpected behavior. For best results, keep all clocks
on the network set to the same time by adjusting them regularly, or use an NTP server to correct them all
automatically.
• NTP may not be usable in some networks. The default NTP Server (ntp.jst.mfeed.ad.jp) belongs to Internet Multi
Feed Inc. For more information, please visit www.jst.mfeed.ad.jp. Use NTP at your own risk. Buffalo Technology is
not responsible for any loss or damage caused by using of this service, stopping the service, or missing service.
• If the TeraStation cannot automatically obtain the time from an NTP server, check the TeraStation's DNS server
address settings. If the NTP server is specified by a hostname instead of an IP address, a DNS server address
13
must be set in [Network] - [IP Address] of the Web Admin interface.
1 1
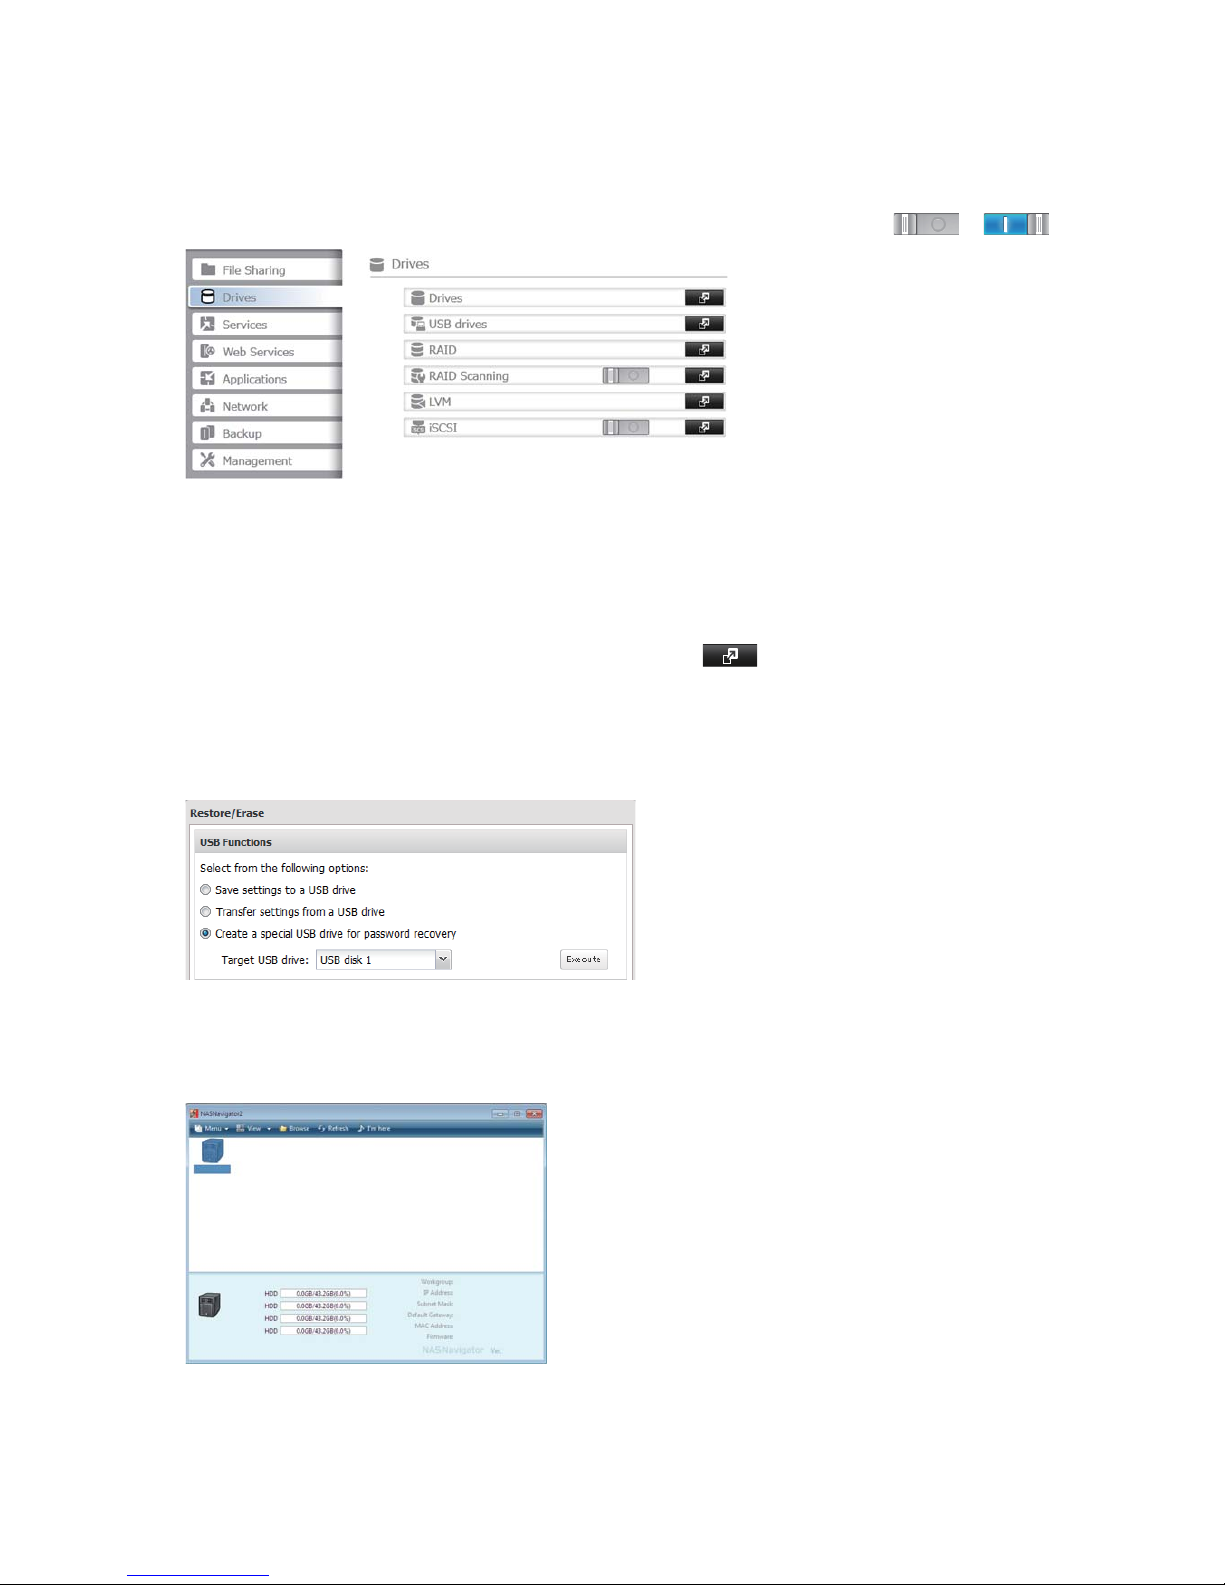
To con gure a RAID scan, click [Drives], then change the icon next to [RAID Scanning] from -> .
Note:
RAID scans check RAID arrays to con rm that they can be read properly and have no bad sectors. If any problems
are found, they will be repaired automatically.
1 2
This creates a USB memory device that can be used to restore default settings or transfer settings to another iden-
tical TeraStation.
1. In the TeraStation's Web Admin interface, click [Management] -
next to [Restore/Erase].
2. Connect a USB memory device (not included) with 1 GB or larger to a USB 2.0 port on the TeraStation.
3. Select [Create a special USB drive for password recovery]. This recovery USB drive will also reset the TeraStation's
administrator password to its default.
4. Select the connected USB memory device, then click [Execute].
To return the TeraStation to the default settings using the created USB memory device, see "Recovering by
Changing the Boot Mode Switch on the Rear Panel When Starting the TeraStation" in Chapter 9.
1 3
In NAS Navigator2, double-click your TeraStation's icon. This will open the shared folder of the TeraStation.
Notes:
• For Mac OS X, the TeraStation is mounted as a drive icon on the desktop, or it is displayed in the sidebar of the

14
Finder.
• You can now use the TeraStation's shared folder to save files just like any other folder.
This completes the setup.
Turning on the TeraStation
Press the power button on the TeraStation to turn it on.
Turning of f the TeraStation
The TeraStation might be damaged if it is unplugged suddenly without powering it down properly rst. Follow one of
the procedures below to turn o the TeraStation properly.
Using the Power Button
Press the power button twice within 3 seconds to shut down the TeraStation.
Using the TeraStation's Web Admin interface
1
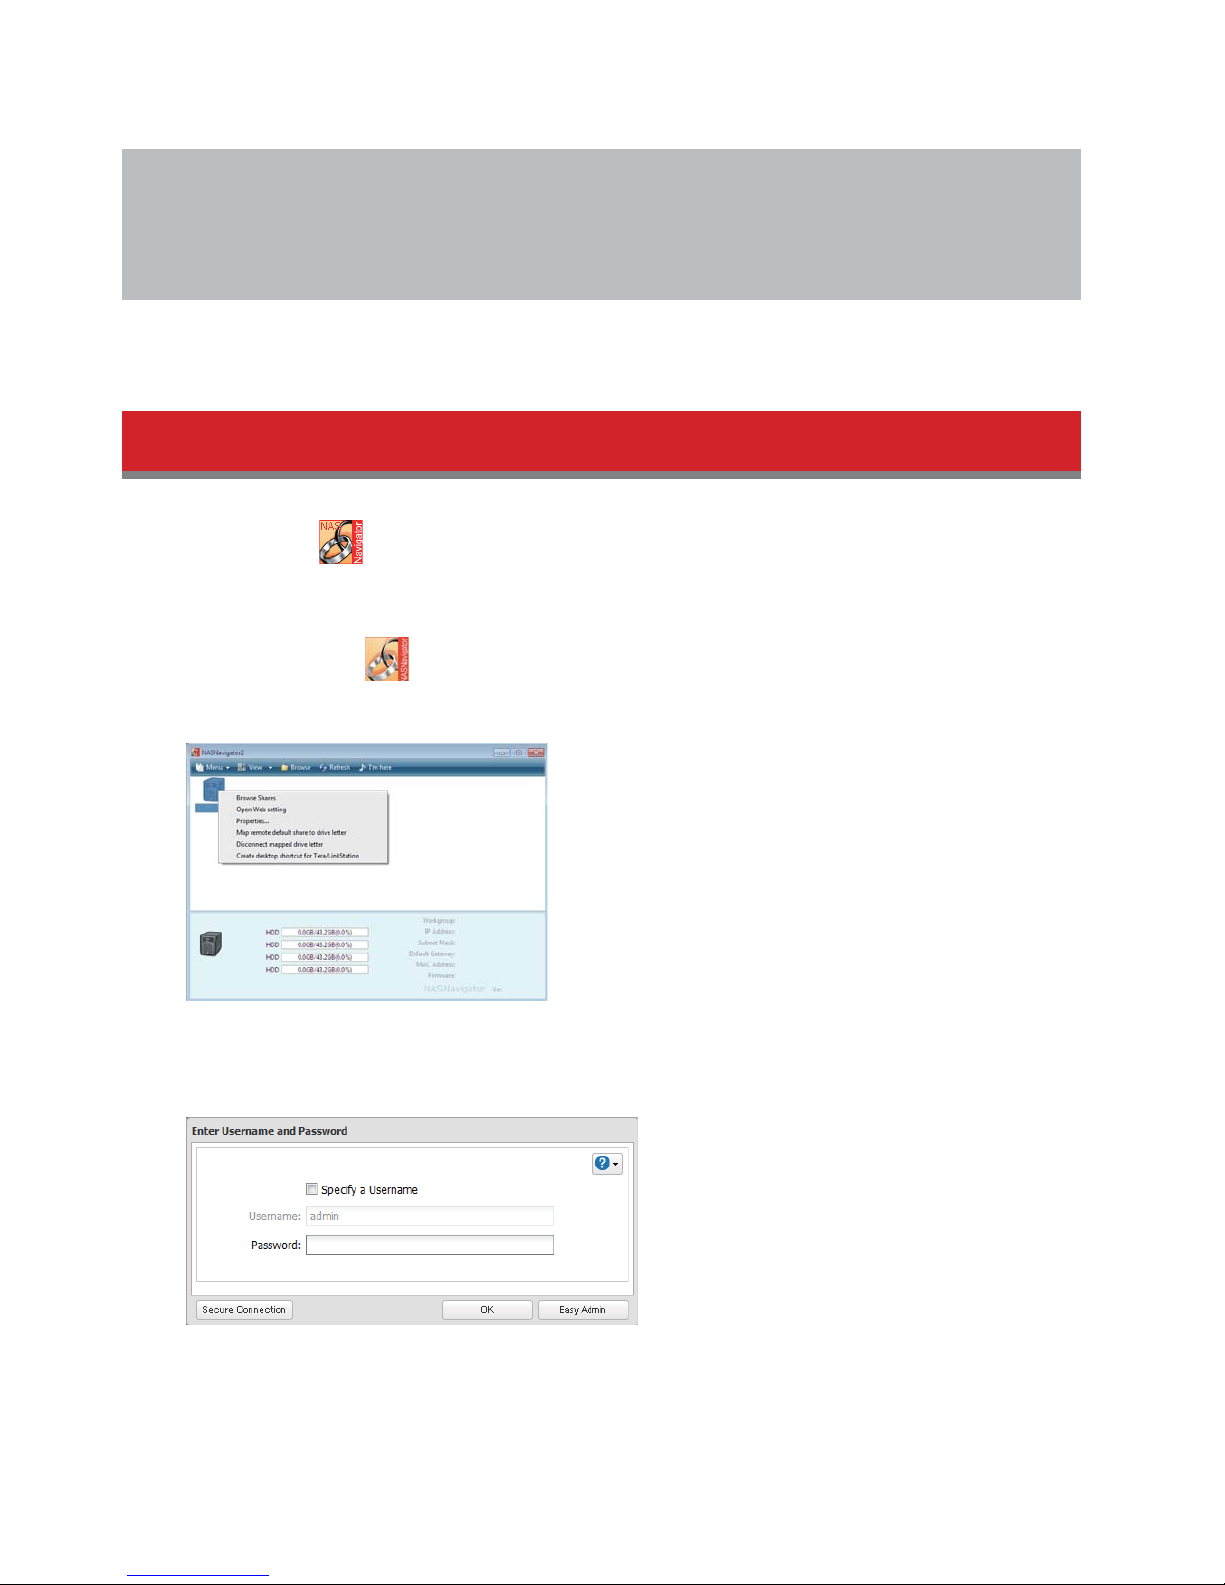
Double-click the icon on the desktop.
NAS Navigator2 will start.
Note:
For Mac OS X, click the
icon in the Dock.
2
Right-click on the TeraStation icon, then select [Open Web setting].
Note:
For Mac OS X, click the TeraStation icon while holding down the control key, then select [Open Web setting].
15
3
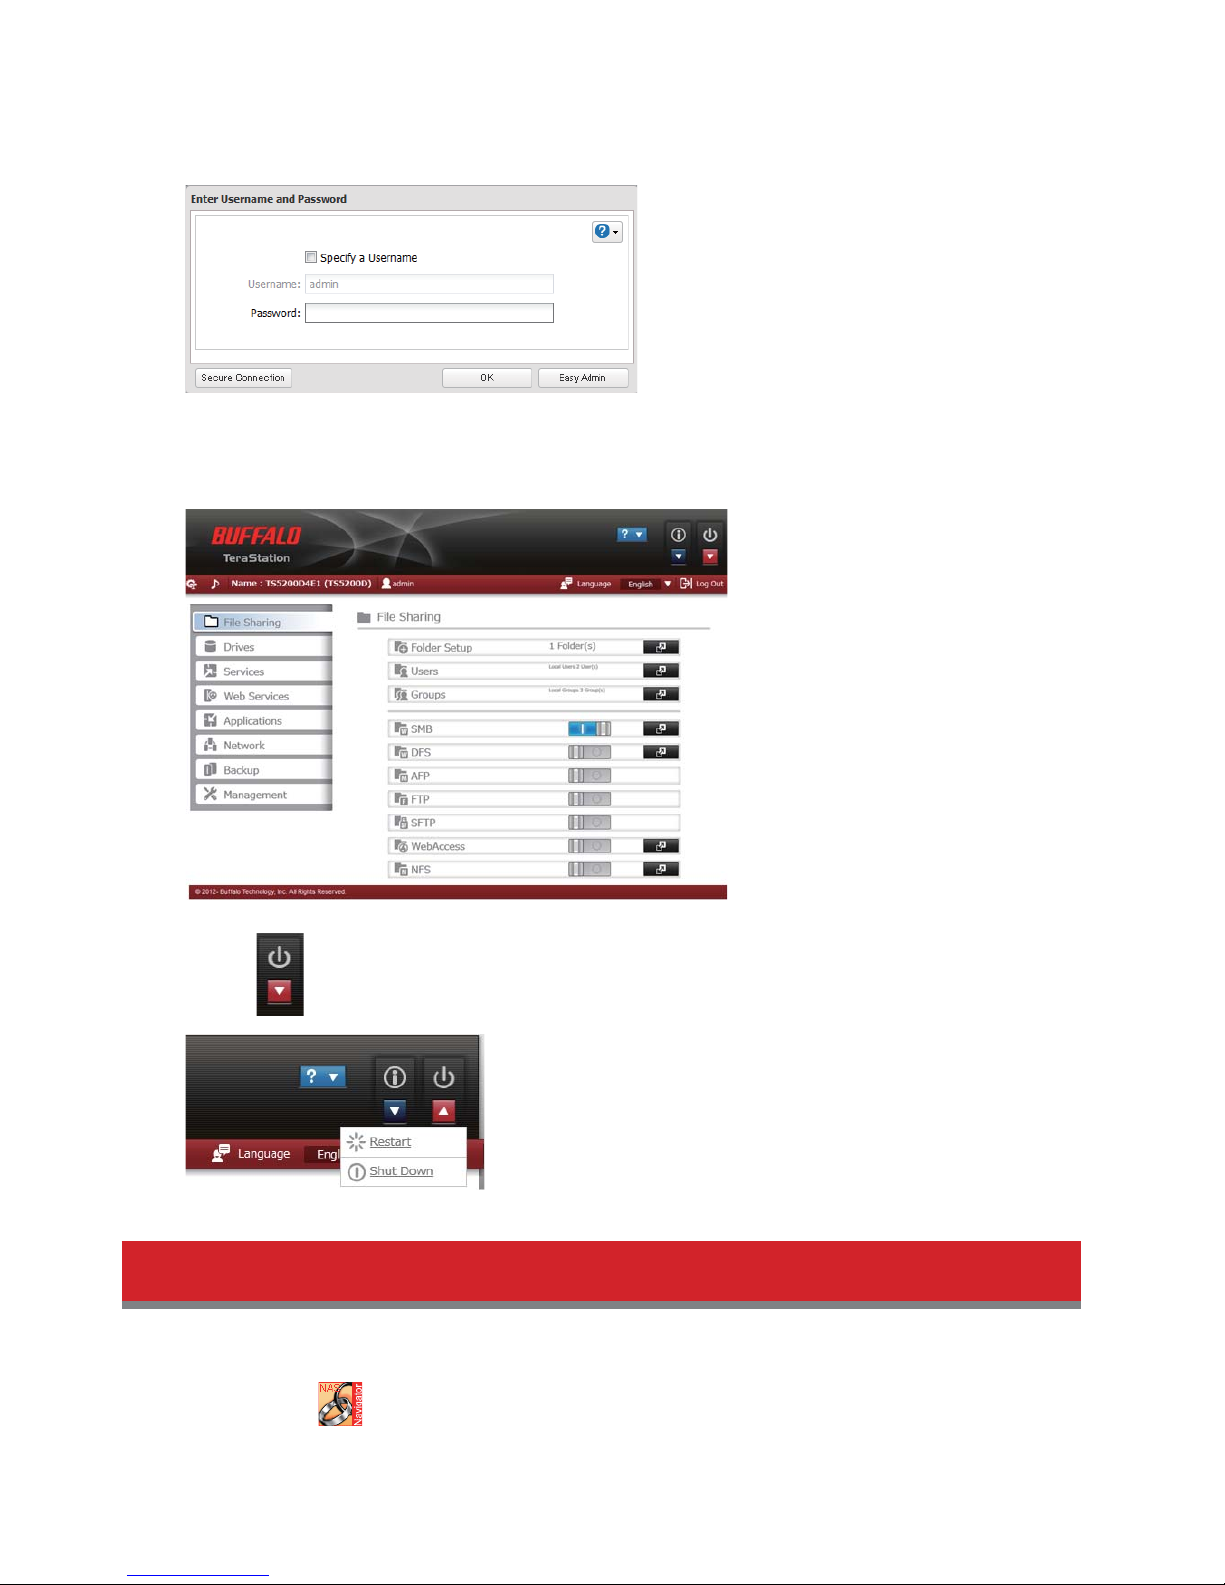
Enter the username and password, then click [OK].
Note:
The default username and password are "admin" and "password" respectively.
4
The Web Admin interface will open.
5
Click the on the right top of the Web Admin interface, then click [Shut Down].
When all the LEDs on the front of the TeraStation turn o , the shutdown process is complete.
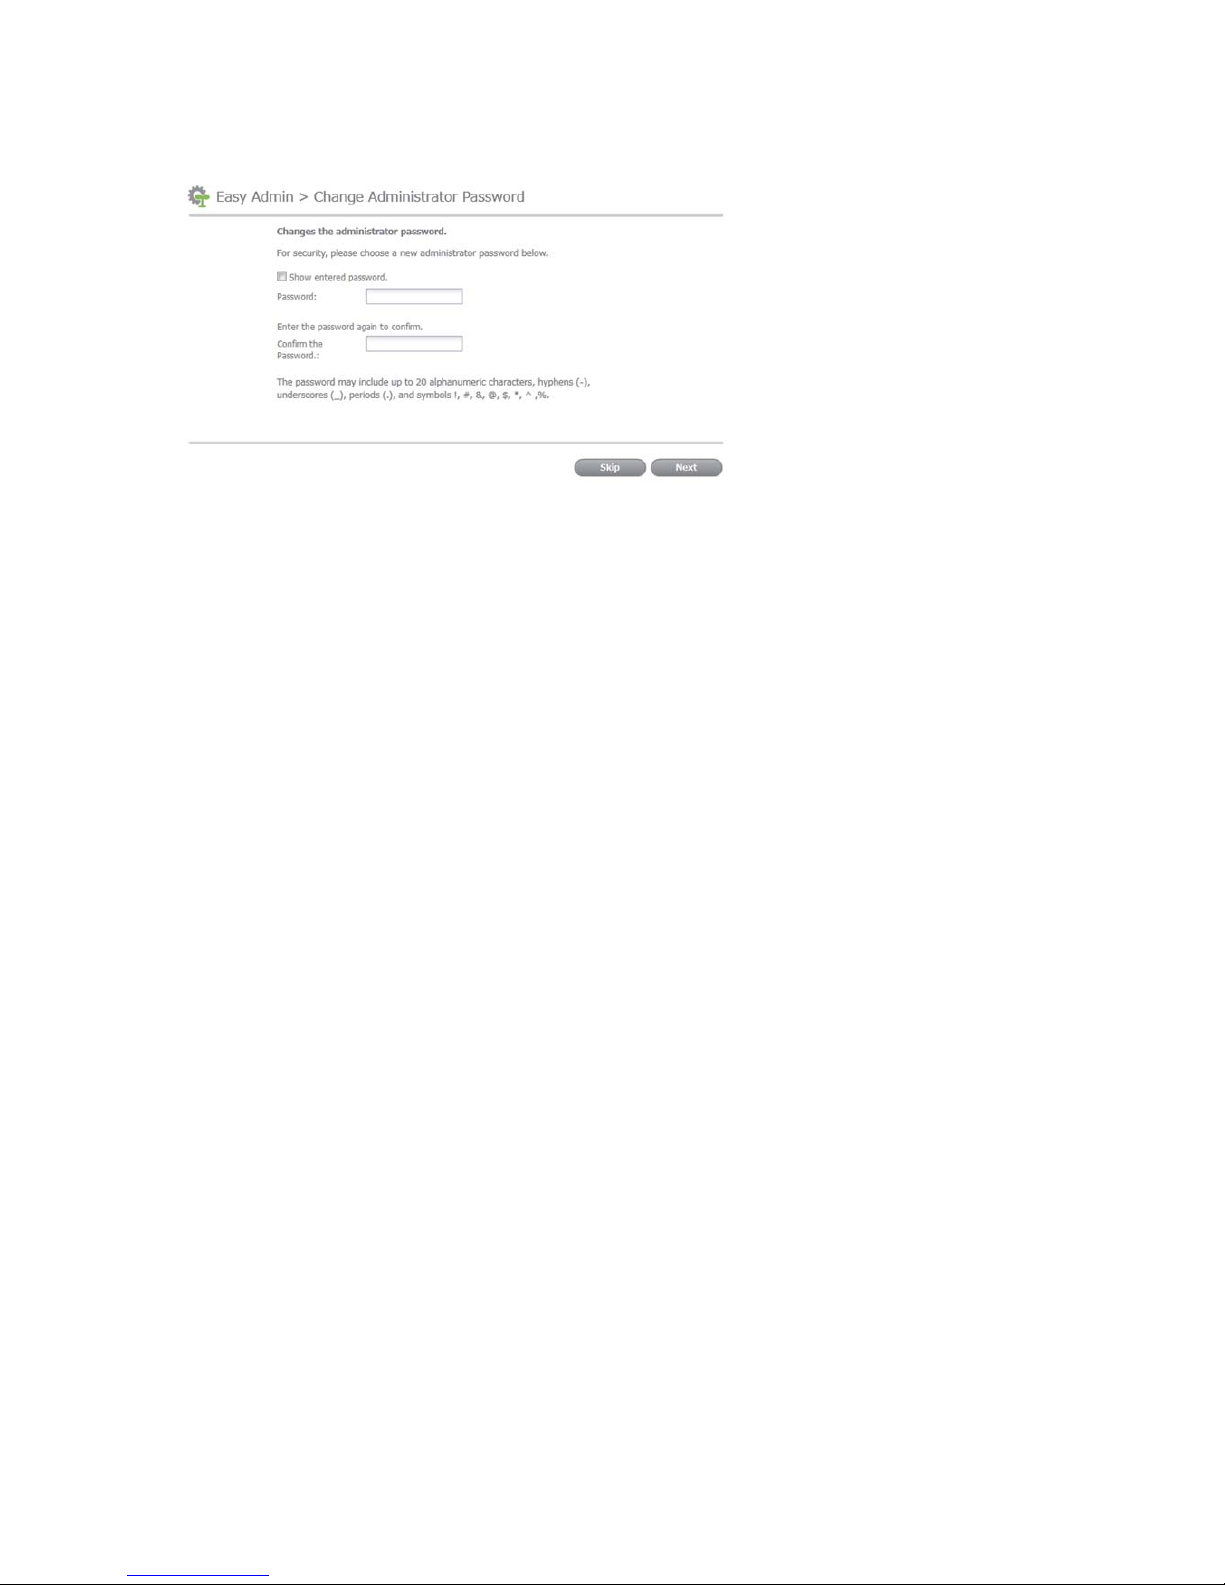
Changing the Password
After initial setup, follow the procedure below to change your password.
1
Double-click the icon on the desktop.

16
NAS Navigator2 will start.
Note:
For Mac OS X, click the icon in the Dock.
2
Right-click on the TeraStation icon, then select [Open Web setting].
Note:
For Mac OS X, click the TeraStation icon while holding down the control key, then select [Open Web setting].
3
Click [Easy Admin].
4
Click [Change Password].
17
5
Enter the desired password for new password and con rm new password.
6
Click [OK].
You have now changed the admin password.
18
Chapter 2 Configuration
To con gure and administer your TeraStation, use the Web Admin interface. It lets you con gure all the TeraStation's settings from a browser window. To open it, use the procedure below, or type the TeraStation's IP address into the URL eld
of your browser.
Opening the Web Admin Interface
1
Double-click the icon on the desktop.
NAS Navigator2 will start.
Note:
For Mac OS X, click the
icon in the Dock.
2
Right-click on the TeraStation icon, then select [Open Web setting].
Note:
For Mac OS X, click the TeraStation icon while holding down the control key, then select [Open Web setting].
3
Enter the username and password, then click [OK].
19
Notes:
• The default username and password are "admin" and "password" respectively.
• If you are logged in with the admin account, all settings are available.
• Alternately, you may log in as a guest (if the guest account is enabled) or with your username.
• To log in as a guest, enter "guest" as the username and leave the password blank. If you are logged in as guest,
you can check the TeraStation's name, IP address, workgroup, drive status, and firmware version.
• If you log in with your username and password, you can check the TeraStation's name, IP address, workgroup,
drive status, and firmware version, and you can change your password.
• Click [Easy Admin] to open the Easy setup screen. Click [Secure Connection] to encrypt data during
communication.
• The Web Admin interface is compatible with Internet Explorer 9 or later, Firefox 8 or later, Google Chrome 15
or later, and Safari 5 or later. If using Internet Explorer, if there are a large number of registered users, groups,
or shared folders, the Web Admin interface screen may not be displayed correctly. Use of Firefox 8 or later is
recommended.
• If a proxy server is enabled in the browser settings, the Web Admin interface cannot be displayed properly.
Disable the proxy server if it is enabled.
• The Web Admin interface may not display correctly in Internet Explorer due to your browser security settings.
If this happens, navigate to [Tools] - [Internet Options] - [Security] on Internet Explorer, and set the Security
Settings to [Local intranet].
4
The Web Admin interface will open.
This completes the opening of the Web Admin interface.
Note:
Mac OS X allows you to log in to the Web Admin interface with an alternative procedure using Bonjour. Follow the
procedure below to use this alternative method to log in to Mac OS X 10.4 or later:
1. Start the Safari Internet browser.
2. From the Safari menu, click [View] - [Show Bookmarks Bar]. Set so that the Safari bookmark bar is displayed.
3. From Bookmarks, click [Bonjour] - [(TeraStation name)].
The Web Admin interface will open.
Opening the Easy Setup Screen in the Web Admin Interface
Use the Easy Setup screen to make common changes to settings. Follow the procedure below to open the Easy Setup

20
screen.
1
Double-click the icon on the desktop.
NAS Navigator2 will start.
Note:
For Mac OS X, click the
icon in the Dock.
2
Right-click on the TeraStation icon, then select [Open Web setting].
Note:
For Mac OS X, click the TeraStation icon while holding down the control key, then select [Open Web setting].
3
Click [Easy Admin].
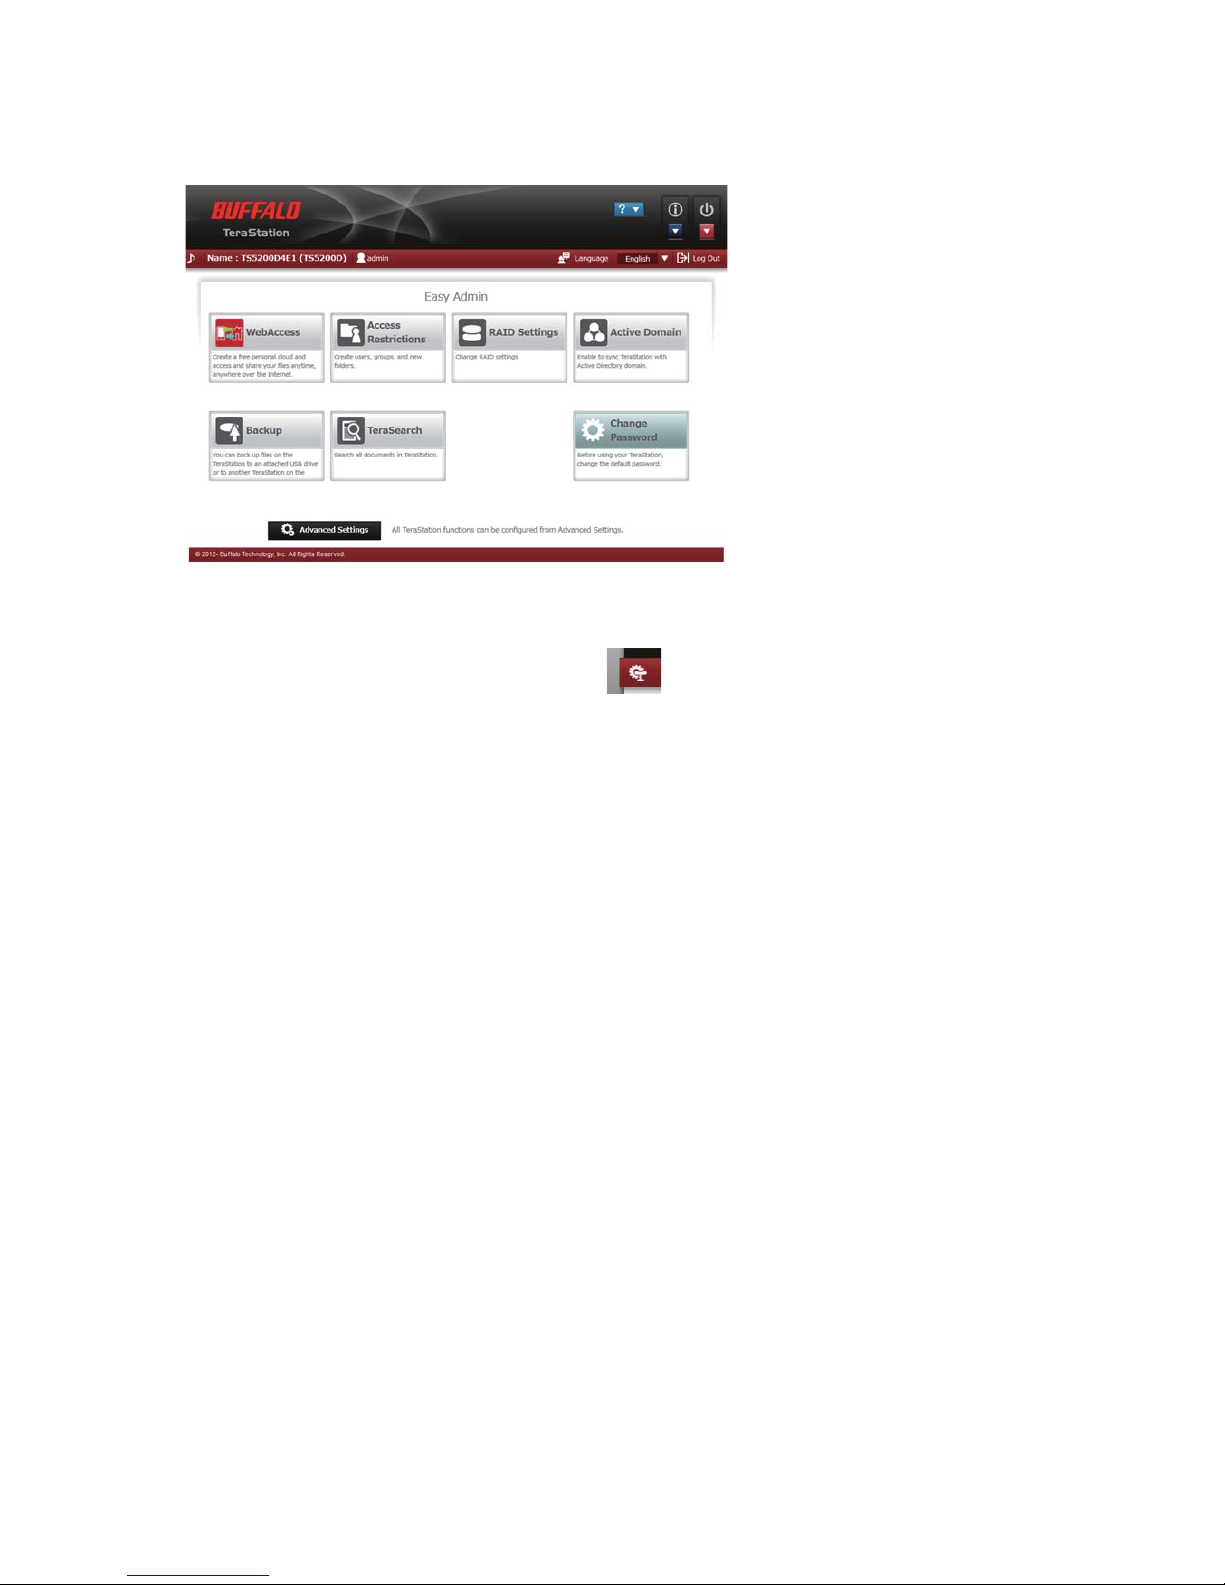
21
4
The Easy setup screen will open in the Web Admin interface.
Notes:
• If you click any buttons , a screen is displayed for entering the username and password. Enter the username and
password, then click [OK].
• You can open the Easy setup screen by clicking the
icon on the top left.
This completes the opening of the Easy setup screen in the Web Admin interface.
22
Chapter 3 Access Restrictions
You may restrict access to speci c shared folders. Only selected users and groups will be able to access these folders.
Notes:
• Access restrictions can be set separately for each shared folder. However, access restrictions cannot be set for
folders within the shared folder.
• Access restrictions must be configured through the TeraStation's Web Admin interface. Standard Windows
access restrictions as set in the Security tab of the Properties window of the TeraStation folder are not
supported and may cause unexpected behavior.
• Instead of the procedure below, you can also configure users, groups, and shared folders from Easy Setup by
clicking [Access Restrictions].
Configuring Access Restrictions on Users and Groups
Adding a Shared Folder
1
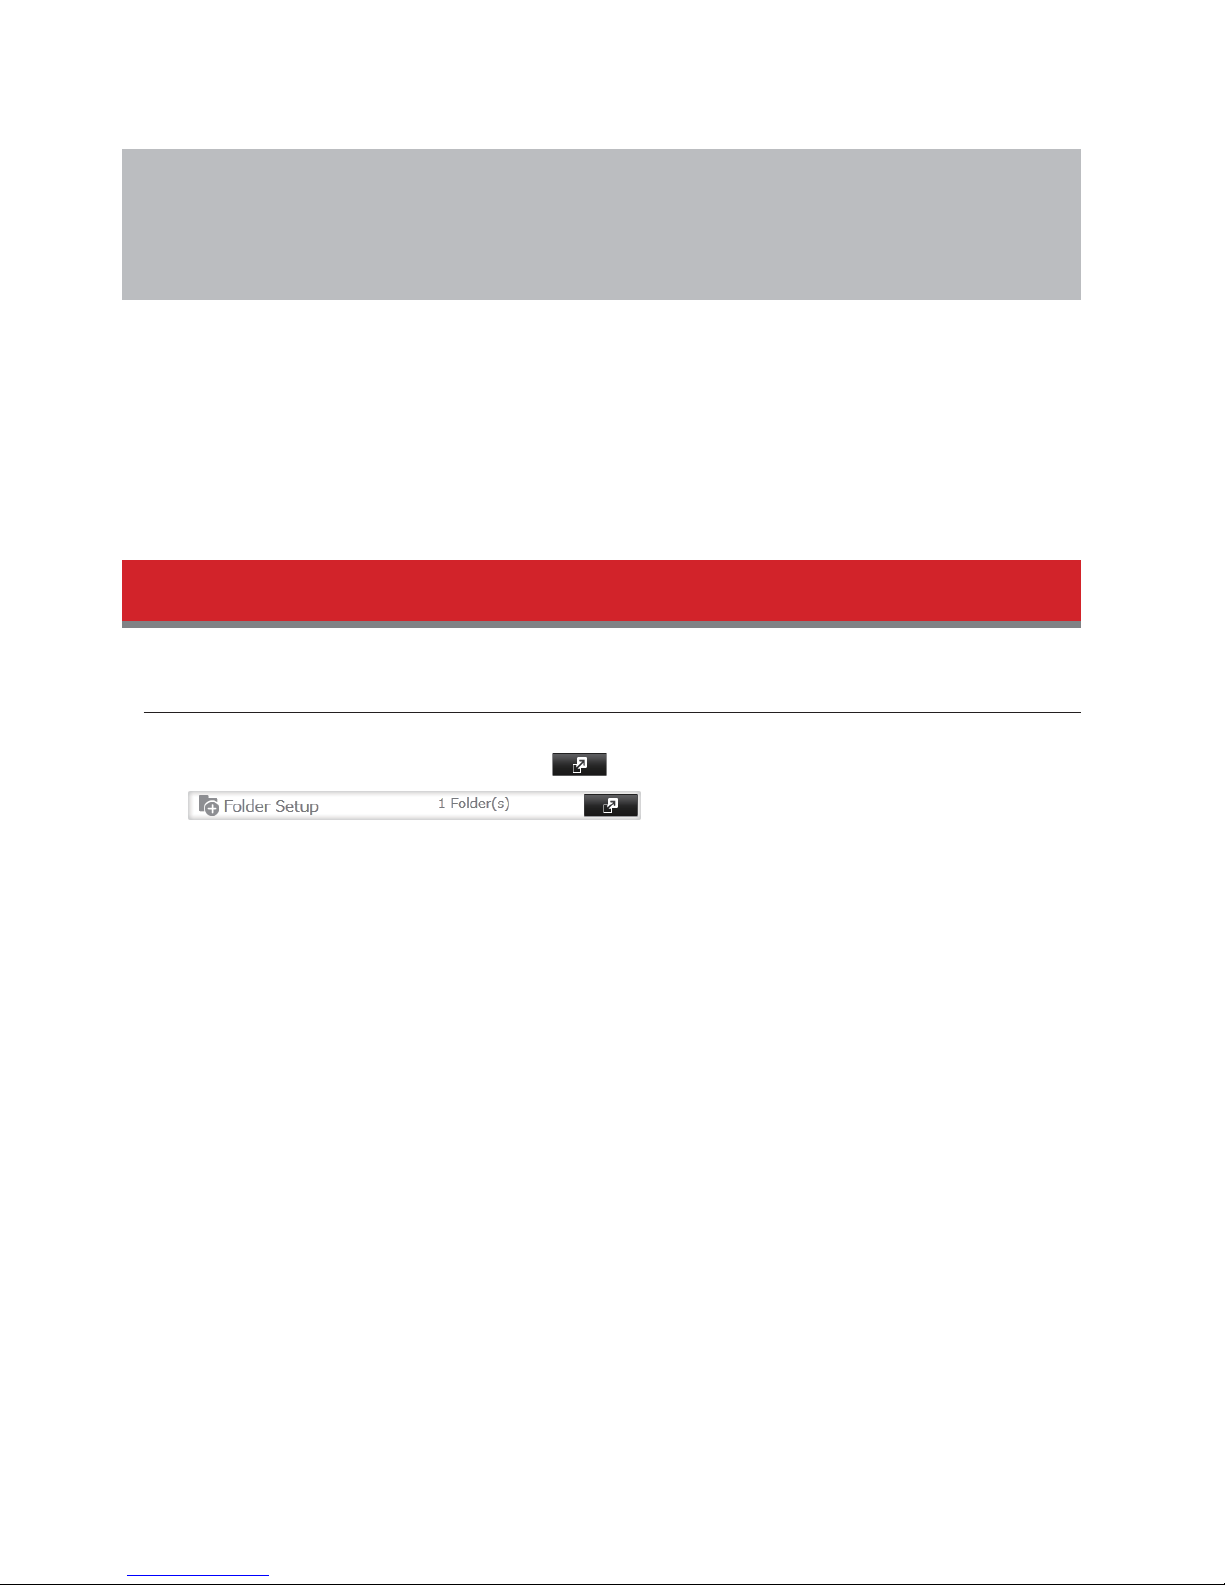
In the TeraStation's Web Admin interface, click next to [Folder Setup].
2
Click [Create Folder].
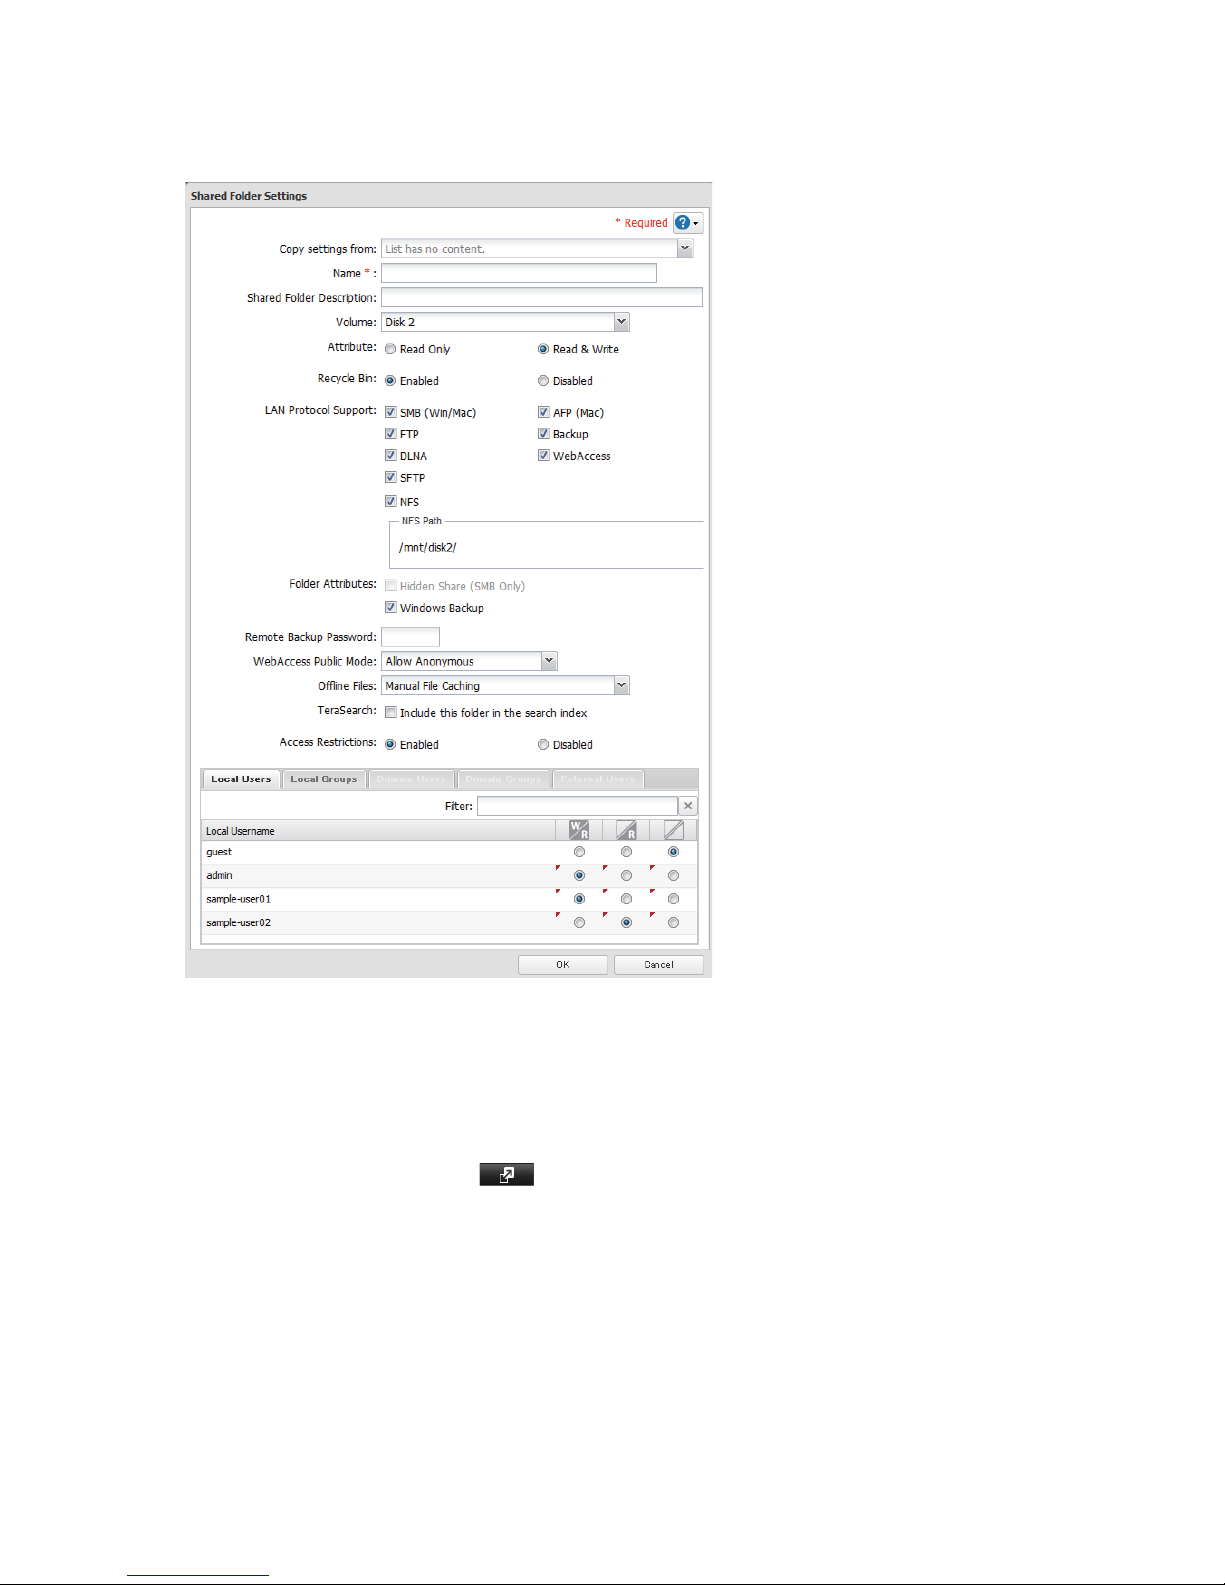
23
3
Con gure the desired settings, then click [OK].
Notes:
• The name may contain up to 27 alphanumeric characters, hyphens (-), and underscores (_). Do not use a symbol
as the first character.
• The description may contain up to 75 bytes alphanumeric characters, hyphens (-), underscores (_), and spaces.
Do not use a symbol and space as the first character.
• You may create up to 400 shared folders on the TeraStation.
• If multi-byte characters are used in a shared folder name used for both AFP and FTP, the client language must
be set by clicking [Management] -
next to [Name/Time/Language] - [Language] - [Edit] to match the
characters that are being used. Also, you may be unable to access the folder if certain characters are used in the
name, and so the use of letters and numbers only is recommended.
• The names of shared folders used for both AFP and FTP cannot use characters from different language sets
(such as by mixing Japanese and Korean characters, for instance).
You have created a new shared folder.
Preventing accidental deletion of data
To protect your data from accidental deletion, you may enable a Recycle Bin for each shared folder. Only SMB connec-

24
tions can use a Recycle Bin. If the Recycle Bin is enabled, data that is deleted from the shared folder is temporarily moved
to the Recycle Bin folder. To restore the deleted data, open the Recycle Bin folder and move the les back to the share.
After the Recycle Bin is enabled, the Recycle Bin folder is created when a le or folder is deleted from the shared folder.
The Recycle Bin folder is not created immediately after it is enabled. To delete all the les in the Recycle Bin, click [File
Sharing] - [Folder Setup] - [Empty the recycle bin] in the Web Admin interface.
To set a shared folder to Read-Only
In the Shared Folders settings window, select Read-Only for the [Shared Folder Attributes], then click [Apply]. The default
setting is [Read & Write]. Data in a shared folder that is set to Read-Only can be written only by users and groups with
write access. Read-Only shared folders and HFS+ formatted USB hard drives will have "(Read Only)" added to the shared
folder description.
To create a shared folder accessible only to users who know that it exists
To hide a shared folder, select the folder attribute [Hidden Share (SMB Only)] and click [OK]. To open a hidden folder, click
[Start] - [Search programs and les] and enter \\TeraStation name\Shared folder name$\ for the name. Example: If the
TeraStation name is "TS-XX001" and the shared folder name is "share", then enter "\\TS-XX001\share$\" to open it. FTP,
SFTP, and Mac AFP folders cannot be hidden.
Restrictions
The restrictions described here assume that the latest rmware version is installed in the TeraStation. The latest rmware
can be downloaded from the Bu alo Technology web site.
• The following characters are handled di erently by Mac OS X and Windows. Avoid using these characters when sharing data between Mac OS X and Windows:
• Windows does not support some characters that Mac OS X and the TeraStation allow. If you create a lename on a
Mac with any of the following characters, it will not display correctly on a Windows computer. With Mac OS X 10.2 or
later, you may have to connect to the TeraStation via AFP in order to display or copy any of the following characters.
? [ ] / \ = + < > ; : " , | *
• Do not use any of the following words as a username or group name:
root, bin, daemon, sys, adm, tty, disk, lp, sync, shutdown, halt, operator, nobody, mail, news,
uucp, ftp, kmem, utmp, shadow, users, nogroup, all, none, hdusers, admin,
guest, man, www, sshd, administrator, ftpuser, apache, mysql
• Do not use any of the following words as the name of a shared folder. These words are reserved for internal use by
the TeraStation:
info, spool, lost+found, global, printers, homes, lp, authtest, ram, msdfs_root, mt-daapd, usbdisk# (where # is a number, for example: usbdisk1)
• If any of the characters below are used for the shared folder name, workgroup name, or lename, the data on the
TeraStation may not be accessible or le operations may not be performed properly. To prevent this from happening,
avoid use of these characters.
<List of Unsupported Characters>
25
• File and folder names may contain up to 255 single-byte characters (UTF-8). DBCS characters (such as Japanese)
count as two characters (2 bytes) each. File and folder names should contain 255 bytes of data or less. You may not
be able to copy a folder or le whose name contains more than 255 bytes of information.
• Attributes (hidden/read-only) for the folders and files in the TeraStation cannot be set in Windows. Use the Web
Admin interface to set attributes for shared folders. In the Web Admin interface, navigate to [File Sharing] - [Shared
Folder]. Select [Read Only] or [Read & Write] from the attributes.
• If non-Roman alphabetical folder names or workgroup names do not display properly, rename the folder or workgroup with Roman alphabetical characters.
• If shared folders are accessed from a Macintosh, information les for the Macintosh may be generated automatically.
Do not delete these les. If they are deleted using Windows, this may prevent further access from a Macintosh.
• If an SMB connection is used from Mac OS X 10.3.9, the names of mounted volumes may appear as unreadable characters in Finder or other applications. (This is not a problem with the lename or data.)
• In Mac OS X 10.5 to 10.5.6, if a search is conducted using Spotlight, the search cannot be performed over an AFP connection. In this case, either use an SMB connection, or use Mac OS X 10.5.7 or later.
• TeraStation belongs to the default zone in AppleShareServer. The zone cannot be speci ed.
• When les are copied to the TeraStation, or to a USB drive connected to the TeraStation, le information such as date
created, date modi ed, and other date information may be updated or changed.
• The value for the hard drive capacity when checked from a browser may di er from the value shown when checked
from the Properties window of the hard drive in Windows.
• During a le transfer, if settings are changed in the Web Admin interface, the le transfer operation may be aborted.
• File copying to the TeraStation is protected by a journaling le system, but the situations below can occur if the copying operation is canceled or ended (such as by disconnection of a Ethernet cable or power outage) while in progress.
- The preset data (TeraStation name, user, and group) may be erased.
- An incomplete le may be copied and the le can no longer be deleted. If this happens, restart the TeraStation, delete the le, and perform the copy operation again.
• Even if the TeraStation's hard drive is formatted, the [% Used] and [Amount Used] in the Web Admin interface will not
be 0. This is because some drive space is being used for the system area.
• Your TeraStation username and password should be the same as your Windows username and password. If they are
di erent, you may not be able to access folders on the TeraStation with access restrictions con gured.
• To delete the contents of the trashbox folders for all shared folders, click [File Sharing] - [Folder Setup] - [Empty the
recycle bin] in the Web Admin interface.
• Do not set the same network address for LAN port 1 and LAN port 2. Network communication may be unstable if the
IP addresses are set so that they have the same network address.
26
• Use LAN port 1 to access di erent network subnets from the TeraStation. Access to a di erent network subnet is not
possible from LAN port 2 since it doesn't have a default gateway.
Examples:
- Email noti cation isn't working because the mail server can't be found.
- A backup device isn't detected, even when the IP address is speci ed and the backup location is selected.
To prevent these and similar problems, either use LAN port 1 on the TeraStation for main network communication, or
move other devices such as a mail server or backup device to the same subnet of the network.
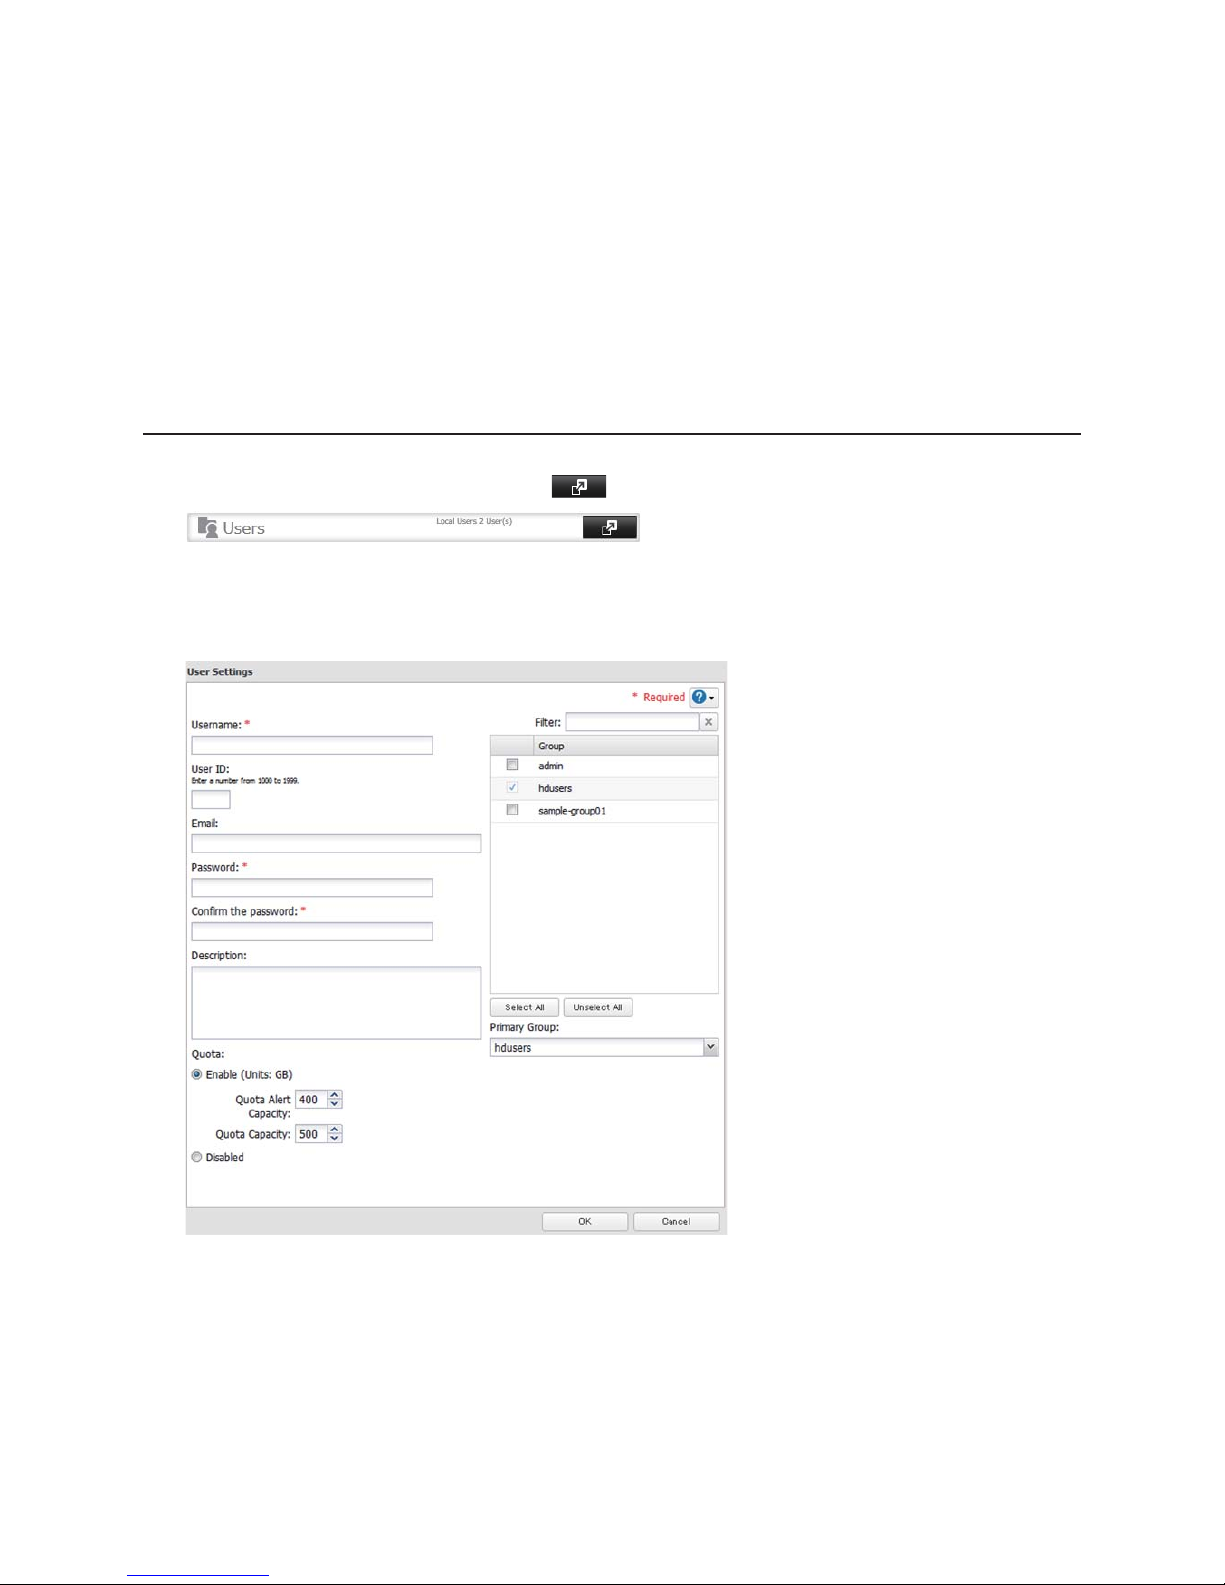
Adding Users
1
In the TeraStation's Web Admin interface, click next to [Users].
2
Click [Create User].
3
Enter the desired settings, then click [OK].
Notes:
• Usernames may contain up to 20 alphanumeric characters, hyphens (-), underscores (_), periods (.), !, #, &, @, $, *,
^, and %. Do not use a symbol as the first character.
• If the user ID is left blank, a user ID will be automatically assigned. Use numbers between 1000 and 1999 to set a
user ID manually. Make sure that user IDs are unique.
• To assign quotas for users, enable user quotas and enter a limit in GB.
• If you log in with a username, you can check the TeraStation name, IP address, workgroup, and drive status, and

27
you can change your own password.
• User descriptions may contain up to 75 alphanumeric characters, hyphens (-), underscores (_), and spaces. Do
not use a symbol and space as the first character.
• When setting users with access privileges, a maximum of 300 users can be registered in the TeraStation.
• Passwords may contain up to 20 alphanumeric characters and the following characters: - _ @ ! # $ % & ‘ ( ) * + , . /
; < > = ? [ ] ^ { } | ~. Do not use a symbol other than an underscore (_) as the first character.
• In Windows 7/Vista/XP/2000 and Windows Server 2003/Server 2008, if the network login name is different, a
screen is displayed for entering the username and password, but even after these are entered, access to the
shared folder is not possible. For best results, use the same username and password for both Windows and the
TeraStation.
• Repetitive deletions and additions of users may cause quotas to not work properly. Even if data is copied by
a backup job, quotas may not work properly if a user ID or group ID is duplicated. Always use distinct, unique
usernames and group names.
This completes the procedure for adding users.
Quotas only limit available space. They don't check the amount of space that each user
is using, so these amounts must be managed individually. Owners can be confirmed
with the procedure below.
• From the Properties screen of the le or folder, open a new window from the [Security] tab - click [Advanced], and
check using the [Owner] tab.
• In My Computer or Explorer, right-clicking the bar shown for [Name], [Date modi ed], [Type], [Size], or other parameter allows the selection of which parameter details are displayed. [Owner] can be con rmed from the right-click
menu. The procedure for con rming the owner varies depending on the OS. The above example is for Windows XP.
Importing user information
All user information can be imported in a single operation by entering the information below to [CSV Files] in the [File
Sharing]-[Users] screen and clicking [Import CSV File].
User information format: Username (required), password (required), and user description (optional).
Example:
username1,password1,comment1
username2,password2,comment2
username3,password3,comment3
…
…
…
• Importing may take over an hour depending on how many users are imported. During import, other operations performed from the Web Admin interface may be slower than usual, or may not be performed at all.
• Commas (,) are used as separators. Do not put spaces before or after commas.
• If a line has an incorrect format, the user for that line will not be registered.
• If a user with the same name is already registered, the new user information overwrites the old information.
• Do not use commas (,) in the username, password, or user description. See the previous page for other restrictions on
what characters to use for the username, password and user description.
28
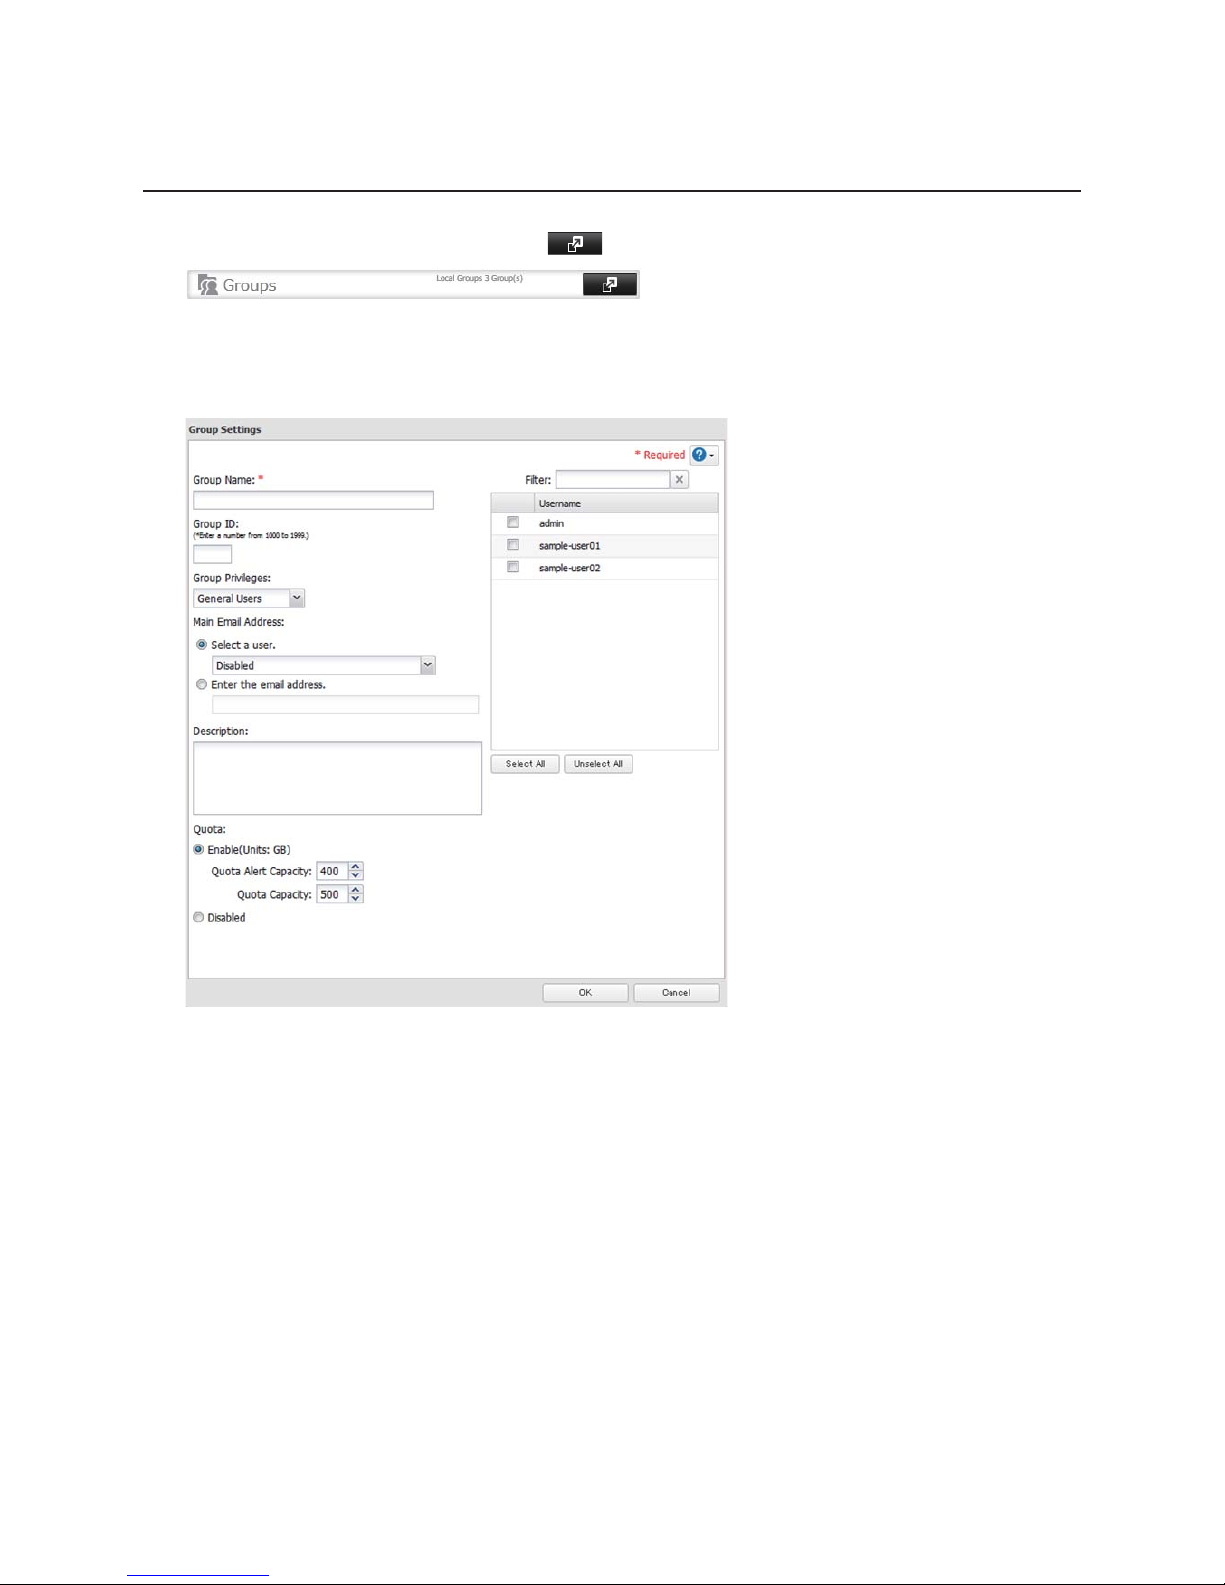
Adding Groups
1
In the TeraStation's Web Admin interface, click next to [Groups].
2
Click [Add Group].
3
Enter the desired settings, then click [OK].
Notes:
• If the Group ID field is left blank, a group ID will be automatically assigned. Use numbers between 1000 and
1999 to set a group ID manually. Make sure that group IDs are not duplicated by other groups.
• To set a Quota for a group, enable group quota and enter the maximum disk space allotted in GB.
• Group names may contain up to 20 alphanumeric characters, hyphens (-), underscores (_), and periods (.). Do
not use a symbol other than an underscore (_) as the first character.
• Group descriptions may contain up to 75 alphanumeric characters, hyphens (-), underscores (_), and spaces. Do
not use a symbol and space as the first character.
• You may register up to 300 groups with the TeraStation.
• Repetitive deletions and additions of groups may cause quotas to not work properly. Even if data is copied by
a backup job, quotas may not work properly if a user ID or group ID is duplicated. Always use distinct, unique
usernames and group names.
This completes the procedure for adding groups.
29
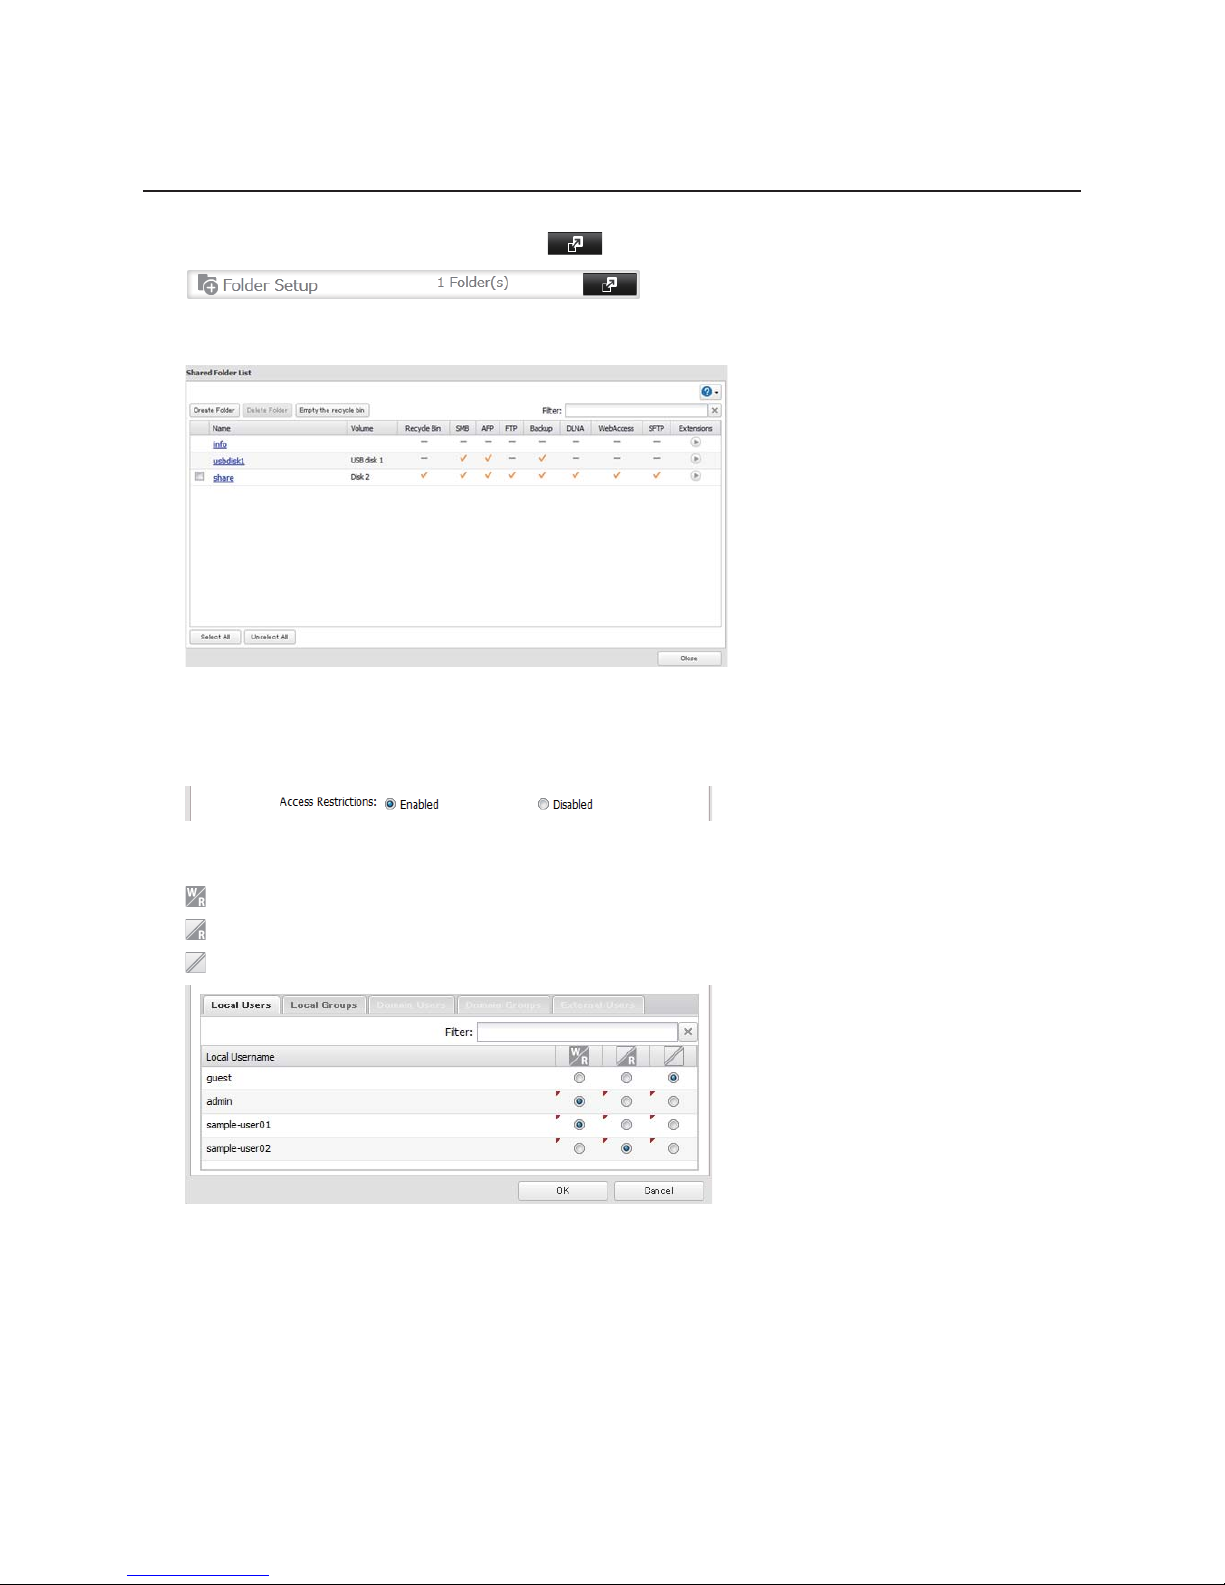
Access Restrictions
1
In the TeraStation's Web Admin interface, click next to [Folder Setup].
2
Click a shared folder you want to set access restrictions for.
3
Click [Edit].
4
Enable [Access Restrictions].
5
Select the level of access for the user or group you added.
: Read and write access allowed
: Read access allowed
: Access prohibited
Note:
An example of access restrictions by local users is shown in the screen. To apply access restrictions by local group,
 Loading...