

Page 1
Gehaktmachine
Handleiding
Hachoir à viande
Mode d'emploi
Fleischwolf
Bedienungsanleitung
Tritacarne
Manuale di istruzioni
Picadora de carne
Manual de instrucciones
Picadora de Carne
Manual de instruções
Köttkvarn
Bruksanvisning
Kødhakker
Instruktionsvejledning
Kjøttkvern
Brukerhåndbok
Lihamylly
Ohjekirja
NL
FR
DE
IT
ES
PT
S
DK
N
FIN
Meat Mincer
Instruction manual
Model • Modèle • Modell • Modello • Modelo • Malli:
CD400
Page 2

Table of Contents
Safety Tips . . . . . . . . . . . . . . . . . . . . . . . . . . . . . . . . . . . . . . . . . . . . . . 1
Introduction . . . . . . . . . . . . . . . . . . . . . . . . . . . . . . . . . . . . . . . . . . . . . 1
Pack Contents . . . . . . . . . . . . . . . . . . . . . . . . . . . . . . . . . . . . . . . . . . . 1
Assembly . . . . . . . . . . . . . . . . . . . . . . . . . . . . . . . . . . . . . . . . . . . . . . . 2
Operation . . . . . . . . . . . . . . . . . . . . . . . . . . . . . . . . . . . . . . . . . . . . . . . 2
Cleaning, Care & Maintenance . . . . . . . . . . . . . . . . . . . . . . . . . . . . . . 3
Troubleshooting . . . . . . . . . . . . . . . . . . . . . . . . . . . . . . . . . . . . . . . . . . 3
Technical Specifications . . . . . . . . . . . . . . . . . . . . . . . . . . . . . . . . . . . . 4
Electrical Wiring . . . . . . . . . . . . . . . . . . . . . . . . . . . . . . . . . . . . . . . . . . 4
Compliance . . . . . . . . . . . . . . . . . . . . . . . . . . . . . . . . . . . . . . . . . . . . . 4
Inhoudsopgave
Veiligheidstips . . . . . . . . . . . . . . . . . . . . . . . . . . . . . . . . . . . . . . . . . . . . 5
Inleiding . . . . . . . . . . . . . . . . . . . . . . . . . . . . . . . . . . . . . . . . . . . . . . . . 5
Verpakkingsinhoud . . . . . . . . . . . . . . . . . . . . . . . . . . . . . . . . . . . . . . . . 5
Montage . . . . . . . . . . . . . . . . . . . . . . . . . . . . . . . . . . . . . . . . . . . . . . . . 6
Werking . . . . . . . . . . . . . . . . . . . . . . . . . . . . . . . . . . . . . . . . . . . . . . . . 6
Reiniging, zorg & onderhoud . . . . . . . . . . . . . . . . . . . . . . . . . . . . . . . . 7
Oplossen van problemen . . . . . . . . . . . . . . . . . . . . . . . . . . . . . . . . . . . 7
Technische specificaties . . . . . . . . . . . . . . . . . . . . . . . . . . . . . . . . . . . . 8
Elektrische bedrading . . . . . . . . . . . . . . . . . . . . . . . . . . . . . . . . . . . . . . 8
Productconformiteit . . . . . . . . . . . . . . . . . . . . . . . . . . . . . . . . . . . . . . 8
Sommaire
Conseils de sécurité . . . . . . . . . . . . . . . . . . . . . . . . . . . . . . . . . . . . . . . 9
Introduction . . . . . . . . . . . . . . . . . . . . . . . . . . . . . . . . . . . . . . . . . . . . . 9
Contenu de l'emballage . . . . . . . . . . . . . . . . . . . . . . . . . . . . . . . . . . . . 9
Montage . . . . . . . . . . . . . . . . . . . . . . . . . . . . . . . . . . . . . . . . . . . . . . . . 10
Fonctionnement . . . . . . . . . . . . . . . . . . . . . . . . . . . . . . . . . . . . . . . . . . 10
Nettoyage, entretien et maintenance . . . . . . . . . . . . . . . . . . . . . . . . . 11
Dépannage . . . . . . . . . . . . . . . . . . . . . . . . . . . . . . . . . . . . . . . . . . . . . . 11
Spécifications techniques . . . . . . . . . . . . . . . . . . . . . . . . . . . . . . . . . . . 12
Raccordement électrique . . . . . . . . . . . . . . . . . . . . . . . . . . . . . . . . . . . 12
Conformité . . . . . . . . . . . . . . . . . . . . . . . . . . . . . . . . . . . . . . . . . . . . . . 12
UK
NL
FR
Page 3

Inhalt
Sicherheitshinweise . . . . . . . . . . . . . . . . . . . . . . . . . . . . . . . . . . . . . . . 13
Einführung . . . . . . . . . . . . . . . . . . . . . . . . . . . . . . . . . . . . . . . . . . . . . . . 13
Lieferumfang . . . . . . . . . . . . . . . . . . . . . . . . . . . . . . . . . . . . . . . . . . . . . 13
Montage . . . . . . . . . . . . . . . . . . . . . . . . . . . . . . . . . . . . . . . . . . . . . . . . 14
Betrieb . . . . . . . . . . . . . . . . . . . . . . . . . . . . . . . . . . . . . . . . . . . . . . . . . 14
Reinigung, Pflege und Wartung . . . . . . . . . . . . . . . . . . . . . . . . . . . . . . 15
Störungssuche . . . . . . . . . . . . . . . . . . . . . . . . . . . . . . . . . . . . . . . . . . . 15
Technische Spezifikationen . . . . . . . . . . . . . . . . . . . . . . . . . . . . . . . . . 16
Elektroanschlüsse . . . . . . . . . . . . . . . . . . . . . . . . . . . . . . . . . . . . . . . . . 16
Konformität . . . . . . . . . . . . . . . . . . . . . . . . . . . . . . . . . . . . . . . . . . . . . 16
Indice
Suggerimenti per la sicurezza . . . . . . . . . . . . . . . . . . . . . . . . . . . . . . . . 17
Introduzione . . . . . . . . . . . . . . . . . . . . . . . . . . . . . . . . . . . . . . . . . . . . . 17
Contenuto dell'imballaggio . . . . . . . . . . . . . . . . . . . . . . . . . . . . . . . . . 17
Montaggio . . . . . . . . . . . . . . . . . . . . . . . . . . . . . . . . . . . . . . . . . . . . . . . 18
Funzionamento . . . . . . . . . . . . . . . . . . . . . . . . . . . . . . . . . . . . . . . . . . . 18
Pulizia e manutenzione . . . . . . . . . . . . . . . . . . . . . . . . . . . . . . . . . . . . . 19
Risoluzione dei problemi . . . . . . . . . . . . . . . . . . . . . . . . . . . . . . . . . . . 19
Specifiche tecniche . . . . . . . . . . . . . . . . . . . . . . . . . . . . . . . . . . . . . . . . 20
Cablaggi elettrici . . . . . . . . . . . . . . . . . . . . . . . . . . . . . . . . . . . . . . . . . . 20
Conformità . . . . . . . . . . . . . . . . . . . . . . . . . . . . . . . . . . . . . . . . . . . . . . 20
Índice
Consejos de Seguridad . . . . . . . . . . . . . . . . . . . . . . . . . . . . . . . . . . . . . 21
Introducción . . . . . . . . . . . . . . . . . . . . . . . . . . . . . . . . . . . . . . . . . . . . . 21
Contenido del Conjunto . . . . . . . . . . . . . . . . . . . . . . . . . . . . . . . . . . . 21
Montaje . . . . . . . . . . . . . . . . . . . . . . . . . . . . . . . . . . . . . . . . . . . . . . . . . 22
Funcionamiento . . . . . . . . . . . . . . . . . . . . . . . . . . . . . . . . . . . . . . . . . . 22
Limpieza, Cuidado y Mantenimiento . . . . . . . . . . . . . . . . . . . . . . . . . . 23
Resolución de problemas . . . . . . . . . . . . . . . . . . . . . . . . . . . . . . . . . . . 23
Especificaciones Técnicas . . . . . . . . . . . . . . . . . . . . . . . . . . . . . . . . . . . 24
Cableado Eléctrico . . . . . . . . . . . . . . . . . . . . . . . . . . . . . . . . . . . . . . . . 24
Cumplimiento . . . . . . . . . . . . . . . . . . . . . . . . . . . . . . . . . . . . . . . . . . . . 24
DE
IT
ES
Page 4

Índice
Conselhos de segurança . . . . . . . . . . . . . . . . . . . . . . . . . . . . . . . . . . . 25
Introdução . . . . . . . . . . . . . . . . . . . . . . . . . . . . . . . . . . . . . . . . . . . . . . 25
Conteúdo da embalagem . . . . . . . . . . . . . . . . . . . . . . . . . . . . . . . . . . . 25
Montagem . . . . . . . . . . . . . . . . . . . . . . . . . . . . . . . . . . . . . . . . . . . . . . . 26
Funcionamento . . . . . . . . . . . . . . . . . . . . . . . . . . . . . . . . . . . . . . . . . . . 26
Limpeza, cuidados & manutenção . . . . . . . . . . . . . . . . . . . . . . . . . . . . 27
Resolução de problemas . . . . . . . . . . . . . . . . . . . . . . . . . . . . . . . . . . . 27
Especificações técnicas . . . . . . . . . . . . . . . . . . . . . . . . . . . . . . . . . . . . . 28
Cablagem eléctrica . . . . . . . . . . . . . . . . . . . . . . . . . . . . . . . . . . . . . . . . 28
Conformidade . . . . . . . . . . . . . . . . . . . . . . . . . . . . . . . . . . . . . . . . . . . 28
Innehållsförteckning
Säkerhetsråd . . . . . . . . . . . . . . . . . . . . . . . . . . . . . . . . . . . . . . . . . . . . . 29
Inledning . . . . . . . . . . . . . . . . . . . . . . . . . . . . . . . . . . . . . . . . . . . . . . . . 29
Förpackningsinnehåll . . . . . . . . . . . . . . . . . . . . . . . . . . . . . . . . . . . . . . 29
Montering . . . . . . . . . . . . . . . . . . . . . . . . . . . . . . . . . . . . . . . . . . . . . . . 30
Drift . . . . . . . . . . . . . . . . . . . . . . . . . . . . . . . . . . . . . . . . . . . . . . . . . . . 30
Rengöring, omvårdnad och underhåll . . . . . . . . . . . . . . . . . . . . . . . . . 31
Felsökning . . . . . . . . . . . . . . . . . . . . . . . . . . . . . . . . . . . . . . . . . . . . . . . 31
Technical Specifications . . . . . . . . . . . . . . . . . . . . . . . . . . . . . . . . . . . . 32
Elektriska kablar . . . . . . . . . . . . . . . . . . . . . . . . . . . . . . . . . . . . . . . . . . 32
Tillmötesgående . . . . . . . . . . . . . . . . . . . . . . . . . . . . . . . . . . . . . . . . . . 32
Indholdsfortegnelse
Sikkerhedstips . . . . . . . . . . . . . . . . . . . . . . . . . . . . . . . . . . . . . . . . . . . 33
Introduktion . . . . . . . . . . . . . . . . . . . . . . . . . . . . . . . . . . . . . . . . . . . . . 33
Emballagens indhold . . . . . . . . . . . . . . . . . . . . . . . . . . . . . . . . . . . . . . . 33
Samling . . . . . . . . . . . . . . . . . . . . . . . . . . . . . . . . . . . . . . . . . . . . . . . . . 34
Brug . . . . . . . . . . . . . . . . . . . . . . . . . . . . . . . . . . . . . . . . . . . . . . . . . . . 34
Regnøring, pleje og vedligeholdelse . . . . . . . . . . . . . . . . . . . . . . . . . . . 35
Fejlfinding . . . . . . . . . . . . . . . . . . . . . . . . . . . . . . . . . . . . . . . . . . . . . . . 35
Tekniske specifikationer . . . . . . . . . . . . . . . . . . . . . . . . . . . . . . . . . . . 36
El-kabler . . . . . . . . . . . . . . . . . . . . . . . . . . . . . . . . . . . . . . . . . . . . . . . . 36
Overensstemmelse . . . . . . . . . . . . . . . . . . . . . . . . . . . . . . . . . . . . . . . 36
PT
S
DK
Page 5

Innhold
Sikkerhetstips . . . . . . . . . . . . . . . . . . . . . . . . . . . . . . . . . . . . . . . . . . . . 37
Innledning . . . . . . . . . . . . . . . . . . . . . . . . . . . . . . . . . . . . . . . . . . . . . . . 37
Pakkeinnhold . . . . . . . . . . . . . . . . . . . . . . . . . . . . . . . . . . . . . . . . . . . . 37
Montasje . . . . . . . . . . . . . . . . . . . . . . . . . . . . . . . . . . . . . . . . . . . . . . . . 38
Bruk . . . . . . . . . . . . . . . . . . . . . . . . . . . . . . . . . . . . . . . . . . . . . . . . . . . 38
Rengjøring, stell og vedlikehold . . . . . . . . . . . . . . . . . . . . . . . . . . . . . . 39
Feilsøking . . . . . . . . . . . . . . . . . . . . . . . . . . . . . . . . . . . . . . . . . . . . . . . 39
Tekniske spesifikasjoner . . . . . . . . . . . . . . . . . . . . . . . . . . . . . . . . . . . 40
Elektrisk tilkopling . . . . . . . . . . . . . . . . . . . . . . . . . . . . . . . . . . . . . . . . 40
Samsvar . . . . . . . . . . . . . . . . . . . . . . . . . . . . . . . . . . . . . . . . . . . . . . . . 40
Sisällysluettelo
Turvallisuusvihjeitä . . . . . . . . . . . . . . . . . . . . . . . . . . . . . . . . . . . . . . . . 41
Johdanto . . . . . . . . . . . . . . . . . . . . . . . . . . . . . . . . . . . . . . . . . . . . . . . . 41
Pakkauksen sisältö . . . . . . . . . . . . . . . . . . . . . . . . . . . . . . . . . . . . . . . . 41
Kokoonpano . . . . . . . . . . . . . . . . . . . . . . . . . . . . . . . . . . . . . . . . . . . . . 42
Käyttö . . . . . . . . . . . . . . . . . . . . . . . . . . . . . . . . . . . . . . . . . . . . . . . . . . 42
Puhdistus, hoito & huolto . . . . . . . . . . . . . . . . . . . . . . . . . . . . . . . . . . 43
Vianetsintä . . . . . . . . . . . . . . . . . . . . . . . . . . . . . . . . . . . . . . . . . . . . . . 43
Tekniset tiedot . . . . . . . . . . . . . . . . . . . . . . . . . . . . . . . . . . . . . . . . . . . 44
Sähköjohdot . . . . . . . . . . . . . . . . . . . . . . . . . . . . . . . . . . . . . . . . . . . . . 44
Vaatimustenmukaisuus . . . . . . . . . . . . . . . . . . . . . . . . . . . . . . . . . . . . . 44
N
FIN
Page 6

1
UK
Safety Tips
• Position on a flat, stable surface.
• A service agent/qualified technician should carry out installation and any repairs if required. Do not
remove any components on this product.
• Consult Local and National Standards to comply with the following:
• Health and Safety at Work Legislation
• BS EN Codes of Practice
• Fire Precautions
• IEE Wiring Regulations
• Building Regulations
• DO NOT feed meat in to the appliance by hand. ALWAYS use the pusher supplied.
• DO NOT use fingers to clear the exit hole while the appliance is turned on.
• DO NOT allow the motor to work against a blockage for any length of time.
• DO NOT immerse in water.
• Only use original BUFFALO parts and attachments with this appliance.
• Always carry the appliance by the motor housing.
• Not suitable for outdoor use.
• Keep all packaging away from children. Dispose of the packaging in accordance to the regulations of
local authorities.
• If the power cord is damaged, it must be replaced by a BUFFALO agent or a recommended qualified
technician in order to avoid a hazard.
Introduction
Please take a few moments to carefully read through this manual. Correct maintenance and operation of
this appliance will provide the best possible performance from your BUFFALO product.
Pack Contents
The following is included:
BUFFALO prides itself on quality and service, ensuring that at the time of packaging the contents are
supplied fully functional and free of damage.
Should you find any damage as a result of transit, please contact your BUFFALO dealer immediately.
• BUFFALO Meat Mincer
•Hopper tray
•Food pusher
• Feed screw
• Cutting screw
• Cutting plate (coarse - 8mm)
• Cutting plate (medium 6 mm)
• Instruction Manual
Page 7
2
UK
Telephone Helpline: 0845 146 2887 (United Kingdom)
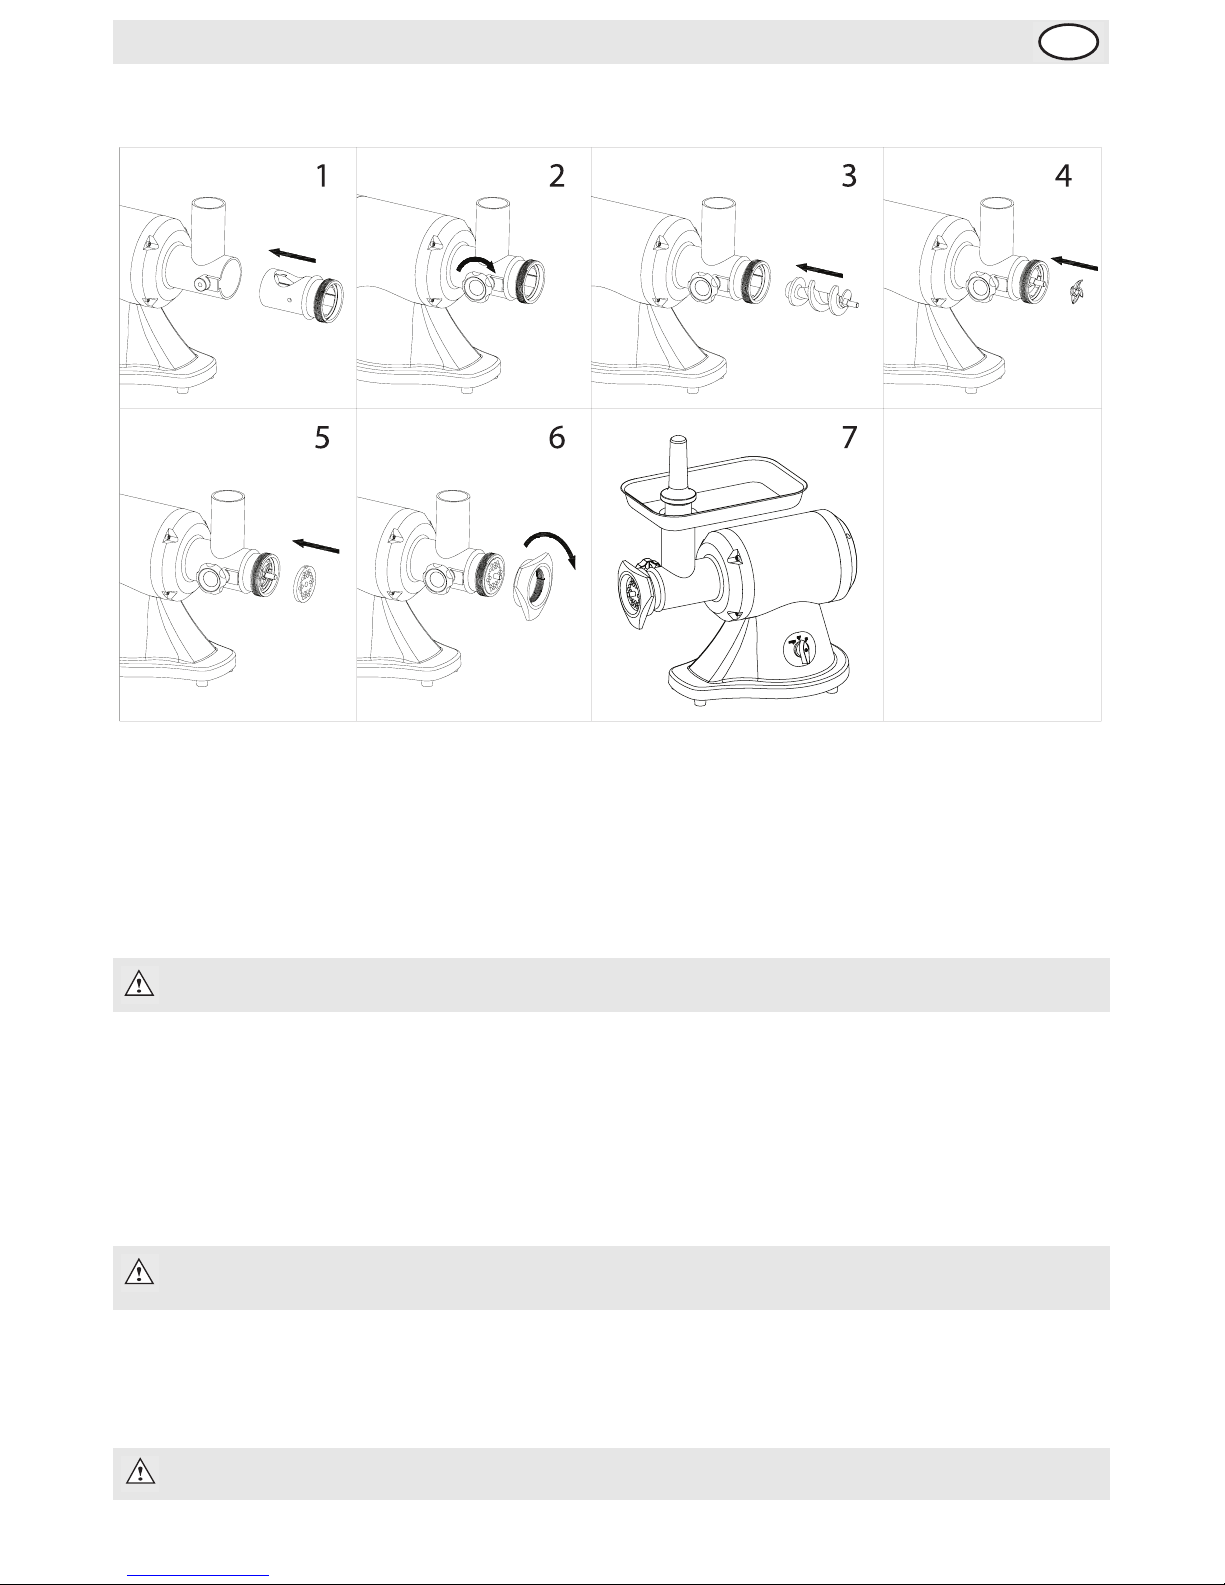
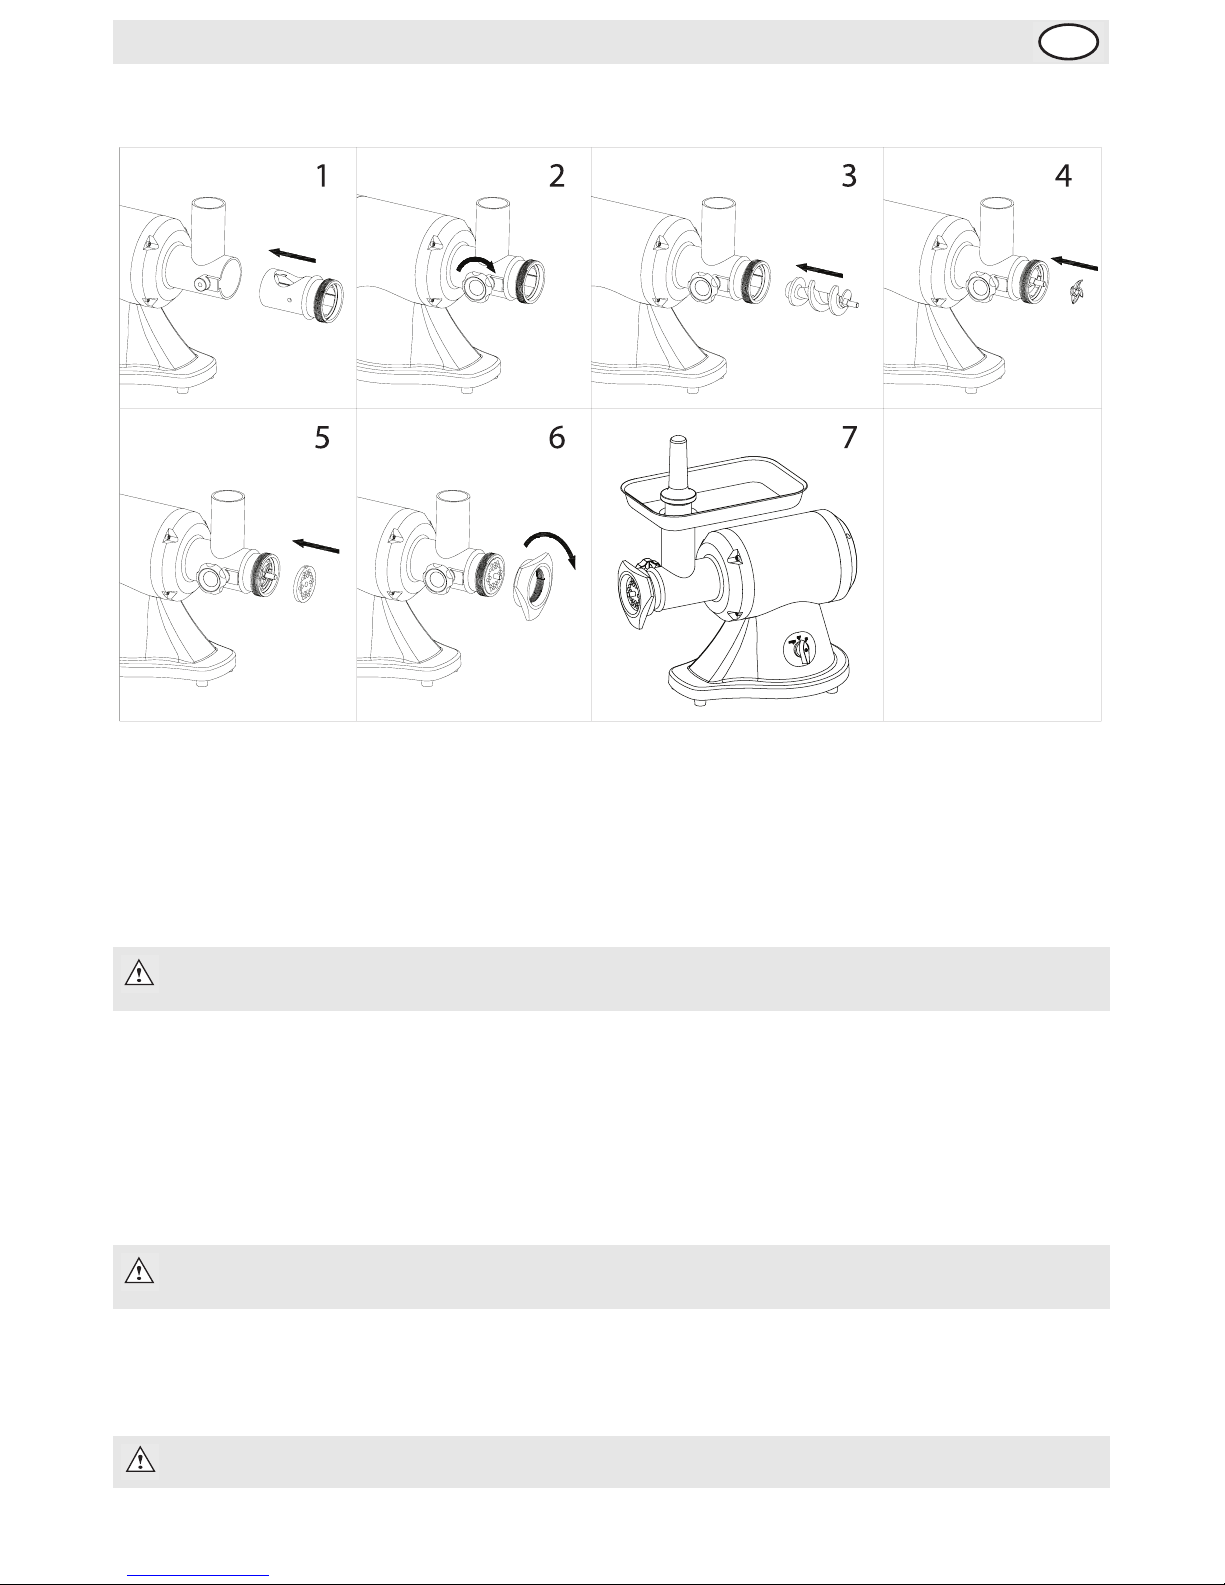
Assembly
1. Insert the mincing barrel into the motor housing mouth, with the hole facing upwards [Fig. 1].
2. Tighten the locking knob [Fig. 2].
3. Insert the feed screw in to the mincing barrel. Turn the screw slightly to slot the base of the screw on
to the transmission shaft, if necessary [Fig. 3].
4. Insert the cutting blade on to the end of the feed screw [Fig. 4].
5. Match the groove on the edge of the desired cutting disc to the pin on the mincing barrel. Slide the
cutting disc on to the feed screw [Fig. 5].
6. Screw the barrel cap on to the end of the mincing barrel until tight [Fig. 6].
7. Twist the hopper tray into place [Fig. 7].
Operation
1. Cut the meat into small enough pieces to fit in to the hole in the hopper tray.
2. Turn t he powe r switc h ON.
3. Feed the meat into the shaft using the food pusher.
Note: Ensure the flat face of the blade faces forwards as illustrated.
Note: Clean the appliance with warm soapy water and dry thoroughly before using for
the first time.
WARNING: Never push the meat into the shaft using your fingers.
Page 8
3
UK
If the circuit breaker stops the appliance or the appliance becomes jammed:
1. Turn Off the appliance immediately.
2. Press the RESET button located at the back of the appliance above the power cord.
3. Turn and HOLD the switch in the reverse position to clear the blockage.
4. Remove and clear the mincing barrel and all components.
Cleaning, Care & Maintenance
• Do not use any abrasive cleaning agents on the appliance. Use warm soapy water.
• Do not immerse the motor housing in water. Clean the exterior with a damp cloth.
• Always dry thoroughly after cleaning.
• A BUFFALO agent or qualified technician should carry out repairs if required.
For ease of cleaning, disassemble the appliance:
• Unscrew the barrel cap.
• Remove the mincing barrel, plate, blade and feed screw as one unit. Gently tip the barrel to remove
the pieces one by one.
• Twist off the hopper tray.
• Remove meat from all components and wash in warm, soapy water.
•Dry thoroughly.
• Lubricate the parts with a little cooking oil before replacing for best performance.
Trou bl e sh oo t ing
If your BUFFALO appliance develops a fault, please check the following table before making a call to the
Helpline.
Note: Always switch off and disconnect the appliance from the power supply before
cleaning.
Note: If the cap has been put on too tight, knock the corners of the cap with a rubber
mallet or similar instrument to loosen it.
Fault Probable Cause Action
The appliance is not working The appliance is not switched onCheck the appliance is plugged in
correctly and switched on
Plug and lead are damaged Call BUFFALO agent or qualified
technician
Fuse in the plug has blown Replace the plug fuse
Power supply Check power supply
Internal wiring fault Call BUFFALO agent or qualified
technician
Page 9
4
UK
Telephone Helpline: 0845 146 2887 (United Kingdom)
Technical Specifications
Electrical Wiring
This appliance is supplied with a 3 pin, moulded, BS1363 plug and lead, with a 13 amp fuse as standard.
The plug is to be connected to a suitable mains socket.
This appliance is wired as follows:
• Live wire (coloured brown) to terminal marked L
• Neutral wire (coloured blue) to terminal marked N
• Earth wire (coloured green/yellow) to terminal marked E
This appliance must be earthed, using a dedicated earthing circuit.
If in doubt consult a qualified electrician.
Electrical isolation points must be kept clear of any obstructions. In the event of any emergency
disconnection being required they must be readily accessible.
Compliance
The WEEE logo on this product or its documentation indicates that the product must
not be disposed of as household waste. To help prevent possible harm to human
health and/or the environment, the product must be disposed of in an approved and
environmentally safe recycling process. For further information on how to dispose of
this product correctly, contact the product supplier, or the local authority responsible
for waste disposal in your area.
BUFFALO parts have undergone strict product testing in order to comply with
regulatory standards and specifications set by international, independent, and federal
authorities.
BUFFALO products have been approved to carry the following symbol:
All rights reserved. No part of these instructions may be produced or transmitted in any form or by any means,
electronic, mechanical, photocopying, recording or otherwise, without the prior written permission of BUFFALO.
Every effort is made to ensure all details are correct at the time of going to press, however, BUFFALO reserve the
right to change specifications without notice.
Fault Probable Cause Action
Minced meat does not exit the
appliance evenly
The barrel cap is on too tight Loosen the cap
The cutting plate is blocked Remove and clean the plate
The cutting blade is blunt Replace the cutting blade
Model Voltage Power Current Capacity Output
Dimensions
h x w x d mm
Weight
CD400 230V 50Hz 800W 3.6A 3.5kg 250kg/hour 410 x 328 x 517 24.5kg
Page 10

5
NL
Klantenondersteuning: 050 – 609999 (België)
Veiligheidstips
• Plaatsen op een vlakke en stabiele ondergrond.
• De installatie en eventuele reparaties zijn door een servicetechnicus/vaktechnicus uit te voeren.
Verwijder geen componenten of servicepanelen van dit product.
• Raadpleeg en volg de plaatselijke en nationale regelgeving op m.b.t. tot het volgende:
• Wetgeving van gezondheid en veiligheid op de werkplaats
• Werkregels
• Brandpreventie
• IEE bekabelingsnormen
• Bouwverordeningen
• NIET met de hand vlees in het apparaat stoppen. ALTIJD de meegeleverde aandrukker gebruiken.
• NOOIT uw vingers in de nabijheid van de afvoeropening houden wanneer het apparaat aanstaat.
• NIET de motor geforceerd laten werken bij blokkeringen gedurende enige tijd dan ook.
• NIET in water onderdompelen.
• Gebruik uitsluitend originele BUFFALO onderdelen en hulpmiddelen bij dit apparaat.
• Houd bij het verplaatsen het apparaat aan de motorbehuizing vast.
• Niet geschikt voor gebruik buitenshuis.
• Laat verpakkingsmateriaal niet binnen handbereik van kinderen. Verpakkingsmateriaal in
overeenstemming met de regelgeving van de plaatselijke overheden als afval laten verwerken.
• Indien de stroomkabel beschadigd raakt, dient men deze door een BUFFALO technicus of aanbevolen
vaktechnicus te laten vervangen om gevaarlijke situaties te verhinderen.
Inleiding
Neem de tijd en lees deze handleiding aandachtig door. Een correct gebruik en onderhoud van deze
machine waarborgt de beste prestatie van uw BUFFALO product.
Verpakkingsinhoud
De verpakking bevat het volgend:
BUFFALO is trots op de haar productkwaliteit en dienstverlening en controleer de inhoud van de
verpakkingen, tijdens de verpakkingsfase, op functionaliteit en schade.
Mocht u product door transport zijn beschadigd, neem dan onmiddellijk contact op met uw BUFFALO dealer.
•BUFFALO Gehaktmachine
• Haklade
• Vleesaandrukker
• Invoerschroef
•Snijschroef
• Snijplaat (grof - 8 mm)
• Snijplaat (middelgroot - 6 mm)
• Handleiding
Page 11

6
NL
Klantenondersteuning: 040 – 2628080 (Nederland)
Montage
1. Plaats de hakcilinder in de mond van de motorbehuizing en met de cilinderopening naar boven
[afb. 1].
2. Draai de bevestigingsknop [afb. 2] aan.
3. Plaats de invoerschroef in de hakcilinder. Draai de schroef om de basis van de schroef in de
transmissieas te plaatsen, indien nodig [afb. 3].
4. Plaats het snijblad op het uiteinde van de invoerschroef [afb. 4].
5. Lijn de inkeping aan de rand van de gewenste snijschijf op de pin van de hakcilinder. Schuif de
snijschijf op de invoerschroef [afb. 5].
6. Schroef de cilinderkap goed vast op het uiteinde van de hakcilinder [afb. 6].
7. Draai de haklade op zijn plaats [afb. 7].
Werking
1. Snij het vlees in kleine stukken en zodanig dat deze in de opening van de haklade passen.
2. Zet de stroomschakelaar op ON (AAN).
3. Stop het vlees met behulp van de vleesaandrukker in de cilinder.
Opmerking: controleer of het vlakke oppervlak van het snijblad aan de voorzijde zit,
conform afbeelding.
Opmerking: Alvorens het eerste gebruik, dient u het apparaat met warm zeepwater te
reinigen en zorgvuldig te drogen.
WAARSCHUWING: nooit met uw vingers het vlees in de cilinder aandrukken.
Page 12
7
NL
Klantenondersteuning: 050 – 609999 (België)
Wanneer de stroomonderbreker het apparaat stopt of het apparaat geblokkeerd raakt,zet dan het apparaat
onmiddellijk uit.
1. Druk op de RESET-knop aan de achterzijde van het apparaat boven de stroomkabel.
2. Draai en HOUD de schakelaar in de achteruitstand om de blokkering te verhelpen.
3. Verwijder en ontruim de hakcilinder en alle componenten.
Reiniging, zorg & onderhoud
• Gebruik geen bijtende reinigingsmiddelen voor dit apparaat. Gebruik warm zeepwater.
• De motorbehuizing niet in water dompelen. Reinig de buitenkant met een vochtige doek.
• Na reiniging altijd zorgvuldig drogen.
• Eventuele reparaties moeten door een BUFFALO technicus of een vaktechnicus worden uitgevoerd.
Demonteer het apparaat voor een gemakkelijke reiniging:
• Schroef de cilinderkap los.
• Verwijder de hakcilinder, plaat, snijblad en invoerschroef als één geheel. Kantel de cilinder voorzichtig
naar voren om één voor één de onderdelen te verwijderen.
• Draai de haklade los.
• Verwijder het vlees van alle componenten en was deze in warm zeepwater.
• Zorgvuldig drogen.
• Voor de beste prestatie smeert u voor de plaatsing de onderdelen met een beetje kookolie in.
Oplossen van problemen
Indien er een storing van uw BUFFALO product optreedt, dient u de onderstaande tabel te raadplegen
alvorens contact op te nemen met uw BUFFALO dealer of de Hulplijn te bellen.
Opmerking: alvorens het apparaat te reinigen dient men altijd de stroomvoorziening uit
te schakelen.
Opmerking: Indien de kap te vast is aangedraaid, tik met een rubberen hamer of
vergelijkbaar instrument op de hoeken van de kap, zodat deze losraakt.
Probleem Mogelijke oorzaak Handeling
Het apparaat werkt niet Het apparaat staat uit Controleer of de stroomkabel van het
apparaat is aangesloten en of het
apparaat is ingeschakeld
Steker en kabel zijn beschadigd Laat een BUFFALO technicus of een
vaktechnicus komen
De zekering in de steker is gesprongen Vervang de zekering in de steker
Stroomvoorziening Controleer de stroomvoorziening
Storing interne bedrading Laat een BUFFALO technicus of een
vaktechnicus komen
Het gehakte vlees
komt niet geleidelijk
uit het apparaat
De cilinderkap is te strak aangedraaid Maak de kap los
De snijplaat is geblokkeerd Verwijder en reinig de plaat
Het snijblad is bot Vervang het snijblad
Page 13
8
NL
Klantenondersteuning: 040 – 2628080 (Nederland)
Technische specificaties
Elektrische bedrading
Men dient de steker op een geschikt stopcontact aan te sluiten.
De bedrading van dit apparaat is als volgt:
• Stroomkabel (bruin) naar de aansluitklem gemarkeerd met L
• Neutraalkabel (blauw) naar de aansluitklem gemarkeerd met N
• Aardekabel (groen/geel) naar de aansluitklem gemarkeerd met E
Dit apparaat moet worden geaard met behulp van een adequaat aardingscircuit.
Bij twijfels raadpleeg een vakkundige elektricien.
De elektrische isolatiepunten mogen niet worden geblokkeerd. In geval van een nooduitschakeling moeten
de isolatiepunten direct toegankelijk zijn.
Productconformiteit
Het WEEE-logo op dit product of bijbehorende documentatie geeft aan dat het product
niet onder huisvuil valt en als zodanig ook niet mag worden verwerkt. Ter preventie
van mogelijke gevaren voor de gezondheid van personen en/of voor het milieu, dient
men dit product in overeenstemming met het voorgeschreven en milieuveilige
recyclingproces als afval te verwerken. Raadpleeg uw productleverancier of uw
plaatselijk afvalverwerkingsbedrijf voor meer informatie over de juiste
afvalverwerking van dit product.
De onderdelen van BUFFALO producten hebben strenge producttesten ondergaan om
te voldoen aan wettelijke regels en specificaties die door internationale,
onafhankelijke en landelijke overheden worden voorgeschreven.
BUFFALO producten zijn goedgekeurd en voorzien van het volgende symbool:
Alle rechten voorbehouden. Het is verboden om deze handleiding, hetzij volledig of gedeeltelijk, elektronisch of
mechanisch te reproduceren, kopiëren, op opslagmedia op te slaan of op enigerlei wijze over te dragen, zonder
voorafgaande goedkeuring van BUFFALO.
Wij hebben er alles aan gedaan om er zeker van te zijn dat op publicatiedatum van de handleiding alle details correct
zijn, desondanks, behoudt BUFFALO het recht voor om specificaties zonder aankondiging te wijzigen.
Model Voltage Vermogen Stroom Inhoud
Vleesprodu
ctie
Afmetingen
h x b x d mm
Gewicht
CD400 230V 50Hz 800W 3.6A 3.5kg 250kg/hour 410 x 328 x 517 24.5kg
Page 14

9
FR
Standard d'assistance téléphonique: 050 – 600006 (Belgique)
Conseils de sécurité
• Placez l'appareil sur une surface plane, stable.
• L'installation et les éventuelles réparations doivent être confiées à un dépanneur / technicien qualifié.
Ne retirez aucun composant ou cache de ce produit.
• Consultez les normes locales et nationales pour vous conformer aux :
• lois sur l'hygiène et la sécurité au travail ;
• codes de bonnes pratiques BS EN ;
• précautions contre le risque d'incendie ;
• réglementations sur les branchements électriques IEE ;
• règlements sur la construction.
• NE PAS pousser la viande dans l'appareil à la main. Utilisez TOUJOURS le pilon fourni.
• NE PAS essayer de déboucher du bout des doigts les trous de sortie de la viande, quand l'appareil est
en marche.
• NE PAS laisser le moteur forcer trop longtemps en cas d'obturation.
• NE PAS immerger l'appareil.
• N'utilisez que des pièces et accessoires d'origine BUFFALO avec cet appareil.
• Ne portez l'appareil que par le carter moteur.
• Cet appareil est réservé exclusivement à une utilisation à l'intérieur.
• Gardez les emballages hors de portée des enfants. Débarrassez-vous des emballages conformément
aux règlements des autorités locales.
• Un cordon d'alimentation endommagé doit être remplacé par un agent BUFFALO ou un technicien
qualifié recommandé, pour éviter tout danger.
Introduction
Nous vous invitons à consacrer quelques instants à la lecture attentive de ce manuel. L'entretien et
l'utilisation appropriés de cet appareil vous permettront de tirer le meilleur de votre produit BUFFALO.
Contenu de l'emballage
Eléments fournis de série :
BUFFALO attache une grande importance à la qualité et au service et veille à fournir des produits en parfait
état opérationnel, parfaitement intacts au moment de l'emballage.
Nous vous prions de contacter votre revendeur BUFFALO immédiatement si vous constatez un dommage
quelconque survenu pendant le transport du produit.
• Hachoir à viande BUFFALO
•Plateau de trémie
• Pilon
• Spirale d'alimentation
• Disque de coupe
• Plaque de coupe (grossière - 8 mm)
• Plaque de coupe (moyenne - 6 mm)
• Mode d'emploi
Page 15
10
FR
Standard d'assistance téléphonique: 01 64 89 73 61 (Français)
Montage
1. Insérez le corps du hachoir dans l'orifice du carter moteur, en orientant le trou vers le haut [Fig. 1].
2. Serrez le bouton de verrouillage [Fig. 2].
3. Insérez la vis sans fin dans le corps du hachoir. Faites légèrement pivoter la vis sans fin pour en
engager la base dans l'axe de transmission, si nécessaire [Fig. 3].
4. Insérez le couteau sur l'extrémité de la vis sans fin [Fig. 4].
5. Alignez la rainure située sur le bord du disque de coupe utilisé, sur l'ergot du barillet de hachoir.
Glissez le disque de coupe sur la spirale d'alimentation [Fig. 5].
6. Vissez à fond la couronne filetée du corps du hachoir sur l'extrémité du corps du hachoir [Fig. 6].
7. Faites pivoter le plateau de trémie à sa place [Fig. 7].
Fonctionnement
1. Coupez la viande en morceaux assez petits pour passer à travers le trou du plateau de trémie.
2. Mettez l'interrupteur de mise sous tension sur ON.
3. Poussez la viande dans le trou, à l'aide du poussoir.
Remarque : Veillez à ce que le côté plat du couteau soit orienté vers l'avant,
conformément à l'illustration.
Remarque : Nettoyez l'appareil à l'eau tiède savonneuse et séchez-le minutieusement
avant la première mise en service.
AVERTISSEMENT : Ne poussez jamais la viande dans le trou à la main.
Page 16
11
FR
Standard d'assistance téléphonique: 050 – 600006 (Belgique)
Si le coupe-circuit se déclenche et arrête l'appareil ou si l'appareil se bloque :
1. Eteignez immédiatement l'appareil.
2. Appuyez sur le bouton RESET (Réinitialisation) situé à l'arrière de l'appareil, au-dessus du cordon
d'alimentation électrique.
3. Faites pivotez et MAINTENEZ l'interrupteur en position d'inversion, pour dégager l'obstruction.
4. Retirez et débouchez le corps du hachoir et toutes les pièces.
Nettoyage, entretien et maintenance
• N'utilisez aucun produit de nettoyage abrasif sur l'appareil. Nettoyez-le à l'eau tiède savonneuse.
• N'immergez pas le carter moteur de l'appareil, dont vous nettoierez l'extérieur à l'aide d'un chiffon
humide.
• Séchez toujours minutieusement l'appareil après l'avoir nettoyé.
• Les réparations, le cas échéant, doivent être confiées à un agent BUFFALO ou à un technicien qualifié.
Démontez l'appareil pour en faciliter le nettoyage :
• Dévissez la couronne filetée du corps du hachoir.
• Retirez ensemble le corps du hachoir, la plaque perforée, le couteau et la vis sans fin. Inclinez
doucement le corps du hachoir pour en retirer les pièces, une par une.
• Dégagez le plateau de trémie, en le faisant pivoter.
• Retirez la viande de toutes les pièces et lavez-les à l'eau tiède savonneuse.
• Séchez-les minutieusement.
• Lubrifiez les pièces avec un peu d'huile de cuisson avant de les remonter, pour optimiser les
performances du hachoir.
Dépannage
En cas de panne de votre appareil BUFFALO, vérifiez les données du tableau ci-dessous avant d'appeler
notre standard d'assistance ou votre revendeur BUFFALO.
Remarque : N'oubliez jamais d'éteindre l'appareil et d'en débrancher le cordon
d'alimentation avant de le nettoyer.
Remarque : Si la couronne filetée est trop serrée, tapotez les bords de la couronne à
l'aide d'un maillet en caoutchouc ou d'un instrument similaire, pour la décoincer.
Dysfonctionnement Cause probable Intervention
L'appareil ne fonctionne pas L'appareil n'est pas allumé Vérifier que l'appareil est bien
branché et allumé
La prise et le cordon sont
endommagés
Appeler un agent BUFFALO ou un
technicien qualifié
Alimentation Vérifier l'alimentation
Problème de branchement
interne
Appeler un agent BUFFALO ou un
technicien qualifié
Page 17

12
FR
Standard d'assistance téléphonique: 01 64 89 73 61 (Français)
Spécifications techniques
Raccordement électrique
La prise doit être reliée à la prise secteur qui convient.
Cet appareil est câblé comme suit :
• Fil conducteur (brun) à la borne marquée L
• Fil neutre (bleu) à la borne marquée N
• Fil de terre (vert / jaune) à la borne marquée E
Cet appareil doit être raccordé à la terre, par le biais d'un circuit de mise à la terre dédié.
En cas de doute, consultez un électricien qualifié.
Les points d'isolation électrique doivent être libres de toute obstruction. En cas de débranchement requis
en urgence, ils doivent être facilement accessibles.
Conformité
Le logo WEEE qui figure sur ce produit ou sa documentation indique qu'il ne doit pas
être mis au rebut avec les ordures ménagères. Pour éviter qu'il ne présente un risque
pour la santé humaine et / ou écologique, confiez la mise au rebut de ce produit à un
site de recyclage agréé respectueux de l'environnement. Pour de plus amples détails
sur la mise au rebut appropriée de ce produit, contactez le fournisseur du produit ou
l'autorité responsable de l'enlèvement des ordures dans votre région.
Les pièces BUFFALO ont été soumises à des tests rigoureux pour pouvoir être
déclarées conformes aux normes et spécifications réglementaires définies par les
autorités internationales, indépendantes et fédérales.
Les produits BUFFALO ont été déclarés aptes à porter le symbole suivant :
Tous droits réservés. La production ou transmission, partielles ou intégrales, sous quelque forme que ce soit ou par
n'importe quel moyen, tant électronique que mécanique, sous forme de photocopie, d'enregistrement ou autre de
ce mode d'emploi sont interdites sans l'autorisation préalablement accordée par BUFFALO.
Nous nous efforçons, par tous les moyens dont nous disposons, de faire en sorte que les détails contenus dans le
présent mode d'emploi soient corrects en date d'impression. Toutefois, BUFFALO se réserve le droit de changer les
spécifications de ses produits sans préavis.
Dysfonctionnement Cause probable Intervention
La viande hachée ne sort pas
uniformément de la plaque
perforée.
Couronne de corps du
hachoir trop serrée
Desserrer la couronne
Plaque perforée obstruée Retirer et nettoyer la couronne
Couteau émoussé Remplacer le couteau
Modèle Tension Puissance Courant
Capacité Débit
Dimensions
h x l x l mm
Poids
CD400 230V 50Hz 800W 3.6A 3.5kg 250kg/hour 410 x 328 x 517 24.5kg
Page 18

13
DE
Sicherheitshinweise
• Auf eine flache, stabile Fläche stellen.
• Alle erforderlichen Montage- und Reparaturarbeiten sollten von Wartungspersonal oder einem
qualifizierten Techniker durchgeführt werden. Keine Bauteile oder Bedienflächen von diesem Produkt
entfernen.
• Für folgende Normen und Vorschriften sind die lokalen und nationalen Normen heranzuziehen:
• Arbeitsschutzvorschriften
• BS EN Verhaltenspraktiken
• Brandschutzvorschriften
• IEE-Anschlussvorschriften
• Bauvorschriften
• Fleisch NICHT von Hand in das Gerät füllen. IMMER den mitgelieferten Stopfer verwenden.
• Bei eingeschaltetem Gerät die Ausgangsöffnung NICHT mit den Fingern freimachen.
• Den Motor NICHT über längere Zeit eingeschaltet lassen, wenn eine Blockierung vorliegt.
• NICHT in Wasser eintauchen.
• Für dieses Gerät nur BUFFALO-Originalteile und -Zubehör verwenden.
• Zum Tragen das Gerät stets am Motorgehäuse fassen.
•Nicht zum Gebrauch im Freien geeignet.
• Verpackungsmaterial außerhalb der Reichweite von Kindern aufbewahren und gemäß den lokalen
Vorschriften entsorgen.
• Aus Sicherheitsgründen muss ein beschädigtes Stromkabel von einem BUFFALO-Mitarbeiter oder
empfohlenen qualifizierten Elektriker erneuert werden.
Einführung
Bitte nehmen Sie sich einige Minuten Zeit und lesen Sie dieses Handbuch sorgfältig durch. Nur bei korrekter
Wartung und vorschriftsgemäßem Betrieb kann Ihr BUFFALO-Produkt optimale Leistung erzielen.
Lieferumfang
Folgende Teile befinden sich in der Verpackung:
BUFFALO ist stolz auf die hochwertige Qualität seiner Produkte und seinen erstklassigen Service. Wir stellen
sicher, dass alle gelieferten Produkte zum Zeitpunkt der Verpackung voll funktionsfähig sind und sich in
einwandfreiem Zustand befinden.
• BUFFALO-Fleischwolf
• Einfülltrichter
•Stopfer
• Zuführschraube
• Schnittschraube
• Schneidplatte (grob - 8 mm)
• Schneidplatte (mittelfein - 6 mm)
• Bedienungsanleitung
Page 19

14
DE
Telefonische Helpline: 0800 – 1860806 (Deutschland)
Montage
1. Die Hacktrommel in die Öffnung des Motorgehäuses schieben. Dabei muss die Öffnung nach oben
weisen [Abb. 1].
2. Den Verriegelungsknopf anziehen [Abb. 2].
3. Die Zuführschraube in die Hacktrommel einführen. Falls erforderlich die Schraube leicht drehen, damit
die Basis der Schraube in die Getriebewelle greift [Abb. 3].
4. Das Messer auf das Ende der Zuführschraube setzen [Abb. 4].
5. Die Nut an der Kante der gewünschten Schneidscheibe muss am Stift an der Hacktrommel
ausgerichtet werden. Die Schneidscheibe auf die Zuführschraube stecken [Abb. 5].
6. Den Trommeldeckel fest auf das Ende der Hacktrommel schrauben [Abb. 6].
7. Den Einfülltrichter durch Drehen in Position bringen [Abb. 7].
Betrieb
1. Das Fleisch in Stücke schneiden, die durch die Öffnung im Einfülltrichter passen.
2. Das Gerät einschalten.
3. Das Fleisch mit dem Stopfer in den Schaft drücken.
Hinweis: Darauf achten, dass die flache Kante des Messers nach vorne weist (siehe
Abbildung).
Hinweis: Das Gerät vor dem ersten Gebrauch mit einer warmen Seifenlauge reinigen
und gründlich trocknen.
VORSICHT: Das Fleisch niemals mit den Fingern in den Schaft drücken.
Page 20

15
DE
Wenn der Schutzschalter das Gerät stoppt oder das Gerät blockiert ist:
1. Das Gerät sofort ausschalten.
2. Die RESET-Taste hinten am Gerät über dem Stromkabel drücken.
3. Den Schalter im Rückwärtslauf GEDRÜCKT halten, um die Blockierung zu entfernen.
4. Die Hacktrommel und alle Bauteile auseinandernehmen.
Reinigung, Pflege und Wartung
• Zum Reinigen keine Scheuermittel verwenden. Mit einer warmen Seifenlauge reinigen.
• Motorgehäuse NICHT in Wasser eintauchen. Das Gerät außen mit einem feuchten Tuch reinigen.
• Nach dem Reinigen stets gründlich trocknen.
• Erforderliche Reparaturen sollten von einem BUFFALO-Mitarbeiter oder einem qualifizierten Techniker
ausgeführt werden.
Das Gerät lässt sich einfacher reinigen, wenn zunächst die einzelnen Bauteile ausgebaut werden:
• Trommeldeckel abdrehen.
• Hacktrommel, Scheibe, Messer und Zuführschraube in eins herausnehmen. Die Trommel vorsichtig
neigen, um die Teile nacheinander einzeln zu entnehmen.
• Den Einfülltrichter abdrehen.
• Fleischreste von allen Teilen entfernen und die Teile mit einer warmen Seifenlauge reinigen.
•Gründlich abtrocknen.
• Die Teile vor dem erneuten Zusammenbau mit etwas Speiseöl einfetten, dies verbessert die Leistung
des Geräts.
Störungssuche
Bei einem Defekt Ihres BUFFALO-Geräts konsultieren Sie bitte zunächst folgende Tabelle, bevor Sie die
Helpline oder Ihren BUFFALO-Händler anrufen.
Hinweis: Vor der Reinigung stets zunächst das Gerät abschalten und den Netzstecker
ziehen.
Hinweis: Wenn der Deckel zu fest sitzt, mit einem Gummihammer oder ähnlichen
Werkzeug auf die Deckelecken klopfen, um ihn zu lösen.
Störung Vermutliche Ursache Lösung
Das Gerät funktioniert
nicht
Das Gerät ist nicht eingeschaltet Prüfen, ob der Netzstecker in die
Steckdose gesteckt wurde und das
Gerät eingeschaltet ist
Stecker und Kabel sind beschädigt BUFFALO-Mitarbeiter oder
qualifizierten Techniker anrufen
Sicherung im Stecker ist durchgebrannt Neue Sicherung in den Stecker
einsetzen
Stromzufuhr Netzstrom prüfen
Interner Vernetzungsfehler BUFFALO-Mitarbeiter oder
qualifizierten Techniker anrufen
Page 21

16
DE
Telefonische Helpline: 0800 – 1860806 (Deutschland)
Technische Spezifikationen
Elektroanschlüsse
Der Stecker muss in eine geeignete Steckdose gesteckt werden.
Das Gerät ist wie folgt verdrahtet:
• Stromführender Leiter (braun) an Klemme L
• Neutralleiter (blau) an Klemme N
• Erdleiter (grün/gelb) an Klemme E
Das Gerät muss über eine spezielle Erdleitung geerdet werden.
Bei Fragen wenden Sie sich bitte an einen qualifizierten Elektriker.
Elektroisolierpunkte dürfen nicht blockiert werden. Bei einem Notstopp müssen diese Punkte jederzeit sofort
zugänglich sein.
Konformität
Das WEEE-Logo an diesem Produkt oder in der Dokumentation weist darauf hin, dass
das Produkt nicht mit dem normalen Hausmüll entsorgt werden darf. Um potenziellen
Gesundheits- bzw. Umweltschäden vorzubeugen, muss das Produkt durch einen
zugelassenen und umweltverträglichen Recyclingprozess entsorgt werden. Ausführliche Informationen zur korrekten Entsorgung dieses Produkts erhalten Sie von Ihrem
Produktlieferanten oder der für die Müllentsorgung in Ihrer Region zuständige
Behörde.
Alle BUFFALO-Produkte werden strengen Tests unterzogen, um die Einhaltung von
Normen und Spezifikationen internationaler und nationaler Behörden und
unabhängiger Organisationen zu gewährleisten.
BUFFALO-Produkte dürfen durch folgendes Symbol gekennzeichnet werden:
Alle Rechte vorbehalten. Diese Anleitung darf ohne vorherige schriftliche Genehmigung von BUFFALO weder ganz
noch teilweise in irgendeiner Form oder auf irgendeinem Wege - einschließlich elektronischer, mechanischer
Verfahren, durch Fotokopieren, Aufnahme oder andere Verfahren - vervielfältigt oder übertragen werden.
Es werden alle Anstrengungen unternommen um sicherzustellen, dass alle Angaben bei der Drucklegung korrekt
sind. BUFFALO behält sich jedoch das Recht vor, Spezifikationen ohne Vorankündigung zu ändern.
Störung Vermutliche Ursache Lösung
Hackfleisch kommt
nicht gleichmäßig
aus dem Gerät
Der Trommeldeckel sitzt zu fest Deckel etwas lockern
Die Schneidscheibe ist blockiert Scheibe ausbauen und reinigen
Das Messer ist stumpf Das Messer auswechseln
Modell Spannung Leistung
Strom-
stärke
Fassungsve
rmögen
Leistung
Abmessungen
h x b x t mm
Gewicht
CD400 230V 50Hz 800W 3.6A 3.5kg 250kg/hour 410 x 328 x 517 24.5kg
Page 22

17
IT
Suggerimenti per la sicurezza
• Posizionare il fabbricatore di ghiaccio su una superficie in piano e stabile.
• L'installazione e le eventuali riparazioni devono venire eseguite da un agente/tecnico qualificato. Non
rimuovere i componenti o i pannelli di accesso dell'apparecchio.
• Verificare la conformità alle normative locali e nazionali di quanto segue:
• Normativa antinfortunistica sul lavoro
• Linee guida BS EN
• Precauzioni antincendio
• Normativa IEE sui circuiti elettrici
• Norme di installazione
• NON inserire la carne nell'apparecchio utilizzando le mani nude. Utilizzare SEMPRE il pestello in
dotazione.
• NON utilizzare le dita per pulire il foro di uscita quando l'apparecchio è acceso.
• NON consentire che il motore giri in presenza di una ostruzione per un periodo prolungato di tempo.
• NON immergere in acqua.
• Utilizzare solo parti e accessori BUFFALO con questo apparecchio.
• Trasportare sempre l'apparecchio mantenendolo dal carter motore.
• Non idoneo per l'utilizzo all'aperto.
• Tenere lontano l'imballaggio dalla portata dei bambini. Smaltire l'imballaggio in conformità alle
normative locali.
• Se danneggiato, il cavo di alimentazione deve venire sostituito da un agente BUFFALO o da un tecnico
qualificato al fine di prevenire eventuali rischi.
Introduzione
Leggere con attenzione il presente manuale. La manutenzione e l'utilizzo corretti di questo apparecchio
consentiranno di ottenere le massime prestazioni da questo prodotto BUFFALO.
Contenuto dell'imballaggio
L'imballaggio contiene quanto segue:
BUFFALO garantisce una qualità e un servizio impeccabili e assicura che al momento dell'imballaggio tutti i
componenti forniti sono integralmente funzionanti e privi di difetti.
Nel caso siano rilevati danni risultanti dal trasporto del prodotto, rivolgersi immediatamente al rivenditore
BUFFALO locale.
• Tritacarne BUFFALO
•Tramoggia
•Pestello
• Coclea di alimentazione
•Vite di taglio
• Piastra di taglio (grossolano - 8mm)
• Piastra di taglio (medio - 6mm)
• Manuale di istruzioni
Page 23

18
IT
Montaggio
1. Inserire il condotto di macinazione nella bocca del carter motore, con il foro rivolto verso l'alto
[Fig. 1].
2. Serrare la manopola di bloccaggio [Fig. 2].
3. Inserire la coclea di alimentazione nel condotto di macinazione. Serrare leggermente la coclea per
inserire la base della coclea all'albero motore, se necessario [Fig. 3].
4. Inserire il coltello all'estremità della coclea di alimentazione [Fig. 4].
5. Fare corrispondere la scanalatura sul bordo del disco di taglio desiderato al perno sul condotto di
macinazione. Fare scivolare il disco di taglio sulla coclea di alimentazione [Fig. 5].
6. Serrare stretto il tappo del condotto all'estremità del condotto di macinazione [Fig. 6].
7. Avvitare in posizione la tramoggia [Fig. 7].
Funzionamento
1. Tagliare la carne in pezzi di grandezza sufficiente a entrare nel foro della tramoggia.
2. Accendere l'alimentazione.
3. Inserire la carne utilizzando il pestello in dotazione.
Nota: assicurarsi che il lato piatto del coltello sia rivolto in avanti come illustrato in
figura.
Nota: prima di utilizzare l'apparecchio, pulire con acqua calda saponata e asciugare
completamente.
ATTENZIONE: non spingere la carne utilizzando le dita.
Page 24

19
IT
Se l'interruttore automatico arresta l'apparecchio o l'apparecchio si inceppa:
1. Spegnere immediatamente l'apparecchio.
2. Premere il pulsante RESET sul retro dell'apparecchio sopra il cavo di alimentazione.
3. Girare e MANTENERE l'interruttore nella posizione inversa per rimuovere il blocco.
4. Rimuovere e pulire il condotto di macinazione e tutti i componenti.
Pulizia e manutenzione
• Non utilizzare detergenti aggressivi sull'apparecchio. Usare acqua calda saponata.
• Non immergere il carter motore in acqua. Pulire le superfici esterne con un panno umido.
• Dopo la pulizia, asciugare completamente.
• Le riparazioni devono venire eseguite da un tecnico qualificato o da un agente BUFFALO.
Per facilitare la pulizia, smontare l'apparecchio:
• Svitare il tappo del condotto.
• Rimuovere in gruppo il condotto di macinazione, la piastra, il coltello e la coclea di alimentazione.
Inclinare con delicatezza il condotto per rimuovere i componenti uno alla volta.
• Disinserire la tramoggia.
• Rimuovere la carne da tutti componenti e lavarli in acqua calda saponata.
• Asciugare completamente.
• Prima di rimontare, lubrificare i componenti con una piccola quantità di olio per cucina.
Risoluzione dei problemi
In caso di guasto dell'erogatore di bevande, controllare quanto segue prima di contattare l'assistenza
telefonica.
Nota: prima di eseguire la pulizia, spegnere e scollegare l'apparecchio
dall'alimentazione.
Nota: se il tappo è stato serrato troppo a fondo, picchiettare gli angoli con una mazzuola
in gomma o un attrezzo simile per allentare.
Guasto Probabile causa Azione
L'apparecchio non funziona L'apparecchio non è acceso Controllare che l'apparecchio sia
correttamente collegato e acceso
La presa e il cavo sono
danneggiati
Rivolgersi a un tecnico qualificato o a
un agente BUFFALO
Il fusibile della presa è guasto Sostituire il fusibile della presa
Alimentazione Controllare l'alimentazione
Guasto dei circuiti interni Rivolgersi a un tecnico qualificato o a
un agente BUFFALO
La carne tritata non esce
dall'apparecchio in maniera
uniforme
Il tappo del condotto è
eccessivamente serrato.
Allentare il tappo
Page 25

20
IT
Specifiche tecniche
Cablaggi elettrici
La spina deve venire collegata a una presa di rete appropriata.
L'apparecchio ha i seguenti cablaggi:
• Filo sotto tensione (colore marrone) a terminale L
• Filo del neutro (colore blu) a terminale N
• Filo di terra (colore verde/giallo) a terminale E
L'apparecchio deve avere un circuito dedicato di messa a terra.
In caso di dubbi, consultare un elettricista qualificato. I punti di isolamento elettrico devono essere liberi da
ostruzioni.
In caso di emergenza, i punti devono essere facilmente raggiungibili qualora sia necessario scollegarli.
Conformità
Il logo WEEE riportato su questo prodotto o sulla relativa documentazione indica che
il prodotto non può essere smaltito come normale rifiuto domestico. Per evitare
possibili danni alla salute e/o all'ambiente, il prodotto deve venire smaltito utilizzando
una procedura di riciclaggio approvata e sicura per l'ambiente. Per ulteriori
informazioni su come smaltire in maniera corretta questo prodotto, contattare il
fornitore del prodotto o l'ente locale responsabile per lo smaltimento dei rifiuti.
I componenti BUFFALO sono stati sottoposti a un rigoroso collaudo ai fini della
conformità agli standard e alle specifiche normative previste dalle autorità
internazionali, indipendenti e federali.
I prodotti BUFFALO sono autorizzati a esporre il seguente simbolo:
Tutti i diritti riservati. È vietata la riproduzione o la trasmissione in alcuna forma, elettronica, meccanica, mediante
fotocopiatura o altro sistema di riproduzione, di qualsiasi parte delle presenti istruzioni senza la previa
autorizzazione scritta di BUFFALO.
Le informazioni contenute sono corrette e accurate al momento della stampa, tuttavia BUFFALO si riserva il diritto
di modificare le specifiche senza preavviso.
Guasto Probabile causa Azione
La carne tritata non esce
dall'apparecchio in maniera
uniforme
La piastra di taglio è bloccata Rimuovere e pulire la piastra
Il coltello è spuntato Sostituire il coltello
Modello Tensione
Alimentazi
o
Corrente Capacità
Output
Dimensioni
h x l x p mm
Peso
CD400 230V 50Hz 800W 3.6A 3.5kg 250kg/hour 410 x 328 x 517 24.5kg
Page 26

21
ES
Consejos de Seguridad
• Colóquela sobre una superficie plana, estable.
• Un agente de servicio / técnico cualificado debería llevar a cabo la instalación y cualquier reparación si
se precisa. No retire ningún componente ni panel de servicio de este producto.
• Consulte las Normas Locales y Nacionales correspondientes a lo siguiente:
• Legislación de Seguridad e Higiene en el Trabajo
• Códigos de Práctica BS EN
• Precauciones contra Incendios
• Normativos de Cableado de la IEE
• Normativas de Construcción
• NO introduzca carne con las manos en el aparato. Utilice SIEMPRE el asidero de empuje incluido.
• NO utilice los dedos para limpiar el orificio de salida con el aparato encendido.
• NO deje el motor en marcha si hay un bloqueo.
• NO sumerja el aparato en agua.
• Utilice sólo piezas y accesorios BUFFALO originales con este aparato.
• Mueva siempre el aparato del bastidor del motor.
• No adecuado para el uso exterior.
• Mantenga el embalaje fuera del alcance de los niños. Deseche el embalaje de acuerdo con las
normativas de las autoridades locales.
• Si el cable eléctrico resultada dañado, debe ser reemplazado por un técnico cualificado recomendado o
un agente de BUFFALO para evitar cualquier riesgo.
Introducción
Tómese unos minutos para leer este manual. El correcto mantenimiento y manejo de esta máquina
proporcionará el mejor funcionamiento posible de su producto BUFFALO.
Contenido del Conjunto
Se incluye lo siguiente:
BUFFALO se enorgullece de su calidad y servicio y asegura que en el momento del embalaje, el contenido
se suministró con plena funcionalidad y sin ningún defecto.
Si encontrara algún daño resultante del transporte, póngase en contacto inmediatamente con su
distribuidor BUFFALO.
• Picadora de carne BUFFALO
• Bandeja de la tolva
• Asidero de empuje
• Tornillo de avance
• Tornillo de corte
• Placa de corte (grueso - 8mm)
• Placa de corte (medio - 6mm)
• Manual de instrucciones
Page 27

22
ES
Montaje
1. Introduzca el tubo de picado en la boca del bastidor del motor con el orificio mirando hacia arriba
[Fig. 1].
2. Apriete el mando de bloqueo [Fig. 2].
3. Introduzca el tornillo de avance en el tubo de picado. Gire el tornillo ligeramente para introducir la
base del tornillo en el eje de transmisión si fuera preciso [Fig. 3].
4. Introduzca la hoja de corte en el extremo del tornillo de avance [Fig. 4].
5. Haga coincidir la acanaladura del extremo del disco de corte deseado con el pasador del tubo de
picado. Deslice el disco de corte en el tornillo de avance [Fig. 5].
6. Ajuste la tapa del tubo en el extremo del tubo de picado hasta que esté bien apretado [Fig. 6].
7. Gire la bandeja de la tolva para colocarla en su sitio [Fig. 7].
Funcionamiento
1. Corte la carne en trozos suficientemente pequeños como para que entren por el orificio de la bandeja
de la tolva.
2. Encienda el interruptor de activación (ON).
3. Introduzca la carne por el eje utilizando el asidero de empuje.
Nota: asegúrese de que la cara plana de la hoja está mirando hacia adelante tal y como
se ve en la ilustración.
Nota: limpie el aparato con agua jabonosa caliente y séquelo bien antes de utilizarlo por
primera vez.
ADVERTENCIA: No empuje nunca la carne en el eje con los dedos.
Page 28

23
ES
Si el disyuntor detiene el aparato o el aparato se atasca:
1. Apague el aparato inmediatamente.
2. Pulse el botón RESET que se encuentra en la parte posterior del aparato encima del cable de
alimentación.
3. Gire y MANTENGA el interruptor en la posición inversa para eliminar el bloqueo.
4. Retire y limpie el tubo de picado y todos los componentes.
Limpieza, Cuidado y Mantenimiento
• No utilice ningún producto de limpieza abrasivo con el aparato. Utilice agua jabonosa caliente.
• NO sumerja el bastidor del motor en agua. Limpie el exterior con un trapo húmedo.
• Séquelo bien siempre después de la limpieza.
• Un agente de BUFFALO o un técnico cualificado deberían llevar a cabo las reparaciones en caso de
precisarse.
Para facilitar la limpieza, desmonte el aparato:
• Desenrosque la tapa del tubo.
• Retire el tubo de picado, la placa, la hoja y el tornillo de avance en bloque. Incline suavemente el tubo
para sacar las piezas una a una.
• Suelte la bandeja de la tolva girándola.
• Retire la carne de todos los componentes y lávelos con agua jabonosa caliente.
• Séquelo bien.
• Lubrique las piezas con un poco de aceite de cocina antes de volver a colocarlas para lograr un mejor
rendimiento.
Resolución de problemas
Si su aparato BUFFALO falla, compruebe la tabla siguiente antes de llamar a la línea de asistencia o a su
distribuidor BUFFALO.
Nota: desconecte el aparato y desenchúfelo del suministro eléctrico siempre antes de
llevar a cabo la limpieza.
Nota: si la tapa se ha apretado demasiado, golpee suavemente las esquinas de la tapa
con una maza de goma o un instrumento simular para aflojarla.
Fallo Probable Causa Acción
El aparato no funciona El aparato no está conectado Compruebe que el aparato esté
enchufado correctamente y
conectado
El enchufe y el cable están
dañados
Llame a un técnico cualificado o a un
agente de BUFFALO
El fusible del enchufe se ha
fundido
Cambie el fusible del enchufe
Suministro eléctrico Compruebe el suministro eléctrico
Fallo del cableado interno Llame a un técnico cualificado o a un
agente de BUFFALO
Page 29

24
ES
Especificaciones Técnicas
Cableado Eléctrico
El enchufe tiene que conectarse a una toma eléctrica adecuada.
Este aparato está conectado de la forma siguiente:
• Cable cargado (de color marrón) al terminal marcado como L
• Cable neutro (de color azul) al terminal marcado como N
• Cable de tierra (de color verde / amarillo) al terminal marcado como E
El aparato debe estar conectado a tierra, utilizando un circuito de conexión a tierra especializado.
Si tiene alguna duda, consulte a un electricista cualificado.
Los puntos de aislamiento eléctrico deben mantenerse libres de cualquier obstrucción. En caso de precisarse
una desconexión de emergencia, deben estar disponibles de forma inmediata.
Cumplimiento
El logotipo WEEE en este producto o su documentación indica que no debe eliminarse
como un residuo doméstico. Para ayudar a prevenir posibles daños a la salud humana
y/o el medio ambiente, el producto debe eliminarse en un proceso de reciclaje
aprobado y medioambientalmente seguro. Para obtener más información sobre cómo
eliminar correctamente este producto, póngase en contacto con el proveedor del
mismo o la autoridad local responsable de la eliminación de residuos en su zona.
Las piezas BUFFALO han pasado estrictas pruebas de productos para cumplir las
especificaciones y normas reguladoras establecidas por las autoridades
internacionales, independientes y federales.
Los productos BUFFALO han sido autorizados para llevar el símbolo siguiente:
Reservados todos los derechos. Puede estar prohibida la reproducción o transmisión en cualquier forma o por
cualquier medio electrónico, mecánico, de fotocopiado, registro o de otro tipo, de cualquier parte de estas
instrucciones sin la autorización previa y por escrito de BUFFALO.
Se ha hecho todo lo posible para garantizar que todos los datos son correctos en el momento de su publicación; sin
embargo, BUFFALO se reserva el derecho a modificar las especificaciones sin que medie notificación previa.
Fallo Probable Causa Acción
La carne picada no sale
uniformemente del aparato
La tapa del tubo está
demasiado apretada
Afloje la tapa
La placa de corte está
bloqueada
Retire y limpie la placa
La hoja de corte está
desafilada
Cambie la hoja de corte
Modelo Tensión Potencia Corriente
Capacidad Salida
Dimensions
a x a x p mm
Peso
CD400 230V 50Hz 800W 3.6A 3.5kg 250kg/hour 410 x 328 x 517 24.5kg
Page 30

25
PT
Conselhos de segurança
• Colocar numa superfície plana e estável.
• Um agente de serviço/técnico qualificado deverá efectuar a instalação e quaisquer reparações, caso
necessário. Não retirar qualquer componente ou painéis de serviço deste produto.
• Consultar e cumprir os regulamentos locais e nacionais no que diz respeito à:
• Legislação de saúde e segurança no local de trabalho
• Códigos de trabalho
• Prevenção de incêndios
• Normas para sistemas eléctricos IEE
• Código de construção
• NÃO vá colocando manualmente a carne no aparelho. USE SEMPRE o empurrador fornecido para o
efeito.
• NÃO use os dedos para desobstruir o orifício de saída enquanto o aparelho estiver ligado.
• NÃO deixe o motor a trabalhar com entupimento durante qualquer período de tempo.
• NÃO mergulhe o aparelho em água.
• Use apenas as peças e acessórios BUFFALO neste aparelho.
• Transporte sempre o aparelho pela caixa do motor.
• Não está preparado para uso ao ar livre.
• Ao não utilizar o aparelho, deve sempre desligar o mesmo e retirar a ficha da tomada.Mantenha o
material da embalagem fora do alcance de crianças. O material da embalagem é para ser deitado fora
respeitando as regras das autoridades locais.
• A fim de evitar situações perigosas, a substituição dos cabos de alimentação danificados deve ser feita
por um agente BUFFALO ou um técnico qualificado recomendado.
Introdução
Por favor utilize o tempo necessário para ler atentamente este manual. Uma manutenção e utilização
correcta deste aparelho permitem a melhor capacidade de funcionamento do seu produto BUFFALO.
Conteúdo da embalagem
A embalagem inclui o seguinte:
A BUFFALO orgulha-se pelo serviço e a qualidade dos seus produtos e portanto verifica, durante a fase de
embalagem, o estado funcional e o bom estado do conteúdo fornecido.
Quando confrontado com quaisquer danos provocados durante o transporte, contacte imediatamente o
seu fornecedor BUFFALO.
• Picadora de Carne BUFFALO
• Boca de enchimento
• Empurrador de comida
• Parafuso de alimentação
• Parafuso de corte
• Placa de corte (grossa - 8 mm)
• Placa de corte (média - 6 mm)
• Manual de instruções
Page 31

26
PT
Montagem
1. Insira o tambor de picagem na entrada da caixa do motor, com o orifício virado para cima [fig. 1].
2. Aperte o manípulo de bloqueio [fig. 2].
3. Insira o parafuso de alimentação no tambor de picagem. Gire o parafuso ligeiramente para inserir a
base no parafuso no eixo de transmissão, se necessário [fig. 3].
4. Insira a lâmina de corte até ao final do parafuso de alimentação [fig. 4].
5. Encaixe a ranhura na aresta do disco de corte desejado até ao terminal do tambor de picagem. Deslize
o disco de corte pelo parafuso de alimentação [fig. 5].
6. Aperte a tampa do tambor até ao fim no tambor de picagem, até estar bem presa [fig. 6].
7. Gire a boca de enchimento até ficar no lugar [fig. 7].
Funcionamento
1. Corte a carne em pedaços suficientemente pequenos para caberem no orifício da boca de enchimento.
2. Coloque o interruptor eléctrico no modo ON (ligado).
3. Vá introduzindo a carne no cilindro usando o empurrador de comida.
Nota: assegure-se de que a face plana da lâmina está virada para a frente, de acordo
com o ilustrado.
Nota: limpe o aparelho com água morna com sabão e seque cuidadosamente antes de o
usar pela primeira vez.
AVISO: nunca introduza a carne no cilindro usando os dedos.
Page 32

27
PT
Se o interruptor de carga parar o aparelho ou este ficar entupido:
1. Desligue o aparelho imediatamente.
2. Carregue no botão RESET (REINICIAR) localizado na parte de trás do aparelho, por cima do cabo de
alimentação.
3. Gire e MANTENHA o interruptor na posição de marcha-atrás para eliminar o bloqueio.
4. Retire e limpe o tambor de picagem e todos os seus componentes.
Limpeza, cuidados & manutenção
• Não use agentes abrasivos de limpeza no aparelho. Use água morna com sabão.
• Não mergulhe a caixa do motor em água. Limpe o exterior com um pano húmido.
• Seque-o sempre cuidadosamente depois da limpeza.
• As reparações necessárias devem ser feitas por um representante BUFFALO ou técnico qualificado.
Para uma limpeza mais fácil, desmonte o aparelho:
• Desaperte a tampa do motor.
• Retire o tambor de picagem, tabuleiro, lâmina e parafuso de alimentação como se fosse uma unidade
só. Incline suavemente o tambor para retirar as peças uma por uma.
• Desaperte a boca de enchimento.
• Remova a carne de todos os componentes e lave-os com água morna com sabão.
• Seque cuidadosamente.
• Lubrifique as peças com um pouco de óleo de cozinha antes de as recolocar, para um melhor
desempenho.
Resolução de problemas
Se o seu produto BUFFALO apresentar uma falha, consulte a seguinte tabela antes de telefonar à linha de
apoio ou ao seu agente BUFFALO.
Nota: apague sempre o aparelho e desligue-o da corrente antes de o limpar.
Nota: Se a tampa estiver demasiado apertada, bata nos cantos da tampa com um
martelo de borracha ou um instrumento similar para a desapertar.
Problema Causa provável A fazer
O aparelho não funciona O aparelho não está ligado Verifique a ligação correcta dos cabos
e ligue o aparelho
A ficha e o cabo estão
danificados
Chame o agente da BUFFALO ou um
técnico qualificado
O fusível da ficha disparou Substitua o fusível da ficha
Fonte de alimentação Verifique a fonte de alimentação
Erro na cablagem interna Chame o agente da BUFFALO ou um
técnico qualificado
Page 33

28
PT
Especificações técnicas
Cablagem eléctrica
Deve-se utilizar tomadas adequadas para ligar a ficha do aparelho.
O esquema de electricidade deste aparelho é o seguinte:
• Cabo eléctrico (castanho) para o terminal marcado L
• Cabo neutro (azul) para o terminal marcado N
• Cabo terra (verde/amarelo) para o terminal marcado com E
Este aparelho tem que estar ligado à terra através de um circuito de terra.
Consulte um electricista qualificado em caso de dúvidas.
Os pontos eléctricos isolados devem ficar limpos de qualquer obstrução. Estes pontos têm que ser
imediatamente acessíveis caso seja necessário desligar a electricidade.
Conformidade
O logótipo WEEE neste produto ou a sua documentação indicam que o produto não
deve ser tratado como lixo doméstico. Para ajudar a prevenir possíveis danos para a
saúde humana e/ou ambiente, o produto deve ser eliminado de acordo com um
processo de reciclagem aprovado e seguro para o ambiente. Para mais informação
sobre como eliminar este produto correctamente, contacte o fornecedor do mesmo ou
as autoridades locais responsáveis pela eliminação de desperdícios na sua área.
As componentes BUFFALO foram submetidas a testes rigorosos a fim de cumprirem
as normas e especificações legais determinadas pelas autoridades internacionais,
independentes e nacionais.
Os produtos BUFFALO foram aprovados e trazem o seguinte símbolo:
Todos os direitos reservados. É proibida a reprodução electrónica ou mecânica, ou por qualquer outro meio copiar,
guardar em meios digitais ou transmitir a terceiros estas instruções, seja parcialmente ou na sua totalidade, sem a
autorização prévia de BUFFALO.
Nós nos esforçamos para que no dia de publicação deste manual todos os pormenores sejam correctos, no entanto,
a BUFFALO tem o direito de alterar as especificações sem aviso prévio.
Fault Probable Cause Action
A carne picada não sai
uniformemente do aparelho
A tampa do tambor está
demasiada apertada
Afrouxe a tampa
O tabuleiro de corte está
bloqueado
Retire e limpe o tabuleiro
A lâmina de corte está gasta Substitua a lâmina de corte
Model Voltagem Alimentação Curronte
Capacidade Resultado
Dimensões
a x l x p mm
Pesos
CD400 230V 50Hz 800W 3.6A 3.5kg 250kg/hour 410 x 328 x 517 24.5kg
Page 34

29
S
Säkerhetsråd
• Placera på en plan stabil yta.
• Ett serviceombud/kvalificerad tekniker skall utföra installation och reparationer om så krävs. Avlägsna
inte några komponenter eller servicepanler på produkten.
• Konsultera lokala och nationella normer för att efterleva följande:
• Lagstiftning om hälsa och säkerhet i arbetet
• BS EN Tillämpningsregler
• Brandförebyggande åtgärder
• IEE Regler för kabeldragning
• Byggregler
• Mata INTE in kött i apparaten för hand. Använd ALLTID inmataren som medföljer.
• Rengör INTE utmatningshålet med fingrarna när apparaten är påslagen.
• Låt INTE motorn kämpa mot ett hinder under en längre tid.
• Sänk INTE ned apparaten i vatten.
• Använd bara BUFFALO originaldelar och tillbehör med apparaten.
• Håll alltid i motorhuset när apparaten bärs.
• Ej lämplig för användning utomhus.
• Håll allt förpackningsmaterial borta från barn. Kasta allt förpackningsmaterial i enlighet med de lokala
myndigheternas föreskrifter.
• Om nätsladden skadas, måste den bytas av en BUFFALO-representant eller en kvalificerad tekniker för
att undvika faror.
Inledning
Ta några minuter för att noggrant läsa igenom denna manual. Korrekt underhåll och drift av maskinen
kommer att göra att din BUFFALO-produkt ger bästa möjliga prestanda.
Förpackningsinnehåll
Följande medföljer:
Håll allt förpackningsmaterial åtskiljt från barn. Släng förpackningsmaterialet i enlighet med loka
myndigheters regleringar.
Om elsladden är skadad måste den bytas ut av en BUUFALO-representant eller en rekommenderad
kvalificerad tekniker för att undvika risker.
• BUFFALO köttkvarn
• Matningsfack
• Inmatare
• Matarskruv
• Skärskruv
• Skärplatta (grov - 8 mm)
• Skärplatta (medel - 6 mm)
• Bruksanvisning
Page 35

30
S
Montering
1. För in cylindern i öppningen på motorhuset med hålet riktat uppåt [Fig. 1].
2. Dra åt låsratten [Fig. 2].
3. För in matarskruven i cylindern. Vrid skruven en aning så att skruvens bas passar in i överföringsaxeln
om det behövs [Fig. 3].
4. Sätt fast skärbladet på matarskruvens ände [Fig. 4].
5. Rikta in skåran med kanten på önskad skärskiva med stiftet på cylindern. Skjut på skärskivan på
matarskruven [Fig. 5].
6. Skruva fast cylinderhållaren på cylinderns ände ordentligt [Fig. 6].
7. Vrid fast matningsfacket på plats [Fig. 7].
Drift
1. Skär köttet i små bitar som passar in i hålet på matningsfacket.
2. Slå PÅ strömbrytaren.
3. Mata in köttet i axelöppningen med inmataren.
Obs: Kontrollera att den plana sidan på bladet är riktad utåt så som visas.
Obs: Rengör apparaten i varmt tvålvatten och torka den noga innan den används för
första gången.
VARNING: Mata aldrig in kött i axelöppningen med fingrarna.
Page 36

31
S
Om kretsbrytaren stoppar apparaten eller apparaten täpps till:
1. Stäng av apparaten omedelbart.
2. Tryck på RESET-knappen på apparatens baksida ovanför nätsladden.
3. Rensa blockaget genom att vrida och HÅLLA strömbrytaren i backningsläget.
4. Ta bort och rengör cylindern och de övriga komponenterna.
Rengöring, omvårdnad och underhåll
• Använd inte slipande rengöringsmedel på apparaten. Använd varmt tvålvatten.
• Sänk inte ned motorhuset i vatten. Rengör utsidan med en fuktad trasa.
• Torka alltid noga efter rengöringen.
• En BUFFALO-representant eller kvalificerad tekniker bör utföra reparationer om det behövs.
Ta isär apparaten för att underlätta rengöringen:
• Skruva loss cylinderhållaren.
• Ta bort cylindern, plattan, bladet och matarskruven som en uppsättning. Luta försiktigt cylindern och
ta ut delarna en efter en.
•Vrid loss matningsfacket.
• Avlägsna köttrester från komponenterna och tvätta i varmt tvålvatten.
•Torka noga.
• Smörj delarna med lite matolja innan de sätts tillbaka för bästa prestanda.
Felsökning
Om din BUFFALO-apparat påvisar något fel, kontrollera först tabellen innan du ringer till hjälplinjen eller din
BUFFALO-återförsäljare.
Obs: Stäng alltid av och koppla bort apparaten från eluttaget innan apparaten rengörs.
Obs: Om hållaren har dragits åt för hårt kan du lossa den genom att knacka på hållarens
hörn med en gummihammare eller liknande.
Fel Möjlig orsak Åtgärd
Apparaten fungerar
inte
Apparaten är inte påslagen Kontrollera att apparaten är korrekt
ansluten och påslagen
Kontakt och ledning är
skadade
Ring BUFFALO-representant eller
kvalificerad tekniker
Säkring i kontakten har gått Byt ut säkringen
Strömtillförsel Kontrollera strömtillförseln
Internt kabeldragningsfel Ring BUFFALO-representant eller
kvalificerad tekniker
Köttfärs matas inte ut ur
apparaten jämnt
Cylinderhållaren är för hårt
åtdragen
Lossa hållaren
Page 37

32
S
Tekniska specifikationer
Elektriska kablar
Kontakten måste vara ansluten till ett lämpligt eluttag.
Denna apparat har följande kablar:
• Elektrisk kabel (brun) till uttag markerat L
• Neutral kabel (blå) till uttag markerat N
• Jordkabel (grön/gul) till uttag markerat E
Denna apparat måste vara jordad, och bruka en dedikerad jordad krets.
Vid tveksamheter rådfråga en kvalificerad elektriker.
Elektriska isoleringspunkter måste hållas fria från hinder. I händelse av urkoppling vid nödfall krävs, måste
de vara lättåtkomliga.
Tillmötesgående
WEEE-logotypen på den här produkten eller i dokumentationen anger att produkten
inte får kastas med vanliga hushållssopor. För att förhindra hälso- och/eller
miljöskador måste produkten lämnas in på en godkänd insamlingsplats för miljösäker
återvinning. Kontakta leverantören eller de lokala myndigheterna som ansvarar för
sophanteringen om du vill ha mer information om hur produkten ska kastas.
BUFFALO-delarna har genomgått strikt produkttestning för att tillmötesgå reglerande
normer och specifikationer utsatta av internationella, oberoende och statliga
myndigheter.
BUFFALO-produkterna har godkänts för att bära följande symbol:
Alla rättigheter reserverade. Ingen del av dessa instruktioner får framställas eller överföras i någon form eller på
något sätt, elektroniskt, mekaniskt, fotokopieras, spelas in eller på annat sätt, utan tidigare skriftligt tillstånd från
BUFFALO.
Vi gör allt vi kan för att försäkra att alla detaljer är korrekta då informationen trycks, men, BUFFALO förbehåller
sig rätten att ändra specifikationerna utan tidigare meddelande.
Fel Möjlig orsak Åtgärd
Köttfärs matas inte ut ur
apparaten jämnt
Skärplattan är blockerad Ta bort och rengör plattan
Skärbladet är utnött Byt ut skärbladet
Modell Spänning Kraft Ström
Kapacitet Uteffekt
Mått
h x b x d mm
Vikt
CD400 230V 50Hz 800W 3.6A 3.5kg 250kg/hour 410 x 328 x 517 24.5kg
Page 38

33
DK
Sikkerhedstips
• Anbring apparatet på en jævn, stabil overflade.
• Installation og reparation skal udføres af en serviceagent/kvalificeret tekniker, hvis det bliver
nødvendigt. Fjern ikke komponenter eller servicepaneler på dette produkt.
• Check de lokale og nationale standarder for at imødekomme det følgende:
•Sikkerhed og sundhed på arbejdspladsen
•BS EN Regler for god praksis
•Brandforholdsregler
•IEE Strømkabelregulativer
•Bygningsvedtægter
• De MÅ IKKE skubbe kød ind i kødhakkeren med hånden. Brug ALTID den medfølgende skubbepind.
• De MÅ IKKE bruge fingrene til at rydde udgangshullet, mens udstyret er tændt.
• De MÅ IKKE lade motoren arbejde mod en tilstopning i længere stykke tid.
• De MÅ IKKE nedsænke udstyret i vand.
• Brug kun originale BUFFALO dele og tilbehør med dette udstyr.
• De skal altid holde udstyret i motorhuset, når De bærer det.
• Ikke egnet til udendørs brug.
• Opbevar al emballage utilgængeligt for børn. Kasser emballagen i henhold til de lokale love og
bestemmelser.
• Hvis strømkablet er beskadiget, skal det udskiftes af en BUFFALO agent eller en anbefalet kvalificeret
tekniker for at undgå fare.
Introduktion
Brug et par minutter til at læse denne vejledning omhyggeligt igennem. Korrekt vedligeholdelse og drift af
denne maskine vil give dit BUFFALO produkt den bedst mulige ydelse.
Emballagens indhold
Følgende er inkluderet:
BUFFALO er stolte vores kvalitet og service, der sikrer at det leverede indhold er fuldt funktionelt og fri for
skader ved pakning.
Skulle du alligevel opdage skader, som resultat af transporten, bedes du kontakte din BUFFALO forhandler
med det samme.
•BUFFALO Kødhakker
• Tragtbakke
• Madskubbepind
•Fødesnegl
•Skæreskrue
• Skæreplade (grov - 8mm)
• Skæreplade (medium - 6mm)
•Brugsanvisning
Page 39

34
DK
Samling
1. Sæt hakketromlen ind i motorhusets åbning, og sørg for, at hullet vender opad [Figur 1].
2. Stram låseknoppen [Figur 2].
3. Sæt fremføringsskruen ind i hakketromlen. Drej skruen let, så bunden af skruen falder i hak med
transmissionsakslen, hvis det er nødvendigt [Figur 3].
4. Sæt skærebladet på enden af fremføringsskruen [Figur 4].
5. Sammenpas fordybningen på kanten af den ønskede skæreskive med stiften på kødhakketromlen.
Skub skæreskiven hen på fødesneglen [Figur 5].
6. Skru tromledækslet på enden af hakketromlen, indtil det er strammet til [Figur 6].
7. Drej tragtbakken på plads [Figur 7].
Brug
1. Skær kødet i mindre stykker, så stykkerne passer ind i hullet i tragtbakken.
2. Drej kontakten til ON.
3. Tilføj kødet i skaftet ved brug af madskubbere.
Bemærk: Sørg for, at den flade side af skærebladet vender fremad som vist på
illustrationen.
Bemærk: Udstyret skal gøres rent med varmt sæbevand og tørres grundigt, før det skal
bruges igen en anden gang.
ADVARSEL: De må aldrig skubbe mad ind i skaftet med fingrene.
Page 40

35
DK
Hvis hovedafbryderen stopper udstyret, eller hvis udstyret bliver tilstoppet, skal De:
1. Øjeblikkeligt slukke for maskinen.
2. Tryk på RESET-knappen, som sidder bag på udstyret ovenover strømledningen.
3. Drej, og HOLD kontakten nede i den modsatte stilling for at rydde tilstopningen.
4. Tag hakketromlen af, og ryd den såvel som alle komponenterne.
Regnøring, pleje og vedligeholdelse
• De må ikke bruge slibende rengøringsmidler på udstyret. Brug varmt sæbevand.
• De må ikke nedsænke motorhuset i vand. Rengør udstyret udvendigt med en fugtig klud.
• Tør altid udstyret grundigt, efter det er blevet gjort rent.
• En BUFFALO forhandler eller kvalificeret tekniker bør foretage alle eventuelle reparationer.
For at gøre rengøringen lettere skal De afmontere udstyret:
• Skru tromledækslet af.
• Tag hakketromlen, pladen, skærebladet og fremføringsskruen af som en enkelt enhed. Vip forsigtigt
tromlen for at tage delene ud en ad gangen.
• Drej tragtbakken af.
• Fjern kødrester fra alle komponenterne, og vask dem med varmt sæbevand.
• Tør dem grundigt.
• For at opnå den bedste ydeevne kan De smøre delene med lidt madolie, før de sættes på igen.
Fejlfinding
Hvis der opstår en fejl i dispenseren, skal man kontrollere følgende punkter, før man ringer til
hjælpetelefonen.
Bemærk: Udstyret skal altid slukkes og kobles fra strømforsyningen, før De gør det rent.
Bemærk: Hvis dækslet er blevet strammet for hårdt til, kan De slå på hjørnerne af
dækslet med en gummihammer eller et lignende værktøj for at løsne det.
Fejl Mulig årsag Løsning
Apparatet virker ikke Apparatet er ikke tændt Kontroller, at apparatet er sat rigtigt i
stikkontakten og er tændt
Stik og ledning er beskadiget Kontakt BUFFALO agenten eller en
kvalificeret tekniker
En sikring i stikket er sprunget Udskift stiksikringen
Strømforsyning Kontroller strømforsyningen
Intern ledningsfejl Kontakt BUFFALO agenten eller en
kvalificeret tekniker
Det hakkede kød kommer ikke
ensartet ud af udstyret
Tromledækslet er blevet
strammet for hårdt til
Løsn dækslet
Page 41

36
DK
Tekniske specifikationer
El-kabler
Stikket skal tilsluttes til en passende hovedkontakt.
Apparatet er kabelført som følger:
• Strømførende ledning (brun) til terminal L
• Neutral ledning (blå) til terminal N
• Jordledning (grøn/gul) til terminal E
Dette apparat skal være jordforbundet med et fast fejlstrømsrelæ.
Spørg en autoriseret elektriker i tvivlstilfælde.
Elektriske isolationspunkter skal holdes fri af blokeringer. I nødstilfælde skal de være tilgængelige for
afbrydelse.
Overensstemmelseserklæring
WEEE-logoet på dette produkt eller den tilhørende dokumentation angiver, at
produktet ikke må bortskaffes som almindeligt husholdningsaffald. For at forhindre
mulig fare for personers helbred og/eller miljøet, skal produktet bortskaffes gennem
en godkendt og miljøvenlig genbrugsproces. For yderligere oplysninger om, hvordan
dette produkt bortskaffes korrekt, skal De kontakte leverandøren af produktet eller de
lokale myndigheder, som er ansvarlige for bortkastning af affald i Deres omegn.
BUFFALO dele har gennemgået streng produkttestning for at overholde de normer,
standarder og specifikationer, som er fastsat af internationale, uafhængige og
amerikanske føderale myndigheder.
BUFFALO produkter er godkendt til at bære følgende symbol:
Med forbehold for alle rettigheder. Ingen del af disse anvisninger må produceres eller transmitteres i noget format
eller på nogen måde, hvad enten det drejer sig om elektronisk, mekanisk, fotokopiering, lagring på edb eller andet,
før der er blevet forudindhentet skriftlig tilladelse hertil fra BUFFALO.
Der er blevet gjort alle bestræbelser på at sikre, at oplysningerne er korrekte på trykningstidspunktet, men
BUFFALO forbeholder sig ret til at ændre specifikationerne uden varsel.
Fejl Mulig årsag Løsning
Det hakkede kød kommer ikke
ensartet ud af udstyret
Skærebladet er blevet
blokeret
Tag pladen af, og gør den ren
Skærebladet er sløvt Sæt et nyt skæreblad på
Model Spænding Strøm
Strømsty
rke
Kapacitet
Ydelse
Mål h x b x d
mm
Vaegt
CD400 230V 50Hz 800W 3.6A 3.5kg 250kg/hour 410 x 328 x 517 24.5kg
Page 42

37
N
Sikkerhetstips
• Plasser på en vannrett og stabil flate.
• Installasjon og all reparasjon skal utføres av en serviceagent eller en kyndig tekniker. Komponenter
eller inspeksjonsdeksler må ikke fjernes på dette produktet.
• Rådfør deg med lokale og nasjonale standarder for å oppfylle følgende:
• HMS-lovgivningen (Helse/Miljø/Sikkerhet)
• Bransjestandard BS EN
• Forholdsregler mot brann
• IEE-forskrifter for tilkopling
• Byggeregler
• IKKE skyv kjøtt inn i apparatet for hånd. Bruk ALLTID den medleverte skyveren.
• IKKE bruk fingrene til å fjerne noe fra utløpshullet mens apparatet er slått på.
• IKKE la motoren gå i lengre tid når det oppstår en blokkering.
• IKKE senk utstyret ned i vann.
• Bruk bare originale deler og utstyr fra BUFFALO til dette apparatet.
• Apparatet skal alltid løftes i motorhuset.
• Ikke egnet for bruk utendørs.
• Slå alltid av og frakople strømtilførselen når enheten ikke er i bruk.Hold all emballasje unna barn.
Emballasjen skal deponeres i henhold til forskrifter bestemt av myndighetene på stedet.
• Hvis strømledningen er skadet skal den skiftes ut av en BUFFALO-agent eller en kyndig tekniker for å
unngå fare.
Innledning
Vennligst ta deg tid til å lese nøye gjennom denne håndboka. Korrekt vedlikehold og bruk av ismaskinen vil
gi best mulig ytelse på ditt BUFFALO-produktet.
Pakkeinnhold
Følgende er inkludert:
• BUFFALO kjøttkvern
•Traktbrett
•Skyver
• Instruksjonsbok
BUFFALO er stolt av sin kvalitet og service, og garanterer at da innholdet ble pakket var det fullstendig
funksjonelt og uten skade.
Skulle du finne noe som helst skade som et resultat av transitt, vennligst ta omgående kontakt med BUFFALO-forhandleren på stedet.
Page 43

38
N
Montasje
1. Sett inn kverntrommelen i munningen til motorhuset med hullet oppover [fig. 1].
2. Stram låseknappen [fig. 2].
3. Sett mateskruen inn i kverntrommelen. Drei litt på skruen for å sette skruens ende mot
transmisjonsskaftet dersom det er behov for dette [fig. 3].
4. Sett kniven inn i enden av mateskruen [fig. 4].
5. Før sporet i skjæreskivens kant mot kverntrommelens stift. Skyv skjæreskiven inn på mateskruen
[fig. 5].
6. Skru trommeldekslet på enden av kverntrommelen til det er strammet [fig. 6].
7. Vri traktbrettet inn på plass [fig. 7].
Bruk
1. Kutt kjøttet i stykker som er så små at de passer i traktbrettets hull.
2. Slå på nettbryteren.
3. Før kjøttet inn i hullet med skyveren.
Merk: Sørg for at knivens plane side vender framover som vist.
Merk: Rengjør apparatet med varmt såpevann og tørk grundig før det tas i bruk første
gang.
ADVARSEL: Skyv aldri kjøttet inn i hullet med fingrene.
Page 44

39
N
Dersom sikringen går eller apparatet blir blokkert:
1. Slå straks av apparatet.
2. Trykk på tilbakestillingsknappen merket RESET på apparatets bakside, over nettledningen.
3. Drei bryteren og HOLD den i motsatt posisjon for å løsne blokkeringen.
4. Fjern og rens kverntrommelen og alle komponenter.
Rengjøring, stell og vedlikehold
• Det må ikke benyttes slipende rensemidler til apparatet. Bruk varmt såpevann.
• Motorhuset må ikke senkes ned i vann. Utvendige deler rengjøres med en fuktig klut.
• Tørk alltid grundig etter rengjøring.
• Reparasjoner må overlates til en representant for BUFFALO eller en kvalifisert tekniker ved behov.
Apparatet bør skilles for at det skal bli lettere å gjøre rent:
• Skru av trommeldekslet.
• Ta av kverntrommelen, platen, kniven og mateskruen som en enhet. Vipp trommelen forsiktig for å ta
ut delene, en etter en.
• Vri av traktbrettet.
• Fjern kjøtt fra alle komponenter og vask dem i varmt såpevann.
• Tørk grundig.
• Smør delene med litt matolje før de settes på plass; dette gir best yteevne.
Feilsøking
Skulle BUFFALO mikrobølgeovnen utvikle feil, sjekk følgende tabell før du ringer hjelpelinjen eller tar
kontakt med BUFFALO-forhandleren på stedet.
Merk: Apparatet skal alltid slås av og kobles fra nettforsyningen før rengjøring.
Merk: Dersom dekslet er strammet for hardt, må dets hjørner bankes med en
gummiklubbe eller liknende for å løsne det.
Feil Sannsynlig årsak Aksjon
Ismaskinen fungerer ikke Ismaskinen er ikke slått på Sjekk at støpslet på ismaskinen er
plugget inn korrekt og at kontakten er
slått på
Støpsel og ledning er skadet Ring BUFFALO-agenten eller en
kyndig tekniker
Sikringen i støpslet har gått Skift ut sikringen i støpselet
Strømtilførsel Sjekk strømtilførselen
Intern koplingsfeil Ring BUFFALO-agenten eller en
kyndig tekniker
Page 45

40
N
Tekniske spesifikasjoner
Elektrisk tilkopling
Støpselet skal tilkoples en passende strømkontakt.
Enheten er koplet som følger:
• Strømførende ledning (brun) - koplingspunkt merket L
• Nøytral ledning (blå) - koplingspunkt merket N
• Jordledning (grønn) - koplingspunkt merket E
Denne enheten skal ha jording ved å bruke en dedisert jordingskrets.
Hvis i tvil, rådfør deg med en kyndig elektriker.
Elektriske isolasjonspunkter / skillebrytere skal være uhindret. I et nødstilfelle hvor det er nødvendig med
frakopling, skal de alltid være tilgjengelige.
Samsvar
Logoen WEEE på produktet eller dets dokumentasjon betyr at produktet ikke må
kastes som ordinært husholdningsavfall.
For å hindre skader på mennesker og/eller miljø må produktet kastes eller resirkuleres
gjennom godkjente og trygge prosesser for avfallshåndtering. For ytterligere
informasjon om hvordan produktet kasseres, kontakt den lokale leverandøren eller
miljøstasjon.
Deler brukt av BUFFALO har gjennomgått streng produkttesting for å være i samsvar
med regulative standarder og spesifikasjoner fastlagt av internasjonal, uavhengig og
føderale myndigheter.BUFFALO-produkter har blitt godkjent for å bære følgende
symbol:
Vi tar forbehold om alle rettigheter. Ikke noen del av disse instruksjonene må fremstilles eller oversendes i noen
form eller med noen midler, elektronisk, mekanisk, fotokopiert, nedskrevet eller på noen annen måte, uten at
BUFFALO har gitt skriftlig tillatelse på forhånd.
Det er truffet omfattende tiltak for å sikre at alle detaljer er korrekte på tidspunktet for trykking, men BUFFALO
forbeholder seg retten til å endre spesifikasjoner uten forvarsel
Feil Sannsynlig årsak Aksjon
Det kommer ikke kjøttdeig
jevnt ut av apparatet
Kverndekslet sitter for stramt Løsne dekslet
Kutteplaten er blokkert Ta ut platen og gjør den ren
Kniven er sløv Bytt kniven
Modell Spenning Strøm Strømstyrke
Kapasitet Produksjon
Mål
h x w x d mm
Vekt
CD400 230V 50Hz 800W 3.6A 3.5kg 250kg/hour 410 x 328 x 517 24.5kg
Page 46

41
FIN
Turvallisuusvihjeitä
• Aseta laite tasaiselle, vakaalle pinnalle.
• Huoltoedustajan/pätevän huoltomiehen tulisi suorittaa asennus ja tarvittaessa kaikki korjaustyöt. Älä
irrota mitään tämän laitteen osia tai huoltopaneelia.
• Katso tietoja paikallisista ja kansallisista standardeista varmistaaksesi, että seuraavia määräyksiä
noudatetaan:
• Työterveys- ja turvallisuuslainsäädäntö
• BS EN-mukaiset ohjeet
• Paloturvallisuusmääräykset
• IEE-johdotusmääräykset
• Rakennusmääräykset
• ÄLÄ syötä lihaa laitteeseen käsin. Käytä AINA laitteen mukana toimitettua työnnintä.
• ÄLÄ käytä sormia laitteen ulostuloaukon avaamiseen, kun laite on kytketty päälle.
• ÄLÄ anna moottorin käydä pitkiä aikoja, kun laite on mennyt tukkoon.
• ÄLÄ upota laitetta veteen.
• Käytä ainoastaan alkuperäisiä BUFFALO -varaosia ja lisävarusteita tämän laitteen kanssa.
• Kanna laitetta aina pitäen kiinni moottorikotelosta.
• Ei sovellu käytettäväksi ulkotiloissa.
• Pidä kaikki pakkausmateriaali poissa lasten ulottuvilta. Hävitä pakkausmateriaali paikallisten
viranomaisten määräysten mukaisesti.
• Jos virtajohto on vaurioitunut, saa sen vaihtaa uuteen ainoastaan BUFFALO-edustaja tai valtuutettu
pätevä huoltomies vaarojen välttämiseksi.
Johdanto
Käytä muutama minuutti tämän ohjekirjan lukemiseen huolellisesti läpi. Kun tätä BUFFALO-tuotetta
huolletaan ja käytetään oikein, saadaan laitteesta paras mahdollinen hyöty.
Pakkauksen sisältö
Pakkaus sisältää seuraavat:
BUFFALO on ylpeä laadusta ja palvelusta varmistaen, että laitetta pakattaessa pakkauksen sisältö on täysin
kunnossa ja ilman vikoja.
Mikäli laite on kuljetuksen takia vaurioitunut, ota välittömästi yhteyttä BUFFALO -edustajaan.
• BUFFALO lihamylly
•Suppilo
• Syöttöpainin
• Syöttöruuvi
• Leikkuuruuvi
• Reikälevy (karkea - 8mm)
• Reikälevy (keskikoko - 6mm)
•Ohjekirja
Page 47

42
FIN
Kokoonpano
1. Aseta jauhatussylinteri moottorin kotelon suuhun siten, että siinä oleva reikä osoittaa ylöspäin
[Kuva 1].
2. Kiristä lukitusnappi [Kuva 2].
3. Laita syöttöruuvi jauhatussylinterin sisään. Tarpeen vaatiessa kierrä ruuvia hieman, jotta ruuvin pohja
menee paikalleen siirtoakselille [Kuva 3].
4. Laita jauhatusterä syöttöruuvin päähän [Kuva 4].
5. Aseta halutun leikkuuterän reunassa oleva ura kohdakkain jauhatussylinterissä olevan tapin kanssa.
Vedä leikkuuterä syöttöruuvin päälle [Kuva 5].
6. Ruuvaa rungon päätykappale myllyn rungon päähän niin, että se on kireä [Kuva 6].
7. Kierrä suppilo paikalleen [Kuva 7].
Käyttö
1. Leikkaa liha tarpeeksi pieniksi palasiksi, jotta ne mahtuisivat suppilossa olevaan aukkoon.
2. Käännä virtakytkin PÄÄLLE.
3. Syötä liha akselille syöttöpaininta käyttäen.
Huom.: Varmista, että terän tasainen puoli osoittaa eteenpäin kuvan esittämällä
tavalla.
Huom.: Puhdista laite lämpimällä saippuavedellä ja kuivaa se huolellisesti ennen
ensimmäistä käyttökertaa.
VAROITUS: Älä koskaan työnnä lihaa akselille sormien avulla.
Page 48

43
FIN
Jos piirikatkaisin pysäyttää laitteen tai laite menee tukkoon:
1. Kytke laite pois päältä välittömästi.
2. Paina NOLLAUS -painiketta (RESET), joka sijaitsee laitteen takana virtajohdon yläpuolella.
3. Käännä kytkin peruutusasentoon ja PIDÄ sitä siinä asennossa niin, että tukos saadaan poistettua.
4. Irrota myllyn runko sekä kaikki muut osat ja puhdista ne.
Puhdistus, hoito & huolto
• Älä käytä hankaavia puhdistusaineita laitteen puhdistukseen. Käytä lämmintä saippuavettä.
• Älä upota moottorin koteloa veteen. Puhdista ulkopuoli kostealla pyyhkeellä.
• Kuivaa laite aina huolellisesti puhdistamisen jälkeen.
• A BUFFALO -edustajan tai pätevän huoltomiehen on tarvittaessa suoritettava korjaustoimenpiteet.
Jotta puhdistaminen olisi helpompaa, pura laite seuraavasti:
• Ruuvaa myllyn rungon päätykappale irti.
• Irrota myllyn runko, levy, terä ja syöttöruuvi yhtenä osana. Kallista runkoa varovasti saadaksesi osat
yksitellen ulos.
• Kierrä suppilo irti paikaltaan.
• Poista kaikkiin osiin jäänyt liha ja pese ne lämpimällä saippuavedellä.
• Kuivaa osat perusteellisesti.
• Jotta laite toimisi parhaalla mahdollisella tavalla, voitele osat pienellä määrällä ruokaöljyä ennen kuin
ne laitetaan takaisin paikoilleen.
Vianetsintä
BUFFALO -laitteeseen tulee vika, tarkista seuraavassa taulukossa esitetyt seikat ennen kuin otat yhteyttä
puhelinpalveluun tai BUFFALO -edustajaan.
Huom.: Kytke laite aina pois päältä ja irrota se verkkovirrasta ennen puhdistamista.
Huom.: Jos päätykappale on laitettu paikalleen liian tiukkaan, kopauta päätyosan
kulmia kumivasaralla tai vastaavalla välineellä osan löysäämiseksi.
Vika Mahdollinen aiheuttaja Toimenpide
Laite ei toimi Laitetta ei ole kytketty päälle Tarkista, että laite on liitetty
verkkovirtaan oikein ja kytketty päälle
Pistotulppa ja johto ovat
vioittuneet
Soita BUFFALO -edustajalle tai
pätevälle huoltomiehelle
Pistotulpassa oleva sulake on
palanut
Vaihda sulake uuteen
Virransyöttö Tarkasta virransyöttö
Sisäinen vika johdoissa Soita BUFFALO -edustajalle tai
pätevälle huoltomiehelle
Page 49

44
FIN
Tekniset tiedot
Sähköjohdot
Pistotulppa on liitettävä sopivaan verkkovirtapistokkeeseen.
Laitteen johdot liitetään seuraavasti:
• Jännitteellinen johto (väriltään ruskea) napaan, jossa on merkintä L
• Neutraali johto (väriltään sininen) napaan, jossa on merkintä N
• Maadoitusjohto (väriltään vihreä/keltainen) napaan, jossa on merkintä E
Tämä laite on maadoitettava käyttämällä tarkoitukseen varattua maadoituspiiriä.
Jos et ole varma asiasta, kysy neuvoa pätevältä sähkömieheltä.
Sähkövirran eristyspisteet on pidettävä vapaina kaikista esteistä. Mikäli laite joudutaan hätätapauksessa
kytkemään verkkovirrasta, on niihin päästävä helposti.
Vaatimustenmukaisuus
Tässä tuotteessa tai sen asiakirjoissa oleva WEEE -logo osoittaa, että tuotetta ei saa
hävittää tavallisen talousjätteen mukana. Jotta vältyttäisiin ihmisen terveydelle ja/tai
ympäristölle koituvilta mahdollisilta haitoilta, tuote on hävitettävä hyväksytyllä ja
ympäristön kannalta turvallisella kierrätysprosessilla. Lisätietoja tämän tuotteen
oikeasta hävittämisestä voidaan saada ottamalla yhteyttä tuotteen toimittajaan tai
paikalliseen viranomaiseen, joka on vastuussa jätteiden hävityksestä alueellasi.
BUFFALO-osat ovat käyneet läpi tarkan tuotetestauksen, jotta ne noudattaisivat
kansainvälisten, itsenäisten ja valtiollisten viranomaisten asettamia säädöksiä ja
vaatimuksia.
BUFFALO-tuotteet on hyväksytty merkittäviksi seuraavilla merkinnöillä:
Kaikki oikeudet pidätetään. Mitään näiden ohjeiden osaa ei saa jäljentää tai lähettää missään muodossa tai millään
tavalla, elektronisesti, mekaanisesti, valokopioimalla, nauhoittamalla tai jollain muulla tavalla ilman, että BUFFALO
on antanut etukäteisen luvan.
Kaikki mahdollinen on tehty sen hyväksi, että annetut tiedot olisivat aina painatushetkellä oikeita, mutta BUFFALO
varaa itselleen oikeuden muuttaa tietoja siitä erikseen ilmoittamatta.
Vika Mahdollinen aiheuttaja Toimenpide
Jauhettu liha ei tule ulos
tasaisesti laitteesta
Rungon päätyosa on liian
tiukasti paikallaan
Löysää päätyosaa
Reikälevy on tukossa Irrota levy ja puhdista se
Leikkuuterä on tylsä Vaihda leikkuuterä uuteen
Malli Jännite Teho Virta Kapasiteetti Teho
Mitat
k x l x s mm
Paino
CD400 230V 50Hz 800W 3.6A 3.5kg 250kg/hour 410 x 328 x 517 24.5kg
Page 50

DECLARATION OF CONFORMITY
• Conformiteitsverklaring • Déclaration de conformité • Konformitätserklärung • Dichiarazione di conformità •
• Declaración de conformidad • Declaração de conformidade • Överensstämmelseförsäkran •
• Overensstemmelseserklæring • Konformitetserklæring • Selvitys vaatimustenmukaisuudesta •
Equipment Type • Uitrustingstype • Type d'équipement • Gerätetyp •
Tipo di apparecchiatura • Tipo de equipo • Tipo de equipamento • Meat Mincer
Enhetstyp • Udstyrstype • Type utstyr • Laitteen tyyppi:
Model • Modèle • Modell • Modello • Modelo: CD400
Serial Number • Serienummer • Numéro de série • Seriennummer •
Numero di serie • Número de serie • Número serial • Sarjanumero:
Year of Manufacture • Fabricagejaar • Date de fabrication • Herstellungsjahr •
Anno di produzione • Año de fabricación • Ano de fabricação • Tillverkningsår •
Produktionsår • Produksjonsår • Valmistusvuosi:
Application of Council Directives(s) • Toepassing van Europese Richtlijn(en) • EMC Directive 2004/108/EC
Application de la / des directive(s) du Conseil: • Anwendbare EU-Richtlinie(n) •
Applicazione delle Direttive: • Aplicación de la(s) directiva(s) del consejo •
LVD Directive 2006/95/EC
Aplicação de directiva(s) do Conselho • Tillämpning av rådets direktiv •
Gennemførelse af Rådets Direktiv(er) af • Applisering av kommuneforskrift(er) •
Neuvoston direktiivi(e)n soveltaminen:
Standards • Standaarden • Normes • Normen • Standard • Estándares •
Normas
• Normer • Standarder • Standardit
:
Producers Name
• Naam fabrikant • Nom du prodocteur • Name des Herstellers •
Nome del produttore • Nombre del fabricante • Nome do fabricante •
BUFFALO
Tillverkarens namn • Fabrikantens navn • Produsentens navn • Valmistajan nimi:
Producers Address • Adres fabrikant • Adresse du prodocteur •
Anschrift des Herstellers • Indirizzo del produttore • Dirección del fabricante •
Endereço do fabricante • Tillverkarens adress • Fabrikantens adresse •
Produsentens adresse • Valmistajan osoite:
I, the undersigned, hereby declare that the equipment specified above conforms to the above Directive(s) and Standard(s).
Ik, de ondergetekende, verklaar hierbij dat de hierboven gespecificeerde uitrusting goedgekeurd is volgens de bovenstaande Richtlijn(en) en
Standaard(en).
Je soussigné, confirme la conformité de l'équipement cité dans la présente à la / aux Directive(s) et Norme(s) ci-dessus
Ich, der/die Unterzeichnende, erkläre hiermit, dass das oben angegebene Gerät der/den oben angeführten Richtlinie(n) und Norm(en)
entspricht.
Il sottoscritto dichiara che l'apparecchiatura di sopra specificata è conforme alle Direttive e agli Standard sopra riportati.
El abajo firmante declara por la presente que el equipo arriba especificado está en conformidad con la(s) directiva(s) y estándar(es) arriba
mencionadas.
Eu, o abaixo-assinado, declaro que o equipamento anteriormente especificado está em conformidade com a(s) anterior(es) Directiva(s) e
Norma(s).
Jag, den undertecknande, betygar härmed att ovan specificerade enhet överrensstämmer med ovan direktiv och norm(er).
Jeg, undertegnede, erklærer hermed at udstyret, der er specificeret ovenfor opfylder de ovenstående direktive(r) og standard(er).
Jeg, undertegnede, erklærer herved at utstyret som er spesifisert ovenfor er i overensstemmelse med ovennevnte forskrift(er) og standard(er).
Minä allekirjoittanut vakuutan täten, että yllä mainittu laite noudattaa yllä olevaa(olevia) direktiiviä(direktiivejä) ja standardia(standardeja).
Date • Data • Date • Datum • Data • Fecha • Data • Dato • Päivämäärä: 02/06/2010
Signature • Handtekening • Signature • Unterschrift
•
Firma • Firma • Assinatura • Underskrift • Allekirjoitus:
Full Name • Volledige naam • Nom et prénom • Vollständiger Name •
Nome completo • Nombre completo • Nome por extenso • Richard Cromwell
Fullständigt namn • Fulde navn • Fullstendig navn • Täydellinen nimi:
Position • Functie • Fonction • Position • Qualifica • Posición • Função • Marketing Director
Befattning • Stilling • Asema:
Fourth Way
Avonmouth
Bristol
BS11 8TB
United Kingdom
EN 55014-1:2006,EN 61000-3-2:2006,
EN 61000-3-3: 1995+A1:2001+A2:2005, EN 550142:1997/A1:2001
EN 60335-1:2002+A11:2004+A1:2004+A12:2006
EN 60335-2-64:2000+A1:2002
Page 51

• Notes • Remarques • Notas • Opmerkingen • Anmerkungen • Notas •
•
Note • Noteringar • Merknader • Bemærkninger • Huomautukset •
Page 52

CD400_ML_A5_v1
 Loading...