

Page 1
Rice Cooker
Instruction manual
Rijstkoker
NL
Handleiding
Autocuiseur de riz
FR
Mode d'emploi
Reiskocher
DE
Bedienungsanleitung
Cuociriso elettrico
IT
Manuale di istruzioni
ES
Arrocera
Manual de instrucciones
Panela de arroz
PT
Manual de instruções
Riskokare
S
Bruksanvisning
Riskoger
DK
Instruktionsvejledning
Riskoker
N
Brukerhåndbok
Riisinkeitin
FIN
Ohjekirja
Model • Modèle • Modell • Modello • Modelo • Malli:
J193/J300/CB944
Page 2

UK
Table of Contents
Safety Tips . . . . . . . . . . . . . . . . . . . . . . . . . . . . . . . . . . . . . . . . . . . . . . . . . . . . . . . . . . . . . . . . . 1
Introduction . . . . . . . . . . . . . . . . . . . . . . . . . . . . . . . . . . . . . . . . . . . . . . . . . . . . . . . . . . . . . . . . 1
Pack Contents . . . . . . . . . . . . . . . . . . . . . . . . . . . . . . . . . . . . . . . . . . . . . . . . . . . . . . . . . . . . . . 1
Operation . . . . . . . . . . . . . . . . . . . . . . . . . . . . . . . . . . . . . . . . . . . . . . . . . . . . . . . . . . . . . . . . . 2
Cooking Tips . . . . . . . . . . . . . . . . . . . . . . . . . . . . . . . . . . . . . . . . . . . . . . . . . . . . . . . . . 2
Using the Rice Cooker . . . . . . . . . . . . . . . . . . . . . . . . . . . . . . . . . . . . . . . . . . . . . . . . . 2
Rice/Water Measurements . . . . . . . . . . . . . . . . . . . . . . . . . . . . . . . . . . . . . . . . . . . . . . . . . . . . 2
Cleaning, Care & Maintenance . . . . . . . . . . . . . . . . . . . . . . . . . . . . . . . . . . . . . . . . . . . . . . . . . 3
J300 Only . . . . . . . . . . . . . . . . . . . . . . . . . . . . . . . . . . . . . . . . . . . . . . . . . . . . . . . . . . . 3
Troubleshooting . . . . . . . . . . . . . . . . . . . . . . . . . . . . . . . . . . . . . . . . . . . . . . . . . . . . . . . . . . . . 3
Technical Specifications . . . . . . . . . . . . . . . . . . . . . . . . . . . . . . . . . . . . . . . . . . . . . . . . . . . . . . . 4
Electrical Wiring . . . . . . . . . . . . . . . . . . . . . . . . . . . . . . . . . . . . . . . . . . . . . . . . . . . . . . . . . . . . 4
Compliance . . . . . . . . . . . . . . . . . . . . . . . . . . . . . . . . . . . . . . . . . . . . . . . . . . . . . . . . . . . . . . . . 4
NL
Inhoudsopgave
Veiligheidstips . . . . . . . . . . . . . . . . . . . . . . . . . . . . . . . . . . . . . . . . . . . . . . . . . . . . . . . . . . . . . . 5
Inleiding . . . . . . . . . . . . . . . . . . . . . . . . . . . . . . . . . . . . . . . . . . . . . . . . . . . . . . . . . . . . . . . . . . . 5
Verpakkingsinhoud . . . . . . . . . . . . . . . . . . . . . . . . . . . . . . . . . . . . . . . . . . . . . . . . . . . . . . . . . . 5
Bediening . . . . . . . . . . . . . . . . . . . . . . . . . . . . . . . . . . . . . . . . . . . . . . . . . . . . . . . . . . . . . . . . . . 6
Kooktips . . . . . . . . . . . . . . . . . . . . . . . . . . . . . . . . . . . . . . . . . . . . . . . . . . . . . . . . . . . . 6
De rijstkoker gebruiken . . . . . . . . . . . . . . . . . . . . . . . . . . . . . . . . . . . . . . . . . . . . . . . . 6
Rijst/watermaten . . . . . . . . . . . . . . . . . . . . . . . . . . . . . . . . . . . . . . . . . . . . . . . . . . . . . . . . . . . . 7
Reiniging, zorg & onderhoud . . . . . . . . . . . . . . . . . . . . . . . . . . . . . . . . . . . . . . . . . . . . . . . . . . . 7
Uitsluitend voor J300 . . . . . . . . . . . . . . . . . . . . . . . . . . . . . . . . . . . . . . . . . . . . . . . . . . 7
Oplossen van problemen . . . . . . . . . . . . . . . . . . . . . . . . . . . . . . . . . . . . . . . . . . . . . . . . . . . . . 7
Technische specificaties . . . . . . . . . . . . . . . . . . . . . . . . . . . . . . . . . . . . . . . . . . . . . . . . . . . . . . . 8
Elektrische bedrading . . . . . . . . . . . . . . . . . . . . . . . . . . . . . . . . . . . . . . . . . . . . . . . . . . . . . . . . 8
Productconformiteit. . . . . . . . . . . . . . . . . . . . . . . . . . . . . . . . . . . . . . . . . . . . . . . . . . . . . . . . . . 8
FR
Sommaire
Conseils de sécurité . . . . . . . . . . . . . . . . . . . . . . . . . . . . . . . . . . . . . . . . . . . . . . . . . . . . . . . . . 9
Introduction . . . . . . . . . . . . . . . . . . . . . . . . . . . . . . . . . . . . . . . . . . . . . . . . . . . . . . . . . . . . . . . . 9
Contenu de l'emballage . . . . . . . . . . . . . . . . . . . . . . . . . . . . . . . . . . . . . . . . . . . . . . . . . . . . . . . 9
Fonctionnement . . . . . . . . . . . . . . . . . . . . . . . . . . . . . . . . . . . . . . . . . . . . . . . . . . . . . . . . . . . . . 10
Conseils de cuisson . . . . . . . . . . . . . . . . . . . . . . . . . . . . . . . . . . . . . . . . . . . . . . . . . . . 10
Pour utiliser l'autocuiseur de riz . . . . . . . . . . . . . . . . . . . . . . . . . . . . . . . . . . . . . . . . . 10
Dosage du riz / de l'eau . . . . . . . . . . . . . . . . . . . . . . . . . . . . . . . . . . . . . . . . . . . . . . . . . . . . . . . 11
Nettoyage, entretien et maintenance . . . . . . . . . . . . . . . . . . . . . . . . . . . . . . . . . . . . . . . . . . . . 11
J300 uniquemont . . . . . . . . . . . . . . . . . . . . . . . . . . . . . . . . . . . . . . . . . . . . . . . . . . . . . . 11
Dépannage . . . . . . . . . . . . . . . . . . . . . . . . . . . . . . . . . . . . . . . . . . . . . . . . . . . . . . . . . . . . . . . . . 11
Spécifications techniques . . . . . . . . . . . . . . . . . . . . . . . . . . . . . . . . . . . . . . . . . . . . . . . . . . . . . . 12
Raccordement électrique . . . . . . . . . . . . . . . . . . . . . . . . . . . . . . . . . . . . . . . . . . . . . . . . . . . . . 12
Conformité . . . . . . . . . . . . . . . . . . . . . . . . . . . . . . . . . . . . . . . . . . . . . . . . . . . . . . . . . . . . . . . . . 12
Page 3

DE
Inhalt
Sicherheitshinweise . . . . . . . . . . . . . . . . . . . . . . . . . . . . . . . . . . . . . . . . . . . . . . . . . . . . . . . . . . 13
Einführung . . . . . . . . . . . . . . . . . . . . . . . . . . . . . . . . . . . . . . . . . . . . . . . . . . . . . . . . . . . . . . . . . 13
Packungsinhalt . . . . . . . . . . . . . . . . . . . . . . . . . . . . . . . . . . . . . . . . . . . . . . . . . . . . . . . . . . . . . . 13
Betrieb . . . . . . . . . . . . . . . . . . . . . . . . . . . . . . . . . . . . . . . . . . . . . . . . . . . . . . . . . . . . . . . . . . . . 14
Zubereitungstipps . . . . . . . . . . . . . . . . . . . . . . . . . . . . . . . . . . . . . . . . . . . . . . . . . . . . . 14
Einsatz des Reiskochers . . . . . . . . . . . . . . . . . . . . . . . . . . . . . . . . . . . . . . . . . . . . . . . . 14
Reis-/Wassermengen . . . . . . . . . . . . . . . . . . . . . . . . . . . . . . . . . . . . . . . . . . . . . . . . . . . . . . . . . 15
Reinigung, Pflege und Wartung . . . . . . . . . . . . . . . . . . . . . . . . . . . . . . . . . . . . . . . . . . . . . . . . . 15
Nur J300 . . . . . . . . . . . . . . . . . . . . . . . . . . . . . . . . . . . . . . . . . . . . . . . . . . . . . . . . . . . . 15
Fehlersuche . . . . . . . . . . . . . . . . . . . . . . . . . . . . . . . . . . . . . . . . . . . . . . . . . . . . . . . . . . . . . . . . 15
Technische Spezifikationen . . . . . . . . . . . . . . . . . . . . . . . . . . . . . . . . . . . . . . . . . . . . . . . . . . . . 16
Elektroanschlüsse . . . . . . . . . . . . . . . . . . . . . . . . . . . . . . . . . . . . . . . . . . . . . . . . . . . . . . . . . . . 16
Konformität . . . . . . . . . . . . . . . . . . . . . . . . . . . . . . . . . . . . . . . . . . . . . . . . . . . . . . . . . . . . . . . . 16
IT
Indice
Suggerimenti per la sicurezza . . . . . . . . . . . . . . . . . . . . . . . . . . . . . . . . . . . . . . . . . . . . . . . . . . 17
Introduzione . . . . . . . . . . . . . . . . . . . . . . . . . . . . . . . . . . . . . . . . . . . . . . . . . . . . . . . . . . . . . . . 17
Contenuto della confezione . . . . . . . . . . . . . . . . . . . . . . . . . . . . . . . . . . . . . . . . . . . . . . . . . . . 17
Funzionamento . . . . . . . . . . . . . . . . . . . . . . . . . . . . . . . . . . . . . . . . . . . . . . . . . . . . . . . . . . . . . 18
Suggerimenti per la cottura . . . . . . . . . . . . . . . . . . . . . . . . . . . . . . . . . . . . . . . . . . . . . 18
Utilizzo del cuociriso elettrico . . . . . . . . . . . . . . . . . . . . . . . . . . . . . . . . . . . . . . . . . . . 18
Dosi di riso/acqua . . . . . . . . . . . . . . . . . . . . . . . . . . . . . . . . . . . . . . . . . . . . . . . . . . . . . . . . . . . 19
Pulizia e manutenzione . . . . . . . . . . . . . . . . . . . . . . . . . . . . . . . . . . . . . . . . . . . . . . . . . . . . . . . 19
Solo J300 . . . . . . . . . . . . . . . . . . . . . . . . . . . . . . . . . . . . . . . . . . . . . . . . . . . . . . . . . . . . 19
Risoluzione dei problemi . . . . . . . . . . . . . . . . . . . . . . . . . . . . . . . . . . . . . . . . . . . . . . . . . . . . . . 19
Specifiche tecniche . . . . . . . . . . . . . . . . . . . . . . . . . . . . . . . . . . . . . . . . . . . . . . . . . . . . . . . . . . 20
Cablaggi elettrici . . . . . . . . . . . . . . . . . . . . . . . . . . . . . . . . . . . . . . . . . . . . . . . . . . . . . . . . . . . . 20
Conformità . . . . . . . . . . . . . . . . . . . . . . . . . . . . . . . . . . . . . . . . . . . . . . . . . . . . . . . . . . . . . . . . . 20
ES
Índice
Consejos de Seguridad . . . . . . . . . . . . . . . . . . . . . . . . . . . . . . . . . . . . . . . . . . . . . . . . . . . . . . . 21
Introducción . . . . . . . . . . . . . . . . . . . . . . . . . . . . . . . . . . . . . . . . . . . . . . . . . . . . . . . . . . . . . . . 21
Contenido del Conjunto . . . . . . . . . . . . . . . . . . . . . . . . . . . . . . . . . . . . . . . . . . . . . . . . . . . . . . 21
Funcionamiento . . . . . . . . . . . . . . . . . . . . . . . . . . . . . . . . . . . . . . . . . . . . . . . . . . . . . . . . . . . . . 22
Consejos de cocción . . . . . . . . . . . . . . . . . . . . . . . . . . . . . . . . . . . . . . . . . . . . . . . . . . 22
Utilización de la arrocera . . . . . . . . . . . . . . . . . . . . . . . . . . . . . . . . . . . . . . . . . . . . . . . 22
Cantidades de arroz / agua . . . . . . . . . . . . . . . . . . . . . . . . . . . . . . . . . . . . . . . . . . . . . . . . . . . . 23
Limpieza, Cuidado y Mantenimiento . . . . . . . . . . . . . . . . . . . . . . . . . . . . . . . . . . . . . . . . . . . . . 23
Sólo en el modelo J300 . . . . . . . . . . . . . . . . . . . . . . . . . . . . . . . . . . . . . . . . . . . . . . . . . 23
Resolución de problemas . . . . . . . . . . . . . . . . . . . . . . . . . . . . . . . . . . . . . . . . . . . . . . . . . . . . . 23
Especificaciones Técnicas . . . . . . . . . . . . . . . . . . . . . . . . . . . . . . . . . . . . . . . . . . . . . . . . . . . . . 24
Cableado Eléctrico . . . . . . . . . . . . . . . . . . . . . . . . . . . . . . . . . . . . . . . . . . . . . . . . . . . . . . . . . . 24
Cumplimiento . . . . . . . . . . . . . . . . . . . . . . . . . . . . . . . . . . . . . . . . . . . . . . . . . . . . . . . . . . . . . . 24
Page 4

PT
Índice
Conselhos de segurança . . . . . . . . . . . . . . . . . . . . . . . . . . . . . . . . . . . . . . . . . . . . . . . . . . . . . . 25
Introdução . . . . . . . . . . . . . . . . . . . . . . . . . . . . . . . . . . . . . . . . . . . . . . . . . . . . . . . . . . . . . . . . . 25
Conteúdo da embalagem . . . . . . . . . . . . . . . . . . . . . . . . . . . . . . . . . . . . . . . . . . . . . . . . . . . . . . 25
Funcionamento . . . . . . . . . . . . . . . . . . . . . . . . . . . . . . . . . . . . . . . . . . . . . . . . . . . . . . . . . . . . . 26
Conselhos . . . . . . . . . . . . . . . . . . . . . . . . . . . . . . . . . . . . . . . . . . . . . . . . . . . . . . . . . . . 26
Utilizar a panela de arroz . . . . . . . . . . . . . . . . . . . . . . . . . . . . . . . . . . . . . . . . . . . . . . . 26
Medidas de arroz/água . . . . . . . . . . . . . . . . . . . . . . . . . . . . . . . . . . . . . . . . . . . . . . . . . . . . . . . . 27
Limpeza, cuidados & manutenção . . . . . . . . . . . . . . . . . . . . . . . . . . . . . . . . . . . . . . . . . . . . . . . 27
Apenas para J300 . . . . . . . . . . . . . . . . . . . . . . . . . . . . . . . . . . . . . . . . . . . . . . . . . . . . . 27
Resolução de problemas . . . . . . . . . . . . . . . . . . . . . . . . . . . . . . . . . . . . . . . . . . . . . . . . . . . . . . 27
Especificações técnicas . . . . . . . . . . . . . . . . . . . . . . . . . . . . . . . . . . . . . . . . . . . . . . . . . . . . . . . 28
Cablagem eléctrica . . . . . . . . . . . . . . . . . . . . . . . . . . . . . . . . . . . . . . . . . . . . . . . . . . . . . . . . . . 28
Conformidade. . . . . . . . . . . . . . . . . . . . . . . . . . . . . . . . . . . . . . . . . . . . . . . . . . . . . . . . . . . . . . . 28
S
Innehållsförteckning
Säkerhetsråd . . . . . . . . . . . . . . . . . . . . . . . . . . . . . . . . . . . . . . . . . . . . . . . . . . . . . . . . . . . . . . . 29
Inledning . . . . . . . . . . . . . . . . . . . . . . . . . . . . . . . . . . . . . . . . . . . . . . . . . . . . . . . . . . . . . . . . . . . 29
Förpackningsinnehåll . . . . . . . . . . . . . . . . . . . . . . . . . . . . . . . . . . . . . . . . . . . . . . . . . . . . . . . . . 29
Operation . . . . . . . . . . . . . . . . . . . . . . . . . . . . . . . . . . . . . . . . . . . . . . . . . . . . . . . . . . . . . . . . . 30
Koktips . . . . . . . . . . . . . . . . . . . . . . . . . . . . . . . . . . . . . . . . . . . . . . . . . . . . . . . . . . . . . 30
Använda riskokaren . . . . . . . . . . . . . . . . . . . . . . . . . . . . . . . . . . . . . . . . . . . . . . . . . . . 30
Ris/vattenmått . . . . . . . . . . . . . . . . . . . . . . . . . . . . . . . . . . . . . . . . . . . . . . . . . . . . . . . . . . . . . . 30
Rengöring, omvårdnad och underhåll . . . . . . . . . . . . . . . . . . . . . . . . . . . . . . . . . . . . . . . . . . . . 31
Endast J300 . . . . . . . . . . . . . . . . . . . . . . . . . . . . . . . . . . . . . . . . . . . . . . . . . . . . . . . . . . 31
Felsökning . . . . . . . . . . . . . . . . . . . . . . . . . . . . . . . . . . . . . . . . . . . . . . . . . . . . . . . . . . . . . . . . . 31
Tekniska specifikationer . . . . . . . . . . . . . . . . . . . . . . . . . . . . . . . . . . . . . . . . . . . . . . . . . . . . . . 32
Elektriska kablar . . . . . . . . . . . . . . . . . . . . . . . . . . . . . . . . . . . . . . . . . . . . . . . . . . . . . . . . . . . . 32
Tillmötesgående . . . . . . . . . . . . . . . . . . . . . . . . . . . . . . . . . . . . . . . . . . . . . . . . . . . . . . . . . . . . . 32
DK
Indholdsfortegnelse
Sikkerhedstips . . . . . . . . . . . . . . . . . . . . . . . . . . . . . . . . . . . . . . . . . . . . . . . . . . . . . . . . . . . . . . 33
Indledning . . . . . . . . . . . . . . . . . . . . . . . . . . . . . . . . . . . . . . . . . . . . . . . . . . . . . . . . . . . . . . . . . . 33
Pakkens indhold . . . . . . . . . . . . . . . . . . . . . . . . . . . . . . . . . . . . . . . . . . . . . . . . . . . . . . . . . . . . . 33
Brug . . . . . . . . . . . . . . . . . . . . . . . . . . . . . . . . . . . . . . . . . . . . . . . . . . . . . . . . . . . . . . . . . . . . . . 34
Tilberedningstips . . . . . . . . . . . . . . . . . . . . . . . . . . . . . . . . . . . . . . . . . . . . . . . . . . . . . . 34
Sådan anvendes riskogeren . . . . . . . . . . . . . . . . . . . . . . . . . . . . . . . . . . . . . . . . . . . . . . 34
Måling af ris/vand . . . . . . . . . . . . . . . . . . . . . . . . . . . . . . . . . . . . . . . . . . . . . . . . . . . . . . . . . . . . 35
Rengøring, pleje og vedligeholdelse . . . . . . . . . . . . . . . . . . . . . . . . . . . . . . . . . . . . . . . . . . . . . 35
Kun J300 . . . . . . . . . . . . . . . . . . . . . . . . . . . . . . . . . . . . . . . . . . . . . . . . . . . . . . . . . . . . 35
Fejlfinding . . . . . . . . . . . . . . . . . . . . . . . . . . . . . . . . . . . . . . . . . . . . . . . . . . . . . . . . . . . . . . . . . . 35
Tekniske specifikationer . . . . . . . . . . . . . . . . . . . . . . . . . . . . . . . . . . . . . . . . . . . . . . . . . . . . . . 36
El-kabler . . . . . . . . . . . . . . . . . . . . . . . . . . . . . . . . . . . . . . . . . . . . . . . . . . . . . . . . . . . . . . . . . . . 36
Overensstemmelseserklæring . . . . . . . . . . . . . . . . . . . . . . . . . . . . . . . . . . . . . . . . . . . . . . . . . . 36
Page 5

N
Innhold
Sikkerhetstips . . . . . . . . . . . . . . . . . . . . . . . . . . . . . . . . . . . . . . . . . . . . . . . . . . . . . . . . . . . . . . . 37
Innledning . . . . . . . . . . . . . . . . . . . . . . . . . . . . . . . . . . . . . . . . . . . . . . . . . . . . . . . . . . . . . . . . . . 37
Pakkeinnhold . . . . . . . . . . . . . . . . . . . . . . . . . . . . . . . . . . . . . . . . . . . . . . . . . . . . . . . . . . . . . . . 37
Bruk . . . . . . . . . . . . . . . . . . . . . . . . . . . . . . . . . . . . . . . . . . . . . . . . . . . . . . . . . . . . . . . . . . . . . . 38
Koketips . . . . . . . . . . . . . . . . . . . . . . . . . . . . . . . . . . . . . . . . . . . . . . . . . . . . . . . . . . . . 38
Bruke riskokeren . . . . . . . . . . . . . . . . . . . . . . . . . . . . . . . . . . . . . . . . . . . . . . . . . . . . . 38
Mål for ris/vann . . . . . . . . . . . . . . . . . . . . . . . . . . . . . . . . . . . . . . . . . . . . . . . . . . . . . . . . . . . . . 39
Rengjøring, stell og vedlikehold . . . . . . . . . . . . . . . . . . . . . . . . . . . . . . . . . . . . . . . . . . . . . . . . . 39
Kun for J300 . . . . . . . . . . . . . . . . . . . . . . . . . . . . . . . . . . . . . . . . . . . . . . . . . . . . . . . . . 39
Feilsøking . . . . . . . . . . . . . . . . . . . . . . . . . . . . . . . . . . . . . . . . . . . . . . . . . . . . . . . . . . . . . . . . . . 39
Tekniske spesifikasjoner . . . . . . . . . . . . . . . . . . . . . . . . . . . . . . . . . . . . . . . . . . . . . . . . . . . . . . 40
Elektrisk tilkopling . . . . . . . . . . . . . . . . . . . . . . . . . . . . . . . . . . . . . . . . . . . . . . . . . . . . . . . . . . . 40
Samsvar . . . . . . . . . . . . . . . . . . . . . . . . . . . . . . . . . . . . . . . . . . . . . . . . . . . . . . . . . . . . . . . . . . . 40
FIN
Sisällysluettelo
Turvallisuusvihjeitä . . . . . . . . . . . . . . . . . . . . . . . . . . . . . . . . . . . . . . . . . . . . . . . . . . . . . . . . . . . 41
Johdanto . . . . . . . . . . . . . . . . . . . . . . . . . . . . . . . . . . . . . . . . . . . . . . . . . . . . . . . . . . . . . . . . . . . 41
Pakkauksen sisältö . . . . . . . . . . . . . . . . . . . . . . . . . . . . . . . . . . . . . . . . . . . . . . . . . . . . . . . . . . . 41
Käyttö . . . . . . . . . . . . . . . . . . . . . . . . . . . . . . . . . . . . . . . . . . . . . . . . . . . . . . . . . . . . . . . . . . . . 42
Keittovihjeitä . . . . . . . . . . . . . . . . . . . . . . . . . . . . . . . . . . . . . . . . . . . . . . . . . . . . . . . . . 42
Riisinkeittimen käyttö . . . . . . . . . . . . . . . . . . . . . . . . . . . . . . . . . . . . . . . . . . . . . . . . . . 42
Riisin/veden mittaaminen . . . . . . . . . . . . . . . . . . . . . . . . . . . . . . . . . . . . . . . . . . . . . . . . . . . . . . 43
Puhdistus, hoito & huolto . . . . . . . . . . . . . . . . . . . . . . . . . . . . . . . . . . . . . . . . . . . . . . . . . . . . . 43
Ainoastaan J300 . . . . . . . . . . . . . . . . . . . . . . . . . . . . . . . . . . . . . . . . . . . . . . . . . . . . . . . 43
Vianetsintä . . . . . . . . . . . . . . . . . . . . . . . . . . . . . . . . . . . . . . . . . . . . . . . . . . . . . . . . . . . . . . . . . 43
Tekniset tiedot . . . . . . . . . . . . . . . . . . . . . . . . . . . . . . . . . . . . . . . . . . . . . . . . . . . . . . . . . . . . . 44
Sähköjohdot . . . . . . . . . . . . . . . . . . . . . . . . . . . . . . . . . . . . . . . . . . . . . . . . . . . . . . . . . . . . . . . . 44
Vaatimustenmukaisuus . . . . . . . . . . . . . . . . . . . . . . . . . . . . . . . . . . . . . . . . . . . . . . . . . . . . . . . 44
Page 6

UK
Safety Tips
• Position on a flat, stable surface.
• A service agent/qualified technician should carry out installation and any repairs if required. Do not
remove any components on this product.
• Consult Local and National Standards to comply with the following:
• Health and Safety at Work Legislation
• BS EN Codes of Practice
• Fire Precautions
• IEE Wiring Regulations
• Building Regulations
• DO NOT immerse the appliance in water.
• Do not touch hot surfaces with bare hands. Always use protective gloves.
• Use extreme caution when moving or handling appliances containing hot oil or any other hot liquid.
• Never fill the inner bowl above the top water line.
• Never allow water or any liquid into the outer pot.
• Only use utensils provided with this appliance when using the rice cooker. Sharp objects may damage
the non-stick coating of the inner bowl.
• Do not use the appliance for anything other than its intended use.
• Do not plug in the cable until ready to cook. The rice cooker's power will remain ON unless unplugged.
• Always switch off and disconnect the power supply to the appliance when not in use.
• Not suitable for outdoor use.
• Keep all packaging away from children. Dispose of the packaging in accordance to the regulations of
local authorities.
• If the power cord is damaged, it must be replaced by an BUFFALO agent or a recommended qualified
technician in order to avoid a hazard.
Introduction
Please take a few moments to carefully read through this manual. Correct maintenance and operation of
this machine will provide the best possible performance from your BUFFALO product.
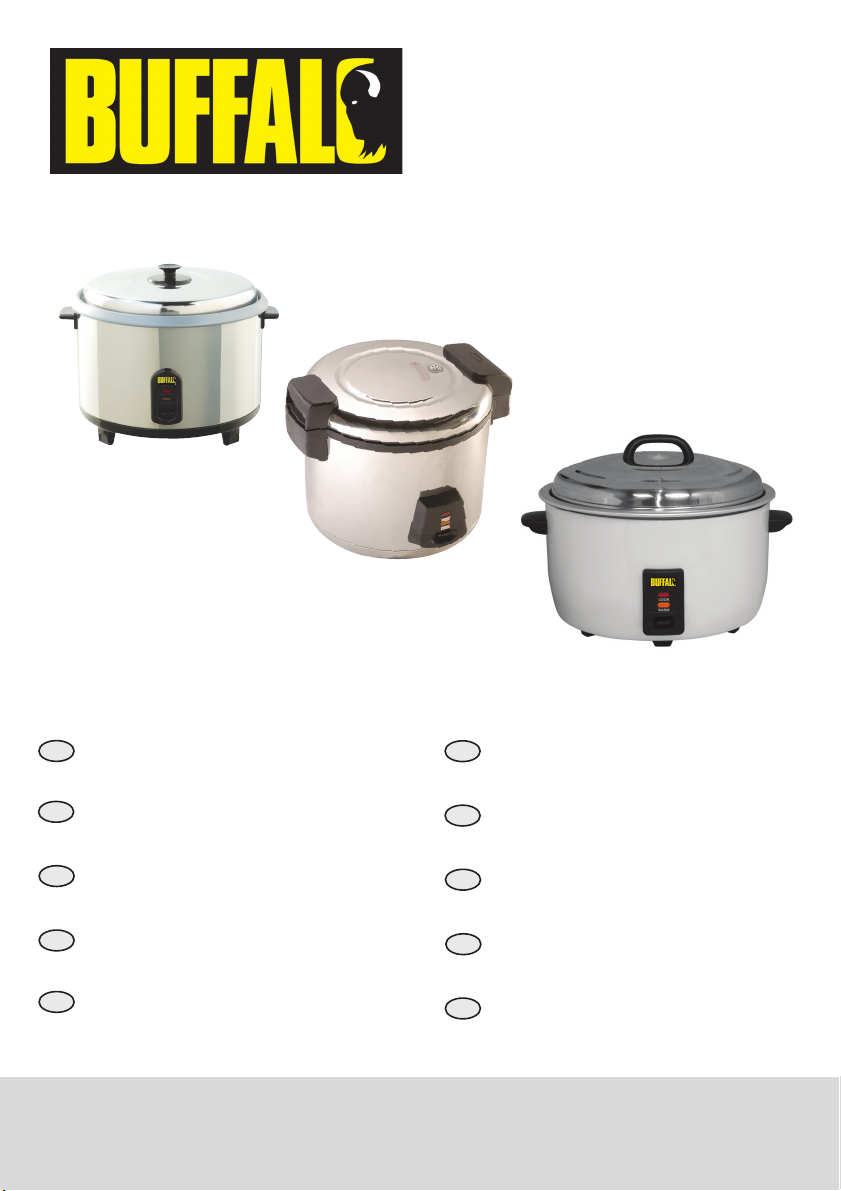
Pack Contents
The following is included:
• BUFFALO Rice cooker
•Measuring cup
J193/CB944 x 1
J300 x 2
BUFFALO prides itself on quality and service, ensuring that at the time of packaging the contents are
supplied fully functional and free of damage.
Should you find any damage as a result of transit, please contact your BUFFALO dealer immediately.
1
•Spoon
• Fork (J300 only)
• Instruction manual
Page 7
Telephone Helpline: 0845 146 2887 (United Kingdom)
Operation
Cooking Tips
Wash the rice thoroughly before cooking. This helps to stop rice grains sticking together.
• A small amount of vegetable oil in the rice can help separate grains.
• Brown or wild rice may require additional water.
UK
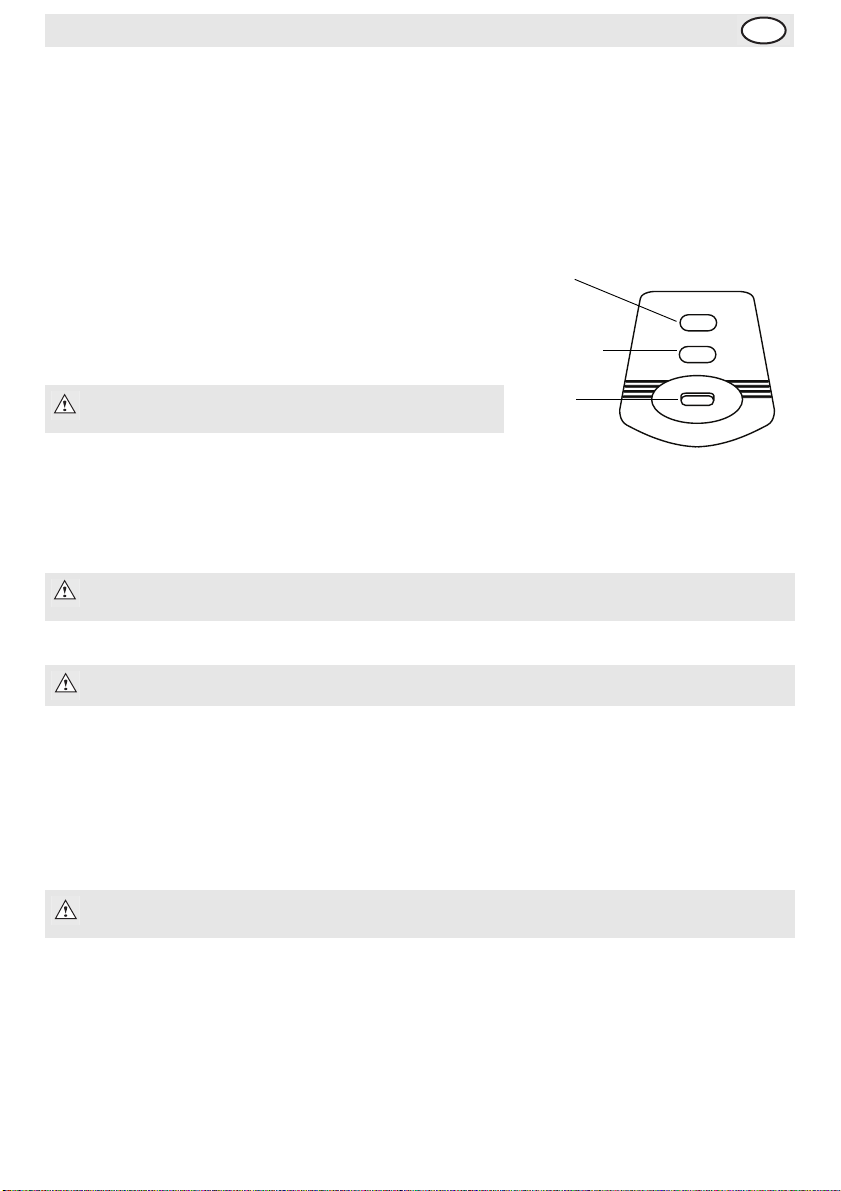
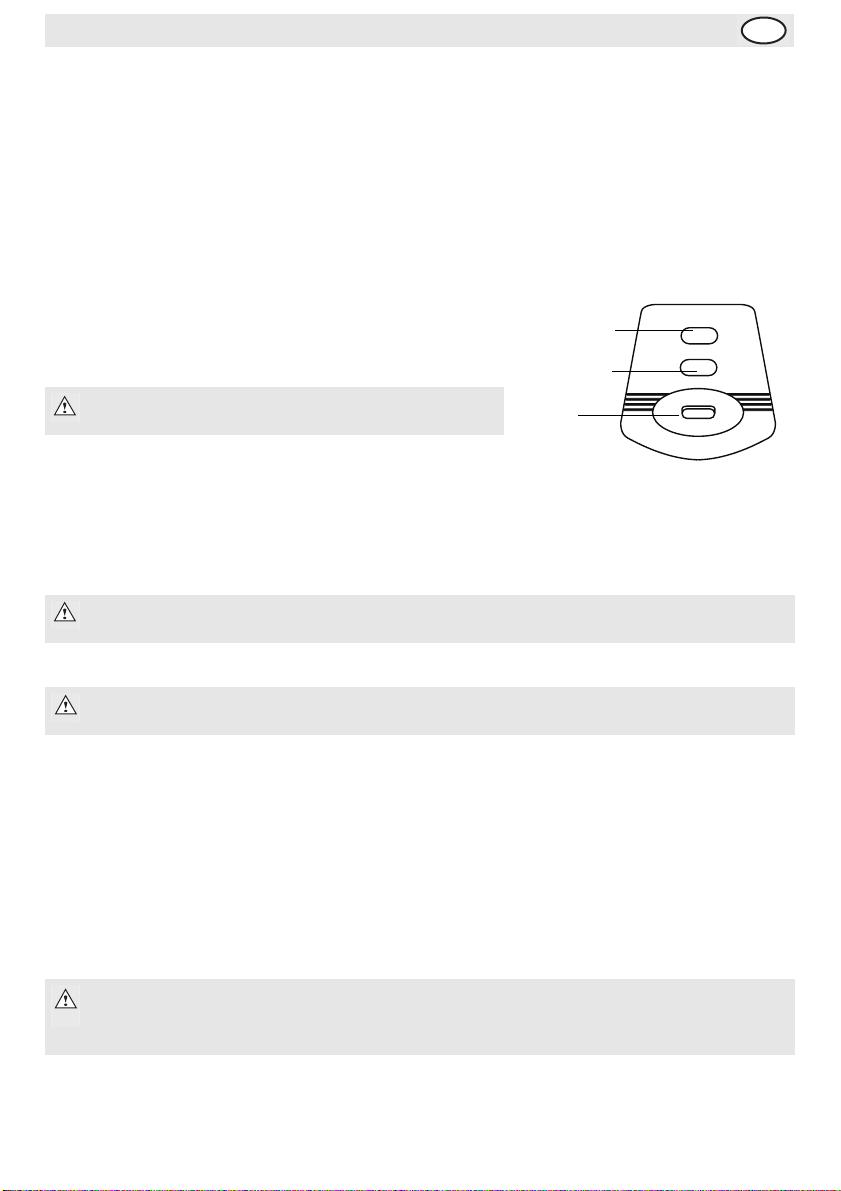
Using the Rice Cooker
Cook light
The inner bowl features measurement lines inside as a guide. The
cup provided is designed to measure the rice and water.
1. Measure the desired amount of rice using the measuring cup
supplied.
Note: One cup of rice will produce
Keep Warm
light
Lever
HEAT
WARM
approximately two cups of cooked rice.
2. Rinse the rice in a sieve under running water to remove
excess bran and starch.
3. Pour the rice into the inner bowl. To achieve evenly cooked rice, spread evenly around the bowl.
4. Add the correct amount of water by using the measuring cup, or by filling the inner bowl to the
Model shown: J300
appropriate level.
Note: Slightly reduce the amount of water for firmer rice, and increase the amount for
softer rice.
5. Place the inner bowl into the rice cooker.
Note: Ensure there is no rice or moisture on the outside of the inner bowl.
6. Replace the lid (J193/CB944) or close the lid and press down until the latch snaps shut (J300).
7. Connect the rice cooker to the power.
8. Depress the lever to the COOK position. The Cook light turns on.
9.
Once cooking is finished the switch automatically moves to the WARM position. The Warm light turns on.
10. Keep the lid closed for 10 - 15 minutes for best results.
11. Carefully open the lid, allowing any steam and condensation to run back into the rice cooker.
WARNING: Always take care to avoid the expulsion of steam when removing the lid.
Always use heat proof gloves when removing the inner bowl after cooking.
12. Stir the rice and serve as quickly as possible.
13. Disconnect the appliance from the power supply.
Rice/Water Measurements
As a general guide, use one full cup of water to each full cup of rice.
Add slightly more water for softer rice, or slightly less water for firmer rice.
2
Page 8

UK
Cleaning, Care & Maintenance
Note: Always switch off and disconnect the appliance from the power supply before
cleaning.
Always allow the appliance to cool before cleaning.
1. Remove the inner bowl and wash in warm, soapy water. Do not use harsh abrasive cleaners or
products that are not recommended for use on non-stick coatings.
2. Rinse and dry thoroughly.
3. Clean the exterior of the rice cooker with a damp cloth.
4. Ensure the heating plate is clean and free of food or other debris that could interfere with the cooking
process.
5. Dry the heating plate thoroughly before use.
J300 Only
1. Remove the water collector from below the lid hinge by pulling
outwards [Fig. 1]. Discard the water collected after each use.
2. Clean and replace the water collector.
Tr ou bl es h oo ti n g
Fig. 1
Fault Probable Cause Action
The unit is not
working
Rice is not thoroughly
cooked
Rice is overcooked Too much water Decrease the amount of water used
3
The unit is not switched on Check the unit is plugged in correctly and
Plug and lead are damaged Call BUFFALO agent or qualified technician
Fuse in the plug has blown Replace the plug fuse
Power supply Check power supply
Internal wiring fault Call BUFFALO agent or qualified technician
The bowl is not in contact with the
heating plate
The bowl is not in contact with the
heating plate
The bowl has become deformed Replace bowl
Not enough water Increase the amount of water used
switched on
Realign bowl
Reposition bowl
Page 9
Telephone Helpline: 0845 146 2887 (United Kingdom)
Technical Specifications
UK
Model Voltage Power Current
J193 230V 50Hz 1600W 7A 4.2 litres 5.1kg 360 x 410 x 260
J300 230V 50Hz 1950W 8.5A 6 litres 10.2kg 335 x 420 x 420
CB944 230V 50Hz 2950W 12.8A 23 litres 11.8kg 555 x 485 x 395
Capacity
Weight
Dimensions
h x w x d mm
Electrical Wiring
This appliance is supplied with a 3 pin, moulded, BS1363 plug and lead, with a 13 amp fuse as standard.
The plug is to be connected to a suitable mains socket.
This appliance is wired as follows:
• Live wire (coloured brown) to terminal marked L
• Neutral wire (coloured blue) to terminal marked N
• Earth wire (coloured green/yellow) to terminal marked E
This appliance must be earthed, using a dedicated earthing circuit.
If in doubt consult a qualified electrician.
Electrical isolation points must be kept clear of any obstructions. In the event of any emergency
disconnection being required they must be readily accessible.
Compliance
The WEEE logo on this product or its documentation indicates that the product must
not be disposed of as household waste. To help prevent possible harm to human
health and/or the environment, the product must be disposed of in an approved and
environmentally safe recycling process. For further information on how to dispose of
this product correctly, contact the product supplier, or the local authority responsible
for waste disposal in your area.
BUFFALO parts have undergone strict product testing in order to comply with
regulatory standards and specifications set by international, independent, and federal
authorities.
BUFFALO products have been approved to carry the following symbol:
All rights reserved. No part of these instructions may be produced or transmitted in any form or by any means,
electronic, mechanical, photocopying, recording or otherwise, without the prior written permission of BUFFALO.
Every effort is made to ensure all details are correct at the time of going to press, however, BUFFALO reserve the
right to change specifications without notice.
4
Page 10

NL
Klantenondersteuning: 050 – 609999 (België)
Veiligheidstips
• Plaatsen op een vlakke en stabiele ondergrond.
• De installatie en eventuele reparaties zijn door een servicetechnicus/vaktechnicus uit te voeren.
Verwijder geen componenten of servicepanelen van dit product.
• Raadpleeg en volg de plaatselijke en nationale regelgeving op m.b.t. tot het volgende:
• Wetgeving van gezondheid en veiligheid op de werkplaats
• Werkregels
• Brandpreventie
• IEE bekabelingsnormen
• Bouwverordeningen
• Dit apparaat NIET in water dompelen.
• Hete oppervlakken NIET met blote handen aanraken. Altijd beschermende kookwanten gebruiken.
• Wees uiterst voorzichtig bij het verplaatsen of omgaan met apparaten die hete olie of andere hete
vloeistoffen bevatten.
• Nooit de binnenpan boven de bovenste waterlijn vullen.
• Nooit water of andere vloeistoffen in de buitenpan laten komen.
• Gebruik tijdens het gebruik van de rijstkoker uitsluitend de meegeleverde accessoires. Scherpe
voorwerpen kunnen de antiaanbaklaag van de binnenpan beschadigen.
• Gebruik dit apparaat uitsluitend voor het bestemde gebruik.
• Steek de kabel alleen in het stopcontact wanneer u klaar bent om te gaan koken. De
stroomvoorziening van de rijstkoker blijft ON (aan) zolang de steker in het stopcontact zit.
• Schakel het apparaat altijd uit en haal de steker uit het stopcontact wanneer u het apparaat niet
gebruikt.
• Niet geschikt voor gebruik buitenshuis.
• Laat verpakkingsmateriaal niet binnen handbereik van kinderen. Verpakkingsmateriaal in
overeenstemming met de regelgeving van de plaatselijke overheden als afval laten verwerken.
• Indien de stroomkabel beschadigd raakt, dient men deze door een BUFFALO technicus of aanbevolen
vaktechnicus te laten vervangen om gevaarlijke situaties te verhinderen.
Inleiding
Neem de tijd en lees deze handleiding aandachtig door. Een correct gebruik en onderhoud van deze
machine waarborgt de beste prestatie van uw BUFFALO product.
Verpakkingsinhoud
De verpakking bevat het volgende:
•BUFFALO Rijstkoker
• Maatbeker
J193/CB944 x 1
J300 x 2
BUFFALO is trots op de haar productkwaliteit en dienstverlening en controleer de inhoud van de
verpakkingen, tijdens de verpakkingsfase, op functionaliteit en schade.
Mocht u product door transport zijn beschadigd, neem dan onmiddellijk contact op met uw BUFFALO dealer.
5
• Lepel
• Vork (Uitsluitend voor J300)
• Handleiding
Page 11

Klantenondersteuning: 040 – 2628080 (Nederland)
Bediening
Kooktips
Rijst goed wassen alvorens te koken. Hierdoor gaan de rijstkorrels minder plakken.
• Een kleine hoeveelheid plantaardige olie in rijst houdt de rijst los.
• Bruine of zilvervliesrijst kan extra water nodig hebben.
NL
De rijstkoker gebruiken
Kooklampje
De binnenpan is voorzien van maatstrepen die u als richtlijn kunt
gebruiken. De meegeleverde maatbeker is bedoeld voor het meten
van rijst en water.
1. Meet de gewenste hoeveelheid rijst af met de meegeleverde
maatbeker.
Warmhoudlampje
Hendel
HEAT
WARM
Opmerking: één beker rijst is gelijk aan twee
bekers gekookte rijst.
2. Was de rijst in een zeef onder stromende water om zemelen
Afgebeeld model: J300
en zetmeel te verwijderen.
3. Schenk de rijst in de binnenpan. Verdeel de rijst gelijkmatig over de pan zodat alle rijst goed word
gekookt.
4. Voeg de correcte waterhoeveelheid toe met de maatbeker of door de binnenpan tot aan de geschikte
maatstreep te vullen.
Opmerking: voor stevigere rijst schenkt u iets minder dan de bestemde
waterhoeveelheid in de binnenpan, voor zachte rijst iets meer.
5. Plaats de binnenpan in de rijstkoker.
Opmerking: controleer of de buitenkant van de binnenpan niet nat is en dat er géén rijst
aan de buitenkant zit.
6. Plaats de deksel (J193/CB944) of sluit de deksel en houd deze onderdruk totdat de vergrendelingen
(J300) vastklikken.
7. Steek de steker van de rijstkoker in het stopcontact.
8. Druk de hendel naar de COOK stand. Het kooklampje licht op.
9. Is de rijst eenmaal gekookt dan gaat de schakelaar automatisch naar de WARM stand. Het
warmlampje licht op.
10. Voor de beste resultaten houdt u de deksel gedurende 10 - 15 minuten gesloten.
11. Maak de deksel voorzichtig open, waardoor stoom en condenswater terug kan stromen in de rijstkoker.
WAARSCHUWING: zorg tijdens het verwijderen van de deksel dat er geen enorme
stoomwolk vrijkomt.
Gebruik altijd hittebestendige handschoenen bij het verwijderen van de binnenpan na
het koken.
12. Roer de rijst en dien deze zo snel mogelijk op.
13. Haal de steker van het apparaat uit het stopcontact.
6
Page 12

NL
Klantenondersteuning: 050 – 609999 (België)
Rijst/watermaten
De algemene regel is, één volle kop water voor elke volle kop rijst.
Voor een zachte rijst voegt u iets meer water toe en voor een stevigere rijst schenkt u iets minder water
dan de normale hoeveelheid.
Reiniging, zorg & onderhoud
Opmerking: alvorens het apparaat te reinigen dient men altijd de stroomvoorziening uit
te schakelen.
Laat altijd het apparaat afkoelen voordat u met het schoonmaken begint.
14. Haal de binnenpan uit de rijstkoker en was deze met warm zeepwater. Gebruik géén bijtende
reinigingsmiddelen of producten die niet voor reiniging van antiaanbaklagen worden aanbevolen.
15. Spoelen en goed droog maken.
16. Reinig de buitenkant van de rijstkoker met een vochtige doek.
17. Controleer of de verwarmingsplaat schoon en vrij van etensresten of vuil is zodat dit niet van invloed
kan zijn op het kookproces.
18. Verwarmingsplaat voor gebruik goed droogmaken.
Uitsluitend voor J300
1. Haal de wateropvangbak, onder het dekselscharnier, in een
uitwaartse beweging [afb. 1] uit de rijstkoker. Gooi het opgevangen
water na gebruik weg.
2. Reinig de plaats de wateropvangbak opnieuw.
Oplossen van problemen
Probleem Mogelijke oorzaak Handeling
Het apparaat werkt
niet
De rijst is niet goed
doorgekookt
De rijst is overgaar Teveel water Gebruik minder water
7
Het apparaat staat uit Controleer of de stroomkabel van het apparaat is
Steker en kabel zijn
beschadigd
De zekering in de steker is
gesprongen
Stroomvoorziening Controleer de stroomvoorziening
Storing interne bedrading Laat een BUFFALO technicus of een vaktechnicus
De binnenpan is niet in
aanraking met de
verwarmingsplaat
De binnenpan is vervormd Vervang de binnenpan
Niet voldoende wate Gebruik meer water
aangesloten en of het apparaat is ingeschakeld
Laat een BUFFALO technicus of een vaktechnicus
komen
Vervang de zekering in de steker
komen
Plaats de binnenpan op correcte wijze
Fig. 1
Page 13
Klantenondersteuning: 040 – 2628080 (Nederland)
Technische specificaties
NL
Model Voltage Vermogen Stroom Inhoud Gewicht
J193 230V 50Hz 1600W 7A 4,2 liters 5,1kg 360 x 410 x 260
J300 230V 50Hz 1950W 8,5A 6 liters 10,2kg 335 x 470 x 470
CB944 230V 50Hz 2950W 12,8A 23 liters 11,8kg 555 x 485 x 395
Afmetingen
h x b x d mm
Elektrische bedrading
Men dient de steker op een geschikt stopcontact aan te sluiten.
De bedrading van dit apparaat is als volgt:
• Stroomkabel (bruin) naar de aansluitklem gemarkeerd met L
• Neutraalkabel (blauw) naar de aansluitklem gemarkeerd met N
• Aardekabel (groen/geel) naar de aansluitklem gemarkeerd met E
Dit apparaat moet worden geaard met behulp van een adequaat aardingscircuit.
Bij twijfels raadpleeg een vakkundige elektricien.
De elektrische isolatiepunten mogen niet worden geblokkeerd. In geval van een nooduitschakeling moeten de isolatiepunten direct toegankelijk zijn.
Productconformiteit
Het WEEE-logo op dit product of bijbehorende documentatie geeft aan dat het product
niet onder huisvuil valt en als zodanig ook niet mag worden verwerkt. Ter preventie
van mogelijke gevaren voor de gezondheid van personen en/of voor het milieu, dient
men dit product in overeenstemming met het voorgeschreven en milieuveilige
recyclingproces als afval te verwerken. Raadpleeg uw productleverancier of uw
plaatselijk afvalverwerkingsbedrijf voor meer informatie over de juiste
afvalverwerking van dit product.
De onderdelen van BUFFALO producten hebben strenge producttesten ondergaan om
te voldoen aan wettelijke regels en specificaties die door internationale,
onafhankelijke en landelijke overheden worden voorgeschreven.
BUFFALO producten zijn goedgekeurd en voorzien van het volgende symbool:
Alle rechten voorbehouden. Het is verboden om deze handleiding, hetzij volledig of gedeeltelijk, elektronisch of
mechanisch te reproduceren, kopiëren, op opslagmedia op te slaan of op enigerlei wijze over te dragen, zonder
Wij hebben er alles aan gedaan om er zeker van te zijn dat op publicatiedatum van de handleiding alle details correct
zijn, desondanks, behoudt BUFFALO het recht voor om specificaties zonder aankondiging te wijzigen.
voorafgaande goedkeuring van BUFFALO.
8
Page 14

FR
Conseils de sécurité
• Placez l'appareil sur une surface plane, stable.
• L'installation et les éventuelles réparations doivent être confiées à un dépanneur / technicien qualifié.
Ne retirez aucun composant ou cache de ce produit.
• Consultez les normes locales et nationales pour vous conformer aux :
• lois sur l'hygiène et la sécurité au travail ;
• codes de bonnes pratiques BS EN ;
• précautions contre le risque d'incendie ;
• réglementations sur les branchements électriques IEE ;
• règlements sur la construction.
• NE PAS immerger l'appareil.
• Ne touchez pas aux surfaces chaudes à mains nues. Portez toujours des gants de protection.
• Soyez particulièrement vigilant si vous devez déplacer ou manipuler des appareils contenant de l'huile
chaude ou n'importe quel autre liquide chaud.
• Ne remplissez jamais le contenant amovible au-delà du repère maximum de niveau d'eau.
• Ne laissez jamais de l'eau ou n'importe quel autre liquide pénétrer dans la coque isolante externe.
• N'utilisez que les ustensiles fournis avec l'autocuiseur de riz. Les objets coupants risquent
d'endommager le revêtement antiadhésif du contenant amovible.
• Réservez uniquement cet appareil à l'usage pour lequel il a été conçu.
• Ne branchez pas le cordon d'alimentation avant d'être prêt à cuire. L'autocuiseur de riz reste SOUS
TENSION tant que la prise n'a pas été débranchée.
• N'oubliez jamais d'éteindre et de débrancher l'appareil hors utilisation.
• Cet appareil n'est pas conçu pour fonctionner à l'extérieur.
• Gardez les emballages hors de portée des enfants. Débarrassez-vous des emballages conformément
aux règlements des autorités locales.
• Un cordon d'alimentation endommagé doit être remplacé par un agent BUFFALO ou un technicien
qualifié recommandé, pour éviter tout danger.
Introduction
Nous vous invitons à consacrer quelques instants à la lecture attentive de ce manuel. L'entretien et
l'utilisation appropriés de cet appareil vous permettront de tirer le meilleur de votre produit BUFFALO.
Contenu de l'emballage
Eléments fournis de série :
• Autocuiseur de riz BUFFALO
• Gobelet mesureur
J193/CB944 x 1
J300 x 2
BUFFALO attache une grande importance à la qualité et au service et veille à fournir des produits en parfait
état opérationnel, parfaitement intacts au moment de l'emballage.
Nous vous prions de contacter votre revendeur BUFFALO immédiatement si vous constatez un dommage
quelconque survenu pendant le transport du produit.
9
•Spatule
• Fourchette (J300 uniquemont)
• Mode d'emploi
Page 15
Standard d'assistance téléphonique: 01 64 89 73 61 (Français)
FR
Fonctionnement
Conseils de cuisson
• Bien rincer le riz avant la cuisson. Cette précaution empêche les grains de riz de s'amalgamer.
• Une petite quantité d'huile végétale incorporée aux grains de riz peut faciliter la séparation des grains.
• Le riz complet ou sauvage peut obliger à augmenter la quantité d'eau.
Pour utiliser l'autocuiseur de riz
La cuve intérieure a été munie de repères de guidage. La tasse
fournie a été conçue pour mesurer le riz et l'eau.
1. Mesurez la quantité de riz à cuire à l'aide du gobelet
mesureur fourni.
Remarque : un gobelet de riz sec produit environ
deux gobelets de riz cuit.
Témoin froid
Témoin de
maintien au
chaud
Levier
HEAT
WARM
2. Rincez le riz dans un égouttoir, à l'eau courante ;
débarrassez-le des excès de son et d'amidon.
3. Versez le riz dans le contenant amovible. Pour obtenir une cuisson uniforme du riz, répartissez le riz
Modèle illustré :
J300
uniformément dans le contenant amovible.
4. Ajoutez la quantité d'eau qui convient à l'aide du gobelet mesureur ou en remplissant le contenant
amovible jusqu'au niveau qui convient.
Remarque : Réduisez légèrement la quantité d'eau pour obtenir un riz plus ferme ;
augmentez-la pour obtenir un riz plus mou.
5. Placez le contenant amovible dans l'autocuiseur de riz.
Remarque : veillez à ce que l'extérieur du contenant amovible soit exempt d'humidité
ou de riz.
6. Remettez le couvercle (J193/CB944) ou refermez le couvercle et appuyez jusqu'à ce que le verrou
s'enclenche (J300).
7. Branchez l'autocuiseur à la prise d'alimentation secteur.
8. Mettez le levier dans la position COOK (CUISSON). Le témoin Cook (Cuisson) s'allume.
9. À la fin de la cuisson, l'interrupteur se met automatiquement dans la position WARM (Tiède). Le
témoin Warm (Tiède) s'allume.
10. Laissez fermé le couvercle pendant 10 - 15 minutes, pour de meilleurs résultats.
11. Ouvrez doucement le couvercle, pour laisser la vapeur et la condensation retomber dans l'autocuiseur
de riz .
AVERTISSEMENT : Veillez toujours à éviter l'expulsion de vapeur au retrait du couvercle.
Portez toujours des gants résistants à la chaleur pour retirer le contenant amovible
après cuisson.
12. Mélangez le riz et servez-le dès que possible.
13. Débranchez l'appareil de l'alimentation secteur.
10
Page 16

FR
Dosage du riz / de l'eau
À titre de guide général, prévoyez une tasse pleine d'eau par tasse pleine de riz (1/1).
Augmentez légèrement le volume d'eau pour obtenir un riz plus moelleux et diminuez-le légèrement pour un riz plus ferme.
Nettoyage, entretien et maintenance
Remarque : Veillez à toujours éteindre et débrancher l'appareil de la prise secteur avant
de le nettoyer.
Laissez toujours l'appareil refroidir avant de le nettoyer.
1. Retirez le contenant amovible et lavez-le à l'eau tiède savonneuse. N'utilisez pas de crèmes ou
produits abrasifs agressifs dont l'usage n'aurait pas été recommandé pour les revêtements
antiadhésifs.
2. Rincez abondamment et séchez minutieusement.
3. Nettoyez l'extérieur de l'autocuiseur de riz à l'aide d'un chiffon doux.
4. Veillez à ce que la plaque chauffante soit propre et exempte d'aliments ou autres débris susceptibles
d'altérer le processus de cuisson.
5. Séchez minutieusement la plaque chauffante avant d'utiliser l'appareil.
J300 uniquemont
1. Retirez le récupérateur d'eau du dessous de la charnière du
couvercle en le tirant vers l'extérieur
[Fig. 1]. Jetez l'eau récupérée après chaque utilisation.
2. Nettoyez et remettez le récupérateur d'eau.
Dépannage
Dysfonctionnement Cause probable Intervention
L'appareil ne
fonctionne pas
Le riz n'est pas bien
cuit
Le riz est trop cuit Trop d’eau Réduire la quantité d'eau de cuisson
11
L'appareil n'est pas allumé Vérifier que l'appareil est bien
branché et allumé
La prise et le cordon sont
endommagés
Alimentation Vérifier l'alimentation
Problème de branchement interne Appeler un agent BUFFALO ou un
Le contenant amovible n'est pas en
contact avec la plaque chauffante
Le contenant amovible s'est déformé Remplacer le contenant amovible
Quantité d'eau insuffisante Augmenter la quantité d'eau de
Appeler un agent BUFFALO ou un
technicien qualifié
technicien qualifié
Repositionner le contenant amovible
cuisson
Fig. 1
Page 17

Standard d'assistance téléphonique: 01 64 89 73 61 (Français)
Spécifications techniques
FR
Modèle Tension Puissance Courant Capacité Poids
J193 230V 50Hz 1600W 7A 4,2 litres 5,1kg 360 x 410 x 260
J300 230V 50Hz 1950W 8,5A 6 litres 10,2kg 335x 470 x 470
CB944 230V 50Hz 2950W 12,8A 23 litres 11,8kg 555 x 485 x 395
Dimensions
h x l x p mm
Raccordement électrique
La prise doit être reliée à la prise secteur qui convient.
Cet appareil est câblé comme suit :
• Fil conducteur (brun) à la borne marquée L
• Fil neutre (bleu) à la borne marquée N
• Fil de terre (vert / jaune) à la borne marquée E
Cet appareil doit être raccordé à la terre, par le biais d'un circuit de mise à la terre dédié.
En cas de doute, consultez un électricien qualifié.
Les points d'isolation électrique doivent être libres de toute obstruction. En cas de débranchement requis
en urgence, ils doivent être facilement accessibles.
Conformité
Le logo WEEE qui figure sur ce produit ou sa documentation indique qu'il ne doit pas
être mis au rebut avec les ordures ménagères. Pour éviter qu'il ne présente un risque
pour la santé humaine et / ou écologique, confiez la mise au rebut de ce produit à un
site de recyclage agréé respectueux de l'environnement. Pour de plus amples détails
sur la mise au rebut appropriée de ce produit, contactez le fournisseur du produit ou
l'autorité responsable de l'enlèvement des ordures dans votre région.
Les pièces BUFFALO ont été soumises à des tests rigoureux pour pouvoir être
déclarées conformes aux normes et spécifications réglementaires définies par les
autorités internationales, indépendantes et fédérales.
Les produits BUFFALO ont été déclarés aptes à porter le symbole suivant :
Tous droits réservés. La production ou transmission, partielles ou intégrales, sous quelque forme que ce soit ou par
n'importe quel moyen, tant électronique que mécanique, sous forme de photocopie, d'enregistrement ou autre de
Nous nous efforçons, par tous les moyens dont nous disposons, de faire en sorte que les détails contenus dans le
présent mode d'emploi soient corrects en date d'impression. Toutefois, BUFFALO se réserve le droit de changer les
ce mode d'emploi sont interdites sans l'autorisation préalablement accordée par BUFFALO.
spécifications de ses produits sans préavis.
12
Page 18

DE
Sicherheitshinweise
• Auf eine flache, stabile Fläche stellen.
• Alle erforderlichen Montage- und Reparaturarbeiten sollten von Wartungspersonal oder einem
qualifizierten Techniker durchgeführt werden. Keine Bauteile oder Bedienflächen von diesem Produkt
entfernen.
• Für folgende Normen und Vorschriften sind die lokalen und nationalen Normen heranzuziehen:
• Arbeitsschutzvorschriften
• BS EN Verhaltenspraktiken
• Brandschutzvorschriften
• IEE-Anschlussvorschriften
• Bauvorschriften
• Gerät NICHT in Wasser eintauchen.
• Heiße Flächen nicht mit bloßen Händen berühren. Stets Schutzhandschuhe tragen.
• Beim Umgang mit Geräten, die heißes Öl oder andere heiße Flüssigkeiten enthalten, ist stets große
Vorsicht angebracht.
• Den Einsatz niemals über die obere Wasserlinie hinaus füllen.
• Kein Wasser oder andere Flüssigkeiten in den äußeren Behälter gelangen lassen.
• Für den Reiskocher nur die mitgelieferten Utensilien verwenden. Scharfe Objekte können die
Antihaftbeschichtung des Einsatzes beschädigen.
• Das Gerät nur gemäß Gebrauchsanweisung verwenden.
• Den Netzstecker erst dann einstecken, wenn der Reiskocher einsatzbereit ist. Der Reiskocher bleibt
solange eingeschaltet, bis der Netzstecker gezogen wird.
• Nach dem Gebrauch das Gerät stets ausschalten und den Netzstecker ziehen.
•Nicht zum Gebrauch im Freien geeignet.
• Verpackungsmaterial außerhalb der Reichweite von Kindern aufbewahren und gemäß den lokalen
Vorschriften entsorgen.
• Aus Sicherheitsgründen muss ein beschädigtes Stromkabel von einem BUFFALO-Mitarbeiter oder
empfohlenen qualifizierten Elektriker erneuert werden.
Einführung
Bitte nehmen Sie sich einige Minuten Zeit, um diese Anleitung gründlich zu lesen. Durch die korrekte
Wartung und den ordnungsgemäßen Einsatz dieses Geräts erhalten Sie optimale Leistung von Ihrem
BUFFALO-Produkt.
Packungsinhalt
Die Verpackung enthält folgende Teile:
•BUFFALO Reiskocher
• Messbecher
J193/CB944 x 1
J300 x 2
BUFFALO ist stolz auf die hochwertige Qualität seiner Produkte und seinen erstklassigen Service. Wir stellen
sicher, dass alle gelieferten Produkte zum Zeitpunkt der Verpackung voll funktionsfähig sind und sich in
einwandfreiem Zustand befinden.
Sollten Sie Transportschäden feststellen, wenden Sie sich bitte unverzüglich an Ihren BUFFALO-Händler.
13
•Löffel
• Gabel (nur J300)
• Bedienungsanleitung
Page 19

Telefonische Helpline: 0800 – 1860806 (Deutschland)
DE
Betrieb
Zubereitungstipps
Den Reis vor dem Kochen gründlich waschen. Dadurch kleben die Reiskörner nicht zusammen.
• Wenn dem Reis eine kleine Menge Pflanzenöl zugefügt wird, können die Reiskörner besser
voneinander getrennt werden.
• Für braunen oder Wildreis ist u. U. zusätzliches Wasser erforderlich.
Einsatz des Reiskochers
Auf der Innenseite der inneren Schale befinden sich Messlinien als
Anhaltspunkte. Die mitgelieferte Tasse misst sowohl Reis als auch
Wasser.
1. Mit dem mitgelieferten Messbecher die gewünschte
Reismenge abmessen.
Hinweis: Ein Messbecher Reis ergibt rund zwei
Becher gekochten Reis.
2. Den Reis in einem Sieb unter laufendem Wasser abspülen,
um überschüssige Kleie und Stärke abzuwaschen.
3. Den Reis in den Einsatz gießen und gleichmäßig verteilen, damit der Reis gleichmäßig kocht.
4. Die korrekte Menge Wasser mit dem Messbecher zugeben oder den Einsatz bis zur entsprechenden
Höhe mit Wasser füllen.
Hinweis: Damit der Reis fester wird, die Wassermenge etwas reduzieren, für weicheren
Reis etwas erhöhen.
Kochanzeige
Warmhaltean
-zeige
Hebel
Abgebildetes Modell: J300
HEAT
WARM
5. Den Einsatz in den Reiskocher stellen.
Hinweis: Darauf achten, dass sich außen am Einsatz kein Reis oder Feuchtigkeit
befindet.
6. Den Deckel (J193/CB944) wieder auflegen oder schließen und herunterdrücken, bis das Gelenk (J300)
einrastet.
7. Den Netzstecker des Reiskochers an den Strom anschließen.
8. Den Hebel in die Position COOK (Kochen) herunterdrücken. Die Kochanzeige leuchtet auf.
9. Nach dem Kochen wechselt der Schalter automatisch in die Position WARM (Warmhalten), und die
Warmhalteanzeige leuchtet auf.
10. Nach Möglichkeit den Deckel weitere 10 - 15 Minuten geschlossen lassen.
11. Vorsichtig den Deckel öffnen, sodass der Dampf entweichen und Kondensation wieder in den
Reiskocher zurücklaufen können.
VORSICHT: Beim Öffnen des Deckels aufpassen, da Dampf entweicht.
Beim Entnehmen des Einsatzes nach dem Kochen stets Ofenhandschuhe tragen.
12. Den Reis umrühren und möglichst schnell servieren.
13. Das Gerät ausschalten und den Netzstecker ziehen.
14
Page 20

DE
Reis-/Wassermengen
Als Faustregel gilt: eine volle Tasse Wasser pro voller Tasse Reis.
Wenn der Reis etwas weicher werden soll, etwas mehr Wasser zugeben, für festeren Reis etwas weniger
Wasser.
Reinigung, Pflege und Wartung
Hinweis: Vor dem Reinigen das Gerät stets ausschalten und den Netzstecker ziehen und
warten, bis sich das Gerät abgekühlt hat.
1. Den Einsatz entfernen und mit einer warmen Seifenlauge waschen. Keine groben Scheuermittel oder
Produkte verwenden, die nicht für Antihaftbeschichtungen geeignet sind.
2. Gründlich abspülen und abtrocknen.
3. Den Reiskocher außen mit einem feuchten Tuch reinigen.
4. Darauf achten, dass die Warmhalteplatte sauber und frei von Nahrungsmittelresten oder anderen
Stoffen ist, die den Garprozess beeinträchtigen könnten.
5. Die Warmhalteplatte vor dem Gebrauch gründlich abtrocknen.
Nur J300
1. Die Wasserauffangschale nach außen ziehen und so unter dem
Deckelscharnier hervorziehen [Abb. 1]. Das gesammelte Wasser
nach jedem Gebrauch ausgießen.
2. Die Auffangschale reinigen und wieder einsetzen.
Fehlersuche
Störung Vermutliche Ursache Lösung
Das Gerät funktioniert
nicht
Das Gerät funktioniert
nicht
Reis ist nicht völlig
gar
Reis ist zu weich
gekocht
15
Das Gerät ist nicht eingeschaltet Prüfen, ob der Netzstecker in die Steckdose
Stecker und Kabel sind
beschädigt
Sicherung im Stecker ist
durchgebrannt
Stromzufuhr Netzstrom prüfen
Interner Vernetzungsfehler BUFFALO-Mitarbeiter oder qualifizierten
Die Schale hat keinen Kontakt
zur Warmhalteplatte
Die Schale hat sich verformt Schale auswechseln
Nicht ausreichend Wasser Die verwendete Wassermenge erhöhen
Zu viel Wasser Die verwendete Wassermenge reduzieren
gesteckt wurde und das Gerät eingeschaltet ist
BUFFALO-Mitarbeiter oder qualifizierten
Techniker kontaktieren
Neue Sicherung in den Stecker einsetzen
Techniker kontaktieren
Schale neu einsetzen
Abb. 1
Page 21

Telefonische Helpline: 0800 – 1860806 (Deutschland)
Technische Spezifikationen
DE
Modell Spannung Leistung
J193 230V 50Hz 1600W 7A 4,2 liters 5,1kg 360 x 410 x 260
J300 230V 50Hz 1950W 8,5A 6 liters 10,2kg 335x 470 x 470
CB944 230V 50Hz 2950W 12,8A 23 liters 11,8kg 555 x 485 x 395
Strom-
stärke
Füllmenge Gewicht
Abmessungen
h x b x t mm
Elektroanschlüsse
Der Stecker muss in eine geeignete Steckdose gesteckt werden.
Das Gerät ist wie folgt verdrahtet:
• Stromführender Leiter (braun) an Klemme L
• Neutralleiter (blau) an Klemme N
• Erdleiter (grün/gelb) an Klemme E
Das Gerät muss über eine spezielle Erdleitung geerdet werden.
Bei Fragen wenden Sie sich bitte an einen qualifizierten Elektriker.
Elektroisolierpunkte dürfen nicht blockiert werden. Bei einem Notstopp müssen diese Punkte jederzeit sofort
zugänglich sein.
Konformität
Das WEEE-Logo an diesem Produkt oder in der Dokumentation weist darauf hin, dass
das Produkt nicht mit dem normalen Hausmüll entsorgt werden darf. Um potenziellen
Gesundheits- bzw. Umweltschäden vorzubeugen, muss das Produkt durch einen
zugelassenen und umweltverträglichen Recyclingprozess entsorgt werden. Ausführliche Informationen zur korrekten Entsorgung dieses Produkts erhalten Sie von Ihrem
Produktlieferanten oder der für die Müllentsorgung in Ihrer Region zuständige
Behörde.
Alle BUFFALO-Produkte werden strengen Tests unterzogen, um die Einhaltung von
Normen und Spezifikationen internationaler und nationaler Behörden und
unabhängiger Organisationen zu gewährleisten.
BUFFALO-Produkte dürfen durch folgendes Symbol gekennzeichnet werden:
Alle Rechte vorbehalten. Diese Anleitung darf ohne vorherige schriftliche Genehmigung von BUFFALO weder ganz
noch teilweise in irgendeiner Form oder auf irgendeinem Wege - einschließlich elektronischer, mechanischer
Verfahren, durch Fotokopieren, Aufnahme oder andere Verfahren - vervielfältigt oder übertragen werden.
Es werden alle Anstrengungen unternommen um sicherzustellen, dass alle Angaben bei der Drucklegung korrekt
sind. BUFFALO behält sich jedoch das Recht vor, Spezifikationen ohne Vorankündigung zu ändern.
16
Page 22

IT
Suggerimenti per la sicurezza
• Posizionare il fabbricatore di ghiaccio su una superficie in piano e stabile.
• L'installazione e le eventuali riparazioni devono venire eseguite da un agente/tecnico qualificato. Non
rimuovere i componenti o i pannelli di accesso dell'apparecchio.
• Verificare la conformità alle normative locali e nazionali di quanto segue:
• Normativa antinfortunistica sul lavoro
• Linee guida BS EN
• Precauzioni antincendio
• Normativa IEE sui circuiti elettrici
• Norme di installazione
• NON immergere l'apparecchio in acqua.
• Non toccare le superfici calde con le mani nude. Utilizzare sempre guanti protettivi.
• Usare sempre estrema cautela quando si spostano o si maneggiano apparecchi contenenti olio caldo o
altri liquidi caldi.
• Non riempire mai la scodella interna al di sopra della linea dell'acqua superiore.
• Non lasciare penetrare acqua o altri liquidi nel contenitore esterno.
• Quando si utilizza il cuociriso elettrico, utilizzare solo gli utensili forniti con l'apparecchio. Gli oggetti
appuntiti possono danneggiare il rivestimento antiaderente della scodella interna.
• Non utilizzare l'apparecchio per scopi diversi da quelli indicati.
• Inserire il cavo nella presa solo quando si è pronti a cucinare. L'alimentazione del cuociriso elettrico
rimane INSERITA se l'apparecchio non viene scollegato.
• Spegnere e scollegare l'alimentazione quando l'apparecchio non è utilizzato.
• Non idoneo per l'utilizzo all'aperto.
• Tenere lontano l'imballaggio dalla portata dei bambini. Smaltire l'imballaggio in conformità alle
normative locali.
• Se danneggiato, il cavo di alimentazione deve venire sostituito da un agente BUFFALO o da un tecnico
qualificato al fine di prevenire eventuali rischi.
Introduzione
Leggere con attenzione il presente manuale. La manutenzione e l'utilizzo corretti di questo apparecchio
consentiranno di ottenere le massime prestazioni da questo prodotto BUFFALO.
Contenuto della confezione
La confezione contiene:
• Cuociriso elettrico BUFFALO
• Tazza dosatrice
J193/CB944 x 1
J300 x 2
BUFFALO garantisce una qualità e un servizio impeccabili e assicura che al momento dell'imballaggio tutti i
componenti forniti sono integralmente funzionanti e privi di difetti.
Nel caso siano rilevati danni risultanti dal trasporto del prodotto, rivolgersi immediatamente al rivenditore
BUFFALO locale.
17
•Cucchiaio
• Forchetta (Solo J300)
• Manuale di istruzioni
Page 23

IT
Funzionamento
Suggerimenti per la cottura
Lavare accuratamente il riso prima di cuocerlo. In questo modo durante la cottura i chicchi rimarranno
separati.
• Una piccola quantità di olio vegetale nel riso può aiutare a mantenere i chicchi separati.
• Il riso integrale o selvatico può richiedere una maggiore quantità di acqua.
Utilizzo del cuociriso elettrico
La scodella interna è dotata di linee di misurazione del livello. La
tazza fornita consente di dosare il riso e l'acqua.
1. Per misurare la quantità di riso desiderata, utilizzare la tazza
dosatrice fornita.
Nota: una tazza di riso produce circa due tazze
di riso cotto.
2. Sciacquare il riso in un colino sotto l'acqua corrente per
rimuovere la crusca e l'amido in eccesso.
3. Versare il riso nella scodella interna. Per ottenere un riso cotto uniformemente, disporre il riso nella
scodella in maniera uniforme.
4. Aggiungere la quantità corretta di acqua utilizzando la tazza dosatrice oppure riempiendo la scodella
interna fino al livello appropriato.
Nota: ridurre leggermente la quantità d'acqua per ottenere un riso più sodo oppure
aumentarla per ottenere un riso più morbido.
Spia di cottura
Spia
riscaldamento
Leva
Modello in figura: J300
HEAT
WARM
5. Inserire la scodella interna nel cuociriso elettrico.
Nota: assicurarsi che non sia presente riso o condensa sulla superficie esterna della
scodella interna.
6. Chiudere il coperchio (J193/CB944) oppure chiudere il coperchio e premere fino a fare scattare il
blocco (J300).
7. Collegare il cuociriso elettrico all'alimentazione.
8. Premere la leva nella posizione COOK. La spia di cottura si illumina.
9. Completata la cottura, l'interruttore si sposta automaticamente sulla posizione WARM. La spia di
riscaldamento si illumina.
10. Per ottenere i migliori risultati, mantenere il coperchio chiuso per 10 - 15 minuti.
11. Aprire il coperchio con cautela per consentire al vapore e alla condensa di rimanere all'interno del
cuociriso elettrico.
ATTENZIONE: quando viene rimosso il coperchio, fare sempre attenzione a evitare la
rapida fuoriuscita del vapore.
Utilizzare sempre guanti resistenti al calore per rimuovere la scodella interna dopo la
cottura.
12. Mescolare il riso e servire subito.
13. Scollegare l'apparecchio dall'alimentazione.
18
Page 24

IT
Dosi di riso/acqua
Come indicazione generale, utilizzare una tazza piena d'acqua per ogni tazza di riso.
Aumentare leggermente la quantità d'acqua per ottenere un riso più morbido oppure diminuirla per ottenere
un riso più sodo.
Pulizia e manutenzione
Nota: prima di eseguire la pulizia, spegnere e scollegare l'apparecchio
dall'alimentazione.
Lasciare sempre raffreddare l'apparecchio prima di procedere alla pulizia.
1. Rimuovere la scodella interna e lavare con acqua saponata calda. Non utilizzare detergenti o prodotti
abrasivi non raccomandati per l'utilizzo su superfici antiaderenti.
2. Sciacquare e lasciare asciugare completamente.
3. Pulire la superficie esterna del cuociriso elettrico utilizzando un panno inumidito.
4. Assicurarsi che la piastra riscaldante sia pulita e priva di residui di cibo o altri residui che possano
interferire con il processo di cottura.
5. Asciugare completamente la piastra riscaldante prima dell'uso.
Solo J300
1. Estrarre il raccoglitore dell'acqua sotto della cerniera del coperchio
tirando verso l'esterno [Fig. 1]. Eliminare l'acqua raccolta dopo
ciascun utilizzo.
2. Pulire e reinserire il raccoglitore dell'acqua.
Risoluzione dei problemi
Guasto Probabile causa Azione
L'apparecchio non
funziona
Il riso non è
completamente cotto
Il riso è troppo cotto Acqua in eccesso Ridurre la quantità di acqua utilizzata
19
L'apparecchio non è acceso Controllare che l'apparecchio sia
La presa e il cavo sono
danneggiati
Il fusibile della presa è guasto Sostituire il fusibile della presa
Alimentazione Controllare l'alimentazione
Guasto dei circuiti interni Rivolgersi a un tecnico qualificato o a un
La scodella non è a contatto con
la piastra riscaldante
La scodella si è deformata Sostituire la scodella
Acqua insufficiente Aumentare la quantità di acqua utilizzata
correttamente collegato e acceso
Rivolgersi a un tecnico qualificato o a un
agente BUFFALO
agente BUFFALO
Riposizionare la scodella interna
Fig. 1
Page 25

Specifiche tecniche
IT
Modello Tensione Alimentazio Corrente
J193 230V 50Hz 1600W 7A 4,2 litri 5,1kg 360 x 410 x 260
J300 230V 50Hz 1950W 8,5A 6 litri 10,2kg 335 x 470 x 470
CB944 230V 50Hz 2950W 12,8A 23 litri 11,8kg 555 x 485 x 395
Capacità del
serbatoio
Peso
Dimensioni
h x l x p mm
Cablaggi elettrici
La spina deve venire collegata a una presa di rete appropriata.
L'apparecchio ha i seguenti cablaggi:
• Filo sotto tensione (colore marrone) a terminale L
• Filo del neutro (colore blu) a terminale N
• Filo di terra (colore verde/giallo) a terminale E
L'apparecchio deve avere un circuito dedicato di messa a terra.
In caso di dubbi, consultare un elettricista qualificato.
I punti di isolamento elettrico devono essere liberi da ostruzioni. In caso di emergenza, i punti devono
essere facilmente raggiungibili qualora sia necessario scollegarli.
Conformità
Il logo WEEE riportato su questo prodotto o sulla relativa documentazione indica che
il prodotto non può essere smaltito come normale rifiuto domestico. Per evitare
possibili danni alla salute e/o all'ambiente, il prodotto deve venire smaltito utilizzando
una procedura di riciclaggio approvata e sicura per l'ambiente. Per ulteriori
informazioni su come smaltire in maniera corretta questo prodotto, contattare il
fornitore del prodotto o l'ente locale responsabile per lo smaltimento dei rifiuti.
I componenti BUFFALO sono stati sottoposti a un rigoroso collaudo ai fini della
conformità agli standard e alle specifiche normative previste dalle autorità
internazionali, indipendenti e federali.
I prodotti BUFFALO sono autorizzati a esporre il seguente simbolo:
Tutti i diritti riservati. È vietata la riproduzione o la trasmissione in alcuna forma, elettronica, meccanica, mediante
fotocopiatura o altro sistema di riproduzione, di qualsiasi parte delle presenti istruzioni senza la previa
Le informazioni contenute sono corrette e accurate al momento della stampa, tuttavia BUFFALO si riserva il diritto
autorizzazione scritta di BUFFALO.
di modificare le specifiche senza preavviso.
20
Page 26

ES
Consejos de Seguridad
• Colóquela sobre una superficie plana, estable.
• Un agente de servicio / técnico cualificado debería llevar a cabo la instalación y cualquier reparación si
se precisa. No retire ningún componente ni panel de servicio de este producto.
• Consulte las Normas Locales y Nacionales correspondientes a lo siguiente:
• Legislación de Seguridad e Higiene en el Trabajo
• Códigos de Práctica BS EN
• Precauciones contra Incendios
• Normativos de Cableado de la IEE
• Normativas de Construcción
• NO sumerja el aparato en agua.
• NO toque las superficies calientes con las manos descubiertas. Utilice siempre guantes de protección.
• Vaya con extrema precaución al mover o manipular aparatos que contengan aceite caliente o cualquier
otro líquido caliente.
• No llene nuca el bol interior por encima de la línea de agua superior.
• No permita nunca la entrada de agua ni ningún líquido en el recipiente exterior.
• Utilice solamente los utensilios suministrados con este aparato al utilizar el aparato para cocer arroz.
Los objetos afilados pueden dañar el revestimiento antiadherente del bol interior.
• No utilice el aparato para ningún uso diferente al destinado.
• No enchufe el cable hasta que esté listo para cocinar. La arrocera permanecerá CONECTADA hasta que
se desenchufe.
• Desconoce y desenchufe siempre el aparato cuando no se esté utilizando.
• No adecuado para el uso exterior.
• Mantenga el embalaje fuera del alcance de los niños. Deseche el embalaje de acuerdo con las
normativas de las autoridades locales.
• Si el cable eléctrico resultada dañado, debe ser reemplazado por un técnico cualificado recomendado o
un agente de BUFFALO para evitar cualquier riesgo.
Introducción
Tómese unos minutos para leer este manual. El correcto mantenimiento y manejo de esta máquina
proporcionará el mejor funcionamiento posible de su producto BUFFALO.
Contenido del Conjunto
Se incluye lo siguiente:
•Arrocera BUFFALO
• Taza de medición
J193/CB944 x 1
J300 x 2
BUFFALO se enorgullece de su calidad y servicio y asegura que en el momento del embalaje, el contenido
se suministró con plena funcionalidad y sin ningún defecto.
Si encontrara algún daño resultante del transporte, póngase en contacto inmediatamente con su
distribuidor BUFFALO.
21
• Cuchara
• Tenedor (Sólo en el modelo J300)
• Manual de instrucciones
Page 27

ES
Funcionamiento
Consejos de cocción
Lave bien el arroz antes de cocerlo. Esto ayuda a impedir que los granos de arroz se peguen entre sí.
• Una pequeña cantidad de aceite vegetal en el arroz puede ayudar a separar los granos.
• El arroz integral o el arroz silvestre pueden requerir agua adicional.
Utilización de la arrocera
El bol interior presenta líneas de medición en el interior a modo de
guía. La taza suministrada está diseñada para medir el arroz y el
agua.
1. Mida la cantidad deseada de arroz utilizando la taza de
medición suministrada.
Nota: una taza de arroz producirá
aproximadamente dos tazas de arroz cocido.
2. Enjuague el arroz en un colador bajo agua corriente para
retirar el exceso de salvado y fécula.
3. Deposite el arroz en el bol interior. Para obtener un arroz con una cocción uniforme, extiéndalo
uniformemente alrededor del bol.
4. Añada la cantidad correcta de agua mediante la taza de medición o llenando el bol interior al nivel
apropiado.
Nota: Reduzca ligeramente la cantidad de agua para un arroz más firme y aumente la
cantidad para un arroz más blando.
Luz de cocción
Luz para
mantener el
calor
Palanca
Modelo mostrado: J300
HEAT
WARM
5. Ponga el bol interior en la arrocera.
Nota: asegúrese de que no haya aceite ni humedad en el exterior del bol interior.
6. Vuelva a poner la tapa (J193/CB944) o cierre la tapa y presione hacia abajo hasta que el pasador
quede bloqueado (J300).
7. Enchufe la arrocera al suministro eléctrico.
8. Presione la palanca hasta la posición COOK (COCER). Se enciende la luz de cocción.
9. Una vez la cocción haya finalizado, el interruptor automáticamente pasa a la posición WARM
(MANTENER EL CALOR). Se enciende la luz para mantener el calor.
10. Mantenga la tapa cerrada durante 10 - 15 minutos para obtener los mejores resultados.
11. Abra con cuidado la tapa, permitiendo que el vapor y la condensación vuelvan a la arrocera.
ADVERTENCIA: vaya siempre con cuidado para evitar la expulsión del vapor al retirar la
tapa. Utilice siempre guantes a prueba de calor al sacar el bol interior tras la cocción.
12. Remueva el arroz y sírvalo lo más rápido posible.
13. Desenchufe el aparato del suministro eléctrico.
22
Page 28

ES
Cantidades de arroz / agua
Como orientación general, utilice una taza de agua llena por cada taza de arroz llena.
Añada un poco más de agua para obtener un arroz más cocido, y un poco menos para obtener un arroz
menos cocido.
Limpieza, Cuidado y Mantenimiento
Nota: Desconecte el aparato y desenchúfelo del suministro eléctrico siempre antes de
llevar a cabo la limpieza.
Deje siempre que el aparato se enfríe antes de iniciar la limpieza.
1. Retire el bol interior y lávelo en agua caliente, con jabón. No utilice limpiadores altamente abrasivos ni
productos que no estén recomendados para el uso en revestimientos no pegajosos.
2. Enjuáguelo y séquelo bien.
3. Limpie el exterior de la arrocera con un paño húmedo.
4. Asegúrese de que la placa de calentamiento esté limpia y exenta de comida u otros residuos que
pudieran interferir en el proceso de cocción.
5. Seque bien la placa de calentamiento antes del uso.
Sólo en el modelo J300
1. Saque el colector de agua de debajo de la bisagra de la tapa tirando
hacia fuera [Fig. 1]. Elimine el agua recogida después de cada uso.
2. Limpie y cambie el colector de agua.
Resolución de problemas
Fallo Probable Causa Acción
El aparato no
funciona
El arroz no se cuece
bien
El arroz se cuece
demasiado
23
El aparato no está conectado Compruebe que el aparato esté
El enchufe y el cable están dañados Llame a un técnico cualificado o a un
El fusible del enchufe se ha fundido Cambie el fusible del enchufe
Suministro eléctrico Compruebe el suministro eléctrico
Fallo del cableado interno Llame a un técnico cualificado o a un
El bol no está en contacto con la placa
de calentamiento
El bol se ha deformado Cambie el bol
No hay suficiente agua Aumentar la cantidad de agua utilizada
Demasiada agua Reduzca la cantidad de agua utilizada
Fig. 1
enchufado correctamente y conectado
agente de BUFFALO
agente de BUFFALO
Recoloque el bol
Page 29

Especificaciones Técnicas
ES
Modelo Tensión Potencia Corriente Capacidad Peso
J193 230V 50Hz 1600W 7A 4,2 litros 5,1kg 360 x 410 x 260
J300 230V 50Hz 1950W 8,5A 6 litros 10,2kg 335 x 470 x 470
CB944 230V 50Hz 2950W 12,8A 23 litros 11,8kg 555 x 485 x 395
Dimensiones
a x a x p mm
Cableado Eléctrico
El enchufe tiene que conectarse a una toma eléctrica adecuada.
Este aparato está conectado de la forma siguiente:
• Cable cargado (de color marrón) al terminal marcado como L
• Cable neutro (de color azul) al terminal marcado como N
• Cable de tierra (de color verde / amarillo) al terminal marcado como E
El aparato debe estar conectado a tierra, utilizando un circuito de conexión a tierra especializado.
Si tiene alguna duda, consulte a un electricista cualificado.
Los puntos de aislamiento eléctrico deben mantenerse libres de cualquier obstrucción. En caso de precisarse
una desconexión de emergencia, deben estar disponibles de forma inmediata.
Cumplimiento
El logotipo WEEE en este producto o su documentación indica que no debe eliminarse
como un residuo doméstico. Para ayudar a prevenir posibles daños a la salud humana
y/o el medio ambiente, el producto debe eliminarse en un proceso de reciclaje
aprobado y medioambientalmente seguro. Para obtener más información sobre cómo
eliminar correctamente este producto, póngase en contacto con el proveedor del
mismo o la autoridad local responsable de la eliminación de residuos en su zona.
Las piezas BUFFALO han pasado estrictas pruebas de productos para cumplir las
especificaciones y normas reguladoras establecidas por las autoridades
internacionales, independientes y federales.
Los productos BUFFALO han sido autorizados para llevar el símbolo siguiente:
Reservados todos los derechos. Puede estar prohibida la reproducción o transmisión en cualquier forma o por
cualquier medio electrónico, mecánico, de fotocopiado, registro o de otro tipo, de cualquier parte de estas
Se ha hecho todo lo posible para garantizar que todos los datos son correctos en el momento de su publicación; sin
embargo, BUFFALO se reserva el derecho a modificar las especificaciones sin que medie notificación previa.
instrucciones sin la autorización previa y por escrito de BUFFALO.
24
Page 30

PT
Conselhos de segurança
• Colocar numa superfície plana e estável.
• Um agente de serviço/técnico qualificado deverá efectuar a instalação e quaisquer reparações, caso
necessário. Não retirar qualquer componente ou painéis de serviço deste produto.
• Consultar e cumprir os regulamentos locais e nacionais no que diz respeito à:
• Legislação de saúde e segurança no local de trabalho
• Códigos de trabalho
• Prevenção de incêndios
• Normas para sistemas eléctricos IEE
• Código de construção
• NÃO colocar este aparelho em água.
• NÃO tocar nas superfícies quentes com as mãos. Sempre utilizar luvas de forno.
• Tenha muito cuidado ao deslocar ou utilizar aparelhos contendo óleo quente ou quaisquer outros
líquidos.
• Nunca encher a tigela interior acima da marca de medida.
• Não deixar entrar água ou quaisquer outros líquidos na tigela exterior.
• Apenas utilizar utensílios apropriados ao utilizar a panela de arroz. Objectos aguçados podem danificar
o revestimento antiaderente da tigela interior.
• Utilize o aparelho exclusivamente para a sua finalidade doméstica de cozer arroz com água.
• Coloque a ficha na tomada quando pronto para cozinhar. A panela de arroz mantém-se ON (ligada)
enquanto a ficha estiver na tomada.
• Retire a ficha da tomada quando o aparelho não estiver em utilização.
• Não adequado para utilizar ao ar livre.
• Mantenha o material da embalagem fora do alcance de crianças. O material da embalagem é para ser
deitado fora respeitando as regras das autoridades locais.
• A fim de evitar situações perigosas, a substituição dos cabos de alimentação danificados deve ser feita
por um agente BUFFALO ou um técnico qualificado recomendado.
Introdução
Por favor utilize o tempo necessário para ler atentamente este manual. Uma manutenção e utilização
correcta deste aparelho permitem a melhor capacidade de funcionamento do seu produto BUFFALO.
Conteúdo da embalagem
A embalagem inclui o seguinte:
• BUFFALO Panela de arroz
• Copo medidor
J193/CB944 x 1
J300 x 2
A BUFFALO orgulha-se pelo serviço e a qualidade dos seus produtos e portanto verifica, durante a fase de
embalagem, o estado funcional e o bom estado do conteúdo fornecido.
Quando confrontado com quaisquer danos provocados durante o transporte, contacte imediatamente o seu fornecedor BUFFALO.
25
•Espátula
• Garfo (Apenas para J300)
• Manual de instruções
Page 31

PT
Funcionamento
Conselhos
Lave bem o arroz antes de cozer. Isto ajuda o arroz a ficar solto.
• Uma pequena quantidade de óleo vegetal também ajuda o arroz a ficar solto.
• Arroz castanho ou arroz integral pode requer mais água.
Utilizar a panela de arroz
A tigela interior tem linhas medidoras que lhe ajudam como as
quantidades. O copo medidor fornecido serve para medir arroz e
água.
1. Utilize o copo medidor para medir a quantidade desejada de
arroz.
Nota: um copo de arroz equivale aproximadamente
a dois copos de arroz cozido.
2. Lave o arroz num passador por debaixo da torneira para
retirar farelos e féculas.
3. Coloque o arroz na tigela interior. Para obter uma cozedura uniforme deve distribuir o arroz de forma
nivelada na tigela.
4. Com o copo medidor adicione a quantidade correcta ou enche a tigela interior com água até à marca
medidor adequada.
Nota: para obter um arroz mais rijo utilize menos água, para um arroz mais cozido
utilize mais água.
Luz de
cozedura
Luz placa
eléctrica
Alavanca
Modelo ilustrado: J300
HEAT
WARM
5. Coloque a tigela interior dentro da panela de arroz.
Nota: verifique que o exterior da tigela interior não esteja molhada ou tenha grãos de
arroz colados.
6. Coloque a tampa (J193/CB944) ou feche a tampa e pressione-a até encaixar (J300).
7. Coloque a ficha da panela de arroz na tomada.
8. Desloque a alavanca para a posição COOK (cozer). A luz de cozedura acende.
9. Assim que o arroz estiver cozido a alavanca muda automaticamente para a posição WARM (quente). A
luz placa eléctrica acende.
10. Para obter os melhores resultados mantenha a tampa fechada durante 10-15 minutos.
11. Abra a tampa com cuidado, deixando o vapor escapar e a condensação voltar para a panela de arroz.
AVISO: tenha sempre cuidado em evitar explosões de vapor ao retirar a tampa.
Utilizar sempre luvas resistentes ao calor para retirar a tigela interior da panela de
arroz.
12. Mexa o arroz e sirva-o assim que possível.
13. Retire a ficha da panela de arroz da tomada.
26
Page 32

PT
Medidas de arroz/água
Como regra geral, utilize um copo de água por cada copo de arroz.
Utilize mais água para obter um arroz mais cozido ou menos água para obter um arroz mais rijo.
Limpeza, cuidados & manutenção
Nota: deve-se sempre desligar o aparelho e retirar a ficha da tomada antes de fazer a
limpeza.
Sempre deixar arrefecer o aparelho antes de fazer a limpeza.
1. Retire a tigela interior e lave-a com água de sabão quente. Não utilizar produtos de limpeza abrasivos
ou produtos não recomendados para revestimentos antiaderentes.
2. Enxaguar e secar bem.
3. Limpe o exterior da panela de arroz com um pano húmido.
4. Verifique se a placa eléctrica está limpa e que não tenha restos de alimentos ou outras coisas que
podem interferir com o processo de cozedura.
5. Secar bem a placa eléctrica antes de uso.
Apenas para J300
1. Retire o colector de água, por debaixo da dobradiça da tampa,
puxando-o para fora [fig. 1]. Retire a água recolhida após uso.
2. Limpe e coloque o colector de água no lugar.
Resolução de problemas
Problema Causa provável A fazer
O aparelho não
funciona
O arroz não está bem
cozido
O arroz está cozido Água a mais Utilize menos água
27
O aparelho não está ligado Verifique a ligação correcta dos cabos e ligue
A ficha e o cabo estão danificados Chame o agente da BUFFALO ou um técnico
O fusível da ficha disparou Substitua o fusível da ficha
Fonte de alimentação Verifique a fonte de alimentação
Erro na cablagem interna Chame o agente da BUFFALO ou um técnico
A tigela interior não faz contacto
com a placa eléctrica
A tigela ficou deformada Substituir a tigela interior
Quantidade de água Utilize mais água
o aparelho
qualificado
qualificado
Reposicione a tigela
Fig. 1
Page 33

Especificações técnicas
PT
Model Voltagem Alimentação Curronte Capacida Peso
J193 230V 50Hz 1600W 7A 4,2 litros 5,1kg 360 x 410 x 260
J300 230V 50Hz 1950W 8,5A 6 litros 10,2kg 335 x 470 x 470
CB944 230V 50Hz 2950W 12,8A 23 litros 11,8kg 555 x 485 x 395
Dimensões
a x l x p mm
Cablagem eléctrica
Deve-se utilizar tomadas adequadas para ligar a ficha do aparelho.
O esquema de electricidade deste aparelho é o seguinte:
• Cabo eléctrico (castanho) para o terminal marcado L
• Cabo neutro (azul) para o terminal marcado N
• Cabo terra (verde/amarelo) para o terminal marcado com E
Este aparelho tem que estar ligado à terra através de um circuito de terra.
Consulte um electricista qualificado em caso de dúvidas.
Os pontos eléctricos isolados devem ficar limpos de qualquer obstrução. Estes pontos têm que ser
imediatamente acessíveis caso seja necessário desligar a electricidade.
Conformidade
O logótipo WEEE neste produto ou a sua documentação indicam que o produto não
deve ser tratado como lixo doméstico. Para ajudar a prevenir possíveis danos para a
saúde humana e/ou ambiente, o produto deve ser eliminado de acordo com um
processo de reciclagem aprovado e seguro para o ambiente. Para mais informação
sobre como eliminar este produto correctamente, contacte o fornecedor do mesmo ou
as autoridades locais responsáveis pela eliminação de desperdícios na sua área.
As componentes BUFFALO foram submetidas a testes rigorosos a fim de cumprirem
as normas e especificações legais determinadas pelas autoridades internacionais,
independentes e nacionais.
Os produtos BUFFALO foram aprovados e trazem o seguinte símbolo:
Todos os direitos reservados. É proibida a reprodução electrónica ou mecânica, ou por qualquer outro meio copiar,
guardar em meios digitais ou transmitir a terceiros estas instruções, seja parcialmente ou na sua totalidade, sem a
Nós nos esforçamos para que no dia de publicação deste manual todos os pormenores sejam correctos, no entanto,
a BUFFALO tem o direito de alterar as especificações sem aviso prévio.
autorização prévia de BUFFALO.
28
Page 34

S
Säkerhetsråd
• Placera på en plan stabil yta.
• Ett serviceombud/kvalificerad tekniker skall utföra installation och reparationer om så krävs. Avlägsna
inte några komponenter eller servicepanler på produkten.
• Konsultera lokala och nationella normer för att efterleva följande:
• Lagstiftning om hälsa och säkerhet i arbetet
• BS EN Tillämpningsregler
• Brandförebyggande åtgärder
• IEE Regler för kabeldragning
• Byggregler
• Doppa INTE ner apparaten i vatten.
• Rör inte heta ytor med bara händer. Använd alltid skyddshandskar.
• Var ytterst försiktig när du flyttar eller hanterar apparater som innehåller het olja eller annan het
vätska.
• Fyll aldrig upp den inre.
• Låt aldrig vatten eller någon annan vätska komma in i ytterkärlet.
• Använd endast kokkärl som levererades med apparaten när du använder riskokaren. Vassa föremål
kan skada den inre skålens ytbehandling av typen "non-stick".
• Använd inte apparaten för något annat än avsett bruk.
• Sätt inte i kabeln förrän du skall koka ris. Strömmen till riskokaren kommer vara PÅ såvida kabeln inte
är utdragen.
• Stäng alltid av apparaten och koppla från elförsörjningen när den inte används.
• Inte lämpad för bruk utomhus.
• Håll allt förpackningsmaterial åtskiljt från barn. Släng förpackningsmaterialet i enlighet med loka
myndigheters regleringar.
• Om elsladden är skadad måste den bytas ut av en BUFFALO-representant eller en rekommenderad
kvalificerad tekniker för att undvika risker.
Inledning
Ta några minuter för att noggrant läsa igenom denna manual. Korrekt underhåll och drift av maskinen
kommer att göra att din BUFFALO-produkt ger bästa möjliga prestanda.
Förpackningsinnehåll
Följande medföljer:
•BUFFALO riskokare
•Mätkopp
J193/CB944 x 1
J300 x 2
Håll allt förpackningsmaterial åtskiljt från barn. Släng förpackningsmaterialet i enlighet med loka
myndigheters regleringar.
Om elsladden är skadad måste den bytas ut av en BUUFALO-representant eller en rekommenderad
kvalificerad tekniker för att undvika risker.
29
•Sked
• Gaffel (Endast J300)
• Bruksanvisning
Page 35

S
Operation
Koktips
Tvätta riset noggrant innan du kokar det. Detta hjälper till att hindra riset från att klibba.
• Lite vegetarisk olja i riset kan hjälpa till att separera riskornen.
• Brunt eller vildris kan kräva extra vatten.
Använda riskokaren
Det finns mätlinjer i innerskålen som vägledning. Den medföljande
måttkoppen är utformad att mäta upp ris och vatten.
1. Mät upp önskad mängd ris med medföljande mätkopp.
Obs! En kopp ris kommer att ge ungefär två koppar
kokat ris.
2. Skölj riset i ett såll under rinnande vatten för att avlägsna
överskott av kli och stärkelse.
3. Häll i riset i det inre kärlet. Sprid ut det jämnt i skålen för att
få ett jämnt kokat ris.
4. Tillsätt korrekt mängd vatten genom att använda mätkoppen eller genom att fylla den inre skålen till
korrekt nivå.
Obs! Använd något mindre mängd vatten för hårdare ris och öka mängden för mjukare
ris.
Kokljus
Håll varmtljus
Spak
Visad modell: J300
HEAT
WARM
5. Placera det inre kärlet i riskokaren.
Obs! Se till att det inte finns något ris eller fukt på det inre kärlets utsida
6. Sätt tillbaka locket (J193/CB944) eller stäng locket och tryck ner tills låset knäpper igen (J300).
7. Anslut riskokaren till eluttaget.
8. Tryck ner spaken till positionen COOK. Kokljuset sätts på.
9. Då kokningen är färdig flyttar spaken automatiskt till positionen WARM. Varmljuset sätts på.
10. Håll locket stängt under 10-15 minuter för bästa resultat.
11. Öppna försiktigt locket och låt ånga och kondens gå tillbaka in i riskokaren.
VARNING: Var försiktig så att du inte får ångan direkt på dig när du tar av locket.
Använd alltid värmesäkra handskar när du tar ut det inre kärlet efter kokningen.
12. Rör om riset och servera så snart som möjligt.
13. Koppla ur apparaten från eluttaget.
Ris/vattenmått
Som en allmän riktlinje bör du använda ett mått vatten för varje mått ris.
Tillsätt en aning mer vatten om du vill att riset ska vara mjukare eller en aning mindre för fastare ris.
30
Page 36

S
Rengöring, omvårdnad och underhåll
Obs! Stäng alltid av och koppla från eltillförseln till apparaten innan rengöring.
Låt alltid apparaten kylas ner innan rengöring.
1. Ta bort det inre kärlet och tvätta med varmt tvålvatten. Använd inte starkt slipande rengöringsmedel
eller produkter som inter är rekommenderade för ytbehandlingar av typen "non-stick".
2. Skölj och torka noggrant.
3. Rengör riskokarens utsida med en fuktig trasa.
4. Se till att kokplattan är ren och inte att det inte har fastnat mat eller annat skräp på den som kan störa
kokningen.
5. Torka kokplattan noggrant innan användning.
Endast J300
1. Ta bort vattenuppsamlaren under lockfästet genom att dra utåt
[fig. 1.]. Häll ut det uppsamlade vattnet efter varje användning.
2. Rengör och sätt tillbaka vattenuppsamlaren.
Felsökning
fig. 1
Fel Möjlig orsak Åtgärd
Apparaten fungerar
inte
Riset är inte
färdigkokt
Riset är överkokt För mycket vatten Minska använd vattenmängd
Apparaten är inte påslagen Kontrollera att apparaten är korrekt ansluten
Kontakt och ledning är skadade Ring BUFFALO-representant eller kvalificerad
Säkring i kontakten har gått Byt ut säkringen
Strömtillförsel Kontrollera strömtillförseln
Internt kabeldragningsfel Ring BUFFALO-representant eller kvalificerad
Kärlet har inte kontakt med
kokplattan
Skålen har deformerats Byt ut skålen
Inte tillräckligt med vatten Öka använd vattenmängd
och påslagen
tekniker
tekniker
Ändra skålen placering
31
Page 37

Tekniska specifikationer
S
Modell Spänning Kraft Ström
J193 230V 50Hz 1600W 7A 4,2 5,1kg 360 x 410 x 260
J300 230V 50Hz 1950W 8,5A 6 10,2kg 335 x 470 x 470
CB944 230V 50Hz 2950W 12,8A 23 11,8kg 555 x 485 x 395
Kapacitet
(liter)
Vikt
Mått
h x b x d mm
Elektriska kablar
Kontakten måste vara ansluten till ett lämpligt eluttag.
Denna apparat har följande kablar:
• Elektrisk kabel (brun) till uttag markerat L
• Neutral kabel (blå) till uttag markerat N
• Jordkabel (grön/gul) till uttag markerat E
Denna apparat måste vara jordad, och bruka en dedikerad jordad krets.
Vid tveksamheter rådfråga en kvalificerad elektriker.
Elektriska isoleringspunkter måste hållas fria från hinder. I händelse av urkoppling vid nödfall krävs, måste
de vara lättåtkomliga.
Du kan också ringa BUFFALO:s hjälplinje för information om nationella företag för avfallshantering i EU.
Tillmötesgående
WEEE-logotypen på den här produkten eller i dokumentationen anger att produkten
inte får kastas med vanliga hushållssopor. För att förhindra hälso- och/eller
miljöskador måste produkten lämnas in på en godkänd insamlingsplats för miljösäker
återvinning. Kontakta leverantören eller de lokala myndigheterna som ansvarar för
sophanteringen om du vill ha mer information om hur produkten ska kastas.
BUFFALO-delarna har genomgått strikt produkttestning för att tillmötesgå reglerande
normer och specifikationer utsatta av internationella, oberoende och statliga
myndigheter.
BUFFALO-produkterna har godkänts för att bära följande symbol:
Alla rättigheter reserverade. Ingen del av dessa instruktioner får framställas eller överföras i någon form eller på
något sätt, elektroniskt, mekaniskt, fotokopieras, spelas in eller på annat sätt, utan tidigare skriftligt tillstånd från
Vi gör allt vi kan för att försäkra att alla detaljer är korrekta då informationen trycks, men, BUFFALO förbehåller
sig rätten att ändra specifikationerna utan tidigare meddelande.
BUFFALO.
32
Page 38

DK
Sikkerhedstips
• Anbring apparatet på en jævn, stabil overflade.
• Installation og reparation skal udføres af en serviceagent/kvalificeret tekniker, hvis det bliver
nødvendigt. Fjern ikke komponenter eller servicepaneler på dette produkt.
• Check de lokale og nationale standarder for at imødekomme det følgende:
• Sikkerhed og sundhed på arbejdspladsen
• BS EN Regler for god praksis
• Brandforholdsregler
• IEE Strømkabelregulativer
• Bygningsvedtægter
• Kom IKKE apparatet i vand.
• Rør ikke ved varme overflader med bare hænder. Brug altid grydelapper, grillhandsker el.lign.
• Ved flytning og håndtering af apparater, der indeholder varm olie eller anden varm væske, skal der
altid udvises stor forsigtighed.
• Fyld aldrig inderskålen over den øverste vandstreg.
• Lad aldrig vand eller anden væske komme ned i den ydre gryde.
• Når riskogeren anvendes, må der kun benyttes de redskaber, der følger med apparatet. Skarpe
genstande kan beskadige inderskålens "slip-let" belægning.
• Anvend kun apparatet til det beregnede formål.
• Man må ikke sætte ledningens stik i stikkontakten, før man er klar til at koge risen. Hvis stikket sidder
i stikkontakten, er der tændt for strømmen til riskogeren.
• Sluk altid for apparatet og tag stikket ud af stikkontakten, når apparatet ikke er i brug.
• Ikke egnet til udendørs brug.
• Opbevar al emballage utilgængeligt for børn. Kasser emballagen i henhold til de lokale love og
bestemmelser.
• Hvis strømkablet er beskadiget, skal det udskiftes af en BUFFALO agent eller en anbefalet kvalificeret
tekniker for at undgå fare.
Indledning
Brug venligst et par øjeblikke på at gennemlæse denne brugsanvisning grundigt. BUFFALO produktet vil
fungere bedst muligt, hvis maskinen vedligeholdes og anvendes korrekt.
Pakkens indhold
Der skal være følgende:
•BUFFALO riskoger
• Målebæger
J193/CB944 x 1
J300 x 2
BUFFALO er stolte vores kvalitet og service, der sikrer at det leverede indhold er fuldt funktionelt og fri for
skader ved pakning.
Skulle du alligevel opdage skader, som resultat af transporten, bedes du kontakte din BUFFALO forhandler
med det samme.
33
•Ske
• Gaffel (Kun J300)
•Brugsanvisning
Page 39

DK
Brug
Tilberedningstips
• Skyl risene grundigt før tilberedning. Derved undgår man, at risene klistrer sammen.
• En lille smule vegetabilsk olie i risen kan hjælpe med at skille risene ad.
• Det kan være nødvendigt at bruge ekstra vand til brune eller vilde ris.
Sådan anvendes riskogeren
Inderskålen kommer med målestreger på indersiden til vejledning.
Den medfølgende kop er designet til at måle ris og vand.
1. Mål den ønskede mængde ris ved hjælp af det medfølgende
målebæger.
Bemærk: 1 mål ris giver ca. 2 mål kogt ris.
2. Skyl risene i en si under løbende vand for at fjerne overflødigt
klid og stivelse.
3. Hæld risene i inderskålen. For at opnå jævnt kogt ris skal de
fordeles jævnt rundt i skålen.
4. Tilsæt den korrekte mængde vand ved at måle det med målebægeret eller ved at fylde inderskålen til
det relevante niveau.
Bemærk: Brug lidt mindre vand for fastere ris og lidt mere vand for blødere ris.
Kontrollampe
for kogning
Kontrollampe
for holdevarmfunktion
Håndtag
Den viste model: J300
HEAT
WARM
5. Sæt inderskålen ned i riskogeren.
Bemærk: Sørg for at der ikke sidder ris eller fugt på ydersiden af inderskålen.
6. Sæt låget på (J193/CB944) eller luk låget og tryk ned, indtil låsen går i indgreb (J300).
7. Sæt riskogerens stik i stikkontakten.
8. Tryk håndtaget ned til "COOK" (kogning). Kontrollampen for kogning begynder at lyse.
9. Når kogningen er færdig, indstilles kontakten automatisk på "WARM" (holde-varm-stilling).
Kontrollampen for holde-varm-funktionen begynder at lyse.
10. Hold låget lukket i 10 - 15 minutter for at opnå det bedste resultat.
11. Åbn forsigtigt låget og lad evt. damp og kondensvand løbe ned i riskogeren igen.
ADVARSEL: Pas altid på den udstrømmende damp, når låget fjernes.
Brug altid grillhandsker, grydelapper el.lign., når inderskålen fjernes efter kogning.
12. Rør i risene og servér dem hurtigst muligt.
13. Tag apparatets stik ud af stikkontakten.
34
Page 40

DK
Måling af ris/vand
Som en generel vejledning skal man bruge en hel kop vand til hver hele kop ris.
Tilsæt en anelse mere vand til blødere ris eller lidt mindre vand til fastere ris.
Rengøring, pleje og vedligeholdelse
Bemærk: Sluk altid for apparatet og tag stikket ud af stikkontakten inden rengøring.
Lad altid apparatet køle af inden rengøring.
1. Fjern inderskålen og vask den i varmt sæbevand. Brug ikke skrappe, ridsende rengøringsmidler eller
produkter, som ikke er anbefalet til brug på "slip-let" belægninger.
2. Skyl og tør grundigt.
3. Rengør ydersiden af riskogeren med en fugtig klud.
4. Sørg for at varmepladen er ren og fri for mad og andre rester, som kan påvirke kogningsprocessen.
5. Tør varmepladen grundigt inden brug.
Kun J300
1. Fjern vandsamleren fra under låghængslet ved at trække den udad
[Fig. 1]. Det vand, der har samlet sig, skal hældes væk, hver gang
apparatet har været i brug.
2. Rengør vandsamleren og sæt den på igen.
Fig. 1
Fejlfinding
Fejl Mulig årsag Løsning
Apparatet virker ikke Apparatet er ikke tændt Kontroller, at apparatet er sat rigtigt i
Stik og ledning er beskadiget Kontakt BUFFALO agenten eller en
En sikring i stikket er sprunget Udskift stiksikringen
Strømforsyning Kontroller strømforsyningen
Intern ledningsfejl Kontakt BUFFALO agenten eller en
Riset är inte
färdigkokt
Riset är överkokt För mycket vatten Minska använd vattenmängd
35
Kärlet har inte kontakt med
kokplattan
Skålen har deformerats Byt ut skålen
Inte tillräckligt med vatten Öka använd vattenmängd
stikkontakten og er tændt
kvalificeret tekniker
kvalificeret tekniker
Ändra skålen placering
Page 41

Tekniske specifikationer
DK
Model Spænding Strøm Strømstyrke
J193 230V 50Hz 1600W 7A 4,2 liter 5,1kg 360 x 410 x 260
J300 230V 50Hz 1950W 8,5A 6 liter 10,2kg 335 x 470 x 470
CB944 230V 50Hz 2950W 12,8A 23 liter 11,8kg 555 x 485 x 395
Kapacitet
(liter)
Vægt
Mål h x b x d
mm
El-kabler
Stikket skal tilsluttes til en passende hovedkontakt.
Apparatet er kabelført som følger:
• Strømførende ledning (brun) til terminal L
• Neutral ledning (blå) til terminal N
• Jordledning (grøn/gul) til terminal E
Dette apparat skal være jordforbundet med et fast fejlstrømsrelæ.
Spørg en autoriseret elektriker i tvivlstilfælde.
Elektriske isolationspunkter skal holdes fri af blokeringer. I nødstilfælde skal de være tilgængelige for
afbrydelse.
Overensstemmelseserklæring
WEEE-logoet på dette produkt eller den tilhørende dokumentation angiver, at
produktet ikke må bortskaffes som almindeligt husholdningsaffald. For at forhindre
mulig fare for personers helbred og/eller miljøet, skal produktet bortskaffes gennem
en godkendt og miljøvenlig genbrugsproces. For yderligere oplysninger om, hvordan
dette produkt bortskaffes korrekt, skal De kontakte leverandøren af produktet eller de
lokale myndigheder, som er ansvarlige for bortkastning af affald i Deres omegn.
BUFFALO dele har gennemgået streng produkttestning for at overholde de normer,
standarder og specifikationer, som er fastsat af internationale, uafhængige og
amerikanske føderale myndigheder.
BUFFALO produkter er godkendt til at bære følgende symbol:
Med forbehold for alle rettigheder. Ingen del af disse anvisninger må produceres eller transmitteres i noget format
eller på nogen måde, hvad enten det drejer sig om elektronisk, mekanisk, fotokopiering, lagring på edb eller andet,
Der er blevet gjort alle bestræbelser på at sikre, at oplysningerne er korrekte på trykningstidspunktet, men
før der er blevet forudindhentet skriftlig tilladelse hertil fra BUFFALO.
BUFFALO forbeholder sig ret til at ændre specifikationerne uden varsel.
36
Page 42

N
Sikkerhetstips
• Plasser på en vannrett og stabil flate.
• Installasjon og all reparasjon skal utføres av en serviceagent eller en kyndig tekniker. Komponenter
eller inspeksjonsdeksler må ikke fjernes på dette produktet.
• Rådfør deg med lokale og nasjonale standarder for å oppfylle følgende:
• HMS-lovgivningen (Helse/Miljø/Sikkerhet)
• Bransjestandard BS EN
• Forholdsregler mot brann
• IEE-forskrifter for tilkopling
• Byggeregler
• IKKE senk riskokeren ned i vann.
• Ikke ta på varme overflater med bare hender. Bruk alltid vernehansker.
• Vær ekstra forsiktig når riskokeren skal flyttes eller håndteres med varm olje eller annen varm væske i
riskokeren.
• Fyll aldri den indre skålen over den øvre vannlinja.
• Det må aldri komme vann eller noe væske i den ytre skålen.
• Bruk kun kjøkkenredskaper som følger med riskokeren. Skarpe gjenstander kan muligens skade nonstick belegget på den indre skålen.
• Ikke bruk riskokeren til andre formål enn hva den er beregnet til.
• Sett ikke støpslet i kontakten før du er klar til å bruke riskokeren. Strømmen vil være PÅ så lenge
støpslet er i kontakten.
• Slå alltid Av og frakople strømmen når riskokeren ikke er i bruk.
• Er ikke egnet til utendørs bruk.
• Slå alltid av og frakople strømtilførselen når enheten ikke er i bruk.Hold all emballasje unna barn.
Emballasjen skal deponeres i henhold til forskrifter bestemt av myndighetene på stedet.
• Hvis strømledningen er skadet skal den skiftes ut av en BUFFALO-agent eller en kyndig tekniker for å
unngå fare.
Innledning
Vennligst ta deg tid til å lese nøye gjennom denne håndboka. Korrekt vedlikehold og bruk av ismaskinen vil
gi best mulig ytelse på ditt BUFFALO-produktet.
Pakkeinnhold
Følgende er inkludert:
•BUFFALO riskoker
•Målekopp
J193/CB944 x 1
J300 x 2
BUFFALO er stolt av sin kvalitet og service, og garanterer at da innholdet ble pakket var det fullstendig
funksjonelt og uten skade.
Skulle du finne noe som helst skade som et resultat av transitt, vennligst ta omgående kontakt med
BUFFALO-forhandleren på stedet.
37
•Skje
• Gaffel (Kun for J300)
• Brukerhåndbok
Page 43

Bruk
Koketips
Vask risen godt før koking. Dette gjør at risen ikke kleber seg så godt sammen.
• Bruk litt matolje i risen for å holde riskorn fra hverandre.
• Brun ris eller vannris kan muligens trenge ekstra vann.
Bruke riskokeren
Den indre bollen har veiledende målestreker på innsiden. Den
medfølgende koppen er designet til oppmåling av risen og vannet.
1. Mål ønsket mengde ris ved å bruke koppen som følger med er
spesielt laget for måling av ris og vann
Merk: En målekopp med ris vil gi cirka to kopper
kokt ris.
Kokelamp
Hold varmlampe
Spak
N
HEAT
WARM
2. Skyll risen i en sil under rennende vann for å fjerne overflødig
kli og stivelse.
3. Hell risen over i den indre skålen. For å oppnå jevn kokt ris, spre den jevnt ut i skålen.
4. Tilsett korrekt vannmengde ved å bruke målekoppen, eller ved å fylle den indre skålen til passende
Modell vist: J300
nivå.
Merk: Reduser litt på vannmengden for fastere ris, og øk vannmengden for mykere ris.
5. Plasser den indre skålen i riskokeren.
Merk: Sjekk at det ikke er noe ris eller fuktighet på yttersiden av den indre skålen.
6. Sett lokket på plass igjen (J193/CB944) eller lukk lokket og trykk det ned til sperren går i lås (J300).
7. Kople strømmen til riskokeren.
8. Trykk spaken ned til COOK (kokeposisjon) og kokelampen slår seg på.
9. Når ferdig kokt slår bryteren seg automatisk over til WARM (varmposisjon) og varmlampen slår seg på.
10. Hold lokket lukket i 10 - 15 minutter for best resultat.
11. Åpne lokket forsiktig og la all damp og kondens renne tilbake i riskokeren.
ADVARSEL: Vær alltid forsiktig når lokket åpnes for at dampen ikke skal strømme ut.
Bruk alltid varmebestandige hansker når den indre skålen skal fjernes etter koking.
12. Røre i risen og server så snart som mulig.
13. Frakople strømmen til riskokeren.
38
Page 44

N
Mål for ris/vann
Som regel brukes en full kopp med vann for hver fulle kopp med ris.
Tilsett litt mer vann for bløtere ris, eller litt mindre vann for fastere ris.
Rengjøring, stell og vedlikehold
Merk: Slå alltid av og frakople strømmen til riskokeren før rengjøring.
La alltid riskokeren avkjøle før rengjøring.
1. Fjern den indre skålen og vask i varmt såpevann. Bruk ikke grove abrasive rengjøringsmidler eller
produkter som ikke er anbefalt til bruk på non-stick belegg.
2. Skyll og tørk grundig.
3. Gjør rent utvendig på riskokeren med fuktig klut.
4. Kontroller at varmeplaten er ren og fri for matrester eller annet avfall som måtte forstyrre
kokeprosessen.
5. Tørk varmeplaten grundig før bruk.
Kun for J300
1. Fjern vannsamleren som er plassert under hengselen på lokket ved
å trekke den utover [Fig. 1]. Tøm ut oppsamlet vann hver gang etter
bruk.
2. Gjør vannsamleren ren og sett den på plass igjen.
Fig. 1
Feilsøking
Feil Sannsynlig årsak Aksjon
Ismaskinen fungerer
ikke
Risen er for lite kokt Skålen er ikke i kontakt med
Risen er for mye kokt For mye vann Reduser vannmengden
39
Ismaskinen er ikke slått på Sjekk at støpslet på ismaskinen er plugget
inn korrekt og at kontakten er slått på
Støpsel og ledning er skadet Ring BUFFALO-agenten eller en kyndig
tekniker
Sikringen i støpslet har gått Skift ut sikringen i støpselet
Strømtilførsel Sjekk strømtilførselen
Intern koplingsfeil Ring BUFFALO-agenten eller en kyndig
tekniker
Omplasser skålen
varmeplaten
Skålen er deformert Skift ut skålen
For lite vann Øk vannmengden
Page 45

Tekniske spesifikasjoner
N
Modell Spenning Strøm Strømstyrke
J193 230V 50Hz 1600W 7A 4,2 5,1kg 360 x 410 x 260
J300 230V 50Hz 1950W 8,5A 6 10,2kg 335 x 4470 x 470
CB944 230V 50Hz 2950W 12,8A 23 11,8kg 555 x 485 x 395
Kapasitet
(liter)
Vekt
Mål
h x w x d mm
Elektrisk tilkopling
Støpselet skal tilkoples en passende strømkontakt.
Enheten er koplet som følger:
Strømførende ledning (brun) - koplingspunkt merket L
Nøytral ledning (blå) - koplingspunkt merket N
Jordledning (grønn) - koplingspunkt merket E
Denne enheten skal ha jording ved å bruke en dedisert jordingskrets.
Hvis i tvil, rådfør deg med en kyndig elektriker.
Elektriske isolasjonspunkter / skillebrytere skal være uhindret. I et nødstilfelle hvor det er nødvendig med
frakopling, skal de alltid være tilgjengelige.
Samsvar
Logoen WEEE på produktet eller dets dokumentasjon betyr at produktet ikke må
kastes som ordinært husholdningsavfall.
For å hindre skader på mennesker og/eller miljø må produktet kastes eller resirkuleres
gjennom godkjente og trygge prosesser for avfallshåndtering. For ytterligere
informasjon om hvordan produktet kasseres, kontakt den lokale leverandøren eller
miljøstasjon.
Deler brukt av BUFFALO har gjennomgått streng produkttesting for å være i samsvar
med regulative standarder og spesifikasjoner fastlagt av internasjonal, uavhengig og
føderale myndigheter.BUFFALO-produkter har blitt godkjent for å bære følgende
symbol:
Vi tar forbehold om alle rettigheter. Ikke noen del av disse instruksjonene må fremstilles eller oversendes i noen
form eller med noen midler, elektronisk, mekanisk, fotokopiert, nedskrevet eller på noen annen måte, uten at
Det er truffet omfattende tiltak for å sikre at alle detaljer er korrekte på tidspunktet for trykking, men BUFFALO
BUFFALO har gitt skriftlig tillatelse på forhånd.
forbeholder seg retten til å endre spesifikasjoner uten forvarsel.
40
Page 46

FIN
Turvallisuusvihjeitä
• Aseta laite tasaiselle, vakaalle pinnalle.
• Huoltoedustajan/pätevän huoltomiehen tulisi suorittaa asennus ja tarvittaessa kaikki korjaustyöt. Älä
irrota mitään tämän laitteen osia tai huoltopaneelia.
• Katso tietoja paikallisista ja kansallisista standardeista varmistaaksesi, että seuraavia määräyksiä
noudatetaan:
• Työterveys- ja turvallisuuslainsäädäntö
• BS EN-mukaiset ohjeet
• Paloturvallisuusmääräykset
• IEE-johdotusmääräykset
• Rakennusmääräykset
• ÄLÄ laita käsiäsi teroitusurien läheisyyteen, kun laitetta käytetään.
• ÄLÄ teroita saksia tai muita teriä, jotka eivät sovi vapaasti teroitusuriin.
• ÄLÄ laita märkiä teriä teroitusuriin.
• ÄLÄ upota laitetta veteen.
• ÄLÄ yritä teroittaa 3mm paksumpia teriä.
• Sopii ainoastaan käyttöön sisätiloissa.
• Kytke laite aina pois päältä ja irrota se verkkovirrasta, kun sitä ei käytetä.
• Pidä kaikki pakkausmateriaali poissa lasten ulottuvilta. Hävitä pakkausmateriaali paikallisten
viranomaisten määräysten mukaisesti.
• Jos virtajohto on vaurioitunut, saa sen vaihtaa uuteen ainoastaan BUFFALO-edustaja tai valtuutettu
pätevä huoltomies vaarojen välttämiseksi.
Johdanto
Käytä muutama minuutti tämän ohjekirjan lukemiseen huolellisesti läpi. Kun tätä BUFFALO-tuotetta
huolletaan ja käytetään oikein, saadaan laitteesta paras mahdollinen hyöty.
Pakkauksen sisältö
Pakkaus sisältää seuraavat:
• BUFFALO riisinkeitin
• Mittakuppi
J193/CB944 x 1
J300 x 2
BUFFALO on ylpeä laadusta ja palvelusta varmistaen, että laitetta pakattaessa pakkauksen sisältö on täysin
kunnossa ja ilman vikoja.
Mikäli laite on kuljetuksen takia vaurioitunut, ota välittömästi yhteyttä BUFFALO -edustajaan.
41
• Lusikka
• Haarukka (Ainoastaan J300)
•Ohjekirja
Page 47

FIN
Käyttö
Keittovihjeitä
Pese riisi perusteellisesti ennen keittämistä. Sillä estetään riisinjyvien tarttuminen toisiinsa.
• Pieni määrä kasviöljyä riisinkeittimessä voi auttaa riisinjyvien erottelussa.
• Ruskea tai villi riisi voivat tarvita enemmän vettä.
Riisinkeittimen käyttö
Sisemmän astian sisäpuolella on mitta-asteikko, jota voi käyttää
ohjeena. Mukana toimitettu kuppi on suunniteltu riisin ja veden
mittaamiseen.
1. Mittaa haluttu määrä riisiä käyttäen mukana toimitettua
mittakuppia.
Huom.: Yhdestä kupista riisiä saadaan suunnilleen
kaksi kuppia keitettyä riisiä.
2. Huuhtele riisi siivilässä juoksevalla vedellä ylimääräisten
leseiden ja tärkkelyksen poistamiseksi.
3. Kaada riisi sisempään astiaan. Jotta riisi kypsyisi tasaisesti, levitä se tasaisesti astian pohjalle.
4. Lisää astiaan oikea määrä vettä käyttäen mittakuppia tai täyttämällä sisempi astia tarvittavalle mitta-
asteikon kohdalle.
Huom.: Vähennä vesimäärää hieman, kun haluat kovempaa riisiä, ja lisää vähän
enemmän vettä halutessasi pehmeämpää riisiä.
Keittovalo
Lämmitysvalo
Vipu
Esitetty malli: J300
HEAT
WARM
5. Aseta sisempi astia riisinkeittimeen.
Huom.: Varmista, että sisemmän astian ulkopinnalla ei ole riisiä tai kosteutta.
6. Aseta kansi (J193/CB944) paikalleen tai sulje kansi ja paina kantta alas kunnes sen salpa napsahtaa
kiinni (J300).
7. Kytke riisinkeitin verkkovirtaan.
8. Paina vipu asentoon COOK (KEITTO). Keittovalo tulee päälle.
9. Kun keittäminen on tullut valmiiksi, kytkin siirtyy automaattisesti asentoon WARM (LÄMMITYS).
Lämmitysvalo tulee päälle.
10. Pidä kansi suljettuna 10 - 15 minuutin ajan parhaimman tuloksen aikaansaamiseksi.
11. Avaa kansi varovasti ja anna höyryn ja kanteen tiivistyneen veden valua takaisin riisinkeittimeen.
VAROITUS: Varo aina höyryn ulostuloa kantta poistettaessa.
Käytä aina lämpöä kestäviä käsineitä sisemmän astian poistamiseen keittämisen
jälkeen.
12. Sekoita riisiä varovasti ja tarjoile se mahdollisimman nopeasti.
13. Kytke laite irti verkkovirrasta.
42
Page 48

FIN
Riisin/veden mittaaminen
Yleisenä ohjeena voidaan käyttää yhtä täyttä vesikuppia yhtä täyttä riisikuppia kohti.
Lisää vähän enemmän vettä, kun halutaan pehmeämpää riisiä, tai vähän vähemmän vettä, kun halutaan
kovempaa riisiä.
Puhdistus, hoito & huolto
Huom.: Kytke virta aina pois päältä ja irrota pistoke verkkovirrasta ennen
puhdistamista.
Anna laitteen jäähtyä ennen sen puhdistamista.
1. Ota sisempi astia ulos ja pese se lämpimällä saippuavedellä. Älä käytä hankaavia puhdistusaineita tai
aineita, joita ei ole suositeltu tarttumattoman pinnan puhdistukseen.
2. Huuhtele astia ja kuivaa se huolellisesti.
3. Puhdista riisinkeittimen ulkopuoli kostealla pyyhkeellä.
4. Varmista, että lämmityslevyssä ei ole ruoka-aineita tai muita jäänteitä, jotka voivat vaikuttaa
haitallisesti keittoprosessiin.
5. Kuivaa lämmityslevy huolellisesti ennen käyttöä.
Ainoastaan J300
1. Irrota veden kerääjä kannen saranan alta vetämällä sitä ulospäin
[kuva. 1]. Heitä vedenkeräjään kertynyt vesi pois jokaisen
käyttökerran jälkeen.
2. Puhdista vedenkerääjä ja aseta se takaisin paikalleen.
Fig. 1
Vianetsintä
Vika Mahdollinen aiheuttaja Toimenpide
Laite ei toimi Laitetta ei ole kytketty päälle Tarkista, että laite on liitetty verkkovirtaan
oikein ja kytketty päälle
Pistotulppa ja johto ovat vioittuneet Soita BUFFALO -edustajalle tai pätevälle
huoltomiehelle
Pistotulpassa oleva sulake on palanut Vaihda sulake uuteen
Virransyöttö Tarkasta virransyöttö
Sisäinen vika johdoissa Soita BUFFALO -edustajalle tai pätevälle
huoltomiehelle
Riisi ei ole kypsynyt
kunnolla
Riisi on liian kypsää Liian paljon vettä Vähennä käytettävän veden määrää
43
Astia ei kosketa lämmityslevyä Aseta astia paikalleen uudelleen
Astian muoto on muuttunut Vaihda astia uuteen
Ei tarpeeksi vettä Lisää käytettävän veden määrää
Page 49

Tekniset tiedot
FIN
Malli Jännite Teho Virta
J193 230V 50Hz 1600W 7A 4,2 5,1kg 360 x 410 x 260
J300 230V 50Hz 1950W 8,5A 6 10,2kg 335 x 470 x 470
CB944 230V 50Hz 2950W 12,8A 23 11,8kg 555 x 485 x 395
Tilavuus
(litraa)
Paino
Mitat
k x l x s mm
Sähköjohdot
Pistotulppa on liitettävä sopivaan verkkovirtapistokkeeseen.
Laitteen johdot liitetään seuraavasti:
• Jännitteellinen johto (väriltään ruskea) napaan, jossa on merkintä L
• Neutraali johto (väriltään sininen) napaan, jossa on merkintä N
• Maadoitusjohto (väriltään vihreä/keltainen) napaan, jossa on merkintä E
Tämä laite on maadoitettava käyttämällä tarkoitukseen varattua maadoituspiiriä.
Jos et ole varma asiasta, kysy neuvoa pätevältä sähkömieheltä.
Sähkövirran eristyspisteet on pidettävä vapaina kaikista esteistä. Mikäli laite joudutaan hätätapauksessa
kytkemään verkkovirrasta, on niihin päästävä helposti.
Vaatimustenmukaisuus
Tässä tuotteessa tai sen asiakirjoissa oleva WEEE -logo osoittaa, että tuotetta ei saa
hävittää tavallisen talousjätteen mukana. Jotta vältyttäisiin ihmisen terveydelle ja/tai
ympäristölle koituvilta mahdollisilta haitoilta, tuote on hävitettävä hyväksytyllä ja
ympäristön kannalta turvallisella kierrätysprosessilla. Lisätietoja tämän tuotteen
oikeasta hävittämisestä voidaan saada ottamalla yhteyttä tuotteen toimittajaan tai
paikalliseen viranomaiseen, joka on vastuussa jätteiden hävityksestä alueellasi.
BUFFALO-osat ovat käyneet läpi tarkan tuotetestauksen, jotta ne noudattaisivat
kansainvälisten, itsenäisten ja valtiollisten viranomaisten asettamia säädöksiä ja
vaatimuksia.
BUFFALO-tuotteet on hyväksytty merkittäviksi seuraavilla merkinnöillä:
Kaikki oikeudet pidätetään. Mitään näiden ohjeiden osaa ei saa jäljentää tai lähettää missään muodossa tai millään
tavalla, elektronisesti, mekaanisesti, valokopioimalla, nauhoittamalla tai jollain muulla tavalla ilman, että BUFFALO
Kaikki mahdollinen on tehty sen hyväksi, että annetut tiedot olisivat aina painatushetkellä oikeita, mutta BUFFALO
varaa itselleen oikeuden muuttaa tietoja siitä erikseen ilmoittamatta.
on antanut etukäteisen luvan.
44
Page 50

DECLARATION OF CONFORMITY
• Conformiteitsverklaring • Déclaration de conformité • Konformitätserklärung • Dichiarazione di conformità •
• Declaración de conformidad • Declaração de conformidade • Överensstämmelseförsäkran •
• Overensstemmelseserklæring • Konformitetserklæring • Selvitys vaatimustenmukaisuudesta •
Equipment Type • Uitrustingstype • Type d'équipement • Gerätetyp •
Tipo di apparecchiatura • Tipo de equipo • Tipo de equipamento • 4.2 litre / 6 litre / 23 litre Rice Cooker
Enhetstyp • Udstyrstype • Type utstyr • Laitteen tyyppi:
Model • Modèle • Modell • Modello • Modelo: J193 / J300 / CB944
Serial Number • Serienummer • Numéro de série • Seriennummer •
Numero di serie • Número de serie • Número serial • Sarjanumero:
Year of Manufacture • Fabricagejaar • Date de fabrication • Herstellungsjahr •
Anno di produzione • Año de fabricación • Ano de fabricação • Tillverkningsår •
Produktionsår • Produksjonsår • Valmistusvuosi:
Application of Council Directives(s) • Toepassing van Europese Richtlijn(en) • Low Voltage Directive 73/23/EEC
Application de la / des directive(s) du Conseil: • Anwendbare EU-Richtlinie(n) • EMC Directive 89/336/EEC
Applicazione delle Direttive: • Aplicación de la(s) directiva(s) del consejo •
Aplicação de directiva(s) do Conselho • Tillämpning av rådets direktiv •
Gennemførelse af Rådets Direktiv(er) af • Applisering av kommuneforskrift(er) •
Neuvoston direktiivi(e)n soveltaminen:
Standards • Standaarden • Normes • Normen • Standard • Estándares •
Normas
• Normer • Standarder • Standardit
Producer Name
Nome del produttore • Nombre del fabricante • Nome do fabricante •
Tillverkarens namn • Fabrikantens navn • Produsentens navn • Valmistajan nimi:
• Naam fabrikant • Nom du producteur • Name des Herstellers •
:
EN 60335-1:1994+A1:1996+A2:2000+A11
1995+A12:1996+A13:1998+A14:1998
EN 60335-2-15:1996+A1:1999+A2:2000
EN 55014-12000+A1:2001, EN 55014-2:1997+A1:2001
EN 61000-3-2:2000, EN 61000-3-3:1995+A1:2001
CB944 - EN55014-1:2000+A1:2001+A2:2002,
EN 55014-2:1997+A1:2001, En 61000-3-2:2000,
EN61000-3-3:1995+A1:2001, EN 60335-1:2002,
EN 60335-2-15:2002
BUFFALO
Producers Address • Adres fabrikant • Adresse du producteur •
Anschrift des Herstellers • Indirizzo del produttore • Dirección del fabricante •
Endereço do fabricante • Tillverkarens adress • Fabrikantens adresse •
Produsentens adresse • Valmistajan osoite:
I, the undersigned, hereby declare that the equipment specified above conforms to the above Directive(s) and Standard(s).
Ik, de ondergetekende, verklaar hierbij dat de hierboven gespecificeerde uitrusting goedgekeurd is volgens de bovenstaande Richtlijn(en) en
Standaard(en).
Je soussigné, confirme la conformité de l'équipement cité dans la présente à la / aux Directive(s) et Norme(s) ci-dessus
Ich, der/die Unterzeichnende, erkläre hiermit, dass das oben angegebene Gerät der/den oben angeführten Richtlinie(n) und Norm(en)
entspricht.
Il sottoscritto dichiara che l'apparecchiatura di sopra specificata è conforme alle Direttive e agli Standard sopra riportati.
El abajo firmante declara por la presente que el equipo arriba especificado está en conformidad con la(s) directiva(s) y estándar(es) arriba
mencionadas.
Eu, o abaixo-assinado, declaro que o equipamento anteriormente especificado está em conformidade com a(s) anterior(es) Directiva(s) e
Norma(s).
Jag, den undertecknande, betygar härmed att ovan specificerade enhet överrensstämmer med ovan direktiv och norm(er).
Jeg, undertegnede, erklærer hermed at udstyret, der er specificeret ovenfor opfylder de ovenstående direktive(r) og standard(er).
Jeg, undertegnede, erklærer herved at utstyret som er spesifisert ovenfor er i overensstemmelse med ovennevnte forskrift(er) og standard(er).
Minä allekirjoittanut vakuutan täten, että yllä mainittu laite noudattaa yllä olevaa(olevia) direktiiviä(direktiivejä) ja standardia(standardeja).
Date • Data • Date • Datum • Data • Fecha • Data • Dato • Päivämäärä: 08/11/2007
Signature • Handtekening • Signature • Unterschrift
Firma • Firma • Assinatura • Underskrift • Allekirjoitus:
Full Name • Volledige naam • Nom et prénom • Vollständiger Name •
Nome completo • Nombre completo • Nome por extenso • Richard Cromwell
Fullständigt namn • Fulde navn • Fullstendig navn • Täydellinen nimi:
Position • Functie • Fonction • Position • Qualifica • Posición • Função • Marketing Director
Befattning • Stilling • Asema:
•
Fourth Way,
Avonmouth,
Bristol
BS11 8TB
United Kingdom
Page 51

• Notes • Remarques • Notas • Opmerkingen • Anmerkungen • Notas •
•
Note • Noteringar • Merknader • Bemærkninger • Huomautukset •
Page 52

J193_J300_CB944_ML_A5_v6
 Loading...