

User Manual
Powerline 500AV Wireless-N Router
Powerline 500AV Wireless-N Router Starter kit
WPL-05G300 Series
English
www.bualotech.com

Contents
Chapter 1 - Product Overview ......................................... 5
Features .................................................................................. 5
Package Contents ................................................................... 6
WPL-05G300/2 .............................................................................. 6
WPL-05G300 ................................................................................. 6
Hardware Overview ................................................................. 7
Front Panel LEDs ........................................................................... 7
Bottom Panel ................................................................................. 9
Side Panel ...................................................................................... 9
Back Side ....................................................................................... 11
Chapter 2 - Installation ..................................................... 12
Maximizing the Performance of Your AirStation ...................... 12
Starter Kit Installation Procedure ............................................ 12
Extender Kit Installation Procedure ......................................... 16
Chapter 3 - Conguration ................................................ 19
Installing the AirStation Conguration Tool (Windows) ............ 19
Setting the AirStation IP Address (Windows) .......................... 20
Setting the AirStation IP Address (Mac OS X) ........................ 23
Accessing the Web-based Conguration Interface (Windows) 26
Accessing the Web-based Conguration Interface (Mac OS X) ... 28
Conguration Interface Menus in Router Mode ...................... 30
Conguration Interface Menus in Bridge Mode ....................... 32
Setup ....................................................................................... 34
Internet/LAN (LAN Cong) ...................................................... 36
Internet (Router Mode only) ........................................................... 36
PPPoE (Router Mode only) ............................................................ 37
WPL-05G300 Series User Manual 1

DDNS (Router Mode only) ............................................................. 40
VPN server (Router Mode Only) .................................................... 42
PLC ................................................................................................ 44
LAN ................................................................................................ 45
DHCP Lease (Router Mode only) .................................................. 47
NAT (Router Mode only) ................................................................ 48
Route ............................................................................................. 49
Wireless Cong ....................................................................... 50
WPS ............................................................................................... 50
Basic .............................................................................................. 51
Advanced ....................................................................................... 54
WMM .............................................................................................. 55
MAC Filter ...................................................................................... 57
Multicast Control ............................................................................ 58
AOSS ............................................................................................. 59
Security (Router Mode only) ................................................... 61
Firewall (Router Mode only) ........................................................... 61
IP Filter (Router Mode only) ........................................................... 63
VPN Passthrough (Router Mode only) ........................................... 64
LAN Cong .............................................................................. 65
Port Forwarding (Router Mode only) .............................................. 65
DMZ (Router Mode only) ............................................................... 66
UPnP (Router Mode only) .............................................................. 67
QoS (Router Mode only) ................................................................ 68
Movie Engine (QoS) ...................................................................... 69
Admin Cong ........................................................................... 71
Name ............................................................................................. 71
Password ....................................................................................... 72
Time/Date ...................................................................................... 73
NTP ................................................................................................ 74
ECO ............................................................................................... 75
Access ........................................................................................... 77
Log ................................................................................................. 78
Save/Restore ................................................................................. 79
WPL-05G300 Series User Manual 2

Initialize/Restart ............................................................................. 80
Update ........................................................................................... 81
Diagnostic ............................................................................... 83
System Info .................................................................................... 83
Logs ............................................................................................... 85
Packet Info ..................................................................................... 86
Client Monitor ................................................................................. 87
Ping ................................................................................................ 88
Chapter 4 - Connect to a Wireless Network ................... 89
Automatic Secure Setup (AOSS/WPS) ................................... 89
Windows 7/Vista (Client Manager V) ............................................. 90
Windows XP (Client Manager 3) .................................................... 91
Mac OS X (AOSS Assistant) .......................................................... 92
Other Devices (e.g. Game Console) .............................................. 93
Manual Setup .......................................................................... 93
Windows 7 (WLAN AutoCong) ..................................................... 93
Windows Vista (WLAN AutoCong) ............................................... 94
Windows XP (Wireless Zero Conguration) ................................... 97
Mac OS X (Wi-Fi) ........................................................................... 98
Chapter 5 - Troubleshooting ............................................99
Cannot connect to the Internet over wired connection. ........... 99
Cannot access the web-based conguration Interface. .......... 99
Cannot connect to the network wirelessly. .............................. 100
You forgot the AirStation's SSID, Encryption Key, or Password. .. 100
If the AirStation is reset, it is disconnected from the network. . 101
The link speed is slower than 300 Mbps. ................................ 101
Other Tips ................................................................................ 102
Chapter 6 - Default Conguration Settings .................... 104
WPL-05G300 Series User Manual 3

Chapter 7 - Checking Wireless Signal Quality ............... 110
Windows 7/Vista ...................................................................... 110
Mac OS X ................................................................................ 111
Chapter 8 - TCP/IP Settings ............................................. 113
Windows 7 ............................................................................... 113
Windows Vista ......................................................................... 114
Windows XP ............................................................................ 115
Mac OS X ................................................................................ 116
Chapter 9 -
Appendix A -
Restoring the Default Conguration .............117
Specications .............................................118
Appendix B - Regulatory Compliance Information ....... 120
Appendix C - Environmental Information .......................126
Appendix D - GPL Information ........................................ 127
Appendix E - Warranty Information ................................ 128
WPL-05G300 Series User Manual 4

Chapter 1 - Product Overview
Features
Supports Homeplug AV 500
High-speed home network via household electrical wiring with transmission rates of up to 500
Mbps.
Supports IEEE802.11n and IEEE802.11b/g
With support for current Wireless-N, Wireless-G, and Wireless-B standards, the AirStation can transfer
data to and from all standard 2.4 GHz wireless clients.
Dual speed mode
Dual speed mode makes wireless transmission faster by using 2 channels, allowing 300 Mbps data
transmission.
Supports AOSS and WPS
Both AOSS (AirStation One-touch Secure System) and WPS (Wi-Fi Protected Setup) are supported.
These automatic connection standards make connection with compatible wireless devices easier.
Security Features
The AirStation is equipped with the following security features:
• AOSS
• WPS
• WPA-PSK (AES)
• WPA2-PSK (AES)
• WPA/WPA2 mixed PSK
• WEP (64-bit and 128-bit)
• Privacy Separator
• MAC address access restriction
• Deny Any Connection/SSID stealth
• Password for web-based control interface
• Firewall with easy rules
Automatic Channel Selection
Monitors wireless interference and automatically assigns the clearest, best channel.
Auto Mode (Router/Bridge Automatic Recognition)
In Auto mode, the AirStation will detect whether or not your network has a router and automatically
switch to the appropriate router or bridge mode. You can also manually switch between modes.
(See page 9.)
WPL-05G300 Series User Manual 5

Chapter 1 Product Overview
Package Contents
The following items are included in your AirStation package. If any of the items are missing, please
contact your vender.
WPL-05G300/2
• WPL-05G300 .................................................................................................................................. 2
• LAN cable ....................................................................................................................................... 2
• Setup CD ........................................................................................................................................1
• Quick Setup Guide ...................................................................................................................... 1
WPL-05G300
• WPL-05G300 .................................................................................................................................. 1
• LAN cable ....................................................................................................................................... 1
• Setup CD ........................................................................................................................................1
• Quick Setup Guide ...................................................................................................................... 1
WPL-05G300 Series User Manual 6
Chapter 1 Product Overview
Hardware Overview
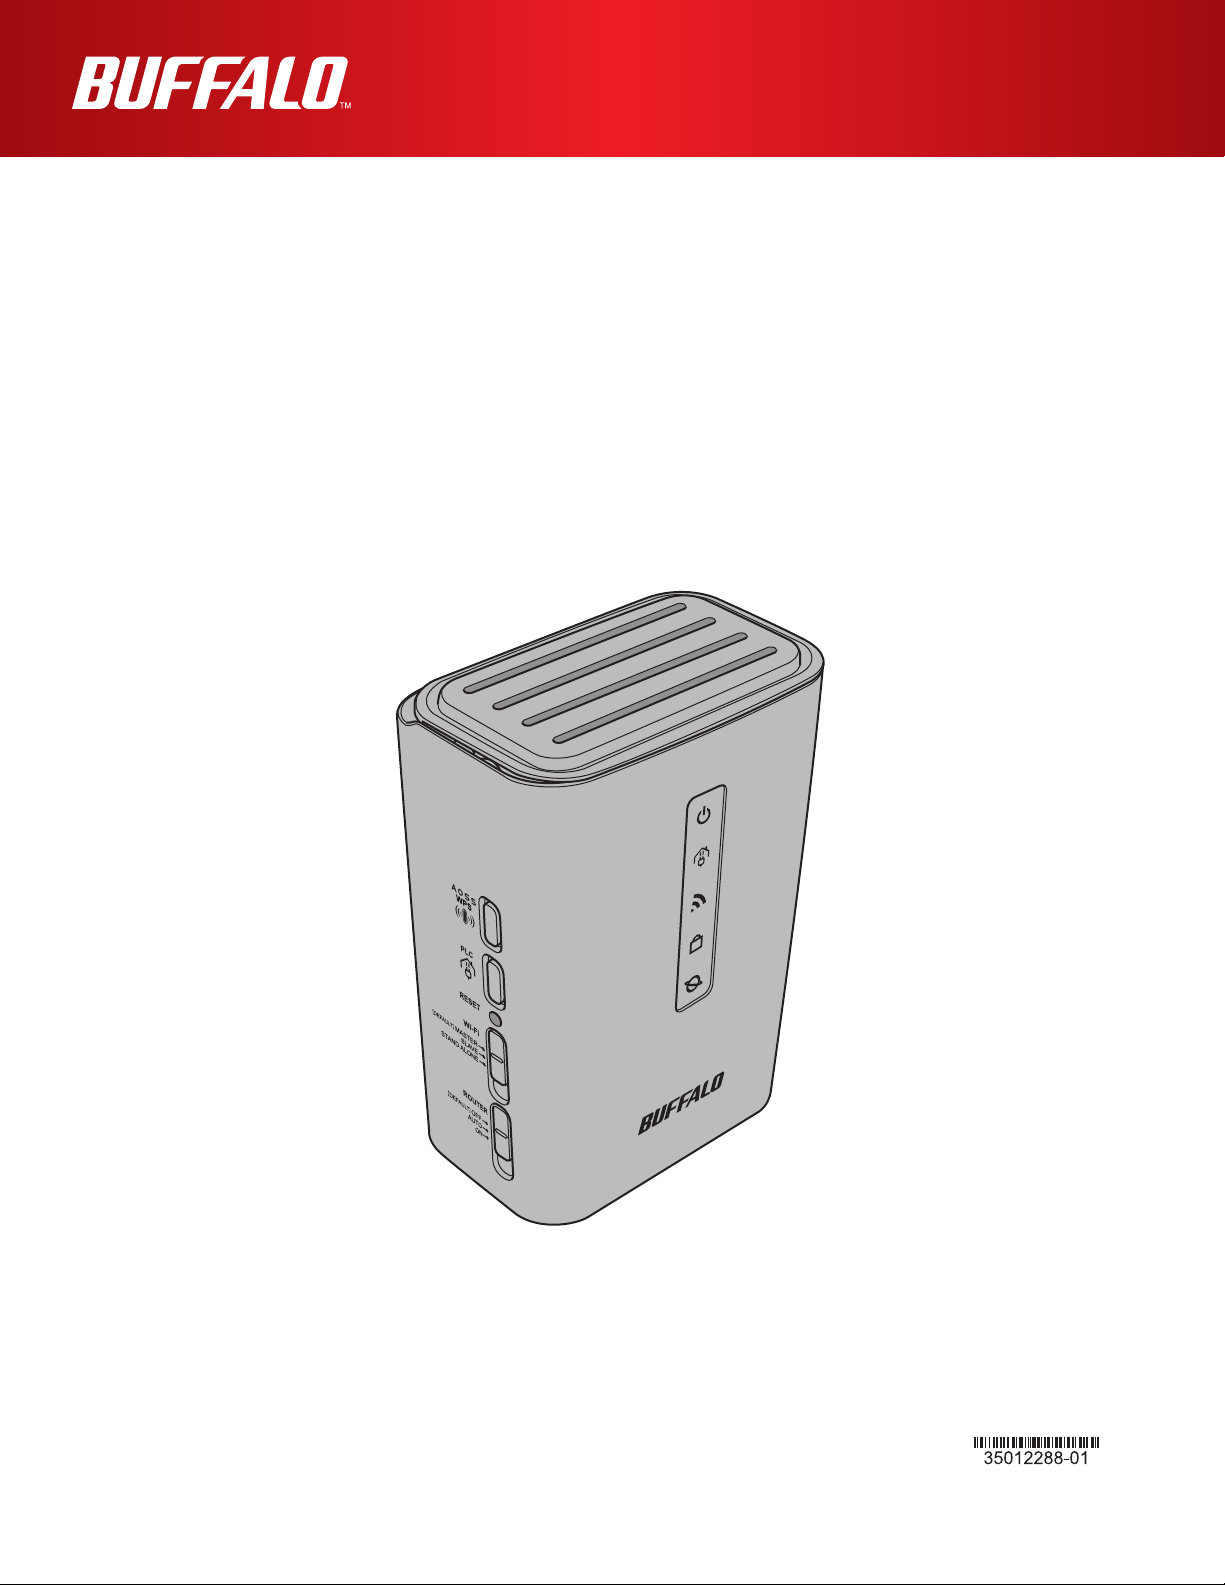
Front Panel LEDs
1
2
3
4
5
1
Power LED
Indicates the status of the AirStation power and PLC.
On (Green) : Power is on.
Blinking (Green) : PLC connection in progress.
2 blinks (Green) : PLC connection failed.
PLC connection timeout.
Either hold down the PLC button for 1 to 3 seconds, or wait for about 30
minutes for the indicator (green) to turn on.
3 blinks (Green) : Disconnecting the PLC connection.
O : Power is o.
2 blinks (Amber)
3 blinks (Amber)
4 blinks (Amber)
5 blinks (Amber) : IP address setting error.
Continuously
blinking (Amber)
*1 Turn o AirStation rst, wait for a few seconds, then turn it back on.
*2 If the power LED keeps blinking, do not turn o the AirStation nor unplug its power
cable.
*1
: Flash ROM error.
*1
: Wired Ethernet LAN error.
*1
: Wireless LAN error.
Updating rmware, saving settings, or initializing settings.
*2
:
WPL-05G300 Series User Manual 7

Chapter 1 Product Overview
2
PLC LED (Green)
Indicates the AirStation PLS status.
On : PLC connected.
O : PLC is disabled.
3
Wireless LED (Green)
Indicates wireless LAN status.
On: Wireless LAN is transmitting.
O: Wireless LAN is disabled.
4
Security LED (Amber)
Indicates security status.
On: AOSS/WPS activated; accessed to exchange security keys.
Wireless security has been set.
O: AOSS or Encryption is not set.
2 blinks: AirStation is waiting for an AOSS or WPS security key.
Blinking: AOSS/WPS error; failed to exchange security keys.
Note: The Security LED is lit if an security key has been set.
5
Router LED (Green)
On: Router functionality is enabled.
O: Router functionality is disabled.
WPL-05G300 Series User Manual 8
Chapter 1 Product Overview
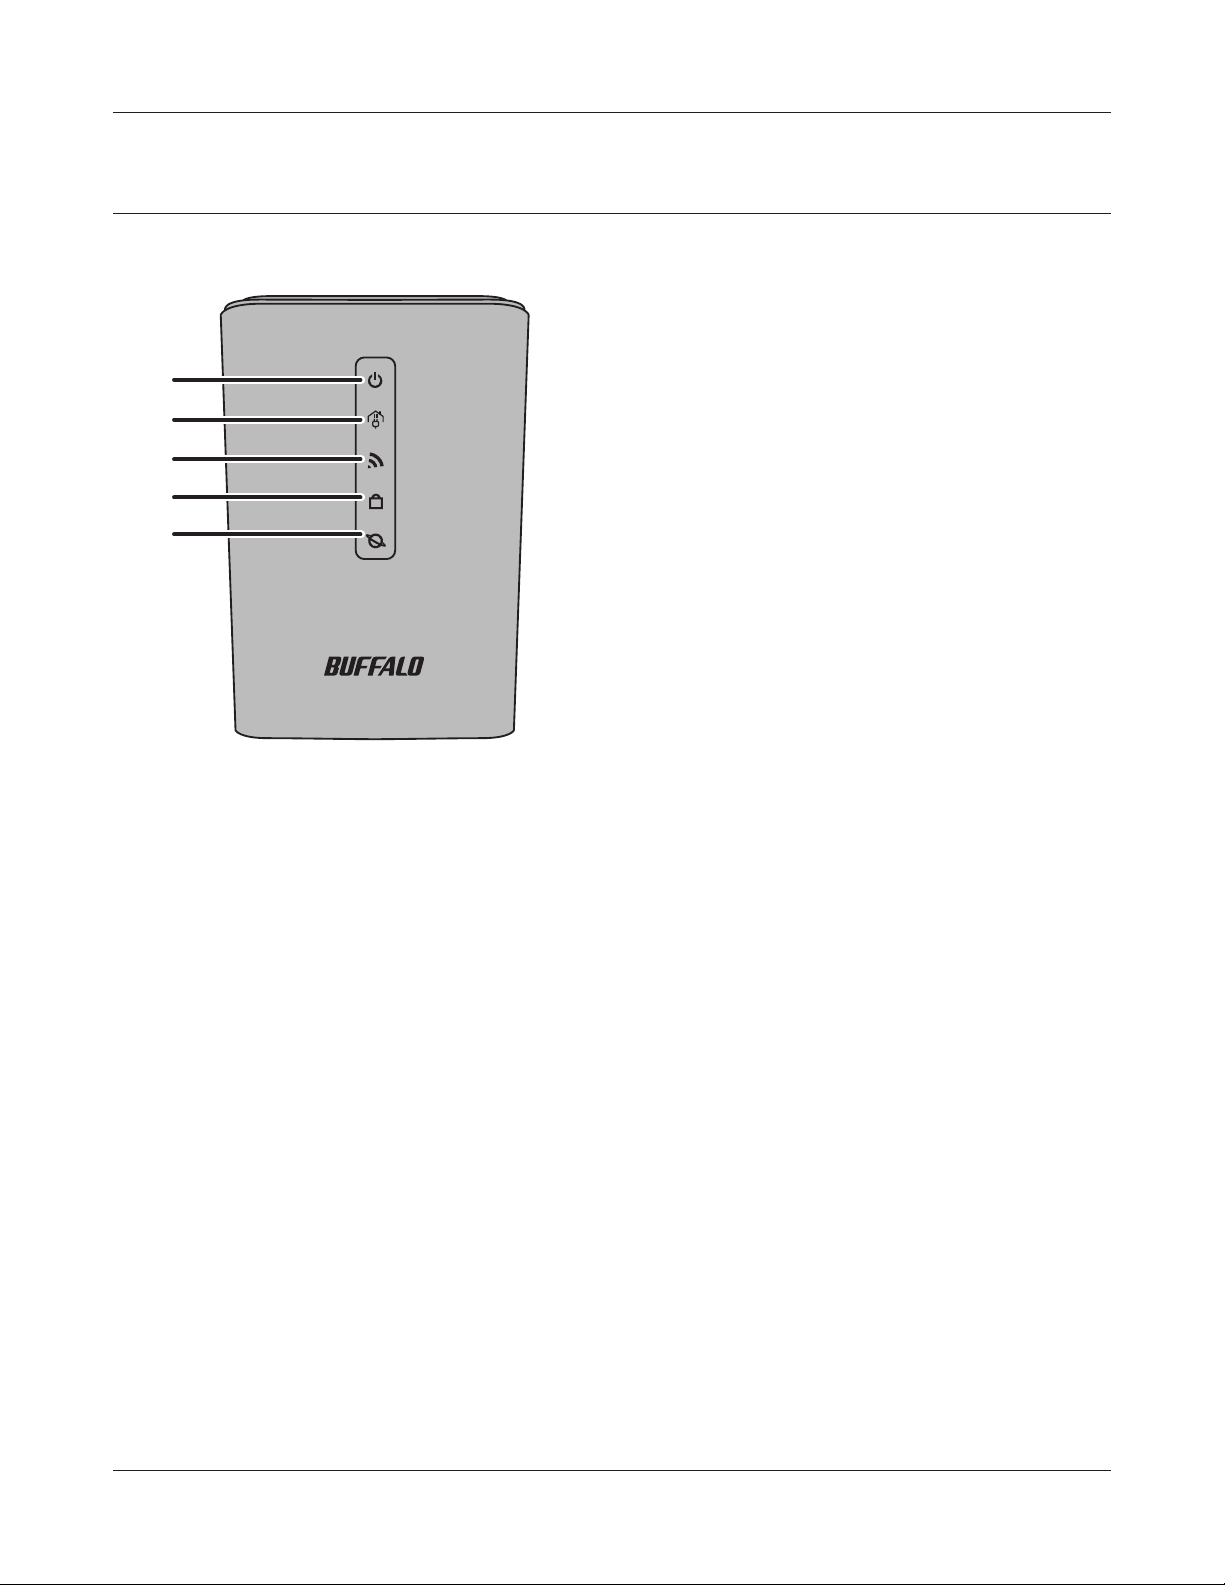
Bottom Panel
76
6
LAN Port Connect your computer, hub, or other Ethernet devices to these ports.
This switching hub supports 10 Mbps and 100 Mbps connections.
7
Internet / LAN
Port
10 Mbps and 100 Mbps connections are supported.
Note: In bridge/AP mode (router switch o), the Internet port becomes a
regular LAN port, for a total of 2 usable LAN ports.
Side Panel
8
9
10
11
12
WPL-05G300 Series User Manual 9

Chapter 1 Product Overview
8
AOSS Button
To initiate AOSS, hold down this button until the Security LED ashes (about 1 second). Then,
push or click the AOSS button on your wireless client device to complete the connection. Both
devices must be powered on for this to work.
9
PLC Button
Hold down
for 1 to 3 seconds:
Hold down
for 10 seconds:
10
Reset Button
To reset all settings, hold down this button until the amber power LED ashes (about 3
seconds). Power must be on.
11
Wireless Button
This is not used in this product.
12
Router Switch
Switches router mode between enabled, disabled, and auto.
On: Router functionality is enabled (router mode).
O: Router functionality is disabled (bridge/AP mode).
Auto: This switches between modes automatically based on whether or not
This starts the PLC connection process or cancels the connection process.
If the Power LED indicates that the PLC connection has failed, the Power
LED stops blinking.
This disconnects the PLC connection.
another router is detected on the Internet port. The default setting for
this switch is Auto.
WPL-05G300 Series User Manual 10
Chapter 1 Product Overview
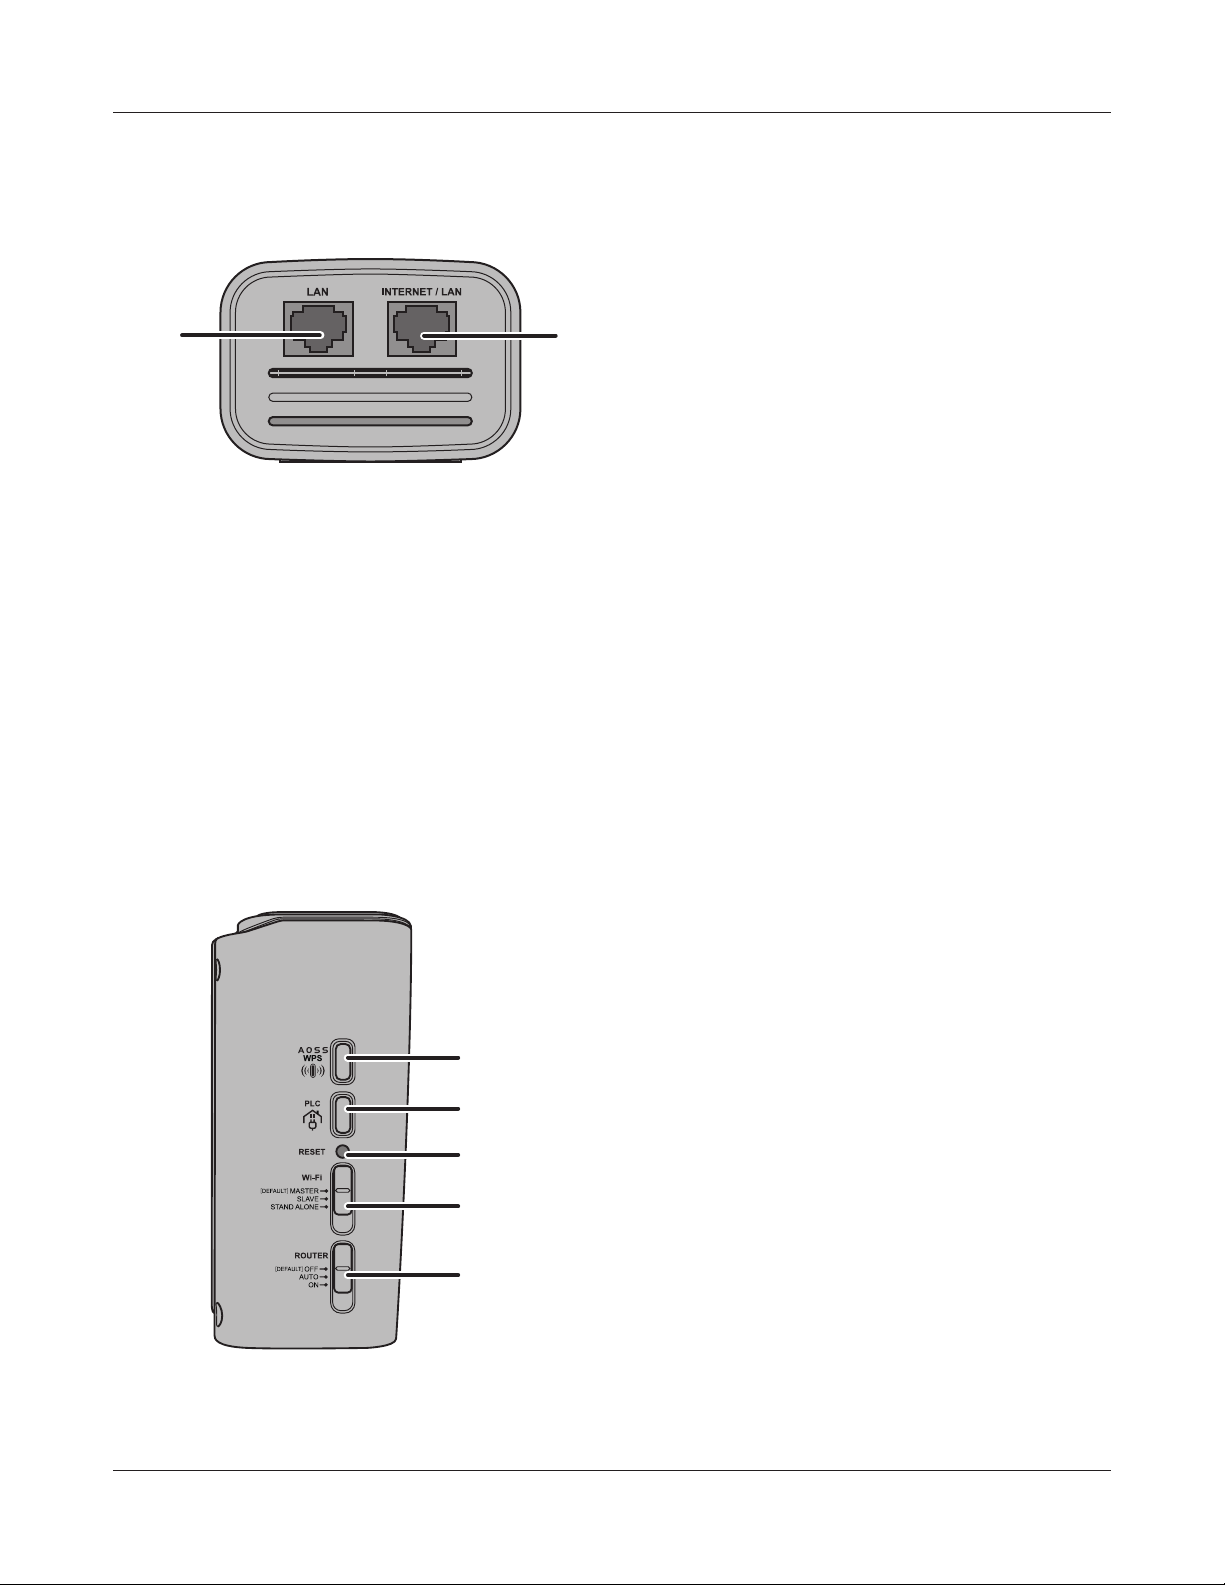
Back Side
13
13
Factory Default Settings This sticker shows the AirStation’s SSID, default encryption key,
MAC address, WPS PIN code, and Device Password. By default,
encryption is disabled for AirStations sold in Asia Pacic.
WPL-05G300 Series User Manual 11
Chapter 2 - Installation
Maximizing the Performance of Your AirStation
For best performance, plan the location of your AirStation:
Use an electrical outlet that is not controlled by a wall switch to avoid someone unknowingly
turning off the power to the outlet.
Don’t plug in AirStation to a power strip, extension cord, or surge protector as this might
prevent them from working correctly or reduce the network performance.
· Avoid plugging AirStation into electrical outlets located near an appliance that uses a lot of
power, such as a washer or dryer, or a refrigerator. This could potentially prevent the AirStation
from working correctly, or reduce network performance.
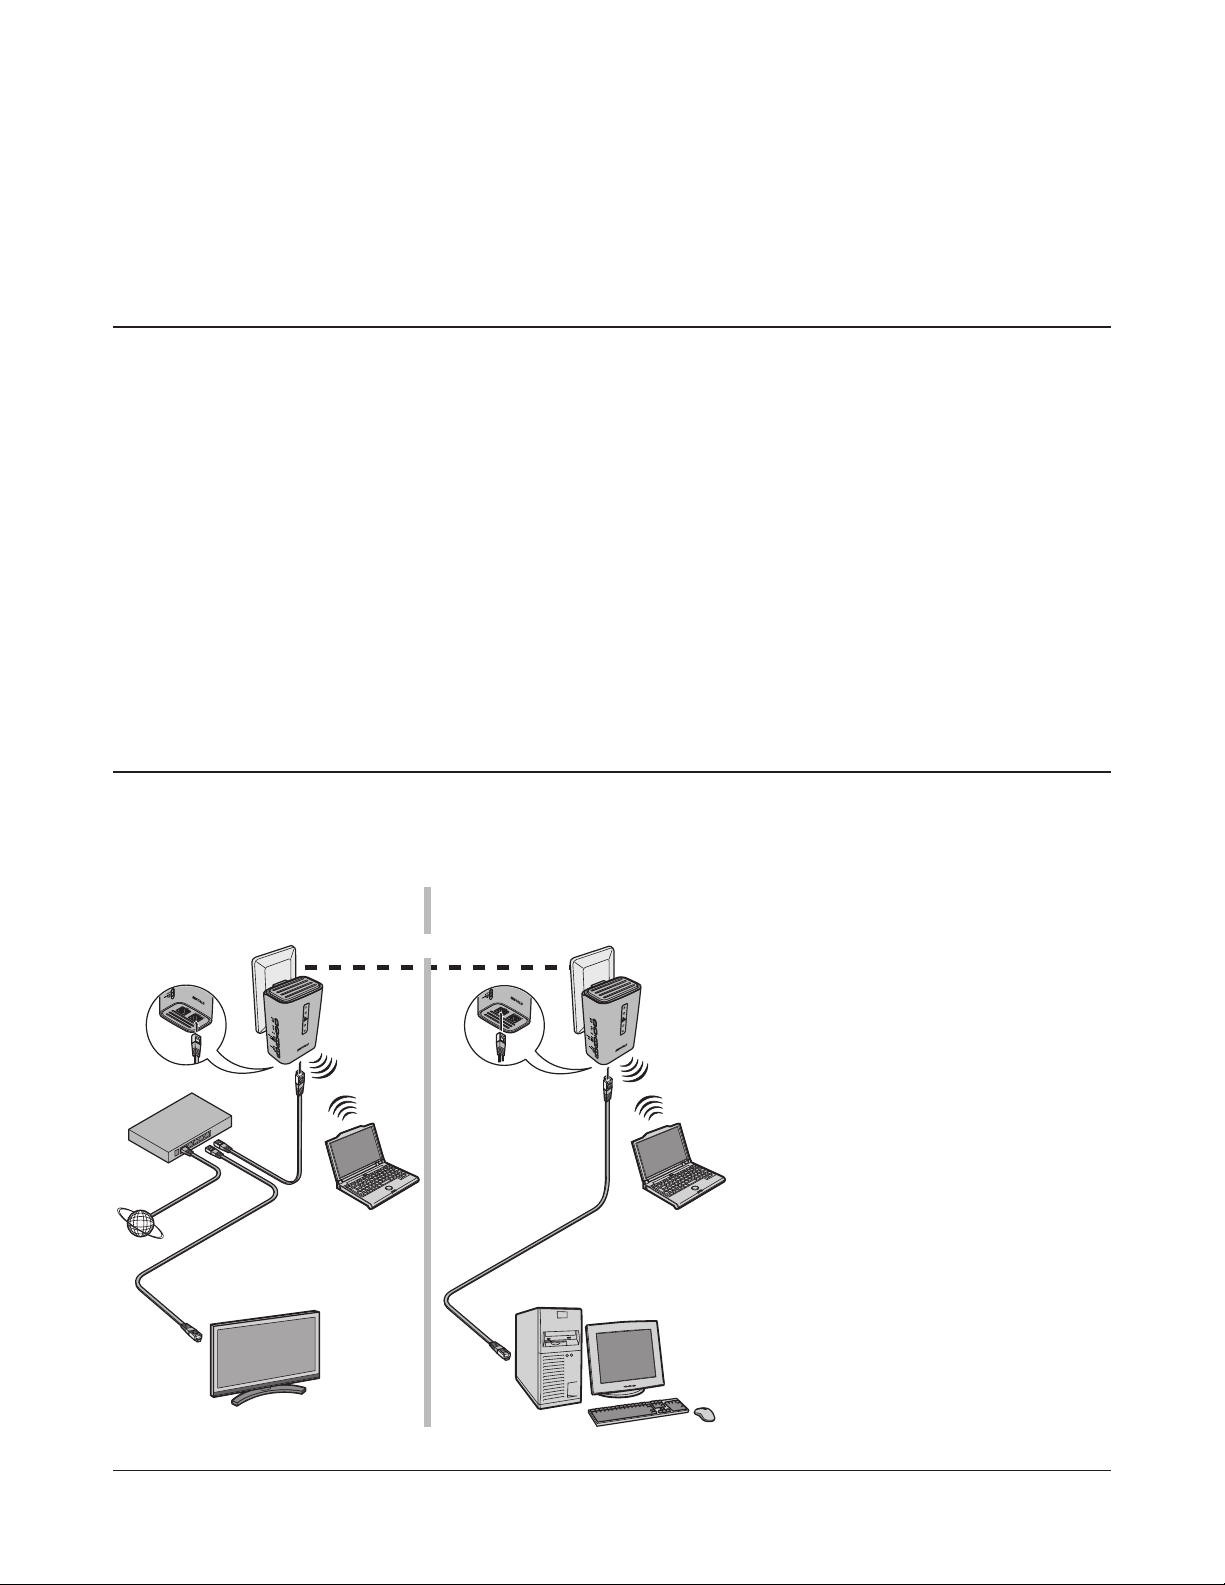
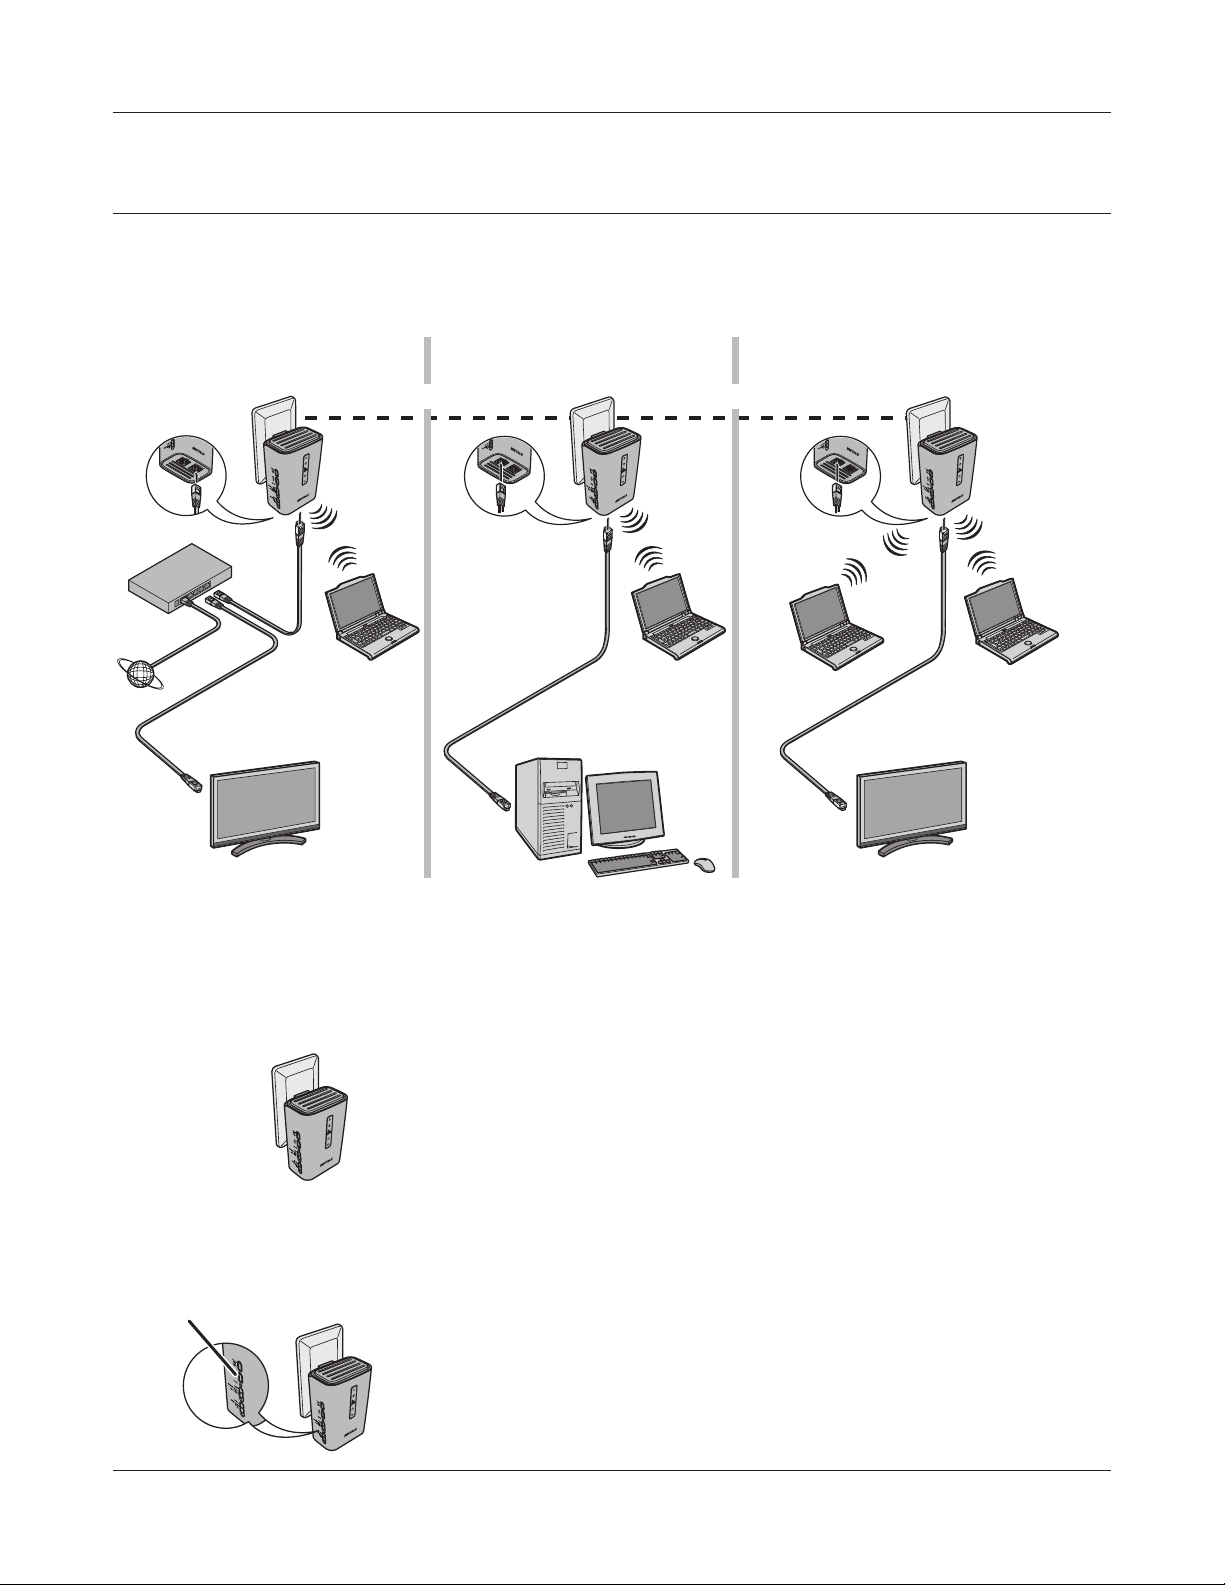
Starter Kit Installation Procedure
To congure Starter Kit, follow the procedure below.
Room 1 Room 2
Powerline
AirStation
(starter kit)
modem or router
Internet
computer computer
AirStation
(starter kit)
TV
(with an Ethernet interface)
WPL-05G300 Series User Manual 12
computer
Chapter 2 Installation
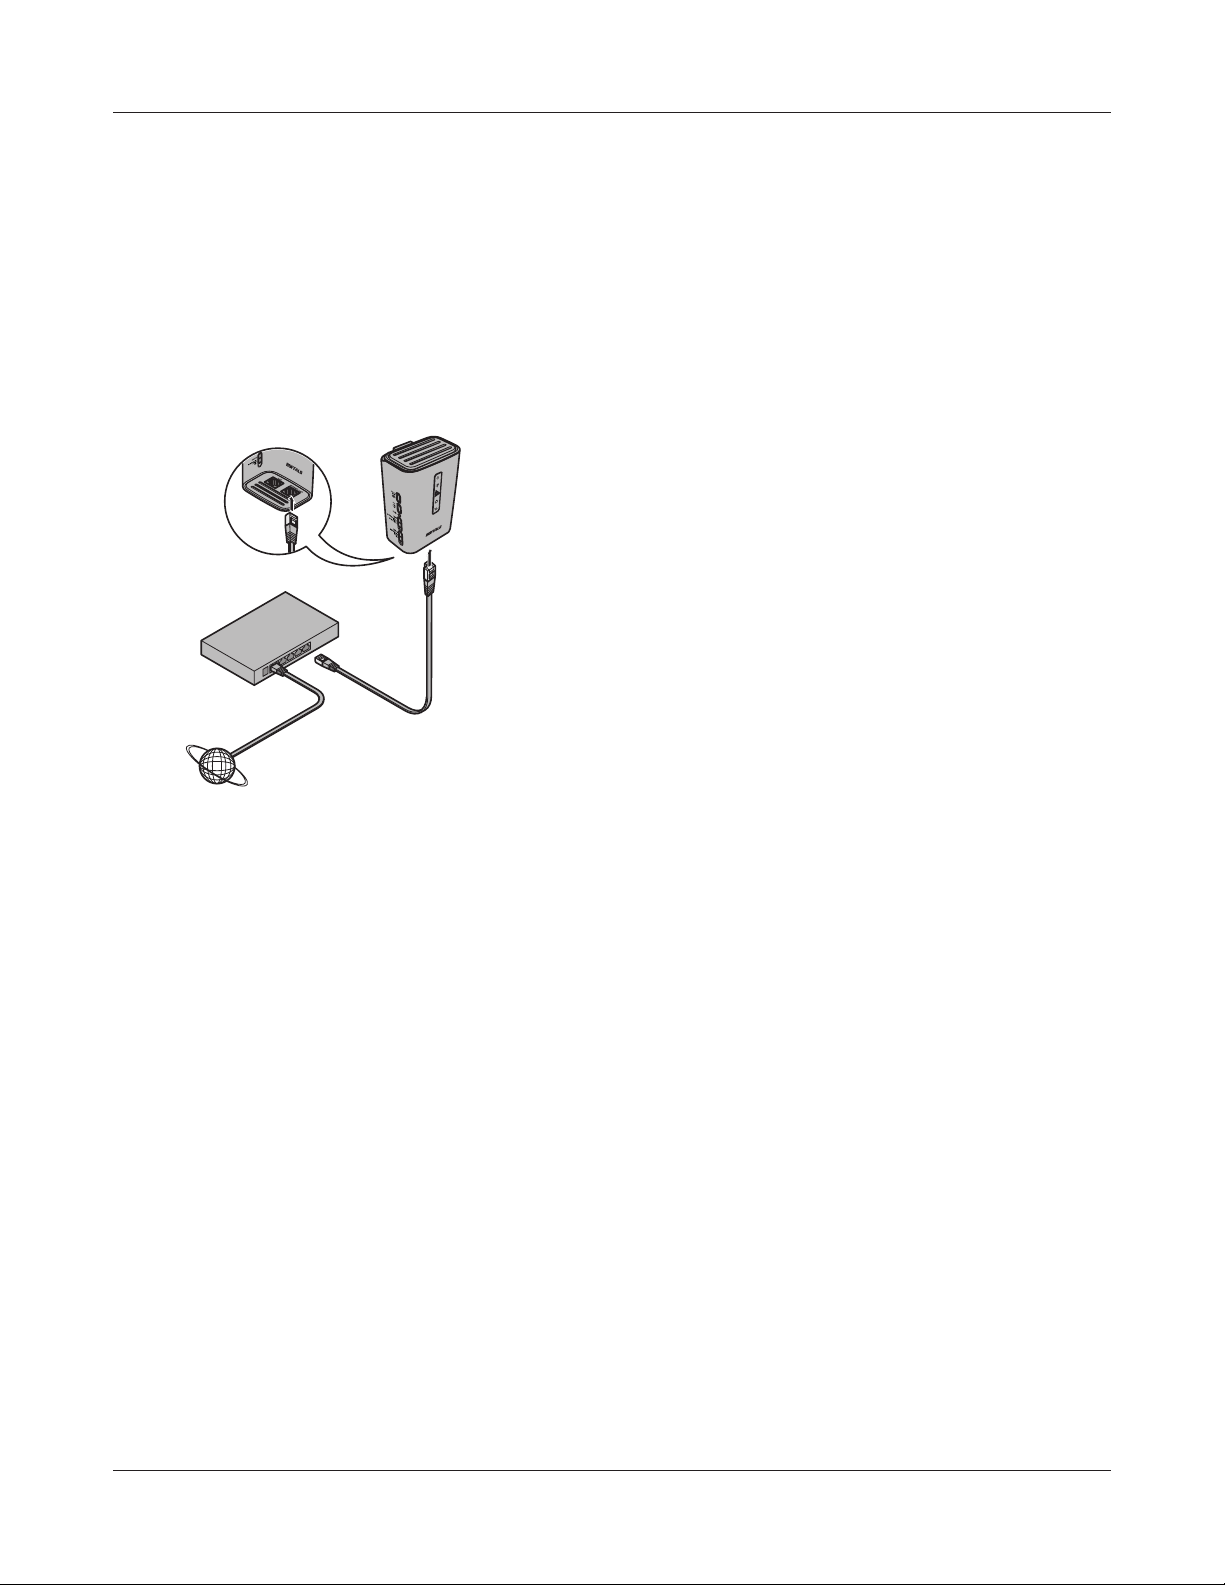
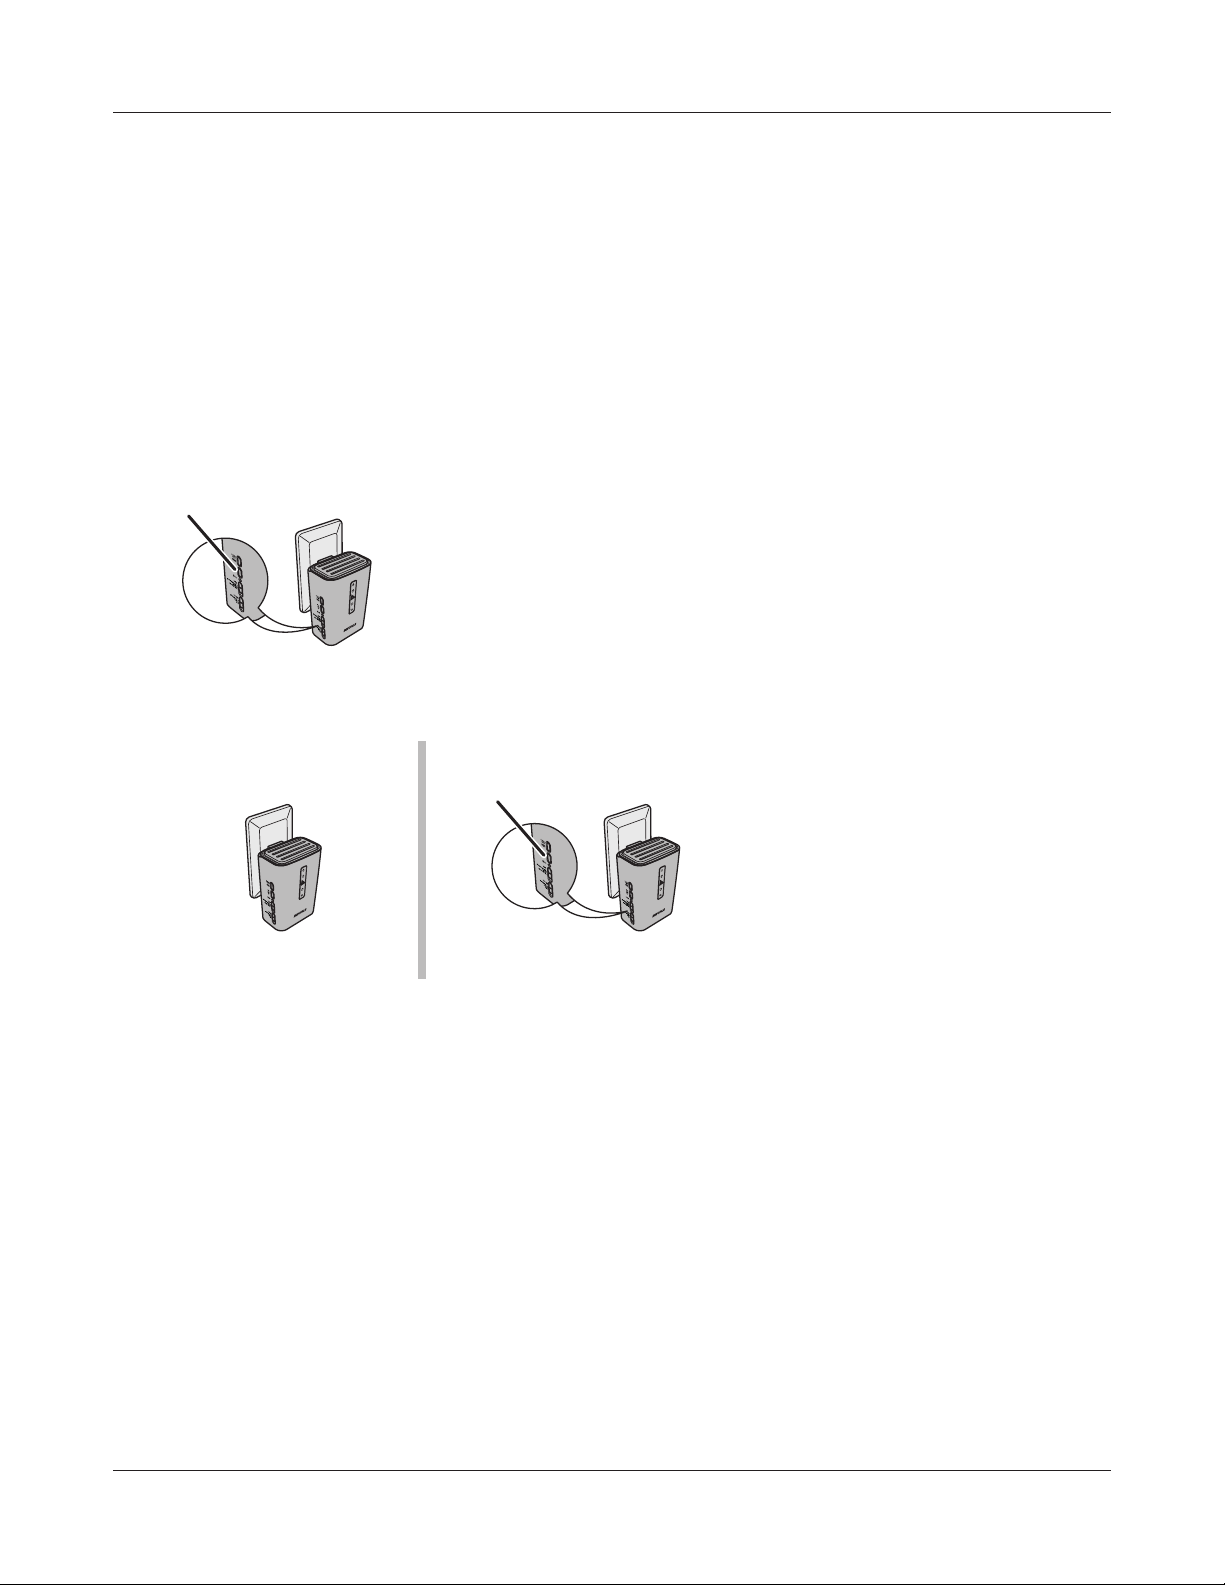
1
2
Check that connection to the Internet is possible without using the AirStation. Then, turn o
the modem or router.
Room 1
AirStation
modem or router
Internet
Connect one end of the LAN cable to the
modem or router, and connect the other end
to the Internet port of the AirStation.
Turn on the modem or router.
3
4
Connect the AirStation to the power outlet.
Once the AirStation is turned on, check that the LEDs appear as shown below:
Power Green LED on.
PLC O
Wireless Green LED on or blinking.
Router O
For LED locations, refer to chapter 1.
WPL-05G300 Series User Manual 13
Chapter 2 Installation
5
6
Room 1
Connect the AirStation to your computer or TV.
If using a wired connection, connect the
AirStation LAN port to your computer or TV
with a LAN cable.
If connecting to your computer with a wireless
connection, see Chapter 4.
AirStation
Start your browser. If the home screen is displayed, setup for the rst AirStation is complete.
Note: If the home screen is not displayed, check that the AirStation and computer are connected correctly.
If the AirStation and computer are connected correctly, disconnect the AirStation from the power
outlet, set the Router switch to ON, and then reconnect to the power outlet.
After waiting one minute, start your browser. If the home screen is displayed, setup for the rst
AirStation is complete. If the screen for entering the user name and password is displayed without
showing the home screen, follow the on-screen instructions to complete the settings.
7
Room 2
Bring the other AirStation to the location where you want
to install it and connect it to the power outlet.
AirStation
WPL-05G300 Series User Manual 14
Chapter 2 Installation
8
9
Check that the LEDs appear as shown below when the AirStation power is turned on.
Power Green LED on.
PLC Green LED on.
Wireless Green LED on or blinking.
Router O
For LED locations, refer to chapter 1.
Note: If the PLC LED does not turn on even after waiting one minute, install near the rst AirStation that was
installed in step 3.
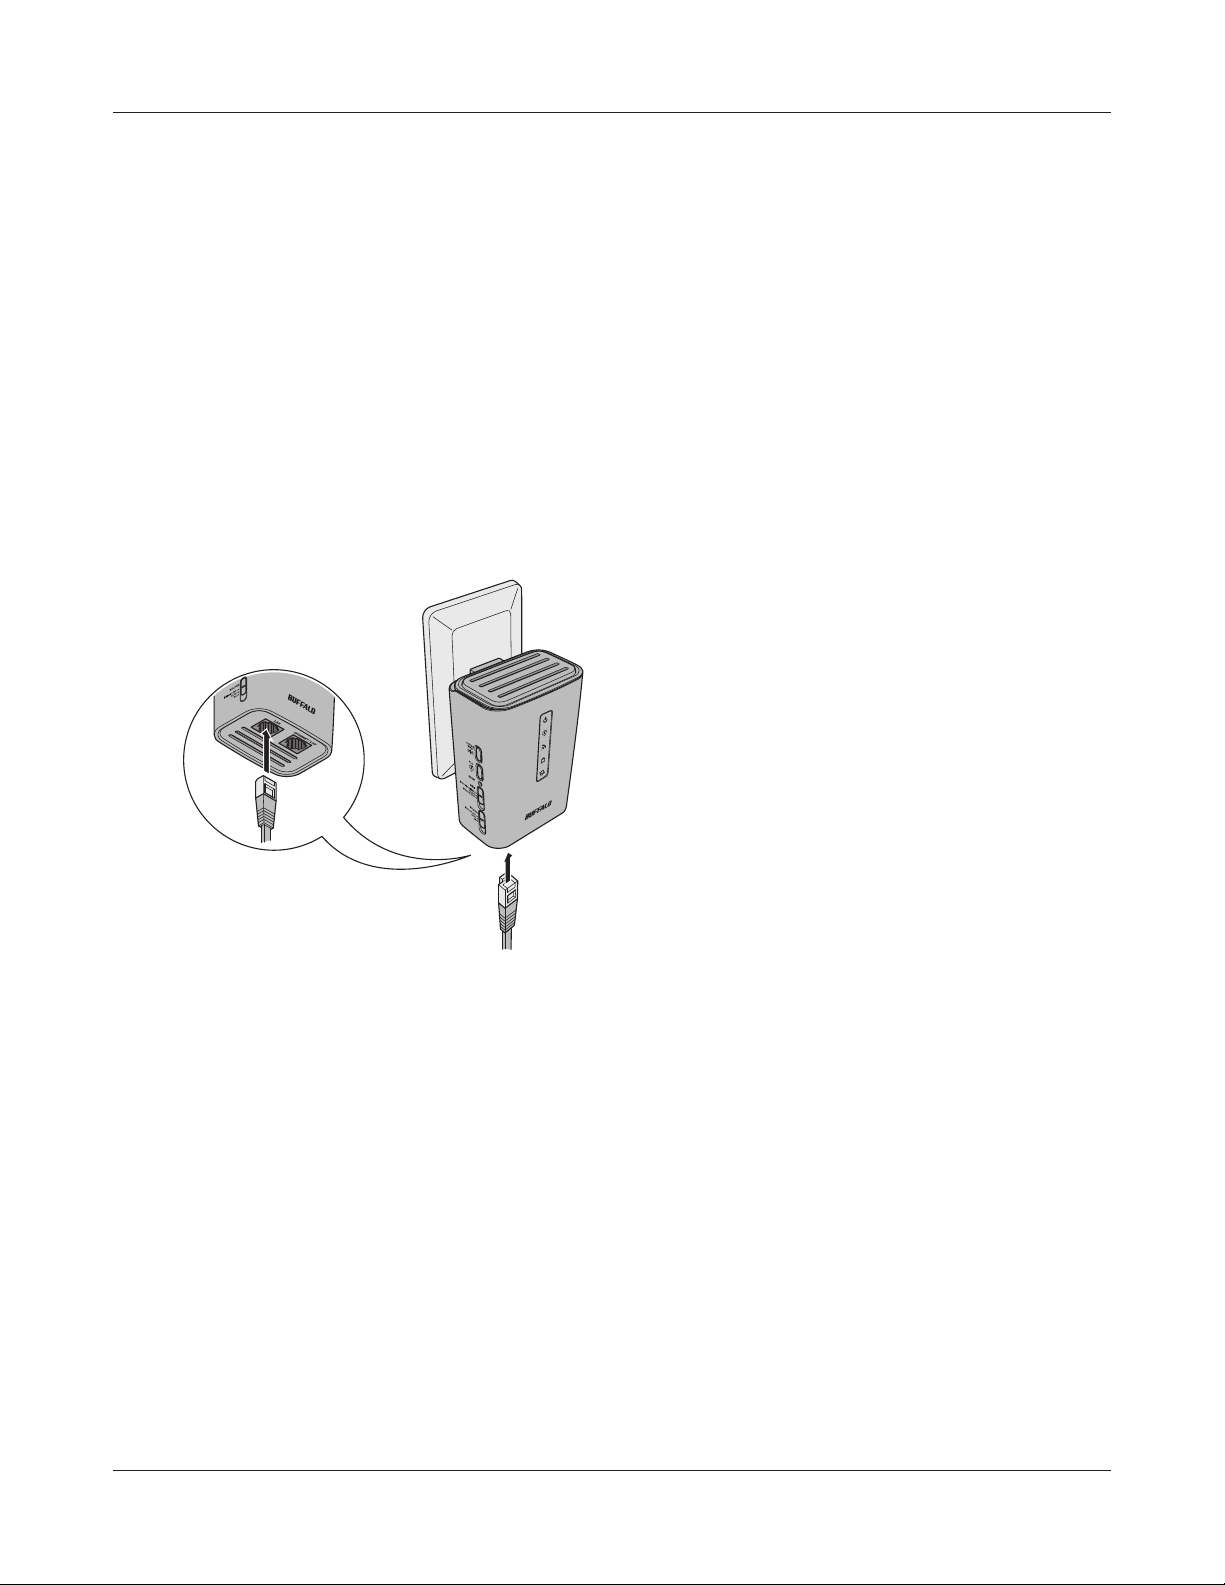
Room 2
Connect the AirStation to your computer or TV.
If using a wired connection, connect the
AirStation LAN port to your computer or TV
with a LAN cable.
If connecting to your computer with a wireless
connection, see Chapter 4.
10
AirStation
Start your browser. If the home screen is displayed, setup for the second AirStation is
complete.
Note: If the home screen is not displayed, check that the AirStation and computer are connected correctly.
WPL-05G300 Series User Manual 15
Chapter 2 Installation
Extender Kit Installation Procedure
To congure the Extender Kit, follow the procedure below.
Room 1 Room 2 Room 3
Powerline Powerline
modem or router
Internet
(with an Ethernet interface)
1
TV
Room 3
AirStation
(starter kit)
computer computer
computer
AirStation
(starter kit)
Bring the AirStation to the location where you want to install it and
connect it to the power outlet.
computer
(with an Ethernet interface)
AirStation
(extender kit)
computer
TV
AirStation
(extender kit)
2
PLC button
WPL-05G300 Series User Manual 16
Room 3
AirStation
(extender kit)
Hold down the PLC button of the AirStation over 10
seconds when the AirStation power is turned on.
Chapter 2 Installation
3
4
5
Check that the LEDs appear as shown below.
Power Green LED on.
PLC O
Wireless Green LED on or blinking.
Router O
For LED locations, refer to chapter 1.
Room 2
PLC button
AirStation
Room 2 Room 3
PLC button
Hold down the PLC button of the AirStation that is
already installed until the Power LED starts blinking
green (about one second).
Within 2 minutes, hold down the
PLC button of the AirStation that
was installed in step 1 until the
Power LED starts blinking green
(about one second).
AirStation AirStation
(extender kit)
6
WPL-05G300 Series User Manual 17
Check that the PLC LED changes to steady green after about 1 minutes.
Note: If the PLC LED does not turn steady green after about one minute, perform the setup procedure again
from the beginning.
Chapter 2 Installation
7
8
Room 3
Connect the AirStation to your computer or TV.
If using a wired connection, connect the
AirStation LAN port to your computer or TV
with a LAN cable.
If connecting to your computer with a wireless
connection, see Chapter 4.
AirStation
(extender kit)
Start your browser. If the home screen is displayed, setup for the AirStation is complete.
Note: If the home screen is not displayed, check that the AirStation and computer are connected correctly.
WPL-05G300 Series User Manual 18
Chapter 3 - Conguration
The web-based conguration tool lets you change advanced settings for the AirStation. Don’t
change these settings unless you know what you’re doing.
Installing the AirStation Conguration Tool (Windows)
The AirStation Conguration Tool is required to display the AirStation Conguration Interface in a
Windows computer. Use the procedure below to perform the installation.
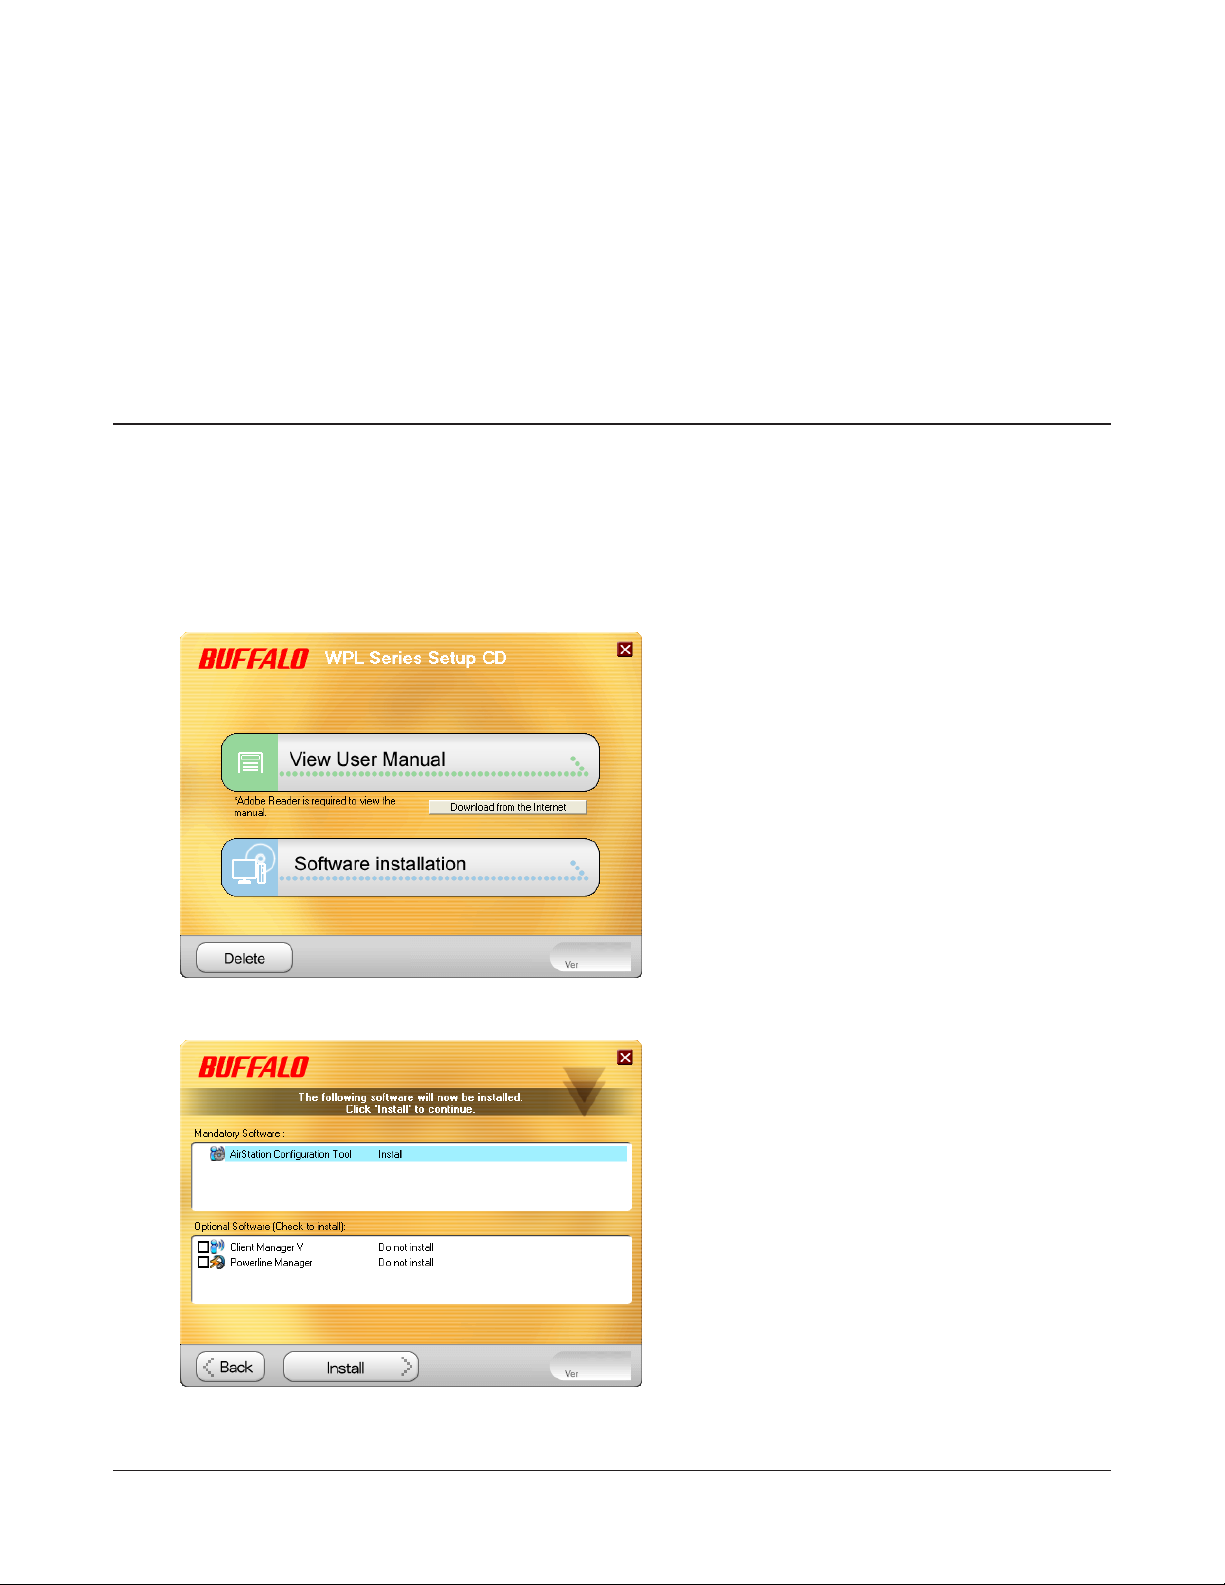
1
2
3
Load the Setup CD into your computer.
Click [Software Installation].
Click [Install].
WPL-05G300 Series User Manual 19
Chapter 3 Conguration
4
Follow the on-screen instructions to install the AirStation Conguration Tool.
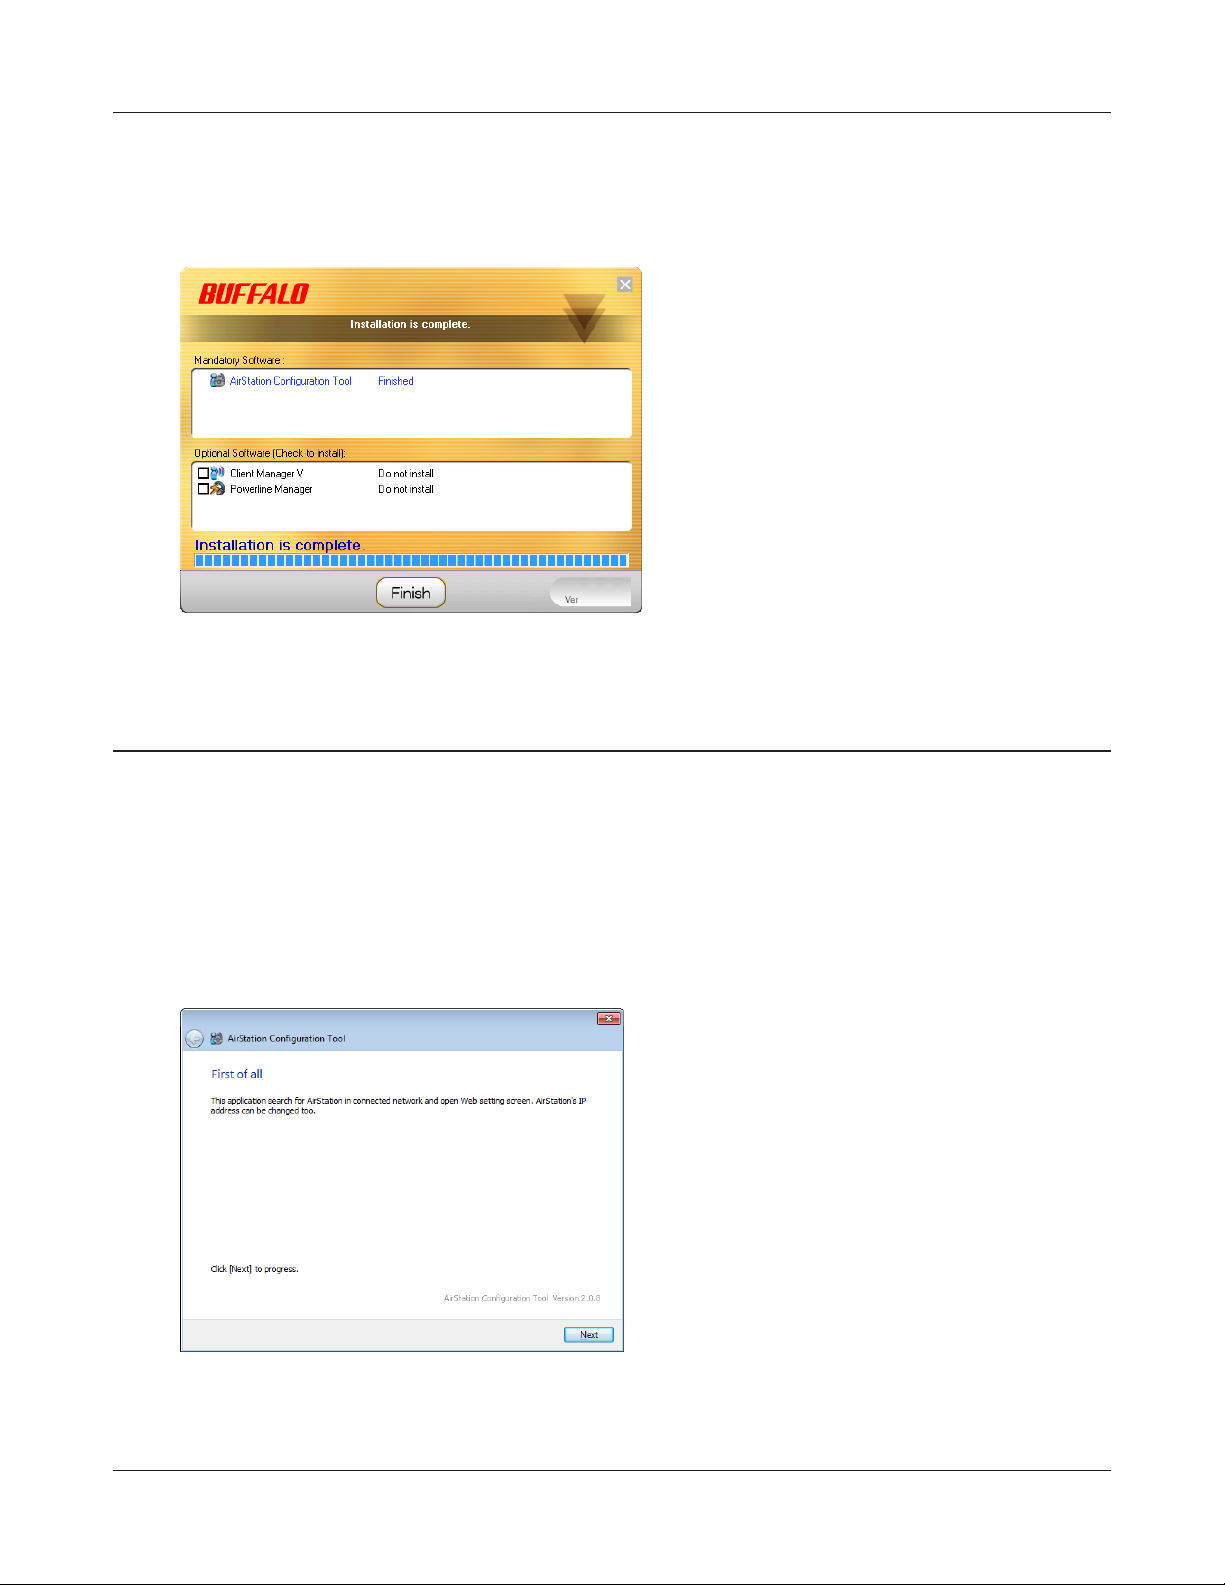
5
After installation is completed, click
[Finish].
Setting the AirStation IP Address (Windows)
The AirStation Conguration Tool can be used to change the IP address of the AirStation. If using a
Windows computer, follow the procedure below to set the AirStation IP address.
1
Click [Start] > [All Programs] > [BUFFALO] > [AirStation Utility] > [AirStation Conguration
Tool].
2
Click [Next].
WPL-05G300 Series User Manual 20
Chapter 3 Conguration
3
4
Select the AirStation displayed in the list,
and click [Next].
Click [Congure this AirStation IP
Address].
5
Select “Obtain IP address from DHCP
server (Easy)”, and click [Next].
WPL-05G300 Series User Manual 21
Chapter 3 Conguration
6
7
Enter “password” for the administrator
password, and click [Next].
The new IP address is set to the AirStation.
Once the settings are complete, the
“Complete settings” screen is displayed.
Click [Finish].
WPL-05G300 Series User Manual 22
Chapter 3 Conguration
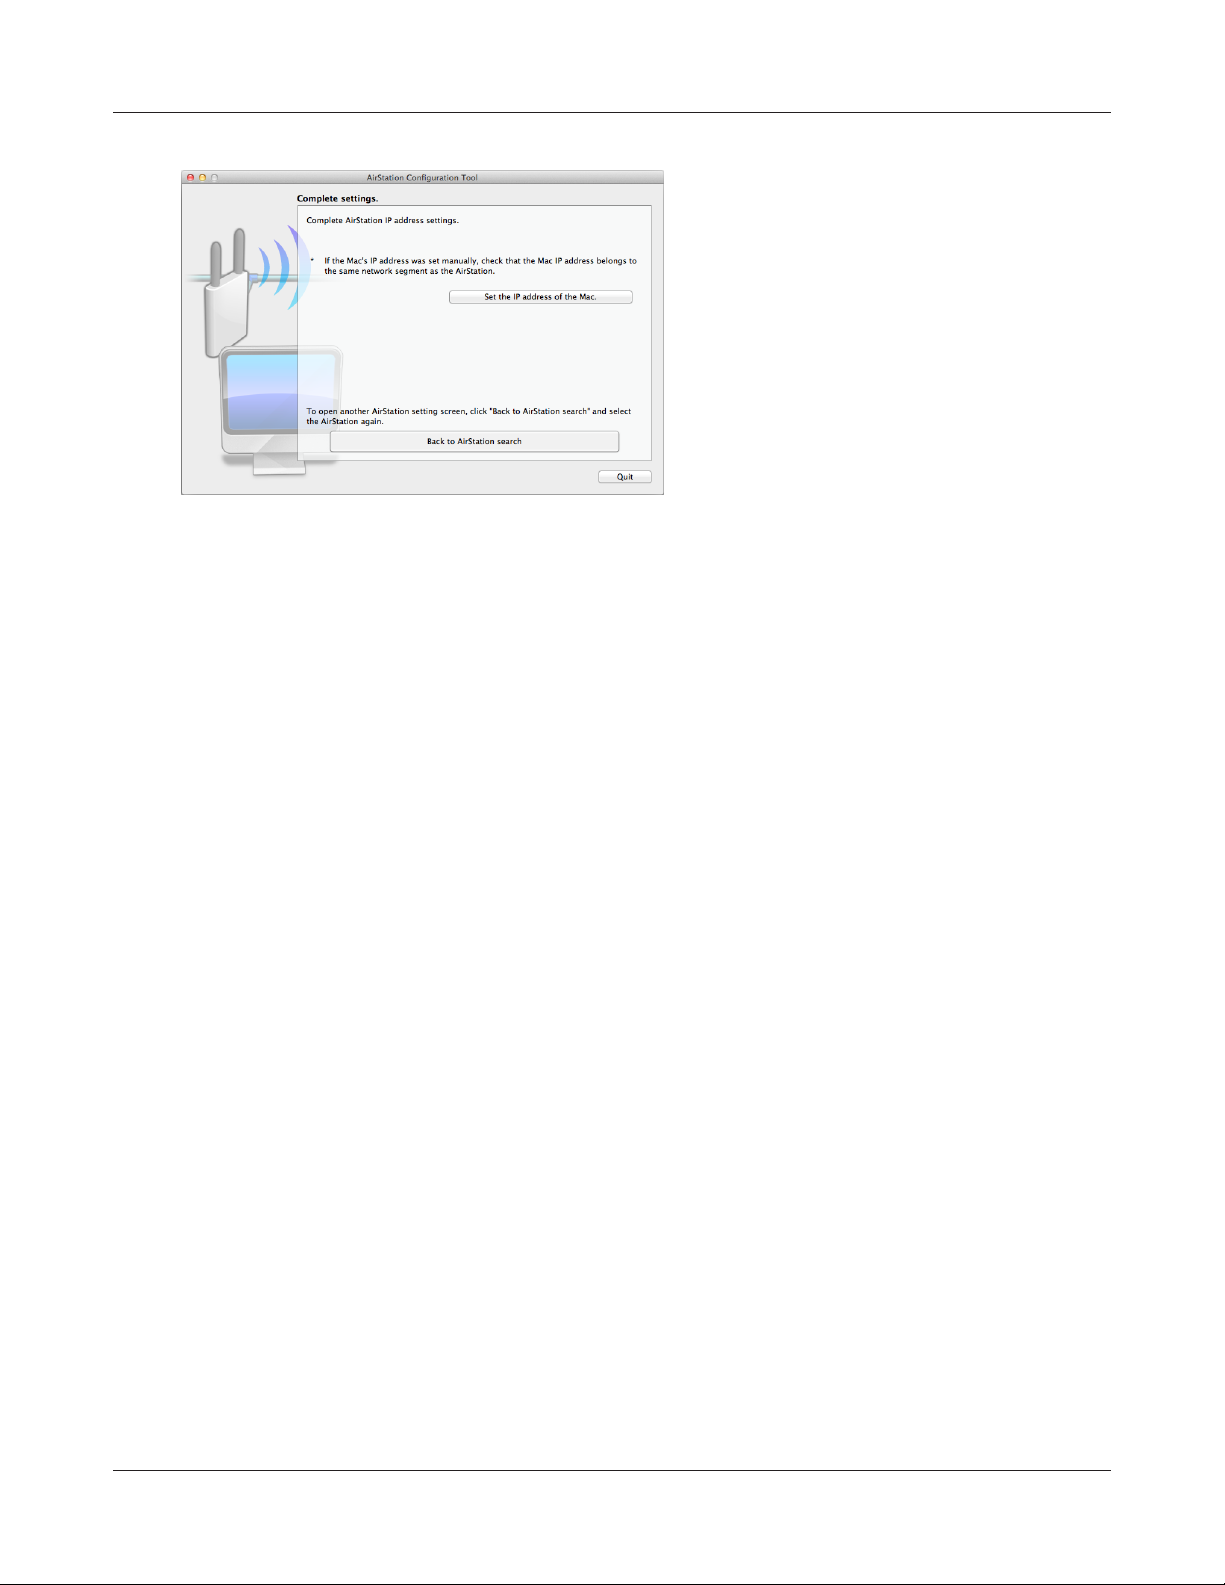
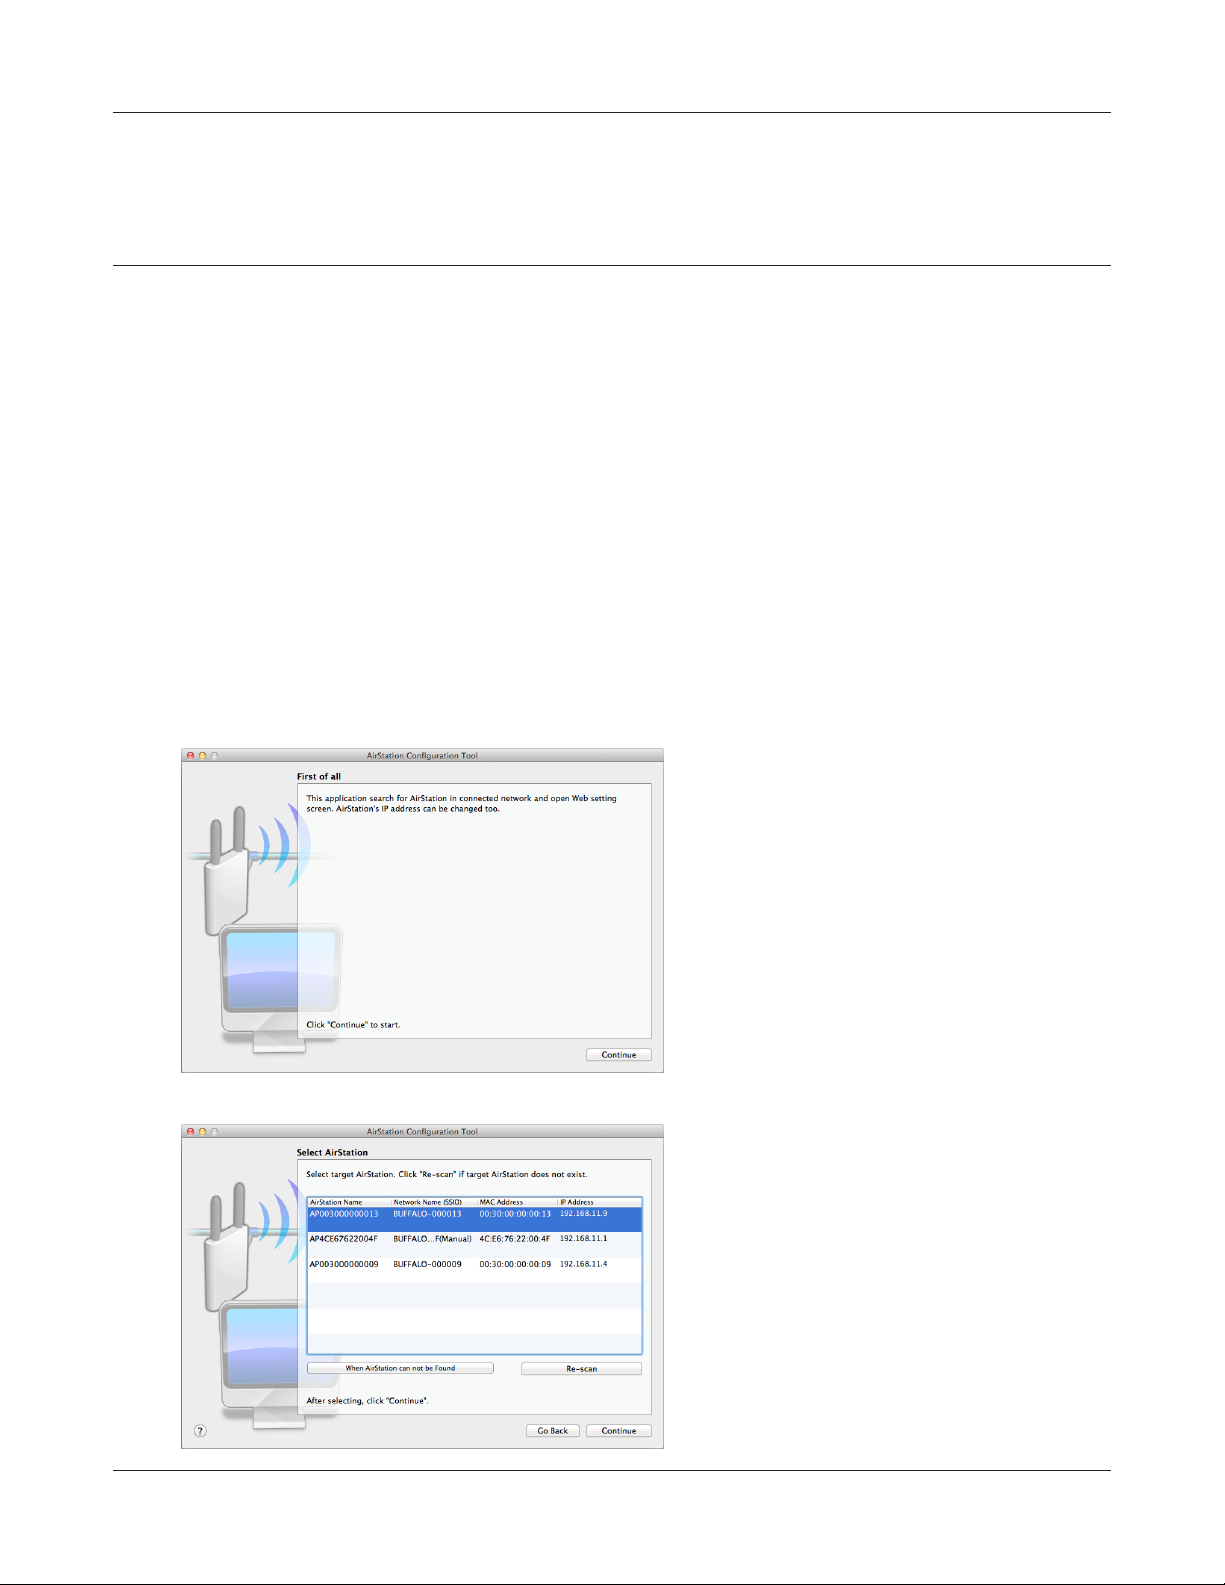
Setting the AirStation IP Address (Mac OS X)
The AirStation Conguration Tool can be used to change the IP address of the AirStation. If using a
Mac, follow the procedure below to set the AirStation IP address.
1
2
3
4
5
Load the Setup CD into your Mac.
From the menu bar, click [Go] > [Computer].
Double-click the CD icon, and then double-click [AirStation Conguration Tools] in the “Mac”
folder.
The software license screen is displayed. Click [Agree] to proceed.
Click [Continue].
6
Select the AirStation displayed in the list,
and click [Continue].
WPL-05G300 Series User Manual 23
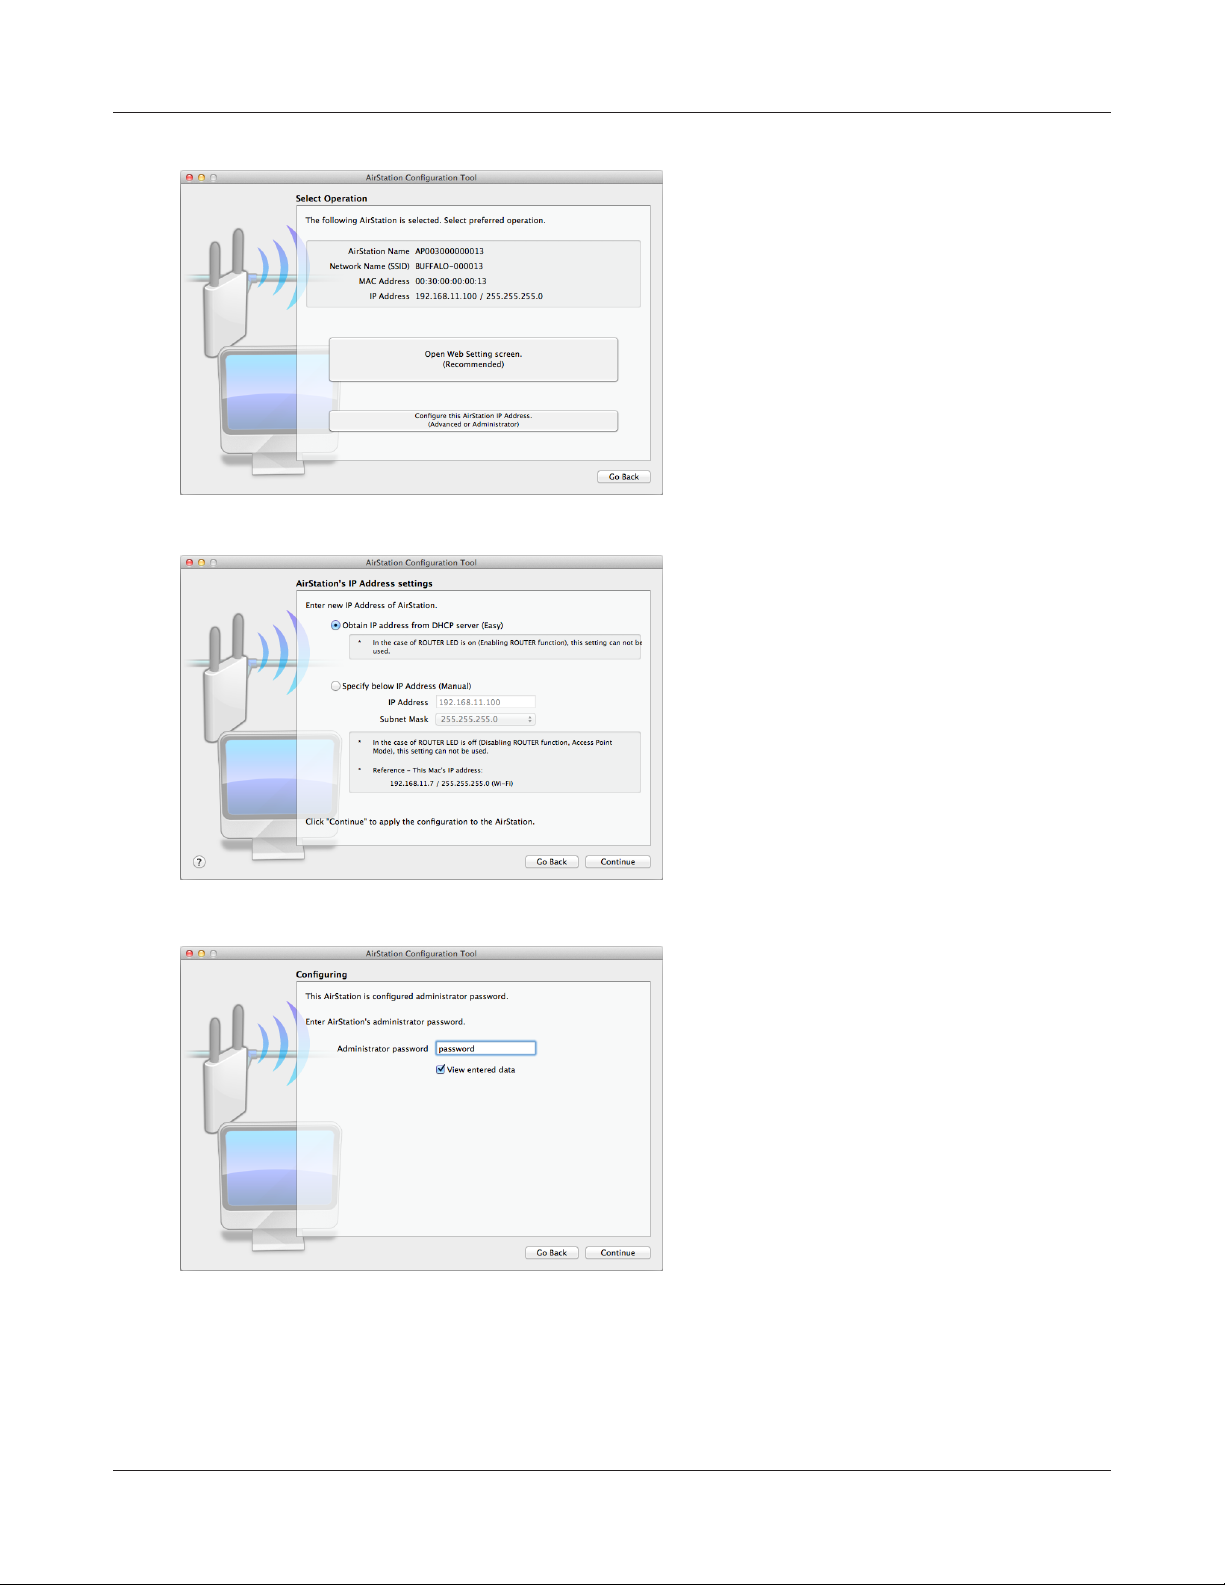
Chapter 3 Conguration
7
8
Click [Congure this AirStation IP
Address].
Select “Obtain IP address from DHCP
server (Easy)”, and click [Continue].
9
WPL-05G300 Series User Manual 24
Enter “password” for the administrator
password, and click [Continue].
Chapter 3 Conguration
10
The new IP address is set to the AirStation.
Once the settings are complete, the
“Complete settings” screen is displayed.
Click [Quit].
WPL-05G300 Series User Manual 25
Chapter 3 Conguration
Accessing the Web-based Conguration Interface
(Windows)
To manually set the AirStation advanced settings from a Windows computer, use the procedure
below to log into the AirStation Conguration interface.
1
2
3
Click [Start] > [All Programs] > [BUFFALO] > [AirStation Utility] > [AirStation Conguration
Tool].
Click [Next].
Select the AirStation displayed in the list,
and click [Next].
WPL-05G300 Series User Manual 26
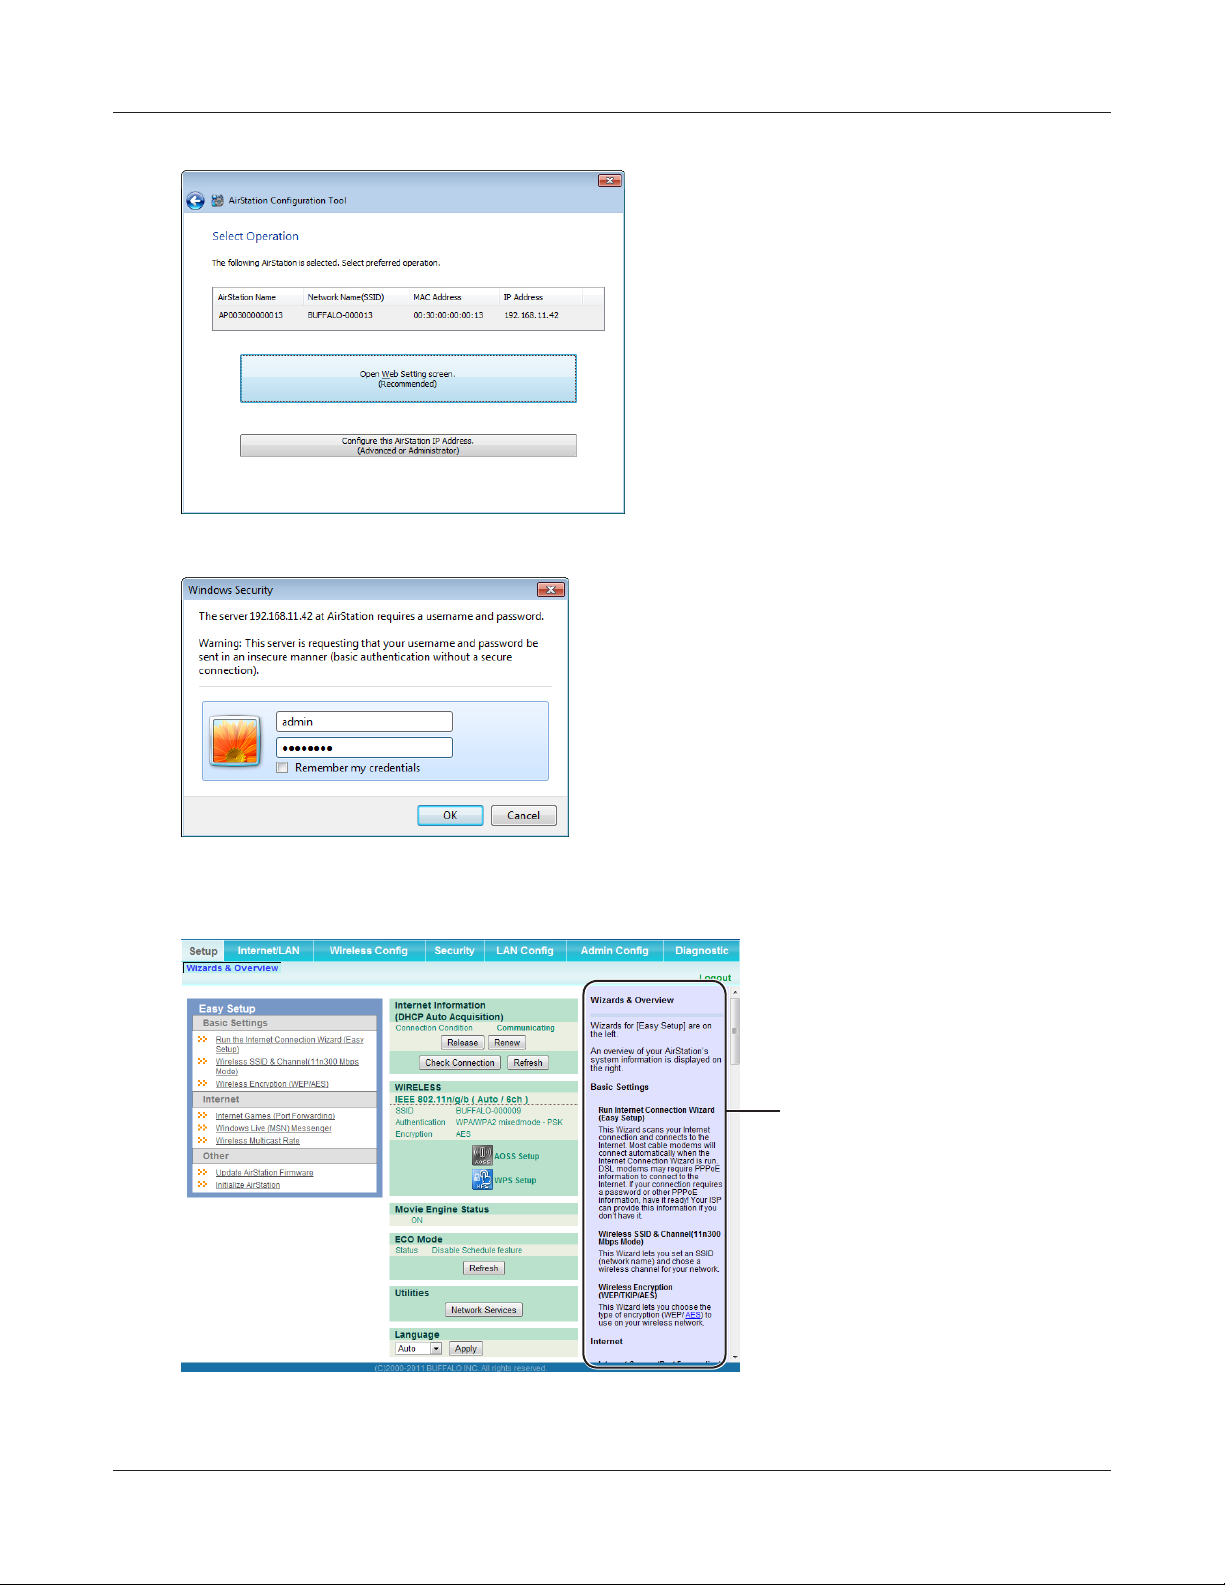
Chapter 3 Conguration
4
5
Click [Open Web Setting screen].
Enter “admin” for the user name and “password”
for the password, and click [OK].
6
Note: The default password is “password”.
If you forget your password, hold down the
reset button (page 10) to initialize all settings.
This is the conguration
interface, where most
AirStation settings can be
congured.
Help is always displayed on
the right side of each screen.
Refer to the Help screens for
more information on using the
conguration interface.
Once the settings are complete, the “Complete settings” screen is displayed. Click [Finish].
WPL-05G300 Series User Manual 27
Chapter 3 Conguration
Accessing the Web-based Conguration Interface
(Mac OS X)
To manually set the AirStation advanced settings from a Mac, use the procedure below to log into
the AirStation Conguration interface.
1
2
3
4
5
Load the Setup CD into your Mac.
From the menu bar, click [Go] > [Computer].
Double-click the CD icon, and then double-click [AirStation Conguration Tools] in the “Mac”
folder.
The software license screen is displayed. Click [Agree] to proceed.
Click [Continue].
6
Select the AirStation displayed in the list,
and click [Continue].
WPL-05G300 Series User Manual 28
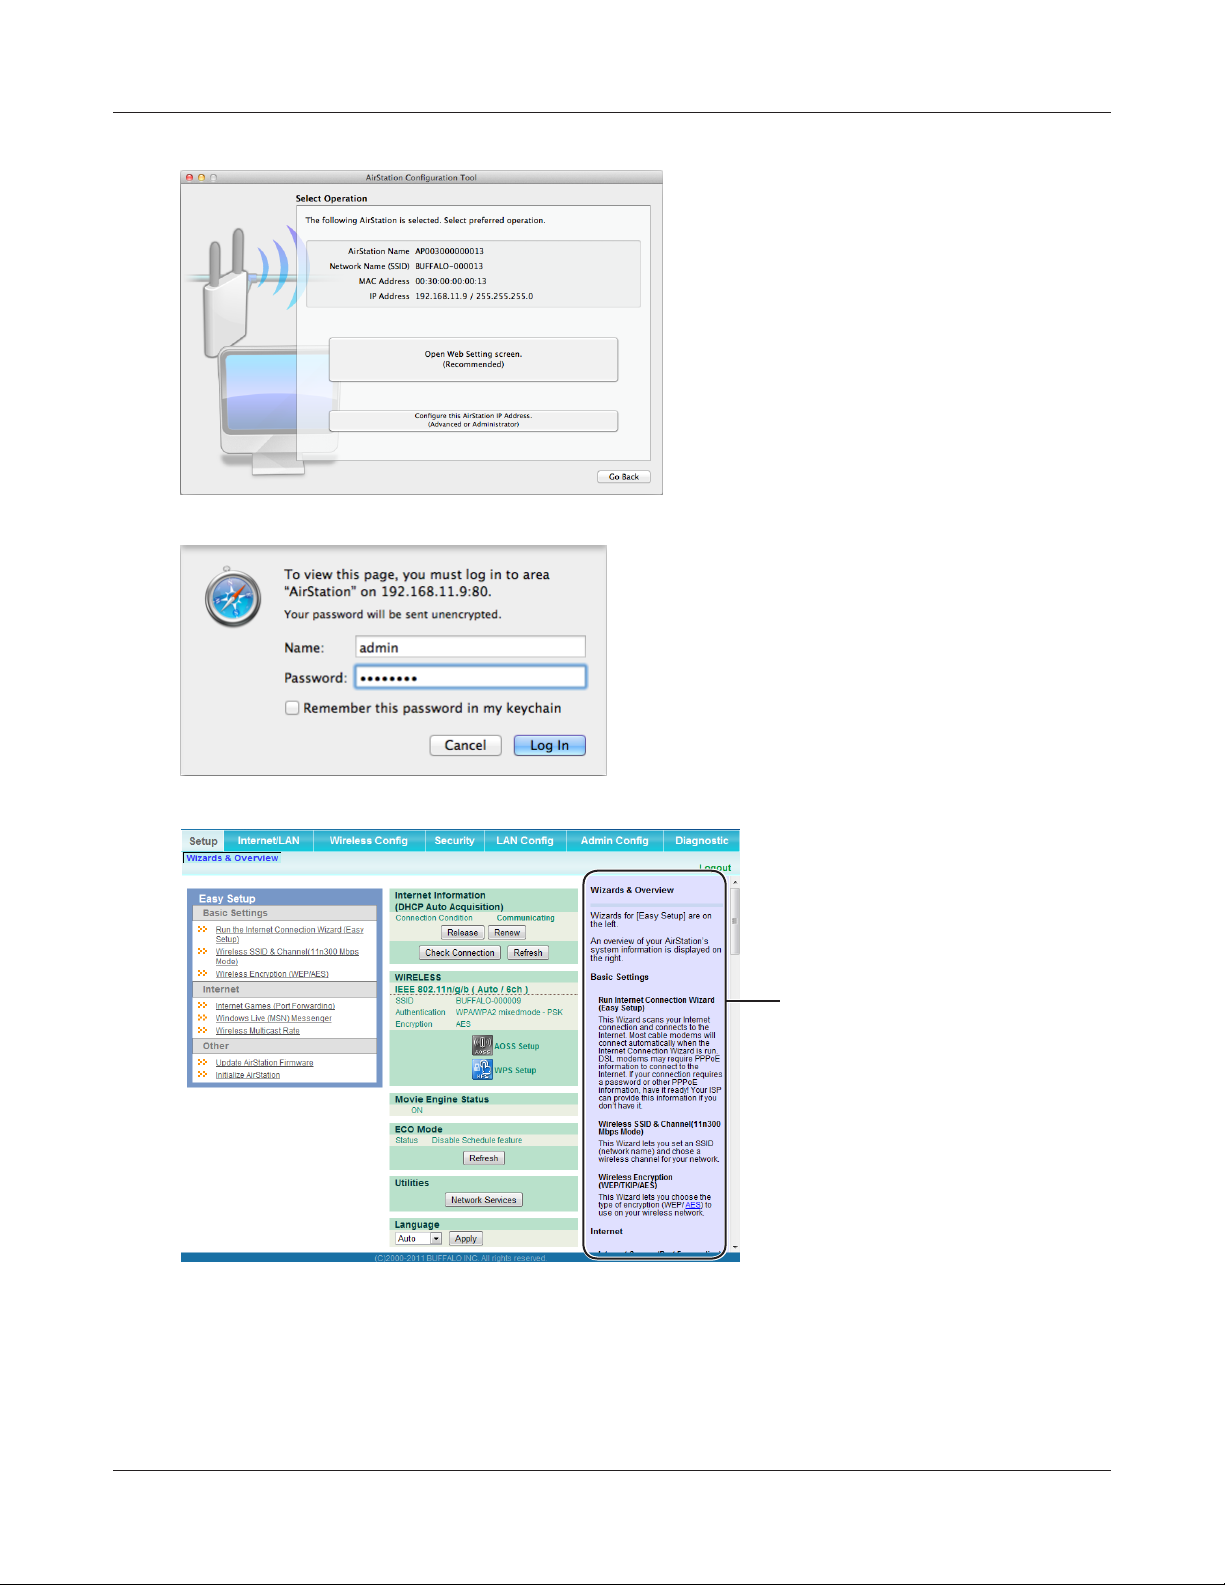
Chapter 3 Conguration
7
8
Click [Open Web Setting screen].
Enter “admin” for the name and “password” for
the password, and click [Log In].
Note: The default password is “password”.
If you forget your password, hold down the
reset button (page 10) to initialize all settings.
9
This is the conguration
interface, where most
AirStation settings can be
congured.
Help is always displayed on
the right side of each screen.
Refer to the Help screens for
more information on using the
conguration interface.
Once the settings are complete, the “Complete settings” screen is displayed. Click [Quit].
WPL-05G300 Series User Manual 29
 Loading...