

Page 1

AirStation
WXR-1900DHP
User Manual
www.buffalotech.com
35020xxx-01
2014-09
Page 2
Chapter 1 - Setup
Introduction
Thank you for purchasing a Buffalo AirStation. The WXR-1900DHP AirStations are dual-band wireless routers with
outstanding performance and range. They combine high data transfer speeds with a robust set of extra features like
QoS, USB NAS, media server, and web filtering. This manual will help you set up and use your new wireless router. If
you’re new to wireless networking, turn to chapter 2 to start configuring your wireless network.
For advanced users, use a wired Ethernet connection to access the AirStation’s settings:
• Default LAN-side IP address: 192.168.11.1
• Username: admin
• Default password: password
Diagrams and Layout
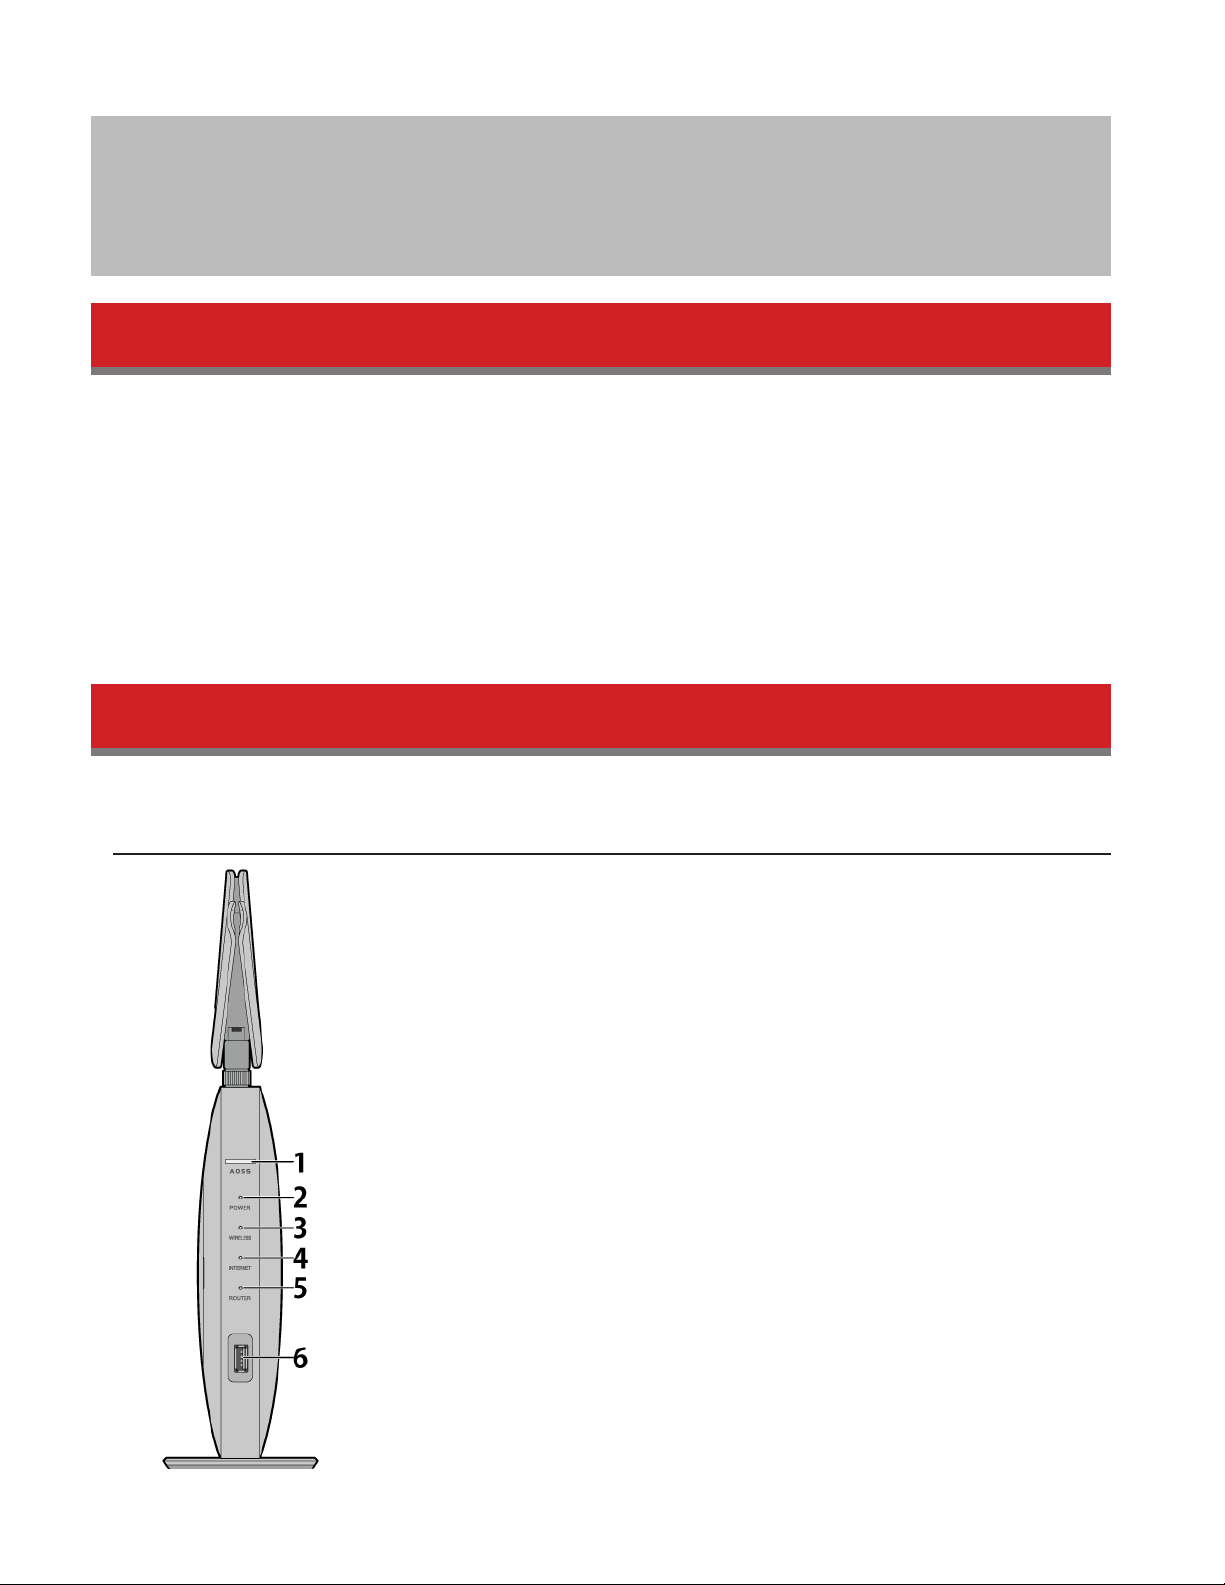
Front Panel
2
Page 3

1 AOSS button
To initiate AOSS, hold down this button until the wireless LED flashes (about 1 second). Then, push or click the
AOSS button on your wireless client device to complete the connection. Both devices must be powered on.
Press and hold the AOSS button for about 10 seconds to start Wi-Fi settings transfer.
2 Power LED (white or amber)
On (white):
Power is on.
Blinking (white):
Booting.
Off:
Power is off.
Blinking (amber):
An error occurred. If it happened, turn the power off and restart AirStation.
3 Wireless LED (white or amber)
On:
Wireless LAN is enabled or transmitting.
Double blinks:
AirStation is waiting for an AOSS or WPS security key.
Blinking (white):
AOSS/WPS error; failed to exchange security keys.
Blinking (amber):
The AirStation is in wireless bridge mode and not connect to an access point.
Off:
Wireless LAN is disabled.
4 Internet Access LED (white)
On:
Internet access is available.
Off:
No Internet access.
5 Router LED (white)
On:
Router functionality is enabled.
Off:
Router functionality is disabled.
6 USB 3.0 Port
You can connect a USB 3.0 drive.
3
Page 4
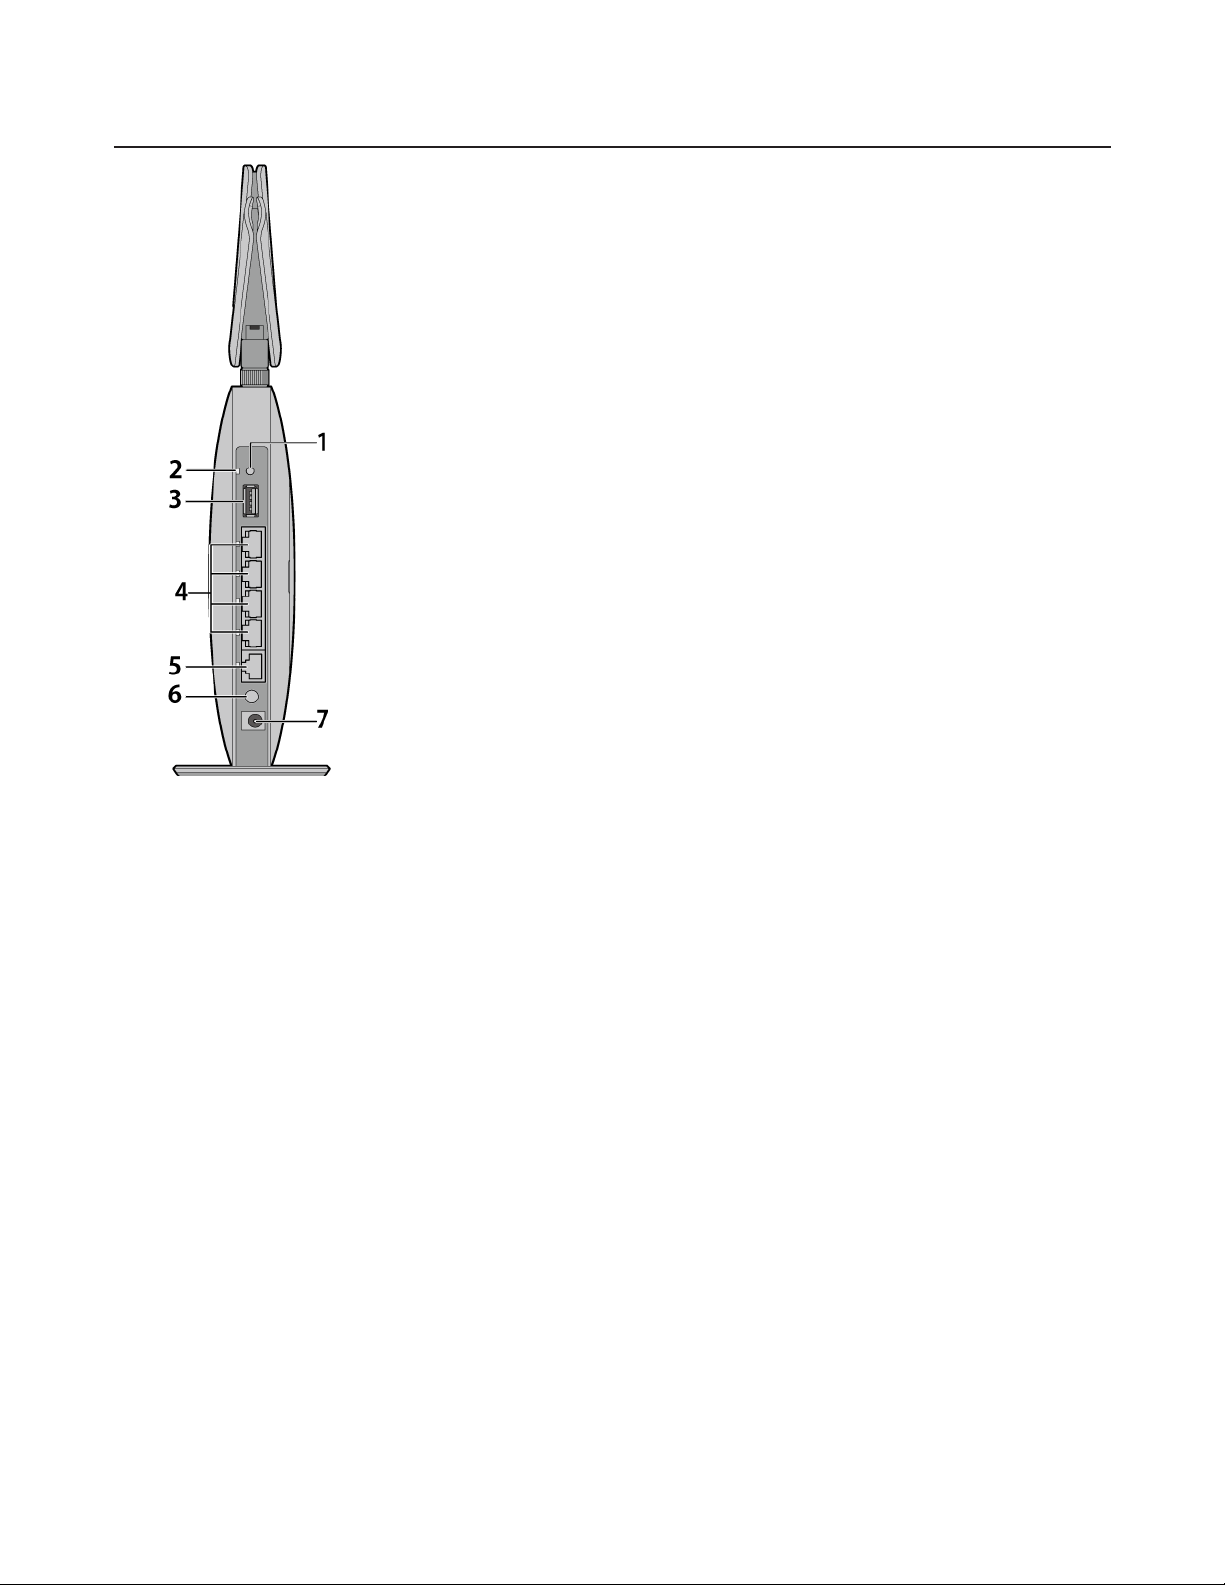
Back Panel
1 USB Eject Button
To dismount a USB hard drive, hold down this button until the USB LED flashes (about 3 seconds). The USB drive
can then be unplugged safely.
2 USB LED (green)
On:
A USB drive is connected.
Blinking:
The USB drive is being dismounted; do not unplug.
Off:
The USB drive has been dismounted and safely unplugged or no USB drive is connected.
Note: Do not remove the USB drive or turn off the AirStation while LED is blinking.
3 USB 2.0 Port
You can connect a USB 2.0 drive.
Note: USB 3.0 hubs are not supported. Use USB 2.0 hubs only.
4 LAN Ports and LAN LEDs (green)
Connect your computer, hub, or other Ethernet devices to these ports. This switching hub supports 10 Mbps, 100
Mbps, and 1000 Mbps connections.
On:
An Ethernet device is connected.
Blinking:
An Ethernet device is communicating.
4
Page 5
5 Internet Port and Internet LED (green)
10 Mbps, 100 Mbps, and 1000 Mbps connections are supported.
Note: In bridge mode, the Internet port becomes a regular LAN port, for a total of 5 usable LAN ports.
On:
The Internet port is connected.
Blinking:
The Internet port is transmitting data.
6 Power Button
This button turns the power on and off.
7 DC Connector
Connect the included AC adapter here.
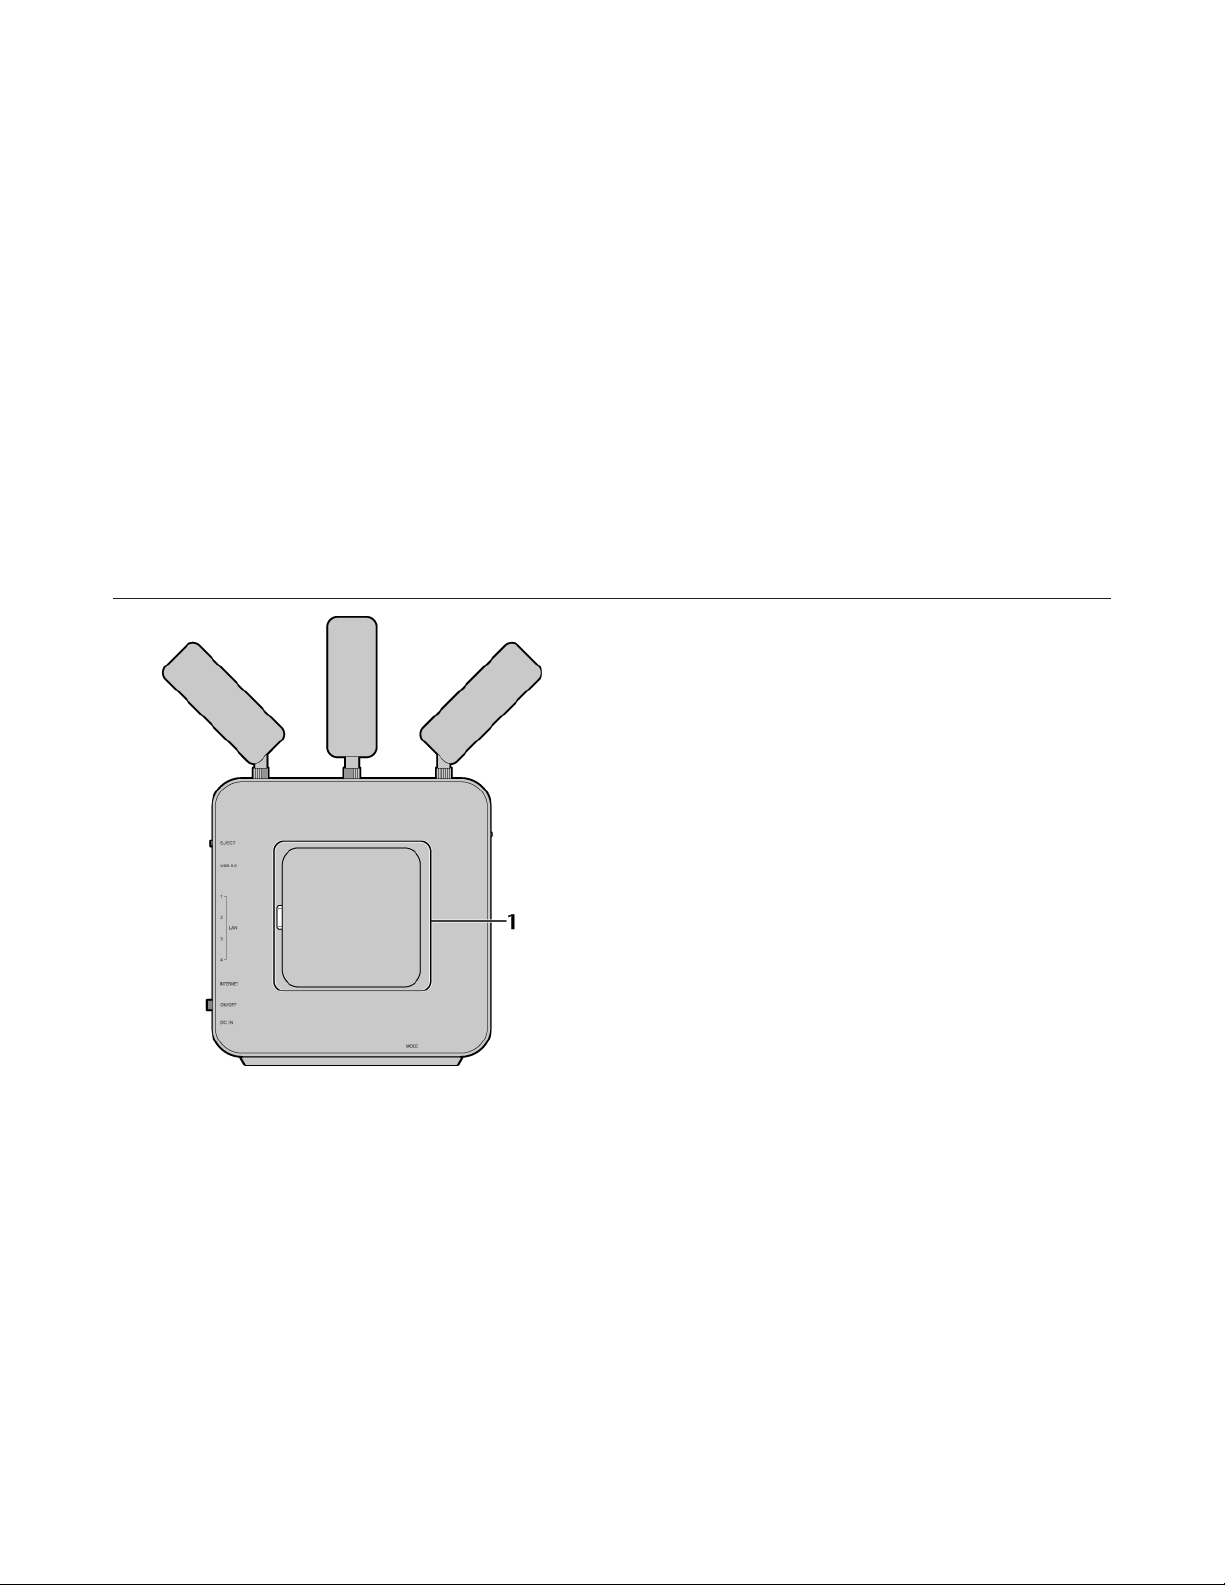
Side Panel
1 Setup Card Panel
This is the panel where the AirStation setup card is stored. The initial settings for the username, password, SSID,
and encryption type are provided on the card for logging in to Settings.
5
Page 6
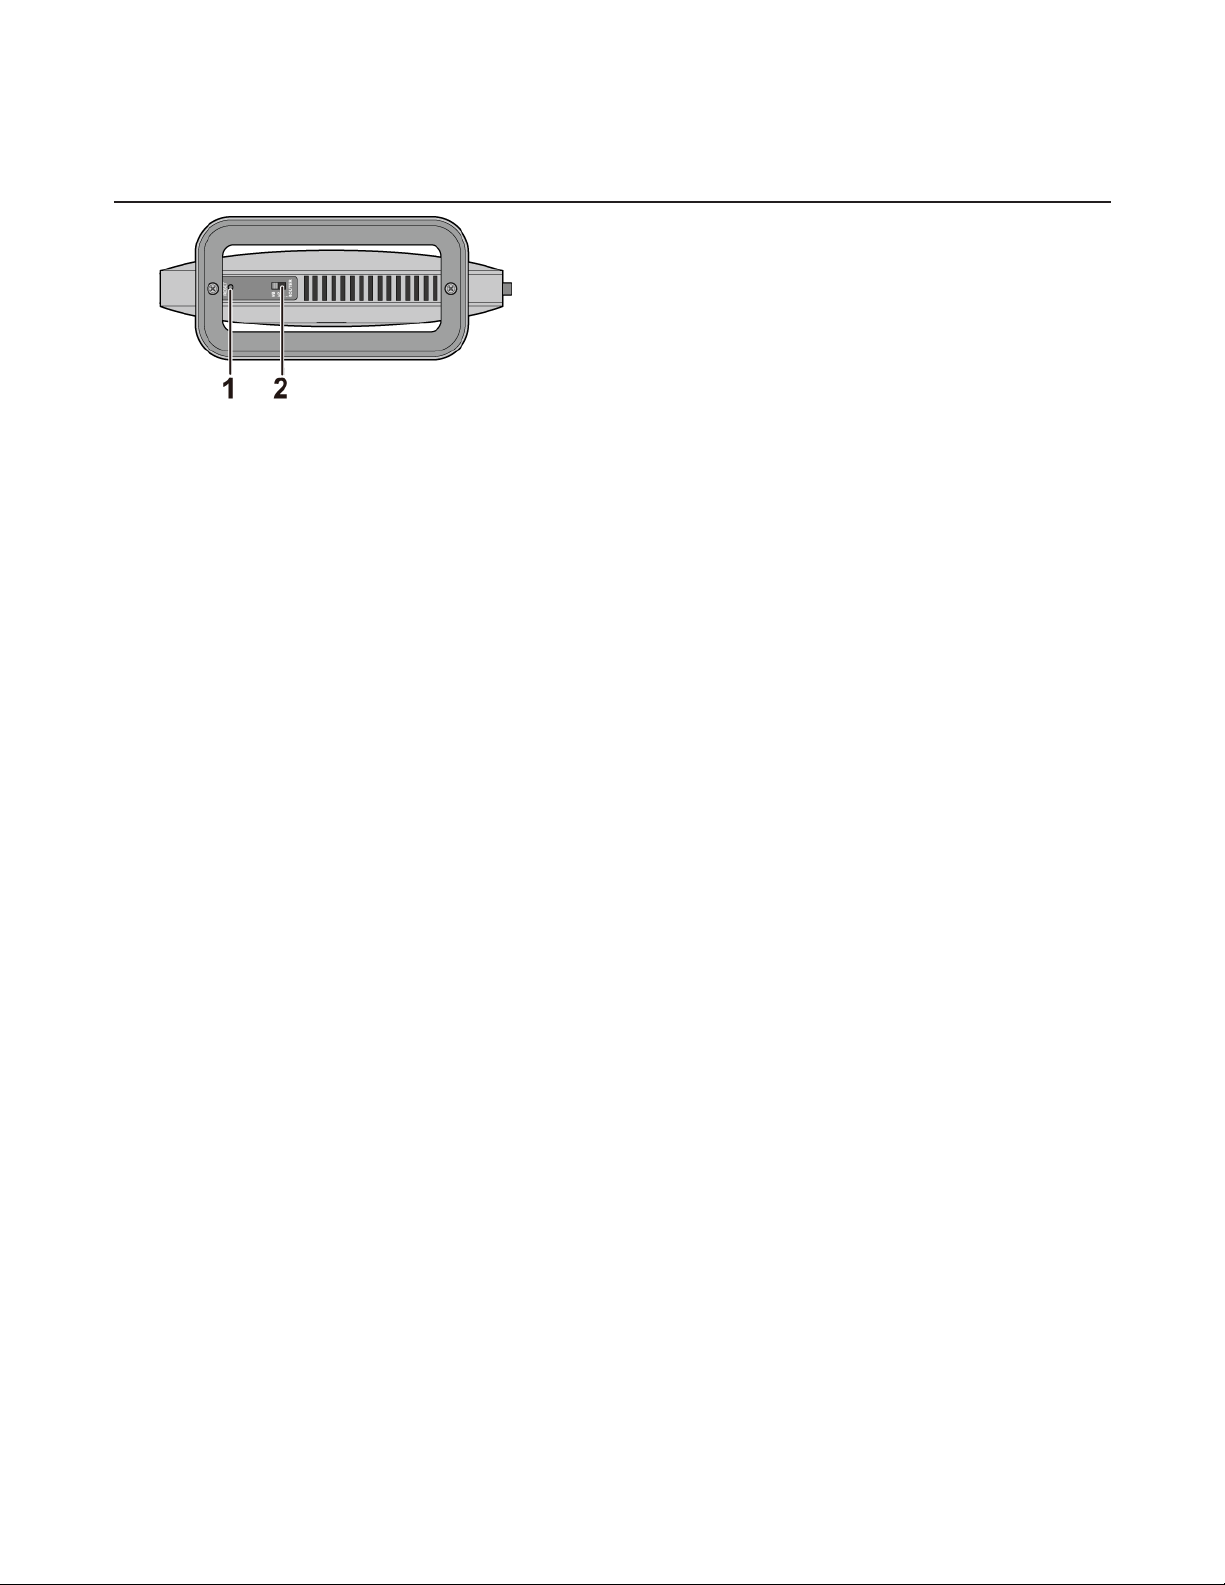
Bottom
1 Reset Button
To reset all settings, hold down this button until the power LED starts blinking (about 3 seconds). The power must
be on for this to work.
2 Mode Switch
This switches between router mode, access point mode, and wireless bridge mode.
6
Page 7

How to Set Up AirStation for the First Time
Connect to a PC and Power On
To configure your AirStation, follow the procedure below.
1 Verify that you can connect to the Internet without the AirStation, then turn off your modem and computer.
2 Unplug the LAN cable which connects your computer and modem.
3 Plug one end of the LAN cable into your modem and the other end to the AirStation’s Internet (WAN) port. Turn on
the modem.
7
Page 8

4 Turn on the AirStation and wait one minute.
Note: If the power does not turn on when the AC adapter is connected, press the power button on the rear of the
AirStation.
5 If using a wired LAN, connect the AirStation LAN port and computer using a LAN cable.
If using a wireless LAN, connect the computer to the wireless LAN as described in Chapter 3.
6 Once your computer has booted, the AirStation’s LEDs should be lit as described below:
Power/Diag: Lit green.
Wireless: Lit green.
Internet access: Lit green.
Router: Lit green.
LAN: Lit or blinking green.
Internet: Lit or blinking green.
8
Page 9

7 Launch a web browser. If the home screen is displayed, setup is complete.
If username and password fields are displayed, enter “admin” for the username and “password” for the password,
then click [Log In]. Step through the wizard to complete setup.
You’ve completed the initial setup of your AirStation.
Opening Settings
To configure the AirStation, log in to Settings as shown below.
1 Launch a web browser.
2 Enter the AirStation’s LAN-side IP address in the address field and press the enter key.
Notes:
• The AirStation’s default LAN-side IP address depends on the mode.
• In router mode: 192.168.11.1
• In access point mode: 192.168.11.100
• In wireless bridge mode: 192.168.11.100
• If you changed the IP address of the AirStation, then use the new IP address.
3 Enter “admin” for the username and “password” for the password, then click [Log In].
Note: If you forget your password, hold down the reset button to initialize all settings. Note that all other settings
will also revert to their default values.
9
Page 10

4 This is the home page of Settings, where most AirStation settings can be configured.
Connect Your Wireless Devices
For each wireless device that you want to connect to the network, use the device’s built-in software to search for
available networks. Find your SSID (the name of your wireless network) on the list of detected networks and select it.
Enter the passphrase for the network and you’ll be connected. Repeat for any additional wireless client devices that you
want to connect.
10
Page 11

Appendix A - Supplemental Information
Package Contents
The following items are included in your AirStation package. If any of the items are missing, please contact your vender.
AirStation.....................................................1
AirStation setup card...............................1
Antennas......................................................3
USB cap.........................................................1
AC adapter...................................................1
Ethernet cable...........................................1
Quick setup guide...................................1
Warranty statement................................1
Factory Default Settings
Feature Parameter Default Setting
Method of Acquiring IP Address Internet Connection Wizard
Default Gateway -
Internet
PPPoE
Dynamic DNS Dynamic DNS Service Disabled
PPTP
NAT Address Translation Enabled
DNS Name Server Address Internet MAC Address Use default MAC address
MTU Size of Internet Port 1500 Bytes
Default PPPoE Connection No active session.
IP Unnumbered PPPoE
Connection
PPPoE Connection List No connections registered.
Preferred Connections No connections registered.
PPTP Server Disabled
Authentication Type MS-CHAPv2 (40/128-bit Encryption)
Server IP Address Auto
Client IP Address Auto
DNS Server IP Address LAN-side IP address of the AirStation
WINS Server IP Address MTU/MRU Value 1362
PPTP User List No registered users.
No active session.
11
Page 12

Feature Parameter Default Setting
IPv6 IPv6 Connection Method Internet Connection Wizard
LAN-side IP Address
DHCP Server Enabled
DHCP IP Address Pool From 192.168.11.2 to 192.168.11.65
LAN-side IP Address (For IP
LAN
DHCP Leases Current DHCP Clients Routing Routing No routes registered.
Unnumbered)
Advanced Settings Not displayed
Lease Period 48 hours
Default Gateway AirStation’s IP address
DNS Servers AirStation’s IP address
WINS Server Do not specify
Domain Name Assigned by DHCP
IP address: 192.168.11.1
Subnet mask: 255.255.255.0
-
12
Page 13

Feature Parameter Default Setting
Wireless Enabled
Wireless Channel Auto Channel
2.4 GHz: 288.9 Mbps (20 MHz)
5 GHz: 1300 Mbps (80 MHz)
An 8-digit random number
(Printed on the setup card)
2.4 GHz: 1, 2, 5.5, 11 Mbps
5 GHz: 6, 12, 24 Mbps
CWmin 15 15
CWmax 1023 1023
AIFSN 7 7
TXOP Limit 0 0
Admission Control ----- Disabled
CWmin 15 15
CWmax 63 1023
AIFSN 3 3
TXOP Limit 0 0
Admission Control ----- Disabled
CWmin 7 7
CWmax 15 15
AIFSN 1 2
TXOP Limit 94 94
Admission Control ----- Disabled
2.4 GHz
5 GHz
High-Speed Mode
Broadcast SSID Allow
SSID 1 Use
SSID Isolation Not used
SSID Use AirStation’s MAC address
Wireless Authentication WPA2-PSK
Encrypt Wireless Data AES
WPA-PSK (Pre-shared Keys)
Key Renewal Interval 0 minutes
SSID 2 Not used
SSID Isolation Not used
SSID Use AirStation’s MAC address
WEP Encryption Key Settings -
BSS Basic Rate Set
Multicast Rate Auto
802.11n Protection Not used
DTIM Period 1
Wireless Client Isolation Not used
Output Power 100%
11bg-256QAM (2.4 GHz only) Use
BeamformingEX (5 GHz only) Use
WMM Settings Not displayed
WMM-EDCA Parameters
(Priority AC_BK (Low))
WMM-EDCA Parameters
(Priority AC_BE (Normal))
WMM-EDCA Parameters
(Priority AC_VI (High))
For AP For STA
For AP For STA
For AP For STA
13
Page 14

Feature Parameter Default Setting
CWmin 3 3
CWmax 7 7
AIFSN 1 2
TXOP Limit 47 47
Admission Control ----- Disabled
An 8-digit random value
(Printed on the label of the AirStation)
WPS Status:
Configured
SSID:
Buffalo-A-XXXX (where “XXXX” is the last 4 digits of the
AirStation’s MAC address).
Buffalo-G-XXXX (where “XXXX” is the last 4 digits of the
AirStation’s MAC address).
Security:
WPA2-PSK AES
Encryption Key:
An 8-digit random number (Printed on the setup card)
Disabled
Enabled
WPS
AOSS
MAC Filtering
Multicast
Control
Guest Accounts
Wi-Fi Settings
Transfer
WMM-EDCA Parameters
(Priority AC_VO (Highest))
WPS Enabled
External Registrar Enabled
AirStation PIN
WPS PIN -
WPS Security Settings
AOSS Status Not in use
Allow WEP for Game Consoles
Only
AOSS Button on The AirStation
Unit
Enforce MAC Filtering Disabled
Registration List No Registered MAC addresses
Snooping Enabled
Multicast Aging Time 300 seconds
Guest Accounts Disabled
Guest User Authentication Disabled
Guest Account LAN IP Address Auto
Permitted Access Time 3 hours
SSID Use AirStation’s MAC address
Wireless Authentication No Authentication
Wireless Encryption No Encryption
Show Guests No registered guest users.
Settings Transfer Status No transfers
For AP For STA
14
Page 15

Feature Parameter Default Setting
Prohibit NBT and Microsoft-DS routing:
Disabled
Firewall Settings (IPv4)
Firewall
Firewall Settings (IPv6)
IP Filter IPv4 Filter No IP filters have been configured yet.
IPv6 Filter IPv6 Filter No IP filters have been configured yet.
Passthrough
Port Forwarding Forwarded Ports Port forwarding has not been set up yet.
DMZ Add IP Address to DMZ UPnP UPnP Enabled
Web Filtering Filter Level No Filters
Access Control Access Control Disabled
Disk
Management
Sharing
WebAccess
Media Server Media Server Disabled
BitTorrent
PPPoE Passthrough Disabled
PPTP Passthrough Enabled
Automatic USB Drive
Assignment
Advanced Not Displayed
Character Code for FAT North America (CP437)
Sleep Mode Disabled
Current Users No users registered.
Shared Folder Enabled
AirStation Name “AP” + AirStation’s MAC Address
AirStation Description Workgroup Name WORKGROUP
Windows Client Language North America (CP437)
WebAccess Disabled
HTTPS/SSL Encryption Disabled
WebAccess External Port Auto
DNS Service Hostname Use BuffaloNAS.com registration
BitTorrent Disabled
External Port Number Auto
Bandwidth Restriction Enabled
Maximum Download Speed 1000 KB/s
Maximum Upload Speed 200 KB/s
Reject ident requests:
Enabled
Block ping from Internet:
Enabled
Prohibit NBT and Microsoft-DS/SMB 2.0 routing:
Enabled
Reject ident requests:
Enabled
Block ping from Internet:
Disabled
Block TCP connection requests from Internet:
Enabled
Enabled
15
Page 16

Feature Parameter Default Setting
Priority Control QoS Disabled
Optimize for Video
Video:
Ultra Premium - High Bandwidth
Conference:
Premium - Low Latency, Medium Bandwidth
Gaming:
QoS
eco Mode
Network USB
System
Manual
Manual Entry No custom QoS rules added.
Power Saving Disabled
LED Off
Wired LAN eco
Wireless LAN Off
Weekly Schedule Mode Normal
Start Time 0:00
End Time 0:30
Day of Week Network USB Enabled
Use Multifunction Printer Enabled
AirStation Name “AP” + AirStation’s MAC Address
Administrator admin (fixed)
Administrator Password password
Access
NTP Functionality Enabled
NTP Server time.nist.gov
Update Interval 24 hours
Local Date 2014 Year 1 Month 1 Day
Local Time 0 Hour 0 Minute 0 Seconds (12 midnight)
Time Zone (GMT - 06:00) Central Standard Time: CST
DST (Daylight Saving Time) USA (from second Sunday in Mar to first Sunday in Nov)
Premium - Low Latency, 320 Kbps Bandwidth
Audio:
Above Average, 320 Kbps Bandwidth
Browsing:
Standard, Best Availability
Download:
Junk, Lowest Priority
Prohibit configuration from wireless LAN:
Disabled
Prohibit configuration from wired LAN:
Disabled
Permit configuration from wired Internet:
Disabled
Limit network scanning:
Disabled
16
Page 17

Feature Parameter Default Setting
Transfer Logs Disabled
Syslog Server -
Address Translation, IP Filter, Firewall, PPP Client, Dynamic
Syslog Settings
Update
Firmware
Logs
Detailed logs Update Method Specify a file on your PC
Firmware File Name Automatic Update Check Enabled
Daily Check Time Automatic
DNS, DHCP Client, DHCP Server, AOSS, Wireless Client,
Authentication, Setting Changes, System Boot, NTP Client,
Wired, USB, System
Technical Specifications
Wireless LAN Interface
Standard Compliance IEEE 802.11ac / IEEE 802.11n / IEEE 802.11a / IEEE 802.11g / IEEE 802.11b
Transmission Method Direct sequence spread spectrum (DSSS), OFDM, MIMO
Frequency Range Available frequencies depend on the country of purchase.
IEEE 802.11ac 20 MHz BW <Long GI>:
260/234/195/175.5/156/117/78/58.5/39/19.5 Mbps (3 streams)
156/130/117/104/78/52/39/26/13 Mbps (2 streams)
78/65/58.5/52/39/26/19.5/13/6.5 Mbps (1 stream)
IEEE 802.11ac 20 MHz BW <Short GI>:
288.9/260/216.7/195/173.3/130/86.7/65/43.3/21.7 Mbps (3 streams)
173.3/144.4/130/115.6/86.7/57.8/43.3/28.9/14.4 Mbps (2 streams)
86.7/72.2/65/57.8/43.3/28.9/21.7/14.4/7.2 Mbps (1 stream)
IEEE 802.11ac 40 MHz BW <Long GI>:
540/486/405/364.5/324/243/162/121.5/81/40.5 Mbps (3 streams)
360/324/270/243/216/162/108/81/54/27 Mbps (2 streams)
Transmission Rate 802.11ac
180/162/135/121.5/108/81/54/40.5/27/13.5 Mbps (1 stream)
IEEE 802.11ac 40 MHz BW <Short GI>:
600/540/450/405/360/270/180/135/90/45 Mbps (3 streams)
400/360/300/270/240/180/120/90/60/30 Mbps (2 streams)
200/180/150/135/120/90/60/45/30/15 Mbps (1 stream)
IEEE 802.11ac 80 MHz BW <Long GI>:
1170/1053/877.5/702/526.5/351/263.3/175.5/87.8 Mbps (3 streams)
780/702/585/526.5/468/351/234/175.5/117/58.5 Mbps (2 streams)
390/351/292.5/263.3/234/175.5/117/87.8/58.5/29.3 Mbps (1 stream)
IEEE 802.11ac 80 MHz BW <Short GI>:
1300/1170/975/780/585/390/292.5/195/97.5 Mbps (3 streams)
866.7/780/650/585/520/390/260/195/130/65 Mbps (2 streams)
433.3/390/325/292.5/260/195/130/97.5/65/32.5 Mbps (1 stream)
17
Page 18

IEEE 802.11n 20 MHz BW <Long GI>:
260/234/195/175.5/156/117/78/58.5/39/19.5 Mbps (3 streams)
156/130/117/104/78/52/39/26/13 Mbps (2 streams)
78/65/58.5/52/39/26/19.5/13/6.5 Mbps (1 stream)
IEEE 802.11n 20 MHz BW <Short GI>:
288.9/260/216.7/195/173.3/130/86.7/65/43.3/21.7 Mbps (3 streams)
173.3/144.4/130/115.6/86.7/57.8/43.3/28.9/14.4 Mbps (2 streams)
86.7/72.2/65/57.8/43.3/28.9/21.7/14.4/7.2 Mbps (1 stream)
IEEE 802.11n 40 MHz BW <Long GI>:
Transmission Rate 802.11
n/a/b/g
Access Mode Infrastructure Mode
Security
Wired LAN Interface
Standard Compliance IEEE 802.3ab (1000BASE-T) / IEEE 802.3u (100BASE-TX) / IEEE 802.3 (10BASE-T)
Transmission Rate 10 / 100 / 1000 Mbps
Transmission Encoding 1000BASE-T 4DPAM5, 100BASE-TX 4B5B/MLT-3, 10BASE-T Manchester Coding
Access Method CSMA/CD
Speed and Flow Control 10 / 100 / 1000 Mbps, Auto Sensing, Auto MDIX
Number of LAN Ports 4
USB Interface
Interface USB 3.0 / USB 2.0
Connector Type USB 3.0 x 1, USB 2.0 x 1
Other
Power Supply
Power Consumption 27.8 W (Max)
Dimensions 185 (H) × 41 (D) × 185 (W) mm (7.28 x 1.61 x 7.28 in.)
Weight 549 g (19.37 oz.)
Operating Environment 0 - 40° C (32 - 104° F), 10 - 85% (non-condensing)
540/486/405/364.5/324/243/162/121.5/81/40.5 Mbps (3 streams)
360/324/270/243/216/162/108/81/54/27 Mbps (2 streams)
180/162/135/121.5/108/81/54/40.5/27/13.5 Mbps (1 stream)
IEEE 802.11n 40 MHz BW <Short GI>:
600/540/450/405/360/270/180/135/90/45 Mbps (3 stream)
400/360/300/270/240/180/120/90/60/30 Mbps (2 stream)
200/180/150/135/120/90/60/45/30/15 Mbps (1 stream)
IEEE 802.11a / IEEE 802.11g:
54/48/36/24/18/12/9/6 Mbps
IEEE 802.11b:
11/5.5/2/1 Mbps
AOSS, WPA/WPA2 mixed PSK, WPA2-PSK (AES), WPA-PSK (AES), 64-bit or 128-bit WEP,
MAC address filter
External AC 100-240 V Universal, 50/60 Hz
AC Adapter Type: WA-36A12 or WA-36A12U
Manufacturer: Asian Power Devices Inc.
18
Page 19

Shared Folders and USB Ports
There are several restrictions on using the AirStation’s USB port:
• When using two-byte characters (such as Japanese), keep folder and file names within 80 characters. You may not be
able to copy a folder or a file whose name length is more than 80 characters.
• You cannot set attributes (hidden or read-only) for folders or files on the AirStation.
• When using access restrictions, you can register up to 16 users for the AirStation.
• Please note that you are not allowed to use any of the following words as a user or group name: adm, administrator,
all, bin, daemon, disk, ftp, guest, halt, hdusers, kmen, lp, mail, man, news, nobody, nogroup, none, operator, root,
shadow, shutdown, sshd, sync, sys, ttyusers, utmp, uucp, www.
• Please note that you are not allowed to use any of the following words as a shared folder name: global, homes,
printers, bittorrent, disk1_pt1, disk1_pt2, disk1_pt3, disk1_pt4, disk2_pt1, disk2_pt2, disk2_pt3, disk2_pt4, disk3_
pt1, disk3_pt2, disk3_pt3, disk3_pt4, disk4_pt1, disk4_pt2, disk4_pt3, disk4_pt4.
• If a file created on a Mac contains any of the following characters, it will not be displayed correctly under Windows.
Also, you cannot copy or properly display a file when connecting via SMB from Mac OS if it contains any of these
characters:
? [ ] / ¥ = + < > ; : “ , | *
• Cancelling or aborting a file copy may leave the file incomplete, and you may no longer be able to delete the
incomplete file. This can also happen during a power outage or if the LAN cable is suddenly disconnected. If it
happens, restart the AirStation, delete the file, and try copying the file again.
• Use the same username and password for the AirStation as the user’s Windows login. If they are different, the user
may not be able to access shared folders with access restrictions on the AirStation.
• Date and time stamps stored on the USB hard drive may be updated by the OS accessing the AirStation. File creation
or access dates may not be maintained.
• If you view the size of a hard drive from Settings, it shows a bigger value than when you see it in Windows’ drive
properties. This is because Settings shows the size of the drive in gigabytes but Windows shows it in gibibytes.
• If you have logged in using a “guest” account from Windows 8, Windows 7, Windows Vista, Windows XP, or Windows
2000, access restrictions may not work properly. A (different) guest account already exists on the AirStation.
• If you access a shared folder from a Mac, additional Mac OS information files may be automatically generated. Do not
delete these files from a Windows computer. Otherwise, you may no longer be able to access folders from a Mac.
• Device types that can be connected to the AirStation’s USB connector are USB hard drives, USB memory sticks,
USB printer, or USB card readers. Card readers with 5 or more slots are not supported. USB devices such as digital
cameras, CD/DVD drives, mice, and keyboards are not supported.
• Encrypted USB hard drives are not supported.
• If your hard drive has an auto power mode switch, move the switch to [manual] or [on] position. Leaving the switch
set to [auto] may result in unpredictable behavior.
• Up to 4 partitions can be recognized on a USB hard drive.
• Available file systems for USB hard drives are FAT12, FAT16, FAT32, and XFS.
19
Page 20

GPL Information
The source code for Buffalo products that use GPL code is available at http://opensource.buffalo.jp/ .
20
Page 21

Appendix C - Regulatory Compliance
Information
Only use the cables and accessories that are included in the package. Don’t use other accessories or cables unless
specifically instructed to in the documentation.
Company Information
Buffalo Americas, Inc.
11100 Metric Boulevard suite 750 Austin Texas 78758
+1-512-349-1500
FCC Statement
The information below is only for US region.
This equipment has been tested and found to comply with the limits for a Class B digital device, pursuant to Part 15 of
the FCC Rules. These limits are designed to provide reasonable protection against harmful interference in a residential
installation. This equipment generates, uses and can radiate radio frequency energy and, if not installed and used
in accordance with the instructions, may cause harmful interference to radio communications. However, there is no
guarantee that interference will not occur in a particular installation. If this equipment does cause harmful interference
to radio or television reception, which can be determined by turning the equipment off and on, the user is encouraged
to try to correct the interference by one of the following measures:
• Reorient or relocate the receiving antenna.
• Increase the separation between the equipment and receiver.
• Connect the equipment into an outlet on a circuit different from that to which the receiver is connected.
• Consult the dealer or an experienced radio/TV technician for help.
Any changes or modifications not expressly approved by the party responsible for compliance could void the user’s
authority to operate this equipment.
This device complies with Part 15 of the FCC Rules. Operation is subject to the following two conditions: (1) This device
may not cause harmful interference, and (2) this device must accept any interference received, including interference
that may cause undesired operation.
This equipment complies with FCC radiation exposure limits set forth for an uncontrolled environment. This equipment
should be installed and operated with minimum distance 20cm between the radiator & your body.
This transmitter must not be co-located or operating in conjunction with any other antenna or transmitter.
21
Page 22

IC statement (IC déclaration)
The information below is only for Canada region.
This device complies with Industry Canada license-exempt RSS standard(s). Operation is subject to the following two
conditions: (1) this device may not cause interference, and (2) this device must accept any interference, including
interference that may cause undesired operation of the device.
Le présent appareil est conforme aux CNR d’Industrie Canada applicables aux appareils radio exempts de licence.
L’exploitation est autorisée aux deux conditions suivantes : (1) l’appareil ne doit pas produire de brouillage, et (2)
l’utilisateur de l’appareil doit accepter tout brouillage radioélectrique subi, même si le brouillage est susceptible d’en
compromettre le fonctionnement.
(i) The device for the band 5150-5250 MHz is only for indoor usage to reduce potential for harmful interference to cochannel mobile satellite systems.
(ii) The maximum antenna gain permitted for devices in the band 5725-5825 MHz shall comply with the e.i.r.p. limits
specified for point-to-point and non point-to-point operation as appropriate.
High-power radars are allocated as primary users (i.e., priority users) of the bands 5250–5350 MHz and 5650–5850 MHz
and that these radars could cause interference and/or damage to LE-LAN devices.
(i) Le dispositif fonctionnant dans la bande 5150-5250 MHz est réservé uniquement pour une utilisation à l’intérieur afin
de réduire les risques de brouillage préjudiciable aux systèmes de satellites mobiles utilisant les mêmes canaux.
(ii) le gain maximal d’antenne permis (pour les dispositifs utilisant la bande 5 725-5 825 MHz) doit se conformer à la
limite de p.i.r.e. spécifiée pour l’exploitation point à point et non point à point, selon le cas.
De plus, les utilisateurs devraient aussi être avisés que les utilisateurs de radars de haute puissance sont désignés
utilisateurs principaux (c.-à.d., qu’ils ont la priorité) pour les bandes 5250–5350 MHz et 5650–5850 MHz et que ces radars
pourraient causer du brouillage et/ou des dommages aux dispositifs LAN-EL.
This equipment complies with IC radiation exposure limits set forth for an uncontrolled environment. This equipment
should be installed and operated with minimum distance 20cm between the radiator and your body.
This transmitter must not be co-located or operating in conjunction with any other antenna or transmitter.
Under Industry Canada regulations, this radio transmitter may only operate using an
antenna of a type and maximum (or lesser) gain approved for the transmitter by Industry
Canada. To reduce potential radio interference to other users, the antenna type and its gain should be so chosen that
the equivalent isotropically radiated power (e.i.r.p.) is not more than that necessary for successful communication.
Cet équipement est conforme aux limites d’exposition aux rayonnements IC établies pour un environnement non
contrôlé. Cet équipement doit être installé et utilisé avec un minimum de 20 cm de distance entre la source de
rayonnement et votre corps.
L’antenne utilisée pour ce transmetteur ne doit pas être co-localisés en conjonction avec toute autre antenne ou
transmetteur.
22
Page 23

Conformément à la réglementation d’Industrie Canada, le présent émetteur radio peut fonctionner avec une antenne
d’un type et d’un gain maximal (ou inférieur) approuvé pour l’émetteur par Industrie Canada. Dans le but de réduire
les risques de brouillage radioélectrique à l’intention des autres utilisateurs, il faut choisir le type d’antenne et son gain
de sorte que la puissance isotrope rayonnée équivalente (p.i.r.e.) ne dépasse pas l’intensité nécessaire à l’établissement
d’une communication satisfaisante.
This radio transmitter (WXR-1900DHP) has been approved by Industry Canada to operate with the antenna types
listed below with the maximum permissible gain and required antenna impedance for each antenna type indicated.
Antenna types not included in this list, having a gain greater than the maximum gain indicated for that type, are strictly
prohibited for use with this device.
Le présent émetteur radio (WXR-1900DHP) aété approuvé par Industrie Canada pour fonctionner avec les types
d’antenne énumérés ci-dessous et ayant un gain admissible maximal et l’impédance requise pour chaque type
d’antenne. Les types d’antenne non inclus dans cette liste, ou dont le gain est supérieur au gain maximal indiqué, sont
strictement interdits pour l’exploitation de l’émetteur.
Antenna Type Peak Gain Required Impedance
Omnidirectional antenna 2.4GHz 2dBi / 5GHz 3dBi 50ohms
23
 Loading...