

Page 1
102.50 mm
410.00 mm
287.00 mm
143.5 mm
Quick Install Guide
Package Contents
Wire less Ro uter
Powe r Adapte r
Qui ck Inst all Gui de
War ra nt y
If an y of the ab ove item s is inco rrect , missi ng, or da maged, p lease c ontac t your
Tenda r esell er for im mediat e repla cemen t.
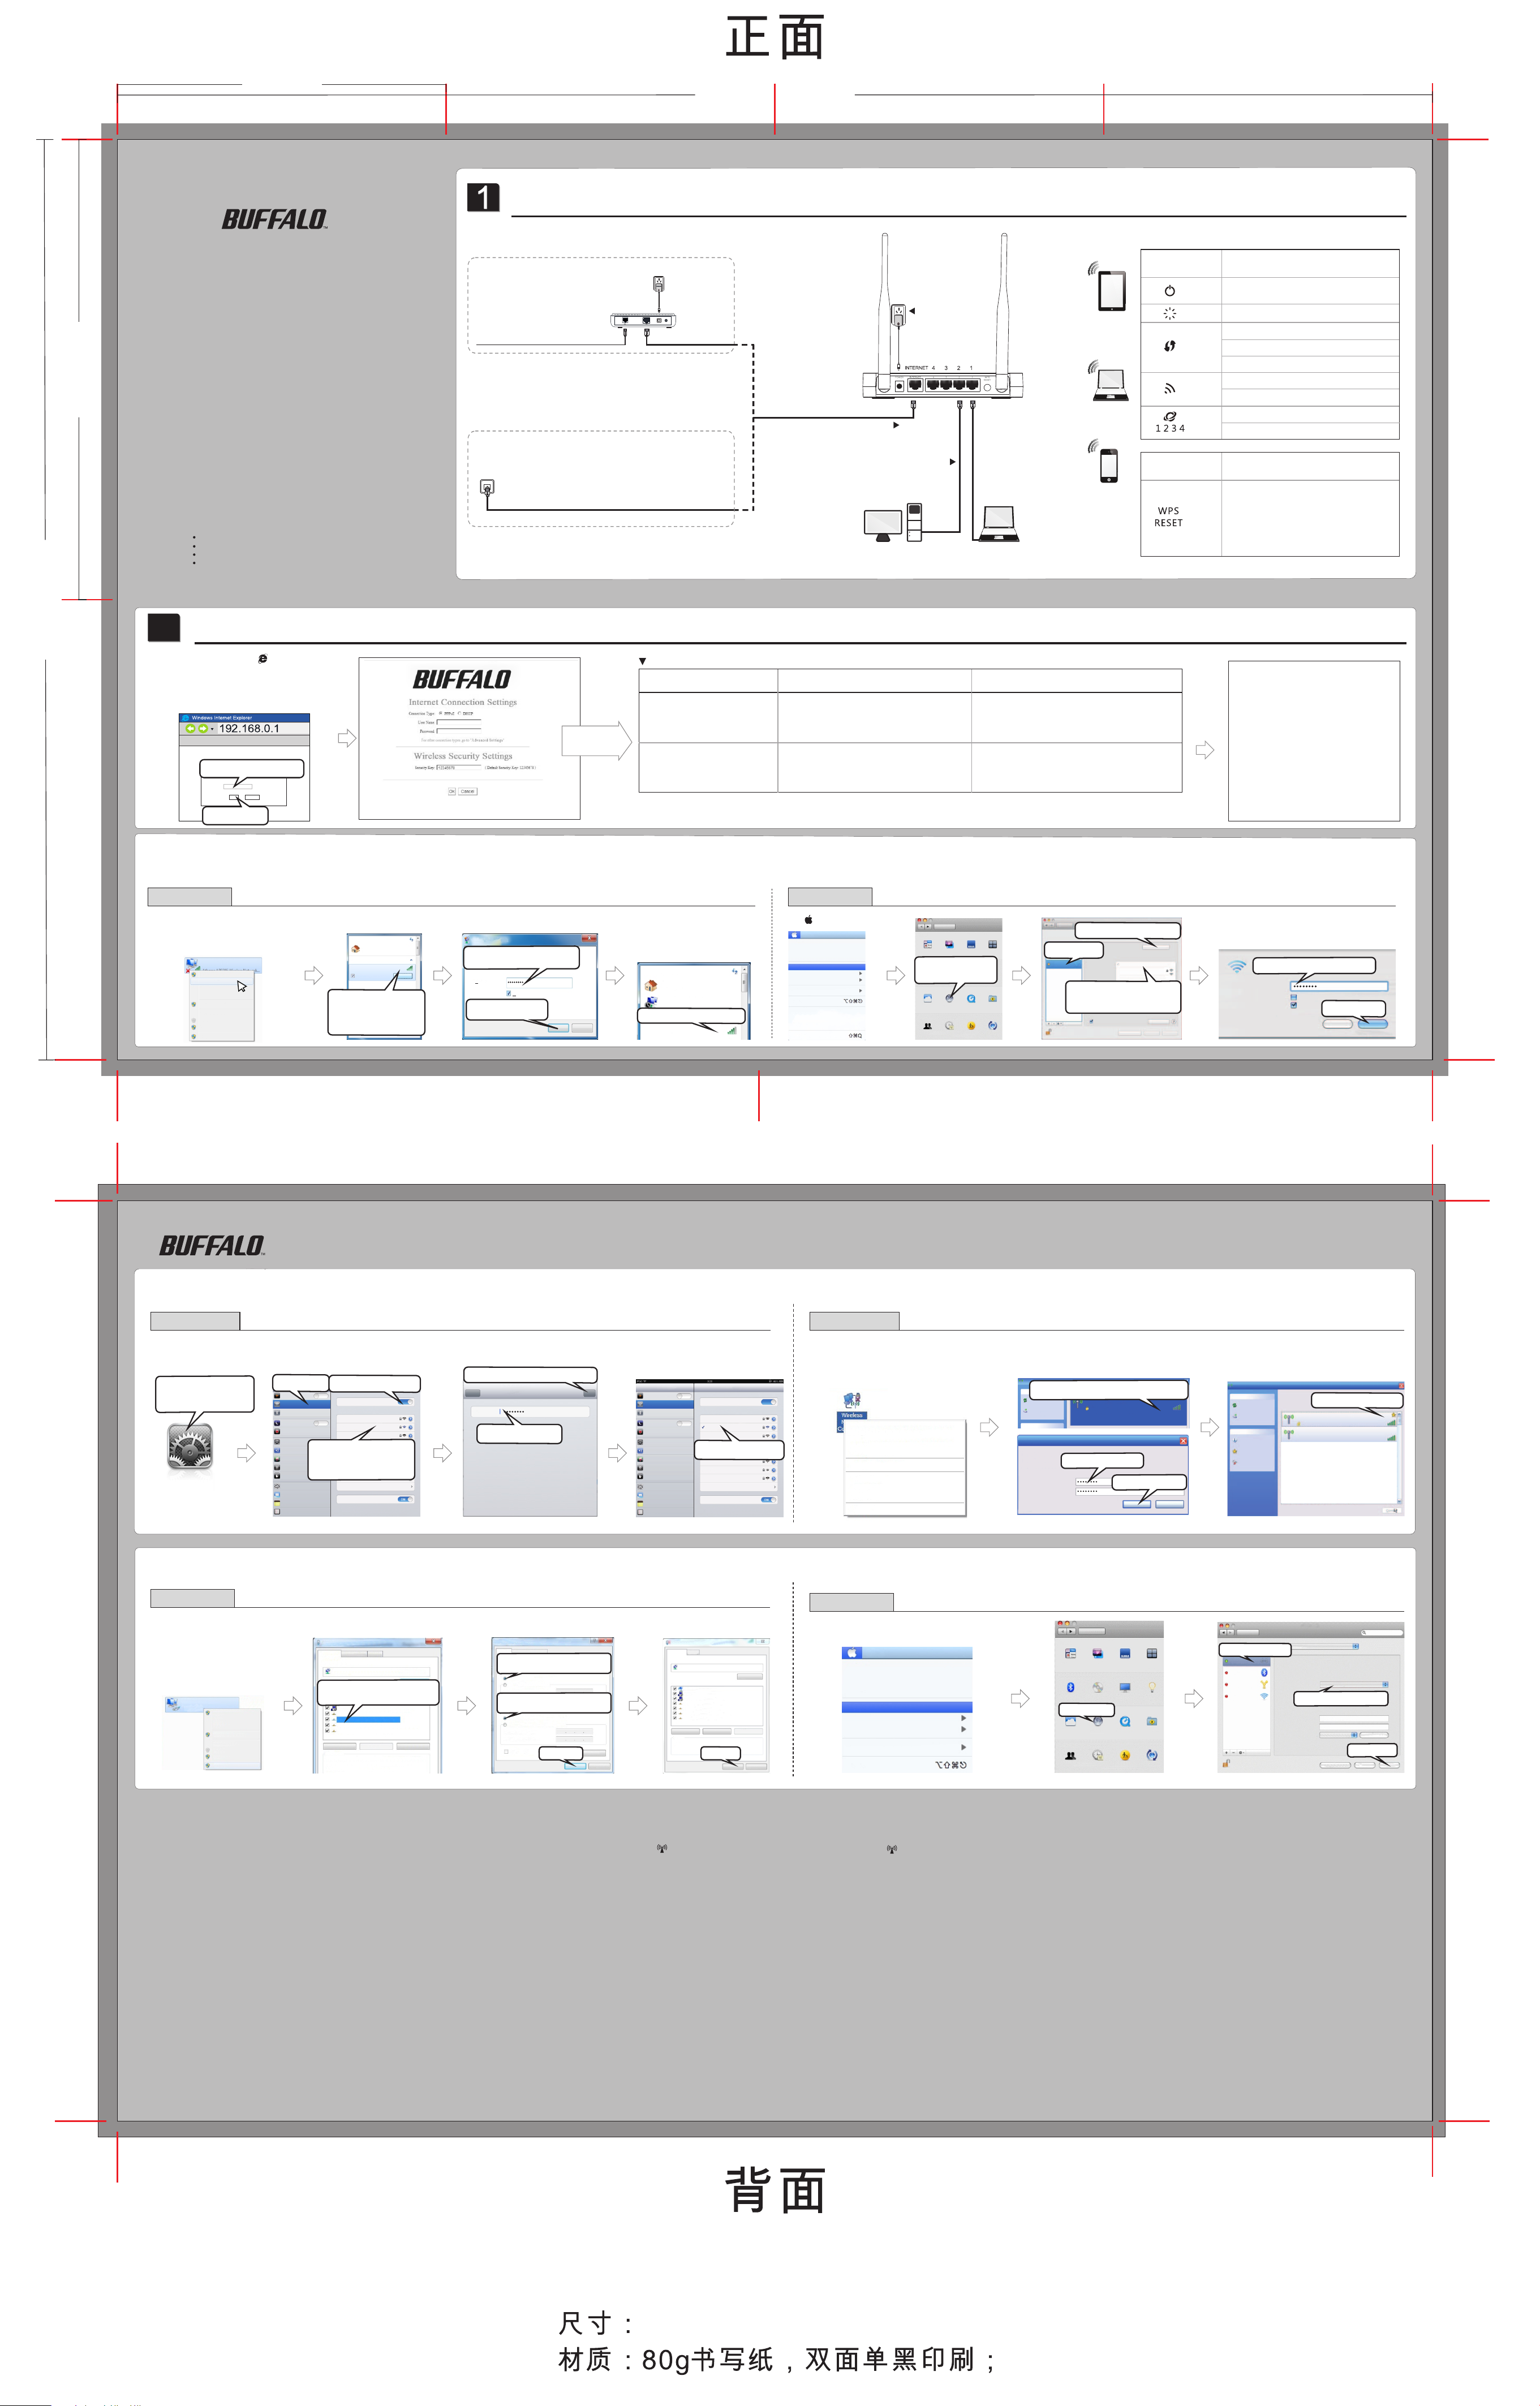
Hardware Install
A.Telephone line or FTTH
(fiber to the home)
Cable Modem
Teleph one lin e or Fi ber
or
B. Ethernet cable
or ONT
Ethernet Cab le
Ethernet Cab le
Select a proper installation method according to what type of WAN medium your ISP is delivering:
Ethernet Cab le
1. Con nect th e Ether net cable to
the WAN port on t he router .
2. Con nect on e of t he ports(1 /2/3/ 4)
on the rou ter to your P C.
3. Connect the router
to po we r supply
LED
Button
Description
Solid: Indicates a prop er connection
to th e power supply
Blinking: Syste m is f un ctioning properly
Off: WPS is disabled
Blink
ing: Negotiat in g ke y
Solid: WPS is enabled
Solid: Wireless is enabled
Blinking: Transfe rring data
Solid: Indicates prop er connection
Blinking: Transmitting data
Description
Whe n th e router power on, if pre ss t hi s
butto n sh or tly(Less than 10 seco nd s) ,
WPS will be enabled, if press it more
than 10 secon ds t il l th e SYS light stop
blinking, the rou ter will restore to Fa ctor
Default Setting.
Images herein are for refe rences only.
2
2
Configure Router
Lau nch any brow ser, say, IE and a s creen a s seen in
the s creenshot be low wil l appea r; if not , type
192 .168. 0.1 in th e address bar an d press Ente r. If the
screen sti ll does n ot appe ar, follow in struc tions o n
Ap
pen dix 3 to configu re your PC.
File (F) (Edi t)E View(V) Add to F avori tes(A )
Login
1.E nter the login p assword.
Defaul t:adm in
Passwo rd:
Cancel
OK
2.C lick OK
Appendix 1: Join a Wireless Network
Windows 7
Click Start->Control Panel->Network and
Sharing Center->Change Adapter
Settings->right click Wireless Network
Connection->select Connect/Disconnect.
Wirele ss Netw ork Con necti on
Not Conn ected
Disab le
Connec t / Disco nnec t
Status
Diagno se
Bridg e Connec tion s
Create S hortc ut
Delet e
Renam e
Proper ties
Current ly conn ected t o:
Networ k 4
Intern et acce ss
Wireles s Netwo rk Conn ectio n
Buffal o-G- XXXX
Connec t autom atica lly
1.Find t he wire less
net work yo u wish to
con nect.
2.C lick Conne ct.
Open Net work an d Shari ng Cent er
Connec t
Ple ase se lect a proper I nternet co nnec tion t ype. Contact I SP for a ssistance if y ou don't k now what ty pe of In tern et connect ion to s elec t.
Internet Connection Type
Features
Sel ect PPPoE (Point to Poin t Protoc ol over
Eth ernet ) if you used to c onnec t to the Inte rnet
usi ng a broadband c onnec tion th at requ ires a
use rname a nd a pass word.
Sel ect DHCP (D ynami c IP) if yo u can access
Int ernet a s soon as your com puter d irect ly
Please follow
instructions
on the right table.
PPPoE
DHCP
con nects t o an Inte rnet- enabl ed ADSL /Cabl e
mod em.
*Fo r configurations o f othe r Inte rnet con nect ion ty pes, go to o ur website: ww w.ten dacn .com a nd download th e latest u ser gu ide from S uppo rt->
Dow nloa ds.
Not e:
1.T he defa ult SSI D (wirel ess net wor
2.B y defau lt, for fi rst-t ime wir eless c onnec tion to t he devi ce, ther e is no pre set sec urity k ey; how ever, on ce you con nect to i t wirel essly a nd conf igure
Int ernet c onnec tion ye t make no c hange i n the sec urity k ey fiel d, 1234 5678 wil l be auto matic ally se t as the se curit y key by de fault .
3. To conf igure t he route r wirel essly, f ollow i nstru ction s on sect ions: 1 . Hardwa re Inst all-> A ppend ix 1 or App endix 2 -> 2. Conf igure R outer .
k nam e) is Tenda_ xxxxx x, wher e xxxxx x is the la st 6 char acter s in the de vice's M AC addr ess.
MAC OS
Conn ect to a Ne twork
Type t he netw ork sec urity k ey
1.E nter the secur ity key.
Secu rity ke y:
Hide c harac ters
2.C lick OK .
Whe n you see Co nnected d isplayed
nex t to the wi reless netwo rk you
sel ected , you have c onnec ted to th e
wireless n etwor k succe ssful ly.
Curre ntly co nnect ed to:
Netw ork 4
Inte rnet ac cess
Buff alo-G -XXXX
Inte rnet ac cess
Connected su ccessfully.
OK
Cancel
Wirel ess Net work Co nnect ion
Buff alo- G-XXXX
Conn ected
Cli ck ->Sys tem Prefer ences.
Edit
File
Finder
About Thi s Mac
Soft ware Updat e...
Mac OS X Sof tware. ..
System Pr eference s...
Dock
Locat ion
Recen t Items
Force Qui t Finder
Sleep
Resta rt...
Shut Do wn...
Log Out he lpdesk ...
View
Instructions
Sel ect PPPoE, ent er the PPPoE u serna me and PP PoE
pas sword prov ided by your I SP, cust omi
key t o secure you r wireless net work an d then cl ick OK.
Sel ect DHCP, c ustomize a sec urity k ey to sec ure your
wireless n etwor k and the n click O K.
Show All
Personal
Des kto p &
Appea ranc e
Hardware
Sel ect Net work from
Int ernet & N etwork .
Bluet ooth
Internet & Network
Mobil eMe Ne twor k Quick Time Shari ng
System
Accou nts
Scr een Sav er
D
C s & DVDs Displ ays
Date & Tim e
Parent al
Contr ols
Dock
Expos e &
Space s
Energ y
Saver
Softw are
Updat e
ze a se curit y
Show All
Ethernet
Not Connec ted
1.Cl ick W i- F i
FireWire
Not Connec ted
Wi-Fi
On
Network
2.Click here to Turn Wi-Fi On
Automatic
Location:
Status: O n
Wi-Fi is t urn ed o n bu t is not con ne cte d to a
netw ork .
No network sel ected
Network Name
Buffalo-G -XXXX
Buffalo-G -XXXX
3.C lick No n etwork sel ected
4.S elect the w irele ss
net work na me of your rou ter
Click the lock to prevent further changes.
Show Wi- Fi stat us in me nu bar
Assist me...
Turn Wi- Fi Of f
Advanced...
Revert
1. You ca n acce ss Int ernet vi a a wire d
con nect ion to t he dev ice wh en Connect ion
Sta tus di splays Connect ed.
2. To access I nternet via a wi reless
con nect ion to t he dev ice, s ee Appendix 1
(fo r Win dows 7 /MAC OS ) or App endi x 2 (for
iPh one/ iPad/ Wind ows XP).
For a d eskt op, you w ill ne ed an ex tern al
wirel ess ad apte r.
The ne twork “cat herin e” requ ires a WPA
1.E nter the wirel ess pas sword.
pas sword.
Password:
Show password
Remember this network
2.C lick on J oin.
Apply
Cancel
Join
Appendix 2 :Join a Wireless Network (iPhone/Windows XP)
iPhone/iPad
1.Sc roll sc reen to find t he
Set tings i con.
2.Cl ick the i con.
Set tings
1.C lick Wi- Fi.
Settings
Airplane Mode OFF
Disconnected
Wi-Fi
Bluetooth Off
Do Not Disturb
Notifications
General
3.Find th e name of t he
Sounds
wireless n etwor k you wis h
Brightness & Wallpaper
to connect
Picture Frame
4.Cl ick on it .
Privacy
iCloud
Mail, Contacts, Calendars
Notes
Reminders
2.Click he re to open Wi-Fi
OFF
Wi-Fi
Wi-Fi ON
Choose a Network…
Buffalo -G-XXXX
Buffalo -G-XXXX
Buffalo -G-XXXX
JOSHUA
Other…
Ask to Join Networks
Known networks will be joined automatically. If no
known networks are available, you will be asked
before joining a new network.
2.Click here to join the wireless network.
Passwo rd
Enter the password for “dianshang”
Enter Password
Join
Cancel
1.En ter a security key.
Appendix 3: Configure PC
Settings
Airplane Mode OFF
Tenda_xxxxxx
Wi-Fi
Bluetooth Off
Do Not Disturb
Notifications
General
Sounds
Brightness & Wallpaper
Picture Frame
Privacy
iCloud
Mail, Contacts, Calendars
Notes
Reminders
Wi-Fi
Wi-Fi ON
Choose a Network…
ChinaNet -YJ3M
OFF
Buffalo -G-XXXX
dianshang
JOSHUA
Connected su ccessfully
Other…
Ask to Join Networks
Known networks will be joined automatically. If no
known networks are available, you will be asked
before joining a new network.
Windows XP
Click Start->Control Panel->Double click
Network Connections->right click
Wireless Network Connection->select
View Available Wireless Networks.
Disab le
View Avai lable Wirele ss Networ ks
Statu s
Repai r
Bridg e Connect ions
Create S hortcu t
Delet e
Renam e
Proper ties
Local Are a Conne ction 2
Local Are a Conne ction 2
Double click the wireless network you wish
Network Task s
to connect.
Refresh network list
Set up a wireless network
for a home or small office
Wireless Network Connection
The network “Tenda_home” requires a network key(also called a WEP key or WPA key),A
network key helps prevent unknown intruders from connection to this network.
Type the key,and then click Connect
Network Key:
Confirm network key:
Choo se a w irel ess n etwo rk
Buffalo -G-XXX X
Security-enabled wireless network(WPA)
To connect to this network,click Connect,You might need to enter
additional information
1.En ter a security key.
2.Cl ick Connec t.
Connect Cancel
Quick Install Guide
Local Ar ea Conn ectio n 2
Networ k Tasks
Refresh network list
Set up a wireless network
for a home or small office
Relate d Tasks
Learn about wireless
networking
Change the order of
preferred networks
Change advanced
settings
Cho ose a w ire less netw ork
Click an item in the list below to connect to a wireless network in range or to get more
information
Connected Su ccessfully .
Buffalo -G-XXXX
Securit-enabled wireless network(WPA)
Buffalo -G-XXXX
Unsecured wireless network
Connected
Windows 7
Click Start-> Control Panel
-> Network and Sharing
Center-> Change Adapter
Setting->right click Local
Area Connection
->select Properties.
Local Ar ea Conne ctio n
Networ k 2
Disabl e
Status
Diagno se
Bridge C onnec tions
Create S hortc ut
Delete
Rename
Proper ties
Local Area Connection Properties
Networking
Connect uaing:
Reatek RTL8102E/RTL8103E Family PCI-E Fast Etheme
Double click Inte rnet Proto col
This connection uses the following tems:
Versi on 4(TCP/ IPv4).
Inatall...
Description
Transmission Control Protocol/Internet Protocol. The default
wide area network protocol that provides communication
across diverse interconnected networks.
Sharing
Authentication
Contigure...
Clent for Microaoft Networks
QoS Pocket Scheduler
File and Printer Sharing for Microsoft Networks
Internet Protocol Version 6(TCP/IPv6)
Internet Protocol Version 4(TCP/IPv4)
Link-Layer Topology Discovery Mapper I/0 Driver
Link-Layer Topology Discovery Responder
Uninatall
Properties
Inte rnet Pr otoco l Versio n 4 (TCP/IP v4)Pro perti es
Gene ral
Alte rnate C onfig urati on
You can get IP settings assigned automatically if your network supports
1.Select Obtain an IP add ress
this capability. Otherwise,you need to ask your network administrator
for the appropriate IP settings.
automatically
Obtain an IP address automatically
Use the following IP address:
IP address:
Subnet mask:
2.Select Obtain DNS server
Default gateway:
address auto matically
Obtain DNS server address automatically
Use the following DNS server addresses:
Preferred DNS ser ver:
Alternate DNS ser ver:
Validate settings up o
FAQs
1. Whe re should I plac e the wireless d evice for op timum p erformance?
1. Pl ace it in the cen ter to ex tend wire less coverag e as far as p ossib le.
2. Ne ver place the device n ear to metal obje cts or in direc t sunsh ine.
3. Ke ep it far away fro m devices that use the 2.4 G Hz radi o wave frequen cy to trans mit and receive da ta,
suc h as 802. 11g/n w ireless netwo rk devi ces, electronic de vices s uch as cell phone s, radio transmitt ers,
blu e tooth , cordles s phone s, fax machine, refrigerato r and mic rowaves to avo id electronic int er feren ce.
2. I ca nnot access th e device's man ageme nt interf ace. What s hould I do?
3. I forget th e wireless secur ity key. What sh ould I do ? How do I confi gure or change the s ecuri ty key?
4. My n otebo ok is una ble to search wi reless netwo rks, what shou ld I do?
y the p hysical conn ection (nam ely, the Eth er net cable) betwee n your PC and the device . For
1. Verif
det ails, see 1. Hardware Ins tall he reof.
2. Do uble ch eck the TCP/IP se tting s on your PC. Fo r details, se e Appen dix 3.Conf igure P C hereof.
3. Press the R ese
t but ton for over 1 0 seconds on the device an d then re -acce ss the ma nagem ent interface.
4. Ch ange th e Ether net cable that co nnects yo ur PC and the device.
5. Try access ing dev ice management int er face from o ther PC s, smart phones or iPads.
6. Connect your PC alone t o one of the LAN ports on the device.
1. Try the default se curit y key: 1 2345678.
2. Access the de vice ma nagement inte rface an d reconfigure a se curit y key. For details, s ee 1. Hardw are
Ins tall an d 2. Configu re Router.
3. Press the R eset butt on for over 10 seconds on th e devic e to restore factor y defau lt sett ings.
1. Verify that wi reless is enabled on your notebook by c heck ing the w ireless hardwa re or sof tware b utton
on your notebook . The hardwa re button is us ually l ocated on the side of yo ur notebook. Note tha t
n exit
3.Click OK
MAC OS
Click on the Apple icon from the top-left
Local Area Connection Properties
Networking
Sharing
Connect uaing:
Reatek PCle GBE Family Controler
This connection uses the following tems:
Clent for Microaoft Networks
QoS Pocket Scheduler
File and Printer Sharing for Microsoft Networks
Internet Protocol Version 6(TCP/IPv6)
Internet Protocol Version 4(TCP/IPv4)
Link-Layer Topology Discovery Mapper I/0 Driver
Link-Layer Topology Discovery
Inatall...
Description
r to access resources on a Mcrosoft
Allows your compute
Advanced.. .
Cancel
ok
network.
Click OK
Uninatall
Responder
ok
Contigure...
Properties
Cancel
som e noteb ooks may not ha ve such hardware butto n. Software b utton can be implement ed by
pressing Fn+ . Fn is si tuated on the bottom l eft cor ner of yo ur keyboard. may be any ke y
bet ween F1 -F12 depending on wha t ty pe of key board you are us ing.
2. Log in to the devic e, select Adv anced-> Wire
les s and cha nge the w ireless network name (SS ID).
The n search agai n.
3. Follow be low steps to verify that wir eless serv ice is enabled on y our notebook (for Windows XP OS
onl y).
From the d eskto p, righ t-click o n the My Co mputer icon and sele ct Manage. Se lect Ser vices and
App lications, do uble click Ser vices and view the statu s of Wireless Zero Configu ration. I f Status dose
not d isplay Star ted, right click the Wireless Ze ro Conf igura tion and select Start; if Star tup Type
dis plays Disabled, ri ght click the Wirel ess Zero Configurati on, sel ect Propert ies; from the Sta rtup Type
drop- down list b ox, selec t Automat ic and th en click Start in Servic e Status.
5. Why cannot I j oin the s earched wire less ne twork?
1. Verify that you entered a correct security key. If not, see q uesti on 3.
2. Log in to the devic e, select Adv anced-> Wirel ess and cha nge the w ireless network name (
The n connect again.
3. Log in to the devic e, select Adv anced-> Wirel ess-> Wire less Se curit y and change th e secur ity
set tings. Then conne ct again.
6. Wire less co nnectio n shows "Con
nec ted" but I ca nnot access In ternet. Wha t shoul d I do?
1. Verify that you are con necting to a ri ght SSI D (wireless n etwor k).
2. Follow in structions on this Quick Inst all Gui de to reconfigur e all settings.
corner and select System Preferences.
Finder
File
About This Mac
Software Update...
Mac OS X Software...
System Preferences...
Dock
Location
Recent Items
Force Quit Finder
Edit
View
SSI D).
Show All
Personal
Dock
Paren tal
Cont rols
Expo se &
Soft ware
Des kt op &
Appe aran ce
Scr ee n Sa ver
Hardware
D
C s & DVD s Disp lays
Blue toot h
Internet & Network
Click Network
Mobi leMe Netw ork Qui ck Tim e Sha ring
System
Date & Ti me
Accou nts
Spac es
Ener gy
Save r
Upda te
Show All
1.Click on Ethernet
Ethernet
Connected
Bluetooth
Not Connected
FireWire
Not Connected
Wi-Fi
Off
Click the lock to prevent further changes.
Location:
Network
Automatic
Status:
Connecte d
Ethernet is currentl y active and has the IP
addre ss 142. 104.5 7.27.
Configure:
Using DHCP
IP Address:
0.0.0. 0
2.Choose Using DHCP
Subnet Mask:
255.25 5.255. 192
142.1 04.57 .62
Router:
142.1 04.6. 1,142 .104. 80.2
DNS Server:
Search Domains:
uvic.ca
802.1X:
WPA:UVicDe f...
Assi st me ...
Connect
Advanced...
3.Click Apply
Revert
Apply
FCC St atemen t
Thi s device c ompli es with P art 15 of t he FCC Ru les. Ope ratio n is subj ect to th e follo wing tw o condit ions: ( 1) This de vice ma y not
cau se harm ful int erfer ence, an d (2) thi s devic e must ac cept any i nter ferenc e recei ved, inc ludin g inter feren ce that m ay cause
und esire d operat ion.
Thi s equip ment has b een tes ted and f ound to co mply wi th the li mits fo r a Class B d igita l devic e, pursu ant to Par t 15 of th e FCC
Rul es. These l imits a re desi gned to p rovide r eason able pr otect ion aga inst ha rmful i nterf erence i n a resid entia l insta llati on. This
equ ipmen t gener a
tes, u ses and c an radi ate rad io freq uency e nergy a nd, if not i nstal led and u sed in ac corda nce with t he
ins truct ions, m ay caus e harmf ul inter feren ce to rad io comm unica tions. H oweve r, there is n o guara ntee th at inter feren ce will n ot
occ ur in a par ticul ar inst allat ion. If t his equ ipmen t does ca use har mful in terfe rence to r adio or t elevi sion re cepti on, whi ch can be
det ermin ed by tur ning th e equip ment off a nd on, th e user is e ncour aged to t ry to cor rect th e inter feren ce by one o f the foll owing
mea sures :
-Reo rient o r reloc ate the re ceivi ng ante nna.
-Inc rease t he sepa rat
ion b etwee n the equ ipmen t and rece iver.
-Con nect th e equip ment in to an outl et on a cir cuit di fferen t from th at
to wh ich the re ceive r is conn ected .
-Con sult th e dealer o r an expe rienc ed radi o/TV t echni cian for h elp.
FCC Ca ution : Any cha nges or m odifi cation s not exp ressl y appro ved by the p arty r espon sible fo r compl iance c ould voi d the use r's
aut horit y to oper ate thi s equipm ent.
Thi s trans mitter m ust not b e co-lo cated o r opera ting in c onjun ction w ith any o ther ant enna or t ransm itter.
The m anufa cture r is not res ponsi ble for a ny radio o r TV inte rfere nce cau sed by un a
uth orize d modif icati ons to thi s equip ment.
Rad iatio n Expos ure Stat ement
Thi s equip ment com plies w ith FCC r adiati on expo sure li mits se t forth f or an unc ontrol led env ironm ent. This e quipm ent sho uld be
ins talle d and ope rated wi th mini mum dis tance 2 0cm bet ween th e radia tor & your b ody.
NOTE :(1)T he manu factu rer is no t respo nsibl e for any ra dio or TV i nterf erence c aused b y unaut horiz ed modi ficat ions to t his
equ ipmen t.(2) To avoi d unnec essar y radi ation i nterf erence , it is rec ommend ed to use a s hield ed RJ45 c able
410*287mm
,风琴四折页,折后尺寸102.5*143.5mm
 Loading...