

Page 1

User Manual
AirStation
WZR-1166DHP
www.bualotech.com
Page 2

Contents
Chapter 1 - Product Overview .........................................5
Package Contents ................................................................... 5
Hardware Overview ................................................................. 6
Front Panel LEDs ........................................................................... 6
Back Panel ..................................................................................... 8
Bottom ............................................................................................ 9
Right Side ...................................................................................... 10
Vertical Placement .................................................................. 11
Horizontal Placement .............................................................. 11
Wall-Mounting ......................................................................... 12
Chapter 2 - Installation ..................................................... 13
Initial Setup ............................................................................. 13
Appendix A -
WZR-1750DHP ....................................................................... 16
WZR-1166DHP ....................................................................... 19
Specications .............................................16
Appendix B - Environmental Information .......................22
Appendix C - GPL Information ........................................23
- 1 -
Page 3

Chapter 1 - Product Overview
Package Contents
The following items are included in your AirStation package. If any of the items are missing, please
contact your vender.
• AirStation ....................................................................................................................................... 1
• AirStation Setup Card ................................................................................................................ 1
• AC adapter ..................................................................................................................................... 1
• Stands ..............................................................................................................................................2
• Screws for wall-mounting ........................................................................................................ 2
• Ethernet Cable .............................................................................................................................1
• Quick Setup Guide ...................................................................................................................... 1
• Warranty Statement ................................................................................................................... 1
- 5 -
Page 4

Chapter 1 Product Overview
Hardware Overview
Front Panel LEDs
1
2
3
4
5
1
AOSS button To initiate AOSS, hold down this button until the wireless LED ashes
(about 1 second). Then, push or click the AOSS button on your wireless
client device to complete the connection. Both devices must be powered
on for this to work.
2
Wireless LED (Blue or Amber)
On: Wireless LAN is enabled.
Randomly blinking: Wireless LAN is transmitting.
Double blinks: AirStation is waiting for an AOSS or WPS security key.
Continuously blinking: AOSS/WPS error; failed to exchange security keys.
O : Wireless LAN is disabled.
Note:
Wireless LED is blue : Security settings have been made for the wireless LAN.
Wireless LED is amber : Security settings have not been made for the wireless LAN.
- 6 -
Page 5

Chapter 1 Product Overview
3
Internet access LED (Blue)
On: Internet access is available.
O: Internet access is not available.
Router functionality is disabled.
4
Router LED (Blue)
On: Router functionality is enabled.
O: Router functionality is disabled.
5
Bualo LED (White or Red)
On (White): Power is on.
O: Power is o.
On (Red)*1: Booting.
2 blinks (Red)*2: Flash ROM error.
3 blinks (Red)*2: Wired Ethernet LAN error.
4 blinks (Red)*2: Wireless LAN error.
5 blinks (Red)*3: IP address setting error.
9 blinks (Red)*2: System error.
Continuously blinking*1:
*1 Never unplug the AC adapter while the Bualo LED is blinking continuously.
*2 Turn o AirStation rst, wait for a few seconds, then turn it back on.
*3 Because the network addresses of both the Internet port (WAN port) and the LAN port are the
same, it is not possible to establish communication. Change the LAN-side IP address of the
AirStation.
Updating rmware, saving settings, or initializing settings.
- 7 -
Page 6
Chapter 1 Product Overview
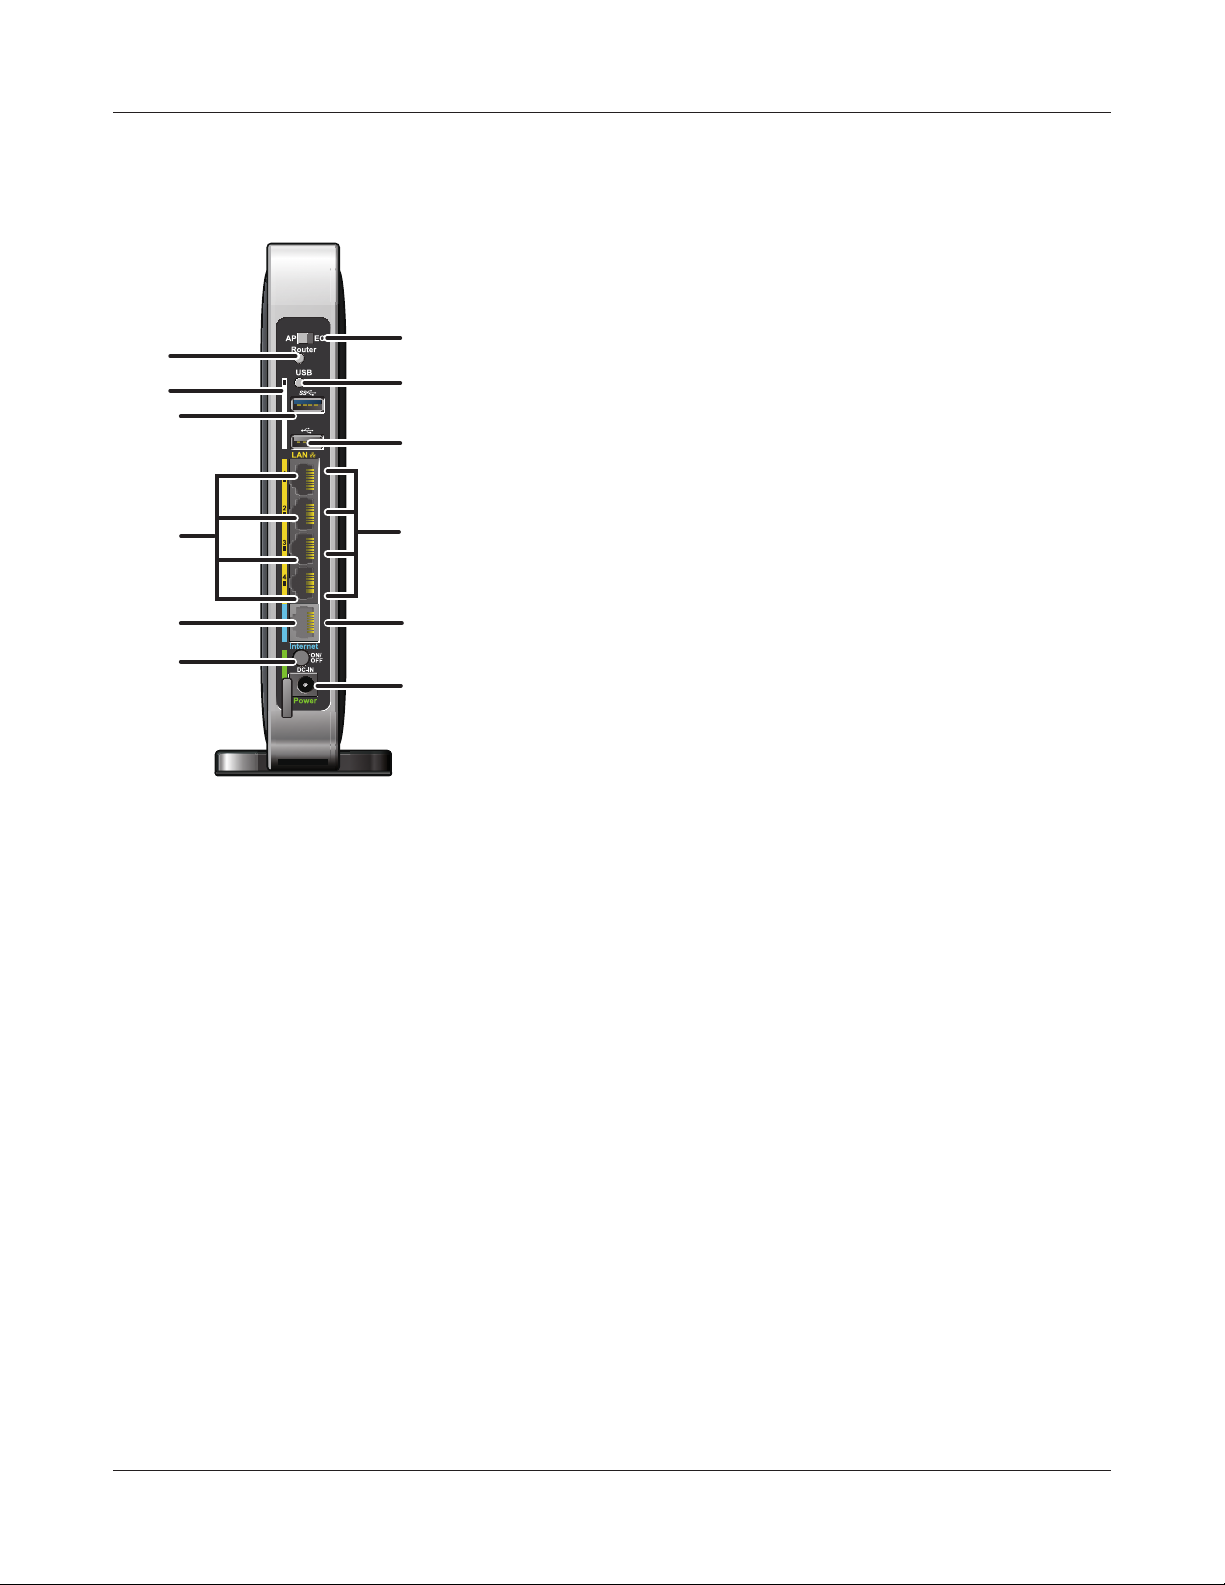
Back Panel
7
6
8
9
10
11
14
15
12
13
16
17
6
Mode switch Switches operation mode.
7
Mode button This button turns the router on and o . The operation mode is changed
by holding down the button.
8
USB LED (Blue)
On: A USB drive is connected.
Blinking: A USB drive can be removed.
Note: When this LED is blinking, the connected USB drive cannot be used. Remove the connected USB
drive. If the LED continues to blink even after the USB drive is removed, restart the AirStation. Do
not remove the USB drive or turn o the AirStation while the USB LED is on.
9
USB Eject button To dismount a USB hard drive, hold down this button until the USB LED
ashes (about 3 seconds). The USB drive can then be unplugged safely.
10
USB 3.0 Port Connect the USB drive.
11
USB 2.0 Port Connect the USB drive.
12
LAN Port Connect your computer, hub, or other Ethernet devices to these ports.
This switching hub supports 10 Mbps,100 Mbps, and 1000 Mbps
connections.
- 8 -
Page 7

Chapter 1 Product Overview
13
Internet Port 10 Mbps, 100 Mbps, and 1000 Mbps connections are supported.
Note: In bridge/AP mode (router o), the Internet port becomes a
regular LAN port, for a total of 5 usable LAN ports.
14
LAN LED (Green)
On: An Ethernet device is connected.
Blinking: An Ethernet device is communicating.
15
Internet LED (Green)
On: The Internet port is connected.
Blinking: The Internet port is transmitting data.
16
Power button This button turns the power on and o.
17
DC connector Connect the included AC adapter here.
Bottom
18
19
18
Reset button To reset all settings, hold down this button until the Bualo LED turns red
(about 3 seconds). The power must be on for this to work.
19
Setup card slot This is the slot where the AirStation setup card is stored. The initial
settings for the username, password, SSID, and encryption type are
provided on the card for logging into the conguration interface.
- 9 -
Page 8

Chapter 1 Product Overview
Right Side
20
20
Mounting holes Mounting holes are provided for mounting the AirStation to a
wall. Use the supplied screws to mount to a wall.
- 10 -
Page 9

Chapter 1 Product Overview
Vertical Placement
Attach the stand as shown in the gure below.
Stand
Stand
Horizontal Placement
The same stand also allows horizontal placement. Install the stand as shown in the gure below.
Stand
- 11 -
Page 10

Chapter 1 Product Overview
Wall-Mounting
Attach to the wall with the supplied screws in the mounting holes as shown below.
85 mm (3.35 in.)
Mounting holes
Screws
50 mm (1.97 in.)
- 12 -
Page 11

Chapter 2 - Installation
Initial Setup
To congure your AirStation, follow the procedure below.
1
2
3
Verify that you can connect to the internet without the AirStation, then turn o your modem
and computer.
disconnect
modem computer
Plug one end of the LAN cable into your modem and the other end to the AirStation’s
Internet (WAN) port. Turn on the modem.
Unplug the LAN cable which connects
your computer and modem.
- 13 -
Page 12

Chapter 2 Installation
4
5
Turn on the AirStation, then wait one minute.
Note : If the power does not turn on even when the AC
adapter is connected, press the Power button on
the rear of the AirStation.
If using a wired LAN, connect the AirStation LAN port and computer using a LAN cable.
If using a wireless LAN, connect the computer to the wireless LAN.
6
Once your computer has booted, the AirStation’s LEDs should be lit as described below:
Power On.
Wireless On or blinking.
Internet access On.
Router On.
LAN On or blinking.
Internet On or blinking.
For LED locations, refer to chapter 1.
Note: If the router LED is not lit, hold down the router button to switch to router mode.
- 14 -
Page 13

Chapter 2 Installation
7
Launch a web browser. If the home screen is displayed, setup is complete.
If username and password elds are displayed, enter “admin” for the username and
“password” for the password, then click [OK]. Step through the wizard to complete setup.
You’ve completed the initial setup of your AirStation.
- 15 -
Page 14

Appendix A Specications
WZR-1166DHP
Wired LAN Interface
Standard Compliance IEEE802.3ab (1000BASE-T), IEEE802.3u (100BASE-TX), IEEE802.3 (10BASE-T)
Transmission Rate 10 / 100 / 1000 Mbps
Transmission Encoding 1000BASE-T 4DPAM5, 100BASE-TX 4B5B/MLT-3, 10BASE-T Manchester Coding
Access Method CSMA/CD
Speed and Flow Control 10 / 100 / 1000 Mbps, Auto Sensing, Auto MDIX
Number of LAN Ports 4
LAN Port Connector RJ-45
Wireless LAN Interface
Standard Compliance IEEE802.11ac (Draft 2.0) /n/a/g/b
Transmission Method Direct Sequence Spread Spectrum (DSSS), OFDM, MIMO
Frequency Range Available frequencies depend on the country of purchase. See the next page
for details.
Transmission Rate
802.11ac (Draft)
802.11ac (Draft):
20 MHz BW (Long GI)
156, 130, 117, 104, 78, 52, 39, 26, 13 Mbps (2 stream)
78, 65, 58.5, 52, 39, 26, 19.5, 13, 6.5 Mbps (1 stream)
20 MHz BW (Short GI)
173.3, 144.4, 130, 115.6, 86.7, 57.8, 43.3, 28.9, 14.4 Mbps (2 stream)
86.7, 72.2, 65, 57.8, 43.3, 28.9, 21.7, 14.4, 7.2 Mbps (1 stream)
40 MHz BW (Long GI)
360, 324, 270, 243, 216, 162, 108, 81, 54, 27 Mbps (2 stream)
180, 162, 135, 121.5, 108, 81, 54, 40.5, 27, 13.5 Mbps (1 stream)
40 MHz BW (Short GI)
400, 360, 300, 270, 240, 180, 120, 90, 60, 30 Mbps (2 stream)
200, 180, 150, 135, 120, 90, 60, 45, 30, 15 Mbps (1 stream)
80 MHz BW (Long GI)
780, 702, 585, 526.5, 468, 351, 234, 175.5, 117, 58.5 Mbps (2 stream)
390, 351, 292.5, 263.3, 234, 175.5, 117, 87.8, 58.5, 29.3 Mbps (1 stream)
80 MHz BW (Short GI)
866.7, 780, 650, 585, 520, 390, 260, 195, 130, 65 Mbps (2 stream)
433.3, 390, 325, 292.5, 260, 195, 130, 97.5, 65, 32.5 Mbps (1 stream)
- 19 -
Page 15

Appendix A Specications
Transmission Rate
802.11n/a/b/g
802.11n:
20 MHz BW (Long GI)
130, 117, 104, 78, 52, 39, 26, 13 Mbps (2 stream)
65, 58.5, 52, 39, 26, 19.5, 13, 6.5 Mbps (1 stream)
20 MHz BW (Short GI)
144.4, 130, 115.6, 86.7, 57.8, 43.3, 28.9, 14.4 Mbps (2 stream)
72.2, 65, 57.8, 43.3, 28.9, 21.7, 14.4, 7.2 Mbps (1 stream)
40 MHz BW (Long GI)
270, 243, 216, 162, 108, 81, 54, 27 Mbps (2 stream)
135, 121.5, 108, 81, 54, 40.5, 27, 13.5 Mbps (1 stream)
40 MHz BW (Short GI)
300, 270, 240, 180, 120, 90, 60, 30 Mbps (2 stream)
150, 135, 120, 90, 60, 45, 30, 15 Mbps (1 stream)
802.11a/g:
54, 48, 36, 24, 18, 12, 9, 6 Mbps
802.11b:
11, 5.5, 2, 1 Mbps
Access Mode Infrastructure Mode
Security
AOSS, WPA2-PSK (AES), WPA/WPA2 mixed PSK, WPA-PSK (AES), 64-bit or 128-
bit WEP, Mac Address Filter
USB Interface
Interface USB 2.0 port x 2
Connector Type Type A (plug)
Compliance 5.0 V 500 mA (max 1000 mA)
Other
Power Supply External AC 100-240 V Universal, 50/60 Hz
Power Consumption TBD
Dimensions 212 x 183 x 34 mm (8.4 x 7.2 x 1.3 in.)
Weight TBD
Operating Environment 0 - 40° C (32 - 104° F), 10 - 85% (non-condensing)
- 20 -
Page 16

Appendix A Specications
Frequency Range
USA
Canada
Mexico
EU
Middle East
5180-5240 MHz (Channels 36, 40, 44, 48)
5745-5825 MHz (Channels 149, 153, 157, 161, 165)
2412-2462 MHz (Channels 1, 2, 3, 4, 5, 6, 7, 8, 9, 10, 11)
5180-5240 MHz (Channels 36, 40, 44, 48)
5260-5320 MHz (Channels 52, 56, 60, 64)
2412-2472 MHz (Channels 1, 2, 3, 4, 5, 6, 7, 8, 9, 10, 11, 12, 13)
India
Australia
Hong Kong
Singapore
5180-5240 MHz (Channels 36, 40, 44, 48)
5260-5320 MHz (Channels 52, 56, 60, 64)
5745-5825 MHz (Channels 149, 153, 157, 161, 165)
2412-2472 MHz (Channels 1, 2, 3, 4, 5, 6, 7, 8, 9, 10, 11, 12, 13)
Malaysia
Philippines
Thailand
5180-5240 MHz (Channels 36, 40, 44, 48)
5260-5320 MHz (Channels 52, 56, 60, 64)
5745-5825 MHz (Channels 149, 153, 157, 161, 165)
2412-2472 MHz (Channels 1, 2, 3, 4, 5, 6, 7, 8, 9, 10, 11, 12, 13)
Taiwan 5745-5825 MHz (Channels 149, 153, 157, 161, 165)
2412-2462 MHz (Channels 1, 2, 3, 4, 5, 6, 7, 8, 9, 10, 11)
South Korea 5260-5320 MHz (Channels 52, 56, 60, 64)
5745-5825 MHz (Channels 149, 153, 157, 161, 165)
2412-2472 MHz (Channels 1, 2, 3, 4, 5, 6, 7, 8, 9, 10, 11, 12, 13)
- 21 -
Page 17

Appendix B - Environmental Information
• The equipment that you have purchased has required the extraction and use of natural resources
for its production.
• The equipment may contain hazardous substances that could impact health and the environment.
• In order to avoid the dissemination of those substances in our environment and to diminish the
pressure on the natural resources, we encourage you to use the appropriate take-back systems.
• The take-back systems will reuse or recycle most of the materials of your end life equipment in a
sound way.
• The crossed-out wheeled bin symbol invites you to use those systems.
• If you need more information on collection, reuse, and recycling systems, please contact your local
or regional waste administration.
- 22 -
Page 18

Appendix C - GPL Information
The source code for Bualo products that use GPL code is available at http://opensource.bualo.jp/ .
- 23 -
 Loading...