

Buderus Logalux LT135/2, Logalux LT300/2, Logalux LT160/2, Logalux LT200/2 Installation And Maintenance Manual
Page 1
6302 4827 – 05/2003 US For Installers
Read these Instructions Carefully for Assembly and Maintenance
Installation and Maintenance
Manual
Indirect-fired Water Heaters
Logalux LT135/2 – 300/2
Page 2

Foreword
2
We reserve the right to make any changes due to technical modifications!
Installation and Maintenance Manual Logalux LT135/2 – 300/2 • Issue 05/2003
Buderus Heiztechnik GmbH • http://www.heiztechnik.buderus.de
Technical Changes!
Buderus Hydronic Systems, Inc. reserves the right to
make changes due to continued technological and
engineering improvements.
Updating Technical Information
Please contact us if you have suggestions for improving
this manual or when you have noticed incorrect
information.
To these instructions
This Installation and Maintenance manual contains
important information regarding proper installation,
operation and maintenance of the indirect fired domestic
hot water tank series LT135/2 - 300/2 (DHW storage
tank).
The installation and maintenance instructions are
directed at a licensed installing contractor with
knowledge of accepted industry practices for the
installation and maintenance of the equipment and
various applications of the equipment involved.
Please inform the owner regarding proper use of the
equipment and point out the safety components and
features of the equipment.
Please hand over after finalizing the installation
these technical documents to the end user.
Page 3

Table of Contents
3
We reserve the right to make any changes due to technical modifications!
Installation and Maintenance Manual Logalux LT135/2 – 300/2 • Issue 05/2003
Buderus Heiztechnik GmbH • http://www.heiztechnik.buderus.de
1 General Information . . . . . . . . . . . . . . . . . . . . . . . . . . . . . . . . . . . . . . . . . .4
1.1 Standards and Guidelines . . . . . . . . . . . . . . . . . . . . . . . . . . . . . . . . . . . . . .4
1.2 Tools, Materials and Test Equipment . . . . . . . . . . . . . . . . . . . . . . . . . . . . . . .4
2 Safety Considerations. . . . . . . . . . . . . . . . . . . . . . . . . . . . . . . . . . . . . . . . .5
2.1 Application Purpose . . . . . . . . . . . . . . . . . . . . . . . . . . . . . . . . . . . . . . . . . .5
2.2 Guideline of Notices . . . . . . . . . . . . . . . . . . . . . . . . . . . . . . . . . . . . . . . . . .5
2.3 Observe the following Notices . . . . . . . . . . . . . . . . . . . . . . . . . . . . . . . . . . . .5
2.4 Waste Disposal . . . . . . . . . . . . . . . . . . . . . . . . . . . . . . . . . . . . . . . . . . . . .5
3 Product Description . . . . . . . . . . . . . . . . . . . . . . . . . . . . . . . . . . . . . . . . . .6
4 Technical Information . . . . . . . . . . . . . . . . . . . . . . . . . . . . . . . . . . . . . . . . .7
4.1 Dimensions and Connections . . . . . . . . . . . . . . . . . . . . . . . . . . . . . . . . . . . .7
4.2 Safety Standards . . . . . . . . . . . . . . . . . . . . . . . . . . . . . . . . . . . . . . . . . . . .7
5 Transport and Placement . . . . . . . . . . . . . . . . . . . . . . . . . . . . . . . . . . . . . .8
5.1 Moving the Tank on a Pallet . . . . . . . . . . . . . . . . . . . . . . . . . . . . . . . . . . . . .8
5.2 Moving the Tank Unpackaged . . . . . . . . . . . . . . . . . . . . . . . . . . . . . . . . . . . .9
6 Tank Installation . . . . . . . . . . . . . . . . . . . . . . . . . . . . . . . . . . . . . . . . . . . . 10
6.1 Placement of the Tank. . . . . . . . . . . . . . . . . . . . . . . . . . . . . . . . . . . . . . . . 10
6.2 Installation of Water Piping . . . . . . . . . . . . . . . . . . . . . . . . . . . . . . . . . . . . . 11
6.3 Installation of Temperature Sensor/Aquastat . . . . . . . . . . . . . . . . . . . . . . . . . . 12
6.4 Checking Magnesium Anode Connection . . . . . . . . . . . . . . . . . . . . . . . . . . . . 12
7 Putting the Tank in Operation . . . . . . . . . . . . . . . . . . . . . . . . . . . . . . . . . . 13
7.1 Putting Tank in Operation. . . . . . . . . . . . . . . . . . . . . . . . . . . . . . . . . . . . . . 13
7.2 Operating Notice . . . . . . . . . . . . . . . . . . . . . . . . . . . . . . . . . . . . . . . . . . . 14
7.3 Taking out Operation . . . . . . . . . . . . . . . . . . . . . . . . . . . . . . . . . . . . . . . . 14
8 Maintenance . . . . . . . . . . . . . . . . . . . . . . . . . . . . . . . . . . . . . . . . . . . . . . . 15
8.1 Preparing the Tank for Maintenance . . . . . . . . . . . . . . . . . . . . . . . . . . . . . . . 15
8.2 Cleaning of the Tank. . . . . . . . . . . . . . . . . . . . . . . . . . . . . . . . . . . . . . . . . 16
8.3 Checking Anode Operation. . . . . . . . . . . . . . . . . . . . . . . . . . . . . . . . . . . . . 16
8.4 Changing out the Anode . . . . . . . . . . . . . . . . . . . . . . . . . . . . . . . . . . . . . . 18
8.5 Placing the Tank back in Operation after Cleaning . . . . . . . . . . . . . . . . . . . . . . 19
Page 4
4
We reserve the right to make any changes due to technical modifications!
Installation and Maintenance Manual Logalux LT135/2 – 300/2 • Issue 05/2003
Buderus Heiztechnik GmbH • http://www.heiztechnik.buderus.de
General Information1
1 General Information
1.1 Standards and Guidelines
1.2 Tools, Materials and Test Equipment
Standard tools and equipment from the HVAC industry
are required for the installation.
Other useful components:
– Dolly with strap
– Transport aids: 3 pipes with ¾“ NPT or 1“ NPT (see
page 9)
– Dry vac for cleaning
– Electrical test equipment to check anode operation
Caution!
Please observe the local and state
requirements regarding equipment
installation!
NOTICE
When installing the tank in the state of
Massachusetts the installation must by
done by a Massachusetts licensed
plumber or contractor.
Page 5
Safety Considerations 2
5
We reserve the right to make any changes due to technical modifications!
Installation and Maintenance Manual Logalux LT135/2 – 300/2 • Issue 05/2003
Buderus Heiztechnik GmbH • http://www.heiztechnik.buderus.de
2 Safety Considerations
2.1 Application Purpose
The LT135/2 - 300/2 are designed to be used for heating
of domestic hot water.
The tanks can only be heated using heating water and
can only be used in closed systems.
2.2 Guideline of Notices
Two levels of danger are identified by the following
warning labels:
The following symbols are used to denote danger and
other notices:
2.3 Observe the following Notices
2.4 Waste Disposal
Dispose of the packaging components in an
environmental friendly manner.
The old replaced DHW tank, if present, shall be
disposed off properly.
WARN ING!
HEALTH DANGER
Denotes a possible severely dangerous
situation where, without proper caution,
bodily injury or loss of life may result.
CAUTION!
DANGER OF INJURY/SYSTEM
DAMAGE
Denotes a possible dangerous situation
that can lead to mild to moderate bodily
injury or physical damage.
WARN ING!
DANGER
Due to electricity.
APPLICATION NOTICE
Application comment for optimum use of
equipment and adjustment as well as
useful information.
WARNING!
HEALTH DANGER
Due to improper cleaning the domestic hot
water can be contaminated.
CAUTION!
TANK DAMAGE
Due to improper cleaning and maintenance.
A bi-annual cleaning is recommended.
Please correct any issue immediately,
to avoid further damage.
APPLICATION NOTICE
Use only original Buderus parts for service
and replacement. We are not responsible
for damage caused by non-Buderus parts.
Page 6
6
We reserve the right to make any changes due to technical modifications!
Installation and Maintenance Manual Logalux LT135/2 – 300/2 • Issue 05/2003
Buderus Heiztechnik GmbH • http://www.heiztechnik.buderus.de
Product Description3
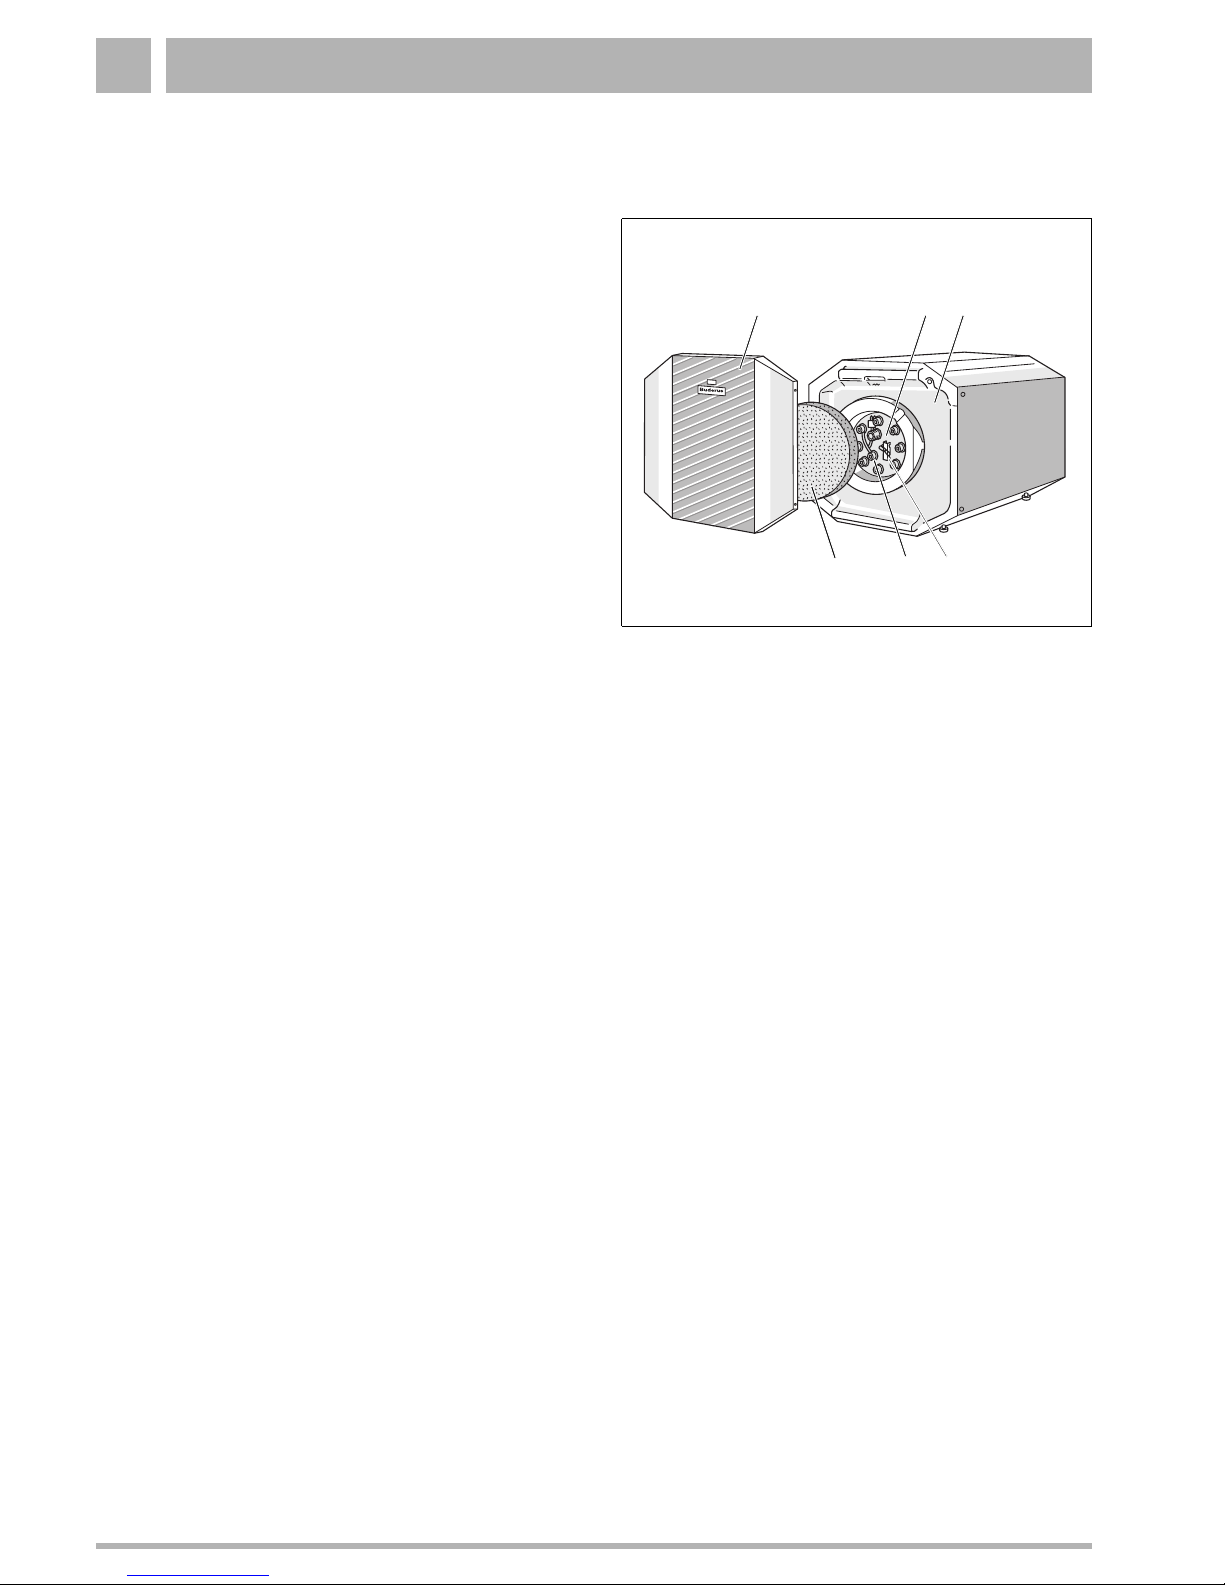
3 Product Description
The LT135/2 - 300/2 indirect fired domestic hot water
tanks are factory assembled with exception of screw-on
feet (packaged with the boiler) and piping accessories
(packaged in envelope with tank) to be installed in the
field.
The major components of the tank are:
– Tank vessel with corrosion protection
Corrosion protection is provided by hygienic Buderus
Thermoglaze "DUOCLEAN" as well as additional
cathodic protection using a magnesium anode rod
(Fig. 1, Item. 5), which is accessible by means of the
clean-out cover (Fig. 1, Item. 2).
– Clean-out cover (Fig. 1, Item. 2) for maintenance
and service access.
– Insulation (Fig. 1, Item. 3)
The insulation consists of high density polyurethane
directly attached to the tank vessel. An insulating
ring (Fig. 1, Item. 6) reduces heat loss from the
clean-out cover.
– Domestic water temperature sensor bracket (when
using Buderus Logamatic control) (Fig. 1, Item. 4)
The sensor is strapped under the clip on the cleanout cover for temperature control when using a
Buderus Logamatic control. When using a
Honeywell aquastat (not furnished), the coupling and
immersion well supplied are connected to the EZ
connection on the back of the tank.
– Smooth surface heat exchanger
A smooth surface heat exchanger inside the tank
vessel transfers the energy from the boiler water to
the domestic water. The temperature in the tank will
be evenly distributed.
Fig. 1 Logalux LT135/2 – 300/2
Item. 1: Front cover
Item. 2: Clean-out cover
Item. 3: Insulation
Item. 4: Sensor bracket
Item. 5: Magnesium anode rod
Item. 6: Insulation clean out
1
56
2 3
4
Page 7

Technical Information 4
7
We reserve the right to make any changes due to technical modifications!
Installation and Maintenance Manual Logalux LT135/2 – 300/2 • Issue 05/2003
Buderus Heiztechnik GmbH • http://www.heiztechnik.buderus.de
4 Technical Information
4.1 Dimensions and Connections
Table. 1 Dimensions and Connections
1
without water, incl. packaging.
4.2 Safety Standards
Fig. 2 Dimensions and Connections
M
25 ¾ in.
25¾ in.
0.6 – 1 in.
M: Strap-on location for Logamatic/SP30D sensor
AW: DHW Outlet EZ: DHW recirc connection/well for Honeywell aquastat
VS: Boiler Water Supply EK: DHW Inlet
RS: Boiler Water Return EL: Tank Drain
Type
Tank content
VS/RS/AW EK/EL EZ
Length L Weight
1
Gal. In. Lbs.
LT135/2 36
NPT 1 NPT 1¼ NPT ¾
32 190
LT160/2 42 36¼ 220
LT200/2 53 42¼ 247
LT300/2 79 57¾ 364
Maximum Value Tempe-
rature
Operating
pressure
Test
pressure
2
°C (°F) bar (psi) bar (psi)
Boiler water 100 (212) 16 (232)
1
k.A.
1
Domestic water 95 (203) 10 (1453) 10 (1453)
Table. 2 Limiting Values for DHW Tanks
1
Depending on relief valve and expansion tank settings.
2
Operating and Test Pressures are gauge pressures.
3
Maximum 100 psi for Massachussetts.
CAUTION!
TANK DAMAGE
Due to exceeding critical values.
Please observe the maximium listed
safety values.
Page 8

8
We reserve the right to make any changes due to technical modifications!
Installation and Maintenance Manual Logalux LT135/2 – 300/2 • Issue 05/2003
Buderus Heiztechnik GmbH • http://www.heiztechnik.buderus.de
Transportation and Placement5
5 Transportation and Placement
5.1 Moving the Tank on the Pallet
Use suitable cart/dolly to move the tank. Secure the
tank from tipping over.
Remove plastic wrapping across from the side of the
tank labelled "Kessel -Speicherbefestigung" (Fig. 3).
Remove only this cut-out section.
Screw in the 4 tank feet (Fig. 3, Item. 2) (packaged
with boiler in plastic bag) about ½" into the bottom of
the tank.
Remove the two wooden corner posts (Fig. 3,
Item. 1) from the bottom side of the tank.
Tip the tank horizontally using the pallet as support
(Fig. 4).
Remove rest of plastic wrapping, packaging material
and pallet by lifting the tank carefully.
NOTICE
The storage tank can be moved in its
original packaging. This will protect the
tank against possible damage.
Fig. 3 Cut out of plastic wrapping and screwing in of feet
Item. 1: Wooden corner posts
Item. 2: Screw-in feet
Item. 3: Back side of tank
Item. 4: Front side of tank
Fig. 4 Placement of tank
1
2
4
3
NOTICE
The tank can also be moved using a overhead crane. Cut out a portion from the top
insulation and put hook through the lifting
eye at the tank top.
Page 9

Transportation and Placement 5
9
We reserve the right to make any changes due to technical modifications!
Installation and Maintenance Manual Logalux LT135/2 – 300/2 • Issue 05/2003
Buderus Heiztechnik GmbH • http://www.heiztechnik.buderus.de
5.2 Moving the Tank Unpackaged
You can easily move the tank when you attach three carrying pipe stubs (not supplied) to the tank.
Remove the 4 front panel screws (Fig. 5).
Remove front panel. Pull the front and bottom of the
panel back.
Remove insulating ring.
One carrying pipe stub ( ¾ NPT) for the front of the
tank
Screw a ¾“ coupling on a pipe end (Fig. 6, Item. 1).
Tread coupling on front clean-out cover.
Two carrying pipe stubs (1“ NPT) on rear side of
tank
Screw two 1“ coupling on two pipe ends (Fig. 7,
Item. 1).
Screw carrying pipe stubs on boiler coil connections.
Fig. 5 Remove front cover
Fig. 6 Assembly of front carrying pipe stub
1
NPT¾
Fig. 7 Assembly of rear carrying pipe stubs
1
VS/RSRS/VS
Page 10

1
0
We reserve the right to make any changes due to technical modifications!
Installation and Maintenance Manual Logalux LT135/2 – 300/2 • Issue 05/2003
Buderus Heiztechnik GmbH • http://www.heiztechnik.buderus.de
Tank Installation6
6 Tank Installation
6.1 Placement of the Tank
The tank is designed for horizontal installation and can
serve as base for a Buderus boiler.
For placement of the tank, observe the recommended
clearance dimensions for proper access and service.
(Fig. 8). Buderus requires maintaining a minimum
clearance of 2" between hot water piping and
combustible surfaces.
Make sure that the floor is level and sufficiently strong.
The tank can be installed on combustible flooring as
long as the screw-in feet are used.
Level the tank using the adjustable feet (Fig 9).
Fig. 8 Placement of tank (Recommended clearances)
min.
26 in.
min.
16 in.
CAUTION!
TANK DAMAGE
Due to frost.
Make sure that the boiler room is dry
and frost free.
Fig. 9 Leveling of the tank using a level
NOTICE
The screw-in feet have rubber feet that
allows you to slide the tank in its final
location.
Page 11

Tank Installation 6
11
We reserve the right to make any changes due to technical modifications!
Installation and Maintenance Manual Logalux LT135/2 – 300/2 • Issue 05/2003
Buderus Heiztechnik GmbH • http://www.heiztechnik.buderus.de
6.2 Installation of Water Piping
Please observe the following warnings before piping the
indirect tank. Follow these warnings carefully to ensure
trouble free operation. The installation of the indirectfired hot water tank and all associated piping must be in
accordance with all applicable codes and regulations.
All work must be done by a licensed contractor.
Fig. 10 Installation Diagram
Item. 1: Indirect-fired hot water tank
Item. 2: Service valve
Item. 3: P and T relief valve
Item. 4: Flow check
Item. 5: Tank charging pump
Item. 6: Optional DHW recirc pump
Item. 7: Air purge valve
Item. 8: Drain valve
Item. 9: Back flow preventer
Item. 10:Thermal expansion tank
AW: DHW outlet
EZ: DHW recirc tapping
VS Boiler supply
RS Boiler return
EK/EL: DHW inlet/drain
Install furnished brass tees on AW and EK/EL
connections. Install supplied P and T valve on ¾"
connection of brass tee at the AW connection; install
tank drain on ¾" connection of brass tee at the
EK/EL connection.
If using a Logamatic control or Goldline SP30D
control, plug EZ connection, or use it for DHW recirc.
If using a Honeywell aquastat for tank water
sensing, use furnished ¾" coupling and long shank
immersion well on EZ connection to mount
Honeywell aquastat on.
CAUTION!
TANK DAMAGE
In the domestic water connections AW, EZ
and EK you will find protective inserts.
These inserts provide additional protection
to the coated interior pipe surfaces.
Keep these inserts in place during
piping.
WARN ING!
HEALTH DANGER
The domestic water can be contaminated
if the assembly process is done in a
unclean fashion.
Install all domestic water piping in a
hygienic fashion and clean all joints
thoroughly.
CAREFUL!
SYSTEM DAMAGE
Due to unprofessional installation.
Observe all local codes and regulations
as well as common industry standards
during installation and operation of the
tank.
NOTICE
When a backflow preventer is present or
required, a domestic expansion tank must
be used.
CAREFUL!
SYSTEM DAMAGE
Due to leaking connections.
Install all piping connections without
tension.
When using flexible connections, make
sure they are not kinked or twisted.
NOTICE
If boiler output exceeds 100,000 Btu/hr,
change the P and T relief valve to match or
exceed the boiler rating.
Page 12

12
We reserve the right to make any changes due to technical modifications!
Installation and Maintenance Manual Logalux LT135/2 – 300/2 • Issue 05/2003
Buderus Heiztechnik GmbH • http://www.heiztechnik.buderus.de
Tank Installation6
Install all domestic water piping according to local
code and regulations.
Do not install elbows in the tank drain piping to
ensure easy flushing of the tank.
6.3 Installation of Temperature Sensor/Aquastat
6.3.1 Logamatic or Goldline SP30D control
When using a Buderus Logamatic control or Goldline
SP30D control, the temperature sensor must be
strapped to the front of the tank. Remove the front cover
from the tank. (see Chapter 5.2, page 9).
Follow the Installation Manual for the control regarding
the proper electrical connections:
Guide the sensor wiring (Fig. 11, Item. 1) into the
raceway from the rear of the tank (Fig. 11, Item. 2).
Make sure to lengthen the wiring for the LT300/2
model by splicing in 18 gauge wire.
Pull the sensor wiring out of the raceway on the front
of the tank.
Guide the sensor wiring through the knock-out in the
tank insulation (Fig. 12, Item. 4) to the clean-out
cover.
Slide the sensor under the strap-on clip (Fig. 12,
Item. 3) on the clean-out cover and tighten this clip.
6.3.2 Honeywell Aquastat
When using a Honeywell aquastat (not supplied),
install as follows:
Install ¾" brass coupling and long shank immersion
well (furnished with tank) on the EZ connection.
Slide Honeywell capillary fully into immersion well
and secure aquastat to well.
6.4 Checking the Magnesium Anode
Connection
Make sure that the ground cable (Fig. 12, Item. 2) of
the magnesium anode rod (Fig. 12, Item. 1) is
securely tightened to one of the clean-out cover
bolts.
Fig. 11 Installation of temperature sensor
Item. 1: Temperature sensor
Item. 2: Cable raceway
1
2
Fig. 12 Testing the Magnesium anode rod
Item. 1: Magnesium anode
Item. 2: Ground cable
Item. 3: Sensor fastening clip
Item. 4: Knock-out in insulation
Item. 5: Clean-out cover
2
1
3
4
5
Page 13

Putting the Tank in/out of Operation 7
1
3
We reserve the right to make any changes due to technical modifications!
Installation and Maintenance Manual Logalux LT135/2 – 300/2 • Issue 05/2003
Buderus Heiztechnik GmbH • http://www.heiztechnik.buderus.de
7 Putting the Tank in/out of Operation
7.1 Putting the Tank in Operation
Prior to putting the tank in operation, check for leaks and
correct immediately.
Open the highest tap location, to vent the domestic
water system.
Open the cold feed to the tank (Fig. 13, Item. 1) to fill
the tank.
Prior to heating the tank, check to make sure that the
boiler, tank and water lines are filled with water.
Open a hot water faucet at the highest location for
this purpose. Close faucet afterwards.
Check all connections, water lines and clean-out
cover for leaks.
7.1.1 Installation of Insulation and Front Cover
Place insulation ring (Fig. 14, Item. 2) on clean-out
cover.
Install front cover (Fig. 14, Item. 1) and secure with
4 screws.
Fig. 13 Installation diagram
Item. 1: Shut-off valve for cold feed
Item. 2: Pressure/temperature (P and T) relief piping
AW: DHW outlet
EK: Cold feed
EZ: DHW recirc
2
1
NOTICE
Check for leaks on the tank using
strictly domestic water. Maximum
DHW test pressure can not exceed the
pressure relief valve rating.
Fig. 14 Installation of insulation and front cover
Pos. 1: Front cover
Pos. 2: Insulation ring
21
Page 14

14
We reserve the right to make any changes due to technical modifications!
Installation and Maintenance Manual Logalux LT135/2 – 300/2 • Issue 05/2003
Buderus Heiztechnik GmbH • http://www.heiztechnik.buderus.de
Putting the Tank in/out of Operation7
7.2 Operating Notice
Notify the end-user/owner of the following points:
– Make sure to always keep P and T relief piping open
and unobstructed (Fig. 13, page 13).
– Periodically to check the operation of the P and T
valve by manually opening the valve.
– To contact a qualified service company or contractor
if the manual reset trips regularly on the boiler (if
required by local code).
7.3 Taking out of Operation
In case the tank is not used for a long time, we
recommend the following:
Keep the tank in operation.
Set the control to the vacation function (Logamatic),
or set the tank to its minimum setting.
When the tank has been taken out of operation, observe
local code and regulations regarding placing the tank
back in operation and possibly rinsing the domestic
water lines.
CAUTION!
TANK DAMAGE
When the pressure/temperature relief
valve is blocked or damaged, potential
damage may occur to the tank and a very
dangerous situation can develop.
Make sure that the P and T relief
piping Fig. 13, page 13) is NEVER
blocked.
NOTICE
Information regarding operation of the
sensor/aquastat can be obtained from the
documentation furnished with the control.
CAUTION!
TANK DAMAGE
When the tank is kept empty for several
days, localized corrosion can take place
due to residual moisture.
Dry out the tank interior using warm air
and keep the access port open.
Page 15

Maintenance 8
1
5
We reserve the right to make any changes due to technical modifications!
Installation and Maintenance Manual Logalux LT135/2 – 300/2 • Issue 05/2003
Buderus Heiztechnik GmbH • http://www.heiztechnik.buderus.de
8 Maintenance
It is recommended that a licensed contractor or service
company checks and cleans the tank at least once every
two years.
For unfavorable water conditions, (hard or very hard),
extreme high usage and/or high temperature, more
frequent inspections and cleanings are recommended.
8.1 Preparing the Tank for Maintenance
Disconnect electricity to the heating system.
Remove front cover and insulation ring from the tank
(see Chapter 5.2 „Moving the Tank Unpackaged“,
page 9).
Drain tank. Shut off the cold feed (EK) and open tank
drain (Fig. 10, page 11). Open the highest faucet for
venting.
Remove hex head bolts (Fig. 15, Item. 4) from the
clean-out cover (Fig. 15, Item. 3).
Remove clean-out cover together with Magnesium
anode (Fig. 15, Item. 1) and gasket (Fig. 15,
Item. 2).
CAUTION!
TANK DAMAGE
Due to improper maintenance and
cleaning.
Perform the inspection and cleaning at
least every two years.
Correct any problems immediately.
Fig. 15 Removal of clean-out cover
Item. 1: Magnesium anode
Item. 2: Clean-out cover gasket
Item. 3: Clean-out cover
Item. 4: Hex head bolts
3
2
4
1
Page 16

1
6
We reserve the right to make any changes due to technical modifications!
Installation and Maintenance Manual Logalux LT135/2 – 300/2 • Issue 05/2003
Buderus Heiztechnik GmbH • http://www.heiztechnik.buderus.de
Maintenance8
8.2 Cleaning the Tank
Check the tank interior for lime deposits.
Follow the procedure below to properly clean the tank
interior:
Spray the interior surfaces with a high pressure cold
water stream (ca. 58 –
72 psi) (Fig. 16).
You can increase the effectiveness by circulating
heated boiler water through the coil. The thermal
shock will cause the deposits to break off the smooth
surface heat exchanger. Use a wet vac to remove
the deposits from the bottom of the tank.
When large quantities of lime and deposits are found in
the tank, it is advisable to remove these using a
chemical treatment. We recommend to have the
chemical cleaning performed by a professional service
company.
8.3 Checking Anode Operation
The Magnesium anode rod is a sacrificial rod that will be
consumed during use. You must verify the status and
diameter of the anode rod at least once every two years.
In addition, we recommend to perform an annual check
of the electrical protective current.
Benefits of the current measurement are:
– You do not need to shut down the heating system.
– You do not need to access or remove the anode rod.
Fig. 16 Spraying of tank interior
1
2
CAUTION!
SYSTEM DAMAGE
Due to damaged tank surface scratching.
Do NOT use sharp objects to clean the
tank interior.
Page 17

Maintenance 8
17
We reserve the right to make any changes due to technical modifications!
Installation and Maintenance Manual Logalux LT135/2 – 300/2 • Issue 05/2003
Buderus Heiztechnik GmbH • http://www.heiztechnik.buderus.de
8.3.1 Visual Inspection of Anode Rod
Check magnesium anode (Fig. 18, Item. 1) for
decay. Replace anode rod, if the diameter is reduced
to ½" to ¾".
8.3.2 Check the Magnesium anode with multimeter
Follow the outlined procedure:
Remove one side of the grounding lead (Fig. 17,
Item. 3) on the tank.
Set multi-meter (MM) to DcmA (milli amps)
Connect black wire (Fig. 17, Item. 6) of MM to
grounding cable or bolt (Fig. 17, Item. 7).
Connect red cable (Fig. 17, Item. 5) of MM to the
anode.
Ensure clean metallic surfaces for terminal
connections.
The tank must be filled with water during the test.
A reading between .3 mA and 10 mA on the MM is
good.
Record readings each year in the Table. 3.
Record the test date and sign off in the table below:
Properly reconnect the grounding cable after each
test.
NOTICE
Do not contaminate the surface of the rod
with oil or grease. Keep the rod clean.
Fig. 17 Testing the anode with an multi-meter
Item. 1: Magnesium anode
Item. 2: M8-bolt
Item. 3: Ground cable
Item. 4: Clean-out cover
Item. 5: Red cable from multi-meter
Item. 6: Black cable from multi-meter
Item. 7: Hex head bolt from tank
Item. 8: Digital multi-meter
2
1
3
4
6
7
5
8
Date mA Reading Service Company/Signature
Table. 3 Service records
Page 18

1
8
We reserve the right to make any changes due to technical modifications!
Installation and Maintenance Manual Logalux LT135/2 – 300/2 • Issue 05/2003
Buderus Heiztechnik GmbH • http://www.heiztechnik.buderus.de
Maintenance8
8.4 Changing out the Anode
Remove the M8 nut (Fig. 18, Item. 10) to remove the
ground cable (Fig. 18, Item. 8).
Remove M8 nut (Fig. 18, Item. 7).
Separate clean-out cover (Fig. 18, Item. 3) from the
Magnesium anode rod (Fig. 18, Item. 1).
Replace Magnesium anode rod.
Install new rod including the small parts, as shown in
Fig. 18.
Fig. 18 Changing out of the Magnesium anode rod
Item. 1: Magnesium anode
Item. 2: Gasket
Item. 3: Clean-out cover
Item. 4: Insulation piece
Item. 5: Flat washer
Item. 6: Lock washer
Item. 7: M8 nut
Item. 8: Ground cable tab
Item. 9: Lock washer
Item. 10:M8 nut
1
2
3
4
5
6
7
8
9
10
Page 19

Maintenance 8
1
9
We reserve the right to make any changes due to technical modifications!
Installation and Maintenance Manual Logalux LT135/2 – 300/2 • Issue 05/2003
Buderus Heiztechnik GmbH • http://www.heiztechnik.buderus.de
8.5 Placing the Tank Back in Operation after Cleaning
Install the clean-out cover together with magnesium
anode (Fig. 19, Item. 1) back in the tank. Observe
the orientation of the tank gasket. The word
"Deckelseite" must be facing the clean-out cover.
Tighten hex head bolts (Fig. 19, Item. 4) by hand.
Tighten the hex head bolts for the clean-out cover
with a ¾ turn using a wrench (Fig. 19, Item. 4).
Fill the tank and turn on the heating system.
Check all connections and clean-out cover for leaks.
Put back the insulation ring (Fig. 20, Item. 2).
Put the front cover (Fig. 20, Item. 1) back and secure
with 4 screws.
Fig. 19 Installing a new anode rod
Item. 1: Magnesium anode
Item. 2: Clean-out cover gasket
Item. 3: Clean-out cover
Item. 4: Hex head bolt
Item. 5: Ground cable tap
3
2
4
1
5
CAUTION!
SYSTEM DAMAGE
Due to defective gasket.
We recommend using a new gasket
(Fig. 19, Item. 2) when changing out
the Magnesium anode to avoid a
leakage at the tank.
CAUTION!
SYSTEM DAMAGE
Due to corrosion.
Make sure to securely tighten the
ground cable (Fig. 19, Item 5) with a
wrench to the clean-out cover to ensure
a good electrical connection.
Fig. 20 Installing insulation and front cover
Item. 1: Front cover
Item. 2: Insulation Ring
21
Page 20

BBT North America Corporation
50 Wentworth Avenue
Londonderry, NH 03053
Tel: 603-552-1100 ● Fax: 603-584-1681
www.buderus.net
BBT North America Corporation reserves the right to make changes without notice
due to continuing engineering and technological advances.
Heating Contractor:
PRODUCTS MANUFACTURED BY
BBT Thermotechnik GmbH
35573 Wetzlar
www.buderus.de
 Loading...