

Page 1
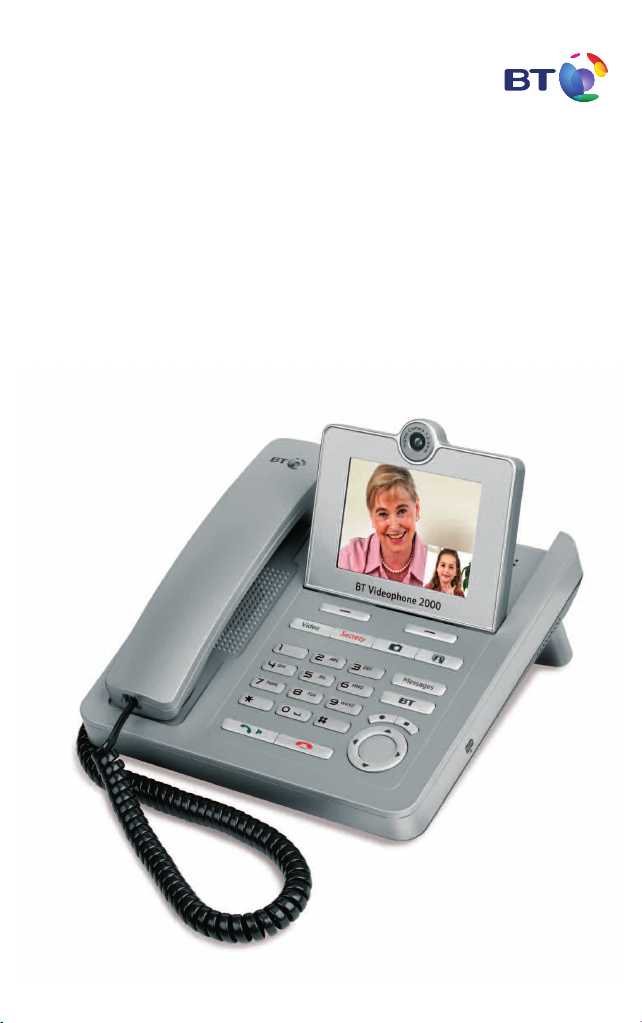
User Guide
BT Videophone 2000
Page 2
Welcome…
to your BT Videophone 2000
Colour screen with digital camera for video calls
•
Select the type of view you prefer for video calls
•
Secrecy button to temporarily switch off sound
•
and vision
Web browser – surf the net from your phone
•
Wireless or wired connection
•
Easy to use on-screen menus
•
Make and receive calls handsfree
•
Easy BT Broadband Talk connection via
•
a router/hub
Record and set your own ringtones, wallpaper
•
images and photos
300 Entry phonebook for your most frequently
•
used names and numbers
Copy numbers to and from SIM Cards
•
Copy data to and from SD/MMC Cards
•
Voice calls if the mains power fails – using the
•
standard network telephone line (included)
Automatic check for software updates. Your
•
phone will download new features and functions
as soon as they are available. For information,
visit www.bt.com/broadbandtalk/video
Page 3

This User Guide provides you with all the
information you need to get the most from
your phone.
Before you make your first call you will
need to set up your phone. Follow the
simple instructions in ‘Getting Started’,
on the next few pages.
Need help?
If you have any problems setting up or using your BT
Videophone 2000, contact the Helpdesk on 0800 028 3228
Alternatively, you may find the answer in ‘Help’ at the back
of this guide.
Got everything?
BT Videophone 2000
•
Mains power adaptor
•
Ethernet cable
•
Telephone line cord
•
Base stand
•
User guide and Quick start guide
•
To use your BT Videophone 2000 you will need:
Broadband line (minimum 128kbps)
•
Compatible broadband router/hub (with spare Ethernet port if
•
connecting to a wired router)
BT Broadband Talk subscription. This includes your broadband
•
telephone number and password.
To subscribe to BT Broadband Talk go online to
www.bt.com/broadbandtalk or call 0800 800 150
from another phone
Page 4

4
In this guide
Getting started
Location . . . . . . . . . . . . . . . . 7
Setting up . . . . . . . . . . . . . . . 7
Wireless connection. . . . . . . . 9
Enter your BT Broadband
Talk account details . . . . . . . . 10
Cable connection problem? . . 12
Getting to know your phone
Buttons . . . . . . . . . . . . . . . . . 14
On-screen menu . . . . . . . . . . 16
Display icons . . . . . . . . . . . . . 16
Menu map. . . . . . . . . . . . . . . 17
Navigating the menus . . . . . . 17
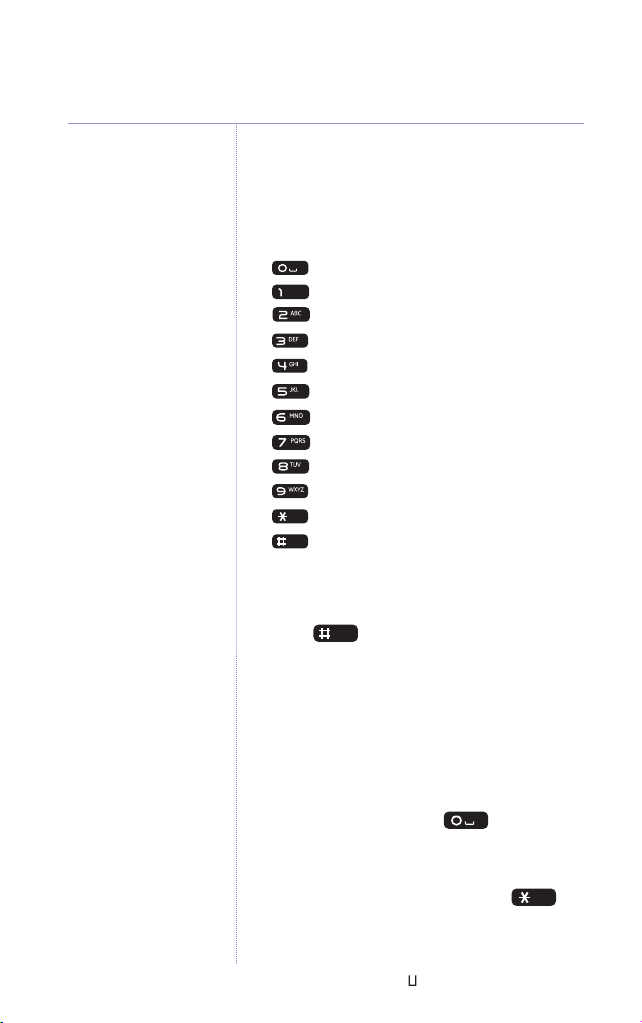
Character map. . . . . . . . . . . . 18
Choose text type . . . . . . . . . . 18
Symbols . . . . . . . . . . . . . . . . 18
Using the phone
Video calls. . . . . . . . . . . . . . . 19
Make a video call. . . . . . . . . . 19
Receiving a video call. . . . . . . 20
Adjust volume during a call
Take a still picture
of your caller . . . . . . . . . . . . . 20
Access the phonebook
during a call . . . . . . . . . . . . . 21
Adjust brightness. . . . . . . . . . 21
Adjust contrast . . . . . . . . . . . 21
Adjust the refresh rate. . . . . . 21
Voice calls . . . . . . . . . . . . . . . 22
Make a voice call . . . . . . . . . . 22
Preparatory dialling . . . . . . . . 22
End a call . . . . . . . . . . . . . . . 23
Receive a voice call . . . . . . . . 23
Handsfree calls . . . . . . . . . . . 23
Make a handsfree voice call
Make a handsfree video call
. . 20
24
. .
24
. .
Switch between receiver
and handsfree . . . . . . . . . . . . 24
Redial . . . . . . . . . . . . . . . . . . 24
Secrecy . . . . . . . . . . . . . . . . . 25
Volume . . . . . . . . . . . . . . . . . 25
Phonebook
Opening the phonebook . . . . 26
Add a new entry . . . . . . . . . . 26
Dial from the phonebook . . . . 28
Search for an entry
alphabetically . . . . . . . . . . . . 28
Edit an entry . . . . . . . . . . . . . 28
Delete an entry . . . . . . . . . . . 29
Assign ringtone and
image to an entry . . . . . . . . . 29
Copy an entry to a SIM
or SD/MMC card . . . . . . . . . . 31
Copy an entry from a SIM
or SD/MMC card . . . . . . . . . . 32
Calls lists
Open calls list menu
Missed calls . . . . . . . . . . . . . . 33
Received calls . . . . . . . . . . . . 34
Dialled calls . . . . . . . . . . . . . . 35
Dial an entry in a calls list . . . 36
Delete calls list . . . . . . . . . . . 36
BT Services
1571 answering service . . . . . 37
Helpdesk . . . . . . . . . . . . . . . . 37
Directory enquiries . . . . . . . . 37
Withhold my number. . . . . . . 37
Display my number . . . . . . . . 37
Using the B
T Services menu. . 38
. . . . . . . 33
Page 5

In this guide 5
Web browser
Add/edit a website address . . 39
Dial a website address . . . . . . 39
Quickdial a favourite site . . . . 39
Navigate around a
website page . . . . . . . . . . . . . 40
Enter a new website address
while browsing. . . . . . . . . . . . 40
Return to the previous
web page . . . . . . . . . . . . . . . 40
Exit the web browser . . . . . . . 40
Images & Sounds
Open the Images &
Sounds menu . . . . . . . . . . . . 41
Take a new photo . . . . . . . . . 41
Taken photos. . . . . . . . . . . . . 42
Received images . . . . . . . . . . 42
Using stored sounds . . . . . . . 43
Create a video clip . . . . . . . . . 44
Record a sound clip . . . . . . . . 44
Using recorded sound clips . . 45
Using received video clips
Deleting all clips in an Images,
Sounds or Videos folder . . . . . 46
Copying
Copying images, sounds,
videos and ringtones . . . . . . . 47
Phone settings
Open the phone
settings menu . . . . . . . . . . . . 48
Set ringer melody . . . . . . . . . 48
Set ringer volume . . . . . . . . . 49
Set audio volume. . . . . . . . . . 49
Set date and time . . . . . . . . .
Set network time . . . . . . . . . .
. . . 45
50
50
Manual network time
update . . . . . . . . . . . . . . . . . 51
Set alarm. . . . . . . . . . . . . . . . 51
Wallpaper . . . . . . . . . . . . . . . 52
Menu colour . . . . . . . . . . . . . 53
Screen saver . . . . . . . . . . . . . 53
View technical details . . . . . . 54
Software upgrades
Automatic checks . . . . . . . . . 55
Check for software
updates manually . . . . . . . . . 55
If the download
progress bar stops . . . . . . . . . 55
Reset phonebook. . . . . . . . . . 56
Reset phone settings . . . . . . . 56
Reset phone . . . . . . . . . . . . . 57
Video settings
Open the Video
settings menu . . . . . . . . . . . . 58
Video call view. . . . . . . . . . . . 58
Video monitor
enable/disable . . . . . . . . . . . . 59
Video monitor
telephone number . . . . . . . . . 60
Refresh rate. . . . . . . . . . . . . . 60
Local view . . . . . . . . . . . . . . . 61
Mirror image . . . . . . . . . . . . . 61
Camera – adjust brightness . . 61
Camera – adjust contrast . . . . 62
Network settings
Open the network
settings menu . . . . . . . . . . . . 63
Connection profile
Bandwidth profile
Service registration
. . . . . . . . . 63
. . . . . . . . .
. . . . . . . .
64
65
Page 6

In this guide6
Help . . . . . . . . . . . . . . . . . . . 66
General information
Safety information . . . . . . . . . 69
Cleaning . . . . . . . . . . . . . . . . 69
Environmental . . . . . . . . . . . . 69
Product disposal instructions . 69
Guarantee . . . . . . . . . . . . . . . 70
Technical information . . . . . . 70
R&TTE . . . . . . . . . . . . . . . . . 70
For your records . . . . . . . . . . 71
Declaration of Conformance . 71
Page 7
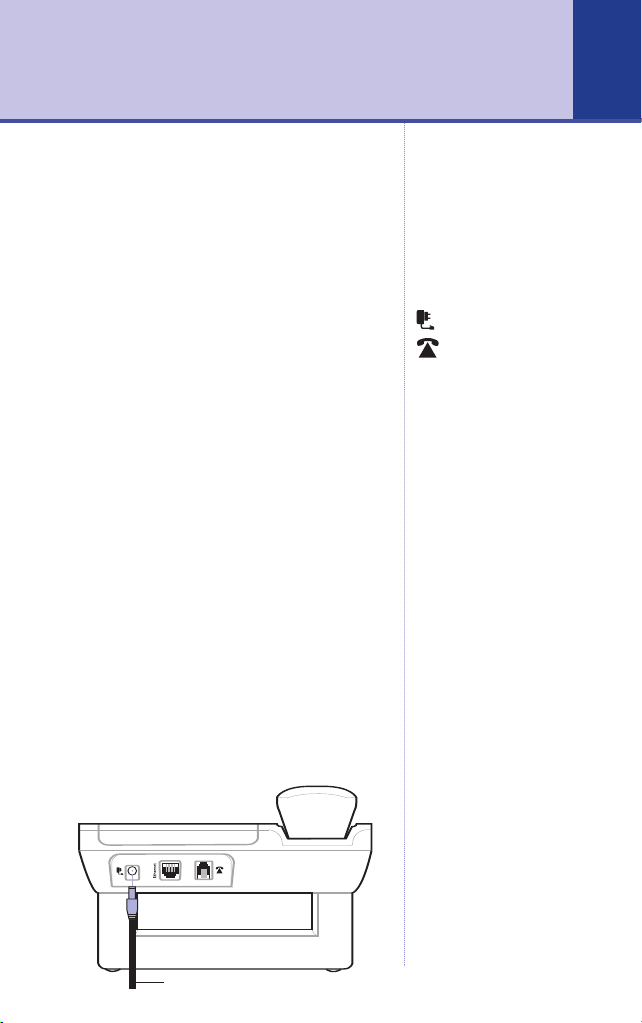
Getting started
Location
Place your BT Videophone 2000 close
enough to a mains power and router/hub,
so that the cables will reach.
Place the telephone on a smooth surface
and if possible on a non-slip base.
Fit stand, if required.
The stand slots into the base of your
BT Videophone 2000.
Setting up
Have your BT Broadband Talk user name
and password ready.
If you have not set up a BT Broadband
Talk account yet, you can subscribe to
BT Broadband Talk by calling BT
on 0800 800 150 or go online at
www.bt.com/broadbandtalk
Decide if you will be connecting either
wired or wirelessly
1. Plug the mains power cable into the back
of the BT Videophone 2000. Plug the
power adaptor into the mains wall socket
and switch the power on.
WARNING
Do not place your BT
Videophone 2000 in the
bathroom or other
humid areas.
Which socket?
Power socket
Telephone line socket
Ethernet socket
Ethernet
7
Power cable
Page 8
Getting started8
DSL
Ethernet
Reset
on/offPower USB
If you cannot register at
this time, switching off the
mains power will mean
your phone will re-start
with the Welcome screen
when you switch the power
back on. Or if you exit the
registration, press the
option button under
Register to restart.
2. When you see
Wecome to the BT
Videophone. Please set the connection
to your Broadband router now
. Press the
OK button.
Wireless (WLAN)
3.
is highlighted. If you do
not have a wireless network, scroll to
Wired (Ethernet). Plug the Ethernet cable
into the back of your BT Videophone 2000
and plug the other end into the socket at
your router/hub. Press
OK.
4. Now go to page 10 to enter your BT
Broadband Talk account details.
Router / Hub
Ethernet cable
5. For wireless connection, follow the steps
Wireless network selection on the
under
next page. For wired connection, go to
Enter your Broadband Talk account
details on page 10.
Page 9

For wireless network
selection
1. Your BT Videophone 2000 searches for all
available wireless networks.
2. When networks are found, they are listed
on the screen. If necessary, scroll to
the name of network you want and press
OPTIONS. The screen shows the
Scanning
Select Network
3.
menu.
is highlighted. Press OK.
The network details are displayed. Press
Select.
4. If requested, enter the network key
(sometimes called WEP key) and press
OK. If you make a mistake press DELETE
to delete the last digit.
5. The screen shows
connection set
Wireless WLAN
and then changes to the
Welcome screen.
6. Go to Enter your BT Broadband Talk
account details on page 10.
Wireless
Getting started 9
Network not listed?
If the wireless network you
want to use is not listed, it
may be hidden to prevent
unauthorised use. Y
must search for it
manually. Follow the steps
under ‘If no network
found’, on the next page.
ou
Page 10

Getting started10
If no network is found
If the network you want to use is not
listed or if your screen shows
networks found
network is hidden and also protected by
a security code to prevent unauthorised
access.
1. Press OPTIONS and either press OK to
select
Search
network manually
2. Screen shows
network SSID name and press
3. If requested, enter your network security
code and press
wireless network
4. When the network is found, you are ready
to register. Follow, ‘Enter your BT
Broadband Talk account details’ below.
If the network is still not found select
Try again
If you still cannot find your wireless
network, check that it is functioning
properly. If the problem persists, contact
the Helpdesk on 0800 028 3228.
it may be because your
again or scroll to
then press OK.
Enter SSID
OK.
Searching for
: and network name.
.
No wireless
Enter
, Enter your
OK.
Enter your BT Broadband Talk
account details
1. When asked if you have a BT Broadband
Talk account, press
2. Press
Register. Your phone will:
perform cable/network connection
•
check.
Ye s.
Page 11
perform a software update check. This
•
may take a few minutes. If new software
is found, your BT Videophone 2000 will
restart automatically after downloading
the software
3. When your see
Broadband Talk details
Please enter your BT
, press OK.
4. Enter your BT Broadband Talk telephone
number and press
OK. If you make a
mistake, use to position the cursor, if
necessary, then press
DELETE to delete
the digit.
5. Enter your password and press
6 Your B
T Videophone 2000 checks that
OK.
these details are correct.
7. The screen displays a ‘
Congratulations
message and your phone number.
8. Press
Exit. The display reverts to the idle
screen and the telephone number and the
wireless
or wired symbol is
displayed to show the connection is
enabled. The time and date should be
updated automatically within 5-10
minutes.
Your BT Videophone 2000 is now ready
for use
Use the button to
toggle around the
characters Abc abc 123.
’
Getting started 11
Page 12

Getting started12
Entering your BT
Broadband Talk number
and password
Your number starts 056 and there are no
spaces between the digits. Your password
can include numbers and letters and be up
to 16 characters long. Passwords are case
sensitive so make sure you are using the
correct upper and lower case letters.
To switch between upper and lower case
letters and numbers, press .
Indication is given on the screen of the
current case.
ABC = upper case only
abc = lower case only
Abc = first letter in upper case
123 = numbers only
Cable connection problem?
Make sure the Ethernet/cable is connected
correctly (if connecting via an ethernet
connection) and that your router/hub is
plugged into the broadband phone line.
Check that your broadband line is
working. If you can access the internet on
a computer connected to the same router,
then it is probably working correctly.
Now press
Try again
.
Page 13

If you still cannot connect, make sure you
are entering your BT Broadband Talk
account details correctly as shown above.
If you continue having problems with the
cable or Broadband connection, call the
BT Videophone 2000 Helpdesk on 0800
028 3228.
Getting started 13
Page 14
14
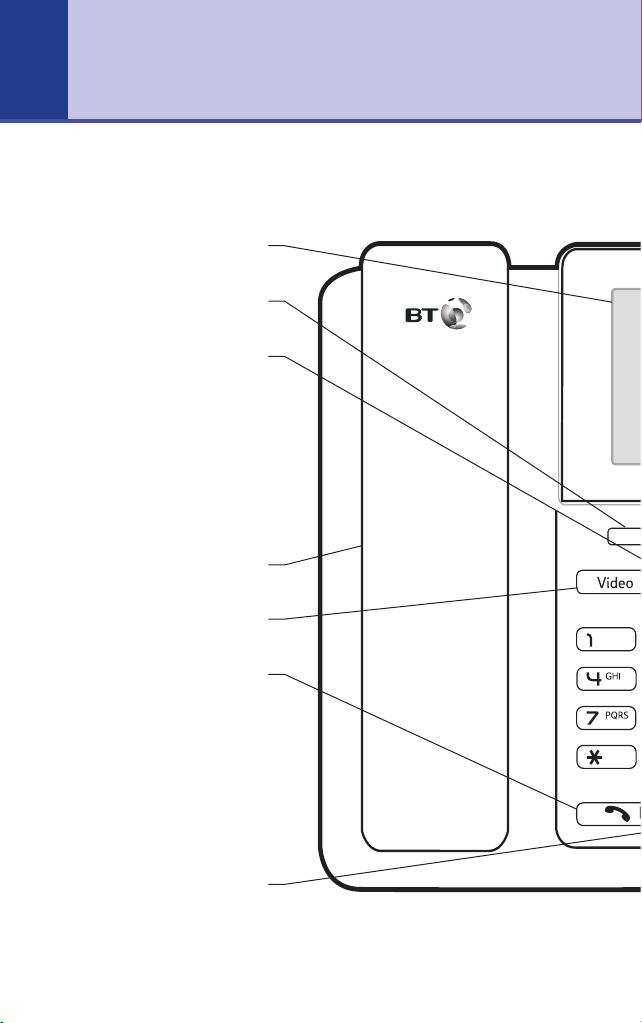
Getting to know your phone
Raise screen to the best position.
Select onscreen options.
Press during a Video call, to
temporarily stop your caller seeing
and hearing you. You can still see
Press Secrecy again to switch the
Press during a voice call to switch off
cannot hear you. Press again to
Press to switch the loudspeaker on
During a call via the handset, press
Handsfree to switch the call to the
loudspeaker or back to the handset
and hear your caller.
video and sound back on.
the microphone, so your caller
resume your conversation.
Press to make a video call.
for handsfree dialling and
Screen
Options
Secrecy
Loudspeaker
Under handset.
Video
Talk / Handsfree
conversations.
again.
During a hands free conversation,
When browsing the menus: press to
return to the previous menu level.
press to end the call.
End Call
Page 15
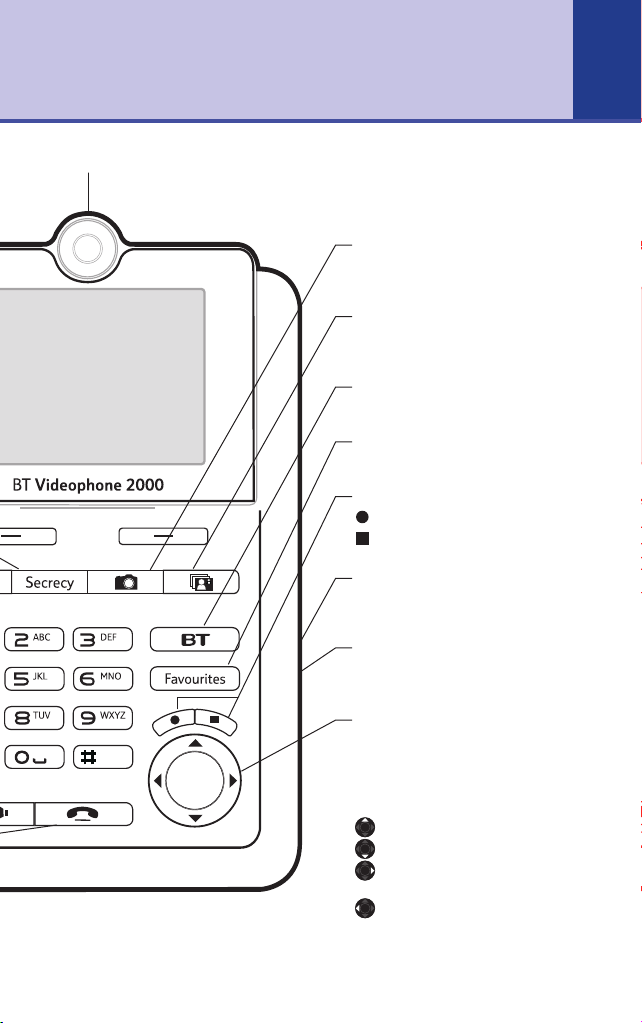
Camera
Camera
Gives direct access to the camera,
audio and video clip recorder.
View
During a video call, enables you to
change the picture layout.
BT
Opens the BT Services menu.
Favourites
Opens the Web address directory.
Web browser buttons
Opens web pages.
Takes you back to web menu.
SD/MMC card slot
Lets you copy data to and from a
memory card, page 31-32.
SIM card slot
Lets you copy directory numbers to and
from your mobile phone, page 31-32.
15
Navigation
Enables you to move through the
different menus.
In standby, press Up to view details of
received calls and press Down to open
the Redial list.
Opens the Dialled calls list.
Opens the Received calls list.
Opens the list of Phonebook
entries.
Dials 1571 to access the BT
network answering service.
Page 16
Getting to know your phone16
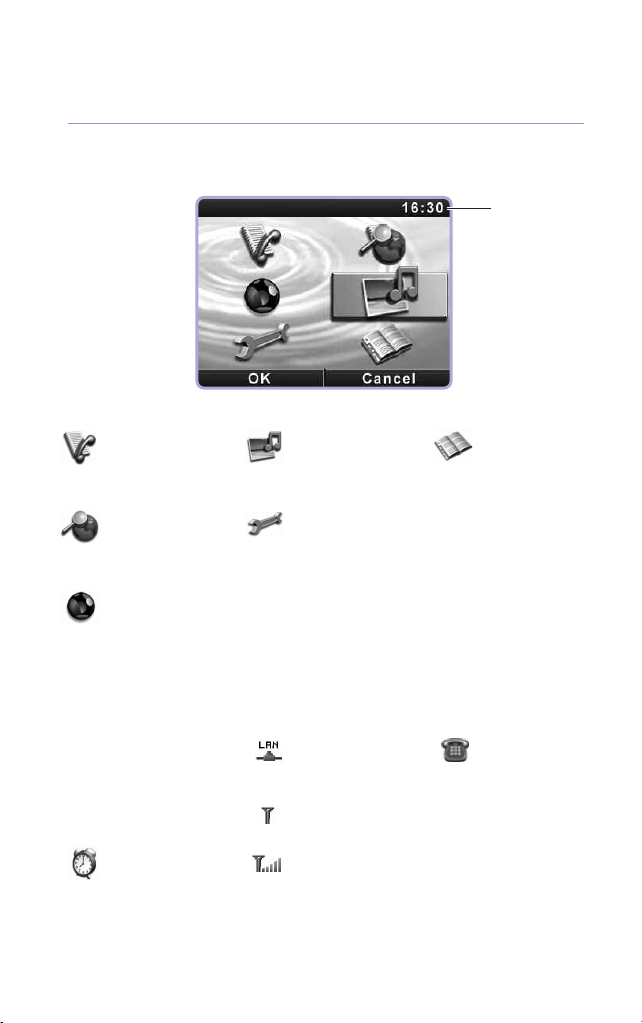
On screen menu
Time
Calls list
Calls list with details
of missed, received
and dialled calls.
Web Browser
Allows you to store
details of up to 4
favourite websites.
BT Services
Lets you access prestored BT network
services.
Display icons
Time
09:30 (HH:MM)
Date
18/04/06
(DD:MM:YY)
ALARM CLOCK
Alarm/event reminder
set
Images & Sounds
Access the images,
sounds and videos
menu.
Settings
Select your personal
preferences for your
phone, video and
network settings.
LAN
Router cable
connection
WIRELESS
Wireless connection
SIGNAL
Wireless signal
strength
Phonebook
Opens the
phonebook.
MISSED CALLS
You have missed calls
Page 17

Menu map
Getting to know your phone 17
Calls Lists
Missed calls
Received calls
Dialled calls
Delete calls list
Web Browser
4 entries
available
BT Services
1571
Helpdesk
BT118500
Withhold my
number
Display my
number
Navigating the menus
Your BT Videophone 2000 has a simple on
screen menu.
Each menu has a list of options, which you
can see above.
When the handset is switched on and in
standby:
1. Press
MENU to open the main menu.
2. Use the button to highlight the menu
you want and press
OK .
3. When the menu item you want is
displayed, press:
OK to select the highlighted option
BACK to return to the previous level
to scroll through the list of options
to return to the standby screen
Images &
Sounds
Images
Sounds
Videos
Delete
Copy
Settings
Phone settings
Video settings
Network
settings
Phonebook
Add new contact
List
Search
Modify
Delete
Copy
Page 18
Getting to know your phone18
Character map
The following table shows you where each
letter and punctuation character can be
found.
, _ ->space 0
, . ->@ 1 and other character symbols
A B C 2
D E F 3
G H I 4
J K L 5
M N O 6
P Q R S 7
T U V 8
W X Y Z 9
Character symbols
A B C 2 a b c 1 2 3
->a b c A b c A B C 1 2 3
Choose text type.
Press to change between Lower
Case, Upper Case letters and numbers,
abc – lower case letters
Abc – upper case for the first letter
ABC – upper case only
123 – numbers
To enter a space, press .
Note
When entering text on a
website, you have the
options of numbers and
lower case letters only.
Symbols
To open the symbols map, press .
The following symbols are available.
.,?!“‘@:;()/\&*#[]{}%-
+=><~^_
€ $£¥
Page 19

Using the phone
Video calls
Make a video call
1. Enter the number and then press .
The number is dialled and you see your
image on the dialing screen. Providing the
person you are calling also has a
compatible video phone, and answers
their phone in Video mode, you will be
able to see each other.
If the person you are calling does not have
a videophone, the call is automatically
connected as a voice call.
2. During a video call, press
scroll to select from:
Phonebook – press OK to open the
Phonebook, then to scroll through
the list.
Switch to voice call – press OK. The
screen is switched off. To ask your caller
to resume the video call, press the
button.
Refresh rate – press OK then to
adjust the rate you see.
Audio volume – press OK then to
adjust the volume.
Brightness – press OK then to adjust
the brightness.
Contrast – press OK then to adjust
the contrast.
Technical information – press OK to see
technical information about the call.
Options and
Want to change the
layout of your video call?
There is a choice of screen
layout options. You can
select one temporarily
during your call or select
one as the default setting.
See Video call view
page 58.
Call timer
The duration of your call is
shown in the display
during the call and for a
few seconds after you
hang up.
19
19
Page 20

20 Using the phone
View photos
Once you have taken the
picture, it is stored in the
Taken photos folder of the
Images and Sounds
directory. See page 41.
Receiving a video call
1. The display shows the caller’s number or
the name if the number is listed in your
phonebook.
2. Lift the handset or press to
answer.
3. The screen shows
requested a video call
The other person has
. Press to
start the call.
4. Or you can press and you are
connected in a handsfree video call.
5. To hang up, replace the handset or press
.
Adjust volume during a video call
1. During a call, press
Take a still picture of your caller
1. During your video call, press .
Take a picture
2.
is highlighted, press OK.
3. When you are ready to take the picture,
press
CAPTURE or press BACK to return
to call as normal.
4. Press
SAVE to keep the image or DELETE
to reject it.
Page 21

Access the phonebook during a call
You can look up numbers or add numbers
to your phonebook.
1. During a call, press
OPTIONS,
Phonebook
is highlighted. Press OK.
2. Scroll to the entry you want.
3. Press
BACK to return to your call.
Adjust brightness
1. During a call, press OPTIONS, scroll
Brightness
to
and press OK.
2. Press to adjust the setting.
Adjust contrast
1. During a call, press OPTIONS, scroll
Contrast
to
and press OK.
2. Press to adjust the setting.
Adjust the refresh rate
This sets how fluid the picture is. The
more fluid the picture is the lower the
image quality will be.
1. During a call, press
to
Refresh rate
OPTIONS, scroll
and press OK.
2. Press to adjust the setting.
Using the phone
You can also change
video settings when the
phone is in standby
As well as Brightness and
Contrast, you can also set
a split screen, the
viewpoint of the camera
and more. See Video
Settings, page 58.
21
Page 22

22 Using the phone
Numbers can also be
dialled using the
phonebook, page 28,
and from the Calls list,
page 36.
If you have stored a name
for the calling number in
your phonebook, then the
caller’s name will be
displayed instead of their
number. See page 26 for
more information.
IMPORTANT
If your call is not answered
it will either divert to the
network 1571 answering
service (if being used) or
Number Unavailable
displayed and the phone
returns to standby.
Voice calls
Make a voice call
1. Lift the handset and enter the number.
Or
Preparatory dialling
1. Enter the number first. If you make a
mistake, press
digits.
2. Lift the handset or press . The
number is dialled.
Options during a voice call
During a voice call press OPTIONS and
scroll or if necessary to:
Phonebook
during the call.
Audio volume
volume.
Received calls
list of Received calls.
Missed calls
Missed calls.
is
Dialled calls
of Dialled calls.
Technical information
display technical information.
Delete to delete the last
– press OK to store an entry
– press OK adjust the
– press OK to display a
press OK to display a list of
– press OK to display a list
– press OK to
Page 23

End a call
Replace the handset or press .
Receive a voice call
When the phone rings, the screen displays
Incoming call
and the caller’s number. If
the number is stored in your phonebook
the name and number is displayed.
1. Lift the handset or press to take
the call handsfree. If you try to answer a
voice call by pressing the button,
the voice call starts.
Handsfree calls
Handsfree lets you talk to your caller
without holding the handset. It also
enables other people in the room to listen
to your conversation over the
loudspeaker.
Using the phone
Please note
When you receive a call
and the caller’s name is
stored in the phonebook,
their name is displayed
instead of the number. If
you have assigned a
picture to the phonebook
entry this will be shown as
well.
Technical information
During a voice or video
call, one of the choices in
the Options menu is
Technical Information. This
is normally only used to
provide information to the
Helpdesk.
23
Page 24

24 Using the phone
Make a handsfree voice call
1. Dial the number then press .
Make a handsfree video call
1. Dial the number and press .
Switch between receiver and
handsfree
1. During a call, press to put the call
on the loudspeaker. Lift the handset to
listen privately.
Redial
Your handset automatically saves up to
the last 20 numbers dialled in the Dialled
calls list.
1. Press . The last number called is
displayed.
2. Scroll to number you want to redial.
3. Press
to dial or lift the handset.
Page 25

Secrecy
During a call, you can talk to someone
nearby without your caller hearing you.
1. During your call, press . Your caller
cannot hear you. If it is a video call, the
screen image of you is blanked so your
caller cannot see you, the icon
displayed.
2. You can still see and hear your caller.
3. Press again to resume your call.
Volume
Adjust volume during a call
1. During the call, press OPTIONS, scroll
Audio Volume
to
2. Scroll to select
and press OK.
3. Press to set the volume.
4. Press
BACK to return to standby.
and press OK.
Handset
or
Handsfree
Using the phone
25
Page 26

26
Phonebook
Opening the phonebook
In standby, press the Names option
button.
Or
Press MENU, scroll and to the
Phonebook menu and press OK.
Or
During a call, press OPTIONS, then OK to
select
Add a new entry
Each entry can hold a home number,
mobile number and an email address.
1. Open the
to
2. Enter the name and press
3. Enter the number and press
4. Enter a mobile if required and press
5. Enter an email address if required and
press
6. Press
Or
To select a specific ringer melody to be
played when a call is received from this
person:
Scroll to
OK.
Phonebook.
Phonebook menu and scroll
Add new contact
Next.
Save to store the entry,
. Press OK.
Assign Melody
OK.
Next.
Next.
and press
Page 27

Scroll to select the type of ringer
melody you want.
Videophone melodies
– to select from the
pre-set tones
New audio
Press
– to record a ringtone sound
OK. Follow the on-screen prompts
to set the melody.
Assign then scroll to
Press
OK
press
Press
Recorded audios
.
Back to return to standby.
– from recordings you
Save
and
have made.
Received melodies
– recordings received
from SD/MMC cards.
To add an image to be displayed when a call
is received from this person
Scroll to
Assign Image
.
and press OK.
Scroll to select the type of image
you want:
Videophone images – a choice of 5 are
pre-set on the telephone.
New – to take a photo,
Taken Photos – to select from the gallery.
OK. Follow the on-screen prompts
Press
to set the image.
OK then scroll to
Press
press
OK.
Back to return to standby.
Press
Save
and
Phonebook 27
Phonebook icons
The phonebook displays
icons to show what
contact methods have
been stored
= home number
= mobile number
= email address
= melody
Page 28

Phonebook28
Dial from the phonebook
1. Open the Phonebook menu.
2. Scroll to the entry you want.
3. To dial, lift the handset or press .
If there is only one number it will be
dialled. If there are two of more numbers
stored, they are displayed. Scroll to
the number you want and press
Search for an entry alphabetically
1. Open the Phonebook menu.
2. Enter the first the name and press
display the first name beginning with that
letter.
3. If necessary, scroll to the entry you
want.
4. To dial, press
for video OR lift the handset which
always displays as a voice call. If there is
only one number stored it will be dialled. If
there are two or more numbers stored
they are displayed. Scroll to the
number you want and press
for a voice call
Call.
OK to
OR
Call.
Edit an entry
1. Open the Phonebook menu. Scroll to
List
and press OK.
2. Scroll to the entry you want and press
Options.
Scroll to
3.
Modify
and press OK.
Page 29

4 Scroll if required to the part of the
entry you wish to edit: name, home,
mobile, email, melody or image.
5. Press
6. Scroll to the next part of the entry you
7. Press
1. Open the Phonebook menu. Scroll to
2. Scroll to the entry you want and press
3 Scroll to
4. Press
5. Press
1. Open the Phonebook menu. Scroll to
2. Scroll to the entry you want and press
3. Scroll to
4. To set a ringtone scroll to show
OK and make the change you need
and press
wish to change and press
Delete an entry
List
OK.
Assign a ringtone and/or image to
an entry
List
OPTIONS.
press
icon and press
delete or replace the melody.
SAVE.
OK.
BACK to return to standby.
and press OK.
Delete
and press OK.
Ye s to confirm or No to cancel.
BACK to return to standby.
and press OK.
Modify
and
OK.
OK. Follow prompts to
Phonebook 29
Page 30

Phonebook30
You can replace a ringtone with:
Videophone melodies
scroll to select the melody then press
Set.
New audio
begin recording (maximum 20 seconds).
Press
– press OK, press Record to
Stop to end recording. Press Back.
Recorded audios
or if required to select the melody from
recordings you have made then press
Received melodies
have copied from an SD/MMC card). Press
OK then scroll to select the melody
then press
5. To set an image, scroll to
press
prompts to delete or replace an image.
You can replace an image with:
Set.
OK. Press
Videophone Images
photo taken of your caller.
Press
OK then scroll through the list.
When the image you want is displayed,
Set.
press
New photo
to take a photo. (Press OPTIONS to set
the 10 timer – gives you a 10 second
countdown before the picture is taken).
Press
To assign the image, press
– Press OK then select Capture
Save to keep the image or Delete.
Taken Photos
through the list. When the image you
want is displayed, press
– press OK then
– press OK then scroll
– (e.g. ringtones you
Image
Options
– press OK then scroll
and follow the
- to select from a
Set.
Set.
Set.
and
Page 31

Phonebook 31
Received images
– (e.g. images you have
copied from an SD/MMC card). Press
then scroll to select the image then
press
Set.
Copy phonebook entries to a SIM or
SD/MMC card
You can copy entries to or from a SIM or
SD/MMC card
1. In standby, open the
Copy from
to
Phonebook, scroll
and press OK.
2. If required, press to scroll to the
or SD/MMC card
OK.
press
option you want and
3. Insert SIM or SD/MMC card.
4. Enter PIN if required and press
5. Press OK to select
All Entries
all phonebook entries, the press
OK.
to copy the
Copy.
The phonebook is copied.
or
Scroll to
Some Entries
to choose the
entries you want to copy then press
Press
Select to choose the entry or
Deselect to ignore the entry.
6. Press
Copy to copy all the selected
entries.
7. Press
BACK to return to the previous
menu level.
OK
SIM
The PIN is only required
for SIM cards.
OK.
Page 32

Phonebook32
Please note
If you enter the SIM PIN
incorrectly and it becomes
locked, you will need to
contact your mobile phone
supplier to unlock it.
Copy a phonebook entries from a SIM
or SD/MMC card
You can copy entries to or from a SIM or
SD/MMC card
1. In standby, press
to
Copy
and press OK.
Phonebook, scroll
2. If required, press to scroll to the
option you want and press
OK.
3. Insert SIM or SD/MMC card.
4. Enter SIM or SD/MMC card PIN code if
required and press
5. Press
OK to select
all phonebook entries, the press
OK.
All Entries
to copy the
Copy.
The phonebook is copied.
or
Scroll to
entries you want to copy then press
Press
Some Entries
to choose the
Select to choose the entry or
OK.
Deselect to ignore the entry.
6. Press
Copy to copy all the selected
entries.
7. Press
BACK to return to the previous
menu level.
If the name is already stored:
1. Press View to see the existing entry then
press
Replace to replace the existing entry
Ignore to cancel.
or
2. If you press
new numbers are shown. Press
Replace, both the old and
Replace
again to store the new number or Ignore
to cancel.
Page 33

Call lists
Your BT Videophone 2000 lets you view
details of:
Received calls – calls that have been
answered
Missed calls – calls that have not been
answered
Dialled calls – calls made from your BT
Videophone 2000.
Up to 60 entries can be stored in the
Dialled, Received and Missed calls lists.
Open the Call Lists menu
1. Press MENU.
Press
Missed calls
1. Open the Call Lists menu and press OK
to open the Missed Calls list.
2. If the caller’s number is stored in the
Phonebook, the name is displayed.
3. Press
Details
Press
Delete
from the lists
confirm or
Withhold my number
141 when you ring this caller back to
prevent your number being displayed.
Scroll to withhold my number and
press
handset or press or .
Call Lists
OK.
OPTIONS to access the following:
- press OK to see call details.
Call to dial.
– scroll to
and press OK. Press Ye s to
No to cancel.
OK. To call the number, lift the
is highlighted.
Delete the call
– This dials the prefix
33
Please note
indicates a voice call.
indicates a video call.
Page 34

Call lists34
Display my number
usually withheld, this option adds the
prefix 1470 when you ring this caller back
so that you number is displayed. Scroll
to
Display my number
To call the number, lift the handset or
press or .
4. Press
1. Open the Call Lists menu. Scroll to
2. Press
3. Press
BACK to return to standby.
Received calls
Received Calls and press
OK to see a list of received calls. If
the caller’s number is stored in the
Phonebook, the name is displayed.
OPTIONS to access the following:
Details
Press
Delete
– press OK to see call details.
Call to dial.
– scroll to
from the lists
confirm or
No to cancel.
Withhold my number
141 when you ring this caller back to
prevent your number being displayed.
Scroll to
OK. To call the number, lift the
press
handset or press or .
Display my number
usually withheld, this option adds the
prefix 1470 when you ring this caller back
so that you number is displayed. Scroll
to
Display my number
– if your number is
and press OK.
OK.
Delete the call
and press OK. Press Ye s to
– This dials the prefix
Withhold my number
– if your number is
and
and press OK.
Page 35

To call the number, lift the handset or
press or .
4. Press
BACK to return to standby.
Dialled calls
1. Open the Call Lists menu. Scroll to
Dialled Calls
and press OK.
2. If the caller’s number is stored in the
Phonebook, the name is displayed.
3. Press
OPTIONS to access the following:
Details
Press
Delete
the lists and press
confirm or
Withhold my number
– press OK to see call details.
Call to dial.
– scroll to
Delete
OK. Press Yes to
No to cancel.
– This dials the prefix
the call from
141 when you ring this caller back to
prevent your number being displayed.
Scroll
Withhold my number
and
to
press OK. To call the number, lift the
handset or press or .
Display my number
– if your number is
usually withheld, this option adds the prefix
1470 when you ring this caller back so that
you number is displayed. Scroll to
Display my number
and press OK. To call
the number, lift the handset or press
or .
4. Press BACK to return to standby.
Call lists 35
Please note
indicates a voice call.
indicates a video call.
Page 36

Call lists36
Dial an entry in a calls list
1. Open the call list and scroll to the number
you want and press or to
make a call.
Delete calls list
You can delete all entries in one of the Call
Lists or all entries in all Call Lists.
1. Open the
to
2. Press
you want to delete or choose
you want to clear the entire Call Lists
directory.
3. Press
cancel.
4. Press
Call Lists menu and scroll
Delete Calls
OK. If required scroll to the list
.
All Calls
OK. Press Ye s to confirm or No to
BACK to return to standby.
if
Page 37

BT Services
Your BT Videophone 2000 menu gives you
quick access to a range of useful services.
1571 answering service
You will be able to check for voicemail
messages by pressing when your
phone is in standby mode.
Helpdesk
If you need help using your BT
Videophone, this option dials the
Helpdesk number – 0800 028 3228.
(Local call rates apply)
BT 118500
Dials 118500 for BT’s directory enquiries
service.
Withhold my number
Puts 141 before the next number you dial,
so that your phone number is withheld.
37
Display my number
If your number is normally withheld, this
puts 1470 before the next number you
dial so that your phone number is
displayed.
Page 38

BT Services38
Using the BT Services Menu
1. Press MENU, scroll to and press
OK.
2. Scroll if required to select from the
following options:
1571
– press OK. The BT answering service
is dialled. Follow the voice prompts to
play, repeat and delete your messages.
Helpdesk
number.
Directory enquiries
BT Directory Enquiries
Withhold my number
141 to the next call you dial.
Display my number
1471 to the next number you dial.
3. Press
– press OK to dial the helpdesk
– press OK to dial
– press OK to add
– press OK to add
BACK to return to standby.
Page 39

Web browser
You can use your BT Videophone 2000 to
access the internet to browse websites.
Store addresses of up to four favourite
websites.
desired, you can overwrite this with a
preferred address.
Add/edit a website address
1. Press MENU, scroll to Web
Browser and press
displayed.
2. If required, scroll to the entry you
want and press
existing address, press
Move the cursor through the address by
pressing .
3. Enter the new site address.
4. Press
again to open the website.
Press to return to standby.
5.
Dial a website address
1. Press MENU, scroll to Web
Browser and press
is displayed.
2. If required, scroll to the entry you
want and press
Quick dial a favourite website
If you have stored a web address in the
Favourites list, press . Scroll to
the address you want. Press
www.bt.com is pre-stored. If
OK. The list of sites is
EDIT. If there is an
DELETE to delete.
OK to add the address. Press OK
OK. The Favourites list
OK. The website is dialled.
OK.
Entering a website
address
For example, to enter.
www.bt.com
Press to enter W.
Wait for the cursor to
move right then and press
again
Wait for the cursor to
move right then and press
again
To enter the dot, press
. The symbols map is
displayed with the dot
highlighted, press
Press twice to
enter b
Press once to
enter t
To enter a dot, press
twice
To enter @ – press ,
scroll across the
symbols map to @ then
press
OK.
Press three times to
enter c
Press three times
to enter o
Press
enter m
OK.
once to
39
Page 40

Web browser40
Navigate around a website page
Once the website is displayed:
Press to navigate around the page
and highlight different sections.
Press to select the highlighted
option.
Press to exit to the web browser
menu.
Enter a new website address while
browsing
1. Press . The screen highlights Enter
Web address. Press
2. Enter the address and press
the site.
Return to the previous web page
1. While browsing, press , scroll
BACK and press OK.
2. To go forward again, press , scroll
FORWARD and press OK.
to
OK.
OK to go to
to
Exit the web browser
1. While browsing, press , scroll to
EXIT
and press OK.
2. To return to standby press
.
Page 41

Images & Sounds
Open the Images & Sounds menu
1. From standby, press MENU and scroll
Images & Sounds
to
2. Press
1. Open the
2. Scroll through the list of images.
3. Press
OK. The menu is displayed.
Using images
Images & Sounds
press
OK to select
OK and select from:
Set as Wallpaper
image as your screen background
Sort
– press OK and choose to order the
images by Name or by Size
Details
the image.
Take a new photo
1. Open the Images & Sounds menu and
press
2. Scroll to
3. Press Options to select from:
– press OK to see details about
OK to select
Camera Timer
second countdown before the picture is
taken.
Quality
quality.
– press OK to adjust the image
.
menu and
Videophone Images
– press OK to set the
Videophone Images
New Photo
– press OK to start a 10
and press OK.
41
.
.
Page 42

Images & Sounds42
Note
Press to cancel
any action and returns to
standby.
Taken photos
1. Open the Images & Sounds menu. Press
OK to select
Photos
2. Press
Images
. Scroll to
Taken
.
OK. Scroll through the photo
gallery to the image you want.
3. Press
OPTION to select from:
Set as Wallpaper
– press OK to set the
image as your screen background.
Delete
– press OK then Ye s to delete the
image.
Rename
– press OK to rename the image.
Assign to phonebook
– press OK. Either
enter the first letter of the name or press
OK to open the list of entries. Scroll to the
entry you want. Press
OK to assign the
image.
Sort
– press OK and choose to order the
images by name or by size.
Details
– press OK to see the name, date
and file size.
4. Press
Back to return to the previous level.
Received images
1. Open the Images & Sounds menu. Press
OK to select Images. Scroll to
Received images
2. Press
OK. Scroll through the photo
.
gallery to the image you want.
Press
3.
OPTION to select from:
Page 43

Images & Sounds 43
Set as Wallpaper
image as your screen background.
Delete
– press OK then Ye s to delete the
image.
Rename
– press OK to rename the image.
Assign to phonebook
enter the first letter of the name or press
OK to open the list of entries. Scroll to
the entry you want. Press
the image.
Sort
– press OK to arrange the list of
video clips by Name or by Size.
Details
video clip.
4. Press
Using stored sounds
1. Open the Images & Sounds menu. Scroll
2. Select from:
– press OK to see details of the
Back to return to the previous level.
to
Sounds
Videophone melodies
stored melodies. Press
the melody as a ringtone.
New audio
audio clip.
Recorded audio
recorded audio clip as a ringtone.
Received melodies
received melody as a ringtone.
– press OK to set the
– press OK. Either
OK to assign
and press OK.
– press OK to play
OPTIONS to set
– press OK to record a new
– press OK to select a
– press OK to select a
Page 44

Images & Sounds44
Create a Video clip
1. Open the Images & Sounds menu, scroll
Videos
to
2. Press
3. Press
4. Press
5. Press
OK to select
OK to record a video clip. Press
Stop to end recording. Recoding stops
automatically after 20 seconds.
Save or Delete.
Options to select from:
Play
– press OK to play a clip.
Delete
selected clip.
Rename
the clip.
Sort
– press OK to arrange the list of
video clips by Name or by Size.
Details
video clip.
7. Press to return to standby.
and press OK.
New Video
– press OK then Yes to delete a
– press OK to change the name of
– press OK to see details of the
.
Record a sound clip
1. Open the Images & Sounds menu. scroll
Sounds
to
2. Press
3. Press
4.
OK to select
Record to begin and Stop to end.
Maximum length 20 seconds. The audio
clip is played back.
Press
B
and press OK.
Record new audio
ACK
to return to standby
.
Page 45

Using recorded sound clips
1. Open the Images & Sounds menu, scroll
Sounds
to
2. Scroll to
and press OK.
Recorded audios
and press
OK
3. Scroll through the audio clips.
When listening to an audio clip press
OPTIONS to select from:
Set as ringing
– press OK to use the clip
as the phone’s ringtone.
Delete
– to delete the clip
Rename
– to set or change the name of
the clip
Assign to phonebook entry
– press OK
and enter the first letter of the entry you
want. Press
phonebook entry and press
OK. Scroll to the exact
OK. When you
receive a call from than number, the
sound will be played as the ringtone.
Sort
– press OK then choose by Name or
by Size to list the clips.
Details
– press Ok to see the name, date
and file size of the clip.
3. Press
BACK to return to standby.
Images & Sounds 45
Importing images, sounds
and videos
Images from an SD/MMC
card which are larger than
a VGA size format, can still
be downloaded onto your
BT Videophone 2000 as a
VGA version of the image
will be displayed. These
images can be used as
wallpapers and assigned to
phonebook entries in the
same way as the images
you take with your
videophone’s camera.
Compatibility
Your BT Videophone 2000
is compatible with:
.wav and .midi sound files
3gp video files
Any files on your SD/MMC
cards that are not
compatible with your BT
Videophone 2000 – such
as MP3 files - will not be
displayed as options for
downloading.
If you don’t hear any
sound when playing a
ringtone, sound clip or
video, adjust the volume
level
Using received video clips
Play clips copied from another source, e.g.
SD/MMC card.
1. Press
Sounds
MENU and scroll
and press OK.
to
Images
&
Page 46

Images & Sounds46
Deleting an individual
image or sound
When playing a specific
image or sound, use the
Options menu to delete
that single image or
sound.
2. Scroll to
3. Scroll to
Videos
and press OK.
Received Videos
and press
OK.
4. Scroll to the clip you want
5. Press
Play to view the clip.
Deleting all clips in an Images, Sounds
or Videos folder
Use the Images & Sounds menu to delete
multiple Images, Sounds & Melodies or
Videos.
To delete an individual image, sound or
video, use the options menu available
when playing the individual file.
1. Press
2. Scroll to
MENU and scroll to Images &
Sounds
and press OK.
Delete
and press OK.
3. If necessary scroll to the option you
want – Images, Sounds or Videos, and
press
OK.
4. Select the delete option you want and
OK.
press
5. Press OK again to confirm or NO to
cancel.
6. Press to return to standby.
Page 47

Copying images, sounds,
videos and ringtones
You can copy images, sounds, videos and
ringtones to and from an SD/MMC card.
1. Insert the SD/MMC card into the tray on
the right hand side of the videophone
Images & Sounds 47
2. Open the
3. Scroll to
Scroll if necessary to select.
4.
or From SD/MMC
5. Scroll
want to transfer and press
available files are displayed.
6. Scroll through the list and press
Select to tick each file you want copied. If
you make a mistake and press
7. Press
If requested, enter the SD/MMC
password.
8. Press to return to standby.
Images & Sounds menu.
Copy
and press OK.
and press OK.
to select the type of file you
OK. The
COPY to copy the list.
To SD/MMC
Delete.
Some SD/MMC cards may
require unlocking before
you can use them.
Page 48

48
Phone Settings
Open the phone settings menu
1. Press MENU, scroll to
OK
press
2. Press OK to select
Set ringer melody
This also lets you record your own ringer
melody.
1. Open the
2. Press
3. Press
4. Press
calls
press
5. Scroll to select the option
you want:
to select one of your videophone’s melodies
Videophone’s melodies – the first melody
is played. Scroll to hear each melody.
Press
the previous level.
to record your own ringer melody
New audios – press OK then Record to
start. Press
Save to keep the recording or Delete then
Yes to cancel. Press Back to return to
standby.
Phone Settings menu.
OK to select
OK to select
OK to set the melody for
or scroll to
OK.
Set to select or Back to return to
SETTINGS
Phone Settings
Ringing
Melody
and
.
.
.
Voice
Video calls
Stop to end recording then
then
Page 49

to set your own recorded melody
Recorded audios – press OK. The first
recorded melody is played. Scroll to
hear any other recorded melodies.
Set to select the ringer melody or
Press
Back to return to the previous level.
to select a received melody
Received melodies – if you have
melodies, the first one is played. Scroll
to hear each melody. Press
select or
level.
Set ringer volume
1. Open the Phone Settings menu.
2. Press
3. Scroll to
4. The current melody volume is played.
Scroll
OK.
5. Press
Back to return to the previous
OK to select
to set the new volume and press
BACK to return to standby.
Ringing
Volume
and press OK.
Set to
.
Phone Settings 49
Set audio volume
You can adjust the default handset or
handsfree volume.
1. Open the
2. Scroll to
3. Scroll to select
and press OK.
Phone Settings menu.
Audio Volume
and press OK
Handset
or
Handsfree
Page 50

Phone Settings50
4. Press to set the volume and press OK
to confirm.
5. Press
BACK to return to standby.
Date and time
Set date and time
1. Open the Phone Settings menu.
2. Scroll to
press
3. Press
4. Use the keypad to enter the date
(DD/MM/YYYY) and press
5. Enter the time (HH/MM) and press
Set network time
This ensures the time on your BT
Videophone 2000 is automatically
updated by your network. You can switch
this function off by selecting Disable (i.e.
Off). The default setting is Enable
(i.e. On).
1. Open the
2. Scroll to
3. Scroll to
4. Select
Date and time
OK.
OK to select
Phone Settings menu.
Set date and time
Date and time
Network time
Enable
or
Disable
and
.
OK.
OK.
and press OK.
and press OK.
and press OK.
Page 51

Manual network time update
1. Open the Phone Settings menu.
2. Scroll to
3. Scroll to
4. Scroll to
Set alarm
Use the alarm to remind you of up to 4
appointments or special events. The
correct time and date must be set first.
1. Open the
2. Scroll to
3. Scroll to
4. If required, scroll to one of the 4
entries.
5. Enter the date you want and press
Enter the time you want and press
6.
7. Write in details of the appointment of
event and press
when the alarm goes off.
8. The standby screen shows to indicate
the alarm has been set.
Date and time
Network time
Update
Phone Settings menu.
Date and time
Alarm
and press OK.
OK. This will be displayed
and press OK.
and press OK.
and press OK.
and press OK.
OK.
OK.
Phone Settings 51
Page 52

Phone Settings52
Display settings
Personalise how your BT Videophone
2000 screen looks.
Wallpaper
1. Open the Phone Settings menu.
2. Scroll to
3. Press
from the following options:
to choose a pre-set image
Videophone’s images – press OK then
scroll through the images. Press
to select the photo or Back to return to
standby.
to set your own picture using the camera
New photo – press OK. Press Capture to
take the picture or use Options to set a 10
second timer and select the quality of
image. Press
Delete to cancel.
to choose from photos you have taken
Taken photos – press OK then scroll
through the photos. Press
the photo or
to choose a received image
Received images - press OK then scroll
through the images. Press
select the photo or
standby.
Display
OK to select
Save to keep the picture or
Back to return to standby.
and press OK.
Wallpaper
Back to return to
and select
Set to select
Set to
Set
Page 53

Menu colour
1. Open the Phone Settings menu.
2. Scroll to
3. Scroll to
Display
Menu Colour
and press OK.
and press OK.
4. Scroll to see the different colours.
OK to set colour.
Press
5. Press
Back to return to standby.
Phone Settings 53
Screen saver
The screen can be set to switch off after a
set length of time.
1. Open the
2. Scroll to
3. Scroll to
4. Press
Phone Settings menu.
Display
Screen saver
and press OK.
and press OK.
Yes to enable or screen saver. If the
screen save is enables, the disable option
will be displayed.
5. Enter standby time before the screen
saver starts (Minutes/Seconds) and press
OK.
6. Press
Back to return to standby.
Please note
Press to cancel
an action at any time.
Page 54

Phone Settings54
Technical
View technical details
This can be used to provide useful
information if you need to call the
Helpdesk. It will include information
about the hardware and software in use,
your IP address, telephone number and
MAC address.
1. Open the
2. Scroll to
3. Details about your BT Videophone 2000
are displayed.
4. Press
Phone Settings menu.
Technical
Back to return to standby.
and press OK.
Page 55

Software upgrades
55
Automatic checks
Your BT Videophone 2000 will
automatically check for software updates
on a regular basis.
When checking for updates the display
Checking for new updates
shows
not need to do anything.
Check for software updates manually
1. Open the Phone Settings menu.
2. Scroll to
3. Scroll to
and press OK.
4. Follow the on-screen prompts as
necessary. During downloading, the
screen displays the progress. When the
download is finished, your BT Videophone
2000 is restarted.
When complete the display shows
5.
Technical
Check for software updates
and press OK.
software has been downloaded
to return to standby.
6. Press
Back to return to standby.
For information about upgrades and
instructions on new features, go to
www.bt.com/broadbandtalk/video
. You do
. Press OK
New
Please note
If your BT Videophone
2000 is disconnected from
the power supply it will
automatically check for
new software upgrades
when the power is
connected again.
If the download progress bar stops
If your BT Videophone 2000 experiences
problems during the software update, the
download progress bar will stop. T
your phone, disconnect it from the mains
o reset
Page 56

Software upgrades56
Cancel upgrade
While downloading any
upgrade, if you need to
use the phone urgently,
press Cancel then Yes to
confirm. The phone
returns to standby.
power and the Ethernet cable (if
connected) for a few seconds, then plug
them in again. If there is a connection
problem, this will be shown on-screen.
Reset
You can restore the original settings to:
• Phonebook
• Phone Settings
• System
Reset phonebook
This will delete all the entries in the
phonebook.
1. Open the
2. Scroll to
3. Press
4. Press
5. Press
Phone Settings menu.
Reset
and press OK.
OK to select
Phonebook
.
Ye s to confirm or No to cancel
BACK to return to standby.
Reset phone settings
This will change all of the personalised
settings on the phone back to their default
state.
1. Open the
2. Scroll to
3. Scroll to
Press
4.
Phone Settings menu.
Reset
and press OK.
Settings
and press OK.
Yesto confirm or No to cancel
Page 57

5. Press BACK to return to standby.
Reset phone
This will restore your BT Videophone 2000
to its original settings and you will need to
re-connect and register your BT Broadband
Talk connection again. Phonebook entries
and all images and sound folders that you
have saved are deleted. All settings are
returned to their default state.
1. Open the
2. Scroll to
3. Scroll to
4. Press
5. Press
Phone Settings menu.
Reset
and press OK.
System
and press OK.
Ye s to confirm or No to cancel
BACK to return to standby.
Software upgrades 57
Page 58

58
Video settings
Open the Video settings menu
1. Press MENU, scroll to Settings and
OK
press
2. Scroll to
OK.
press
Video call view
This menu lets you set the standard image
style for video calls.
The default setting is
1. Open the
OK to select
Scroll to select
Picture in Picture – see a small image of
yourself in the bottom right corner
Video Settings
Video Settings
Picture in Picture.
menu and press
Video Call View
and
.
Full screen remote – your caller in full
screen
Page 59

Video settings 59
Side by side simple – you and your caller
with basic information about your call
displayed
Side by side technical – you and your
caller, this time with more technical call
information displayed.
Press
2.
BACK to return to standby.
Video monitor enable/disable
You can use your BT Videophone 2000 as
a monitor camera. Ring it from another
compatible videophone and see your
camera’s view.
To do this, you must first “enable” the
video call monitor. To return to normal
use, change the setting back to
1. Open the
Video Settings
to
Video monitor
and press OK.
“disable”.
menu, scroll
Changing the video layout
during a call will only apply
while the call lasts.
To change the video layout
for all calls, you must
select the Video call view
as shown on this page
when the phone is in
standby.
Page 60

Video settings60
2. Press OK to enable or disable the monitor
then press
3. Press
Video monitor – telephone number
To stop unauthorised people using your
videophone as a monitor, you can enter
up to three authorised telephone
numbers. Only calls from these numbers
will be accepted for the Video Monitor
function.
1. Open the
Video monitor
to
2. Scroll to
OK.
3. Press
to
4. Press
Refresh rate
This sets how fluid the picture is. The
more fluid the picture the lower the image
quality.
1. Open the
2. Press to adjust the setting then press
OK
3. Press BACK to return to standby.
Ye s to confirm or No to cancel.
BACK to return to standby.
Video Settings menu, scroll
and press OK.
Telephone number
OK to select
Number 2
BACK to return to standby.
Video settings
Refresh rate
to
or
Number 3
Number 1
then press OK.
menu, scroll
and press OK.
and press
or scroll
Page 61

Local view
Lets you see your image as the other
caller is seeing it.
1. Open the
to
2. Press
3. Press
Mirror image
If enabled, you see a mirror image of your
movements on the screen.
1. Open the
to
2. Press
Ye s to confirm or No to cancel.
3. Press
Camera – adjust brightness
1. Open the Video Settings menu, scroll
to
2. Press
3. Press to adjust the setting then press
OK
4. Press BACK to return to standby.
Video Settings menu, scroll
Local view
OK to select
to
BACK to return to standby.
Mirror image
OK to
BACK to return to standby.
Camera
OK to select
and press OK.
Remote view
Camera
then press OK.
Video Settings menu, scroll
and press OK.
Enable
or
Disable
and press OK.
Brightness
or scroll
then press
.
Video settings 61
Page 62

Video settings62
You can also change
video settings when the
phone is in standby
As well as Brightness and
Contrast, you can also set
a split screen, the
viewpoint of the camera
and more. See Video
Settings, page 58
Camera – adjust contrast
1. Open the Video Settings menu, scroll
Camera settings
to
2. Scroll to
and press OK.
Contrast
and press OK.
3. Press to adjust the setting then
OK.
press
4. Press
BACK to return to standby.
Page 63

Network settings
Open the network settings menu.
Press MENU, scroll to Settings and press
OK
Scroll to
OK.
Connection profile
You can set the profile for wired or
wireless connection.
1. Open the
press
2. Press
to set wireless
Scroll if necessary to
press
Press
message is displayed.
to set wired
Scroll if necessary to
OK.
Press
message is displayed.
to set wired settings
Scroll if necessary to
OK.
Scroll to
Press
Press
OK to restart your Ethernet interface.
The settings are displayed. Press
return to standby.
Network Settings
Network Settings menu and
OK.
OK to select
Connection
Wireless
OK.
OK to
Enable
. If already enabled a
Wired
OK to
Enable
. If already enabled a
Wired
Settings
OK to select
OK or scroll to
then press OK.
Network Settings
Apply
and press
profile.
and press
and press
then press
BACK to
63
and
.
Page 64

Network settings64
Press
Connection profile
Scroll to
is highlighted, press OK. The display
shows
of the connections will occur, then return
to the idle screen.
to enable/disable DHCP
Scroll if necessary to
OK.
Scroll to
Wired
Setting new connection
Settings
Network settings
OK.
Scroll to
Select
OK.
Press
to restart Ethernet interface
Scroll if necessary to
OK.
Scroll
Scroll to
No to cancel.
Press
IP Address
Dynamic IP
BACK to return to standby.
to
Settings
Apply
BACK to return to standby.
, then press OK.
and press OK.
Wired
then press OK.
is highlighted, press
and press OK
or
Static IP
Wired
then press OK.
. Press Yes to restart or
Enable
. A recheck
and press
and press
and press
Bandwidth profile
1. Open the
press
2. Scroll to
OK.
3. Press
Medium
profile.
Network Settings
OK.
Bandwidth
OK to select
or
Low
then press OK to set the
profile and press
High
or scroll to
menu and
Page 65

Service registration
1. Open the
press
2. Scroll to
press
3. Display shows
Network Settings
OK.
Service registration
OK.
Checking BT Broadband
Talk account details
Then returns to idle.
menu and
.
Please Wait
65
and
.
Page 66

66
Help
Phone does not work / No display
Check that the phone is connected to the mains correctly and that
the power is switched on at the mains plug.
Speech breaks up during a video call or poor video.
Are there other people making voice calls on other phones
connected to the Broadband Talk number? You may have too
many people using the same broadband line. The number of calls
you can make at the same time can vary depending on your
Broadband bandwidth.
Unable to register to BT Broadband Talk.
If registration fails. Check that you have entered account details in
correct format. The letters are case sensitive. To switch between
Upper Case and Lower Case letters when entering the password,
press .
If you continue to have problems, call the Helpdesk on: 0800 028
3228.
Lost your BT Broadband Talk phone number and password
Call the Helpdesk on: 0800 028 3228.
Can’t make calls
Please ensure you have subscribed to BT Broadband Talk and set
up the videophone to connect to the service.
Haven’t got a spare Ethernet port on your router/hub?
You will either need to get an expansion socket, remove one of the
other cables or buy a router/hub with more sockets.
Can’t make video calls?
When dialling you have to press to start a call as a
video call.
Page 67

Broadband connection problems / Display tells me I have a
network connection problem
Call the Helpdesk on 0800 028 3228
Can’t connect the videophone to your BBT account.
Have you entered the correct phone number and password? Try
going the registration process once more and enter them again
The software download progress bar has stopped
Reset your phone by disconnecting it from the mains power for a
few seconds, then plug it in again. If there is a connection
problem, this will be shown on-screen.
Ringer does not sound
Have you set the ringer volume to Off? To adjust the ringer
volume, see Set ringer volume, page 49.
Making voice calls if the mains power fails
If the mains power fails, you will not be able to make video calls.
You can make voice calls by plugging the telephone line cord into
the line socket on your BT Videophone 2000 and connecting the
other end to the telephone line wall socket.
When the mains power comes back on, disconnect the telephone
line cable from your phone and wall socket.
67Help
General sales enquiries
• BT Residential lines – call 150. BT Business lines – call 152.
• For non BT line customers, call 0800 800 150 (residential) or
0800 800 152 (business).
Page 68

68 Help
Billing enquiries
• Refer to the telephone number shown on your BT Broadband
Talk telephone bill.
If you are still experiencing difficulties, please call the
BT Videophone 2000 Helpdesk on 0800 028 3228
.
Page 69

General information
69
Safety information
• Only use the power supply suitable
for the BT Videophone 2000. Using
an unauthorised power supply will
invalidate your guarantee and may
damage the telephone.
• The item code for the base mains
power supply is 028695.
• Do not open your BT Videophone
2000. This could expose you to high
voltages or other risks. Contact the
Helpdesk on 0800 028 3228 for all
repairs.
Cleaning
• Clean the BT Videophone 2000 with
a damp (not wet) cloth, or an antistatic wipe. Never use household
polish as this will damage the
product. Never use a dry cloth as
this may cause a static shock.
Environmental
• Do not expose to direct sunlight.
• The product may become warm so
we recommend that to avoid
damage you do not place the
product on antique/veneered wood.
• Do not stand your product on
carpets or other surfaces which
generate fibres, or place it in
locations preventing the free flow of
air over its surfaces.
• Do not submerge any part of your
product in water and do not use it in
damp or humid conditions, such as
bathrooms.
• Do not expose your product to fire,
explosive or other hazardous
conditions.
• There is a slight chance your phone
could be damaged by an electrical
storm. We recommend that you
unplug the power and telephone line
cord during an electrical storm.
Product disposal
instructions
• The symbol shown here and on the
product means that the product is
classed as Electrical or Electronic
Equipment and should not be
disposed with other household or
commercial waste at the end of its
working life.
• The Waste of Electrical and
Electronic Equipment (WEEE)
Directive (2002/96/EC) has been put
in place to recycle products using
best available recovery and recycling
techniques to minimize the impact
on the environment, treat any
hazardous substances and avoid the
increasing landfill.
Product disposal instructions for
residential users
• When you have no further use for it,
please remove any batteries and
dispose of them and the product as
per your local authority’s recycling
processes. For more information
please contact your local authority
or the retailer where the product
was purchased.
Product disposal instructions for
business users
• Business users should contact their
suppliers and check the terms and
conditions of the purchase contract
and ensure that this product is not
mixed with other commercial waste
for disposal.
Page 70

70 General information
If you experience any problems, please
call the Helpdesk on 0800 028 3228
Guarantee
Your BT Videophone 2000 is
guaranteed for a period of 12
months from the date of purchase.
Subject to the terms listed below,
the guarantee will provide for the
repair of, or at BT’s or its agent’s
discretion, the option to replace the
BT Videophone 2000 or any
component thereof, which is
identified as faulty or below
standard, or as a result of inferior
workmanship or materials. Products
over 28 days old from the date of
purchase may be replaced with a
refurbished or repaired product.
The conditions of this
guarantee are:
• The guarantee shall only apply to
defects that occur within the 12
month guarantee period.
• Proof of purchase is provided.
• The equipment is returned to BT or
its agent as instructed.
• This guarantee does not cover any
faults or defects caused by
accidents, misuse, fair wear and
tear, neglect, tampering with the
equipment, or any attempt at
adjustment or repair other than
through approved agents.
• This guarantee does not affect your
statutory rights.
Within the 12 month
guarantee period:
Prior to returning your product,
please read the Help section
beginning on page 66 or contact the
Helpdesk on 0800 028 3228 for
assistance. In the unlikely event of a
defect occurring, please follow the
Helpdesk’s instructions for
replacement or repair.
Outside of the 12 month
guarantee period:
• If your product needs repair after
the guarantee period has ended, the
repair must meet the approval
requirements for connection to the
telephone network.
Returning your phone
If the Helpline is unable to remedy
your problem they will ask you to
return the product. Where possible,
pack the product in its original
packaging. Please remember to
include all parts, including the line
cords and power supply unit.
Please note
That we cannot take responsibility
for goods damaged in transit. Please
obtain and keep proof of posting from
ost Office.
the P
Technical information
R&TTE
This product is intended for use
within the UK for connection to the
public telephone network and
compatible switchboards.
This equipment complies with the
essential requirements for the Radio
Equipment and Telecommunications
Terminal Equipment Directive
1999/5/EC.
Page 71

For your records
Date of purchase:
Place of purchase:
Serial number:
For guarantee purposes proof of
purchase is required so please keep
your receipt.
Declaration of Conformance
Hereby, LG-Nortel declares that this
BT Videophone 2000 is in compliance
with the essential requirements and
other relevant provisions of Directive
1999/5/EC.
The Declaration of Conformance for
the BT Videophone 2000 is published
on the website:
www.capstancommunications.com/bt
General information
71
Page 72

Visit us at www.bt.com
Offices worldwide
The telecommunications services described in this publication are
subject to availability and may be modified from time to time.
Services and equipment are provided subject to British
Telecommunications plc’s respective standard conditions of contract.
Nothing in this publication forms any part of any contract.
© British Telecommunications plc 2006.
Registered Office: 81 Newgate Street, London EC1A 7AJ.
Registered in England No. 1800000.
BT Videophone 2000 Issue 1 (07/06) 3
Designed and produced by The Art & Design Partnership Ltd.
Printed in Korea
 Loading...