

Page 1
Ultimate 106 – Edition 1 – Issue 3 - 18.12.02 – 5129
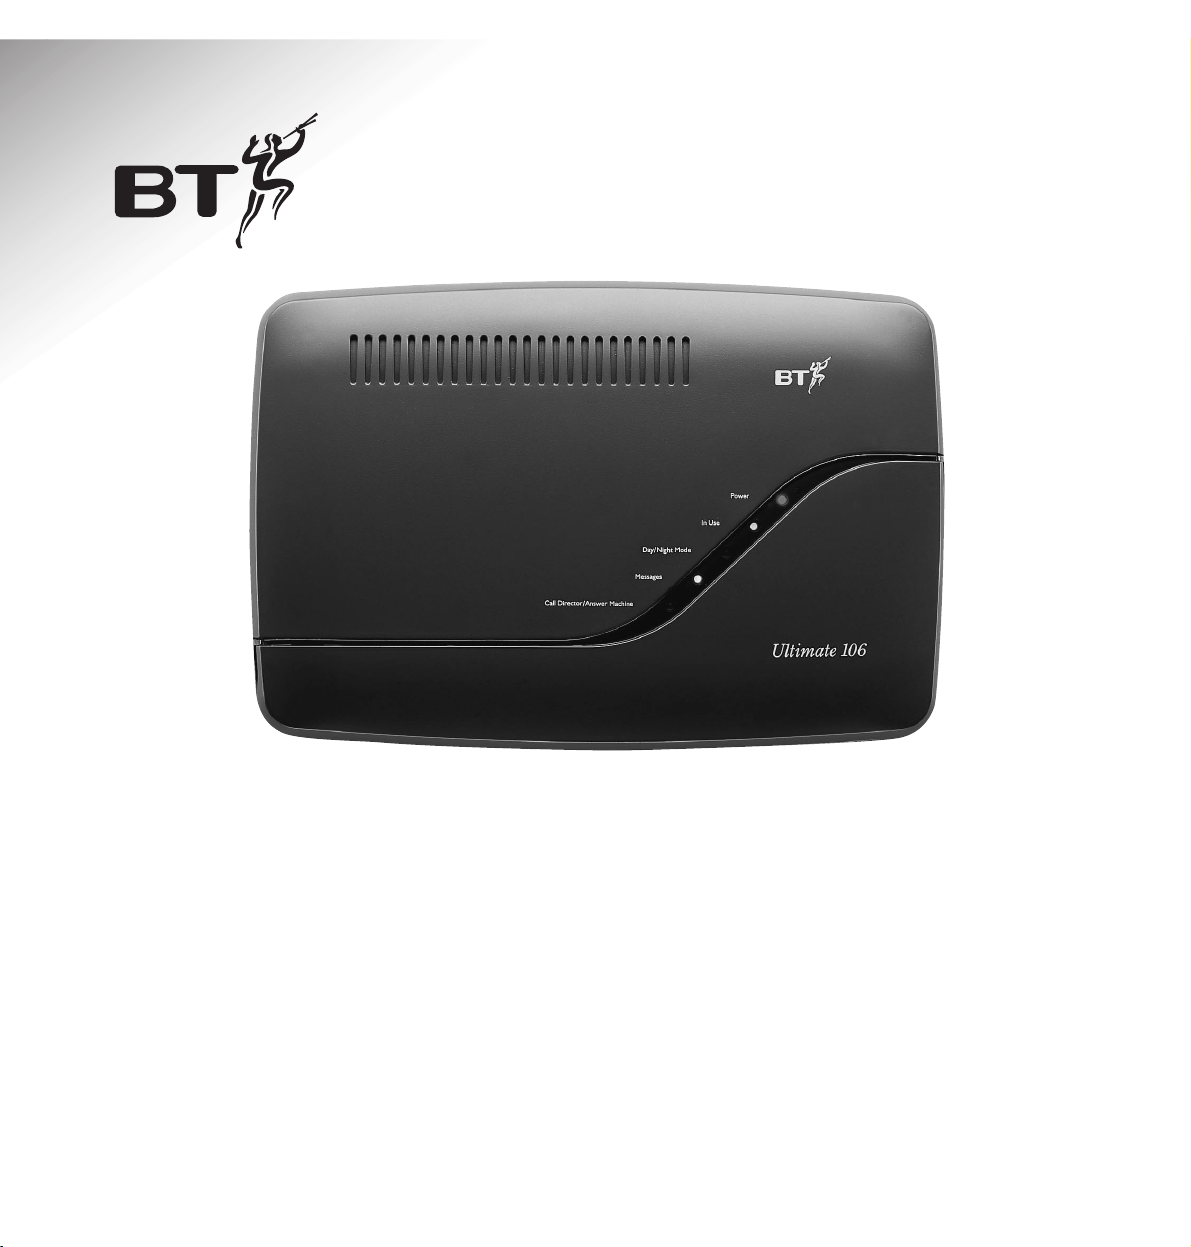
Ultimate 106
Connect up to 6 extensions on a single line, with Voice Mail
and Caller Identification features
User Guide
Page 2
Ultimate 106 – Edition 1 – Issue 3 - 18.12.02 – 5129
Key features
Please open this page for an ‘at a glance’
guide to your Ultimate 106.
Switchboard facilities
The Ultimate 106 has been designed to allow
you to make the most of a single telephone line
for your home or office. For example, you can:
– make internal calls between extensions
– easily transfer a call to any extension connected to your
Ultimate 106
– choose which extensions ring for incoming calls
– set specific extensions to ring at night only
– bar selected extensions from making certain types of
calls (such as international and premium rate).
Six extensions
The Ultimate 106 allows you 6 extension
numbers, one for each of your 6 extension
sockets. By putting 2 phones on the same extension socket
number, you can have up to a maximum of 12 telephones
on your system.
Voice Mail
Voice Mail is simply an answerphone system,
which enables messages to be stored in
separate mailboxes. It’s rather like having an answering
machine for each extension. Callers can leave a message for
a specific person while you can listen just to your messages
without having to skip through everyone else’s.
Caller Number Identification
Caller ID lets you hear who’s calling before you
answer and gives information about each call
you receive.
For the Caller ID feature to receive and transmit the full
range of call information, you must first subscribe to the
BT Caller Display Service. For more information, call BT
on Freefone 0800 800 150.
Call Director
The Ultimate 106 allows callers to direct their
call to the extension they want. The caller is
answered by the Ultimate 106 and is given a choice of
extensions to dial. Once a choice is made, only the relevant
extension rings, leaving everyone else uninterrupted by a
call that was not for them.
Combining Call Director with Voice Mail gives the caller
the opportunity to reach the correct person directly,
without disturbing anyone else. If the person called is
unavailable, a message can be left again without
interrupting anyone needlessly.
Dedicated fax extension
Your Ultimate 106 lets you have a dedicated
fax extension without the need or expense for
another telephone line.
Door entry phone (optional)
You can use your Ultimate 106 system to speak
to callers at the door and let them enter via a
door entry system. The Ultimate 106 door entry system is
available separately from your Ultimate 106 retailer.
Page 3
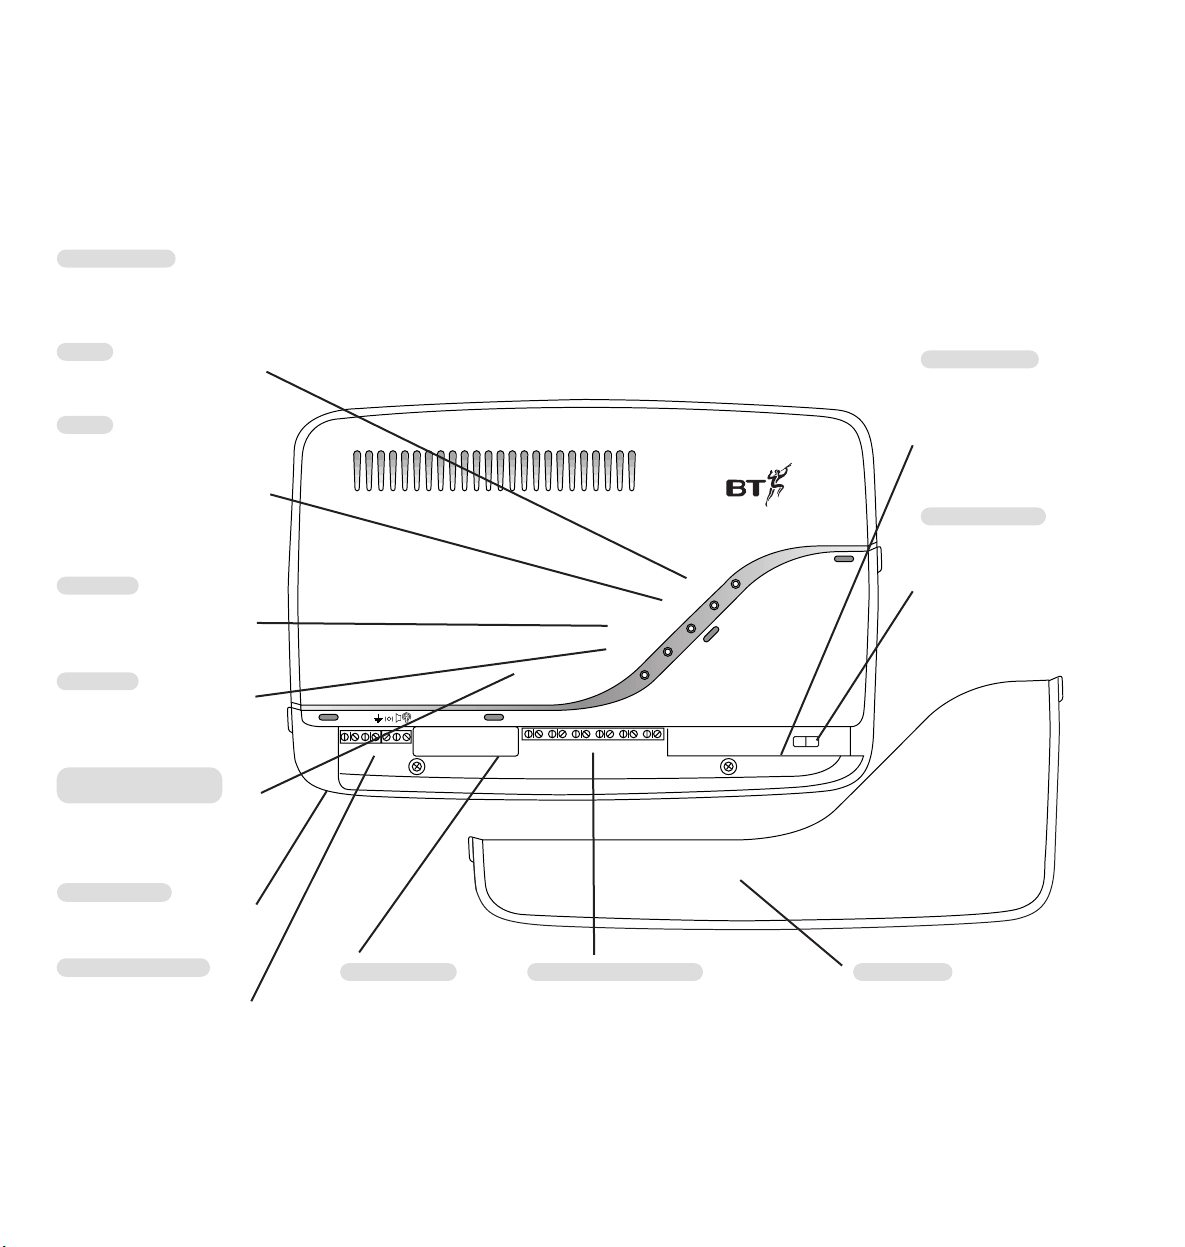
Power
Day/Night Mode
In Use
Messages
Call Director/Answer Machine
Ultimate 106
EXT 11
EXT 12 EXT 13 EXT 14 EXT 15 EXT 16
Ext 11 Ext 12 Ext 13 Ext 14 Ext 15 Ext 16
Telephone
Line
External Music On Hold Input Normal Program
Doorlock/
Intercom
12v/ 12v/
Com N.O. N.C.
Indicator lights
So you can see the status of your system at a glance,
the Ultimate 106 has 5 indicator lights on the front panel.
Power
Red light indicates when the
mains power is switched on
In Use
Green light comes on when
an external or internal call is
being made or the system is
in use. (When you initially
connect your Ultimate 106
the In Use light will flash.)
Day/Night
Amber light comes on when
the unit is in Night mode.
See page 11.
Messages
Green light comes on when
there are messages in the
internal answering machine.
Call Director/Answer
machine
Amber light comes on when
the Call Director or answer
machine is taking a call.
At a glance
Program switch
Lets you switch between
normal and programming
mode.
See page 9.
Telephone line
Extension connections
Lets you connect up to 6 extension
phones
Music on hold*
Lets you connect an optional
CD or cassette player to
have your own choice of
music played when callers
are put on hold.
Lower cover
To connect your unit to your BT line,
extensions, power and any other
optional equipment, you must remove
the lower cover.
Ultimate 106 – Edition 1 – Issue 3 - 18.12.02 – 5129
Door entry phone
Lets you attach an
optional door intercom.
There are also 2 screw
terminals for attaching a
12v door opener.
Mains power
Mains power lead and plug
are attached.
1
Page 4

2
Ultimate 106 – Edition 1 – Issue 3 - 18.12.02 – 5129
For your records
For warranty purposes, proof of purchase is
required, so please keep your receipt.
Personal Emergency Numbers
*A licence from the Performing Right Society is required when businesses
use copyright music with this equipment. For further information or to
obtain a licence call 0800 068 4828.
Date of purchase:
Place of purchase:
Serial number (under the lower cover):
Purchase price:
1
2
3
4
Page 5

3
Ultimate 106 – Edition 1 – Issue 3 - 18.12.02 – 5129
Contents
At a glance 1
Introduction 4
Installation 5
Setting up your
Ultimate 106 system 9
Setting up the Answering
Machine and Call Director 18
Using your phone extensions 25
Using BT Select Services 31
Maintenance 34
Wall mounting 35
Help 36
Technical information 37
Ultimate 106 default settings 38
Index 40
Page 6

Unpacking your Ultimate 106
If anything is missing, please contact your place
of purchase immediately.
●
Ultimate 106 (with mains
power cord 13amp and 3-pin plug
attached).
●
Telephone line cord
●
User guide
●
Extension installation kit
(optional)
●
Lead for CD/cassette player
for music on-hold feature
●
Mounting screws
4
Ultimate 106 – Edition 1 – Issue 3 - 18.12.02 – 5129
To make the best use of your Ultimate 106
features, we recommend that you subscribe to
the following BT Select Services.
Call Waiting – Allows you to be notified of a
second call while you are already engaged in
conversation.
Caller Identification – Allows your Ultimate 106
to receive the caller’s details before you answer
the call.
Call Sign – Allows you to allocate a second
number to a specific extension such as a fax
machine without the need for a separate line.
Additionally, a door intercom unit can be
answered from any extension phone and the
door opened by pressing the keypad buttons.
Please read the instructions carefully before use
and retain this user guide for future reference.
Introduction
Your Ultimate 106 has been designed for ease of use and made to the
high standards set by BT.
CUSTOMER HELPLINE
Should you have problems with your installation,
call the Ultimate 106 Helpline on
0845-3300042.
Page 7
5
Ultimate 106 – Edition 1 – Issue 3 - 18.12.02 – 5129
Wall mounting the Ultimate 106
We advise that you wall mount your
Ultimate 106.
Please ensure that:
•
You install your Ultimate 106 next to
your master telephone socket (within
2m) and a power point (within 1.5m).
•
The wall can support the weight of the
Ultimate 106.
•
The visual indicators on the Ultimate 106
are visible.
•
Once installed, your Ultimate 106 is
easily accessible and you can easily
remove the lower cover if required.
Please see ‘Wall mounting’ on page 35
Extension numbers
You can have up to 6 extensions from your
Ultimate 106 and each extension has a 2-digit
number. These six numbers are 11, 12, 13, 14,
15, and 16.
Extension 11 is the master phone which must be
connected and situated very near to your
Ultimate 106. It is the extension that is used
when making any settings that affect your
whole system.
Installation
a
CONNECT YOUR ‘MASTER’ PHONE HERE
IMPORTANT
Extension 11 will be connected directly to your
telephone line so, in event of mains power failure
calls can be made from this extension only.
Ext 11 Ext 12 Ext 13 Ext 14 Ext 15 Ext 16
Telephone
Line
EXT 12 EXT 13 EXT 14 EXT 15 EXT 16
EXT 11
Extern
Page 8
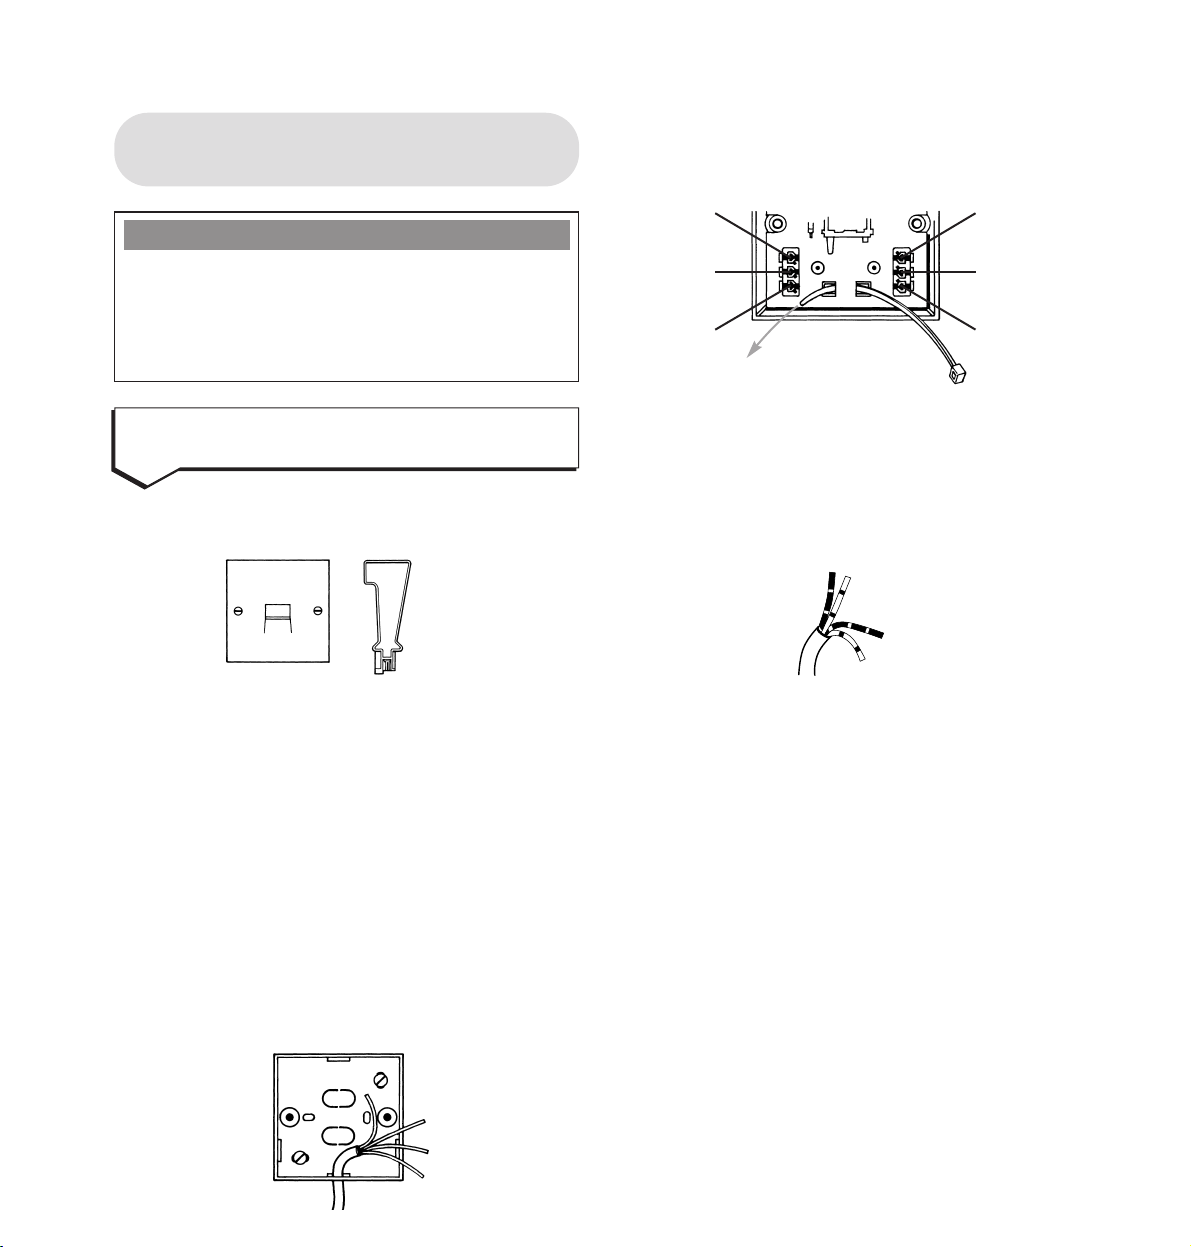
Run the required cable length to your
Ultimate 106. Attach the cable firmly to the wall.
Thread the plastic wire grip through the socket
(as shown above).
The telephone extension cable contains 4
strands of wire, 2 with broad orange, or blue
stripes, 2 with narrow orange or blue stripes.
Choose a pair of wires of the same colour, for
instance the broad blue stripes and the narrow
blue strips.
Then, holding the insertion tool, as shown,
simply push the wires firmly into connection 2
and 5. The broad blue stripes into connector 2,
the narrow blue stripes to connector 5. Secure
the cable with the cable grip.
6
Ultimate 106 – Edition 1 – Issue 3 - 18.12.02 – 5129
To connect up to 6 master
extension sockets
In your Wiring Kit you will find the white
socket(s) and a disposable insertion tool.
You will need to decide how you wish to fix the
extension socket and how the cable will be run
into it.
Push out the plastic ‘holes’ in the backbox that
correspond with where you wish the cables to run.
Screw the backbox of your extension socket
onto the skirting board or wall using the screws
provided.
Now strip off approximately 5 cms (about 2 ins)
of outer sheath from the extension cable. The
colour-coded covering on the wires in the cable
should not be stripped.
IMPORTANT
You must connect your extensions to a
MASTER telephone socket. You can
purchase master sockets and wiring kits
from any good electrical retailer.
●
1
Install the required number of
extension sockets
Connector 1
Connector 2
Connector 3
Connector 6
Connector 5
Connector 4
Page 9
Only 2 wires are connected to terminals 2 and 5.
Leave the 2 wires that are not used coiled up
neatly in the back of the socket for future use.
Pull the plastic wire grip tight, trapping the wire.
Finally, fit the front plate onto the backbox with
the screws provided.
7
Ultimate 106 – Edition 1 – Issue 3 - 18.12.02 – 5129
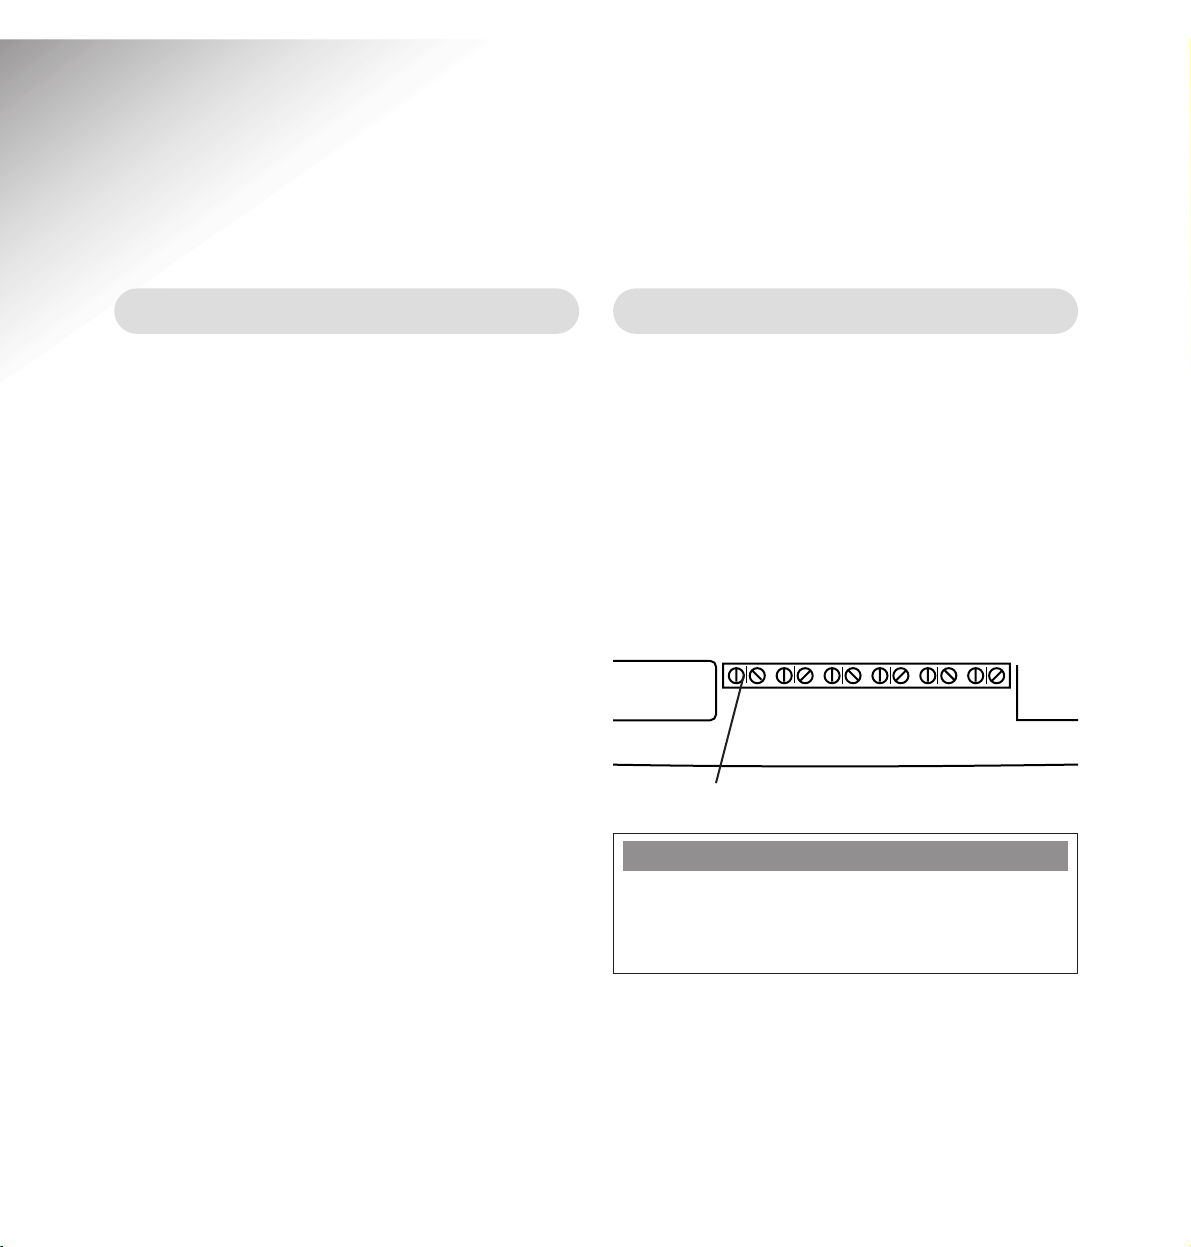
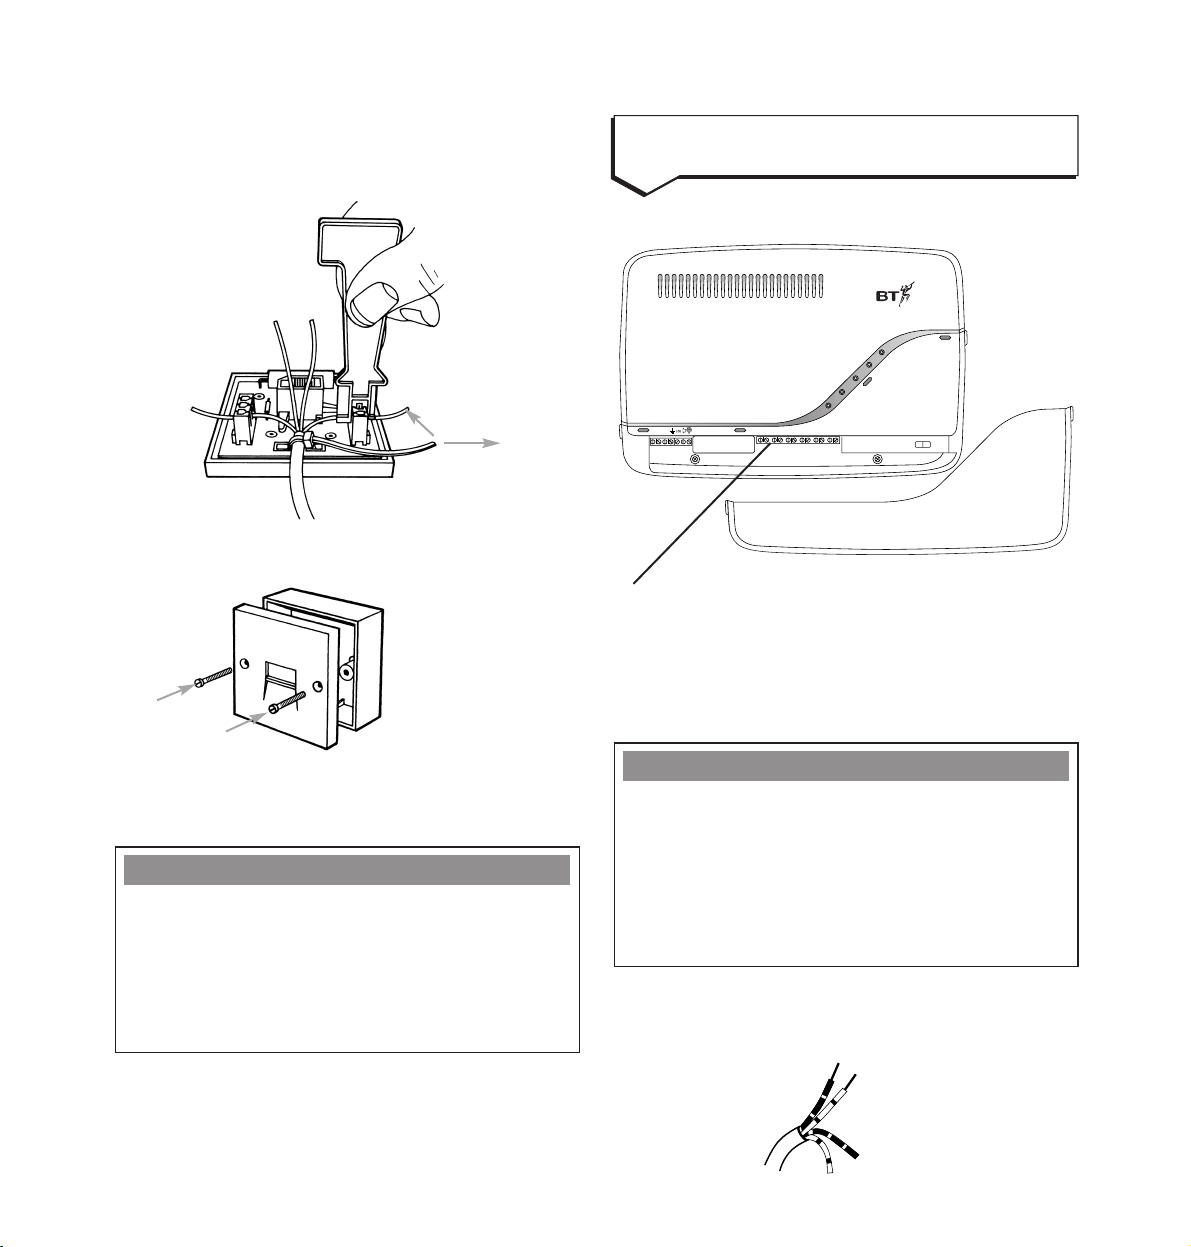
Remove the lower cover from the Ultimate 106.
There are 6 sets of twin screw connectors.
The telephone extension cable contains 4 strands
of wire, 2 with broad orange or blue stripes, 2 with
narrow orange or blue stripes.
Strip the insulation cable off at the end in order
to expose 5mm of copper wire for the blue or
orange strands.
Power
Day/Night Mode
In Use
Messages
Call Director/Answer Machine
Ultimate 106
EXT 11
EXT 12 EXT 13 EXT 14 EXT 15 EXT 16
Ext 11 Ext 12 Ext 13 Ext 14 Ext 15 Ext 16
Telephone
Line
External Music On Hold Input Normal Program
Doorlock/
Intercom
12v/ 12v/
Com N.O. N.C.
●
2
Connect the extension sockets to
the Ultimate 106
Plastic wire grip
IMPORTANT
If you have connected the 2 blue strands to the
socket, you must also connect the blue strands to
the twin screw connectors in the Ultimate 106.
Equally, if you have connected the 2 orange
strands to the extension socket, you must connect
the 2 orange strands to the twin screw connector.
IMPORTANT
Please note, cable supplied may not match
exactly the colours specified.
Please ensure that the 2 wires used at the
extension socket are the same 2 wires used at
the Ultimate 106 connectors.
Page 10
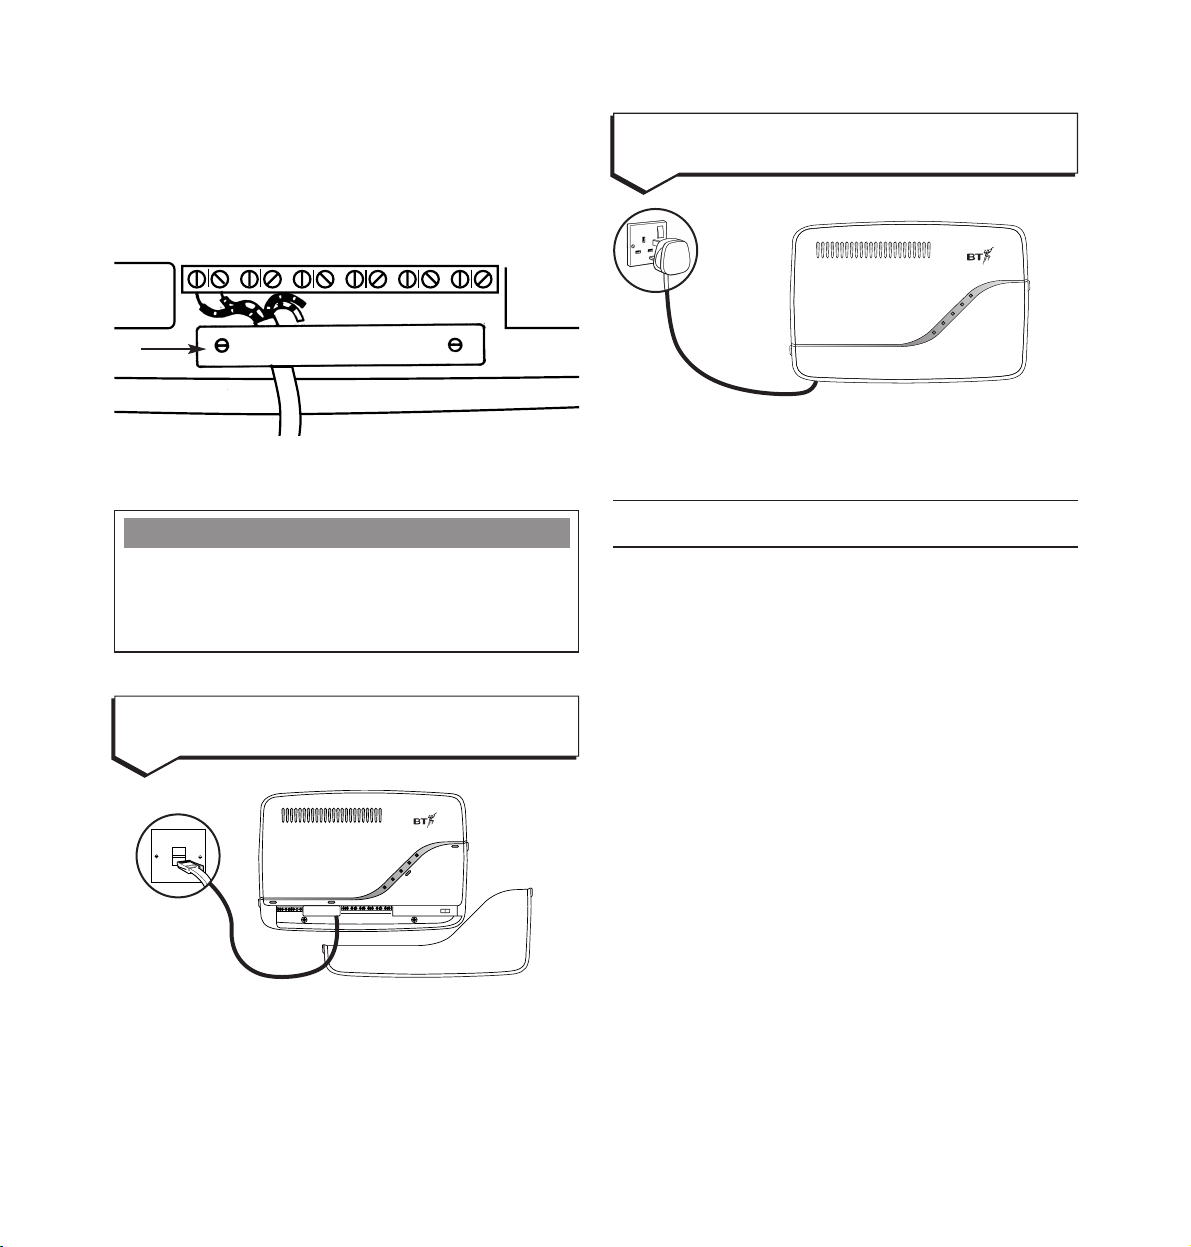
Connect the 3-pin plug into the mains socket and
switch the power on. The POWER light comes on.
Your Ultimate 106 is now installed
8
Ultimate 106 – Edition 1 – Issue 3 - 18.12.02 – 5129
●
4
Connect the power cable
Ultimate 106
1X6 PABX WITH VOICE MAIL & CALLER ID
Power
Day/Night
In Use
Messages
DISA/Ans
First remove the cable clamp. Connect the 2
exposed wires into the first set of twin screw
connectors in your Ultimate 106 and tighten the
screws to secure the wire, in place.
Replace the cable clamp when finished.
If you do not have modern phone sockets, call
Freefone 0800 800 150 and ask for a BT
engineer to come and fit the correct type. This
is a chargeable service.
EXT 11
EXT 12 EXT 13 EXT 14 EXT 15 EXT 16
Ext 11 Ext 12 Ext 13 Ext 14 Ext 15 Ext 16
ephone
Line
External
PLEASE NOTE
If you are planning to site 2 extension sockets
side by side, you can use the blue wires for one
socket and the orange wires for the second socket.
●
3
Connect the telephone line cord
Power
Day/Night
In Use
Messages
DISA/Ans
Ultimate 106
1X6 PABX WITH VOICE MAIL & CALLER ID
EXT 11
EXT 12EXT 13 EXT 14EXT 15 EXT 16
Cable
clamp
Page 11

Remove the lower cover.
Set the programme switch to
PROGRAM.
Remember to switch off the programme switch
when you have finished changing system settings,
otherwise you will not be able to receive or
make any calls when in Program mode. Callers
will still hear the usual ringing tone.
9
Ultimate 106 – Edition 1 – Issue 3 - 18.12.02 – 5129
Setting up your
Ultimate 106 system
Before you use your Ultimate 106, you must
select some basic settings in order to choose the
way you want your phone system to work.
There are 2 types of settings which you can
adjust: System settings and Extension settings.
When changing System settings switch to
Program mode, when changing Extension
settings switch to Normal mode (see program
switch on “At a glance” page 1).
All settings must be carried out using the
master phone on extension 11.
System settings
System settings affect all extensions connected to
your Ultimate 106. To change Systems Settings,
the Programme switch must be set to
PROGRAM.
• Time and Date.
• Day and Night Ringing.
• Call Barring.
• Hotline.
• Fax Extension.
• Direct Line Extension.
• System Reset.
• Music.
• Extension Ring Delay.
To make any system settings
Power
Day/Night
In Use
Messages
DISA/Ans
Ultimate 106
1X6 PABX WITH VOICE MAIL & CALLER ID
EXT 11
EXT 12EXT 13 EXT 14EXT 15 EXT 16
COVER
PROGRAM
SWITCH
IMPORTANT
When in program mode, the extensions 11-16
are identified as the following:
extn 11 = 1, 12 = 2, 13 = 3 etc.
PLEASE NOTE
When in program mode, a different kind of dial
tone is heard and the “In Use” light comes on.
Page 12
Time and date settings
Your Ultimate 106 automatically adds the time
and date received to each voice mail message.
When you subscribe to BT’s Caller Identification
service, the time and date is automatically set
with the first call you receive. It is then updated
each time a call is received. If you do not have
Caller Identification, simply follow the steps
below to set the time and day.
Press keypad buttons in order shown
From your master phone, extension 11:
In program mode.
73
#
Enter the time code.
eg. Enter the hour and minutes in 24-hour
15-15
format.
#
To confirm.
Your Ultimate 106 announces the time
entered, e.g.
“The time is 3.15pm”
Replace the handset back on the cradle.
In program mode.
From your master phone, extension 11:
74
#
Enter the date code.
eg.
27
Enter the date, (01-31).
eg.
02
Enter the month, (Jan = 01, Dec=12).
eg.
99
Enter the year.
1-7
Enter the day (1 = Mon, 2 = Tue,
3 = Wed, 4 = Thur, 5 = Fri, 6 = Sat,
7 = Sun).
#
To confirm.
Your Ultimate 106 announces the date
entered, e.g.
“Monday February 27th”
Replace the handset back on the cradle.
10
Ultimate 106 – Edition 1 – Issue 3 - 18.12.02 – 5129
To set the time
To set the day
Page 13

Extension ring delay
You can set your Ultimate 106 to delay ringing
certain extensions when a call comes in. For
example, if you want extension 11 to ring before
any others, then you need to put a delay on all
the other extensions.
From your master phone, extension 11:
In program mode.
2
Enter this code.
Ext
Enter the extension number you
require (
1-6).
#
To confirm.
Delay
Enter the Ring Delay you want
0 = No Delay (1-9 = 1-9 rings).
Enter when you want the ring delay
to apply.
1
Day mode only.
2
Night mode only.
3
Day and night mode.
Your Ultimate 106 announces the
extension and ring delay.
“Extension 13,
ring delay is 3 rings” and (day mode)
or (night mode) if applicable.
Replace the handset back on the cradle.
Day and night modes
You can set which extensions you want to ring
during the day and which ones you want to ring
at night. You can also set the times when day and
night modes begin and end.
The default (original) setting is for all connected
extensions to ring at all times.
For example:
At home you could set just one extension phone
to ring at night, so no one else will be disturbed
should someone ring you.
At work, you could set one phone only to ring
during office hours so a receptionist can answer
all calls. Outside office hours, all extensions can
ring so any available person can take the call.
To set the ring delay
11
Ultimate 106 – Edition 1 – Issue 3 - 18.12.02 – 5129
Page 14
12
Ultimate 106 – Edition 1 – Issue 3 - 18.12.02 – 5129
In program mode.
From your master phone, you can stop
specific extensions from ringing.
1
Enter this code.
Ext
Enter the number of the individual
extension you don’t want to ring (
1-6).
#
To confirm.
2
Enter 2 to disable day ring mode.
Replace the handset back on the cradle.
In program mode.
From your master phone, you can set
the extensions that you want to ring
during the night.
1
Enter this code.
Ext
Enter the number of the individual
extension you want to ring (
1-6).
#
To confirm.
3
Enter 3 to enable night mode ring
(default).
For example, to program extension 15
to ring for night mode: 15
#
3.
If you wish to set extension ringing for
all your extensions, these instructions
must be repeated for each extension.
Replace the handset back on the cradle.
To select which extensions ring
during the night
Press keypad buttons in order shown
In program mode.
From your master phone, you can set
the extensions that you want to ring
during the day. The default (original)
setting is for all extensions to ring.
If you are using day and night modes,
we recommend that you set up the
ringing you require individually for
each extension in turn.
1
Enter this code.
Ext
Enter the number of the individual
extension you want (
1-6).
#
To confirm.
1
Enter 1 to enable day mode ring
(default).
For example, to program extension 14
to ring for day mode: 14
#
1.
If you wish to set extension ringing for
all your extensions, these instructions
must be repeated for each extension.
Replace the handset back on the cradle.
To select which extensions ring
during the day
To stop extensions from ringing
during the day
Page 15

In program mode.
71
##
Enter this code.
In program mode.
72
#
Enter this code.
00-23
Enter hour in 24-hour format.
00-59
Enter minutes.
#
To confirm.
For example, to start the night-time
settings at 6pm:
72#1800#.
Your Ultimate 106 announces
“Night mode start 6pm.”
In program mode.
72
##
Enter this code.
Replace the handset back on the cradle.
In program mode.
From your master phone, you can stop
specific extensions from ringing.
1
Enter this code.
Ext
Enter the number of the individual
extension you want (
1-6).
#
To confirm.
4
Enter 4 to disable night mode ringing.
Replace the handset back on the cradle.
In program mode.
71
#
Enter this code.
00-23
Enter hour and minutes in 24-hour
format.
#
To confirm.
For example, to start the day-time
setting at 8.30am: 71
#
0830#.
Your Ultimate 106 announces
“Day mode start 8:30 a.m.”
Replace the handset back on the cradle.
To set when day-time ringing starts
To stop extensions ringing during
the night
To set when night-time ringing starts
To stop day-time ringing from
automatically switching on
13
Ultimate 106 – Edition 1 – Issue 3 - 18.12.02 – 5129
To stop night-time ringing from
automatically switching on
PLEASE NOTE
If you are in day or night mode, and you wish to
change mode before the preset time, follow these
instructions: (whilst in normal mode)
To switch from night to day mode: 83
#
To switch from day to night mode: 84
#
This will not alter the preset mode permanently.
Page 16

Call barring
You can stop calls, such as international or
premium rate, being made from an extension.
Press keypad buttons in order shown
In program mode.
4
Enter this code to start call barring.
Ext
Enter the extension number you want
to bar calls from (1 = 11, 2 = 12 etc.)
#
To confirm.
Now choose the type of barring:
0
No restrictions; all calls allowed.
1
Allows speed dial numbers, 999, 112
and 144, numbers not beginning with
0 or 1.
2
Allows speed dial numbers only, 999,
112 and 144.
3
Allows 999, 112 and 144 only.
Your Ultimate 106 announces, for
example:
“Extension 12 barring is
level 3”
Replace the handset back on the cradle.
14
Ultimate 106 – Edition 1 – Issue 3 - 18.12.02 – 5129
1
To set a hotline numberTo set a hotline number
Creating a hotline number
You can designate an extension telephone as
a hotline. This means the telephone will
automatically dial a pre-set number whenever
the receiver is lifted. A hotline number overrides
any call-barring restrictions that have been set.
For example, if the Ultimate 106 is installed in a
bar, one extension can be set to dial a local taxi
service. At home, you may want to provide
children with a phone that will automatically call
your work number.
In program mode.
5
Enter code.
Ext
Enter extension you want as a hotline
(
2-6). (Extension 1 cannot be used as
a hotline.)
#
1
To confirm.
Your Ultimate 106 announces, for
example:
“Extension 12 is set for hotline”.
The hotline number that will be dialled
must be stored as a speed dial number,
location 50, see page 29 of this user
guide to store speed dial numbers.
To set call barring
PLEASE NOTE
The following numbers can always be dialled,
whatever level of call barring you set:
999, 112, 144 emergency services and
Chargecard calls.
Page 17

In program mode.
5
Enter this code.
Ext
Enter the extension number (2-6) you
have as a hotline.
#
Enter this code.
6
To confirm.
Replace the handset back on the cradle.
Connecting a payphone
You can connect a private payphone as one
of your extensions to the Ultimate 106. None of
the Ultimate 106’s features are available to a
payphone extension, it simply behaves as a
standard telephone line. If you hear an engaged
tone when the receiver is lifted, it means
another extension is using the line. This option
is also used. Note that only one extension can be
set as a payphone extension.
It is possible to accept incoming calls at a
payphone extension and to use normal call
transfer functions (using
RECALL).
To cancel the hotline number
PLEASE NOTE
The hotline number is dialled immediately
after the handset is lifted. You can still answer
incoming calls on a hotline extension and you
can transfer calls (using the
RECALL) button.
There is no voicemail from this extension.
15
Ultimate 106 – Edition 1 – Issue 3 - 18.12.02 – 5129
In program mode.
5
Enter this code.
Ext
Enter the extension number you want
to set as a payphone (
2-6).
#
To confirm.
2
Enter 2 to set as payphone mode.
Your Ultimate 106 announces, for
example:
“Extension 12 is set for payphone”
Replace the handset back on the cradle.
In program mode.
5
Enter this code.
Ext
Enter the payphone extension number
(
2-6).
#
6
To confirm.
Your Ultimate 106 announces
“Extension 12 is set for normal”.
Replace the handset back on the cradle.
PLEASE NOTE
For a payphone extension:
• You do not need to dial
9 to get an outside line.
• A voicemail box cannot be assigned to a
payphone extension.
To cancel a payphone extension
To set a payphone as an extension
Page 18

16
Ultimate 106 – Edition 1 – Issue 3 - 18.12.02 – 5129
To cancel a fax extension
PLEASE NOTE
A voicemail box cannot be assigned
to a fax extension.
Connecting a fax machine
You can set a fax machine as one of your
extensions. This also enables incoming fax calls to
be recognised automatically, using either the BT
Call Sign service or the Ultimate 106 Call Director.
In program mode.
5
Ext
Enter the Fax extension number (2-6).
#
6
Your Ultimate 106 announces “Extension
12 is set to normal”.
5
Enter this code.
Ext
Enter the extension number you
want to set as a fax machine (
2-6).
#
To confirm.
3
To set automatic fax tone sensing when
the Call Director mode is switched on.
This sends incoming fax calls direct to
the fax machine when the fax tone is
detected. Your Ultimate 106 announces,
for example:
“Extension 12 is set for fax”.
Or
4
To set automatic recognition of incoming
calls when you are subscribing to BT
Call Sign service. Incoming calls with
the distinctive ring will be diverted to
this extension. Ringing at other
extensions is delayed for two rings and
therefore other extensions will not ring
at all for incoming calls with the
distinctive ring. Your Ultimate 106
announces, for example:
“Extension 12
Call Sign on, delay on”.
Or
5 To set automatic recognition of
incoming calls when you are subscribing
to BT Call Sign service. Ringing at all
extensions starts immediately but will
stop if the distinctive ring is detected,
in that case only this extension will
continue to ring, Your Ultimate 106
announces, for example:
“Extension 12
Call Sign on, delay off”.
Please note that you may need to set
your fax machine to automatic, or add a
ring delay to this extension.
In program mode.
5
Ext
Enter the Fax extension number (2-6).
#
6
Your Ultimate 106 announces “Extension
12 is set to normal”.
Resetting the system
If you wish to de-program all you have set and
return your Ultimate 106 to the default settings,
you will need to re-set the system.
A reset will clear all the settings you have made.
It will also reset the memory and clear all the
voice messages, outgoing messages and speed
dial numbers.
To set a fax machine as an
extension
Page 19

choice. By recording a looped tape you can also
play a message for your callers which will
continually repeat.
In program mode.
81
#
Enter this code. Callers put on hold will
automatically hear the pre-set tune.
In program mode.
82
#
Enter this code.
Remove any jackplug from the music
on hold socket.
In program mode.
Plug your CD or cassette tape player
jackplug into the music on-hold socket.
Set your CD or cassette player to
PLAY.
82
#
Enter this code. Callers put on hold will
be played the music or message.
You can stop external music on-hold by
removing the jackplug from the music
on-hold socket.
To play the pre-set music on hold
tune (default setting)
To disable the pre-set tune
To reset all except speed dial names
and numbers, OGMs and voicemail
messages
17
Ultimate 106 – Edition 1 – Issue 3 - 18.12.02 – 5129
To play your own choice of music
or message
Switch to program mode.
91
#
1
✱
0✱6
✱ Enter this code.
#
To confirm. The Ultimate 106 will
announce:
“System reset”.
Set switch back to normal mode.
Hang up handset and wait 30 seconds
until IN USE light goes out.
Do NOT switch off power until IN USE
light goes out.
This resets the system completely and
clears all settings.
In program mode.
92
#
1
✱
0✱6
✱ Enter this code.
#
To confirm.
Playing music to callers on hold
You can play music to callers who are put on
hold while waiting to be connected to one of the
extensions.
Your Ultimate 106 lets you choose between
playing a pre-set tune or connecting a CD or
cassette player to play the music of your
To reset the system
IMPORTANT
After you have programmed your system
settings you must set the program switch
to NORMAL.
Page 20

18
Ultimate 106 – Edition 1 – Issue 3 - 18.12.02 – 5129
Setting up the Answering
Machine and Call Director
The Ultimate 106 is equipped with a digital
recording system, which allows callers to leave
messages. The system can work in one of
2 modes, Answering Machine or Call Director.
Between the 2 modes, you have complete
control over your voice mail. You can switch
between Answering Machine and Call Director
mode at any time (provided there are no
messages in the system).
Answering Machine
Your Ultimate 106 acts just like a normal
answering machine to take calls, play your
outgoing message (OGM) and record incoming
messages. If you subscribe to BT’s Caller
Display service, the system automatically stores
information about the call. (See Caller
Identification, page 31.) The answering machine
can be operated from any extension or remotely
from an outside phone.
Call Director
Your Ultimate 106 enables callers to ring specific
extensions only and leave a message if the
extension does not answer.
Your outgoing message should include a list of
the extension numbers. When the caller dials an
extension number, they are put through to that
extension only. If fax tones are heard, the Call
Director automatically sends the call to the fax
machine (if one is connected). If the caller does
not select a specific extension, then the Call
Director will ring all the extensions (or those that
have been set to ring during the day or night.
For day-time/night-time ringing, see pages 11-13).
If the extension called does not answer, the
voice mail system will ask the caller to record a
message.
“Sorry, extension is unavailable,
please record a message after the tone.”
The message is then stored in the voice mailbox
for that extension only. This helps keep messages
separate and saves other users from having to
listen to messages that are not intended for them.
Please note that if a caller does not choose an
extension then they will not be able to leave a
message.
To set-up Answering Machine
Press keypad buttons in order shown
Set the Normal/Program switch to
PROGRAM.
From extension 11 only.
84
#
Enter this code, your Ultimate 106
announces
“Answering machine is set”.
Replace handset and set the Normal/
Program switch to
NORMAL.
To select answering machine mode
Page 21

19
Ultimate 106 – Edition 1 – Issue 3 - 18.12.02 – 5129
In normal mode.
36
#
Enter this code, your Ultimate 106
announces
“Please record your outgoing
message after the tone”.
Example of OGM
“Hello. I’m sorry we can’t take your
call at the moment, but if you leave
a message we’ll call you back. Please
speak after the tone”.
#
To stop recording. The Ultimate 106
replays your OGM, and then announces:
“Press square to confirm”.
#
To save your OGM or hang-up to abort
without saving the message.
In normal mode.
36
#
Enter this code, your Ultimate 106
announces
“Please record your outgoing
message after the tone”.
✱ Press while the voice is announcing this
message, and your outgoing message
will be replayed.
To replay your outgoing message
To record an outgoing message
(OGM)
To turn answering machine on, from
any extension
Set Normal/Program switch to
PROGRAM.
From extension 11 only.
6
Enter this code.
3
#
Toll saver (answers after 6 rings if
there are no new messages in mailbox 1,
after 2 rings if there are new messages
in mailbox 1). Your Ultimate 106
announces:
“Answering delay is set”.
Or
4
#
2 rings. Your Ultimate 106 announces:
“Answering delay is two rings”.
Or
5
#
6 rings. Your Ultimate 106 announces:
“Answering delay is six rings”.
Or
6
#
9 rings. Your Ultimate 106 announces:
“Answering delay is nine rings”.
When in normal mode.
86
#
Enter this code, your Ultimate 106
announces
“Answering machine is on”.
When in normal mode.
87
#
Enter this code, your Ultimate 106
announces
“Answering machine is off”.
To set the ring delay for Answer
Machine/Call Director
To turn answering machine of f, from
any extension
Page 22

20
Ultimate 106 – Edition 1 – Issue 3 - 18.12.02 – 5129
To turn Call Director ON, from any
extension
When in normal mode.
From the extension you wish to switch
on voicemail:
81
#
Enter this code to switch your extension
voicemail on.
When in normal mode.
86
#
Enter this code, your Ultimate 106
announces
“Call Director is on”.
When in normal mode.
87
#
Enter this code, your Ultimate 106
announces
“Call Director is off”.
To switch individual extension
mailboxes on
To turn Call Director OFF, from any
extension
Press keypad buttons in order shown
In normal mode.
36
#
Enter this code.
0
Enter 0.
To set up Call Director
Set the Normal/Program switch to
PROGRAM.
From extension 11 only.
83
#
Enter this code, your Ultimate 106
announces
“Call Director is set”.
Hang up.
Set the Normal/Program switch to
NORMAL.
If you wish callers to be directed straight
to the Call Director OGM without
ringing any of your extensions, first a
ring delay of 2 must be set on each
extension. Please see page 11 and 19.
To delete your outgoing message and
use the system default OGM
To select Call Director mode
IMPORTANT
You cannot switch between Call Director and
Answering Machine modes if there are any
messages stored in the system. You must delete
any messages before switching (see page 23).
Page 23

21
Ultimate 106 – Edition 1 – Issue 3 - 18.12.02 – 5129
Example of home/business message:
“Thank you for calling Holmes
Newsagents. If your call is for the shop
please press 11; if your call is personal
please press 12. Otherwise please hold
and your call will be connected.”
When in normal mode.
37
#
Enter this code, your Ultimate 106
announces
“Please record your call
director message after the tone”.
✱ Press while your Ultimate 106 is
announcing this message, and your call
director outgoing message will be
replayed.
When in normal mode.
37
#
Enter this code.
0
Enter 0.
When in normal mode.
37
#
Enter this code from any extension,
your Ultimate 106 announces
“Please
record your call director message
after the tone”.
Speak your Call Director OGM.
#
To stop recording.
The Ultimate 106 replays your OGM
then your Ultimate 106 announces
“Press square to confirm”.
#
To save your call director OGM or
hang-up to abort without saving the
message.
At home:
“Hello welcome to the Smith’s; for Alan
dial 11, for Jane dial 12, for Peter dial 13
for Sarah dial 14, for Mike dial 15, to be
connected to the fax machine dial 16; or
just wait for a moment until someone
answers.”
At work:
“Thank you for calling The Grand
Restaurant. To make a reservation dial 11; to
speak to someone in the kitchen dial 12;
to speak to someone in the bar dial 13;
for administration or accounts dial 14;
and to send a fax dial 15. Otherwise please
hold and your call will be connected.”
To record a Call Director OGM
Call Director, example OGMs
To replay the Call Director OGM
To delete your Call Director OGM
and use the system default OGM
Page 24

For example, a message might be:
“Message from 0161 743 9660 on Monday
17th January. ‘Hi this is David, I can’t make
it tonight but call me when you get in.’”
Playing back your messages
Your Ultimate 106 has a total capacity of up to
96 messages (standard voice recording) or 49
minutes recording time approximately, whichever
is reached first. If the recording memor y
becomes full, new messages will not be recorded
and you must delete old messages. Note that the
speed dial numbers and outgoing messages are
stored as messages and therefore also use up
the message number limit and time limit.
In program mode.
61
#
For standard quality (max. 49 minutes
recording time). Silence detection is
on so that silences in the call are not
recorded, giving longer time.
62
#
For high quality (max. 21 minutes
recording time). Silence detection is
off so all of the call is recorded.
22
Ultimate 106 – Edition 1 – Issue 3 - 18.12.02 – 5129
To set recording quality for playing
back your messages
PLEASE NOTE
If record quality is set to HI, there will only be
approximately 21 minutes remaining.
Press keypad buttons in order shown
35
#
Enter this code. Speak your new OGM
into the handset at the extension phone.
#
To end recording. Your message is
played back. Ultimate 106 announces:
“Push square to confirm”.
#
To save.
35
#
✱
Enter this code to replay your
extension OGM.
35#0
Enter this code to delete your
extension OGM.
Your messages
If a caller does not leave a message but you have
Caller Identification, you will hear the Caller ID
information and the date and time the message
was received.
As well as recording a message, your Ultimate
106 adds the following information, so when you
play a message back, you will hear in this order:
• Number
• Day or week.
• Date.
• Time.
• Message.
To record an extension mailbox OGM
To replay or delete an extension
mailbox OGM
Page 25

23
Ultimate 106 – Edition 1 – Issue 3 - 18.12.02 – 5129
At the end of your message, the voice
announces
“End of message, press 1
to replay the messages”.
1
Press 1 to replay or hang-up to exit.
Accessing the Answering
Machine or Call Director from
another telephone
You can call your Ultimate 106 from an outside
telephone to operate the answering machine or to
access messages in your individual Call Director
voice mailbox.
You need a 4-digit PIN number to access the
Answering Machine.
In program mode.
31
#
Enter this code using extension 11..
KEYPAD
Enter a 4 digit PIN code of your choice
(exclude
✱
,# keys).
#
To confirm.
34
#
Enter this code.
Your Ultimate 106 announces
“Please
hold the line, you have 30 minutes of
record time remaining”.
If new messages have been received,
when you lift any handset the dialtone
changes to a higher pitch. The LED on
the Ultimate 106 will also be illuminated.
7
Press 7 to play your messages. If you
have no messages your Ultimate 106 will
announce
“No messages”, otherwise it
will announce
“You have X messages”
the message will then be played.
During message playback:
90
To delete the current message.
91
To go back to the previous message.
92
To repeat the current message.
93
To skip to the next message.
95
To dial the number that the call came
from (only if Caller Display is activated
and number available).
96
To speak the number (or name) that
the call came from (only if Caller Display
is activated).
9
#
To skip to the end of “Time/date
announcement”
and go straight to the
message.
To hear how much recording time
is remaining
To program your PIN
To replay Answering Machine or
Call Director voice-mail messages
PLEASE NOTE
The above menu selections must be pressed during
playback at a message in order to activate the
function.
Page 26

24
Ultimate 106 – Edition 1 – Issue 3 - 18.12.02 – 5129
To operate your Answering Machine
from another telephone
Press keypad buttons in order shown
Your Ultimate 106 must be set to
answering machine mode. See page 18.
KEYPAD
Dial your number and wait for the
answering machine to take your call.
✱ During the outgoing message.
KEYPAD
Enter your PIN.
You may now use the following options:
7
Press 7 to play back the messages.
90
To delete the current message.
91
To go back to the previous message.
92
To repeat the current message.
93
To skip to the next message.
96
To speak the number that the call came
from (only if Caller Display is activated).
Your Ultimate 106 must be set to Call
Director mode. See page 20.
KEYPAD
Dial your number and wait for your
Ultimate 106 to answer.
KEYPAD
Enter your 2-digit extension number
during the outgoing call director
message.
Wait for your voicemail OGM.
✱ When your voicemail OGM is being
played.
KEYPAD
Enter your 4 digit PIN followed by #.
You may now use the following options:
7
Press 7 to play back the messages.
90
To delete the current message.
91
To go back to the previous message.
92
To repeat the current message.
93
To skip to the next message.
96
To speak the number that the call came
from (only if Caller Display is activated).
To operate your Call Director voice
mailbox from another telephone
Page 27

25
Ultimate 106 – Edition 1 – Issue 3 - 18.12.02 – 5129
You can redial the last number dialled
on your line (not necessarily your
extension).
Lift the handset.
✱
00
There will be a short pause before the
number is dialled.
Pick up the extension handset and speak.
Pick up the handset.
2
Press 2 to speak to the caller.
To answer a call ringing at another
extension
Using your phone extensions
Making and receiving calls
To make internal calls
You can use your system to make internal calls
simply by dialling the 2-digit extension number
you want. You can also make all other extensions
ring, and speak to the first person to answer.
Lift the handset and dial the relevant extension
number:
10 Rings all extensions.
11 Rings extension 1.
12 Rings extension 2.
13 Rings extension 3.
14 Rings extension 4.
15 Rings extension 5.
16 Rings extension 6.
17 Rings the door intercom (if installed).
18 Rings the door intercom and opens the door
(if installed).
19 Announces the time.
Lift the handset of any extension phone:
9
To get the dialling tone.
KEYPAD
Dial the number you want.
To make an external call
To redial a number
To answer a call
PLEASE NOTE
This will be the last number dialled from
ANY extension – not necessarily this one.
Page 28

26
Ultimate 106 – Edition 1 – Issue 3 - 18.12.02 – 5129
You can hold a 3-way conversation
between 2-extensions and one
external caller.
During an external call:
RECALL
To put the caller on hold.
Ext
Enter the 2-digit number for the
extension you want (11-16).
RECALL
When the extension answers.
You can now talk to both callers at the
same time.
You can forward calls from one
extension to another.
Lift the handset of the extension you
want calls forwarded from:
4
Ext
Enter the number of the extension to
which you want your calls forwarded
(
1-6).
#
To confirm.
When the handset is picked up, the
voice announces
“Extension divert
is set”.
Press keypad buttons in order shown
An external call may be placed on hold
while you do something else. You can
set your Ultimate 106 to play music or
a message automatically to callers on
hold (see page 17). Your caller will not
be able to hear you until you take the
call off hold.
RECALL
The caller is put on hold.
RECALL
To speak to your caller again.
You can transfer an external call to any
other extension in your system.
RECALL
The caller is put on hold.
Ext
Enter the extension number you want.
11 to 16. When the called extension
answers, you can communicate with
them.
Hang up to transfer the call.
To put a call on hold
To forward calls to another extension
To hold a 3-way call
To transfer a call between extensions
QUICK TRANSFER
To transfer a call without talking to the other
extension, press the Recall button, the extension
number and then hang up.
If there is no answer from the extension you
dialled within 30 seconds, the caller will be
returned to your extension which will ring.
Page 29

27
Ultimate 106 – Edition 1 – Issue 3 - 18.12.02 – 5129
4✱#
Enter this code. The Ultimate 106
announces:
“Extension divert is off”.
If you do not wish to receive any calls
on your extension, lift the handset:
40
#
Enter this code. The Ultimate 106
announces:
“Extension do not disturb
is set”.
If the extension handset is picked up,
the dialtone will be slightly broken to
confirm
“Do not disturb is set”.
4✱#
Enter this code. The Ultimate 106
announces:
“Extension do not disturb
is off”.
If you wish to hear the current time
from any extension:
19
Enter this code.
To cancel call forwarding
To set “Do not disturb”
To cancel “Do not disturb”
You can set an extension to ring at a
specific time during the next 24 hours:
85
#
Enter this code.
KEYPAD
Enter the hours then the minutes using
the 24-hour clock to set the alarm call
time. For example, to set 8:30 am,
enter 0830.
#
To repeat daily.
Or
✱ To confirm. To sound only once.
. The voice announces
“Alarm on. 8:30 am”.
When the alarm call is due, the extension
rings for 30 seconds. If answered, the
voice announces
“This is your Alarm
call. The time is now 8.30 am”. One
alarm call per extension (within 24 hrs).
This must be set at the extension to
which you wish the wake-up call to ring.
85
##
Enter this code at the appropriate
extension. The voice announces
“Alarm cleared”.
To set an alarm call
To cancel an alarm call
To hear a time announcement
Page 30

28
Ultimate 106 – Edition 1 – Issue 3 - 18.12.02 – 5129
Using Ringback
You can set your Ultimate 106 to tell you when
engaged extensions or telephone numbers are
free again.
Your Ultimate 106 can be set to call you
back when an engaged extension or
external line you have dialled becomes
free again.
Before replacing the handset:
RECALL
5
Replace the handset. When the extension
becomes available, your handset will ring
for 30 seconds. When you pick up the
handset, the voice announces:
“Ringback Extension X” or “Ringback
external line”. Then the extension you
are calling rings. Automatic extension
Ringback does not apply to the
doorphone.
Using your Ultimate 106 as
a Room Monitor
You can use extensions on your Ultimate 106 to
monitor sounds.
Press keypad buttons in order shown
To hear the sounds close to an
extension:
Lift the receiver.
80
#
Enter this code on the extension phone
and leave the receiver off hook.
When that extension is dialled from
any other extension, you can hear the
sounds at the off-hook extension instead
of an engaged tone.
To set the Room Monitor
To set automatic internal Ringback
By using speakerphones as extensions,
it is possible for 2-way communication
between the extension on Room Monitor and
another extension.
PLEASE NOTE
If you lift the handset while waiting for
Ringback, the internal Ringback request
is cancelled.
Page 31

Using the speed dial memory
Up to 50 names and numbers may be stored in
the system.
6
Enter this code.
The voice announces
“Record name”.
Speak the name to go with the number
into the handset.
After 3 seconds the voice announces
“Enter 2 digit location and number”
(to shorten the length of the recorded
RECALL
name, press RECALL while recording).
01-50
Enter the 2-digit memory location under
which you want to store the number.
(Select from
01 to 50).
KEYPAD
Enter the telephone number you want.
(It is not necessary to insert
9 for an
outside line when storing Speed Dial
numbers.)
Hang up your extension.
A maximum of 30 digits can be stored.
If 30 digits are entered, you will hear a
beep and the number is stored. Hang
up to finish.
Location 50 is reserved for a hotline
extension number.
Location 49 is reserved for the door
intercom
“Ring a telephone number”
mode. This will enable visitors to be
directed to another number (stored in
location 49) when pressing the door
intercom button.
29
Ultimate 106 – Edition 1 – Issue 3 - 18.12.02 – 5129
With the BT Ringback service, when an
engaged telephone becomes free again,
you are called back.
This is a BT Network Service and is
chargeable. Please contact BT for more
details.
When you hear the engaged signal:
5
Press 5.
Replace the receiver. When the network
rings back, all extensions will ring.
When you lift the handset, the call is
connected.
9
Enter this code from any extension.
#37#
To use the BT Ringback service
To cancel a BT network Ringback
PLEASE NOTE
If you have set Answer Machine, the Ringback
will continue to ring all extensions. It will not
be answered by the Answer Machine.
To store a name and number
Page 32

Press keypad buttons in order shown
Proceed as if storing a name and number.
RECALL
Press RECALL instead of the telephone
number to store the last dialled number.
You will hear a beep and the number is
stored. Hang up to finish.
Lift the handset.
✱ Enter this code.
01-50
Enter the 2-digit location for the speed
dial number you want. The recorded
name is announced and the number is
dialled.
If the external line is busy, you will hear
an engaged tone.
30
Ultimate 106 – Edition 1 – Issue 3 - 18.12.02 – 5129
To dial a speed dial number
To store the last dialled call as a
speed dial number
PLEASE NOTE
If you replace the receiver at any time during
a procedure, the procedure will be cancelled.
PLEASE NOTE
It is not possible to store numbers in the
speed dial memory from extensions which have
call barring set.
Page 33

31
Ultimate 106 – Edition 1 – Issue 3 - 18.12.02 – 5129
To make the most of your Ultimate 106, we
recommend you subscribe to the following BT
Select Services:
Caller Display – Lets you know who’s calling
before you answer, and provides additional
information about each call.
Call Sign – Gives you a second number to
allocate to a specific extension – such as a fax
machine – without needing a second line.
Call Waiting – Lets you know when someone
else is trying to get through, even when you’re
already on the phone. During a call, you hear
beeps to indicate that another person is ringing
your number.
Save with BT’s Value Plan
All 3 services are subscription based. Ask about
BT’s value plan, which delivers a range of
services for a special combined price. Call BT on
Freefone 0800 800 150.
Using Caller Identification
With Caller Identification, your Ultimate 106
gives you information about each call.
“VOICE ANNOUNCEMENTS”
The voice announces information received from
the Caller Identification service. If no speed dial
name is matched to the number, the number will
be announced including the national dialling
codes.
If the Caller ID service was unable to identify
the number, one of the following
announcements will be used:
“INTERNATIONAL” the call received was from
outside the UK.
“UNAVAILABLE” The caller’s exchange/network
does not offer a Caller Display Service.
“WITHHELD” The caller has stopped their
number from being sent. If you decide not to
take this call, it is diverted to the Answer
Machine/Call Director immediately.
“NETWORK RINGBACK” This a Ringback call.
Wait until you are connected.
“INVALID” If your Ultimate 106 does not
recognise the information contained within the
caller display message. It will announce
“No
number” rather than announce a message which
could contain errors. It does not mean there is a
fault with your Ultimate 106.
Using BT Select Services
PLEASE NOTE
Ultimate 106 provides “Talking Caller ID”.
It does not display Caller ID or pass Caller ID
information on to its extensions for display.
Page 34

32
Ultimate 106 – Edition 1 – Issue 3 - 18.12.02 – 5129
Press keypad buttons in order shown
You must select the level of Caller
Display functions you receive at each
extension.
Lift the handset at the extension you
wish.
8
Enter this code.
1
Switches Caller Display
announcements off.
Or
2
For announcements that indicate
withheld or unavailable numbers.
Or
3
For announcements that give a name
linked to a number stored in the speed
dial directory, as well as any withheld
or unavailable numbers.
Or
4
For Caller Identification announcements
on all incoming calls. If no name is
linked to the number, the number will be
announced in full, including the national
and international dialling codes.
✱ To confirm.
To set the Caller Identification options
at each extension
#
Enter this digit. The Ultimate 106 will
announce the last calling number.
3
Enter this digit. The Ultimate 106 will
announce chronologically later
numbers.
or
Or
1
Enter this digit. The Ultimate 106 will
announce chronologically earlier
numbers.
When you pick up the handset the
number is announced to you.
To take the call, press Recall or wait.
To ignore a call, hang up. All phones
will start to ring again. If Call Director
or answer machine in ON, they will
pick up after the programmed number
of rings.
To review calling numbers
To screen incoming calls using
Caller Identification
Page 35

33
Ultimate 106 – Edition 1 – Issue 3 - 18.12.02 – 5129
BT’s Call Waiting service
During a call, if you hear the call waiting
beeps:
RECALL
0
To place the first caller on hold and
speak to the new caller. Alternatively,
hang up to end the first call and your
extension will ring (if it is programmed
to do so). Lift the receiver and speak to
your new caller.
When one caller is on hold, and you
are speaking to the second caller, you
can switch back and forth between
both calls.
RECALL
0
To use BT’s Call Waiting service
To switch between 2 callers
Page 36

34
Ultimate 106 – Edition 1 – Issue 3 - 18.12.02 – 5129
Maintenance
General
Simply clean the Ultimate 106 with a damp cloth
(not wet) or an antistatic wipe.
Service
Within guarantee
If you experience a problem with your Ultimate
106, you should contact the Ultimate 106
Helpline on 0845-3300042. Calls are charged
at local call rates. If the problem is not
remedied, you will be advised to contact your
original point of purchase.
Some retailers offer extended warranty schemes
for cover outside the initial 12-month period.
Please ask them for details.
Outside warranty
If your Ultimate 106 needs repair after the
warranty period has ended, call the Ultimate 106
Helpline on 0845-3300042 for information on
our recommended repair agents.
If you have to return your Ultimate 106
Pack the unit securely, preferably in the original
packaging with the telephone line cord and
mains power cable. We cannot take
responsibility for goods damaged in transit.
Page 37

35
Ultimate 106 – Edition 1 – Issue 3 - 18.12.02 – 5129
Wall mounting
Your Ultimate 106 can be wall mounted using
the screws and wall plugs provided. Use the wall
mounting template (enclosed on a separate
sheet from this user guide) as a guide for the
drill holes.
Before you wall mount your Ultimate 106, check
that:
• It is close to the master telephone socket and
a mains power socket.
• It is in a convenient position from which to run
the cabling from your extensions.
• The wall can suppor t the weight of the
apparatus.
• You have easy access to the Ultimate 106 and
can easily take off the lower case cover when
you need to program this system.
1 Using a pencil, mark the place on the wall
where you wish to place the screws 191 mm
apart.
2 Drill 2 holes suitable for the screws and wall
plugs supplied.
3 Drive the screws into the wall, leaving about
5 mm free on which to hang the Ultimate 106.
4 Remember to leave sufficient space below
the Ultimate 106 to give access to the wiring
entry slots and at least 15mm above to allow
the Ultimate 106 to be hooked on to the
mounting screws.
To wall mount the Ultimate 106
base unit
WALL
WALL PLUG
SCREW
WALL PLUG
SCREW
191 mm
Page 38

36
Ultimate 106 – Edition 1 – Issue 3 - 18.12.02 – 5129
Help
For the latest information on the Ultimate 106,
please see www.ultimate106.com
If you are still experiencing difficulty, call the
Ultimate Helpline on 0845-3300042.
Feature code does not perform the function
you would expect.
Are you in the correct programming mode i.e.
program/normal.
When in programming mode, on picking up
the telephone handset you hear an engaged
tone and are unable to program anything.
You should be using extension 11 when
programming, any other extension will give the
above symptoms.
Unable to dial an external number.
Are you dialling 9 first, is there barring on the
extension, is the external line OK?
You are not receiving any incoming calls, the
in-use LED is on but no one is using any of
the extensions.
You have the system in program mode.
Page 39

37
Ultimate 106 – Edition 1 – Issue 3 - 18.12.02 – 5129
Technical information
RTTE
Hereby Promotion & Display Technology Ltd. declares that this
Ultimate 106 is in compliance with the essential requirements and other
relevant provisions of Directive 1999/5/EC.
The Declaration of Conformance for the Ultimate 106 is published on the
Website: http.//www.pdtuk.com/archive/certificates/ultimate/default.htm
Installation information
The Ultimate 106 connects to one exchange line and six (2 wire)
telephone extensions.
Signalling
DTMF.
Pulse dialling (typical 10 pps).
RECALL to external line – duration: 100ms.
type: timed break.
RECALL detection from extension – duration: 85ms to 200ms,
type: timed break.
REN
REN of the Ultimate 106 is 4.
Maximum REN per extension is 2.
Environmental conditions
Temperature range: (storage) –10C to 60C, (operating) 0C to 55C.
Humidity range: (storage) 65%, (operating) 60% maximum.
Ring cadences
Internal: 1s ON, 2s OFF.
External: 0.4s ON, 0.2s OFF, 0.4s ON, 2s OFF.
Door-phone: 0.5s ON, 2.5s OFF.
Alarm call: 0.5s ON, 0.3s OFF, 0.2s ON, 2s OFF.
Internal Ring-back: 0.2s ON, 0.2s OFF, 0.2s ON, 0.2s OFF, 0.2s ON, 2s OFF.
External Ring-back: 0.5s ON, 0.3s OFF, 0.2s ON, 2s OFF.
Power Supply (internal)
Power supply 220-240V AC 50/60Hz.
Power consumption 45W.
Weight
Weight 1.5kg.
Dimensions (approx.)
Height: 200mm. Width: 295mm. Depth: 48mm (52mm from wall).
Page 40

38
Ultimate 106 – Edition 1 – Issue 3 - 18.12.02 – 5129
Code Description After power fail After soft reset After hard reset
(92#1*0*6*#) (91#1*0*6*#) and
factory default
83# or Switch to day mode/ Day mode Day mode Day mode
84# night mode
86# or Answer machine (or On On On
87# Call Director) on/off
4?# Call for warding/Do Off Off Off
Not Disturb
85?? Alarm call No alarm call set No alarm call set No alarm call set
*01 to Speed dial numbers Unchanged Unchanged No speed dial
*50 numbers stored
Recorded Messages Unchanged Unchanged No messages
stored
OGM Unchanged Unchanged No messages
stored
8?* Caller display No No No
announcements announcements announcements announcements
81# or Extension mailbox Off Off Off
82# on/off
Ultimate 106 default settings
Normal mode
x = extension number
? = option code
Page 41

39
Ultimate 106 – Edition 1 – Issue 3 - 18.12.02 – 5129
Code Description After power fail After soft reset After hard reset
(92#1*0*6*#) (91#1*0*6*#) and
factory default
73# Time setting Midnight Midnight Midnight
74# Date setting 1st January 1st January 1st Januar y
1999 1999 1999
2x#?? Ring delay Unchanged No ring delay No ring delay
1x#? Day/night ringing Unchanged All extensions All extensions
select (on or off) ring ring
71#? Day mode start time Unchanged No automatic No automatic
day mode start day mode start
time time
72#? Night mode start time Unchanged No automatic No automatic
night mode night mode
start time start time
4x#? Extension call barring Unchanged No restrictions No restrictions
5x#? Extension setting (i.e. Unchanged Normal Normal
hotline/fax/payphone/
call sign/normal
81# or Internal/External music Unchanged Internal music Internal music
82# on hold
83# or Call Director mode/ Unchanged Unchanged Answer
84# Answer machine mode machine
61# or Recording quality Unchanged High quality High quality
62# normal/high
Answer machine rings Unchanged 2 rings 2rings
before answer
31#? PIN code Unchanged No PIN code No PIN code
(remote access (remote access
to messages not to messages not
possible) possible)
Global programming mode
x = extension number
? = option code
Page 42

40
Ultimate 106 – Edition 1 – Issue 3 - 18.12.02 – 5129
Index
Alarm call 27
Answer a call 25
from other ext. 25
Answer machine 18
delete messages 23
delete OGM 20
on/off 19
record OGM 19
remote access 23
replay OGM 19
ring delay 19
select 18
Cable clamp 8
Cable grip 6
Call barring 9,14
Call Director 18,20
default OGM 21
delete messages 23
delete OGM 21
example OGM 21
mailbox OGM 22
on/off 20
record OGM 21
remote access 23,24
replay OGM 21,24
select 20
Caller Display 18
Caller Identification 4,10,22,31
call screening 32
reviewing 32
setting 32
Call screening 32
Call Sign 4,31
Call Waiting 4,31,33
Cover 1,9
Day and night ringing 9,11-13
Default settings 38-39
Deleting messages 23
Direct line extension 9
Do not disturb 27
Door entry phone 1,4
Emergency numbers 2
Extensions
connecting
1,5,7
direct line 9
fax 9,16
installing 6
mailbox 20
making calls 25
master 5,6
numbers 5
payphone 15
ring delay 9,11
settings 9
sockets 6
External calls 25
Fax machine 9,16
Forward calls 26,27
Guarantee 34
Help 36
Helpline 4
Hotline 9,14-15
Page 43

41
Ultimate 106 – Edition 1 – Issue 3 - 18.12.02 – 5129
Insertion tool 6
Internal calls 25
International 31
Invalid 31
Lights,
answer machine
1
call director 1
day/night 1
indicator 1
in use 1,9
messages 1
power 1
Mailbox,
extension
20
OGM 22
remote access 24
Making calls 25
Memory
dial
29,30
name 29,30
store 29
Messages,
play back
22
recording quality 22
recording time 23
your 22
Music on hold 1,9,17
Network ringback 31
On hold 26
Out Going Message
Answer machine
19
Call Director 21
Payphone 15
PIN 23
Playing messages 22
Power 1,8,37
Program 9
switch 1
Recording messages 22-23
Redial 25
Remote access 23
Reset system 9,16-17
Returns 34
Ringback 28,29,31
Ring delay, extension 9,11
Room monitor 28
Safety 37
Select Services 31
Sockets, extension 6
Speed dial 29
Switch between callers 33
System settings 9,38
Telephone line 1,8
Time and date 9,10,27
Time announce 27
Transferring calls 26
Unavailable 31
Voice announcements 31
Voicemail 23
Wall Mounting 5,35
Withheld 31
3-way call 26
Page 44

Ultimate 106 – Edition 1 – Issue 3 - 18.12.02 – 5129
Offices worldwide
The telecommunications services described in this publication
are subject to availability and may be modified from time to time.
Services and equipment are provided subject to British
Telecommunications plc’s respective standard conditions of contract.
Nothing in this publication forms any part of any contract.
Touchtone™ is a registered trade mark of
British Telecommunications plc in the UK.
© British Telecommunications plc 2002.
Registered Office: 81 Newgate Street, London EC1A 7AJ.
Registered in England No. 1800000.
Printed in the China. Ultimate 106 Issue 3 (12/02) 1
Designed by The Art & Design Par tnership Limited.
Page 45

Ultimate 106 Wall Mounting Template
Use this template to mark the wall for the fixing screws to mount your
Ultimate 106.
Do not trim this sheet.
Remember to leave sufficient space below the Ultimate 106 to give access
to the wiring entry slots and at least 15mm above to allow the Ultimate 106
to be hooked on to the mounting screws.
Drill Points
 Loading...