

Page 1
10%
over
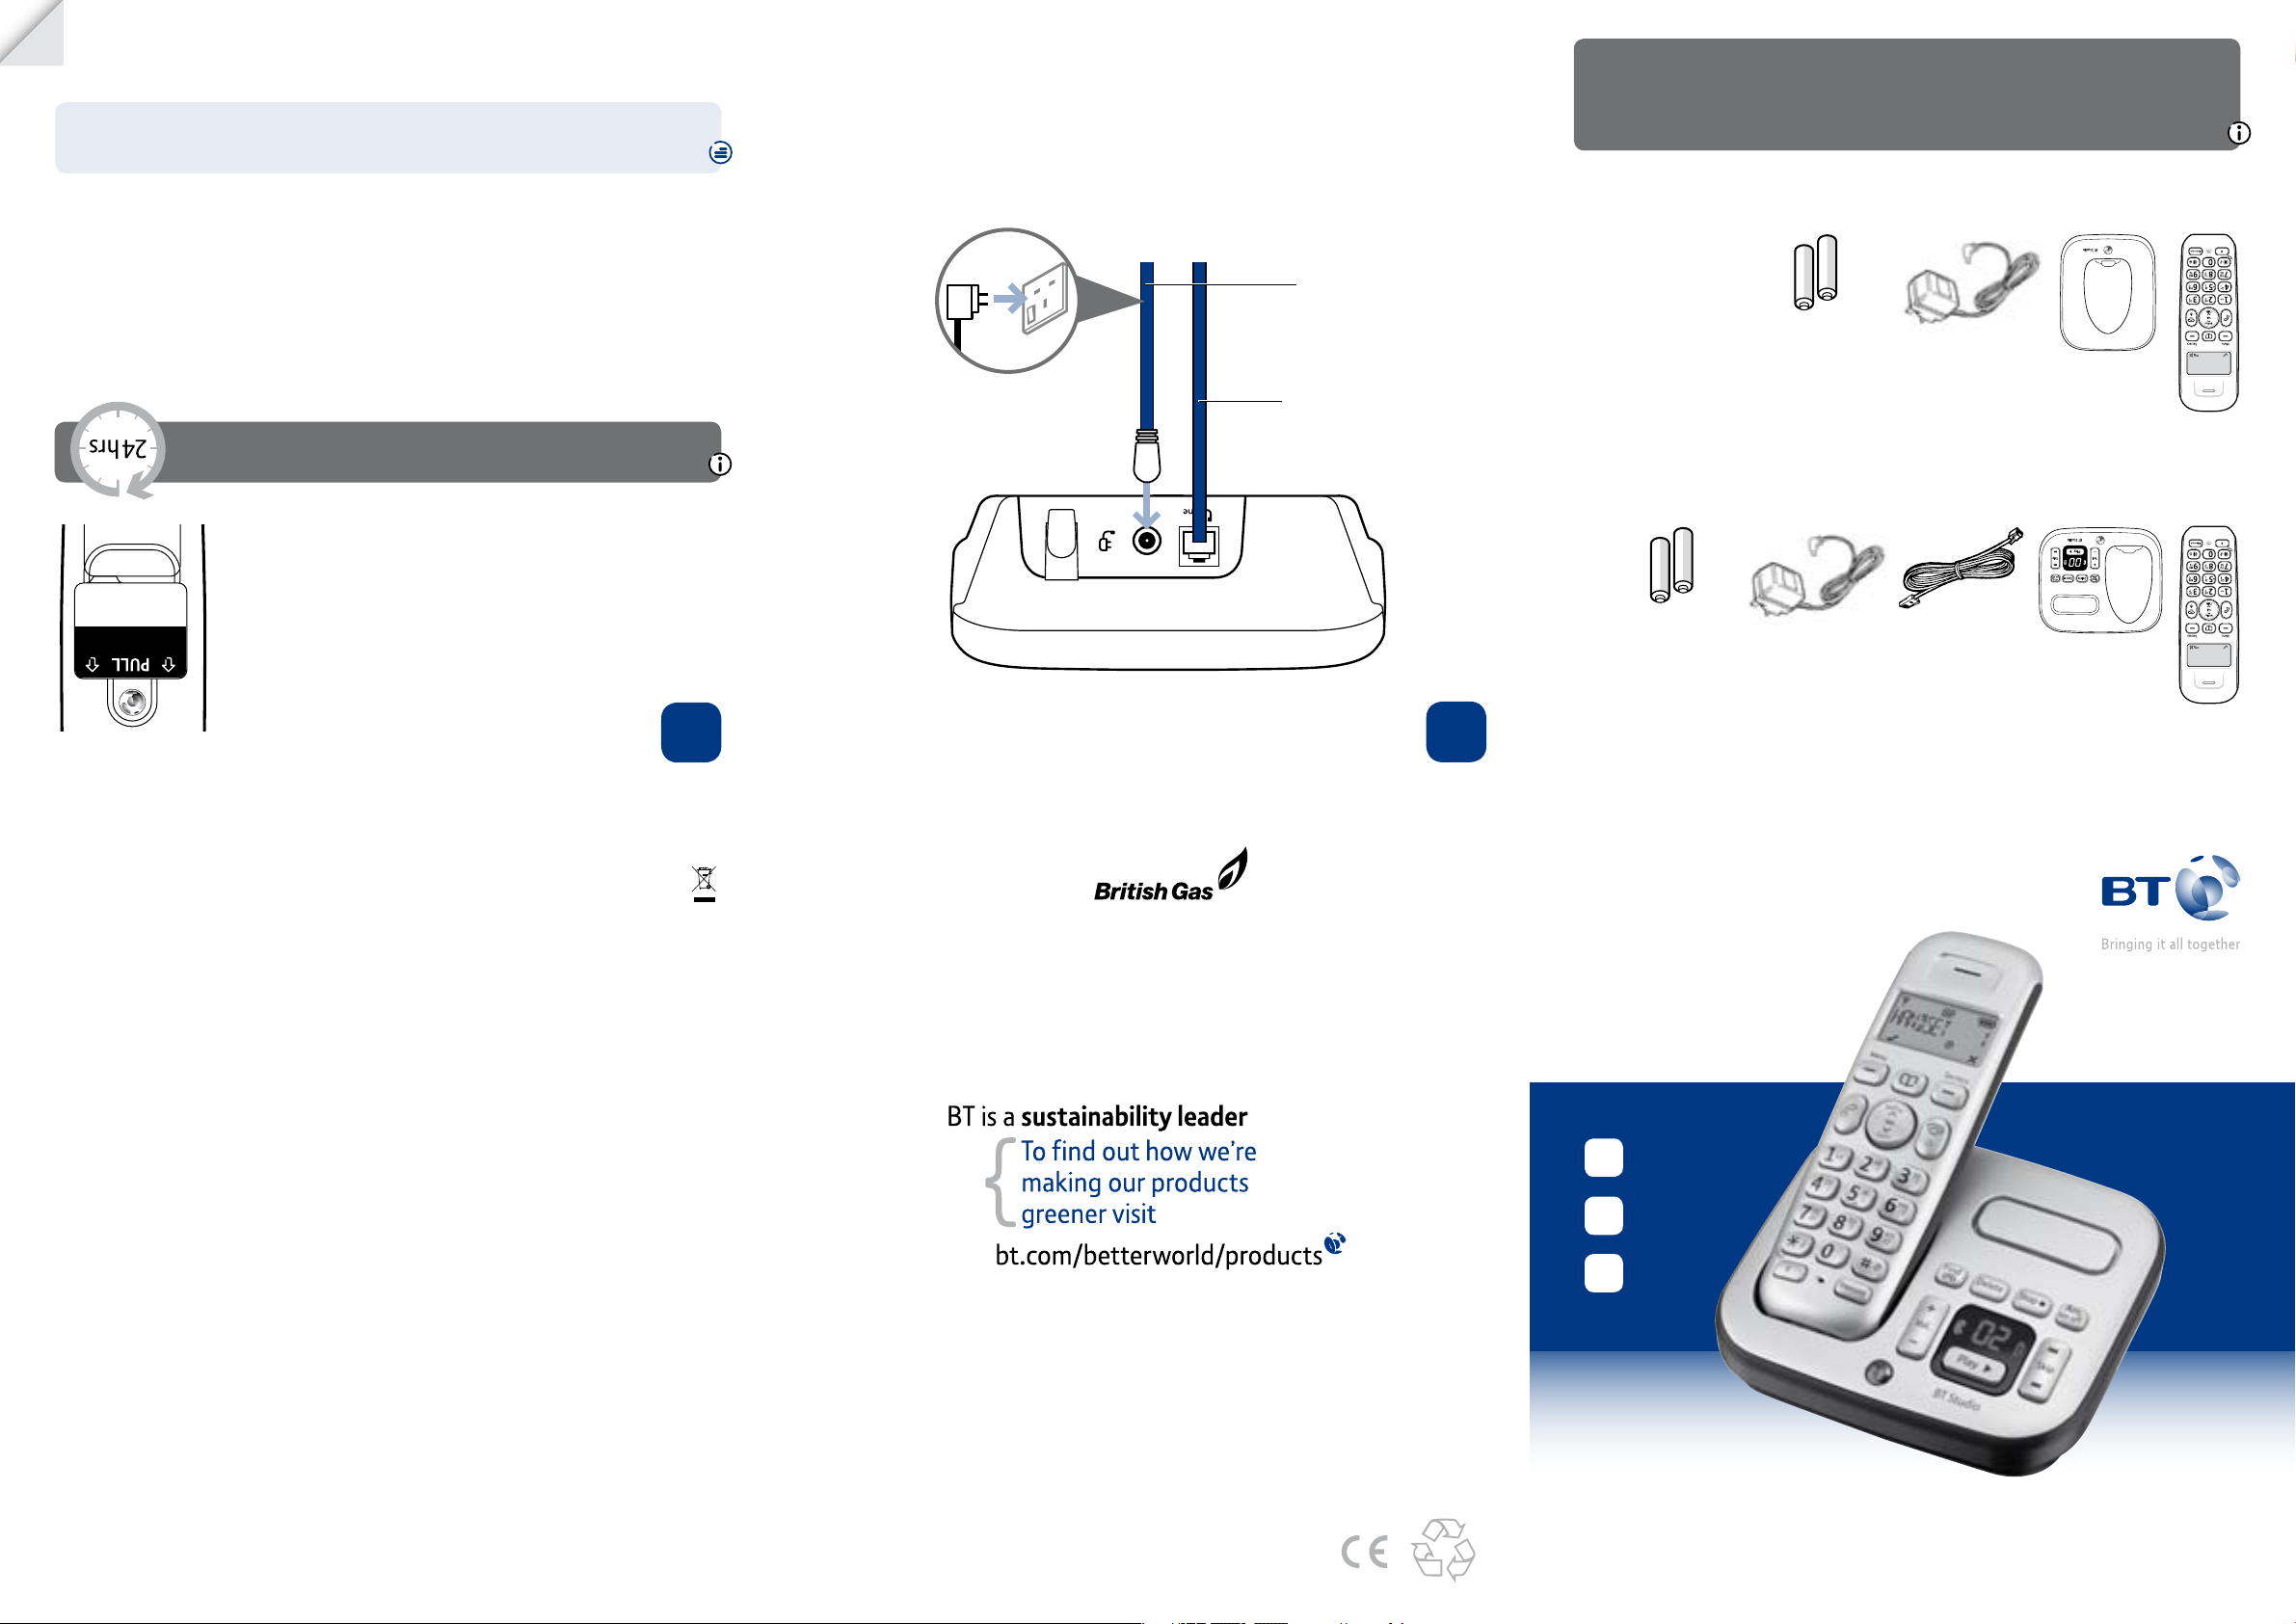
Rechargeable batteries
already fitted
Remove this tab
and charge batteries
for 24 hours before use.
turn
Please
Your BT Studio 4500 is now ready for use.
compartment cover and using the nger holes grip the batteries and pull them out.
If you ever need to remove the batteries, simply slide open the battery
3 Place the handset on the charger to charge for 24 hours.
shown above.
2 Remove the protective lm from the handset screen and activate the batteries as
power on.
retaining clip and plug the other end into the mains wall socket and switch the
048610) into the socket on the back of the charger, secure the cable behind the
1 For each additional handset and charger: plug the mains power adaptor (item code
clip on back of base.
cable behind retaining
Secure power adaptor
(item code 048611).
ring on the connector
adaptor with the blue
2 Plug in the mains power
(already in handset)
rechargeable batteries
2x AAA NiMH 500mAh
caused to your BT Studio 4500 by using any other type of batteries.
batteries must be of the same type. BT accepts no responsibility for damage
supplied in this box, or this product may not work. Any replacement rechargeable
Important: Only use the mains power adaptors, cables and rechargeable batteries
(item code 048610)
Handset Charger Mains power adaptor
General information
For information on safety instructions,
cleaning, technical information or
connecting to a switchboard, please
refer to the ‘General Information’
section in the full user guide at
www.bt.com/producthelp
Guarantee
Your BT Studio 4500 is guaranteed for a period of 12
months from the date of purchase.
Subject to the terms listed below, the guarantee
will provide for the repair of, or at BT’s or its agent’s
discretion the option to replace the BT Studio 4500, or
any component thereof, (other than batteries), which
is identied as faulty or below standard, or as a result
of inferior workmanship or materials. Products over 28
days old from the date of purchase may be replaced
with a refurbished or repaired product.
The conditions of this guarantee are:
• The guarantee shall only apply to defects that
occur within the 12 month guarantee period.
• Proof of purchase is required.
• The equipment is returned to BT or its agent
as instructed.
This guarantee does not cover any faults or defects
caused by accidents, misuse, fair wear and tear,
neglect, tampering with the equipment, or any
attempt at adjustment or repair other than through
approved agents.
This guarantee does not affect your statutory rights.
For further information within and outside the 12
month guarantee, please refer to the full user guide at
www.bt.com/producthelp
or your phone may not work.
Important: Charge the handset batteries for 24 hours
telephone wall socket.
the plastic tab away from the back of the handset.
and the base lens and activate the batteries by pulling
Product disposal instructions
The symbol shown here and on the product
means that the product is classed as Electrical or
Electronic Equipment and should not be disposed with
other household or commercial waste at the end of its
working life.
The Waste of Electrical and Electronic Equipment
(WEEE) Directive (2002/96/EC) has been put in place
to recycle products using best available recovery and
recycling techniques to minimise the impact on the
environment, treat any hazardous substances and
avoid the increasing landll.
Product disposal instructions for residential users
When you have no further use for it, please remove
any batteries and dispose of them and the product as
per your local authority’s recycling processes. For more
information please contact your local authority or the
retailer where the product was purchased.
Product disposal instructions for business users
Business users should contact their suppliers and check
the terms and conditions of the purchase contract
and ensure that this product is not mixed with other
commercial waste for disposal.
Warning
This equipment is not designed for making
emergency telephone calls when the power fails.
Alternative arrangements should be made for
access to emergency services.
R&TTE Directive & Declaration of Conformity
This product is intended for use within the UK for
connection to the public telephone network and
compatible switchboards.
This equipment complies with the essential requirements
for the Radio Equipment and Telecommunications
Terminal Equipment Directive (1999/5/EC).
For a copy of the Declaration of Conformity
please refer to www.bt.com/producthelp
Set up your additional handsets (multipacks only)
and switch on.
into the wall socket
the power adaptor
3 Plug the other end of
3 After 24 hours, plug the telephone line cord into the
2 Place the handset on the base to charge.
1 Remove the protective lm from the handset screen
2 Charge
BT &
Working together, supporting energy saving products
BT & British Gas have joined forces to help our customers nd new ways to save energy
around the home, so we can all do our bit for the environment & save money too!
Ofces worldwide
The services described in this publication are subject to availability and may be
modied from time to time. Services and equipment are supplied subject to
British Telecommunications plc’s respective standard conditions of contract.
Nothing in this publication forms any part of a contract.
© British Telecommunications plc 2009.
Registered Ofce: 81 Newgate Street, London EC1A 7AJ.
Registered in England No. 1800000.
Designed and produced by The Art & Design Partnership Ltd.
Printed in China / Issue 2 / ADP08-09
the wall socket yet.
plug the other end into
is pre-installed but don’t
1 The telephone line cord
(already in handset)
rechargeable batteries
2x AAA NiMH 500mAh
(item code 048611)
(pre-installed)
Telephone line cord
Base
Contents for each additional handset (multipacks only)
Handset Mains power adaptor
1 Plug in
Check box contents
BT Studio 4500
User Guide
1 Plug in
2 Charge
3 Go!
Setting up is easy. Just follow the simple steps in this guide.
If you need further assistance, please visit our website www.bt.com/producthelp
to view our advanced user guide or call our helpdesk on 0800 218 2182*
* Calls made from within the UK mainland network are free. Mobile and International call costs may vary.
Page 2
Your phone
Handset
Soft key: Use with icons displayed
on the screen above the key.
move up menu options.
Make/receive phone calls.
move up menu options.
Used when connected to a
switchboard/PBX, and with some
The answer machine handset controls on buttons
work when a message is being played on the handset.
Base
Page/locate
a handset.
Green In use
LED indicator
Adjust speaker
volume during
playback.
Opens menu.
Selects menu options.
Display Redial list and
Increase volume.
Display Call list and
Decrease volume.
Replay message.
Press and hold to turn
ringer on/off.
BT Calling Features.
Delete messages
during playback.
Message display
showing number of
messages and answering
machine status.
Digits ash when there
are new messages.
Stop message
during playback.
Play messages.
Open phonebook.
Soft key: Use with icons displayed
on the screen above the key.
During a call press for 2 seconds
to mute your voice so your caller
cannot hear you.
End a call.
Press and hold for 5 seconds
to turn handset on/off.
Stop playback of current message.
Delete message.
Skip to next message.
Press and hold to lock/
unlock keypad.
Make internal calls.
Press and hold to insert a Pause
in number to be dialled.
Switch answering
machine on/off.
Red battery
charging LED
indicator
and will only
Repeat current
message.
Skip forward during
message playback.
3 Go!
Set time and date
Press to open the main menu.
Press
Press
minute using the 24hr format and press soft key. You will hear a conrmation tone.
Press
dd-mm-yy format and press . You will hear a conrmation tone.
Making calls
Press then dial the phone number. Press to end the call.
Answering calls
If you have subscribed to Caller Display, the caller’s details will be displayed before you answer
(see below and also the full user guide online at www.bt.com/producthelp for details).
Lift the handset from the base or charger to answer incoming calls. If the handset is
not on the base or charger, press
Secrecy
Press the
prevent the caller hearing anything from your end. Press the soft key for 2 seconds again
to resume your call.
Redial (up to last 10 numbers called)
Press
through the list.
Press
Phonebook
Storing new phonebook entries (up to 50)
Press to open the phonebook. The rst entry (or
Press the
the keypad, enter the name, then press . You may need to press the same button
a few times until the letter you want is displayed. For example, press once for A,
or twice for B.
If you make a mistake, press to delete the last digit or letter entered.
Press
and press to conrm. Press to return to standby.
Dialling a phonebook entry
Press
Or, search alphabetically using the keypad to enter the rst letter of the name you want
then scroll or to the exact entry and press to dial.
Caller Display and the Call list
You must subscribe to a Caller Display service for this feature to work. Your network
provider may charge you for this service.
View and dial from the Call list
Press
The
standby screen until they have all been viewed in the calls list.
The
the screen. Press to allow you to scroll through the rest of the number.
Press
Copy a Call list number to the phonebook
Press
Press
Enter a name using the keypad and press . The number is displayed, press to conrm.
You will hear Melody 1 played, press
played when this caller rings you and then press
to scroll to hs
to
set tiMe
,
set dAte
settings
and press soft key.
dAte & tiMe
is displayed, press .
and press soft key. Enter 2 digits for the hour and 2 for the
is displayed. Press . Enter the day, month and year using the
.
soft key for 2 seconds during a call to activate secrecy mode, if you want to
to open the list of most recently dialled numbers. Press or to scroll
to redial the number displayed or press to access the options menu.
left soft key,
nuMBer
is displayed, enter the phone number for the entry and press .
Add
is displayed. press .
list eMPty
nAMe
is displayed. Using the letters on
) is displayed.
or to select a ringtone you want to be played when this caller rings you
. Scroll or to the entry you want. Press to dial.
, then or to scroll through the last 40 incoming calls.
indicates new missed calls. The number of New Calls to the handset is shown on the
icon is displayed when the phone number is too long to be fully shown on
to dial the number displayed.
, then or to the entry you want and press .
until
stOre nuMBer
is displayed and then press .
nAMe
is displayed.
or to choose a ringtone you want to be
.
Answering machine
Your answering machine is on and ready to record messages. The controls are shown
in the base diagram to the bottom left and the features can also be accessed via the
handset
Ans MAchine
menu.
Recording your own outgoing message
Press
Press
Press
Press
Press
. The display shows
to scroll to
to scroll to
or to select either
to scroll to
When prompted, speak your message into the handset. When nished press
Ans MAchine
Ans settings
OutgOing Msg
Ans & recOrd
recOrd Msg
and press to record your message.
, press .
and press .
and press .
or
Answer Only
and press .
.
Your message will be played back to you. Press if you want to delete the message.
Set the answer delay
To set the number of rings that are played before the answer machine picks up:
Press
Press
Press
Press
. The display shows
to scroll to
to scroll to
or to select the number of rings before the answer machine answers:
2-9 rings or time saver and press
Ans MAchine
Ans settings
Answer delAy
.
, press .
and press .
and press .
For detailed instructions on all the answering machine features see the full
user guide online at www.bt.com/producthelp
Help
Problem Solution
No dial tone Only use the cables and batteries supplied.
Poor speech quality Make sure the product is not located too close to other
Using broadband on the same
phone line?
Answer machine not
answering calls
Most problems can be xed with a few simple checks.
Make sure both the mains power adaptor cable and
telephone line cord are plugged into the correct sockets.
electrical appliances. This can also help improve the
handset range from the base.
Battery icon ashing
and scrolling digits
The battery charge is very low. Make sure you charge the
batteries for 24 hours before use to ensure maximum
battery performance.
Make sure you plug the phone
into the wall socket via an ADSL
microlter (not supplied), otherwise
you may have problems with this
product and your broadband service.
Check the answer machine is on and set to Answer &
Record. Also check that the ring delay is set to answer
before any voicemail service (e.g. 1571) on the line.
ADSL
microlter
Find out more
• New Frequently Asked Questions available at www.bt.com/producthelp
• If you need more detailed instructions, a full user guide is available to
download from www.bt.com/producthelp
• If you cannot nd the answer to your problem in the full online user guide,
then please call the free Helpline on 0800 218 2182* or email bt.helpdesk@
vtecheurope.com. Our dedicated advisors are more likely to be able to help you
than the retailer where you made your purchase.
• This document is also available in other formats, such as Large print, Braille
and Audio CD. If you would like a copy, please call 0800 218 2182*.
 Loading...