

Page 1
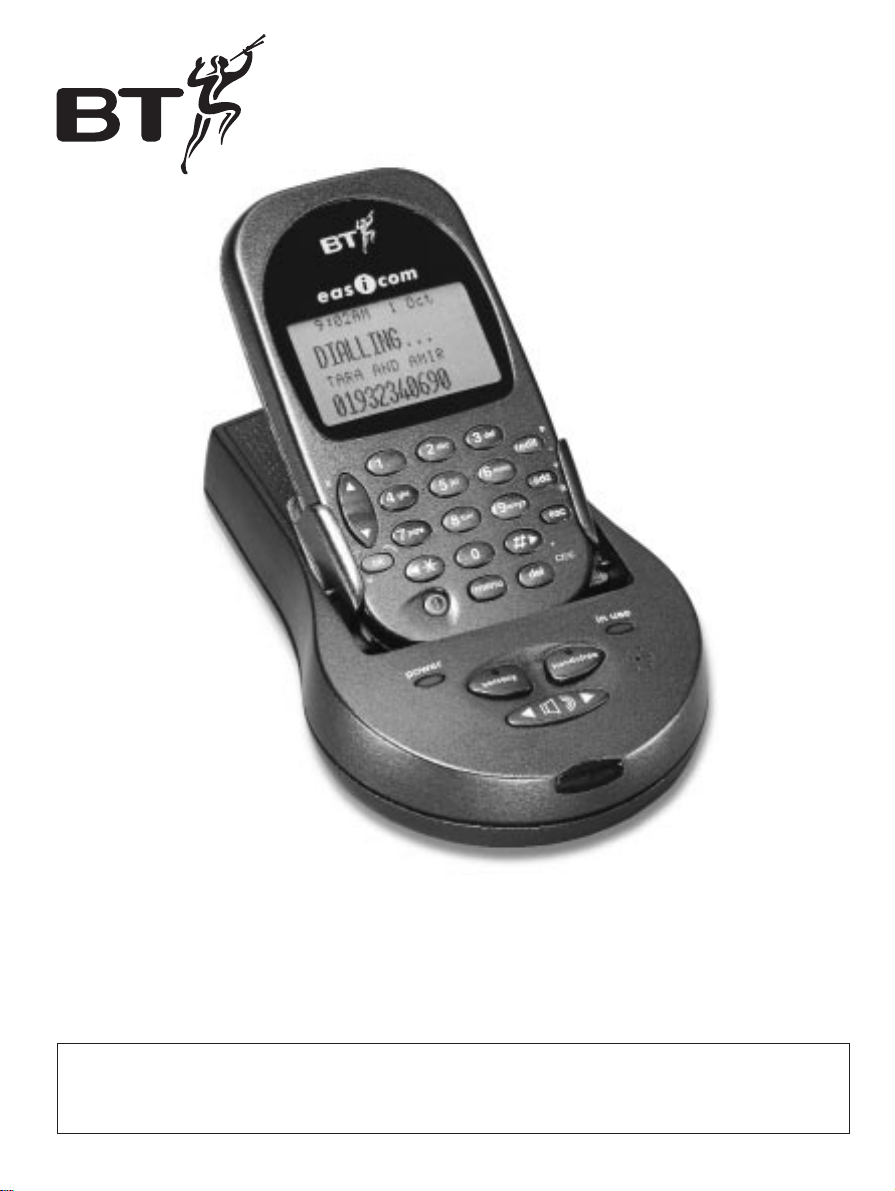
Easicom 100 User Guide
Personal organiser and handsfree telephone
This equipment is not designed for making emergency telephone calls
when the power fails. Alternative arrangements should be made for
access to emergency services.
Page 2

Please open this page for a fur ther
‘at a glance’ guide to your Easicom 100.
Page 3

Please open this page for an ‘at a glance’
guide to your Easicom 100.
Page 4
...................................
...................................
...................................
...................................
...................................
...................................
...................................
...................................
...................................
...................................
...................................
...................................
...................................
...................................
...................................
...................................
...................................
...................................
...................................
...................................
...................................
...................................
...................................
...................................
...................................
...................................
...................................
...................................
...................................
...................................
power
in use calls
secrecy
handsfree
§ ©
eas com
i
100
. .
. . .
. .
1
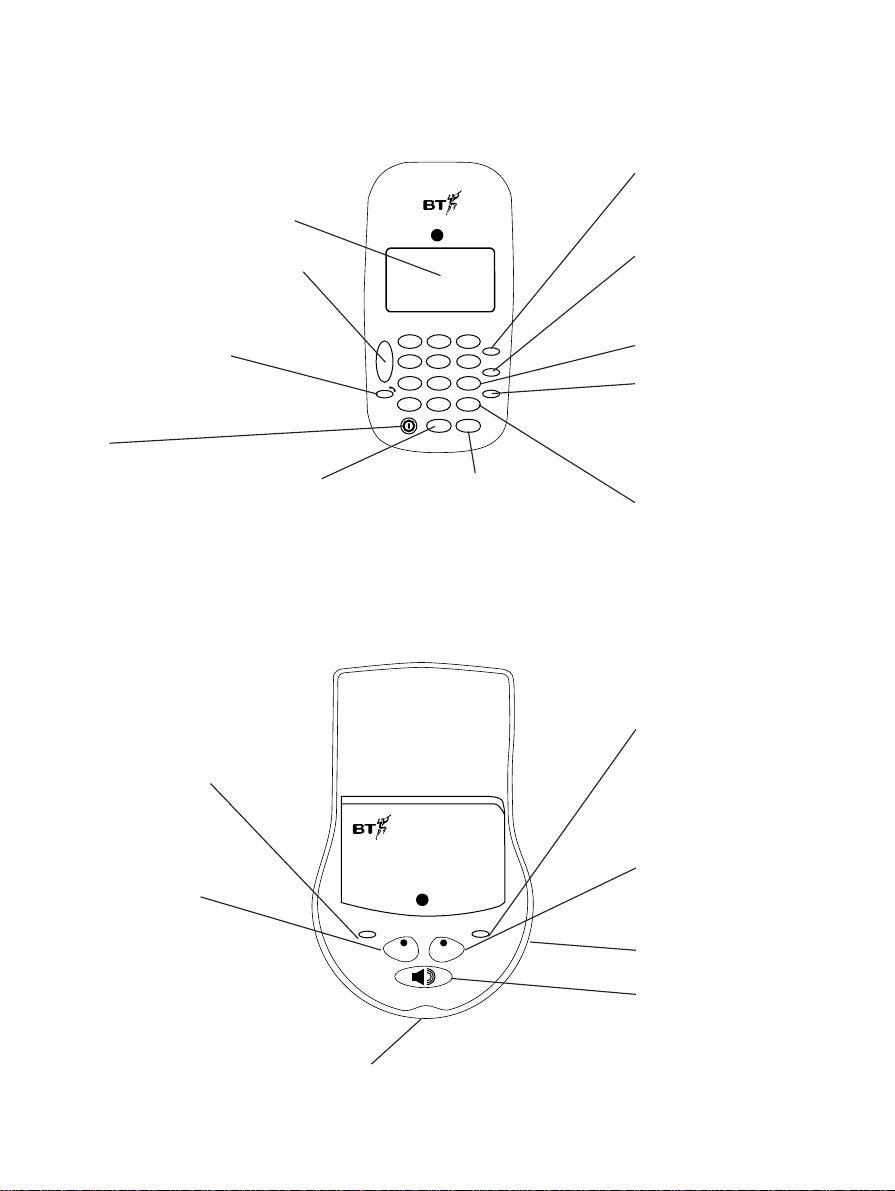
At a glance
In use
Lights up during a call.
Power light
Lights up when mains
power is switched on.
Infrared receiver
Enables you to make a handsfree
call when the organiser is removed
from the base.
Microphone
Volume
Adjusts the ringer volume
when not on a call. Adjusts
the handsfree volume
during a call.
Secrecy
Allows you to talk to
someone close by
without your caller
hearing. LED lights up
when secrecy function is
switched on.
Handsfree
Lets you use the
microphone and
loudspeaker for handsfree
operation. The red LED
lights up when handsfree
mode is switched on.
CRADLE
123
4
5
6
7
89
0
wxyz
mno
tuv
jkl
pqrs
ghi
abc def
✱
§
©
A
edit
add
esc
ok
menu del
3
4
¶
Ä
x
P
–
+
R
.
CE/C
eas com
i
Esc
To move back to the
previous screen display, to
exit the function.
Phone/OK
Dials telephone numbers.
Confirms settings.
Menu
Press to display
the main menu on
the screen.
Power
Switches the organiser on
and off. When slotted in the
cradle and connected to the
mains power, the organiser
is permanently switched on.
RIGHT/LEFT
Used when selecting and
setting options.
Del
Lets you delete
entries.
Add
Used when adding new
entries. Also used as the
Recall button.
Edit
Used when changing
entries. Enter a pause in a
telephone number.
UP/DOWN
Lets you scroll through the settings.
LCD Display
ORGANISER
Keypad
Page 5

2
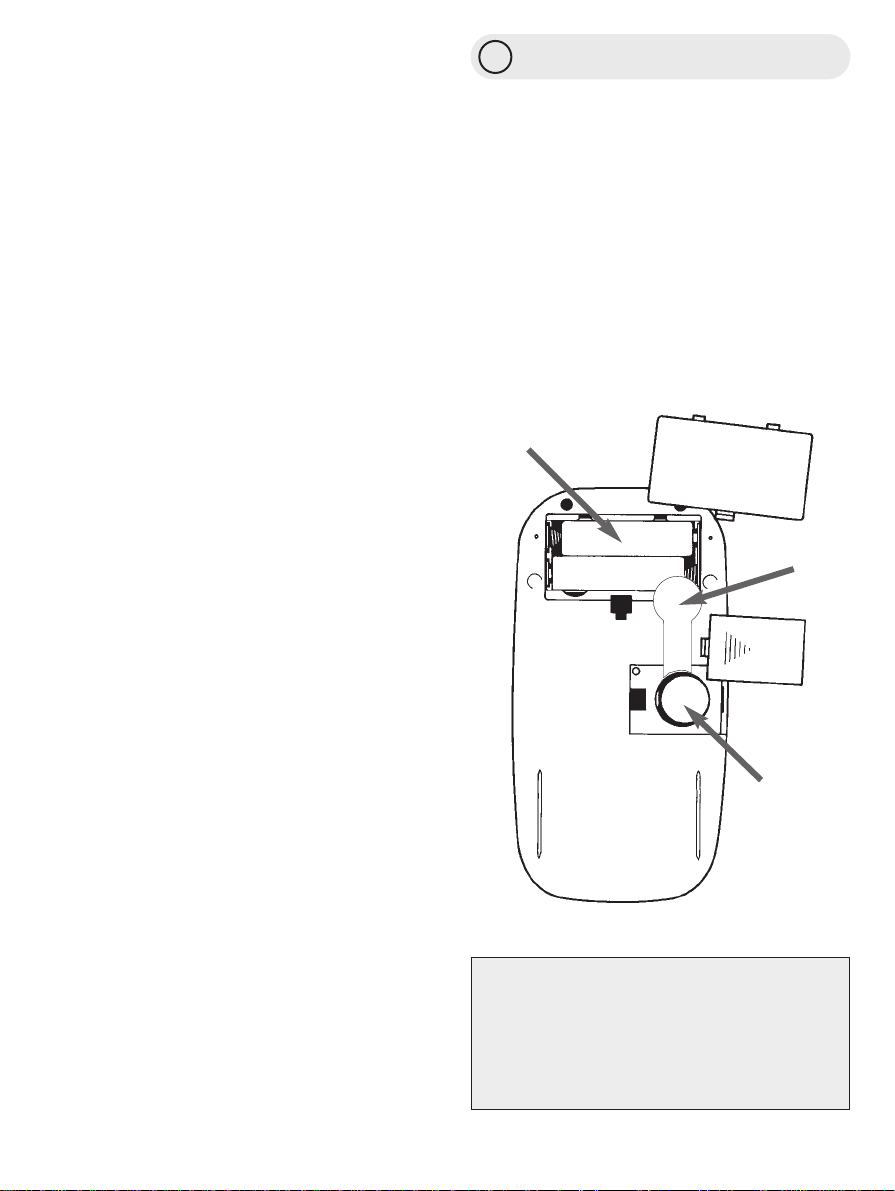
Reset
Resets the organiser to its default settings
without losing any information stored on
the memor y.
Organiser
Main batter y compartment
2 x AAA alkaline batteries (supplied)
Back up batter y compartment
1 x CR1616 batter y (supplied)
Connection sockets
– to mains power supply
– to telephone socket
– to attach a telephone
– to PC or notebook computer
Main batteries
Back-up
battery
6vDC line phone PC
Page 6

Page 7

3
Contents
At a glance 1
Introduction 4
Installing your Easicom 100 5
Using your Easicom 100 9
Using Select Services 25
Set up Options 30
Connecting to a switchboard/PBX 34
Maintenance 35
Help 36
Technical information 38
Index 39
Hints and tips boxes
In this user guide, we’ve included helpful tips and useful hints.
They are shown in boxes.
Page 8

Introduction
Your Easicom 100 has been designed for
ease of use and made to the high standards
set by BT.
In order for the Caller Display feature to
receive and display the full range of call
information, you must subscribe to the BT
Caller Display Service. For more information
call BT on Freefone 0800 800 150.
You can expect your Easicom 100 to give
you many years of trouble free service.
Please read the instr uctions carefully
before use and keep this User Guide for
future reference.
For your records
For warranty purposes, proof of pur chase
is required, so please keep your receipt.
Date of purchase:
Place of purchase:
Serial numbers:
(on the underside of the cradle
and the back of the organiser):
4
Page 9

Installing your Easicom 100
Emergency calls.
The emergency services can be contacted
in the UK by dialling 999. You may also
dial 112 which is valid in any country that
is a member of the European community.
You may not be able to make an emergency
call in certain situations:
• If the telephone is disconnected
• If the main and back-up batteries in the
organiser have run down
• If there is a fault on the line from your
phone or on the network
• If mains supply is switched off or power
adaptor is disconnected
If your Easicom 100 is connected to a
PBX (switchboard), you may have to dial
an access number before 999 to contact
the emergency services. Some switchboards
cannot dial out during a power failure.
IMPORTANT
Check that your Easicom 100
is complete.
When you unpack you should have:
Easicom 100 organiser.
Easicom 100 cradle (i.e., the base unit)
Plug-mounted mains adaptor.
4 x AAA alkaline batteries – two for the
organiser, two for the cradle
1 x CR1616 lithium battery for organiser.
User guide.
If you have a problem with your
Easicom 100 call the Easicom Helpline on
0345 573468.
You can also ask us for details about the
Easicom PC Link 150 software.
5
Page 10
1
Install organiser batteries
Main batteries
• Remove the main batter y cover using a
small screwdriver or similar instr ument
to release the clip.
• Inser t two AAA alkaline batteries as
shown.
Back-up batter y
• Pull out the plastic tab. The batter y is
now connected.
• To replace the back-up batter y, see
page 36.
Warning
Use only alkaline batteries in the organiser
main batter y compartment. For the
organiser back-up batter y, use only lithium
CR1616 batteries.
Do not tr y to use any power supply
connection except the one provided
other wise you may damage your Easicom
100. It may also invalidate approval of this
apparatus.
Do not dispose of used batteries with
general household rubbish and do not burn
them.
Clean the organiser and cradle with a damp
(not wet) cloth or antistatic wipe. Never
spray cleaning fluid directly onto the
organiser or base.
6
IMPORTANT
Once installed, do not take the
main batteries and the back-up battery
out at the same time, otherwise data
will be lost.
Main batteries
Back-up
battery
Plastic tap
Page 11
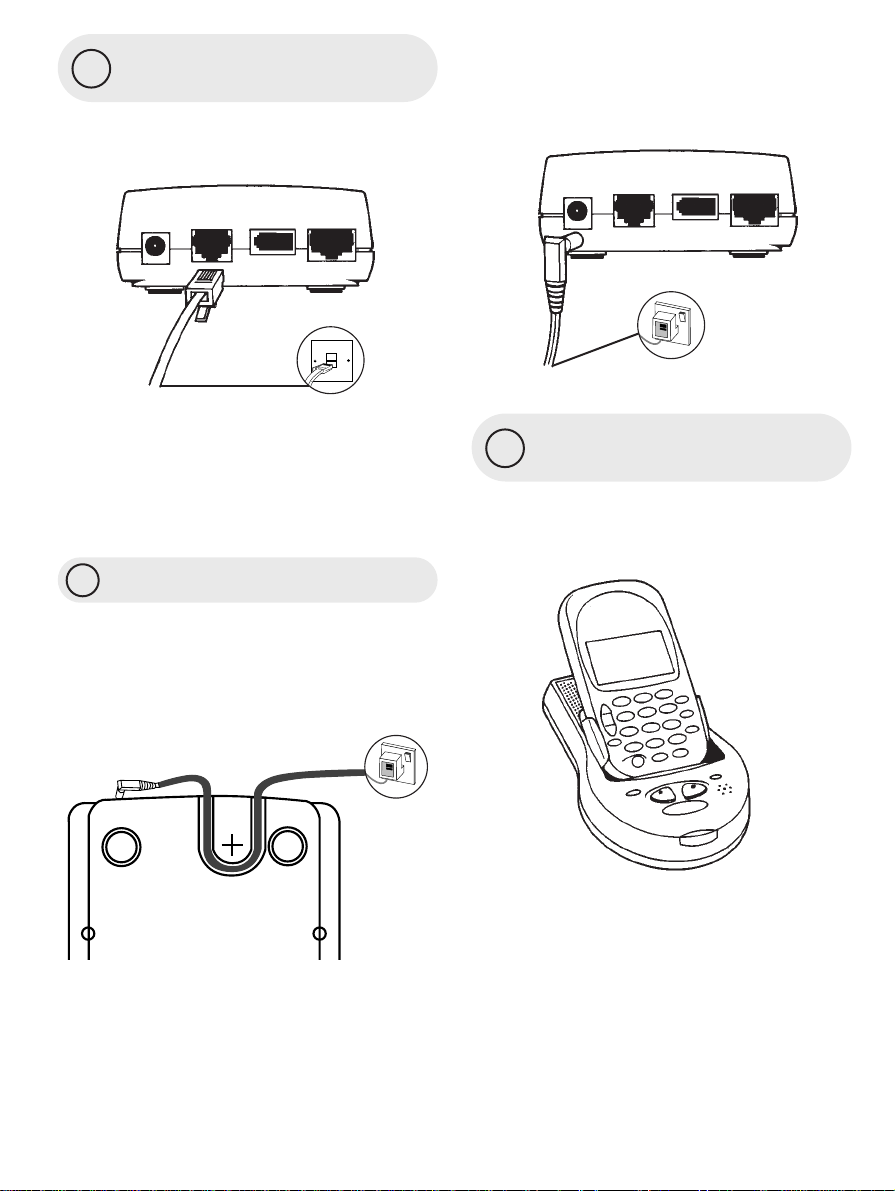
3
2
4
Now plug in the 3-pin power adaptor into
the mains socket. When the power is
switched on, the cradle POWER light
comes on.
Place the organiser in the
cradle
Open the lid on the top of the cradle and
slide the organiser along the guides and
into the connector.
Connect the telephone
line cord
Plug the other end into the telephone line
wall socket.
If you do not have modern phone sockets,
call Freefone 0800 800 150 and ask for a
BT engineer to come and fit the correct
type. This is a chargeable ser vice.
Connect the power cable
Plug the power cable into the socket
marked 6vDC on the cradle. Run the cable
through the channel on the underside of
the cradle to prevent the plug from being
accidentally pulled out.
7
6vDC line phone PC
6vDC line phone PC
Page 12
5
6
7
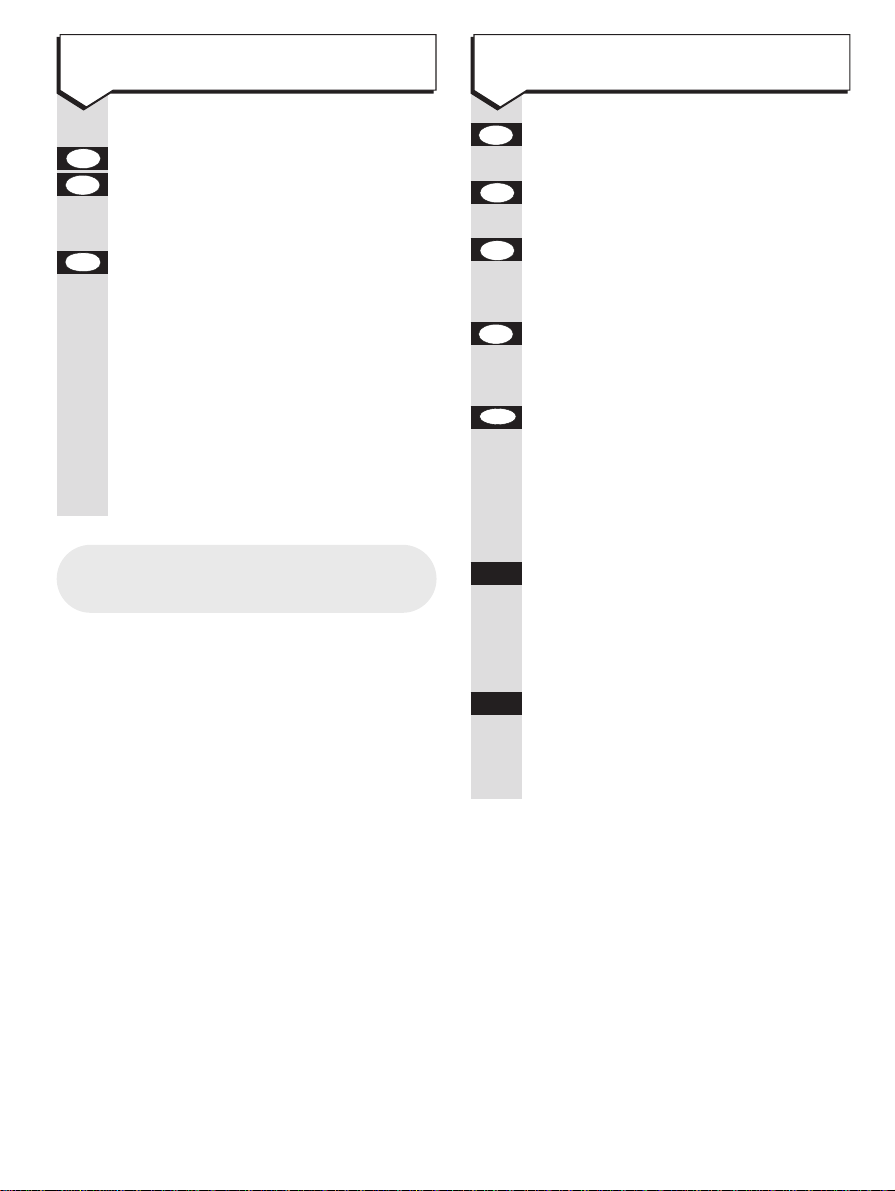
Set the time and date
Press buttons in order shown
When the main menu is displayed
Enter the number 0 on the
keypad. (Or press the UP button to
highlight SET UP then press OK).
Press the 5 button. (Or the DOWN
button to highlight TIME & DATE on
the menu).
Press the LEFT and RIGHT buttons
to highlight AM/PM for a 12 hour
clock setting or 24 HOUR for a
24 hour clock setting.
Press the edit button.
Use the LEFT and RIGHT buttons to
highlight DAY/MONTH/YEAR/TIME
setting you want.
Press the UP and DOWN buttons to
adjust the setting.
Press the OK button to confir m.
You can also choose further set up
options
Alarm Clock p30
Appointment Alarm p20
Password p31
Keypad Tone p31
Memor y/Battery Status p32
LCD Contrast p32
Automatic Shut Down p32
Switchboard/PBX setting p34
OK
Ä
¶
©
A
✱
§
edit
P
©
A
✱
§
5
jkl
0
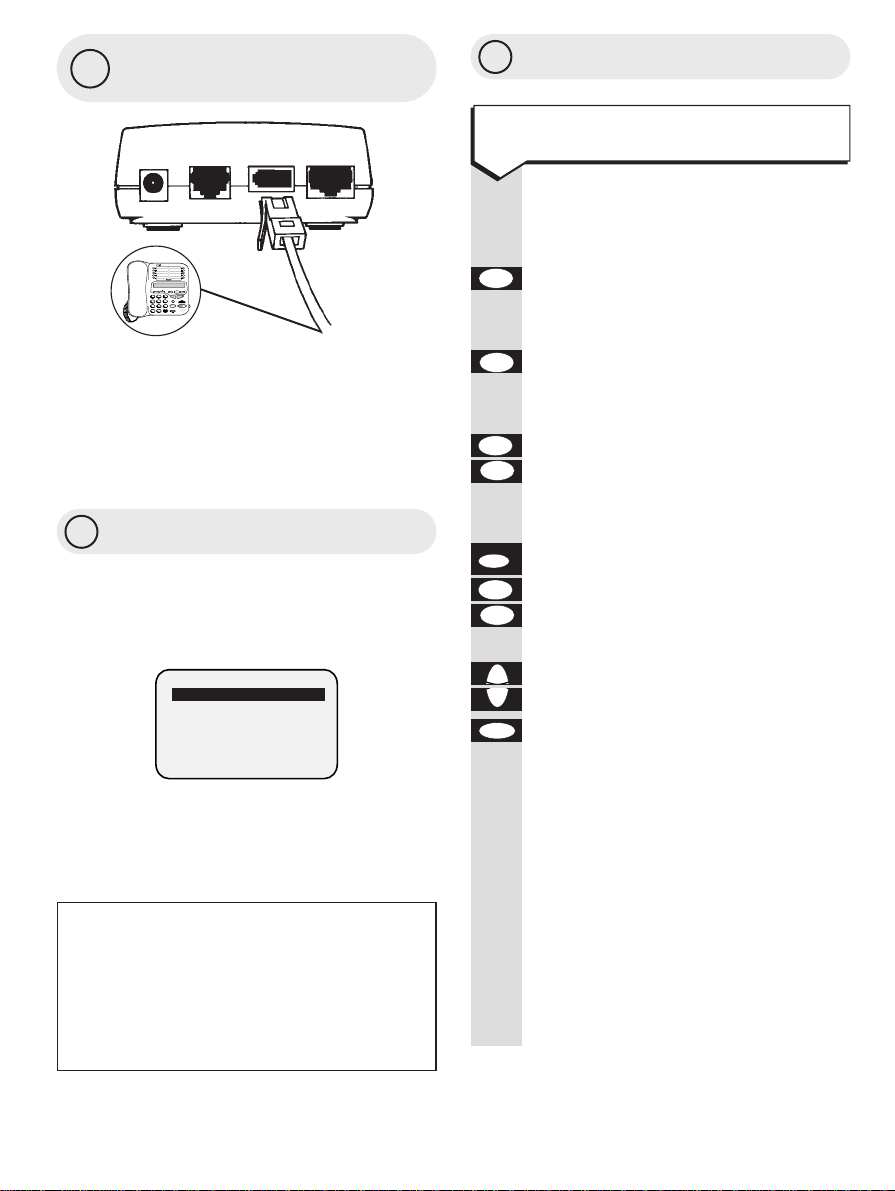
Connect a telephone
(optional)
So you can hold conversations not heard
via the loudspeaker, connect a telephone by
plugging the telephone cable into the back
of the Easicom cradle in the socket marked
PHONE.
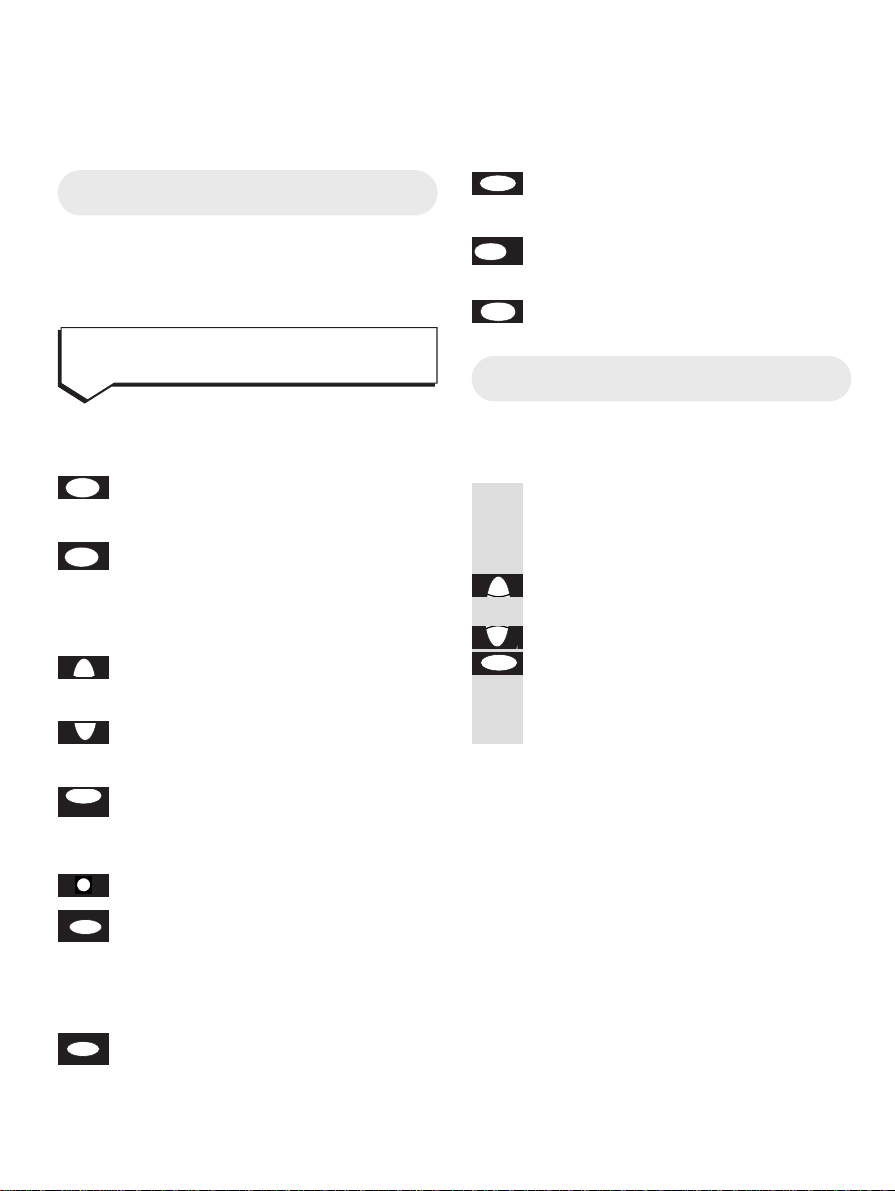
Switch the organiser on
Press the POWER button until the
Organiser switches on. The main menu is
displayed.
If no buttons are pressed, the screen
automatically switches of f after approximately
2 minutes
8
6vDC line phone PC
To set the time and date manually
Battery saver
If you do not press any buttons on the
organiser after removing it from the cradle,
the battery saver automatically switches the
screen off after 2 minutes. This time limit
is adjustable. See Auto Shut Down p.32.
MENU
*
TELEPHONE
1. QUICKDIAL
2. PERSONAL
3. BUSINESS
4. APPOINTMENTS
5. CALCULATOR
Page 13
9
Using your Easicom 100
to move back to the previous screen
display to exit the function
to delete an entr y
clear, when in calculator mode
returns display to main menu.
Using the menu
There are two ways to reach the menu
option you want.
Either
Press the number next to the option.
Or
Press the UP or DOWN buttons to
or highlight the options you want, then
press the OK button.
You can then use the
add, edit
and
del
buttons as required.
OK
Ä
¶
menu
del
CE/C
esc
The organiser keypad
Each button lets you enter numbers, letters
and special symbols. These include / @ .
and many more.
All calculator functions are marked
in orange on the Organiser
to move the cursor to the left enter
a ✱ during a call.
to move the cursor to the right enter
a # during a cal
decimal point, when in calculator
mode
to move the cursor up
multiply, when in calculator mode
to move the cursor down
divide, when in calculator mode
to dial a number and to confirm
a setting
equals, when in calculator mode
power switch, on and of f
to begin editing entries
subtract, when in calculator mode
to add a pause to telephone
numbers.
to add one entr y
plus, when in calculator mode recall
add
+
R
edit
P
–
I
OK
=
Ä
.
––
.
¶
X
©
A
•
✱
§
Using the organiser
Page 14
Press buttons in order shown
are used to move the cursor to the
right and left.
Delete
Press the del button to delete the
character to the left of the cursor.
Hold down the button for more than
one second to delete a whole name
or number.
Insert a character
Position the cursor where you want
to inser t and press the r equired
character button.
Entering details into the
organiser
Letters are entered by pressing the relevant
button repeatedly.
When entering a name using the keypad, if
you don’t press the button after one second
the cursor moves to the next space.
Punctuation marks are given under the
1
and 0 buttons.
For example, to store the name JOHN
456
GHI JKL MNO
del
✱
§
©
A
Press 5 on the organiser until J
appears in the display.
Then press 6 on the organiser until
the display shows O.
Enter the H by pressing 4 on the
organiser until H appears on the
display.
Press 6 on the organiser until N
appears on the display. The whole
name is now entered.
Press the OK button to confir m your
selection and return to the idle
screen.
To switch between upper and lower
case letters
KEYPAD
Letters are displayed in upper case
capitals. To change to lower case,
when you display the letter you
want, hold the button down until the
character changes.
KEYPAD
To return a letter to upper case,
highlight the character and hold
down the appropriate button until it
changes back.
OK
6
mno4ghi6mno5jkl
10
Controlling the cursor To make an entry
Page 15

In handsfree mode:
Press the handsfree button and
speak.
Or
Using an attached telephone
Pick up the handset and speak
Press the handsfree button on the
cradle.
Or
If using an attached phone, replace
the handset.
Or
Press the OK button while the
telephone number is shown on the
screen. The number stays on screen
for approximately 20 seconds.
OK
handsfree
handsfree
Making and receiving
telephone calls
You can dial with the organiser in or out of
the cradle. The infrared link sends details
from the organiser to the cradle when calls
are made and received.
Press buttons in order shown
When the main menu is displayed:
Press the OK button.
KEYPAD
Dial the number. If the or ganiser is
of f the base, make sure the infrar ed
link is pointing at the base.
Press the OK button. Display shows
DIALLING and the number is dialled.
You hear your call going thr ough
and speak to your caller using the
microphone and loudspeaker in the
cradle.
You can have a private conversion by
picking up the handset of a phone
connected to your Easicom 100. The
loudspeaker is automatically cut of f.
You hear and talk to your caller
through the telephone handset.
OK
OK
11
To make a call
To end a call
Please note
After the number has been dialled, the
display returns to idle.
Please note
If you are dialling a number which has
been stored in one of the organiser’s
memories, the display will show the name
that has been stored with the number.
2:11PM 24 AUG
REDIAL – PRESS OK
To receive a call
Page 16

During a call
Press the volume control to increase
or decrease the loudspeaker volume.
When NOT making a call
Press the volume control to increase
or decrease the ringer volume.
§ ©
§ ©
Press buttons in order shown
When the main menu is displayed:
Press the OK button.
Press the OK button. The last
number called is displayed
Press the OK button to dial the
number.
You can pr event your caller from
hearing you while you hold a
conversation with someone else
close by.
During a call
Press the secrecy button.
The secrecy light comes on.
Your caller cannot hear you speak.
Resume talking to your caller by
pressing the secrecy button again.
The secrecy light goes of f.
secrecy
secrecy
OKOKOK
12
2:11PM 24 AUG
REDIAL – PRESS OK
To use the secrecy button
To adjust the ringer volume
To adjust the call volumeTo redial the last number
Page 17

Select QUICKDIAL from the main menu.
Press the UP or DOWN button to
highlight the Quickdial number you
want to change.
Press the edit button to start edit.
KEYPAD
Use the keypad to change the name
and number.
Press the OK button to save the
or entry or esc to cancel.
Press esc to cancel or OK to save.
Select QUICKDIAL from the main menu.
Press the DOWN button to highlight
the entr y you want to delete.
Press the del button.
Press the OK button to delete the
or entry or the esc button to cancel.
esc
OK
del
Ä
OK
esc
esc
OK
edit
P
Ä
¶
13
To delete a Quickdial number
Using the Quickdial memory
Store up to 6 of your most frequently
dialled numbers in the Quickdial memor y.
You can also copy entries into Quickdial
from the other directories.
Press buttons in order shown
Select QUICKDIAL from the main menu.
Press the DOWN button to highlight
the location under which you want to
store a number.
Press the add button. Screen shows
Use the keypad to enter the
number and name
Press OK to save the entry or
esc to cancel.
If you press esc, display asks for
confirmation. Press OK to save or
esc to cancel.
del
OK
add
+
R
Ä
To add a Quickdial number
To edit a Quickdial number
QUICKDIAL
NAME
&
NUMBER
Page 18

Press buttons in order shown
Select PERSONAL from the main menu.
Press the add button.
KEYPAD
Use the keypad to enter the
information you want
Press OK to save the entry or
esc to cancel.
esc
OK
add
+
R
Select QUICKDIAL from the main menu
.
Press the button 1-6 to automatically
dial the number you want. (Or press
the UP and DOWN buttons to
highlight the number you want and
then press the OK button.)
Using the Personal directory
You can stor e all your friends, family and
non-business contacts in a separate
directory.
Entries in the Personal directory are stored
in alphabetical order.
The Personal directory screen
The Personal screen lets you store various
information in addition to each person’s
name.
H = Home phone number
O = Office phone number
M = Mobile phone number
F = Fax number
P = Pager number
EMAIL = email address
NOTES = additional information
1-6
14
To dial a Quickdial number To add a Personal entry
PERSONAL
H:
O:
N:
F:
P:
Page 19

You can copy a number fr om a
Personal entr y to the Quickdial
memor y.
Select PERSONAL from the main menu.
KEYPAD
Highlight the name for the entr y
you want to copy.
Press the OK button.
Highlight the number you want to
copy.
Press the add button. Display
shows COPY TO QUICKDIAL SCREEN.
Press the OK button to copy the
or entry or esc to cancel.
If the Quickdial memor y is full, the
display shows
Press the OK button to cancel.
You must delete one of the existing
Quickdial entries to create space for
copying another entr y.
OK
esc
OK
add
+
Ä
¶
OK
Press buttons in order shown
Select PERSONAL from the main menu.
Find the name you want by entering
the first letter (or letters) of the
person’s name. The screen shows
all the names with or next to those
letters. If necessar y pr ess the UP
and DOWN buttons to highlight the
name you want.
Press the edit button.
KEYPAD
Use the keypad to change the entr y.
If required press the UP or DOWN
or buttons to scroll to anther next
screen to edit other information.
Press OK to save the entry
or or esc to cancel.
esc
OK
Ä
¶
edit
P
Ä
¶
To copy a Personal entry
15
To edit a Personal entry
PERSONAL
NAME ONE
NAME TWO
NAME THREE
NAME FOUR
NAME FIVE
NAME SIX
PERSONAL
NAME ONE
H : 1234567890
O : 2345678901
M : 3456789012
F : 4567890123
P : 5678901234
DIRECTORY
FULL!
OK
Page 20

16
Select PERSONAL from the main menu.
Find the name you want by entering
the first letter (or letters) of the
person’s name. The screen shows
all the names with or next to those
letters. If no entr y is listed under
the letter, the next entry
alphabetically is shown. If necessar y
press the UP and DOWN buttons to
highlight the name you want.
Press the OK button to display the
information stored for that person.
Highlight the number you want to
dial.
Press the OK button. Display shows
OK
Ä
¶
OK
Ä
¶
To dial a Personal number
PERSONAL
NAME ONE
NAME TWO
NAME THREE
NAME FOUR
NAME FIVE
NAME SIX
4:I5 PM 18 APR
DIALLING...
NAME
1234567890
Press buttons in order shown
Select PERSONAL from the main menu.
Find the name you want by entering
the first letter (or letters) of the
person’s name. The screen shows
all the names with or next to those
letters. If necessar y pr ess the UP
and DOWN buttons to highlight the
name you want.
Press the del button. Display shows
Press OK to delete the entry or esc
or to cancel.
esc
OK
del
Ä
¶
To delete a Personal entry
PERSONAL
NAME ONE
NAME TWO
NAME THREE
NAME FOUR
NAME FIVE
NAME SIX
PERSONAL
NAME ONE
NAME TWO
NAME THREE
NAME FOUR
NAME FIVE
NAME SIX
DELETE?
OK ESC
Page 21

Select BUSINESS from the main menu.
KEYPAD
Highlight the company name you
want to edit.
Press the edit button.
KEYPAD
Use the keypad to make the changes
you want.
Press OK to save the entry or esc
or to cancel.
Select BUSINESS from the main menu.
KEYPAD
Highlight the company or individual
name you want to delete.
Press the del button. Display shows
Press the OK button to delete the
or entry or the
esc button to cancel.
esc
OK
del
esc
OK
edit
P
Using the Business directory
The Business directly lets you store a
company name and list a number of people
under each company name. You can also
view individual details from the Personal
directory.
Entries in the Business directory are
stored in alphabetical order. Individual
contacts under a business name are also
stored in alphabetical order.
Press buttons in order shown
Select BUSINESS from the main menu.
Press the add button.
KEYPAD
Use the keypad to enter the
information you want.
Press OK to save the entry. Display
shows
KEYPAD
Enter the details you want.
Press the OK button to save or esc
to cancel. When you press OK,
the display allows you to enter the
persons details.
esc
OK
OK
add
+
R
To edit a Business entry
To change the personal details of a person’s
name stored in Business directory, you
must first highlight the person’s name then
press the edit button to display their details.
17
To add a Business entry
BUSINESS
BUSINESS
BUSINESS
COMPANY ONE
COMPANY TWO
COMPANY THREE
COMPANY FOUR
COMPANY FIVE
COMPANY SIX
To delete a Business entry
DELETE?
OK ESC
Page 22

Select BUSINESS from the main menu.
KEYPAD
Find the company name you want
by entering the first letter (or letters)
of the Company’s name.
Press the OK button to display the
list of names stored under that
company.
Highlight the person’s name you
want.
Press the OK button.
Highlight the number you want
to dial.
Press the OK button. Display shows
OK
Ä
¶
OK
Ä
¶
OK
4:I5 PM 18 APR
DIALLING...
NAME
1234567890
18
To dial a number in the Business directory
Press buttons in order shown
You can copy a number to the
Quickdial memor y.
Select BUSINESS from the main menu.
KEYPAD
Highlight the phone number you
want to copy.
Press the add button. Display shows
Press the OK button to copy the entry
or or
esc to cancel.
If the Quickdial memor y is full,
press the OK button to cancel. You
must delete one of the existing
Quickdial entries to create space for
copying another entr y.
OK
esc
OK
add
+
R
BUSINESS
BUSINESS ONE
H : 1234567890
O : 2345678901
M : 3456789012
F : 4567890123
P : 5678901234
To copy a Business entry
COPY TO
QUICKDIAL?
OK ESC
Page 23

Select APPOINTMENTS fr om the
main menu.
Press the add button.
KEYPAD
Use the keypad to enter the details
of your appointment, then add any
relevant notes. Each appointment
must have a title. Time settings for
appointments are shown to the
nearest 5 minutes.
Press the OK button to save the
or entry or the esc button to cancel.
esc
OK
add
+
R
Using the Appointments diary
You can keep track of appointments,
meetings, schedules and other dates and
times you have to remember. The
Appointments diar y can contain up to 60
separate entries.
Providing the appointments alarm is set to
ON, your Easicom 100 will give you an aler t
call at any time up to 15 minutes before
your appointment. When the alarm goes off,
the screen displays details of your
appointment. The appointment screen is
displayed even if the alarm is not switched on.
You cannot set the alar m if you ar e entering
an appointment which is less than 15
minutes after the current time and day.
Press buttons in order shown
Select APPOINTMENTS from the main
menu.
To scroll through your appointments.
Press the OK button to display the
highlighted entr y in full.
Press the esc button to return to
the appointments list.
esc
OK
Ä
¶
19
To browse through your appointments
APPOINTMENTS
1 JUN 98 12:00
TITLE
NOTES:
To add an appointment
Page 24

Appointment alarm
The appointment alarm is automatically set
when you make an appointment time entr y.
Providing the appointment alarm is switched
on, the alarm will go off 15 minutes before
the appointment time.
Select SET-UP from the main menu.
Now select APPOINTMENT ALARM
from the set-up menu. Display shows
Highlight ON or OFF.
Press the OK button to confir m.
OK
©
A
✱
§
Ä
¶
20
To switch the appointment alarm on and off
Press buttons in order shown
Select APPOINTMENTS from the main
menu.
Highlight the entr y you want to
change.
Press the edit button.
KEYPAD
Use the keypad and cursor buttons
to change the details you want.
Press the OK button to save the
or changes or the esc button to cancel.
Select APPOINTMENTS from the main
menu.
Highlight the entr y you want to
delete.
Press the del button. Display shows.
Press the OK button to delete or the
or esc button to cancel.
esc
OK
del
Ä
¶
esc
OK
edit
P
Ä
¶
To edit an appointment
To delete an appointment
APPOINTMENTS
08 JUL/MEETING (BILL)
15 JUL/FLIGHT
31 JUL/DENTIST
05 AUG/THEATRE
12 AUG/MEETING (BOB)
18 AUG/SEMINAR
DELETE?
OK ESC
APPOINTM’T ALARM
ON OFF
Page 25

Using Notes
Your Easicom 100 can act as a notepad to
keep a record of important information.
You can stor e up to 18 separate notes.
Press buttons in order shown
Select NOTES from the main menu.
Press the add button. Display shows
Use the keypad to write your note.
You must give each note a title.
Press the OK button to save the
or entry or the esc button to cancel.
Select NOTES from the main menu.
Highlight the title of the note you
want to view.
Press the edit button.
KEYPAD
Use the keypad to make changes.
Press the OK button to save or the
or esc button to cancel.
esc
OK
edit
P
–
Ä
¶
esc
OK
add
+
R
Using the calculator
The calculator buttons are:
Press buttons in order shown
Select CALCULATOR from the
main menu.
Display shows
You can now use your Easicom 100
as a calculator.
21
CALCULATOR
0.
4
Equal OK BUTTON
2
Multiply UP ARROW BUTTON
3
Divide DOWN ARROW BUTTON
`
Add ADD BUTTON
1
Subtract EDIT BUTTON
Clear/Clear All
CE/C
(CE/C) DELETE BUTTON
z
DECIMAL POINT#/LEFT ARROW BUTTON
To use the calculator
To edit a note
To add a note
NOTES
TITLE:
CONTENTS:
Page 26

Press buttons in order shown
Select NOTES from the main menu.
Highlight the title of the note you
want to delete.
Press the del button to delete.
Press the OK button to confir m or
or the esc button to cancel.
Select NOTES from the main menu.
Highlight the title of the note you
want to view.
Press the OK button.
OK
Ä
¶
esc
OK
del
Ä
¶
To view a note
To delete a note
22
Caller Display
Your Easicom 100 does not offer Caller
Display. If you select Calls List from the
menu, the screen shows ‘EASICOM 200
FEATURE’. However, if you use your
Easicom 100 organiser with an Easicom
200 cradle, your calls list can be updated.
Page 27

Select USER INFO fr om the
main menu.
Highlight the entr y you want
to edit.
Press the edit button.
Use the keypad to change the
information.
Press the OK button to save the
or entry or the esc button to cancel.
Select USER INFO from the
main menu.
Highlight the entr y you want to
delete.
Press the del button.
Press the OK button to confir m
or or the esc button to cancel.
esc
OK
del
Ä
¶
esc
OK
edit
P
Ä
¶
User information
You can stor e important personal information
such as your Diving License, National
Insurance and Passpor t numbers under User
Info for easy reference at any time.
Press buttons in order shown
Select USER INFO from the
main menu.
Press the add button.
Use the keypad to write the
information. You must give each
entr y a title.
Press the OK button to save
or or the esc button to cancel.
esc
OK
add
+
R
23
To add a User Info entry
To delete a User Info entry
To edit a User Info entry
Once your own telephone number has been
stored, it will automatically appear in the
right place in the Call My Bill and Friends
& Family sections in Select Services.
Page 28

Press buttons in order shown
Select USER INFO from the
main menu.
highlight the USER INFO entry you
want to view
Press the OK button. The entry is
displayed.
OK
Ä
¶
To view a User Info entry
24
Page 29

Press buttons in order shown
Select SELECT SERVICES from the
main menu.
Select CALL DIVERSION.
Display shows
Press the OK button to contact the
Call Diversion ser vice.
The announcement asks you to
enter the telephone number to
which you want your calls diver ted
followed by the #button.
Press the OK button to confir m the
number.
Select SELECT SERVICES from the
main menu.
Select CALL DIVERSION.
Highlight CANCEL.
Press the OK button.
OK
Ä
OK
©
A
OK
25
Using Select Services
Your Easicom 100 gives you easy access to
the following range of BT Select Ser vices.
Friends & Family
Call My Bill
Call Waiting (Subscription service)
Call Diversion (Subscription ser vice)
Reminder Call (Pay as you use)
For fur ther infor mation, see the Select
Ser vices User Guide, supplied when you
subscribe to the ser vices of your choice.
Call Diversion
Your Easicom 100 can divert all your
incoming calls to another number where
you can be reached
SELECT SERVICES
1 FRIENDS & FAMILY
2 CALL MY BILL
3 CALL WAITING
4 CALL DIVERSION
5 REMINDER CALL
Note
If you are not connected to the BT network,
some of the services may not be available.
Please contact your network provider.
To set Call Diversion
SELECT SERVICES
CALL DIVERSION
SET
CANCEL
CHECK
To cancel Call Diversion
Page 30

26
Press buttons in order shown
You can check to see if Call Diversion
is on or of f.
Select SELECT SERVICES from the
main menu.
Select CALL DIVERSION.
Highlight CHECK.
Press the OK button.
OK
Ä
To check Call Diversion
Friends and Family
Your Easicom 100 makes it easy to add or
change numbers for discounts with BT’s
Friends & Family scheme. The telephone
number of the Friends & Family ser vice is
pre-programmed into your Easicom 100.
You will need to follow these steps
to put in your telephone number
and your customer number before
you contact Friends and Family with
your Easicom 100.
Select SELECT SERVICES from the
main menu.
Press OK to select Friends & Family.
Highlight TEL.
Press the edit button.
KEYPAD
Enter your telephone number.
Press the DOWN button to highlight
CUST NO.
KEYPAD
Enter your BT CUSTOMER
NUMBER .(This number appears
on the top right hand corner of
your bill.)
Press the OK button to save.
OK
Ä
edit
P
–
¶
OK
To set Friends and Family for the first time
Page 31

Call My Bill
This gives you the cost of calls recorded on
your telephone number since your last bill.
Before phoning the Call My Bill service, you
need your BT customer number. This is in
the top right hand corner of your phone bill.
You will need to follow the steps
below to put in your telephone
number and your customer number
before you contact Call My Bill with
your Easicom 100.
Press OK to select Call My Bill.
Highlight TEL.
Press the edit button.
KEYPAD
Enter your telephone number.
Press the DOWN button to highlight
CUST NO.
KEYPAD
Enter your BT CUSTOMER
NUMBER .(This number appears
on the top right hand corner of
your bill.)
Press the OK button to save.
OK
Ä
edit
P
¶
OK
27
To set Call My Bill for the first time
Press buttons in order shown
Providing the above steps have been
followed the first time you contact
Friends and Family with your
Easicom 100, you need only follow
the steps below to quickly add or
change numbers.
When the main menu is displayed:
Select SELECT SERVICES from the
main menu.
Press OK to select Friends & Family.
The Friends & Family 0800 number
is automatically highlighted
Press the OK button. The number
is dialled and the display highlights
✱✱
.
When requested press the OK
button to send
✱✱
. Display
highlights your telephone number.
When requested press the OK
button to send the telephone
number. Display highlights your
customer number
When requested press the OK
button to send customer number.
Now follow the instructions fr om
the ser vice to add or change
numbers. Press the OK button to
send each number.
OK
OKOKOKOKOK
To contact Friends and Family
Page 32

28
Reminder Call
You can set your Easicom 100 to give you a
call at a pre-arranged time...
Select SELECT SERVICES from the
main menu.
Select REMINDER CALL.
Display shows
Press the OK button. The Reminder
Call is dialled.
Announcement asks you to enter
the time of your reminder call
followed by the #button.
Press the OK button to confir m.
Select SELECT SERVICES from the
main menu.
Select REMINDER CALL.
Highlight CANCEL.
Press the OK button
OKÄOK
OK
Ä
To set a reminder call
To cancel a reminder call
Press buttons in order shown
You can get an instant bill total
including all charges up to the last
working day.
When the main menu is displayed:
Select SELECT SERVICES from the
main menu.
Highlight CALL MY BILL.
Press the OK button. The Call My
Bill number is displayed.
Press the OK button. The Call My
Bill number is dialled.
Listen to the announcement for your
up to date bill.
Press the OK button. The number
is dialled and the display highlights
✱✱
.
When requested press the OK
button to send
✱✱
. Display
highlights your telephone number.
When requested press the OK
button to send the telephone
number. Display highlights your
customer number
When requested press the OK
button to send customer number.
Now follow the instructions fr om
the ser vice to add or change
numbers. Press the OK button to
send each number.
OKOKOKOKOK
OK
OK
Ä
To use Call My Bill
SELECT SERVICES
REMINDER CALL
SET
CANCEL
CHECK
Page 33

Press buttons in order shown
Select SELECT SERVICES from the
main menu.
Select CALL WAITING.
Press the OK button.
Select SELECT SERVICES from the
main menu.
Select CALL WAITING.
Highlight OFF.
Press the OK button.
Select SELECT SERVICES from the
main menu.
Select CALL WAITING.
Highlight CHECK.
Press the OK button.
OKÄOK
Ä
OK
29
To switch Call Waiting ON
To switch Call Waiting OFF
To check a Call Waiting
Page 34

Press buttons in order shown
Select SET UP from the main menu.
Press the OK button.
Press the edit button.
Use the keypad andLEFTand
RIGHT
buttons to set the time you want the
alarm clock to ring.
Press OK to save
or or esc to cancel.
Highlight ON or OFF. The alarm will
not sound unless set to ON.
Press the OK button to save or esc
or to cancel.
esc
OK
Ä
¶
esc
OK
©
A
✱
§
edit
P
OK
30
To set the alarm clock
Set up Options
Your Easicom 100 pr ovides a range of
useful features which you can adjust to suit
your preferences.
Alarm Clock – set the time you want it to
ring ever y day.
Password – to help pr event unauthorised
access to the details in the organiser.
Keypad tones – switch off for silent
operation.
Memory optimise – r efresh the memory
occasionally to ensure maximum ef ficiency.
Battery status – check the status of your
organiser batteries at any time.
Display contrast – adjust the brightness
for easier viewing.
Automatic shutdown – switches off the
organiser screen when removed from the
cradle to save batter y power.
Time and Date – see page 8.
Appointment Alarm – see page 20.
Switchboard/PBX setting – see page 34.
Page 35

31
Press buttons in order shown
You can use a passwor d to prevent
unauthorised access to your
Easicom 100. The default setting is
no password.
Once password protection is
switched on, ever y time you switch
on the organiser, you will be asked
to enter the password.
Select SET UP from the main menu.
Select PASSWORD.
Display shows
Highlight ON or OFF.
Press the edit button.
KEYPAD
Use the keypad to enter the
information required. A passwor d
must be a number of up to six digits.
Press the OK button
or or esc to cancel.
esc
OK
edit
P
Ä
Ä
To enter a password
PASSWORD
NAME:
TEL:
OLD:
NEW:
CONFIRM:
PASSWORD: ON OFF
If you make a mistake when confirming
the new password, you are asked to enter
it again.
Each time one of the buttons is
pressed, the organiser gives a tone.
You can switch this on or off. The
default setting is ON.
Select SET UP from the main menu.
Select KEYPAD TONE.
Display shows
Highlight ON or OFF.
Press the OK button to save
or or esc to cancel.
esc
OK
Ä
Ä
Password note
If you cannot remember the password,
resetting your Organiser will enable you to
use it again. (See page 33)
To switch the keypad tone on and off
KEYPAD TONE
ON OFF
Page 36

Press buttons in order shown
When entries have been deleted
or changed, memor y can be used
inef ficiently. To ensure you have the
maximum amount of free space for
entries it is a good idea to refresh
the memor y every now and then.
Select SET UP from the main menu.
Select MEM/BAT STATUS.
Display shows
Select manual to see how much
memory space is free. Display shows
Press OK. Screen shows OPTIMISING
then COMPLETE.
Press the OK button.
Select SET UP from the main menu.
Select MEM/BAT status.
Select BATTERY to see the status of
the organiser batteries.
Press the esc button to return to
the MEM/BAT status screen.
esc
Ä
Ä
OK
OK
Ä
Ä
Select SET UP fr om the main menu.
Select LCD CONTRAST.
Adjust the contrast between Low
and High.
Press the OK button to save
or or esc to cancel.
Your Easicom 100 has been pr e-set
to automatically shut down 2
minutes after the last button press.
You can adjust Auto Shut Down to
between 1-5 minutes.
Select SET UP from the main menu.
Select AUTO SHUT DOWN.
Select the number of minutes
between 1-5, before Auto Shut Down
occurs.
Press the OK button to save
or or esc to cancel.
esc
OK
Ä
¶
Ä
esc
OK
©
A
✱
§
Ä
To adjust the display contrast
To check the battery status
To adjust the Auto Shut Down
32
To optimise the memory and view the
memor y status
MEM/BATT STATUS
1. MEMORY
2. BATTERY
MEMORY
OPTIMISE
96% FREE
Page 37

33
Resetting the organiser
If you cannot remember the password, or if
the organiser stops working, you can reset
and re-star t it without losing any of the
information stored on the memory.
• Press the RESET button, located in the
back-up batter y compartment.
Please note
If you want to reset and delete all the of the
data that has been entered, simply take the
2 AAA batteries and the back-up battery
out of the organiser at the same time.
Then re-install the batteries.
Page 38

Connection information
Connection information
Your Easicom 100 can be connected to most
modern switchboards.
If in doubt, your switch supplier or
maintainer should be able to of fer help.
Advice on connection to BT switching
systems can be obtained by dialling BT
Freefone 0800 800 152.
If you are connecting your Easicom 100 to
a switchboard/PBX, you may need to dial a
number (e.g. 9) in order to get an outside
line. This number can be programmed into
your Easicom 100. The directories are
stored within the cradle. So if you have a
cradle for work and one for home, you can
simply transpor t the organiser between
the two without having to re-programme all
the numbers.
34
Connecting to a
switchboard/PBX
Press buttons in order shown
The organiser must be placed on the
cradle while you follow these steps.
Select SET UP from the main menu.
Select PBX SETTING.
Display shows
If the organiser is not placed in the
cradle, the display shows
Highlight ON or OFF.
Press the edit button.
KEYPAD
Enter the code your switchboard
requires to get an outside line. Your
Easicom 100 allows up to four digits.
Press the OK button to save
or or esc to cancel.
esc
OK
edit
P
Ä
Ä
To set the number for an outside line
PBX SETTING
NUMBER:
ON OFF
PBX SETTING
PLACE IN CRADLE
TO ACCESS
OK
The number for an outside line will be lost
if there is a power failure.
The organiser must be placed in the
cradle while you follow the steps below.
Page 39

35
Maintenance
General
Simply clean the Easicom 100 with a damp
cloth (not wet) or an antistatic wipe.
Service
Within guarantee
If you experience a problem with your
Easicom 100 or handset you should contact
the Easicom 100 Helpline on 0345 573464.
Calls are charged at local call rates. If the
problem is not remedied, you will be advised
to contact you original point of purchase.
Some retailers of fer extended warranty
schemes for cover outside the initial 12month period. Please ask them for details.
Outside warranty
If your Easicom 100 needs repair after the
warranty period has ended, call the
Easicom 100 Helpline on 0345 573464 for
information on our recommended repair
agents.
If you have to return your
Easicom 100
Pack the cradle and handset securely,
preferably in the original packaging.
All par ts must be returned including line
cords, power supply unit and original
batter y. We cannot take responsibility for
goods damaged in transit.
Page 40

If the back-up organiser battery is running
low, display shows
Replace the batteries as soon as possible to
ensure your information is secure.
• Remove lid from back up battery
compar tment.
• Insert 1xCR1616 lithium battery as shown.
• Hold the batter y by its sides only as
touching the contacts can shor ten its life.
No dial tone
Is the Easicom 100 telephone line cord
plugged into the phone socket?
Check that the cradle is connected to the
mains power and switched on.
The organiser does not link up with the
cradle
Make sure the infrared window on the
organiser can “see” the cradle without
obstruction.
The range for the organiser is 3 metres
from the cradle.
Batteries could be low or flat.
36
Help
If the main Organiser batteries are running
low, display shows
Replace the batteries as soon as possible to
ensure your information is secure.
• Remove the main batter y cover using a
small screwdriver or similar instr ument
to release the clip.
• Insert 2 x AAA alkaline batteries as shown.
Replacing organiser batteries
IMPORTANT
Do not take the main batteries and the
back-up battery out at the same time,
otherwise data will be lost.
BACKUP BATTERY LOW
OK
MAIN BATTERY LOW
OK
Main batteries
Back-up
battery
Page 41

37
No ring on cradle
The ringer volume may be turned down too
low. Pr ess the volume switch on the cradle
to increase the ringer volume.
Check that the Easicom 100 is plugged into
the phone socket.
Check that the cradle is plugged into the
mains power and switched on.
Organiser does not function at all
Try resetting the organiser. See page 33.
Switchboard/PBX code does not get an
outside line
There may have been a power failure and
your switchboard/PBX setting has been
lost. To check your setting see page 34.
You may need to enter a pause after the
access code to allow enough time for the
switchboard/PBX to get an outside line.
Flashing IN USE light
There is an incoming call
Your Easicom doesn’t disconnect from
a call when the handset of an attached
telephone is replaced.
Check that your telephone is plugged into
the Easicom cradle rather than the
telephone wall socket.
Organiser seems to be getting slower
The memor y may be r eaching its capacity.
Try optimising the memory, see page 32.
If you are still experiencing difficulty, call
the Easicom 100 Helpline on 0345 573464.
Lines open 8.30am-5.30pm, MondayFriday and 12pm-5pm Saturday, excluding
bank holidays.
Page 42

38
Technical information
Environment
Your Easicom 100 should be kept fr ee of
dust, moisture, high temperature and
excessive vibration. It should not be used
in the bathroom or near water.
It is only designed to be operated in a
normal office or domestic environment
where the relative humidity does not
exceed 60%.
How many phones can you
have?
All items of telephone equipment have a
Ringer Equivalence Number (REN), which
is used to calculate the number of items
that may be connected to any one
telephone line. Your Easicom 100 has a
REN of 1. A total REN of 4 is allowed. If the
total REN of 4 is exceeded, the telephones
may not ring. With different telephone
types there is no guarantee of ringing, even
when the REN is less than 4.
Signalling
The Easicom 100 only suppor ts Touchtone
®
dialling and Timed Break Recall.
Guarantee
If you own your Easicom 100 – under
guarantee.
BT guarantee the product for one year
provided that:
The equipment has only been used for its
proper purpose and has not been subjected
to misuse or has been wilfully of
accidentally damaged.
The equipment has not been tampered with
or repaired by anyone other than BT, its
staf f, or agents. If a fault does occur in this
product and you bought the unit yourself,
provided that you retur n it to the place of
purchase and produce your receipt, it will
be either repaired or replaced free of
charge. The terms and conditions of this
guarantee do not af fect your statutory
rights.
If you own your Easicom 100 – outside
guarantee.
If your Easicom 100 needs repair after the
guarantee period has ended, it must be
repaired so as to comply with the approval
requirements for connection to the
telephone network. We recommend that
you call BT on Freefone 0800 800 150 or
visit your nearest BT shop, and you will be
informed of our recommended repair
agents.
Page 43

39
Index
Alarm clock 30
Appointments diar y 19
Appointment alarm 20
At a glance 1
Auto shut down 32
Batteries 6
backup 6, 36
cradle 7
organiser 6
replacing 36
Batter y memory 32
Batter y saver 8
Business directory 17
Calculator 21
Connect a telephone 7
Display contrast 32
Emergency calls 5
Ending calls 11
Entering details 10
Help 36
Installing 6
Introduction 4
Keypad tone 31
Making calls 11
Maintenance 35
Memor y status 32
Menu 9
Notes 21
Organiser keypad 9
Organiser symbols 9
Password 31
Personal directory 14
Power cable 7
Quickdial 13
Receiving calls 11
Redial 12
Reminder call 28
Resetting the organiser 33
Secrecy button 12
Select Ser vices 25
Call Diversion 25
Friends and Family 26
Call my Bill 27
Call Waiting 29
Reminder Call 28
Set up options 30
Switchboard/PBX 34
Switching on 8
Technical information 38
Telephone line cord 7
Time and date 8
User Info 23
Volume 12
Warning 6
Page 44

Offices in Europe, North America,
Japan and Asia Pacific.
The Telecommunications services described in this
publication are subject to availability and may be modified
from time to time. Services and equipment ar e provided
subject to British Telecommunications plc’s respective
standard conditions of contract. Nothing in this
publication forms any part of any contract.
Touchtone
TM
is a registered trade mark of
British Telecommunications plc in the UK.
© British Telecommunications plc 1997.
Registered Office: 81 Newgate Street, London EC1A 7AJ.
Registered in England No. 1800000.
Printed in China. Issue No.1 (8/98) 4.
Designed by The Art & Design Partnership Limited.
 Loading...