

Page 1

User Guide
BT AVIATOR 10M
Page 2
Welcome…
to your BT Aviator 10M DAB radio
■ Listen to superior quality DAB – digital audio broadcast –
radio stations
■ Use Replay to hear up to the last 10 minutes received by
your DAB radio, so you needn’t miss a tune or important
details
■ Slot in a SD or MMC card to play your MP3 recordings
■ FM radio option
■ Use your radio as clock/alarm
■ Select from a range of display options
■ Rich, clear stereo sound
If you have any problem setting up or using your
BT Aviator 10M then please call the Helpline on
0870 241 0217. Calls are charged at national rates.
Lines are open 09.00-18.00 Monday to Friday and
09.00-17.30 Saturday.
Page 3

In this guide 3
Getting started . . . . . . . . . . . . . . . . .4
Getting to know your radio
Buttons . . . . . . . . . . . . . . . . . . . . . . .5
Menu map . . . . . . . . . . . . . . . . . . . . .6
Basics
Switch radio on/off . . . . . . . . . . . . . . .7
Adjust volume . . . . . . . . . . . . . . . . . .7
Open menu . . . . . . . . . . . . . . . . . . . .7
Time . . . . . . . . . . . . . . . . . . . . . . . . .7
DAB radio
To switch to DAB radio mode . . . . . . .8
Select station . . . . . . . . . . . . . . . . . . .8
Pre-set DAB stations . . . . . . . . . . . . .8
Display information . . . . . . . . . . . . . .9
Full DAB scan . . . . . . . . . . . . . . . . . .9
Sort stations by preferred order . . . . . .10
Replay . . . . . . . . . . . . . . . . . . . . . . . .10
DAB Replay . . . . . . . . . . . . . . . . . . . .11
Delete replay content . . . . . . . . . . . . .12
FM radio
Switch to FM mode . . . . . . . . . . . . . .13
Pre-set stations . . . . . . . . . . . . . . . . .13
MP3 memory cards
Play MP3 recordings . . . . . . . . . . . . . .14
During play . . . . . . . . . . . . . . . . . . . .14
Clock/alarm
Alarm off . . . . . . . . . . . . . . . . . . . . . .15
Snooze off . . . . . . . . . . . . . . . . . . . . .15
Open the clock menu . . . . . . . . . . . . .15
Big time display . . . . . . . . . . . . . . . . .15
Set alarm . . . . . . . . . . . . . . . . . . . . . .16
Set sleep . . . . . . . . . . . . . . . . . . . . . .16
Set time . . . . . . . . . . . . . . . . . . . . . .17
Set snooze . . . . . . . . . . . . . . . . . . . . .17
12/24 hr clock . . . . . . . . . . . . . . . . . .18
Wake up mode . . . . . . . . . . . . . . . . .18
Settings
Open the settings menu . . . . . . . . . . .19
Audio . . . . . . . . . . . . . . . . . . . . . . . .19
Animation . . . . . . . . . . . . . . . . . . . . .19
Backlight off . . . . . . . . . . . . . . . . . . .20
Audio in . . . . . . . . . . . . . . . . . . . . . .20
Restore defaults . . . . . . . . . . . . . . . . .20
Help . . . . . . . . . . . . . . . . . . . . . . . . .21
General information
Safety information . . . . . . . . . . . . . . .23
Cleaning . . . . . . . . . . . . . . . . . . . . . .23
Guarantee . . . . . . . . . . . . . . . . . . . . .23
Returning your radio . . . . . . . . . . . . .24
Page 4

Getting started4
Only use the power adapter
supplied with your BT Aviator
10M.
IMPORTANT
If not all your local digital stations
are stored or if you move the radio
to another location there may be
different local digital stations
available. Set your radio to
perform a new scan, page 9.
1. Plug in the mains power lead.
2. Insert 4 x D type alkaline batteries (optional).
Slide down the battery compartment cover. Insert the
batteries (not supplied) as shown and slide the cover shut.
When the mains power is switched on or batteries are
in, the screen comes on. A set of fully charged alkaline
batteries should deliver 8-10 hours of radio/mp3
operation.
3. Press to switch the radio on.
The first time your BT Aviator 10M is switched on, it
automatically scans for the strongest digital radio station
signals in your areas.
The DAB stations are stored in alpha-numerical order
and the first station in the list starts playing.
Whenever you switch your radio on in the future, it will
play the last station you listened to.
Page 5
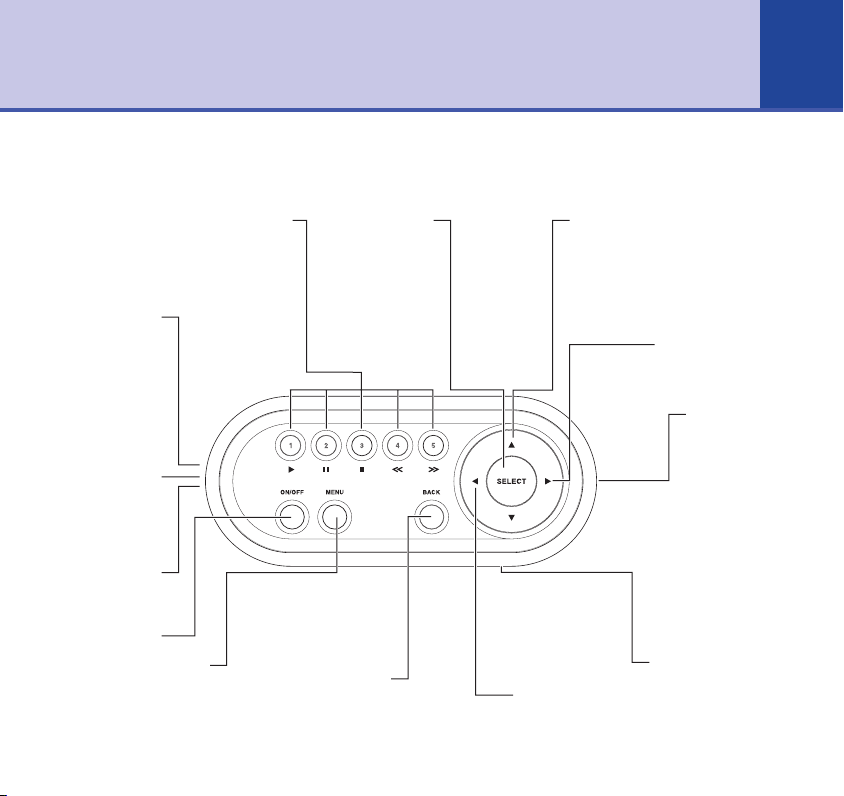
Getting to know your radio
Buttons
5
DAB and FM preset buttons, page 8/13.
Also used to play, pause and select
when using the Replay or MP3
functions, page 11/14.
Aux in
Use your radio
as an amplifier
for MP3 and
other devices.
You must also
switch the
Audio In setting
On, page 20.
Aux out
Connect your
radio to another
device such as
your hifi.
Headphones
Connect
headphones.
On/Off
Opens the main menu to
select between DAB, FM,
MP3, Clock and Settings,
Menu
page 7.
1-5
Selects the
highlighted
the screen.
Takes you out of
Back
the menu.
Select
option on
Up/Down
Scroll to radio
station or option
displayed on
screen.
Left
Volume down.
Right
Volume up.
SD/MMC card
Insert card to
play your own
recordings,
page 14.
Replay
Replays up to the last
10 minutes received
by the DAB radio,
page 11.
Page 6

6
Getting to know your radio
Menu map
Menu
dab radio
fm radio
mp3
clock
settings
dab radio
display
sort
scan
fm radio mp3 clock
big time display
set alarm
set sleep
set time
set snooze
12/24 hour clock
wake up mode
settings
audio
animation
backlight
audio in
restore defaults
about
Page 7
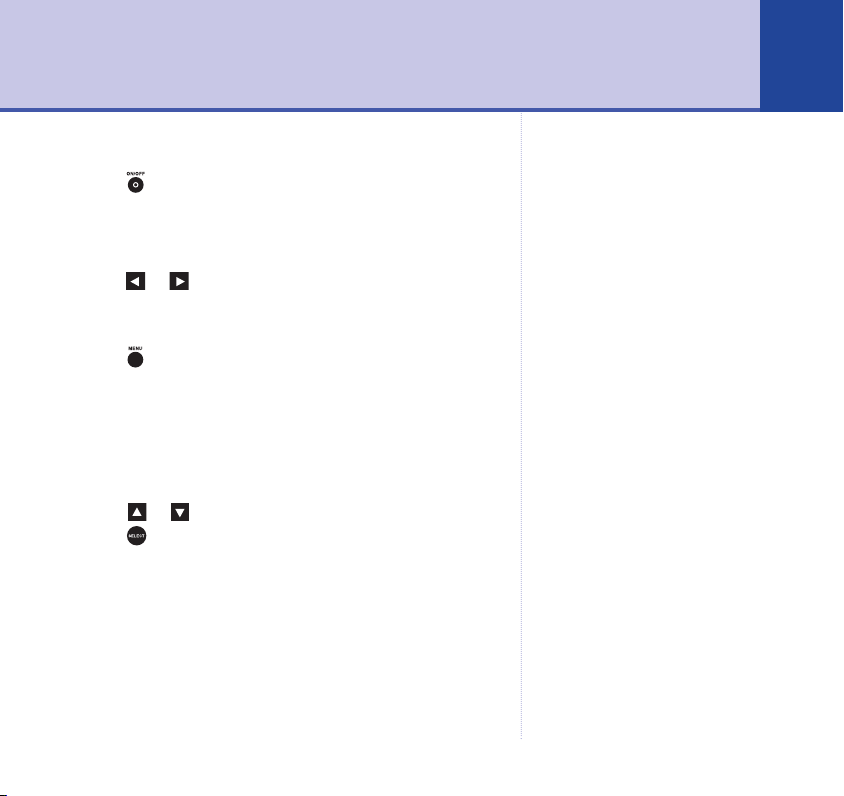
Basics 7
Switch radio on/off
Press . The display shows the radio station or MP3
that is playing.
Adjust volume
Press or . A bar is displayed showing the level.
Open menu
Press to display the options of:
■ dab radio
■ fm radio
■ mp3
■ clock
■ settings
Scroll or to highlight the option you want then
press .
Time
Once you have tuned into a digital radio station, the
clock is automatically set to the correct time. When you
switch the radio off, the time will be displayed.
To set the time manually and set the alarm clock
functions, see page 17.
To set your preferred display, see page 9.
There may be a delay before the
correct time is displayed as it is
dependant on the DAB signal
received from the radio station.
When the signal is received the
time will appear in the top right
section of the screen.
Page 8

DAB radio8
Press at any time to leave
the menu.
To switch to DAB radio mode
Press . dab radio is highlighted. Press .
Select station
Press or to display the list of radio stations.
The next station in the list is highlighted.
Scroll or to until the station you want is highlighted
and press .
Pre-set DAB stations
Set and select up to 5 stations using the 1-5 buttons.
While playing the station, press and hold the 1-5 button
for about 2 seconds until the number of the button is
displayed to the left of the station title, e.g. CAPITAL
GOLD.
When in DAB mode, press the 1-5 button to play the
pre-set station.
You can overwrite a pre-set station simply by setting a
new one in its place.
Page 9

Display information
Select the information displayed on screen when your
radio station is playing.
1. When in DAB mode, press then . display is
highlighted.
2. Press then scroll or to highlight:
broadcasting info – press to display details about
the programme across the screen.
station info – press , the display gives you the genre,
bit rate, stereo/mono and multiplex of the station in turn.
scan – performs a full DAB station scan, (see below).
Full DAB scan
You can set your BT Aviator 10M to perform a full scan
of DAB stations in your area. You should always do this if
you move your radio to another location to ensure you
can receive all available stations.
1. When in DAB mode, press then . display is
highlighted.
2. Press then to highlight scan.
3. Press . When the scan is finished the first available
station is played.
DAB radio
9
Page 10

10
DAB radio
Stations sorted by genre are listed
under the headings of:
■
Not classified
■
News
■
Sports events
■
Varied
■
Pop music
■
Rock music
■
Easy music
■
Classical music
■
Other music
■
For children
■
Travel
■
Jazz music
■
Oldies music
Sort stations by preferred order
You can choose to have the DAB stations listed in the
order you prefer:
a-z – listed in alpha-numeric order
genre – listed by broadcast content of station.
most played – automatically selects your most played
radio station.
1. When in DAB mode, press then . display is
highlighted.
2. Press then to highlight sort. Press to confirm.
3. Scroll or to select a-z, genre or most played and
then press .
4. The stations are displayed. Scroll or to the station
you want and press , or if you selected most played,
the radio will automatically start to play the appropriate
station.
Replay
In DAB mode, your BT Aviator 10M can record the last
10 minutes of radio reception, so if you miss an
announcement or want to hear a tune again, you can
hear it with Replay.
Page 11

DAB Replay
REPLAY
When you want to replay up to the last 10 minutes of
digital radio:
1. Press . The screen displays dab replay and the
REPLAY
elapsed time of the replay. The bottom of the screen
shows a progress bar.
2. During replay press:
to pause
to start/resume replay
to stop playback – and return to the start of the
Replay content
to go back, indicated in the progress bar
to go forwards, indicated in the progress bar
3. To exit Replay mode and delete the Replay content,
press and hold for about 2 seconds until the screen
reverts to your normal radio display.
OR
DAB radio
11
Page 12

12
REPLAY
DAB radio
To exit Replay and save the Replay content, press or
. The radio station resumes playing but the
screen still displays the symbol. The Replay function
will not record again until you delete the Replay content.
Delete replay content
Press and hold for about 2 seconds until the
symbol disappears from the screen.
Page 13

FM radio 13
Switch to FM mode
1. Press to switch the radio on.
2. Press , scroll to fm radio and press .
3. To search, press and hold or for about 2 seconds
to locate the next station automatically.
4. Fine tune in .05 MHz jumps by pressing or .
Pre-set stations
Set and select up to 5 FM stations using the 1-5 buttons.
1. While playing the station, press and hold the 1-5 button
for about 2 seconds until the number of the button is
displayed to the left of the station, e.g. 89.10Mhz.
2. When in FM mode, press the 1-5 button to play that
station.
You can overwrite a pre-set station simply by setting a
new one in its place.
Page 14

MP3 memory cards14
All files on your card will be
displayed but only MP3 files can be
played.
Your BT Aviator 10M lets you play your SD and MMC
cards.
Play MP3 recordings
1. Press to switch your radio on.
2. Press and scroll to highlight mp3.
3. Press . If no card is inserted, the screen displays
please insert card.
4. Insert the card into the slot on the side of your radio.
The albums on the card are displayed.
5. Press or to scroll through the albums and press .
6. Press or to scroll through the tracks. Press or
to start playing.
During play
to pause
resume play
stop
to go back
to go forwards
Page 15

Clock/alarm 15
Set the Time, Alarm, Sleep and Snooze functions.
Alarm off
1. To turn the alarm off, press and hold for 2 seconds, or
press .
Snooze off
1. To mute Snooze, press .
2. To cancel Snooze, press and hold for 2 seconds,
release, then press and hold for a further 2 seconds.
Open the clock menu
1. Press and scroll to highlight clock.
2. Press . Scroll to highlight the option you want.
Big time display
Screen displays the time in large numerals when the
radio is switched off.
1. big time display is highlighted. Press .
2. Press to set the large time display on when you turn
the radio off.
If the Snooze period is set to
0 minutes, the alarm will turn
off when muted.
Page 16

16
Clock/alarm
Set alarm
Set the time you want.
1. set alarm is highlighted. Press . 00:00 OFF SET is
displayed.
2. The hour number flashes. Press or to set the hour.
Press .
3. The minute number flashes. Press or to set the
minute. Press .
4. OFF flashes. Press or to set ON. Press to
confirm. When set, the top bar of the screen displays the
alarm icon and the time the alarm has been set.
5. SET flashes. Press to confirm.
To turn off the alarm repeat stages 1-5 but select OFF at
stage 4. The no longer appears in the display.
Set sleep
Set the amount of time before your radio switches off
automatically.
1. set sleep is highlighted. Press . OFF is displayed.
2. Press or to set the duration you want up to 80
minutes or OFF. Press . When set, the top bar of the
screen displays the sleep icon .
Page 17

Set time
Your radio should automatically set the time when you
listen to a digital radio station. You can also set the clock
manually.
1. set time is highlighted. Press .
2. The hour number flashes. Press or to set the hour.
Press .
3. The minute number flashes. Press or to set the
minute. Press .
4. SET flashes. Press to confirm.
Set snooze
Set the length of snooze.
1. set snooze is highlighted. Press . 0 minutes is
displayed.
2. Press or to set the amount of snooze time you
want 0-5 minutes.
3. Press confirm.
Clock/alarm
There may be a delay before the
correct time is displayed as it is
dependant on the DAB signal
received from the radio station.
When the signal is received the
time will appear in the top right
section of the screen.
If the Snooze period is set to
0 minutes, the alarm will turn
off when muted.
17
Page 18

18
Clock/alarm
12/24 hr clock
Set the time display format.
1. 12/24 hr clock is highlighted. Press .
2. Press or to switch between 12 hour and 24 hour
displays.
3. Press confirm.
Wake up mode
If you set the alarm, you can select your BT Aviator 10M
to switch on in dab, fm, mp3 or alarm modes.
1. wake up mode is highlighted. Press . Scroll or
to the setting you want.
2. Press .
Page 19

Settings 19
Open the settings menu
1. Press to switch your radio on.
2. Press , scroll to settings then press .
3. Scroll or to highlight the option you want.
Audio
Adjust the sound quality of your radio.
1. audio is highlighted. Press . Scroll or to the
setting you want:
normal – press to switch the default sound setting
ON.
bass – press to switch the enhanced bass ON.
treble – press to switch the enhanced treble ON.
karaoke – press to switch karaoke mode ON. This
cuts out the vocals from songs, so you can sing along!
Animation
Select an animated screen display. Choose Aquarium,
Stars, Snow fall or Circles.
1. animation is highlighted. Press . Scroll or to
the setting you want:
If you adjust the volume, the
screen will show the new volume
setting then revert to the
animation.
Page 20

20
Settings
Use a 3.5mm stereo jack cable
(not supplied).
If you are having any difficulties
with your radio, selecting Restore
Defaults may end the problem.
2. Press to start the animation.
Backlight off
1. backlight off is highlighted. Press to turn off the
screen backlight.
2. To switch the backlight on again, press .
Audio in
When plugging another device – such as an mp3 or CD
player – into the AUX IN socket to play through your BT
Aviator 10M you must switch the audio in setting ON.
1. audio in is highlighted. Press . Screen displays Line In
is ON. You can now play the connected device through
your radio.
2. To exit the audio in setting, press or .
Restore defaults
You can restore your BT Aviator 10M to its original
settings. Please note that this will cancel any pre-set
stations you have stored on the 1-5 buttons.
1. restore defaults is highlighted. Press and hold for 2
seconds.
Page 21

Help
If you are having any difficulties using your BT Aviator 10M you may find the answer to
your problem here.
If not, then please call the BT Aviator Helpline on 0870 241 0217. Calls are charged at
national rates. Lines are open 09.00-18.00 Monday to Friday and 09.00-17.30 Saturday.
No sound
■ Check that your radio is connected to the mains or has fully charged batteries.
■ Check the volume setting. Press to increase the volume.
■ Have you moved the radio to a different location? In DAB radio mode, try a Full Scan
(page 9) to tune into all available digital stations.
■ In FM mode, press and hold or to tune to the next radio station.
21
Screen displays “No services available
■ Check that DAB coverage is available in your area by going online to
”
www.digitalradionow.com or use SMS to text the word DAB followed by your postcode
to 87220. You will receive a text back straight away telling you how many stations you
can receive. Calls cost 25p per text plus your network’s text charge. Provided by Virgin
Radio New Media.
■ Check that the aerial is fully extended.
Page 22

22
Help
Poor reception
Any radio service can have areas where the signal is weak
■ Check that the aerial is fully extended. Try moving the radio around the room or to
another room.
■ In FM mode try adjusting the reception frequency by pressing or .
■ If necessary, you can remove your aerial (using an 11mm spanner) and plug in a standard
co-axial 75 ohm external antenna.
Screen displays “Station off air”
■ This may occur if a broadcaster takes a station off-air whilst you are listening to it.
Choose another station if necessary.
Cannot get secondary DAB radio services
■ Few secondary services are available at the time of publishing. However, this may
increase as broadcasters fully exploit DAB technology.
Restore defaults
■ If you are having any difficulties with your radio, simply setting RESTORE DEFAULTS may
end the problem. See page 20.
Page 23

General information 23
Safety information
■ Do not open the radio. This could expose you to high voltages or other risks.
■ Never dispose of batteries in a fire. There is a serious risk of explosion and/or the release
of highly toxic chemicals.
Cleaning
■ Clean the radio with a damp (not wet) cloth, or an anti-static wipe. Never use household
polish as this may damage the product.
Guarantee
■ Your BT Aviator 10M is guaranteed for a period of 12 months from the date of purchase.
■ Subject to the terms listed below, the guarantee will provide for the repair of, or at BT’s
or its agent’s discretion the option to replace the BT Aviator 10M or any component
thereof, (other than batteries), which is identified as faulty or below standard, or as a
result of inferior workmanship of materials. Products over 28 days old from the date of
purchase may be replaced with a refurbished or repaired product.
The conditions of this guarantee are:
■ The guarantee shall only apply to defects that occur within the 12 month guarantee period.
■ Proof of purchase is required.
■ The equipment is returned to BT or its agent as instructed.
Page 24

24
General information
■ This guarantee does not cover any faults or defects caused by accidents, misuse, fair
wear and tear, neglect, tampering with the equipment, or any attempt at adjustment or
repair other than through approved agents.
■ This guarantee does not affect your statutory rights.
Within the 12 month guarantee period:
■ In the unlikely event of a defect occurring, please return the product with the receipt, to
the place of purchase.
Outside of the 12 month guarantee period:
■ If your product needs repair after the guarantee period has ended. We recommend that
you contact BTís approved repair agent, TecLogic on 08702 405029 or a local qualified
repairer.
Returning your radio
Where possible, pack the product in its original packaging.
Please include all parts, including the mains power cords.
(Please note we cannot take responsibility for goods
damaged in transit.) Please obtain and keep proof of
posting from the Post Office or carrier.
For your records
Date of purchase:
Place of purchase:
Serial number:
For guarantee purposes proof of
purchase is required so please
keep your receipt.
Page 25

Visit us at www.bt.com
Offices worldwide
The telecommunications services described in this publication
are subject to availability and may be modified from time to time.
Services and equipment are provided subject to British
Telecommunications plc’s respective standard conditions of
contract. Nothing in this publication forms any part of any contract.
© British Telecommunications plc 2004.
Registered Office: 81 Newgate Street, London EC1A 7AJ.
Registered in England No. 1800000.
BT Aviator 10M (09/04) 3
Designed and produced by The Art & Design Partnership Ltd.
Printed in China
 Loading...