

Page 1
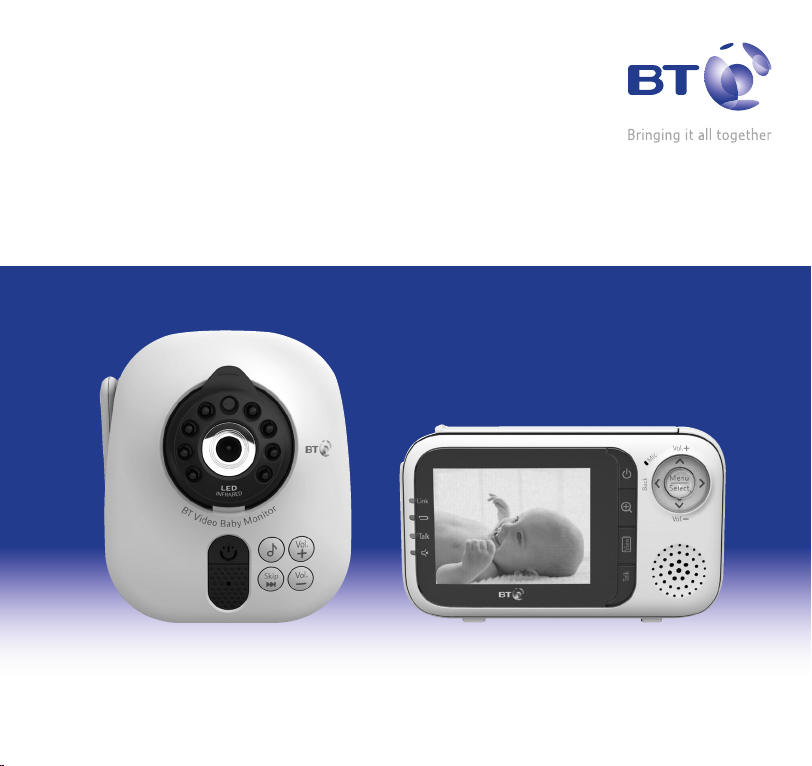
BT Digital Video Baby Monitor 1000
User Guide
Page 2
Welcome…
to your BT Digital Video Baby
Monitor 1000
• Large 2.8˝ LCD screen so you can see your baby clearly
• Quality video experience with a high refresh rate for a
smooth picture
• Digital sound quality lets you hear your baby breathe,
gurgle, snuffle or cry with complete clarity
• Wireless range of up to 300m outdoors and up to
50m indoors (in ideal conditions) – giving you the
freedom to move around with clear reception and
no interference from other baby monitors
• Auto-adjusts between day and night modes so no
need to press buttons in the dark
• Baby room temperature monitor
• 5 Lullabies
• Talk Back feature lets you instantly reassure and calm
your baby
• Connect up to 4 cameras
• Out of range and battery low warnings
Page 3

This User Guide provides you with all
the information you need to get the
most from your BT Digital Video Baby
Monitor 1000.
Please read this guide carefully and
keep it for future reference.
Need help?
If you have any problems setting up or using your
BT Digital Video Baby Monitor 1000 (or would like
any additional or replacement batteries), call our
free BT Digital Video Baby Monitor 1000 Helpline
on 0808 100 6554*. Our dedicated advisors are
more likely to be able to help you than the retailer
where you made your purchase.
Alternatively, you may find the answer in the ‘Help’
section at the back of this guide.
Additional answers to Frequently Asked Questions
are also available from www.bt.com/producthelp
* Calls made from within the UK mainland network are free.
Mobile and international call costs may vary.
Got everything?
• Baby unit
• Parent unit
• Rechargeable battery
for your Parent unit
• 1 x battery compartment
cover for your Parent unit
• 1 x power adaptor for
your Parent unit (item
code 064761)
• 1 x power adaptor for
your Baby unit (item
code 064785)
• Wall mounting bracket,
screws (x2) and wall
plugs (x2)
Page 4

4
4
Important safety information
• Your BT Digital Video Baby Monitor 1000 is designed to be an aid and should not
be used as a substitute for responsible and proper adult supervision.
• Make sure the Baby unit, Parent unit and mains adaptor cables are kept out of
reach of your baby – at least one metre away.
• Never place the Baby unit inside your baby’s cot, bed or playpen.
• Never cover your Parent or Baby units (e.g. with clothes, towels or blankets).
• Never use or place your Parent or Baby units in moist places or near water.
• If travelling abroad, make sure that the voltage shown on the mains power
adaptor corresponds to the local mains power before connecting to the
power supply.
• There is a risk of explosion if the batteries are replaced by an incorrect type. Only
use the supplied battery for the Parent unit (or a replacement as advised by the
Helpline). Only use x4 AA batteries (not supplied) for the Baby unit. You can use
rechargeable batteries but the Baby unit will not charge them.
• Dispose of used batteries according to the instructions. Do not dispose of
batteries in a fire as they may explode.
• Only use the power adaptor cables supplied. Using an incorrect power adaptor
could seriously damage the product.
If you experience any problems, please call the Helpline on Freephone 0808 100 6554* or visit www.bt.com/producthelp
Page 5

Important safety information 5
• Do not try and disassemble, open or remove parts of the product. Contact the
Helpline for any repairs.
• During continual use the Baby unit and Parent unit power adaptors may become
warm to the touch. This is normal and is not something to be concerned about.
If you experience any problems, please call the Helpline on Freephone 0808 100 6554* or visit www.bt.com/producthelp
Page 6

6
6
In this guide
Important safety information ........... 4
Your BT Digital Video Baby
Monitor 1000
Baby unit
Back of Baby unit
Parent unit
Parent unit screen display icons
Parent unit menu map
Setting up
Parent unit
Baby unit
Positioning and operating range
Testing the units before use
Pairing the units
Wall mounting the Baby unit –
optional
..........................................8
...............................9
......................................10
........12
.....................14
.................................... 16
......................................16
........................................18
.......20
..............21
..............................21
..........................................22
Using your BT Digital Video Baby
Monitor 1000
Using the Baby unit
Switch the Baby unit on/off
Adjust the Baby unit loudspeaker
volume............................................25
Play lullabies from the Baby unit
To play lullabies
Night vision
Using the Parent unit
Switch the Parent unit on/off
Adjust the Parent unit loudspeaker
volume............................................27
Zoom
Zoom in or out in single-CAM mode
View
To view different Baby units
.....................................26
..............................................27
...............................................28
..........................25
..............25
.......25
...............................26
.......................26
............26
. .27
..............28
If you experience any problems, please call the Helpline on Freephone 0808 100 6554* or visit www.bt.com/producthelp
Page 7

In this guide 7
Zoom in or out in multi-CAM mode (if
you have more than one Baby unit)
To turn the screen on/off
Talk to the Baby unit
Parent unit settings menu
Using the menu
...............................30
..................28
........................29
.............. 30
...28
Turn the battery low alert tone
.............................................30
on/off
Turn the No link alert on the
Parent unit on/off
Sensitivity level
............................31
................................32
To set the sound sensitivity level
of the Baby unit
Room temperature monitor
Set the minimum room temperature
...............................32
..............33
.33
Set the maximum room temperature
Turn the temperature alert on or off
Set the temperature format
............................................37
Vibrate
..............36
..35
Sound activated screen
Parent unit screen brightness
Display language
Pair/unpair CAM
To pair a Baby unit to the
Parent unit
......................................40
To unpair a Baby unit from the
Parent unit
Help
......................................42
............................................. 43
General information
Cleaning
Guarantee
..........................................46
.......................................46
Product disposal instructions
.............................................47
R&TTE
Declaration of Conformance
. 34
User Guide formats
....................38
............38
.............................39
..............................40
...................... 46
............47
.............47
..........................47
If you experience any problems, please call the Helpline on Freephone 0808 100 6554* or visit www.bt.com/producthelp
Page 8
8
8
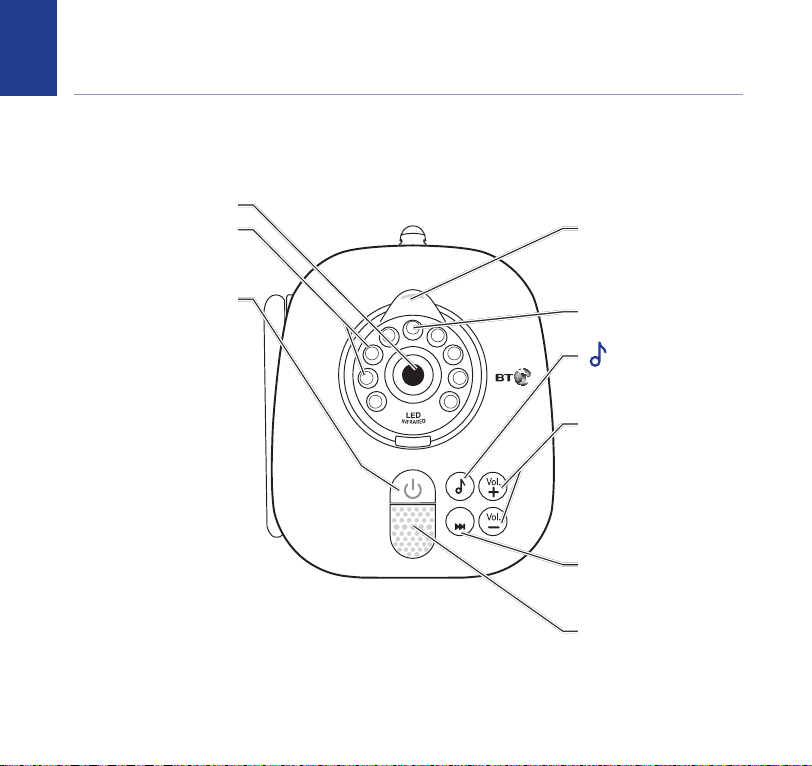
Your BT Digital Video Baby Monitor 1000
Baby unit
The Baby unit is also referred to as a CAM (camera) in this guide.
Camera
Infra red LEDs
Back-up light for
night vision.
Power on/off
Press and hold to
turn on or off.
Red light is on when the
Baby unit is powered
by batteries.
Green light is on
when the Baby unit
is powered by the
power adaptor.
Flashes red when
the Baby unit
battery is low.
Flashes red and green
alternately when
the Baby unit is in
pairing mode.
B
T
V
i
d
e
o
r
o
t
i
n
o
M
y
B
b
a
Skip
Camera angle
adjustment tab
Pull to adjust the
camera angle.
Light sensor
Press to play and
stop lullabies.
Volume +/-
Press to increase or
decrease the volume.
Skip
Press to skip to the
next lullaby.
Microphone
If you experience any problems, please call the Helpline on Freephone 0808 100 6554* or visit www.bt.com/producthelp
Page 9
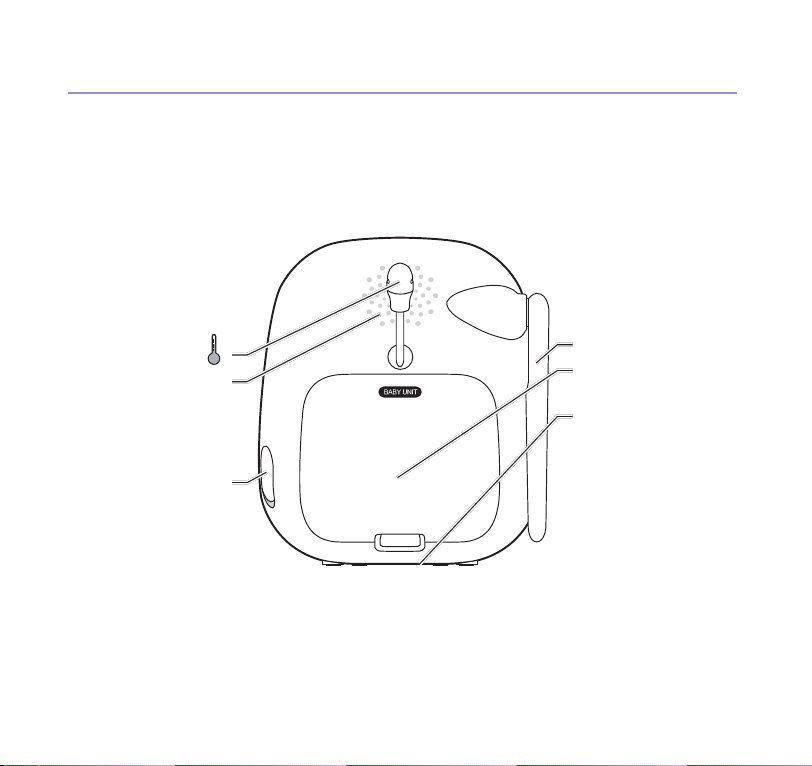
Back of Baby unit
Your BT Digital Video Baby Monitor 1000 9
Temperature sensor
Speaker
To listen to lullabies
and parent’s voice
when Talk feature
is used.
Power socket
(beneath the
rubber cover)
If you experience any problems, please call the Helpline on Freephone 0808 100 6554* or visit www.bt.com/producthelp
Antenna
Battery
compartment cover
Threaded socket
(6mm)
Used for the wall
mounting bracket
supplied or a tripod
(not supplied).
Page 10
Your BT Digital Video Baby Monitor 1000
10
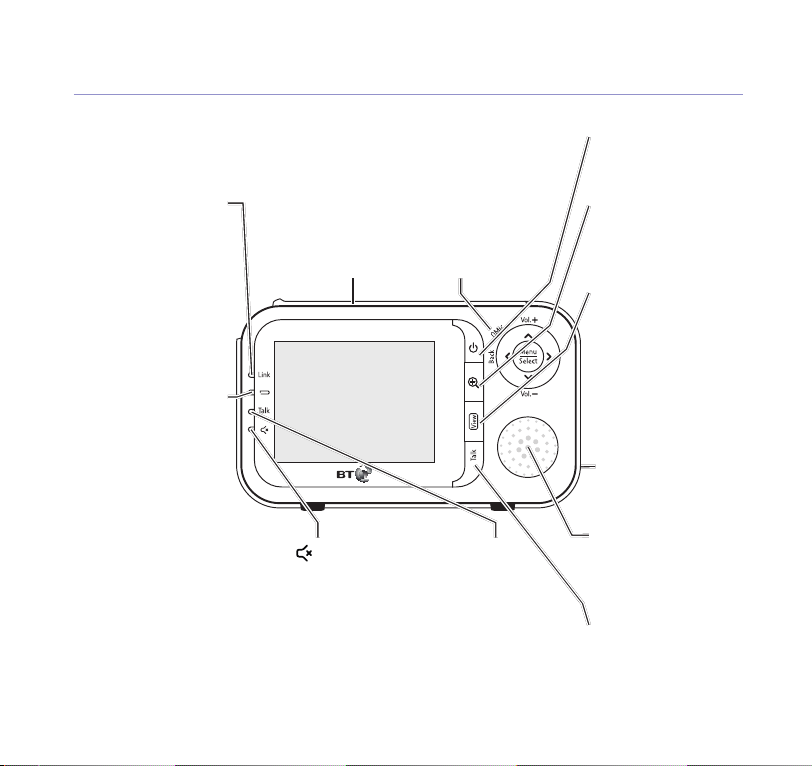
Parent unit
Link light
On = strong signal is
detected between the
Parent and Baby unit.
Flashing = Parent unit
cannot link to the
Baby unit.
Off = Parent unit
is turned off.
Battery light
On = Parent unit
battery is
being charged.
Flashing = Parent unit
battery is low and
needs charging.
Off = Parent unit
battery is fully
charged (if connected
to mains power) or
Parent unit battery
is adequate (when
operated using
the battery).
Antenna Microphone
light
On = Parent unit screen
is in multi-CAM mode or
the Parent unit speaker
volume is turned off.
Talk light
On = Parent unit
is talking to the
Baby unit.
Power on/off
Press and hold to turn
on or off.
Zoom
Whilst viewing in
single-CAM mode,
press to zoom in or out.
View
Press repeatedly to
view an individual
camera or all cameras at
the same time.
Press and hold to turn
the screen off or press
to turn it on.
Power socket
(beneath the
rubber cover).
Speaker
To listen to sounds
transmitted from the
Baby unit.
Talk
Whilst viewing in
single-CAM mode,
press and hold to talk
to the Baby unit.
If you experience any problems, please call the Helpline on Freephone 0808 100 6554* or visit www.bt.com/producthelp
Page 11
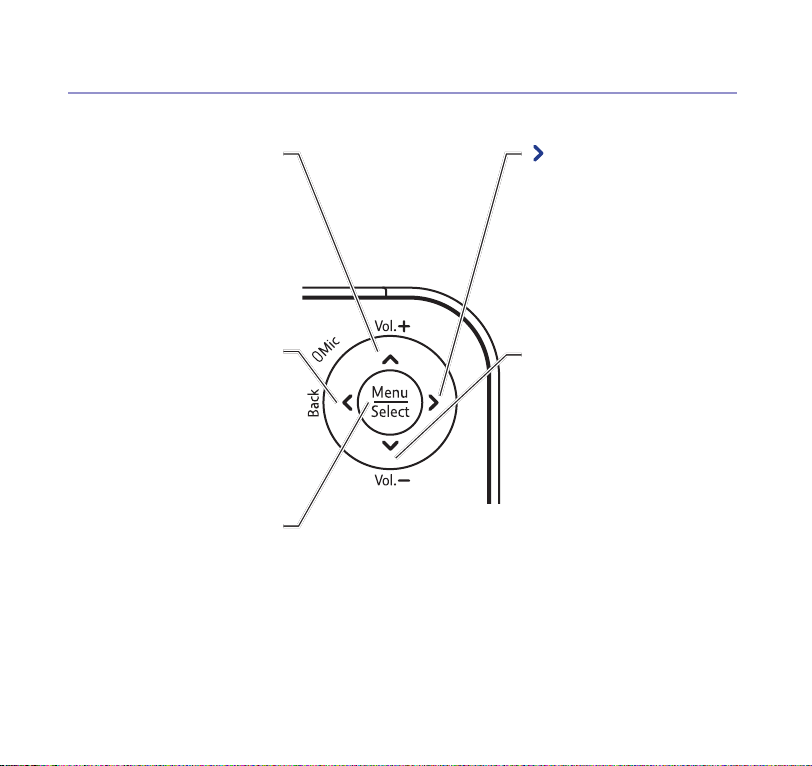
Parent unit continued
Up/Vol+
Press to increase the Parent
unit speaker volume.
Press to scroll up a menu.
Whilst viewing in zoom
mode, press to move up.
Whilst viewing in multi-CAM
mode, press to scroll up to
highlight a certain camera.
In menu mode, press to return
to the previous menu.
Whilst viewing in zoom mode,
press to move to the left.
Whilst viewing in multi-CAM
mode, press to move left
to highlight a certain camera.
Menu/Select
Press to enter the menu.
In menu mode, press to select
an option or save a setting.
Whilst viewing in multi-CAM
mode, press to select a
certain camera.
Back
Your BT Digital Video Baby Monitor 1000 11
Whilst viewing in zoom mode,
press to move right.
In menu mode, press to select
an option.
Whilst viewing in multi-CAM
mode, press to move right to
highlight a certain camera.
Down/Vol –
Press to decrease the Parent
unit speaker volume.
Press to scroll down a menu.
Whilst viewing in zoom mode,
press to move down.
Whilst viewing in multi-CAM
mode, press to scroll down to
highlight a certain camera.
If you experience any problems, please call the Helpline on Freephone 0808 100 6554* or visit www.bt.com/producthelp
Page 12
Your BT Digital Video Baby Monitor 1000
18 oC
12
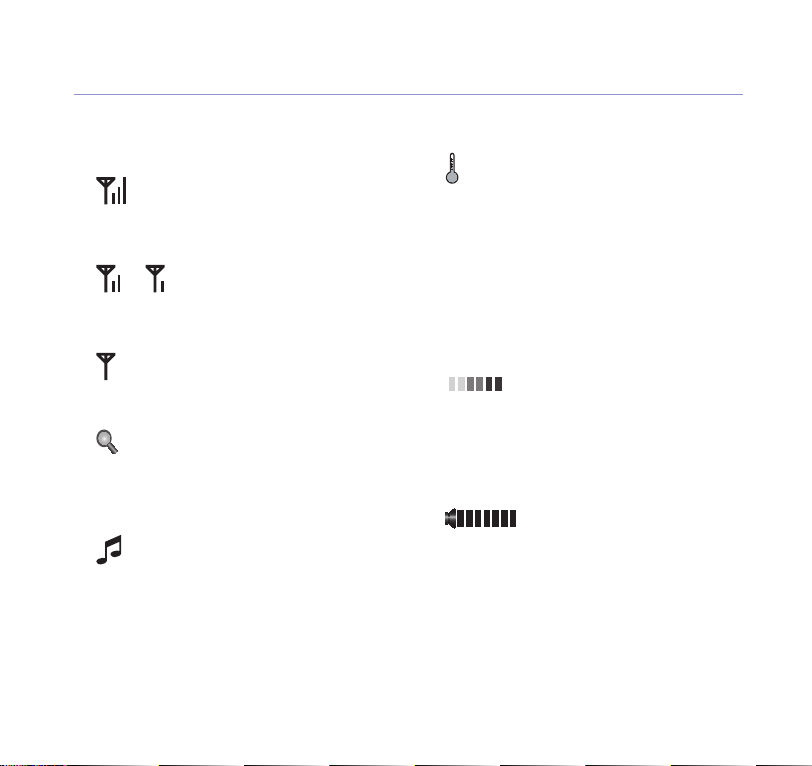
Parent unit screen display icons
Connection status
displayed when strong signal
strength is detected between the
Baby and Parent unit.
or displayed when moderate
signal strength is detected between
the Baby and Parent unit.
displayed when the link between
the Baby and Parent unit is lost.
Zoom
Displayed when the camera at the
Baby unit has been zoomed in.
Lullaby
Displayed when a lullaby is playing at
the Baby unit.
Temperature alert
Displayed when the temperature
alert is set to on.
Current temperature
Displays the temperature in the room
where the Baby unit is.
Sound level indicators
Light up to indicate the level of
sound being transmitted from the
Baby unit.
Speaker volume
Light up when adjusting the speaker
volume level.
If you experience any problems, please call the Helpline on Freephone 0808 100 6554* or visit www.bt.com/producthelp
Page 13

Parent unit screen display icons continued
Your BT Digital Video Baby Monitor 1000 13
CAM 1, 2, 3, 4
Current view status
Displays the number of the Baby unit
that is being viewed when in singleCAM mode.
Displays the highlighted Baby unit
when in multi-CAM mode.
The icon does not appear when the
Parent unit has no paired Baby unit.
Battery status
The battery icon will scroll
when charging.
Displayed when the battery is
fully charged.
Displayed when the battery is
low and needs charging.
Displayed when no battery is
installed but is operating using the
power adaptor, or the battery has
been installed incorrectly.
If you experience any problems, please call the Helpline on Freephone 0808 100 6554* or visit www.bt.com/producthelp
Page 14
Your BT Digital Video Baby Monitor 100014
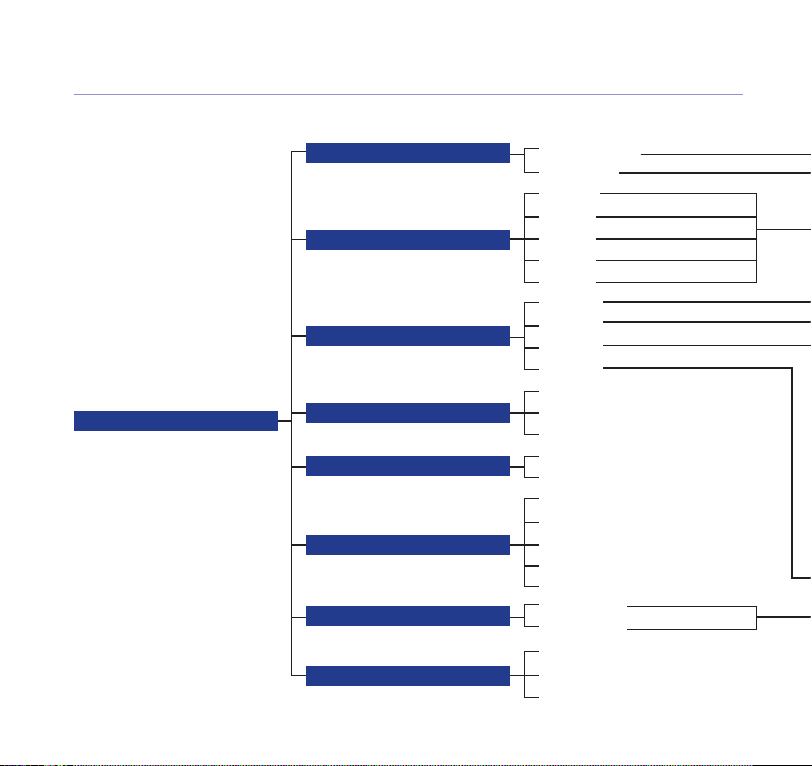
Parent unit menu map
Menu
Alert Tone
Sensitivity
Temperature
Vibration
Sound-Activated Screen
LCD Brightness
Pair/Unpair CAM
Language
Low Battery Tone
No Link Alert
ALL CAM
CAM 1
CAM 2
CAM 3
CAM 4
Minimum
Maximum
Alert
Format
On if speaker is off
Always On
Off
On
1
Off
Level 1
Level 2
1
Level 3
Level 4
Level 5
Pair new CAM
Unpair CAM
1
English
Francais
Espanol
1
If you experience any problems, please call the Helpline on Freephone 0808 100 6554* or visit www.bt.com/producthelp
Page 15
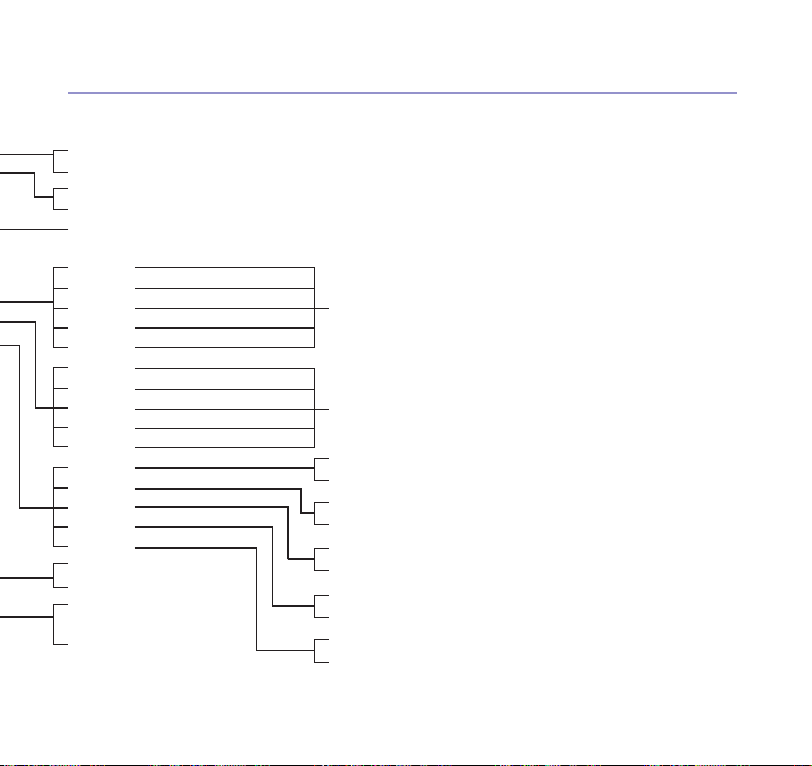
Your BT Digital Video Baby Monitor 1000 15
1
On
Off
1
On
Off
Level 1-5 (5=Maximum, 3=Default)
ALL CAM
CAM 1
CAM 2
CAM 3
CAM 4
ALL CAM
CAM 1
CAM 2
CAM 3
CAM 4
ALL CAM
CAM 1
CAM 2
CAM 3
CAM 4
Farenheit
1
Celsius
Scroll options
<select CAM slot to use>
Scroll options
<select CAM slot to use>
1
Default setting
Scroll options <select between 11 and 20 degrees> (
Scroll options <select between 21 and 30 degrees> (
1
On
Off
1
On
Off
1
On
Off
1
On
Off
1
On
Off
1
=15°)
1
=24°)
If you experience any problems, please call the Helpline on Freephone 0808 100 6554* or visit www.bt.com/producthelp
Page 16

16
16
Setting up
WARNING
Only use the battery supplied.
Using another type could
permanently damage the unit.
Battery performance
The operating time for using the
rechargeable battery is limited. It
will last for approximately 6 hours
in standby mode but this will vary
depending on the sensitivity level
you have set, your actual use and
the age of the battery. Therefore,
if you want to monitor your baby
for long periods we strongly
recommend you connect the
power adaptor to the Parent unit,
especially at night.
Please note that new batteries
do not reach full capacity until
they have been in normal use
for several days. The charge
capacity of rechargeable
batteries will reduce with time as
they wear out, so reducing the
performance time of the Parent
unit. Eventually they will need to
be replaced. New batteries can
be obtained from the BT Digital
Video Baby Monitor 1000
Helpline on 0808 100 6554*.
Parent unit
1. Remove the plastic protective film from the front of
the unit.
Insert the battery supplied into the battery
compartment. It will only fit one way round.
Antenna
Release
Battery
release tab
2. Replace the battery compartment cover by aligning
the cover flat against the battery compartment,
then slide it towards the centre of the Parent unit
until it clicks into place.
Antenna
Release
If you experience any problems, please call the Helpline on Freephone 0808 100 6554* or visit www.bt.com/producthelp
Page 17

Setting up 17
Removing the battery
If you ever need to remove the battery, unplug
the power adaptor and then open the battery
compartment cover. Move the battery release tab
(see diagram on page 16 for position) to the right to
release the battery.
3. Plug the power adaptor cable (item code 064761)
into the socked marked on the side of the
Parent unit and plug the other end into the mains
power and switch on. The
light on the front
of the Parent unit will turn on while the battery
is charging.
4. Leave the battery to charge continuously for 12
hours before you switch the Parent unit on. When
the battery is fully charged the light on the side of
the Parent unit will turn off.
If you experience any problems, please call the Helpline on Freephone 0808 100 6554* or visit www.bt.com/producthelp
The Parent unit rechargeable
battery will lose charge over
a period of time, even if
switched off.
If the Parent unit is not going
to be used for a long time,
remove the battery to prevent
any possible leakage.
Battery low warning
When the battery is low the
screen will display Battery
low at Parent unit and the
icon. The light will
also flash and you will hear
a short alert beep. You will
need to recharge the Parent
unit without interruption for
approximately 30 minutes to
give the Parent unit enough
charge to use for a short time.
If the Parent unit is turned off
during charging, the battery
will charge more quickly.
WARNING
Only use the power adaptor
supplied. Using an incorrect
power adaptor could
permanently damage
your product.
Page 18

18
Setting up
Make sure the Parent unit
and power adaptor cable are
kept away from the reach
of children.
You can charge the battery
when the Parent unit is
switched on but this will
extend the charging time.
WARNING
Do not mix old and new
batteries. Only use the
recommended type of 4 AA
batteries. Using other types
could permanently damage
the unit.
Battery performance
The operating time for using
AA batteries is approximately
8 hours depending on light
conditions and feature usage.
Therefore, if you want to
monitor your baby for long
periods we strongly recommend
you connect the power adaptor
to the Baby camera unit.
5. Once the Parent unit battery has fully charged,
press the button on the Parent unit until the
screen becomes active. The battery icon on the top
line of the screen will be solid to indicate that the
battery is fully charged
.
Baby unit
The Baby unit can be powered up using the power
adaptor provided or using 4 AA batteries (not
supplied). Even if the power adaptor is used, we
recommend that you also install batteries to guarantee
continual operation in the case of a power cut.
1. Install 4 AA batteries (not supplied) into the
battery compartment as shown observing the
polarity markings inside. Then replace the battery
compartment cover.
If you experience any problems, please call the Helpline on Freephone 0808 100 6554* or visit www.bt.com/producthelp
Page 19

Setting up 19
Removing the batteries
If you ever need to remove the batteries, unplug
the power adaptor and then open the battery
compartment cover and use the ribbon to gently
pull them out.
2. Plug the power adaptor cable (item code 064785)
into the socked marked on the side of the Baby
unit and plug the other end into the mains power
and switch on.
If the Baby unit is not going to
be used for a long time, remove
the batteries to prevent any
possible leakage.
Rechargeable batteries
can be used but the Baby
unit cannot charge the
rechargeable batteries.
Battery low warning
When the batteries are low the
light on the
Baby unit will flash red. You will
need to replace the batteries.
WARNING
Only use the power adaptor
supplied. Using an incorrect
power adaptor could
permanently damage
your product.
Make sure the Baby unit
and power adaptor cable are
kept away from the reach
of children.
button of the
If you experience any problems, please call the Helpline on Freephone 0808 100 6554* or visit www.bt.com/producthelp
Page 20

Setting up
20
The Baby unit camera may
be angled down by pulling
the tab on top of the camera
towards you.
Positioning and operating range
Positioning
We recommend you place the Baby unit between
1-2 metres away from your baby for best
performance. Make sure the unit and cable is out
of reach of your baby.
Do not place the Parent and Baby units too close
together as you will hear a high-pitched noise, this
is normal. The units are designed to be located at a
distance from one another, e.g. in separate rooms.
Operating range
The operating range is up to 300 metres outdoors
and 50 metres indoors. The actual operating
range may vary depending on the environmental
conditions and other interferences such as walls,
doors and other obstructions.
The Baby unit may not detect sounds when the
sensitivity level is set below a certain level so you
may wish to increase the sensitivity level, see page
32. You may also need to turn the loudspeaker
volume up on the Parent unit to hear the sounds
transmitted from the Baby unit, see page 27.
If you experience any problems, please call the Helpline on Freephone 0808 100 6554* or visit www.bt.com/producthelp
Page 21

Testing the units before use
It is important that you test the units before use and
at regular times thereafter, especially if they have
not been used for some time.
To test your units
1. Place the Parent and Baby units in the same room
but make sure they are at least 2 metres apart.
2. Press and hold the button on the Baby unit
until the Power light on the button turns on.
3. Press and hold the button on the Parent unit
until the display shows Waiting for linking and the
Link light flashes.
4. Press the button on the Parent unit to view
the image from the Baby unit.
Pairing the units
The Parent and Baby unit supplied are already
paired. You can add or replace Baby units purchased
separately to your baby monitor system. You can
pair a maximum of four Baby units to your Parent
unit. Each new Baby unit must be paired to the
Parent unit before use, see page 40 for instructions.
Setting up 21
If no connection can be
established, the Parent unit
will display No link to C AM for
a few seconds, then Waiting
for linking… The Link light will
continue to flash.
If you experience any problems, please call the Helpline on Freephone 0808 100 6554* or visit www.bt.com/producthelp
Page 22

22
Setting up
Important
Before you wall mount,
please check that:
• the wall can support the
weight of the product
• the power adaptor will reach
the power socket
• you are not drilling into any
hidden wiring or plumbing
BT are not responsible for any
damage/injury caused while
attempting to wall mount
your product.
Wall mounting the Baby unit – optional
The Baby unit is ready for tabletop use but you can
wall mount it using the wall mounting bracket
supplied if you wish to. Make sure you test the
units (see page 21) from the proposed position
before wall mounting.
1. Place the wall mounting bracket against the wall
where you want to wall mount the Baby unit and
use a pencil to mark the top two holes as shown.
Ð
Ð
2. Remove the wall mounting bracket and check the
reception strength of the Baby unit and camera
angle before drilling two holes in the wall using a
5mm drill bit.
If you experience any problems, please call the Helpline on Freephone 0808 100 6554* or visit www.bt.com/producthelp
Page 23

3. Align the wall mounting bracket and screws with
the holes in the wall as shown. Make sure you
attach the screw in the middle hole first so that the
wall mounting position is fixed, then attach the
other screw in the top hole.
Setting up 23
If you experience any problems, please call the Helpline on Freephone 0808 100 6554* or visit www.bt.com/producthelp
Page 24

24
Setting up
4. Place the Baby unit onto the wall mounting bracket
and tighten the screw into the threaded socket at
the bottom to secure the Baby unit in place.
Your BT Digital Video Baby Monitor 1000 is now
ready for use.
If you experience any problems, please call the Helpline on Freephone 0808 100 6554* or visit www.bt.com/producthelp
Page 25

Using your BT Digital Video Baby Monitor 1000
Using the Baby unit
Switch the Baby unit on/off
1. Press and hold the button until the light on
the button turns on.
2. To turn the Baby unit off, press and hold the
button for 2 seconds. The
Adjust the Baby unit loudspeaker volume
You can adjust the loudspeaker volume from Level
1 to Level 5. The default setting is Level 3. If you
adjust the loudspeaker volume it will also adjust the
parent voice (Talk) playback volume.
1. Press the or button on the Baby unit at
any time to increase or decrease the loudspeaker
volume.
Play lullabies from the Baby unit
The Baby unit has five lullabies that can be played
to gently soothe your baby. The total lullaby
playback time is about 15 minutes and it starts
from where you stopped it last time.
will turn off.
light
When the maximum or
minimum volume levels have
been reached you will hear an
error tone.
25
If you experience any problems, please call the Helpline on Freephone 0808 100 6554* or visit www.bt.com/producthelp
Page 26

Using your BT Digital Video Baby Monitor 1000
26
Lullaby playback will be paused
if the Talk feature is being used,
when finished lullaby playback
will resume.
The infrared LED’s may glow red
slightly when viewed in dark
conditions. This is normal.
To play lullabies
Press the
Press the
Press the
button to play.
Skip
button to skip to the next lullaby.
button to stop playback.
Night vision
To help you monitor your baby at night, the Baby
unit automatically uses the light from its infrared
LEDs when it is turned on in a dark room. However,
it only transmits black and white images in
this mode.
Using the Parent unit
Switch the Parent unit on/off
1. Press and hold the button until the display
screen turns on.
2. To turn the Parent unit off, press and hold the
button until the display screen turns off.
If you experience any problems, please call the Helpline on Freephone 0808 100 6554* or visit www.bt.com/producthelp
Page 27

Using your BT Digital Video Baby Monitor 1000 27
Adjust the Parent unit loudspeaker volume
You can adjust the loudspeaker volume from
Volume 1 to Volume 7 or you can switch it off. The
default setting is Volume 4. When the loudspeaker
volume is set to off, the
icon appears on the
screen and the light turns on.
1. Press the or button on the Parent unit
to increase or decrease the loudspeaker volume.
Zoom
You can zoom in or out while viewing images
transmitted from the Baby unit.
Zoom in or out in single-CAM mode
1. Press the button to zoom in. Use the ,
, or button to move the zoomed image
up, down, left or right.
2. To zoom out again, press the button.
If you experience any problems, please call the Helpline on Freephone 0808 100 6554* or visit www.bt.com/producthelp
Page 28

Using your BT Digital Video Baby Monitor 1000
28
View
You can change the screen to view images from
different Baby units (if you have more than one
Baby unit), or you can turn the screen off.
To view different Baby units
Multi-CAM mode is not
available if only one Baby unit is
paired to the Parent unit.
1. Press the button to select the Baby unit you
want: CAM 1, CAM 2, CAM 3, CAM 4 or multi-CAM.
Zoom in or out in multi-CAM mode (if you have
more than one Baby unit)
1. Use the , , or button to choose
the Baby unit you want, then press the or
2. Press the button again to zoom in. Use the
image up, down, left or right.
3. To zoom out again, press the button.
To turn the screen on/off
1. Press and hold the button until the screen
turns off.
2. To turn the screen back on, press any button.
button.
, , or button to move the zoomed
If you experience any problems, please call the Helpline on Freephone 0808 100 6554* or visit www.bt.com/producthelp
Page 29

Using your BT Digital Video Baby Monitor 1000 29
Talk to the Baby unit
You can use the Parent unit Talk feature as a oneway intercom to comfort and reassure your baby.
By speaking into the Parent unit your baby will hear
your voice from the Baby unit. Please note that
when using the Talk feature you will not be able to
hear your baby until you release the
button.
1. If you have more than one Baby unit you may need
to press the button first to select the Baby
unit you want to talk to.
2. Press and hold the button to speak to your baby,
you should speak towards the MIC (microphone) on
the Parent unit. Your voice will be heard from the
Baby unit and while the
button is depressed the
Talk light will be on.
When using the Talk feature, hold the Parent unit
approximately 30cm in front of your mouth when
talking to baby.
The Talk feature will not work
in multi-CAM view mode. You
will need to select a Baby unit
in single-CAM view mode to
use Talk.
If the loudspeaker volume on
the Parent unit is set to off,
it will be reset to the default
volume setting after you press
and hold the
Lullaby playback will be paused
if the Talk feature is being used,
when finished lullaby playback
will resume.
button.
If you experience any problems, please call the Helpline on Freephone 0808 100 6554* or visit www.bt.com/producthelp
Page 30

30
30
Parent unit settings menu
1. Press the button.
2. Press the or button to scroll through the
To return to the previous menu
at any time, press the
button.
3. Press the or button until the feature or
The default setting is on.
The Baby unit low battery
alert will only work when
viewing that particular
Baby unit in single-CAM
or multi-CAM mode.
1. Press .
2. Press or to highlight ALERT TONE, then
Using the menu
The button on the Parent unit can be used to
select and change settings on the Baby and Parent
units. You can access the menu by:
menu options. When the menu option you want is
highlighted on the left, press the
to enter it.
option you want is highlighted on the right, then
press the
or button to enter the feature
menu or to confirm your selection. You will hear a
confirmation tone.
Turn the battery low alert tone on/off
The Parent unit will emit an alert tone when the
Parent or Baby unit battery is low.
press
or .
or button
If you experience any problems, please call the Helpline on Freephone 0808 100 6554* or visit www.bt.com/producthelp
Page 31

3. Press or again to select Low Battery Tone.
4. Use or to select On or Off, then press
to confirm. You will hear a confirmation tone.
Turn the No link alert on the Parent unit on/off
The Parent unit will beep whenever the link between
the Parent and Baby unit is lost. You can turn this
alert beep on or off.
1. Press .
2. Press or to highlight ALERT TONE, then
press
or .
3. Use or to highlight No Link Alert, then
press
or .
4. Use or to select On or Off, then press
to confirm. You will hear a confirmation tone.
31Parent unit settings menu
The default setting is on.
The No link alert will only work
when viewing that particular
Baby unit in single-CAM or
multi-CAM mode.
If you experience any problems, please call the Helpline on Freephone 0808 100 6554* or visit www.bt.com/producthelp
Page 32

32 Parent unit settings menu
To briefly override the
sensitivity setting, to hear all
sounds in baby’s room (for 15
seconds), briefly press the
button on the Parent unit.
The Baby unit(s) must be turned
on in order to enter the sensitivity
menu of the Parent unit.
Sensitivity level
You can change the sensitivity level of sounds
being received from the Baby unit from Level 1 to
Level 5 (maximum). The default setting is Level
3. The higher the sound sensitivity level is set, the
more sensitive the Baby unit is in detecting sounds
transmitted from the Baby unit to the Parent unit.
If you want the Baby unit to be very sensitive
in detecting sounds, you may wish to set the
sensitivity to Level 5 (maximum) so that the Baby
unit will detect any sounds including background
noises. If you want it to be less sensitive in detecting
sounds, you may wish to set the sensitivity to a
lower level (Level 1 – 4), so that the Baby unit will
transmit sounds to the Parent unit only when your
baby is making a noise.
To set the sound sensitivity level of the Baby unit
1. Press .
2. Press or to highlight SENSITIVITY, then
press
or .
If you experience any problems, please call the Helpline on Freephone 0808 100 6554* or visit www.bt.com/producthelp
Page 33

3. Press or to choose the Baby unit you
want or all Baby units, then press or .
4. Use or to select the level you want from
Level 1 to Level 5, then press to confirm. You
will hear a confirmation tone.
Room temperature monitor
There is a temperature sensor on the Baby unit to
monitor the temperature in your baby’s room. When
the temperature alert is set to On, an alert beep will
sound to warn you when the temperature is out of
the range you have set.
Set the minimum room temperature
You can set the minimum temperature between
11°C (52°F) and 20°C (69°F). The pre-set minimum
temperature is 15°C (57°F).
1. Press .
33Parent unit settings menu
IMPORTANT!
The temperature sensor used
in this BT Digital Video Baby
Monitor 1000 is intended as
a guide, to provide parents
with an indication of the room
temperature in which the unit
has been placed.
It is designed to operate within
an approximate tolerance of
2°C and is not intended
to be as accurate as some
medical devices.
2. Press or to highlight TEMPERATURE,
then press
If you experience any problems, please call the Helpline on Freephone 0808 100 6554* or visit www.bt.com/producthelp
or .
Page 34

34 Parent unit settings menu
Please note that your own
temperature reference e.g. your
central heating thermostat may
not be as accurate,
possibly due to tolerances
and positioning of the
thermostat in relation to the
Baby monitor sensor.
Pre-set temperature
alert range
The Baby unit comes with
pre-set maximum and
minimum temperatures,
as recommended by the UK
Department of Health as part
of the recommendations to
reduce the risk of cot death.
If the temperature falls below
or goes above the setting an
alert will sound on the Parent
unit if the temperature alert
is set to On. The temperature
alert pre-set temperatures are
15°C (and below) and 24°C
(and above).
Healthcare professionals advise
that the ideal temperature for
your baby’s room is between
16°C and 20°C.
3. Press or again to select Minimum.
4. Press or to choose the Baby unit you
want or all Baby units, then press or .
5. Use or to select the temperature you
want, then press to confirm. You will hear a
confirmation tone.
Set the maximum room temperature
You can set the maximum temperature between
21°C (70°F) and 30°C (86°F). The pre-set maximum
temperature is 24°C (85°F).
1. Press .
2. Press or to highlight TEMPERATURE,
then press
or .
3. Press or to highlight Maximum, then
press
or .
4. Press or to choose the Baby unit you
want or all Baby units, then press or .
If you experience any problems, please call the Helpline on Freephone 0808 100 6554* or visit www.bt.com/producthelp
Page 35

5. Use or to select the temperature you
want, then press to confirm. You will hear a
confirmation tone.
Turn the temperature alert on or off
1. Press .
2. Press or to highlight TEMPERATURE,
then press
or .
3. Press or to highlight Alert, then press
or .
4. Press or to choose the Baby unit you
want or all Baby units, then press or .
5. Use or to select On or Off, then press
to confirm. You will hear a confirmation tone.
35Parent unit settings menu
The default setting is On.
The temperature alert will
only work when viewing that
particular Baby unit in singleCAM or multi-CAM mode.
If you experience any problems, please call the Helpline on Freephone 0808 100 6554* or visit www.bt.com/producthelp
Page 36

36 Parent unit settings menu
Set the temperature format
You can set the temperature format as either Celsius
or Fahrenheit. The default setting is Celsius.
1. Press .
2. Press or to highlight TEMPERATURE,
then press
or .
3. Press or to highlight Format, then press
or .
4. Press or to choose Celsius or
Fahrenheit, then press
to confirm. You will hear
a confirmation tone.
If you experience any problems, please call the Helpline on Freephone 0808 100 6554* or visit www.bt.com/producthelp
Page 37

37Parent unit settings menu
Vibrate
You can set whether you want the Parent unit
to vibrate. The vibrate setting is pre-set to On if
speaker is off.
1. Press .
2. Press or to highlight VIBRATION, then
press
or .
3. Press or to choose On if speaker is off,
Always on or Off, then press
to confirm. You
will hear a confirmation tone.
The following events will cause
the Parent unit to vibrate (when
set to do so):
• Low battery alert
(Parent or Baby unit).
• Loss of link alert.
• Temperature alert.
• Sensitivity level exceeded.
If you experience any problems, please call the Helpline on Freephone 0808 100 6554* or visit www.bt.com/producthelp
Page 38

38 Parent unit settings menu
Even when enabled, the sound
activated acreen functionality
will temporarily be suspended
if you press any button on the
Parent unit. To resume sound
activated screen functionality,
press and hold the
until the screen turns off.
The Parent unit will only turn
On if the sounds detected are
from the last viewed camera,
or any camera if the view was
multi-CAM mode.
button
Sound activated screen
When the Parent unit screen is turned off (see page
28), you can set the screen to turn on automatically
whenever there are sounds detected from the
Baby unit(s). The Parent unit screen will turn off
automatically when no sounds are detected from
the Baby unit(s) within 30 seconds. The default
setting is Off.
1. Press .
2. Press or to highlight SOUND-
ACTIVATED SCREEN, then press
or .
3. Press or to choose On or Off, then press
to confirm. You will hear a confirmation tone.
Parent unit screen brightness
You can change the brightness of the Parent unit
screen from between Level 1 to Level 5. The default
setting is Level 3.
1. Press .
If you experience any problems, please call the Helpline on Freephone 0808 100 6554* or visit www.bt.com/producthelp
Page 39

2. Press or to highlight BRIGHTNESS,
then press
or .
3. Press or to select the brightness you
want from Level 1 to Level 5, then press to
confirm. You will hear a confirmation tone.
Display language
You can select the language to be displayed on
screen: English, French or Spanish. The default
setting is English.
1. Press .
2. Press or to highlight LANGUAGE (or
LANGUE if French is set or IDIOMA if Spanish is set),
then press
or .
3. Press or to choose ENGLISH, FRANCAIS
or ESPANOL, then press
to confirm. You will
hear a confirmation tone.
39Parent unit settings menu
If you experience any problems, please call the Helpline on Freephone 0808 100 6554* or visit www.bt.com/producthelp
Page 40

40 Parent unit settings menu
Pair/unpair CAM
The Parent and Baby unit supplied are already
paired but you can add or replace Baby units you
purchase separately. You can pair a maximum of
four Baby units to your Parent unit. Each new Baby
unit must be paired to the Parent unit before you
can use it.
If pairing fails, the screen will
display Pairing failed. Try the
pairing procedure again.
If you pair a new Baby unit to
an already occupied Baby unit
slot it will unpair the current
Baby unit.
Only one Baby unit can be
paired at a time.
If you have any problems
pairing or need additional
cameras, call us on 0808 100
6554* or go to www.bt.com/
mybabymonitor for more
information.
If you experience any problems, please call the Helpline on Freephone 0808 100 6554* or visit www.bt.com/producthelp
To pair a Baby unit to the Parent unit
Firstly, make sure the Baby and Parent units are
turned on, see pages 25 and 26.
1. Press on the Parent unit.
2. Press or to highlight PAIR/UNPAIR
CAM, then press
or .
3. Press or again to select Pair new CAM.
4. Press or to choose a Baby unit slot,
then press
.
Page 41

Parent unit settings menu
41
5. When the display shows Please press both
and keys on CAM side until POWER indicator
flashes Red and Green light, press and hold the
and buttons for 5 seconds on the new
Baby unit. The light on the button of the new
Baby unit will flash red and green alternately.
6. When pairing has been successful, the screen will
display the image from the newly paired Baby unit.
The light on the
button of the new Baby unit
will turn red when it is powered by AA batteries or
green when powered by the power adaptor.
You have 60 seconds to
complete the pairing process
once the Parent unit display
shows Please press both
and keys on CAM side until
POWER indicator flashes Red
and Green light.
If you experience any problems, please call the Helpline on Freephone 0808 100 6554* or visit www.bt.com/producthelp
Page 42

Parent unit settings menu
42
To unpair a Baby unit from the Parent unit
Firstly, make sure the Baby and Parent units are
turned on, see pages 25 and 26.
1. Press on the Parent unit.
2. Press or to highlight PAIR/UNPAIR
CAM, then press
or .
3. Press or to select Unpair CAM, then
press
.
4. Press or to select the Baby unit you
want to unpair, then press .
5. When the display shows, To unpair CAM # from the
system, press
key, press the button.
6. When the display shows, Press key to confirm,
press
.
7. When unpairing has been successful, the screen will
display the image from the next paired Baby unit. If
there is no paired Baby unit, the screen will display
NO CAM paired.
If you experience any problems, please call the Helpline on Freephone 0808 100 6554* or visit www.bt.com/producthelp
Page 43

43Help
If you have any problems setting up
or using your BT Digital Video Baby
Monitor 1000, firstly see the answers
below to frequently asked questions.
If you still have difficulties, call the
Helpline on 0808 100 6554*.
My Parent and Baby units do not
work at all
• check that the power adaptor cables
are inserted correctly into the Parent
and Baby unit(s) and switched on at
the wall socket, see pages 17 and 19.
• check that the batteries are installed
correctly in the Parent and Baby
unit(s) and that the Parent unit
battery has been charged correctly,
see pages 16 and 18. If the Parent
unit battery is completely flat, it
may take up to 30 minutes to charge
before it can be used for a short time.
• check that the Parent and Baby unit(s)
are turned on, see pages 25 and 26.
• the Parent unit may be too far from
the Baby unit(s), move the Parent
unit closer.
• large obstructions may affect the
signal between the Parent and Baby
unit(s). Try to position the Baby
unit(s) away from large obstructions.
• other electrical products may cause
interference. Try to position your
Parent and Baby unit(s) as far as
possible from other electrical devices
such as wireless routers, radios,
mobile phones, televisions, personal
computers, cordless phones etc.
• try unplugging the power adaptor
cables from both units, wait 15
seconds, then plug them back in.
Turn the units on and allow 1
minute for the Parent and Baby
unit(s) to link.
If you experience any problems, please call the Helpline on Freephone 0808 100 6554* or visit www.bt.com/producthelp
Page 44

44
Help
My Parent and Baby unit(s) are
producing a high-pitched noise
• the Parent and Baby unit(s) may be
too close together. Make sure they
are at least two metres apart.
• you may be too close to the Baby
unit when you press and hold the
button. Make sure they are at least
two metres apart.
• you may have set the sensitivity level
too high. Try adjusting to a lower
level to avoid audio feedback, see
page 32.
The Parent unit doesn’t play any
sound when there is noise from
the Baby unit
• make sure the Parent unit has power.
Check that the power adaptor cable
is correctly connected and the power
is turned on at the wall socket, see
page 17. Make sure that the battery
in the Parent unit is fully charged, see
page 16-17.
• make sure the Parent unit is turned
on, see page 26 and that the loud
speaker volume is not set to off, see
page 27.
The Parent unit plays all sounds
from the Baby unit and I think it is
too noisy
• you may have set the sensitivity level
to Level 5 (maximum). If so, the Baby
unit will transmit any sound detected
• make sure the Parent unit is not
monitoring in multi-CAM mode, see
page 28.
• check that the sensitivity level is not
set too low, see page 32.
to the Parent unit. To lower the
sensitivity level, see page 32.
• you may need to adjust the loud speaker
volume on the Parent unit, see page 27.
If you experience any problems, please call the Helpline on Freephone 0808 100 6554* or visit www.bt.com/producthelp
Page 45

Help 45
The link between the Baby and
Parent unit is lost every now and
then and I’m experiencing sound or
video interruptions
• move the Parent and Baby unit
closer together (but not less than
2 metres) as the Parent unit may be
out of range.
• Reset the units by turning them
off and unplugging the power
adaptor cables. Wait for 15 seconds
and plug them back in. Turn the
units on and allow up to one minute
for them to link.
The battery does not charge in the
Parent unit
• make sure the battery is installed
correctly, see page 16. The battery
light on the Parent unit should be on
when charging.
• try removing the battery completely
and installing it again, then charge
for up to 12 hours.
• if the battery is completely flat, it
may take up to 30 minutes to charge
the Parent unit before it can be used
for a short time.
• after time the battery may begin
to wear out so you might need
to purchase a new battery, contact
the Helpline.
If you experience any problems, please call the Helpline on Freephone 0808 100 6554* or visit www.bt.com/producthelp
Page 46

46
46
General information
Cleaning
Your units have a durable plastic casing that should
retain their lustre for many years. To clean, use only
a soft cloth slightly dampened with water or a mild
soap. Do not use excess water or cleaning solvents
of any kind.
Guarantee
Your BT Digital Video Baby Monitor 1000 is
guaranteed for a period of 12 months from the date
of purchase.
Subject to the terms listed below, the guarantee
will provide for the repair of, or at BT’s or its agent’s
discretion the option to replace the BT Digital
Video Baby Monitor 1000 or any component
thereof, which is identified as faulty or below
standard, or as a result of inferior workmanship of
materials. Products over 28 days old from the date
of purchase may be replaced with a refurbished or
repaired product.
The conditions of this guarantee are:
• The guarantee shall only apply to defects that occur
within the 12 month guarantee period.
• Proof of purchase is required.
• The equipment is returned to BT or its agent as
instructed.
• This guarantee does not cover the batteries and
any faults or defects caused by accidents, misuse,
fair wear and tear, neglect, tampering with the
equipment, or any attempt at adjustment or repair
other than through approved agents.
• This guarantee does not affect your statutory rights.
Within the 12 month guarantee period
Prior to returning your product, please read the
Help section beginning on page 43 or contact the
BT Digital Video Baby Monitor 1000 Helpline on
0808 100 6554* for assistance. Additional answers
to Frequently Asked Questions are available from
www.bt.com/producthelp
In the unlikely event of a defect occurring, the
Helpdesk will issue a Fault Reference Authorisation
(FRA) number and instructions for replacement or
repair. Please note you will need the FRA number
before returning the product. This does not affect
your statutory rights.
Outside of the 12 month guarantee period:
If your product needs repair after the guarantee
period has ended or if you require technical
assistance outside of the 12 month guarantee
period, please call BT’s approved technical support
agent, Discount Communications Ltd on
0800 980 8999.
If you experience any problems, please call the Helpline on Freephone 0808 100 6554* or visit www.bt.com/producthelp
Page 47

General information 47
Returning your product
If the Helpline is unable to remedy your problem
they will issue a Fault Reference Authorisation
number and ask you to return the product to your
original place of purchase. Where possible, pack the
product in its original packaging. Please remember
to include all parts, including the power supply
adaptors and the original batteries.
For guarantee purposes proof of purchase is
required so please keep your receipt.
Product disposal instructions
The symbol shown here and on the product
means that the product is classed as
Electrical or Electronic Equipment and
should not be disposed with other
household or commercial waste at the
end of its working life.
The Waste of Electrical and Electronic Equipment
(WEEE) Directive (2002/96/EC) has been put in
place to recycle products using best available
recovery and recycling techniques to minimize the
impact on the environment, treat any hazardous
substances and avoid the increasing landfill.
Product disposal instructions for residential users
When you have no further use for it, please remove
any batteries and dispose of them and the product
as per your local authority’s recycling processes.
For more information please contact your local
authority or the retailer where the product was
purchased.
R&TTE
This product is intended for use within the UK.
This equipment complies with the essential
requirements for the Radio Equipment and
Telecommunications Terminal Equipment Directive
1999/5/EC.
Declaration of Conformance
Hereby, Vtech declares that this BT Digital Video
Baby Monitor 1000 is in compliance with the
essential requirements and other relevant provisions
of Directive 1999/5/EC.
The Declaration of Conformance for the
BT Digital Video Baby Monitor 1000 is available
from www.bt.com/producthelp.
User Guide formats
This document is also available in other formats,
such as Large print, Braille and Audio CD. If you
would like a copy, please call 0808 100 6554*.
If you experience any problems, please call the Helpline on Freephone 0808 100 6554* or visit www.bt.com/producthelp
Page 48

Offices worldwide
The se rvices de scribed in t his publica tion are subj ect to avail ability
and may be m odified fr om time to tim e. Servic es and equipm ent
are pro vided subje ct to Brit ish Telecommu nications p lc’s respec tive
stan dard condi tions of cont ract. No thing in this p ublicatio n forms
any par t of any contr act.
© Brit ish Telecommu nication s plc 2011.
Regis tered Of fice: 81 Newga te Street , London EC 1A 7AJ.
Regis tered in Eng land No. 180 0000.
Prin ted in China.
Desig ned and prod uced by The Ar t & Design Pa rtners hip Ltd.
BT Digi tal Video B aby Monito r 1000 (12/ 11) Issue 2
 Loading...