

Bryton Rider 750 User Manual
User Manual
Rider 750
Table of Contents
Getting Started ...................... |
4 |
Rider 750 Key Functions ............. |
4 |
Reboot Rider .............................. |
4 |
Accessories ................................ |
4 |
Touch Screen .............................. |
5 |
GUI Display ................................ |
6 |
Quick Status ................................ |
7 |
Status Icons ............................... |
8 |
Step 1: Charge Your Rider 750 ..... 9 |
|
Step 2: Turn On Rider 750 .......... |
9 |
Step 3: Initial Setup .................... |
9 |
Step 4: Acquire Satellite Signals |
10 |
Step 5: Ride with Rider 750 ...... |
10 |
Step 6: Share Your Records ........ |
10 |
Firmware Update . ..................... |
14 |
Course ............................ |
15 |
Follow Track ............................. |
15 |
Workout ..................................... |
17 |
Bryton Test ................................ |
19 |
Smart Trainer ............................. |
20 |
Navigation ....................... |
23 |
Voice Search ............................. |
23 |
Pin a Location ............................ |
24 |
Navigate on Bryton Active App ...... |
25 |
Download Maps ....................... . |
26 |
Results ............................ |
27 |
Settings ........................... |
28 |
Brightness ................................ |
31 |
Pair Sensors ............................. |
32 |
System ..................................... |
35 |
Altitude .................................... |
39 |
Navigation Settings ................... |
40 |
Network (WLAN) ......................... |
40 |
About ....................................... |
41 |
Profile.............................. |
42 |
Bryton Advanced Settings .... |
43 |
Notifications ............................... |
43 |
Appendix ......................... |
44 |
Specifications ............................. |
44 |
Battery Information ..................... |
45 |
Install Rider 750 ........................ |
47 |
Install the Speed/Cadence/Dual Sensor |
|
(Optional)................................... |
48 |
Install Heart Rate Belt |
|
(Optional)................................... |
49 |
Wheel Size and Circumference ..... |
50 |
Data Fields................................. |
51 |
Basic Care For Your Rider 750 ..... |
55 |
Bike Setup ............................... |
28 |

 WARNING
Always consult your physican before you begin any training. Please read the details in Warranty and Safety information guide in the package.
Australian Consumer Law
Our goods come with guarantees that can not be excluded under the New Zealand and Australian Consumer Laws. You are entitled to a replacement or refund for a majory failure and for compensation for any other reasonably forseeable loss or damage. You are also entitled to have the goods repaired or replaced if the goods fail to be of acceptable quality and the failure does not amount to a majoy failure.
Video Tutorial
For a step-by-step demonstration of device and Bryton Active app, please scan the QR code below to check out Bryton Tutorial Videos.
http://www.youtube.com/c/BrytonActive
Getting Started
This section will guide you through basic preparations before the first use with your Rider 750.
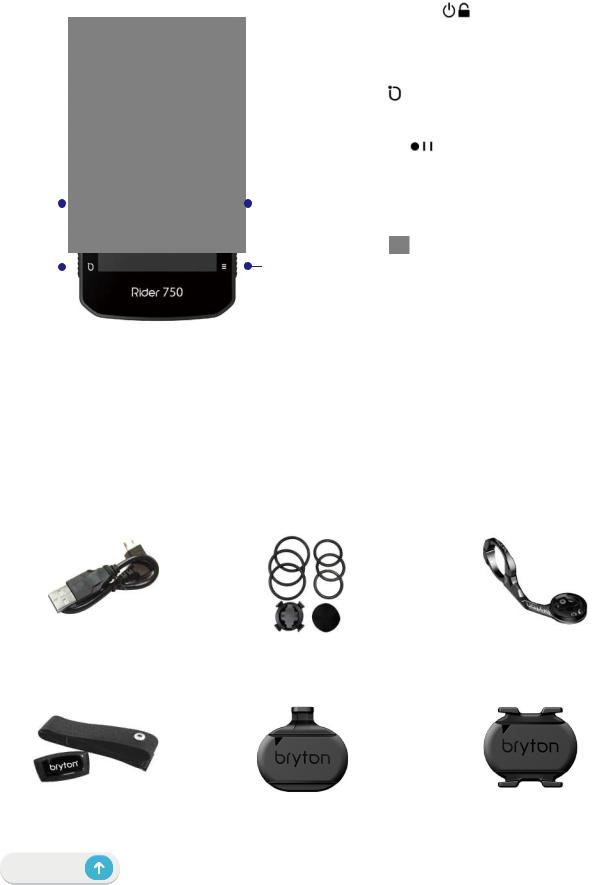
Rider 750 Key Functions
|
|
|
|
|
|
|
|
|
POWER/LOCK ( |
) |
||
|
|
|
|
|
|
A |
||||||
|
|
|
|
|
|
|
|
|
x |
Press to turn the device ON. |
||
|
|
|
|
|
|
|
|
|
x |
Long Press to turn the device OFF. |
||
|
|
|
|
|
|
|
|
|
x |
Press to lock or unlock the screen. |
||
|
|
|
|
|
|
|
|
LAP ( |
) |
|
||
|
|
|
|
|
|
B |
|
|||||
|
|
|
|
|
|
|
|
|
x |
When recording, press to mark the lap. |
||
|
|
|
|
|
|
|
RECORD ( |
) |
|
|||
|
|
|
|
|
|
C |
|
|||||
|
|
|
|
|
|
|
|
|
x |
In Cycling mode, press to start |
||
|
|
|
|
|
|
|
|
|
|
recording. |
|
|
|
|
|
|
|
|
|
|
|
x |
When recording, press to pause |
||
A |
|
|
|
C |
|
|
|
|
||||
|
|
|
|
|
||||||||
|
|
|
|
|
|
|
|
|
|
recording and enter the Menu. |
||
|
|
|
|
|
|
|
PAGE ( |
) |
|
|||
|
|
|
|
|
|
D |
|
|||||
B |
|
|
|
D |
|
|
|
|
x |
In Cycling mode, press to switch meter |
||
|
|
|
|
|||||||||
|
|
|
|
|
|
|
|
|
|
screen pages. |
|
|
Reboot Rider
Press (  /
/  /
/  /
/  ) at the same time to reboot the device.
Accessories
The Rider 750 comes with the following accessories:
USB Cable |
Bike Mount |
Sport Mount |
Optional items: |
|
|
Smart Heart Rate Monitor |
Smart Speed Sensor |
Smart Cadence Sensor |
Back to Top
4 Getting Started

Touch Screen
|
Speed |
h |
|
|
|
|
|
|
|
|
|
Speed |
Spe d |
|
Speed |
|
Ride Time |
|
||||||||
|
21.5 |
|
|
|
|
|
|
|
|
|
|
|
21 |
5 |
|
|
|
|
|
|
|
6:15 |
|
|||
|
|
|
k |
|
|
|
|
|
|
|
|
|
|
|
|
|
|
|
|
|
|
|
|
|
|
|
|
Ride Time |
|
|
|
|
|
|
|
|
|
|
|
|
Dista |
c |
|
|
|
|
|
|
|
|
Alt. Gain |
|
|
|
|
|
|
|
|
|
|
|
|
|
|
|
|
|
|
|
|
|
|
|
|
|||||
|
|
|
|
|
|
|
|
|
|
|
|
|
|
|
|
|
|
|
|
|
|
|||||
|
01:58:2 |
|
|
|
|
|
|
|
|
|
|
|
|
11 . |
|
|
|
|
|
|
|
42 |
|
|||
|
Distance |
Alt. Gain |
|
|
|
|
|
|
|
|
|
|
|
|
Grad en |
|
|
|
|
|
|
|
|
Avg. Speed |
|
|
|
48.8 |
42 |
|
|
|
Bike 1 |
|
|
|
|
|
- |
|
|
|
|
|
|
|
|
11 7 |
|
||||
|
|
|
|
|
|
|
|
|
|
|
|
|
|
|
|
|
|
|
|
|
|
|||||
|
|
|
|
|
|
|
|
|
|
|
|
Ri de Time |
Altit de |
|
|
|
|
|
|
|
|
|
|
|||
|
Gradi nt |
Avg. Speed |
|
|
|
|
|
|
|
|
|
|
de Time |
|
|
|
|
M x peed |
|
|||||||
|
0 |
24.8 |
hk |
|
|
|
|
|
|
|
|
06 15 2 |
1 |
|
|
15:2 |
|
|
|
|
|
|||||
|
|
|
|
|
|
|
|
|
|
|
|
|
||||||||||||||
|
Altitud |
Max Speed |
|
|
|
|
|
|
|
|
Distance |
Alt. |
Tim e |
|
|
|
Alt. Gain |
|
Uphill Dist. |
|
||||||
|
12 |
28 |
h |
|
Navigation Course |
|
|
115.7 |
4 |
17: |
2 |
|
|
|
42 |
|
8 |
|
||||||||
|
|
|
k |
|
|
|
|
|
|
|
|
|
|
|
|
|
|
|
|
|
|
|||||
|
|
|
|
|
|
|
|
|
|
|
Gradient |
AVG S |
Tri |
|
|
|
|
AVG Speed |
Temperatur |
|
||||||
|
Tim |
Temperature |
|
|
|
|
|
|
|
|
|
|
|
|
|
|||||||||||
|
17: |
27 |
°C |
|
|
|
|
|
|
|
|
-2 |
1 |
17 |
|
|
|
|
18.2 |
|
26 |
|
||||
|
|
|
|
|
|
|
|
|
|
|
|
|
|
|
||||||||||||
|
|
|
|
|
|
|
|
|
|
|
|
|
|
|
||||||||||||
|
|
|
|
|
|
|
|
|
|
|
|
|
|
|
|
|
|
|
|
|
|
|
|
|
|
|
x Swipe up steadily from the very bottom |
x In Cycling mode, swipe left or right to |
|||||||||||||||||||||||||
of the screen to return to the Home Page |
switch data pages. |
|
|
|
|
|
|
|
|
|
||||||||||||||||
from any screen. |
|
|
|
|
|
|
|
|
|
|
|
|
|
|
|
|
|
|
|
|
|
|
||||
xOn the Lock screen, swipe up to unlock and return to the Home Page. Swipe left or right to switch data pages.
|
|
|
|
|
|
|
|
|
|
|
|
|
|
Speed |
|
CATEGORY |
|
|||
|
|
|
|
|
|
|
|
|
|
|
|
|
|
21.5 |
|
|
|
|
|
|
|
|
|
|
|
|
|
|
|
|
|
|
|
|
|
Ti |
|
|
|
||
|
|
|
|
|
|
|
|
|
|
|
|
|
|
6:15:2 |
|
Sp |
d |
|
|
|
|
|
|
|
|
|
|
|
|
|
|
|
|
|
|
|
|
||||
|
|
|
|
|
|
|
|
|
|
|
|
|
|
|
|
|||||
|
|
|
|
|
|
|
|
|
|
|
|
|
|
|
|
|||||
|
|
|
|
|
|
|
|
|
|
|
|
|
|
Distance |
Alt Gain |
|
istance |
|
||
|
|
|
|
|
|
|
|
|
|
|
|
|
|
115.7 k |
42 |
|
|
|
|
|
|
|
|
|
|
|
|
|
|
|
|
|
|
|
|
DATA FIELDS |
|
||||
|
|
|
|
|
|
|
|
|
|
|
|
|
|
Gradient |
Avg. Speed |
|
|
|||
|
|
|
|
|
|
|
|
|
|
|
|
|
|
-2 % |
115.7 |
|
Speed |
|
||
|
|
|
|
|
|
|
|
|
|
|
|
|
|
|
|
|
Avg Speed |
|
||
|
|
|
|
|
|
|
|
|
|
|
|
|
|
Altitude |
Max Speed |
|
|
|||
|
|
|
|
|
|
|
|
|
|
|
|
|
|
12 |
27 |
|
axx |
ed |
|
|
|
|
|
|
|
|
|
|
|
|
|
|
|
|
Time |
Uphill Dist. |
|
|
|
|
|
|
|
|
|
|
|
|
|
|
|
|
|
|
|
17:2 |
8 |
|
|
|
|
|
|
|
|
|
|
|
|
|
|
|
|
|
|
|
|
|
|
|
|
||
x In cycling mode, single tap to go to the |
x In cycling mode, long press to edit the |
|||||||||||||||||||
Quick Status page. |
|
|
|
|
|
|
|
|
|
cycling grid and scroll up and down to |
||||||||||
|
|
|
|
|
|
|
|
|
|
|
|
view cycling data. |
|
|
|
|
||||
|
|
|
|
|
|
|
|
|
|
|
|
x |
Select |
to confirm selection. |
||||||
|
|
|
|
|
|
|
|
|
|
|
|
|
Select |
to cancel selection. |
||||||
|
TIME ALERT |
|
|
|
|
|
|
|
|
|
|
x |
||||||||
|
|
|
|
|
|
|
|
|
|
|
||||||||||
|
|
|
|
|
|
|
|
|
|
|
||||||||||
|
Status |
|
|
|
|
|
|
|
|
|
||||||||||
|
|
|
|
|
|
|
|
|
|
x |
Select |
to return to the previous page. |
||||||||
|
|
|
|
|
|
|
|
|
|
|
|
|||||||||
|
Time |
|
|
|
|
|
|
|
|
|
|
|
|
|
|
|||||
|
|
Discard |
|
Save |
|
|
|
|
|
|
|
|
|
|||||||
|
|
|
|
|
|
|
|
|
|
|
|
|
||||||||
00:30:00 |
|
|
|
|
|
|
|
|
|
|
|
|
|
|
|
|
|
|
|
|
|
|
|
|
|
|
|
|
|
|
|
|
|
|
|
|
|
|
|
|
|
|
|
|
Ride Time |
Distance |
|
|
|
|
|
|
|
|
|
|||||||
Discard ride without saving?
Back to Top
5 Getting Started
GUI Display
|
|
|
MAX |
|
|
AVG |
452 |
588 |
|
|
243 |
|
w |
|
|
3S |
|
|
|
|
|
|
|
|
|
|
|
MAX |
|
|
|
179 |
185 |
|
|
AVG |
|
b |
|
|
145 |
|
m |
|
|
CUR |
|
|
p |
75 |
AVG |
MAX |
||
70 |
96 |
|||
|
|
|
|
r |
|
|
|
|
|
|
|
|
|
|
|
|
|
|
|
|
|
|
|
p |
|
|
|
|
|
|
|
|
|
m |
|
|
|
|
|
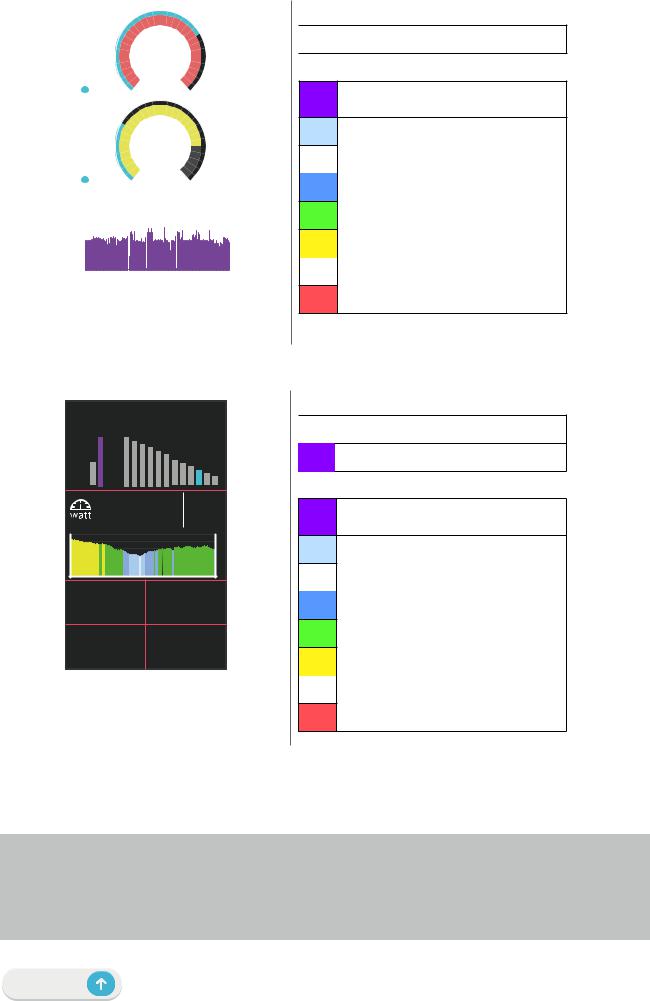
Outer Rings

 Average value
Inner Rings
Current value when using a Speed or a Cadence sensor.
 Current value when using a Heart Rate Monitor or a Power sensor.
The colors will change by different zones, which are  based on the settings.
Gears |
|
||
2/2 |
|
10/12 |
|
283 |
AVG |
MAX |
|
126 |
315 |
||
Di2 Battery |
|
TSS |
w |
|
|
||
80 |
% |
0.8 |
|
Gear Ratio |
|
NP |
|
2.6 |
|
198 |
|
Bar Chart for Di2/E-Shifting

 Value of the Cassette. Value of the Crankset.
Bar Chart for Connected Senors
Current value when using a Speed or a Cadence sensor.
 Current value when using a Heart Rate Monitor or a Power sensor.
The colors will change by different zones, which are  based on the settings.
NOTE:
xPlease go to page 41 to see more details for setting Heart Rate Zone and Power Zone
xPlease go to page 5 to see how to edit data grids in meter page.Select “Graph” in the grid category, if you want to display the data in graphic mode.
xPlease go to page 28 to see more information for data grids settings.Some page options including 8B, 9B, 10, 11,and 12 are not allowed to display graphics.
Back to Top
6 Getting Started
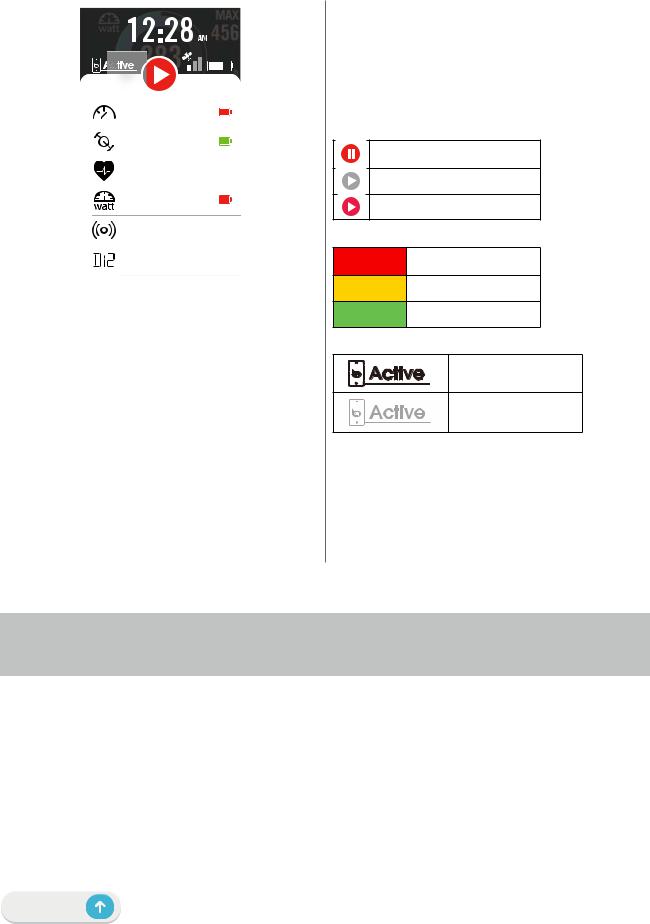
Quick Status
See key statuses while riding, such as sensor & smartphone connection, GPS signal, and individual battery status of paired sensor ,etc…Users can also see if device is recording at a glance by the flicker.
IamErtai SPD
Bryton1235698
123685
Alan’s PW
Katherine’s Radar 
Jennifer’s Di2
1.Single-tap the screen on meter page to open the Quick Staus menu.
2.The recording icon will flicker with
red and gray flashes while the device is recording.
Recording Status
Recording Pause |
Stop / Not Recording |
Recording |
Sensors Battery Status
Critical
Good
New
Active App connecting Status
Connected
Disconnected
NOTE:
xOnly paired sensors will show on the Quick Status Menu.
xIf there is no battery icon next to the sensor names, it means that the sensor has no signal.
Back to Top
7 Getting Started

Status Icons
|
Icon |
|
Description |
|
Icon |
|
Description |
|
|
Icon |
|
Description |
||||||||
|
|
|
|
|
|
|
|
|
|
|
|
|
|
|
|
|
|
|
|
|
|
|
|
|
|
|
|
|
|
|
|
|
|
|
|
|
|
|
|
|
|
|
|
|
|
|
|
|
|
|
|
GPS Signal Status |
|
|
Navigation |
|
|
|
Sensor Pairing |
|||
|
|
|
|
|
|
|
|
|
|
|
|
|
|
|
|
|
|
|
|
Heart Rate Sensor |
|
|
|
|
|
|
|
|
|
|
|
GPS Off / |
|
|
|
|
|
|
|
|
|
|
|
|
|
|
|
|
|
|
|
|
|
|
|
Route |
|
|
|
|
Active |
|
|
|
|
|
|
|
|
|
|
|
|
No Signal (not fixed) |
|
|
|
|
|
|
|
||
|
|
|
|
|
|
|
|
|
|
|
|
|
|
|
|
|
|
|||
|
|
|
|
|
|
|
|
|
|
|
|
|
|
|
|
|
|
|
|
|
|
|
|
|
|
|
|
|
|
|
|
|
|
|
|
|
|
|
|
Speed Sensor Active |
|
|
|
|
|
|
|
|
|
|
|
|
|
|
|
|
|
|
|
|
|
|
|
|
|
|
|
|
|
|
|
|
|
Weak Signal |
|
|
|
History |
|
|
|
|
|
|
|
|
|
|
|
|
|
|
|
|
|
|
|
|
|
|
|
|
||
|
|
|
|
|
|
|
|
|
|
|
|
|
|
|
|
|
|
|
|
Cadence Sensor |
|
|
|
|
|
|
|
|
|
|
|
|
|
|
|
|
|
|
|
|
|
|
|
|
|
|
|
|
|
|
|
|
Strong Signal |
|
|
|
Favorite |
|
|
|
|
Active |
|
|
|
|
|
|
|
|
|
|
|
|
|
|
|
|
|
|
|||
|
|
|
|
|
|
|
|
|
|
|
|
|
|
|
|
|
|
|
|
Combo Sensor |
|
|
|
|
|
|
|
|
|
|
|
|
|
|
|
|
|
|
|
||
|
|
|
|
|
|
|
|
|
|
|
Unable GPS |
|
|
|
Zoom in |
|
|
|
|
Active |
|
|
|
|
|
|
|
|
|
|
|
|
|
|
|
|
|||||
|
|
|
|
|
|
|
|
|
|
|
|
|
|
|
|
|
|
|
Electronic Shifting |
|
|
|
|
|
|
|
|
|
|
|
|
|
|
|
|
|
|
|
|
|
|
|
|
|
|
|
|
|
|
|
|
|
|
|
|
|
|
|
|
|
|
|
|
|
|
|
|
|
|
|
|
|
|
|
|
|
|
Zoom out |
|
|
|
|
Active |
|
|
|
|
|
|
|
|
|
|
|
Power Status |
|
|
|
|
|
|
|||
|
|
|
|
|
|
|
|
|
|
|
|
|
|
|
|
|
|
|||
|
|
|
|
|
|
|
|
|
|
|
|
|
|
|
|
|
|
|
Power Meter Active |
|
|
|
|
|
|
|
|
|
|
|
|
|
|
|
|
|
|
|
|
|
|
|
|
|
|
|
|
|
|
|
|
|
|
|
|
|
Locate |
|
|
|
|
|
|
|
|
|
|
|
|
|
|
|
|
Full battery |
|
|
|
|
|
|
|
||
|
|
|
|
|
|
|
|
|
|
|
|
|
|
Current Position |
|
|
|
|
|
|
|
|
|
|
|
|
|
|
|
|
|
|
|
|
|
|
|
|
|
|
|
|
|
|
|
|
|
|
|
|
|
|
Out of battery |
|
|
|
|
|
|
|
Radar Active |
|
|
|
|
|
|
|
|
|
|
|
|
|
|
|
|
|
|
|
|
||
|
|
|
|
|
|
|
|
|
|
|
|
|
|
Voice Search |
|
|
|
|
||
|
|
|
|
|
|
|
|
|
|
|
|
|
|
|
|
|
|
|
|
|
|
|
|
|
|
|
|
|
|
|
|
Battery Charging |
|
|
|
|
|
|
|
||
|
|
|
|
|
|
|
|
|
|
|
|
|
|
|
|
|
|
|
|
|
|
|
|
|
|
|
|
|
|
|
|
|
|
|
|
|
|
|
|
DI2 Active |
|
|
|
|
|
|
|
|
|
|
|
|
|
|
|
Search POI |
|
|
|
|
||
|
|
|
|
|
|
|
|
|
|
|
|
|
|
|
|
|
|
|
||
|
|
|
|
|
|
|
|
|
|
|
Record |
|
|
|
|
|
|
|||
|
|
|
|
|
|
|
|
|
|
|
|
|
|
|
|
|
|
|
||
|
|
|
|
|
|
|
|
|
|
|
|
|
|
|
|
|
|
|
Smart Bike Trainer |
|
|
|
|
|
|
|
|
|
|
|
|
|
|
|
|
|
|
|
|
|
|
|
|
|
|
|
|
|
|
|
|
|
|
|
|
|
|
|
|
|
||
|
|
|
|
|
|
|
|
|
|
|
Recording |
|
|
|
Add a PIN |
|
|
|
|
Active |
|
|
|
|
|
|
|
|
|
|
|
|
|
|
|
|
|
|
|
||
|
|
|
|
|
|
|
|
|
|
|
|
|
|
|
|
|
|
Electric Bike Active |
||
|
|
|
|
|
|
|
|
|
|
|
|
|
|
|
|
|
|
|
|
|
|
|
|
|
|
|
|
|
|
|
|
|
|
|
|
Move the Map |
|
|
|
||
|
|
|
|
|
|
|
|
|
|
|
Not Recording |
|
|
|
|
|
|
|||
|
|
|
|
|
|
|
|
|
|
|
|
|
|
|
|
|
|
|
||
|
|
|
|
|
|
|
|
|
|
|
|
|
|
|
|
|
|
|
|
Homepage |
|
|
|
|
|
|
|
|
|
|
|
Recording Paused |
|
|
|
Heading Mode |
|
|
|
||
|
|
|
|
|
|
|
|
|
|
|
|
|
|
|
|
|
|
|
||
|
|
|
|
|
|
|
|
|
|
|
|
|
|
|
|
|
|
Profile |
||
|
|
|
|
|
|
|
|
|
|
|
|
|
|
|
|
|
||||
|
|
|
|
|
|
|
|
|
|
|
|
|
|
|
|
|
|
|||
|
|
|
|
|
|
|
|
|
|
|
|
|
|
|
|
|
|
|
|
|
|
|
|
|
|
|
|
|
|
|
|
|
|
|
|
Compass Mode |
|
|
|
|
|
|
|
|
|
|
|
|
|
|
|
|
Recording Stopped |
|
|
|
|
|
|
|
|
|
|
|
|
|
|
|
|
|
|
|
|
|
|
|
|
|
|
|
Settings |
||
|
|
|
|
|
|
|
|
|
|
|
|
|
|
|
|
|
||||
|
|
|
|
|
|
|
|
|
|
|
|
|
|
|
|
|
||||
|
|
|
|
|
|
|
|
|
|
|
|
|
|
|
|
|
|
|
||
|
|
|
|
|
|
|
|
|
|
|
|
|
|
|
|
|
|
|
|
|
|
|
|
|
|
|
|
|
|
|
|
|
|
|
|
|
|
|
|
|
|
|
|
|
|
|
|
|
|
|
|
|
|
|
|
|
|
|
|
|
|
Result |
|
|
|
|
|
|
|
|
|
|
|
|
|
|
|
|
|
|
|
|
|
Back to Top
8 Getting Started

Step 1: Charge your Rider 750
Charge the Rider 750 battery for at least 4 hours. Unplug the device when it is fully charged.
xYou may see the battery icon  blinking when the battery is very low. Keep the device plugged in until properly charged.
xThe temperature suitable for charging battery is 0°C ~ 40°C. Beyond this temperature range, charging will be terminated and the device will draw power from battery.
At least 4 Hours
Step 2: Turn On Rider 750
Press  to turn on the device.
Step 3: Initial Setup
When powering on the Rider 750 for the first time, follow the instruction to complete setup.
1.Select the display language.
2.Choose the units of measurement.
3.Download Bryton Active app and pair the Rider 750 with your cellphone.
4.Go through the starting tutorial before riding.
LANGUAGE |
|
UNIT |
|
|
|
|
|
|
Deutsch |
KM, KG |
|
|
|
|
|
||
|
|
|
|
|
|
|
|
|
|
|
|
|
|
|
|
|
|
English |
MI, LB |
|
|
|
|
|
||
|
|
|
|
|
|
|
|
|
Español |
|
|
|
|
|
|
||
|
|
|
|
|
|
|||
|
|
|
|
|
|
|
|
|
Français |
|
|
|
|
|
|
||
|
|
|
|
|
Navigation |
Course |
||
|
|
|
|
|
||||
Italiano
Back to Top
9 Getting Started

Step 4: Acquire Satellite Signals
Once the Rider 750 is turned on, it will automatically search for satellite signals. It may take 30 to 60 seconds to acquire signals for first time use.
•The GPS signal Icon (
 /
/ 
 ) appears when GPS is fixed.
• If GPS signal is not fixed, a |
icon appears on the screen. |
•If GPS function is disable, a  icon shows on the screen.
Please avoid obstructed environments since they might affect GPS reception.
|
|
|
|
|
|
|
|
|
|
|
|
|
|
|
|
|
|
|
|
|
|
|
|
|
|
|
|
|
|
|
|
|
|
|
|
|
|
|
|
|
|
|
|
|
|
|
|
|
|
|
|
|
|
|
|
|
|
|
|
|
|
|
|
|
|
|
|
|
|
|
|
|
|
|
|
|
|
|
|
|
|
|
|
|
|
|
|
|
|
|
|
|
|
|
|
|
|
|
|
|
|
|
|
|
|
|
|
|
|
|
|
|
|
|
|
|
|
|
|
|
|
|
|
|
|
|
|
|
|
|
|
|
|
|
|
|
|
|
|
|
|
|
|
|
|
|
|
|
|
|
|
|
|
|
|
|
|
|
|
Tunnels |
Inside rooms, |
Underwater |
High-voltage |
Construction |
|||||||||||
|
building, or |
|
wires or |
sites and heavy |
|||||||||||
|
underground |
|
television |
traffic |
|||||||||||
|
|
|
|
|
|
|
|
|
|
towers |
|
|
|
||
|
|
|
|
|
|
|
|
|
|
|
|
|
|
|
|
Step 5: Ride with Rider 750
After the “Satellite Acquired” message pops up, enter the Bike 1, Bike 2 or Bike 3 cycling page and enjoy your ride in free cycling mode.
|
|
|
Speed |
h |
|||||||||
|
|
|
21.5 |
|
|
|
|
||||||
|
|
|
|
|
|
|
|
|
|
|
|
|
k |
|
|
|
|
|
|
|
|
|
|
|
|
|
m |
|
|
|
Ride Time |
|
|||||||||
06:15:21 |
|
||||||||||||
1155 |
ce |
|
|
|
|
Alt |
Gain |
|
|||||
|
|
|
|
|
|||||||||
|
|
|
|
|
|
|
|
|
|
|
|||
|
k |
|
|
|
|
|
4 |
|
|
m |
|||
|
|
|
|
|
|
|
|
|
|
|
|
|
|
|
|
|
|
|
|
|
|
|
|
|
|
|
|
- |
d |
|
|
|
|
A |
2 |
S |
peed |
|
|||
|
|
|
|
|
|
|
|
h |
|||||
|
|
|
|
|
|
|
|
|
|
|
|
|
k |
|
|
|
|
|
|
|
|
|
|
|
|
|
m |
|
|
|
|
|
|
|
|
|
|
|
|
|
|
|
|
|
|
|
|
|
|
|
|
|
|
|
|
Altitude |
m |
|
Max Speed |
mh |
|||||||||
12 |
27 |
||||||||||||
|
|
|
|
|
|
|
|
|
|
|
|
|
k |
|
|
|
|
|
|
|
|
|
|
|
|
|
|
Time |
|
|
Uphill Dist. |
|
|||||||||
17:21 |
|
8 |
m |
||||||||||
|
|
|
|
|
|
|
|
|
|
|
|
|
k |
xFree ride (without recording):
In cycling mode, measurement starts and stops automatically in sync with the movement of the bicycle.
xStart an exercise and record your data:
1.In cycling mode, press  to start recording, press
  again to pause recording.
2.Choose to Discard or Save the result to end riding.
3.Choose  to go to the meter page to see your cycling data. Then tap on
  to go back to the previous page.
4.Tap on  or press
  to continue recording.
Back to Top
10 Getting Started
Step 6: Share Your Records
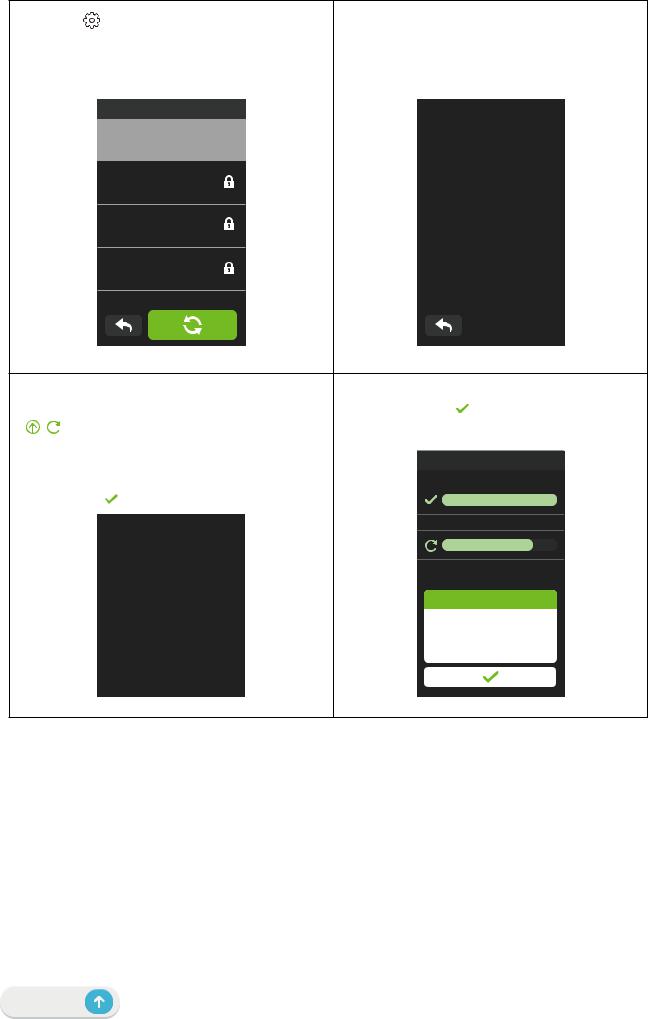
Connect Rider 750 to PC
a.Connect Rider 750 to PC by using Bryton’s original USB cable.
b.The folder will popup automatically or find the “Bryton” disk in the computer.
Share Your Tracks to Brytonactive.com
1.Sign up on Brytonactive.com
a.Go to https://active.brytonsport.com.
b.Register for a new account.
2.Connect to PC
Turn on your Rider 750 and connect it to a computer by USB cable.
3.Share Your Records
a.Click “+” in the right upper corner.
b.Drop FIT, BDX, GPX file(s) here or Click “Select files” to upload tracks.
c.Click “Activities” to check uploaded tracks.
Share Your Tracks to Strava.com
1.Sign up / log in on Strava.com
a.Go to https://www.strava.com
b.Register for a new account or use your current Strava account to log in.
2.Connect to PC
Turn on your Rider 750 and connect it to your computer by USB cable.
3.Share Your Records
a.Click “+” on the top right corner of the Strava page and then click “File”.
b.Click “Select Files” and select FIT files from Bryton device.
c.Enter information about your activities and then click “Save & View”.
Back to Top
11 Getting Started
Auto Sync Tracks to Bryton Active App
No more uploading tracks manually after riding. Bryton Active App automatically syncs your track after pairing with your GPS device.
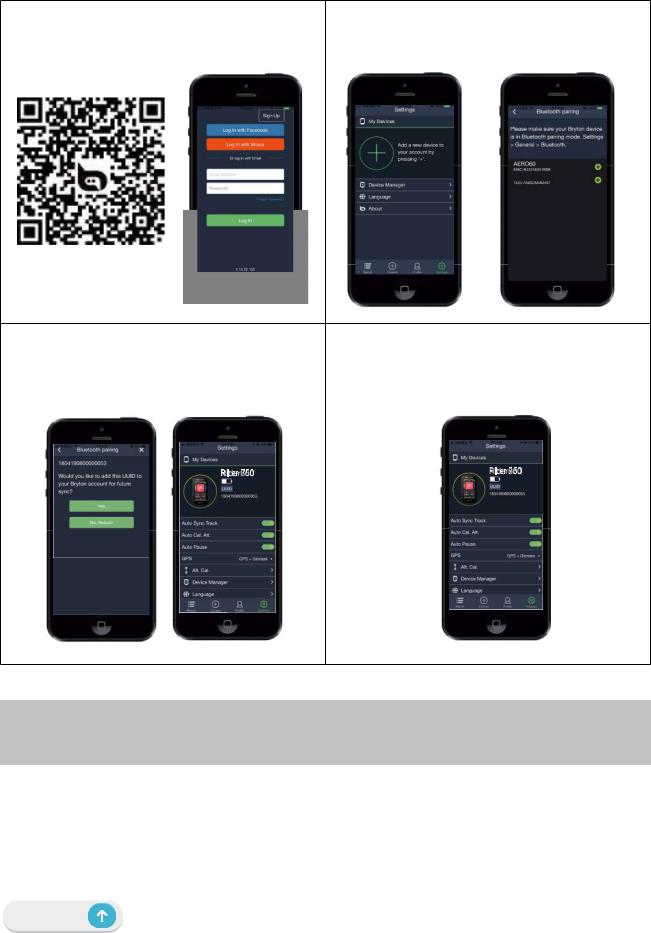
Sync via BLE
a. Scan QR code below to download Bryton Active |
b. Go to Settings > Device Manager > + > Rider 750 |
App or go to Google Play/App Store to search Bryton |
to add your GPS device. |
Active App. Then, log in or create an account. |
|
Rider 750
http://download.brytonsport.com/inst.html
c. Check if the UUID shown on app is as same as |
d. Successfully added! Turn on Auto Sync Tracks. |
|||||
your device. Select “Yes” to confirm adding this |
Now new tracks will be automatically uploaded to |
|||||
device. If the UUID does not match, press NO and |
Bryton Active App.. |
|||||
try again. |
|
|
|
|||
|
|
|
|
|
|
|
|
|
|
|
|
|
|
|
|
|
|
|
|
|
NOTE: Bryton Active App syncs with Brytonactive.com. If you already have a
NOTE: Bryton Active App syncs with Brytonactive.com. If you already have a brytonactive. brytonactive.com account, please use the same account to log in to Bryton Active App and com account, please use the same account to log in to Bryton Active App and vice versa.
vice versa.
Back to Top
12 Getting Started
Sync via WLAN
a. Select |
> Data Sync, then choose a |
b. Make sure the Rider 750 is paired |
network to set up connection. Please go to |
with the Bryton Active app and bind your |
|
Page39 to see more information of setting |
Bryton account before starting data sync. |
|
WLAN. |
|
|
WLAN
Choose Network
Meeting Room
Please pair device with the
Home Bryton Active app to bind the device to your Bryton acount.
Getyourownwifi
|
|
|
|
|
|
|
|
|
|
|
|
|
|
|
|
|
|
|
|
|
|
|
|
|
|
|
|
|
|
|
|
|
|
c. The device will automatically upload the |
d. After the activities are successfully |
|||||||||||||||
activities after connected with your account. |
uploaded. Click |
to continue. |
||||||||||||||
* |
mean the uploads are in progress. |
|
|
|
|
|
|
|
|
|
|
|||||
|
|
|
|
|
|
|
|
|
|
|
|
|
|
|
|
|
|
|
|
DATA SYNC |
|
|
|
|
|
|
|
|
|
|
|
|
|
|
|
|
|
|
|
|
|
|
DATA SYNC |
|
|
|
|
|||
|
|
Upload Activities |
5/5 |
|
|
|
Upload Activities |
|
|
5/5 |
|
|
||||
|
|
|
|
|
|
|
|
|
|
|
|
|
|
|
|
|
|
|
|
|
|
|
|
|
|
|
|
|
|
|
|
|
|
|
|
|
|
|
|
|
|
|
|
|
|
|
|
|
|
|
|
|
|
|
|
|
|
|
|
|
|
|
|
|
|
|
|
|
|
|
|
|
|
|
|
|
|
|
|
|
|
|
|
|
|
|
|
|
|
|
|
|
|
|
|
|
|
|
|
||
|
|
|
|
|
|
|
|
1/2 |
|
|||||||
|
|
|
|
|
|
|
|
Download Firmware |
|
|
|
|||||
|
|
|
|
|
|
|
|
|
|
|
|
|
|
|
|
|
|
|
|
|
|
|
|
|
|
|
|
|
|
|
|
|
|
Done!
Back to Top
13 Getting Started
Firmware Update
Update on the Device
DATA SYNC
|
|
|
|
|
|
|
Upload Activities |
|
5/5 |
||
|
|
|
|
|
|
|
|
|
|
|
|
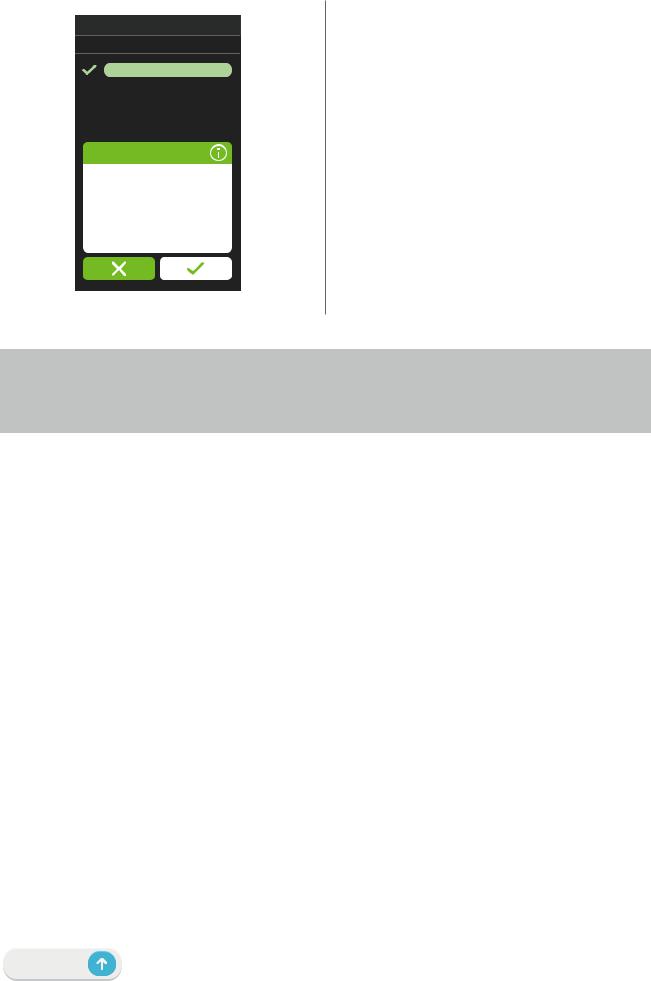
New firmware is available, update now?
1.Select  > Data Sync, then choose a network to set up connection.
2.If there is a new update, the Rider 750 will pop up a message to ask you if you would like to update the firmware.
3.Click  to continue.
4.After the new firmware is succefully
downloaded, tap  to go back to Settings.
5.If the download failed, select  to go back to Settings and redo the process.
NOTE:
If you want to see more information of Data Sync, please go to Page14. If you would like to go through WiFi setup, please go to Page 39.
Bryton Update Tool
Bryton Update Tool is the tool for you to update GPS data, firmware and download Bryton Test.
1.Go to http://www.brytonsport.com/#/supportResult?tag=BrytonTool and download Bryton Update Tool.
2.Follow the on-screen instructions to install Bryton Update Tool.
Update GPS Data
The newer GPS data can speed up the GPS acquisition. We higly recommend you to update GPS data for every 1-2 weeks.
Update Firmware
Bryton releases a new firmware version with new functions or on irregular basis to add new functions or fix bugs. We highly recommend that you update firmware once the latest version is available. It usually takes a while to download and install firmware dor updating. Do not remove USB cable during updating.
Back to Top
14 Getting Started

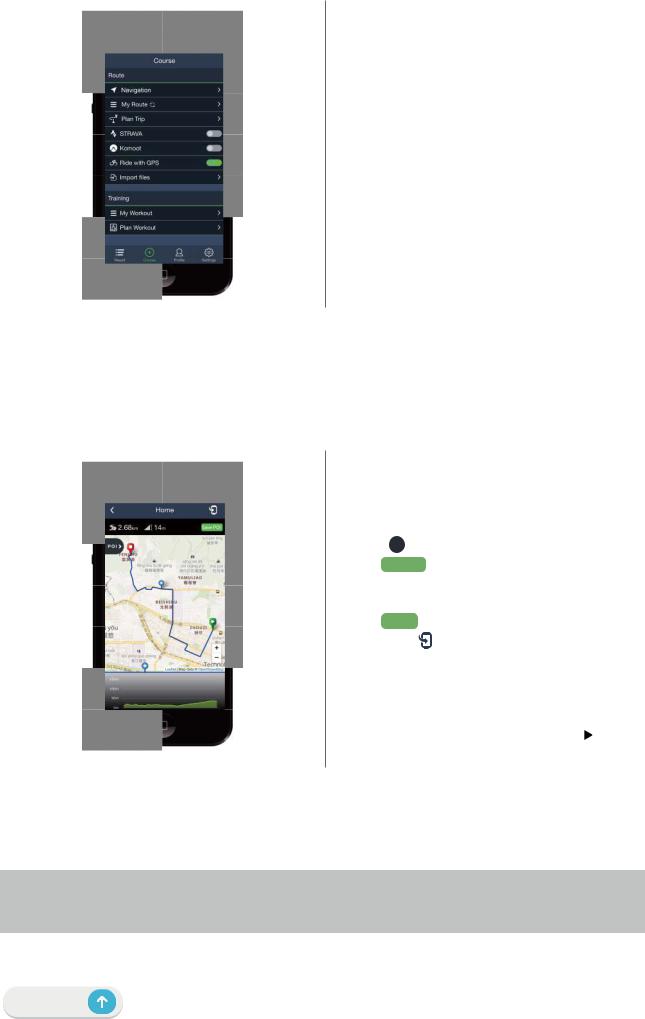
Course
Follow Track
Create Track
Rider 750 provides 3 ways to create tracks: 1. Plan trip via Bryton Active App. 2. Import routes from 3rd party platforms. 3. Auto sync routes from Strava, Komoot and RideWithGPS.
Plan Trips via Bryton Active App
1. In Bryton Active App, select Course > Plan Trip to set a Start point and Destination by tapping on the map or inputing address in left Search Bar.
2. Download the planned trip to My Route by tapping on the  icon .
3. Go to My Route and download a route to device by tapping the route and then click the device icon  .
.
4. In the Device Main Menu, navigate to
Course > Follow Track, find the route and tap on  to start following the track.
Import routes from 3rd-Party Platforms
1. Download routes in gpx file from 3rd party platform.
2. Select Open in Active (for iOS) or Open files with Bryton Active App (for Android).
3. Select Course > My Route in Bryton Active App.
4. Here you can see the routes imported to the App.
5. Select the upper right icon  to download the route to your device.
6. In the Main Menu of the device, navigate to Course > Follow Track, find the route and tap on  to start following the track.
Back to Top
15 Course
Auto Sync routes from Strava, Komoot, RideWithGPS
1. Enable STRAVA / Komoot / RideWithGPS auto sync in the Course
tab to establish a link with the Bryton Active app.
2. Create/modify routes in these platforms and save them as public.
3. Select My Routes and choose a route to download.
4. Press the upper right icon  to download the route to your device.
5. In the Main Menu of the device, navigate to Course > Follow Track, find the route and tap on  to start following the track.
Add POI
After setting up your POI and Peak info, you can check the distance to your next POI or Peak in Follow Track mode, allowing you to make the right decision based on your status and stay motivated along the way.
1. |
Go to Course > My Routes in Bryton |
|||
|
Active App. |
|||
2. |
Select the route you would like to add |
|||
|
POIs. |
|
||
3. |
Tap |
|
> to expand POI menu. |
|
POI |
||||
4. |
Tap |
+Add POI |
and choose POI type. |
|
5. |
Slide the icon on the bar below to place |
|||
|
the POI anywhere along your route. |
|||
6. |
Tap Save POI |
to confirm and save POI. |
||
7. |
Click the |
icon in the upper right |
||
|
corner to download the route to your |
|||
|
Bryton device. |
|||
8. |
In the device Main Menu, find Course > |
|||
|
Follow Track. |
|||
9. |
Find the planed route and press to |
|||
|
start following the track. |
|||
Note: To view on-device POI info, please add the related POI data fields to the data pages. It is also recommended to put these data fields in larger grids to see complete information.
Back to Top
16 Course
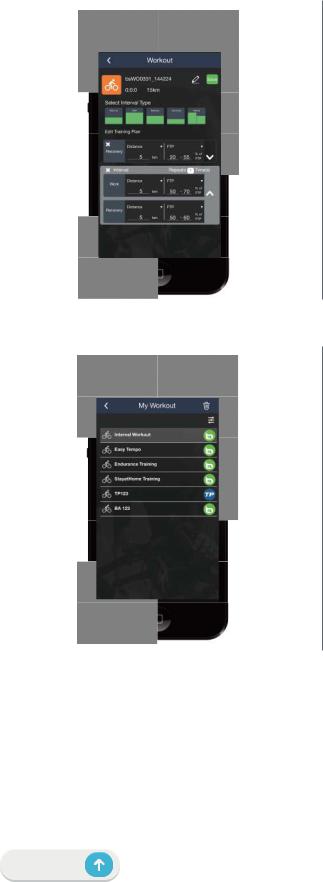
Workout
Create a Workout
Rider 750 provides 2 ways to create workout: 1. Plan workout via Bryton Active App. 2. Import workout from 3rd party platforms.
Plan workout via Bryton Active App
1. In Bryton Active App, select Course > Plan Workout to plan a training workout by selecting interval types and enter details.
2. Click  in the top right to download the workout to the device.
3. You also can download planned workouts by entering My Workout. Select a desired workout then click  in the top right to download the workout to the device.
4. In the Device Main Menu, navigate to Course > Workout, find the workout plan and Tap on  to start workout.
Import workout from 3rd party platforms.
1. Create a workout or find a preferred worout on the 3rd platforms.
2. Enable STRAVA / Komoot / RideWithGPS / Training Peaks auto sync in the Course tab to establish a link with the Bryton Active app.
3. In Bryton Active App, entering My Workout, select a desired workout then click  in the top right to download the workout to the device.
4. In the Device Main Menu, navigate to Course > Workout, find the workout plan and Tap on  to start workout.
Back to Top
17 Course
 Loading...