

Bryton Rider 60 User Manual
User's Manual
60


Rider 60 User’s Manual
2
Table of Contents
Getting Started ................ 4
Your Rider 60 ............................... 4
Touchscreen Button .................... 5
Accessories .................................. 5
Initial Setup ...................... 6
Step 1: Charge the Battery ......... 6
Using the Power Adapter .......................... 6
Using the Computer ................................... 7
Step 2: Turn On the Rider 60 ....... 8
Turn On/O .................................................... 8
Step 3: Initial Setup ..................... 8
Step 4: Acquiring Satellite
Signals .......................................... 8
Step 5: Using Your Rider 60
While Riding ................................ 8
Search Location ......................... 14
Find Coordinate......................... 15
My POI ........................................15
Back to Start ..............................16
Stop Trip ..................................... 16
History ....................................... 16
Training .......................... 17
To Plan ........................................ 17
Simple ............................................................17
Interval ..........................................................18
Race ................................................................18
My Workout ............................... 19
My Schedule Workout ...............19
Bryton Workout ......................... 19
Bryton Test ................................. 21
Information Page ............. 9
Icon Description ........................ 10
Meter & Map ................... 11
Icon Description ........................ 12
Find & Go ........................ 13
Navigate Rides from History .... 13
Navigate Rides from Planned
Trip ............................................. 14
Find POI ...................................... 14
Start Training ............................. 21
Stop Training ............................. 22
View History ................... 23
My Buddy ...................................24
Settings .......................... 25
Bike Prole ................................. 25
Sensors .........................................................25
Speed Source/Cadence Source ...........26
Bike Prole ...................................................27
Smart Lap .....................................................28
Smart Pause .................................................28

Grid Display ............................... 29
Stopwatch ...................... 43
ENGLISH
Info Grid/Lap Page ....................................29
Altitude Page ...............................................29
Map Grid .......................................................30
Day/Night Mode .......................................30
Altitude Calibration .................. 31
Current Altitude .........................................31
Other Position Altitude............................31
Alert ........................................... 32
Find & Go Alert ...........................................32
Training Alert ..............................................33
System ........................................ 33
Backlight .......................................................33
Brightness ....................................................34
Language ......................................................34
Time/Unit ......................................................35
GPS Status ................................. 36
................................ 36
Map ............................................ 37
Map Type ......................................................37
Map Activation ..........................................37
Navigation ................................. 38
Route Color ..................................................38
Display Contour .........................................38
Display POI ...................................................38
Countdown ................................ 43
Stopwatch .................................. 43
Troubleshooting ............ 44
Getting More Information ........44
Reset Rider 60 ............................ 44
Sensor Pairing Issues ................ 44
Heart rate sensor .......................................44
Speed/Cadence sensor ............................44
Appendix ........................ 45
Installing the Bike Mount ......... 45
Installing the Heart Rate
Monitor Set ................................46
Installing the Dual Sensor ........ 47
Installing Map Micro SD Card ... 48
Software Update ....................... 49
Share Your Rides to
Brytonsport.com ....................... 50
Wheel Size and
Circumference ........................... 51
Heart Rate Zones ....................... 52
Always North ...............................................39
Auto Reroute ..............................................39
Basic Care For Your Rider 60 ..... 52
............................53
Voice Guidance ...........................................39
Bluetooth ...................................40
Australian Consumer Law
Our goods come with guarantees that can not be excluded under the New Zealand and Australian Consumer
Laws. You are entitled to a replacement or refund for a major failure and for compensation for any other
reasonably foreseeable loss or damage. You are also entitled to have the goods repaired or replaced if the
goods fail to be of acceptable quality and the failure does not amount to a major failure.
WARNING
Always consult your physician before you begin or modify any training program. Please read the details
in Warranty and Safety Information guide in the package.
Rider 60 User’s Manual 3
4
Rider 60 User’s Manual
Getting Started
LAP
BACK
PAGE
60
This section will guide you on the basic preparations before you start using your Rider 60.
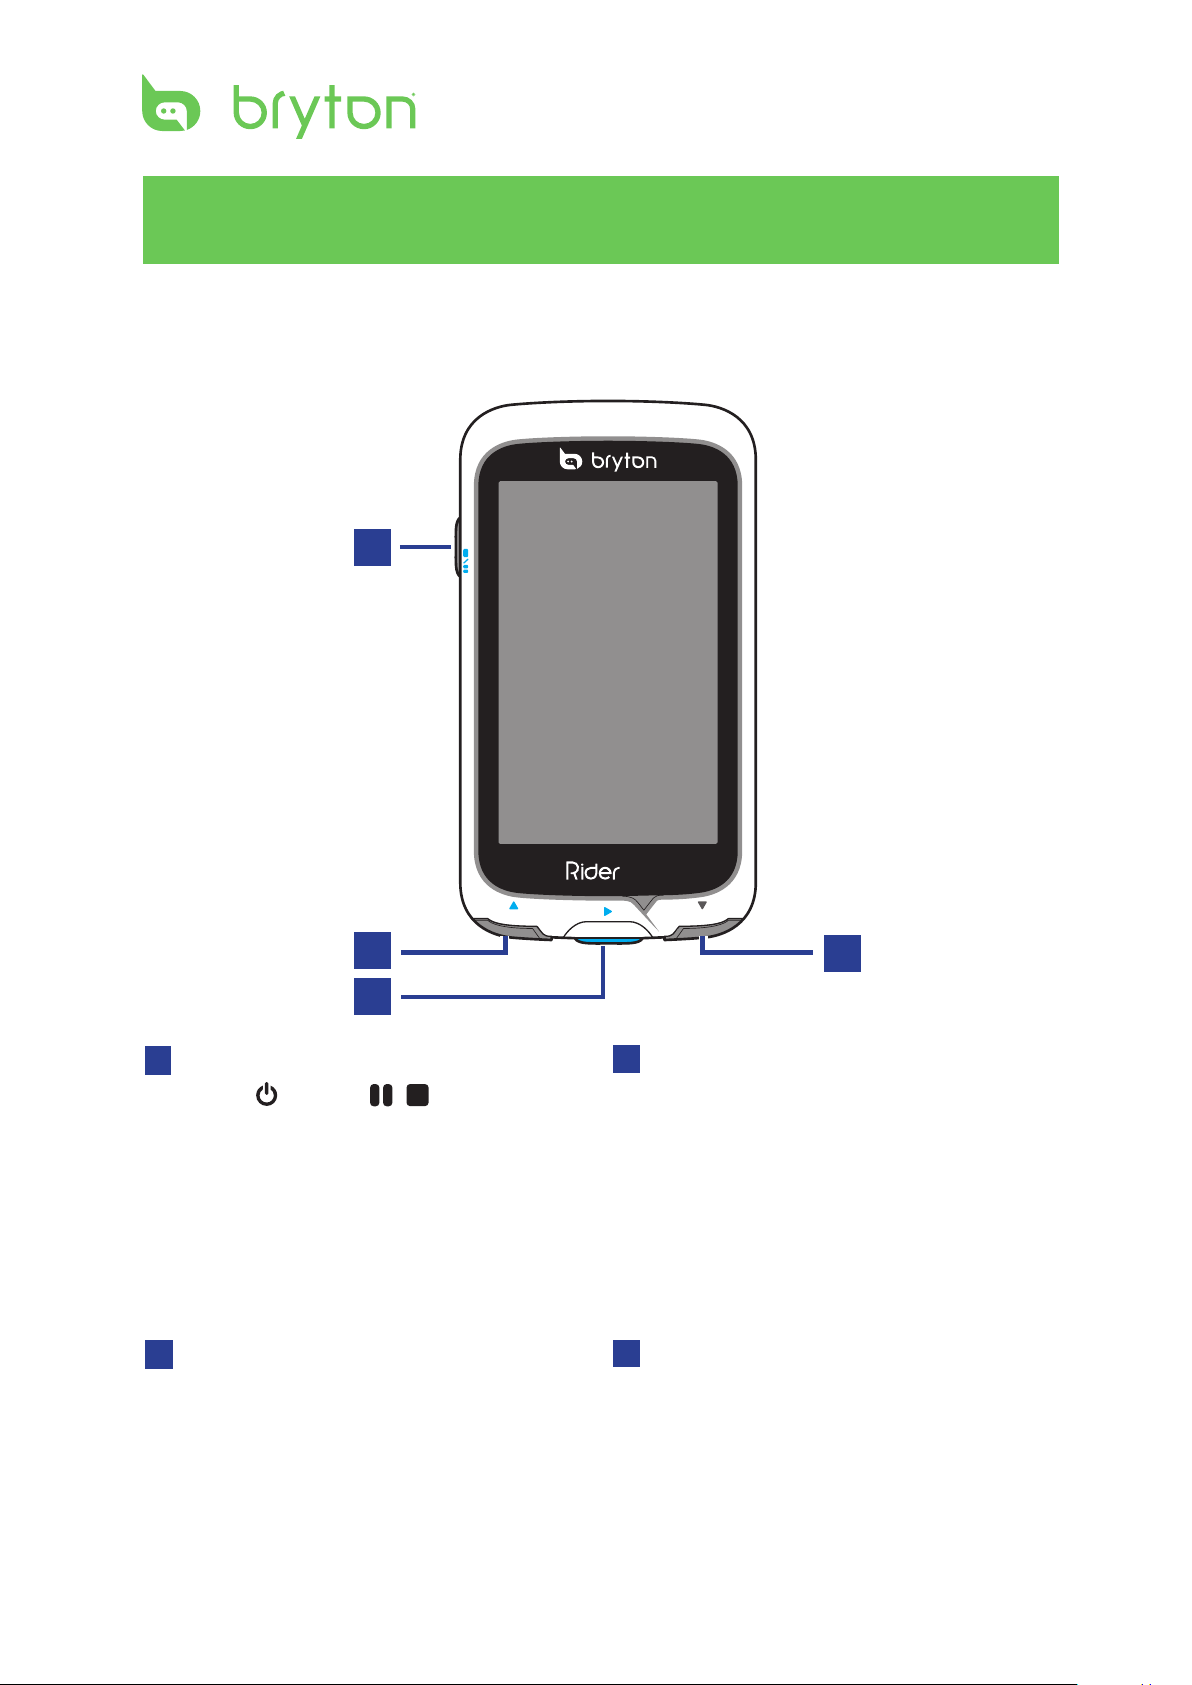
Your Rider 60
1
2
4
3
Power/Back/Pause/
1
Stop ( /BACK/ / )
Press and hold to turn on/o device.•
Press to return to the previous page.•
When recording, press to pause •
recording log and press again to stop.
Tip: Quick press twice to stop recording
log.
Up (p)
2
In Menu, press to move up to scroll •
through menu options.
In meter view, press to switch meter •
screen page.
Lap/Ok/ Record (u/LAP)
3
In Menu, press to enter or conrm a •
selection.
In meter and training mode, press to •
record the log.
When recording, press to mark the lap.•
Down / Page (q/PAGE)
4
In Menu, press to move down to scroll •
through menu options.
In meter view, press to switch meter •
screen page.
5
ENGLISH
Rider 60 User’s Manual
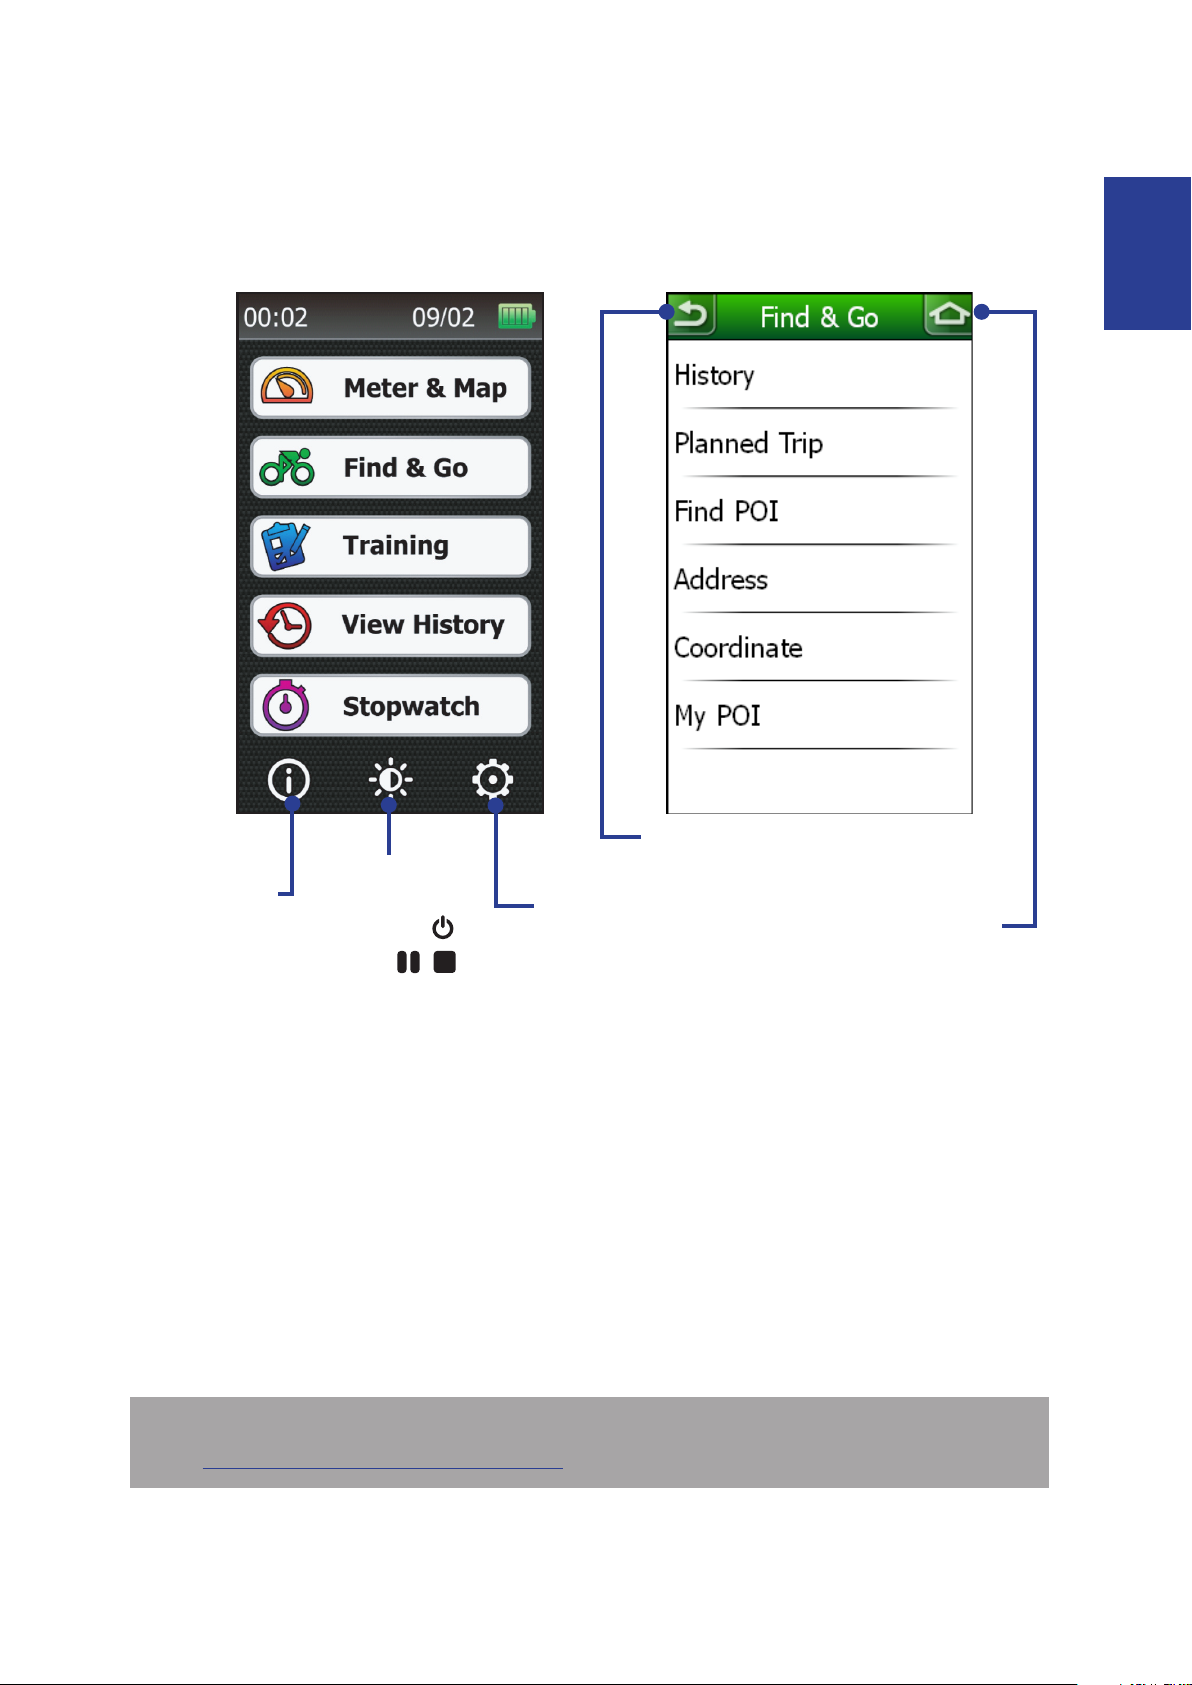
Touchscreen Button
The Rider 60 comes with a touch screen. Tap on the touch screen to operate the device.
Tap to adjust
Tap to enter the
Information page.
the brightness
level. Press /
BACK/ /
key to cancel
the brightness
bar.
Accessories
The Rider 60 comes with the following accessories:
Power adapter•
Plug(s)•
USB cable•
Bike mount•
Rubber bands•
Optional items:
Speed or Cadence sensor•
Speed & Cadence dual sensor•
Heart rate monitor set: including heart rate sensor •
and heart rate belt
Heart rate belt•
Front View Mount•
Tap to return to the
previous page.
Tap to enter the
Setting page.
Tap to return to
Main page.
NOTE: For more information about purchasing optional accessories, please go to Bryton
Eshop http://www.brytonsport.com/eshop or contact your Bryton dealer.
6
Rider 60 User’s Manual
Initial Setup
LAP
BACK
PAGE
60
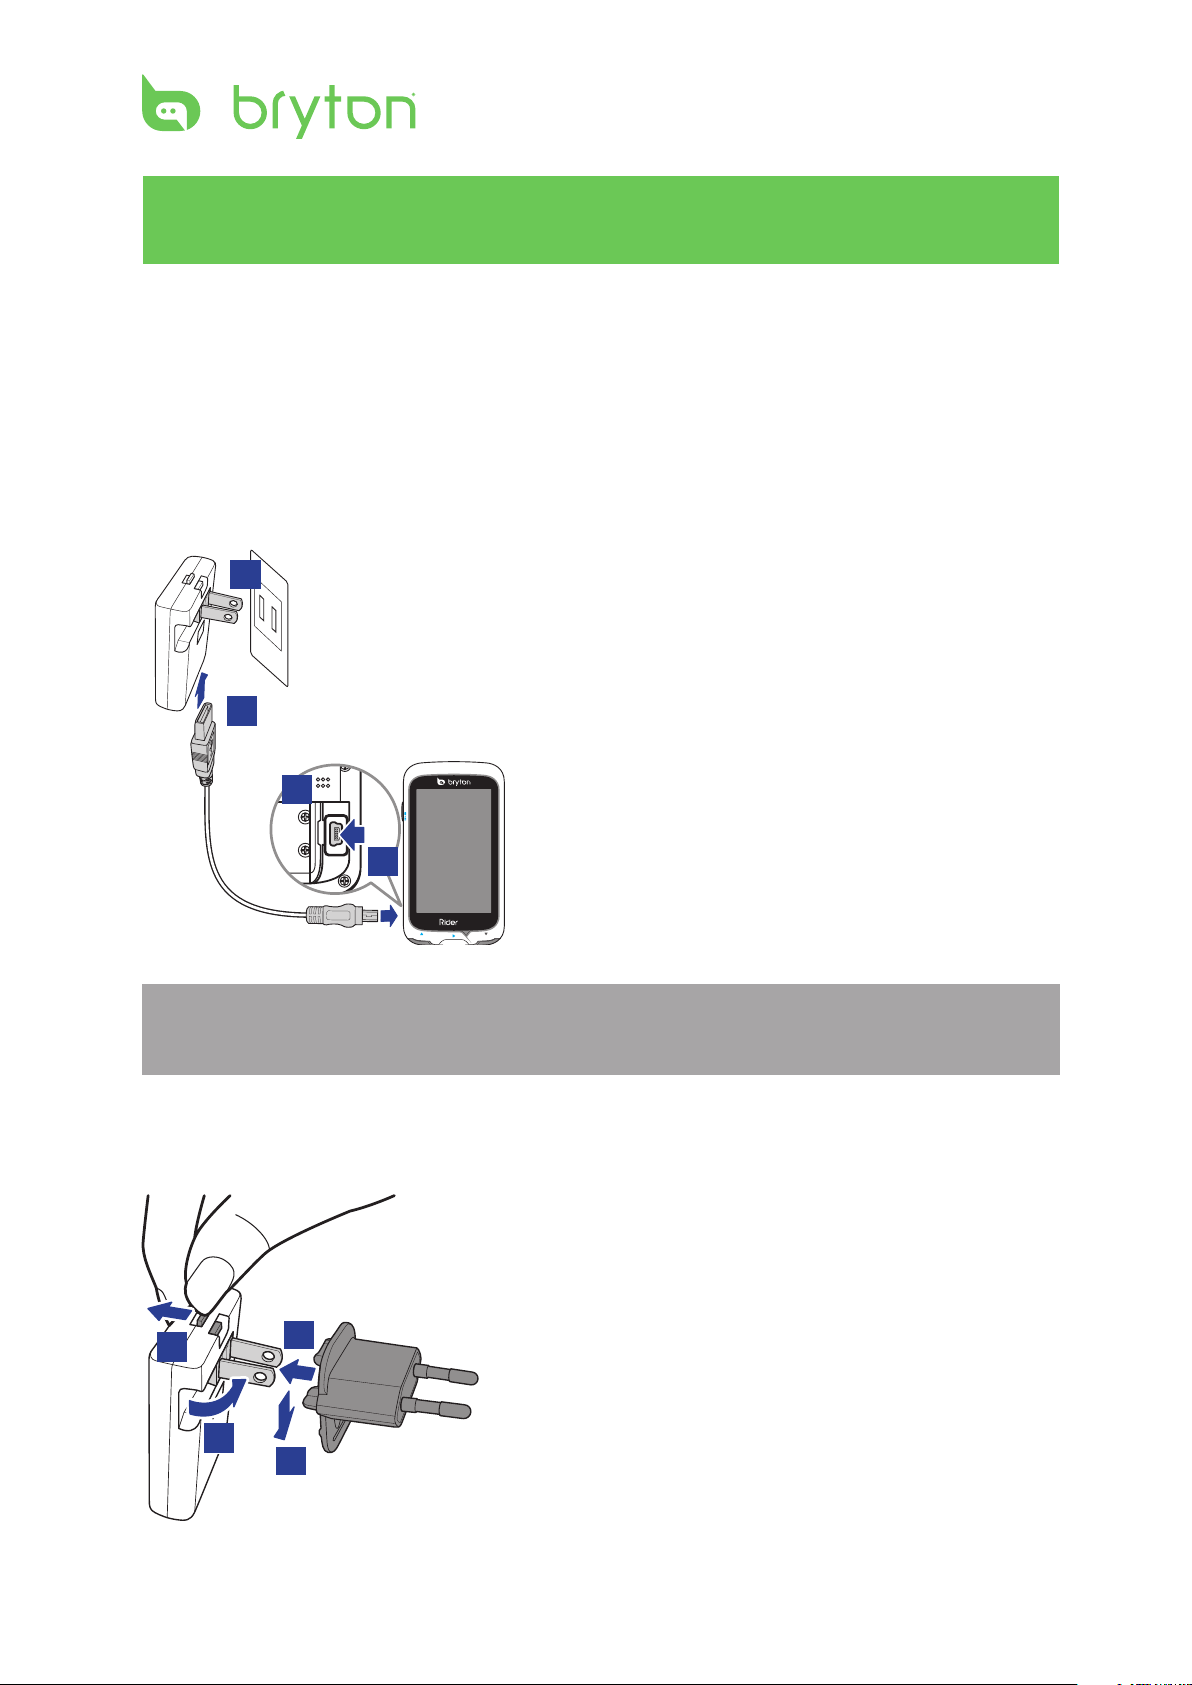
Step 1: Charge the Battery
Using the Power Adapter
Charge the Rider 60 for at least 4 hours before you start using it.
Warning:
This product contains a lithium-ion battery. See the Warranty and Safety Information guide
in the package for important battery safety information.
4
1. Open the USB cover.
2. Connect the mini-USB end of the USB
cable to the mini-USB port of the Rider
60.
3
3. Connect the other end to the power
adapter.
1
2
4. Plug the power adapter to a wall outlet.
NOTE: Always keep the USB cover tightened when riding. If the screen appears foggy, please
place Rider 60 in a dry place for 2 days and wait until the moisture disappears.
The Rider 60 may come with dierent plug head(s) suitable in the country where you
purchased the device.
To use the plug:
2
1
3
4
1. Pull up the default plug.
2. Press and hold the tab.
3. Insert the plug head.
4. Release the tab to lock the plug head and
push the plug down.
7
ENGLISH
Rider 60 User’s Manual
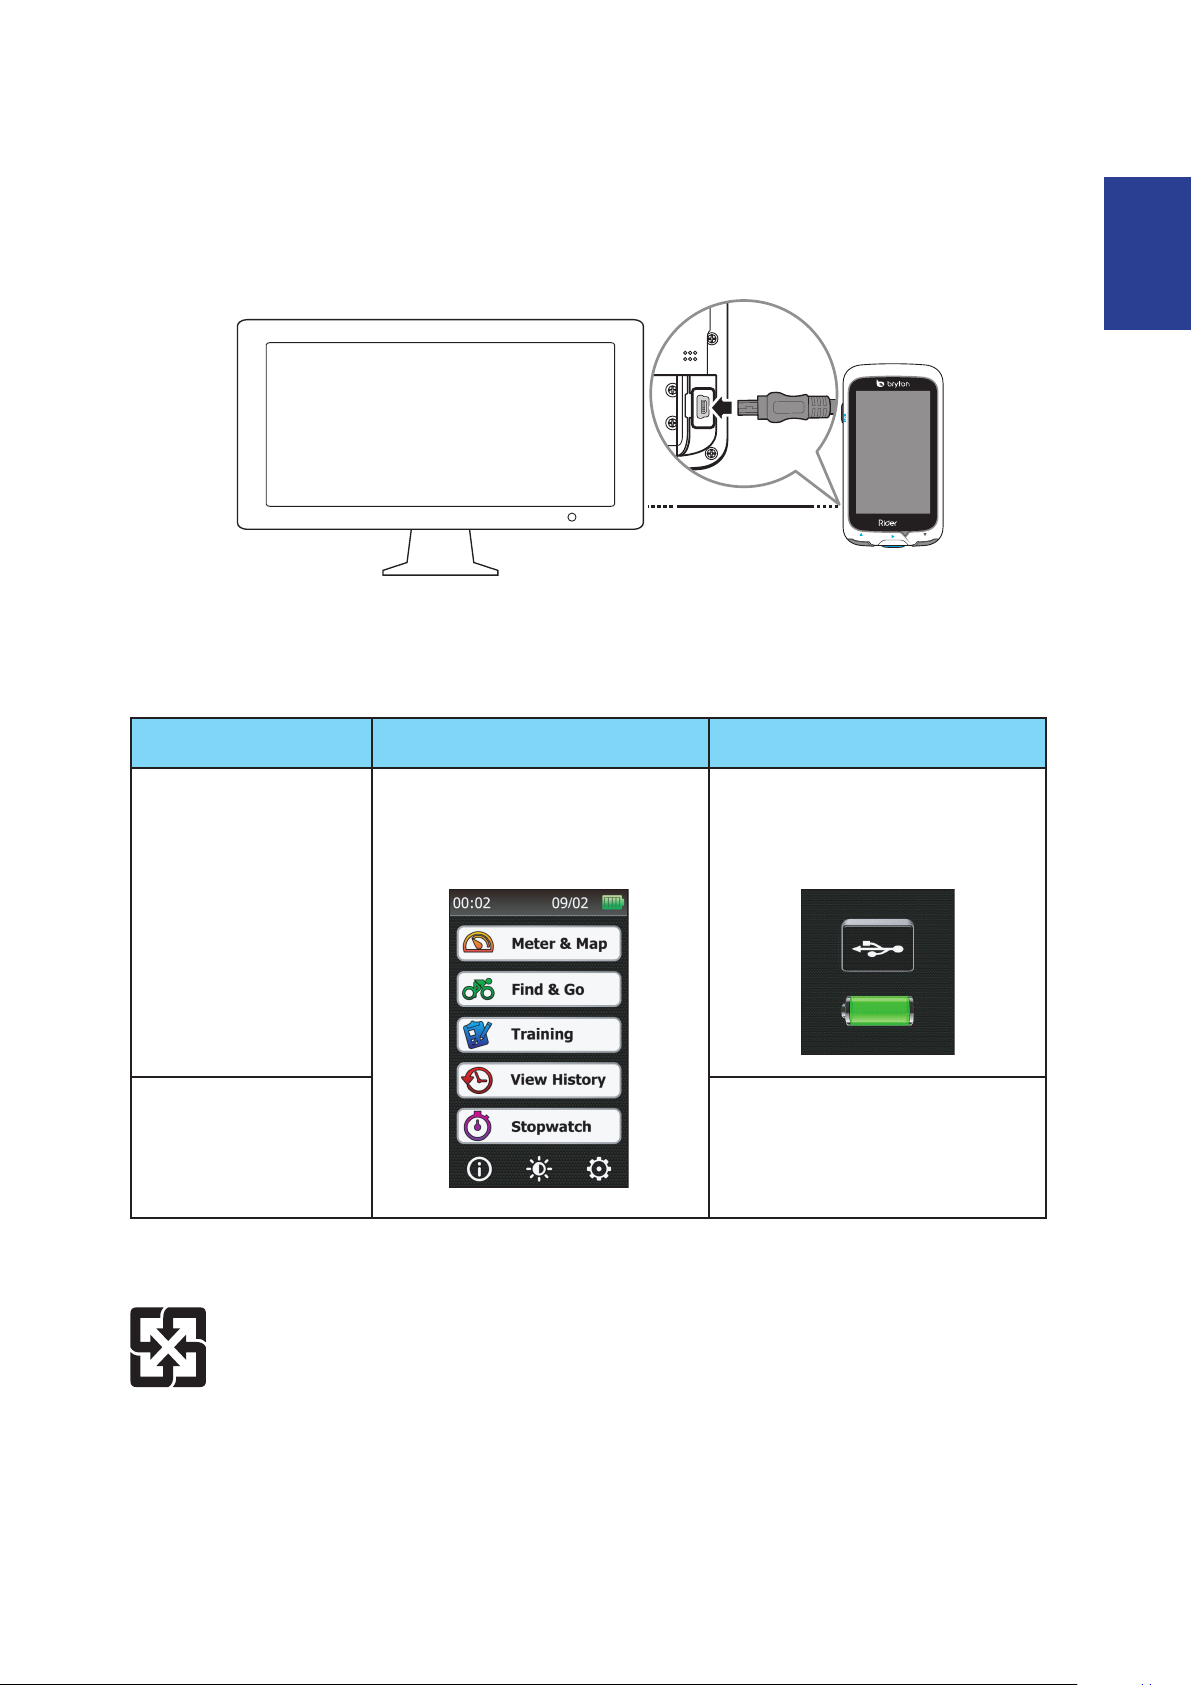
Using the Computer
LAP
BACK
PAGE
60
1. Open the USB cover.
2. Connect the mini-USB end of the USB cable to the mini-USB port of the Rider 60.
3. Connect the other end to a computer.
Dierences by using power adaptor and computer
Situation Power Adaptor Computer
While Rider 60 is
Charging…
After unplug Rider 60
with your computer
For better environmental protection, waste batteries should be collected
separately for recycling or special disposal.
Rider 60 screen still remain
at your current page. You can
continue operating your Rider
60.
Rider 60 will be turned o
automatically and the screen
will switch to charging page
Rider 60 will be shut down
automatically. Please press the
power key to turn on your Rider
60.

8
Rider 60 User’s Manual
Step 2: Turn On the Rider 60
Turn On/O
Press and hold to turn the device on or o.
Step 3: Initial Setup
When turning the Rider 60 on for the rst time, the setup wizard appears on screen. Follow
the instructions to complete setup.
1. Select the display language.
2. Select the unit of measurement.
3. Enter your “User Prole”.
4. Press p/q key to read and accept the Safety Agreement.
5. Select one of the available regional maps from the list.
IMPORTANT: On the Map menu, you can only select one free regional map (i.e. UK). Once
the map activated, you are no longer to change it to another regional map.
NOTE: If you travel to an area that you do not have maps on your device, you can purchase
additional maps for your compatible device. Maps can be be purchased directly on the
Bryton Eshop http://www.brytonsport.com/eshop.
Step 4: Acquiring Satellite Signals
Once the Rider 60 is turned on, it will automatically search for satellite signals. When GPS is
xed, the GPS status will display “Good”. Before you start recording, please make sure you
have acquired the GPS signal.
NOTE:
Please ensure your device has a clear view of the sky for uninterrupted satellite signal.•
For more detailed information, refer to • GPS Status section on page 36.
Step 5: Using Your Rider 60 While Riding
During exercise or training, the Rider 60 allows you to measure and record your activities
and displays your current performance.
Recording: in main page, tap • Meter & Map and press the u button to start recording.
Pause/Stop recording: in meter view, press the • BACK/ / button to pause, press it
again to stop.
9
ENGLISH
Rider 60 User’s Manual
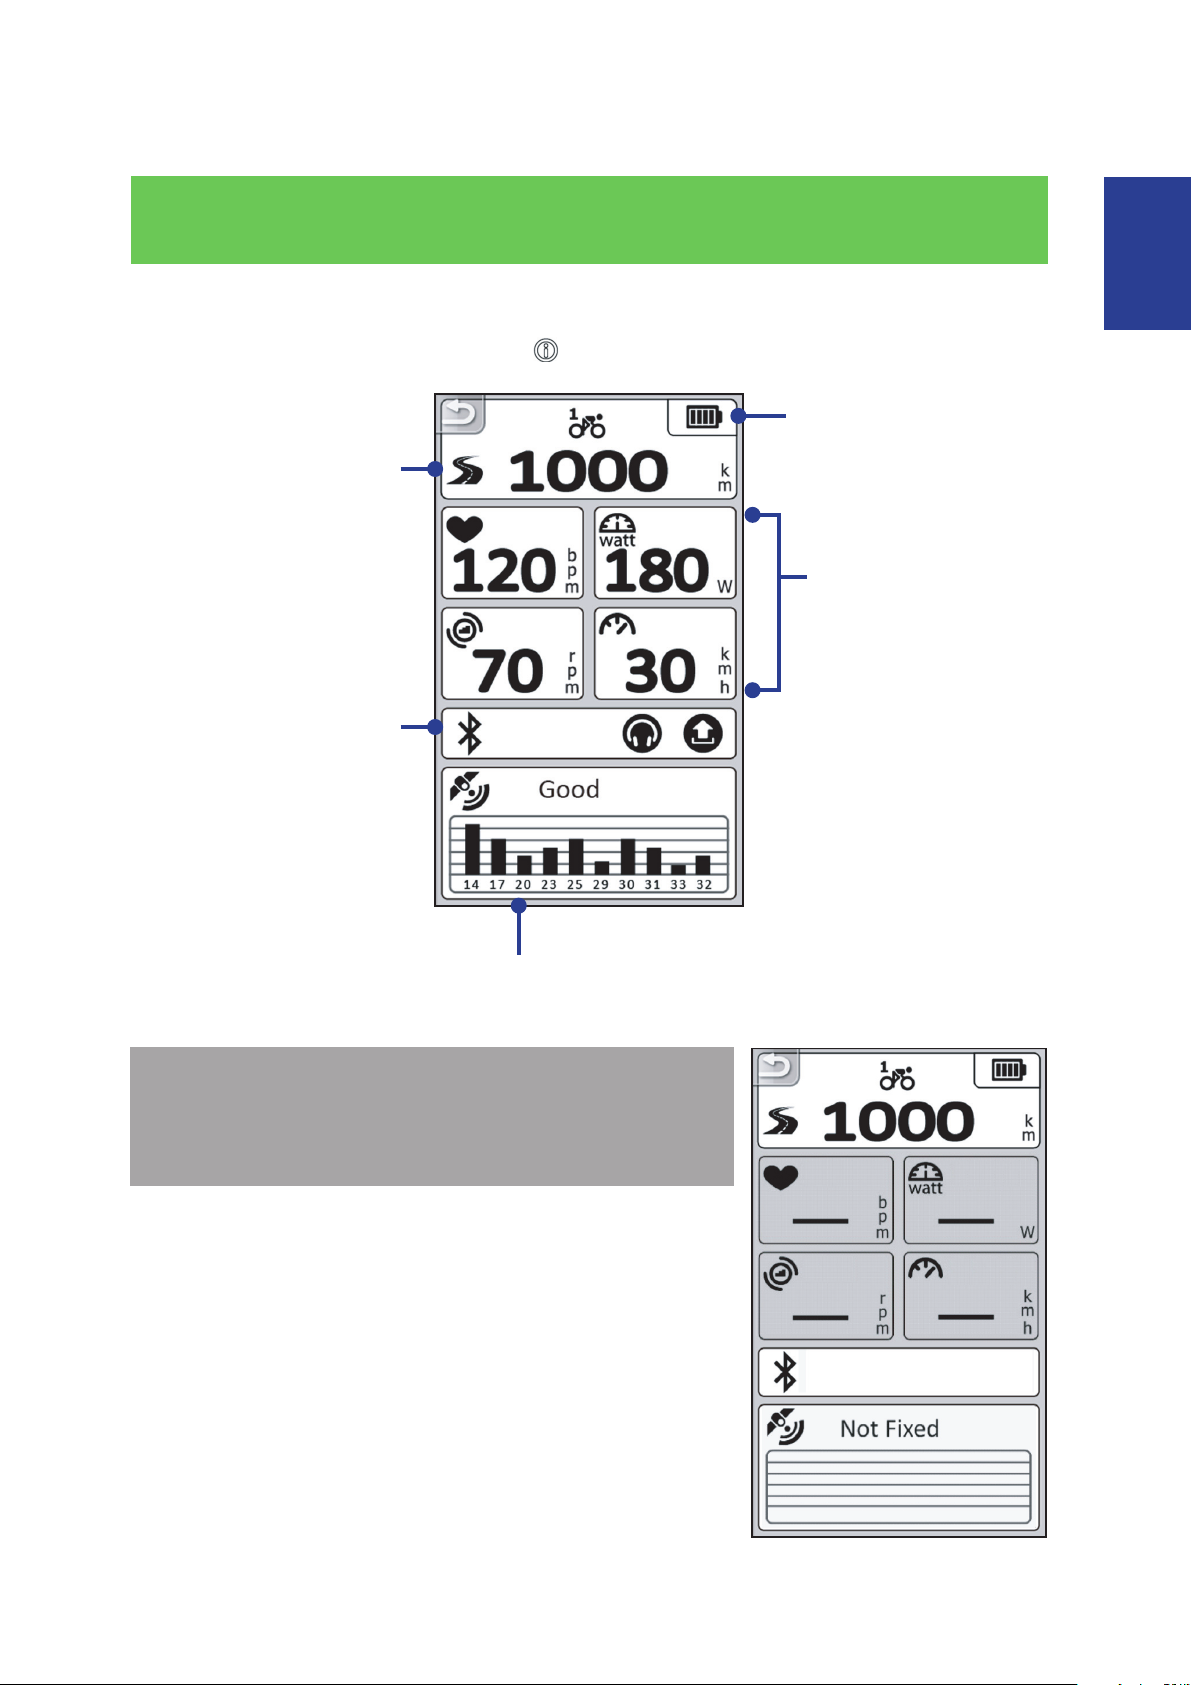
Information Page
The information page displays the status of the bike ODO, battery, ANT+ sensors, GPS signal,
and Bluetooth connection. You can select any icon to change the settings.
To display the information page, tap the icon at the bottom of the Main page.
Battery level
Bike 1 ODO
Total of traveled distance
ANT+ sensor status
Display the current data
of the paired sensor.
Bluetooth status
GPS status
Refer to GPS Status section on page 35 for more information.
NOTE: If the “___” appears on the screen, this indicates that
the Rider 60 has not detect the ANT+ sensor.
Refer to Bike Prole > Sensors section on page 25 for more
information.
10
Rider 60 User’s Manual
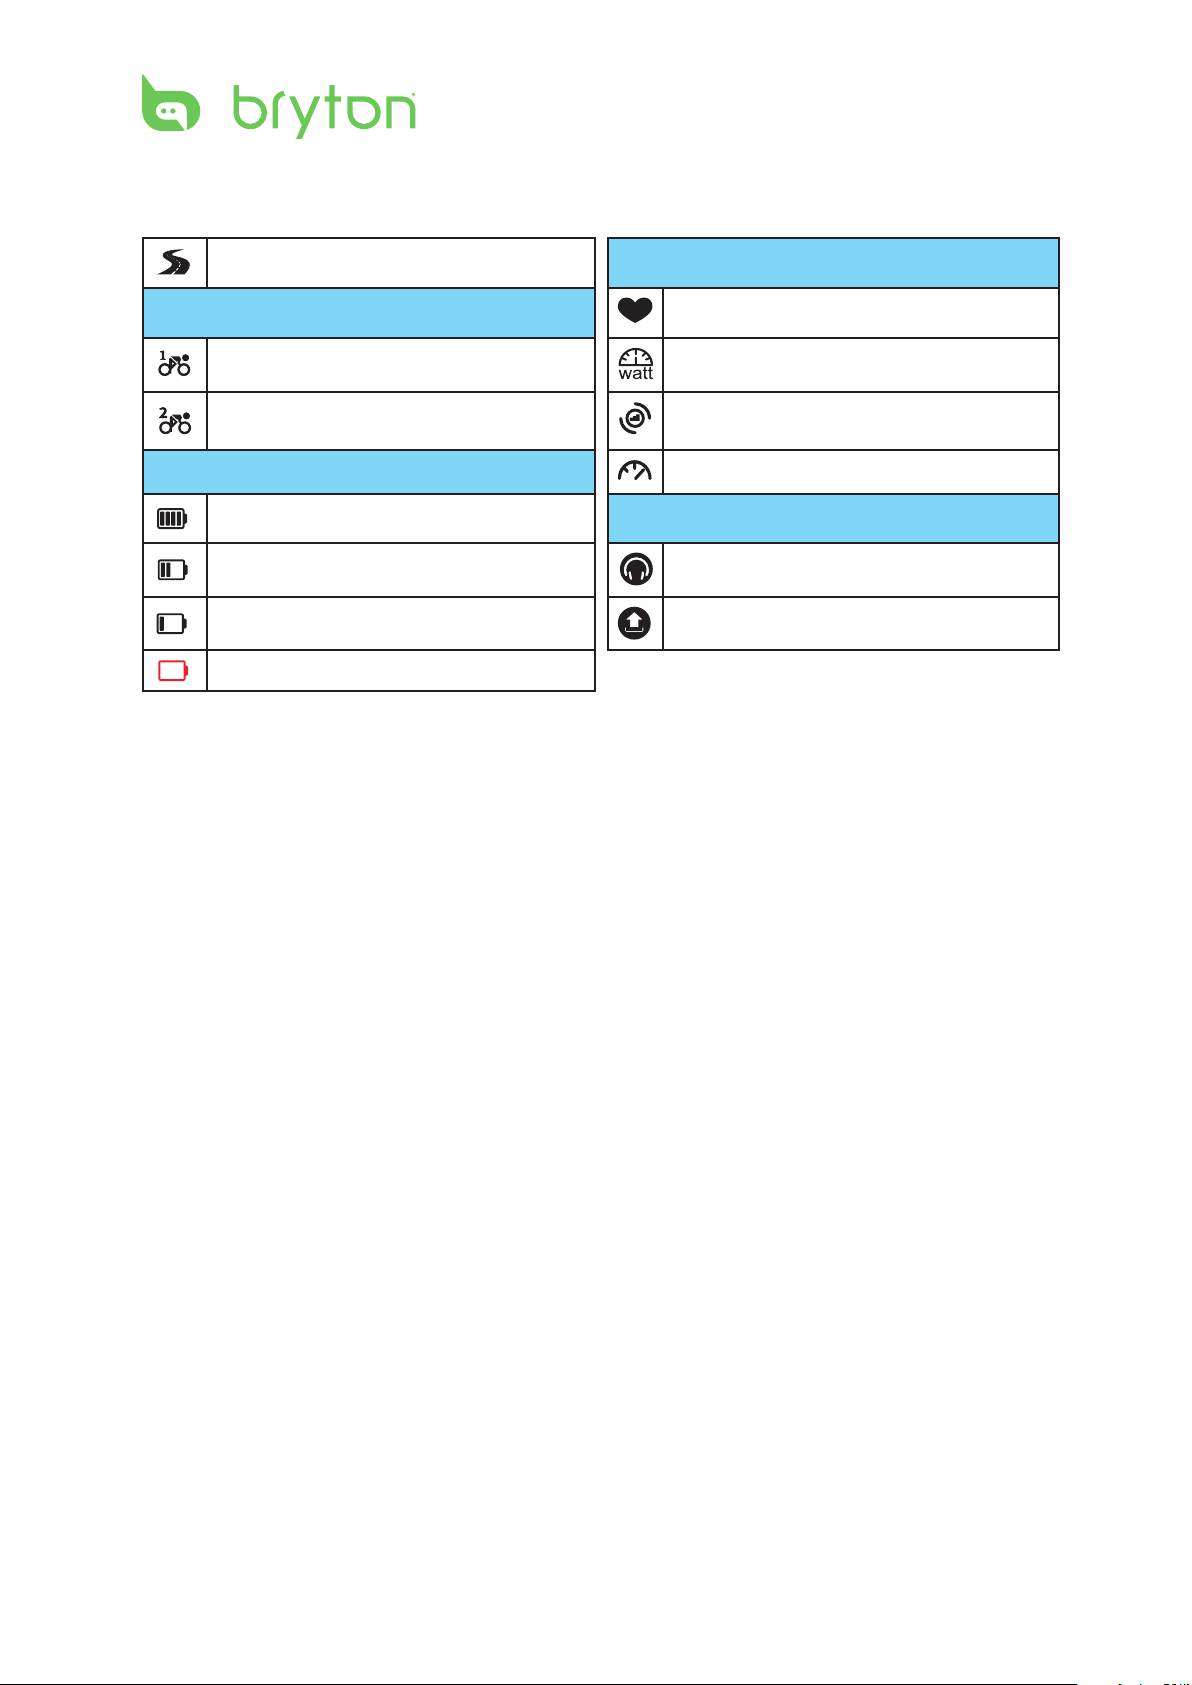
Icon Description
Distance ANT+ Sensor Status
Bike in Use Heart Rate Sensor
Bike 1 Power Meter
Bike 2 Cadence Sensor
Battery Level Speed Sensor
Full Battery Bluetooth Status
Half Battery BT Headset is connected.
Low Battery BT Phone is connected.
30 minutes remaining
11
ENGLISH
Rider 60 User’s Manual
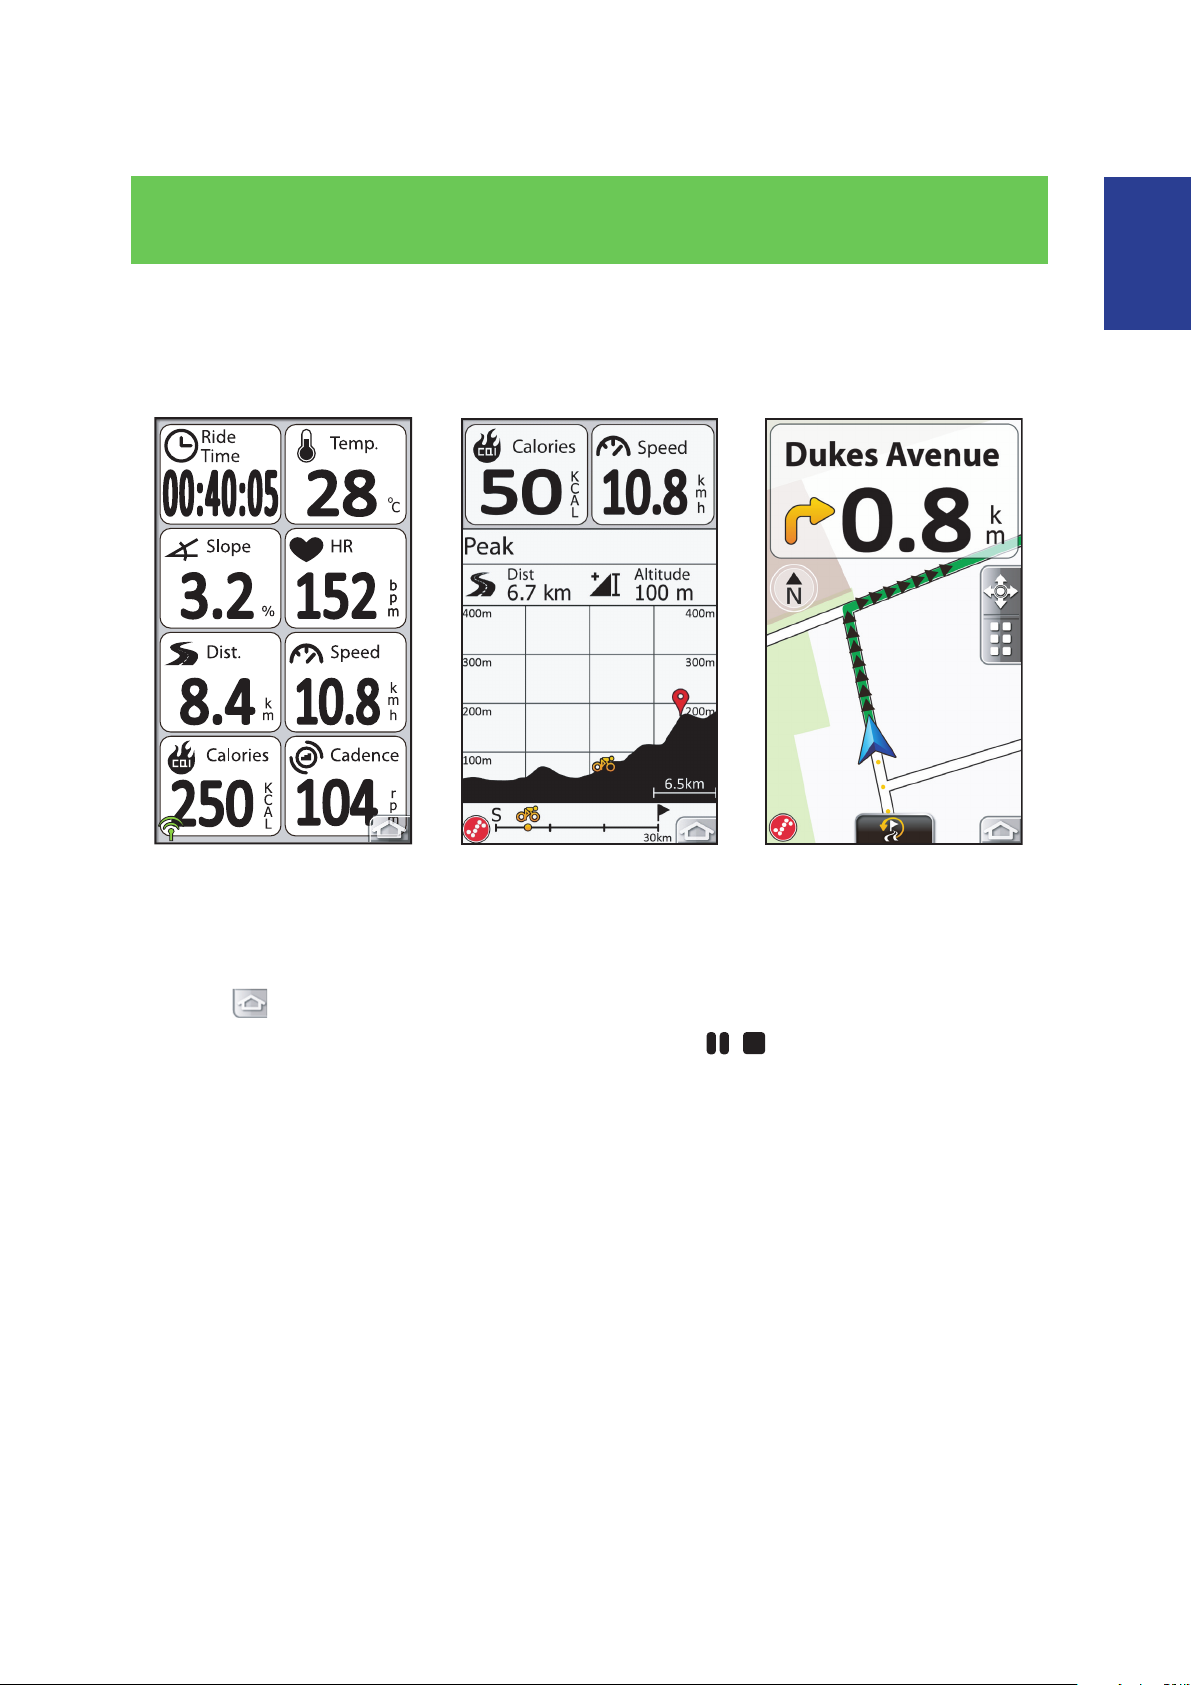
Meter & Map
This feature will allow you to view the Meter page, Lap page, Altitude page, and Map page.
You can customize information shown on the grid by tagging the grid to select your desired
item from various options. For details on how to congure your grid display, refer to Grid
Display section.
Meter Page/Lap Page Altitude Page Map Page
Press the • p or q button to switch the meter screen page.
In meter view, you can long press (press and hold) any grid to set up your preferred item.•
Tap the • icon to return to the main page.
Press the • u button to start recording, press the BACK/ / button to pause recording,
press again to stop recording.
12
Rider 60 User’s Manual
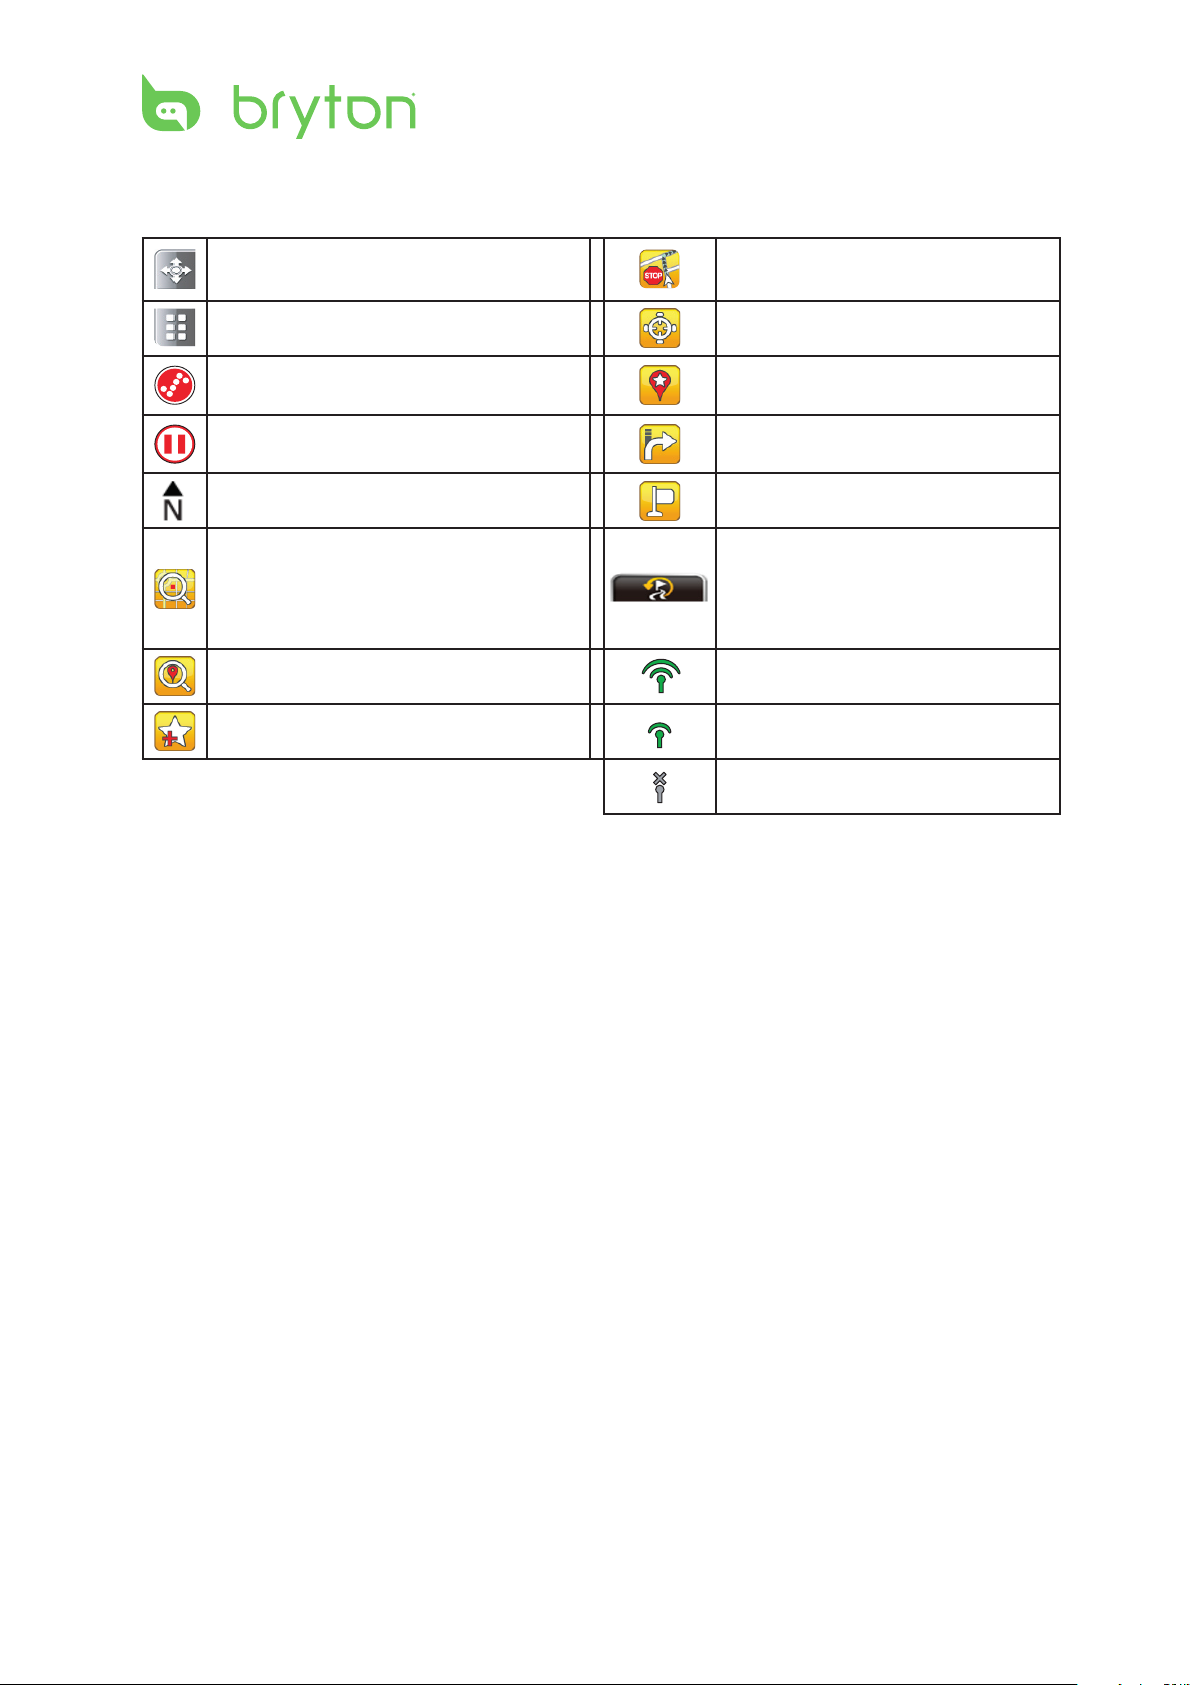
Icon Description
Enable to pan the map and call out
the zoom in/out bar
List menu Find coordinate
Recording My POI
Pause Turn list
Always north Start navigating
Address
Find POI Strong GPS signal
Add to my favorite Weak GPS signal
Stop trip
Reroute (only displayed when
you turn o the auto reroute
feature and you deviated from
the route)
GPS not xed

13
ENGLISH
Rider 60 User’s Manual
Find & Go
With the Find & Go feature, you can navigate rides from History, Planned Trip, and POI
list. You can also nd your points of interest or a place by entering the name, address, or
coordinate of the location.
Navigate Rides from History
Navigate rides from your previous rides history.
You can tap the icon to operate the navigation features.
Tap • to switch the start and end point.
Tap • to zoom in/out to view the route outline on map.
Tap • to navigate to your selected destination.
- Follow the track: follow the GPS track.
- Re-routing: re-route the route by using your start point, way point, and end point. The
route path might be dierent from the GPS track, but it will guide you pass by your start/
way/end point.).
NOTE:
A green line shows the navigated route on the map; the pink line displays the direct route to •
your destination.
You could change the route color by tapping the•
You can also view history by tapping the•
section on page 23 for detailed information.
icon > Navigation > Route Color.
icon > View History. Refer to View History
14
Rider 60 User’s Manual
Navigate Rides from Planned Trip
For the planned trip, you can download your planned trip or other rider’s trip from
Brytonsport.com. Once you have downloaded the trip, select Find & Go > Planned Trip.
Then choose the desired plan trip.
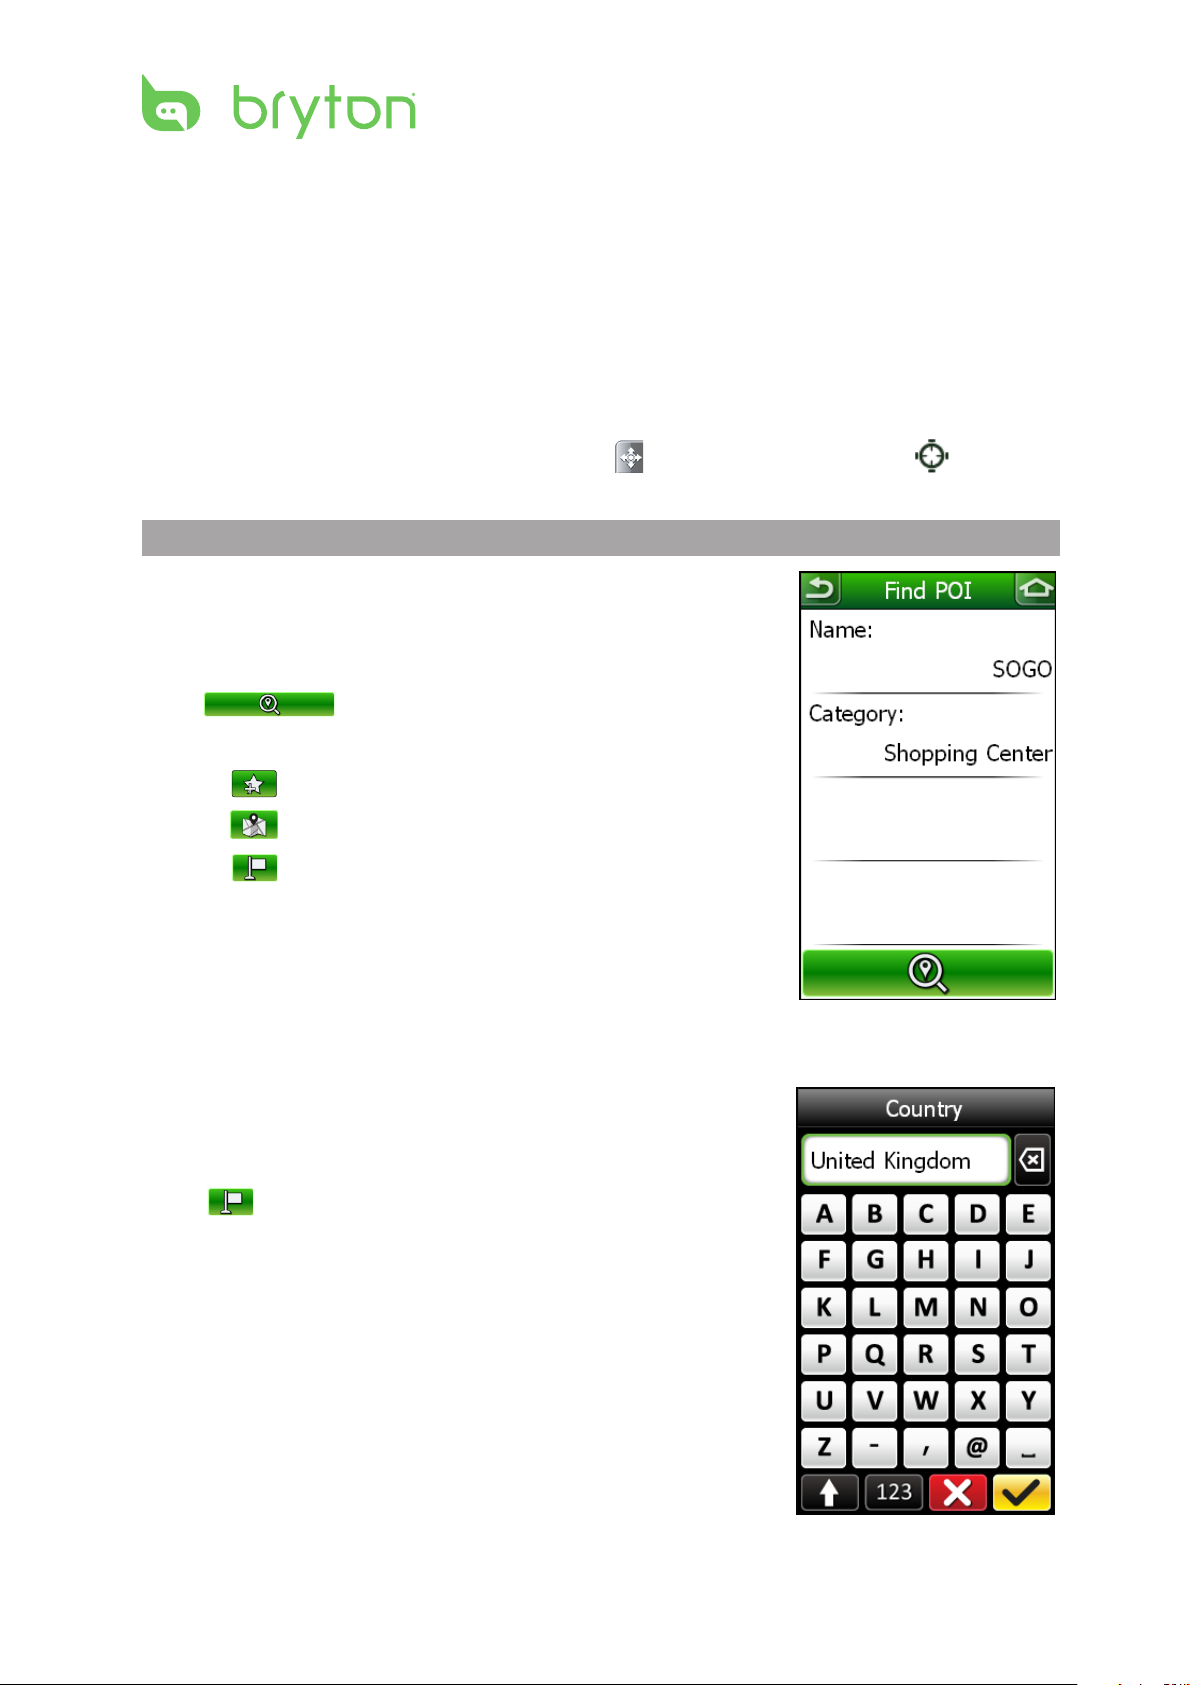
Find POI
By default, this 50km-radius POI search starts at your current position as a center point. To
nd more POIs, please switch to Map Page, tab icon and move the cursor to the
place as a center point to start another 50km-radius POI search.
NOTE: To use the search feature, you need to get the GPS xed.
1. In the Main page, select Find & Go > Find POI.
2. Enter a location name using the on-screen keyboard.
3. Select a category.
4. Tap to search the location.
5. From the search results, do one of the following:
Tap • to add a location into My POI.
Tap • to zoom in/out POI route on map.
Tap • to start navigating to your selected POI.
Search Location
1. In the Main page, select Find & Go > Address.
2. Enter an address (country, city or postcode, road name, and
house number).
3. Tap to start navigating to the destination.
15
ENGLISH
Rider 60 User’s Manual
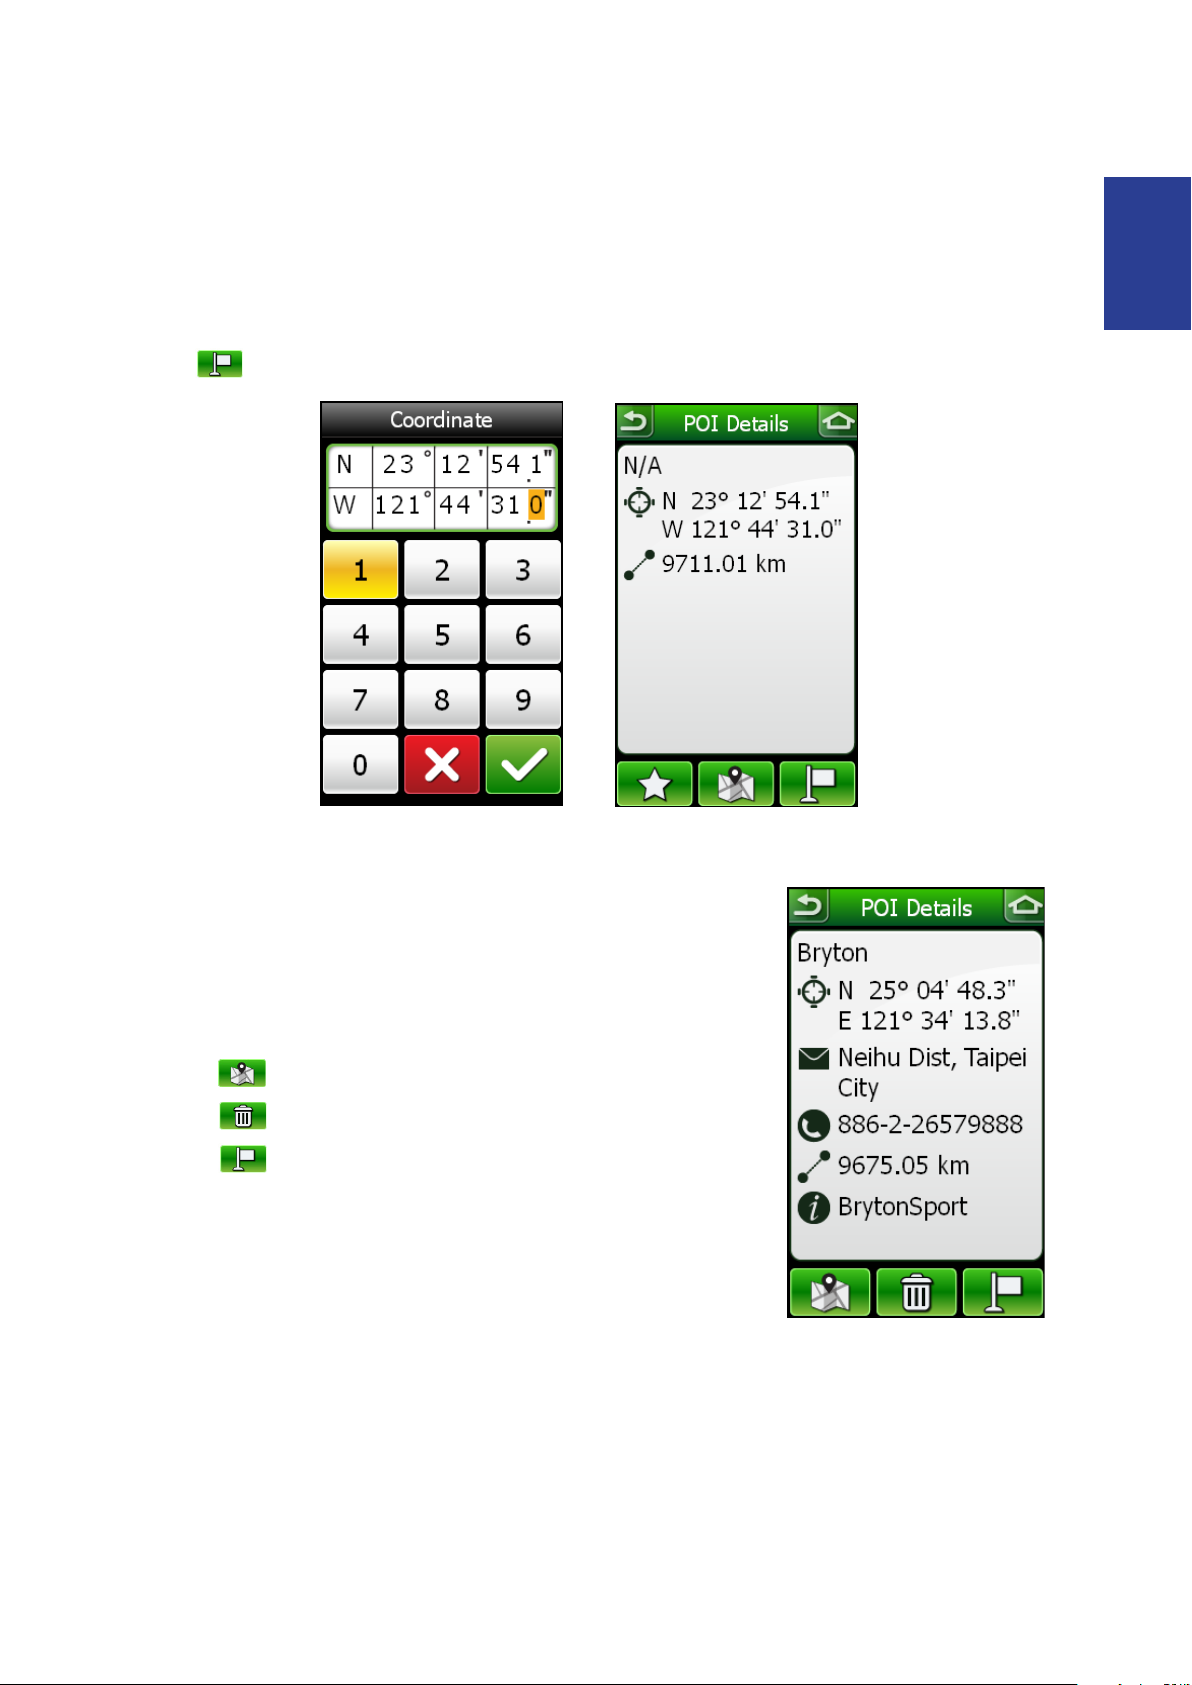
Find Coordinate
1. In the Main page, select Find & Go > Coordinate.
2. Select the coordinate search format.
3. Enter the desired coordinate to search.
4. Tap to start navigating to the destination.
Enter Coordinate Search Result
My POI
1. In the Main page, select Find & Go > My POI.
2. Select a place from the list.
3. Select an option:
Tap • to view the POI outline on map
Tap • to delete the selected POI.
Tap • to navigate to your selected POI.
16
Rider 60 User’s Manual
Back to Start
While cycling, tap the icon and select Find & Go > Back to Start.
The Rider 60 navigates you back to your starting point.
Stop Trip
To stop your ride at any time, tap the icon and select Find & Go > Stop Trip.
NOTE:
Back to Start• and Stop Trip options are only appeared on the screen when you are
navigating.
To stop your ride, you could also switch to Map Page, tap •
navigation.
button and select to stop
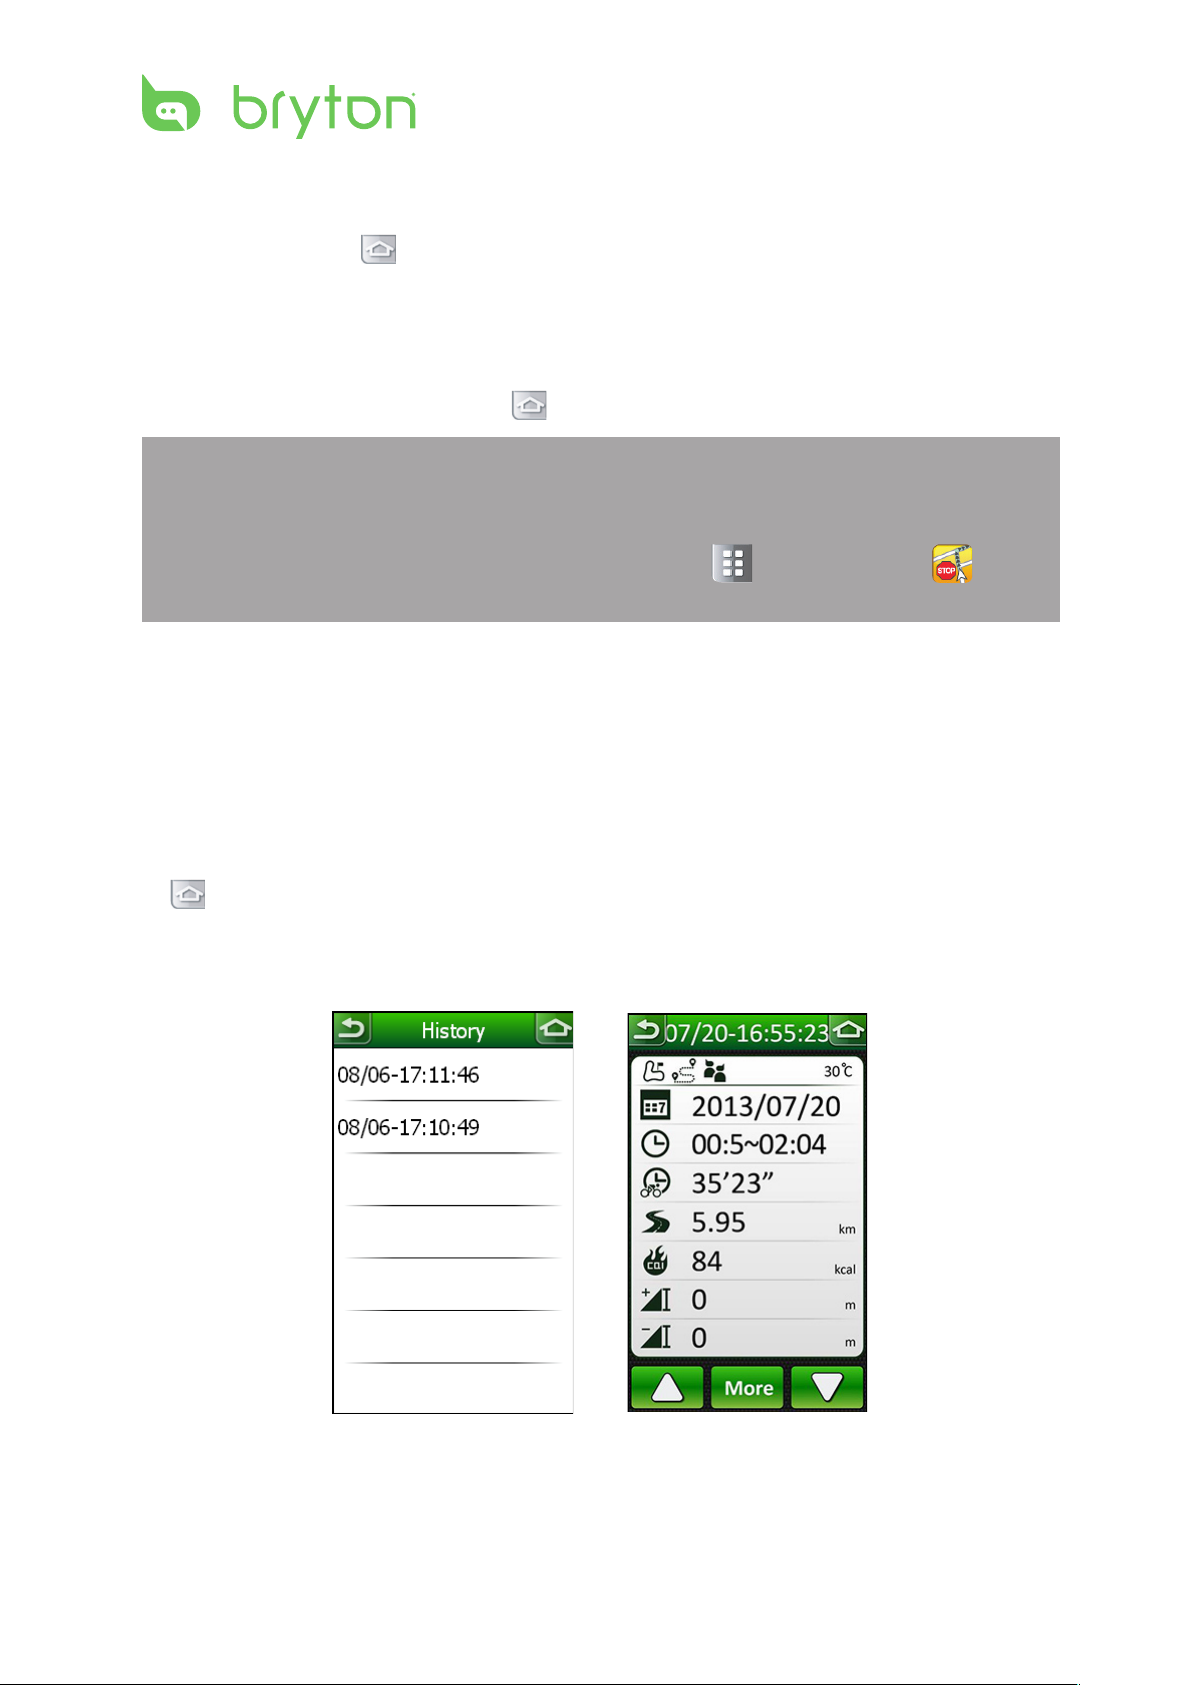
History
The Rider 60 saves the history when you start recording. History includes date, time,
distance, average speed, and altitude. After you have nished a ride, you can view the
history data on the Rider 60.
1. In the Main page, select Find & Go > History. You can also view history by tapping the
icon and select View History.
2. Select a route from the History list. It displays the route details.
Refer to View History section on page 23 for more information.
History list Route Details
 Loading...