

Bryton Rider 530 User Manual [es]
http://corp.brytonsport.com/
products/support_sdownload
Quick Start Guide
快速使用指南
快速使用指南
Guide dedémarrage
rapide
Schnellstartanleitung
Guida introduttiva
Guía de iniciorápido
Aan de slag
Guia de consulta rápida
クイックスタートガイド
빠른 시작 안내
Gyors üzembehelyezési
útmutató
Stručná příručka
Instrukcja szybkiego
uruchomienia
Hurtigvejledning
Hurtigstartguide
Snabbstartguide
Pikaopas
EN
Rider 530
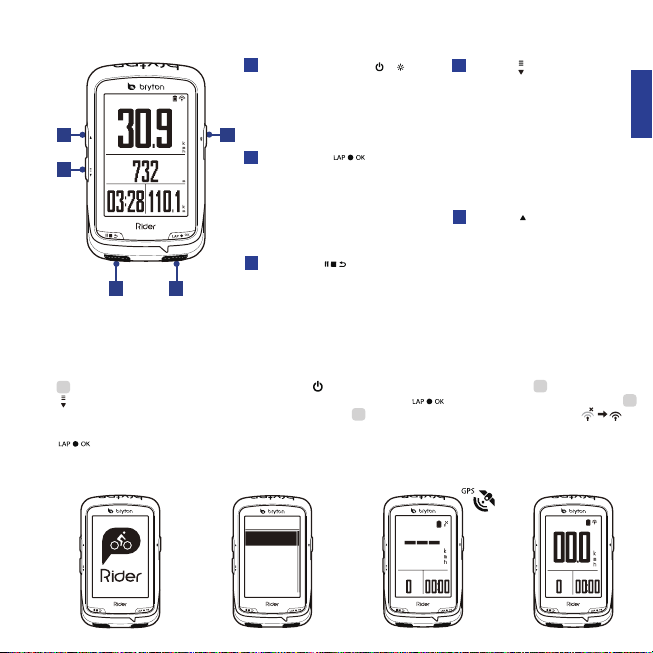
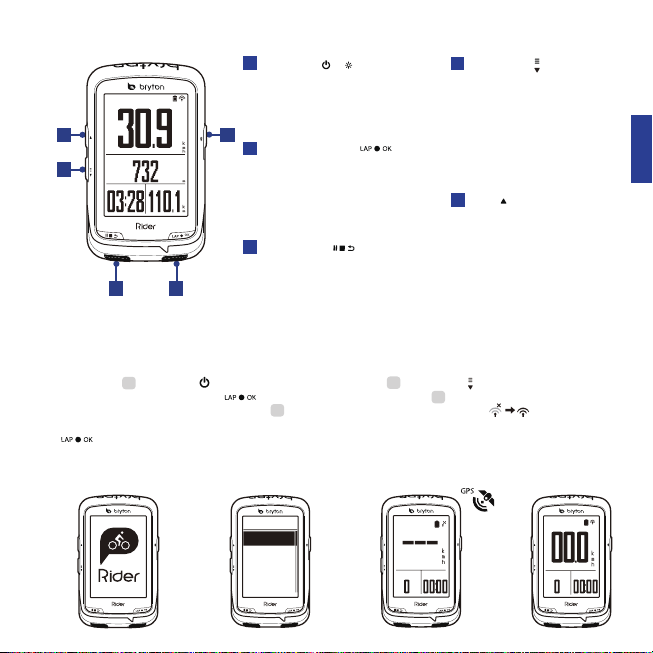
1
Speed
5
Altitude
4
Ride Time
Distance
•
•
1
2
•
•
•
3
•
3 2
•
( / )
•
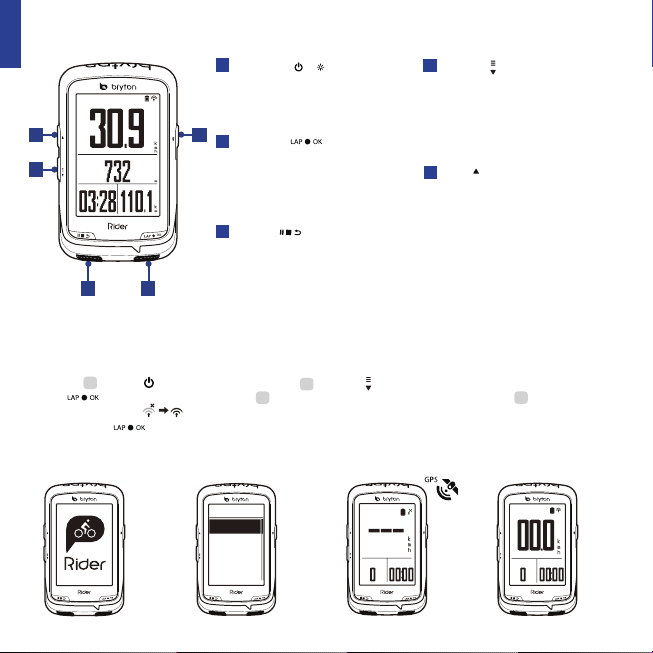
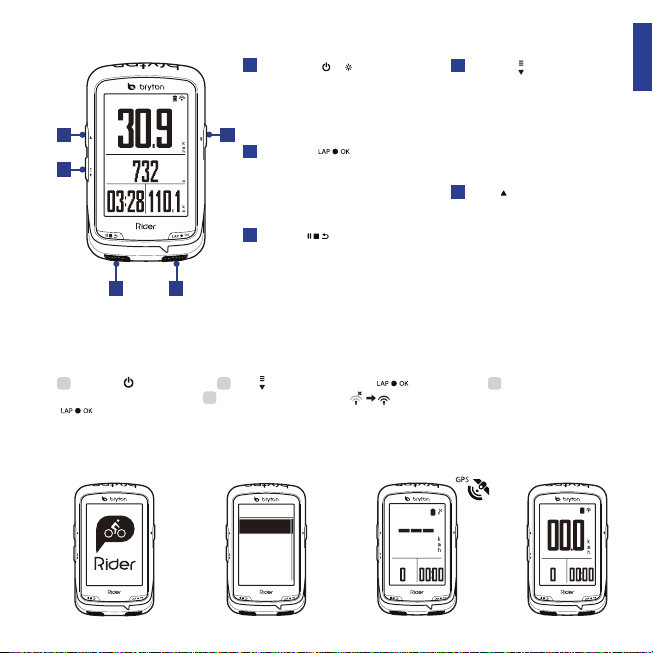
Press to turn the device on.
Press and hold to turn the device off.
Press to turn on/off backlight.
( )
LAP/OK
In Menu, press to enter or confirm a
selection.
In free cycling, press to start recording.
When recording, press to mark the lap.
BACK ( )
Press to return to the previous page or
cancel an operation.
When recording, press to pause
recording. Press it again to stop recording.
4
PAGE ( )ON/OFF
•
In Menu, press to move down to
scroll through menu options.
•
In Meter view, press to switch
meter screen page.
•
In Meter view, long press to
enter into Shortcut Menu.
UP ( )
5
•
In Menu, press to move up to
scroll through menu options.
•
In Meter view, press to switch
meter screen page.
Getting Started
Before first use, please charge your device for at least 4 hours.
To begin 1. Press to turn on the device. 2. Press to select the display language and
press to confirm the selection. 3. Device will search for satellite signals. 4. After GPS
signal is fixed *, ( ) just ride on and enjoy your workout in free cycling mode, and to
record, press to start recording.
*To get GPS acquisition, please take the device to an open sky outdoor environment.
Step 3Step 2Step 1
Step 4
Language
English
繁中
简中
Français
Speed
Dist. RTime
Speed
Dist. RTime
1
Compass
Calibrate the Compass
1. In Main Menu, select Settings > General > Compass Cal. 2. Move the device in a
figure motion till confirmation beep.
Notice
Compass accuracy would be influenced by objects having magnetic field, such as magnet,
materials made of iron and electronic devices. Calibrate the compass outdoors and move
away from buildings and power lines. If you find the compass reading is inconsistent, please
calibrate the compass manually.
Follow Track
With Follow Track feature, you can plan trip via Bryton App, use pervious rides from History
or download gpx tracks online.
Plan Trip via Bryton App
1. Download Bryton app. 2. Sign up / log in on Bryton app. 3. Select Plan Trip to set Start
point and Destination. 4. Download the planned trip to the device via Data Sync. 5. In the
Main Menu, select Follow Track > View and select the planned track and press to start
following the track.
From device History
1. In the Main Menu, select View History > View to select the desired tracks. 2. Select
to the Main Menu. 5. Select Follow Track > View and select the saved track and press
to start following the track.
Create Track 3. Enter a name of the track and press to save it. 4. Press to be back
From 3rd Party Websites
1. Download gpx files to your computer. 2. Use USB cable to connect the device to the
computer. 3. Copy the gpx files from your computer and paste to the Extra Files folder of the
device. 4. Remove USB cable. 5. In the Main Menu, select Follow Track > V
to start following the track.
iew and press
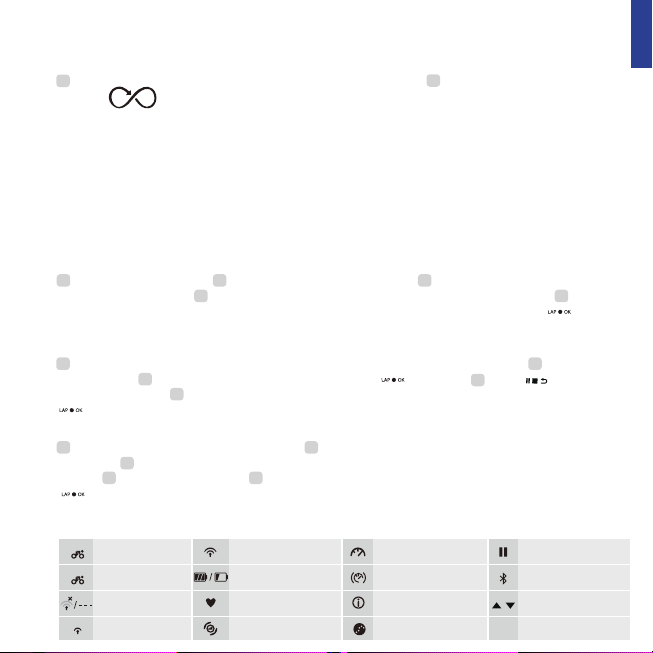
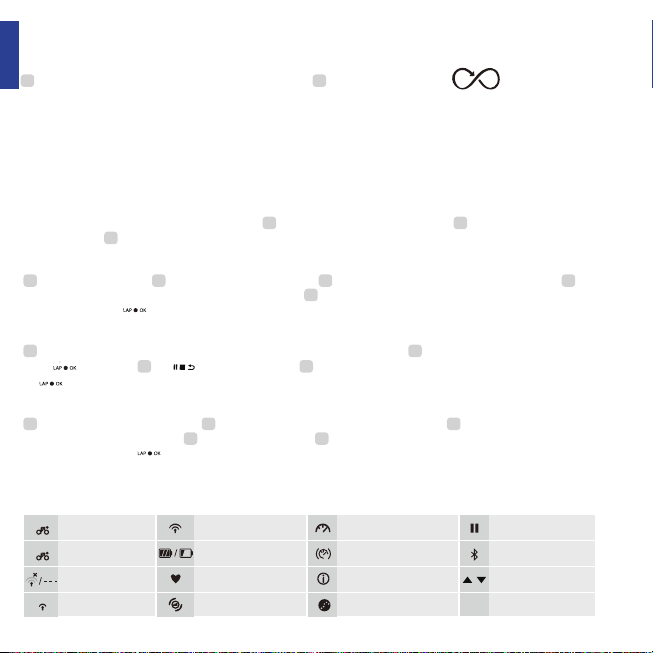
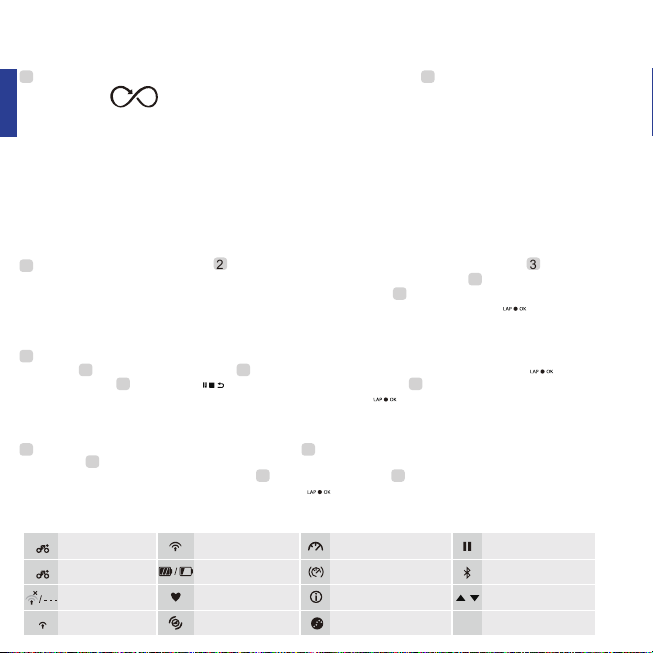
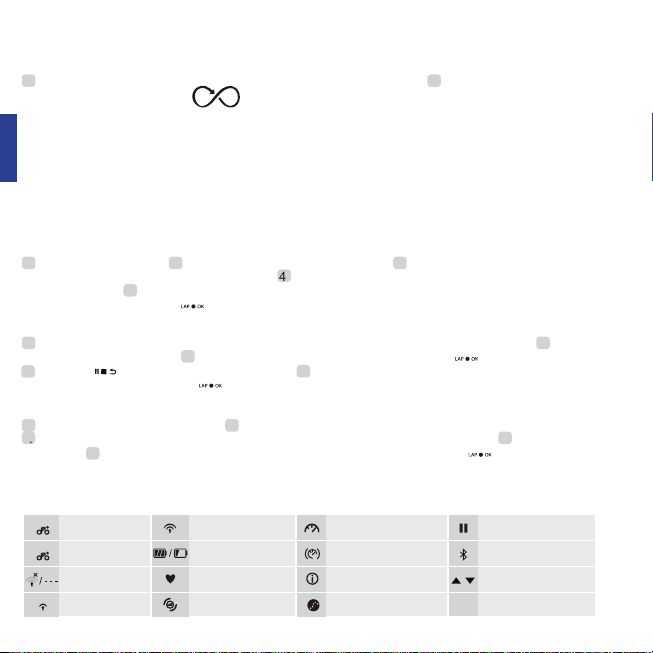
Icon Description
1
Bike 1
2
Bike 2
No Signal (not fixed)
Weak Signal (fixed)
Strong Signal (fixed)
Power Status
Heart Rate Sensor
Active
Cadence Sensor Active
Speed Sensor Active
Dual Sensor Active
Notification
Log Record in Progress
Recording is paused
Bluetooth is enabled
Current speed is faster/
/
slower than average speed
EN
2

EN
Data Sync
Sync Data to / from Bryton App
With the access to the internet, your Rider computer automatically updates GPS data, uploads
recorded tracks, downloads planned trips from app server and check for available firmware
update.
It is required to add your device to your Bryton account before syncing data for the first time.
To add. 1. Scan the QR code labeled on the device securing paperboard inside the box with
your smartphone to download Bryton App. 2. After Bryton App is installed, please sign up for a
new Bryton App account. 3. In the app, tap “Scan Now” to scan the same QR code labeled on
the device securing paperboard to add its UUID to your Bryton App account (or go to Bryton
App: Settings >User Settings>UUID later). 4. If a “successfully added!” message pops up on the
Bryon App, you have successfully added your device to your Bryton account. If not, please tap
“Retry” to scan again or enter the 16 digit device UUID number on the back of your device
manually.
To perform Data Sync, please first go to your device: Settings>Network>Connect to set a
wireless network connection, then go to Data Sync in the main menu and let your Rider
computer smartly guide you through the syncing process.
Note:
● If your device UUID has been added to an Bryton account, QR code will not appear on your
device.
● Firmware updates usually take longer to download and install, select NO if you prefer to update
it on your next sync.
Share Your Tracks via USB
1. Connect the device to your computer via USB cable. 2. Select fit files from Bryton folder in the
device. 3. Upload files to popular training sites including STRAVA, Training Peaks, Endomondo,
Map My Ride, Fit track and many more.
Reset Rider 530
Long press all three keys ( / / ) at the same time to reset the device.
Note:
● Please go to corp.brytonsport.com>Support>Download to download User’s Manual.
3
Rider 530
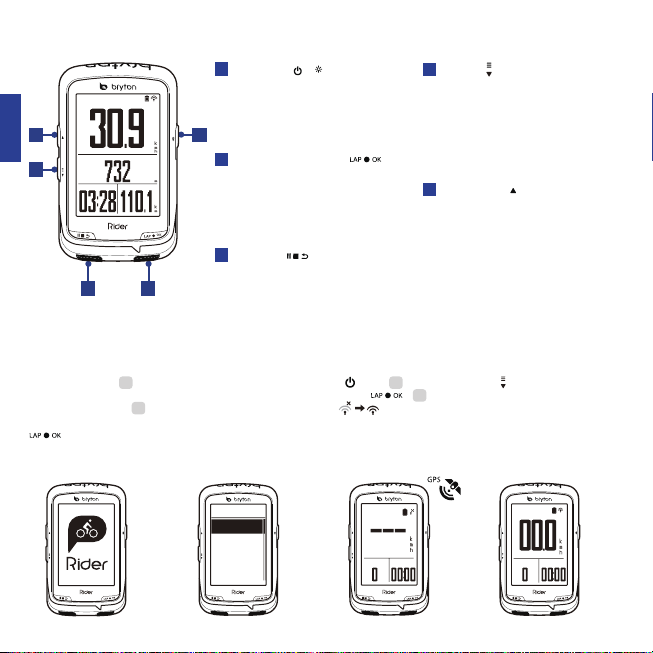
1
速度
5
5
目前高度
4
4
騎乘時間
距離
•
•
1
2
•
•
•
3
•
3 2
•
( / )
•
按此鍵開啟裝置。
長按此鍵關閉裝置。
按此鍵開啟或關閉背光
LAP/OK ( )
在選單中,短按進入或確認選單選項。
騎乘時,按此鍵開始記錄。
騎乘且記錄時,短按開始標示計圈。
BACK ( )
按此鍵回到上頁或取消任務。
記錄時,按此鍵可暫停記錄, 再按一
次停止記錄。
4
PAGE ( )ON/OFF
•
在選單中,短按向下瀏覽選單選
項。
•
在資訊畫面時,短按可換頁瀏覽
騎乘資訊。
•
在資訊畫面時,長按可進入快速
設定選單。
UP ( )
5
•
在選單中,短按向上瀏覽選單選
項。
•
在資訊畫面時,短按可換頁瀏覽
騎乘資訊。
開始使用
使用前,請將此裝置充電至少4小時
1. 請長按 開啟裝置, 2. 按 來選擇語言並按 確認選擇。 3. 裝置被啟動後,會自
動搜尋衛星定位訊號。 4. 衛星定位成功後*,( ) 就可開始您的騎乘,如要記錄請按
。
*請在戶外空曠的地方進行定位。
TC
語言
繁中
简中
Francais
Deutsch
Step 3Step 2Step 1
速度
騎乘時間
距離
Step 4
速度
距離
騎乘時間
4
TC
指南針
校正指南針
1. 在主選單中,選擇設定 > 一般 > 校正指南針 2.
表示完成校正。
注意:
指南針會被具有磁力的東西所影響,如磁鐵、鋼質材料或電子裝置。 校正時,請至戶外並遠
離建築物和電線再進行校正。 當您發現指南針的讀數不穩定時,請手動校正指南針。
擺動您的裝置如右
“ ” ,聽到嗶聲後
路線導航
此功能提供您3種建立騎乘路線的方法: 1. 使用Bryton App來規劃路線、2. 使用自己記錄的歷
史記錄路線、3. 從網路上下載gpx路線檔。
使用Bryton App 來規劃路線
1. 下載Bryton app , 2. 註冊/登入 Bryton app, 3. 點選路徑規劃,設定起始點與終點, 4. 藉
由同步更新功能將規劃的路線下載到裝置上, 5. 在主選單中,進入路線導航 > 檢視 ,選擇您
規劃的路線,按 開始路線導航。
使用歷史記錄
1. 在主選單中,進入瀏覽記錄
名稱 來儲存,
開始路線導航。
按
4. 按 返回到主選單, 5. 進入路線導航 > 檢視,選擇您儲存的路線,
檢視,選擇想要騎乘的路線, 2. 選擇建立路線,
>
3. 輸入路線
下載gpx檔案
1. 下載gpx檔案到您的電腦, 2. 使用USB傳輸線將裝置連接到電腦, 3. 複製gpx檔案至裝置
的”Extra Files”資料夾裡, 4. 移除USB傳輸線, 5. 在主選單中,進入路線導航 > 檢視 ,選擇
您規劃的路線,按 開始路線導航。
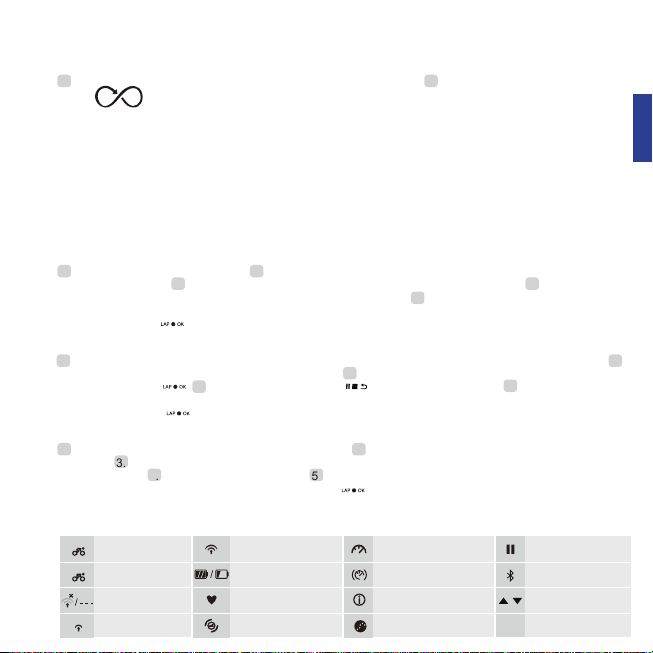
圖示說明
5
1
自行車 1
2
自行車 2
無訊號(未定位)
訊號微弱(已定位)
訊號良好(已定位)
電池圖示
心率感測器使用中
踏頻感測器使用中
速度感測器使用中
二合一感測器使用中
提示功能
錄製騎乘記錄中
暫停錄製騎乘記錄中
藍芽功能使用中
目前速度比
/
平均速度快/慢

同步更新
與Bryton App同步資料
本裝置可藉由手機熱點或WLAN無線網路連線至Bryton app,隨時更新GPS資料、上傳運動記錄
、下載規劃路線和搜尋韌體更新。
同步資料前,請務必依照下列步驟下載Bryton app並將您裝置的UUID新增至Bryton帳號: 1. 使
用智慧手機掃描包裝盒內固定裝置紙卡上的QR Code來下載Bryton app,2.安裝完成後,請註
冊帳號與密碼, 3. 於Bryton app上,按“開始掃描”掃描包裝盒內同一個QR Code來新增裝置
UUID至Bryton 帳號(或進入設定>用戶設定>裝置UUID),4. 如“新增成功”訊息出現在Bryton
app上,表示您成功新增裝置UUID至Bryton 帳號,如失敗,請按“重試”來重新掃描或手動
輸入裝置背後的16位UUID號碼。
成功新增裝置UUID至Bryton 帳號後,裝置在取得網路的連線下,將引導您完成所有的資料同
步。
注意:
● 如您裝置的UUID已被新增至任一Bryton 帳號,QR Code將不會顯示在您的裝置上。
● 韌體的更新需要花較長時間下載與安裝,如您想於下次同步更新時再安裝,請選擇”否”
略過更新韌體。
透過USB分享至運動網站
1. 使用USB傳輸線將裝置連接到電腦, 2. 從裝置的Bryton 資料夾裡,選擇要上傳的fit檔,
上傳fit檔至STRAVA, Training Peaks, Endomondo, Map My Ride, Fit track等運動網站。
3.
重新設定Rider 530
同時長按三個按鍵( / / )放開後即可重新設定裝置。
注意:
● 前往corp.brytonsport.com >支援服務>下載,下載使用者手冊。
TC
6
Rider 530
SC
1
速度
5
当前高度
4
骑行用时
距离
•
•
1
2
•
•
•
3
•
3 2
•
( / )
•
按此键开启电源。
长按此键关闭电源。
按此按键可开或关夜光。
( )
LAP/OK
在菜单中,短按进入或确认菜单选项。
骑行时,按此键开始记录。
骑行且记录时,短按开始标示绕圈。
BACK ( )
按此键回到上页或取消操作。
记录时,按此键可暂停记录,
再按一次停止记录。
4
PAGE ( )ON/OFF
•
在菜单中,短按可向下浏览菜单
选项。
•
在骑行信息页面中,短按可换页
浏览骑行信息。
•
在骑行信息页面中,长按可进入
快捷菜单。
UP ( )
5
•
在菜单中,短按可向上浏览菜单
选项。
•
在骑行信息页面中,短按可换页
浏览骑行信息。
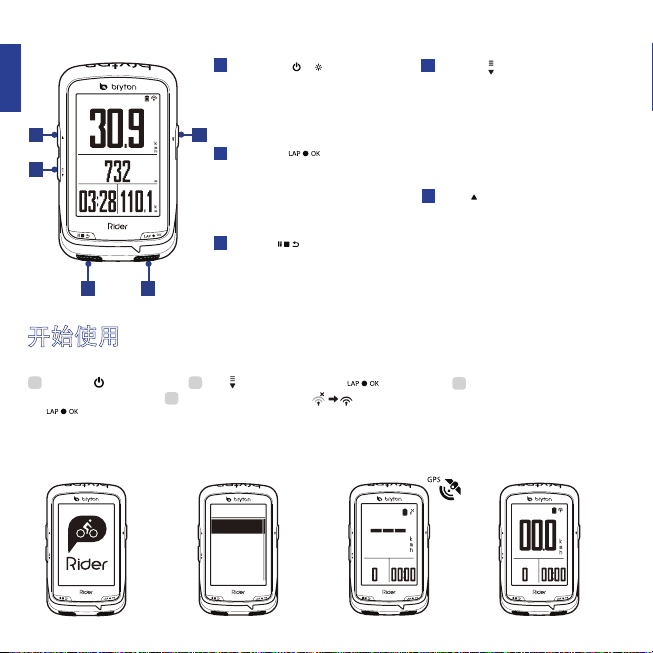
开始使用
使用前,请将此装置充电至少4小时。
1. 请长按 开启设备, 2. 按 来选择语言并按 确认选择。3. 设备被启动后,会自
动搜寻卫星定位讯号。4. 卫星定位成功后*,( ) 就可开始您的骑行,如要记录数据请
按 。
*请到室外空旷地方,开机定位后使用。
Step 4
速度
距离
骑行用时
系统语言
简中
Français
Deutsch
Italiano
Step 3Step 2Step 1
速度
骑行用时
距离
7
电子罗盘
如何校正电子罗盘
1. 在设备菜单中选择,设置 > 常规 > 校正罗盘,选择校正。2. 将设备按图所示 “ ”
移动方向校正罗盘,直到设备发出提示音表示完成电子罗盘校正。
提示
所有电子罗盘都会建议用户,固定周期做电子罗盘校正。校正电子罗盘时,请务必远离任何有
磁性环境或是物体。校正电子罗盘仅需几分钟即可。
轨迹导航
用户可通过bryton百锐腾app规划轨迹,或是用户自己记录的历史记录,或是下载gpx档案等3
种方法来进行轨迹导航。
从百锐腾
APP先规划轨迹进行轨迹导航
1. 下载bryton百锐腾APP。2. 注册/登录 Bryton 百锐腾APP。3. 选择起点与终点,完成规划
轨迹。4. 上传规划的轨迹到设备上。5. 查看百锐腾设备的菜单,选择“轨迹导航 > 检视”并选择
已规划的轨迹并按下 开始轨迹导航。
从历史记录进行轨迹导航
1. 在设备菜单中选择 浏览记录 > 检视选择进行轨迹导航的历史运动记录。2. 选择“ 创建轨迹”。
3. 通过选择来输入轨迹名称并按下 保存轨迹。4. 按下 返回主菜单。5. 菜单中选择
“轨迹导航> 检视“ 选择轨迹后,按下 按键开始轨迹导航。
从下载gpx档案进行轨迹档航
1. 下载gpx后缀的档案到您的电脑中做好准备。2. 使用USB数据线连接你的bryton百锐腾设备
与电脑。3. 复制gpx后缀的档案到bryton设备盘符中的”Extra Files“档案夹。4. 移开USB数据
线。5. 主菜单中选择”轨迹导航>检视“ 选择轨迹后,按下 开始轨迹导航。
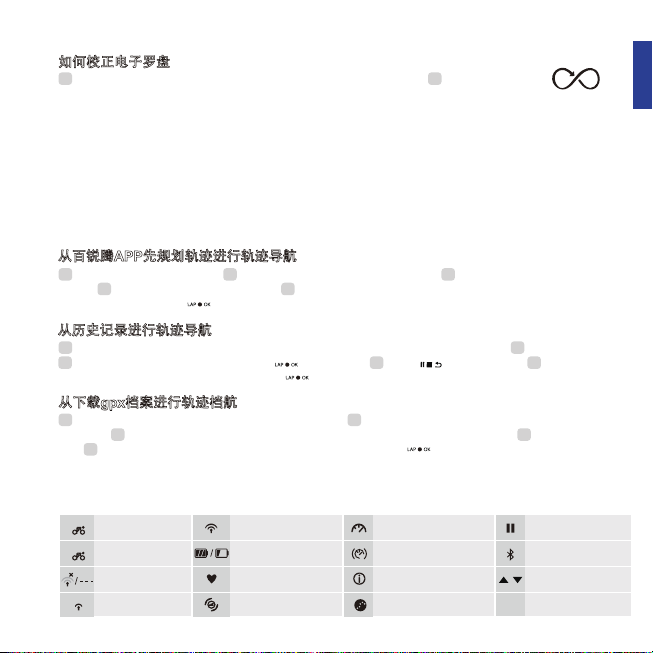
图示说明
1
自行车 1
2
自行车 2
无讯号(未定位)
讯号微弱(已定位)
讯号良好(已定位)
电池图示
心率带使用中
踏频传感器使用中
速度传感器使用中
二合一传感器使用中
提示功能
记录骑行数据中
暂停骑行数据中
蓝芽功能使用中
提供当前速度与均速对
/
比快慢的指示箭头
SC
8
同步更新
SC
通过bryton百锐腾APP同步更新
建议用户按照下面步骤添加百锐腾Wi-Fi设备到bryton账号,以便及时通过Wi-Fi快速上传下
载运动数据或GPS轨迹导航,或是及时更新最新固件版本号与加快GPS定位时间等优点(绑定
设备只需一次操作即可,已绑定可自动联机)
如何添加绑定:1)打开手机扫一扫包装盒的二维码,下载百锐腾新版app 本地的版本。2)
安装好,请注册或是登录百锐腾新版app。3)进入app点击“现在扫描”的按键后,去扫描
百锐腾设备背后的机器码进行配对(或是点击app菜单的位置:设置/其他设置/机器码
UUID/添加设备)。4)绑定完成,app会出现完成配对的信息。您也可点击“重试”按键
去重新扫描或是手动输入16位机器码重新绑定。
如何使用“同步更新”快速更新与上传数据:1. 打开设备中的设置/网络热点/WiFi列表选
择无线网络接入点。2. 回到设备主菜单中的“同步更新”进行GPS更新/固件版本号更新下
载。
提示:
● 如设备机器码已被绑定Bryton APP,绑定所需要的二维码将不重复显示。
● 用户可按下“同步更新”选择上网接入点连接网络,保持Wi-Fi设备同步更新。同步更新
完毕后会关闭Wi-Fi节省电源。
● 通过Wi-Fi下载固件更新安装包可能需要花点时间下载,用户可选择 “否” 不下载更新
安装包。另外您也可通过bryton update tool桌面软件同步更新,更快速下载固件更新安装
包。
通过
USB口上传运动记录
1. 通过USB口,连接bryton百锐腾设备与电脑或是笔记本。2. 打开谷歌浏览器或360极速浏
览器,进入brytonsport.com或是Strava, Training Peaks, Endomondo等第三方网站(视第三
方网站是否接受fit档案而定)。3. 选择百锐腾盘符(bryton:) 里面fit后缀名的运动记录上传
到你需要的网站。
如何重启Rider 530
同时按下3个组合按键2秒后松开重启码表 ( / / )。
提示
:
● 扫描包装盒二维码或进入百锐腾Wi-Fi设备菜单“同步更新”下载bryton app。
● 前往corp.brytonsport.com >支援服务>下载,下载使用者手册。
9
Rider 530
4
PAGE ( )
•
Dans le menu, appuyez pour faire
défiler les options du menu vers le
bas.
•
Dans la vue Compteur, appuyez
pour passer à la page de l'écran
du compteur.
•
Dans la vue Compteur, faites un
appui long pour accéder au menu
Raccourci.
5
HAUT ( )
•
Dans le menu, appuyez pour faire
défiler les options du menu vers le
haut.
•
Dans la vue Compteur, appuyez
pour passer à la page de l'écran du
compteur.
FR
Appuyez sur
Étape 3Étape 2Étape 1
Étape 4
Vitesse
5
Altitude
4
Distance
Dur. sess.
3 2
Commencer
1
MARCHE/ARRÊT
Appuyez pour allumer l'appareil.
•
•
Appuyez et maintenez enfoncé pour
éteindre l'appareil.
•
Appuyez pour allumer/éteindre le
1
rétroéclairage.
2
TOUR/OK
•
Dans le menu, appuyez pour entrer ou
confirmer une sélection.
•
En mode cyclisme libre, appuyez pour
commencer l’enregistrement.
•
Pendant l'enregistrement, appuyez
pour marquer le tour.
3
RETOUR ( )
•
Appuyez pour retourner à la page
précédente ou pour annuler une opération.
•
Pendant l'enregistrement, appuyez pour
interrompre l'enregistrement. Appuyez à
nouveau pour arrêter l'enregistrement.
( / )
( )
Avant la première utilisation, veuillez recharger votre appareil pendant au moins 4 heures.
1. Appuyez pendant plusieurs secondes pour allumer/éteindre l'appareil. 2.
pour sélectionner la langue d'affichage et appuyez sur pour confirmer la sélection. 3.
L'appareil recherche les signaux des satellites. 4. Une fois le signal GPS trouvé *, ( )
vous pouvez rouler et vous entraîner en mode cyclisme libre. Pour enregistrer, appuyez sur
afin de commencer l'enregistrement.
* Pour fixer le signal GPS, veuillez mettre l'appareil à l'extérieur à ciel ouvert.
Langue
Français
Deutsch
Italiano
Español
Vitesse
Dist. DurSes
Vitesse
Dist. DurSes
10
Boussole
Étalonner la boussole
1. Dans le menu principal, sélectionnez Réglages > Général > Boussole. 2. Déplacez l'appareil dans un
FR
mouvement en jusqu'au bip de confirmation.
Avis
La précision de la boussole peut être influencée par les objets possédant un champ magnétique, tels
que les aimants, les matériaux ferreux et les appareils électroniques. Étalonnez la boussole à l'extérieur
et éloignez-vous des immeubles et des lignes électriques. Si vous trouvez que la lecture de la boussole
n'est pas cohérente, veuillez étalonner la boussole manuellement.
Suiv Trace
Avec la fonction Suiv trace, vous pouvez planifier un parcours via l'application Bryton, utiliser des
itinéraires précédents depuis l'historique ou télécharger en ligne des pistes au format gpx.
Planifier un parcours via l'application Bryton
1. Téléchargez l'application Bryton. 2. Inscrivez-vous / connectez-vous à l'application Bryton. 3.
Sélectionnez Planifier pa
parcours planifié vers l'appareil via la Synchronisation des données. 5. Dans le menu principal,
sélectionnez Suiv trace > Afficher, puis sélectionnez le parcours planifié et appuyez sur pour
commencer à suivre le parcours.
Depuis l'historique de l'appareil
1. Dans le menu principal, sélectionnez Afficher historique
souhaités. 2. Sélectionnez Créer trace. 3. Saisissez un nom pour le parcours et
pour l'enregistrer. 4. Appuyez sur pour retourner au menu principal. 5. Sélectionnez Suiv trace >
Afficher, puis sélectionnez le parcours enregistré et appuyez sur pour commencer à suivre le
parcours.
Depuis des sites Web tiers
1. Téléchargez les fichiers gpx sur votre ordinateur. 2. Utilisez un câble USB pour connecter l'appareil à
l'ordinateur. 3. Copiez les fichiers gpx depuis votre ordinateur et collez-les dans le dossier Fichiers
supplémentaires (Extra Files) de l'appareil. 4. Retirez le câble USB. 5. Dans le menu principal,
sélectionnez Suiv trace > Afficher, puis appuyez sur pour commencer à suivre le parcours.
rcours pour définir un Point de départ et une Destination. 4. Téléchargez le
> Afficher pour sélectionner les parcours
appuyez sur
Description de l'icône
Enregistrement en
pause
Le Bluetooth est activé
La vitesse actuelle est plus
/
rapide/plus lente que la
vitesse moyenne
11
1
Vélo 1
2
Vélo 2
Aucun signal (non
trouvé)
Signal faible (trouvé)
Signal fort (trouvé)
État de l’alimentation
Capteur de fréquence
cardiaque actif
Capteur de cadence
actif
Capteur de vitesse actif
Capteur double actif
Notification
Enregistrement du journal
en cours

Synchronisation des données
Synchroniser les données vers / depuis l'application Bryton
Avec l'accès à Internet, votre ordinateur Rider met à jour automatiquement les données GPS, télécharge
des pistes enregistrées, télécharge des parcours planifiés depui
les mises à jour de firmware disponibles.
Il est nécessaire d'ajouter votre appareil à votre compte Bryton avant de synchroniser les données pour la
première fois. Pour ajouter. 1. Numérisez le code QR étiqueté sur le dispositif fixant le carton à l'intérieur
de la boîte avec votre smartphone pour télécharger l'application Bryton. 2. Une fois l'application Bryton
installée, veuillez vous inscrire afin de créer un nouveau compte pour l'application Bryton. 3. Dans
l'application, appuyez sur « Numériser maintenant » pour numériser le même code QR étiqueté sur le
dispositif fixant le carton afin d'ajouter son UUID au compte de votre application Bryton (ou allez dans
l'application Bryton : Paramètres > Paramètres utilisateur > UUID ultérieurement). 4. Si un message
« ajouté avec succès ! » apparaît sur l'application Bryton, vous avez ajouté avec succès votre appareil à
votre compte Bryton. Dans le cas contraire, veuillez appuyer sur « Réessayer » pour numériser à nouveau
ou saisissez manuellement le numéro à 16 chiffres de l'UUID de l'appareil à l'arrière de votre appareil.
Pour effectuer la Synchronisation des données, veuillez d'abord aller dans votre appareil :
Réglages>Réseau>Connexion pour définir une connexion à un réseau sans fil, puis allez dans
Synchronisation des données dans le menu principal et laissez votre ordinateur Rider vous guider
intelligemment dans le processus de synchronisation.
s le serveur d'applications et recherche
Remarque :
● Si l'UUID de votre appareil a été ajouté à un compte Bryton, le code QR n'apparaîtra pas sur votre appareil.
● Les mises à jour du firmware prennent généralement plus de temps pour être téléchargées et
installées, sélectionnez NON si vous préférez le mettre à jour lors de votre prochaine
synchronisation.
Partagez vos pistes via USB
1. Connectez l'appareil à votre ordinateur avec le câble USB. 2. Sélectionnez les fichiers appropriés
dans le dossier Bryton de l'appareil. 3. Téléchargez les fichiers sur des sites d'entraînement
populaires tels que STRAVA, Training Peaks, Endomondo, Map My Ride, Fit track et bien plus encore.
Réinitialiser le Rider 530
Faites un appui long sur les trois touches ( / / ) en même temps pour réinitialiser l'appareil.
Remarque :
● Visitez corp.brytonsport.com > Support > Téléchargement pour télécharger le manuel d'utilisation.
12
FR
Rider 530
1
DE
Speed
5
Höhe
4
Fahrzeit
Entf.
•
•
1
2
•
•
•
3
3 2
•
•
Erste Schritte
Bitte laden Sie Ihr Gerät vor der ersten Inbetriebnahme mindestens 4 Stunden lang auf.
Inbetriebnahme: 1. Schalten Sie das Gerät mit der Taste ein. 2. Wählen Sie mit die
Anzeigesprache und drücken Sie zum Bestätigen der Auswahl . 3. Das Gerät sucht nach
Satellitensignalen. 4. Nach Ortung von GPS-Signalen* ( ) können Sie einfach losfahren und Ihr
Training im freien Radfahrmodus genießen; wenn Sie eine Aufzeichnung starten möchten, drücken Sie
.
*Bitte bringen Sie das Gerät zur GPS-Ortung nach draußen (unter freien Himmel).
( / )
•
Zum Einschalten des Gerätes drücken.
Zum Abschalten des Gerätes gedrückt
halten.
Zum Ein-/Ausschalten der
Hintergrundbeleuchtung drücken.
Zwischenzeit/OK
Im Menü zum Aufrufen oder Bestätigen
einer Auswahl drücken.
Beim freien Radfahren zum Starten der
Aufzeichnung drücken.
Während der Aufzeichnung zum
Markieren einer Zwischenzeit drücken.
( )
Zurück ( )
Zum Zurückkehren zur vorherigen Seite
oder zum Abbrechen eines Vorgangs
drücken.
Während der Aufzeichnung zum Anhalten
dieser drücken. Durch erneutes Drücken
wird die Aufzeichnung gestoppt.
Schritt 3Schritt 2Schritt 1
4
Seite ( )Ein/Aus
•
Im Menü zum Abwärtsbewegen
durch die Menüoptionen drücken.
•
In der Messansicht zum
Umschalten der
Messbildschirmseite drücken.
In der Messansicht zum Aufrufen
•
des Verknüpfungsmenüs lange
drücken.
Aufwärts ( )
5
•
Im Menü zum Aufwärtsbewegen
durch die Menüoptionen drücken.
•
In der Messansicht zum
Umschalten der
Messbildschirmseite drücken.
Schritt 4
13
Sprache
Deutsch
Italiano
Español
Nederlandse
Speed
Entf. Fahrzeit
Speed
Entf. Fahrzeit
Kompass
Kompass kalibrieren
1. Wählen Sie im Hauptmenü Einstellungen > Allgemein > Kompass. 2. Bewegen Sie das Gerät in Form
einer „ “, bis ein Bestätigungston ausgegeben wird.
Hinweis
Die Kompassgenauigkeit wird durch Objekte mit einem Magnetfeld, wie z. B. Magnete, Materialien aus
Eisen oder elektronische Geräte, beeinflusst. Kalibrieren Sie den Kompass im Freien; entfernen Sie sich
von Gebäuden und Stromleitungen. Falls Sie den Eindruck haben, dass der Kompass ungenaue
Ergebnisse liefert, kalibrieren Sie ihn bitte manuell.
Streckenverfolgung
Mit der Funktion Streckenverfolgung können Sie einen
Fahrten aus dem Verlauf nutzen oder gpx-Strecken aus dem Internet herunterladen.
Ausflug via Bryton-App planen
1. Laden Sie die Bryton-App herunter. 2. Melden Sie sich an der Bryton-App an (gegebenenfalls müssen Sie sich
zunächst registrieren). 3. Wählen Sie zum Festlegen von Startpunkt und Ziel Ausflug planen. 4. Laden Sie den
geplanten Ausflug per Datensynchronisierung auf das Gerät herunter. 5. Wählen Sie im Hauptmenü
Streckenverfolgung > Anzeige, wählen Sie dann die geplante Strecke und drücken Sie zum Starten der
Streckenverfolgung .
Aus dem Geräteverlauf
1. Wählen Sie im Hauptmenü Verlauf anzeigen > Anzeige; wählen Sie dann die gewünschten Strecken. 2.
Rufen Sie Mehr auf und wählen Sie Strecke erstellen. 3. Geben Sie der Strecke einen Namen und drücken
Sie zum Speichern . 4. Kehren Sie mit der Taste zum Hauptmenü zurück. 5. Wählen Sie
Streckenverfolgung > Anzeige; wählen Sie die gespeicherte Strecke und drücken Sie zum Starten der
Streckenverfolgung .
Von Webseiten Dritter
1. Laden Sie gpx-Dateien auf Ihren Computer herunter. 2. Verbinden Sie das Gerät per USB-Kabel mit dem
Computer. 3. Kopieren Sie die gpx-Dateien auf Ihrem Computer und fügen Sie sie im Extradateien-Ordner
des Gerätes ein. 4. Ziehen Sie das USB-Kabel. 5. Wählen Sie im Hauptmenü Streckenverfolgung > Anzeige
und drücken Sie zum Starten der Streckenverfolgung .
Ausflug via Bryton-App planen, vorangegangene
Symbolbeschreibung
1
Fahrrad 1
2
Fahrrad 2
Kein Signal (keine
Ortung)
Schwaches Signal
(Ortung)
Starkes Signal
(Ortung)
Energiestatus
Herzfrequenzsensor
aktiv
Kadenzsensor aktiv
Geschwindigkeitssensor
aktiv
Dualsensor aktiv
Benachrichtigung
Protokollaufzeichnung
läuft
Aufzeichnung
angehalten
Bluetooth aktiviert
Die aktuelle Geschwindigkeit
liegt ober-/unterhalb der
/
durchschnittlichen Geschwindigkeit
DE
14

Datensynchronisierung
Daten mit/von Bryton-App synchronisieren
Mit Internetzugriff kann Ihr Rider-Computer automatisch GPS-Daten aktualisieren, aufgezeichnete
Strecken hochladen, geplante Ausflüge vom App-Server herunterladen und nach verfügbaren
DE
Firmware-Aktualisierungen suchen.
Sie müssen Ihr Gerät zu Ihrem Bryton-Konto zufügen, bevor Sie Daten das erste Mal
synchronisieren können. Zum Zufügen. 1. Scannen Sie zum Herunterladen der Bryton-App den
QR-Code auf der das Gerät sichernden Pappe im Karton. 2. Bitte registrieren Sie nach
Installation der Bryton-App ein neues Bryton-App-Konto. 3. Tippen Sie in der App zum Scannen
des gleichen QR-Codes, der sich auch auf der das Gerät sichernden Pappe befindet, auf „Jetzt
scannen“ und fügen Sie die UUID Ihrem Bryton-App-Konto hinzu (oder rufen Sie später die
Bryton-App auf: Einstellungen > Nutzereinstellungen UUID). 4. Falls die Meldung „Erfolgreich
zugefügt!“ in der Bryton-App erscheint, haben Sie Ihr Gerät erfolgreich Ihrem Bryton-Konto
zugefügt. Falls nicht, tippen Sie zum erneuten Scannen bitte auf „Erneut versuchen“ oder geben
Sie die 16-stellige UUID auf der Rückseite Ihres Gerätes von Hand ein.
Navigieren Sie zur Datensynchronisierung an Ihrem Gerät zunächst zu Einstellung > Netzwerk >
Verbindungen und richten Sie eine Drahtlosnetzwerkverbindung ein; rufen Sie dann Datensynchro
nisierung im Hauptmenü auf und lassen Sie sich von Ihrem Rider-Computer intelligent durch die
Synchronisierung führen.
Hinweis:
● Falls Ihre Geräte-UUID zu einem Bryton-Konto zugefügt wurde, erscheint der QR-Code nicht an
Ihrem Gerät.
● Das Herunterladen und Installieren von Firmware-Aktualisierungen dauert
wählen Sie Nein, falls Sie die Aktualisierung bei der nächsten Synchronisierung durchführen möchten.
üblicherweise etwas länger;
Ihre Strecken per USB freigeben
1. Schließen Sie das Gerät per USB-Kabel an Ihren Computer an. 2. Wählen Sie fit-Dateien aus dem
Bryton-Ordner auf dem Gerät. 3. Laden Sie die Dateien auf beliebte Trainingsseiten, wie STRAVA,
Training Peaks, Endomondo, Map My
Ride, Fit track usw., hoch.
Rider 530 rücksetzen
Halten Sie zum Rücksetzen des Gerätes alle drei Tasten ( / / ) gleichzeitig lange gedrückt.
Hinweis:
● Einen Download der Bedienungsanleitung finden Sie unter corp.brytonsport.com > Kundendienst >
Download.
15
-
Rider 530
1
Velocità
•
•
5
Altitudine
4
Tempo Perc.
Distanza
1
2
•
•
•
3
•
3 2
•
( / )
•
Premere per accendere il dispositivo.
Tenere premuto per spegnere il dispositivo.
Premere per accendere/spegnere
l’illuminazione.
FRAZIONE/OK
In Menu, premere per accedere o
confermare una selezione.
In pedalata libera, premere per avviare
la registrazione.
Durante la registrazione, premere per
segnare il giro.
INDIETRO ( )
Premere per tornare alla pagina
precedente o per annullare
l’operazione.
Durante la registrazione, premere per
interrompere la registrazione. Premere di
nuovo per terminare la registrazione.
( )
4
PAGINA ( )ON/OFF
•
In Menu, premere per spostarsi
verso il basso e scorrere tra le
opzioni del menu.
•
In visualizzazione Griglia Info,
premere per passare alla funzione
successiva.
•
In visualizzazione Griglia Info,
premere a lungo per accedere al
menu di collegamento.
UP ( )
5
•
In Menu, premere per spostarsi
verso l'alto e scorrere tra le opzioni
del menu.
•
In visualizzazione Griglia Info,
premere per passare alla funzione
successiva.
Operazioni preliminari
Prima del primo uso, caricare il dispositivo per almeno 4 ore.
Per iniziare 1. Premere per accendere il dispositivo. 2. Premere per selezionare la lingua
di visualizzazione e premere per confermare la selezione. 3. Il dispositivo cerca
automaticamente i segnali satellitari. 4. Quando il segnale GPS è fisso *, ( ) basta
continuare il percorso e divertirsi durante l'allenamento in modalità libera e, per registrare, premere
per iniziare la registrazione.
*Per acquisire il GPS, portare il dispositivo in un ambiente esterno a cielo aperto.
Punto 3Punto 2Punto 1
Punto 4
IT
Lingua
Italiano
Español
Nederlandse
Português
Velocità
Dist. Dur.per
Velocità
Dist. Dur.per
16
Bussola
Calibrazione della bussola
1. In Menu principale, selezionare Impostazioni > Generale > Bussola. 2. Muovere il dispositivo
con un movimento a forma di finché si sente un segnale acustico di conferma.
Avviso
La precisione della bussola è influenzata dagli oggetti con campo magnetico, come magneti,
IT
materiali in ferro e dispositivi elettronici. Calibrare la bussola all'aperto e allontanarsi da edifici e
linee elettriche. Se il valore della bussola non è coerente, calibrare la bussola manualmente.
Segui Percorso
La funzione segui traccia consente di pianificare il percorso tramite l'app Bryton, utilizzare i
precedenti percorsi da Cronologia o scaricare i tracciati gpx online.
Pianificazione di un percorso tramite l'app Bryton
1. Scaricare l'app Bryton. 2. Registrarsi/accedere all'app Bryton. 3. Selezionare Pianifica percorso
per impostare Punto iniziale e Destinazione. 4. Scaricare il percorso pianificato sul dispositivo
tramite Sinc. dati. 5. In Menu principale, selezionare segui traccia > Vista e selezionare il percorso
pianificato, quindi premere per iniziare a seguire il percorso.
Da Cronologia del dispositivo
1. In Menu principale, selezionare Vis. cronol > Vista per selezionare i percorsi desiderati. 2.
4. Premere per tornare a Menu principale. 5. Selezionare segui traccia > Vista e selezionare
il percorso salvato e premere per iniziare a seguire il percorso.
Selezionare Crea percorso. 3. Immettere un nome del percorso e premere per salvarlo.
Da siti web di terzi
1. Scaricare i file gpx sul computer. 2. Utilizzare il cavo USB per collegare il dispositivo al computer.
3. Copiare i file gpx dal computer e incollarli nella cartella File extra del dispositivo. 4. Rimuovere il
cavo USB. 5. In Menu principale, selezionare segui traccia > Vista e premere per iniziare
a seguire il percorso.
Descrizione icona
Segnale potente
(fisso)
Stato alimentazione
Sensore di frequenza
cardiaca attivo
Sensore di cadenza
attivo
Sensore di velocità
attivo
Doppio sensore attivo
Notifica
Registrazione log in corso
Registrazione interrotta
Bluetooth abilitato
La velocità corrente è più
veloce / più lenta della
/
velocità media
17
1
Bicicletta 1
2
Bicicletta 2
Nessun segnale
(non fisso)
Segnale debole
(fisso)
 Loading...