

Bryton Rider 50 User's Manual
User's Manual

Table of Contents
Getting Started................. |
5 |
Your Rider 50................................ |
5 |
Reset the Rider 50........................ |
6 |
Accessories................................... |
6 |
Status Icons.................................. |
6 |
Charge the Battery...................... |
7 |
Turn on the Rider 50.................... |
8 |
Acquire Satellite Signals............. |
8 |
Initial Setup.................................. |
8 |
Ride your Bike with Rider 50!...... |
9 |
Manage Rider 50 Data via Your |
|
Computer..................................... |
9 |
Install microSD memory card... |
10 |
Share Your Experience With |
|
Other Bikers............................... |
10 |
Find & Go......................... |
11 |
Navigate Rides from History..... |
11 |
Navigate Rides from Planned |
|
Trip.............................................. |
11 |
Find Location.............................. |
12 |
Search POI..................................................... |
12 |
Enter a Location Name Using the |
|
On-screen Keyboard................................. |
13 |
Select a Category....................................... |
13 |
Search Location.......................................... |
14 |
My POI......................................... |
15 |
Stop Navigating......................... |
16 |
Data Recording.......................... |
16 |
History........................................ |
16 |
Use the Map................................ |
17 |
Training........................... |
19 |
Simple Workouts........................ |
19 |
By Time........................................................... |
19 |
By Distance................................................... |
20 |
By Calories.................................................... |
20 |
Basic Workouts........................... |
21 |
Interval Workouts...................... |
22 |
Lap Workouts............................. |
22 |
My Workout................................ |
23 |
Test Workouts............................. |
23 |
Stop Training.............................. |
24 |
Step Counter................... |
25 |
Settings........................... |
26 |
Grid Display................................ |
26 |
Info Page / Altitude Page / Map Page / |
|
My Buddy Page........................................... |
26 |
Day/Night mode......................................... |
27 |
Sensors....................................... |
28 |
Compass........................................................ |
28 |
Cadence......................................................... |
28 |
Heart Rate..................................................... |
29 |
Speed.............................................................. |
29 |
Speed/Cadence.......................................... |
30 |
Power.............................................................. |
30 |
Auto Detect.................................................. |
31 |
Change Altitude Settings.......... |
31 |
Current Altitude.......................................... |
31 |
Other Position Altitude............................ |
32 |
Change System Settings........... |
32 |
Backlight Off................................................ |
32 |
Brightness..................................................... |
33 |
2 Table of Contents

Language...................................................... |
33 |
Date Format................................................. |
33 |
Time Format................................................. |
34 |
Unit Format.................................................. |
34 |
Adjust Date and Time................ |
35 |
Alert............................................ |
35 |
Cadence......................................................... |
36 |
Distance......................................................... |
36 |
Speed.............................................................. |
36 |
Time................................................................ |
37 |
Heart Rate..................................................... |
37 |
View GPS Status......................... |
38 |
Personalize User Profile............ |
38 |
Personalize Bike Profile............. |
39 |
Change Map Setting.................. |
39 |
Data Management......... |
40 |
Load Files.................................... |
40 |
Insert a microSD Card (optional).......... |
40 |
Connect the USB Cable............................ |
40 |
Transfer Files to Your Computer............ |
40 |
Transfer Files to Another |
|
Rider 50...................................... |
40 |
Transfer Data................................................ |
41 |
Receive Data................................................ |
41 |
Stopwatch....................... |
42 |
Countdown................................. |
42 |
Timer........................................... |
43 |
Appendix........................ |
44 |
Specifications............................. |
44 |
Battery Information................... |
45 |
Wheel Size and |
|
Circumference............................ |
46 |
Heart Rate Zones....................... |
47 |
Basic Care For Your Rider 50...... |
47 |
<![endif]>ENGLISH
Table of Contents 3

 WARNING
Always consult your physician before you begin or modify any training program. Please read the details in Warranty and Safety Information guide in the package.
Product Registration
Help us better support you by completing your device registration using Bryton Bridge. Go to http://support.brytonsport.com for more information.
Bryton Software
Go to http://brytonsport.com to download free software to upload your personal profile, tracks and analyze your data on the web.
4 Getting Started
Getting Started
This section will guide you on the basic preparations before you start using your Rider 50.
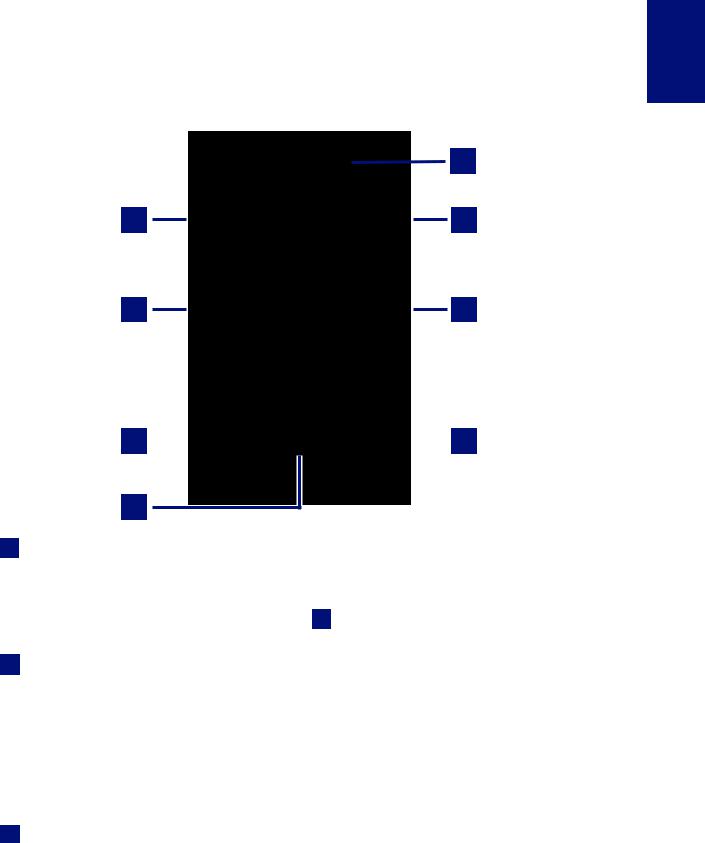
Your Rider 50
|
5 |
1 |
6 |
2 |
7 |
3 


 8
8
4
1Power
•Press and hold to turn the Rider 50 on or off.
•Short press to turn on or off the backlight.
2Start / Stop 
•In training mode or direction mode, press and hold  to stop recording log.
•In free cycling, press  to start recording. Press and hold
  to stop recording.
3Info
•Press to display information about the Message List, Training Overview (Displayed after started a training),
Step Overview (Displayed after enabled Step Counter), or Lap info (Displayed after started a Lap training).
45-Way Navigator / Enter
•Move up/down to scroll through list, move right to the next page; move left to back the previous page. Press the center to confirm a selection.
•In map page, move cursor by 5-way
navigator to the location you want to save, press to save the POI. Move up/down/left/right to pen the map.
Press the center to call out the zoom in/out bar. Press it again to cancel.
<![endif]>ENGLISH
Getting Started 5

5LED Indicator
• Red is charging; Green is fully charged.
6Menu 
•Press to open the menu.
•Press and hold to calibrate the barometer.
7Mode 

•Press to switch modes: Grid, Map, and My Buddy (Displayed after started a training).
•For quick change of the display info in a grid, you can highlight a grid by moving the 5-way navigator and enter it to select a new display item.
8Back 
•In Map page, press  to re-center grid display cursor position.
•In other pages, press to return to the previous page or cancel an operation.
Reset the Rider 50
To reset the Rider 50, press and hold  and
and  for five seconds.
Accessories
The Rider 50 comes with the following accessories:
• |
Power adapter |
Optional items: |
||
• |
Plug(s) |
|||
• |
Speed/Cadence sensor |
|||
• |
USB cable |
|||
• |
Heart rate belt |
|||
• |
Bike mount |
|||
|
|
|||
• |
microSD card |
|
|
|
Status Icons
Icon Description
Bike in used
Bike 1
Bike 2
GPS Signal Status
No signal (not fixed)
Weak signal
Strong signal
Icon Description
Power Status
Full battery
Half battery
Low battery
Heart Rate Sensor Active
Cadence Sensor Active
Power Meter Active
6 Getting Started
Icon Description
New Message notification
Training Plan in Progress
Log Record in Progress
NOTE: Training Plan, Log Record, and New Message notification are displayed only when they are in progress.
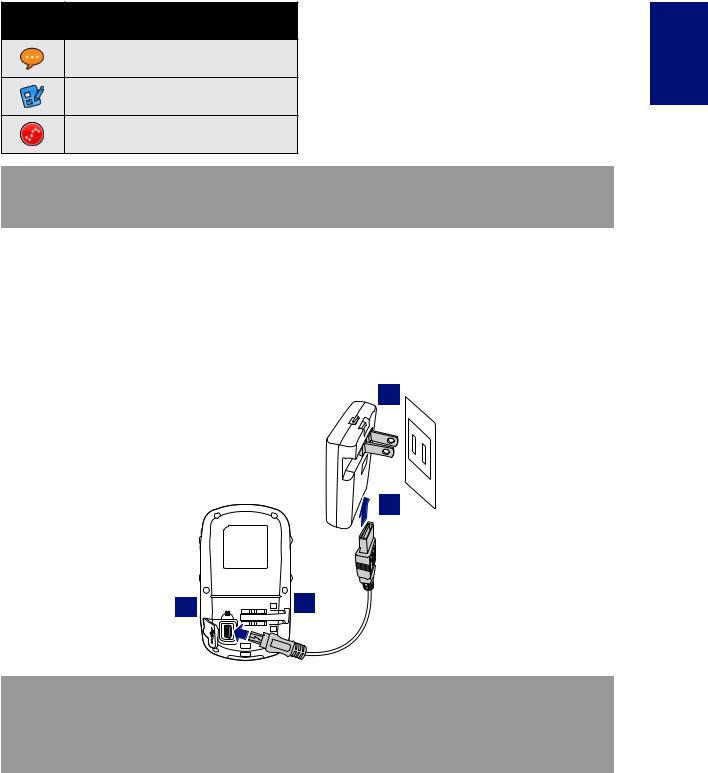
Charge the Battery
Warning:
This product contains a lithium-ion battery. See the Warranty and Safety Information guide in the package for important battery safety information.
4
3
1 |
2 |
NOTE:
•Charge the Rider 50 for at least 4 hours before you start using it.
•You can also charge the Rider 50 using your computer but recommended to turn off the Rider 50 to ensure the battery will be fully charged.
The Rider 50 may come with different plug head(s) suitable in the country where you purchased the device.
<![endif]>ENGLISH
Getting Started 7
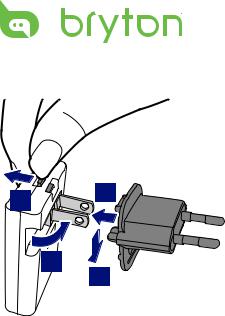
To use the plug:
2 |
3 |
|
1
4
1.Pull up the default plug.
2.Press and hold the tab.
3.Insert the plug head.
4.Release the tab to lock the plug head and push the plug down.
Turn on the Rider 50
Press and hold the Power  button to turn the Rider 50 on.
Acquire Satellite Signals
Once the Rider 50 is turned on, it will automatically search for satellite signals. It may take 30 to 60 seconds to acquire signals. The GPS signal icon turns blue when GPS is fixed.
Initial Setup
When turning the Rider 50 on for the first time, the setup wizard appears on screen. Follow the instructions to complete setup.
1.Select the display language.
2.Select the unit of measurement.
3.Enter your “user profile”.
(It is recommended to input the data. The data accuracy will highly affect your training analysis.)
4.Read and accept the Safety Agreement.
8 Getting Started
Ride your Bike with Rider 50!
1.Just ride with free cycling mode or set up a training program through Menu options.
2.Press the Mode 
 button to switch modes.
3.Select from the available different modes: Grid, Map, and My Buddy.
If the screen is at the Grid mode, use the 5-way navigator to change the setting.
4. In free cycling, press  to start recording log, and press and hold
  to stop recording.
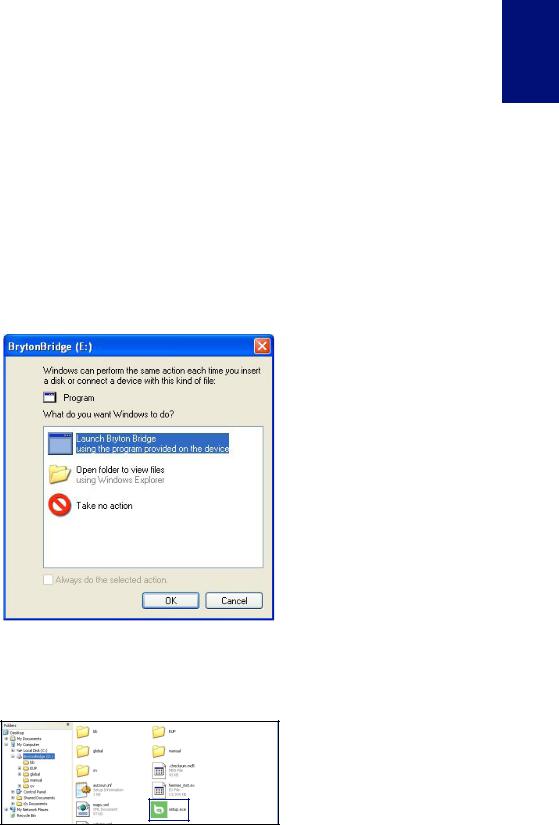
Manage Rider 50 Data via Your Computer
1.Turn on your Rider 50 and connect it to your computer by using USB cable.
2.Install the Bryton Bridge application from DVD.
a. A pop-up installation window appears on the screen.
Click Launch Bryton Bridge and follow the on-screen instructions to install Bryton Bridge.
b.Otherwise, go to My Computer > DVD drive > double-click setup.exe and follow the on-screen instructions to install Bryton Bridge.
3.Follow the on-screen instructions to transfer data to your computer.
<![endif]>ENGLISH
Getting Started 9
NOTE:
•After unplugging the Rider 50 from the USB, the Rider 50 will reset itself.
•Do not unplug the USB cable during the files transferring process. Otherwise, the files may be damaged or corrupted.
•We highly recommend you to register the Rider 50 via Bryton Bridge. (Internet connection required)
•After you have installed Bryton Bridge, it will automatically launch when the device is connected to the computer. If the software does not automatically launch, double-click
Bryton Bridge shortcut icon  on the computer’s desktop. For more information, please read Rider 50 and Bryton Bridge User Manual on DVD or visit http://corp.brytonsport.com/ supportSDownload.html.
Install microSD memory card
Insert a microSD card with the golden contact area facing downwards as shown on below illustration.
NOTE: After you insert or remove the microSD card, the Rider 50 will automatically restart.
Share Your Experience With Other Bikers
To share your experiences with other bikers around the world, please visit http://Brytonsport.com.
10 Getting Started
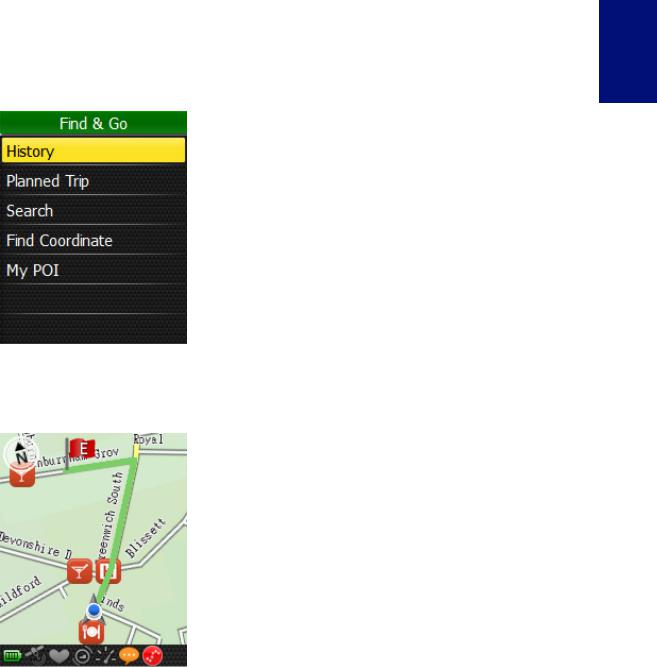
Find & Go
With the Find & Go feature, you can navigate rides from History, Planned Trip, and My POI list. You also can find your points of interest or a place by entering the name, address, or coordinate of the location.
1. Press the Menu  button to open the menu.
2. Use the 5-way navigator to select Find & Go.
• Move the 5-way navigator up/down to select the item.
• Press the center to confirm.
Navigate Rides from History
You can navigate any trip saved in your Rider 50 history.
1. In the Find & Go menu, use the 5-way navigator to select History.
2. Select a ride from the list.
3. Highlight  and press the center of the 5-way navigator to start navigation.
4. A pink dotted line (track) appears on the map, showing you the direction to your destination.
Navigate Rides from Planned Trip
You can navigate a ride uploaded to your Rider 50 from the Bryton Bridge application.
1.Prepare and download your trip via brytonsport.com and Bryton Bridge application.
2.Connect your Rider 50 with the computer using the USB cable.
3.Follow the on-screen instructions to transfer data to your Rider 50.
4. Press the Menu  button.
5.Use the 5-way navigator to select Find & Go > Planned Trip.
6.Select a ride from the list and press the center of the 5-way navigator to confirm. It displays the details of the ride.
<![endif]>ENGLISH
Find & Go 11
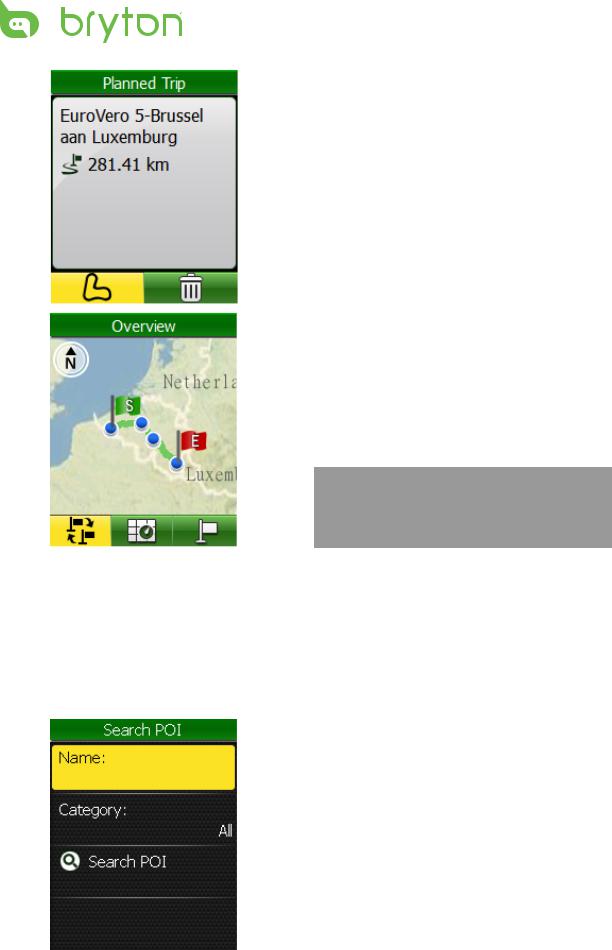
Select an option:
 - display the route.
 - delete the selected route from the Planned Trip list.
In the Overview display, select an option:
 - switch the starting and ending points.
 - view the route on the map.
 - navigate to your selected destination.
• A preplanned trip is as a green line on the map; the pink line is as the direction to your destination.
NOTE: To add a location into My POI list, press the Info  button. Highlight
  and enter the location name.
Find Location
You can search for points of interest from the saved waypoints (location) and recent finds in your Favorites. You can also search certain place by entering its address.
Search POI
1. In the Find & Go menu, use the 5-way navigator to select Search > Search POI.
2. Enter a name and select a category.
3. To start searching, use the 5-way navigator to highlight  and press the center of the 5-way navigator to confirm.
12 Find & Go

Enter a Location Name Using the On-screen Keyboard
1. Move the 5-way navigator up/down/left/ right to select the character.
2. Press the center of the 5-way navigator to confirm the selection.
• To toggle between upper and lower case letters, select  .
.
• To change the input method, select
 .
.
• To move the cursor position, select
 or
or  .
.
3. When finished, use the 5-way navigator to highlight  and press the center of the 5-way navigator to confirm.
Select a Category
1. Move the 5-way navigator up/down to select the desired category.
2. Press the center of the 5-way navigator to confirm the selection.
An example of Search POI Result
Search Details |
Search Result |
<![endif]>ENGLISH
Find & Go 13
Search Location
1. In the Find & Go menu, use the 5-way navigator to select Search > Address.
2. Enter an address (country-state, city, road name, and house number).
3. To start navigating to the destination, use the 5-way navigator to highlight  and press the center of the 5-way navigator to confirm.
NOTE: To use the Search feature, you need to get the GPS fixed. It will search the place within 6 km radius of the current position.
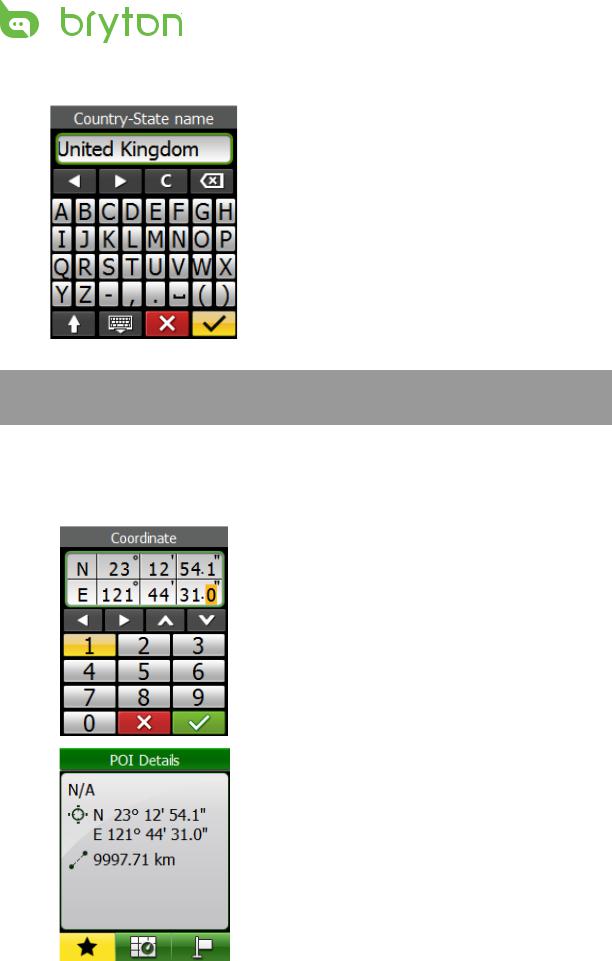
Find Coordinate
You can search for places by entering the coordinate of the location.
1. In the Find & Go menu, use the 5-way navigator to select Find Coordinate.
2. Use the 5-way navigator to select the coordinate search format and press the center of the 5-way navigator to confirm.
3. Use the 5-way navigator to enter the new coordinate.
• To move to another field, select  or
or  . You can also change the coordinate by selecting
  or
or  .
.
4. When finished, use the 5-way navigator to highlight  and press the center of the 5-way navigator to confirm.
5. You can save the Coordinate by selecting  and navigate by selecting
  .
.
14 Find & Go
 Loading...