

Bryton Rider 35 User Manual
User's Manual
35


Table of Contents2
Table of Contents
Getting Started ................ 5
Your Rider 35 ............................... 5
Reset the Rider 35 ....................... 6
Accessories .................................. 6
Status Icons ................................. 6
Charge the Battery ...................... 7
Install the Rider 35 ...................... 7
Mount the Rider 35 to the Bike............... 7
Install the Speed/Cadence
Sensor (Optional) ........................ 8
Install Heart Rate Belt
(Optional) ..................................... 9
Using the Power Adapter
(Optional) ................................... 10
My Workout ...............................17
Stop Training ............................. 17
Find & Go ........................ 18
Navigate Rides from History .... 18
Navigate Rides from Planned
Trip ............................................. 18
My POI ........................................ 19
Stop Navigating ........................19
Data Recording .......................... 19
Save POI .....................................20
View History .............................. 20
Stopwatch ...................... 21
Turn on the Rider 35 ................. 11
Acquire Satellite Signals ........... 11
Initial Setup ...............................11
Ride your Bike with Rider 35! ...11
Manage Rider 35 Data via
Your Computer .......................... 12
Share Your Experience With
Other Bikers ............................... 12
Training .......................... 13
Simple Workouts ....................... 13
Time ................................................................13
Distance ........................................................14
Basic Workouts ..........................15
Interval Workouts ..................... 15
Countdown ................................ 21
Timer .......................................... 22
Settings .......................... 23
Altitude ......................................23
Current Altitude .........................................23
Other Location Altitude ..........................24
Display .......................................24
Meter Display ..............................................24
Find & Go / My Buddy / Altitude
Display ...........................................................25
Auto Switch .................................................25
Sensors ....................................... 26
Personalize User Prole ............ 27
Personalize Bike Prole ............ 27
View Bike Prole .........................................28
Customize Workouts .................16
Customize Workouts using Power
Meter ..............................................................16
Change System Settings ........... 28
Backlight O ................................................28
Alert ................................................................29

Table of Contents 3
ENGLISH
Time/Unit ......................................................29
Language ......................................................30
Erase Data .....................................................30
View GPS Status ........................31
View Firmware Version ............. 31
Appendix ........................ 32
Specications ............................32
Battery Information .................. 33
Wheel Size and
Circumference ........................... 34
Heart Rate Zones ....................... 35
Basic Care For Your Rider 35 .....35

WARNING
Always consult your physician before you begin or modify any training program. Please read
the details in Warranty and Safety Information guide in the package.
Product Registration
Help us better support you by completing your device registration using Bryton Bridge.
Go to http://support.brytonsport.com for more information.
Bryton Software
tracks and analyze your data on the web.
Australian Consumer Law
Our goods come with guarantees that can not be excluded under the New Zealand and
Australian Consumer Laws. You are entitled to a replacement or refund for a major failure
and for compensation for any other reasonably foreseeable loss or damage. You are also
entitled to have the goods repaired or replaced if the goods fail to be of acceptable quality
and the failure does not amount to a major failure.
Getting Started4
Getting Started 5
ENGLISH
Getting Started
BACK START/REC
MODELAP
35
This section will guide you on the basic preparations before you start using your Rider 35.
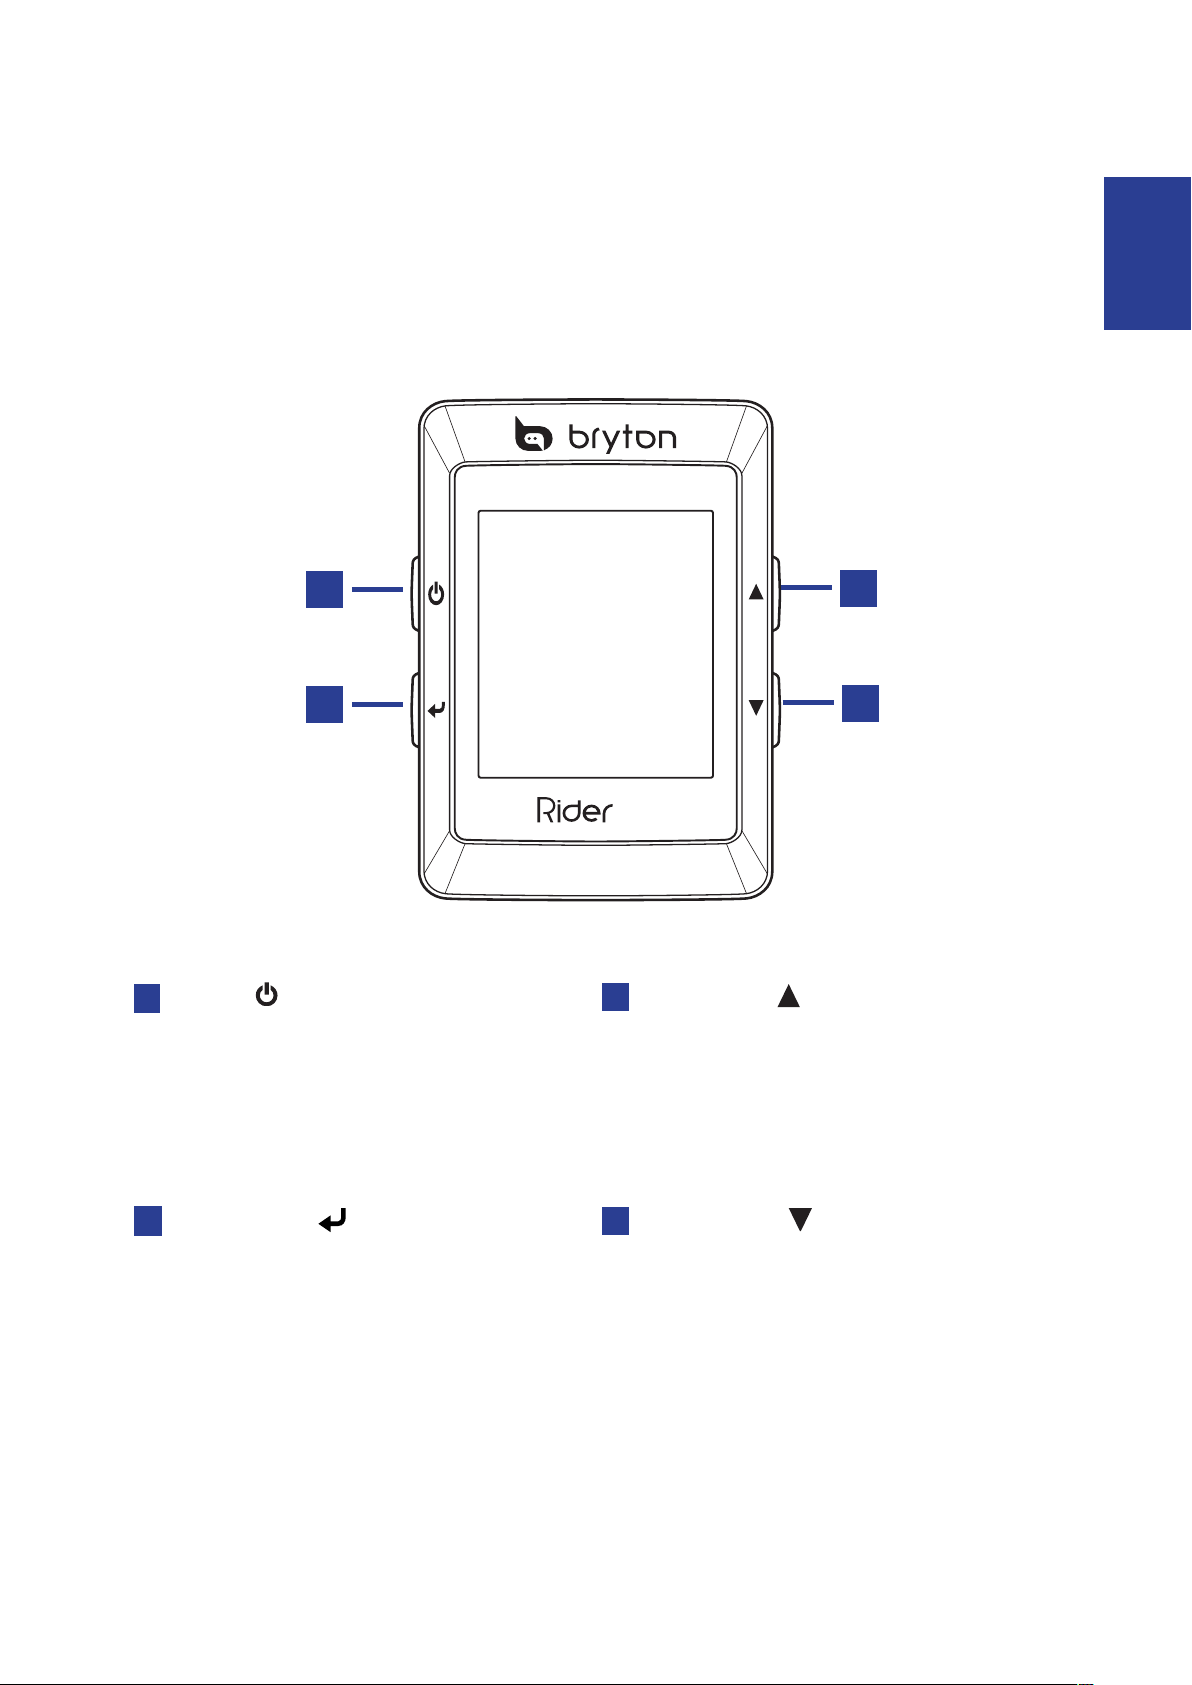
Your Rider 35
Power
1
Press and hold to turn the Rider 35 on •
or o.
Press to return to the previous page or •
cancel an operation.
1
2
Mode / Up
3
Press to switch modes: Meter, Find & •
Go, Altitude Chart, and My Buddy.
In menu mode, press to move up to •
scroll through menu options.
3
4
Start / Stop
2
In menu mode, press to enter or •
conrm a selection.
In free cycling, press to start recording• .
Press it again to stop recording.
Lap / Down
4
In menu mode, press to move down to •
scroll through menu options.
While recording, press to start to •
record a lap.
Getting Started6
Reset the Rider 35
To reset the Rider 35, press and release both and at the same time.
Accessories
The Rider 35 comes with the following accessories:
USB cable•
Bike mount•
Optional items:
Speed/Cadence sensor•
Heart rate belt•
Power adapter•
Plug(s)•
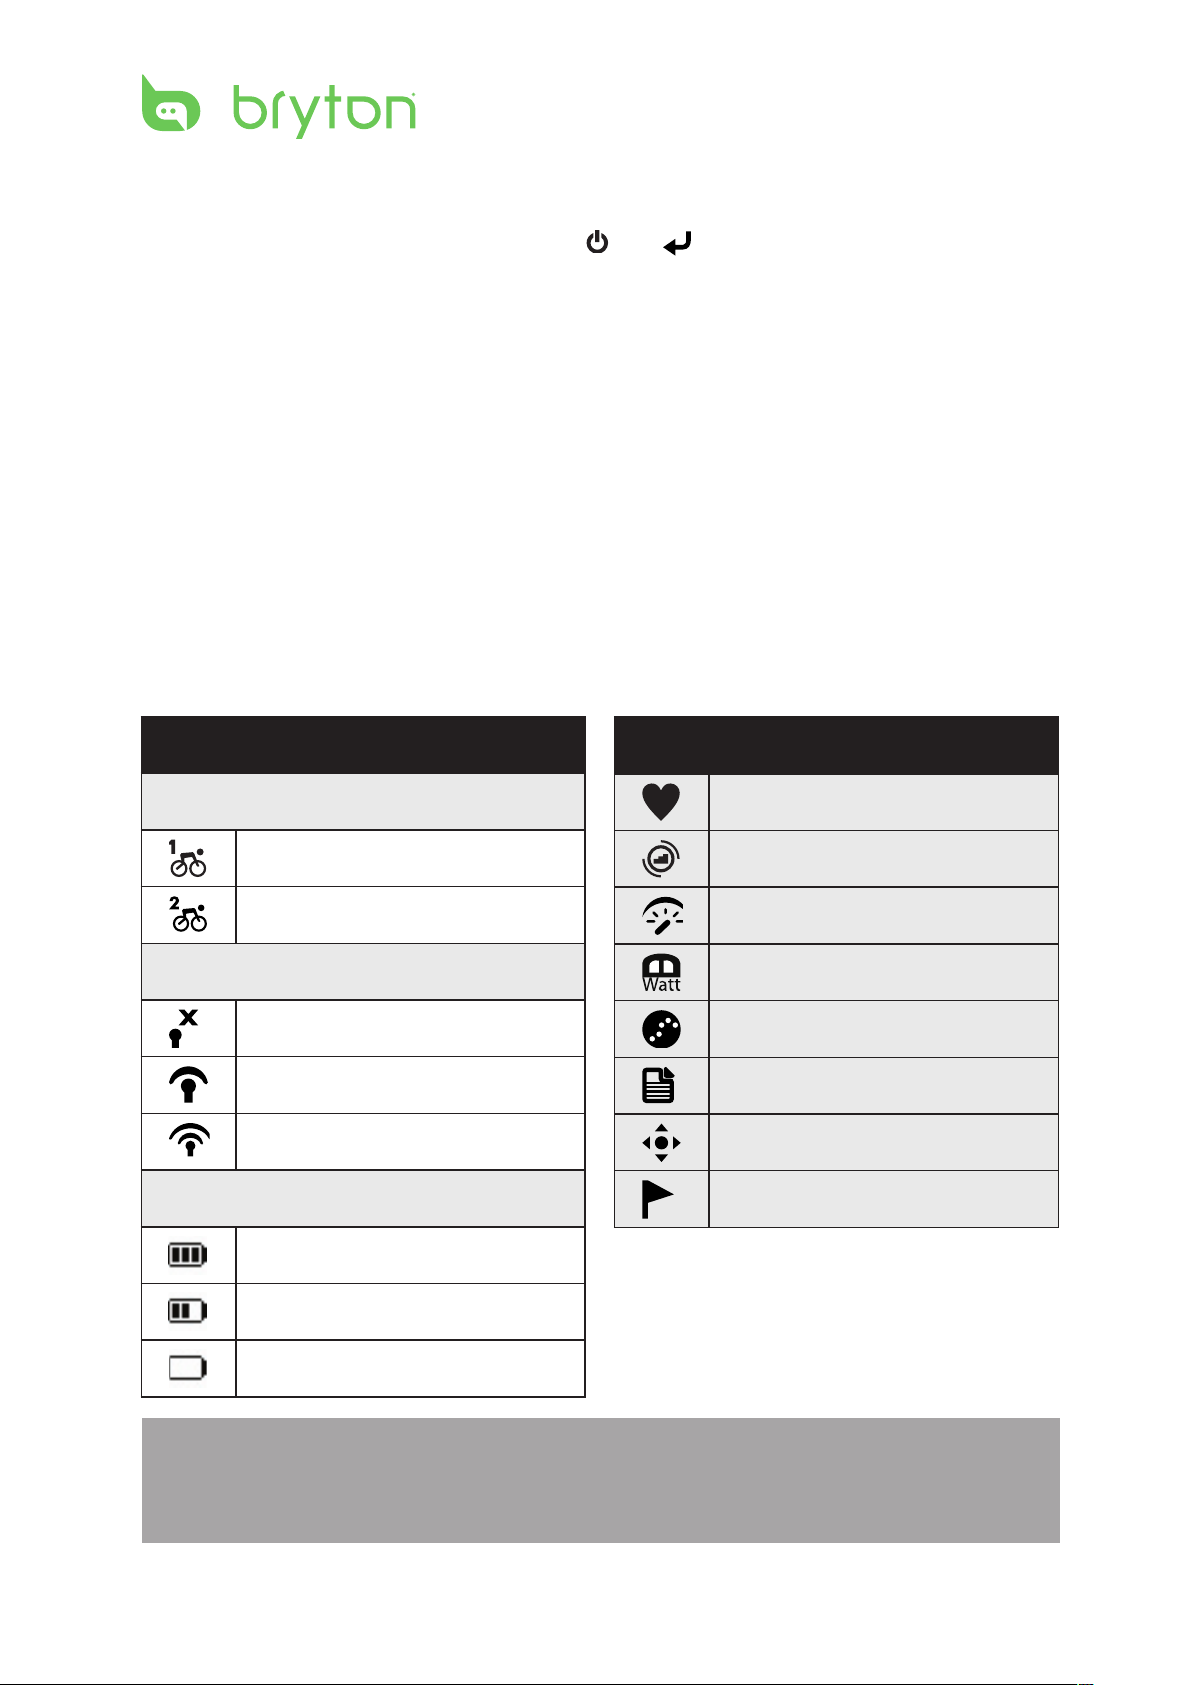
Status Icons
Icon Description
Bike in used
Bike 1
Bike 2
GPS Signal Status
No signal (not xed)
Weak signal
Strong signal
Power Status
Full battery
Half battery
Icon Description
Heart Rate Sensor Active
Cadence Sensor Active
Speed Sensor Active
Power Meter Sensor Active
Log Record in Progress
Training mode
Free ride mode
Navigation mode
Low battery
NOTE:
Log Record is displayed only when it is in progress.•
For the three available modes (training, free ride, and navigation), only the active mode icon •
is displayed on the screen.
Getting Started 7
ENGLISH
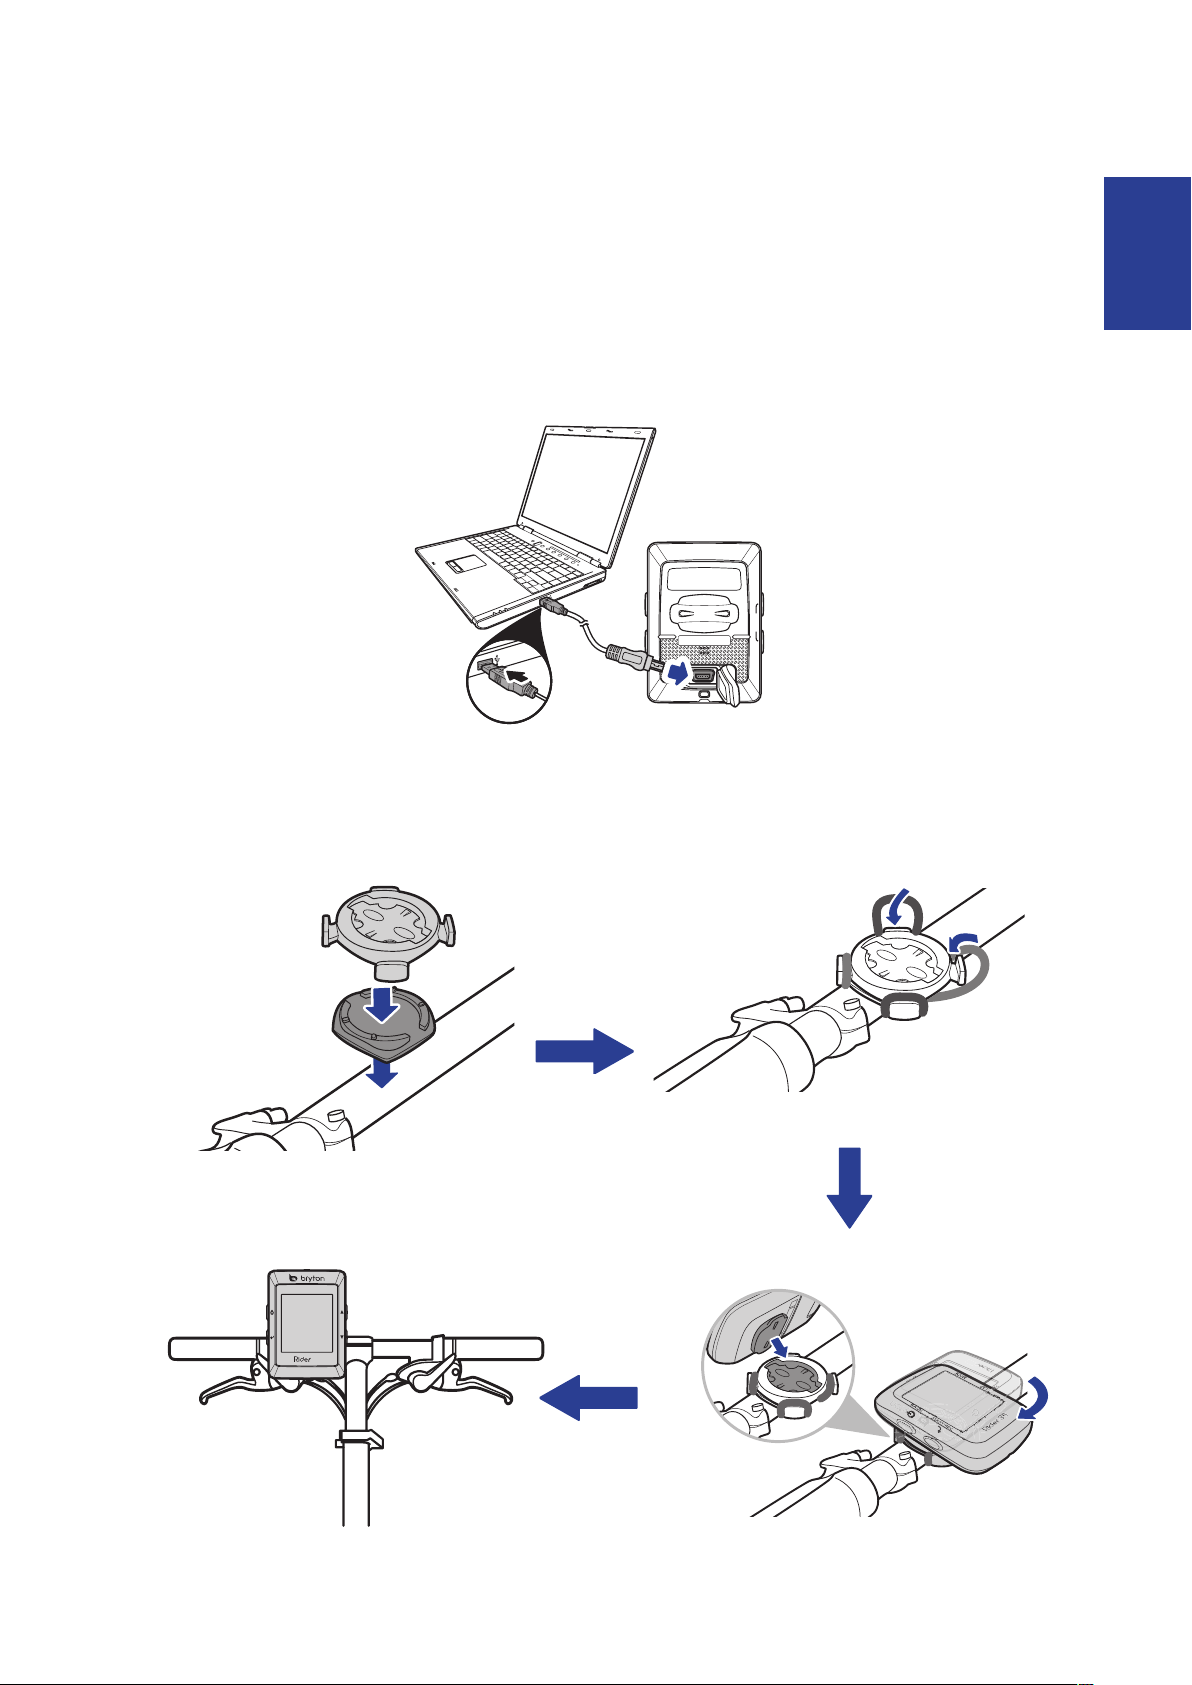
Charge the Battery
BACK START/REC
MODELAP
35
reset
35
Warning:
This product contains a lithium-ion battery. See the Warranty and Safety Information guide
in the package for important battery safety information.
To charge the battery, connect your Rider 35 to your computer using the USB cable.
Install the Rider 35
Mount the Rider 35 to the Bike
1 2
34
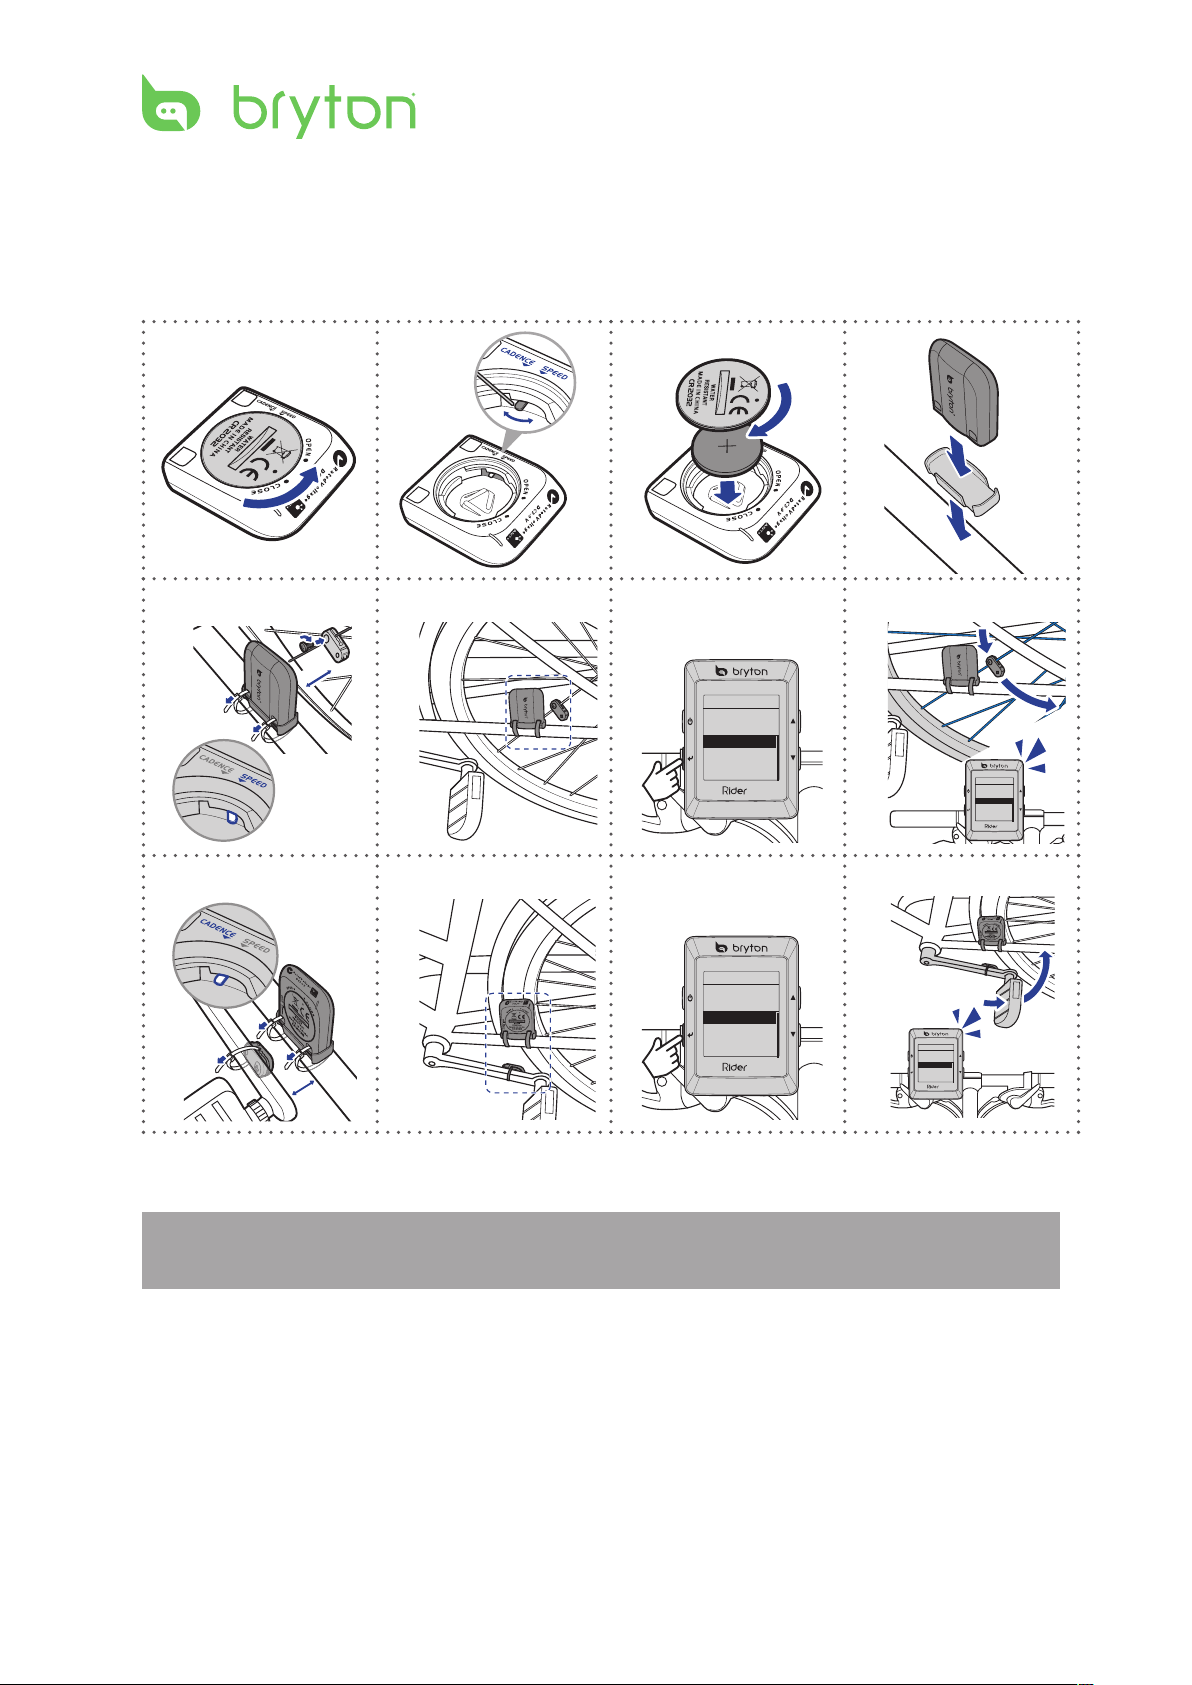
Getting Started8
Install the Speed/Cadence Sensor
3
mm
BACK START/REC
MODELAP
35
Speed
Status: inactive
ID
Rescan
Turn on
0
BACK START/REC
MODELAP
35
Speed
Status: inactive
ID
Rescan
Turn on
0
BACK START/REC
MODELAP
35
Cadence
Status: inactive
ID
Rescan
Turn on
0
1245a6a8a5b
6b
8b
BACK START/REC
MODELAP
35
Cadence
Status: inactive
ID
Rescan
Turn on
0
3
mm
(Optional)
NOTE: To ensure optimum performance, the distance between the sensor and the magnet
must be within 3 mm.
Getting Started 9
ENGLISH
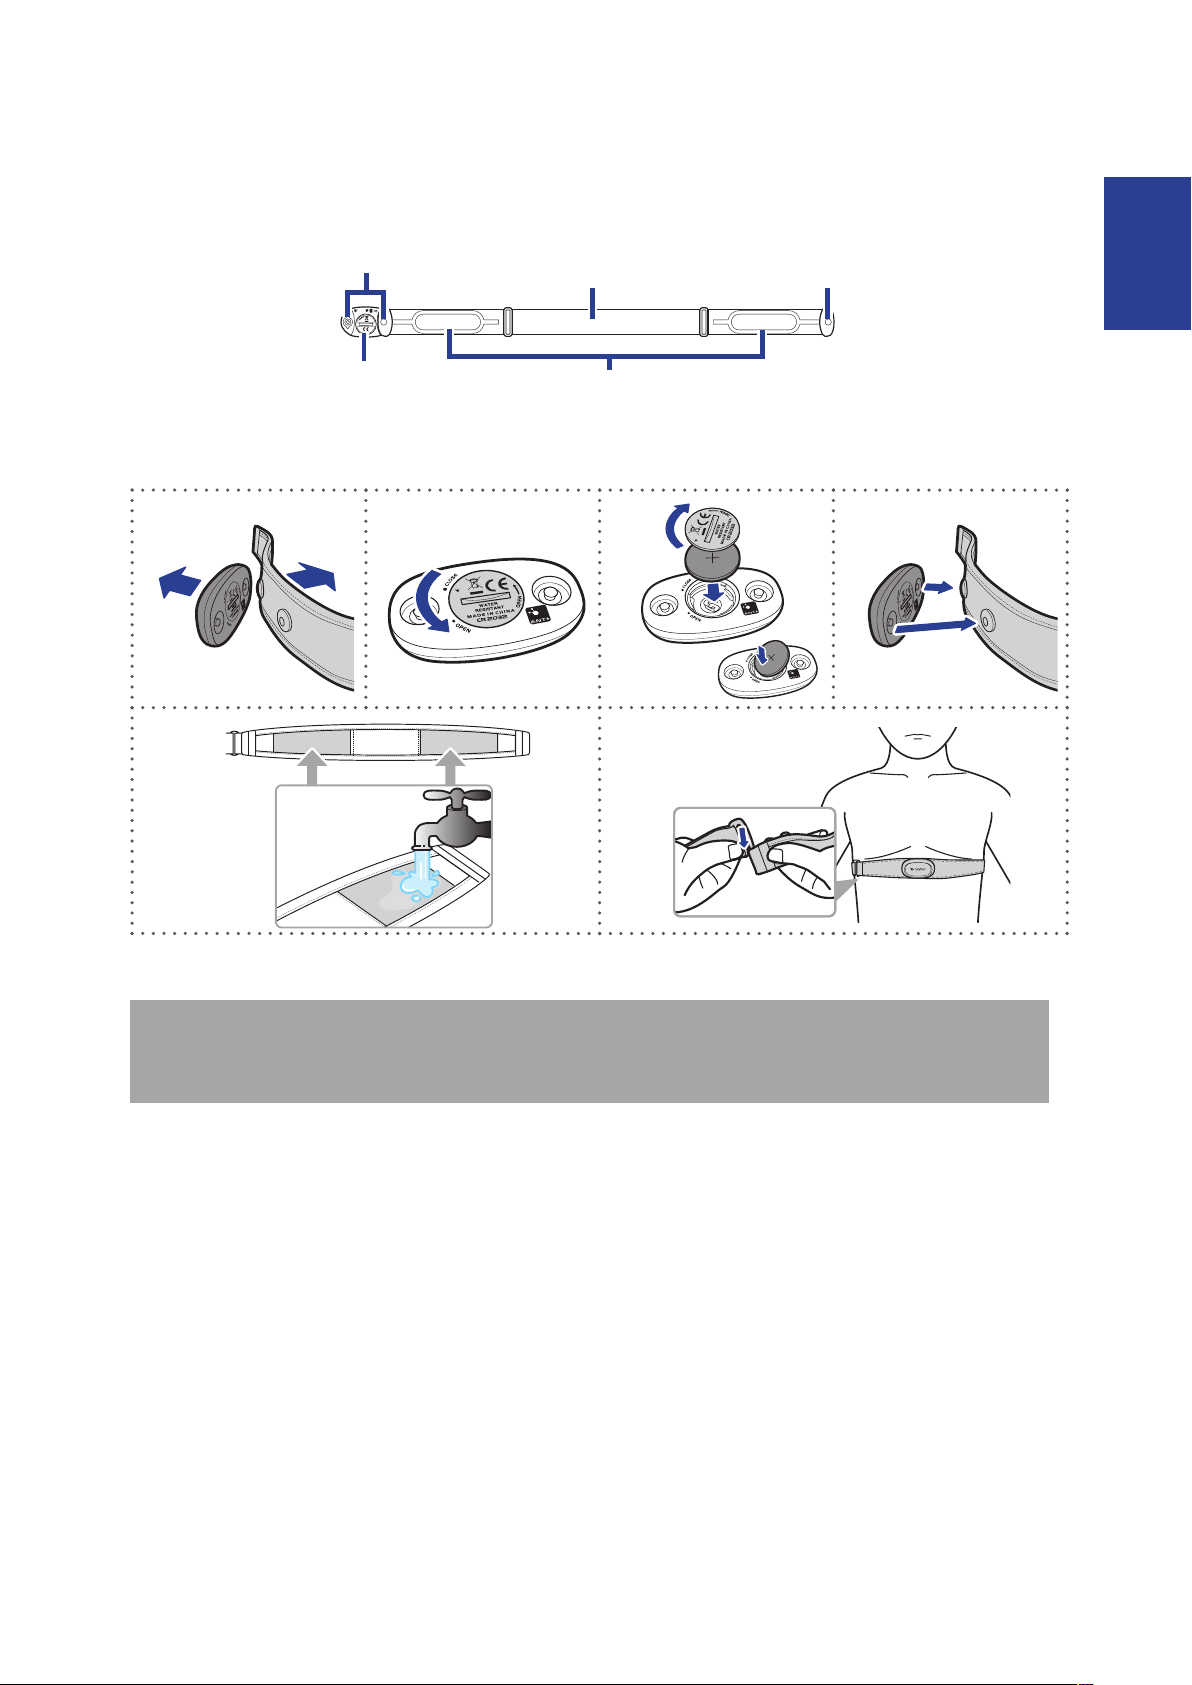
Install Heart Rate Belt (Optional)
HeartW
ear
2.4GHz Digital
F
C
C
I
D
:
0
4
G
H
R
M
H
W
+S
P
O
R
T
AP
L
B
A
T
T
E
R
Y
O
R
2
0
3
2
3
V
124
5
6
Clips
Battery
compartment
Strap
Electrodes
Clip
NOTE:
In cold weather, wear appropriate clothing to keep the heart rate belt warm.•
The belt should be worn directly on your body.•
Getting Started10
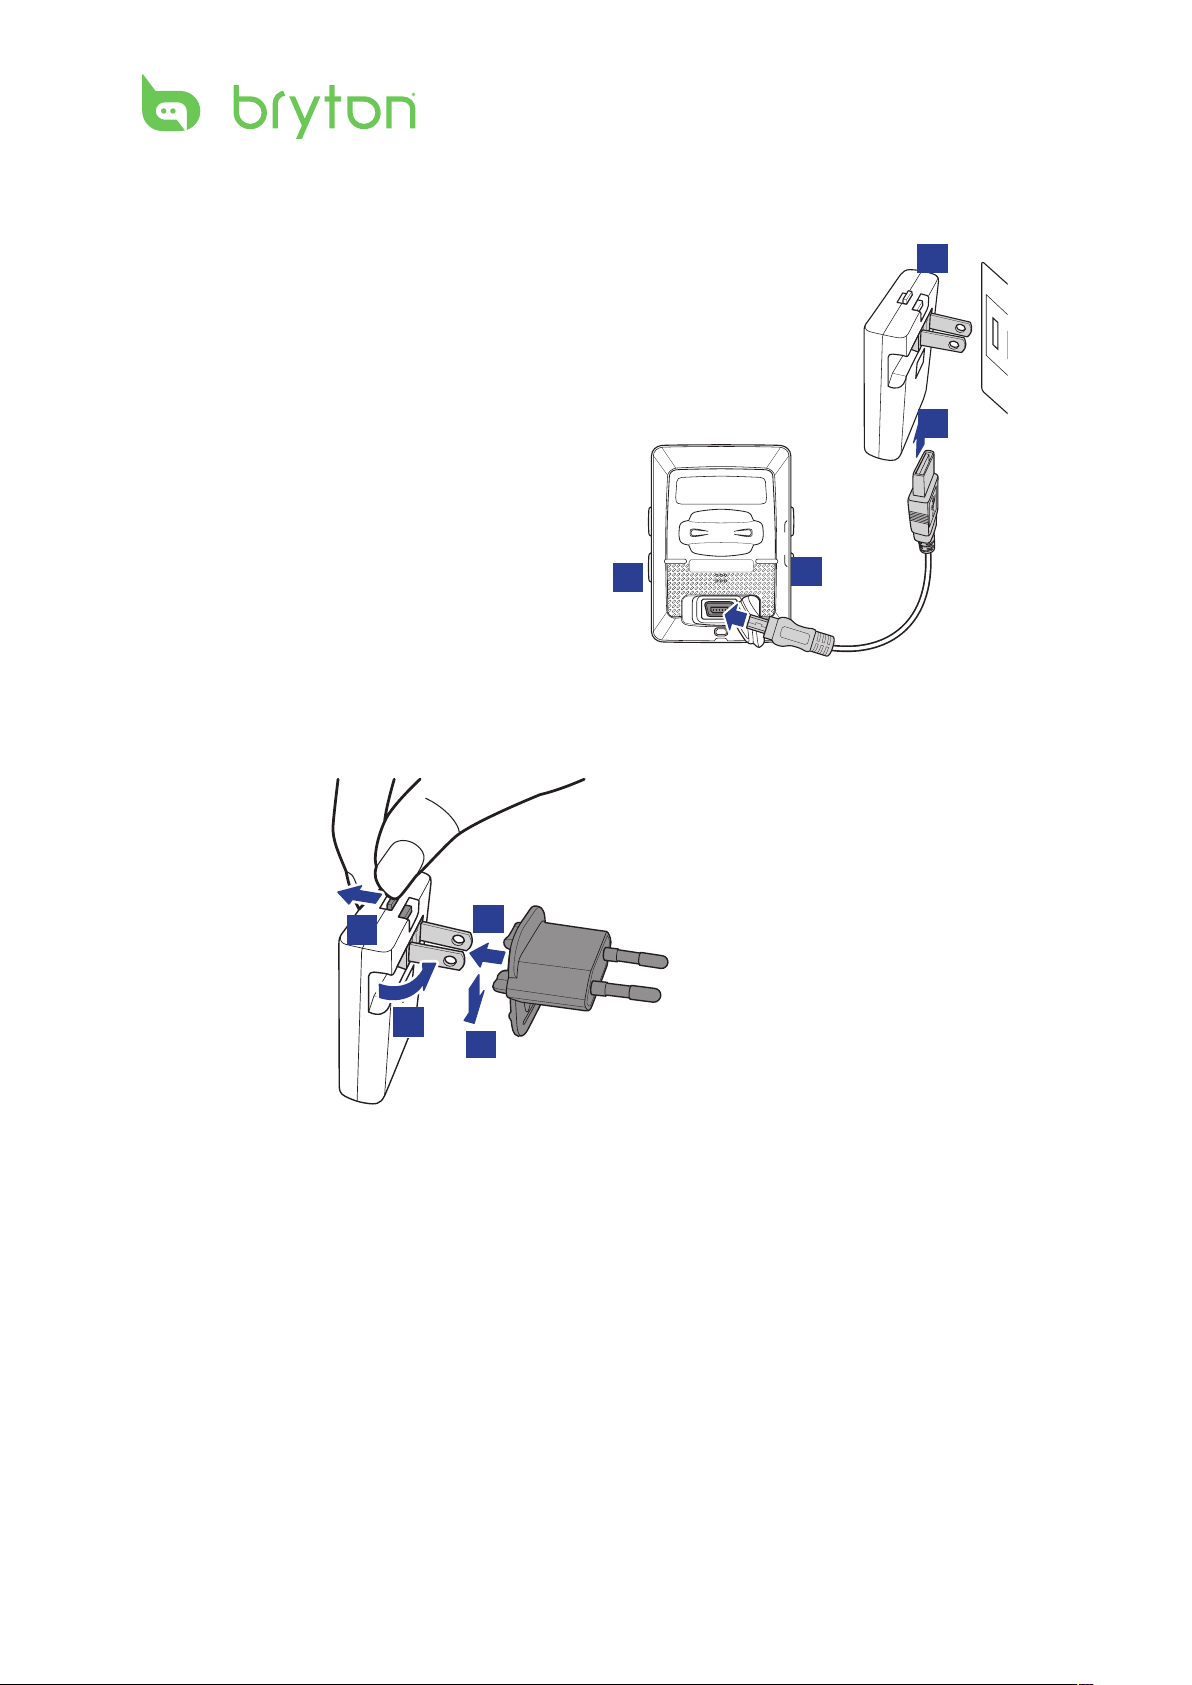
Using the Power Adapter (Optional)
reset
You can use the power adapter to charge the
4
battery.
3
1
2
You can puchase dierent plug head(s) suitable in the country where you purchased the
Rider 35.
To use the plug:
2
1
3
4
Getting Started 11
ENGLISH
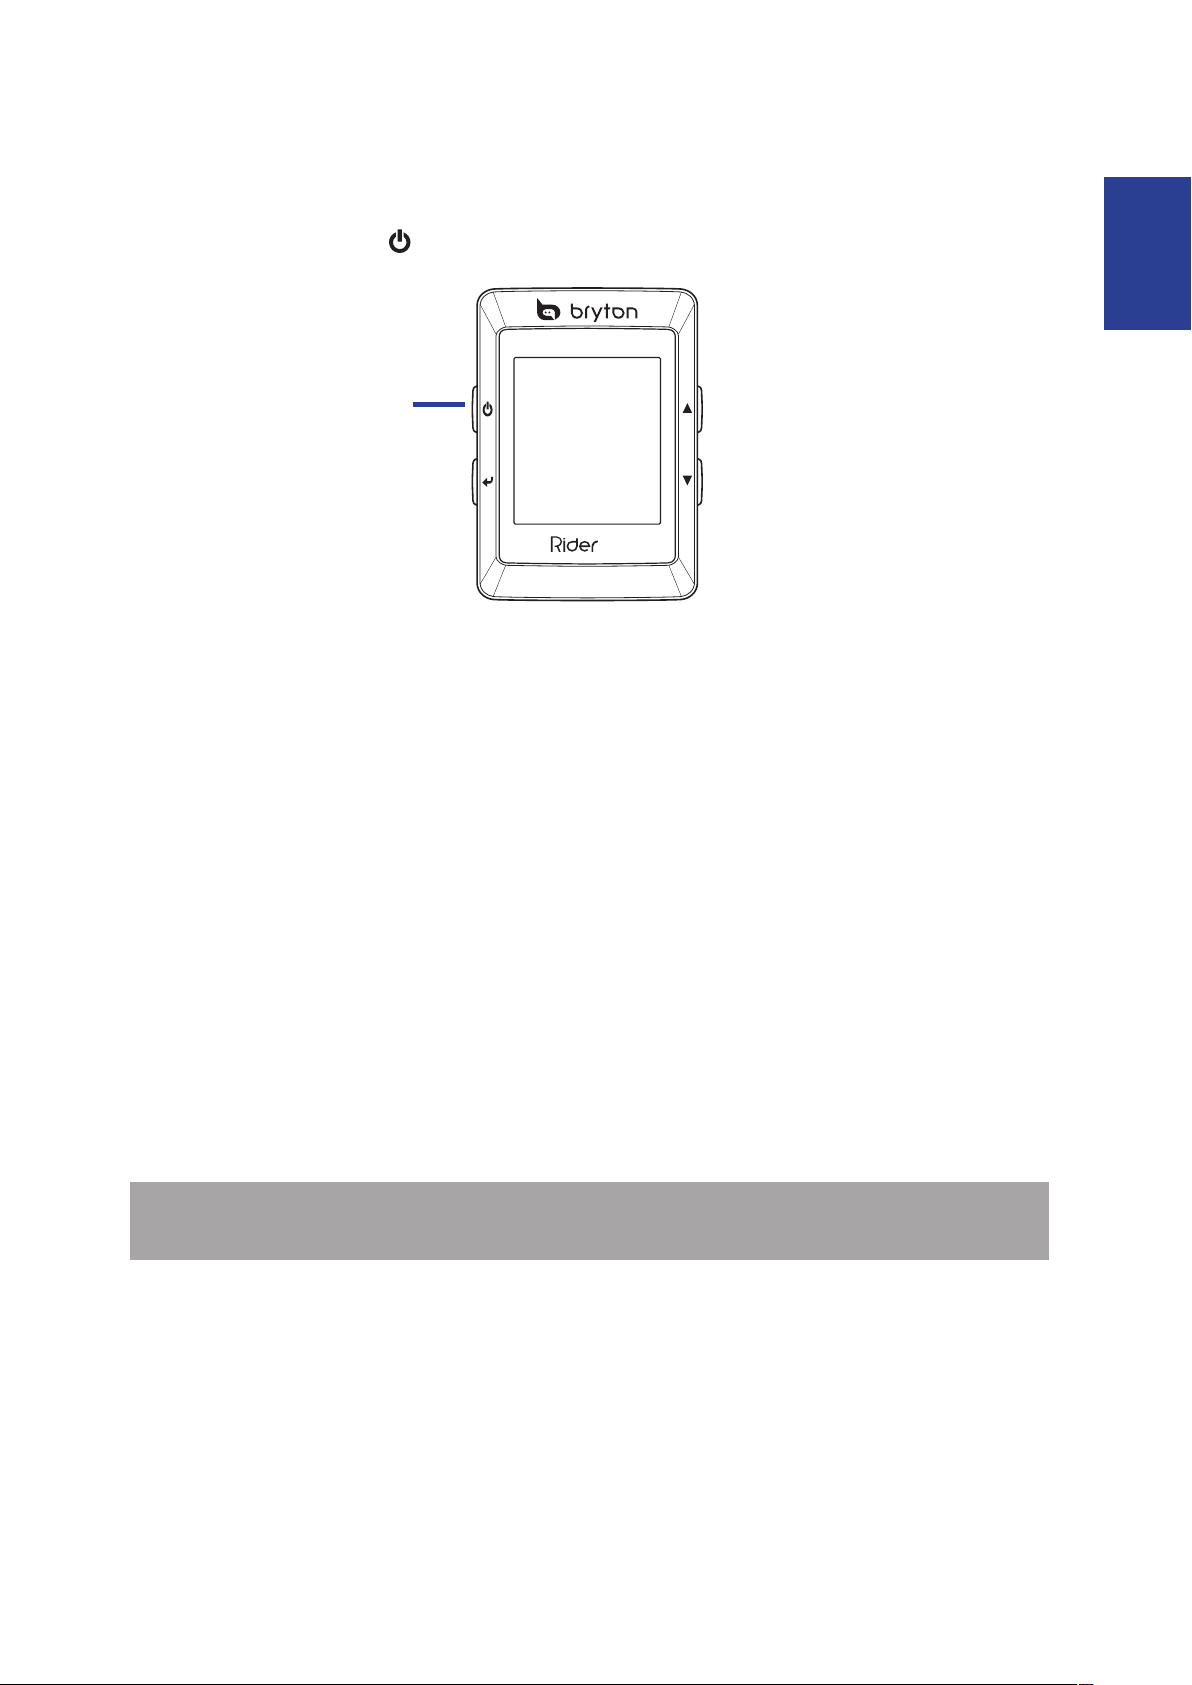
Turn on the Rider 35
BACK START/REC
MODELAP
35
Press and hold the Power button to turn the Rider 35 on.
Power button
Acquire Satellite Signals
Once the Rider 35 is turned on, it will automatically search for satellite signals. It may take 30
to 60 seconds to acquire signals.
Initial Setup
When turning the Rider 35 on for the rst time, the setup wizard appears on screen. Follow
the instructions to complete setup.
1. Select the display language and time zone.
2. Select the unit of measurement.
3. Enter your “user prole”.
(It is recommended to input the data. The data accuracy will highly aect your training
analysis.)
4. Read and accept the Safety Agreement.
NOTE: If you want to change the language on the device, change the setting via Bryton
Bridge > Rider 35 > Language.
Ride your Bike with Rider 35!
1. Just ride with free cycling mode or set up a training program through menu options.
2. Toggle p to switch modes.
Select from the available dierent modes: Meter, Find & Go, Altitude Chart, and My
Buddy.
 Loading...