

40/60
er’s Guide
AM

FCC Regulations:
§ 15.19 (a)(3)
This device complies with part 15 of the FCC Rules. Operation is subject to the following two conditions: (1)
This device may not cause harmful interference, and (2) this device must accept any interference received,
including interference that may cause undesired operation.
§ 15.21
Changes or modications not expressly approved by the party responsible for compliance could void the user‘s
authority to operate the equipment.
**************************************************************************************************************
§ 15.105 (b)
This equipment has been tested and found to comply with the limits for a Class B digital device, pursuant to
part 15 of the FCC Rules. These limits are designed to provide reasonable protection against harmful interference in a residential installation. This equipment generates, uses and can radiate radio frequency energy and, if
not installed and used in accordance with the instructions, may cause harmful interference to radio communications. However, there is no guarantee that interference will not occur in a particular installation. If this equipment does cause harmful interference to radio or television reception, which can be determined by turning the
equipment o and on, the user is encouraged to try to correct the interference by one or more of the following
measures:
—Reorient or relocate the receiving antenna.
—Increase the separation between the equipment and receiver.
—Connect the equipment into an outlet on a circuit dierent from that to which the receiver is connected.
—Consult the dealer or an experienced radio/TV technician for help.
***************************************************************************************************************
FCC RF Exposure Compliance
This device is designed and manufactured not to exceed the emission limits for exposure to radio frequency
(RF) energy set by the Federal Communications Commission for an uncontrolled environment.
IC Regulations:
This device complies with Industry Canada license-exempt RSS standard(s). Operation is subject to the following two conditions:
(1) this device may not cause interference, and
(2) this device must accept any interference, including interference that may cause undesired operation of the
device.
Le présent appareil est conforme aux CNR d'Industrie Canada applicables aux appareils radio exempts de
licence. L'exploitation est autorisée aux deux conditions suivantes:
(1) l'appareil ne doit pas produire de brouillage, et
(2) l'utilisateur de l'appareil doit accepter tout brouillage radioélectrique subi, même si le brouillage est susceptible d'en compromettre le fonctionnement."
***************************************************************************************************************
CAN ICES-3(B)/NMB-3(B)
***************************************************************************************************************
IC RF Exposure Compliance
This equipment complies with IC RSS-102 RF exposure limits set forth for an uncontrolled environment.

Cardio 40/60 User’s Manual
2
Table of Contents
Getting Started ................ 4
Your Cardio 40/60........................ 4
Accessories .................................. 5
Initial Setup ...................... 5
Step 1: Charge the Battery ......... 5
Using the Power Adapter .......................... 5
Using the Computer ................................... 6
Step 2: Turn On the Device ......... 6
Turn On/O (Cardio 40) ............................. 6
Turn On/O (Cardio 60) ............................. 6
Step 3: Initial Setup ..................... 7
Step 4: Acquire Satellite
Signals .......................................... 7
Step 5: Share Your Records to
Brytonsport.com ........................ 8
Exercises ......................... 12
Starting an Exercise ..................12
Running/Cycling ........................................12
Triathlon (Cardio 60 only) .......................12
Multisport (Cardio 60 only) ....................13
Outdoor Swim (Cardio 60 only) ............13
Pause/ Stop Exercising .............. 14
Switch the Meter Page ..............14
Smart Pause ............................... 14
Lap .................................. 15
Smart Lap................................... 15
Mark Lap .................................... 15
Train & Test ..................... 16
To Plan ........................................ 16
Status Page ...................... 9
Icon Description .......................... 9
Receiving GPS Signals .............. 10
Clock View ...................... 11
Display Screen ...........................11
Auto Time Calibration by GPS .. 11
Manually Set Time ..................... 11
Set Alarm (Time1) ..................... 11
Simple Workouts ........................................16
Interval Workouts ......................................17
My Workout ............................... 18
Bryton Workout ......................... 18
Bryton Test ................................. 19
Start Training ............................. 20
Pause/Stop Training .................. 20
View History ................... 21
View History .............................. 21
View Summary .......................... 21
Delete Exercise Records ........... 21
Settings .......................... 22
About .............................................................29
ENGLISH
Exercises Settings ..................... 22
Customize the Display Settings ............22
...............23
Set Exercise Reminder .............................23
Enable Triathlon Transition Time
(Cardio 60 only) ..........................................24
Multisport Sequence Setup
(Cardio 60 only) ..........................................24
Watch Settings .......................... 25
Adjust Date ..................................................25
Change Clock View ...................................25
General Settings ........................ 25
..............25
Enable Auto Key Lock
(Cardio 60 only) ..........................................26
Enable Key Vibrate (Cardio 60 only) ....26
Enable Key Tone .........................................26
Enable Vibrate (Cardio 60 only) ............26
.........................27
Specify Unit ..................................................27
Specify the On-Screen Display (OSD)
Language ......................................................27
Sensors ....................................... 30
Link Heart Rate Sensor ............................30
Link Other Sensors (Cardio 60 only) ...30
............31
...................................................31
...................31
Pace Calculator .............. 32
Troubleshooting ............ 33
Getting More Information ........33
Reset Cardio 40/60 .................... 33
Appendix ........................ 34
Glossary and Customizable Data
Fields Selection .........................34
Installing the Bike Mount
(Cardio 60 only) ......................... 37
Installing the Heart Rate
Monitor ...................................... 38
Set GPS Mode .............................................27
Enable Race Mode ....................................28
(Cardio 60 only) .........................................28
Enable File Saving Mode .........................28
Adjust Contrast Level ..............................29
View Memory Usage ................................29
Wheel Size and
Circumference ........................... 41
Heart Rate Zones ....................... 42
Basic Care For Your
Cardio 40/60 .............................. 42
............................43
Australian Consumer Law
Our goods come with guarantees that can not be excluded under the New Zealand and Australian Consumer
Laws. You are entitled to a replacement or refund for a major failure and for compensation for any other
reasonably foreseeable loss or damage. You are also entitled to have the goods repaired or replaced if the
goods fail to be of acceptable quality and the failure does not amount to a major failure.
WARNING
Always consult your physician before you begin or modify any training program. Please read the details
in Warranty and Safety Information guide in the package.
Cardio 40/60 User’s Manual 3

4
Cardio 40/60 User’s Manual
Getting Started
AM
This section will guide you on the basic preparations before you start using your device.
Your Cardio 40/60
1
2
3
Light / Power ( / )
1
Cardio 40
Press and hold to turn on/o device.•
Press to turn on the backlight.•
Cardio 60
Press and hold to turn the device on.•
T• o turn o device, press and hold to
enter the sub menu, and use up and
down key to scroll between key lock
and power o. Press OK to select
“Power O”.
Press to turn on the backlight.•
4
5
OK (OK)
3
In Clock view, press to enter the menu •
mode.
In Menu, press to enter or conrm a •
selection.
When recording, press to mark the lap.•
Up (p)
4
In Menu, press to move up to scroll •
through menu options. Press and
hold to fast scroll up through menu
options.
2
Back ( / / )
Press to return to the previous page or •
cancel an operation.
In Meter mode, press to pause log. •
While the recording is paused, press
again to stop.
In training mode, press to stop •
recording log.
Down / Page (q/ )
5
In Menu, press to move down to scroll •
through menu options. Press and hold
to fast scroll down through menu
options.
In meter view, press to switch meter •
screen page.
5
ENGLISH
Cardio 40/60 User’s Manual
Accessories
AM
The Cardio 40/60 comes with the following accessories:
Cardio 40 Cardio 60
In the box
Device
USB Charging Clip Cable
Quick Start Guide
Optional items
Speed & Cadence Dual Sensor
Heart Rate Monitor Set
Heart Rate Belt
Bike Mount
Adaptors
NOTE: For more information about purchasing optional accessories, please go to Bryton
Eshop http://www.brytonsport.com/eshop or contact your Bryton dealer.
3 3
3 3
3 3
8 3
3 3
3 3
8 3
3 3
Initial Setup
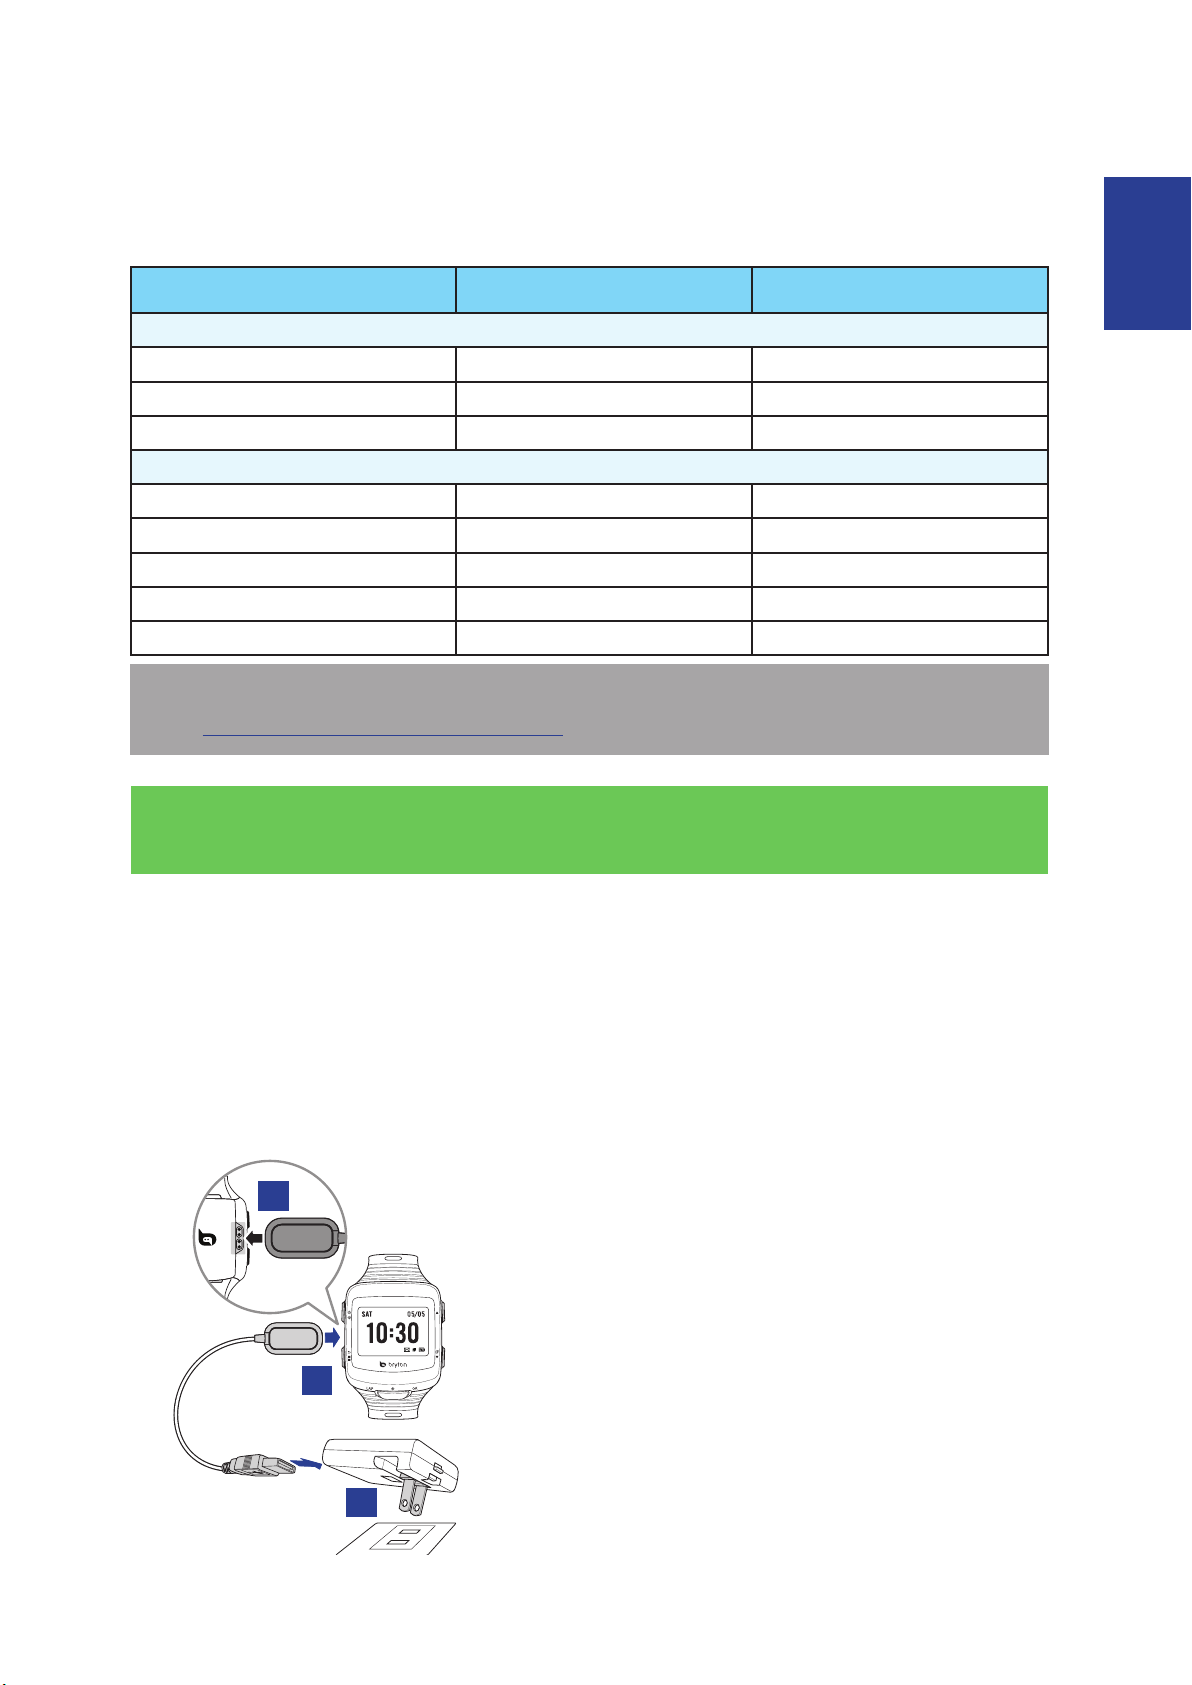
Step 1: Charge the Battery
Using the Power Adapter
Charge the device for at least 3 hours before you start using it.
Warning:
This product contains a lithium-ion battery. See the Warranty and Safety Information guide
in the package for important battery safety information.
1
1. Attach the USB charging clipper onto the
device.
2. Connect the other end of the USB
charging clipper to the power adapter.
Be sure the pin on the charging clipper is
2
3
properly attached to the charging contact
on the back of the device.
3. Plug the power adapter to a wall outlet.
6
Cardio 40/60 User’s Manual
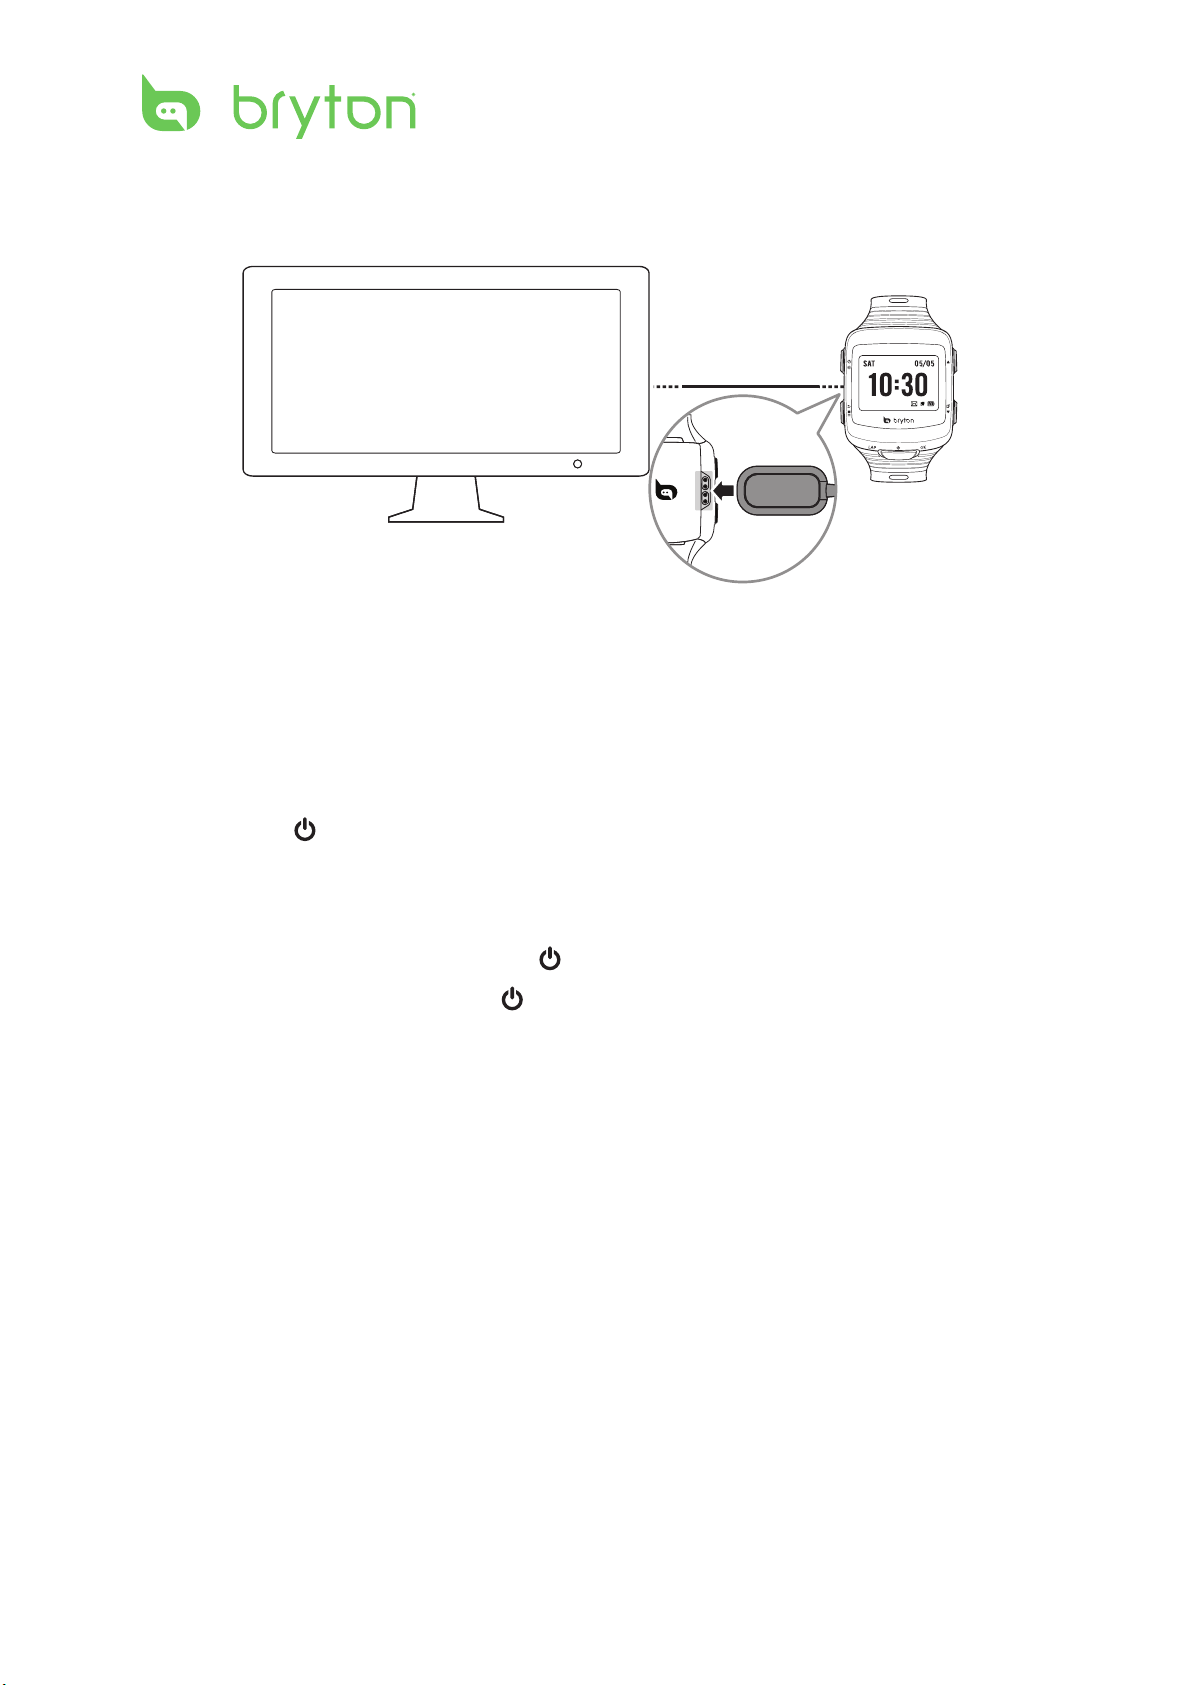
Using the Computer
AM
1. Attach the USB charging clipper onto the device.
2. Plug the other end of the USB charging clipper to a computer.
Step 2: Turn On the Device
Turn On/O (Cardio 40)
Press and hold to turn the device on or o.
Turn On/O (Cardio 60)
To turn on the device, press and hold • .
To turn o device, press and hold • to enter the sub menu, and use up and down key to
scroll between key lock and power o. Press OK to select “Power O”.
7
ENGLISH
Cardio 40/60 User’s Manual
Step 3: Initial Setup
Pls Reposition
Searching
Fixed
When turning the device on for the rst time, the setup wizard appears on screen. Follow
the instructions to complete setup.
1. Select the display language.
2. Select the unit of measurement.
3. Enter your “user prole”.
It is recommended to input the data since data accuracy will highly aect your training
analysis.
4. Read and accept the Safety Agreement.
Press • p and q key to read the Safety Agreement.
Press • OK to accept the Safety Agreement.
Step 4: Acquire Satellite Signals
Once the Cardio 40/60 is turned on, it will automatically search for satellite signals. While the
device is searching for satellite signals, the screen may display:
Pls Reposition•
No GPS signal or GPS signal is weak. Under this environment,
it is very dicult to get GPS position x. This status usually
happens when you’re in urban area or close to buildings.
Please move to an open area to acquire better GPS reception.
Searching•
GPS should be able to acquire position in few minutes.
When ( ) appeared, it is recommend to move to an open
area until ( ) is displayed to acquire as many satellites as
possible.
Fixed•
GPS position is xed. The screen will automatically enter meter
page.
NOTE:
For a more accurate measurement the rst time you use the device, please stay outdoor for •
at least 15 minutes with no obstructions overhead before performing a GPS search.
If you are unable to get the GPS reception after three minutes or more, try again at another •
location.
For more information on receiving GPS signals, refer to • “Receiving GPS Signals” on page 10.

8
Cardio 40/60 User’s Manual
Step 5: Share Your Records to
Brytonsport.com
1. Download Bryton Bridge 2
a. Go to http://www.brytonsport.com/help/start and download Bryton Bridge 2.
b. Follow the on-screen instructions to install Bryton Bridge 2.
2. Register an Account
Go to http://www.brytonsport.com and register an account.
3. Connect to PC
Turn on your Cardio 40/60 and connect it to your computer by using USB charging clipper.
4. Share Your Records With Other People
When My Device Manager window starts up, do one of the following:
a. Click “Manage My Tracks” button. Then, click “Save Tracks to Computer” button to save
your data to computer.
OR
b. Click “Visit Brytonsport.com” button. Then, click “Upload Files” to share your rides to the
Brytonsport website.
NOTE:
Do not unplug the USB charging clipper during the les transferring process. Otherwise, the •
les may be damaged or corrupted.
After you have installed Bryton Bridge, “My Device Manager” will automatically launch when •
the device is connected to the computer. If not, click Bryton (
top or bottom of your computer’s toolbar, and then select “Open my device manager”.
For more instructions, please go to • corp.brytonsport.com > Support > Tutorial.
) icon that is shown at the
9
ENGLISH
Cardio 40/60 User’s Manual
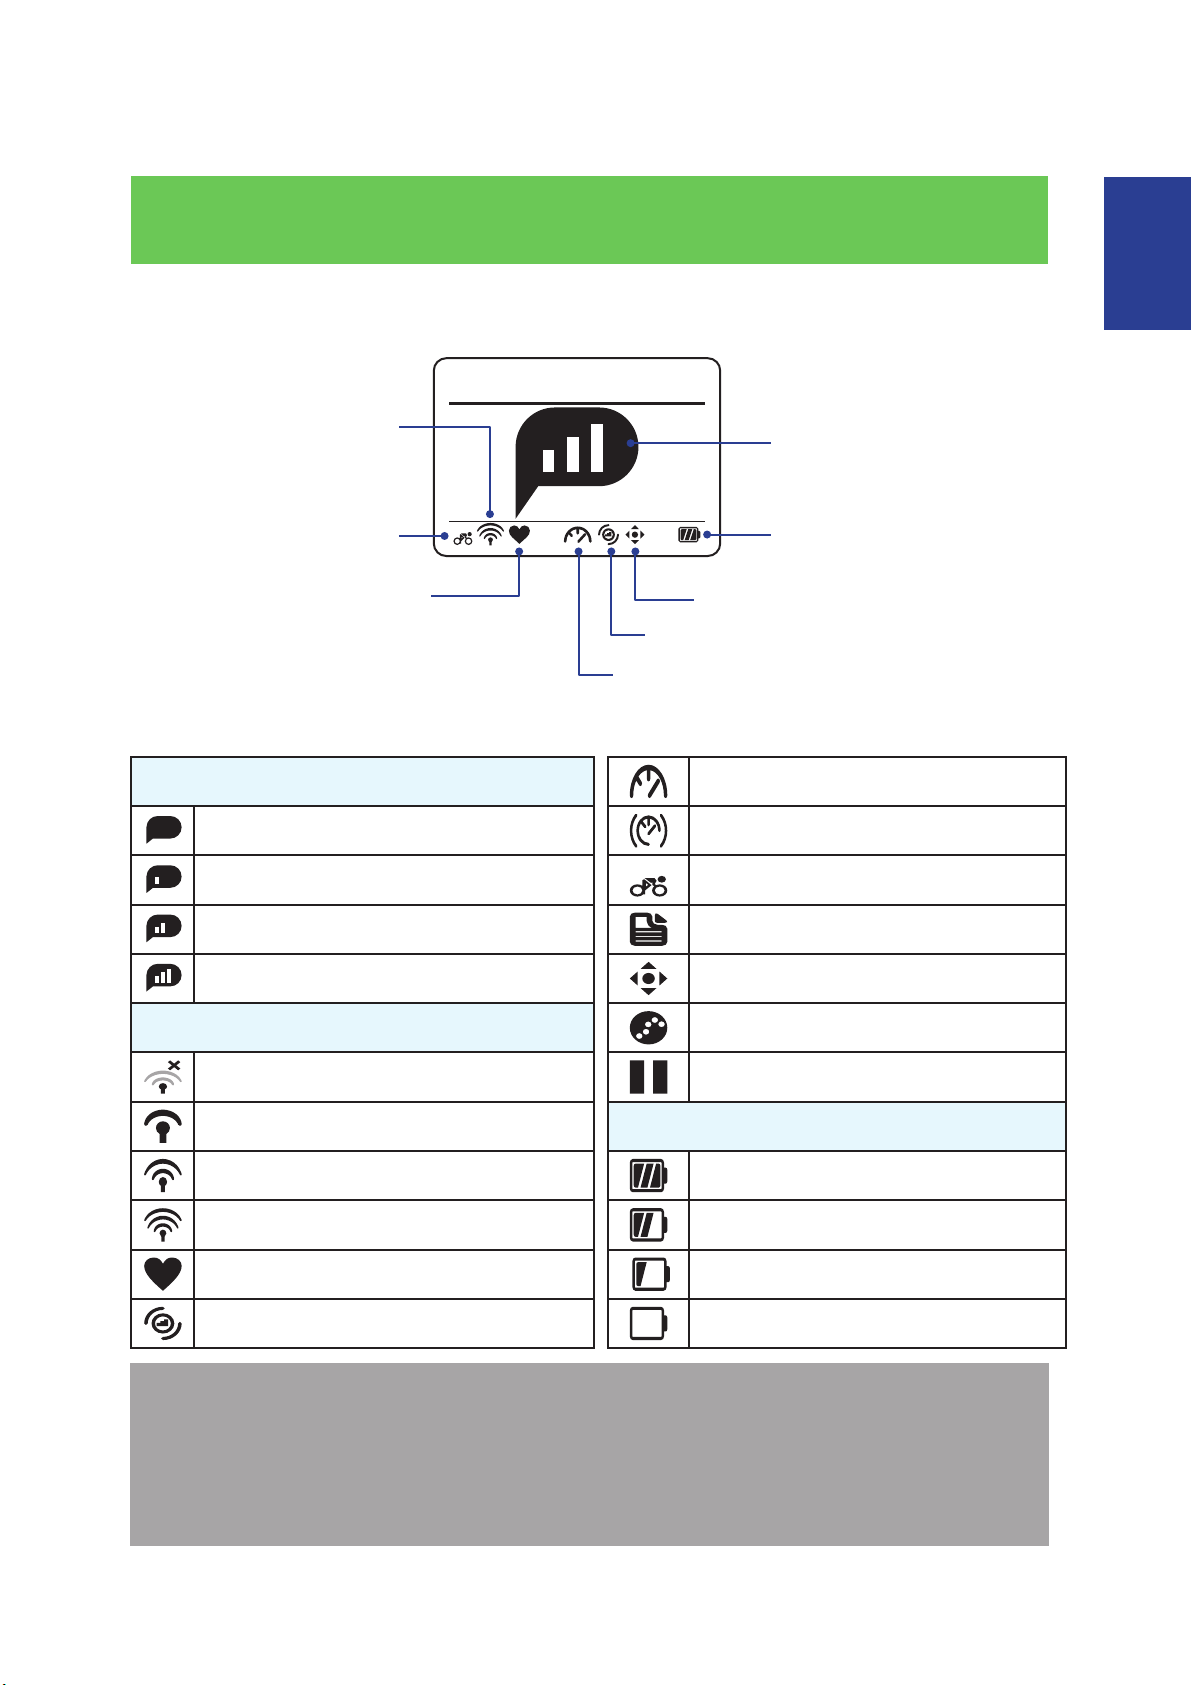
Status Page
1
Fixed
1
GPS positioning
status
Bike Type (Cardio 60 only)
Heart rate sensor
indicator
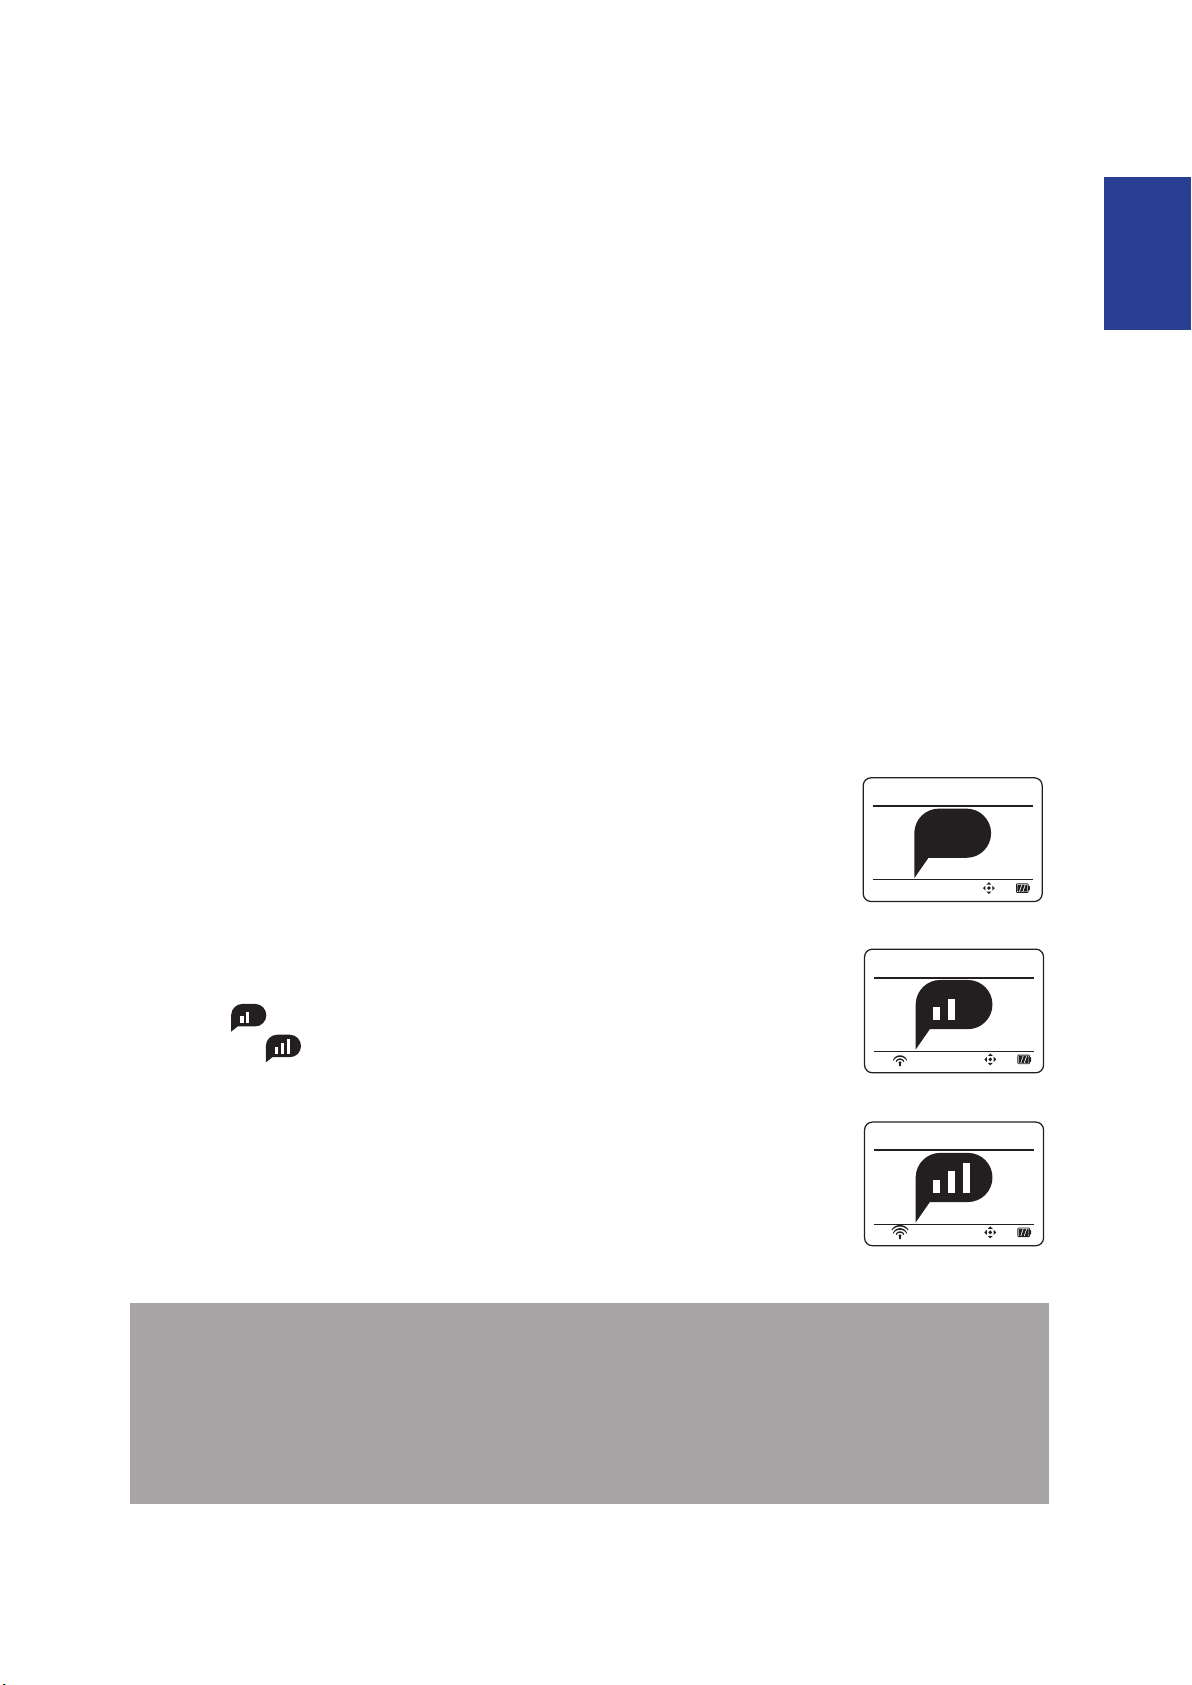
Icon Description
GPS Signal Status Speed sensor active (Cardio 60 only)
No Signal Dual sensor active (Cardio 60 only)
Poor *
Fair ** Training mode
Good ** Meter mode
GPS signal status
Battery level
Meter mode
Cadence sensor indicator (Cardio 60 only)
Speed sensor indicator (Cardio 60 only)
Bike type (Cardio 60 only)
GPS Positioning Status Log record in progress
No signal (not xed) Recording is paused.
Weak Power Status
Normal Full battery
Good Half batteiry
Heart rate sensor active
Cadence sensor active (Cardio 60 only) Battery depleted
NOTE:
Only the active icons are displayed on the screen.•
When the speed & cadence dual sensor is activated, the sensor icon will appear at the speed •
sensor icon position.
* Please go to an open area for better reception.
** When blinking, this indicates the device is still searching for the GPS signal.
Low battery
10
Cardio 40/60 User’s Manual
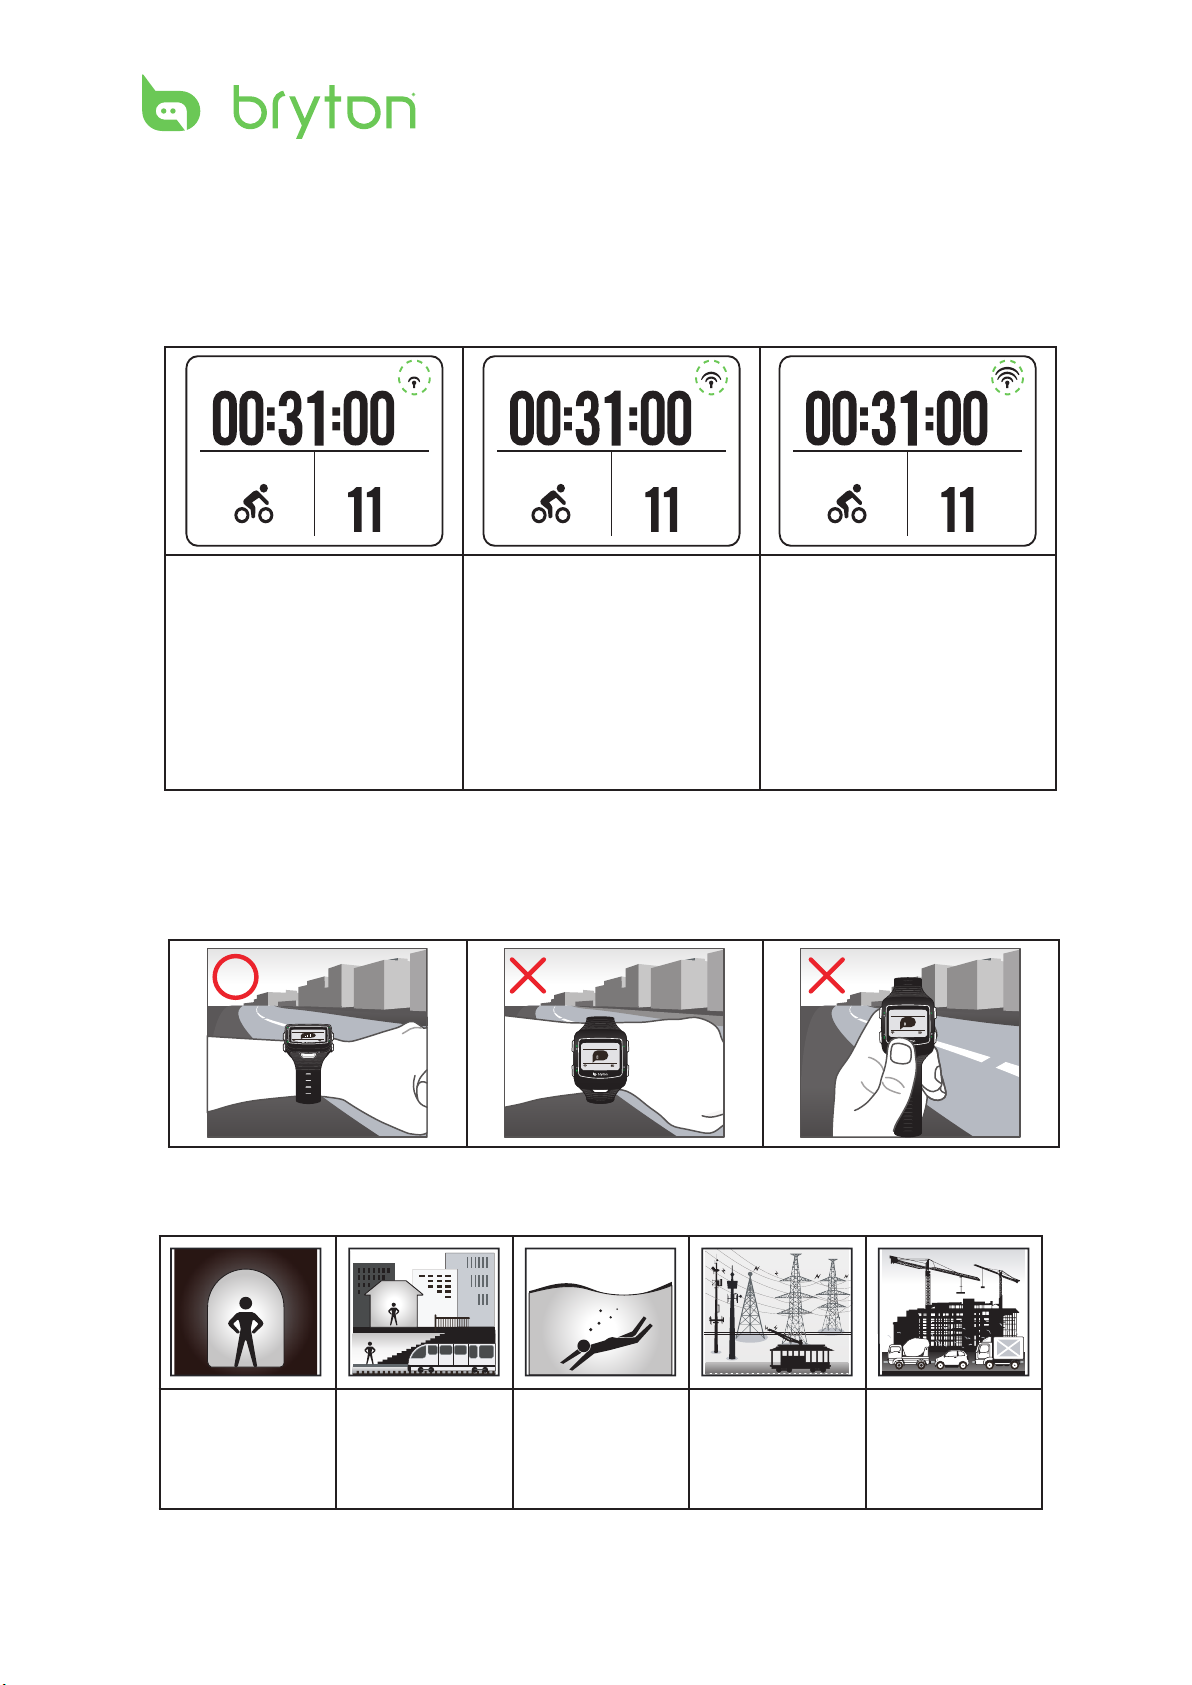
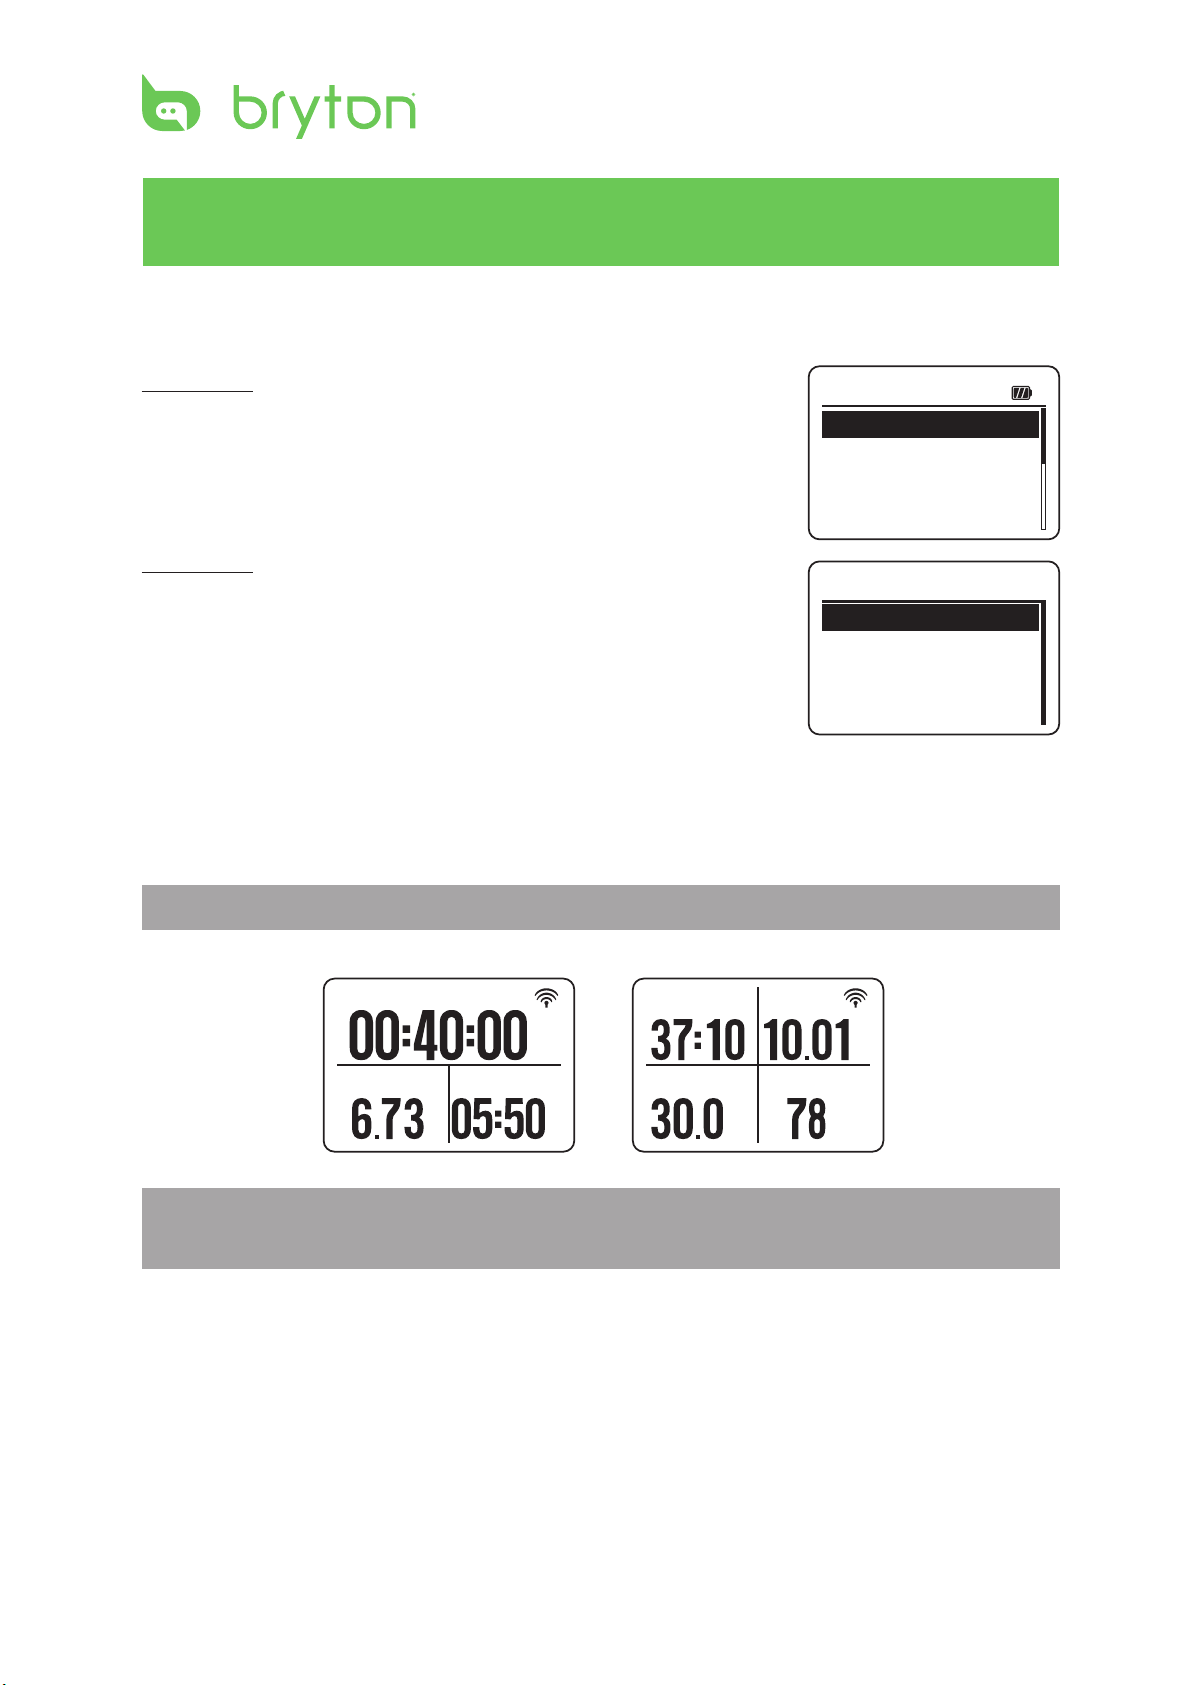
Receiving GPS Signals
Trip Time
Cycling Total Dist.
m
Trip Time
Cycling Total Dist.
m
Trip Time
Cycling Total Dist.
m
GPS Fixed
Searching
Searching
Cardio implements a status page to indicate current GPS signal strength. After position-•
x is done, you can still check GPS status at meter page by inspecting the icon located at
up-right corner.
GPS signal is weak.
The satellite condition is
GPS signal is normal.
Adequate for normal use.
GPS signal is good.
only sucient for positionx. This situation may
not be sustained if your
sky-view changes, such as
going to the obstructed
environments.
The best way to allow GPS get your position is to wear the watch on your wrist, with the •
watch surface facing up. Since GPS antenna is located near the OK key, please do not let
the antenna facing down or cover it with hand.
Please avoid the obstructed environments since they might aect the GPS reception.•
Tunnels Inside rooms,
building, or
underground
Under water High-voltage
wires or
television
Construction
sites and heavy
trac
towers
11
ENGLISH
Cardio 40/60 User’s Manual
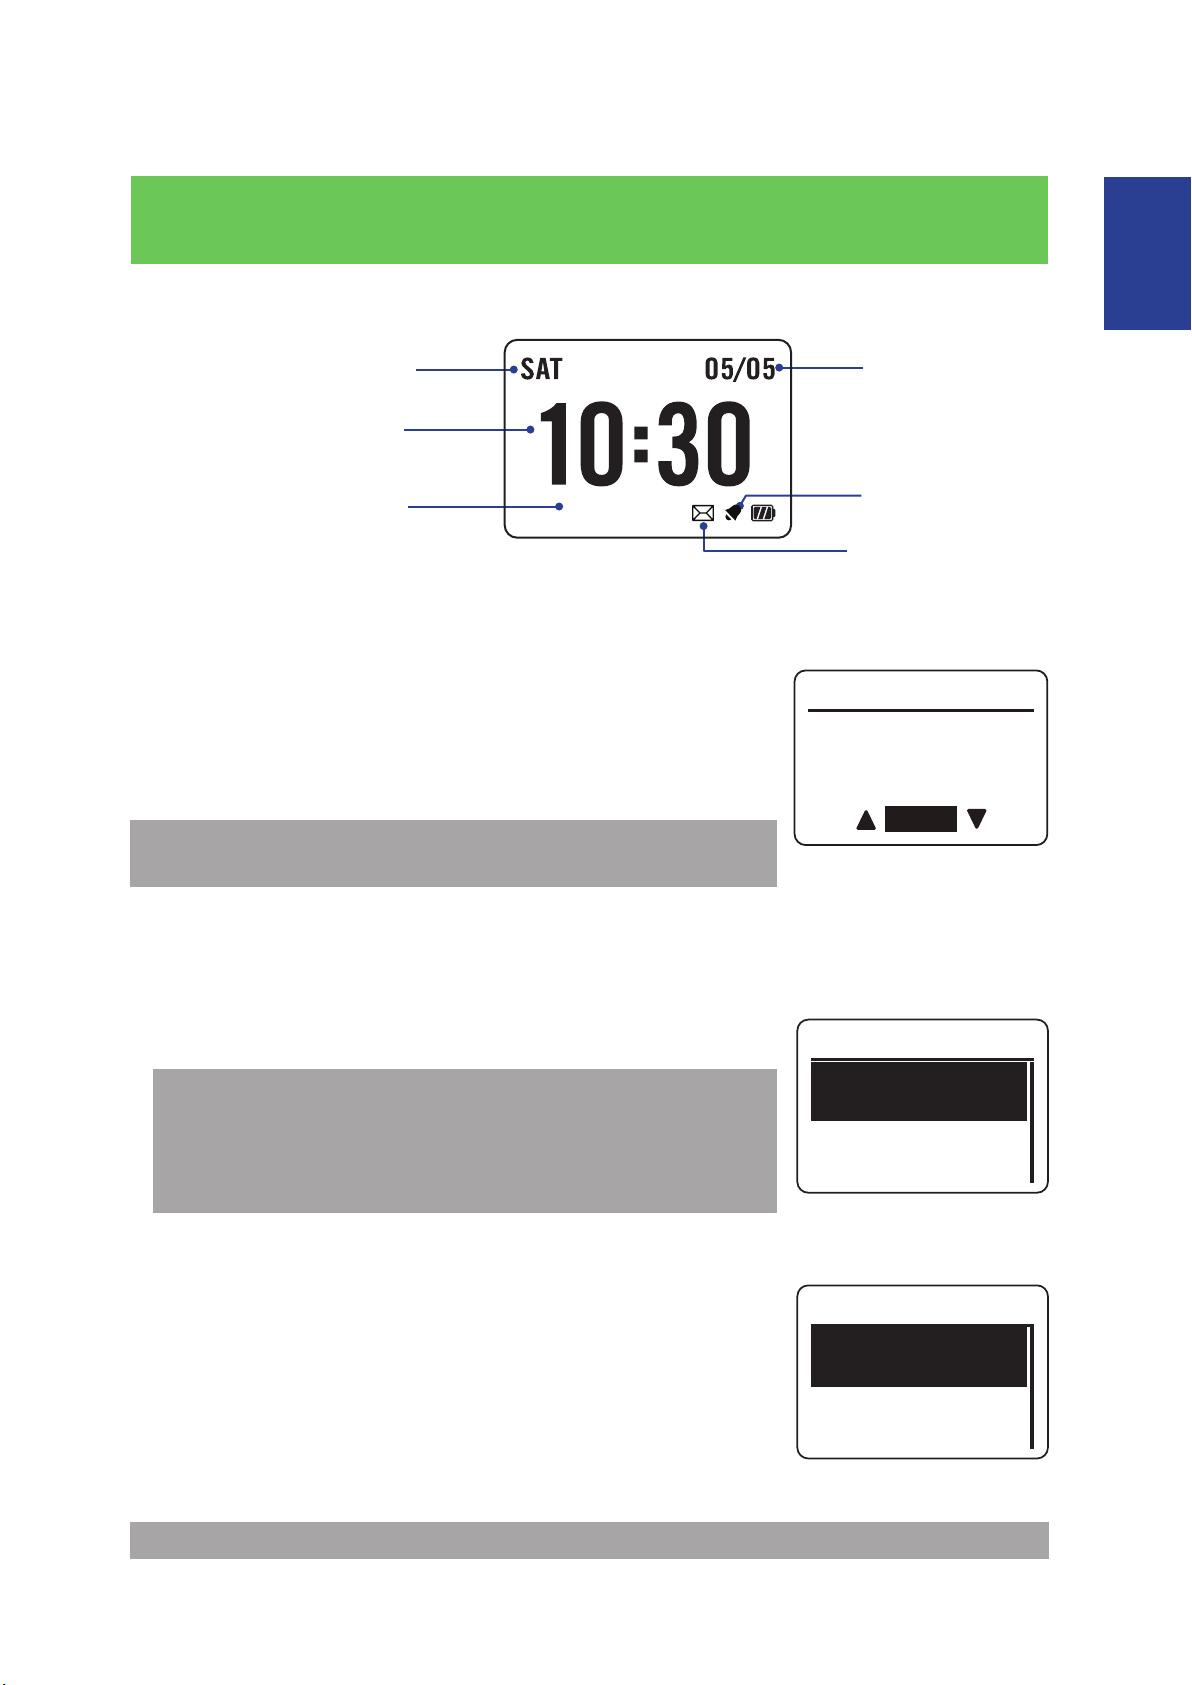
Display Screen
AM
04:30 AM
Off
Time
Set Time1
Set Time2
Alarm
Set Alarm
Switch
On
AM 08:00
Current Time
Running
08:24
Drylight Saving
0 1 : 0 0
Clock View
Current day
Time 1
(local time)
Time 2
(alternate time)
Auto Time Calibration by GPS
1. Press q to enter the menu mode.
2. Press p/q to select Settings > Watch > Time > By GPS and
press OK to enter its submenu.
3. Press p/q to set the daylight saving time and press OK to
conrm.
NOTE: Please go outdoors to acquire GPS signal when you see
“No GPS signal” on the screen.
Manually Set Time
Current date
Alarm icon
Reminder icon
1. Press q to enter the menu mode.
2. Press p/q to select Settings > Watch > Time > Manual >
Set Time 1 or Set Time 2 and press OK to enter its submenu.
3. Press p/q to select the desired setting and press OK to conrm.
Set Alarm (Time1)
1. Press q to enter the menu mode.
2. Press p/q to select Settings > Watch > Alarm > Set Alarm
and press OK to enter its submenu.
3. Pressp/q to select the desired setting and press OK to
conrm.
NOTE: To enable the alarm, select Settings > Watch > Alarm > Switch > On.
NOTE:
To enable the Time 2, select • Settings > Watch > Time > Manual
> Set Time 2 > Switch > On.
To change the time format, select • Settings > Watch > Time >
Time Format.
12
Cardio 40/60 User’s Manual
Exercises
Run Time
Distance Pace
m
/
k
m
Trip Time
Speed
Distance
CAD
m
r
h
k
m
p
m
03:48 PM 01/04
Running
Train & Test
View History
Exercises
Running
Cycling
Triathlon
Starting an Exercise
Cardio 40
To start an exercise, press p/q to select Running. Then press OK
to start.
Cardio 60
To start an exercise, press p/q to select Exercises > Running,
Cycling, Triathlon, Multisport, Outdoor Swim, or Others. Then
press OK to start.
Running/Cycling
Select Running/Cycling and press OK to start exercise.
NOTE: Cycling option is only available on Cardio 60.
NOTE: Displayed information varies on exercise mode and user preference. Refer to
“Customize the Display Settings” on page 23 for more information.
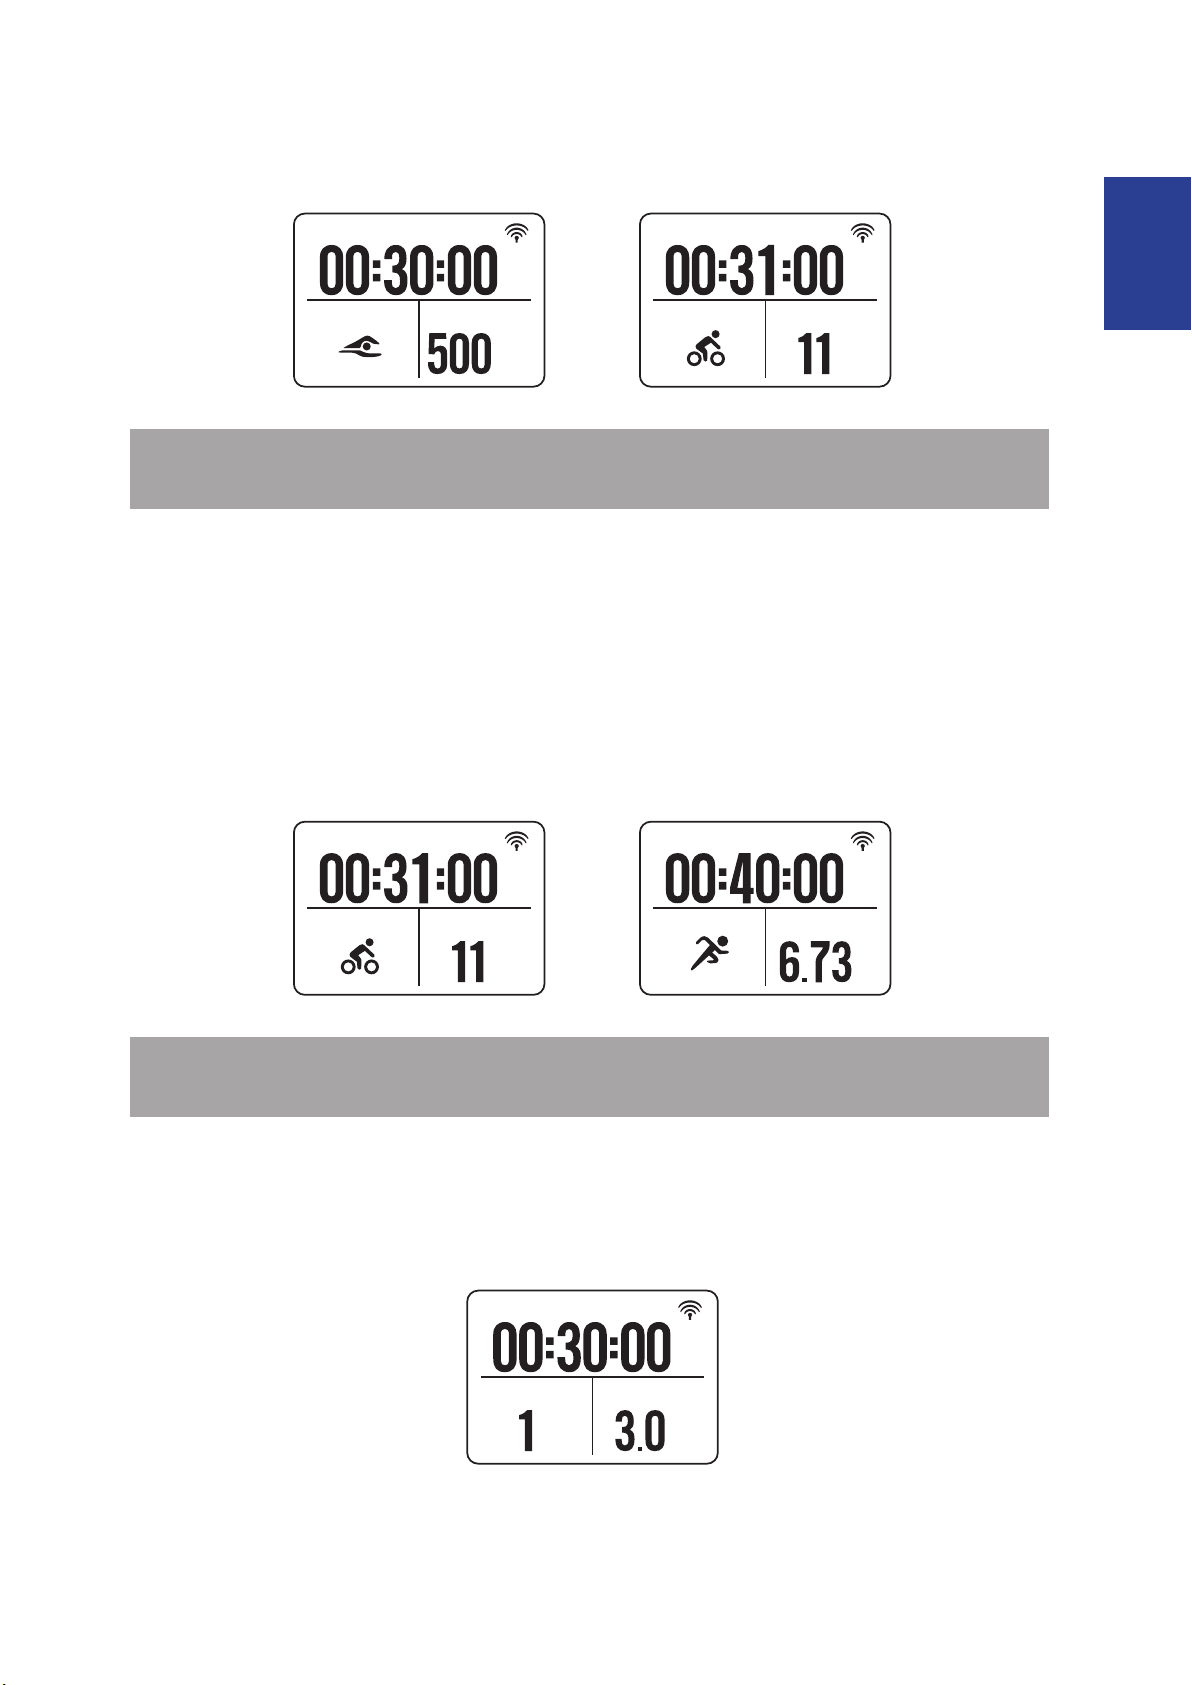
Triathlon (Cardio 60 only)
The exercise information will be displayed as following order: • Swimming > Cycling >
Running. Press OK to switch to the second or third sport.
To add the transition time, refer to • “Enable Triathlon Transition Time “ on page 27.
13
ENGLISH
Cardio 40/60 User’s Manual
Trip Time
Swimming Total Dist.
m
Trip Time
Cycling Total Dist.
m
NOTE: Displayed information varies on exercise mode and user preference. Refer to
Trip Time
Cycling Total Dist
m
Trip Time
Running Total Dist.
m
M
P
Ex. Time
Distance Speed
m
h
k
m
“Customize the Display Settings” on page 23 for more information.
Multisport (Cardio 60 only)
During the Multisport exercise and the mode setting is set to • Manual, press p/q select
the desired sport (Running, Cycling, or Swimming) and press OK to conrm. Then press
OK to start exercise.
To switch to the second sport, press • OK to display the menu option. To customize the
sports sequence in Multisport mode, refer to “Multisport Sequence Setup“ on page 26.
NOTE: Displayed information varies on exercise mode and user preference. Refer to
“Customize the Display Settings” on page 23 for more information.
Outdoor Swim (Cardio 60 only)
Select Outdoor Swim and press OK to start exercise.
 Loading...