

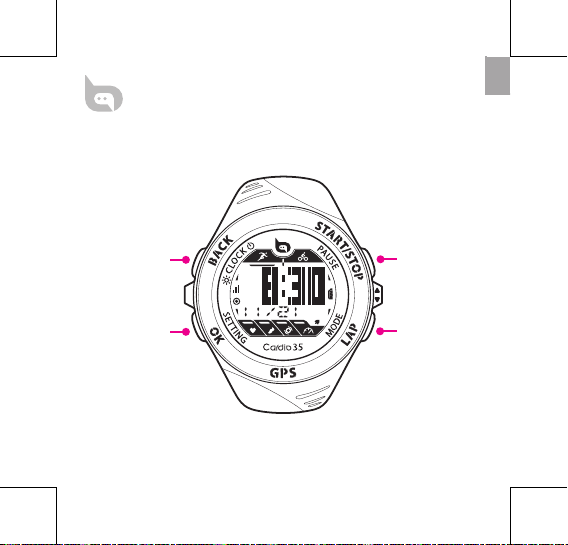
START/PAUSE/
STOP/UP
LAP/MODE/DOWN
POWER/BACK/
BACKLIGHT ON
OK/SETTING/PAGE
Cardio 35
User’s Guide
bb.brytonsport.com
EN
1
2
3
4

2
EN
Contents
Introduction ................................3
Getting Started........................... 4
Buttons .......................................... 6
Clock View ....................................7
Clock Settings .................................8
Exercise/Training ....................... 10
Start / Pause / Stop Exercising ..10
Mark Lap ...........................................11
View Exercise/Training Info .......12
Training Settings ........................13
Set Training .....................................13
Set LAP training ............................. 17
Link Sensors ....................................18
View Exercise/Training
Record ............................................... 21
Using Stopwatch ...........................21
Stride Length .................................. 22
Auto Scrolling .................................23
Clear Storage ..................................23
Icons ............................................... 24
Specications ..............................25
Screen Terminologies ...............26

EN
3
Introduction
Cardio 35 GPS sports watch is for casual activities and professional
training. Cardio 35 can accurately calculate and record your
location, speed, distance, pace, stride rate, calories, cadence*, heart
rate* and more. Your training results can be shared and analyzed
at brytonsport.com. With the built-in sensor, no extra foot pod
is needed for indoor exercise. Cardio 35 is for both running and
cycling activities.
Package Contents
Make sure the following items are in the box:
Cardio 35•
USB cable•
User’s Guide•
Optional accessories:
Heart rate monitor•
Speed / Cadence sensor•
* HRM or SPD/CAD sensor is required.
4
EN
Getting Started
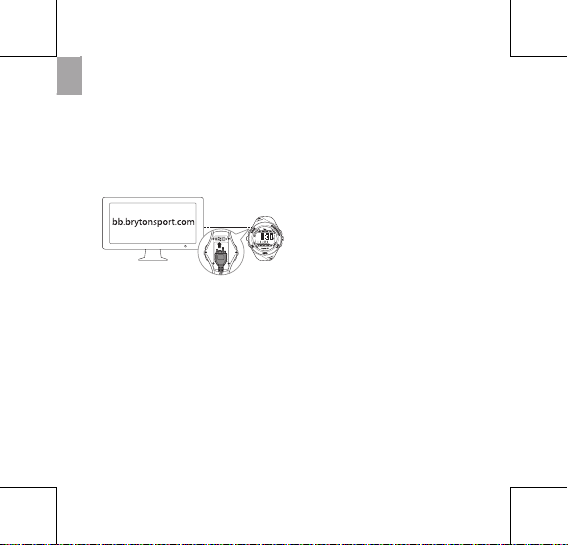
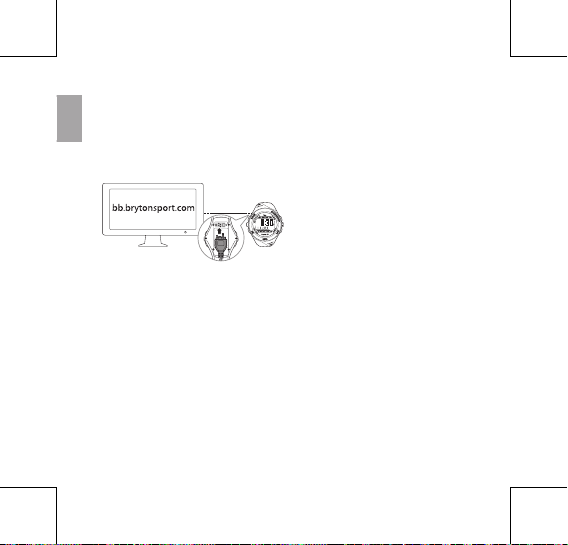
Step 1. Connect, Sync, and Charge
1. Connect Cardio 35 to a PC using the supplied USB cable.
2. Download the Bryton Bridge 2 application at bb.brytonsport.com
and sync with Cardio 35.
Step 2. Turn On
Press button 1 to turn on Cardio 35.
Note: To turn o, long press button 1 for 5 seconds.
Step 3. Initial Setup
For rst time use, do the following:
1. Select your preferred language.
2. Select the unit of measurement.
3. Enter your user prole (recommended).
Note: Data accuracy will highly aect your training analysis.
4. Select you preferred date format.
Keep Cardio 35 connected to
the PC to charge the battery.
Note: For rst time use, charge the
battery for at least 2.5 hours.
EN
5
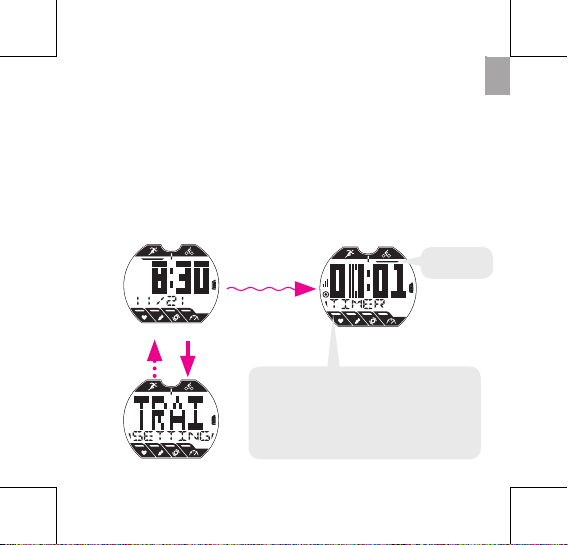
Step 4. Start a training or exercise
Cardio 35 operates in three major modes:
Clock View
Exercise
3
5. Enter your max heart rate.
6. Go outdoors to acquire GPS signal. Once the GPS signal is xed,
Cardio 35 automatically sets the date and time. To manually set
the date and time, refer to Time settings (see page 8).
7. Press button 2 to complete setup.
Training
2
1
Note: During pairing process (with heart
rate monitor/foot pod/cadence sensor/
speed sensor), the LED indicators (on the
top of the icons) will blink. When the sensors
are successfully linked to the device, the LED
indicators will light on.
Activity type
(Bike or Run)
Note: If you want to change your prole, please connect your device to
Brytonsport.com and change the setting via My Device -> Manage Device Data.
Or go to Settings > Others > Prole and change your settings.
6
EN
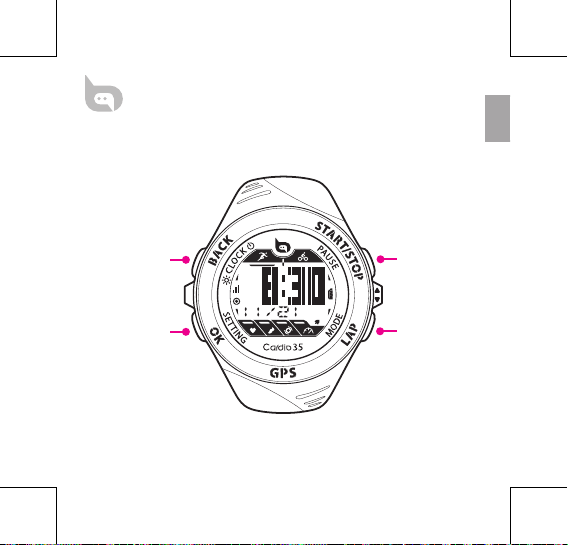
Buttons
Cardio 35 has four buttons that are used for multiple functions.
Power/BACK (1)
Press to turn on Cardio 35. Press and •
hold to turn it o.
After a training/exercise is stopped, •
press to switch to clock view.
In Setting and Stopwatch modes, •
press to go back to clock view.
OK (2)
In Clock view, press to access Setting.•
In Exercise/Training, press to scroll •
your exercise data.
• InSetting,presstoenterorconrma
selection.
In Stopwatch, press to view the le •
for lap data.
START/STOP (3)
In Clock view, press to start/pause/•
stop exercise, and it will also start/
pause/stop recording at the same
time.
In Setting, press to move up to scroll •
through menu options.
4
3
2
1
In Stopwatch, press to start/stop the •
stopwatch.
LAP (4)
In Clock view, press to switch Bike or •
Run mode.
In Exercise or Stopwatch, press to •
mark lap.
In Setting, press to move down to •
scroll through menu options.
After stopwatch is stopped, press to •
reset the stopwatch.
EN
7
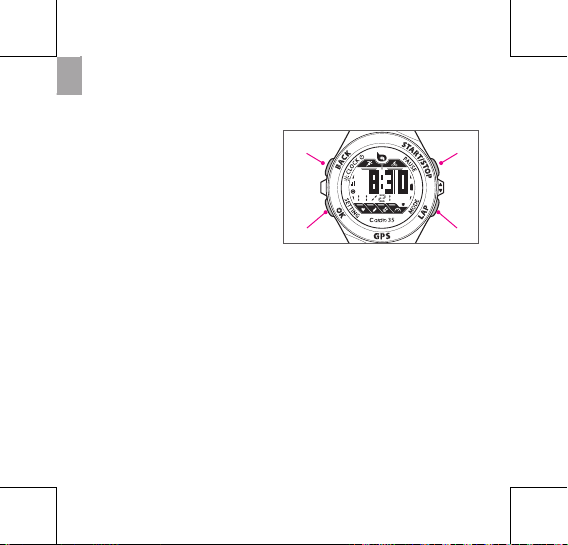
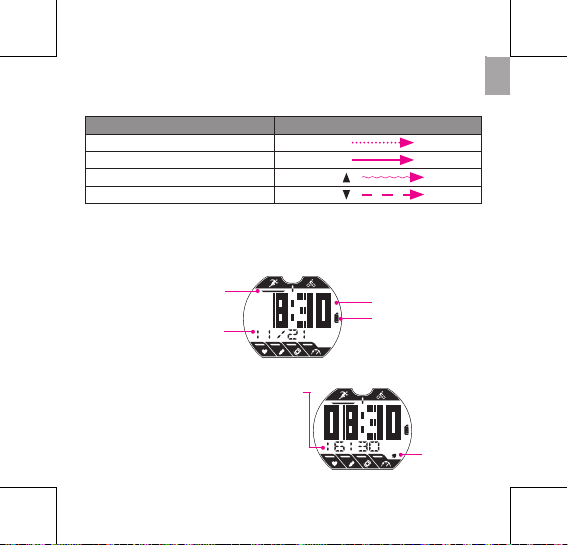
The table below provides a graphical indication on using the
buttons which will be used in later sections.
Buttons Indication
Power/BACK 1
OK 2
START/STOP 3 /
LAP 4 /
Clock View
There are two types of clock view:
Type 1: Display current time (HH:MM) and date (MM-DD).
Battery Status Icon
Exercise mode
Run/Bike mode
Date
MM/DD
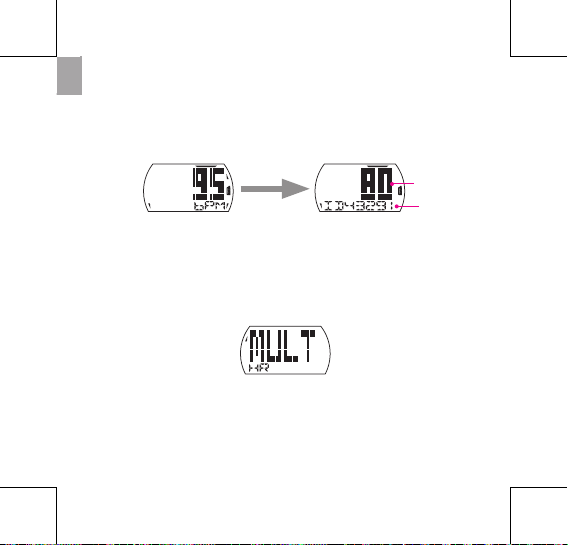
Type 2: Display current time (HH:MM) and secondary time (24-hour
format).
Time 2
Secondary time
Current Time
Alarm Icon
Note: By default, “Date” is displayed at
“Time 2” location. If you want to display
secondary time, please see “Display/Hide
Time 2” on page 9.
8
EN
Clock Settings
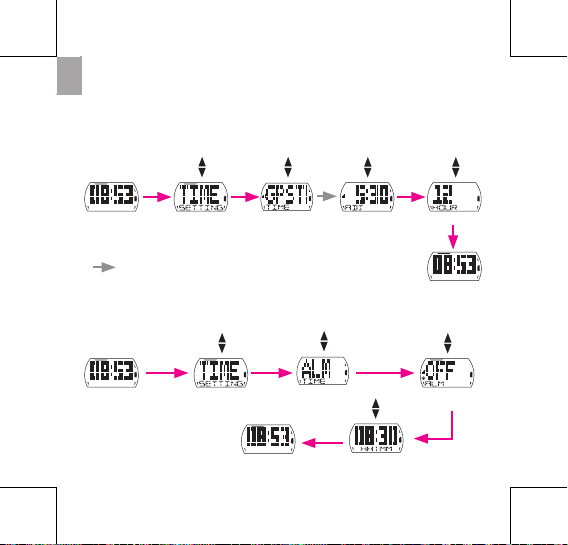
Auto Calibration by GPS
Use this setting to reset the date and time based on your GPS
location.
Set Alarm
Use this setting to set alarm with Cardio 35.
(Select time format)
(Current time is set)TIME GPS TIME
* indicates screen changes, no button is pressed.
(Time is set)
2 2 2
2
(Alarm is set)
(If O, skip this step)
TIME
ALARM
ON
OFF
2 2 2
2
2
EN
9
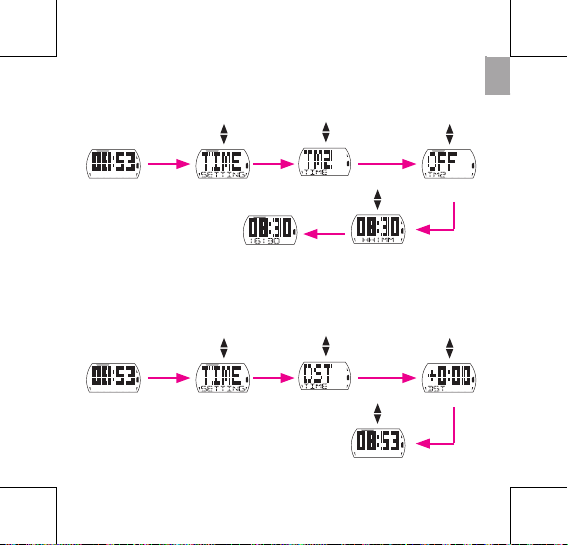
Display/Hide Time 2
Use this setting to display/hide Time2.
(Time 2 display)
(Time 2 is set)
Set Daylight Saving Time
Use this setting to set the daylight saving time.
(Daylight saving time is set)
(Select setting)
Note: After you hide Time 2, Clock view will show Date below current time.
TIME
TIME 2
ON
OFF
2 2 2
2
TIME
Daylight Saving
Time
2 2 2
2
2

10
EN
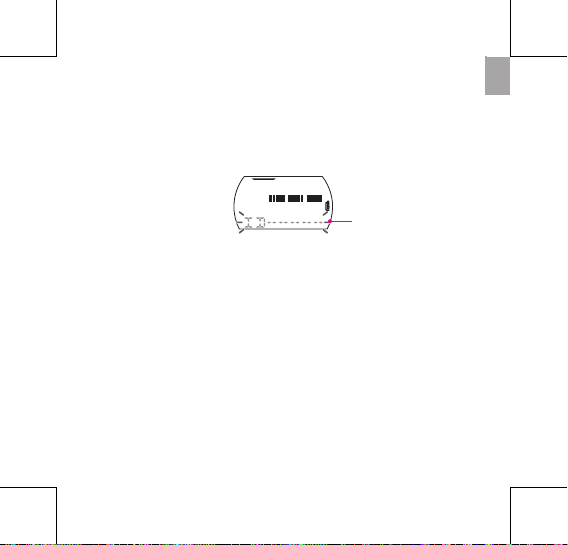
Start / Pause / Stop Exercising
Press button 3 to start, pause, or end an activity.
Display item
Recording indicator
Exercise type
Display data
GPS signal
Exercise/Training
During exercise or training, Cardio 35 allows you to measure
and record your running activities and displays your current
performance.
You can choose the following activity type:
Bike Mode •
Run Mode•
Note:
Displayed information varies on exercise mode and user preference.•
You can switch Bike or Run mode while in clock view by pressing button • 4.
Before you start
Link sensors (page 18), optional•
EN
11
Note: Please go outdoors to acquire GPS signal when you see “FIND GPS” on the
screen.
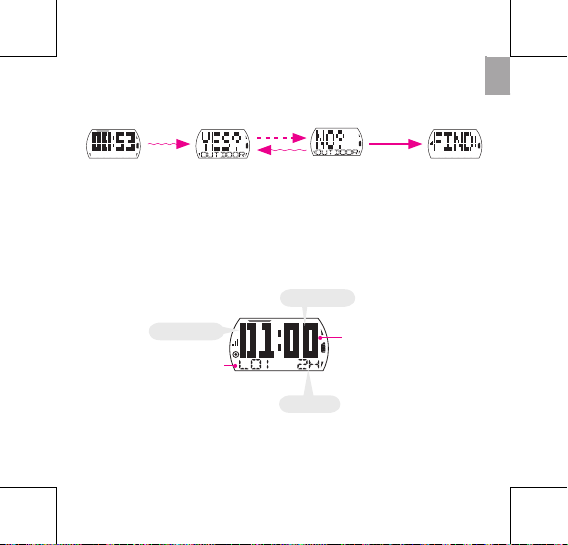
Mark Lap
1. Start an activity rst by pressing button 3.
2. Press button 4 to mark lap.
Recording time
Lap number
01 -- Minute
2H -- Hour
00 -- Second
(Acquire GPS
signal)
YES
NO
3
4
2
3
12
EN
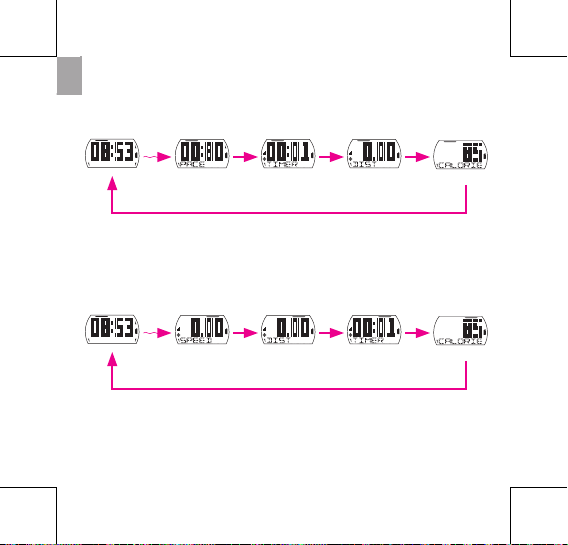
View Exercise/Training Info
Run Mode
CALORIESPACE DISTANCETIMER
Note: If Heart Rate sensor and foot pod are detected, the exercise info will be
displayed as following order:
HEART RATE > FOOT POD > PACE > TIMER > DISTANCE > CALORIES > CLOCK.
Bike Mode
Note: If Heart Rate, Cadence, or Combo sensor is detected, the exercise info will be
displayed as following order:
HEART RATE > CADENCE > COMBO > SPEED > DISTANCE > TIMER > CALORIES.
3 2 2 2
CALORIESSPEED TIMERDISTANCE
3 2 2 2
2
2
EN
13
Note: The type of data displayed depends on the current mode:
If you have marked laps, press • button 4 to see Lap info.
Interval time appears only when training is set to interval training.•
ETA (Estimated Time of Arrival) appears only when training is set to distance.•
If the screen below appears, the device cannot detect the sensor. Adjust the •
sensor and connect again.
Training Settings
You can customize the training settings, link the sensors, view
history, and other settings.
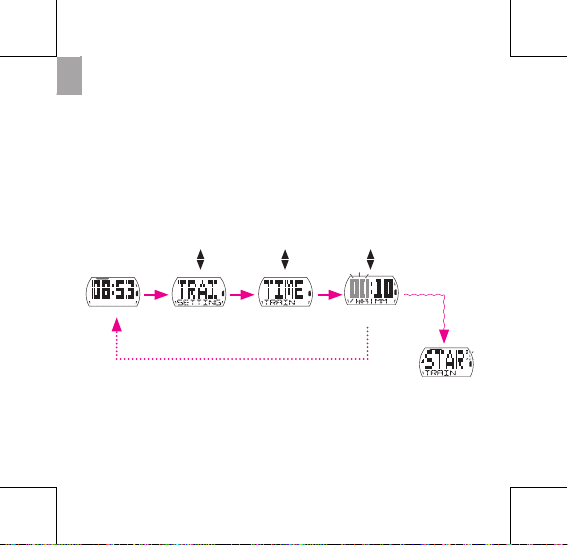
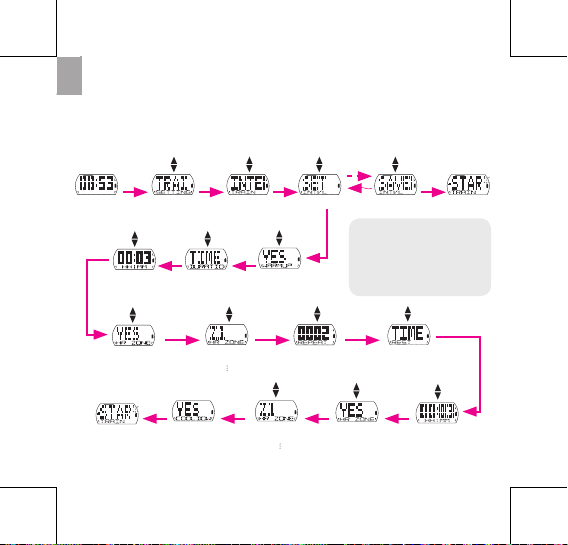
Set Training
Use the Training setting to select the type of training you want.
Training can be based on time, distance, calories burn, heart rate,
pace, speed, or interval.
No sensor is detected
14
EN
Note:
During training set up, the display screen varies depending on selected training.•
After setting the Training mode, press • button 3 to record the results of your
training.
If you want to cancel it, press • button 1 to go back to clock view.
By Time/Distance / Calories
Training can be set by time, distance, or calories burned.
(Set value)
(Start log for training)
TRAINING TIME
DISTANCE
CALORIES
2 2 2 3
1
EN
15
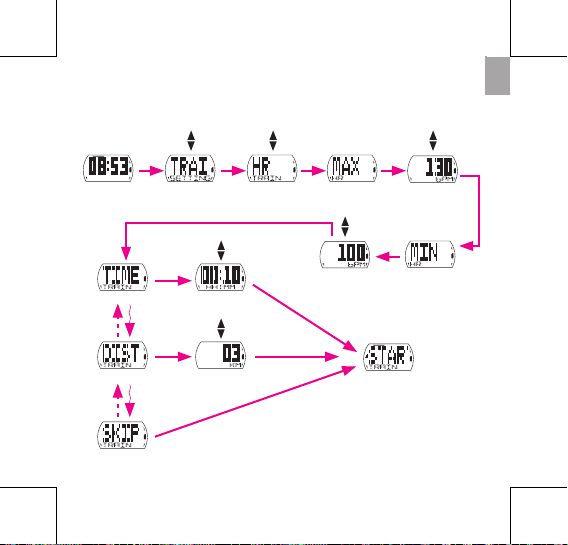
By Heart Rate / Pace / Speed
Training can be set by heart rate, pace, or speed.
(Set value)TRAINING MAXIMUM
VALUE
HEART RATE
PACE
SPEED
(Set value) MINIMUM
VALUE
TIME
2 2 2 2
2
2
DISTANCE
SKIP
(Set value)
(Set value)
(Start log for training)
2
2
2
2
2
34
34
2
16
EN
By Interval
Use the Interval setting to specify the interval between training,
warm up, and cool down time. By default, warm up and cool down
time are set to 5 minutes.
(Set value)
YES
NO
(Set Heart rate)
TIME
DISTANCE
TIME
DISTANCE
(Set Rest setting)
YES
NO
(Set Heart rate)
(Set value)
TRAINING INTERVAL SET
YES
NO
(Set Cool down)
(Set number of
times to repeat)
(Start log for training)
(If YES, select Target zone)
ZONE 1
ZONE 7
(If YES, select Target zone)
ZONE 1
ZONE 7
Note: Your last interval
setting will be saved in
“SAVED” option. You can
choose and start the saved
interval training right away.
SAVED
YES
NO
(Set Warm up)
2 2 2
3
4
2
22
2 2 2
2
222 2
(Start log for
training)
2
2
EN
17
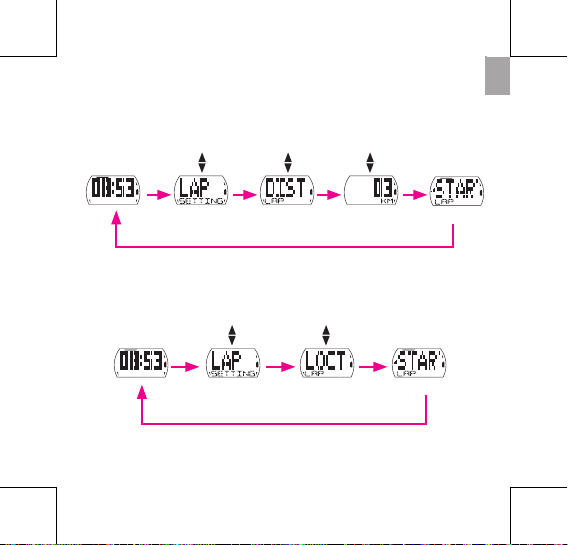
Use Lap by Location setting to set your current location as the lap
point. Upon reaching the lap point, Cardio 35 will automatically
mark the lap.
Set LAP training
Use Lap by Distance to specify the distance of each lap. After
running a specied distance, Cardio 35 will automatically mark the
lap.
LAP (Start log for LAP)LOCATION
(Start log for LAP)
LAP (Set value)DISTANCE
2 2 2 2
2
2 2 2
2
18
EN
Run Mode
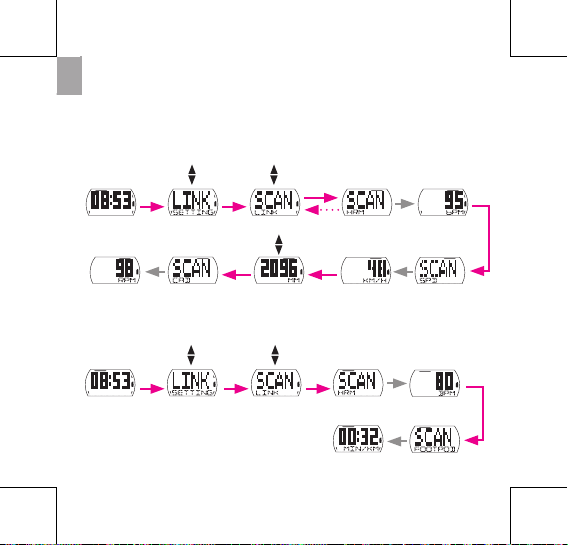
Link Sensors
Use the Link setting to pair sensors and other optional accessories
to Cardio 35.
Bike Mode
Speed sensor
LINK (Current HR data)SCAN
(Set Wheel Size)
LINK
Heart Rate
sensor
SCAN
Cadence
sensor
Note: To view and check data on the connected sensor(s), select “LINK > INFO”.
Heart Rate
sensor
(Current Speed data)
Foot pod sensor
2 2
2
1
2
(Current Cadence data)
2 2
2
2 2 2
(Current HR data)
(Current Foot pod
data)
EN
19
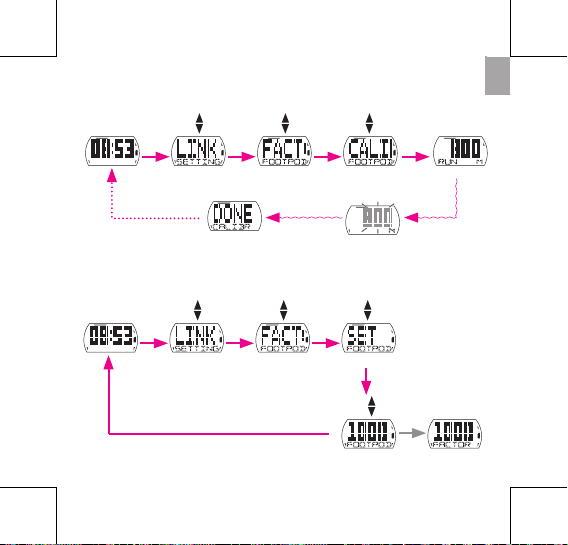
Calibrate Foot Pod
LINK CALIBRATEFACTOR (Prepare to run 800m)
(DONE - Calibration complete)
(FAIL - Fail to complete 800m run)
(Start running)
Complete 800m?
2 2 2 2
331
LINK SETFACTOR
Set foot pod length manually
2 2 2
(Set value) (Current value)
2
2
20
EN
Press button 2 to conrm and move to search next item. If you do not want to
connect the current detected sensor, press button 1 to abort.
Be sure to keep the distance between the similar sensors approximately 30 meters.•
If you see below illustration on the screen, this indicates that there are more than 2 •
sensors are detected. Press button 1 to rescan the sensor.
Note:
When t• he sensors are successfully connected, Cardio 35 will release a short beep
and the LED indicators (on the top of the icons) will blink for 5 seconds.
Once connected, the sensor ID will be displayed on the screen. •
For example:
Heart Rate sensor
Sensor ID
Current data
(Current heart rate and sensor
ID is display)
EN
21
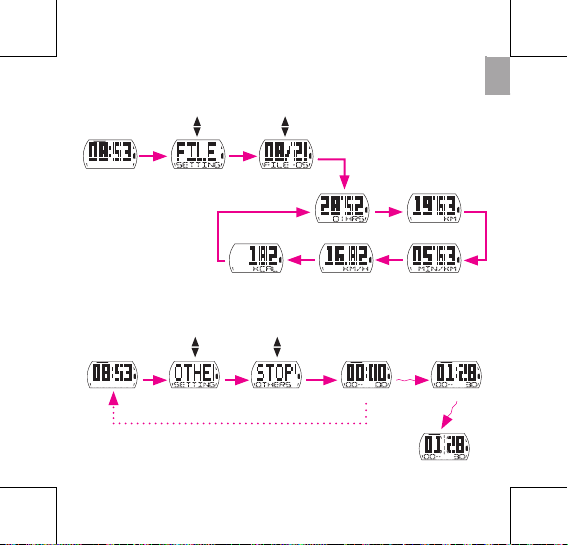
View Exercise/Training Record
Use File to view your training history.
FILE
Timer (Total time)
(Select File)
(View distance)
(View speed)(View calories burned) (View pace)
2 2
2
22
2
2 2
Note: After stopwatch is stopped, press button 4 to reset it or
press button 2 to view les of lap data.
Using Stopwatch
You can use Cardio 35 as a stopwatch.
OTHERS Start stopwatchSTOPWATCH (Start counting)
2 2 2 3
1
Stop stopwatch
3
22
EN
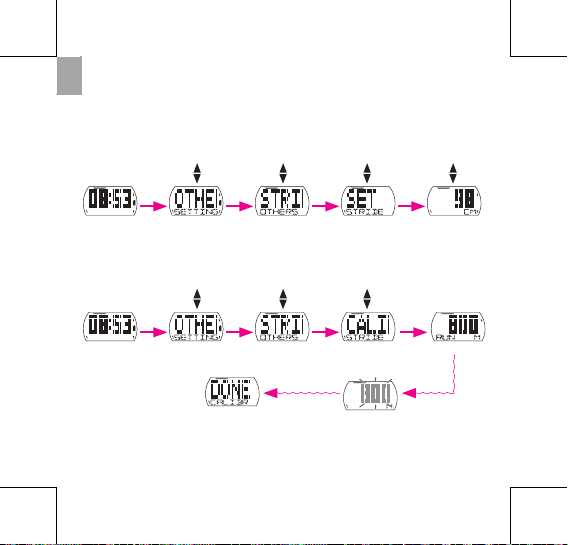
Stride Length
You can calibrate stride length by xed 800m or input your own
stride length manually.
OTHERS SETSTRIDE
Set stride length manually
(Set value)
Calibrate stride length
2 2 2 2
Note: You can only calibrate stride length if you are indoors.
OTHERS CALIBRATESTRIDE (Prepare to run 800m)
(DONE - Calibration complete)
(FAIL - Fail to complete 800m run)
(Start running)
Complete 800m?
2 2 2 2
33
EN
23
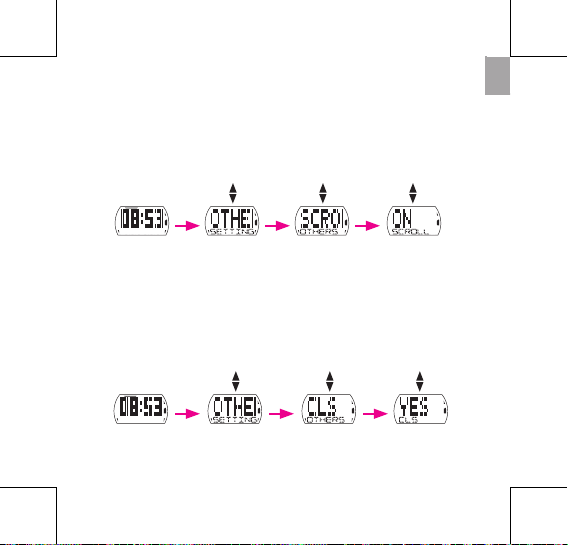
Auto Scrolling
Use the Auto Scrolling setting to enable or disable the auto
scrolling feature. If this feature is enabled, all exercise info will be
displayed in sequences without pressing any button while you are
doing exercise or training.
Clear Storage
Use Clear Storage to delete all training and lap records in Cardio 35.
Note: Make sure you have backed up all your data through the Bryton Bridge 2
application before using this function.
OTHERS YES
NO
CLEAR STORAGE
OTHERS ON
OFF
AUTO SCROLLING
2 2 2
2 2 2
24
EN
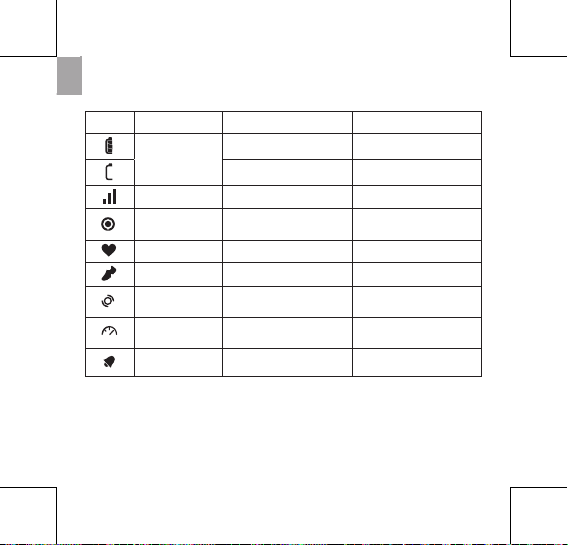
Icons
Icon Item Solid icon Flashing icon
Battery icon
Battery level Battery charging
- Battery low
GPS icon GPS signal level Searching GPS signal
Record icon
Memory full,
must clear storage
Recording in progress
Heart rate icon - -
Foot pod icon - -
Cadence sensor
icon
- -
Speed sensor
icon
- -
Alarm icon Alarm is set -
EN
25
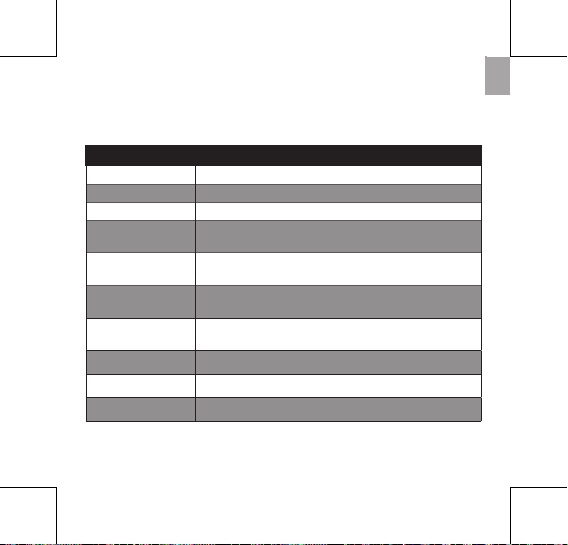
Specications
Cardio 35
Item Description
Display 23.18 x 14 mm Positive FSTN Segemet LCD
Physical size 4.2 x 6.9 x 1.25 cm
Weight 47 g
Operating
temperature
-10°C ~ 50°C
Battery charge
temperature
0°C ~ 40°C
Battery life Up to 35 days in clock mode
Up to 7.5 hours in training mode with GPS on
GPS Integrated high-sensitivity SiRFstarIV receiver with
embedded antenna
RF transceiver 2.4 GHz ANT+ transceiver with embedded antenna
Storage Embedded 1 MB serial ash
G-Sensor 3-axis acceleration sensor

26
EN
Screen Terminologies
Terminology Screen Display
Alarm ALM
Stopwatch ST W
Time2 TM2
Clear storage CLS
Combo sensor DUAL
Speed SPD
Calorie CAL
HR Zone 1 HRZ1
Cadence CAD
Adjust ADJ
Daylight saving DST
Information INFO
Interval INT
Distance DIST
Location LOCT
Multiple sensors MULT SENS
Calibrate CALIB
Key Tone TONE
FR
DÉMARRER/PAUSE/
ARRÊTER/HAUT
TOUR/MODE/BAS
MARCHE/RETOUR/
RÉTROÉCLAIRAGE
ALLUMÉ
OK/RÉGLAGE/
PAGE
Cardio 35
Guide de l’utilisateur
bb.brytonsport.com
1
2
3
4
2
FR
Table des matières
Délement auto ............................23
Eacer la mémoire ........................23
Icônes .............................................24
Spécications ..............................25
Technologie d'écran .................26
Introduction ................................3
Mise en route ..............................4
Boutons .........................................6
Vue d'horloge .............................7
Réglages de l’horloge ..................8
Exercice/Entraînement ............ 10
Démarrer / Pause /
Arrêter exercice ..............................10
Marquer le tour ..............................11
Acher les infos de l'exercise/
entraînement ..................................12
Réglages d'entraînement ....... 13
Régler l'entraînement ..................13
Régler l'entraînement TOUR......17
Connecter les capteurs ...............18
Acher les infos de l'exercise/
entraînement ..................................21
Utilisation du chronomètre .......21
Distance de pas..............................22
FR
3
Introduction
La montre de sport Cardio 35 GPS est pour les activités
occasionnelles et l'entraînement professionnel. Cardio 35 peut
calculer avec précision et enregistrer votre position, vitesse,
distance, rythme, distance de pas, calories, cadence*, fréquence
cardiaque*, etc. Vos résultats d'entraînement peuvent être partagés
et analysés sur brytonsport.com. De plus, avec le capteur intégré,
pas besoin de podomètre supplémentaire pour les exercices à
l'intérieur. Cardio 35 est à la fois pour les activités de course et le
vélo.
Contenu de la boîte
Vériez que tous les éléments suivants sont inclus dans le carton :
Cardio 35•
Câble USB•
Guide de l’utilisateur•
Accessoires optionnels :
Capteur de fréquence cardiaque•
Capteur de vitesse/cadence•
* Un capteur HRM ou SPD/CAD est requis.
4
FR
Mise en route
Étape 1. Connexion, synchronisation et chargement
1. Connectez le Cardio 35 à un PC avec le câble USB fourni.
2. Téléchargez l'application Bryton Bridge 2 sur bb.brytonsport.com
et synchronisez-la avec le Cardio 35.
Étape 2. Allumer
Appuyez sur le bouton 1 pour allumer le Cardio 35.
Remarque :Pour l'éteindre, appuyez pendant 5 seconde sur le bouton 1.
Étape 3. Conguration initiale
La première fois, faites ce qui suit :
1. Sélectionnez votre langue préférée.
2. Choisissez l'unité de mesure.
3. Entrez votre prol utilisateur (recommandé).
Remarque : La précision des données aura un impact important sur l'analyse
de vos entraînements.
4. Choisissez le format préféré de la date.
5. Entrez votre fréquence cardiaque maximum.
Laissez le Cardio 35 connecté au
PC pour recharger la batterie.
Remarque : Pour la première
utilisation, rechargez la batterie
pendant au moins 2,5 heures.

FR
5
Etape 4. Commencer un exercice ou un entraînement
Le Cardio 35 fonctionne en trois modes :
Vue d'horloge
Exercice
3
6. Allez à l'extérieur pour acquérir le signal GPS. Une fois que le
signal GPS est xe, le Cardio 35 règle automatiquement la date
et l'heure. Pour régler manuellement la date et l'heure, allez dans
Réglages de l'heure (voir page 8).
7. Appuyez sur 2 pour terminer la conguration.
Entraînement
2
1
Remarque : Pendant le processus de jumellage
(avec moniteur de fréquence cardiaque/pod de
pied/capteur de cadence/capteur de vitesse), les
indicateurs DEL (au dessus des icônes) clignoteront.
Lorsque les capteurs sont correctement jumelé avec
l'appareil, les indicateurs DEL s'allumeront.
Type d'activité
(Vélo ou
Course)
Remarque :
Si vous voulez modier votre prol, veuillez connecter votre appareil à
Brytonsport.com et modier les réglages via Mon appareil -> Gérer les données de
l’appareil. Ou allez dans Réglages > Autres > Prol et modiez les réglages.

6
FR
Boutons
Le Cardio 35 a quatre boutons qui sont utilisés pour plusieurs
fonctions.
Marche/RETOUR (1)
Appuyez une fois pour allumer le Cardio •
35. Appuyez pendant plusieurs secondes
pour l'éteindre.
Après l'arrêt d'un entraînement/exercice, •
appuyez pour changer à la vue d'horloge
En mode Réglage et Chronomètre, •
appuyez pour retourner à la vue
d'horloge.
OK (2)
En vue d'horloge, appuyez pour accéder •
à Réglage.
En mode Exercice/Entraînement, •
appuyez pour faire déler les données
de l'exercice.
En mode Réglage, appuyez pour ouvrir ou •
conrmer votre sélection.
En mode Chronomètre, appuyez pour •
acher le chier des données de tour.
DÉMARRER/ARRÊTER (3)
En vue d'horloge, appuyez pour •
démarrer/pauser/arrêter l'exercice, et
l'enregistrement démarrera/pausera/
4
3
2
1
s'arrêtera aussi en même temps.
En mode Réglage, appuyez pour aller vers •
le haut dans les options du menu.
En mode Chronomètre, appuyez pour •
démarrer/arrêter le chronomètre.
TOUR (4)
En vue d'horloge, appuyez pour changer au •
mode Vélo ou Course.
En mode Exercice ou Chronomètre, •
appuyez pour marquer un tour.
En mode Réglage, appuyez pour aller vers •
le bas dans les options du menu.
Lorsque le chronomètre est arrêté, appuyez •
pour remettre à zéro le chronomètre.

FR
7
Le tableau suivant fournit une illustration graphique sur comment
utiliser les boutons, qui sont décrits dans les sections ultérieures.
Boutons Description
Marche/RETOUR
1
OK
2
DÉMARRER/ARRÊTER
3 /
TOUR
4 /
Vue d'horloge
Il existe deux types de vue d'horloge :
Type 1 : Ache l'heure actuelle (HH:MM) et la date (MM-JJ).
Icônes d’état de la
batterie
Mode Exercice
Mode Course/Vélo
Date
MM/JJ
Type 2 : Ache l'heure actuelle (HH:MM) et une heure secondaire
(format 24 heures).
Heure 2
Heure secondaire
Heure actuelle
Icône d'alarme
Remarque : Par défaut, “Date” est achée
dans “Heure 2”. Si vous voulez acher l'heure
secondaire, référez-vous à “Acher/Cacher
l'heure 2” à la page 9.

8
FR
Réglages de l’horloge
Calibrage automatique par GPS
Utilisez ce réglage pour réitinialiser la date et l'heure en fonction de
votre position GPS.
Régler l'alarme
Utilisez ce menu pour régler l'alarme du Cardio 35.
(Sélectionner le
format de l'heure)
(L'heure est réglée)HEURE HEURE GPS
* indique un changement d'écran, aucun bouton n'est appuyé.
(L'Heure est réglée)
2 2 2
2
(L'alarme est réglée)
(Si Eteint, ignorez cette étape)
HEURE
ALARME
MARCHE
ARRÊT
2 2 2
2
2

FR
9
Acher/Cacher Heure 2
Utilisez ce réglage pour acher/cacher Heure 2.
(Achage de Heure 2)
(Heure 2 réglée)
Régler l'heure d'été
Utilisez ce réglage pour régler l’heure d’été.
(L'heure d'été est réglée)
(Sélectionner le
réglage)
Remarque : Lorsque vous avez caché Heure 2, la vue d'horloge achera la date
avec l'heure actuelle ci-dessous.
HEURE
HEURE 2
MARCHE
ARRÊT
2 2 2
2
HEURE
Heure d'été
2 2 2
2
2

10
FR
Démarrer / Pause / Arrêter exercice
Appuyez sur le bouton 3 pour démarrer, pauser ou arrêter une
activité.
Exercice/Entraînement
Pendant un exercice ou un entraînement, le Cardio 35 vous permet
de mesurer et d'enregistrer vos activités de course et d'acher vos
performances actuelles.
Vous pouvez choisir entre les types d'activité suivants :
Mode Vélo •
Mode Course•
Remarque :
Les informations achées varient selon le mode d'exercice et les préférences de •
l'utilisateur.
Vous pouvez changer au mode Vélo ou Course en vue d'horloge en appuyant •
sur le bouton 4.
Avant de commencer
Connecter les capteurs (page 18), optionnel•
Achage des éléments
Indicateur d'enregistrement
Type d'exercice
Achage des données
Signal GPS

FR
11
Remarque : Allez à l'extérieur pour obtenir un signal GPS lorsque "TROUVER GPS"
s'ache sur l'écran.
Marquer le tour
1. Commencez une activité en appuyant en premier sur le bouton 3.
2. Appuyez sur le bouton 4 pour marque le tour.
Enregistrement de la durée
Numéro du tour
01 -- Minute
2H -- Heure
00 -- Seconde
(Obtenir le
signal GPS)
OUI
NON
3
4
2
3

12
FR
Acher les infos de l'exercise/entraînement
Mode Course
CALORIESRYTHME DISTANCE
COMPTEUR
Remarque : Si le capteur de fréquence cardiaque et un pod de pied est détecté, les
infos de l'exercice seront achées dans l'ordre suivant :
FRÉQUENCE CARDIAQUE > POD DE PIED > RYTHME > COMPTEUR > DISTANCE >
CALORIES > HORLOGE
Mode Vélo
Remarque : Si le capteur Fréquence cardiaque, Cadence ou Combo est détecté, les
infos de l'exercice seront achées dans l'ordre suivant :
FRÉQUENCE CARDIAQUE > CADENCE > COMBO > VITESSE > DISTANCE >
COMPTEUR > CALORIES.
3 2 2 2
CALORIESVITESSE COMPTEURDISTANCE
3 2 2 2
2
2

FR
13
Remarque : Le type de données achées dépend du mode sélectionné :
Si vous avez marqué des tours, appuyez sur le • bouton 4 pour voir Info de tour.
Temps d'intervalle s'ache uniquement lorsque l'entraînement est réglé sur •
entraînement avec interval.
ETA (Estimated Time of Arrival : Heure d'arrivée estimée) s'ache uniquement •
lorsque l'entraînement est réglé sur distance.
Si l'écran suivant apparaît, l'appareil n'arrive pas à détecter le capteur. Ajustez le •
capteur et reconnectez à nouveau.
Réglages d'entraînement
Vous pouvez personnaliser les réglages d'entraînement, connecter
les capteurs, acher l'historique et faire d'autres réglages.
Régler l'entraînement
Utilisez le réglage Entraînement pour sélectionner le type
d'entraînement que vous voulez. L'entraînement peut être réglé en
fonction de la durée, de la distance, des calories, de la fréquence
cardiaque, du rythme, de la vitesse ou de l'intervalle.
Aucun capteur détecté

14
FR
Remarque :
Pendant le réglage de l'entraînement, l'écran aché varie en fonction de •
l'entraînement sélectionné.
Après avoir réglé le mode Entraînement, appuyez sur le • bouton 3 pour enregistrer
les résultats de votre entraînement.
Si vous voulez annuler, appuyez sur le • bouton 1 pour retourner à la vue d'horloge.
Par Durée/Distance/Calories
L'entraînement peut être réglé en fonction de la durée, de la
distance, ou des calories.
(Régler la valeur)
(Commencer le journal
d'entraînement)
ENTRAîNEMENT
HEURE
DISTANCE
CALORIES
2 2 2 3
1

FR
15
Par Fréquence cardiaque / Rythme / Vitesse
L'entraînement peut être réglé en fonction de la fréquence
cardiaque, du rythme ou de la vitesse.
(Régler la valeur)
ENTRAîNEMENT VALEUR
MAXIMALE
FRÉQUENCE CARDIAQUE
RYTHME
VITESSE
(Régler la valeur) VALEUR
MINIMALE
HEURE
2 2 2 2
2
2
DISTANCE
SAUTER
(Régler la valeur)
(Régler la valeur)
(Commencer le journal
d'entraînement)
2
2
2
2
2
34
34
2

16
FR
Par Intervalle
Utilisez le réglage Intervalle pour spécier l'intervalle entre les durées
d'entraînement, d'échauement et de refroidissement. Par défaut,
les durées d'échauement et de refroidissement sont réglées sur 5
minutes.
(Régler la valeur)
OUI
NON
(Régler la fréquence
cardiaque)
HEURE
DISTANCE
HEURE
DISTANCE
(Régler le réglage
Repos)
OUI
NON
(Régler la fréquence
cardiaque)
(Régler la valeur)
ENTRAîNEMENT
INTERVALLE RÉGLER
OUI
NON
(Régler la durée de
refroidissement)
(Régler le nombre
de fois à répéter)
(Commencer le journal
d'entraînement)
(Si OUI, sélectionner la
Zone cible)
ZONE 1
ZONE 7
(Si OUI, sélectionner la
Zone cible)
ZONE 1
ZONE 7
Remarque : Votre dernier réglage
d'intervalle sera enregistré dans
l'option "SAUVE". Vous pouvez
choisir et commencer l'entraînement
d'intervalle immédiatement.
SAUVE
OUI
NON
(Régler la durée
d'échauement)
2 2 2
3
4
2
22
2 2 2
2
222 2
(Commencer le journal
d'entraînement)
2
2

FR
17
Utilisez le réglage Tour par emplacement pour dénir votre position
actuellement comme point du tour. Lorsque vous atteignez le point
du tour, le Cardio 35 marque automatiquement le tour.
Régler l'entraînement TOUR
Utilisez Tour par distance pour spécier la longueur de chaque
tour. Une fois la distance spéciée parcourue, le Cardio 35 marque
automatiquement le tour.
TOUR
(Commencer le journal
d'entraînement de TOUR)
EMPLACEMENT
(Commencer le journal
d'entraînement de TOUR)
TOUR (Régler la valeur)DISTANCE
2 2 2 2
2
2 2 2
2

18
FR
Mode Course
Connecter les capteurs
Utilisez le réglage Lien pour jumeler les capteurs et autres
accessoires optionnels avec le Cardio 35.
Mode Vélo
Capteur de
vitesse
LIER
(Données de FC
actuelles)
BALAYAGE
(Régler la taille
de roue)
LIER
Capteur de fréquence
cardiaque
BALAYAGE
Capteur de
cadence
Remarque : Pour acher et vérier les données des capteur(s) connecté,
sélectionnez "LIER > INFO".
Capteur de fréquence
cardiaque
(Données de vitesse
actuelle)
Capteur de pod
de pied
2 2
2
1
2
(Données de cadence
actuelle)
2 2
2
2 2 2
(Données de FC
actuelles)
(Données de pod
de pied actuelles)

FR
19
Calibrer le pod de pied
LIER CALIBRERFACTEUR
(Préparer à courir 800m)
(FINI - Calibrage terminé)
(ECHEC - Course de 800m pas nie)
(Commencer à courir)
800m terminé?
2 2 2 2
331
LIER RÉGLERFACTEUR
Régler manuellement la longueur du pod de pied
2 2 2
(Régler la valeur)
(Valeur actuelle)
2
2

20
FR
Appuyez sur 2 pour conrmer et aller à la recherche de l'élément suivant. Si vous
ne voulez pas connecter le capteur détecté, appuyez sur le bouton 1 pour annuler.
Assurez-vous bien que la distance entre des capteurs similaires est d'environ 30 •
mètres.
Si vous voyez l'illustration suivante sur l'écran, cela indique que plus de 2 capteurs •
ont été détectés. Appuyez sur le bouton 1 pour rebalayer le capteur.
Remarque :
Lorsque les • capteurs sont correctement connectés, le Cardio 35 fera un bip et les
indicateurs DEL (au-dessus des icônes) clignoteront pendant 5 secondes.
Une fois qu'il est connecté, l'ID du capteur sera achée sur l’écran. •
Par exemple :
Capteur de fréquence cardiaque
ID du capteur
Données actuelles
(La fréquence cardiaque et l'ID du
capteur sont achés)

FR
21
Acher les infos de l'exercise/entraînement
Utilisez Fichier pour visualiser l'historique de vos entraînements.
FICHIER
Compteur (Durée
totale)
(Sélectionner
un chier)
(Acher la
distance)
(Acher la vitesse)
(Acher les calories)
(Acher le rythme)
2 2
2
22
2
2 2
Remarque : Lorsque le chronomètre est arrêté, appuyez sur le
bouton 4 pour le remettre à zéro ou appuyez sur le bouton 2 pour
acher les chiers des données de tour.
Utilisation du chronomètre
Vous pouvez utiliser le Cardio 35 comme un chronomètre.
AUTRES Commencer le chronomètre
CHRONOMÈTRE
(Commencer le
compteur)
2 2 2 3
1
Arrêter le chronomètre
3

22
FR
Distance de pas
Vous pouvez calibrer la distance de pas sur une distance xe de 800
mètres, ou bien entrer manuellement votre distance de pas.
AUTRES RÉGLER
DISTANCE DE PAS
Régler manuellement la distance de pas
(Régler la valeur)
Calibrer la distance de pas
2 2 2 2
Remarque : Vous ne pouvez calibrer la distance de pas qu'à l'intérieur.
AUTRES CALIBRER
DISTANCE DE PAS
(Préparer à courir 800m)
(FINI - Calibrage terminé)
(ECHEC - Course de 800m pas nie)
(Commencer à courir)
800m terminé?
2 2 2 2
33

FR
23
Délement auto
Utilisez le réglage Délement auto pour activer ou désactiver la
fonction de délement auto. Lorsque cette fonction est activée,
toutes les infos d'exercice seront achées l'une après l'autre
sans appui sur les boutons lorsque vous faites un exercice ou un
entraînement.
Eacer la mémoire
Utilisez Eacer la mémoire pour supprimer tous les enregistrements
d'entraînement et de tour sur le Cardio 35.
Remarque : Vériez que vous avez bien sauvegardé toutes vos données avec
l'application Bryton Bridge 2 avant d'utiliser cette fonction.
AUTRES OUI
NON
EFFACER LE STOCKAGE
AUTRES MARCHE
ARRÊT
DÉFILEMENT AUTO
2 2 2
2 2 2

24
FR
Icônes
Icône Elément Icône xe Icône clignotante
Icône de batterie
Puissance de la
batterie
Chargement de la
batterie
- Batterie faible
Icône GPS
Puissance du signal
GPS
Recherche du signal GPS
Icône
d’enregistrement
Mémoire pleine, la
mémoire doit être
eacée
Enregistrement en cours
Icône de fréquence
cardiaque
- -
Icône de
podomètre
- -
Icône du capteur
de cadence
- -
Icône de capteur
de vitesse
- -
Icône d'alarme L'alarme est réglée -

FR
25
Spécications
Cardio 35
Elément Description
Achage LCD segmenté FSTN négatif 23,18 x 14 mm
Taille physique 4,2 x 6,9 x 1,25 cm
Poids 47 g
Température d'utilisation -10°C ~ 50°C
Température de
chargement de la batterie
0°C ~ 40°C
Durée de la batterie Jusqu'à 35 jours en mode d'horloge
Jusqu'à 7,5 heures en mode d'entraînement avec
GPS allumé
GPS Récepteur SiRFstarIV à haute sensibilité intégré
avec antenne incorporée
Emetteur RF Émetteur-récepteur ANT+ 2,4 GHz avec antenne
incorporée
Stockage Flash série 1 Mo incorporée
G-Sensor Capteur d'accélération 3 axes

26
FR
Technologie d'écran
Terminologie Achage de l’écran
Alarme ALM
Chronomètre CHRO
Heure2 HR2
Eacer le stockage EFF
Capteur combiné vélo DOUBLE
Vitesse VIT
Calorie CAL
HR Zone 1 HRZ1
Cadence CAD
Ajuster AJUST
Heure d'été DST
Information INFO
Intervalle INTV
Distance DIST
Emplacement EMPL
Capteurs multiples CAPT MULT
Calibrer CALIB
Son des touches TON

DE
START/PAUSE/
STOPP/AUFWÄRTS
RUNDE/MODUS/
ABWÄRTS
EIN/ZURÜCK/
HINTERGRUNDBE-
LEUCHTUNG EIN
OK/
EINSTELLUNGEN/
SEITE
Cardio 35
Bedienungsanleitung
bb.brytonsport.com
1
2
3
4

2
DE
Inhaltsverzeichnis
Automatisches Scrollen .............. 23
Speicher leeren .............................. 23
Symbole ........................................ 24
Spezikationen .......................... 25
Bildschirmbegrie .....................26
Einleitung ..................................... 3
Erste Schritte ............................... 4
Tasten.............................................6
Uhransicht ....................................7
Uhreinstellungen ..........................8
Übung/Training .......................... 10
Training starten/anhalten/
beenden ........................................... 10
Zwischenstrecke markieren ......11
Übungs-/Trainingsinformationen
anzeigen ...........................................12
Trainingseinstellungen ............ 13
Training einstellen ........................ 13
ZWISSCHENZEIT-Training
einstellen .......................................... 17
Sensoren verbinden ..................... 18
Übungs-/Trainingsaufzeichnungen
anzeigen ...........................................21
Verwendung als Stoppuhr ......... 21
Schrittlänge .....................................22

DE
3
Einleitung
Die Cardio 35 GPS-Sportuhr eignet sich für Freizeitaktivitäten
und professionelles Training. Die Cardio 35-Sportuhr kann
Standort, Geschwindigkeit, Entfernung, Tempo, Trittfrequenz,
Kalorien, Kadenz*, Herzfrequenz* und mehr exakt berechnen
und aufzeichnen. Sie können Ihre Trainingsergebnisse unter
brytonsport.com mit anderen austauschen und analysieren. Dank
des integrierten Sensors ist kein zusätzlicher Laufsensor bei Training
in Innenräumen erforderlich. Der Cardio 35 eignet sich sowohl zum
Laufen als auch zum Radfahren.
Lieferumfang
Stellen Sie sicher, dass folgende Artikel enthalten sind:
Cardio 35•
USB-Kabel•
Bedienungsanleitung•
Optionales Zubehör:
Herzfrequenzmesser•
Geschwindigkeits- / Kadenzsensor•
* HFM oder Geschwindigkeits-/Kadenzsensor erforderlich.

4
DE
Erste Schritte
Schritt 1. Verbinden, Synchronisieren und Auaden
1. Verbinden Sie die Cardio 35-Sportuhr über das mitgelieferte USBKabel mit einem PC.
2. Laden Sie die Bryton Bridge 2-Anwendung unter bb.brytonsport.
com herunter und führen eine Synchronisierung mit der Cardio
35-Sportuhr durch.
Schritt 2. Einschalten
Drücken Sie die Taste 1, um die Cardio 35 einzuschalten.
Hinweis: Halten Sie die Taste 1 zum Ausschalten 5 Sekunden lang gedrückt.
Schritt 3. Ersteinrichtung
Gehen Sie bei der erstmaligen Verwendung wie folgt vor:
1. Wählen Sie Ihre bevorzugte Sprache.
2. Wählen Sie die Messeinheit.
3. Legen Sie Ihr Benutzerprol an (empfohlen).
Hinweis: Die Exaktheit der Daten wirkt sich deutlich auf Ihre Trainingsanalysen aus.
4. Wählen Sie Ihr bevorzugtes Datumsformat aus.
5. Geben Sie Ihre maximale Herzfrequenz ein.
Lassen Sie die Cardio 35-Sportuhr
zum Auaden des Akkus am PC
angeschlossen.
Hinweis: Laden Sie den Akku vor dem
ersten Einsatz mindestens 2,5 Stunden auf.

DE
5
Schritt 4. Starten eines Training oder einer Übung
Die Cardio 35 bietet drei Hauptmodi:
Uhransicht
Übung
3
6. Gehen Sie zum Beziehen eines GPS-Signals ins Freie. Sobald das GPSSignal bezogen wird, stellt die Cardio 35-Sportuhr automatisch Datum
und Uhrzeit ein. Zur manuellen Einstellung von Datum und Uhrzeit
rufen Sie die Zeiteinstellungen auf (siehe Seite 8).
7. Drücken Sie zum Abschließen der Einrichtung die Taste 2.
Training
2
1
Hinweis: Beim Koppelungsvorgang (mit
Herzfrequenzmonitor/Laufsensor/Kadenzsensor/
Geschwindigkeitssensor) blinken die LEDAnzeigen (über den Symbolen). Wenn die
Sensoren erfolgreich mit dem Gerät verbunden
sind, leuchten die LED-Anzeigen konstant.
Aktivitätstyp
(Fahrrad oder
Laufen)
Hinweis: Wenn Sie Ihr Prol ändern möchten, verbinden Sie Ihr Gerät bitte mit
Brytonsport.com und ändern Sie die Einstellungen über Mein Gerät -> Gerätedaten
verwalten. Oder rufen Sie Einstellungen > Sonstige > Prol auf und ändern Sie Ihre
Einstellungen.

6
DE
Tasten
Der Cardio 35 verfügt über vier Tasten, die mehreren Funktionen dienen.
Ein/Aus/ZURÜCK (1)
Drücken Sie diese, um die Cardio 35 •
einzuschalten. Halten Sie die Taste zum
Ausschalten des Geräts gedrückt.
Drücken Sie die Taste nach Beendigung •
eines Trainings/einer Übung, um in die
Uhransicht umzuschalten.
Drücken Sie die Taste im Einstellungs- und •
Stoppuhrmodus, um zur Uhransicht
zurückzukehren.
OK (2)
Drücken Sie die Taste im Uhrmodus, um •
die Einstellungen aufzurufen.
Drücken Sie die Taste im Übungs-/•
Trainingsmodus, um durch Ihre
Trainingsdaten zu scrollen.
Drücken Sie die Taste im •
Einstellungsmodus, um eine Auswahl
aufzurufen oder zu bestätigen.
Drücken Sie die Taste im Stoppuhrmodus, •
um die Datei für Zwischenzeitdaten
anzuzeigen.
START/STOPP (3)
Drücken Sie die Taste im Uhrmodus, •
um das Training zu starten/anzuhalten/
zu beenden. Gleichzeitig wird die
4
3
2
1
Aufzeichnung gestartet/angehalten/beendet.
Drücken Sie die Taste im Einstellungsmodus, •
um nach oben durch Menüoptionen zu
scrollen.
Drücken Sie die Taste im Stoppuhrmodus, um •
die Stoppuhr zu starten/anzuhalten.
ZWISCHENZEIT (4)
Drücken Sie die Taste in der Uhransicht, um •
zum Fahrrad- oder Laufmodus zu wechseln.
Drücken Sie die Taste im Trainings- oder •
Stoppuhrmodus, um eine Zwischenzeit zu
markieren.
Drücken Sie die Taste im Einstellungsmodus, •
um nach unten durch Menüoptionen zu
scrollen.
Drücken Sie die Taste nach dem Beenden der •
Stoppuhr, um die Stoppuhr zurückzusetzen.

DE
7
Die nachstehende Tabelle liefert eine grasche Darstellung zur Nutzung
der Tasten, die in späteren Abschnitten verwendet werden.
Tasten Anzeige
Ein/Aus/BACK
1
OK
2
START/STOP
3 /
RUNDE
4 /
Uhransicht
Der Uhrmodus verfügt über zwei Ansichten:
Typ 1: Anzeige der aktuellen Uhrzeit (HH:MM) und des aktuellen Datums
(MM-TT).
Akkustatussymbol
Trainingsmodus
Lauf-/Fahrradmodus
Datum
MM/TT
Typ 2: Anzeige der aktuellen Uhrzeit (HH:MM) und der zweiten Zeit
(24-Stunden-Format).
Zeit 2
Zweite Zeit
Aktuelle Zeit
Alarmsymbol
Hinweis: Standardmäßig wird “Datum” unter
“Zeit 2” angezeigt. Wenn Sie eine zweite Zeit
anzeigen möchten, lesen Sie bitte unter “Zeit 2
anzeigen/ausblenden” auf Seite 9 nach.

8
DE
Uhreinstellungen
Automatische Kalibrierung mittels GPS
Verwenden Sie diese Einstellung zum Zurücksetzen von Datum und Zeit
basierend auf Ihrem GPS-Standort.
Alarm einstellen
Verwenden Sie diese Einstellung, um den Alarm der Cardio 35 einzustellen.
(Zeitformat auswählen)
(Aktuelle Zeit ist
eingestellt)
Zeit GPS-Zeit
* weist auf Bildschirmveränderungen hin, ohne dass eine Taste gedrückt wird.
(Zeit ist eingestellt)
2 2 2
2
(Alarm ist eingestellt)
(Falls „Aus“ > Schritt überspringen)
Zeit
Alarm
Ein
Aus
2 2 2
2
2

DE
9
Zeit 2 anzeigen/ausblenden
Verwenden Sie diese Einstellung, um Zeit 2 anzuzeigen/auszublenden.
(Zeit 2 wird angezeigt)
(Zeit 2 ist eingestellt)
Sommerzeit einstellen
Verwenden Sie diese Einstellung, um die Sommerzeit einzustellen.
(Sommerzeit ist eingestellt)
(Einstellung wählen)
Hinweis: Wenn Sie die Zeit 2 ausblenden, wird in der Uhransicht das Datum unter der
aktuellen Zeit angezeigt.
Zeit
Zeit 2
Ein
Aus
2 2 2
2
Zeit
Sommerzeit
2 2 2
2
2

10
DE
Training starten/anhalten/beenden
Drücken Sie die Taste 3, um eine Aktivität zu starten, anzuhalten oder zu
beenden.
Übung/Training
Während einer Übung oder während des Trainings können Sie mit
der Cardio 35 Ihre Laufaktivitäten messen und aufzeichnen sowie Ihre
aktuelle Leistung anzeigen.
Sie können zwischen den folgenden Aktivitätstypen wählen:
Fahrradmodus •
Laufmodus•
Hinweis:
Die im Trainingsmodus angezeigten Informationen variieren je nach Trainingsmodus •
und bevorzugten Einstellungen.
In der Uhransicht können Sie zwischen Fahrrad- und Laufmodus umschalten, indem •
Sie die Taste 4 drücken.
Bevor Sie starten
Sensoren verbinden (Seite 18), optional•
Anzeigeelement
Aufzeichnungsanzeige
Trainingstyp
Anzeigedaten
GPS-Signal

DE
11
Hinweis: Bitte gehen Sie zum Beziehen eines GPS-Signals ins Freie, sobald „GPS-LOK“ auf
dem Bildschirm erscheint.
Zwischenstrecke markieren
1. Starten Sie eine Aktivität, indem Sie die Taste 3 drücken.
2. Drücken Sie die Taste 4, um eine Zwischenzeit zu markieren.
Aufzeichnungszeit
Zwischenzeitnummer
01 -- Minute
2H -- Stunde
00 -- Sekunde
(GPS-Signal
beziehen)
Ja
Nein
3
4
2
3

12
DE
Übungs-/Trainingsinformationen anzeigen
Laufmodus
KALORIENTEMPO ENTFERNUNG
ZEITNEHMUNG
Hinweis: Wird ein Herzfrequenzsensor und Laufsensor erkannt, werden die
Trainingsinformationen in der folgenden Reihenfolge angezeigt:
HERZFREQUENZ > LAUFSENSOR > TEMPO > ZEITNEHMUNG > ENTFERNUNG >
KALORIEN > UHR.
Fahrradmodus
Hinweis: Wird ein Herzfrequenz-, Kadenz- oder Kombinationssensor erkannt, werden die
Trainingsinformationen in der folgenden Reihenfolge angezeigt:
HERZFREQUENZ > KADENZ > KOMBI > GESCHWINDIGKEIT > ENTFERNUNG >
ZEITNEHMUNG > KALORIEN.
3 2 2 2
KALORIEN
Geschwindigkeit ZEITNEHMUNG
ENTFERNUNG
3 2 2 2
2
2

DE
13
Hinweis: Die Art der angezeigten Daten ist vom aktuellen Modus abhängig:
Wenn Sie Zwischenzeiten markiert haben, drücken Sie die • Taste4, um
Zwischenzeitinformationen zu sehen.
Informationen zur Intervallzeit erscheinen nur, wenn das Training auf den •
Intervallmodus eingestellt ist.
ETA (geschätzte Ankunftszeit) erscheint nur, wenn das Training auf Entfernung •
eingestellt ist.
Wird der nachfolgende Bildschirm angezeigt, kann das Gerät den Sensor nicht •
erkennen. Justieren Sie den Sensor und schließen Sie ihn erneut an.
Trainingseinstellungen
Sie können die Trainingseinstellungen anpassen, Verbindungen zu
Sensoren herstellen, Verläufe anzeigen und sonstige Einstellungen
vornehmen.
Training einstellen
Verwenden Sie zur Auswahl des gewünschten Trainingstyps die
Trainingseinstellung. Das Training kann auf Zeit, Entfernung,
Kalorienverbrauch, Herzfrequenz, Tempo, Geschwindigkeit oder Intervall
basieren.
Kein Sensor erkannt

14
DE
Hinweis:
Bei der Trainingskonguration variiert die Bildschirmanzeige je nach gewähltem •
Training.
Drücken Sie nach dem Einstellen des Trainingsmodus die • Taste3, um die Ergebnisse Ihres
Trainings aufzuzeichnen.
Wenn Sie abbrechen möchte, drücken Sie die • Taste 1, um in die Uhransicht
zurückzukehren.
Nach Zeit/Entfernung/Kalorien
Das Training kann auf Zeit, Entfernung oder Kalorienverbrauch eingestellt
werden.
(Wert einstellen)
(Protokoll für Training
starten)
Training Zeit
ENTFERNUNG
KALORIEN
2 2 2 3
1

DE
15
Per Herzfrequenz / Tempo / Geschwindigkeit
Das Training kann auf Herzfrequenz, Tempo oder Geschwindigkeit
eingestellt werden.
(Wert einstellen)Training MAXIMALWERTHerzfrequenz
TEMPO
Geschwindigkeit
(Wert einstellen) MINIMALWERT
Zeit
2 2 2 2
2
2
ENTFERNUNG
AUSLASSEN
(Wert einstellen)
(Wert einstellen)
(Protokoll für Training
starten)
2
2
2
2
2
34
34
2

16
DE
Per Intervall
Verwenden Sie zur Festlegung des Intervalls zwischen Training, Aufwärmund Abkühlphase die Intervalleinstellung. Standardmäßig sind Aufwärmund Abkühlphase auf 5 Minuten eingestellt.
(Wert einstellen)
Ja
Nein
(Herzfrequenz
einstellen)
Zeit
ENTFERNUNG
Zeit
ENTFERNUNG
(Pausezeit einstellen)
Ja
Nein
(Herzfrequenz
einstellen)
(Wert einstellen)
Training Intervall EINSTELLUNG
Ja
Nein
(Abkühlphase
einstellen)
(Anzahl an
Wiederholungen
einstellen)
(Protokoll für
Training starten)
(Wenn JA, Zielzone auswählen)
Zone 1
Zone 7
(Wenn JA, Zielzone auswählen)
Zone 1
Zone 7
Hinweis: Ihre letzte
Intervalleinstellung wird unter der
Option “GESPEICHERT” gespeichert.
Sie können diese auswählen und
sofort mit dem gespeicherten
Intervalltraining beginnen.
GESPEICHERT
Ja
Nein
(Aufwärmphase einstellen)
2 2 2
3
4
2
22
2 2 2
2
222 2
(Protokoll für
Training starten)
2
2

DE
17
Verwenden Sie die zum Einstellen Ihres aktuellen Standortes als
Zwischenstreckenpunkt die Zwischenstreckeneinstellung. Sobald Sie
den Zwischenstreckenpunkt wieder erreichen, markiert die Cardio
35-Sportuhr die Zwischenstrecke automatisch.
ZWISSCHENZEIT-Training einstellen
Verwenden Sie zur Festlegung der Entfernung pro Zwischenstrecke
die Option Zwischenstrecke (Entfernung). Nachdem Sie die festgelegte
Entfernung zurückgelegt haben, markiert die Cardio 35-Sportuhr die
Zwischenstrecke automatisch.
RUNDE
(Protokoll für
Zwischenzeit starten)
Standort
(Protokoll für
Zwischenzeit starten)
RUNDE (Wert einstellen)ENTFERNUNG
2 2 2 2
2
2 2 2
2

18
DE
Laufmodus
Sensoren verbinden
Verwenden Sie zum Paaren von Sensoren und anderem optionalen
Zubehör mit der Cardio 35-Sportuhr die Verbindungseinstellung.
Fahrradmodus
Geschwindigkeitssensor
VERBINDUNG (Aktuelle
Herzfrequenzdaten)
Suche
(Radgröße einstellen)
VERBINDUNG
Herzfrequenzsensor
Suche
Kadenzsensor
Hinweis: Um Daten von angeschlossenen Sensoren anzuzeigen und zu überprüfen,
wählen Sie “VERBINDUNG > INFO”.
Herzfrequenzsensor
(Aktuelle
Geschwindigkeitsdaten)
Laufsensor
2 2
2
1
2
(Aktuelle Kadenzdaten)
2 2
2
2 2 2
(Aktuelle
Herzfrequenzdaten)
(Aktuelle
Laufsensordaten)

DE
19
Laufsensor kalibrieren
VERBINDUNG KALIBRIERENFaktor
(Vorbereiten,
800 m zu laufen)
(FERTIG - Kalibrierung abgeschlossen)
(FEHLER - 800-Meter-Lauf nicht
abgeschlossen)
(Lauf beginnen)
800 m abgeschlossen?
2 2 2 2
331
VERBINDUNG EINSTELLUNGENFaktor
Laufsensorlänge manuell einstellen
2 2 2
(Wert einstellen)
(Aktueller Wert)
2
2

20
DE
Drücken Sie die Taste 2, um zu bestätigen und zum nächsten Element weiterzugehen.
Wenn Sie für den aktuell erkannten Sensor keine Verbindung herstellen möchten, drücken
Sie die Taste 1, um den Vorgang abzubrechen.
Achten Sie darauf, dass der Abstand zwischen ähnlichen Sensoren ca. 30 Meter beträgt.•
Wenn Sie auf dem Bildschirm die nachstehende Abbildung sehen, weist das darauf hin, •
dass 2 Sensoren erkannt wurden. Drücken Sie die Taste 1, um erneut nach dem Sensor
zu suchen.
Hinweis:
Wenn • Sensoren erfolgreich verbunden werden, gibt die Cardio 35 einen kurzen Piepton
aus, und die LED-Anzeigen (über den Symbolen) blinken 5 Sekunden lang.
Nach dem Herstellen der Verbindung wird die Sensorkennung auf dem Bildschirm •
angezeigt.
Zum Beispiel:
Herzfrequenzsensor
Sensorkennung
Aktuelle Daten
(Aktuelle Herzfrequenz und
Sensorkennung werden angezeigt)

DE
21
Übungs-/Trainingsaufzeichnungen anzeigen
Verwenden Sie zur Anzeige Ihres Trainingsverlaufs die Datei-Option.
DATEI
Zeitnehmung
(Gesamtzeit)
(Datei auswählen)
(Entfernung
anzeigen)
(Geschwindigkeit
anzeigen)
(Kalorienverbrauch anzeigen) (Tempo anzeigen)
2 2
2
22
2
2 2
Hinweis: Nach dem Beenden der Stoppuhr können Sie die Taste 4
drücken, um sie zurückzusetzen, oder die Taste 2, um Dateien mit
Zwischenzeitdaten anzuzeigen.
Verwendung als Stoppuhr
Sie können die Cardio 35 als Stoppuhr verwenden.
SONSTIGE Stoppuhr beendenSTOPPUHR (Zeitnehmung starten)
2 2 2 3
1
Stoppuhr beenden
3

22
DE
Schrittlänge
Sie können Ihre Schrittlänge durch Zurücklegen von 800 m kalibrieren
oder manuell eingeben.
SONSTIGE EINSTELLUNGENSCHRITT
Schrittlänge manuell einstellen
(Wert
einstellen)
Schrittlänge kalibrieren
2 2 2 2
Hinweis: Sie können die Schrittlänge nur kalibrieren, wenn Sie sich in einem Raum
benden.
SONSTIGE KALIBRIERENSCHRITT (Vorbereiten,
800 m zu laufen)
(FERTIG - Kalibrierung abgeschlossen)
(FEHLER - 800-Meter-Lauf nicht abgeschlossen)
(Lauf beginnen)
800 m abgeschlossen?
2 2 2 2
33

DE
23
Automatisches Scrollen
Verwenden Sie die Einstellung für automatisches Scrollen, um diese
Funktion zu aktivieren oder zu deaktivieren. Wird die Funktion aktiviert,
werden alle Trainingsinformationen nacheinander angezeigt, ohne dass
eine Taste gedrückt werden muss, während Sie trainieren.
Speicher leeren
Verwenden Sie zum Löschen aller Trainings- und
Zwischenstreckenaufzeichnungen in der Cardio 35-Sportuhr die Option
Speicher leeren.
Hinweis: Denken Sie daran, vor dem Ausführen dieser Funktion all Ihre Daten über die
Bryton Bridge 2-Anwendung zu sichern.
SONSTIGE Ja
Nein
Speicher leeren
SONSTIGE Ein
Aus
AUTOMATISCHES
SCROLLEN
2 2 2
2 2 2

24
DE
Symbole
Symbol Element
Konstantes
Symbol
Blinkendes
Symbol
Akkusymbol
Akkustand Akkuauadung
-
Batteriestand
gering
GPS-Symbol GPS-Signalstärke
Suche nach
GPS-Signal
Aufzeichnungssymbol
Speicher voll, muss
geleert werden
Aufzeichnung
erfolgt
Herzfrequenzsymbol - -
Laufsensorsymbol - -
Kadenzsensorsymbol - -
Geschwindigkeitssensor-
Symbol
- -
Alarmsymbol
Alarm ist
eingestellt
-

DE
25
Spezikationen
Cardio 35
Element Beschreibung
Bildschirm 23,18 x 14 mm, positiver FSTN-Segment-LCD
Physikalische Größe 4,2 x 6,9 x 1,25 cm
Gewicht 47 g
Betriebstemperatur -10°C ~ 50°C
Temperatur bei
Ladevorgang
0°C ~ 40°C
Akkulaufzeit Bis zu 35 Tage im Uhrmodus
Bis zu 7,5 Stunden im Trainingsmodus mit aktiviertem
GPS
GPS Integrierter hochempndlicher SiRFstarIV-Empfänger
mit eingebauter Antenne
HF-Transceiver 2,4 GHz-ANT+-Transceiver mit eingebauter Antenne
Speicher Integrierte 1 MB serieller Flash
G-Sensor 3-Achsen-Beschleunigungssensor

26
DE
Bildschirmbegrie
Begri Bildschirmanzeige
Alarm ALM
Stoppuhr SUHR
Zeit 2 ZT2
Speicher leeren SPL
Kombi-Sensor DUAL
Geschwindigkeit GESW
Kalorien KAL
HF-Zone 1 HFZ1
Kadenz KAD
Anpassen ANPASS
Sommerzeit SMZT
Information INFO
Intervall INTV
Entfernung ENF
Standort ORT
Mehrere Sensoren MULT SENS
Kalibrieren K ALIB
Tastenton TON

IT
AVVIO/ARRESTO/
SU
FRAZIONE/MODO/
GIÙ
ACCENSIONE/
INDIETRO/
RETROILLUMINAZIONE
ON
OK/IMPOSTAZIONE/
PAGINA
Cardio 35
Guida utente
bb.brytonsport.com
1
2
3
4

2
IT
Indice
Introduzione ................................ 3
Per cominciare ............................ 4
Pulsanti .......................................... 6
Visualizzazione Orologio ........7
Impostazioni Orologio ................8
Esercizio/Allenamento.............10
Avvia/metti in pausa/
arresta esercizi ................................ 10
Segna giro ........................................ 11
Vedi info Esercizio/
Allenamento ...................................12
Impostazioni di allenamento 13
Imposta allenamento ..................13
Imposta allenamento GIRO ....... 17
Collega sensori ............................... 18
Vedi registro Esercizio/
Allenamento ...................................21
Uso del cronometro .....................21
Lunghezza della falcata ..............22
Scorrimento automatico ............23
Cancella memoria ......................... 23
Icone............................................... 24
Speciche ..................................... 25
Terminologie a schermo ......... 26

IT
3
Introduzione
L'orologio sportivo con GPS Cardio 35 è per attività occasionali e
allenamento professionale. Cardio 35 è in grado di calcolare con
precisione e registrare la posizione, la velocità, la distanza, il passo, il
ritmo di falcata, le calorie, la cadenza*, la frequenza cardiaca* e altro.
I risultati dell'allenamento possono poi essere condivisi e analizzati
nel sito brytonsport.com. Grazie al sensore incorporato, non è
necessario alcun altro foot pod per gli esercizi indoor. Cardio 35 può
essere utilizzato per la corsa e il ciclismo.
Contenuto della confezione
Accertarsi che la scatola contenga i seguenti oggetti:
Cardio 35•
Cavo USB•
Guida utente•
Accessori opzionali:
Cardiofrequenzimetro•
Sensore di velocità / cadenza•
* È necessario il sensore HRM o SPD/CAD.

4
IT
Per cominciare
Passo 1. Collegamento, sincronizzazione e carica
1. Collegare Cardio 35 a un PC con il cavo USB in dotazione.
2. Scaricare l'applicazione Bryton Bridge 2 dal sito bb.brytonsport.
com e sincronizzarla con Cardio 35.
Passo 2. Accensione
Per accendere Cardio 35, premere il pulsante 1.
Nota: Per spegnerlo, premere il pulsante 1 per 5 secondi.
Passo 3. Setup iniziale
La prima volta, agire come segue:
1. Scegliere la lingua.
2. Scegliere l'unità di misura.
3. Inserire il proprio prolo (consigliato).
Nota: La precisione dei dati inuenza notevolmente l'analisi dell'allenamento.
4. Selezionare il formato data preferito.
5. Inserire la propria frequenza cardiaca massima.
Mantenere Cardio 35
collegato al PC per caricare la
batteria.
Nota: La prima volta, caricare la
batteria per almeno 2,5 ore e mezzo.

IT
5
Passo 4. Avviare un allenamento o un esercizio
Cardio 35 funziona in tre modi principali:
Visualizzazione Orologio
Esercizio
3
6. Uscire all'aperto per acquisire il segnale GPS. Una volta acquisito
il segnale GPS, Cardio 35 imposta automaticamente data e ora.
Per impostare manualmente data ed ora, fare riferimento alle
impostazioni di Ora (vedi pag. 8).
7. Premere il pulsante 2 per completare il setup.
Allenamento
2
1
Nota: Durante la procedura di collegamento
(con cardiofrequenzimetro/foot pod/sensore
di cadenza/sensore di velocità), i LED (sopra
le icone) lampeggiano. Quando i sensori sono
collegati correttamente al dispositivo, i LED
si accendono.
Tipo di
attività
(Bici o Corsa)
Nota: Se si desidera modicare il proprio prolo, si prega di collegare il dispositivo
a Brytonsport.com e modicare l’impostazione tramite Dispositivo -> Gestisci
dati dispositivo. Oppure andare su Impostazioni > Altro > Prolo e modicare le
impostazioni.

6
IT
Pulsanti
Cardio 35 è dotato di quattro pulsanti usati per diverse funzioni.
Accensione/INDIETRO (1)
Premere per accendere Cardio 35. •
Tenere premuto per spegnere.
Una volta arrestato un allenamento/•
esercizio, premere per passare alla
visualizzazione Orologio.
Nei modi Impostazione e •
Cronometro, premere per tornare alla
visualizzazione Orologio.
OK (2)
In visualizzazione Orologio, premere •
per accedere a Impostazione.
In Esercizio/Allenamento, premere per •
scorrere i dati di esercizio.
In Impostazione, premere per entrare •
o confermare una selezione.
In Cronometro, premere per •
visualizzare il le per i dati di giro.
AVVIO/ARRESTO (3)
I• n visualizzazione Orologio, premere
per avviare/mettere in pausa/arrestare
l'esercizio. In tal modo, si arresta/mette
in pausa/avvia contemporaneamente
la registrazione.
4
3
2
1
In Impostazione, premere per spostarsi •
in su facendo scorrere le opzioni di
menu.
In Cronometro, premere per avviare/•
arrestare il cronometro.
FRAZIONE (4)
In visualizzazione Orologio, premere •
per passare a Bici o Corsa.
In Esercizio o Cronometro, premere per •
segnare il giro.
In Impostazione, premere per spostarsi in •
giù facendo scorrere le opzioni di menu.
Una volta arrestato il cronometro, •
premere per azzerare il cronometro.

IT
7
La tabella che segue riporta un'indicazione graca sull'uso dei
pulsanti che verranno impiegati nelle sezioni successive.
Pulsanti Indicazione
Accensione/INDIETRO
1
OK
2
AVVIO/ARRESTO
3 /
FRAZIONE
4 /
Visualizzazione Orologio
Vi sono due tipi di visualizzazione Orologio:
Tipo 1: visualizzazione di ora (HH:MM) e data (MM-GG) attuali.
Icona di stato della
batteria
Modo Esercizio
Modo Corsa/Bici
Data
MM/GG
Tipo 2: visualizzazione di ora attuale (HH:MM) e ora secondaria
(formato 24 ore).
Ora 2
Orario secondario
Ora attuale
Icona allarme
Nota: Per impostazione predenita, “Data”
viene visualizzato sulla posizione di “Ora 2”.
Per visualizzare l'orario secondario, vedere
“Visualizza/nascondi Ora 2” a pagina 9.

8
IT
Impostazioni Orologio
Calibrazione automatica tramite GPS
Usare l'impostazione per azzerare la data e l'ora in base alla propria
posizione GPS.
Impostazione allarme
Usare questa impostazione per impostare l'allarme con Cardio 35.
(Selezione formato ora)
(Ora attuale
impostata)
TEMPO GPSTM
* indica il cambio di schermo, nessun pulsante premuto.
(Ora impostata)
2 2 2
2
(Allarme impostato)
(Se spento, saltare
questo passaggio)
TEMPO ALLARME ON
OFF
2 2 2
2
2

IT
9
Visualizza/nascondi Ora 2
Usare questa impostazione per visualizzare/nascondere Ora 2.
(Visualizzazione Ora 2)
(Ora 2 impostata)
Imposta ora legale
Usare questa impostazione per impostare l'ora legale.
(Ora legale impostata)
(Selezione
impostazione)
Nota: Una volta nascosto Ora 2, la visualizzazione Orologio mostra Data sotto
l'ora attuale.
TEMPO
ORA 2
ON
OFF
2 2 2
2
TEMPO
Ora legale
2 2 2
2
2

10
IT
Avvia/metti in pausa/arresta esercizi
Premere il pulsante 3 per avviare, mettere in pausa o terminare
un'attività.
Visualizzazione voce
Indicatore registrazione
Tipo di esercizio
Visualizzazione dati
Segnale GPS
Esercizio/Allenamento
Durante l'esercizio o l'allenamento, Cardio 35 consente di misurare
e registrare le proprie attività di corsa visualizzando le prestazioni
attuali.
È possibile selezionare i seguenti tipi di attività:
Modo Bici •
Modo Corsa•
Nota:
In modo Esercizio, le informazioni visualizzate variano a seconda delle •
preferenze dell'utente.
È possibile passare la modo Bici o Corsa in visualizzazione Orologio, premendo •
il pulsante 4.
Prima di iniziare
Collegare i sensori (pag. 18), opzionale•

IT
11
Nota: Uscire all'esterno per acquisire il segnale GPS quando si legge “TROVA GPS”
sullo schermo.
Segna giro
1. Iniziare un'attività premendo prima il pulsante 3.
2. Premere il pulsante 4 per segnare il giro.
Tempo di registrazione
Numero giro
01 -- Minuto
2H -- Ora
00 -- Secondo
(Acquisisci
segnale GPS)
SÌ
NO
3
4
2
3

12
IT
Vedi info Esercizio/Allenamento
Modo Corsa
CALORIEPASSO DISTANZATIMER
Nota: Se si rilevano il sensore di frequenza cardiaca e il foot pod, le informazioni
relative all'esercizio vengono visualizzate nel seguente ordine:
FREQUENZA CARDIACA > FOOT POD > PASSO > TIMER > DISTANZA > CALORIE
> OROLOGIO.
Modo Bici
Nota: Se si rileva il sensore di frequenza cardiaca, di cadenza o combinato, le
informazioni relative all'esercizio vengono visualizzate nel seguente ordine:
FREQUENZA CARDIACA > CADENZA > COMBINATO > VELOCITÀ > DISTANZA >
TIMER > CALORIE.
3 2 2 2
CALORIEVELOCITÀ TIMERDISTANZA
3 2 2 2
2
2

IT
13
Nota: Il tipo di dati visualizzati dipende dal modo usato:
Se si dispone di giri segnati, premere il • pulsante 4 per vedere le informazioni
sul giro.
Il tempo di intervallo compare solo quando l'allenamento è impostato in •
allenamento a intervalli.
L'ETA (Tempo stimato d'arrivo) compare solo quando l'allenamento è impostato •
sulla distanza.
Se appare la schermata di seguito, il dispositivo non è in grado di rilevare il •
sensore. Regolare il sensore e collegare di nuovo.
Impostazioni di allenamento
È possibile personalizzare le impostazioni sull'allenamento,
collegare i sensori, visualizzare la cronologia e altre impostazioni.
Imposta allenamento
Usare l'impostazione Allenamento per scegliere il tipo di
allenamento voluto. L'allenamento può basarsi su tempo, distanza,
calorie bruciate, frequenza cardiaca, passo, velocità o intervallo.
Nessun sensore rilevato

14
IT
Nota:
Durante l'impostazione dell'allenamento, la schermata varia in base •
all'allenamento selezionato.
Dopo aver impostato il modo Allenamento, premere il • pulsante 3 per registrare i
risultati del proprio allenamento.
Per annullarlo, premere il • pulsante 1 per tornare alla visualizzazione Orologio.
Per Tempo / Distanza / Calorie
L'allenamento può essere impostato per tempo, distanza o calorie
bruciate.
(Imposta valore)
(Avvia registro per
allenamento)
ALLENAMENTO TEMPO
DISTANZA
CALORIE
2 2 2 3
1

IT
15
Per Frequenza cardiaca / Passo / Velocità
L'allenamento può essere impostato per frequenza cardiaca, passo
o velocità.
(Imposta valore)ALLENAMENTO VALORE
MASSIMO
FREQUENZA CARDIACA
PASSO
VELOCITÀ
(Imposta valore) VALORE
MINIMO
TEMPO
2 2 2 2
2
2
DISTANZA
SALTARE
(Imposta valore)
(Imposta valore)
(Avvia registro per
allenamento)
2
2
2
2
2
34
34
2

16
IT
Per intervallo
Usare l'impostazione Intervallo per indicare l'intervallo tra tempo di
allenamento, riscaldamento e rareddamento. Di default, i tempi di
riscaldamento e rareddamento sono regolati a 5 minuti.
(Imposta valore)
SÌ
NO
(Imposta frequenza
cardiaca)
TEMPO
DISTANZA
TEMPO
DISTANZA
(Imposta riposo)
SÌ
NO
(Imposta frequenza
cardiaca)
(Imposta valore)
ALLENAMENTO INTERVALLI IMPOSTA
SÌ
NO
(Imposta
rareddamento)
(Imposta numero
di ripetizioni)
(Avvia registro per
allenamento)
(Se SÌ, seleziona
zona target)
ZONA 1
ZONA 7
Nota: L'ultima impostazione
intervallo viene salvata
nell'opzione “SALVATO”.
È possibile scegliere e
avviare immediatamente
l'allenamento a intervalli.
SALVATO
SÌ
NO
(Imposta
riscaldamento)
3
4
2
22
2 2 2
2
222 2
(Avvia registro per
allenamento)
2222
2
(Se SÌ, seleziona
zona target)
ZONA 1
ZONA 7

IT
17
Utilizzare l'impostazione Giro per posizione per impostare la
posizione attuale come punto del giro. Quando si raggiunge il
punto giro, Cardio 35 contrassegnerà automaticamente il giro.
Imposta allenamento GIRO
Usare Giro per distanza per indicare la distanza di ciascun giro. Dopo
aver percorso una distanza prestabilita, Cardio 35 contrassegnerà
automaticamente il giro.
FRAZIONE
(Avvia registro
per GIRO)
POSIZIONE
(Avvia registro
per GIRO)
FRAZIONE (Imposta valore)DISTANZA
2 2 2 2
2
2 2 2
2

18
IT
Modo Corsa
Collega sensori
Usare l'impostazione Collegamento per collegare i sensori ed altri
accessori opzionali a Cardio 35.
Modo Bici
Sensore di velocità
LINK (Dati FC attuali)SCANSIONE
(Imposta
dimensione ruote)
LINK Sensore di
frequenza cardiaca
SCANSIONE
Sensore
cadenza
Nota: Per visualizzare e controllare i dati sui sensori collegati, selezionare
“COLLEGAMENTO > INFO”.
Sensore di
frequenza cardiaca
(Dati di velocità
attuali)
Sensore foot pod
2 2
2
1
2
(Dati di cadenza
attuali)
2 2
2
2 2 2
(Dati FC attuali)
(Dati foot pod attuali)

IT
19
Calibra foot pod
LINK CALIBRAZIONEFATTORE
(Prepararsi ad una
corsa di 800 m)
(FINE - Calibrazione completata)
(NON RIUSCITO - Corsa di 800 m
non completata)
(Inizia la corsa)
Completare 800 m?
2 2 2 2
331
LINK IMPOSTAFATTORE
Imposta manualmente la lunghezza del foot pod
2 2 2
(Imposta valore) (Valore attuale)
2
2

20
IT
Premere il pulsante 2 per confermare e spostarsi alla ricerca dell'elemento
successivo. Se non si desidera collegarsi al sensore attualmente rilevato, premere il
pulsante 1 per interrompere.
Assicurarsi di mantenere una distanza di circa 30 metri da sensori simili.•
Se sullo schermo appare la seguente illustrazione, signica che sono stati rilevati •
altri 2 sensori. Premere il pulsante 1 per eseguire una nuova scansione del sensore.
Nota:
Quando i• sensori sono collegati correttamente, Cardio 35 emette un breve
segnale acustico e i LED (sulla parte superiore delle icone) lampeggiano per 5
secondi.
Una volta collegati, sullo schermo viene visualizzata l'ID del sensore. •
Ad esempio:
Sensore di
frequenza cardiaca
ID sensore
Dati attuali
(Frequenza cardiaca attuale
e ID sensore visualizzati)

IT
21
Vedi registro Esercizio/Allenamento
Usare File per visualizzare la propria cronologia di allenamento.
FILE
Timer (tempo totale)
(Seleziona le)
(Visualizza distanza)
(Visualizza velocità)( Visualizza calorie
bruciate)
(Visualizza passo)
2 2
2
22
2
2 2
Nota: Una volta arrestato il cronometro, premere il pulsante
4 per ripristinarlo o premere il pulsante 2 per visualizzare i le
dei dati di giro.
Uso del cronometro
È possibile usare Cardio 35 come cronometro.
ALTRI
Avvia cronometro
CRONOMETRO
(Avvia conteggio)
2 2 2 3
1
Arresta cronometro
3

22
IT
Lunghezza della falcata
È possibile calibrare la lunghezza della falcata su 800 m ssi o
immettere manualmente la propria.
ALTRI IMPOSTAFALCATA
Imposta manualmente la lunghezza della falcata
(Imposta valore)
Calibra lunghezza della falcata
2222
Nota: È possibile calibrare la lunghezza della falcata solo se si è al chiuso.
ALTRI
CALIBRAZIONEFALCATA (Prepararsi ad una
corsa di 800 m)
(FINE - Calibrazione completata)
(NON RIUSCITO - Corsa di 800 m
non completata)
(Inizia la corsa)
Completare 800 m?
2 2 2 2
33
 Loading...