

B
A
C
K
/
L
I
N
E
2
G
P
S
T
I
M
E
S
E
T
T
I
N
G
S
T
W
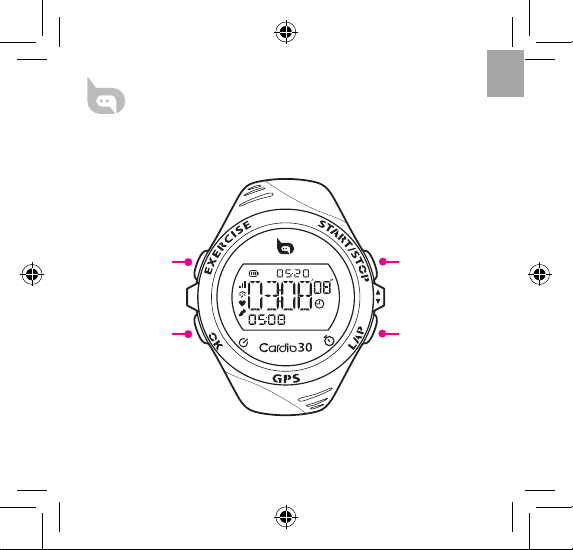
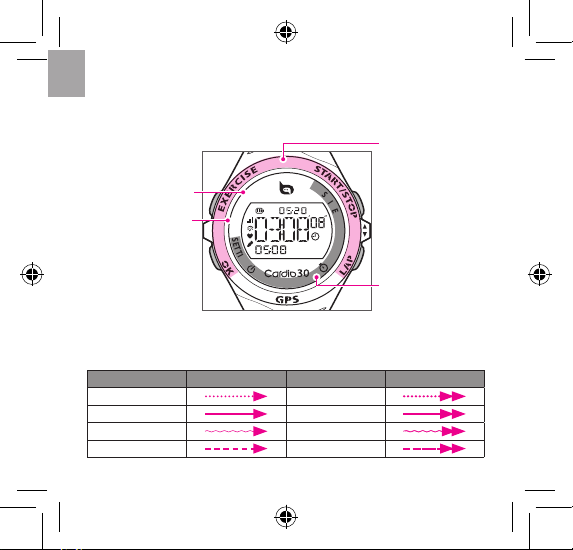
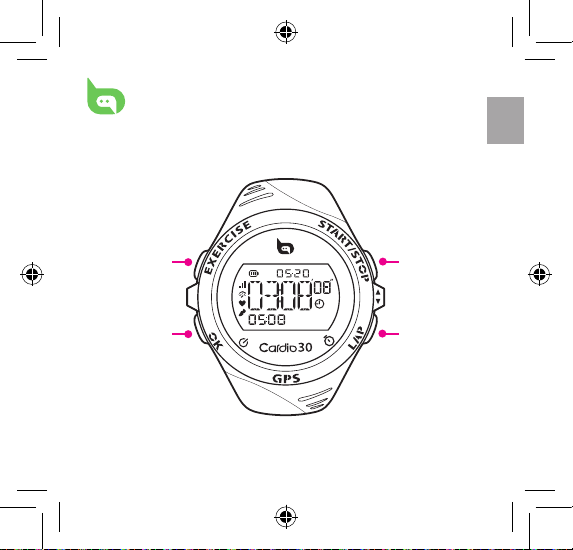
START/STOP/GPS TIME
LAP/STW
EXERCISE/BACK
OK/SETTING/POWER
Cardio 30
User’s Guide
bb.brytonsport.com
EN

2
EN
Contents
Introduction ................................3
Getting Started........................... 4
Modes ............................................ 5
Buttons ..........................................6
Menu Structure ..........................7
Clock Mode ..................................8
Display/Hide Time 2 .....................8
Auto Calibrate Time by GPS ......8
Use Stopwatch ...............................8
Clock Mode Settings ....................9
Exercise Mode .............................12
Start / Stop Running ....................12
Mark Lap ...........................................13
View Exercise Info .........................13
Set Training .....................................14
Link Sensors ....................................18
View Training Record ...................18
Turn GPS On/O ............................19
Set Training Type ...........................19
Stride Length ..................................19
Set Prole .........................................20
Set Unit .............................................21
Clear Storage ..................................21
Icons ............................................... 22
Specications ..............................23
Screen Terminologies ............... 24
EN
3
Introduction
Cardio 30, the smallest GPS sports watch on the market, is for all
levels of athletes. By setting goals in the pre-training programs,
Cardio 30 can accurately calculate and record your location, speed,
distance, pace, stride rate, cadence*, heart rate*, and more. Your
training results can then be shared and analyzed at brytonsport.
com. Also, with the built-in sensor in Cardio 30, no extra foot pod is
needed for indoor exercise.
Package Contents
Make sure the following items are in the box:
Cardio 30•
USB cable•
User’s Guide•
Optional accessories:
Heart rate monitor•
Speed / Cadence sensor•
* HRM or SPD/CAD sensor is required.
4
EN
Getting Started
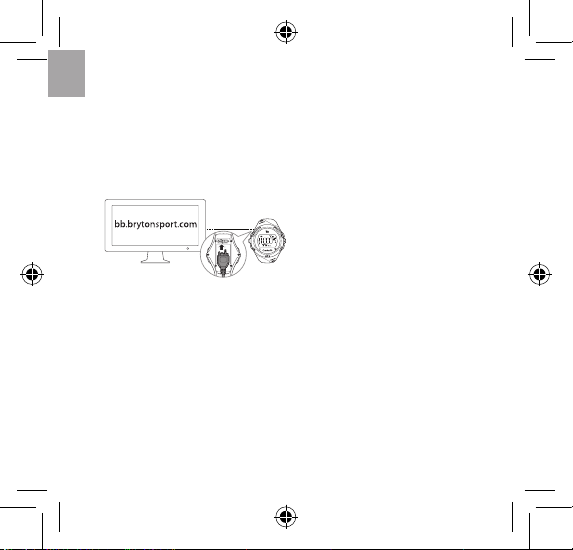
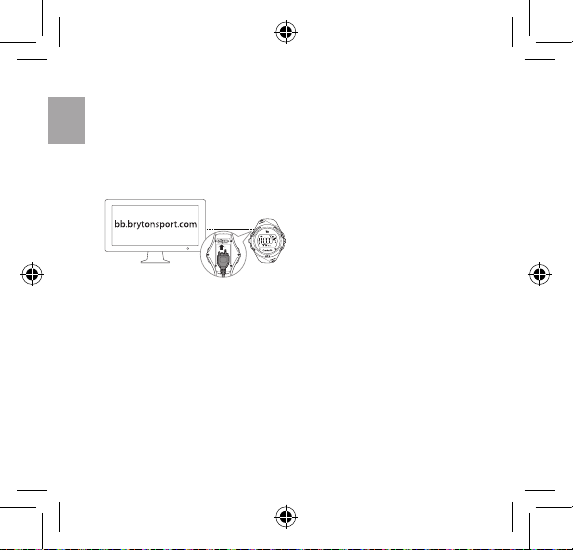
Step 1. Connect, Sync, and Charge
1. Connect Cardio 30 to a PC using the supplied USB cable.
2. Download the Bryton Bridge application at bb.brytonsport.com
and sync with Cardio 30.
S
E
T
T
I
N
G
S
T
W
B
A
C
K
/
L
I
N
E
2
G
P
S
T
I
M
E
Step 2. Turn On
Short press the OK button to turn on Cardio 30.
Note: To turn o, long press the OK button for 5 seconds.
Step 3. Initial Setup
For rst time use, the setup wizard appears.
1. Select your preferred language.
2. Select the unit of measurement.
3. Enter your user prole (recommended).
Note: Data accuracy will highly aect your training analysis.
Keep Cardio 30 connected to
the PC to charge the battery.
Note: For rst time use, charge the
battery for at least 2.5 hours.
EN
5
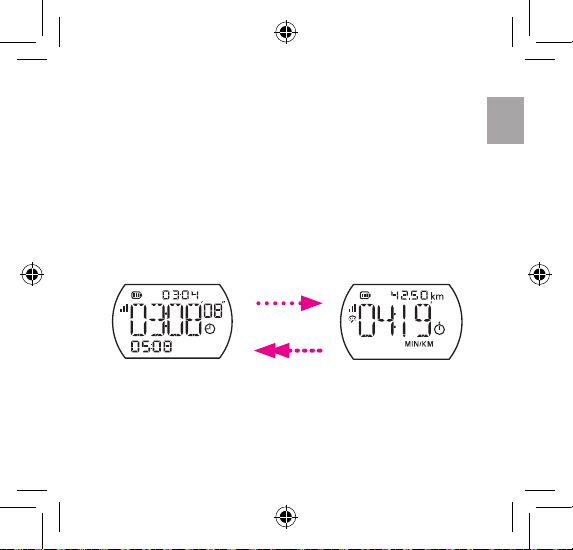
Modes
Cardio 30 operates in two modes:
Clock Mode Exercise Mode
The typical wristwatch, with:
Date and time•
Alarm•
Stopwatch•
Provides training analysis:
Time•
Distance•
Pace•
Speed•
Heart Rate•
Calorie•
Lap•
Stride Rate•
Short press
EXERCISE/BACK
4. Enter your max heart rate.
5. Go outdoors to acquire GPS signal. Once the GPS signal is xed,
Cardio 30 automatically sets the date and time. To manually set
the date and time, go to Time settings (see page 8).
6. Press OK to complete setup.
Long press
EXERCISE/BACK
6
EN
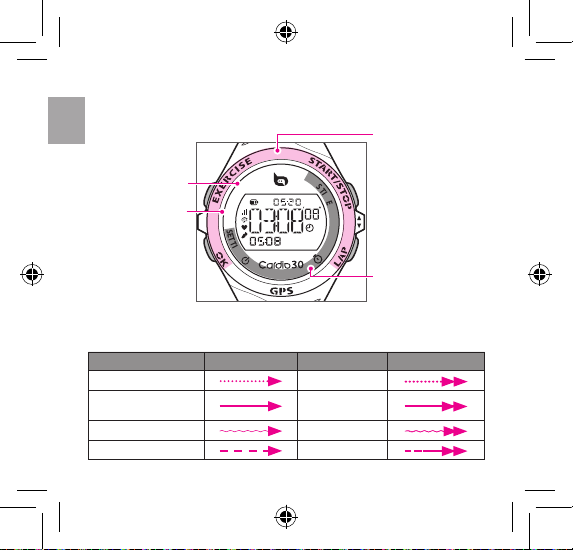
Buttons
Cardio 30 has four buttons that are used for multiple functions.
B
A
C
K
/
L
I
N
E
2
G
P
S
T
I
M
E
S
E
T
T
I
N
G
S
T
W
Long press the
buttons to perform
the inner functions.
Short press the
buttons to perform
the outer functions.
BACK
Short press to go •
back a previous screen.
In Exercise mode, •
long press to switch to
Clock mode.
LINE2: Short press to
view the exercise info.
The table below provides a graphical indication on using the
buttons which will be used in later sections.
Buttons Short Press Buttons Long Press
EXERCISE/BACK/LINE2
BACK
OK/Backlight
SETTING/POWER
START/STOP GPS TIME
LAP STW
EN
7
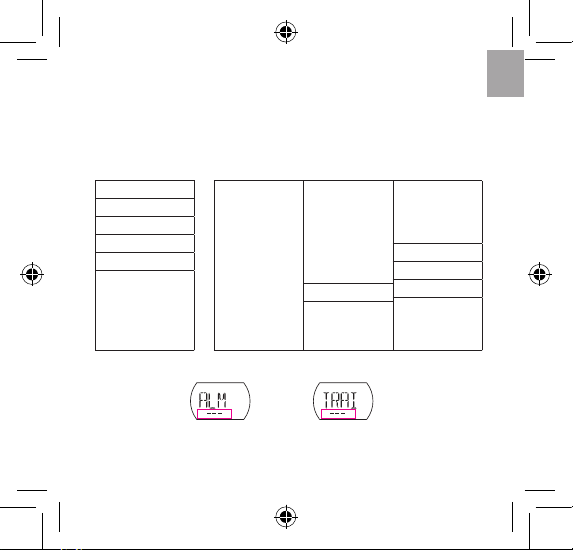
Menu Structure
Long press OK/SETTING to access Settings.
Short press
EXERCISE/BACK
to go back the previous page.
Exercise Mode Menu
(Accessible in Exercise Mode only)
Clock Mode Menu
(Accessible in Clock Mode only)
1. Alarm
2. Date
3. Time
4. Backlight
5. Tone
6. Language
1. Training
1.1 Easy
1.1.1 Time
1.1.2 Distance
1.1.3 Calories
1.2 Zone
1.2.1 HR
1.2.2 Pace
1.2.3 Speed
1.3 Lap
1.4 Interval
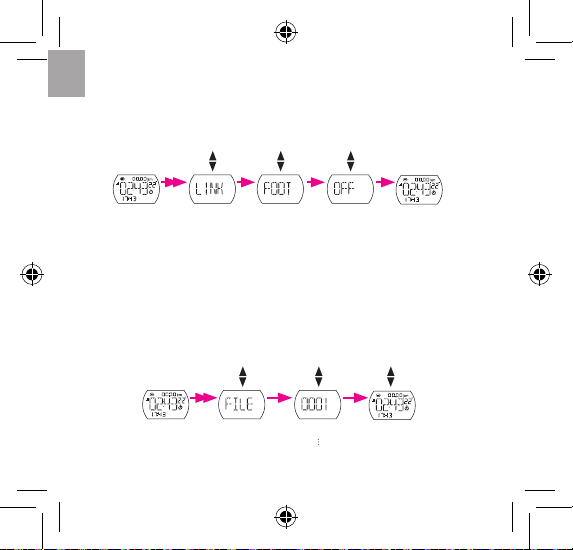
2. Link
1.1 Foot pod
1.2 HRM
1.3 Speed
1.4 Cadence
1.5 Combo
3. File
4. GPS
5. Type
5.1 Run
5.2 Bike
5.3 Treadmill
6. Stride
7. Prole
8. Unit
9. Clear
Storage
When navigating on the menu settings, similar screen may appear:
Each space represents a menu level (1st, 2nd, 3rd, 4th).
The number indicates the sequence of the current option in the menu.
1
1
Clock Mode Exercise Mode
8
EN
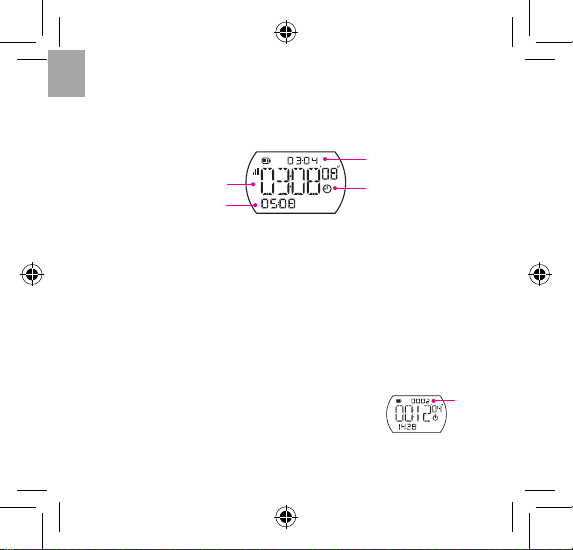
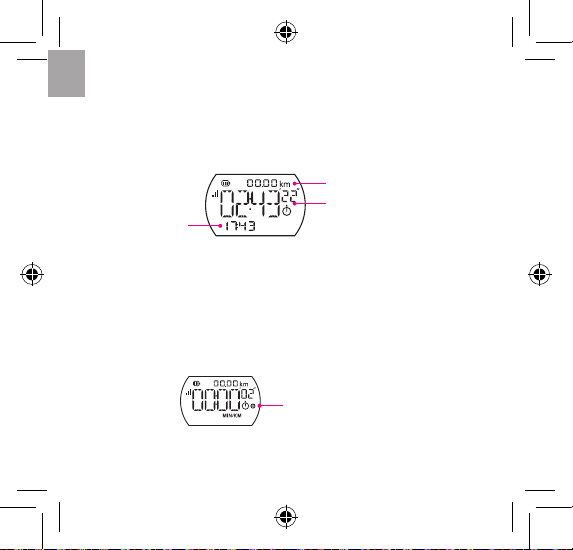
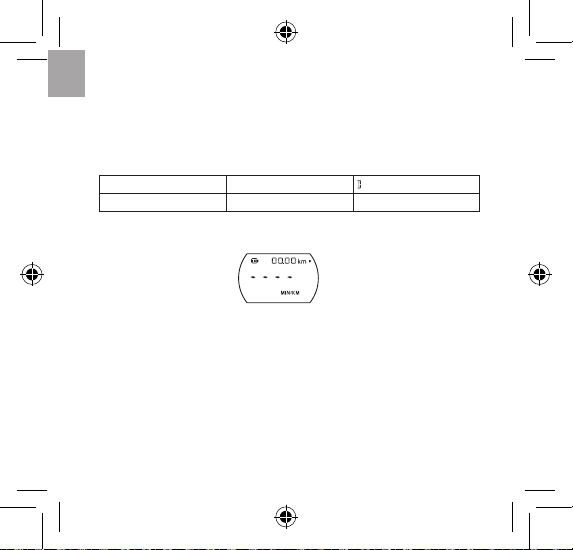
Clock Mode
The Clock mode displays the date and time with alarm and
stopwatch functions.
Date
Clock/Alarm
indicator
Time 1
Current time
Time 2
Secondary time
Display/Hide Time 2
Long press
EXERCISE/BACK
to display/hide Time2.
Auto Calibrate Time by GPS
Long press
START/STOP
to reset the date and time based on your
GPS location.
Use Stopwatch
1. Enter stopwatch mode, long press LAP/STW.
2. To start timer, short press
START/STOP
.
3. To mark lap, short press LAP/STW.
4. To stop timer, short press
START/STOP
.
Lap
EN
9
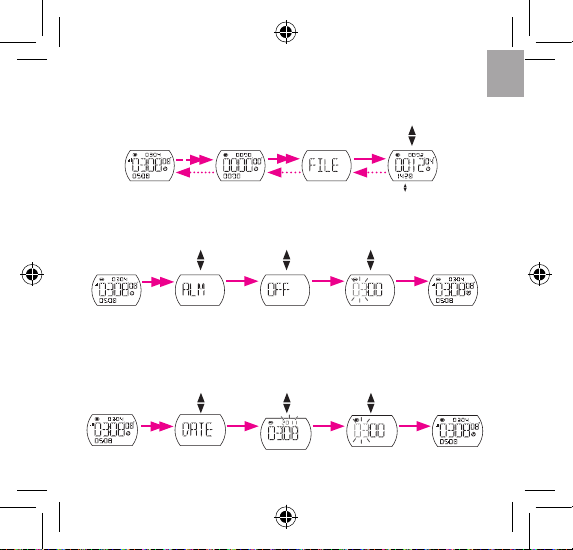
Clock Mode Settings
Set Alarm
(Alarm is set)
(If O, skip this step)
ALARM OFF
DAILY
WEEKDAY
ONCE
View Stopwatch History
Use the Stopwatch setting to view the stopwatch history record.
(In Stopwatch mode)
(Press
to browse
stopwatch history)
Set Date and Time
Use the Date setting to set the date and time manually.
(Set hour, minute)(Set year, month, day)
10
EN
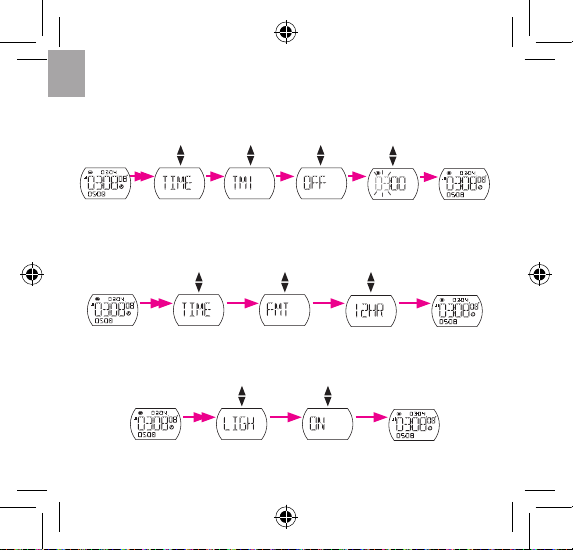
Set Time2
Use the Time setting to set and display a secondary time (Time2) or
adjust the current time (Time1) manually.
TIME 1
TIME 2
(Select On)
OFF
ON
Set Time Format
Use the Format setting to select the time format.
TIME FORMAT 12HR
24HR
Set Backlight
Use the Backlight setting to set the backlight.
BACKLIGHT ON
AUTO
EN
11
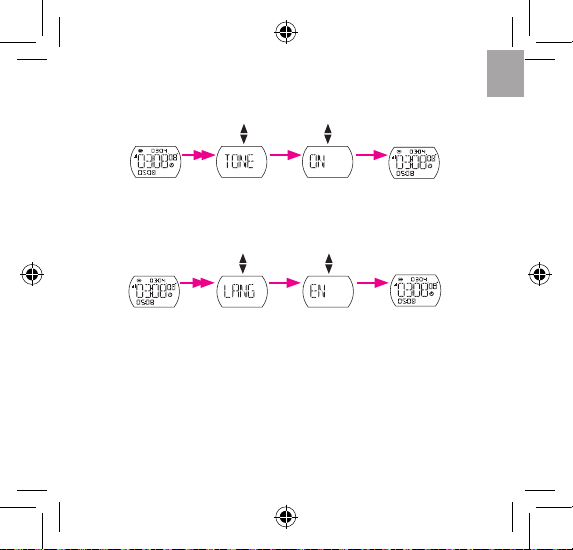
Change Language
Use the Language setting to select desired language.
LANGUAGE ENGLISH (EN)
FRENCH (FR)
GERMAN (DE)
ITALIAN (IT)
ESPAÑOL (ES)
DUTCH (DU)
Brazilian Portuguese (PTBR)
Set Tone
Use the Tone setting to enable or disable the key tone.
ON
OFF
12
EN
Start / Stop Running
Short press
START/STOP
to start or end an activity.
Recording indicator
Note: Please go outdoors to acquire GPS signal when you see “Find GPS” on the
screen.
Exercise Mode
The Exercise mode allows you to measure and record your running
activities and displays your current performance.
Displayed information varies on user preference.
Distance traveled
LINE2
Time •
(Exercise / ETA / Lap / Interval)
Training analysis •
(Pace / Heart Rate /
Calorie / Distance / Speed / Stride Rate)
Before you start
Link sensors (page 13), optional•
Current time
EN
13
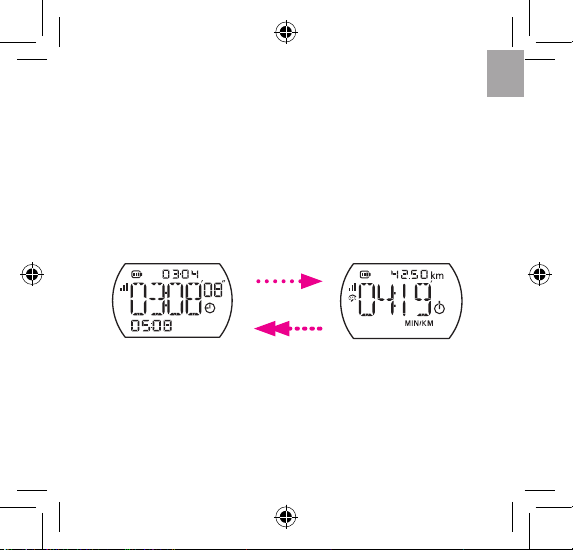
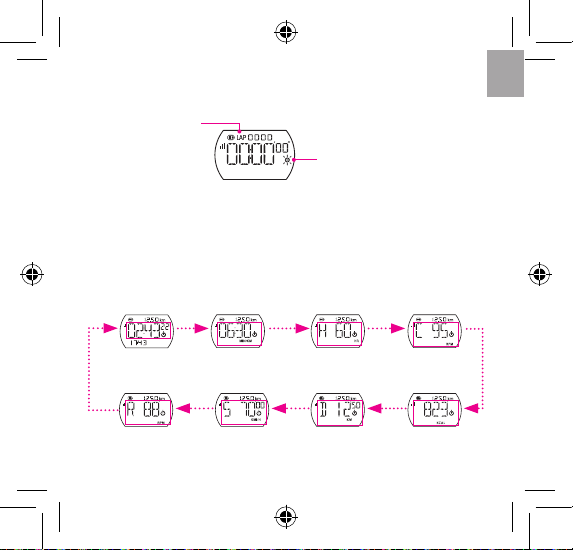
View Exercise Info
View Time/Training Analysis Display
By default, time and training analysis are shown on LINE2.
Press
EXERCISE/BACK
(LINE2) to change display.
Cadence
(only when linked with
a cadence sensor)
Heart rate
(only when linked with
a Heart rate monitor)
Calorie
Distance
SpeedStride Rate
Exercise Time / Interval time
Pace
Mark Lap
Recording indicator
Lap mode
1. Start an activity rst by short pressing START/STOP.
2. Short press LAP to mark lap.
14
EN
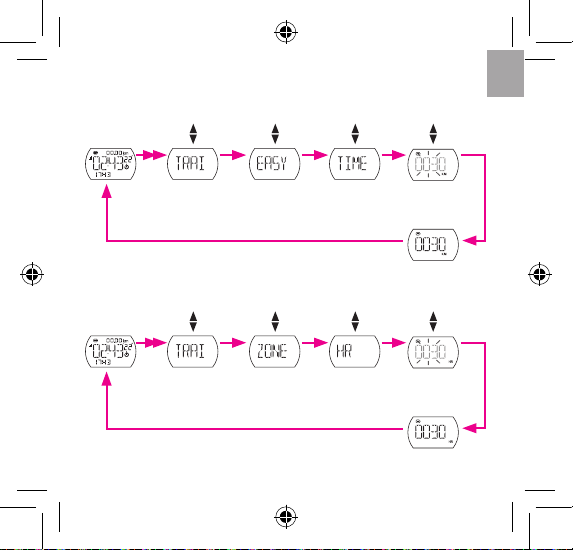
Set Training
Use the Training setting to select the type of training you want.
Training can be based on easy, zone, lap, or interval.
Note: After setting the Training mode, short press
START/STOP
to record the
results of your training.
If the screen below appears, the device cannot detect the sensor. Adjust the •
sensor and connect again.
Note: The type of data displayed depends on the current mode:
Total time is displayed when an activity is started.•
Lap info appears only when training is set to Lap mode.•
Interval time appears only when training is set to Interval mode.•
ETA (Estimated Time of Arrival) appears only when training is set to distance.•
Screen legends:•
H = Heart Rate S = Speed = Distance
C = Cadence R = Stride Rate
EN
15
By Heart Rate / Pace / Speed
Training can be set by heart rate, pace, or speed.
(Set value)
(Displayed screen varies depending on selected training)
(Displayed info varies)
TRAINING HEART RATE
PACE
SPEED
ZONE
By Time/Distance / Calories
Training can be set by time, distance, or calories burned.
(Set value)
(Displayed screen varies depending on selected training)
(Displayed info varies)
TRAINING TIME
DISTANCE
CALORIES
EASY
16
EN
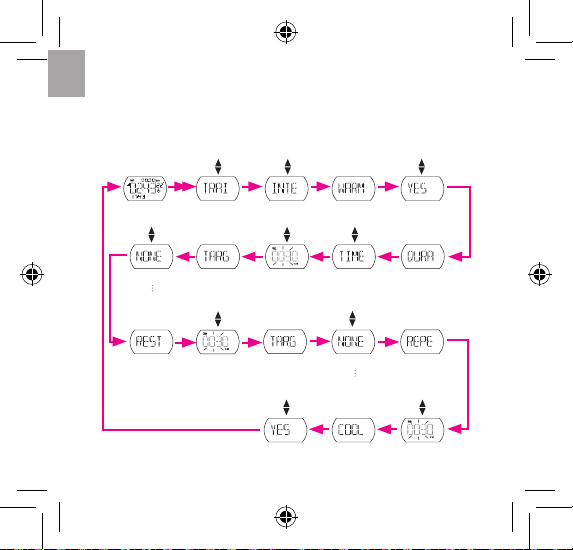
By Interval
Use the Interval setting to specify the interval between training,
warm up, and cool down time. By default, warm up and cool down
time are set to 10 minutes.
DURATION
(Set value)
TARGET HR
ZONE
TIME
DISTANCE
REST TARGET HR
ZONE
REPEAT
(Set value)
(Set number of
times to repeat)
COOL DOWN
TRAINING WARM UPINTERVAL YES
NO
(Set Warm up)
NONE
ZONE 1
ZONE 7
(Select Target zone)
NONE
ZONE 1
ZONE 7
(Select Target zone)
YES
NO
(Set Cool down)
EN
17
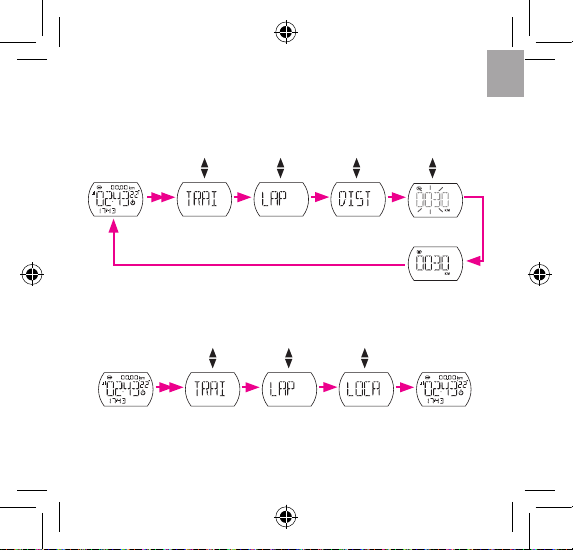
Use Lap by Location setting to set your current location as the lap
point. Upon reaching the lap point, Cardio 30 will automatically
mark the lap.
TRAINING LAP LOCATION
By Lap Distance / Lap Location
Use Lap by Distance to specify the distance of each lap. After
running a specied distance, Cardio 30 will automatically mark the
lap.
(Set value)TRAINING LAP DISTANCE
18
EN
View Training Record
Use File to view your training history.
001
002
(Change displayed info)
Link Sensors
Use the Link setting to pair sensors and other optional accessories
to Cardio 30.
(Displayed icon varies
depending on
selected sensor)
FOOT POD
HRM
SPEED
CADENCE
COMBO
OFF
ON
SCAN
FACTOR
(Factor is only
available if Foot
Pod is selected)
Note: Choose SCAN if it is the rst time to pair with the sensor. Choose ON if the
sensor has been paired before.
EN
19
Stride Length
You can calibrate stride length by xed 800m or input your own
stride length manually.
STRIDE LENGTH CALIBRATE (Fixed at 800m)
SET (manual input)
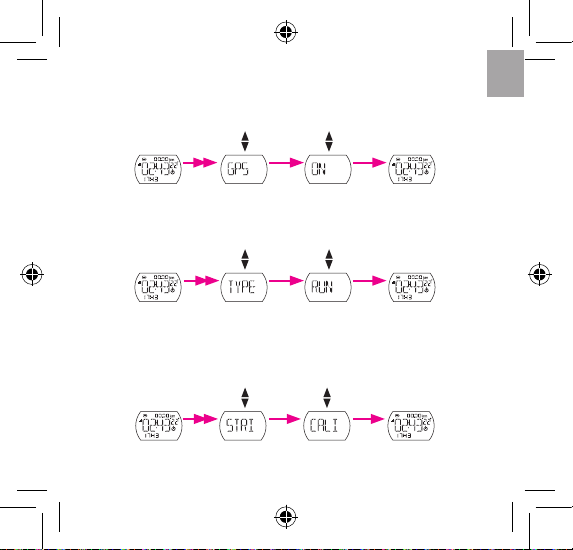
Turn GPS On/O
Use the GPS setting to turn GPS on or o.
ON
OFF
Set Training Type
Use the Type setting to select the training type:
RUN, BIKE or TREADMILL
.
RUN
BIKE
TREADMILL
20
EN
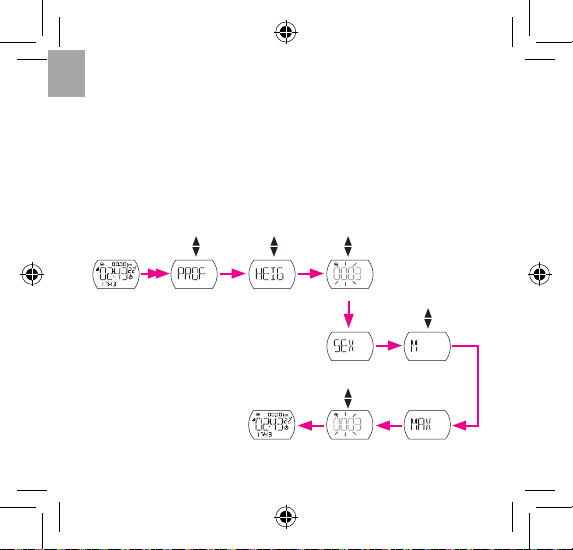
Set Prole
Use Prole to enter or update your prole.
Note: All information must be entered accurately. Missing or inaccurate data may
cause inconsistencies of training results.
PROFILE HEIGHT
WEIGHT
AGE
SEX
MAXIMUM
HEART RATE
(Enter value)
(Enter value)
MALE
FEMALE
Note:
Availability of the Stride Length setting depends on the selected training type:
Stride length is not available in BIKE training.•
In RUN training, CALIBRATE is not available because the built-in sensor calibrates •
your stride length automatically or you can manually input it by SET.

EN
21
Set Unit
Use the Unit setting to set the default unit of measurement.
METRIC
IMPERIAL
Clear Storage
Use Clear Storage to delete all training and lap records in Cardio 30.
Note: Make sure you have backed up all your data through the Bryton Bridge
application before using this function.
CLEAR STORAGE
22
EN
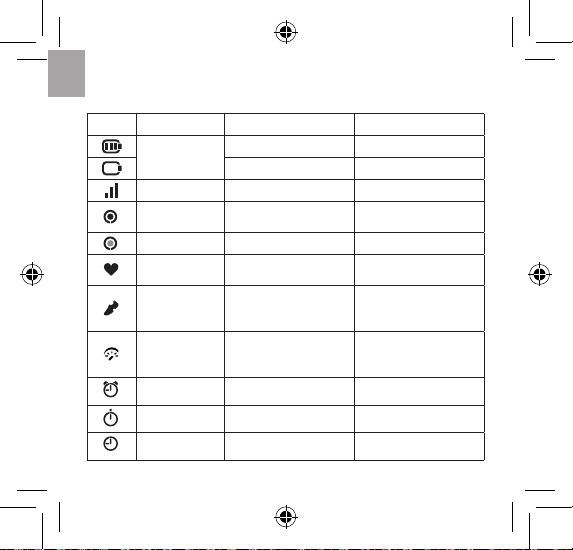
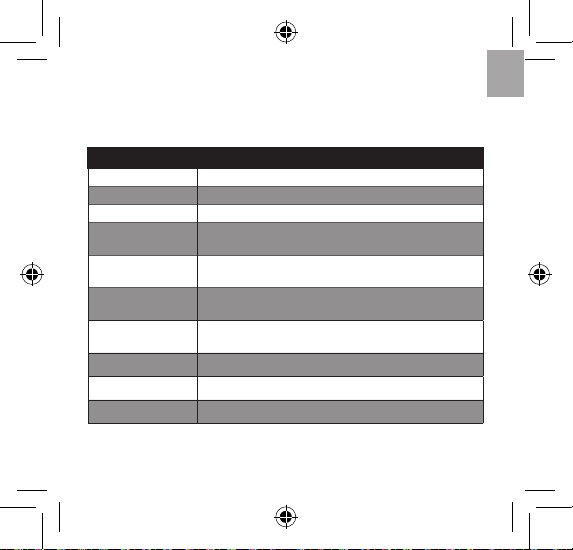
Icons
Icon Item Solid icon Flashing icon
Battery icon
Battery level Battery charging
- Battery low
GPS icon GPS signal level Searching GPS signal
Memory icon
Memory full,
must clear storage
-
Record icon - Recording in progress
Heart rate icon
Linked with heart rate
monitor
Pairing with heart rate
monitor in progress
Foot pod or
cadence icon
Linked with food pod or
cadence sensor
Pairing with foot pod
or cadence sensor in
progress
Speed sensor
icon
Linked with
speed sensor
Pairing with speed
sensor
in progress
Alarm icon Alarm is set -
Stopwatch icon Stopwatch is set -
Clock icon Clock mode is set -
EN
23
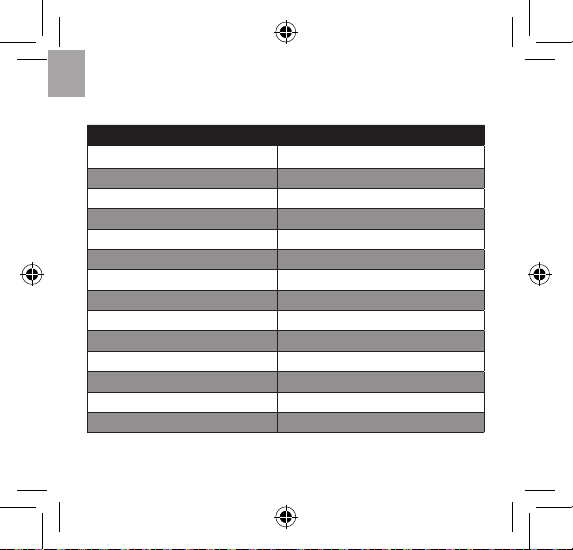
Specications
Cardio 30
Item Description
Display 23.18 x 14 mm Positive FSTN Segemet LCD
Physical size 4.2 x 6.9 x 1.25 cm
Weight 47 g
Operating
temperature
-10°C ~ 50°C
Battery charge
temperature
0°C ~ 40°C
Battery life Up to 35 days in clock mode
Up to 8.5 hours in training mode with GPS on
GPS Integrated high-sensitivity Sirf IV receiver with
embedded patch antenna
RF transceiver 2.4 GHz ANT+ transceiver with embedded antenna
Storage Embedded 512 MB serial ash
G-Sensor 3-axis acceleration sensor
24
EN
Screen Terminologies
Terminology Screen Display
Alarm ALM
Stopwatch STW
Time format FMT
Language LANG
Daily DAY
Weekday WDAY
Time1 TM1
Time2 TM2
Clear storage CLS
Combo sensor DUAL
Speed SPD
Calorie CAL
Exercise EXE
HR Zone 1 HRZ1
B
A
C
K
/
L
I
N
E
2
G
P
S
T
I
M
E
S
E
T
T
I
N
G
S
T
W
DÉMARRER/ARRÊTER/
HEURE GPS
TOUR/STW
EXERCICE/
RETOUR
OK/RÉGLAGE/
ALIMENTATION
Cardio 30
Guide d'utilisation
bb.brytonsport.com
FR
2
FR
Table des
matières
Introduction ................................3
Prise en main ............................... 4
Modes ............................................ 5
Boutons ......................................... 6
Structure du menu .................... 7
Mode Horloge............................. 8
Acher/Masquer heure 2 ..........8
Calibrage automatique de
l'heure par GPS ............................... 8
Utilisation du chronomètre ....... 8
Réglage du mode Horloge ........9
Mode Entraînement .................12
Début / Fin de course ..................12
Marquer le tour .............................. 13
Acher les infos
d'entraînement .............................. 13
Dénir l'entraînement ................. 14
Connecter les capteurs ...............18
Acher le journal
d'entraînement .............................. 18
Activer/désactiver le GPS ...........19
Dénir le type d'entraînement . 19
Longueur de foulée ...................... 19
Dénir le prol ...............................20
Dénir l'unité ..................................21
Eacer la mémoire ........................ 21
Icônes ............................................. 22
Caractéristiques .........................23
Technologie d'écran ................. 24
3
FR
Introduction
Cardio 30, la plus petit montre sportive GPS sur le marché, est
destinée aux athlètes de tous niveaux. En réglant les objectifs
dans les programmes de pré-entraînement, la Cardio 30 permet
de calculer avec précision et d'enregistrer les données telles que
position, vitesse, distance, rythme, fréquence de foulée, cadence*,
rythme cardiaque*, etc. Vos résultats à l'entraînement peuvent être
partagés et analysés sur brtyonsprot.com. De plus, avec le capteur
intégré de la Cardio 30, pas besoin de podomètre supplémentaire
pour vos exercices en salle.
Contenu de l'emballage
Vériez que tous les éléments suivants sont bien dans le carton :
Cardio 30•
Câble USB•
Guide d'utilisation•
Accessoires en option :
Capteur de rythme cardiaque•
Capteur de vitesse / cadence•
* Un capteur HRM ou SPD/CAD est requis.
4
FR
Prise en main
Étape 1. Connecter, synchroniser et charger
1. Connectez la Cardio 30 à un PC avec le câble USB fourni.
2. Téléchargez l'application Bryton Bridge à partir de
bb.brytonsport.com et synchronisez-la avec la Cardio 30.
S
E
T
T
I
N
G
S
T
W
B
A
C
K
/
L
I
N
E
2
G
P
S
T
I
M
E
Étape 2. Allumer
Appuyez une fois sur le bouton OK pour allumer Cardio 30.
Remarque: Pour éteindre, appuyez pendant 5 seconde sur le bouton OK.
Étape 3. Conguration initiale
À la première utilisation, l'assistant de conguration s'ache.
1. Sélectionnez votre langue préférée.
2. Sélectionnez l'unité de mesure.
3. Entrez votre prol utilisateur (recommandé).
Remarque : La précision des données aura un impact important sur l'analyse
de vos entraînements.
Laissez la Cardio 30 connectée
au PC pour recharger la
batterie.
Remarque : Pour la première
utilisation, rechargez la batterie
pendant au moins 2,5 heures.
5
FR
Modes
La Cardio 30 fonctionne en deux modes :
Montre-bracelet classique,
avec :
Date et heure•
Alarme•
Chronomètre•
Donne l'analyse des
entraînements :
Durée•
Distance•
Rythme•
Vitesse•
Rythme cardiaque•
Calories•
Tour•
Fréquence de foulée•
4. Entrez votre rythme cardiaque maximum.
5. Allez à l'extérieur pour acquérir le signal GPS. Une fois que le
signal GPS est xe, la Cardio 30 règle automatiquement la date
et l'heure. Pour régler manuellement la date et l'heure, allez sur
Réglages de l'heure (voir page 8).
6. Appuyez sur OK pour terminer la conguration.
Mode Horloge Mode Entraînement
Appuyez une fois sur
EXERCICE/RETOUR
Appuyez sans arrêter sur
EXERCICE/RETOUR
6
FR
Boutons
Cardio 30 a quatre boutons qui sont utilisés pour plusieurs
fonctions.
Le tableau suivant fournit une illustration graphique sur comment
utiliser les boutons, qui sont décrits dans les sections ultérieures.
Boutons Appui bref Boutons Appui long
EXERCICE/RETOUR/LIGNE2
RETOURNER
OK/Rétroéclairage
RÉGLAGE/
ALIMENTATION
DÉMARRAGE/ARRÊT HEURE GPS
TOUR STW
B
A
C
K
/
L
I
N
E
2
G
P
S
T
I
M
E
S
E
T
T
I
N
G
S
T
W
Appuyez sans
arrêter sur les
boutons pour
utiliser les fonctions
secondaires.
Appuyez une fois
sur les boutons pour
utiliser les fonctions
primaires.
RETOURNER
Appuyez une fois •
pour retourner à
l’écran précédent.
En mode Exercice, •
appuyez sans arrêter
pour changer au mode
Horloge.
LIGNE2: Appuyez une
fois pour acher les
infos de l’exercice.
 Loading...