

Page 1
THE BEST THERE IS™
BOSS
OWNER’S MANUAL
®
Page 2

SWEET SPOT CHARTS FOR YOUR
BOSS®-EQUIPPED RIFLE ARE
AVAILABLE AT BROWNING.COM
OR CALL:
1-800-333-3288
BOSS®OWNER’S MANUAL
(BALLISTIC OPTIMIZING SHOOTING SYSTEM)
Very important: Save this booklet. Carefully read this entire
owner’s manual before using your new Browning firearm.
New Gun Owner’s Record
Keep this record for future reference:
Browning Model __________________________________
Serial Number __________________________________
Gauge / Caliber __________________________________
Purchase Price __________________________________
Purchased From __________________________________
Date of Purchase __________________________________
Page 3

YOU ARE RESPONSIBLE FOR FIREARMS SAFETY
These are additional instructions specific to the BOSS® installed on
your new A-Bolt or BAR rifle. You must read and understand the
cautions and proper handling procedures outlined in this booklet and
in the owner’s manual received with your rifle before using your new
BOSS®-equipped rifle. If you are missing the owner’s manual for your
rifle, we will send you a free replacement manual upon request.You
can also visit our website at browning.com as many of our owner’s
manuals are posted on line.
CAUTION: THE THREADING ON YOUR BARREL IS FOR BROWNING BOSS
COMPONENTS ONLY. DO NOT INSTALL ANY OTHER DEVICE ONTO THE
BROWNING BOSS
RIFLE, WHICH IS NOT DESIGNED AND FITTED FOR THE BOSS
®
BARREL. DO NOT INSTALL THE BOSS®DEVICE ON ANY
®
BY
BROWNING. DOING SO MAY CAUSE SERIOUS INJURY OR DEATH TO
YOURSELF OR OTHERS.
GENERAL OPERATION
The BOSS® (Ballistic Optimizing Shooting System) allows you to fine
tune accuracy by modifying the vibrations of your rifle’s barrel using
an adjustable weight system.
Every time a rifle is fired, barrel vibrations are set in motion. These
vibrations occur in all directions, even back and forth along the axis of
the barrel. Browning research has confirmed that barrel vibrations are
the primary cause of inaccuracy. Barrel vibrations are influenced by
many factors such as bullet type, bullet weight, primers, different
powders and barrel configurations.
The BOSS® adjusts timing of barrel vibrations so the bullet
consistently leaves the rifle muzzle at the most advantageous time.
Once the BOSS® is adjusted to this “Sweet Spot” for a given
ammunition, your rifle will consistently deliver extraordinarily tight
groups. With precision ammunition, BOSS®-equipped rifles of many
calibers are capable of 100 yard, one hole groups. The smallest 3-shot
group obtained during the BOSS® development measured an
incredible .051" at 100 yards, using factory loaded ammunition. No
2
®
Page 4
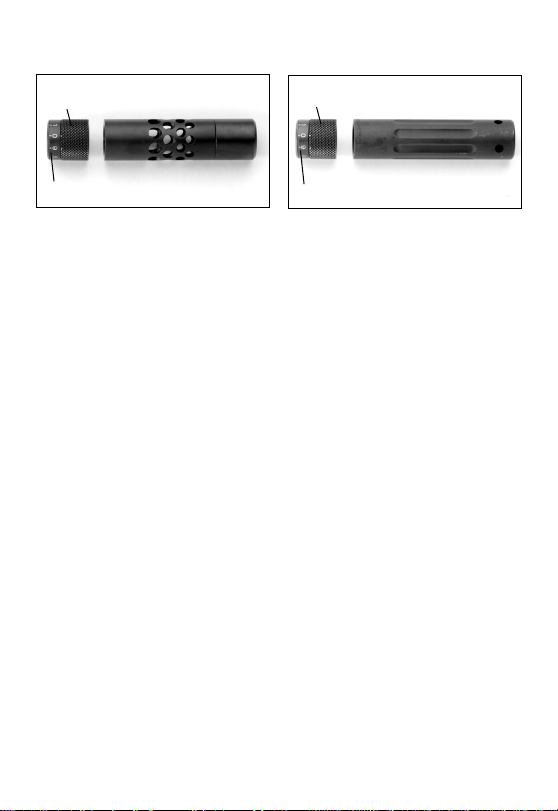
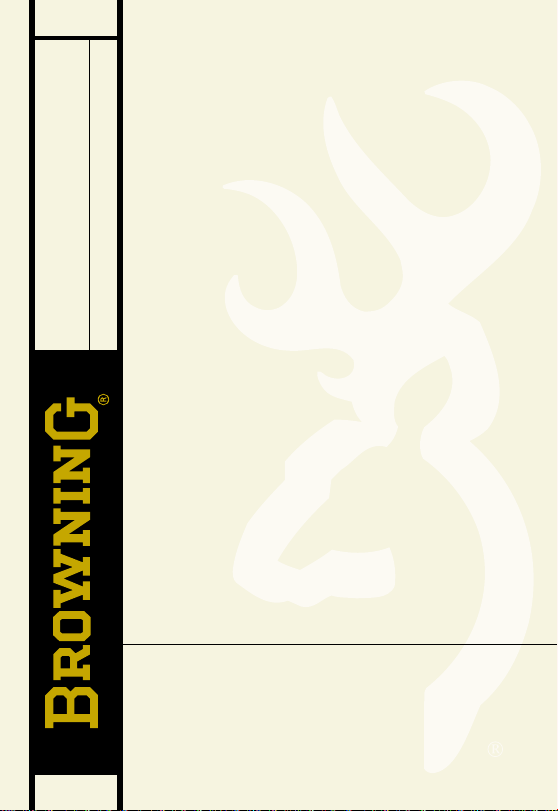
FIGURE 1 FIGURE 1A
Micro Adjustable
Lockout
Body
Micro Adjustable
Lockout
Body
Micrometer Adjustment Ring
Micrometer Adjustment Ring
longer will you need to try a variety of ammunition to obtain
acceptable accuracy. With the BOSS®, you can tune your rifle to get
the optimum accuracy for all available factory loads.
When adjusted to its Sweet Spot, the BOSS® will compensate for slight
deviations in ammunition velocity. However, the BOSS® will not
compensate for poor shooting or flyers caused by low quality bullets
and ammunition.
TO OBTAIN THE HIGHEST LEVEL OF ACCURACY FROM YOUR RIFLE, IT IS
RECOMMENDED THAT THE RIFLE BORE BE CLEANED AFTER EVERY 12 TO 15
ROUNDS. SEE "CLEANING THE RIFLE BORE" SECTION OF THIS BOOKLET
FOR CLEANING PROCEDURES.
MUZZLE BRAKE FEATURE
The BOSS® is available in two versions, the muzzle break version
(Figure 1) and the CR (conventional recoil) version (Figure 1A).
WARNING: THE BOSS®WITH RECOIL REDUCING MUZZLE BRAKE PROVIDES
SUBSTANTIAL INCREASED NOISE/MUZZLE BLAST. ALWAYS WEAR HEARING
PROTECTION TO PREVENT HEARING LOSS OR DAMAGE.
The unique exhaust hole pattern on the BOSS® with muzzle brake
provides considerable recoil reduction. Recoil reduction of the BOSS®
ranges from 30% to 50% - depending on caliber, weight of rifle, etc.
You will experience an increase in noise and concussion (muzzle blast)
when a BOSS®-equipped rifle is fired. Hearing protectors (shooting
ear plugs or muffs) should always be worn to guard against hearing
damage when shooting a BOSS®-equipped rifle. Wear shooting glasses
3
Page 5

to protect your eyes from flying particles. Always keep a safe distance
between the muzzle of your firearm and any persons nearby, as
muzzle blast, debris and ejecting shells could inflict serious injury.
BOSS®SPECIFICATIONS
The BOSS® body length is 2" for all calibers. The size of the gas vent
holes and hole pattern is the same for all calibers. The size of the
bullet exit hole is the same for all calibers except for the 338 Win.
Mag. and 375 H&H. The thread system for the 338 Win. Mag. and the
375 H&H is different from other calibers to rule out the possibility of
accidentally switching components and creating an unsafe
combination. Do not attempt to interchange these systems. Use only
the BOSS intended for use with your rifle.
Each BOSS® consists of a micro-adjustable lock nut and body
(Figure 1). The body of the BOSS® consists of a weight and muzzle
brake. The weight and muzzle brake are affixed by LOCTITE®. The
micro-adjustable lock nut has a micrometer adjustment ring.
To obtain the utmost accuracy from your BOSS®-equipped rifle, it is very
important that the micro-adjustable lock nut and body are always tight.
THE “SWEET SPOT”
Precision accuracy from the BOSS® system is achieved by calibrating
your rifle caliber and ammunition with a prescribed Sweet Spot
setting. (The Sweet Spot chart is available separately from this manual.
If you do not have a Sweet Spot chart, call 1-800-333-3288 to request
one. You can also look up this information at browning.com) This
chart lists average, or suggested, Sweet Spots. These settings were
determined through extensive testing by the Browning research and
development staff. Sweet Spots may vary between rifles of identical
specifications with given ammunition. Even one quarter of a turn
away from the Sweet Spot can cause a group to spread out as much as
one inch or more. We suggest you use our listed Sweet Spot settings as
a starting point in determining the exact Sweet Spot setting for your
particular rifle and make changes accordingly.
THE BOSS
4
®
SETTING MAY SLIGHTLY ALTER YOUR RIFLE’S POINT OF IMPACT.
NOTE: ANY CHANGE IN
Page 6
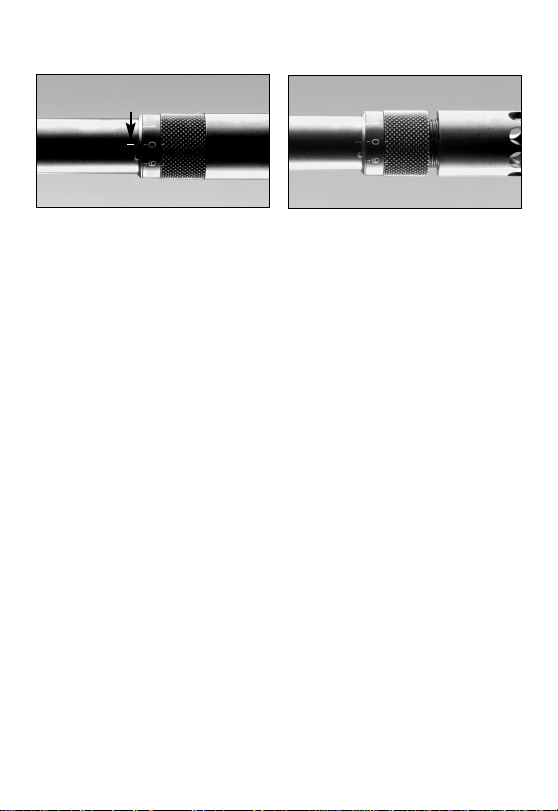
FIGURE 2 FIGURE 2A
Calibrate the BOSS®so ”0“ lines up with the
hatch mark on the barrel.
The micro-adjustable lock nut must be bottomed out.
It is recommended you set the BOSS® Sweet Spot setting before sighting
in your rifle for windage and elevation. The BOSS® was tested in full
1
⁄2 and 1⁄4 turn increments. Tighter groups may be achieved with
turn,
the BOSS® tested in other positions. On the Sweet Spot chart, Sweet
Spots are listed by both ammunition and rifle model. Settings not listed,
either do not apply or are for ammunition not yet tested.
PRELIMINARY ADJUSTMENTS
Before setting your Sweet Spot, it is important that your BOSS® be
calibrated with the barrel. This will ensure that your rifle is consistent
with those tested by Browning research and development when
BOSS® Sweet Spots were initially determined.
To find out if your BOSS® needs to be recalibrated, loosen the microadjustable lock nut and turn it until it bottoms out on the threads of
the BOSS® – or will not loosen any further. If your BOSS® is
calibrated, the “0” on the micrometer adjustment ring will line up
with the longitudinal hatch mark on the barrel (Figure 2). If the “0” is
not aligned with the longitudinal hatch mark, you will need to
calibrate your BOSS®. Move the micrometer adjustment ring on the
bottom of the micro-adjustable lock nut so the “0” is aligned with the
longitudinal hatch mark. To adjust the micrometer adjustment ring,
insert your fingernail or a small pointed object in the split of the ring
and rotate the ring (Figure 3).
5
Page 7

FIGURE 3
Rotate the micrometer adjustment ring
FIGURE 4
Full-turn Sweet Spot increments
CAUTION: WHEN SETTING THE SWEET SPOT ON YOUR RIFLE, MAKE CERTAIN
YOUR RIFLE IS FULLY UNLOADED AND THAT THE RIFLE’S SAFETY IS IN THE
"ON SAFE" POSITION AND YOUR RIFLE IS POINTED IN A SAFE DIRECTION.
SETTING YOUR RIFLE’S SWEET SPOT
Full turn Sweet Spot settings or graduations are numbered 1-10 and
inscribed on the barrel of your rifle (Figure 4). Smaller
increments are inscribed on the micrometer adjustment ring
(Figure 5). To set the Sweet Spot, the micro-adjustable lock nut is
turned either clockwise or counterclockwise until it is aligned with the
desired Sweet Spot number inscribed on your rifle’s barrel. One full
revolution of the micro-adjustable lock nut indicates one full change
1
in setting, or one index mark on the barrel.
⁄10 turn increments are set
by rotating the micro-adjustable lock nut until the desired setting lines
up with the hatch mark on the barrel.
IMPORTANT: When adjusting the Sweet Spot, make sure you grip the
knurled surface of the lock nut. The knurled portion of the microadjustable lock nut and micrometer adjustment ring must rotate
together to ensure a precise Sweet Spot setting and retainment of
proper calibration.
1
turn
⁄10
6
Page 8

FIGURE 5 FIGURE 6
1
⁄10 turn Sweet Spot increments
Example 1: Sweet Spot set at 6.0
EXAMPLE 1
1 Suppose you have a 270 caliber A-Bolt rifle and are sighting in
with 150 grain cartridges. Referring to the Sweet Spot chart, you
will find the average Sweet Spot to be 6.0 for a 270 A-Bolt with
150 grain ammunition.
2 After having made sure your BOSS® is calibrated properly on the
barrel, rotate the micro-adjustable lock nut counterclockwise six full
revolutions. The edge of the micrometer adjustment ring should
line up, or rest, on the marking for 6.0 on the barrel of the rifle.
NOTE: It is not necessary to calibrate your BOSS® with each change
in Sweet Spot settings. However, you should check the BOSS®
periodically to assure proper alignment.
3 Since the Sweet Spot setting is listed at 6.0, the 0 inscribed on the
micrometer adjustment ring should line up with the hatch mark
or longitudinal line on the barrel (Figure 6).
4 Tighten the body of the BOSS® so it is secure against the micro-
adjustable lock nut. Use the special wrench supplied with your
rifle. Insert the wrench through one end of an exhaust hole and
out through another. It is recommended to insert the wrench
through the smallest set of holes possible. Turn clockwise until
the body and micro-adjustable lock nut are tight (Figure 7).
7
Page 9

FIGURE 7 FIGURE 8
Tighten the BOSS so it is secure
Example 2: sweet spot set at 2.5
CAUTION: REMOVE THE WRENCH FROM THE BOSS
®
EXHAUST HOLES
BEFORE FIRING YOUR RIFLE. FAILURE TO DO SO CAN CAUSE INJURY TO
YOURSELF OR OTHERS.
EXAMPLE 2
1 Suppose you have a 300 Win. Mag. BAR rifle and are using Federal
180 grain cartridges. Referring to the Sweet Spot chart, you will find
the average Sweet Spot to be 2.5.
2 Calibrate your BOSS® and rotate the micro-adjustable lock nut
counterclockwise until the edge of the micrometer adjustment ring
lines up, or rests, on the marking for 2.0 on the barrel.
3 Since the Sweet Spot is listed as 2.5, the 5.0 inscribed on the
micrometer adjustment ring should line up with the hatch mark or
vertical line on the barrel (Figure 8).
4 Using the special wrench, tighten the body of the BOSS® so it is
secure against the lock nut. Your BOSS® system is now calibrated
for Federal 180 grain ammunition using a 300 Win. Mag. BAR rifle.
MORE PRECISE ADJUSTMENTS
If you desire to further experiment and possibly obtain even tighter
groupings, turn the micro-adjustable lock nut
and fire your rifle at a safe target. If the group opens up (gets larger),
turn the micro-adjustable lock nut counterclockwise and sight in at
1
different
⁄4 turns until you are satisfied with your groupings. Sweet
Spot settings may vary between rifles of identical specifications with a
8
1
⁄4 of a turn clockwise
Page 10

FIGURE 9
Barrel Mounting Screw
FIGURE 10
Trigger Guard Screw
BAR Forearm Locking Screw
given ammunition. As in any sighting-in process, the best results are
obtained through trial and error. You may need to retune the BOSS®
should you decide to shoot ammunition of different brands, lots
and/or types.
Be sure to keep a record of your rifle’s Sweet Spots, especially if you
use your rifle for different game and shoot different loads.
CAUTION: WHEN ADJUSTING THE SWEET SPOT, NEVER SET THE BOSS
®
BEYOND THE 10 SETTING.
With the BOSS® set beyond 10, it could become loose, misaligned or
disengaged when firing the rifle. This could result in serious injury to
yourself or others.
IMPORTANT: Each time you set the Sweet Spot, the body of the
BOSS® must be tight against the micro-adjustable lock nut. Failure to
keep the components tightly locked will adversely affect accuracy.
NOTE: The barrel mounting screw and trigger guard screw on the ABolt should also be fully tightened (Figure 9). If the barrel mounting
screw and trigger guard screw are loose on your A-Bolt, tighten the
barrel mounting screw before tightening the trigger guard screw. On
the BAR, the forearm locking screw should be kept fully tightened
(Figure 10) to obtain, and retain, the best possible accuracy from your
BOSS®-equipped rifle.
9
Page 11

NYLON LOCKING DEVICE
A strip of nylon in the threaded portion of the barrel helps keep the
Sweet Spot properly positioned. This locking device keeps the
components tight to the barrel, which is essential to optimum accuracy
(Figure 11). The nylon may become worn with prolonged use and may
require replacement. Replacement nylon locks are available from the
Browning parts department located in Arnold, Missouri.
CARE OF YOUR BOSS®-EQUIPPED RIFLE
The BOSS® is a precision instrument.
OPERATE EFFECTIVELY, IT IS VERY IMPORTANT YOUR RIFLE REMAINS IN ITS
ORIGINAL PURCHASE CONDITION. IT IS NECESSARY FOR YOUR RIFLE’S BARREL
TO REMAIN FREE-FLOATING AND THE ACTION TO BE PROPERLY BEDDED.
The above statement holds true either for the A-Bolt or BAR. To check
for adequate clearance, it is recommended that a piece of paper, folded
once, be able to pass between the barrel and stock without any
interference. If the barrel is not free-floating, take your rifle to a
competent gunsmith or send it to the Browning service facility in
Arnold, Missouri. Special rubber bedding in the barrel mounting
screw area and magazine well area of your BOSS®-equipped A-Bolt
rifle is installed at the factory and aids greatly in improving accuracy.
(Rubber bedding is not needed for the BAR.) If you have any
modifications made to your stock, make sure the rubber bedding has
not been altered. If the rubber bedding on your rifle has been
modified, send your rifle to the service facility in Arnold, Missouri.
IN ORDER FOR THE BOSS®TO
FIGURE 11
Nylon Locking Device
10
Page 12

CLEANING THE RIFLE BORE
To maintain the utmost accuracy from your BOSS®-equipped rifle, or
any rifle, extensive testing has proven that the rifle bore must be
cleaned after every 12 to 15 rounds.
CAUTION: BEFORE CLEANING YOUR RIFLE, MAKE CERTAIN YOUR RIFLE IS FULLY
UNLOADED, THE MAGAZINE IS REMOVED, THE SAFETY IS IN THE "ON SAFE"
POSITION AND IT IS POINTED IN A SAFE DIRECTION.
We highly recommend that your rifle be cleaned with the BOSS
installed on your barrel. On the A-Bolt, remove the bolt and clean rifle
from the breech end. The BAR, by design, must be cleaned from the
muzzle end. Use extra care when cleaning to avoid damaging the
muzzle crown.
Modern cartridge jackets are made mainly of copper and zinc. These
metals glide easily and prolong barrel life; however, residues from
copper and zinc stick to the barrel and require more frequent
cleaning. As top benchrest shooters have known for decades, copper
solvent is the key to cleaning a barrel for optimum accuracy. The
recommended cleaning procedure is as follows:
1 Clean the bore with a good powder solvent to remove all traces
of powder residue. Performing this step before the application
of a copper solvent will prevent the bore from refouling with
copper so readily.
2 Swab the bore with a good copper solvent using the manufacturer’s
recommended procedures. After neutralizing the solvent, generally
with oil, it is important to swab the bore dry to reduce copper
buildup.
CONCURRENTLY. A CHEMICAL REACTION MAY RESULT THAT WILL CORRODE EVEN
STAINLESS STEEL BARRELS. IT IS IMPORTANT TO FOLLOW THE MANUFACTURER’S
RECOMMENDATIONS EXACTLY.
NOTE: DO NOT USE SOLVENTS OF DIFFERENT MANUFACTURERS
3 If necessary, the BOSS® may be removed to facilitate cleaning
your rifle.
®
11
Page 13

NOTE: WHEN CLEANING THE BAR WITH THE BOSS
®
REMOVED, THE PLASTIC CAP
(CROWN AND ACCURACY PRESERVER) PROVIDED WITH THE RIFLE SHOULD ALWAYS
BE USED TO PROTECT THE MUZZLE’S CROWN. ALWAYS MAKE SURE THE CAP USED
MATCHES THE CALIBER OF THE RIFLE BEING CLEANED. THE CALIBER IS MARKED ON
THE END OF THE CAP.
Clean the BOSS® by unscrewing the body and micro-adjustable lock
nut from the rifle. With the components disassembled, wipe each
component with oil. Browning oil is excellent for this application.
Lightly oil all threads and make sure the exhaust holes are free of
obstructions.
REMEMBER TO REMOVE THE PLASTIC CAP WHEN REASSEMBLING THE BOSS
®
ON THE BAR.
4 Reassemble your BOSS® by screwing on the micro-adjustable lock
nut and then the BOSS® body. After taking apart the BOSS®, it will
be necessary to reset the Sweet Spot.
MAKE CERTAIN ALL CLEANING PATCHES ARE REMOVED FROM THE BARREL
AND EXHAUST HOLES IN THE BODY OF THE BOSS
®
BEFORE FIRING YOUR RIFLE.
5 After cleaning the bore, it is recommended two fouling shots be
fired when firing for extreme accuracy. Additionally, it is
recommended the rifle be allowed to cool every three rounds.
12
Page 14

You Are Responsible For Firearms Safety
As a gun owner, you accept a set of demanding responsibilities. How seriously you take these
responsibilities can mean the difference between life and death. Failure to follow any of these
instructions can cause extensive damage to your gun and/or possible serious injury or death to
yourself and others. There is no excuse for careless or abusive handling of any firearm. At all
times handle any firearm with intense respect for its power and potential danger.
PLEASE READ AND UNDERSTAND ALL OF THE CAUTIONS, PROPER HANDLING PROCEDURES
AND INSTRUCTIONS OUTLINED IN THE OWNER’S MANU AL BEFORE USING YOUR NEW
FIREARM.
1. ALWAYS KEEP THE MUZZLE OF YOUR RIFLE POINTED IN A SAFE DIRECTION, even
though you are certain that the rifle is unloaded. Never point any firearm at anything you
do not intend to shoot. Be extremely alert and aware of all persons and property within
the range of your ammunition.
2.
NEVER RELY TOTALLY ON YOUR RIFLE'S MECHANICAL "SAFETY" DEVICE. The word
"safety" describes a gun's trigger block mechanism, sear block mechanism, hammer
block mechanism or firing pin block mechanism. These mechanical devices are designed
to place your gun in a SAFER status. No guarantee can be made that the gun will not fire
even if the "safety" is in the "on safe" position. See "Operations of the Safety" for
instructions on operation of YOUR gun's "safety."
LIKE ANY MECHANICAL DEVICE, A "SAFETY" CAN SOMETIMES FAIL; IT CAN BE
JARRED OR INADVERTENTLY MANIPULATED INTO AN UNSAFE CONDITION.
Mechanical "safeties" merely aid safe gun handling and are no excuse for pointing your
rifle's muzzle in an unsafe direction.
While it is a good idea to "test" your rifle's mechanical "safeties" periodically for proper
function,
DIRECTION
NEVER TEST IT WHILE YOUR RIFLE IS LOADED OR POINTED IN AN UNSAFE
Safe gun handling does not stop with your gun's mechanical "safety devices -- it starts
there. Always treat your rifle with the respect due a loaded, ready-to-fire firearm.
WHENEVER YOU HANDLE A FIREARM, OR HAND IT TO SOMEONE, ALWAYS OPEN THE
3.
ACTION IMMEDIATELY, VISUALLY CHECK YOUR RIFLE'S CHAMBER, FEED MECHANISM
AND MAGAZINE.
Make certain they do not inadvertently contain any ammunition. Always keep the
chamber empty and "safety" in the "on safe" position unless shooting is imminent.
4.
DO NOT TRANSPORT YOUR RIFLE LOADED, WHETHER IN A SCABBARD, GUN CASE, OR
OTHER CONTAINER.
HUNTING FROM ELEVATED SURFACES SUCH AS TREE STANDS IS DANGEROUS, and
5.
may increase the risk of handling a firearm. The following rules should always be
observed by you and those you hunt with: Always make certain that the stand being used
is safe and stable. Always make certain that your firearm is unloaded when it is being
taken up to and down from the stand. Always make certain that your firearm is not
dropped from the stand, or dropped while it is being taken up to or down from the stand.
Remember, a loaded firearm may discharge when dropped, even with the safety in the
"on safe" position.
Page 15

6. BEWARE OF BARREL OBSTRUCTIONS, for the safety of both your gun and yourself.
Mud, snow, and an infinite variety of other obstructions may inadvertently lodge in a
barrel bore. It takes only one small obstruction to cause dangerously increased pressures
that can ruin (swell or rupture) the finest rifle barrels.
BEFORE CHECKING FOR A BARREL OBSTRUCTION, BE CE RTAIN NO LIVE ROUND IS IN
THE CHAMBER AND THAT THE MAGAZINE IS REMOVED AND FEED MECHANISMS ARE
COMPLETELY EMPTY. PLACE THE "SAFETY" IN THE "ON SAFE" POSITION.
Look through the barrel to be sure it is clear of any obstruction. If an obstruction is seen,
no matter how small it may be, clean the bore with a cleaning rod and patch as described
in "Cleaning and Maintenance Suggestions." Before the first firing, clean the bore
with a cleaning rod and patch, and wipe away any anti-rust compound in the
action/chamber areas.
7.
ALWAYS UNLOAD YOUR RIFLE WHEN NOT IN USE. REFER TO "UNLOADING THE RIFLE"
FOR AN EXPLANATION OF HOW TO UNLOAD YOUR RIFLE PROPERLY.
As a safety precaution, it is preferable to disassemble your gun for storage. Store your
gun and ammunition separately -- well beyond the reach of children. Take all safeguards
to ensure your rifle does not become available to untrained, inexperienced or unwelcome
hands.
8.
USE THE PROPER AMMUNITION.
The barrel and action of this rifle have been made with substantial safety margins over
the pressures developed by established American commercial loads. Nevertheless,
Browning assumes no liability for incidents which occur through the use of cartridges of
nonstandard dimensions which develop pressures in excess of commercially available
ammunition with standards established by the Sporting Arms and Ammunitions
Manufacturers' Institute (SAAMI).
BE ALERT TO THE SIGNS OF AMMUNITION MALFUNCTION.
If you detect an off sound or light recoil when a cartridge s fired, DO NOT LOAD
ANOTHER CARTRIDGE INTO THE CHAMBER.
Open the action and remove all cartridges
from the magazine, chamber and action areas. With the action open, glance down the
barrel to make sure that an obstruction does not remain in the barrel. If there is an
obstruction, completely clear the barrel before loading and firing again. Failure to follow
these instructions can cause extensive damage to your gun and possible serious injury to
yourself and others.
MAKE SURE OF ADEQUATE VENTILATION IN THE AREA THAT YOU DISCHARGE A
FIREARM. WASH HANDS THOROUGHLY AFTER EXPOSURE TO AMMUNITION OR
CLEANING A FIREARM.
Lead exposure can be obtained from discharging firearms in poorly ventilated areas,
cleaning firearms or handling ammunition. Lead is a substance that has been known to
cause birth defects, reproductive harm and other serious injury.
9.
DO NOT SNAP THE FIRING PIN ON AN EMPTY CHAMBER -- THE CHAMBER MAY N OT BE
EMPTY!
Treat every gun with the respect due a loaded gun, even though you are certain the gun is
unloaded.
10.
KEEP FINGERS AWAY FROM THE TRIGGER WHILE UNLOADING, LOADING, UNTIL YOU
ARE READY TO SHOOT.
Page 16

11. BE SURE OF YOUR TARGET AND BACKSTOP.
Particularly during low light periods. Know the range of your ammunition. Never shoot
at water or hard object.
12.
ALWAYS UNLOAD YOUR RIFLE'S CHAMBER BEFORE CROSSING A FEN CE, CLIMBING A
TREE, JUMPING A DITCH OR NEGOTIATING OTHER OBSTACLES.
Refer to "Unloading The Rifle" for instructions on the unloading of your rifle. Never
place your loaded rifle on or against a fence, tree, car or other similar object.
13.
WEAR EYE AND EAR PROTECTION WHEN SHOOTING.
Unprotected, repeated exposure to gunfire can cause hearing damage. Wear ear protectors
(shooting ear plugs or muffs) to guard against such damage. Wear shooting glasses to
protect your eyes from flying particles. Allow proper distance (eye relief) between the
scope and your eye when firing a scoped rifle or shotgun. Always keep a safe distance
between the muzzle of your firearm and any persons nearby, as muzzle blast, debris and
ejecting shells could inflict serious injury. Also, wear eye protection when disassembling
and cleaning your shotgun to prevent the possibility of springs, spring-tensioned parts,
solvent or other agents from contacting your eyes.
14.
DROPPING A LOADED GUN CAN CAUSE AN ACCIDENTAL DISCHARGE even with the
"safety" in the "on safe" position. Be extremely careful while hunting or during any
shooting activity, to avoid dropping any firearm.
15.
IF YOUR RIFLE FAILS TO FIRE, KEEP THE MUZZLE POINTED IN A SAFE DIRECTION.
Hold this position for a minimum of 30 seconds. Carefully open the action and remove
the cartridge. If the primer is indented, the cartridge should be disposed of in a way that
cannot cause harm. If the primer is not indented, your firearm should be examined by a
qualified gunsmith and the cause of the malfunction should be corrected before further
use.
16.
BE DEFENSIVE AND ON GUARD AGAINST UNSAFE GUN HANDLING AROUND YOU AN D
OTHERS.
Don't be timid when it comes to gun safety. If you observe other shooters violating any of
these safety precautions, politely suggest safer handling practices.
17.
BE CERTAIN YOUR RIFLE IS UNLOADED BEFORE CLEANING. Because so many gun
accidents occur when a firearm is being cleaned, special and extreme care should be
taken to be sure your gun is unloaded before disassembly, cleaning and reassembly. Keep
ammunition away from the cleaning location. Never test the mechanical function of any
firearm with live ammunition.
18.
TEACH AND SUPERVISE FIREARMS SAFETY TO ALL MEMBERS OF YOUR FAMILY -ESPECIALLY TO CHILDREN AND NONSHOOTERS.
Closely supervise newcomers to the shooting sports. Encourage enrolling in
hunting/shooting safety courses.
19.
NEVER DRINK ALCOHOLIC BEVERAGES OR TAKE ANY TYPE OF DRUGS BEFORE OR
DURING SHOOTING.
Your vision and judgment could be dangerously impaired, making your gun handling
unsafe to you and to others.
Page 17

20. READ AND HEED ALL WARNINGS in this instruction book, on ammunition boxes and
with all accessories that you install on your firearm. It is your responsibility to secure the
most up-to-date information on the safe handling procedures of your Browning gun.
Browning assumes no liability for incidents which occur when unsafe or improper gun
accessories or ammunition combinations are used.
21.
PERIODIC MAINTENANCE -- AVOID UNAUTHORIZED SERVICING.
Your rifle is a mechanical device which will not last forever, and as such, is subject to
wear and requires periodic inspection, adjustment and service. Browning firearms should
be serviced by a Browning Recommended Service Center or by Browning's service
facility in Arnold, Missouri. Browning cannot assume any responsibility for injuries
suffered or caused by unauthorized servicing, alterations or modifications of Browning
firearms.
22.
BROWNING RESERVES THE RIGHT TO REFUSE SERVICE ON FIREARMS THAT HAVE
BEEN ALTERED, ADDED TO OR SUBSTANTIALLY CHANGE D.
Removal of metal from barrel(s), or modification of the firing mechanism and/or
operating parts may lead to Browning's refusal of service on such firearms. Browning
will charge the owner parts and labor to return the firearm to original Browning
specifications.
DO NOT, UNDER ANY CIRCUMSTANCES, ALTER THE TRIGGER, SAFETY OR PARTS OF
THE FIRING MECHANISM OF THIS OR ANY OTHER FIREARM. FAILURE TO OBEY THIS
WARNING MAY RESULT IN INJURY OR DEATH TO YOURSELF OR OTHERS.
BE CAREFUL!
Page 18

SERVICE OR REPAIR
If your firearm should require service or repair, we suggest you first
contact a local recommended Browning Firearms Service Center.
Contact your Browning sporting goods dealer or call our service
department for the address of the Service Center nearest you.
Alternatively, you may send your firearm directly to our own service
department. For technical questions about your firearm, call our
service department.
Browning Firearms Service Department
One Browning Place
Arnold, Missouri 63010-9406
800-322-4626
Canadian customers call or write:
Browning Canada Sports Ltd./Ltee
5583 Chemin St-François
St-Laurent, Quebec H4S 1W6
514-333-7261
Page 19

SWEET SPOT CHARTS FOR YOUR
BOSS®-EQUIPPED RIFLE ARE AVAILABLE
AT BROWNING.COM OR CALL
1-800-333-3288
Page 20

WWW.BROWNING.COM
BROWNING CANADA: Browning Canada Sports Ltd/Ltee,St-Laurent, Quebec, H4S 1W6
BROWNING US: Morgan, Utah 84050-9326
BROWNING INTL: Parc Industriel des Hauts-Sarts, B-4040 Herstal, Belgium
AO0302/02380
 Loading...