


A500 SEMI-AUTOMATIC SHOTGUN

New Gun Owner’s Record
(KEEP THIS RECORD FOR FUTURE REFERENCE)
Browning Model
Serial Number
Gauge
Purchase Price
Purchased From
Date of Purchase
Please fill out and mail the Market Survey Card at the back of this booklet.

We are pleased that you have chosen a
Browning A-500 shotgun.
It is certainly a gun you can be proud to own. It
represents the state-of-the-art in modern gun design
and manufacturing. The processes of design, testing
and manufacturing were all assisted by advanced
computer systems. The result is superior dependability,
greater ease-of-operation, smoother handling and
more reliable overall function. With a reasonable
amount of care, your A-500 shotgun should give you
many years of dependable, enjoyable service. Please
feel free to write us immediately if you have any
observations regarding its performance and operation.
Also, please take a moment to complete and mail in
the brief attached marketing survey card found on our
back cover. It helps us considerably in our constant
effort to provide you with better service.
NOTE: All current production A-500 shotguns have an
improved trigger group assembly. You can confirm this
by the letter “H” stamped on the trigger guard. (See
Figure 10 on page 37 of this manual.)
If your trigger guard does not have the letter “H”
stamped on it then please contact our Browning
Service Department toll free at 1-800-322-4626 for
information on how to get the improved trigger
assembly installed on your A-500.
Thank You.
Route #1 Morgan, Utah 84050
Distributed in Canada by Browning Canada Sports Ltd./Ltee, St-Laurent, Quebec H4S 1SO
1

You Are Responsible for Firearms
Safety
As a gun owner, you accept a set of demanding
responsibilities. How seriously you take these
responsibilities can be the difference between life
and death. Mistakes made with guns are final
and cannot be paid for with money or regret.
There is no excuse for careless or abusive
handling of any firearm. At all times handle your
shotgun and any other firearm with intense
respect for its power and potential danger.
PLEASE READ AND UNDERSTAND ALL OF
THE CAUTIONS, PROPER HANDLING
PROCEDURES AND INSTRUCTIONS
OUTLINED IN THIS BOOKLET BEFORE
USING YOUR NEW FIREARM.
ALWAYS KEEP THE MUZZLE OF YOUR
SHOTGUN POINTED IN A SAFE
DIRECTION
the shotgun is unloaded. Never point any
firearm at anything you do not intend to
shoot. Be extremely alert and aware of all
persons and property within the range of
your ammunition.
even though you are certain
NEVER TRUST YOUR SHOTGUN’S
MECHANICAL “SAFETY” DEVICE.
2
The

word “safety” describes a gun’s trigger
block mechanism, sear block mechanism,
hammer block mechanism or firing pin
block mechanism. These mechanical
devices are designed to place your gun in
a SAFER status. No guarantee can be made
that the gun will not fire even if the
“safety” is in the “on safe” position. The
A-500 has a cross bolt “safety” which
blocks the gun’s trigger. See “Operation of
the Safety” on page 15 for instructions on
operation of this gun’s safety.
Like any mechanical device, a “safety” can
sometimes fail; it can be jarred or
inadvertently manipulated into an unsafe
condition. Mechanical “safeties” merely aid
safe gun handling and are no excuse for
pointing your shotgun’s muzzle in an
unsafe direction.
While it is a good idea to “test” your
shotgun’s mechanical “safeties” periodically
for proper function,
“SAFETY” WHILE YOUR SHOTGUN IS
LOADED OR POINTED IN AN UNSAFE
DIRECTION.
NEVER TEST THE
Safe gun handling does not stop with your
gun’s mechanical “safety” devices — it
starts there. Always treat this shotgun with
the respect due a loaded, ready-to-fire
firearm.
3

WHENEVER YOU HANDLE A FIREARM,
OR HAND IT TO SOMEONE, ALWAYS
OPEN THE ACTION IMMEDIATELY,
VISUALLY CHECK YOUR SHOTGUN’S
CHAMBER, FEED MECHANISM AND
MAGAZINE to be certain that they do not
inadvertently contain any ammunition.
Always keep the chamber empty and the
“safety” in the “on safe” position unless
shooting is imminent.
DO NOT TRANSPORT YOUR SHOTGUN
LOADED, WHETHER IN A SCABBARD
GUN CASE, OR OTHER CONTAINER.
BEWARE OF BARREL OBSTRUCTIONS,
for the safety of both your gun and
yourself. Mud, snow, and an infinite variety
of other objects may inadvertently lodge in
a barrel bore. It takes only one small
obstruction to cause dangerously increased
pressures that can ruin (swell or rupture)
the finest shotgun barrels.
BEFORE CHECKING FOR A BARREL
OBSTRUCTION, BE CERTAIN NO LIVE
ROUND IS IN THE CHAMBER AND
THAT THE MAGAZINE AND FEED
MECHANISMS ARE COMPLETELY
EMPTY. PLACE THE “SAFETY” IN THE
“ON SAFE” POSITION
(See page 28 for
instructions on unloading). After assuring
4

yourself that the shotgun is completely empty,
again, open the breechblock, locking it to
the rear, and look through the barrel to be
sure it is clear of any obstruction. If an
obstruction is seen, no matter how small it
may be, clean the bore with a cleaning rod
and patch as described in “Cleaning and
Maintenance Suggestions” on page 54.
Before the first firing, clean the bore with a
cleaning rod and patch, and wipe away
any anti-rust compounds in the action/
chamber areas.
ALWAYS UNLOAD YOUR SHOTGUN WHEN
NOT IN USE. REFER TO PAGE 28 OF THIS
INSTRUCTION BOOKLET EXPLAINING
THE UNLOADING OF YOUR SHOTGUN.
As a safety precaution, it is preferable to
disassemble your gun for storage. Store
your gun and ammunition separately —
well beyond the reach of children. Take all
safeguards to ensure your shotgun does
not become available to untrained,
inexperienced or unwelcome hands.
USE THE PROPER AMMUNITION. The
barrel and action of this shotgun have
been made with substantial safety margins
over the pressures developed by
established American commercial loads.
Nevertheless, Browning assumes no
5

liability for incidents which occur through
the use of cartridges of nonstandard
dimensions which develop pressures in
excess of commercially available
ammunition which has been loaded in
accordance with standards established by
SAAMI (Sporting Arms and Ammunition
Manufacturers Institute).
DO NOT PUT A 20 GAUGE SHELL IN A
12 GAUGE GUN.
Store all shells of
different gauges in completely separate
and well-marked containers. Do not store
shells of mixed gauges in a common
container or in your pockets.
EVERY SHELL YOU PUT IN YOUR GUN.
EXAMINE
The most certain way to bulge or rupture
a barrel is to drop a 20 gauge shell into a
12 gauge chamber. The 20 gauge shell,
unfortunately, will not fall completely
through the barrel; its rim is caught by the
front of a 12 gauge chamber. Your gun will
misfire (with the chamber appearing to be
empty). It is then possible to load a 12
gauge shell behind the 20 gauge shell. If
the 12 gauge shell is then fired, the result
will be a so-called “12-20 burst” which can
cause extensive damage to your gun and
possible serious injury to you.
6

DO NOT USE 3” SHOTGUN SHELLS IN
A BARREL WITH A 2 3/4” CHAMBER.
THE SIZE OF THE CHAMBER IS
INSCRIBED, ALONG WITH CHOKE
DESIGNATIONS, ON THE SIDE OF THE
BARREL.
DO NOT SNAP THE FIRING PIN ON AN
EMPTY CHAMBER — THE CHAMBER
MAY NOT BE EMPTY!
Treat every gun
with the respect due a loaded gun, even
though you are certain the gun is unloaded.
KEEP YOUR FINGERS AWAY FROM THE
TRIGGER WHILE UNLOADING,
LOADING
BE SURE OF YOUR TARGET AND
BACKSTOP,
or until you are ready to shoot.
particularly during low light
periods. Know the range of your ammunition.
Never shoot at water or hard objects.
ALWAYS UNLOAD YOUR SHOTGUN’S
CHAMBER BEFORE CROSSING A
FENCE, CLIMBING A TREE, JUMPING
A DITCH OR NEGOTIATING OTHER
OBSTACLES. Refer to page 28 of this
instruction book for instructions on the
unloading of your shotgun. Never place
your shotgun on or against a fence, tree,
car, or other similar object.
7

WEAR EYE AND EAR PROTECTION
WHEN SHOOTING.
Unprotected, repeated
exposure to gunfire can cause hearing
damage. Wear ear protectors (shooting ear
plugs or muffs) to guard against such
damage. Wear shooting glasses to protect
your eyes from flying particles. Also, wear
eye protection when disassembling and
cleaning your shotgun to prevent the
possibility of springs, spring-tensioned
parts, solvents or other agents from
contacting your eyes.
DROPPING A WADED GUN CAN CAUSE
AN ACCIDENTAL DISCHARGE
even with
the “safety” in the “on safe” position. Be
extremely careful while hunting or during
any shooting activity, to avoid dropping
any firearm.
IF YOUR SHOTGUN FAILS TO FIRE,
KEEP THE MUZZLE POINTED IN A
SAFE DIRECTION.
Hold this position for a
minimum of 30 seconds. Carefully open
the action and remove the cartridge. If the
primer is indented, the cartridge should be
disposed of in a way that cannot cause
harm. If the primer is not indented, your
firearm should be examined by a qualified
gunsmith and the cause of the malfunction
should be corrected before further use.
8

BE DEFENSIVE AND ON GUARD
AGAINST UNSAFE GUN HANDLING
AROUND YOU AND OTHERS.
Don’t be
timid when it comes to gun safety. If you
observe other shooters violating any of
these safety precautions, politely suggest
safer handling practices.
BE CERTAIN YOUR SHOTGUN IS
UNLOADED BEFORE CLEANING.
Because so many gun accidents occur
when a firearm is being cleaned, special
and extreme care should be taken to be
sure your gun is unloaded before disassembly,
cleaning and reassembly. Keep ammunition
away from the cleaning location. Never test
the mechanical function of any firearm
with live ammunition.
EDUCATE AND SUPERVISE FIREARMS
SAFETY TO ALL MEMBERS OF YOUR
FAMILY —
especially to children and
nonshooters. Closely supervise newcomers
to the shooting sports. Encourage
enrollment in hunting/shooting safety
courses.
NEVER DRINK ALCOHOLIC
BEVERAGES OR TAKE ANY TYPE OF
DRUGS BEFORE OR DURING
SHOOTING.
Your vision and judgment
9

could be dangerously impaired, making your
gun handling unsafe to you and to others.
READ AND HEED ALL WARNINGS in
this instruction book and on ammunition
boxes. It is your responsibility to secure the
most up-to-date information on the safe
handling procedures for your Browning
gun. Browning cannot assume any
responsibility when unsafe or improper
arms and ammunition combinations are used.
PERIODIC MAINTENANCE — AVOID
UNAUTHORIZED SERVICING.
Your
shotgun is a mechanical device which will
not last forever, and as such, is subject to
wear and requires periodic inspection,
adjustment, and service. Browning firearms
should be serviced by a Browning
Recommended Service Center or by
Browning’s service facility in Arnold,
Missouri. Browning cannot assume any
responsibility for injuries suffered or caused
by unauthorized servicing, alterations or
modifications of Browning firearms.
CAN BE VERY DANGEROUS TO ALTER
THE TRIGGER, SAFETY OR OTHER
FIRING MECHANISM PARTS OF THIS
OR ANY OTHER FIREARM.
IT
10
BE CAREFUL!
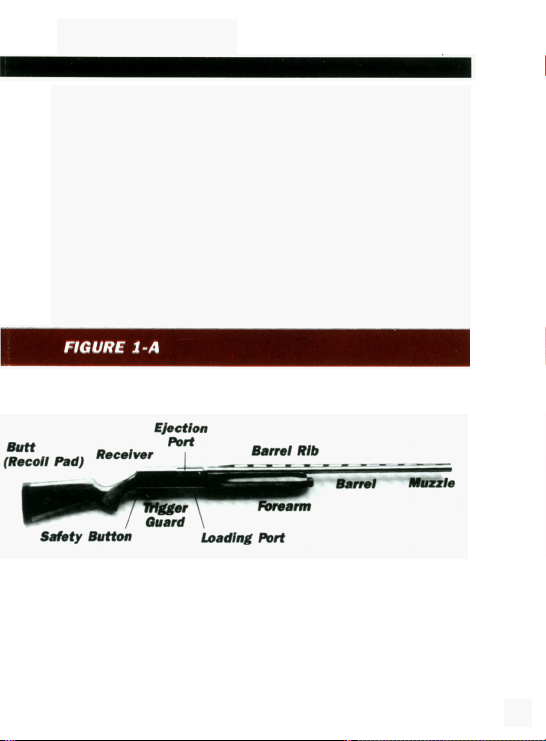
Nomenclature
In conventional gun terminology, the position
and movement of gun parts are described as
they occur with the gun horizontal and in
normal firing position; i.e., the muzzle is forward
or front; butt stock is rearward or rear; trigger is
downward or underneath; the rib is upward or
on top. For general parts nomenclature refer to
Figure 1-A. See Figure 1-B for names of all parts
and assemblies covered in disassembly and
cleaning procedures.
11

A. Barrel Extension Guides
B. Barrel Ring Guide
C. Front Action Springs
D. Bolt Release Button
(Carrier Latch Button)
E. Breechblock Assembly
E Carrier
G. Forearm R. Trigger Group
H. Forearm Buffer Rings
I. Magazine Tube
J. Magazine Cap
K. Magazine Spring Retainer
L. Magazine Follower
M. Magazine Spring
N. Operating Handle
O. Recoil Spring
P. Rotary Bolt Head
Q. Three Shot Adapter
S. Trigger Guard Retaining Nut
T. Trigger Guard Retaining Screw
General Operating Procedures
The Browning A-500 shotgun is a short recoil-
operated, semi-automatic shotgun. It is capable
of shooting five shots (with the magazine plug
removed) in rapid succession, with each pull of
the trigger. The rotary bolt locks into the barrel
12

with four lugs. Upon firing, recoil causes the
barrel to travel rearward. Energy differences
between loads are absorbed by an internal
breechblock spring. A special buffer surrounding
the magazine tube stops the rearward motion of
the barrel after about 1/2”. Inertia from the
barrel causes the breechblock to continue
rearward, turning and unlocking the 4-lug rotary
bolt, recocking the hammer, and ejecting the
fired shell.
After full rearward travel, the breechblock
returns forward, picking up a new shell from the
magazine and chambering it automatically. After
the last shell has been fired, the breechblock
locks to the rear, instead of returning forward.
This facilitates speedy, convenient reloading.
NOTE: The A-500 is delivered with the magazine
adaptor in the magazine which limits the gun to
three shots, in accordance with federal migratory
bird laws. If you do not want your gun to be so
limited, merely take out the three shot adapter
as explained on page 42 under “Three Shot
Adapter.”
Initial Cleaning
Various exposed metal parts of your new A-500
have been coated at the factory with a rust
13

preventative compound. Before assembling your
A-500, clean the anti-rust compound from the
inside of the barrel, receiver and the action/
chamber areas. Browning Oil is ideal for
removing this compound and for giving your
new gun its first lubrication. However, any
quality gun oil may be used. Use a cleaning rod
and patch as explained under “Cleaning and
Maintenance Suggestions” on page 54.
Serial Number
The serial number of your A-500 shotgun is
found on the left side of the receiver, at the
lower rear, near the grip portion of the buttstock.
Ammunition
The A-500 has a 3-inch chamber and is designed
to shoot and function with all 12 gauge factory
loads: 3-inch Magnum, 2 3/4” Magnum, 2 3/4”
High Velocity loads, 2 3/4” Field and 2 3/4”
Target loads. It is especially suited to shooting
factory steel shot loads. Loads can be
intermixed, in any order. However, Browning
can assume no responsibility for incidents which
occur through the use of cartridges of
nonstandard dimension or those developing
14
pressures in excess of SAAMI (Sporting Arms
and Ammunition Manufacturer’s Institute)
established standards.
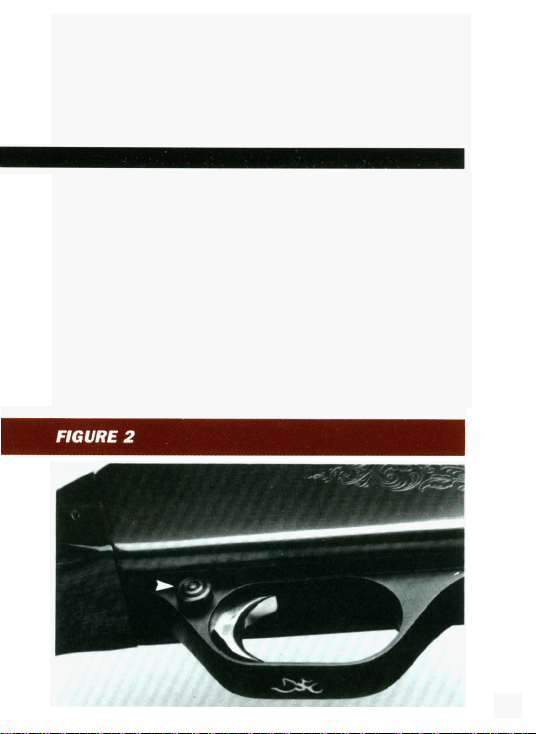
Operation of the “Safety”
The cross bolt “safety” prevents the trigger from
being pulled when in the “on safe” position. The
safety is located conveniently at the rear of the
trigger guard (See Figure 2). In the “off safe” or
“fire” position a conspicuous red warning band is
visible on the safety button on the left side of
the trigger guard. To place the gun “ON SAFE,”
press the “safety” button to the right. To move
the “safety” to the FIRE position, press the
“safety” to the left.
15

An optional left-handed “safety” can be installed
by a competent gunsmith. When installed, the
left-handed “safety” will have the “safety”
button’s red warning band on the RIGHT side of
the trigger guard.
DO NOT DEPEND ON THE RED COLOR
ALONE TO INDICATE YOUR GUN’S SAFETY
STATUS.
well as the abrasive action of cleaning agents
can erase it.
As previously explained on page 2, never rely
on your shotgun’s mechanical “safety” devices as
the sole provision for safety.
YOUR SHOTGUN AT ANYTHING YOU DO NOT
INTEND TO SHOOT.
even when unloaded, with the respect due any
loaded, ready-to-fire firearm.
Time, exposure to the elements, as
NEVER POINT
Always treat your shotgun,
Assembly Procedures — Barrel to
Receiver
The A-500 is delivered, in the box, with the
barrel removed and the forearm (with recoil
spring and forearm buffer inside) attached to the
magazine tube. There are two ways to install the
barrel on the receiver: As a barrel/forearm
assembly, and part by part.
16

ASSEMBLY AS A BARREL ASSEMBLY — This
is the easiest way to install your barrel on the
receiver. If your A-500’s forearm assembly is
already removed go to step 2.
Take the receiver in hand and first, lock
the breechblock rearward by pulling the
operating handle fully to the rear. Then,
remove the forearm, recoil spring and
forearm buffer from the magazine tube by
unscrewing the magazine cap and sliding
the parts forward, off of the magazine
tube.
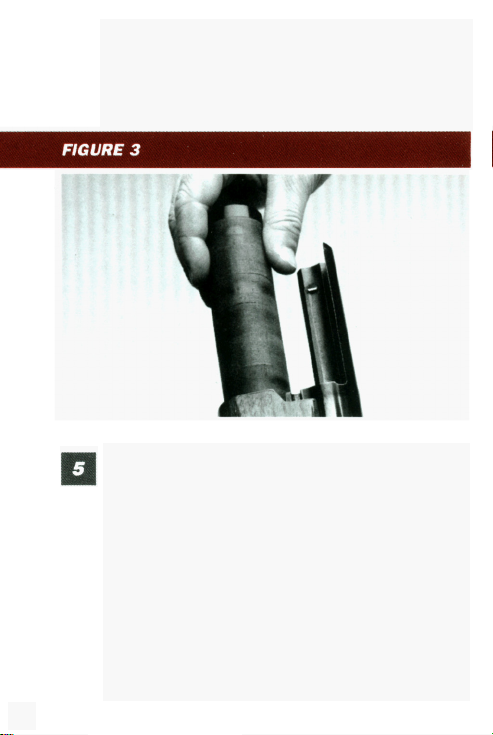
OPEN REAR END OF THE FOREARM.
TOO MUCH PRESSURE COULD CAUSE
THE WOOD TO SPLIT.
Install the forearm on the barrel by sliding
it over the barrel ring and seating it fully
rearward .
With the barrel pointing down, insert the
recoil spring in the opening at the rear of
the forearm and let it slide forward fully in
the forearm cavity.
Insert the forearm buffer into the same
cavity in the forearm and let it slide fully
forward (See Figure 3).
NOTE: The recoil spring must always be
installed at the muzzle end of the magazine
17
tube. The forearm buffer must be toward
the receiver. However, both the spring and
the buffer, individually, can be installed in
either direction.
With the gun in a horizontal position,
install the entire barrel/forearm assembly
onto the receiver by sliding the forearm
(with buffer and spring inside) over the
magazine tube (See Figure 4). Position the
gun vertically (barrel up), then slide the
barrel/forearm assembly fully rearward,
making sure that the barrel extension rails
are fully seated in the receiver tracks. The
barrel extension may hang up slightly
where the extension contacts the face of
18
 Loading...