

Browning 4013E Instruction Manual
Mounting Instructions for
Split Taper Bushings in
Split Taper Bushed Products
F O R M
4013E
Revised
January 2017
• Read and follow all instructions carefully.
• Disconnect and lock-out power before installation and maintenance.
Working on or near energized equipment can result in severe injury or
death.
• Do not operate equipment without guards in place. Exposed
equipment can result in severe injury or death.
Split Taper
Bushing
Before Installation:
1. Make sure the shaft, bushing barrel & bore, Browning split
taper bushed product bore, keys and keyways are free of
burrs, paint, etc. For idler bushings, make sure the bushing
barrel and Browning split taper bushed product bore are free
of burrs, paint, etc.
NOTICE: Lubricant on bushing barrel, hub or screws could
lead to breakage.
2. For proper operation, make sure the shaft size is within the
size limits shown in Table 1. Some applications may benefit
from tighter shaft tolerances.
CAUTION: Mounting a Browning split taper bushing on
a shaft smaller than the size limits shown in Table 1 may
result in a faulty assembly. The assembly may come off the
shaft or undesirable assembly runout may result.
S/T Ass’y., Flange Inboard
Installation:
1. For light weight products, the bushing may first be
loosely installed into the Browning split taper bored product,
hereafter referred to as “product”, and then the assembly slid
onto the shaft (Illustration 1 A and B). For heavier products,
it is usually easier to either first slide the bushing onto the
shaft and then slide the product onto the bushing (Illustration
2A), or first position the product over the shaft, next slide the
bushing onto the shaft, and then pull the product onto the
bushing (Illustration 2B). The “light weight products” method
is common, however if the bushing barrel has collapsed, it
must be wedged open (described below), and the “heavy
product” procedure may be easier.
Heavier product may require a hoist or other means of holding
the product in position until the bushing is installed into the
product. When mounting on a vertical shaft, make sure the
bushing and the product do not drop during installation.
2. It may be necessary to slightly wedge open the saw slot
on some bushings in order to start the bore and position the
bushing onto the shaft. A narrow edged regular screw driver
may be used.
CAUTION: Excessive wedging forces in bushing saw slot
may damage or break bushing. Avoid.
S/T Components, Flange Inboard
• Periodic inspections should be performed. Failure to perform proper
maintenance can result in premature product failure and personal
injury.
®
Browning
Split Taper
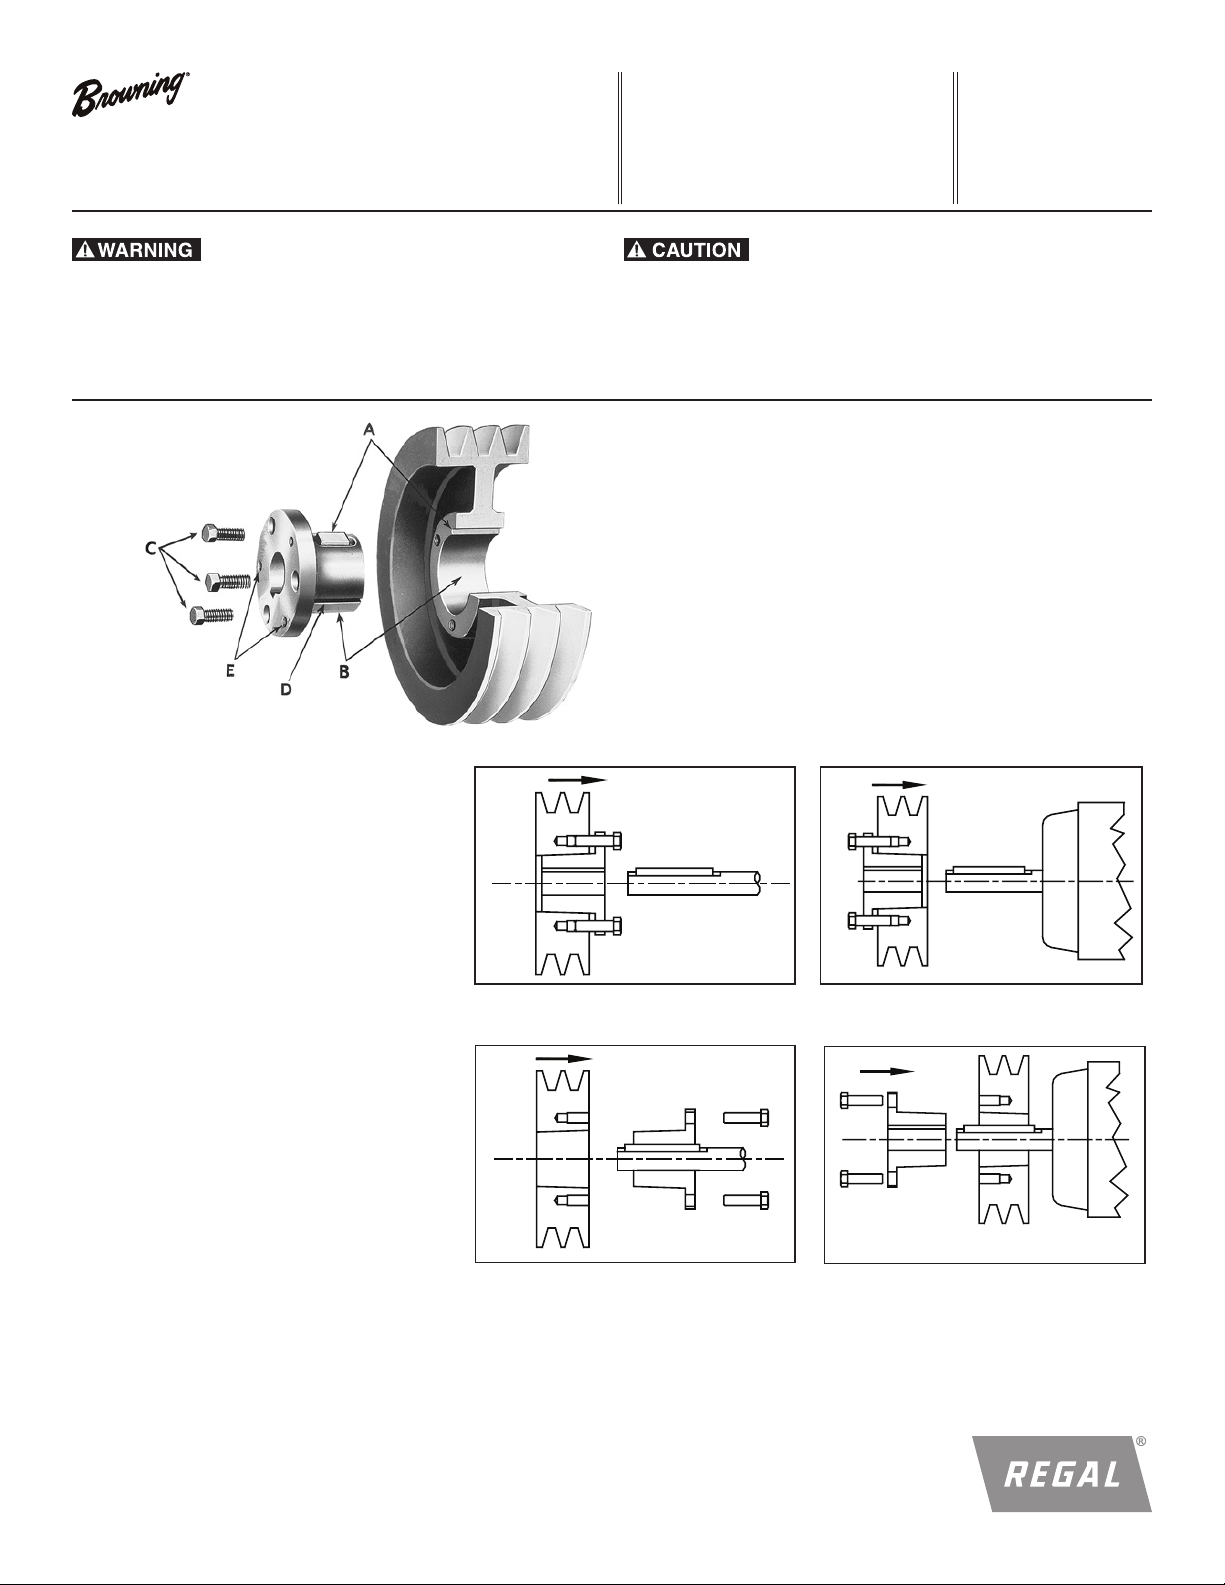
Bushed Product (Gripbelt® Sheave Shown)
A. External key, except G, H and idler bushings.
B. Bushing barrel and product bore are tapered.
C. Bushing cap screws.
D. Bushing barrel is split (except idler bushings).
E. Removal holes are threaded, installation holes are not.
Illustration 1A
Illustration 2A
S/T Components, Flange Outboard
Illustration 1B
S/T Ass’y., Flange Outboard
Illustration 2A
1
3. Align the shaft keyseat with the bushing bore keyway and install the key.
Make sure the key runs the entire length of the bushing bore.
For Type 2 bushings except G and H, a key, which protrudes through the
bushing and into the product, is provided. Some Type 1 bushings with shallow
keyways are also supplied with shaft keys. For proper operation use the key(s)
supplied with the bushing. No keys are required for Browning idler bushings.
4. Position the product so the keyway in the bore of the product is aligned
with the external (barrel) key in the bushing (G, H and idler bushings do not
have an external key). Whether the bushing has an external key or not, the
threaded holes in the product must be aligned with the non-threaded holes
in the bushing flange. Insert the capscrews through the non-threaded holes
in the bushing flange and thread them by hand into the product three or four
turns.
5. Position the bushing - product assembly axially on the shaft such that it
is aligned with its running mate. Be sure to check for adequate clearance
between the assembly and other nearby components if applicable. If the
bushing has a set screw over the keyway, tighten it to the torque value in
Table 2.
CAUTION: Tightening the set screw to a torque higher than shown in Table
2 may lead to bushing damage or breakage. Avoid.
6. If the bushing - product assembly is not between the shaft bearings, then
locating the assembly closer to a bearing will reduce the load and increase the
life of both bearings. Check for adequate clearance as stated in Step 11.
7. Using a torque wrench and appropriate socket, tighten the capscrews
sequentially until each is tightened to the torque shown in Table 2. When the
capscrew torque is at or near recommended torque, make at lease two more
sequential rounds to assure all cap screws are at the Table 2 capscrew torque
value.
CAUTION: Tightening the cap screw to a torque higher than shown in Table
2 may lead to product failure. Avoid.
8. If capscrews were provided with the product, use them instead of the
ones provided with the bushing.
CAUTION: Failure to use the cap screws that came with the product may
lead to an unsafe assembly. Avoid.
9. Since tightening the capscrews may affect the axial position of the product,
confirm that it is still properly aligned with its running mate. If not, determine
how much the assembly must be moved to be in proper alignment.
10. If axial adjustment is required, (following Removal procedure), reposition
the assembly, and repeat step 11.
11. Check installation gap - There must be a gap between the bushing flange
and the product face. If there is no gap between them, disassemble the parts
(following Removal procedure) and determine the reason(s) for the faulty
assembly.
Removal:
1. Heavier product may require a hoist or other means of supporting the
product during the removal procedure. When removing from a vertical shaft,
make sure the bushing and product do not drop during removal.
2. Remove all capscrews sequentially. If the bushing has a keyway setscrew,
loosen it.
3. Insert capscrews in all threaded bushing flange holes. Tighten the cap
screws against the (hub) face of the product until the screw force releases the
product from the bushing.
4. Remove the bushing and product from the shaft using appropriate means.
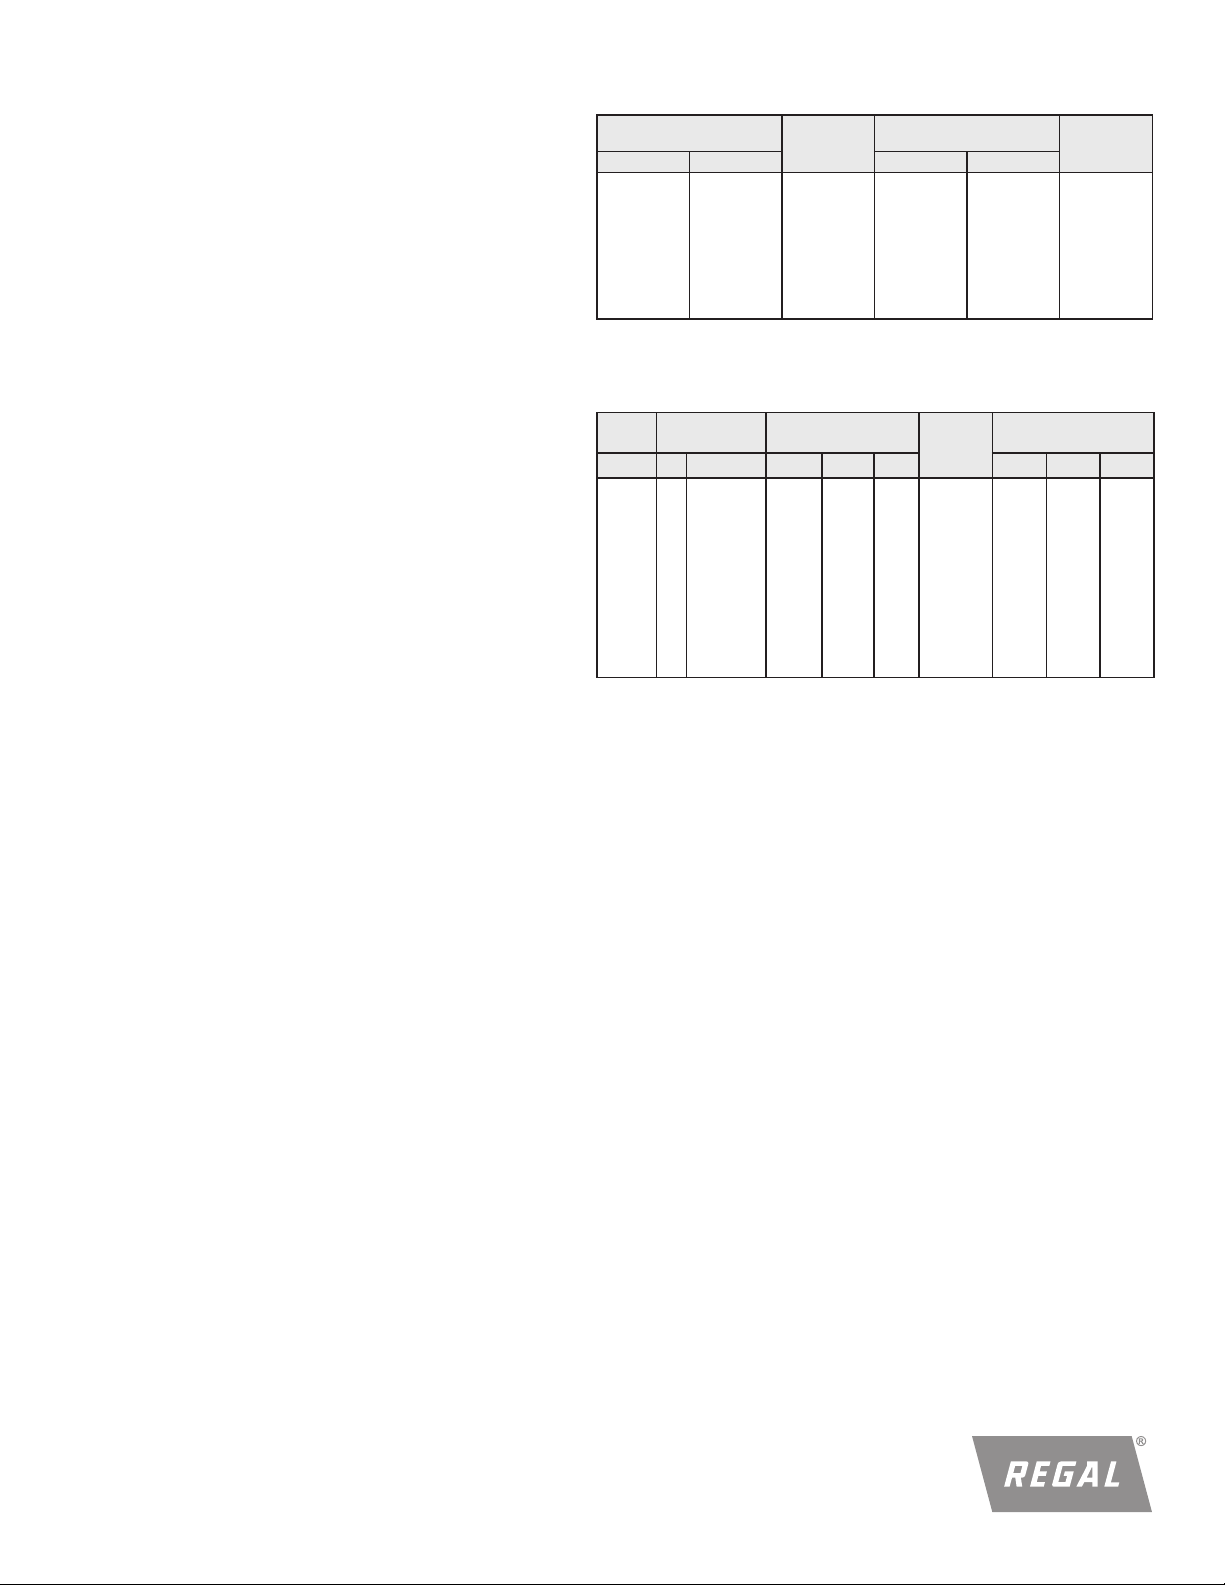
Table 1
Shaft Size Limits for Browning® Split Taper Bushings
Shaft Size
Range (IN)
Above Through Above Through
– 1 1/2 -0.003 — 38.1 -0.076
1 1/2 2 1/2 -0.004 38.1 63.5 -0.102
2 1/2 4 -0.005 63.5 101.6 -0.127
4 6 -0.006 101.6 152.4 -0.152
6 8 -0.007 152.4 203.2 -0.178
8 9 -0.008 203.2 228.6 -0.203
9 — -0.009 228.6 — -0.229
Note: Upper limit is + 0 whether units are inches or millimeters.
Lower Shaft
Size Limit
(IN)
Shaft Size
Range (MM)
Lower Shaft
Size Limit
Table 2
Tightening Torques
Bushing
SAE Grade 5
CapScrew
No. Size (InLbs) (FtLbs) (NM) (InLbs) (FtLbs) (NM)
G; H 2 1/4 -20NC 95 8 10.7 — — — —
P; B 3 5/16 -18NC 192 16 21.7 — — — —
Q 3 3/8 -16NC 348 29 39.3 5/16 -18NC* 165* 13.8* 18.6*
R 3 3/8 -16NC 348 29 39.3 5/16 -18NC 165 13.8 18.6
S 3 1/2 -13NC 840 70 94.9 3/8 -16NC 290 24.2 32.8
U 3 5/8 -11NC 1680 140 189.8 3/8 -16NC 290 24.2 32.8
W 4 3/4 -10NC 3000 250 339 1/2 -13NC* 620* 51.7* 70.1*
YO 4 1 -8NC 7200 600 813.5 1/2 -13NC* 620* 51.7* 70.1*
(N-M) = Newton Meters
*Q3 Type 2 bushings only; W1, W2 and YO Type 1 bushings only.
Idler bushings have no set screws.
For H 38mm, socket head capscrews are used and recommended capscrew torque is
200 in lbs/17 ft-lb/23 NM.
CapScrew Torque
Set Screw
Size
Set Screw Torque
(MM)
Regal, Browning and Gripbelt are trademarks of Regal Beloit Corporation or one of its affiliated companies.
©2017 Regal Beloit Corporation, All Rights Reserved. MCIM17003E • Form 4013E • Printed in USA
2
 Loading...