

Page 1

User’s Guide
RJ-4230B
Before using this printer, be sure to read this User’s Guide.
We suggest that you keep this manual in a handy place for future
reference.
Version 02
ENG
Page 2

Introduction
Important Notice
The contents of this document and the specifications of this product are subject to change without notice.
Unauthorized duplication or reproduction of any or all content of this document is prohibited.
Brother reserves the right to make changes without notice in the specifications and materials contained
herein and shall not be responsible for any damages (including consequential) caused by reliance on the
materials presented, including but not limited to typographical and other errors relating to the publications.
Please note that we cannot assume any responsibility for any damage or lost profit arising from the use of
the label created with this printer or the disappearance or change of data due to failure, repair or
consumables using the rechargeable Li-ion battery, or any claim from a third party.
For servicing, adjustments or repairs, contact Brother customer service or your local Brother dealer.
If the printer operates abnormally or any dysfunction occurs, turn off the printer and disconnect each cord
and contact Brother customer service or your local Brother dealer.
Screen images in this document may differ depending on your version of Windows computer.
Before using the printer, be sure to read all documents included with the printer for information about safety
and correct operation.
Not all models are available in all countries or regions.
Trademarks
Android is a trademark of Google LLC.
The Bluetooth
use of such marks by Brother Industries, Ltd. is under license.
QR Code is a registered trademark of DENSO WAVE INCORPORATED.
Epson ESC/P is a registered trademark of Seiko Epson Corporation.
iPad, iPhone, and iPod touch are trademarks of Apple Inc.
®
word mark and logos are registered trademarks owned by the Bluetooth SIG, Inc. and any
License
QR Code Generating Program Copyright © 2008 DENSO WAVE INCORPORATED.
BarStar Pro Encode Library (PDF417, Micro PDF417, DataMatrix, MaxiCode, AztecCode, GS1
Composite, GS1 Databar, Code93, MSI/Plessey, POSTNET, Intelligent Mail Barcode)
Copyright © 2007 AINIX Corporation. All rights reserved.
Blue SDK
Copyright © 1995-2018 OpenSynergy GmbH.
All rights reserved. All unpublished rights reserved.
Portions of this software are copyright © 2014 The FreeType Project (www.freetype.org
All rights reserved.
).
1
Page 3

Available Manuals
You can download the latest manuals from the Brother Solutions Center at support.brother.com.
Product Safety Guide
Quick Setup Guide
User’s Guide
Command Reference
1
Printed manual in the box.
2
PDF manual on the Brother Solutions Center website.
2
1
1
2
This guide provides safety information; read it thoroughly before using your printer.
This guide provides basic information about using the printer along with safety
information and detailed troubleshooting tips.
This guide includes the contents of the Quick Setup Guide, and additional
information about the printer settings, operations, safety precautions,
communication settings, troubleshooting tips, and maintenance instructions.
This manual provides information about printer control commands for controlling
the printer directly.
Symbols Used in This Guide
The following symbols are used throughout this guide:
Failure to observe instructions and warnings will result in death or serious injuries.
DANGER
WARNING
CAUTION
Important
Note
Follow these guidelines to avoid the risk of heat generation, smoking, explosion, or
fire.
Failure to observe instructions and warnings could result in death or serious injuries.
Follow these guidelines to avoid the risk of heat generation, smoking,explosion, fire,
or injury.
Failure to observe instructions and warnings could result in minor or moderate
injuries.
Follow these guidelines to avoid injury.
Indicates information or directions that should be followed. Ignoring them may result
in damage, or failed operations.
Indicates notes that provide information or directions that can help you better
understand and use the product more efficiently.
2
Page 4
Important Safety Instructions
DANGER
Rechargeable Li-ion Battery
Do not allow the battery to come into contact with liquids.
Do not charge, use, or leave the battery in high temperature (above 60°C /140°F) locations.
Do not attempt to charge the battery using an unsupported charger.
Use only for its intended purpose.
Keep away from heat and fire.
Do not connect the + and - terminals with metal objects such as wire. Do not carry or store the battery with metal
objects.
Do not throw, hit or damage the battery in any way.
Do not solder any connections to the battery.
Do not disassemble or modify the battery.
Do not dispose of the battery with household waste.
WARNING
DO NOT use the printer where its use is prohibited, such as on an airplane. This could affect the airplane’s equipment,
resulting in an accident.
DO NOT use the printer in special environments, such as near medical equipment. Electromagnetic waves may cause
the medical equipment to malfunction.
DO NOT allow organic solvents, such as benzene, thinner, nail polish remover, or deodorizers, to come into contact
with the plastic cover. These may cause the plastic cover to warp or dissolve, resulting in an electrical shock or fire.
3
Page 5
WARNING
Printer, AC Adapter (Optional), or Car Adapter (Optional)
When foreign objects are inserted into the printer or its connectors and ports, stop using the printer and turn off the
power. Then disconnect each cable or remove the battery.
Do not use, charge and store the products in any of the following places.
• Place where liquids come into contact.
• Place where there are much dust.
• Place whose temperature is extremely high.
• During a thunderstorm.
• Place where condensation forms.
Do not disassemble or alter.
Do not pour chemicals and combustible sprays over the products.
Use and store the printer, other components, and packing bags out of the reach of children.
Remove the battery or disconnect the cord when shipping.
If the printer is not in use for long periods, remove the battery or disconnect the cord before storing.
Rechargeable Li-ion Battery
Keep away from infants. If ingested, contact emergency services immediately.
Stop using the battery if there are noticeable abnormalities such as smell, heat, deformities, or discoloration.
If liquid from the battery gets into eyes, wash them immediately with clean water. Contact emergency services
immediately.
AC Adapter, Car Adapter
Use only with the specified product.
Insert the plug firmly into the outlet.
Use the AC adapter with household outlet (AC 100-240 V 50/60Hz) and Car adapter with DC 12 V.
Do not allow metal objets to come into contact with connectors and ports.
Do not pull on the cord when disconnecting the AC adapter cord or Car adapter from the electrical outlet. Hold the
plug and pull it out of the electrical outlet.
Do not damage, twist, severely bend, pull on, place objects on, bind the AC adapter and Car adapter.
Do not allow the AC adapter and Car adapter to be pinched.
Do not overload electrical outlets.
4
Page 6
CAUTION
RD Rolls use thermal paper, therefore the color of the label and the printing may change or fade if exposed to sunlight
or heat. When using outdoors and when durability is important, we DO NOT recommend using RD Rolls.
Depending on the area, material, and environmental conditions, the label may unpeel or become permanently affixed,
and the color of the label may change or be transferred to other objects. Before affixing the label, check the
environmental conditions and the material. Test the label by affixing a small piece of it to an inconspicuous area of the
intended surface.
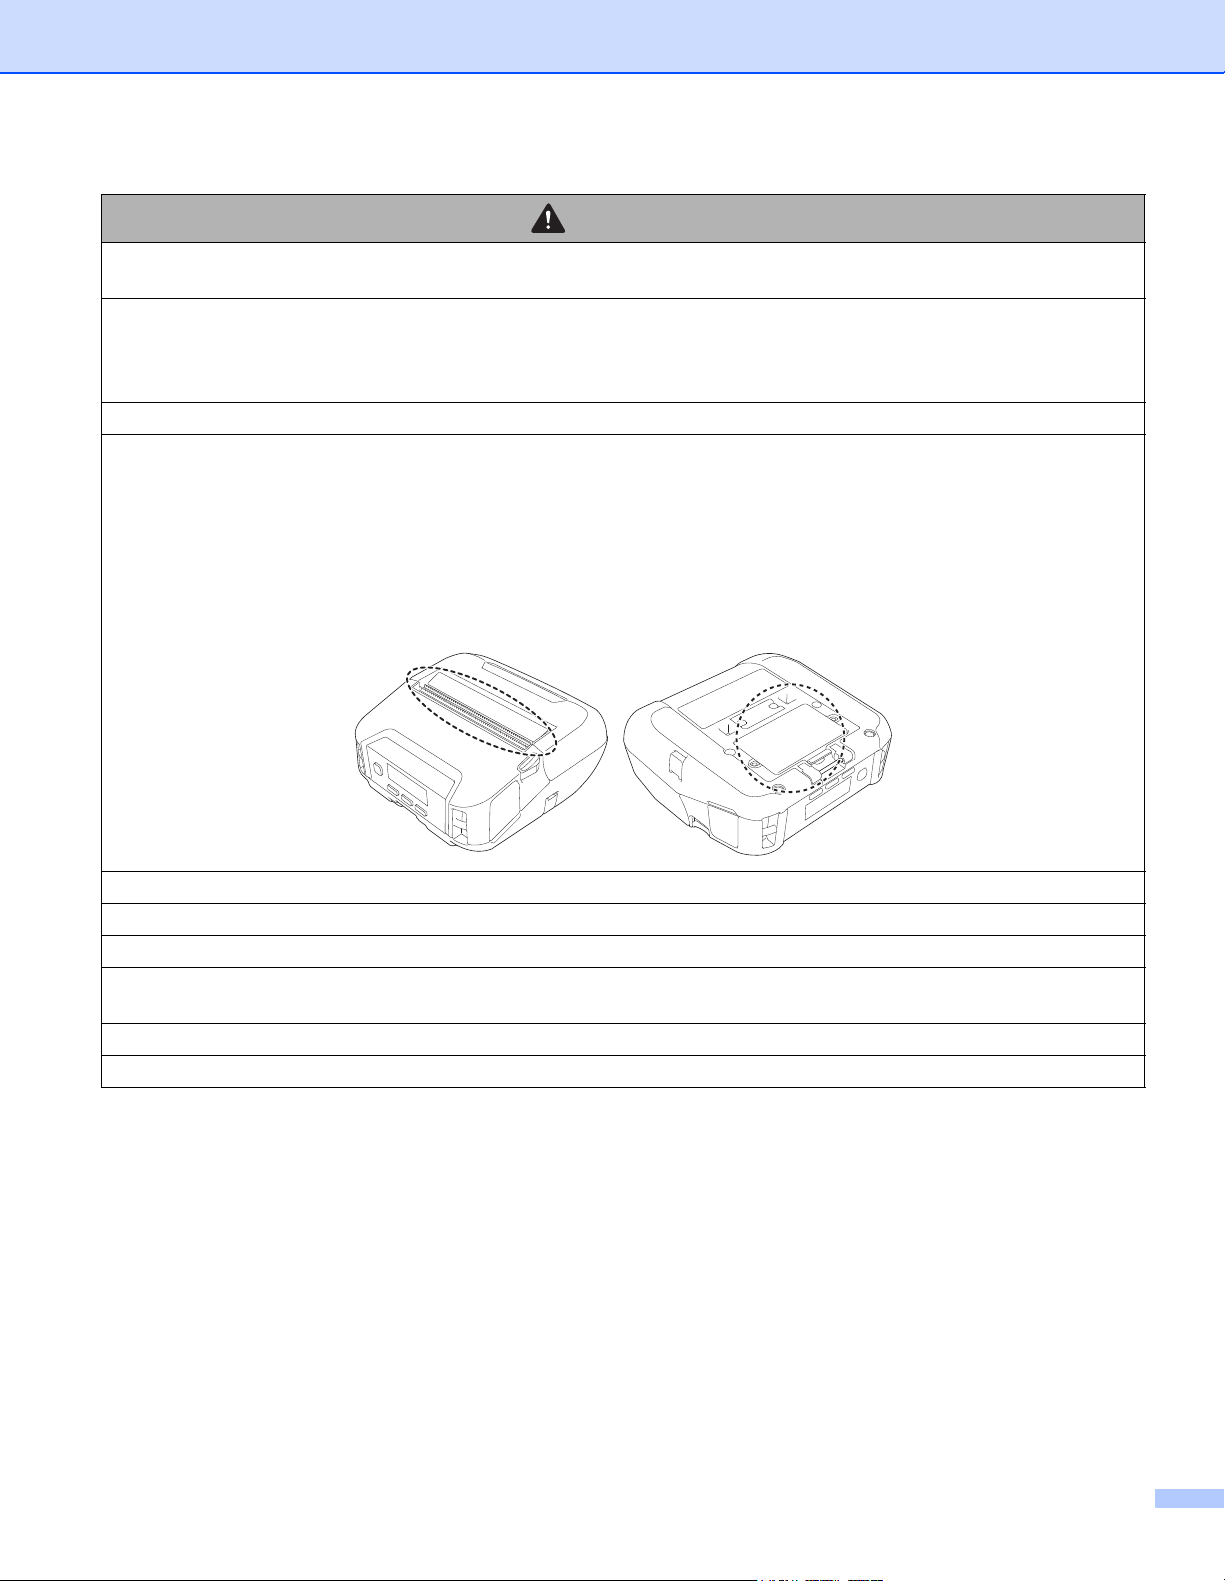
Printer
Do not hold the printer by the RD Roll compartment cover or the roll guide.
There is a risk that the cover could detach or the printer could fall.
When connecting cables and accessories, follow the applicable instructions.
Do not touch the print head and metal parts sorrounding the head.
If the printer is used for a long periods of time, the parts of the printer shown may get hot enough to cause a low
temperature burn.
Rechargeable Li-ion Battery
If liquid from the battery gets onto skin or clothes, immediately rinse with water.
AC Adapter, Car Adapter
Make sure you can always access the cord of the adapter so that you can disconnect it immediately in the event of an
emergency.
Belt Clip
Make sure that the belt clip is attached securely to the printer and the wearer's belt.
5
Page 7
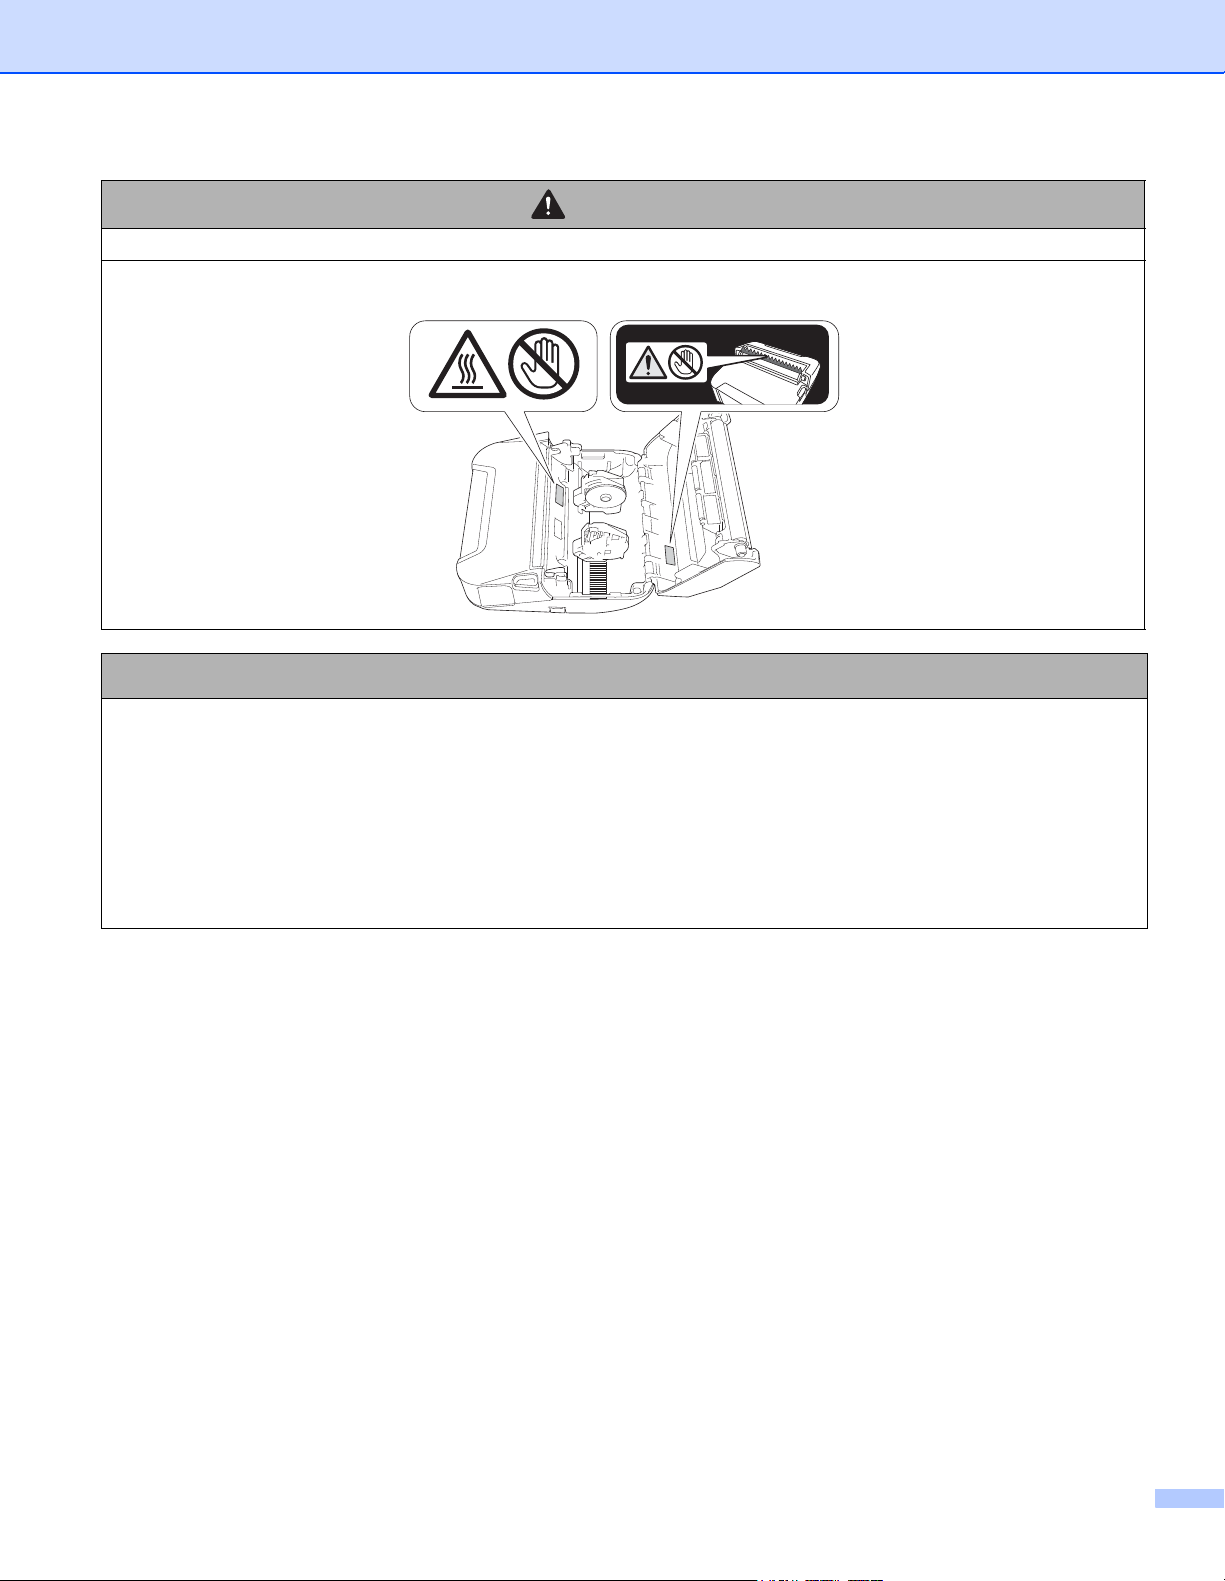
CAUTION
Warning Label
Do not touch the blade and print head.
IMPORTANT
DO NOT remove the labels affixed to the printer. These labels provide operational information and indicate the
printer's model number.
DO NOT push the power button or LED indicator with an object that has a sharp point, such as a pen. This could
damage the button or LED.
DO NOT transport the printer while cables are connected to the DC connector or USB port. The connector and ports
could be damaged.
DO NOT store the printer in an area exposed to high temperatures, high humidity, direct sunlight, or dust. These
could cause discoloration or a malfunction.
6
Page 8
General Precautions
Printer
DO NOT cover or insert foreign objects into the paper exit slot, DC connector, or mini-USB port.
DO NOT use paint thinner, benzene, alcohol or any other organic solvents to clean the printer. Doing so may cause
damage to the surface finish. You can use isopropyl alcohol or ethanol only when cleaning the print head or roller.
Use a soft, dry cloth to clean the printer.
When not used for an extended period, remove the roll from the printer.
Always keep the roll compartment cover closed when printing.
This printer uses thermal paper. If the printed paper is marked with ink, for example written on or stamped, the ink
may cause the printed text to fade or become discolored. In addition the applied ink may take some time to dry.
Printed text may fade or become discolored if the label comes into contact with any of the following: vinyl chloride
products, leather goods such as wallets and purses, organic compounds such as alcohol, ketones, or esters,
adhesive tape, erasers, rubber mats, magic marker ink, permanent marker ink, correction fluid, carbon, glue, diazo
sensitized paper, hand lotion, hair care products, cosmetics, water, or sweat.
DO NOT touch the printer with wet hands.
DO NOT use folded, wet or damp paper, otherwise a paper misfeed or malfunction may occur.
DO NOT touch paper or labels with wet hands, otherwise a malfunction may occur.
RD Roll
Use Brother accessories and supplies (indicated by the mark)
If the label is affixed to a wet, dirty, or oily surface, it may peel off easily. Before affixing the label, clean the surface
to which the label will be affixed.
RD Rolls use thermal paper, therefore ultraviolet rays, wind, and rain may cause the color of the label to fade and
the ends of the label to peel off.
DO NOT expose the RD Roll to direct sunlight, high temperatures, high humidity, or dust. Store in a cool, dark place.
Use the RD Roll soon after opening the package.
Scratching the printed surface of the label with your finger nails or metal objects, or touching the printed surface
with hands dampened by water, sweat, or medicated cream etc., can cause the color to change or fade.
DO NOT affix labels to people, animals, or plants. Never affix labels to public or private property without permission.
The last labels of the RD Roll may not be printed correctly, therefore, each roll contains more labels than is indicated
on the package.
When a label is removed after being affixed to a surface, a portion of the label may remain.
Once a label is affixed, it may be difficult to remove the label.
Printer, AC adapter, Car adapter, or Accessories
Observe all applicable regulations when disposing of these products.
7
Page 9

Table of Contents
Section I Basic Operations
1 Set Up the Printer 13
Parts Description .....................................................................................................................................13
Control Panel.....................................................................................................................................14
LCD ...................................................................................................................................................15
LED Indicators ...................................................................................................................................16
Button Functions................................................................................................................................18
Battery Installation/Removal ....................................................................................................................19
Install the Battery...............................................................................................................................19
Recharge the Battery...............................................................................................................................21
While Installed in the Printer..............................................................................................................21
Stop Battery Charging .......................................................................................................................24
Tips on Using the Battery ..................................................................................................................24
When not Using the Battery...............................................................................................................24
Power On or Off.......................................................................................................................................25
Set the Language ....................................................................................................................................25
Insert the Roll...........................................................................................................................................25
Use the Roll Holder Stop ...................................................................................................................27
Tear Off Media...................................................................................................................................28
Attach the Belt Clip ..................................................................................................................................29
Install Software on Your Windows Computer or Mobile Device ..............................................................30
Available Software.............................................................................................................................30
Install the Printer Driver and Software (When Using a Computer) ....................................................31
Connect the Printer to a Computer or Mobile Device ..............................................................................32
Connect Using USB (Computer Only) ...............................................................................................32
Connect Using Bluetooth...................................................................................................................33
Connect Using NFC (Android)...........................................................................................................33
LCD .........................................................................................................................................................34
LCD Settings .....................................................................................................................................34
2 How to Use the Printer 36
Print from Windows Computer.................................................................................................................36
Printing with the Printer Driver...........................................................................................................36
Set Printer Driver Options..................................................................................................................36
Custom Printing from Mobile Devices......................................................................................................37
8
Page 10

3 Change the Printer Settings 38
Printer Setting Tool ..................................................................................................................................38
Before Using the Printer Setting Tool ................................................................................................38
Use the Printer Setting Tool.....................................................................................................................39
Communication Settings..........................................................................................................................41
Settings Dialog Box ...........................................................................................................................41
Menu Bar ...........................................................................................................................................43
General Tab.......................................................................................................................................45
Bluetooth Tab ....................................................................................................................................46
Apply Setting Changes to Multiple Printers .......................................................................................50
Device Settings........................................................................................................................................51
Settings Dialog Box ...........................................................................................................................51
Menu Bar ...........................................................................................................................................53
Basic Tab...........................................................................................................................................55
Advanced Tab ...................................................................................................................................57
Print Position / Sensor .......................................................................................................................59
Display Settings Tab..........................................................................................................................61
Apply Setting Changes to Multiple Printers .......................................................................................62
P-touch Template Settings ......................................................................................................................63
P-touch Template ..............................................................................................................................63
P-touch Template Settings Dialog Box..............................................................................................64
Paper Size Setup.....................................................................................................................................66
Paper Size Setup Dialog Box ............................................................................................................66
Distribute Paper Formats...................................................................................................................71
Change Settings When Printing from a Mobile Device............................................................................71
4 Other Functions 72
Print the Printer Information.....................................................................................................................72
Mass Storage Mode.................................................................................................................................73
Description.........................................................................................................................................73
Use of Mass Storage Mode ...............................................................................................................73
Print JPEG Images ..................................................................................................................................74
Section II Software
5 How to Use P-touch Editor 76
Use of P-touch Editor...............................................................................................................................76
Start P-touch Editor ...........................................................................................................................76
Print with P-touch Editor ....................................................................................................................78
Tips for Creating Templates ....................................................................................................................80
Create a Template.............................................................................................................................80
Link a Database to a Template..........................................................................................................84
9
Page 11

6 How to Use P-touch Transfer Manager & P-touch Library 86
P-touch Transfer Manager.......................................................................................................................86
Transfer the Template to P-Touch Transfer Manager .............................................................................87
Transfer Templates or Other Data from Computer to the Printer ............................................................90
Back up Templates or Other Data Saved in the Printer...........................................................................94
Delete Printer Data ..................................................................................................................................95
Create Transfer Files and Transfer Package Files ..................................................................................96
Use of P-touch Library .............................................................................................................................97
Start P-touch Library................................................................................................................................97
Open and Edit Templates ........................................................................................................................99
Print Templates......................................................................................................................................100
Search for Templates ............................................................................................................................101
7 How to Transfer Templates with P-touch Transfer Express 103
Prepare P-touch Transfer Express ........................................................................................................103
Transfer the Template to P-Touch Transfer Manager ...........................................................................104
Save the Template as a Transfer Package File (.pdz) ..........................................................................105
Distribute the Transfer Package File (.pdz) and P-Touch Transfer Express to the User.......................107
Transfer the Transfer Package File (.pdz) to the Printer .......................................................................108
8 How to Update P-touch Software 111
Update P-touch Software.......................................................................................................................111
Update the Firmware .............................................................................................................................113
Section III Appendix
9 Printer Maintenance 117
Exterior Maintenance.............................................................................................................................117
Print Head Maintenance ........................................................................................................................117
Roller Maintenance................................................................................................................................118
Paper Exit Slot Maintenance .................................................................................................................118
10 Product Specifications 119
11 Battery Charger (Optional:PA-BC-003) 121
Parts Description ...................................................................................................................................121
Specifications.........................................................................................................................................121
How to Charge Batteries........................................................................................................................122
Wall Mounting ........................................................................................................................................123
Use the Insert Nuts..........................................................................................................................123
Connect Multiple Battery Chargers........................................................................................................125
Disconnect the Battery Chargers...........................................................................................................126
10
Page 12

12 Active Docking Station (Optional:PA-CR-002) 127
Patrs Description ...................................................................................................................................127
Specifications.........................................................................................................................................127
How to Charge Batteries........................................................................................................................128
Printer Removal...............................................................................................................................129
Lock the Eject Button.......................................................................................................................129
Wall Mounting ........................................................................................................................................130
Install the Mounting Arm ........................................................................................................................131
13 Troubleshooting 132
Overview................................................................................................................................................132
Printing Problems ............................................................................................................................132
Printed Image Problems ..................................................................................................................134
Printer Problems..............................................................................................................................135
Problems with Battery Charger (Optional).......................................................................................137
Problems with Active Docking Station (Optional) ............................................................................137
Error Messages from the Printer .....................................................................................................138
11
Page 13

Section I
Basic Operations I
Set Up the Printer 13
How to Use the Printer 36
Change the Printer Settings 38
Other Functions 72
Page 14
1
1
2
3
4
5
6
7
8
9
11
10
15
13
14
16
12
Set Up the Printer 1
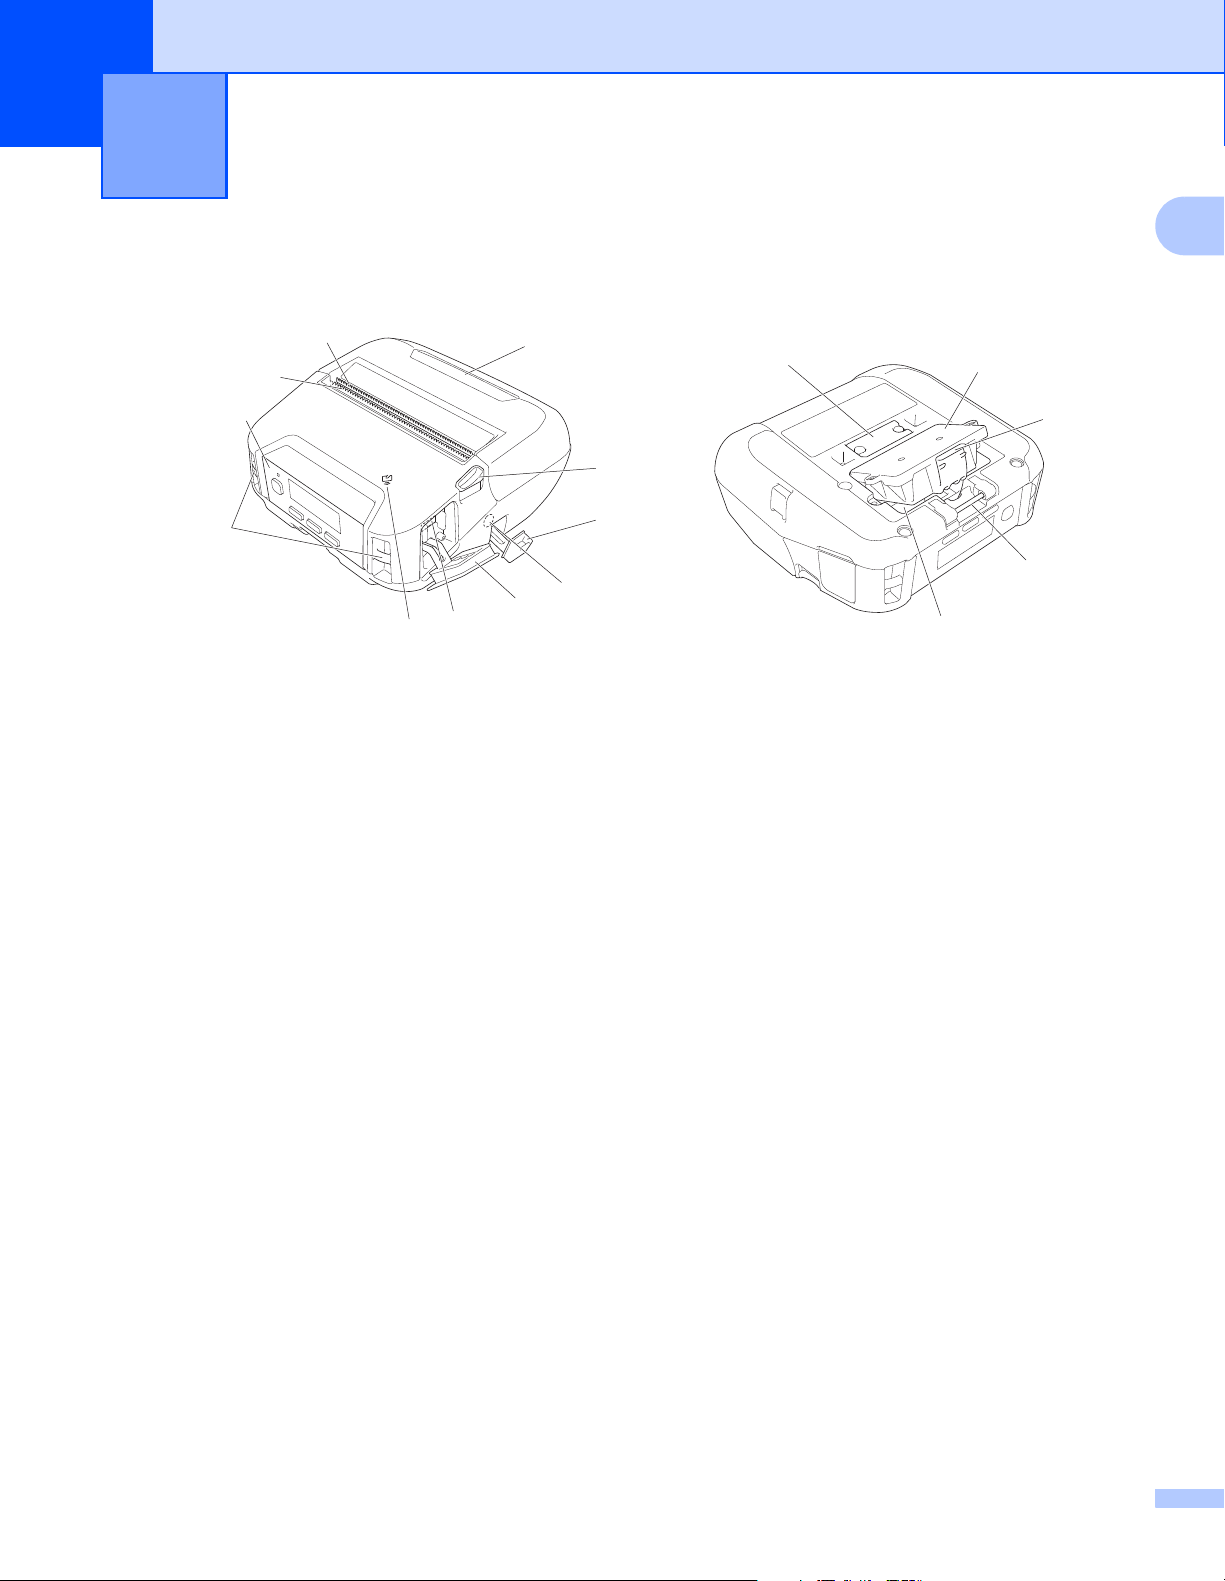
Parts Description 1
1 Upper tear bar
1
2 Lower tear bar
3 Roll compartment cover
4 Roll cover release lever
5 DC connector cover
6 DC connector
7 Interface cover
8 USB port
9 Near-Field Communication (NFC) sensor
10 Shoulder strap slots
11 Control panel
See Control Panel on page 14.
12 Docking station terminal cover
13 Battery cover (RJ-4230B only)
14 Battery cover latch
15 Belt clip hook
16 Battery compartment
13
Page 15
Set Up the Printer
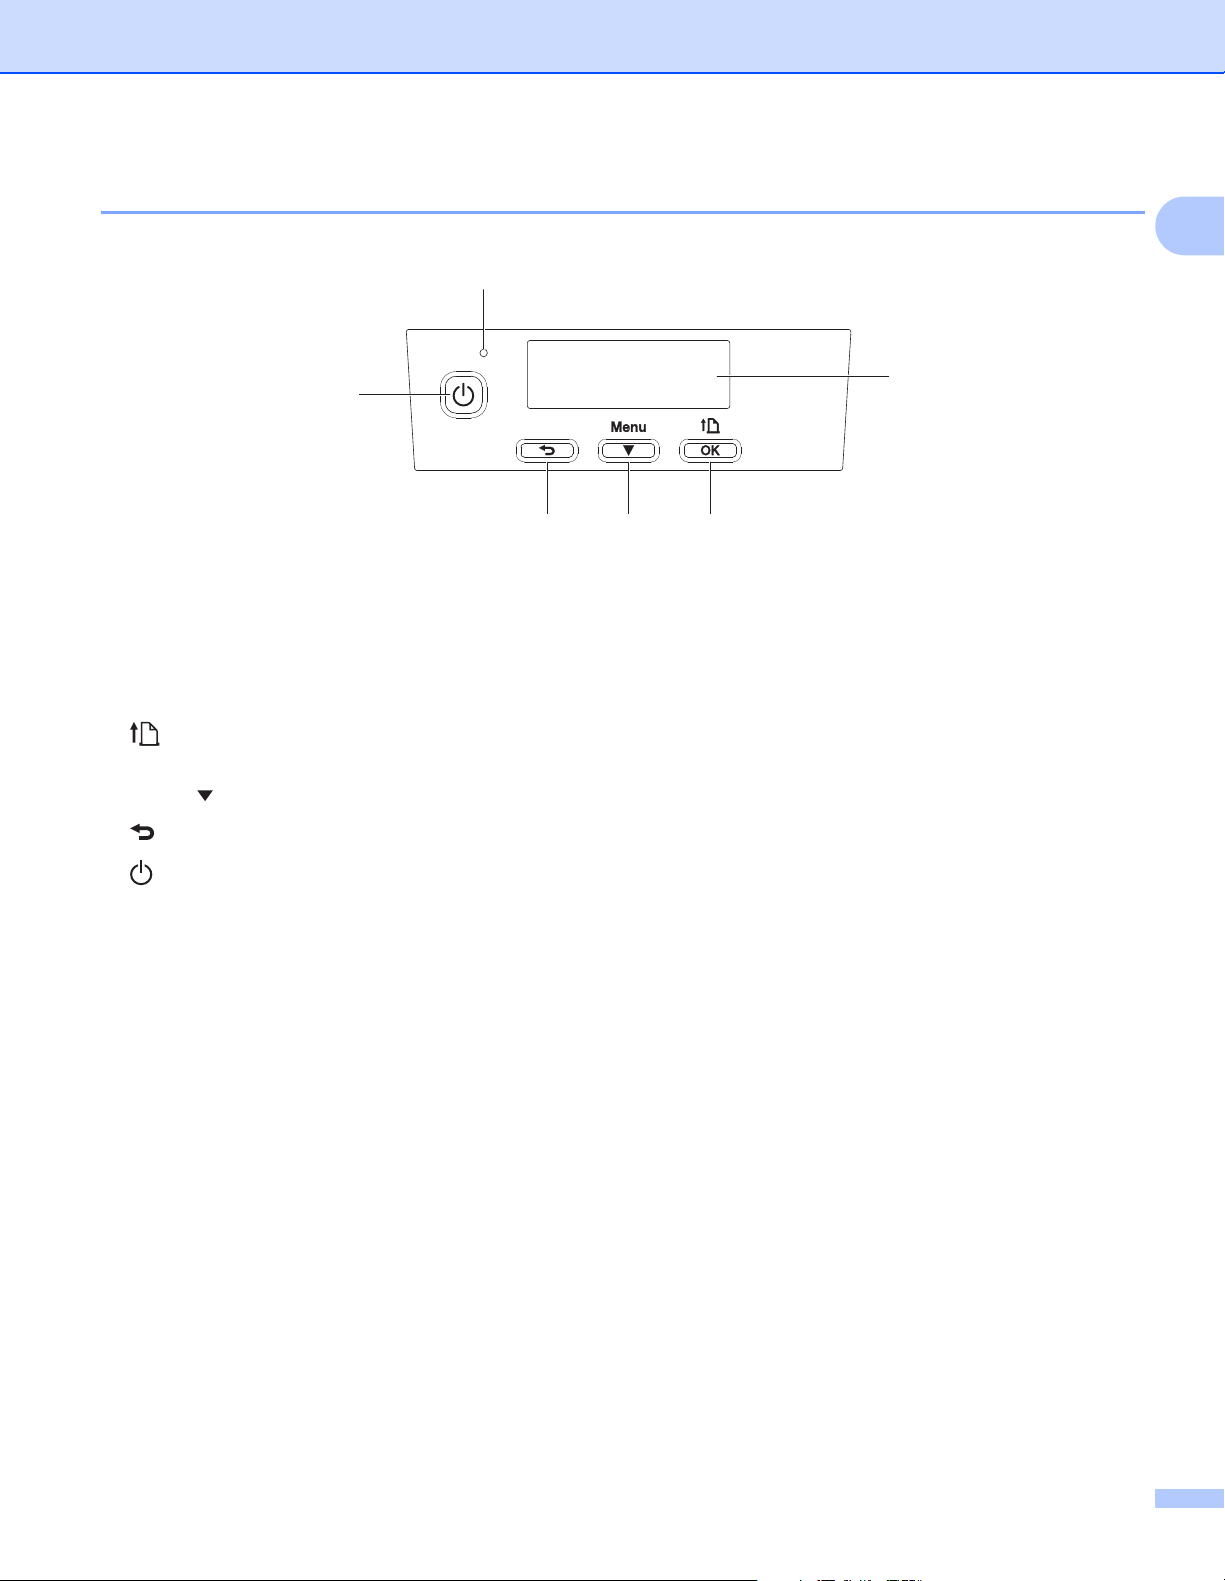
Control Panel 1
1
1
6
1 LED indicator
See LED Indicators on page 16.
2LCD
See LCD on page 15.
3 (Feed) /OK button
To feed the paper or print the printer settings
4 Menu / (Select) button
5 (Back) button
6 (Power) button
To turn the printer on/off
2
345
14
Page 16
Set Up the Printer
LCD 1
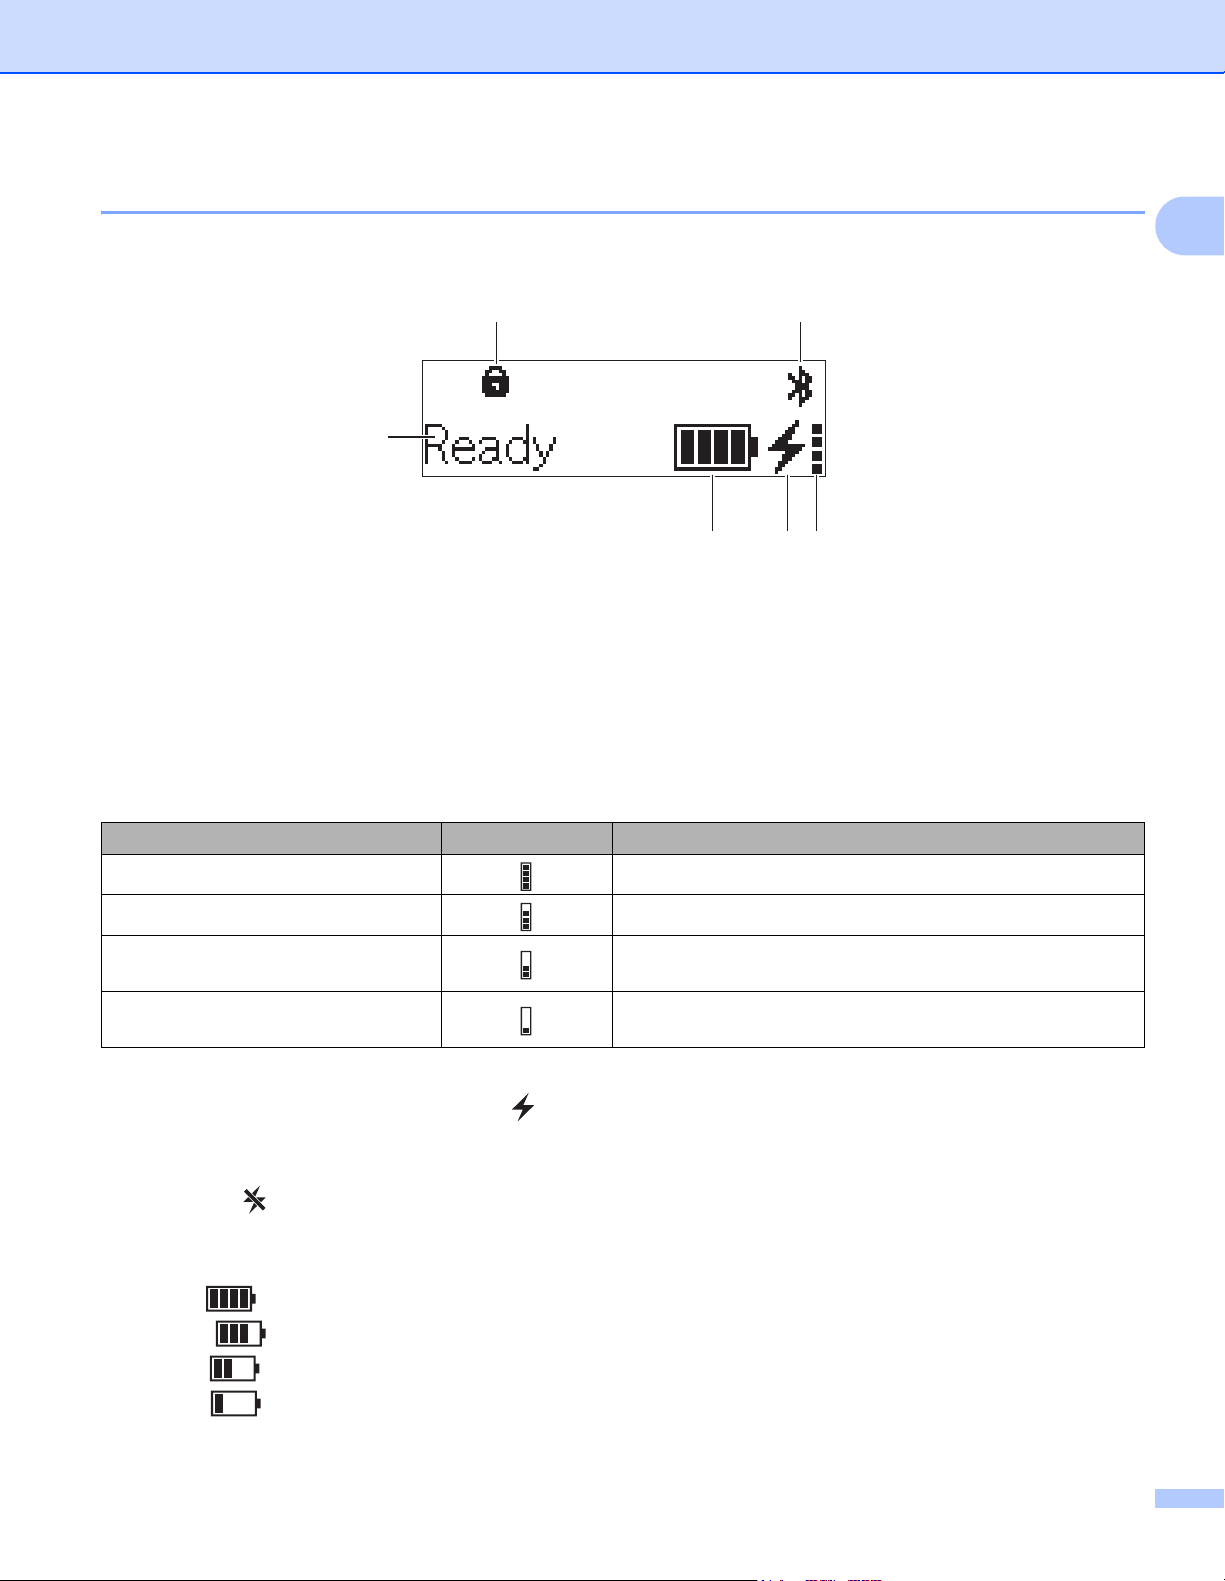
When the printer is turned on, the main screen appears.
1
1
6
5
2
34
1 Menu key lock icon
Displayed when the [Menu Key Function] in Printer Setting Tool is set to on.
®
2 Bluetooth
icon
Indicates Bluetooth is on.
3 Battery health level icon
When the printer is turned on, the battery health level displayed. It does not appear when charging is not
possible.
Message Icon Condition
BatteryHealth Excellent No problems. The battery may be used.
BatteryHealth Good Still healthy. The battery can be used.
Battery Poor Replace soon
Batt. Very Poor Replace
battery
Battery health is deteriorating. Replace the battery with a
new one soon.
The battery is badly deteriorated. Replace the battery with
a new one.
4 Charge status icon
Charging (AC adapter connected):
Not Charging (AC adapter not connected): No icon is displayed.
Not Charging (Battery cannot charge when battery temperature is above 104°F (40°C) or below 32°F
(0°C)):
5 Battery level
Indicates the remaining battery level.
Full:
High:
Half:
Low:
6 Printer status
15
Page 17
Set Up the Printer
LED Indicators 1
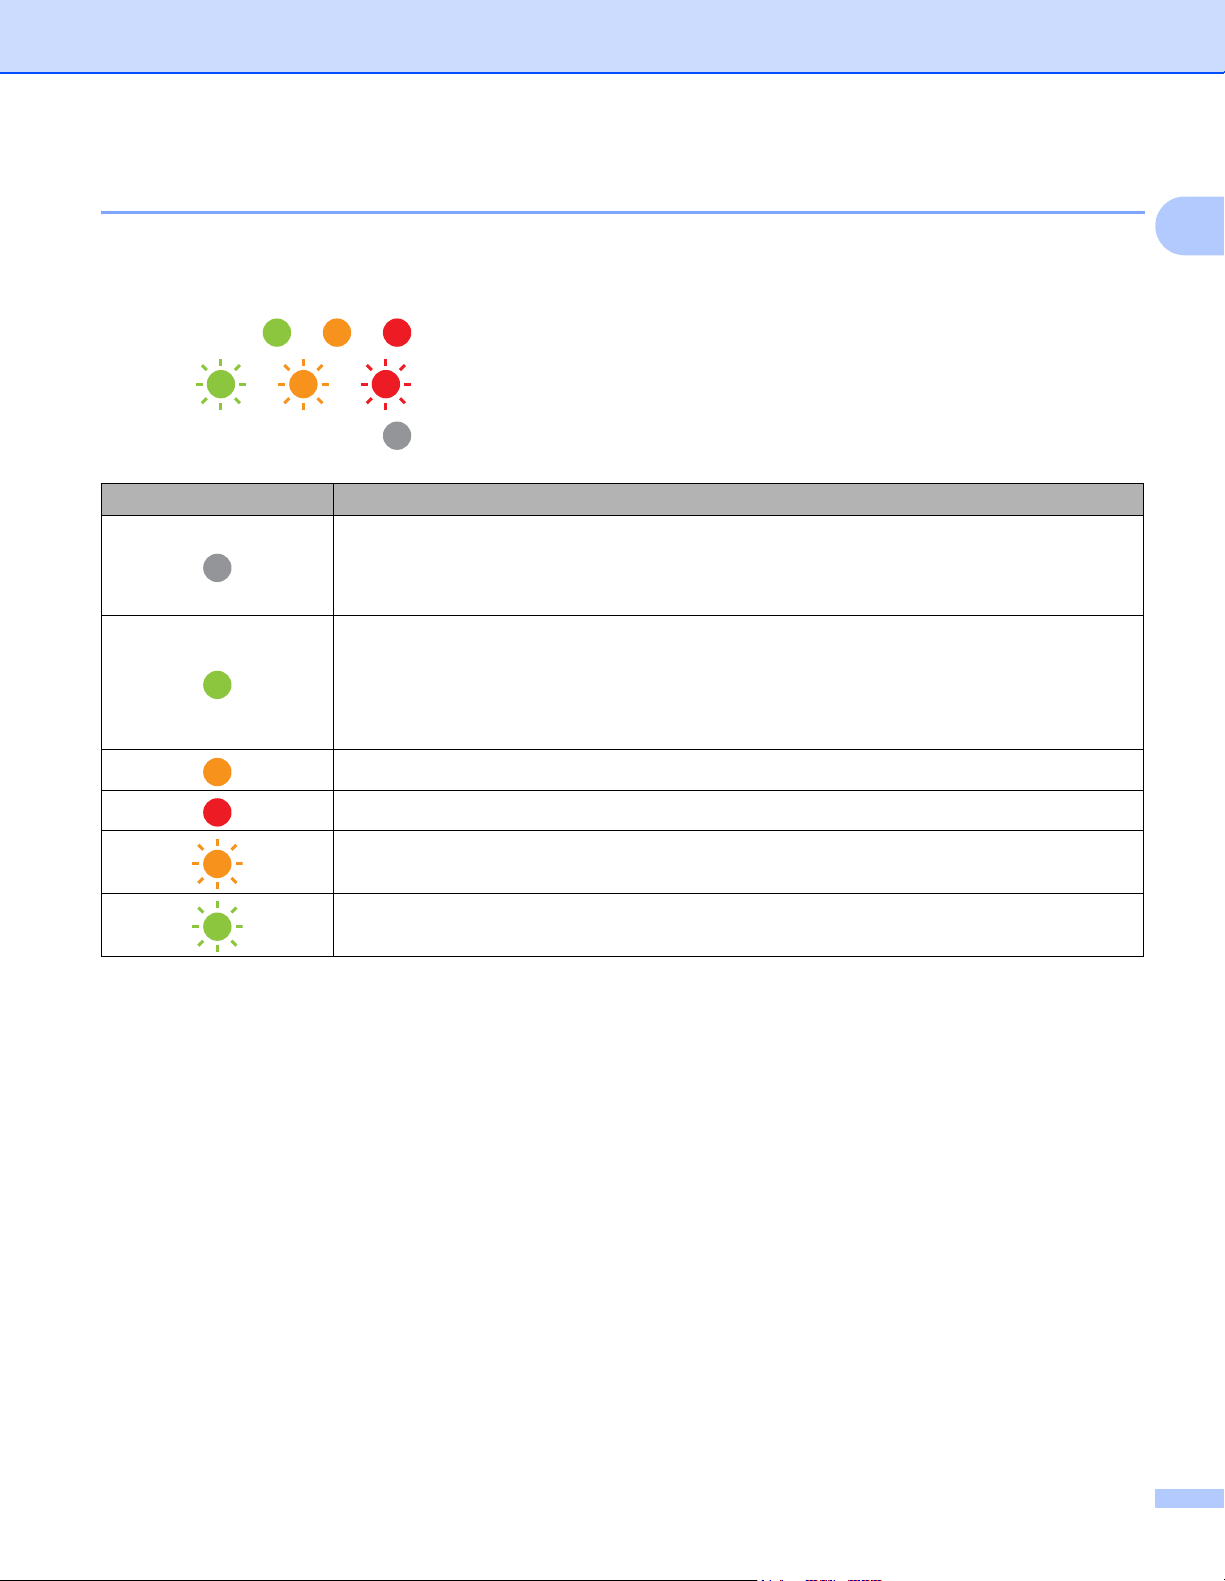
The indicator lights and flashes to indicate the printer’s status. The symbols used in this section explain the
meaning of the different indicator colors and patterns:
1
or or
or or
Indicator is lit in the color shown
Indicator is flashing in the color shown
Indicator is off
LED Indicator Status
Power off
Charging complete (when power is turned off)
No charging (when power is turned off)
Battery level: Half or more
Charging complete (when power is turned on)
Power on (when the battery is not connected but the AC adapter is connected)
No charging (when power is turned on)
Charging
Boot mode
Battery level: low
Sleep mode
16
Page 18

Set Up the Printer
LED Indicator Status
Media end error
Feed error
Cover open error
Communication error
BLF file error
No template error
Memory full error
ESC/P Memory full error
JPEG file error
Battery deterioration error
High temperature error
Mass storage error
Battery level: empty
System error
Database search error
1
Battery error (if the battery is not fully charged after the specified amount of time)
17
Page 19
Set Up the Printer
Button Functions 1
1
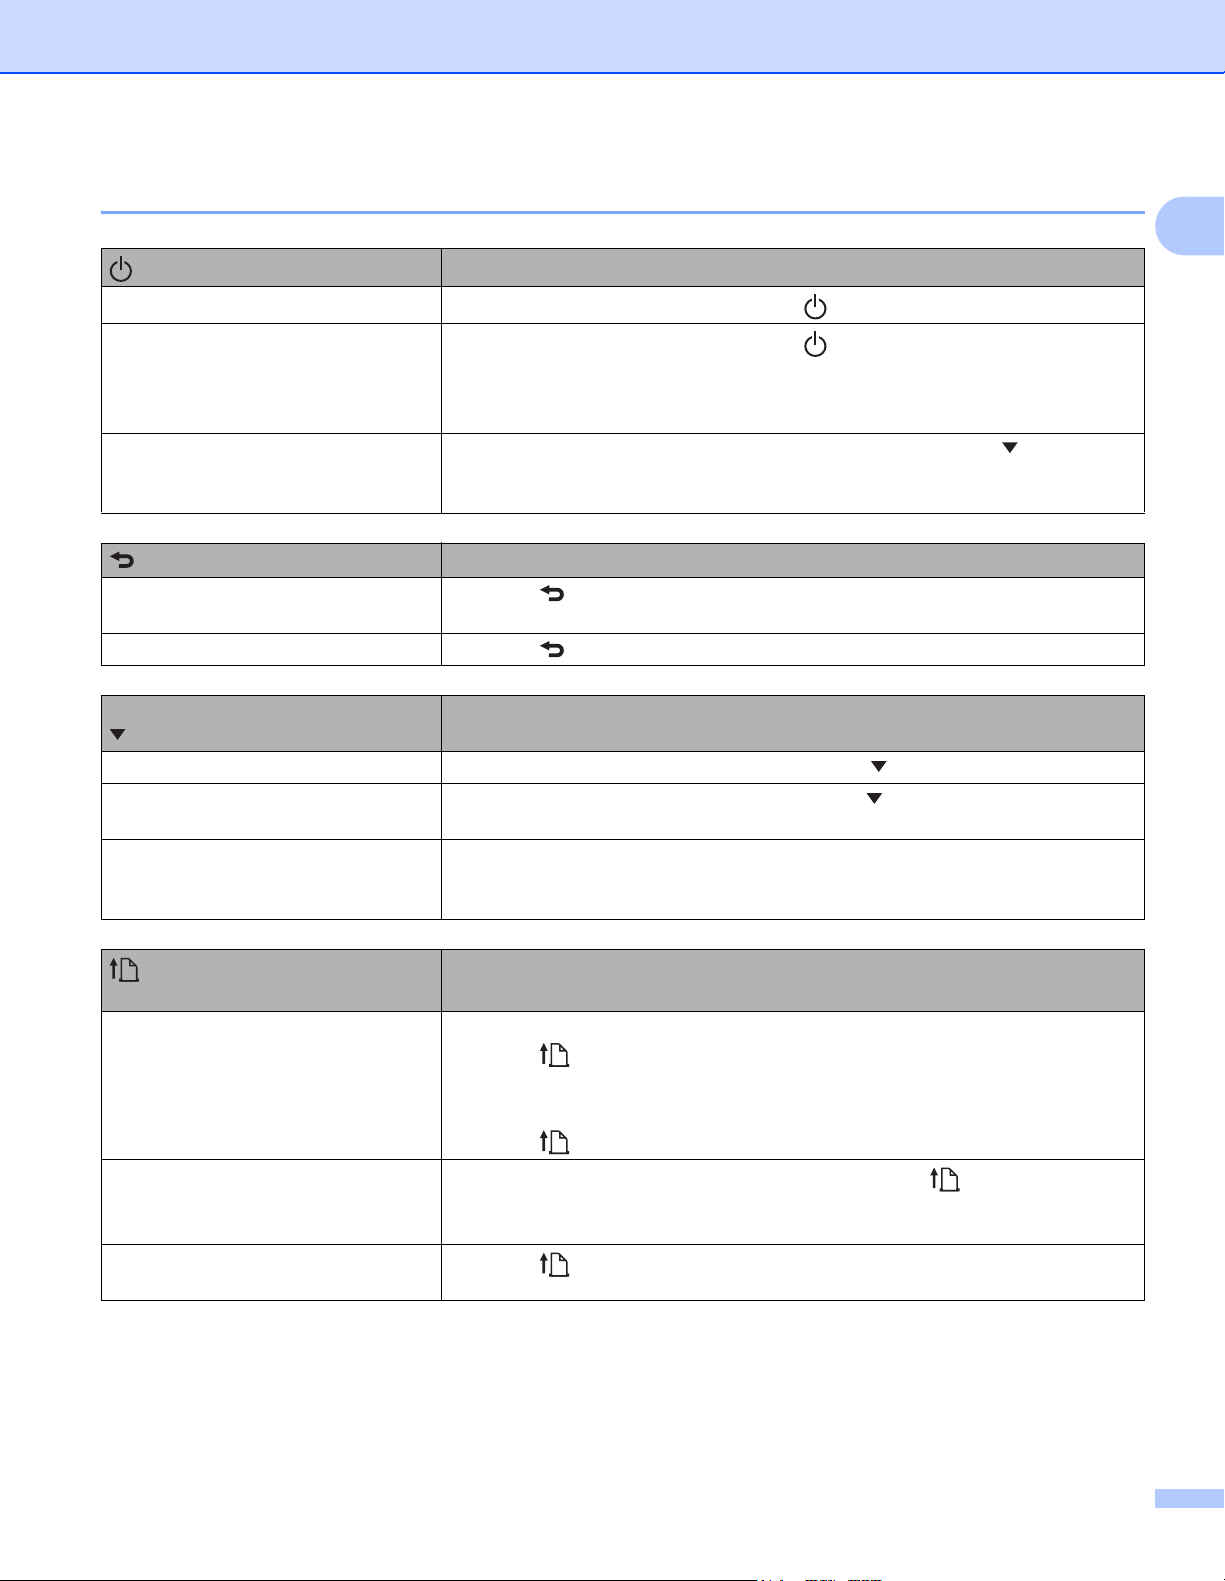
(Power) button function
Turn the printer on
Turn the printer off
Start the printer in mass storage
mode
(Back) button function
Clear the selected menu item and
return to the beginning.
Cancel the current print job.
Menu/
(Select) button function
Enter the menu selection mode While the printer is turned on, press the Menu / (Select) button.
Select the menu option When the menu is displayed, press the Menu / (Select) button to select the
Execute a file stored in the mass
storage area
Operation
While the printer is turned off, press the (Power) button.
While the printer is turned on, press the (Power) button until the message
[System Off] appears on the LCD. (If the [Auto Power Off] feature is enabled
in the Device Settings, the printer will turn itself off automatically after the
selected period of inactivity.)
If you press and hold this button while also pressing the Menu/ (Select)
button, the printer starts in mass storage mode (see Mass Storage Mode
on page 73).
Operation
Press the (Back) button to return to the previous setting category.
Press the (Back) button to cancel the current print job.
Operation
next option.
If you press this button while the printer is running in mass storage mode, you
can execute a command file stored in the mass storage area (see Mass
Storage Mode on page 73).
(Feed)/
OK button function
Feed the paper When the paper type is set to [Die-cut Label] or [Media With Marks]:
Print the printer information
Activate the function mode for the
selected item
Operation
Press the (Feed) /OK button to automatically feed the paper to the print
position.
When the paper type is set to [Continuous Length Tape]:
Press the (Feed) /OK button to feed the paper.
Make sure that a roll is set, and then press and hold the (Feed) /OK button.
The printer starts printing its settings (see Print the Printer Information
on page 72).
Press the (Feed) / OK button to activate the selected menu option.
18
Page 20
Set Up the Printer
Important
Note
Battery Installation/Removal 1
Make sure you charge the rechargeable Li-ion battery (PA-BT-006) either in the printer, or in the charger
before initial use.
Install the Battery 1
For RJ-4230B
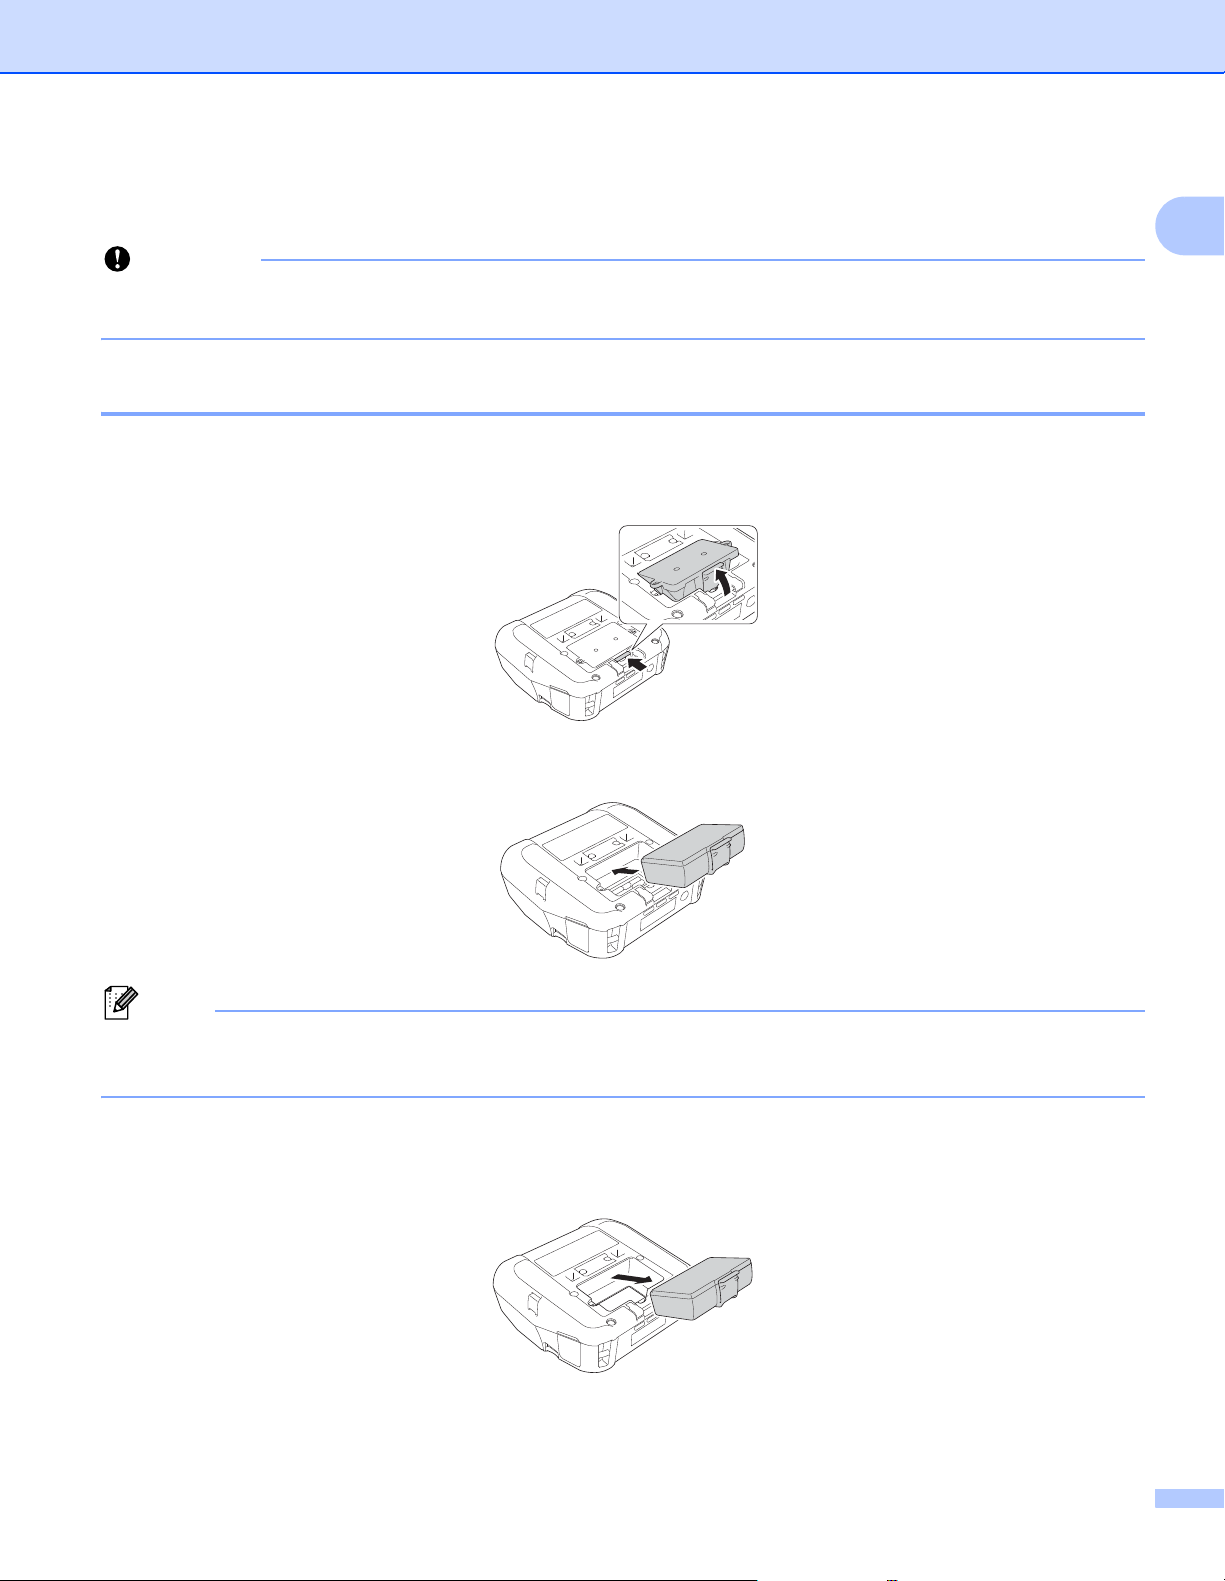
a Unlock and pull out the battery cover.
1
b Insert until battery locks into place.
• To remove the battery, reverse the installation procedure.
• Do not lose the battery cover.
For RJ-4230B-L
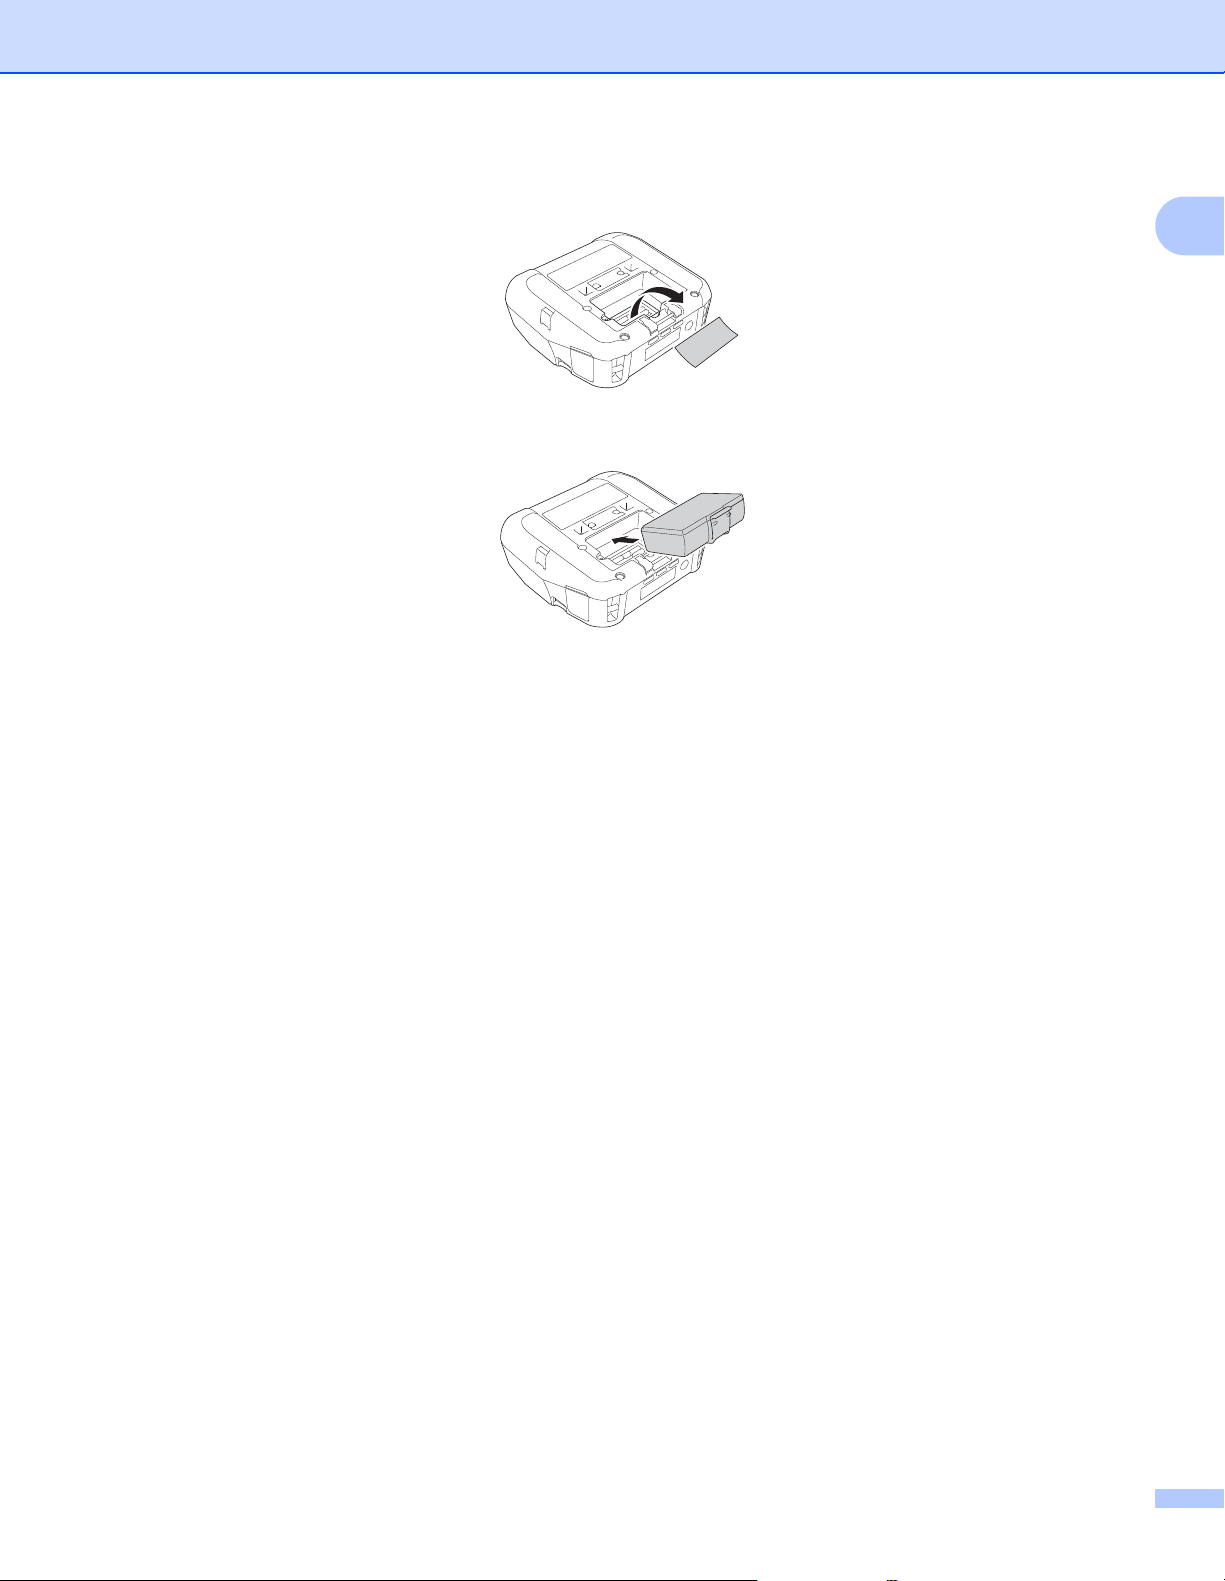
a Unlock and pull out the battery.
19
Page 21
Set Up the Printer
b Remove the insulated sheet.
c Insert until the battery locks into place.
1
20
Page 22
Set Up the Printer
Note
Note
Recharge the Battery 1
While Installed in the Printer 1
To charge the rechargeable Li-ion battery (PA-BT-006), insert it into the printer and do the following:
• Before using the battery, use the following procedure to charge it.
• Print speed varies with the available battery power.
a Make sure that the battery is installed in the printer.
b Use the compatible Brother AC adapter (PA-AD-600A) and the AC power cord to connect the printer to
an AC power outlet (see How to Recharge the Battery with the AC Adapter (Optional) on page 22), or
use the Brother compatible car adapter (PA-CD-600CG) to connect the printer to a DC power outlet (see
How to Recharge the Battery with the Car Adapter (Optional) on page 23).
1
• The LED indicator light is orange when the battery is charging.
When the battery is fully charged, the LED indicator turns off (when power is turned off) or lights in green
(when power is turned on).
• Charging time is approximately 4 hours. It varies on the environmental conditions.
• Due to the temperature of the battery, charging may stop if the ambient temperature is outside the
following range: 32°F to 104°F (0°C to 40°C).
21
Page 23
Set Up the Printer
Note
How to Recharge the Battery with the AC Adapter (Optional) 1
The AC adapter and AC power cord are optional accessories. When purchasing the printer, purchase the
adapter and power cord appropriate for the region where the printer will be used.
The printer will function without a battery installed and external power applied.
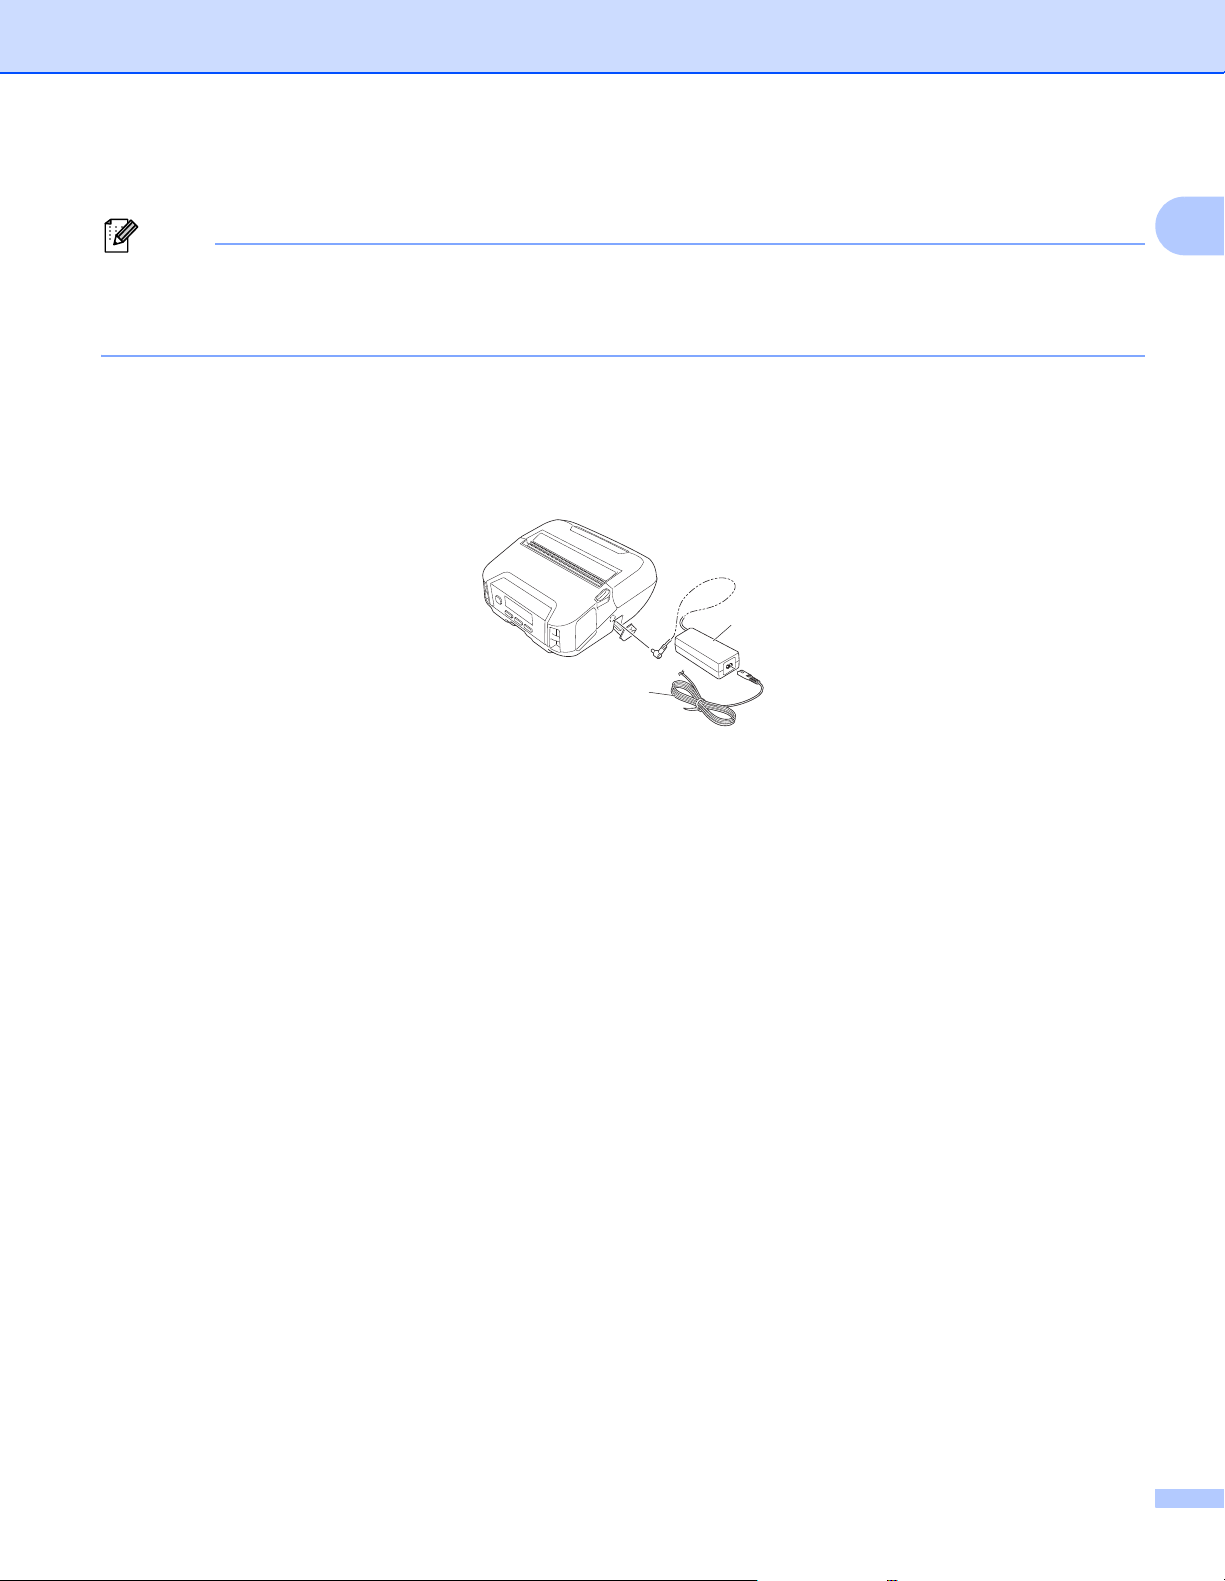
a Open the DC connector cover and connect the AC adapter to the printer.
b Connect the AC power cord to the AC adapter.
c Connect the AC power cord to a nearby AC power outlet (100 - 240 VAC, 50 - 60 Hz).
1
2
1
1 AC adapter
2 AC power cord
22
Page 24
Set Up the Printer
Note
How to Recharge the Battery with the Car Adapter (Optional) 1
Connect the printer to your vehicle’s 12 V DC power outlet (cigarette lighter or similar) to charge the
rechargeable battery.
The car adapter is an optional accessory.
The printer will function without a battery installed and external power applied.
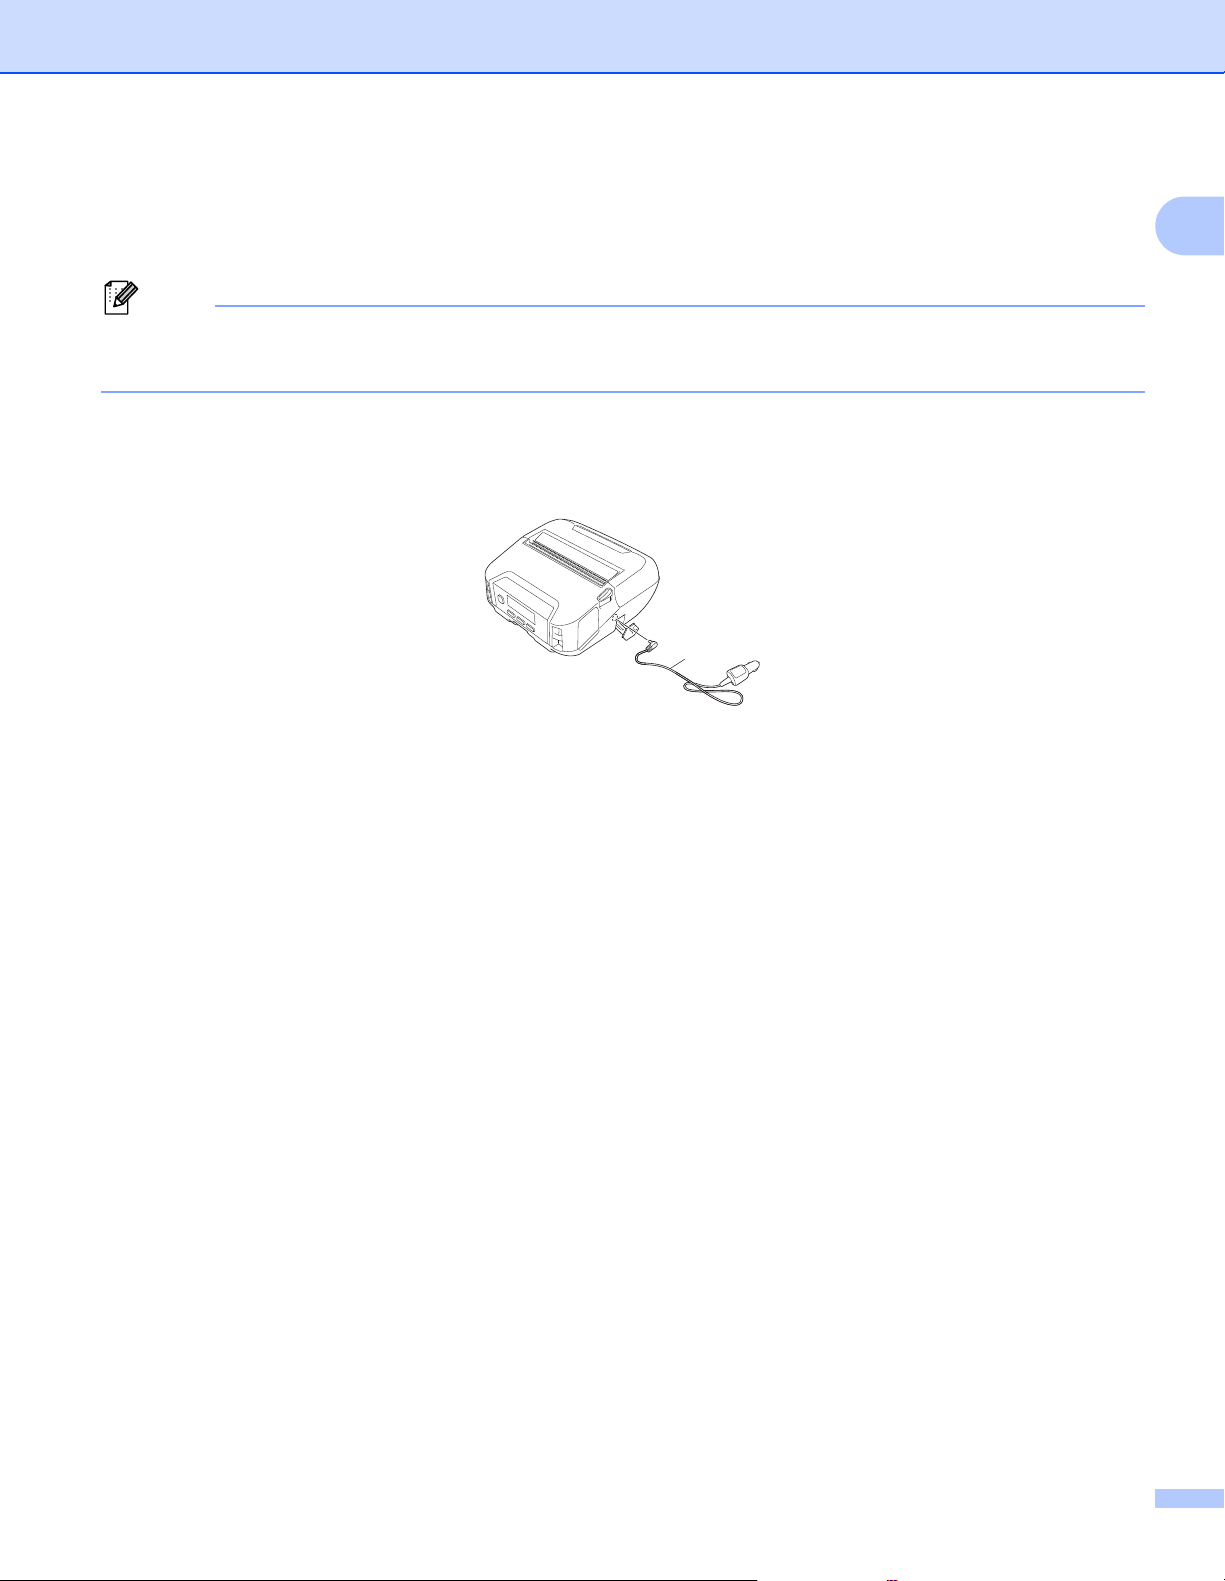
a Connect the car adapter to the vehicle’s 12 V DC power outlet.
b Open the DC cover and connect the car adapter to the printer.
1
1 Car adapter
1
How to Recharge the Battery with the Battery Charger (Optional) or Active Docking Station
(Optional) 1
The battery can be charged using the battery charger (Optional) or Active Docking Station (Optional). For
more information, see Battery Charger (Optional:PA-BC-003) on page 121, or Active Docking Station
(Optional:PA-CR-002) on page 127.
23
Page 25
Set Up the Printer
Note
Stop Battery Charging 1
To stop the battery charging, disconnect the AC adapter or car adapter from the DC connector.
Tips on Using the Battery 1
High density (dark) printing discharges the battery faster than low density printing. You can adjust the print
density setting in the Device Settings (see Device Settings on page 51).
The battery charging must take place in an environment with a temperature between 32°F and 104°F (0°C
and 40°C), otherwise the battery will not be charged. If the charging stops because the environment
temperature is too low or too high, place the printer in an environment with a temperature between 32°F
and 104°F (0°C and 40°C) and try charging again.
If you use the printer when both the battery is installed and the AC adapter or car adapter is connected,
charging may stop even if the battery is not fully charged.
Battery Characteristics 1
To ensure the highest performance and longest life from the battery:
1
Do not use or store the battery in a location exposed to extreme high or low temperatures as it may
deteriorate more quickly.
Remove the battery when storing the printer for long periods of time.
Store batteries with less than a 50% charge in a cool dry place out of direct sunlight.
Recharge the battery every six months if it is stored for long periods of time.
It is normal and safe for the printer to become warm while charging. Disconnect the charger and stop using
the printer if it becomes hot to the touch.
When the printer is turned on, the battery health status is displayed on the LCD.
For battery health status displays, see LCD on page 15.
When not Using the Battery 1
The printer may be operated without the battery in the following ways:
When an AC adapter (PA-AD-600A) or car adapter (PA-CD-600CG) is connected to the printer.
When the printer is installed in the Active Docking Station (PA-CR-002).
When the battery is not installed, securely fasten the battery cover with self-tapping screws (M2.6 x 0.24
in. (6 mm)) (not included). (RJ-4230B only)
24
Page 26
Set Up the Printer
Note
1
Power On or Off 1
On: Press the (Power) button.
Off: Press the (Power) button until the message [System Off] appears on the LCD.
• When the printer is connected to the AC adapter, power turns on automatically by default.
• Do not remove the battery until the LCD turns off when the AC adapter is not connected to the printer and
the AC power outlet.
Set the Language 1
a Press the Menu / (Select) button to select the [Settings] menu, and then press the (Feed) / OK
button.
b Select [ Language] , and then press the (Feed) / OK button.
c Select a language, and then press the (Feed) / OK button.
1
Insert the Roll 1
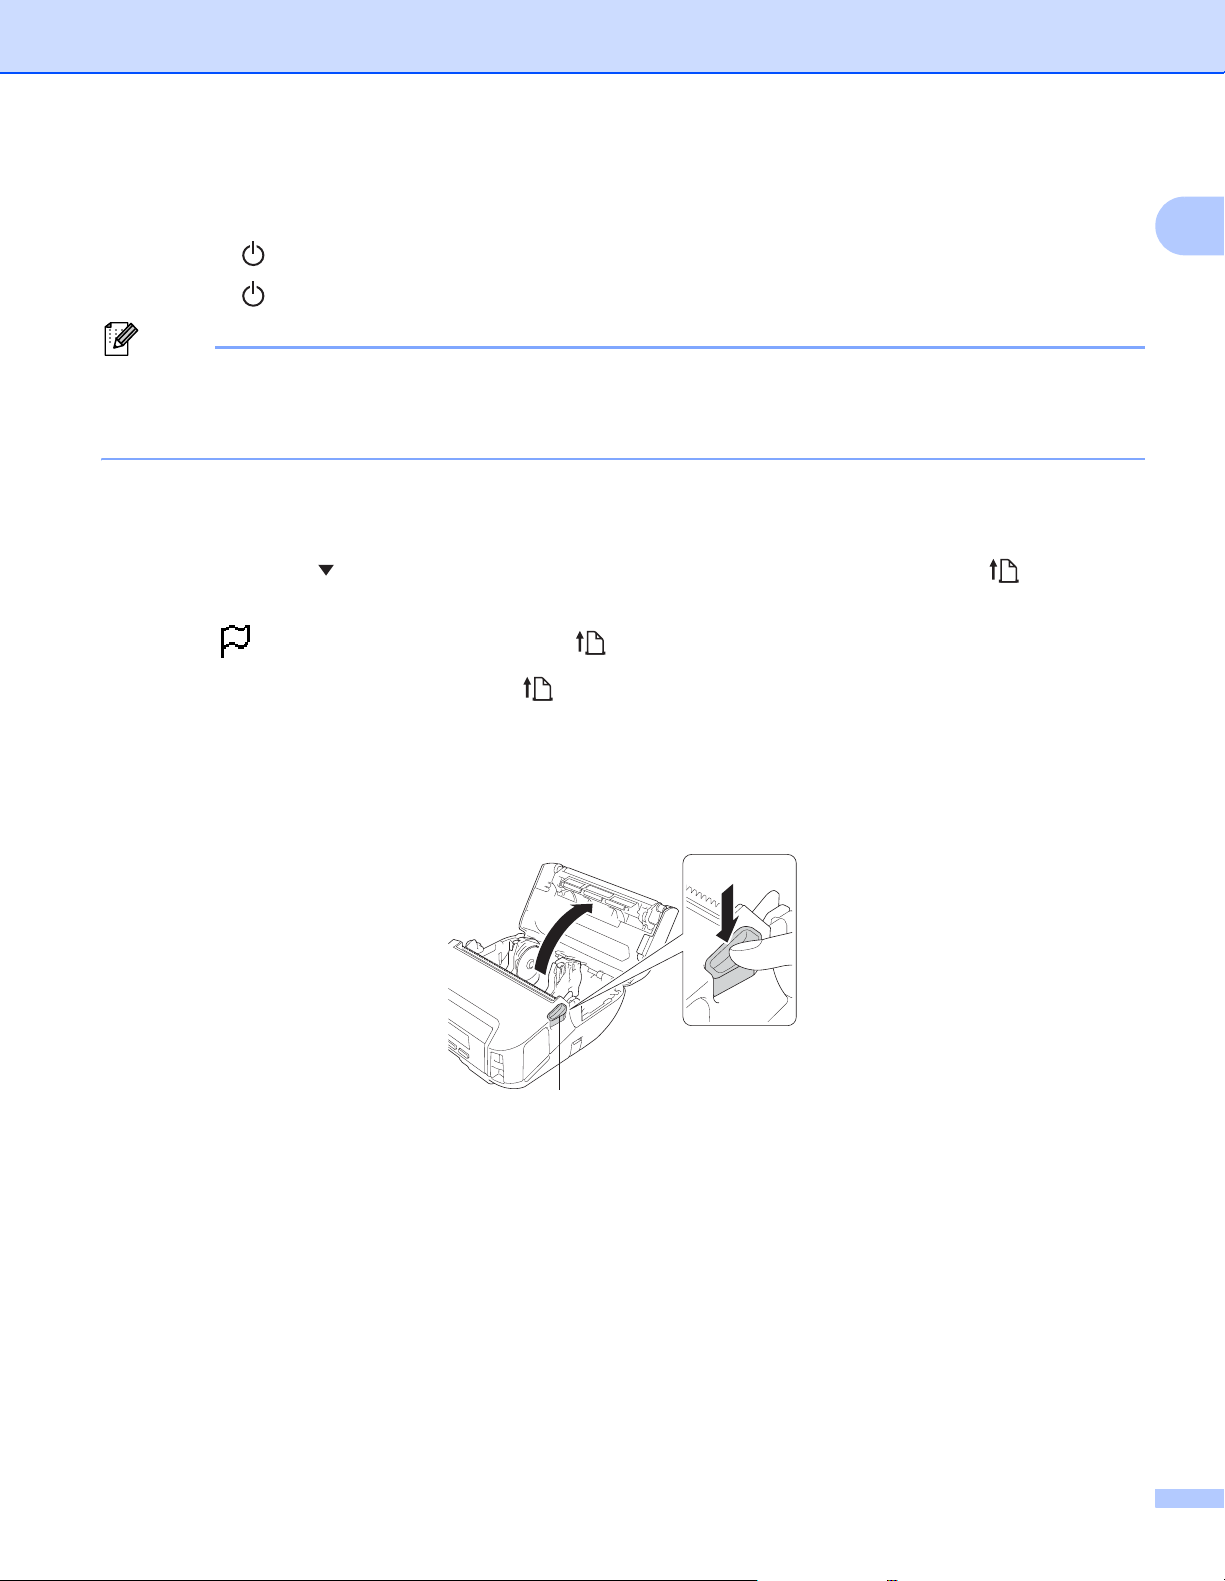
a Push the roll cover release lever to open the roll compartment cover.
1 Roll cover release lever
25
Page 27
Set Up the Printer
Important
1
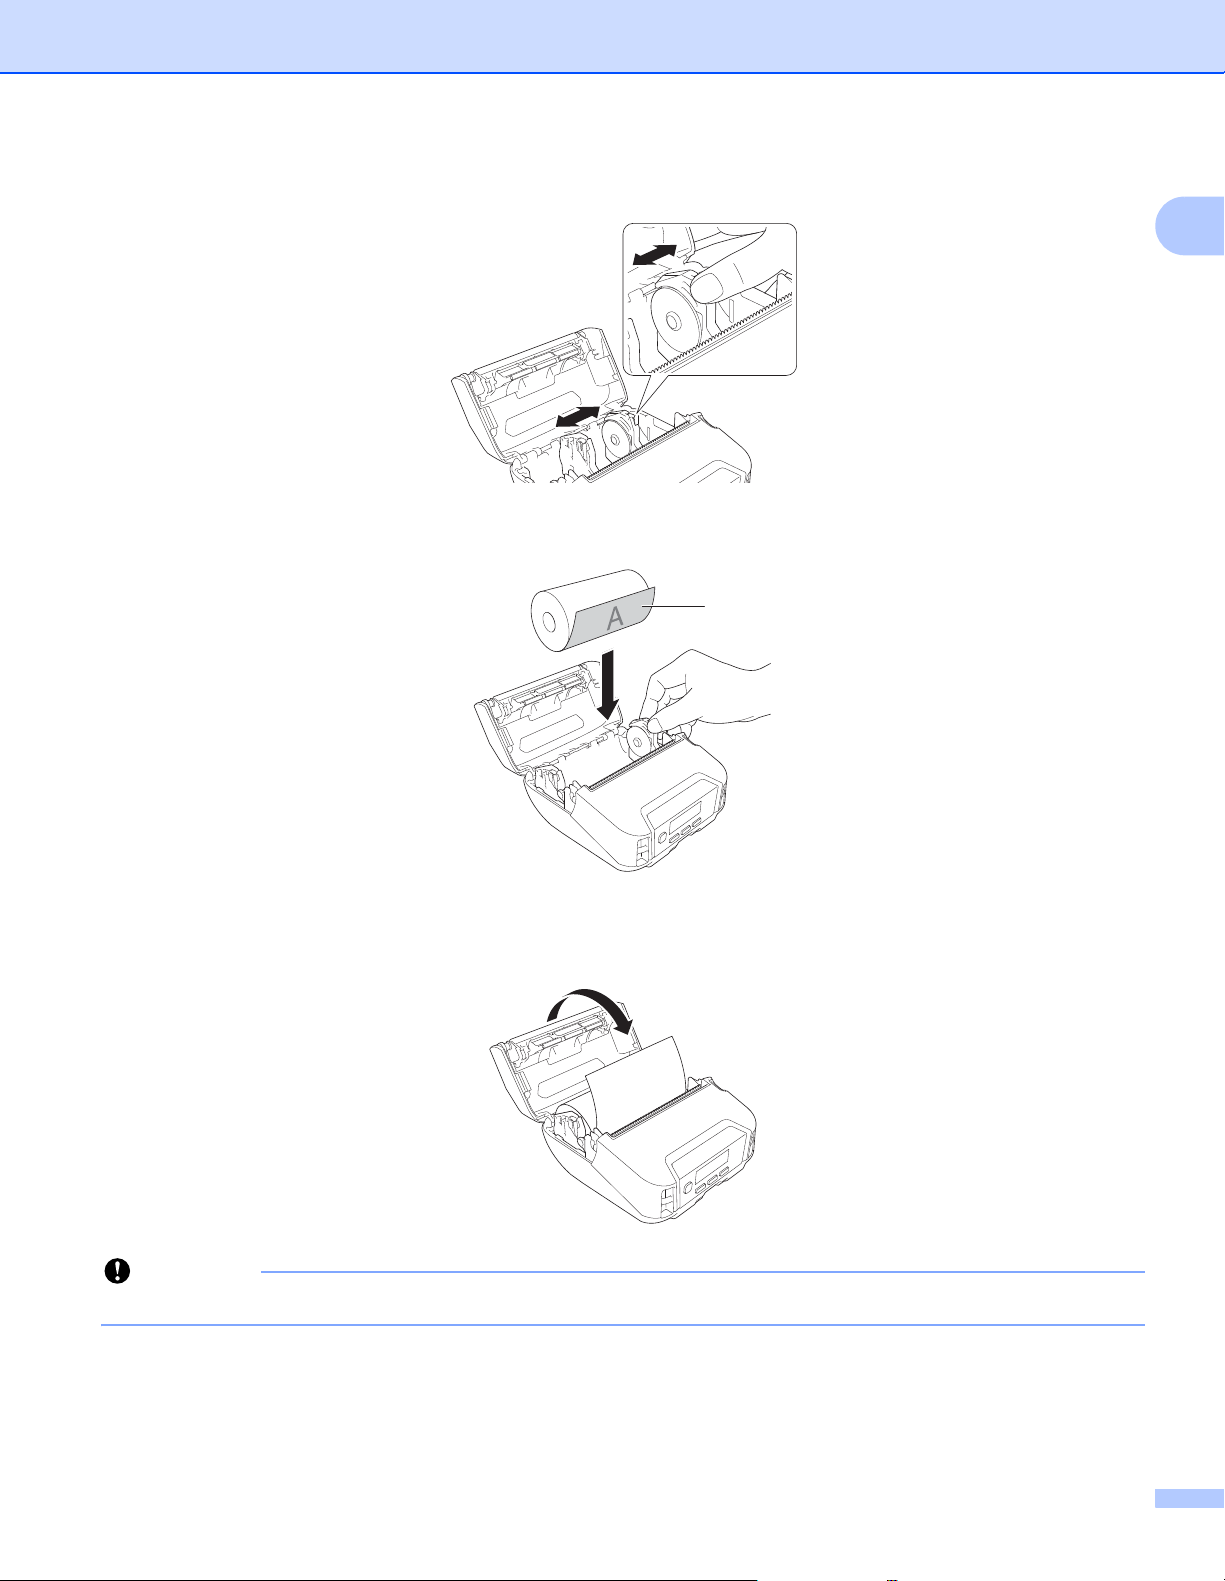
b Slide both roll guides outwards.
c Insert the roll.
1
1 Print surface (faces outwards on the roll)
d Close the roll compartment cover until it locks.
For best performance, use genuine Brother RD rolls.
26
Page 28
Set Up the Printer
Note
Note
• When using die-cut labels, set the paper type to [Die-cut Label], and press the (Feed) / OK button after
inserting the roll. The printer will feed the label to the top of form position.
• To remove the roll, reverse the installation procedure.
• Make sure inserted rolls turn correctly.
Use the Roll Holder Stop 1
The roll holder stop prevents the roll holder from closing. It is ideal to minimize the distance needed to spread
the roll holders in order to load the roll.
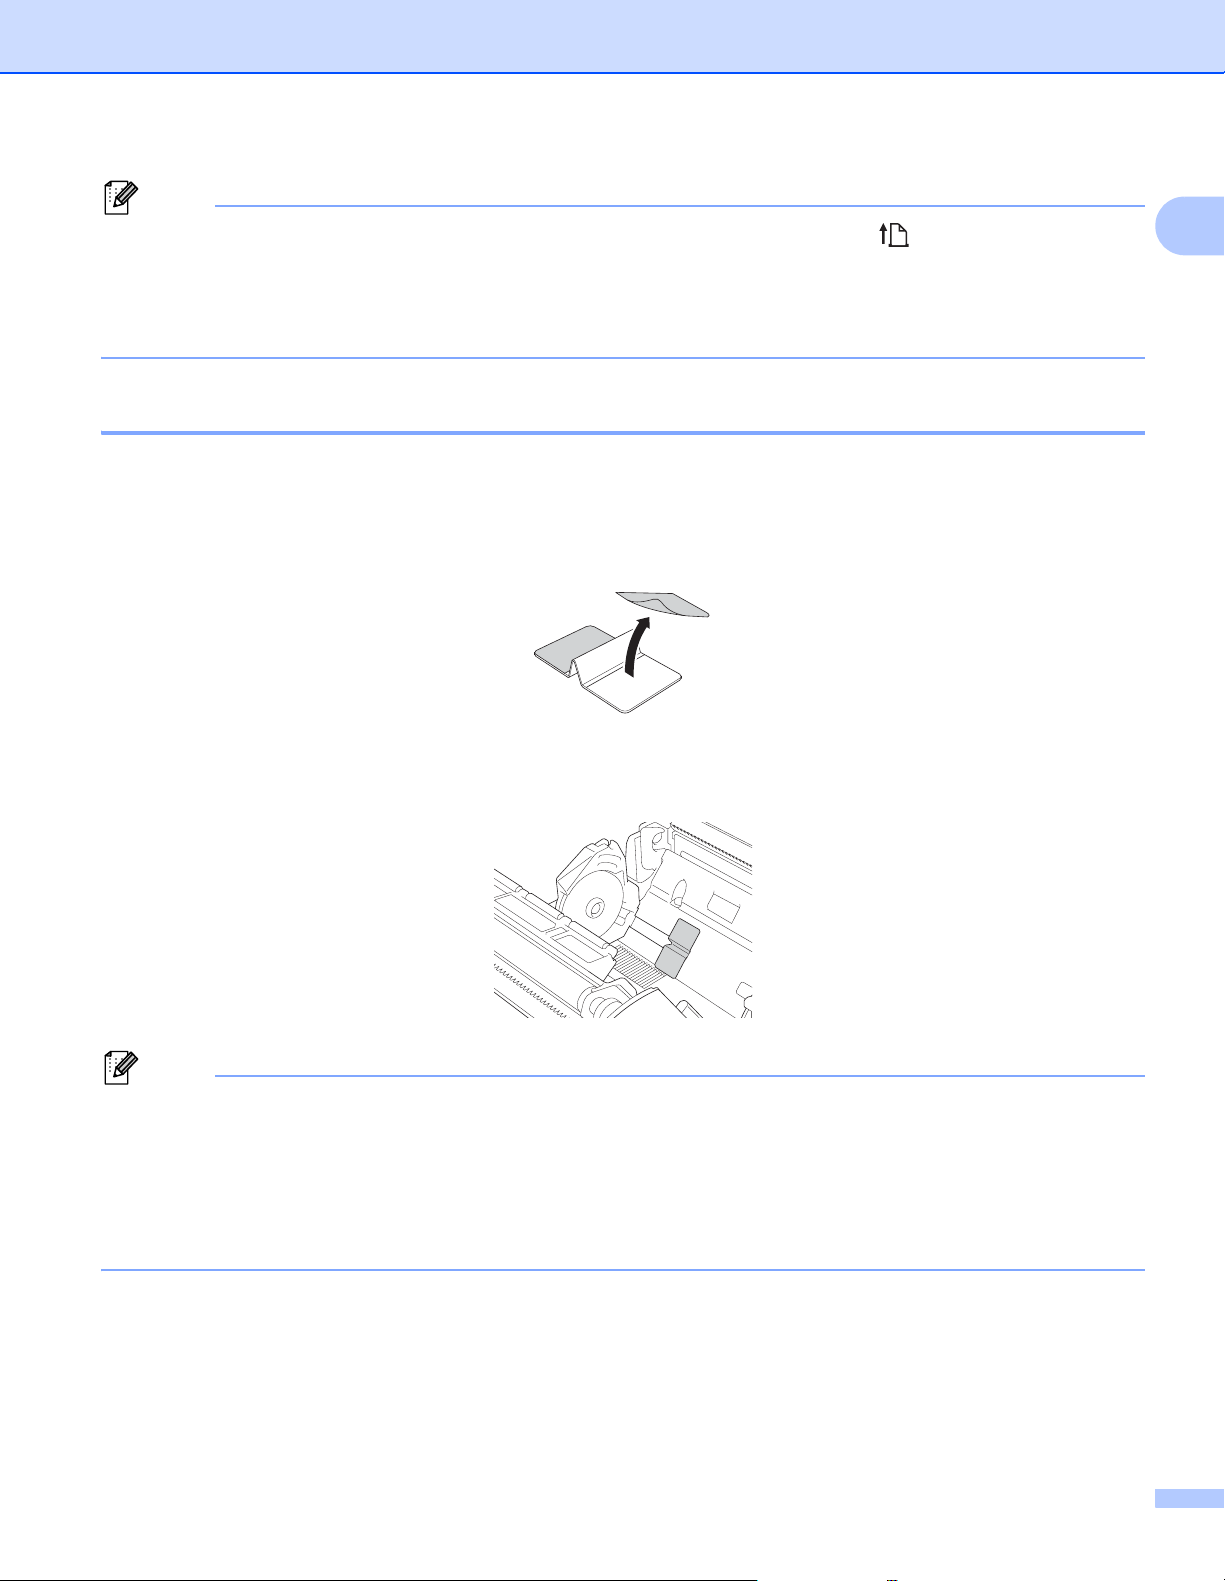
a Remove the backing paper from two locations on the Roll holder stop.
b Extend the roll guide outward and attach the Roll holder stop to the innermost part of groove.
1
• Roll holder stop is supported for 4 inch roll.
• Attach the Roll holder stop with the roll guide outwards.
• The Roll holder stop can be attached to either side of the groove.
• Attach the Roll holder stop not to enter surplus air between the adhesive layer and the printer.
• Clean the pasted part of the printer before attaching.
27
Page 29
Set Up the Printer
CAUTION
1
2
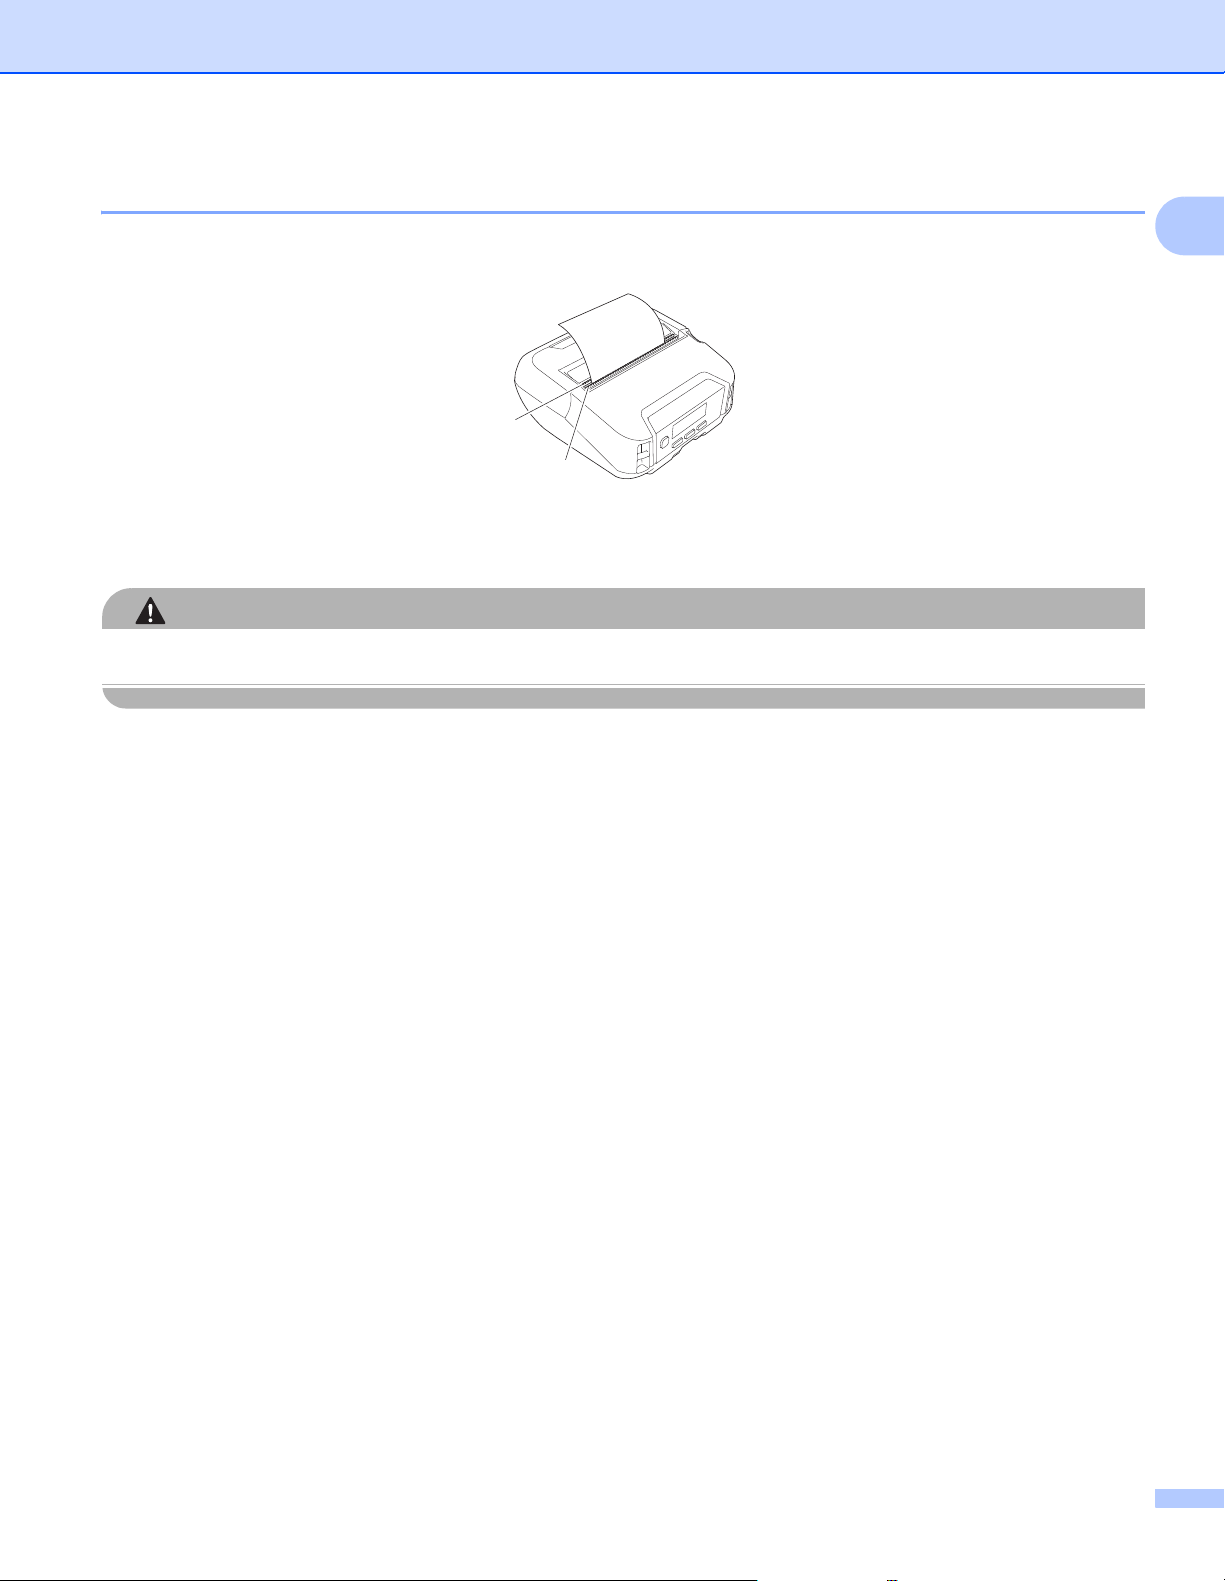
Tear Off Media 1
Receipt paper, labels and tags can be torn off cleanly by swiftly pulling up or down on the media.
1 Lower tear bar
2 Upper tear bar
Do not touch the blade.
1
28
Page 30
Set Up the Printer
Important
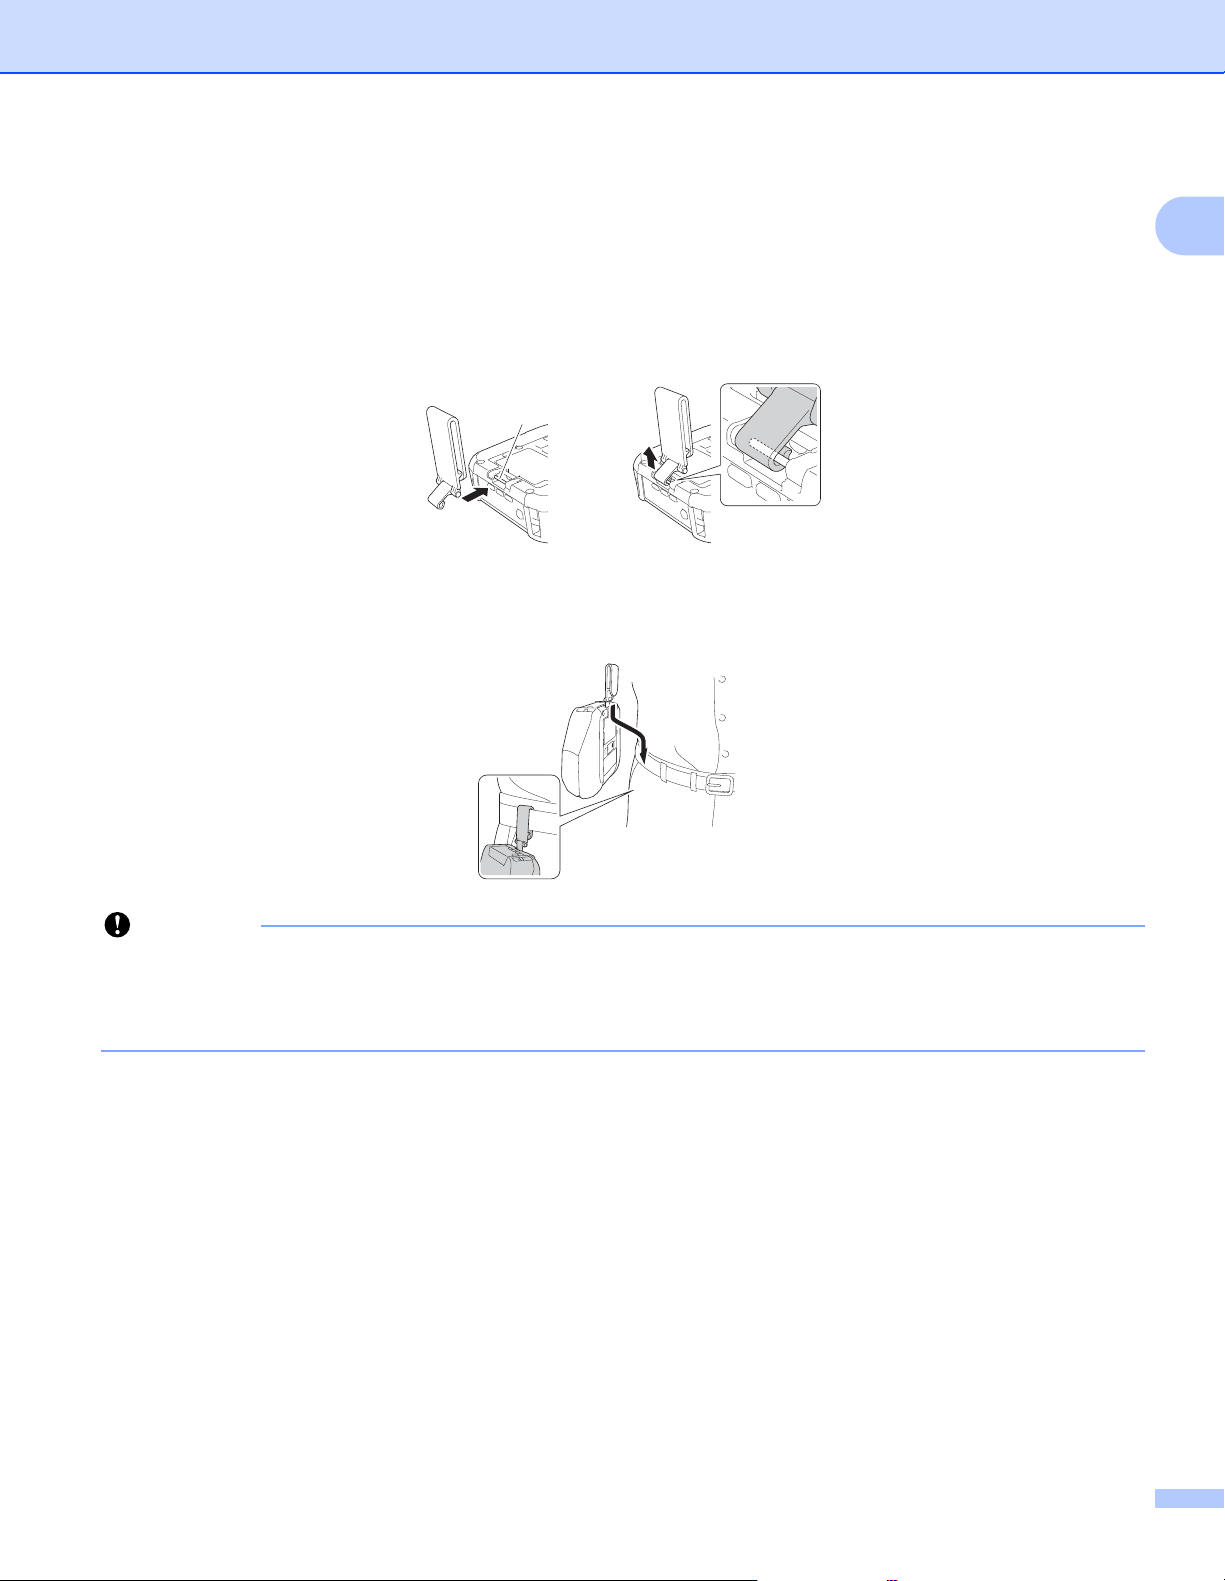
Attach the Belt Clip 1
You can carry the printer on your belt by attaching and using the included belt clip. Follow the instructions
below to attach the clip to the printer and to your belt. After attaching the clip to the printer, you can attach
and secure it to your belt.
a Attach the belt clip to the belt clip hook on the printer, as shown:
1
1 Belt clip hook
b Attach the clip to your belt.
1
• Make sure you attach the belt clip securely to the printer.
• To detach the belt clip, reverse the installation procedure.
• We recommend using a belt that is less than 0.2 in. (5 mm) thick and width is less than 1 7/8 in. (47.63mm).
29
Page 31

Set Up the Printer
Install Software on Your Windows Computer or Mobile Device1
Several printing methods are available, depending on the printer model and the computer or mobile device
you use to print from.
See the following tables and install other software on your computer or mobile device as needed.
Available Software 1
For computer 1
To use the printer with your computer, you must install the printer driver.
Software Features
1 Printer driver —
Communication
Settings
Device Settings
Printer
2
Setting
Tool
3 P-touch Editor
P-touch Transfer
4
Manager
5 P-touch Library Allows you to manage and print P-touch Editor templates.
6 P-touch Transfer Express Allows you to transfer documents to the printer.
7 P-touch Update Software Allows you to update the firmware and software.
8 Font Manager Allows you to transfer fonts to the printer and delete fonts from the printer.
P-touch
Template
Settings
Paper Size
Setup
Allows you to specify the printer’s communication settings and device settings from
the computer.
Allows you to configure the P-touch template settings.
P-touch Template provides functions for inserting data from a device (such as a
barcode reader connected to the printer) into text and barcode objects in layouts
saved on the printer, useful for printing templates and barcodes.
Allow you to add the paper sizes not available in the [Paper Size] list of the printer
driver.
Allows you to design custom documents, store templates, connect to databases, and
use a large library of labels and tags.
Allows you to transfer files created with P-touch Editor to a printer and store the files
in the printer's memory. You can print them from the printer's memory without
connecting to your computer.
Transferred fonts can be accessed and printed using various print commands.
1
About font usage permission
When using fonts, you must abide by all terms and conditions set forth by each
rightful font owner. Before downloading fonts, you must confirm that you have
legitimate licences to use the fonts and comply with their terms and conditions;
otherwise you may not download fonts.
30
Page 32

Set Up the Printer
For mobile devices 1
Software Features
Mobile Transfer
1
Express
Print Service Plugin
2
(Android)
3 Mobile Deploy
Mobile Transfer Express is software that allows you to use a mobile device to transfer files
(templates, databases and images) which were prepared using P-touch Transfer Manager
(Windows version), to a printer.
Print Service Plugin allows you to print from an Android device without installing additional
software.
Mobile Deploy is software that allows simple and easy printer updates and configuration
in the field using a mobile device. Printer updates can be prepared by an administrator and
deployed to multiple users. Users can then apply them to their printers.
A software development kit (SDK) is also available.
To obtain the SDK and Font Manager, visit the Brother Developer Center
(www.brother.com/product/dev/index.htm
).
Install the Printer Driver and Software (When Using a Computer) 1
To print from your computer, install the printer driver, P-touch Editor and other software on your computer.
Visit our website (install.brother
) and download the installer for the software and manuals.
1
31
Page 33

Set Up the Printer
Note
Connect the Printer to a Computer or Mobile Device 1
Refer to the directions for the type or connection method:
USB cable connection (computer only)
See Connect Using USB (Computer Only) on page 32.
Bluetooth connection
See Connect Using Bluetooth on page 33.
NFC connection (Android)
See Connect Using NFC (Android) on page 33.
Connect Using USB (Computer Only) 1
a Before connecting the USB cable, make sure that the printer is turned off.
b Connect the printer end of the USB cable to the mini-USB port on the side of the printer.
c Connect the other end of the USB cable to the USB port on the computer.
1
d Turn the printer on.
USB Strain Relief Clip
The USB strain relief clip secures the USB cable connected to the printer. To install it, use the provided
screw, as shown in the illustration.
Contact Brother for compatible USB cables to use USB strain relief clip.
32
Page 34

Set Up the Printer
Note
Note
Note
Connect Using Bluetooth 1
Follow the manufacturer's recommendations for your Bluetooth-equipped devices (computers and mobile
devices) or Bluetooth adapter, and install any necessary hardware and software.
Use this procedure to pair the printer with the computer using the Bluetooth management software.
a Press the Menu/ (Select) button to select the [Bluetooth] menu, and then press the (Feed) / OK
button.
b Select [On/Off] and then press the (Feed) / OK button.
Select [On].
c Use your Bluetooth management software to discover the printer.
Select the printer (RJ-4230B_XXXX) where XXXX is the last four digits of the printer's serial number.
The unit's serial number is located on the base of the printer.
Bluetooth communication is now available.
1
• You can also change the printer’s communication settings using the Communication Settings (see
Communication Settings on page 41).
• By default, Bluetooth mode is set to [Classic & LE], and these names (for Classic and Low Energy)
might be displayed in the Bluetooth menu of your Android device.
Connect Using NFC (Android) 1
Confirm that printer Bluetooth settings, Bluetooth and NFC settings of mobile device are all set to ON, and
touch your mobile device to the printer.
• The printer's Bluetooth mode must be set to [Classic & LE] or [Classic]. [Low Energy] is not
supported.
• NFC compatibility with your Android device cannot be guaranteed.
33
Page 35

Set Up the Printer
Note
2
1
LCD 1
LCD Settings 1
Specify Settings from the Computer 1
You can specify the LCD settings either by using the printer, or by using the Printer Setting Tool on a
computer connected to the printer. For more information about connecting a computer and specifying
settings, see Change the Printer Settings on page 38.
Specify Settings from the Printer 1
Press the Menu/ (Select) button to select a menu option, and then press the (Feed) / OK button. Press
the Menu/ (Select) button to select an option, and then press the (Feed) / OK button.
1
1 The currently selected option is highlighted.
2 The scroll bar indicates the first parameter with the up arrow, and the last parameter with the down arrow.
If the last parameter is selected, pressing (Select) button scrolls back to the first parameter.
Set the Media Size
a Press the Menu/ (Select) button to select the [Media] menu, and then press the OK button.
b Select [Select Media], and then press the OK button.
Detect the Media Size
The die-cut media can be detected automatically.
a Set the die-cut media in the printer.
b Press the Menu/ (Select) button to select the [Media] menu, and then press the (Feed) / OK
button.
c Select [Auto Detect], and then press the (Feed) / OK button.
If the media size cannot be detected, set the media size from [Select Media].
34
Page 36

Set Up the Printer
Set the LCD Contrast
a Press the Menu/ (Select) button to select the [Settings] menu, and then press the (Feed) /
OK button.
b Select [LCD Contrast] , and then press the (Feed) / OK button. Select the option, and then press
the (Feed) / OK button.
Set the Beeper
Select whether the printer beeps at startup, shutdown and error.
a Press the Menu/ (Select) button to select the [Settings] menu, and then press the (Feed) /
OK button.
b Select [Beeper] , and then press the (Feed) / OK button. Select the option, and then press the
(Feed) / OK button.
Bluetooth Functions
[On/Off]: To connect the printer and your Bluetooth-equipped devices, see Connect Using Bluetooth
on page 33.
[Mode]: Bluetooth mode can be selected from [Classic & LE], [Classic], or [Low Energy].
[AutoReconnect]: Automatically reconnects to a previously connected to iOS supported devices
including iPhone, iPad and iPod touch.
[Clear History]: Deletes information for auto re-paired devices registered in the printer.
1
[BT Address]: The Bluetooth address of the printer appears on the display.
[Print Barcode]: The address and corresponding barcode can be printed.
35
Page 37

2
Note
Note
Note
How to Use the Printer 2
Print from Windows Computer 2
Printing with the Printer Driver 2
a Open the document you want to print.
b Connect the printer to a computer using USB or Bluetooth (see Connect the Printer to a Computer or
Mobile Device on page 32).
If necessary, change the printer settings in the printer driver’s dialog box, or in the Printer Setting Tool (see
Change the Printer Settings on page 38).
c Print from the software.
The message [Printing] appears on the LCD. When printing is finished, the printer reverts to the mode
selected before printing started.
2
To print a JPEG image without using the printer driver, see Print JPEG Images on page 74.
Make Prints Lighter or Darker 2
You can make prints lighter or darker by adjusting the print density setting in the Device Settings (see Device
Settings on page 51).
When using the battery, changing the print density setting may result in slight changes in printing speed and
the number of pages that can be printed on a single charge.
Set Printer Driver Options 2
You can configure various settings such as paper size and number of copies, in the printer driver screen.
You can also use the Printer Setting Tool (see Change the Printer Settings on page 38) to configure
advanced settings.
36
Page 38

How to Use the Printer
Custom Printing from Mobile Devices 2
A software development kit (SDK) is available.
Visit the Brother Developer Center (www.brother.com/product/dev/index.htm
).
2
37
Page 39

3
Note
Important
Change the Printer Settings 3
Printer Setting Tool 3
Using the Printer Setting Tool, you can specify the printer’s communication settings, operation settings,
P-touch template settings and paper size settings from Windows computer.
The Printer Setting Tool is installed automatically when you use the installer to install the printer driver. For
more information, see Install Software on Your Windows Computer or Mobile Device on page 30.
The Printer Setting Tool is available only with compatible printers.
Before Using the Printer Setting Tool 3
Make sure a fully-charged battery is installed.
Make sure the printer driver has been installed correctly and you can print.
3
Connect this printer to a computer with a USB cable.
38
Page 40

Change the Printer Settings
3
2
4
5
6
1
Use the Printer Setting Tool 3
a Connect the printer you want to configure to the computer.
b Start the Printer Setting Tool.
For Windows 10:
Click [Start] > [Brother] > [Printer Setting Tool].
The main window appears.
For Windows 8 / Windows 8.1:
Click the [Printer Setting Tool] icon on the [Apps] screen.
For Windows 7:
Click [Start] > [All Programs] > [Brother] > [Label & Mobile Printer] > [Printer Setting Tool].
3
1 Printer
Lists the connected printers.
2 Communication Settings
Specifies Bluetooth communication settings.
3 Device Settings
Specifies printer operation settings, such as power settings and printer settings. Settings can also
be specified for the LCD.
4 P-touch Template Settings
Specifies P-touch template settings.
For more information on P-touch Template, download the P-touch Template Manual/Command
Reference (English only) from the Brother Solutions Center at support.brother.com
.
39
Page 41

Change the Printer Settings
Important
Important
5 Paper Size Setup
Add media information and settings to the printer driver to use sizes not listed in the [Paper Size]
list of the printer driver.
To open [Paper Size Setup], you must be logged on with administrator rights.
6Exit
Closes the window.
c Check that the printer you want to configure appears next to [Printer]. If a different printer appears, select
the printer you want from the drop-down list.
d Select the setting you want to change, and then specify or change the settings in the dialog box.
For more information on the settings dialog boxes, see Communication Settings on page 41, Device
Settings on page 51, P-touch Template Settings on page 63, or Paper Size Setup on page 66.
e Click [Apply] - [Exit] in the settings dialog box to apply the settings to the printer.
f Click [Exit] in the main window to finish specifying settings.
3
Use the Printer Setting Tool to configure the printer only when the printer is in standby. The printer may
malfunction if you try to configure it while it is handling a job.
40
Page 42

Change the Printer Settings
Communication Settings 3
With [Communication Settings] in the Printer Setting Tool, the printer communication information can be
specified or changed when connecting the printer and computer with a USB cable or via a Bluetooth
connection. Not only can you change the communication settings for one printer, but you can also apply the
same settings to multiple printers.
Settings Dialog Box 3
3
4
5
6
1
3
2
10
7
8
9
1 Disable these settings
When this check box is selected, appears in the tab, and the settings can no longer be specified or
changed.
Settings in a tab where appears will not be applied to the printer even if [Apply] is clicked. In addition,
the settings in the tab will not be saved or exported when the [Save in Command File] or [Export]
command is executed.
To apply the settings to the printer or save or export them, make sure you clear the check box.
2Items
When [Current Status] is selected, the current settings appear in the settings display/change area.
Select the item for the settings that you want to change.
3 Menu Bar
4Printer
Lists the connected printers.
41
Page 43

Change the Printer Settings
Important
Important
5 Bluetooth device name
Displays the Bluetooth device name. (See 7 Change Node Name/Bluetooth Device Name in Menu Bar
on page 43.)
6 Settings Tabs
Contains settings that may be specified or changed.
If appears in the tab, the settings in that tab will not be applied to the printer.
7 Settings Display/Change Area
Displays the current settings for the selected item.
8Refresh
Updates the displayed settings with the most recent information.
9Exit
Exits [Communication Settings], and returns to the main window of the Printer Setting Tool.
Changes to settings are not applied to printers if you click [Exit] without first clicking the [Apply] button.
10 Apply
Applies the settings to the printer.
To save the specified settings in a command file, select [Save in Command File] from the drop-down list.
The saved command file can be used with the mass storage mode to apply the settings to a printer. (See
Mass Storage Mode on page 73.)
Clicking [Apply] applies all settings in all tabs to the printer.
If the [Disable these settings] check box is selected, the settings in that tab are not applied.
3
42
Page 44

Change the Printer Settings
Note
Important
5
9
10
6
1
2
3
4
7
8
Menu Bar 3
3
1 Apply Settings to the Printer
Applies the settings to the printer.
2 Save Settings in Command File
Saves the specified settings in a command file. The file extension is .bin.
The saved command file can be used with the mass storage mode to apply the settings to a printer. (See
Mass Storage Mode on page 73.)
If the [Disable these settings] check box is selected, the settings in that tab are not saved.
• The saved communication settings commands are intended to be used only for applying settings to a
printer. To apply the settings to the printer using this command file, use the mass storage mode.
• Take necessary measures to protect saved command files.
• Do not send the command file to a different printer model.
3 Import
Select a Profile to import
Imports the exported file and applies the settings to a printer.
Click [Browse] and select the file you want to import. The settings in the selected file appear in the
settings display/change area.
43
Page 45

Change the Printer Settings
Note
Note
Important
Note
Note
• All settings can be imported.
• Only profiles that are compatible with the selected printer can be imported.
4 Export
Saves the current settings in a file.
If the [Disable these settings] check box is selected, the settings in that tab are not saved.
Exported files are not encrypted.
5 Automatically restart the printer after applying new settings
If this check box is selected, the printer automatically restarts after communication settings are applied.
If this check box is cleared, your must restart the printer manually.
3
When configuring multiple printers, you can reduce the time needed to change settings by clearing this
check box. In this case, we recommend selecting this check box when configuring the first printer so that
you can confirm that each setting is operating as intended.
6 Automatically detects the connected printer, and retrieves the current settings
If this check box is selected and a printer is connected to the computer, the printer is automatically
detected and the printer’s current settings are displayed in the [Current Status] pane.
If the model of the connected printer is different from that of the printer shown in the [Printer] drop-down
list, the settings available on all tabs change to match the connected printer.
7 Change Node Name/Bluetooth Device Name
Allows renaming a Bluetooth device.
8 Reset to Default Communication Settings
Returns the communication settings to their factory settings.
9 Display Help
Displays the Help.
10 About
Displays the version information.
44
Page 46

Change the Printer Settings
1
General Tab 3
Communication Settings 3
3
1 Bluetooth on Power On
Specifies the conditions for connecting via Bluetooth when the printer is turned on. Select [On by default],
[Off by default] or [Keep Current State].
45
Page 47

Change the Printer Settings
Bluetooth Tab 3
Bluetooth Settings 3
1
3
1 Bluetooth Mode
Set the control mode when Bluetooth is enabled.
Available settings: [Classic & Low Energy], [Classic Only], [Low Energy Only]
46
Page 48

Change the Printer Settings
1
2
3
4
Classic
3
1 Visible to Other Devices
Allows the printer to be “discovered” by other Bluetooth devices.
Available settings: [Discoverable], [Not Discoverable]
2 Change PIN code
If this check box is selected, you can change the PIN code.
3 Display the PIN code on-screen
If this check box is selected, your computer displays the PIN by default.
4 Request Secure Simple Pairing (SSP) settings during pairing
If this check box is selected when using Classic Bluetooth Mode, it is necessary to perform additional
printer key operations to press (Feed) / OK button in the printer (authentication process) when
pairing with devices running Bluetooth Version 2.1 or later.
47
Page 49

Change the Printer Settings
• Auto re-pairing
3
1
2
1 Auto re-pairing
Sets whether or not to automatically reconnect to a previously connected iOS device.
Available settings: [Enable], [Disable]
2 Delete Auto Re-paired Device
Pressing this button deletes information for auto re-paired devices registered in the printer.
48
Page 50

Change the Printer Settings
Low Energy
3
1
2
1 Minimum Security Mode
Select the minimum security level when using [Low Energy Only] mode.
Available settings: [None], [Unauthenticated Encryption], [Authenticated Encryption], [LE Secure
Connections]
2 Request Secure Simple Pairing (SSP) settings during pairing
If this check box is selected when using [Low Energy Only] mode, additional Printer key operations to
press (Feed) / OK button in the printer (authentication process) are required when pairing with Low
Energy compatible devices.
49
Page 51

Change the Printer Settings
Note
Note
Apply Setting Changes to Multiple Printers 3
a After applying the settings to the first printer, disconnect the printer from the computer, and then connect
the second printer to the computer.
b Select the newly connected printer from the [Printer] drop-down list.
If the [Automatically detects the connected printer, and retrieves the current settings] check box in
the [Option Settings] dialog box is selected, the printer connected with the USB cable is automatically
selected.
For more information, see Communication Settings on page 41.
c Click [Apply].
The same settings that were applied to the first printer are applied to the second printer.
d Repeat steps a – c for all printers whose settings you want to change.
3
To save the current settings in a file, click [File] - [Export].
The same settings can be applied to another printer by clicking [File] - [Import], then selecting the
exported settings file. (See Communication Settings on page 41.)
50
Page 52

Change the Printer Settings
Device Settings 3
With [Device Settings] in the Printer Setting Tool, printer settings can be specified or changed when
connecting the printer and computer with a USB cable or via a Bluetooth connection. Not only can you change
the device settings for one printer, but you can also apply the same settings to multiple printers.
When printing from a computer applications, various print settings can be specified from the printer driver;
however, by using [Device Settings] in the Printer Setting Tool, more advanced settings can be specified.
When [Device Settings] is opened, the printer’s current settings are retrieved and displayed. If the current
settings could not be retrieved, the previous settings are displayed. If the current settings could not be
retrieved and previous settings have not been specified, this tool’s default settings are displayed.
Settings Dialog Box 3
1
2
3
4
5
3
6
7
8
1 Menu Bar
Select a command contained in each menu from the list.
2Printer
Specifies the printer whose device settings are to be configured.
If only one printer is connected, it is unnecessary to make a selection because only that printer will appear.
3 Settings Tabs
Contains settings that may be specified or changed.
51
Page 53

Change the Printer Settings
Note
If appears in the tab, the settings in that tab cannot be specified or changed. In addition, the settings
in the tab will not be applied to the printer even if [Apply] is clicked. The settings in the tab will also not be
saved or exported when the [Save in Command File] or [Export] command is executed.
4 Disable these settings
When this check box is selected, appears in the tab, and the settings can no longer be specified or
changed.
Settings in a tab where appears will not be applied to the printer even if [Apply] is clicked. In addition,
the settings in the tab will not be saved or exported when the [Save in Command File] or [Export]
command is executed.
5 Current Settings
Retrieves the settings from the currently connected printer and displays them in the dialog box. Settings
will also be retrieved for parameters on tabs with .
6 Parameters
Displays the current settings.
7Exit
Exits [Device Settings], and returns to the main window of the Printer Setting Tool.
8Apply
Applies the settings to the printer.
To save the specified settings in a command file, select [Save in Command File] from the drop-down list.
The saved command file can be used with the mass storage mode to apply the settings to a printer. (See
Mass Storage Mode on page 73.)
3
52
Page 54

Change the Printer Settings
Menu Bar 3
1
2
3
4
5
6
7
8
9
10
11
3
12
13
1 Apply Settings to the Printer
Applies the settings to the printer.
Performs the same operation as when [Apply] is clicked.
2 Check Setting
Displays the setting currently registered.
3 Save Settings in Command File
Saves the specified settings in a command file.
Performs the same operation as when [Save in Command File] is selected from the [Apply] drop-down
list.
4 Import
Imports the exported file.
5 Export
Saves the current settings in a file.
6 Save Print Log in File
Saves the print log in a file in the CSV format.
53
Page 55

Change the Printer Settings
7 Print Unit Settings
Prints a report containing firmware version and device setting information.
You can also print this report using the (Feed) / OK button (see Print the Printer Information
on page 72).
8 Reset to Factory Defaults
Resets all printer settings to factory settings.
9 Reset only Device settings
Resets the settings that can be changed in the Device Settings to factory settings. The templates,
databases and print log stored in the printer are not reset.
10 Delete Template and Database
Deletes the templates and databases stored in the printer.
11 Delete Print Log
Deletes the print log stored in the printer.
12 Option Settings
If the [Do not display an error message if the current settings cannot be retrieved at startup] check
box is selected, a message will not be displayed next time.
13 About
Displays the version information.
3
54
Page 56

Change the Printer Settings
Note
Basic Tab 3
1
2
3
4
5
6
7
8
9
3
1Auto Power On
Specifies whether the printer turns on automatically when the AC Power Cord is plugged into an AC power
outlet.
Available settings: [On], [Off]
2 Auto Sleep
Designates the amount of time to elapse before the Printer automatically goes into sleep mode.
Available settings: [Off], 1/2/3/4/5/6/7/8/9 minutes
3Auto Power Off
Specify the amount of time that passes before the printer turns off automatically.
Available settings: [Off], 10/30 minutes, 1/3/6/9/12 hours
4 Battery Charge Level
Specify the maximum charge level.
Available settings: [80 %], [100 %]
To get the longest life from the battery, select [80 %]. Although the number of pages that can be printed
on a single charge will be less when you select [80 %], you can get a longer overall battery life.
5 Command Mode
Select the printer’s command format.
Available settings: [Raster], [ESC/P], [P-touch Template], [CPCL emulation], [CPCL Line Print
emulation]
6 Text Direction
Select the printing orientation.
55
Page 57

Change the Printer Settings
Available settings: [Normal], [Inverted 180 Degrees]
This setting is applied only if the printer driver is not used. If the printer driver is used, the setting specified
in the driver will be applied.
7 Print Speed
Select the printer’s printing speed.
Available settings: [3 ips / 76.2 mm/s], [4 ips / 101.6 mm/s], [5 ips / 127 mm/s]
8 Print Density
Adjust the printer’s printing density.
Available settings: -5–+5
9 Align Paper Leading Edge when the Cover is Closed
Select whether the paper is automatically fed when the cover is closed.
Available settings: [Feed], [Do not Feed]
3
56
Page 58

Change the Printer Settings
Advanced Tab 3
1
2
3
4
5
6
7
8
3
1 Feed Key Function
Select the operation that is performed when the (Feed) / OK button is pressed.
If [Program Settings] is selected, click the [File] button and select the command file.
Available settings: [Feed], [Disable], [Program Settings]
2 Menu Key Function
Select the operation that is performed when the Menu / (Select) button is pressed.
If [Program Settings] is selected, click the [File] button and select the command file.
Available settings: [Feed], [Disable], [Program Settings]
3 Printer Information Report
Select which sections are printed when printing the printer setup information.
Available settings: [All], [Usage Log], [Printer Settings], [Printer Transfer Data]
(See Print the Printer Information on page 72)
4 JPEG Printing Setting
Selects the method of image processing when printing JPEG images.
Available settings: [Error Diffusion], [Simple Binary]
5 Serialize Mode
Select whether or not to serialize from the last number printed.
Available settings: [Cont From Last], [From Starting#]
6 Save Printer Print Log
Select whether or not to save the printer’s print log. If [Disable] is selected, [Maintenance] - [Save Print
Log in File] cannot be enabled.
Available settings: [Enable], [Disable]
57
Page 59

Change the Printer Settings
7 Print Data after Printing
Select whether or not print data is erased automatically after it is printed.
Available settings: [Erase All Print Data], [Keep Print Data]
8 Airplane Mode
Disables the Bluetooth interface. This function is useful when you use the printer in a place where signal
transmissions are not allowed.
Available settings: [On], [Off]
3
58
Page 60

Change the Printer Settings
1
2
3
4
Print Position / Sensor 3
If RD Rolls are being used, you do not need to adjust the sensors.
3
1 Printing Reference Point Adjustment Along Label Width / Printing Reference Point Adjustment
Along Label Length
Adjust the position of the reference point (point of origin for printing). This corrects printing misalignments
resulting from differences in printer models or from the fixed margins of some software.
The reference point cannot be adjusted for raster printing.
Available settings: [Along Label Width]: -5.91 in. to 5.91 in. (-150.0 mm to 150.0 mm), [Along Label
Length]: -0.39 in. to 0.39 in. (-10.0 mm to 10.0 mm)
2 Tear Adjust
Adjust the tear bar tear off position for paper media.
Available settings: -0.39 in. to 0.39 in. (-10.0 mm to 10.0 mm)
3 Media Sensor (Transmissive/Gap)
The following transmissive/gap sensor parameters can be adjusted.
[Detection Sensitivity]
Adjust the precision of the sensor that detects the gaps (spacing) for die-cut labels.
Available settings: -2–+2
[Luminescence Adjustment]
Adjust the amount of light emitted by the transmissive/gap sensor.
Available settings: -2–+2
59
Page 61

Change the Printer Settings
4 Media Sensor (Reflective/Bar)
The following reflective/black mark sensor parameters can be adjusted.
[Mark Detection Sensitivity]
Adjust the precision of the sensor that detects the black marks.
Available settings: -2–+2
[Luminescence Adjustment]
Adjust the amount of light emitted by the reflective/black mark sensor.
Available settings: -2–+2
3
60
Page 62

Change the Printer Settings
Note
1
2
3
4
Display Settings Tab 3
3
1 Language
Select the language for the LCD.
Available settings: [Dansk], [Deutsch], [English], [Español], [Français], [Italiano], [Nederlands],
[Norsk], [Português], [Suomi], [Svenska], [ ], [ ]
The available display languages may differ depending on the printer model being used. If the selected
language cannot be used for the LCD, the display language will not be changed.
Make sure that the LCD can display the selected language.
2 LCD Contrast
Select the brightness of the LCD.
Available settings: -2–+2
3 Backlight Timeout
Specify the amount of time of inactivity before the backlight of the LCD turns off automatically.
Available settings: [Off], [5s], [10s], [20s], [30s], [60s]
4 Beeper
Select whether the printer beeps when the (power) button is pressed or any error occurs.
Available settings: [On], [Off]
61
Page 63

Change the Printer Settings
Note
Apply Setting Changes to Multiple Printers 3
a After applying the settings to the first printer, disconnect the printer from the computer, and then connect
the second printer to the computer.
b Select the newly connected printer from the [Printer] drop-down list.
c Click [Apply].
The same settings that were applied to the first printer are applied to the second printer.
d Repeat steps a – c for all printers whose settings you want to change.
To save the current settings in a file, click [File] - [Export].
The same settings can be applied to another printer by clicking [File] - [Import], and then selecting the
exported settings file. (See Device Settings on page 51.)
3
62
Page 64

Change the Printer Settings
Note
P-touch Template Settings 3
P-touch Template mode provides functions for inserting data from an external device (such as a barcode
reader, controller or programmable logic device connected to the printer) into text and barcode objects in
layouts saved on the printer, useful for printing templates and barcodes.
With [P-touch Template Settings] in the Printer Setting Tool, settings for using the P-touch Template
functions can be specified or changed.
To use the P-touch Template functions, you must send the template to the printer using the transfer function.
For more information about the transfer function, see How to Use P-touch Transfer Manager & P-touch
Library on page 86.
P-touch Template 3
The following are the P-touch Template functions:
Basic operations 3
Preset template printing
3
If frequently used templates are stored in the printer, they can be reprinted by simply scanning the barcode
for each template.
Barcode printing
A barcode scanned with the barcode reader can be printed with the protocol and size of a previously
created template.
Database-assisted template printing
By linking objects in a template to a database, then scanning the key barcodes for the database, the
template can be printed with objects in the template replaced with database data.
Advanced operations 3
Numbering function (serialized number) printing
Templates can be printed while automatically incrementing a number or barcode in the templates.
If a command reference is used, see the P-touch Template Manual/Command Reference. You can
download the latest versions from the Brother Solutions Center website:
1 Go to support.brother.com
2 Select your model, and then select [Manuals].
63
Page 65

Change the Printer Settings
11
12
15
13 14
1
2
3
4
5
6
7
8
9
10
P-touch Template Settings Dialog Box 3
3
1 Default Command Mode
Specifies the P-touch Template mode as the default mode.
To change the mode, use the Device Settings.
2 Default Template Number
Specifies a template number to select as default when the printer is turned on.
However, if a template is not to be transferred to the printer, do not specify a template number.
3 Data Delimiter for P-touch Template
A symbol used to indicate the boundaries between groups of data in a file. Between 1 and 20 characters
can be specified.
4 Trigger for P-touch Template Printing
You can specify a trigger to begin printing from a number of options.
[Command Character]: Printing starts when the command character specified here is received.
[Data Insertion into All the Objects]: Printing starts when the delimiter for the last object is received.
[Received Data Size]: Printing starts when the number of characters specified here is received. However,
delimiters are not counted in the number of characters.
5 Character Code Table
Select one of the following character code sets:
Available settings: [Windows 1251], [Windows 1252], [Windows 1250 Eastern Europe], [Brother
standard], [Unicode]
64
Page 66

Change the Printer Settings
6 International Character Set
Lists character sets for specific countries or regions.
Available settings: [United States], [France], [Germany], [Britain], [Denmark], [Sweden], [Italy],
[Spain], [Japan], [Norway], [Denmark II], [Spain II], [Latin America], [Korea], [Legal]
The following 12 codes are switched depending on the country or region selected from the list above:
23h 24h 40h 5Bh 5Ch 5Dh 5Eh 60h 7Bh 7Ch 7Dh 7Eh
For switched characters, see the P-touch Template Manual/Command Reference (which can be
downloaded from the Brother Solutions Center website).
7 Command Prefix Character
Specifies the prefix character code, which identifies commands used in P-touch Template mode.
8 Non-Printed Character
Characters specified here are not printed when data is received. Specify 1 to 20 characters.
9 Available Return Code
The line feed code is used when feeding data to indicate that the following data should be moved to the
next line in a text object. One of the following four line feed codes can be selected, or 1 to 20 characters
can be specified as the line feed code.
Available settings: [^CR], [\0D\0A], [\0A], [\0D]
10 Replace FNC1
See the P-touch Template Manual/Command Reference.
3
11 Number of Copies
Set the number of copies. A number between 1 and 99 can be specified.
12 Inverted 180 Degrees
If this check box is selected, the data will be printed after it has been rotated 180 degrees.
13 Set
After the [Set] button is clicked, the settings are saved as an .ini file when the dialog box is closed.
To save the specified settings in a command file, select [Save in Command File] from the drop-down
menu. The saved command file can be used with the mass storage feature to apply the settings to a
printer. (See Mass Storage Mode on page 73.)
14 Cancel
Cancels the settings and closes the dialog box. The settings will remain unchanged.
15 Default
Click this button to return the settings to their factory defaults.
65
Page 67

Change the Printer Settings
Important
3
2
4
5
6
78
1
Paper Size Setup 3
With [Paper Size Setup] in the Printer Setting Tool, paper sizes not available in the [Paper Size] list of the
printer driver can be added.
Before you print using a paper size other than the available ones, you must register the new paper size by
sending it to the printer.
Printing with a paper size not registered with the printer may produce incorrect print results.
Paper Size Setup Dialog Box 3
3
1 Current settings
Displays the current settings for the selected paper format.
2New
Click this button to display the [New] dialog box and register a new paper size. For details, see New Dialog
Box on page 68.
Do not register a paper size that has already been registered, to avoid incorrect print results.
To use paper of the same size as one that is currently registered, select the size you want from the
[Currently Registered Paper Sizes] list in the [Paper Size Setup] dialog box, and then change and
overwrite the settings from the [Edit] dialog box.
3Edit
Edits the settings for the selected paper format.
To save the selected paper format with the new settings, click [Overwrite]. To add a paper format with the
new settings, change the name in the [Paper Size Name] box, and then click [Add].
4Delete
Deletes the selected paper format. A deleted paper format cannot be restored.
66
Page 68

Change the Printer Settings
Important
Note
Important
5 Import
Reads the text file containing the paper format settings and uses it to replace the contents of the
[Currently Registered Paper Sizes] list.
When the list is imported, the entire contents of the [Currently Registered Paper Sizes] list will be
replaced with the imported paper formats.
6 Export
Exports the paper formats in the [Currently Registered Paper Sizes] list to a file. The exported formats
can then be distributed to other computers. For details, see Distribute Paper Formats on page 71.
7Exit
Exits [Paper Size Setup], and returns to the main window of the Printer Setting Tool.
8Option
Click the b button, and then select an operation.
Click [Register Paper Size With Printer] to register the settings for the selected paper format in the
printer.
Click [Save in Command File] to export the paper settings as a command file. (The file extension is “.bin”.)
3
• When the paper format is registered with the printer and [Exit] is clicked, the [Paper Size Setup] dialog
box appears with the added paper size in the [Currently Registered Paper Sizes] list. If the software is
running, exit the software, and then restart it for the new paper format to appear in the list.
• If the following functions are being used, you can quickly apply their settings to the printer.
• Mass storage feature (page 73)
• Bluetooth (Object Push Profile (OPP))
These settings commands are only intended to be used for applying settings to a printer. These
commands cannot be imported into [Paper Size Setup].
67
Page 69

Change the Printer Settings
New Dialog Box 3
1
2
3
4
56
3
1 Paper Size Name
Type in the name of the paper format to be added.
2 Paper Types
Select the paper type.
Available settings: [Continuous Length Tape], [Die-cut Label], [Media With Marks]
3 Detailed settings
Specify details for the paper format to be added.
4 Advanced Printing Adjustments
Click this button to display the [Advanced Printing Adjustments] dialog box and make advanced printing
adjustments for each paper format. For details, see Advanced Printing Adjustments Dialog Box
on page 69.
5 Cancel
Cancels the settings and closes the dialog box. The settings will remain unchanged.
6Add
Click this button to add the paper format.
68
Page 70

Change the Printer Settings
Note
3
4
76
1
2
5
Advanced Printing Adjustments Dialog Box 3
3
1 Printing Reference Point Adjustment
Adjust the position of the reference point (point of origin for printing). This corrects printing misalignments
resulting from differences in printer models or from the fixed margins of some software.
2 Tear Adjust
Adjust the cutting position when the paper is cut using the tear bar.
Available settings: -0.39 in. to 0.39 in. (-10.0 mm to 10.0 mm)
3 Energy Rank
Select a setting when it is necessary to adjust the amount of heat (energy) from the print head, for
example, with special paper.
• When using “Premium Receipt Paper”*, select [RD 2.00" (50 mm)] in the [Paper Size Setup] dialog box,
click the [Edit] button, and then set [Energy Rank] to [4] in the [Advanced Printing Adjustments] dialog
box.
When using “Standard Receipt Paper”*, set [Energy Rank] to [2].
* Available paper types vary by country or region.
• There may be contrast variations in the print result due to the operating environment and media used.
Change the setting if necessary.
4 Media Sensor (Transmissive/Gap)
Adjust the precision with which the transmissive/gap sensor detects the gaps (spacing) for die-cut labels
and the amount of light emitted by the sensor.
Settings can be specified when [Paper Types] is set to [Die-cut Label].
69
Page 71

Change the Printer Settings
Note
Note
Because the settings for [Media Sensor (Transmissive/Gap)] in the [Device Settings] dialog box (See
Print Position / Sensor on page 59) will have an effect, specify appropriate values.
Example settings:
Setting EX1 Setting EX2
Device Settings +2 -2
Paper Size Setup +2 +2
Actual effect 40
5 Media Sensor (Reflective/Bar)
Adjust the precision with which the reflective/black mark sensor detects black marks and the amount of
light emitted by the sensor.
Settings can be specified when [Paper Types] is set to [Media With Marks].
Because the settings for [Media Sensor (Reflective/Bar)] in the [Device Settings] dialog box (See Print
Position / Sensor on page 59) will have an effect, specify appropriate values.
Example settings:
Setting EX1 Setting EX2
Device Settings +2 -2
Paper Size Setup +2 +2
3
Actual effect 40
6OK
Saves the settings and returns to the previous dialog box.
7 Cancel
Cancels the settings and closes the dialog box. The settings will remain unchanged.
70
Page 72

Change the Printer Settings
Note
Distribute Paper Formats 3
The paper formats exported from the [Currently Registered Paper Sizes] list can be distributed to other
computers.
Distributing Only Paper Formats 3
If the printer driver has been installed on the recipient’s computer, only the paper formats need to be
distributed.
a At the sender’s computer, specify the paper format settings, and then click [Export]. (For details, see
Paper Size Setup on page 66.)
The following files are created: bsr423ed.txt, bsr423ed.ptd, pdt4337.bin
b Save bsr423ed.txt in any location on the recipient’s computer.
c At the recipient’s computer, click [Import].
The paper formats are replaced with the imported ones.
Change Settings When Printing from a Mobile Device 3
If using a mobile device, change the settings as necessary using the software before printing. The settings
that can be changed vary according to the software.
Before connecting a mobile device, you can specify detailed settings by connecting the printer to a
computer, and using the Printer Setting Tool (see Change the Printer Settings on page 38).
3
71
Page 73

4
Note
Note
Other Functions 4
Print the Printer Information 4
You can use the (Feed) / OK button to print a report that lists the following printer information:
Program version
Printer usage history
Missing dot test pattern
Printer settings information
List of transferred data
• You can use the Device Settings to set in advance which items will be printed (see Device Settings
on page 51).
• This operation can also be performed using the Printer Setting Tool.
a Make sure that a roll of receipt paper has been loaded and the roll compartment cover is closed.
b Turn on the printer.
c Press and hold the (Feed) / OK button until [Printing] appears on the LCD. The printer information
will be printed.
To print a printer information, use 4 in. (101.6 mm) continuous roll.
4
72
Page 74

Other Functions
Note
Mass Storage Mode 4
Description 4
The mass storage mode feature allows you to send a file via the USB interface without loading a printer driver.
This feature is useful for:
Applying printer settings saved in a command file (.bin file format) or adding templates (.blf file format)
distributed by the administrator, to the printer.
Executing commands without installing the printer driver.
Using a device with an operating system (including non-Windows operating systems) that has a USB host
feature to print and transmit data.
Use of Mass Storage Mode 4
a Confirm that the printer is turned off.
4
b While pressing the Menu / (Select) button, press and hold the (Power) button.
The printer starts up in mass storage mode. The message [Mass Storage] appears on the LCD.
c Connect the Windows computer or mobile device to the printer via USB.
The printer’s mass storage area is displayed on the computer or device’s screen.
If the mass storage area is not displayed automatically, see the operating instructions for the computer or
device’s operating system for information about displaying the mass storage area.
d Drag and drop the file you want to copy to the mass storage area.
e Press the Menu / (Select) button.
The command file is executed. The message [Receiving] appears on the LCD.
f After the file has been executed, the message [Mass Storage] appears on the LCD.
g To turn mass storage mode off, turn the printer off.
The printer will start up in its normal operating mode.
73
Page 75

Other Functions
Important
Note
• When the printer is turned off, mass storage mode is deactivated and any files in the mass storage area
are deleted.
• This feature supports “.bin”, “.blf”, and “.jpg” files. Do not use other file formats with this feature.
• Do not create folders in the mass storage area. If a folder is created, files in the folder will not be executed.
• The capacity of the mass storage area is 15.8 MB.
• If multiple files are copied, the order that the files will be executed in cannot be guaranteed.
• Bluetooth is not available while the printer is running in mass storage mode.
• Do not access other files in the mass storage area when executing a copied file.
Print JPEG Images 4
Image data (JPEG) can be printed without using the printer driver.
• JPEG images can be printed using the mass storage feature.
4
• The Object Push Profile (OPP) is used for printing via a Bluetooth connection.
• This printer will convert a color JPEG image to a ‘Black & White’ image using a dithering process.
• When sending a JPEG image that is already ‘Black & White’ this dithering process may make your printed
image fuzzy.
• To improve the image quality, try to turn off any preprocessing of the JPEG image.
Only JPEG images can be printed. (Limited to files with the .jpg extension.)
The maximum file size is 15.8 MB.
The maximum resolution is as follows:
Height × Width = 24000 × 832 dots
If these limits are exceeded, the data received by the printer will be discarded and not printed.
Print is at 1 pixel = 1 dot.
This printer performs binary processing (simple binary) to print the image.
The image is printed with the height-to-width proportion of the received data.
74
Page 76

Section II
Software II
How to Use P-touch Editor 76
How to Use P-touch Transfer Manager & P-touch Library 86
How to Transfer Templates with P-touch Transfer
Express
How to Update P-touch Software 111
103
Page 77

5
Note
How to Use P-touch Editor 5
Use of P-touch Editor 5
You must install P-touch Editor and the printer driver to use the printer with Windows computer.
To download the latest driver and software, visit the Brother Solutions Center at:
install.brother
Start P-touch Editor 5
a For Windows 10
Click [Start] > [P-touch Editor 5.2] under [Brother P-touch], or double-click the [P-touch Editor 5.2]
icon on the desktop.
For Windows 8/ Windows 8.1
Click [P-touch Editor 5.2] on the [Apps] screen or double-click the [P-touch Editor 5.2] icon on the
desktop.
For Windows 7
Click [Start] > [All Programs] > [Brother P-touch] > [P-touch Editor 5.2], or double-click the [P-touch
Editor 5.2] shortcut icon on the desktop.
b When P-touch Editor starts, select whether you want to create a new layout or open an existing layout.
To change how P-touch Editor starts, click [Tools] > [Options] in the P-touch Editor menu bar to display
the [Options] dialog box. On the left side, select the [General] heading and then the setting you want in
the [Operations] list box under [Startup Settings]. The factory setting is [Display New View].
5
76
Page 78

How to Use P-touch Editor
c Select an option in the screen.
4
3
1
2
1 To create a new layout, double-click [New Layout], or click [New Layout] and then click [ ].
2 To create a new layout using a preset layout, double-click a category button, or select a category
button and then click [ ].
3 To connect a pre-set layout to a database, select the check box next to [Connect Database].
4 To open an existing layout, click [Open].
5
77
Page 79

How to Use P-touch Editor
B
A
Print with P-touch Editor 5
Express mode
This mode allows you to quickly create layouts that include text and images.
5
Configure the settings in the Print screen before printing.
To print, click [File] > [Print] from the menu bar or click the print icon.
Professional mode
This mode allows you to create layouts using a wide-range of advanced tools and options.
Configure the settings in the Print screen before printing.
To print, click [File] > [Print] from the menu bar or click the print icon (A).
In addition, click the [Print] icon (B) to start printing without changing the settings.
78
Page 80

How to Use P-touch Editor
Snap mode
This mode allows you to capture all or a portion of your computer screen content, print it as an image, and
save it for future use.
a Click the [Snap] mode selection button.
The [Description of Snap mode] dialog box appears.
b Click [OK].
The [Snap] mode palette appears.
5
79
Page 81

How to Use P-touch Editor
Tips for Creating Templates 5
From the computer, use P-touch Editor 5.2, which can be downloaded from the Brother Solutions Center at
install.brother
on page 76.
Create a Template 5
Label sample
a For Windows 10
Click [Start] > [P-touch Editor 5.2] under [Brother P-touch], or double-click the [P-touch Editor 5.2]
icon on the desktop.
, to create a label layout. For more information about its use, see How to Use P-touch Editor
5
For Windows 8/ Windows 8.1
Click [P-touch Editor 5.2] on the [Apps] screen or double-click the [P-touch Editor 5.2] icon on the
desktop.
For Windows 7
Click [Start] > [All Programs] > [Brother P-touch] > [P-touch Editor 5.2], or double-click the [P-touch
Editor 5.2] shortcut icon on the desktop.
b When P-touch Editor starts, select whether you want to create a new layout or open an existing layout.
80
Page 82

How to Use P-touch Editor
c Click [Paper] (1), and then specify the media and length (2). (This example shows the [Express] mode.)
1
2
5
d Click [Text] (1), and then specify the font and style (2).
1
2
81
Page 83

How to Use P-touch Editor
e Clicking displays the cursor so text can be entered.
f After adding the text, click the text box to move it within the template.
g Repeat steps e and f to enter text and arrange the layout.
h [File] > [Save as] on the menu bar, and then specify a file name to save the template.
5
82
Page 84

How to Use P-touch Editor
Important
Insert the Date and Time in a Label 5
a In P-touch Editor 5.2, open the label layout you want to edit.
b On the menu bar, click [Insert] > [Date/Time] to display the [Date and Time Properties] dialog box.
Select settings for the format of the text you want to insert.
5
The date and time inserted into the label will be printed using the printer's default character size. Because
the character size is determined by the size of the date and time object, adjust the object to the size you
want in P-touch Editor 5.2 before transferring the label layout to the printer.
83
Page 85

How to Use P-touch Editor
Note
Link a Database to a Template 5
Label sample
A database can be linked to the template you created. Since the text in the template can be replaced with text
from the database, multiple labels can be printed simply by creating a single template.
For more information on how to create databases and database settings, see [P-touch Editor Help].
a Prepare a database file in advance.
• Files saved as XLS, XLSX, MDB, CSV, TXT and ACCDB formats can be used as databases.
• Only one database can be linked to a single template. A maximum of 65,000 records can be created in
that database. (The total size of templates and databases combined is limited to 12 MB.)
b In P-touch Editor 5.2, open the template to be linked to the database.
c On the menu bar, click [File] - [Database] - [Connect] or to display the [Open Database] dialog box.
Select [Connect Database File], click [Browse], and then select the database you want to link.
5
Click [Next].
84
Page 86

How to Use P-touch Editor
d With [Database Field] under [Merge Fields], specify which database column will be linked to which
object, and then click [OK].
e The template and database will be linked, and the main window appears. Click to select the database
row with the text to be replaced, and display a preview of the label.
5
Finally, transfer the created template to the printer using P-touch Transfer Manager.
For details, see How to Use P-touch Transfer Manager & P-touch Library on page 86.
85
Page 87

How to Use P-touch Transfer Manager &
6
P-touch Library
P-touch Transfer Manager 6
This program allows you to transfer templates and other data to the printer and save backups of your data on
Windows computer.
First P-touch Transfer Manager transfers data to the printer, and then P-touch Template sends text data that
will be inserted into the template and printed. For more information on P-touch Template, download the
P-touch Template Manual/Command Reference (English only) from the Brother Solutions Center at
support.brother.com/manuals
The transfer function is needed to use P-touch Template.
.
6
6
86
Page 88

How to Use P-touch Transfer Manager & P-touch Library
Note
Transfer the Template to P-Touch Transfer Manager 6
To use P-touch Transfer Manager, you must first transfer templates created in P-touch Editor to P-touch
Transfer Manager.
a In P-touch Editor, open the template you want.
b Click [File] > [Transfer Template] > [Transfer].
When P-touch Transfer Manager starts, the main window appears.
The following method can also be used to start the P-touch Transfer Manager.
For Windows 10:
Click [Start] > [P-touch Transfer Manager 2.3] under [Brother P-touch].
For Windows 8 / Windows 8.1:
Click [P-touch Transfer Manager 2.3] on the [Apps] screen.
For Windows 7:
Click [Start] > [All Programs] > [Brother P-touch] > [P-touch Tools] > [P-touch Transfer Manager 2.3].
6
87
Page 89

How to Use P-touch Transfer Manager & P-touch Library
Main window 6
1
2
4
3
5
6
1 Menu bar
Provides access to various commands, which are grouped under each menu title ([File], [Edit], [View],
[Tool], and [Help]) according to their functions.
2 Toolbar
Provides access to frequently used commands.
3 Printer selector
Allows you to select which printer the data will be transferred to. When you select a printer, only the data
that can be sent to the selected printer is displayed in the data list.
4 Folder list
Displays a list of folders and printers. When you select a folder, the templates in the selected folder are
displayed in the template list.
If you select a printer, the current templates and other data stored in the printer are displayed.
5 Template list
Displays a list of templates in the selected folder.
6Preview
Displays a preview of the templates in the templates list.
6
88
Page 90

How to Use P-touch Transfer Manager & P-touch Library
Explanations of the Toolbar Icons
Icon Button name Function
Transfer
Save Transfer File
Transfers templates and other data from the computer to the
printer.
Changes the file type of the data to be transferred to other software.
(When not connected to a
printer)
Select "PDZ" when transferring the data using
P-touch Transfer Express (USB).
The available interfaces differ depending on your model.
Backup
Open Opens the selected template.
Search
Retrieves the templates and other data saved in the printer and
saves it to a computer.
6
Allows you to search for templates or other data that are registered
to P-touch Library.
Display Style Changes the file display style.
89
Page 91

How to Use P-touch Transfer Manager & P-touch Library
Note
Transfer Templates or Other Data from Computer to the Printer 6
Use the following procedure to transfer templates, databases and images from the computer to the printer.
a Connect the computer and the printer via USB, and then turn the printer on.
The printer model name appears next to a printer icon in the folder view.
If you select the printer in the folder view, the current templates and other data stored in the printer
appear.
• If a printer is disconnected or offline, it is not listed in the folder view.
• Before transferring data, check that the computer and the printer are correctly connected via a USB cable,
and that the printer is on.
b Select the printer that you want to transfer the template or other data to.
6
c Right-click the [Configurations] folder, select [New], and then create a new folder.
90
Page 92

How to Use P-touch Transfer Manager & P-touch Library
Note
d Drag the template or other data that you want to transfer and place it in the new folder.
Transfer Function Specification
Data type
Template 255 Each template can contain a maximum of 255 objects.
Database 255
Image
(User-defined
character)
Maximum number of
transferable items
255
Restriction details
Only *.csv files can be transferred.
Each *.csv file can contain a maximum of 65000 records.
Only *.bmp files can be transferred.
Monochrome *.bmp files are recommended.
The size limit is 832 × 832 pixels.
You can confirm the available space in the transfer file memory by printing the Printer Setting Report. For
more information, see Print the Printer Information on page 72.
See [RomFree] for the available space*.
* The available space that appears in "RomFree = *******byte" may be different from the actual available
space.
You can view the templates and other data by selecting:
The folder in the [Configurations] folder
[All Contents]
6
One of the categories under [Filter], such as [Layouts]
When transferring multiple templates or other data, drag all the files you want to transfer and place them
in the new folder.
Each file is assigned a key number (memory location in the printer) when it is placed in the new folder.
91
Page 93

How to Use P-touch Transfer Manager & P-touch Library
Note
e To change the key number assigned to an item, right-click the item, select [Key Assign], and then select
the key number you want.
• Except for the data in databases, all data transferred to the printer is assigned a key number.
• If the template or other data transferred to the printer has the same key number as another template
already saved in the printer, the new template will overwrite the old one. You can confirm the templates
key number assignments saved in the printer by backing up the templates or other data. For more
information, see Back up Templates or Other Data Saved in the Printer on page 94.
6
• If the printer memory is full, remove one or more templates from the printer's storage memory. For more
information, see Back up Templates or Other Data Saved in the Printer on page 94.
f To change the names of templates or other data that will be transferred, click the item you want, and
then type the new name. The number of characters used for the template names may be limited
depending on the printer model.
g Select the folder containing the templates or other data that you want to transfer, and then click
[Transfer]. A confirmation message appears.
92
Page 94

How to Use P-touch Transfer Manager & P-touch Library
Note
• You can also transfer individual items to the printer without adding them to a folder. Select the template or
other data that you want to transfer, and then click [Transfer].
• Multiple items and folders can be selected and transferred in one operation.
h Click [OK].
The selected items are transferred to the printer.
6
93
Page 95

How to Use P-touch Transfer Manager & P-touch Library
Important
Back up Templates or Other Data Saved in the Printer 6
Use the following procedure to retrieve the templates or other data saved in the printer and save it to a
computer.
• Backed up templates or other data cannot be edited on the computer.
• Depending on the printer model, templates or other data backed up from one printer model may not be
able to be transferred to another printer model.
a Connect the computer and the printer and turn the printer on.
The printer model name is displayed in the folder view.
If you select a printer in the folder view, the current templates and other data stored in the printer are
displayed.
b Select the printer to back up from, and then click [Backup].
A confirmation message appears.
6
c Click [OK].
A new folder is created under the printer in the folder view. The folder name is based on the date and
time of the backup. All of the printer's templates and other data are transferred to the new folder and
saved on the computer.
94
Page 96

How to Use P-touch Transfer Manager & P-touch Library
Important
Delete Printer Data 6
Use the following procedure to delete all templates or other data that are saved in the printer.
This feature is only available when the computer and printer are connected via USB.
a Connect the computer and the printer.
The printer model name appears next to a printer icon in the folder view.
b Right-click the printer, and then select [Delete All].
6
A confirmation message appears.
c Click [OK].
All templates and other data saved in the printer are deleted.
95
Page 97

How to Use P-touch Transfer Manager & P-touch Library
Note
Important
Note
Create Transfer Files and Transfer Package Files 6
You can use P-touch Transfer Manager to save template data, which was created using P-touch Editor, in
the .blf or .pdz format. You can transfer these files in this format to a printer, from a computer or mobile device.
You can also print files in BLF format when the printer is in mass storage mode.
a Create the template using P-touch Editor, and then transfer it to P-touch Transfer Manager.
For more information, see Transfer the Template to P-Touch Transfer Manager on page 87.
b Without connecting the printer to the computer, select [Configurations] in the P-touch Transfer Manager
window, and then select the template to save.
You can select multiple templates at the same time.
c Click [File] > [Save Transfer File].
The [Save Transfer File] button appears only if the printer is disconnected from the computer or offline.
6
• If you click [Save Transfer File] after selecting [Configurations], all templates in the folder are saved as
the Transfer file (.blf) or Transfer Package file (.pdz).
• You can combine multiple templates into a single Transfer file (.blf) or Transfer Package file (.pdz).
d In [Save as type], select the format in which to save the template, and then type in the name and save
the template.
Select the BLF format when printing using the mass storage mode or select the PDZ format when
connecting using Bluetooth.
The templates are saved as a Transfer file (.blf) or Transfer Package file (.pdz).
96
Page 98

How to Use P-touch Transfer Manager & P-touch Library
Use of P-touch Library 6
This program allows you to manage and print P-touch Editor templates.
Start P-touch Library 6
For Windows 10:
Click [Start] > [P-touch Library 2.3] under [Brother P-touch].
For Windows 8 / Windows 8.1:
Click [P-touch Library 2.3] on the [Apps] screen.
For Windows 7:
Click [Start] > [All Programs] > [Brother P-touch] > [P-touch Tools] > [P-touch Library 2.3].
When P-touch Library starts, the main window appears.
Main window
1
2
4
3
5
6
6
1 Menu bar
Provides access to all available commands, which are grouped under each menu title ([File], [Edit],
[View], [Tool], and [Help]) according to their functions.
2 Toolbar
Provides access to frequently used commands.
3 Folder list
Displays a list of folders. When you select a folder, the templates in the selected folder are displayed in
the templates list.
97
Page 99

How to Use P-touch Transfer Manager & P-touch Library
4 Templates list
Displays a list of the templates or other data in the selected folder.
5Preview
Displays a preview of the templates or other data selected in the templates list.
Explanations of the Toolbar Icons
Icon Button name Function
Open Opens the selected template.
Print Prints the selected template with the printer.
6
Search Allows you to search for templates registered to P-touch Library.
Display Style Changes the file display style.
98
Page 100

How to Use P-touch Transfer Manager & P-touch Library
Open and Edit Templates 6
Select the template you want to open or edit, and then click [Open].
6
The program associated with the template starts, and lets you edit the template.
99
 Loading...