

Page 1
Quick Reference (English)
Guide de référence rapide (Français)
Page 2

Quick Reference
(English)
Page 3

Introduction
Thank you for purchasing the PT-9500PC.
The PT-9500PC (hereafter, referred to as “this machine”) is a label printer that enables you to easily
print custom labels after it is connected to a computer.
This manual contains various precautions and basic procedures for using this P-touch. Be sure to read
this manual before using the P-touch.
Afterward, keep this manual in a safe place for future reference.
Canadian Department of Communications Compliance Statement
This digital apparatus does not exceed the Class B limits for radio noise emissions from
digital apparatus as set out in the interference-causing equipment standard entitled
“Digital Apparatus”, ICES-003 of the Department of Communications.
2
Page 4

Using this manual
The following Quick Reference is included with the PT-9500PC. Refer to the Quick Reference to use
the PT-9500PC as necessary.
Manual
For preparation and
operation of the
PT-9500PC and soft-
ware installation
Using P-touch Editor
Version 4.0 for
Windows
Using P-touch Editor
Version 3.2 for
Macintosh
Using P-touch Quick
Editor
Quick Reference
(this manual)
Software help files CD-ROM User’s Guide
9 Not Available Not Available
99Not Available
999
99Not Available
3
Page 5

GENERAL PRECAUTIONS
■
P-touch 9500PC
●
The PT-9500PC is a precision machine. Do not drop the PT-9500PC or subject it to strong shocks.
●
Do not grab and lift the PT-9500PC by the tape compartment cover. The cover could come off and the
PT-9500PC could drop and be damaged.
●
The PT-9500PC may malfunction if left near a television, radio, etc. Do not install the PT-9500PC near
any machines that will cause electromagnetic interference.
●
Keep the PT-9500PC out of direct sunlight.
●
Do not use the PT-9500PC in extremely dusty areas, in areas with high temperatures or high humidity,
or in areas where the PT-9500PC may freeze. The PT-9500PC may malfunction or stop operating.
●
Do not clean the PT-9500PC with thinner, benzene, alcohol, or other organic solvents. The PT-9500PC
finish may come off and the PT-9500PC case may be damaged. If dirty, clean the PT-9500PC with a soft,
dry cloth.
●
Do not leave any rubber or vinyl on top of the PT-9500PC for an extended period. The PT-9500PC may
be stained.
●
Do not place any heavy objects or objects containing water on top of the PT-9500PC. If water or any
foreign object enters the PT-9500PC, contact the retail outlet where the PT-9500PC was purchased or
your local authorized service center. If you continue to use the PT-9500PC with water or a foreign
object in the PT-9500PC, the PT-9500PC may be damaged or personal injury could result.
●
Do not touch the cutter. Personal injury could result. Take special care when the tape compartment
cover is open when changing the tape.
●
Do not insert any objects into or block the label outlet, AC adapter jack/socket, USB port, or serial port.
●
Do not touch any metal parts near the print head. The print head is very hot during use and immediately
after use. Do not touch directly with your hands.
●
Use only the interface cables (USB interface cable, serial interface cable) included with the PT-9500PC.
●
Use only genuine Brother accessories and supplies. Do not use any unauthorized accessories or
supplies.
■
AC adapter
●
Use only the AC adapter included with the PT-9500PC.
●
If the PT-9500PC will not be used for an extended period, remove the power supply cord from the
electrical outlet.
■
Tape (tape cassette)
●
Use only Brother TZ tapes or Brother/Avery AV labels with this machine. Do not use tapes that do not
have the or mark.
●
Do not pull on the tape, otherwise the tape cassette may be damaged.
●
If the label is attached to a wet, dirty, or oily surface, it may peel off easily. Before affixing the label,
clean the surface where it will be affixed.
●
Depending on the environmental conditions and the material, condition, roughness, and shape of the
affixing surface, part of the tape may not be affixed properly or the label may peel off.
●
In order to test the adhesive strength of the label or before using the label where safety is a particular
concern, test the label by affixing a small piece of it to an inconspicuous area of the intended surface.
●
If the label is used outdoors, ultraviolet rays, wind, and rain may cause the color of the label to fade and
the ends of the label to peel off.
●
Markings made with oil-based or water-based ink may be visible through a label affixed over them. To
hide the markings, use two labels layered on top of each other or use a dark-colored label.
●
Do not use empty tape cassettes.
●
Do not expose the tape cassettes to direct sunlight, high temperatures, high humidity, or dust. Store in a
cool, dark place. Use the tape cassettes soon after opening the tape cassette package.
●
Note that Brother International Corp. does not assume responsibility for any damage, etc. arising from
failure to follow the precautions listed.
●
Avery® is a registered trademark of AVERY DENNISON CORPORATION.
4
Page 6

■
CD-ROM
●
Do not scratch the CD-ROM.
●
Do not subject the CD-ROM to extremely high or extremely low temperatures.
●
Do not put heavy objects on the CD-ROM or apply force to the CD-ROM.
■
Regarding software use
●
The software contained on the CD-ROM is meant for use with the PT-9500PC only. It may be installed
on multiple personal computers for use at an office, etc.
5
Page 7

Table of Contents
1 Before use ................................................................................................ 9
Confirming the included accessories ...............................................................................10
PT-9500PC terms .............................................................................................................12
Front view ......................................................................................................................................12
Rear view .......................................................................................................................................12
Lamp display ..................................................................................................................................13
Preparations before creating labels .................................................................................14
Connecting the PT-9500PC .............................................................................................15
Connecting to the power source .....................................................................................................15
Connecting to a personal computer ................................................................................................16
Installing the tape cassette ..............................................................................................20
Authorized tape ..............................................................................................................................20
Installing the tape cassette. .............................................................................................................20
Installing the collection tray ............................................................................................22
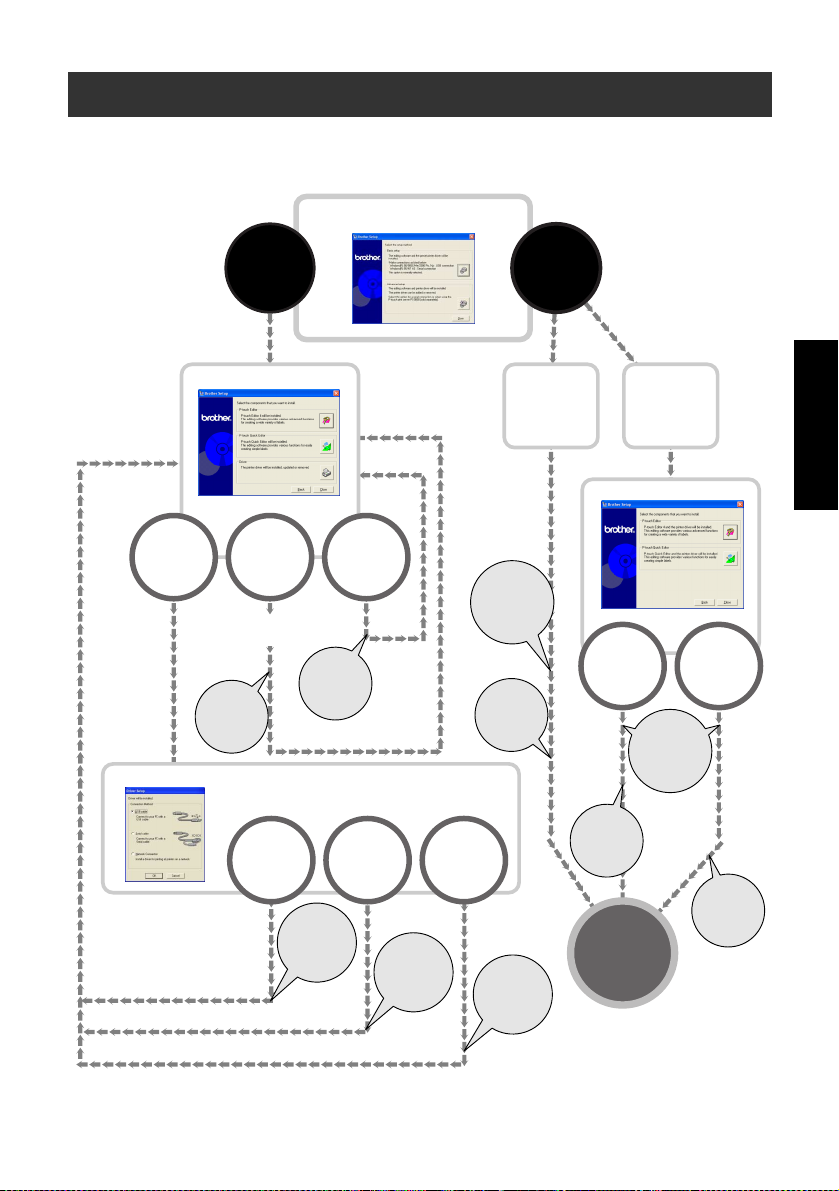
2 Installing the software ........................................................................... 23
Types of software used ....................................................................................................24
Using Windows ...............................................................................................................25
Installation precautions ..................................................................................................................26
Installing using basic setup .............................................................................................................26
Installing P-touch Editor only ..........................................................................................................32
Installing P-touch Quick Editor only ...............................................................................................33
Installing the printer driver only ......................................................................................................35
Setting the personal computer and PT-9500PC baud rate ...............................................................41
Uninstalling the software ................................................................................................................44
Printer is no longer used .................................................................................................................45
Using Mac OS 8.6-9.x .....................................................................................................47
Installing P-touch Editor and the printer driver ................................................................................47
Installing P-touch Quick Editor and the printer driver .....................................................................49
Installing the printer driver only ......................................................................................................50
Selecting the printer .......................................................................................................................52
Uninstalling the software ................................................................................................................52
Using Mac OS X 10.1 or later ..........................................................................................54
Installing P-touch Editor ................................................................................................................. 54
Installing P-touch Quick Editor .......................................................................................................57
Installing the printer driver. .............................................................................................................59
Selecting the printer .......................................................................................................................62
Uninstalling the software ................................................................................................................63
3 Creating labels: Windows version .......................................................... 67
Creating labels .................................................................................................................68
Creating labels using P-touch Editor ................................................................................69
Start P-touch Editor .........................................................................................................................69
Layout window ..............................................................................................................................70
Creating a name badge ...................................................................................................................72
Printing the label you created .........................................................................................................73
Using Help .....................................................................................................................................74
Creating other types of labels ..........................................................................................................76
6
Page 8

Creating labels using P-touch Quick Editor .....................................................................77
Starting P-touch Quick Editor .........................................................................................................77
Simple use ......................................................................................................................................78
Other functions ..............................................................................................................................78
After printing ...................................................................................................................82
Removing the label backing ...........................................................................................................82
4 Creating labels: Macintosh version ........................................................ 85
Creating labels .................................................................................................................86
Creating labels using P-touch Editor ................................................................................87
Starting P-touch Editor ....................................................................................................................87
Layout window ..............................................................................................................................88
Creating a name badge ...................................................................................................................89
Label printing .................................................................................................................................90
Using the CD-ROM User’s Guide ...................................................................................................93
Creating labels using P-touch Quick Editor .....................................................................95
Starting P-touch Quick Editor .........................................................................................................95
Using P-touch Quick Editor ............................................................................................................95
After printing ...................................................................................................................96
5 Appendix ............................................................................................... 97
Creating bar code labels ..................................................................................................98
Bar code summary ..........................................................................................................................98
Precautions for printing bar code labels ..........................................................................................99
Changing the P-touch settings .......................................................................................100
Changing the USB ID mode ..........................................................................................................100
Using multiple computers .............................................................................................................101
Changing the baud rate ................................................................................................................101
Maintenance ..................................................................................................................102
Label is not printed clearly ...........................................................................................................102
Cleaning the cutter .......................................................................................................................104
Troubleshooting ............................................................................................................106
Q & A ..........................................................................................................................................106
Product specifications ...................................................................................................108
PT-9500PC ...................................................................................................................................108
Operating environment ................................................................................................................109
Accessories ....................................................................................................................110
Index .............................................................................................................................114
7
Page 9

8
Page 10

1
Before use
This chapter contains information that should be confirmed before using the
PT-9500PC.
Confirming the included accessories.............................................................10
PT-9500PC terms ..........................................................................................12
Preparations before creating labels...............................................................14
Connecting the PT-9500PC...........................................................................15
Installing the tape cassette............................................................................20
Installing the collection tray..........................................................................22
Page 11
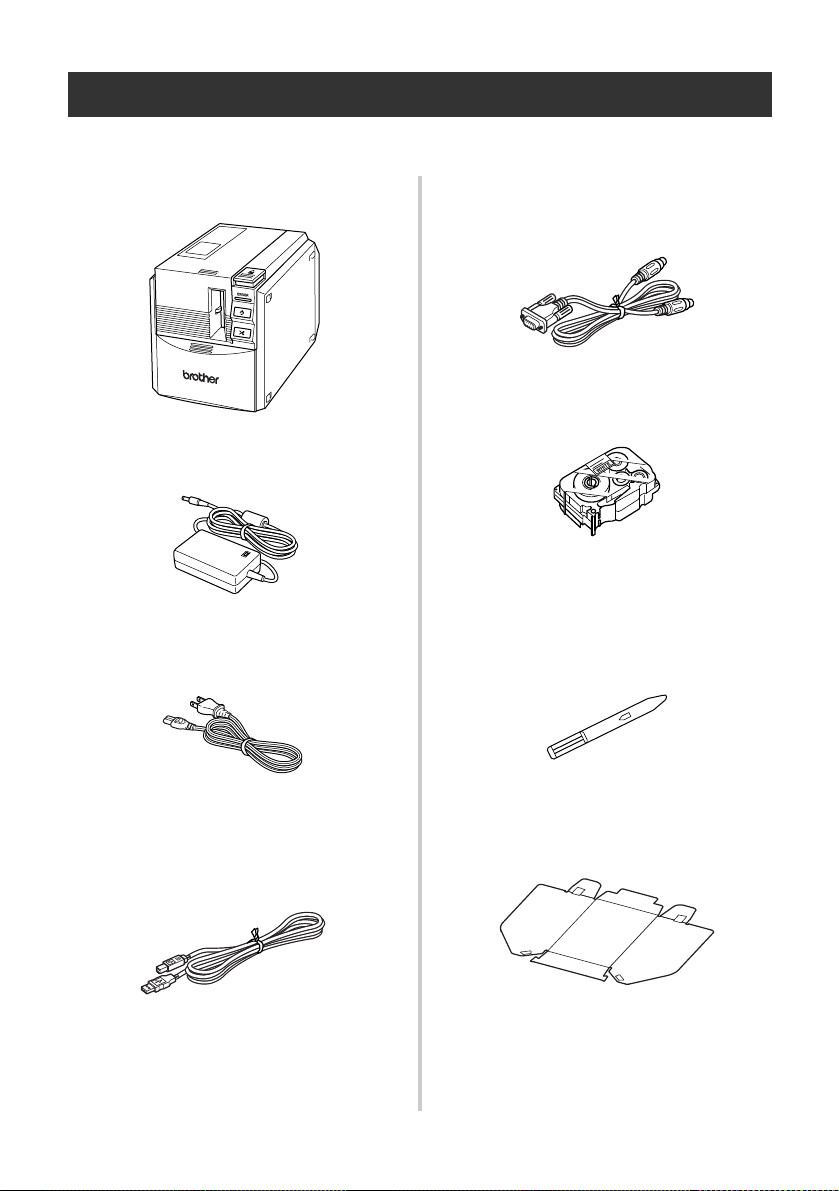
Confirming the included accessories
Open the box and confirm that the following items are included. If any item is missing or damaged,
please contact the retail outlet where the PT-9500PC was purchased.
■
PT-9500PC
Label printer
■
AC adapter (model AD-9000)
Connect to the power supply cord.
■
Power supply cord (AC 120 V)
Connect to an electrical outlet.
■
Serial interface cable
Use this cable to connect the PT-9500PC to
the serial port of a personal computer.
■
Tape cassette
This cassette contains the tape for the labels.
■
Label stick
Use when the backing of a printed label is
difficult to remove. The label stick is installed
inside the PT-9500PC tape compartment
cover.
■
USB interface cable
Use this cable to connect the PT-9500PC to
the USB port of a personal computer.
10
■
Collection tray
This tray collects the printed labels ejected
from the PT-9500PC.
Page 12
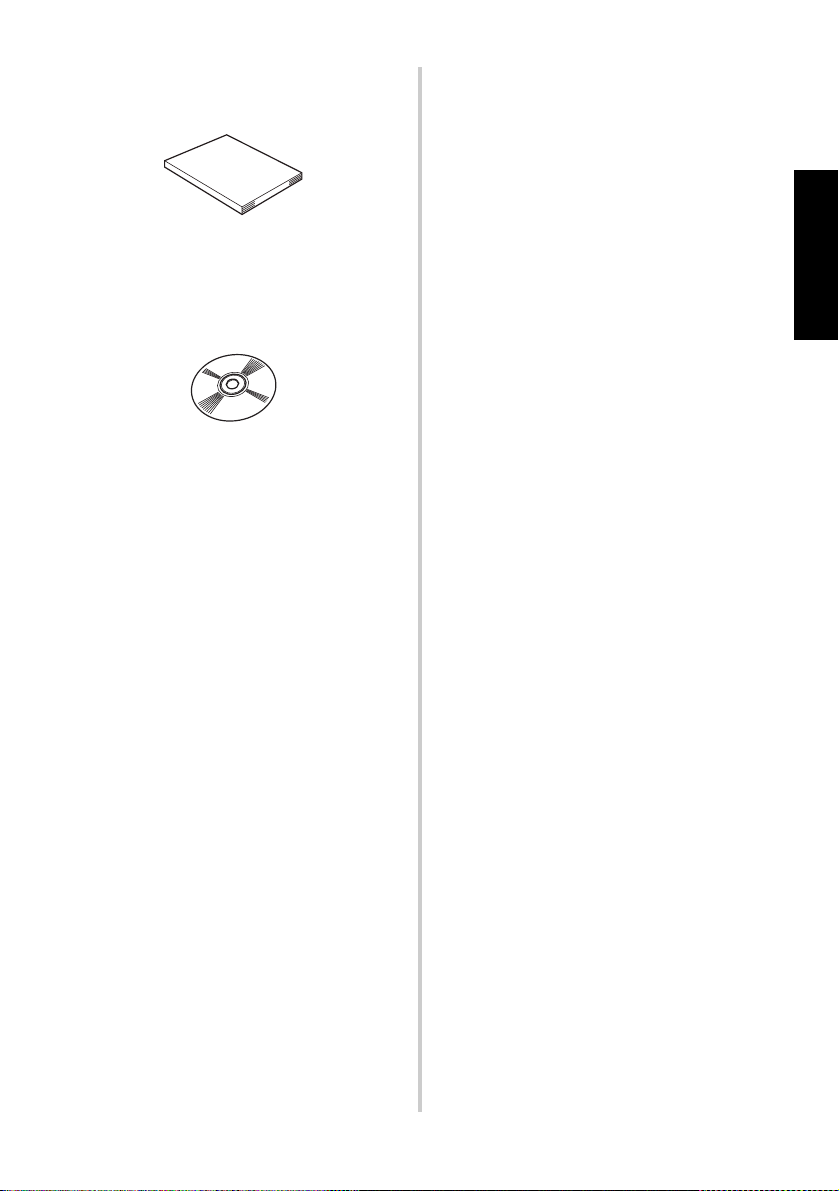
■
Quick Reference (this manual)
Keep for future reference.
■
CD-ROM
The CD-ROM contains software, etc., to
install on a personal computer.
■
Tape catalog
This catalog contains a list of tape cassettes
designed exclusively for the P-touch series
printers.
Before use
11
Page 13
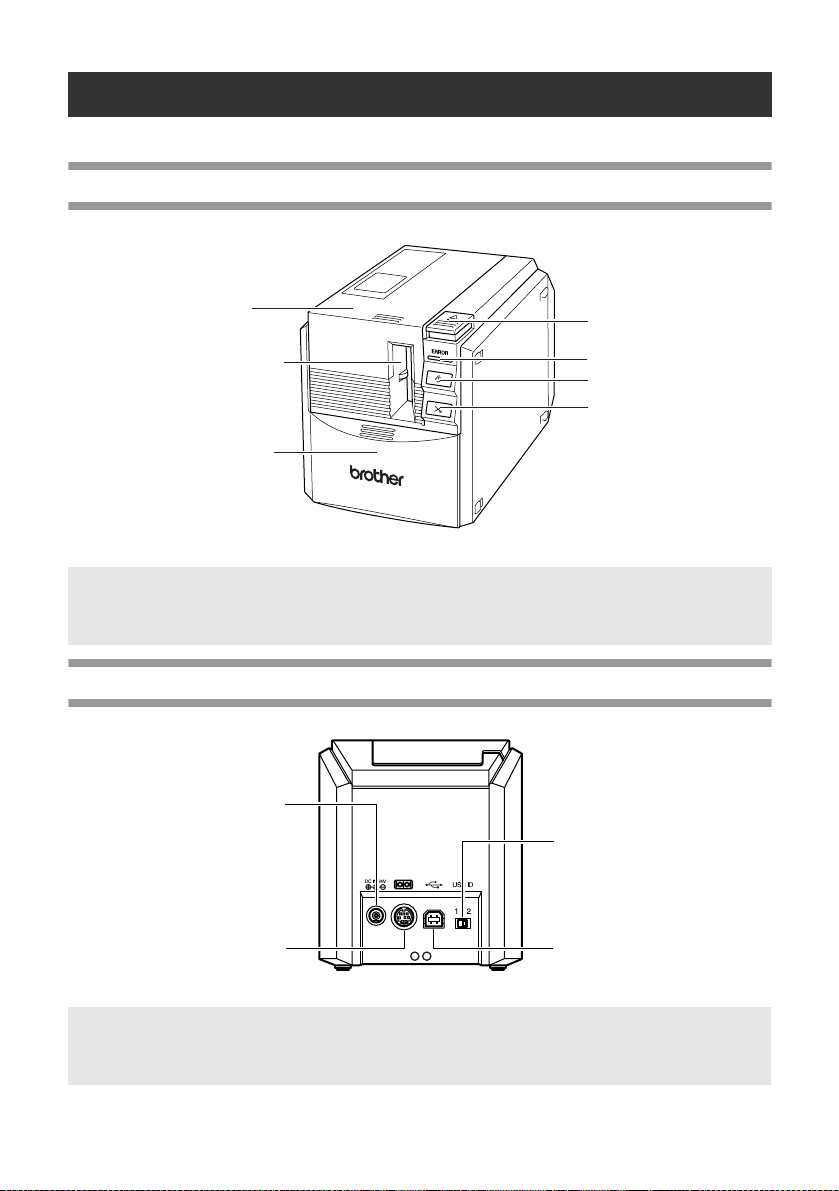
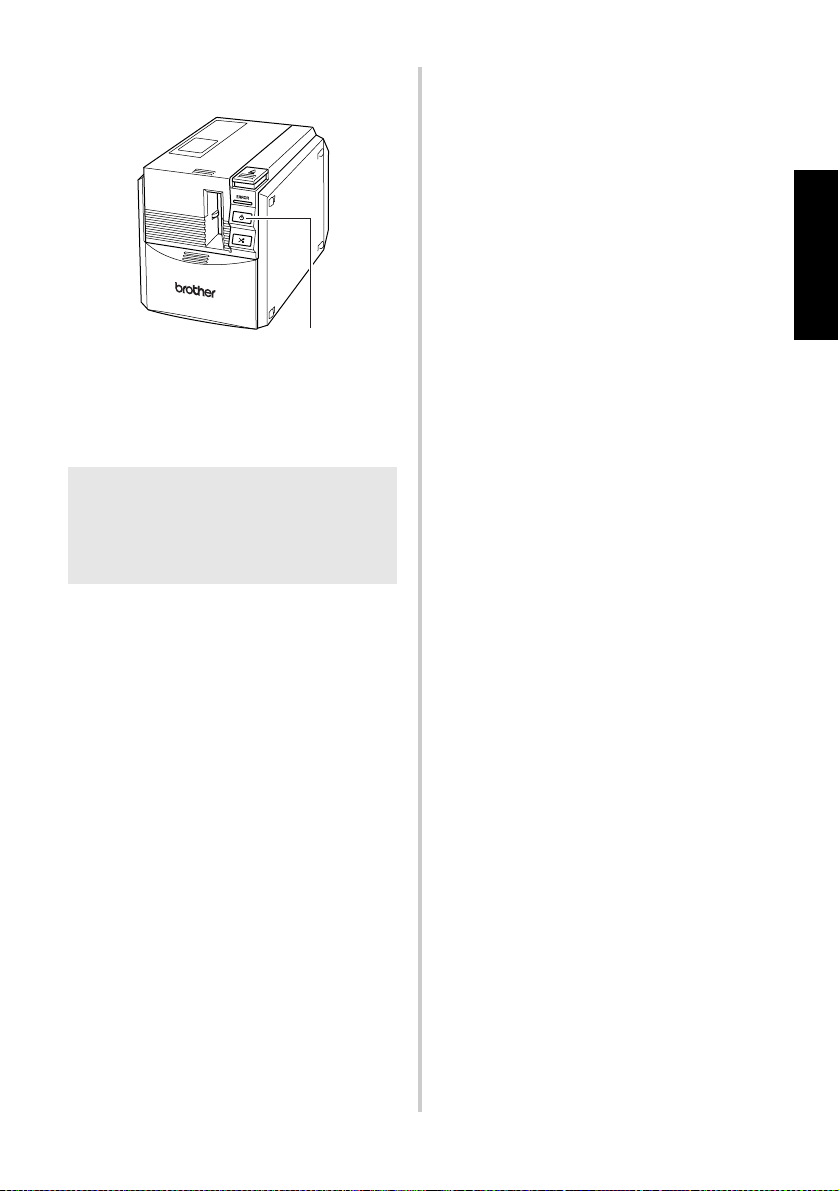
PT-9500PC terms
This section identifies the main PT-9500PC terms.
Front view
Tape compartment cover
Label outlet
Collection tray support
Cover release button
ERROR lamp
Power button (including lamp)
Feed/cut button
Note
● If the tape compartment cover is left open, dust will collect on the print head. Always close the
cover.
Rear view
AC adapter jack/socket
USB ID switch
Serial port
USB port
Note
● The USB ID switch is usually set to “2.” For details, refer to “Changing the USB ID mode” (
P.100).
12
→
Page 14
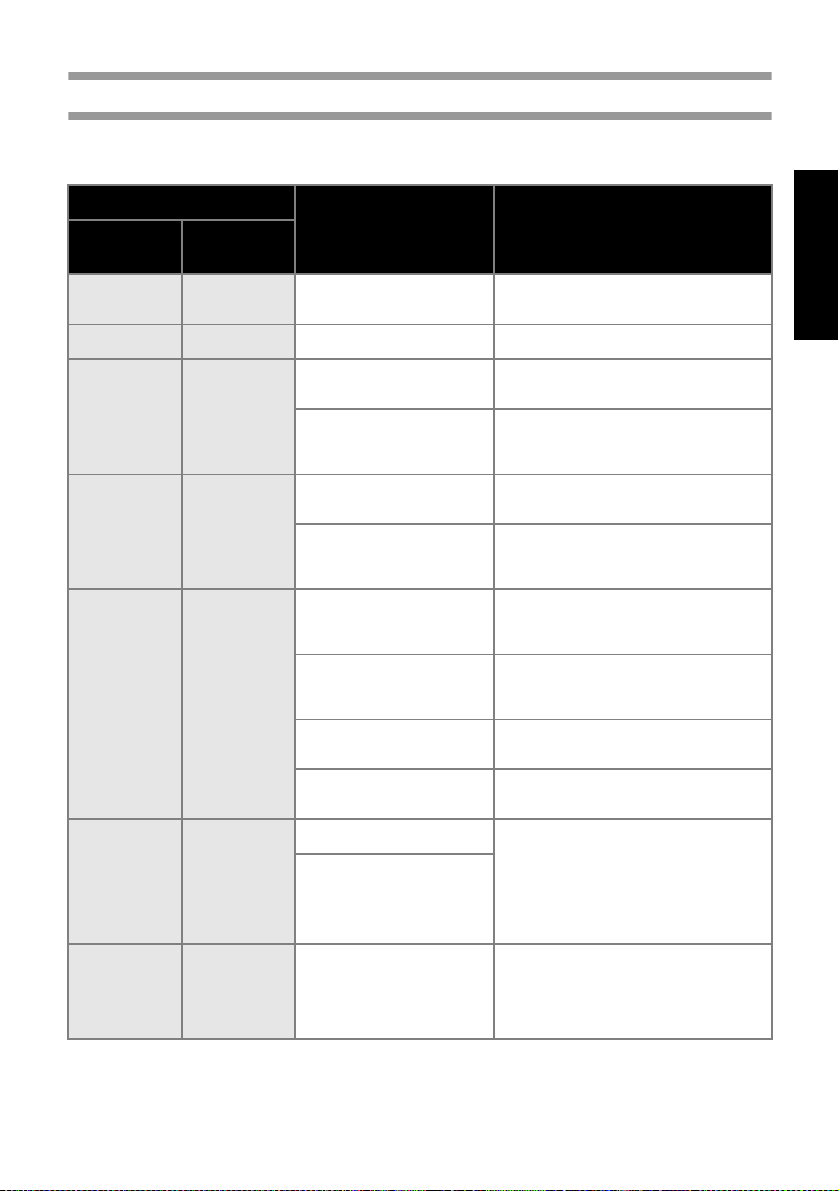
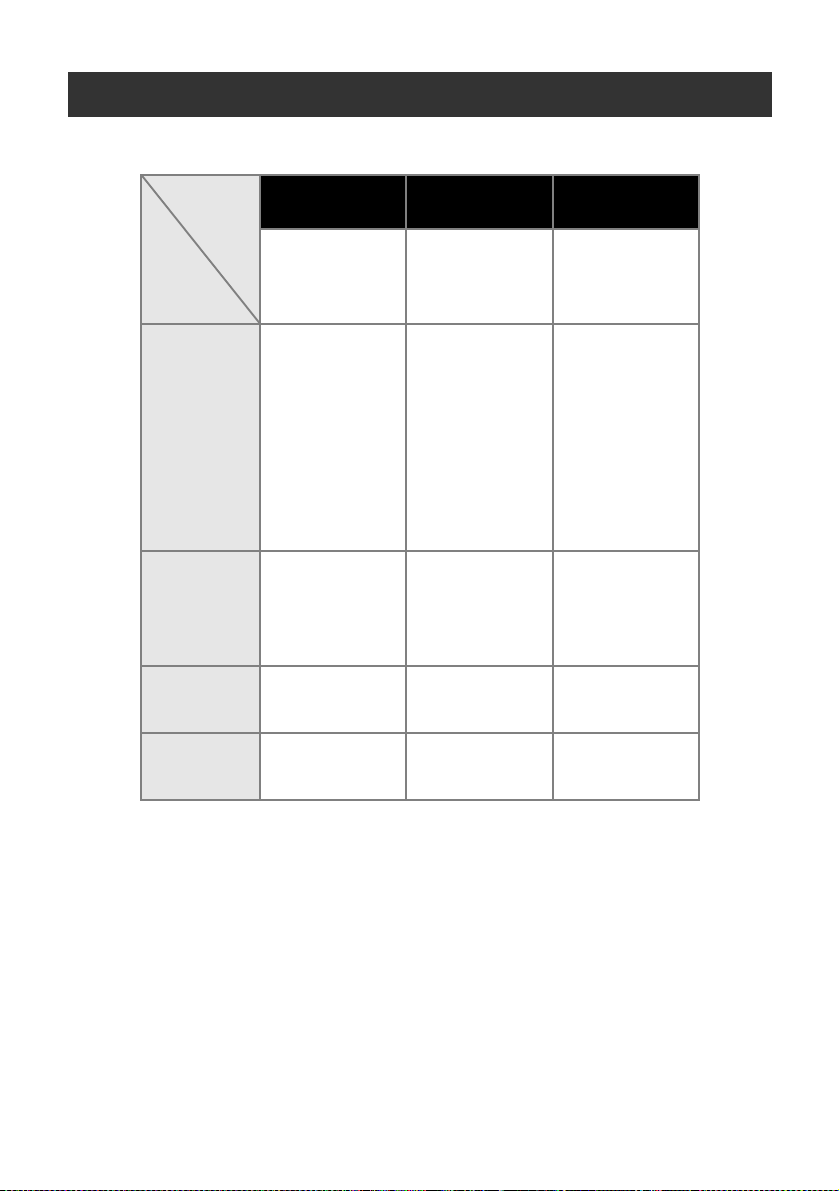
Lamp display
The condition of the PT-9500PC can be determined by the power button lamp (green) and the ERROR
lamp (red).
Lamp condition
Power button
(green)
ERROR lamp
(red)
Condition Remedy
Lit Not lit
Flashing Not lit Receiving data —
Flashing Lit
Lit Lit
Lit Flashing
Lit Flashing fast
PT-9500PC standby
condition
Receiving data
No tape cassette
Receiving data
Tape compartment cover is
open.
During PT-9500PC standby
No tape cassette
During PT-9500PC standby
Tape compartment cover is
open.
During printing
No tape cassette
Incorrect tape cassette
During printing
Tape compartment cover is
open.
Empty tape cassette
Transmission error
Cutter error Confirm that the tape is not jammed in
Roller holder error
—
Install the tape cassette and close the
tape compartment cover.
Close the cover.
Install the tape cassette and close the
tape compartment cover.
Close the cover.
Install the correct tape cassette and close
the tape compartment cover.
Close the cover.
Install a tape cassette containing tape
and close the tape compartment cover.
The PT-9500PC will return to standby
after 5 seconds.
the PT-9500PC. If necessary, turn the
PT-9500PC off and on.
If the ERROR lamp continues to flash,
contact the retail outlet where the
PT-9500PC was purchased or your local
authorized service center.
Before use
Lit
Flashing very
fast
EEPROM error
Circuit board error
Turn the PT-9500PC off and on.
If the ERROR lamp continues to flash,
contact the retail outlet where the
PT-9500PC was purchased or your local
authorized service center.
13
Page 15
Preparations before creating labels
Before creating labels with the PT-9500PC, the following preparations are necessary.
Note
● The connection procedures are different depending on the operating system running on the
personal computer and whether a serial connection or USB connection is used. For details, refer
to “Installing the software” (
Install the printer driver to use the PT-9500PC as a printer
with the personal computer and install the label design
software. For details, refer to “Installing the software” (
P.23).
Connect the PT-9500PC to the power source and a
personal computer.
For details, refer to “Connecting the PT-9500PC” (
→
P.23).
Installing the software
Connecting the PT-9500PC
Creating labels
→
→
P.15).
14
After preparing the PT-9500PC, start creating labels.
For details, refer to “Creating labels: Windows version” (
P.67) or “Creating labels: Macintosh version” (
→
P.85).
→
Page 16
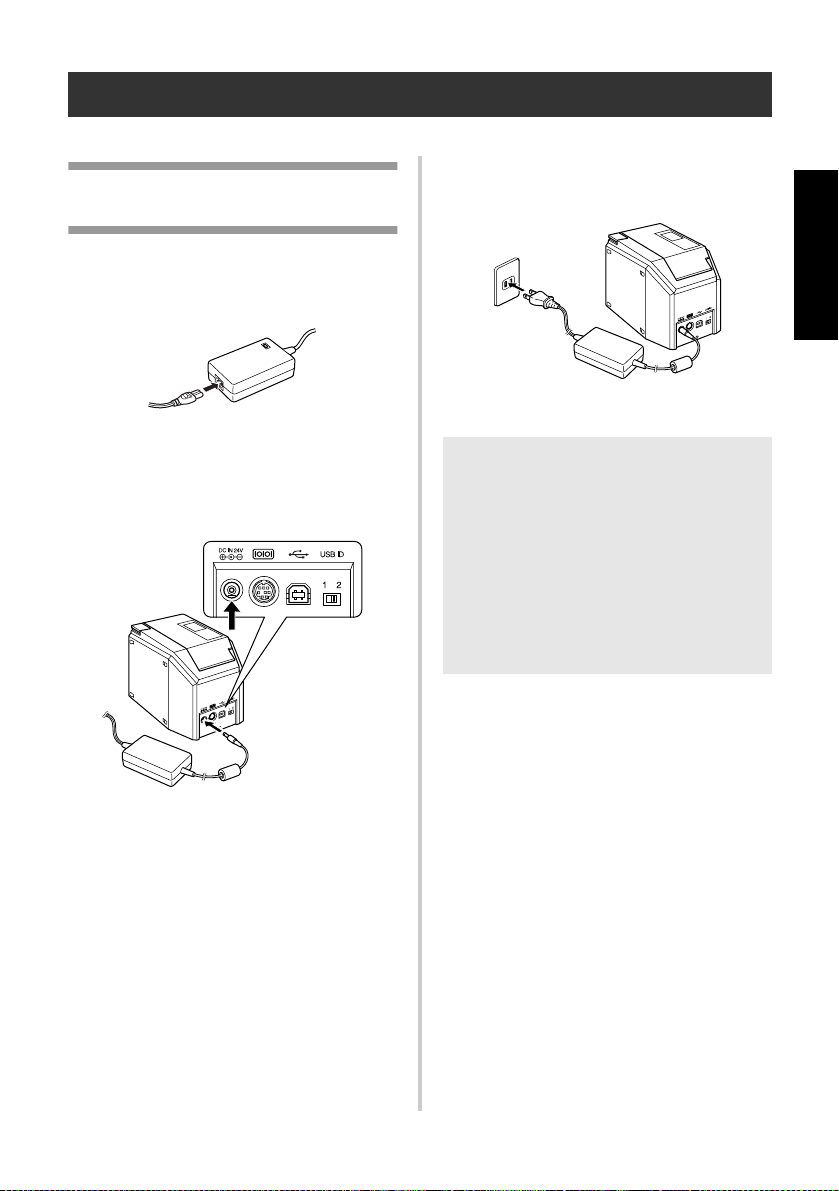
Connecting the PT-9500PC
Connect the PT-9500PC to the power source and a personal computer.
Plug the power supply cord into an
3
Connecting to the power source
Connect the included power supply cord
1
to the AC adapter.
electrical outlet (AC 120 V).
Before use
Insert the AC adapter connector into the
2
AC adapter jack/socket on the back of
the PT-9500PC.
Note
● After using the PT-9500PC, remove the
power supply cord from the electrical
outlet and the AC adapter from the
PT-9500PC and store for future use.
● When removing the AC adapter, do not
pull the AC adapter cord. The wire in the
AC adapter cord may break.
● Do not use any AC adapter other than the
one included with the PT-9500PC. The
PT-9500PC may malfunction.
15
Page 17
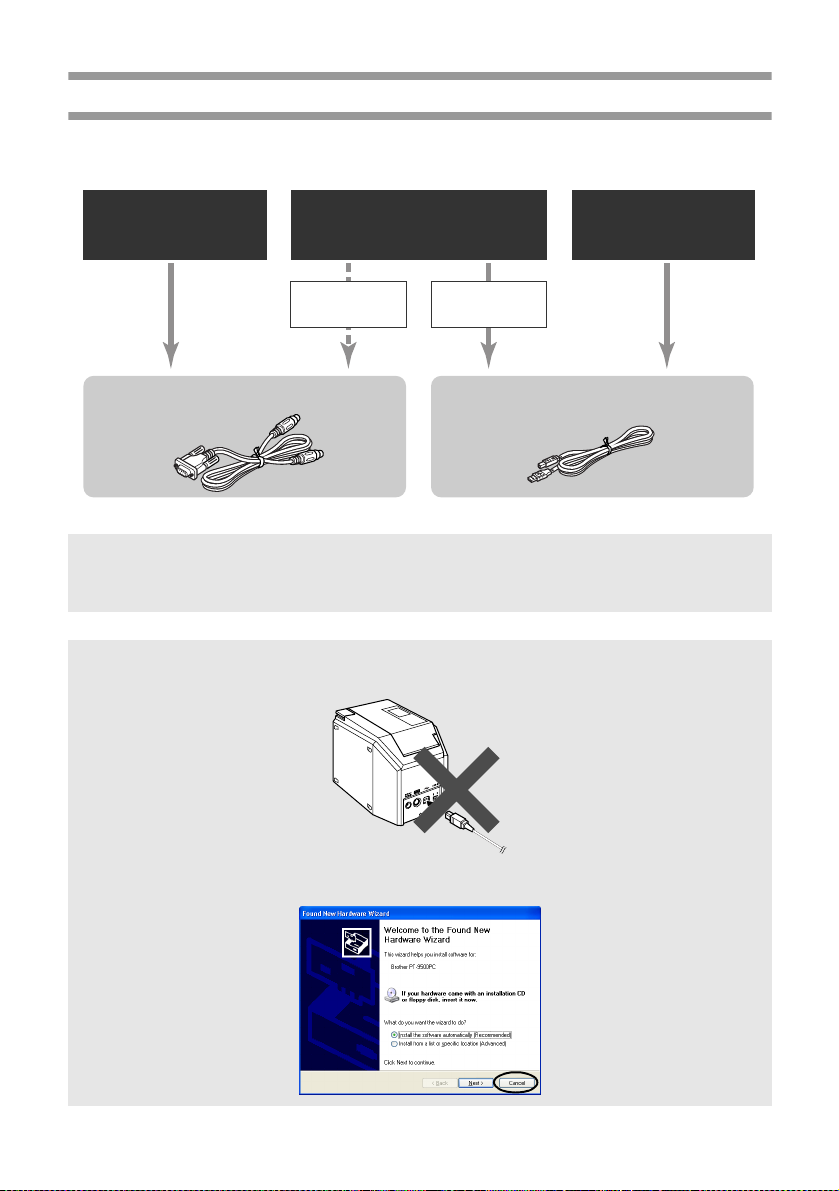
Connecting to a personal computer
Connect the PT-9500PC to a personal computer using the included interface cables. The interface
cables used to connect to a USB port and a serial port are different.
Windows® 95/NT4.0
Connect to serial port. Connect to USB port.
Windows
Advanced setup Basic setup
®
98/98 SE/
Me/2000 Pro/XP
Mac OS 8.6-9.x
Mac OS X 10.1-10.2.6
Note
● Do not connect both the serial interface cable and USB interface cable to the PT-9500PC at the
same time. The PT-9500PC may malfunction.
Note
● Do not connect the USB interface cable to a personal computer until the software has been installed.
● If the USB interface cable is connected to a personal computer before the software is installed,
the following dialog box will appear. Click [Cancel], and then remove the USB interface cable.
16
Page 18

■
Connecting to a USB port
Follow the following procedures to connect
the PT-9500PC to the USB port of a personal
computer running Windows
2000 Pro/XP using the “Basic setup” (
®
98/98 SE/Me/
→
or to the USB port of a Macintosh.
Note
●
The USB interface cable is connected to a
personal computer running Windows
while the software is being installed and
is connected to a Macintosh after the
software has been installed. Do not
connect the PT-9500PC to a personal
computer until instructed to do so.
Note
●
When making a USB connection through
a hub, a proper connection may not be
possible due to the type of hub used. If
this occurs, connect the PT-9500PC to a
personal computer directly with the USB
interface cable.
●
The PT-9500PC cannot be connected to
the USB port of a personal computer
running Windows
case, the PT-9500PC must be connected
to the serial port.
®
95/NT 4.0. In this
P.26)
Insert the plug on the end of the USB
2
interface cable into the USB port on the
back of the PT-9500PC.
Insert the plug on the end of the USB
3
interface cable into the USB port on the
personal computer.
Before use
Prepare the included USB interface
1
cable.
Connect to PT-9500PC
USB port.
Connect to personal
computer USB port.
• The location of the USB port varies
according to the personal computer.
For details, refer to the instruction
manual for the personal computer.
Note
●
To use the PT-9500PC, the software must
be installed on the personal computer.
Proceed to “Installing the software” (
P.23).
→
17
Page 19

■
Connecting to a serial port
A personal computer running Windows
NT 4.0 must be connected to the serial port.
To connect to personal computers running
Windows
®
98/98 SE/Me/2000 Pro/XP using
the serial port, select “Connecting to a serial
port” (
→
P.36).
Note
●
When the USB interface cable is
connected to the PT-9500PC, the serial
port cannot be used for communication.
Remove the USB interface cable from the
PT-9500PC.
●
When connecting the PT-9500PC to a
personal computer using a serial
connection, connect the PT-9500PC to
the personal computer with the serial
interface cable before installing the
software.
●
The serial ports (RS-232C) of some
computers are shaped so that the serial
interface cable cannot be connected. In
this case, use a commercially available
adapter.
●
Macintosh computers cannot be
connected to the serial port of the
PT-9500PC.
®
95/
Make sure that both the PT-9500PC and
2
the personal computer are turned off.
If the power is on, turn them off.
Insert the plug on the end of the serial
3
interface cable into the serial port on the
back of the PT-9500PC.
Insert the plug on the end of the serial
4
interface cable into the serial port on the
personal computer.
Prepare the included serial interface
1
cable.
Connect to PT-9500PC
serial port.
Connect to personal
computer serial port.
18
• The location and shape of the serial
port varies according to the personal
computer. For details, refer to the
instruction manual for the personal
computer.
Page 20
Press the power button on the
5
PT-9500PC.
Power button
→
The power button will light (green).
Turn on the computer.
6
Note
● To use the PT-9500PC, the software must
be installed on the personal computer.
Proceed to “Installing the software” (
P.23).
Before use
→
19
Page 21

Installing the tape cassette
This section lists the types of tape that may be used with the PT-9500PC and explains the procedures to
install the tape cassettes.
Authorized tape
The types of tape that may be used with the
PT-9500PC are listed below.
■
TZ Tapes
Standard Laminated Tape
Standard Non-Laminated Tape
Strong Adhesive Tape - Laminated
Flexible ID tape - Laminated
Security Tape - Laminated
Fabric Iron-On Tape - Non-Laminated
■
AV Labels
Note
●
For details on the tapes, refer to
“Accessories” (
→
P.110).
Installing the tape cassette
This section explains the procedures to install
the tape cassette.
Remove the stopper on the tape cassette.
1
• Note that some tape cassettes may not
have stoppers.
Press the cover release button and open
2
the tape compartment cover.
20
Page 22
Check the tape cassette.
3
Make sure that the end of the tape is not
bent and that it is routed correctly through
the tape guides.
Press the power button on the
6
PT-9500PC.
Before use
End of the tape
Install the tape cassette.
4
Be sure to install the tape cassette in the
Tape guides
correct direction.
Close the tape compartment cover.
5
Power button
→
The power button will light (green).
• If the tape compartment cover is not
completely closed or if the tape cassette
is not installed correctly, the ERROR
lamp will light. In this case, repeat the
procedure from step
Press the feed/cut button.
7
→
Remove the tape slack.
2
.
Feed/cut button
Note
● If no additional operation is performed
within 10 minutes after printing a label,
the roller holder will automatically
release and a sound may be produced.
Due to this function, the tape cannot be
removed if the AC adapter is removed
from the PT-9500PC with the PT-9500PC
turned on because the roller holder will
not be released. Always turn off the
PT-9500PC before removing the AC
adapter from the PT-9500PC.
21
Page 23
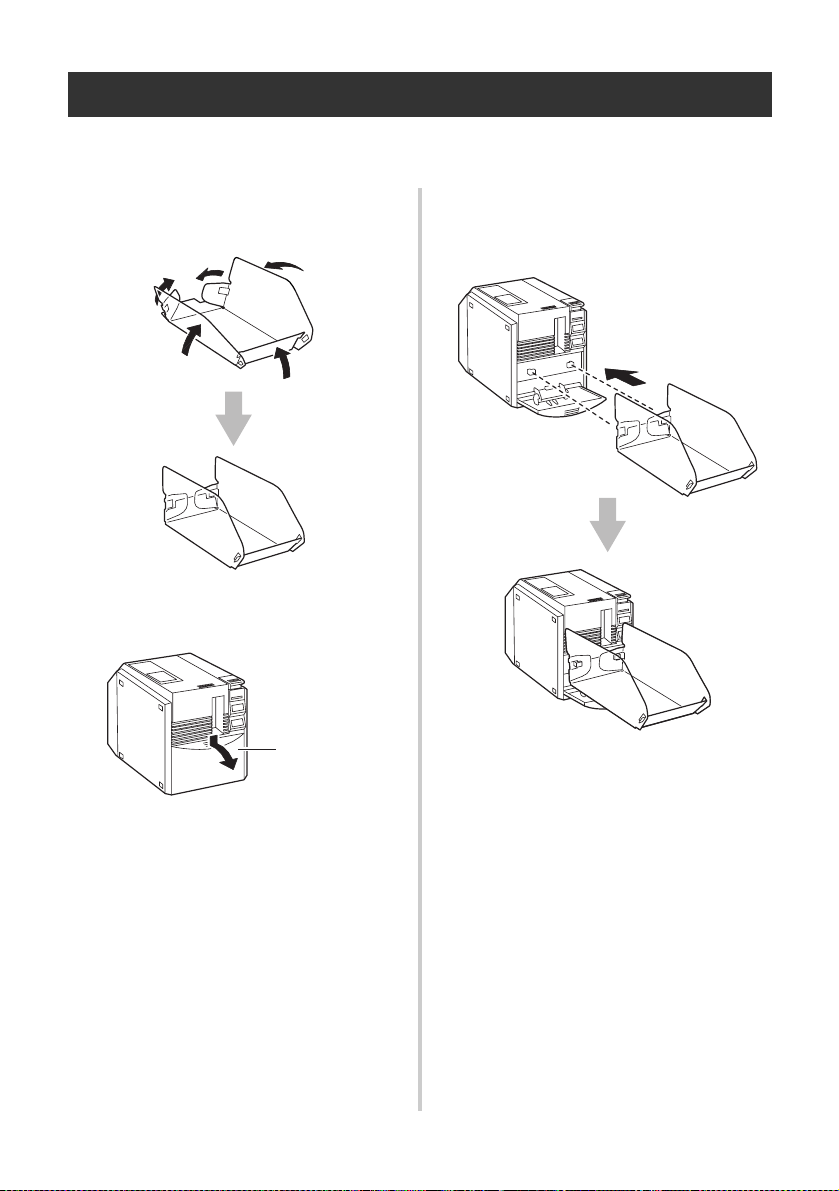
Installing the collection tray
Install the collection tray. The collection tray is used to collect labels ejected from the PT-9500PC. Use
the collection tray when printing a lot of labels, etc.
Assemble the collection tray.
1
Refer to the illustrations below to
assemble the collection tray.
Open the collection tray support.
2
Collection tray
support
Install the collection tray to the
3
PT-9500PC.
Refer to the illustrations below to install
the collection tray.
22
Page 24

2
Installing the software
This chapter contains the procedures to install the necessary software to operate
the PT-9500PC.
Types of software used..................................................................................24
Using Windows.............................................................................................25
Using Mac OS 8.6-9.x...................................................................................47
Using Mac OS X 10.1 or later .......................................................................54
Page 25
Types of software used
To use the PT-9500PC, the following software must be installed on the personal computer. Refer to the
pages listed below for the type of operating system running on the personal computer.
Software
OS
Microsoft
Windows® 98
Microsoft
®
®
Windosw®
98 SE
2000 Pro
Windows
®
4.0
NT
®
®
®
®
®
Microsoft
Windows® Me
Microsoft
Windows®
Microsoft
Windows® XP
Microsoft
Windows® 95
Microsoft
Mac OS 8.6 to
9.x
Mac OS 10.1 to
10.2.6
P-touch Quick
Editor
Software to print
labels using simple
operations.
9
Not Available
9
9
P-touch Editor Printer driver
Software to create
labels with various
designs.
9
(Ver. 4.0)
2
9
*
(Ver. 4.0)
9
(Ver. 3.2)
9
(Ver. 3.2)
Software to enable
the personal
computer to use the
PT-9500PC as a
printer.
USB connection
Serial connection*
Serial connection*
USB connection*
USB connection*
1
3
4
4
*1 Select Basic setup for a USB connection and select Advanced setup for a serial connection.
*2 When using Windows NT
later is not installed.
®
4.0, the P-touch Editor clip art cannot not be used if Internet Explorer 5.5 or
*3 USB connection cannot be used.
*4 Serial connection cannot be used.
24
Page 26
Using Windows
This section contains the procedures to install the software on personal computers running Windows
95/98/98 SE/Me/NT 4.0/2000 Pro/XP.
®
The software is installed
separately.
Follow these procedures
to install/uninstall the
printer driver and when
connecting the
PT-9500PC to a
computer running
®
Windows
2000 Pro/XP using a
serial connection.
98/98 SE/Me/
Select the software to install.
When
installation is
complete, click
[Close].
Driver
Quick Editor
installation
Select connection method.
PT-9500PC is connected
to the personal computer
during installation.
Advanced
setup
P-touch
Quick Editor
®
Windows
is not supported
P-touch
95/NT 4.0
®
Windows
is not supported
95/NT 4.0
USB
interface
cable
Insert the CD-ROM into the
CD-ROM drive and begin setup.
P-touch
Editor
P-touch
Editor
installation
Serial
connection
Printer driver
installation
for USB
connection
Printer driver
installation
for serial
connection
installation
When using
PS-9000
Network
connection
Windows
95/NT 4.0
Printer driver
installation
for serial
connection
P-touch
Editor
Printer driver
installation
for network
connection
Basic
setup
For
The printer driver and
the editing software
are installed together
®
Select the editing software.
P-touch
Quick Editor
P-touch
Quick Editor
installation
Setup is
complete.
For
Windows
98/98 SE/Me/
2000 Pro/XP
Printer driver
installation
for USB
connection
®
P-touch
Editor
P-touch
Editor
installation
software
Installing the
25
Page 27

Installation precautions
Installing using basic setup
When installing the software on a personal
computer, note the following precautions
according to the operating environment used.
■
Connecting to a USB port
Do not connect the USB interface cable to
the personal computer until the software has
been installed.
If the USB interface cable is connected to a
personal computer before the software is
installed, the following dialog box will
appear. Click [Cancel], and then remove the
USB interface cable.
■
Connecting to a serial port
When connecting the PT-9500PC to a
personal computer using a serial connection,
connect the PT-9500PC to the personal
computer with the serial interface cable
before installing the software.
For details, refer to “Connecting to a personal
computer” (
■
Using Windows® NT 4.0/2000 Pro
→
P.16).
When installing the software, log on using a
user name with administrator authority.
■
Using Windows® XP
When installing the software, log on using a
user name with computer administrator
authority.
To enable the personal computer to use the
PT-9500PC, install P-touch Editor 4.0, to design
labels, and the printer driver software.
Install P-touch Editor, and then install the
printer driver.
Note
●
Depending on the operating system
running on the personal computer, it may
be necessary to restart the personal
computer during installation. After
restarting the personal computer, log on
using the same user name and continue
the installation.
●
If a network printer is to be installed,
please use the advanced setup function.
●
When installing only the printer driver,
refer to “Installing the printer driver only”
(
→
P.35).
●
The examples of dialog boxes from
Windows
installation procedures for personal
computers running other operating
systems are basically the same.
1
®
XP are used in this guide. The
Start the personal computer, and then insert
the CD-ROM into the CD-ROM drive.
→
The Brother Select Language dialog
box appears.
• It may take a short time until the Brother
Select Language dialog box appears.
• If the Brother Select Language box does
not appear, double-click the My
Computer icon, and then double-click
the P-touch icon.
26
Page 28
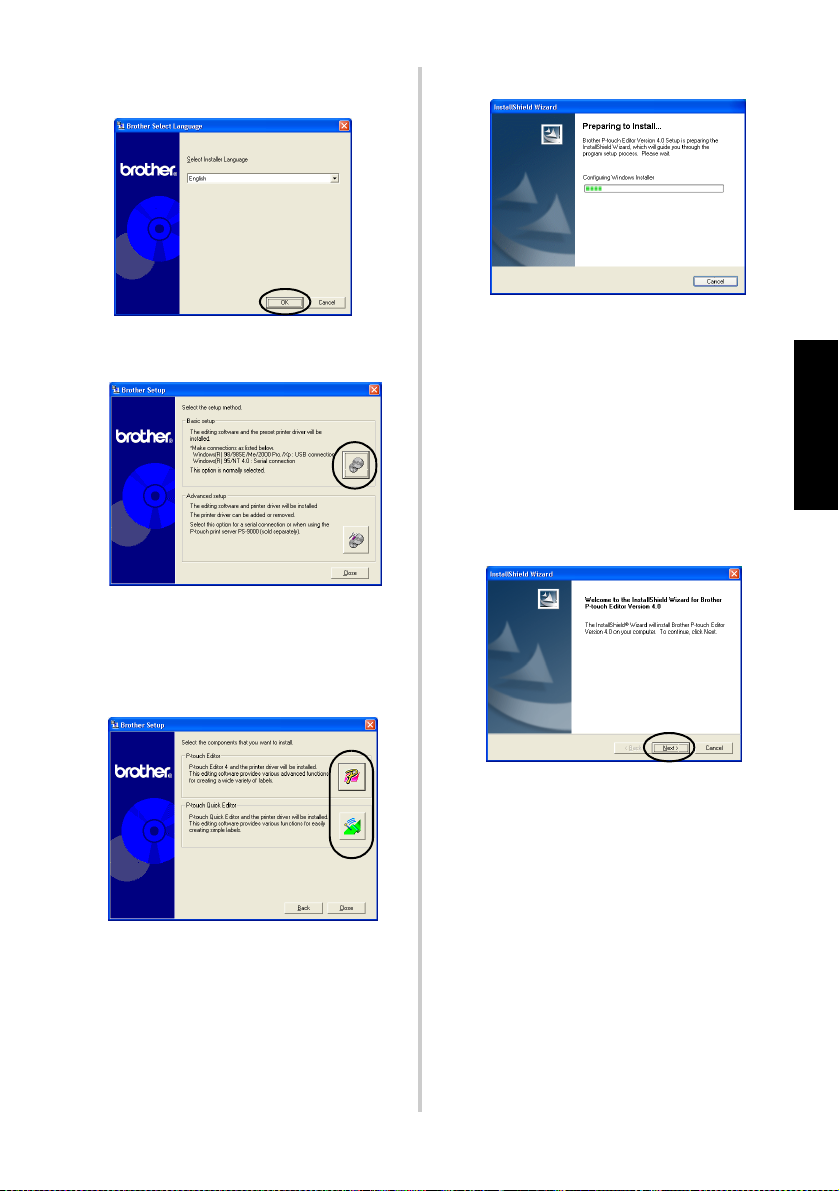
Select the desired language, and then
2
click [OK].
Click the button for Basic setup.
3
→
The dialog box to select the software
to install appears.
→
The installation preparation begins.
If P-touch Quick Editor is selected, refer to
4-9
steps
Editor only” (
step
→
in “Installing P-touch Quick
→
b
P.33). Then, proceed to
(→ P.29).
When the preparation is complete,
the InstallShield Wizard dialog box
appears with the message “Welcome
to the InstallShield Wizard for
Brother P-touch Editor Version 4.0.”
Read the contents, and then click [Next].
5
software
Installing the
Click the button for P-touch Editor or
4
P-touch Quick Editor.
• P-touch Quick Editor cannot be used
with computers running Windows
NT 4.0.
®
95/
→
The License Agreement dialog box
appears.
27
Page 29

Read the license agreement carefully,
6
and then click [Yes].
→
The Customer Information dialog
box appears.
Type the User Name and the Company
7
Name, and then click [Next].
Click “Only for me (system)” if the only
person authorized to use this software is
the person whose user name and
password were used to logon when the
computer was started.
Select the destination folder where the
8
files will be installed, and then click
[Next].
To select another destination folder, click
[Browse].
→
The Setup Type dialog box appears.
Select the type of setup you prefer, and
9
then click [Next].
28
→
The Choose Destination Location
dialog box appears.
The following items will be installed.
Typical
P-touch Editor, P-touch Library, Westernlanguage fonts, Symbol fonts, Help, Clip
Art, Auto Format Templates, and Layout
style will be installed.
Compact
Only P-touch Editor and the clip art will be
installed.
Custom
Click [Next] and select the items you want
to install on the Select Features dialog box.
Page 30
→
The Add shortcut dialog box
appears.
Specify where to add shortcuts for
0
P-touch Editor, and then click [Next].
To add no shortcuts, clear all of the check
boxes.
Select “Yes, install the printer driver.”,
b
and then click [Next].
If P-touch Quick Editor was selected in
4
step
, the following Question dialog
box appears. Click [Yes].
When connecting to a personal computer
®
running Windows
step
5
in the “Connecting to a serial
95/NT 4.0, proceed to
port” section of “Installing the printer
driver only” (
→
→
P.37).
The Confirmation dialog box
appears.
software
Installing the
→
The Start Copying Files dialog box
appears.
Review the settings, and then click
a
[Next].
If you want to review or change any
settings, click [Back].
→
The Install Driver dialog box
appears.
Confirm the contents, and then click
c
[OK].
• This dialog box may not appear
depending on the operating system
running on the personal computer.
→
The Driver Setup (Brother
PT-9500PC) dialog box appears.
29
Page 31

Click [Next].
d
→
The setup preparation begins.
→
When the preparation for setup is
complete, you will be instructed to
connect the PT-9500PC to the
personal computer.
Connect the PT-9500PC to the personal
e
computer with the USB interface cable,
and then turn on the PT-9500PC.
For details, refer to “Connecting to a
→
personal computer” (
P.16).
Select “Install the software automatically
f
(Recommended),” and then click [Next].
→
The necessary programs will be
detected.
→
The Hardware Installation dialog box
appears.
When connecting to a personal computer
®
running Windows
2000 Pro, proceed to step
→
If the personal computer detects that
98/98 SE/Me/
i
the PT-9500PC is connected, The
Found New Hardware Wizard dialog
box appears.
30
(→ P.31).
Click [Continue Anyway].
g
• This software has no compatibility
problems with Windows
be used.
→
Driver installation begins.
®
XP and can
Page 32

Click [Finish].
h
Click [Finish].
i
→
When installation is complete, the
Completing the Found New
Hardware Wizard dialog box
appears.
→
The Driver Setup (Brother
PT-9500PC) dialog box appears
again.
→
The User Registration dialog box
appears.
Select “Yes, display the page.”, and then
j
click [Next].
→
When the P-touch Editor installation
is complete, the InstallShield Wizard
Complete dialog box appears.
Click [Finish].
k
software
Installing the
→
The Setup Status dialog box appears
and installation of P-touch Editor
begins.
If P-touch Quick Editor is selected in step
4
, refer to steps 0-a in “Installing
P-touch Quick Editor only” (
→
P.34).
→
Installation is complete.
When installing P-touch Quick Editor,
proceed to “Installing P-touch Quick
→
Editor only” (
P.33).
When creating a label, proceed to
“Creating labels: Windows version” (
P.67).
→
31
Page 33

Installing P-touch Editor only
Install P-touch Editor 4.0 to design labels.
Start the personal computer, and then
1
insert the CD-ROM into the CD-ROM
drive.
→
The Brother Setup dialog box
appears.
• It may take a short time until the
Brother Setup dialog box appears.
• If the Brother Setup dialog box does not
appear, double-click the My Computer
icon, and then double-click the P-touch
icon.
Select the desired language, and then
2
click [OK].
Click the button for Advanced setup.
3
Follow the instructions on each dialog
5
box and start installation.
Refer to steps
basic setup” (
→
The User Registration dialog box
5-a
in “Installing using
→
P.27).
appears.
Select “Yes, display the page.”, and then
6
click [Next].
→
The InstallShield Wizard Complete
dialog box appears.
Click [Finish].
7
→
The dialog box to select the software
to install appears.
Click the button for P-touch Editor.
4
32
→
P-touch Editor will be installed and
the dialog box in step
3
appears
again.
When installing the printer driver as well,
4
proceed to step
printer driver only” (
in “Installing the
→
P.36).
Page 34

Installing P-touch Quick Editor only
Install P-touch Quick Editor to design labels
using simple operations.
Note
● P-touch Quick Editor cannot be used
with computers running Windows
NT 4.0.
®
95/
Click the button for P-touch Quick
4
Editor.
Start the personal computer, and then
1
insert the CD-ROM into the CD-ROM
drive.
→
The Brother Setup dialog box
appears.
• It may take a short time until the
Brother Setup dialog box appears.
• If the Brother Setup dialog box does not
appear, double-click the My Computer
icon, and then double-click the P-touch
icon.
Select the desired language, and then
2
click [OK].
Click the button for Advanced setup.
3
→
The dialog box to select the software
to install appears.
→
The installation preparation begins.
→
When the preparation is complete,
the Welcome dialog box appears.
Read the contents, and then click [Next].
5
→
The User Information dialog box
appears.
software
Installing the
33
Page 35

Type your name and company name in
6
Name and Company respectively, and
then click [Next].
→
The Registration Confirmation dialog
box appears.
Confirm that the name and company
7
name are correct, and then click [Yes].
To correct the registration information,
click [No].
→
The Choose Destination Location
dialog box appears.
→
The Setup dialog box appears and
installation begins.
→
During installation, the Add shortcut
dialog box appears.
Specify where to add shortcuts for
9
P-touch Quick Editor, and then click
[Next].
To add no shortcuts, clear all of the check
boxes.
Select the destination folder where the
8
files will be installed, and then click
[Next].
To select another destination folder, click
[Browse].
34
→
The Setup Complete dialog box
appears.
Remove the CD-ROM from the CD-ROM
0
drive.
Page 36

Click “Yes, I want to restart my computer
a
now.”, and then click [Finish].
→
Installation of P-touch Quick Editor
is complete, and the personal
computer will restart.
Installing the printer driver only
When installing the printer driver only, follow
the following steps.
■
Connecting to a USB port
Start the personal computer, and then
1
insert the CD-ROM into the CD-ROM
drive.
→
The Brother Setup dialog box
appears.
• It may take a short time until the
Brother Setup dialog box appears.
• If the Brother Setup dialog box does not
appear, double-click the My Computer
icon, and then double-click the P-touch
icon.
Select the desired language, and then
2
click [OK].
Click the button for Advanced setup.
3
software
Installing the
→
The dialog box to select the software
to install appears.
35
Page 37

Click the button for Driver.
4
→
The Driver Setup dialog box appears.
Select “USB cable”, and then click [OK].
5
→
The Confirmation dialog box
appears.
Follow the instructions on each dialog
6
box and start installation.
Refer to steps
basic setup” (
→
The Driver Setup (Brother
c-h
in “Installing using
→
P.29).
PT-9500PC) dialog box appears.
Select “Yes, restart immediately”, and
7
then click [Finish].
→
Installation of the printer driver is
complete, and the personal
computer will restart.
■
Connecting to a serial port
Note
●
When installing the PT-9500PC to the
serial port of a personal computer
running Windows
2000 Pro/XP, install the printer driver
according to following steps.
Start the personal computer, and then insert
1
the CD-ROM into the CD-ROM drive.
→
The Brother Setup dialog box appears.
• It may take a short time until the
Brother Setup dialog box appears.
• If the Brother Setup dialog box does not
appear, double-click the My Computer icon,
and then double-click the P-touch icon.
Select the desired language, and then
2
click [OK].
®
98/98 SE/Me/
36
Click the button for Advanced setup.
3
→
The dialog box to select the software
to install appears.
Page 38

Click the button for Driver.
4
→
The Driver Setup dialog box appears.
Select “Serial cable”, and then click
5
[OK].
→
The Driver Setup (Brother
PT-9500PC) dialog box to indicate
setup will begin appears.
Select the port that the PT-9500PC will
7
be connected to, and then click [Next].
→
The dialog box to confirm the
installation information appears.
Confirm that the driver and port are
8
correct, and then click [Next].
To correct the installation information,
click [Back].
→
Installation begins.
software
Installing the
Select “Install”, and then click [Next].
6
→
The dialog box to select the port that
the PT-9500PC will be to connected
to appears.
37
Page 39

Select the “Start up the Change Baud
9
Rate Wizard” check box, and then click
[Next].
→
The Change Baud Rate Wizard
(Brother PT-9500PC) dialog box
appears.
Select the appropriate Serial Port, and
0
then click [Next].
Select the desired baud rate, and then
a
click [Next].
Select 115,200 bps for the serial port
baud rate using a personal computer that
supports a baud rate of 115,200 bps. If the
personal computer does not support a
serial port baud rate of 115,200 bps,
select the appropriate baud rate.
→
A dialog box to confirm the baud
rate settings appears.
Click [Next].
b
38
→
A dialog box to select the desired
baud rate appears.
→
The baud rate will be set.
• When the baud rate settings are
complete, the PT-9500PC and personal
computer can communicate using the
serial port.
→
The dialog box to indicate
installation is complete appears.
Remove the CD-ROM from the CD-ROM
c
drive.
Page 40

Select “Yes, I want to restart my
d
computer now.”, and then click [Finish].
→
Installation of the printer driver is
complete, and the personal
computer will restart.
Note
●
When the USB interface cable is
connected to the PT-9500PC, the serial
port cannot be used for communication.
Remove the USB interface cable from the
PT-9500PC.
●
When using a personal computer that
does not support a serial port baud rate of
115,200 bps, change the PT-9500PC
baud rate to 9,600 bps. For details, refer
to “Changing the baud rate” (
→
P.101).
■
Using as a network printer
This section contains the procedures to install
the printer driver when using the PS-9000
print server (sold separately) designed
exclusively for the P-touch series printers.
When using the PS-9000 print server, the
PT-9500PC can be used as a network printer.
This function can only be used in a Windows
environment.
PS-9000
Ethernet
HUB
software
Installing the
Ethernet cable
USB cable
Note
●
For PS-9000 setup, refer to the instruction
manual for the PS-9000 print server.
39
Page 41

Start the personal computer, and then
1
insert the CD-ROM into the CD-ROM
drive.
→
The Brother Setup dialog box
appears.
• It may take a short time until the
Brother Setup dialog box appears.
• If the Brother Setup dialog box does not
appear, double-click the My Computer
icon, and then double-click the P-touch
icon.
Select the desired language, and then
2
click [OK].
Click the button for Advanced setup.
3
→
The dialog box to select the software
to install appears.
Click the button for Driver.
4
Select “Network Connection”, and then
5
click [OK].
→
The Driver Setup (Brother
PT-9500PC) dialog box to indicate
setup will begin appears.
Select “Install”, and then click [Next].
6
Click [Next].
7
40
→
The Driver Setup dialog box appears.
→
Driver installation begins.
Page 42

Click [Next].
8
→
The dialog box to indicate
installation is complete appears.
Remove the CD-ROM from the CD-ROM
9
drive.
Select “Yes, I want to restart my
0
computer now.”, and then click [Finish].
Setting the personal computer and PT-9500PC baud rate
Follow the following steps to change or confirm
the baud rate for the personal computer and the
PT-9500PC. The following procedure is shown
based on Windows® XP.
On the taskbar, click the Start button,
1
and then click Control Panel
→
Control Panel appears.
For Windows® 95/98/98SE/Me/NT 4.0/
2000 Pro
On the taskbar, click the Start button, point
to Settings, click Control Panel, and then
double-click the Printer icon. Proceed to
4
step
.
software
Installing the
→
Installation of the printer driver is
complete, and the personal
computer will restart.
Set up the PS-9000 print server.
a
For PS-9000 setup, refer to the instruction
manual for the PS-9000 print server.
Select “Printers and Other Hardware”.
2
→
The Printers and Other Hardware
window appears.
41
Page 43

Click Printers and Faxes.
3
→
The Printers and Faxes window
appears.
Click the Device Setting tab.
5
®
For Windows
95/98/98 SE/Me, click the
Advanced tab.
→
The Device Setting window appears.
Click [Utilities], and then click
6
[Properties] that appears next to Utilities.
Right-click the Brother PT-9500PC icon,
4
and then select “Properties”.
→
The Brother PT-9500PC Properties
sheet appears.
42
®
For Windows
95/98/98 SE/Me, click
[Utilities].
→
The Brother PT-9500PC Utility
dialog box appears.
Page 44

Select the desired baud rate.
7
Click [Apply].
8
→
The baud rate will be changed.
Click [Close].
9
Click [OK].
0
→
Setup is complete and the Brother
PT-9500PC Properties sheet will
close.
Note
● When using a personal computer that
does not support a serial port baud rate of
115,200 bps, change the PT-9500PC
baud rate to 9,600 bps. For details, refer
to “Changing the baud rate” (
→
software
Installing the
P.101).
→
The Brother PT-9500PC Properties
sheet appears again.
43
Page 45

Uninstalling the software
If the PT-9500PC will no longer be used with
the personal computer, follow the following
steps to uninstall the software.
Double-click the My Computer icon, and
1
then click Add or remove programs.
→
The Add or Remove Programs
window appears.
For Windows® 95/98/98SE/Me/NT 4.0/
2000 Pro
On the taskbar, click the Start button, point
to Settings, click Control Panel, and then
double-click the Add/Remove Programs
icon.
Select Brother P-touch Editor Version 4.0
2
or P-touch Quick Editor
For Windows® 95/98/98SE/Me/NT 4.0
.
Select Brother P-touch Editor Version 4.0
or P-touch Quick Editor from the list in the
Add/Remove Programs Properties sheet.
Click [Change/Remove].
3
→
The Confirm File Deletion dialog box
appears.
Click [OK] or [Yes].
4
P-touch Editor 4.0
44
P-touch Quick Editor
→
The software is deleted.
Page 46

Printer is no longer used
Delete the PT-9500PC printer driver. To delete
the PT-9500PC, select P-touch 9500PC from
the Printer window in Control Panel (Printers
and Faxes for Windows
To completely delete the printer driver, follow
the following steps.
Turn off the PT-9500PC and remove the
1
interface cable from the personal
computer.
Insert the CD-ROM into the CD-ROM
2
drive.
→
The Brother Setup dialog box
appears.
• It may take a short time until the
Brother Setup dialog box appears.
• If the Brother Setup dialog box does not
appear, double-click the My Computer
icon, and then double-click the P-touch
icon.
Select the desired language, and then
3
click [OK].
Click the button for Advanced setup.
4
®
XP) and delete.
Click the button for Driver.
5
→
The Driver Setup dialog box appears.
Click [OK].
6
→
The Confirmation dialog box
appears.
Read the contents, and then click [OK].
7
software
Installing the
→
The dialog box to select the software
to install appears.
• This dialog box may not appear
depending on the operating system
running on the personal computer.
→
The Driver Setup (Brother
PT-9500PC) dialog box appears.
45
Page 47

Select “Delete Brother PT-9500PC,” and
8
then click [Next].
→
The Confirmation dialog box
appears.
If “Replace with new Brother PT-9500PC”
is selected, the previously installed printer
driver is deleted and replaced with a new
one. Select this option when upgrading the
printer driver, or when using a personal
computer running Windows
®
2000 Pro/XP
and changing to a PT-9500PC with a
different serial number.
If “Add Brother PT-9500PC” is selected, a
new printer driver is added. Select this
option when connecting and using
multiple PT-9500PCs with the same
personal computer. For Windows
98 SE/Me, only a new port is added
without adding it as a new printer.
®
98/
Click [Finish].
0
→
Deleting the printer driver is
complete.
9
46
Click [Yes].
→
Deletion of the printer driver begins.
→
The dialog box to indicate the
Brother PT-9500PC was correctly
deleted appears.
Page 48

Using Mac OS 8.6-9.x
Follow the following procedure to install the software on a Macintosh running Mac OS 8.6-9.x.
■
Creating labels with various designs
→
Refer to “Installing P-touch Editor and the printer driver” (
■
Printing labels simply
Refer to “Installing P-touch Quick Editor and the printer driver” (
Installing P-touch Editor and the printer driver
Install P-touch Editor 3.2, to design labels, and
the printer driver software.
Note
●
Do not connect the USB interface cable
to the Macintosh until the software has
been installed and the Macintosh has
been restarted. If the USB interface cable
is already connected to the Macintosh,
remove the USB interface cable.
Start the Macintosh, and then insert the
1
CD-ROM into the CD-ROM drive.
→
The P-touch window appears.
Double-click the Mac OS 9 folder.
2
P.47).
→
P.49).
Double-click the P-touch Editor 3.2
4
Installer icon.
→
The Installer starts.
Confirm the drive to install the software
5
to, and then click [Install].
To change the drive, click [Drive].
software
Installing the
→
The Mac OS 9 window appears.
Double-click the P-touch Editor 3.2
3
folder.
→
The P-touch Editor 3.2 window
appears.
Clicking Custom Install displays a dialog
box that allows you to select which
options to install. Only the options with a
check mark beside them are installed.
Clear the check marks from the programs
you do not want to install.
47
Page 49

The programs that can be installed are
listed below.
Program Description
P-touch Editor 3.2 P-touch Editor software
PT-9500PC Driver
Fonts
(13 typefaces)
Auto Format
Templates
Clip Art
Printer driver for the
PT-9500PC
Can install fonts for
English like Atlanta, etc.
A collection of
pre-formatted templates
for labels
A collection of
illustrations, etc. to
arrange on the labels
• If custom installation is not selected, all
of the programs will be installed.
Approximately 100 MB of available
hard-disk space is required.
→
Installation begins.
Click [Restart].
7
→
Installation of P-touch Editor is
complete, and the Macintosh will
restart.
After the Macintosh restarts, connect the
8
PT-9500PC to the Macintosh with the
USB interface cable, and then turn on the
PT-9500PC.
For details, refer to “Connecting to a
personal computer” (
→
P.16).
Proceed to “Selecting the printer” (
P.52).
→
6
48
→
When installation is complete, the
message “Installation is done.”
appears.
Click [Quit].
Page 50

Installing P-touch Quick Editor and the printer driver
Install P-touch Quick Editor to print labels using
simple operations and the printer driver.
Note
● Do not connect the USB interface cable
to the Macintosh until the software has
been installed and the Macintosh has
been restarted. If the USB interface cable
is already connected to the Macintosh,
remove the USB interface cable.
Start the Macintosh, and then insert the
1
CD-ROM into the CD-ROM drive.
→
The P-touch window appears.
Double-click the Mac OS 9 folder.
2
Confirm the drive to install the software
4
to, and then click [Install].
To change the drive, click [Drive].
Clicking Custom Install displays a dialog
box that allows you to select which
options to install. Only the options with a
check mark beside them are installed.
Clear the check marks from the programs
you do not want to install.
software
Installing the
→
The Mac OS 9 window appears.
Double-click the P-touch Quick Editor
3
Installer icon.
→
The Installer starts.
The programs that can be installed are
listed below.
Program Description
P-touch Quick
Editor
PT-9500PC Driver
• If custom installation is not selected, all
of the programs will be installed.
Approximately 20 MB of available
hard-disk space is required.
P-touch Quick Editor
software
Printer driver for the
PT-9500PC
49
Page 51

→
Installation begins.
→
When installation is complete, the
message “Installation is done.”
appears.
Installing the printer driver only
Install only the necessary printer driver to use
the PT-9500PC as a printer.
Note
● Do not connect the USB interface cable
to the Macintosh until the printer driver
has been installed and the Macintosh has
been restarted. If the USB interface cable
is already connected to the Macintosh,
remove the USB interface cable.
Click [Quit].
5
Click [Restart].
6
→
Installation of P-touch Quick Editor
is complete, and the Macintosh will
restart.
After the Macintosh restarts, connect the
7
PT-9500PC to the Macintosh with the
USB interface cable, and then turn on the
PT-9500PC.
For details, refer to “Connecting to a
personal computer” (
→
P.16).
Proceed to “Selecting the printer” (
P.52).
Start the Macintosh, and then insert the
1
CD-ROM into the CD-ROM drive.
→
The P-touch window appears.
Double-click the Mac OS 9 folder.
2
→
The Mac OS 9 window appears.
Double-click the P-touch Editor 3.2
3
folder.
→
→
The P-touch Editor 3.2 window
appears.
50
Page 52

Double-click the P-touch Editor 3.2
4
Installer icon.
→
The Installer starts.
Confirm the drive to install the software
5
to, and then click [Custom Install].
To change the drive, click [Drive].
Click [Install].
7
Click [Quit].
8
→
Installation begins.
→
When installation is complete, the
message “Installation is done.”
appears.
software
Installing the
→
The dialog box to select the
programs to install appears.
Clear the check boxes for all of the
6
options except for PT-9500PC Driver.
Click [Restart].
9
→
Installation of the printer driver is
complete, and the Macintosh will
restart.
After the Macintosh restarts, connect the
0
PT-9500PC to the Macintosh with the
USB interface cable, and then turn on the
PT-9500PC.
For details, refer to “Connecting to a
personal computer” (
→
P.16).
51
Page 53

Selecting the printer
Uninstalling the software
Select the PT-9500PC as the printer.
Pull down the Apple menu and
1
select Chooser.
→
The Chooser window appears.
Select PT-9500PC.
2
If the PT-9500PC will no longer be used with
the Macintosh, follow the following steps to
uninstall the software.
■
Uninstalling P-touch Editor
Double-click the drive where P-touch
1
Editor is installed.
Delete the P-touch Editor 3.2 folder.
2
Double-click the drive where the
3
Macintosh operating system is installed.
In the System Folder, open the
4
Preferences folder and delete P-touch
Editor 3.2 Prefs.
■
Uninstalling P-touch Quick Editor
Double-click the drive where P-touch
1
Quick Editor is installed.
Close the Chooser window.
3
→
A confirmation message appears.
Click [OK].
4
→
The PT-9500PC can now be used as
the printer.
Proceed to “Creating labels: Macintosh
version” (
→
P.85).
52
Delete the P-touch Quick Editor folder.
2
Double-click the drive where the
3
Macintosh operating system is installed.
In the System Folder, open the
4
Preferences folder and delete P-touch
Quick Editor Prefs.
Page 54

■
Deleting the printer driver
Remove the USB interface cable
1
connected to the PT-9500PC from the
Macintosh USB port.
Double-click the drive where the
2
Macintosh operating system is installed.
In the System Folder, open the Extensions
3
folder and delete PT-9500PC and USB
PT-9500PC Extension.
In the System Folder, open the
4
Preferences folder and delete PT-9500PC
Prefs.
software
Installing the
53
Page 55

Using Mac OS X 10.1 or later
Follow the following procedure to install the software on a Macintosh running Mac OS X 10.1-10.2.6.
Install the printer driver after installing P-touch Editor or P-touch Quick Editor.
■
Creating labels with various designs
Refer to “Installing P-touch Editor” (
■
Printing labels simply
Refer to “Installing P-touch Quick Editor” (
Installing P-touch Editor
Install P-touch Editor 3.2, to design labels, and
the printer driver software.
Note
●
When installing the software, log on
using a user name with administrator
authority.
●
For Mac OS X 10.1, operation of the
P-touch Editor Installer may be slow.
When installing or uninstalling the
software, select an input method other
than Japanese, such as U.S., from the
Keyboard Menu. Press the spacebar while
holding down the Command key to
change the input method.
→
P.54).
→
P.57).
Double-click the Mac OS X folder.
3
→
The Mac OS X window appears.
Double-click the P-touch Editor 3.2
4
folder.
Start the Macintosh, and then insert the
1
CD-ROM into the CD-ROM drive.
→
The P-touch CD-ROM icon appears.
Double-click the P-touch icon.
2
→
The P-touch window appears.
54
→
The P-touch Editor 3.2 window
appears.
Page 56

Double-click the P-touch Editor 3.2
5
Installer icon.
→
The Installer starts.
Select the Feature Set and the programs
8
to install, and then click [Next].
6
7
Click [Next].
→
The Important Information dialog
box appears.
Click [Next].
The programs that can be installed are
listed below.
Program Description
P-touch Editor 3.2 P-touch Editor software
Fonts
(13 typefaces)
Auto Format
Templates
Clip Art
Typical
Can install fonts for
English like Atlanta, etc.
A collection of
pre-formatted templates
for labels
A collection of
illustrations, etc. to
arrange on the labels
All of the programs will be installed.
Approximately 100 MB of available harddisk space is required.
Minimal
Only P-touch Editor will be installed.
Approximately 20 MB of available harddisk space is required.
Custom
You can select the programs to install.
→
The Choose Alias Folder dialog box
appears.
software
Installing the
→
The Choose Product Components
dialog box appears.
55
Page 57

Select the location where you would like
9
to create an alias, and then click [Next].
• For Mac OS X 10.2, select a location
other than Dock. If Dock is clicked and
installation continues, the alias will not
be created in the Dock and the Dock
icon may return to Preferences.
→
The Pre-Installation Summary dialog
box appears.
Click [Install].
0
a
→
When installation is complete, the
Install Complete dialog box appears.
Click [Done].
56
→
Installation begins.
→
Installation of P-touch Editor is
complete.
Proceed to “Installing the printer driver”
→
(
P.59).
Page 58

Installing P-touch Quick Editor
Install P-touch Quick Editor to print labels using
simple operations.
Note
● When installing the software, log on
using a user name with administrator
authority.
● For Mac OS X 10.1, operation of the
P-touch Editor Installer may be slow.
When installing or uninstalling the
software, select an input method other
than Japanese, such as U.S., from the
Keyboard Menu. Press the spacebar while
holding down the Command key to
change the input method.
Start the Macintosh, and then insert the
1
CD-ROM into the CD-ROM drive.
→
The P-touch CD-ROM icon appears.
Double-click the P-touch Quick Editor
4
folder.
→
The P-touch Quick Editor window
appears.
Double-click the Quick Editor Installer
5
icon.
software
Installing the
Double-click the P-touch icon.
2
→
The P-touch window appears.
Double-click the Mac OS X folder.
3
→
The Mac OS X window appears.
6
→
The Installer starts.
Click [Next].
→
The Important Information dialog
box appears.
57
Page 59

7
Click [Next].
Click [Install].
9
→
The Choose Alias Folder dialog box
appears.
Select the location where you would like
8
to create an alias, and then click [Next].
• For Mac OS X 10.2, select a location
other than Dock. If Dock is clicked and
installation continues, the alias will not
be created in the Dock and the Dock
icon will return to the initial settings.
→
The Pre-Installation Summary dialog
box appears.
0
→
Installation begins.
→
When installation is complete, the
Install Complete dialog box appears.
Click [Done].
58
→
Installation of P-touch Quick Editor
is complete.
Proceed to “Installing the printer driver”
→
P.59).
(
Page 60

Installing the printer driver
Install the necessary printer driver to use the
PT-9500PC as a printer.
Note
● Do not connect the USB interface cable
to the Macintosh until the printer driver
has been installed and the Macintosh has
been restarted. If the USB interface cable
is already connected to the Macintosh,
remove the USB interface cable.
Type the name and password of the
3
administrator , and then click [OK].
Double-click the Driver Installer.pkg
1
icon in the Mac OS X window.
→
The Installer starts.
Click .
2
→
The dialog box to type the name and
password of the administrator
appears.
→
Click [Continue].
4
→
The Welcome to the PT-9500PC
Driver Installer dialog box appears.
software
Installing the
The necessary operating
environment for installation is
displayed.
59
Page 61

Confirm the contents, and then click
5
[Continue].
To continue with installation, click
7
[Agree].
→
The Software License Agreement
dialog box appears.
Read the contents, and then click
6
[Continue].
→
The dialog box to confirm the license
agreement appears.
→
The Select a Destination dialog box
appears.
Select the drive to install the printer
8
driver to, and then click [Continue].
Select the drive where Mac OS X is
installed.
→
The Easy Install dialog box appears.
60
Page 62

Click [Install].
9
Click [Restart].
a
→
The dialog box to confirm the
installation appears.
To continue with installation, click
0
[Continue Installation].
→
Installation begins.
→
When installation is complete, the
message “Software was installed
correctly.” appears.
→
Installation of the printer driver is
complete, and the Macintosh will
restart.
After the Macintosh restarts, connect the
b
PT-9500PC to the Macintosh with the
USB interface cable, and then turn on the
PT-9500PC.
For details, refer to “Connecting to a
personal computer” (
→
P.16).
software
Installing the
61
Page 63

Selecting the printer
Select the PT-9500PC as the printer.
Double-click the drive where Mac OS X
1
is installed.
Double click the Applications folder.
2
→
The Applications window appears.
Double click the Utilities folder.
3
Double-click the Print Center icon.
4
No printers available to select
The message “You have no printers
available.” appears. Proceed to step
Printers available to select
The names of available printers are
displayed in the Printer List dialog box.
6
Proceed to step
PT-9500PC is already registered.
.
PT-9500PC appears in the Printer List.
8
Proceed to step
Click [Add].
5
.
5
.
62
→
The Utilities window appears.
→
The Printer List dialog box appears.
Click [Add Printer].
6
Page 64

Select “PT-9500PC” and then click
7
[Add].
→
The Printer List dialog box appears
again.
Confirm that PT-9500PC has been added,
8
and then close the Printer List dialog box.
→
The PT-9500PC can now be used as
a printer.
Proceed to “Creating labels: Macintosh
version” (
→
P.85).
Uninstalling the software
If the PT-9500PC will no longer be used with
the Macintosh, follow the following steps to
uninstall the software.
■
Uninstalling P-touch Editor
Double-click the Applications folder in
1
the drive where Mac OS X is installed.
→
The Applications window appears.
Double-click the P-touch Editor 3.2
2
folder.
software
Installing the
→
The P-touch Editor 3.2 window
appears.
63
Page 65

Double-click the Uninstall P-touch Editor
3
folder.
→
The Uninstall P-touch Editor window
appears.
Double-click Uninstall P-touch Editor.
4
→
The InstallAnywhere Uninstaller
starts.
Click [Uninstall].
5
6
→
The software is deleted.
→
When uninstallation is complete, the
Uninstall Complete dialog box
appears.
Click [Quit].
64
Double-click the Preferences folder in
7
Macintosh HD/Users/User Name/
Library/Preferences.
Delete P-touch Editor 3.2 Prefs and
8
P-touch Editor 3.2. plist.
→
P-touch Editor is deleted.
Page 66

■
Uninstalling P-touch Quick Editor
Double-click the Applications folder in
1
the drive where Mac OS X is installed.
→
The Applications window appears.
Double-click Uninstall Quick Editor.
4
→
The InstallAnywhere Uninstaller
starts.
Click [Uninstall].
5
Double-click the P-touch Quick Editor
2
folder.
→
The P-touch Quick Editor window
appears.
Double-click the Uninstall Quick Editor
3
folder.
→
The Uninstall Quick Editor window
appears.
→
The software is deleted.
→
When uninstallation is complete, the
Uninstall Complete dialog box
appears.
software
Installing the
65
Page 67

Click [Quit].
6
Double-click the Preferences folder in
7
Macintosh HD/Users/User Name/
Library/Preferences.
Delete P-touch Quick Editor Prefs.
8
→
P-touch Quick Editor is deleted.
■
Deleting the printer driver
Remove the USB interface cable
1
connected to the PT-9500PC from the
Macintosh USB port.
Double-click the Applications folder in
2
the drive where Mac OS X is installed.
Double-click the Utilities folder.
3
→
The Utilities window appears.
Double-click the Print Center icon.
4
→
The Printer List dialog box appears.
66
→
The Applications window appears.
Select “PT-9500PC”, and then click
5
[Delete].
→
The printer is deleted.
Close the Printer List dialog box.
6
Page 68

3
Creating labels: Windows version
This chapter contains the procedures to design and print labels using Windows.
Creating labels ..............................................................................................68
Creating labels using P-touch Editor..............................................................69
Creating labels using P-touch Quick Editor...................................................77
After printing ................................................................................................82
Page 69

Creating labels
After loading the software on the computer, you can start creating labels.
■
Designing & printing labels
→
Proceed to “Creating labels using P-touch Editor” (
■
Printing labels simply
Proceed to “Creating labels using P-touch Quick Editor” (
P.69).
→
P.77).
68
Page 70

Creating labels using P-touch Editor
Labels can be created with various designs using P-touch Editor.
Note
●
This chapter contains an outline of P-touch Editor. Details on using P-touch Editor are contained
in the on-line help menu. Refer to “Using Help” (
●
The examples of dialog boxes from Windows® XP are shown. P-touch editor can also be used
with Windows
®
95/98/98SE/Me/NT 4.0/2000 Pro.
Start P-touch Editor
Start P-touch Editor.
■
For Windows® XP
On the taskbar, click the Start button, point to
All Programs, point to P-touch Editor 4.0, and
then click P-touch Editor.
→
P.74).
■
For Windows® 95/98/98 SE/Me/NT 4.0/
2000 Pro
On the taskbar, click the Start button, point to
Programs, point to P-touch Editor 4.0, and
then click P-touch Editor.
→
The dialog box to select the layout
appears.
Creating labels:
Windows version
→
The dialog box to select the layout
appears.
69
Page 71

Layout window
When P-touch Editor is started up, a dialog box
appears, allowing you to select the initial layout
method.
Page properties
Set the label size, margins, and orientation.
Select the layout.
1
Click [OK].
2
→
The Layout window appears.
■
Property dock
Click each button in the property dock to
display the property box for setting the font,
layout, etc. Click the button again to close
the property box.
Print properties
Set the label printing method, printer and
number of copies.
Text properties
Set the font, font size, text alignment and
spacing, and line spacing.
Layout properties
Set the graphic or text alignment and
rotation.
■
Draw toolbar
Tools for drawing shapes.
70
Page 72

■
Object dock
The object dock contains icons to add
illustrations and likenesses to a label.
Text
Input lines of text.
Arrange Text
Change the text layout shape.
Bar Code
Set up a bar code.
Decorative Frame
Add a decorative frame.
Table
Create a table.
Screen Capture
Capture an image from the desktop and
add it to the label.
Clip Art
Retries various graphics.
Symbol
Retrieve various symbols.
Make Picture
Assemble different elements to create an
illustration.
Date and Time
Display the date/time on the label.
Creating labels:
Windows version
Image
Retrieve a saved image.
Calendar
Display a (part of a) calendar on the label.
71
Page 73

Creating a name badge
This section contains the procedures to create a
nametag.
Start P-touch Editor.
1
Click .
2
→
The page properties box appears.
Set the tape length to 3” (76 mm).
3
Set the tape width to 1/2” (12 mm).
4
Type the name.
5
Click in the text properties box.
6
→
The text is c entered.
Select the Category and Style.
8
In this example, Simple is selected for
Category and a rounded rectangular
frame (thin line) is selected for Style.
Click [OK].
9
→
The label layout will be:
If the print properties box is not
0
displayed, click in the property
dock.
→
The print properties box appears.
Click in the print
a
properties box. See label printing for
other options.
→
The label will be printed.
Click in the object dock.
7
→
The Frame Property dialog box
appears.
72
Page 74

Printing the label you created
■
Printing
Click .
1
→
The print properties box appears.
Click in the print
2
properties box.
→
The label will be printed.
■
Setting the printing options and label
printing
Click .
1
→
The print properties box appears.
Click in the print properties box.
2
→
The Print dialog box appears.
Specify the printing options.
3
Output
Standard: Select for high-speed printing.
Options
Auto Cut: The printed labels are cut and
then ejected.
Half Cut: Only the label tape is cut without
cutting the backing, making it easier to
remove the label backing.
Chain Printing: The printed label will
remain in the printer without being ejected
until the next label is printed. Extra space
is not inserted between the labels. To
discharge the label, press the feed/cut
button.
Mirror Printing: A mirror image of the data
is printed. When using clear tape, this is
very convenient for affixing to the inner
glass surfaces.
Output Directly to Printer Driver: The
time to send the output to the printer driver
is reduced. However, labels with intensive
graphics and complex designs may not
print correctly.
Numbering (consecutive numbers)
If “Numbering” is selected, several copies
of the same text can be printed while
increasing the selected characters with
each successive label.
Creating labels:
Windows version
4
Click [Print].
→
The label will be printed.
73
Page 75

Using Help
Detailed help is included with P-touch Editor.
This section contains the procedures to use
Help.
For Windows® XP, click the Start button
1
on the taskbar, point to All Programs,
point to P-touch Editor 4.0, and then
click P-touch Editor.
For other Windows operating systems,
click the Start button on the taskbar, point
to Programs, point to P-touch Editor 4.0,
and then click P-touch Editor.
→
P-touch Editor 4.0 starts and the
dialog box to select the layout
appears.
Select one of the layouts, and then click
2
[OK].
• To display Help, any layout method
can be selected.
From the Help file on the menu bar,
3
select “P-touch Editor Help”.
Toolbar
Toolbar buttons to
operate Help
Tab
Heading for each tab is
displayed and keyword
searches are possible
Topics
Explanation appears for
each item selected
Contents for the selected
tab are displayed
74
→
The P-touch Editor4 Help window
appears.
Page 76

■
Printing Help
The contents of the Help files can be printed.
The Help files are printed on a standard
printer, not the P-touch.
Select the Contents tab.
1
Select the topic you want to print from
2
the list displayed.
Printing a specific topic
In the list displayed in the Contents tab,
click the heading to select the information
to be printed. When the heading is
selected, the contents included are also
displayed.
Printing all the help file information
In list displayed in the Contents tab, click
Description of operations.
Select the contents to print.
4
Printing the selected topic
Select “Print the selected topic.”
Printing the selected heading and all
subtopics, or the entire help file
Select “Print the selected heading and all
subtopics.”
Click [OK].
5
→
The Print dialog box appears.
Select the printer to print to in the Select
6
Printer area.
Creating labels:
Windows version
Click on the toolbar.
3
→
The Print Topics dialog box appears.
• The contents of the Help files cannot be
printed on the PT-9500PC. Select a
printer that uses letter size or larger
paper sizes.
• Depending on the type of operating
system running on the personal
computer, the dialog boxes displayed
may be different.
Click [Print].
7
→
The Help file information will be
printed.
75
Page 77

Creating other types of labels
Examples of creating the various labels listed below are introduced in the Description of Operations
Section found in the P-touch Editor Help.
Sample Described function
• Specifying the label size
Creating name
badges
Creating CD case
labels
• Centering the label text
• Adding a frame around
the text
• Specifying a background
theme
• Inserting clip art
illustrations
• Combining multiple
labels using the Sheet
function
Printing using the
numbering (con-
secutive numbers) function
Creating tables
Creating labels for
telephone exten-
sion numbers
Creating bar code
labels
Using Excel data
to print labels
Creating wide
labels
• Specifying a numbering
field and printing
• Inserting a table
• Combining cells
• Typing text into a table
• Creating tables with no
outlines
• Setting table cell width
• Selecting a protocol
• Changing the size
• Linking to an Excel file
• Merging into a layout
• Setting wide labels
• Inverting text
76
Page 78

Creating labels using P-touch Quick Editor
Labels can be created simply using P-touch Quick Editor.
Note
●
The examples of dialog boxes from Windows® XP are mainly used in this chapter.
Starting P-touch Quick Editor
Start P-touch Quick Editor.
■
For Windows® XP
On the taskbar, click the Start button, point to
All Programs, and then click P-touch Quick
Editor.
■
For Windows® 98/98 SE/Me/2000 Pro
On the taskbar, click the Start button, point to
Programs, and then click P-touch Quick
Editor.
Toolbar
Label view
Creating labels:
Windows version
→
P-touch Quick Editor starts.
77
Page 79

Simple use
Other functions
This section contains the procedures to create
labels simply.
Start P-touch Quick Editor.
1
Click in the label view, and then type the
2
text.
Click .
3
→
The label will be printed.
Note
●
The width of the tape in the tape cassette
installed in the PT-9500PC will be
detected automatically.
This section explains the other functions of the
P-touch Quick Editor.
Note
●
If you right-click in the label view or the
toolbar, the menu bar appears and
various functions can be selected.
■
Specifying the label size
Specify the size of the label.
Click of .
1
→
The drop-down list box appears.
Select “Tape Settings”.
2
→
The tape settings properties box
appears.
Select the label Format, Length, Width,
3
etc.
78
Page 80

■
Specifying the text form
Specify the form and type the text.
Click of .
1
→
The drop-down list box appears.
Select “Text Settings”.
2
→
The text settings properties box
appears.
Specify the Font, Style, Size, etc.
3
Click in the label view, and then type the
4
text.
■
Using the text history
Up to 10 previously printed texts are saved.
These texts can be typed easily.
Click .
1
→
The text history list appears.
Select the text you want to use.
2
→
The selected text appears in the label
view.
Creating labels:
Windows version
Note
●
Click to display the text box so
that the text can be checked when it is
too small to be displayed in the label
view.
79
Page 81

■
Inserting symbols
Symbols included in P-touch Quick Editor
can be inserted into labels.
■
Changing the background color
The background color in the label view can
be changed.
Right-click in the label view, point to
1
Symbols, and then select “Insert/
Change”.
→
The Input Symbol window appears.
Select a symbol.
2
Select the font name in the Symbol font
drop-down list, and then select the
symbol in the Symbol List.
Right-click in the label view, and then
1
point to Background Color.
Select the color you want to use from the
2
available colors.
To use a color not displayed in the
available colors list, click User Settings.
Select the color you want from the basic
colors or create a custom color, and then
click [OK].
■
Changing the label view arrangement
The label view arrangement can be changed.
Click .
1
Each time is clicked, the alignment
changes in the order center arrangement,
right arrangement, and left arrangement.
Click [OK].
3
→
The selected symbol appears in the
label view.
• Only one symbol can be inserted in the
label. If a symbol has already been
inserted in the label, it will be replaced
by the newly selected symbol.
80
Note
●
If is clicked when the toolbar and
the label view are separated, they will be
joined.
Page 82

■
Label printing
Specify the printing options and print the
label.
Click of .
1
→
The drop-down list box appears.
Select “Print Options”.
2
→
The Print dialog box appears.
Specify the printing options.
3
Auto Cut
The printed labels are cut and then
ejected.
Half Cut
Only the label tape is cut without cutting
the backing, making it easier to remove the
label backing.
Mirror printing
A mirror image of the data is printed. This
is very convenient for affixing to the inner
surface of glass. Use clear tape.
Chain Printing
The printed label will remain in the printer
without being ejected until the next label is
printed. Extra space is not inserted
between the labels. To discharge the label,
press the feed/cut button.
Click [OK].
4
→
The label will be printed.
■
Minimizing P-touch Quick Editor
Click .
1
→
P-touch Quick Editor is removed
from the desktop and reduced to a
button on the task tray.
Click in the task tray to display
P-touch Quick Editor on the desktop.
■
Exiting P-touch Quick Editor
Exit P-touch Quick Editor.
Right-click in the toolbar or in the label
1
view, and then select “Exit”.
→
The P-touch Quick Editor window
closes.
■
Importing text (for Windows only)
P-touch Quick Editor can be set up so that
text from different applications can easily be
imported into the label.
Specifying the shortcut key for importing
Right-click in the P-touch Quick Editor
1
window, and then click Options in the
menu that appeared.
→
The Options dialog box appears.
Select the desired import keys, and then
2
click [OK].
Importing text from a different
application
Select the desired text in the other
1
application.
Creating labels:
Windows version
Either press the specified shortcut keys or
2
drag the text from the other application
into the label.
81
Page 83

After printing
This section contains the procedures to remove the label backing from the printed label to remove.
Hold one end of the printed label with
3
Removing the label backing
When the backing of a printed label is not cut,
use the included label stick. For labels printed
using the Half Cut option, peel back the
backing from the cut line.
Press the cover release button and open
1
the tape compartment cover.
Remove the label stick installed inside
2
the PT-9500PC tape compartment cover.
one hand and hold the label stick with
the other hand.
Insert half of the printed label into the
4
hole in the label stick with the printed
side facing up.
Turn the label stick and quickly pull as
5
shown in the illustration below.
→
The end of the label will come off of
the backing slightly.
82
Completely remove the backing from the
6
label and affix the label.
Page 84

After using the label stick, install it inside
7
the PT-9500PC tape compartment cover.
Close the cover.
8
Note
● There may be some cases where the use
of the label stick may cause some of the
printed text to wear off.
● Some tapes may have cut lines in the
backing. Peel the backing from the label
using the cut lines.
Creating labels:
Windows version
83
Page 85

84
Page 86

4
Creating labels: Macintosh version
This chapter contains the procedures to design and print labels using Macintosh.
Creating labels ..............................................................................................86
Creating labels using P-touch Editor..............................................................87
Creating labels using P-touch Quick Editor...................................................95
After printing ................................................................................................96
Page 87

Creating labels
After preparing the Macintosh, start creating labels.
■
Designing & printing labels
Proceed to “Creating labels using P-touch Editor” (
■
Printing labels simply
Proceed to “Creating labels using P-touch Quick Editor” (
→
P.87).
→
P.95).
86
Page 88

Creating labels using P-touch Editor
Labels can be created with various designs using P-touch Editor.
Note
●
This chapter contains an outline of P-touch Editor. Details on using P-touch Editor are contained
in the CD-ROM User’s Guide. Refer to “Using the CD-ROM User’s Guide” (
■
For Mac OS X 10.1 or later
Starting P-touch Editor
Double-click the Applications folder in
1
Start P-touch Editor.
■
For Mac OS 8.6-9.x
Double-click the P-touch Editor 3.2
1
folder in the drive where P-touch Editor
is installed.
the drive where Mac OS X is installed.
→
The Applications window appears.
Double-click the P-touch Editor 3.2
2
folder.
→
The P-touch Editor 3.2 window
appears.
→
P.93).
Double-click .
2
If an alias was created, double-click the
alias icon.
→
The layout window appears.
Double-click .
3
If an alias was created, double-click the
alias icon.
→
The layout window appears.
Creating labels:
Macintosh version
87
Page 89

Layout window
When P-touch Editor starts, the layout window
appears.
■
Property dock
Click each button in the property dock to
display the property box for setting the font,
layout, etc. Click the button again to close
the property box.
Page properties
Set the label size and orientation.
Layout properties
Set the figure or text alignment.
Text properties
Set the text alignment, line spacing, etc.
■
Draw toolbar
Draw characters or figures.
Font properties
Set the font, size, italics, etc.
88
Page 90

■
Object dock
The object dock contains icons to add
illustrations and likenesses to a label.
Bar Code
Set up a bar code.
Clip Art
Retrieve various illustrations.
Arrange Text
Change the shape of the lines of text.
Make Picture
Assemble different elements to create an
illustration.
Image
Retrieve a saved illustration or photograph.
Date and Time
The current date and time can be
displayed as a line of text.
Creating a name badge
The chapter contains an example of creating a
nametag using Mac OS 8.6-9.x.
Start P-touch Editor.
1
Click .
2
→
The page properties box appears.
Set the label length to 4” (100 mm).
3
Set the label width to 1” (24 mm).
4
Click in the page property box.
5
→
The printing orientation will be set to
landscape orientation.
Click .
6
→
The font properties box appears.
Merge Database Field
Make a database field.
In the font box, select Atlanta.
7
89
Creating labels:
Macintosh version
Page 91

In the font size box, select 36.
8
Click on the toolbar.
9
→
The text tool is selected.
Click in the layout window, and then
0
type the name.
Drag the typed text to the center of the
a
layout window.
Click .
b
→
The print dialog box appears.
Label printing
Printing the label you created.
■
Printing
Click .
1
→
The print dialog box appears.
Click [Print].
2
For Mac OS X 10.1 or later
Click [Print].
c
90
Click [Print]
→
The label will be printed.
→
The label will be printed.
■
Setting the printing options and label
printing (Mac OS 8.6-9.x)
Click .
1
→
The print dialog box appears.
Page 92

Specify the printing options.
2
Pages
The printing range is specified by page.
Auto Tape Cut
The printed labels are cut and then
ejected.
Multi Half Cut
Only the label tape is cut without cutting
the backing, making it easier to remove the
label backing.
Chain Printing
The printed label will remain in the printer
without being ejected until the next label is
printed. Extra space is not inserted
between the labels. To discharge the label,
press the feed/cut button.
Mirror printing
A mirror image of the data is printed. This
is very convenient for affixing to the inner
surface of glass. Use clear tape.
Numbering
When numbering (consecutive numbers) is
set for labels, the number that appears in
the label can be set to increase by a
specified amount on each successive label.
■
Setting the printing options and label
printing (Mac OS X 10.1 or later)
Click .
1
→
The print dialog box appears.
Click “Copies & Pages”, and then select
2
the items to change.
Specify the printing options.
3
Copies & Pages
Copies: Specify the number of copies of
the label to print.
Layout
Specify the label layout.
Creating labels:
Macintosh version
3
Click [Print].
→
The label will be printed.
91
Page 93

Output Options
Specify when printing data in a file format.
Tape Setting
Length: Specify the length of the tape used.
Margin: Specify the space to be inserted to
the left and right of each label.
Auto Tape Cut: The printed labels are cut
and then ejected.
Multi Half Cut: Only the label tape is cut
without cutting the backing, making it
easier to remove the label backing.
Chain Printing: The printed label will
remain in the printer without being ejected
until the next label is printed. Extra space
is not inserted between the labels. To
discharge the label, press the feed/cut
button.
Mirror printing: A mirror image of the data
is printed. This is very convenient for
affixing to the inner surface of glass. Use
clear tape.
Halftone/Color
Specify the halftone, brightness, and
contrast.
P-touch Editor
Numbering: When numbering
(consecutive numbers) is set for labels, the
number that appears in the label can be set
to increase by a specified amount on each
successive label.
92
Summary
The summary of the printing conditions is
displayed.
Click [Print].
4
→
The label will be printed.
Page 94

Using the CD-ROM User’s Guide
The CD-ROM User’s Guide with a detailed
explanation of using the software is contained
in HTML format on the CD-ROM.
The CD-ROM User’s Guide file can be opened
from the CD-ROM or installed on the
Macintosh.
Note
● Depending on the operating system
running on the Macintosh, the dialog
boxes may be different.
Double-click the Mac OS 9 folder or the
1
Mac OS X folder in the P-touch folder on
the CD-ROM.
Select the folder corresponding to the
operating system running on the
Macintosh.
Double-click the P-touch Editor 3.2
2
folder.
Double-click the User’s Guide folder.
3
Double-click the User’s Guide Installer
4
icon.
Double click the main.htm icon in
6
P-touch Editor 3.2/User’s Guide in the
drive where the CD-ROM User’s Guide is
installed.
→
The browser starts and the CD-ROM
User’s Guide main menu appears.
The operation methods are classified by function. Click
the operation methods to display the explanation
window. Click Index to display a summary of keywords
to search for items by the keyword.
The contents of each menu are classified by item. Click
the menus to display the explanation window.
• If you double-click the main.htm icon,
the CD-ROM User’s Guide file will
open.
Follow the information in the dialog
5
boxes and install the CD-ROM User’s
Guide file.
→
The CD-ROM User’s Guide will be
installed.
93
Creating labels:
Macintosh version
Page 95

In the explanation window, the operation
of the items in each menu is explained.
The operation methods are classified by function.
Click the operation methods to display the explanation
window. Click Home to return to the main menu.
The items for each
menu appear.
The explanation for the
selected item appears.
Note
● The CD-ROM User’s Guide was made to
work best with Internet Explorer 4.01 or
later. The CD-ROM User's Guide may
not be displayed correctly with other
browsers.
94
Page 96

Creating labels using P-touch Quick Editor
Labels can be created simply using P-touch Quick Editor.
Starting P-touch Quick Editor
Start P-touch Quick Editor.
■
For Mac OS 8.6-9.x
Double-click the P-touch Quick Editor
1
folder in the drive where P-touch Quick
Editor is installed.
Double-click .
2
If an alias was created, double-click the
alias icon.
→
P-touch Quick Editor starts.
■
For Mac OS X 10.1 or later
Double-click the Applications folder in
1
the drive where Mac OS X is installed.
→
The Applications window appears.
Double-click the P-touch Quick Editor
2
folder.
→
The P-touch Quick Editor window
appears.
Double-click .
3
If an alias was created, double-click the
alias icon.
→
P-touch Quick Editor starts
Toolbar
Using P-touch Quick Editor
The basic operations for P-touch Quick Editor
for Macintosh are the same as those for
Windows.
Operations that require a right-click in
Windows, are performed in Macintosh by
clicking while holding the control key.
For details on using P-touch Quick Editor, refer
to “Simple use” (
→
(
P.78) in Creating labels: Windows version.
→
P.78) and “Other functions”
Creating labels:
Macintosh version
Text box
95
Page 97

After printing
For details, refer to “After printing” (→ P.82) in Creating labels: Windows version.
96
Page 98

5
Appendix
This chapter contains information for troubleshooting and a list of available
accessories and supplies.
Creating bar code labels................................................................................98
Changing the P-touch settings.....................................................................100
Maintenance ...............................................................................................102
Troubleshooting..........................................................................................106
Product specifications.................................................................................108
Accessories..................................................................................................110
Index...........................................................................................................114
PT-9500PC CONTACT INFORMATION (for Canada Only)........................116
Page 99

Creating bar code labels
Bar code labels for product control and for sales transactions can be created simply with the
PT-9500PC. Because there are a variety of bar code standards, create the bar code labels after
confirming the creation standards and scanning standards for the bar code reader.
Bar code summary
The bar codes that can be created using the PT-9500PC are listed below.
Standard Format Characters
CODE39
I-2/5 (ITF)
UPC-A
UPC-E
EAN13
EAN8
CODABAR (NW-7)
CODE128
EAN128
POSTNET
One-dimensional
code
One-dimensional
code
One-dimensional
code
One-dimensional
code
One-dimensional
code
One-dimensional
code
One-dimensional
code
One-dimensional
code
One-dimensional
code
One-dimensional
code
0-9, A-Z, $, /, %,
+, -, ., space
0-9 1-250
0-9
0-9
0-9
0-9
0-9, A-D, $, /, :,
+, -, .,
All ASCII
(128 characters)
Control code
(37 types)
All ASCII
(128 characters)
Control code
(37 types)
0-9 5, 9, 11*
Number of
Characters
1-250
11+1
(check digit)
6+1
(check digit)
12+1
(check digit)
7+1
(check digit)
3-250
1-250
1-250
Windows Macintosh
99
99
99
99
99
99
9
9
9
99
9
(up to 30
characters)
9
(up to 30
characters)
9
(up to 30
characters)
Laser Bar Code
ISBN-2
ISBN-5
98
One-dimensional
code
One-dimensional
code
One-dimensional
code
0-9
0-9
0-9
3, 5, 7, 9, 11,
13, 15**
14+1
(check digit)
17+1
(check digit)
99
99
99
Page 100

Standard Format Characters
Number of
Characters
Windows Macintosh
PDF417
QRCODE
Data matrix
Two-dimensional
code (stack type)
Two-dimensional
code (matrix type)
Two-dimensional
code (matrix type)
All characters
All characters
All characters
1-1850
(If numbers
only, up to
2710)
1-1817
(If numbers
only, up to
7089)
1-777
(If numbers
only, up to
3116)
9
9
9
Not
Available
Not
Available
Not
Available
* For POSTNET, the first digit of the total data is calculated as 0.
** For laser bar codes, the first digit of the inputed data becomes the check digit.
Precautions for printing bar code labels
Brother P-touch label printers are not designed specifically as bar code printers. The following
suggestions are recommended when creating/printing bar code labels:
●
Please verify the bar code readability with your specific bar code scanner.
●
Bar codes would be printed on black on white labels. The bar code reader may not be able to scan
labels created with other substrate colors.
●
The bar code width should be set to the largest dimensions possible. If the bar code size is too
small, the bar code reader may not be able to scan the bar code.
●
The entire bar code image, including left and right margins, must be within the dimensions of the
label image area.
Please note that the foregoing is solely for your information. This is not a warranty or representation
about the fitness of P-touch label printers to print bar code labels or the quality or legibility of bar code
labels printed with your P-touch label printer. Brother and its affiliates specifically disclaim any and all
damage, loss and liability arising from the use of bar code labels printed by a P-touch label printer.
99
Appendix
 Loading...