

Page 1

Quick Reference
Guide de référence rapide
Kurzanleitung
Guida di riferimento rapido
Beknopte bedieningsgids
Hurtigreferense
Page 2

Page 3
Quick Reference
ENGLISH
Page 4

Thank you for purchasing the PT-9200DX!
With your new Brother label printer, you can print personalised labels for any purpose. Simply insert a label cassette into the
PT-9200DX, design your label with the enclosed P-touch Editor software, and then print it out. Your customised label prints
out in seconds. Labels are available in various sizes and colours—ideal for colour-coding and your own special labelling
needs.
The many features of the P-touch Editor software make creating great labels quick and easy. Not only does the software
automate the more complicated layout functions, but it also includes a variety of pre-formatted templates for immediate use.
Declaration of Conformity
We, Brother Industries Ltd.
declare that this product conforms with the following normative documents:
Safety: EN 60950
EMC: EN 55022 1998 Class B
and follow the provisions of the Low Voltage Directive 73/23/EEC and Electromagnetic Compatibility Directive 89/336/
EEC (as amended by 91/263/EEC and 92/31/EEC).
Issued by: Brother Industries Ltd.
The enclosed interface cables should be used in order to ensure compliance with the limits for EMC.
15-1, Naeshiro-cho, Mizuho-ku,
Nagoya 467-8561, Japan
EN 55024 1998
EN 61000-3-2 1995
EN 61000-3-3 1995
GENERAL PRECAUTIONS
• Use only Brother TZ tapes with machine. Do not use tapes that do not have the mark.
• Do not pull on the tape being fed from the P-touch. Doing so may damage the tape cassette.
• Avoid using the machine in extremely dusty places. Keep it out of both direct sunlight and rain.
• Do not expose the machine to extremely high temperature or humidity.
• Do not leave any rubber or vinyl on the machine for an extended period of time. Doing so may cause staining.
• Do not clean the machine with alcohol or other organic solvents. Only use a soft, dry cloth.
• Do not put any foreign objects into or heavy objects on the machine.
• To avoid injures, do not touch the cutter’s edge.
• Do not touch the print head, which becomes very hot when P-touch is used. Even after the machine is turned off, the
print head remains hot for some time.
• Use only the power supply cord designed exclusively for this machine. Use of any other cord will void the warranty.
• Use only the attached interface cables for this machine. Use of any other cable will void the warranty.
• When the machine is not being used for a long period of time, disconnect the power supply cord.
• Do not try to disassemble the P-touch.
®
• IBM
is trademark of International Business Machines, Inc.
• Microsoft
• Macintosh and Power Macintosh are registered trademarks of Apple Computer, Inc.
• All other software and product names mentioned are trademarks or registered trademarks of their respective compa-
®
and Windows® are registered trademarks of Microsoft Corp. in the US and other countries.
nies.
Page 5

Table of contents
General Precautions
Unpacking ........................................................................................................................................ 2
Connecting the interface and power supply cables .......................................................................... 4
Installing P-touch Editor ................................................................................................................... 6
P-touch Editor & Printer Driver Installation (for Windows® 95/98/Me/NT 4.0/2000 Professional/XP) ......
Installing P-touch Editor Version 3.1............................................................................................. 6
Installing the printer driver ........................................................................................................... 8
For a serial connection............................................................................................................ 8
Using the Change Baud Rate Wizard ...................................................................................... 9
For a USB connection (Windows
P-touch Editor Version 3.1 Installation (for Macintosh) ..................................................................... 12
Installing P-touch Editor Version 3.1............................................................................................ 12
Installing the PT-9200DX printer driver ........................................................................................ 13
Selecting the printer ..................................................................................................................... 14
Uninstalling P-touch Software and Printer Driver .............................................................................. 14
Uninstalling P-touch Editor Version 3.1 (for Windows® 95/98/Me/NT 4.0/2000 Professional/XP) ........
Replacing, installing or deleting the printer driver (for Windows® 95/98/Me/NT 4.0/2000 Professional/XP) ......
For a serial connection............................................................................................................ 15
For a USB connection (Windows
Deleting P-touch Editor Version 3.1 and the printer driver (for Macintosh) ................................... 18
Using P-touch Editor......................................................................................................................... 19
Starting up P-touch Editor.................................................................................................................. 19
Displaying the Properties .................................................................................................................. 20
Creating a new layout ....................................................................................................................... 20
Designing a layout from an Auto Format template ............................................................................. 21
Importing a graphics file.................................................................................................................... 22
Barcode ............................................................................................................................................ 23
Databases ......................................................................................................................................... 23
Reading the User’s Guide ................................................................................................................. 24
Reading the P-touch Editor User’s Guide ........................................................................................... 24
Using the PT-9200DX ....................................................................................................................... 25
Installing the tape cassette ................................................................................................................. 25
Printing a label .................................................................................................................................. 26
Maintenance ..................................................................................................................................... 27
Cleaning the print head and rollers ................................................................................................... 27
Monitoring the P-touch Status .......................................................................................................... 28
Troubleshooting................................................................................................................................ 29
Changing the P-touch’s Baud Rate .................................................................................................... 31
Machine Specification ...................................................................................................................... 32
Accessories ....................................................................................................................................... 33
®
98/Me/2000 Professional/XP only) ..................................... 10
®
98/Me/2000 Professional/XP only) ..................................... 16
6
14
15
1
Page 6
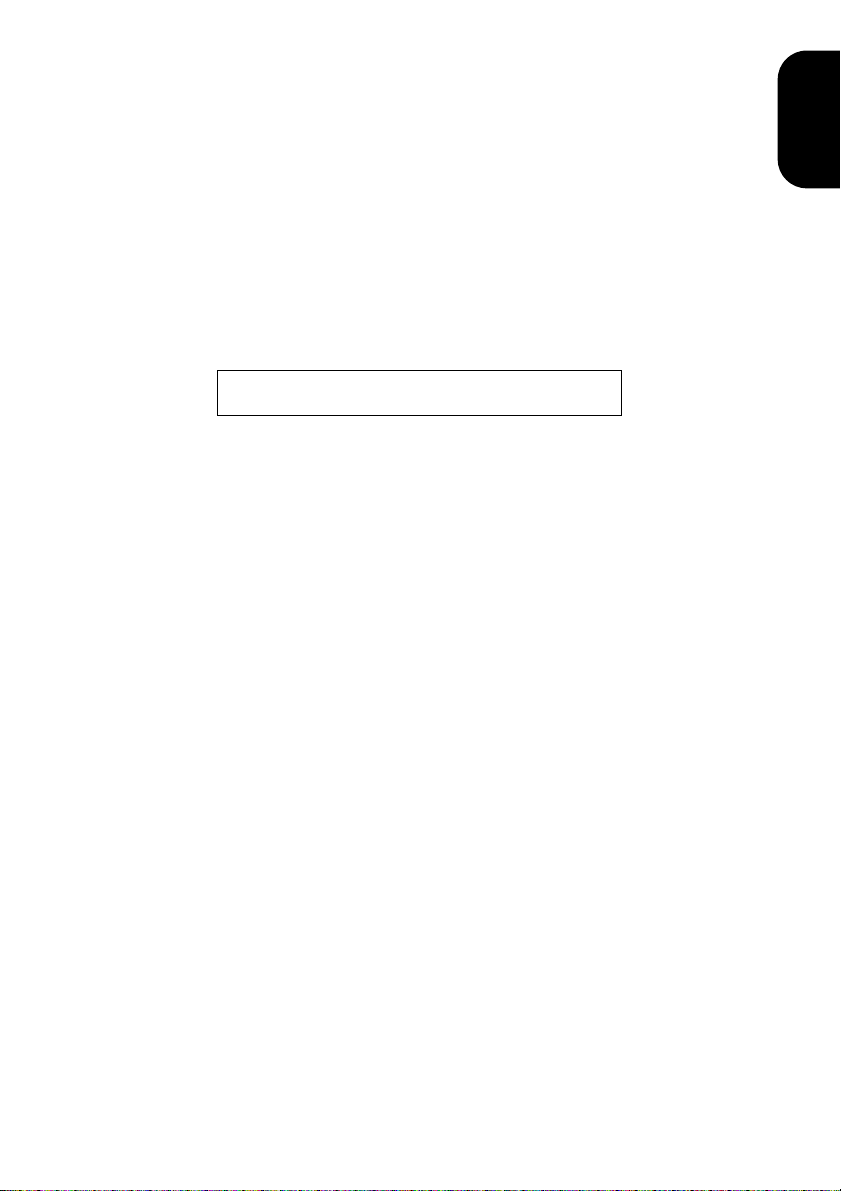
Unpacking
PT-9200DX 24 mm-wide TZ tape cassette
Tape
compartment cover
Feed/cut button
On/off button
Cover release button
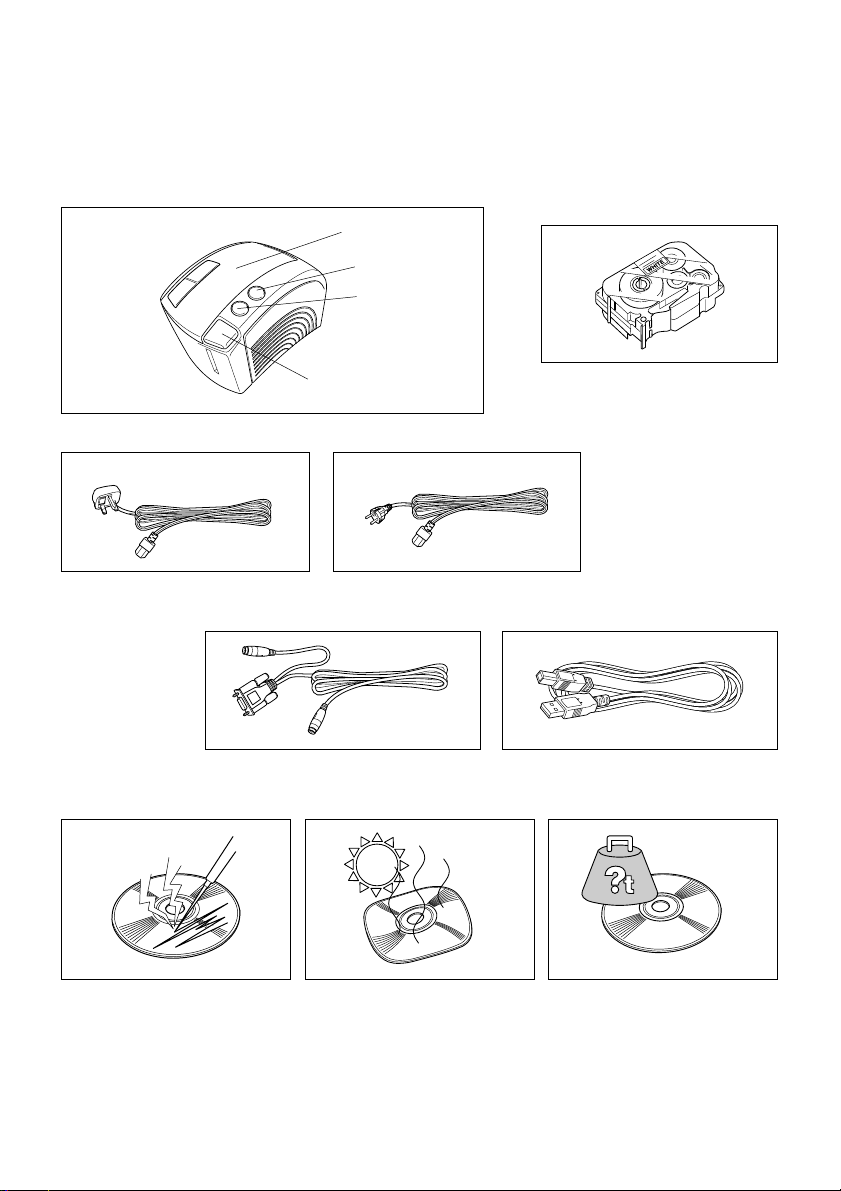
Power supply cord (for connecting the PT-9200DX to the AC outlet)
For the UK and Ireland For continental Europe
Interface cables (2)
CD-ROM containing the PC and Mac software and their manual
Serial: For either IBM PC-compatible or
Macintosh computers
(black characters on white tape)
Only the power supply
cord corresponding to the
country of sale is
included.
USB: For either IBM PC-compatible or
Macintosh computers
Precautions:
• Be careful that the CD-ROM
is not scratched.
2
• Do not subject the CD-ROM
to extremely high or
extremely low temperatures.
• Do not put heavy objects on
the CD-ROM.
Page 7
Tape Cassettes
• Do not pull on the tape, otherwise the tape cassette may be damaged.
• If the label is attached to a wet or dirty surface, it may easily peel off. Before affixing the label, clean the surface
where it will be attached.
• Depending on the environmental conditions and the material, condition, roughness, and shape of the affixing
surface, the label may move out of place or peel off.
• In order to test the label’s adhesive strength or before using this label where safety is a particular concern, test the
label by affixing a small piece of it to a hidden area of the intended surface.
• Sunlight, wind and rain may cause the color of the label to fade or the label to peel off.
• Markings made with oil-based or water-based ink may be visible through a label affixed over them. To hide the
markings, use two labels layered on top of each other, or use tape with a dark background.
• This tape may not be adequate in cases where liabilities may result due to damage or injuries.
Brother Co., Ltd. and its suppliers possess all rights and copyrights to this software (including, but not limited to, the
programming, images, clip art, templates, and text incorporated into the software), the text in the enclosed manuals, and
duplicates of the software. This software, either in part or in whole, may not be duplicated, modified, reverse-engineered, disassembled or decompiled without permission.
3
Page 8
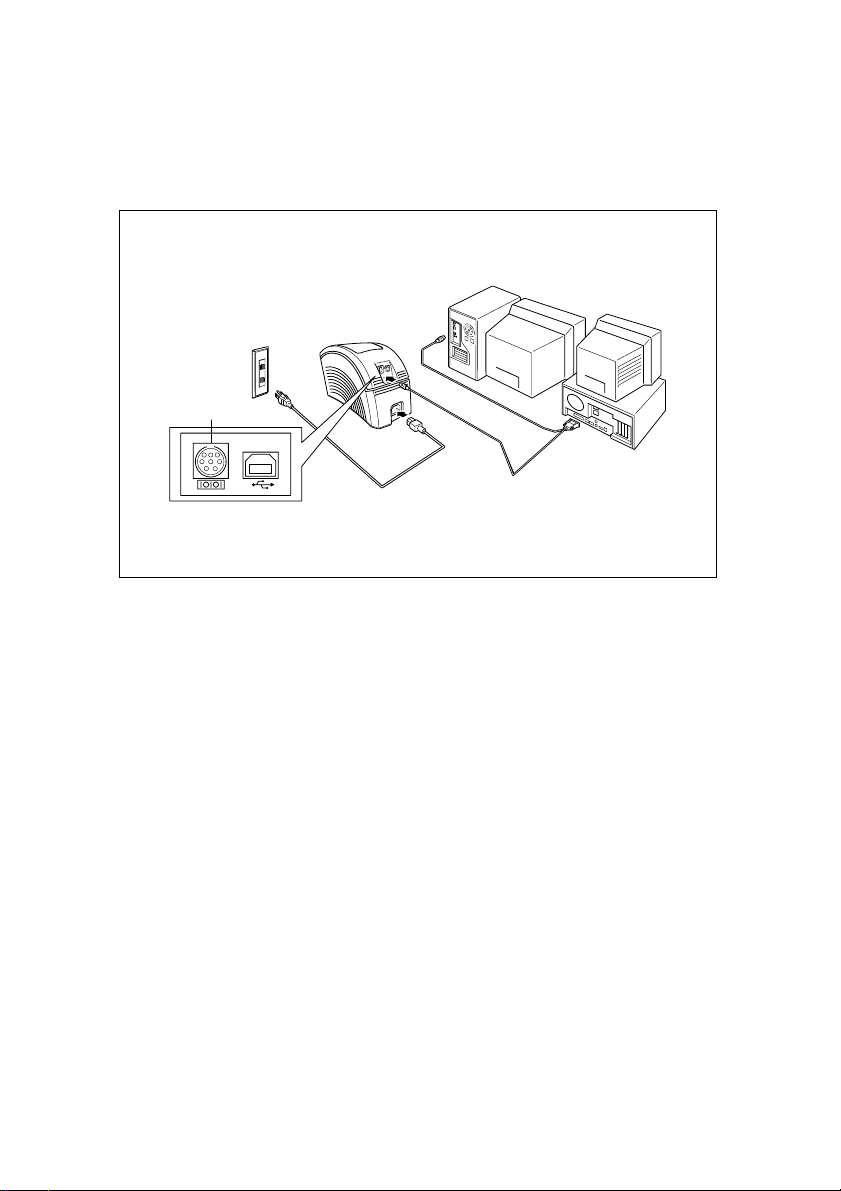
Connecting the interface and power supply cables
Connect the PT-9200DX to the computer according to the instructions below.
When connecting to the serial port:
Serial
1 Make sure that both the PT-9200DX and the computer are turned off.
2 Connect one end of the enclosed serial interface cable to the serial connector (IOIOI) of the PT-9200DX and the
other end of the cable to the serial port of the computer. For a Macintosh connection, connect the PT-9200DX to
either the modem or the printer port (preferably the modem port).
The serial (RS-232C) ports of some computers are shaped so that the serial interface cable cannot be con-
nected. If this is the case, use a commercially available adapter.
3 Insert the plug on one end of the power supply cord into the power supply jack on the PT-9200DX.
4 Insert the plug on the other end of the power supply cord into an AC outlet equipped with a grounding terminal.
Some locations may require the use of an adapter provided with a grounding wire. Connect this wire to the ground
terminal.
5 Turn on the PT-9200DX, and then turn on the computer.
4
Page 9
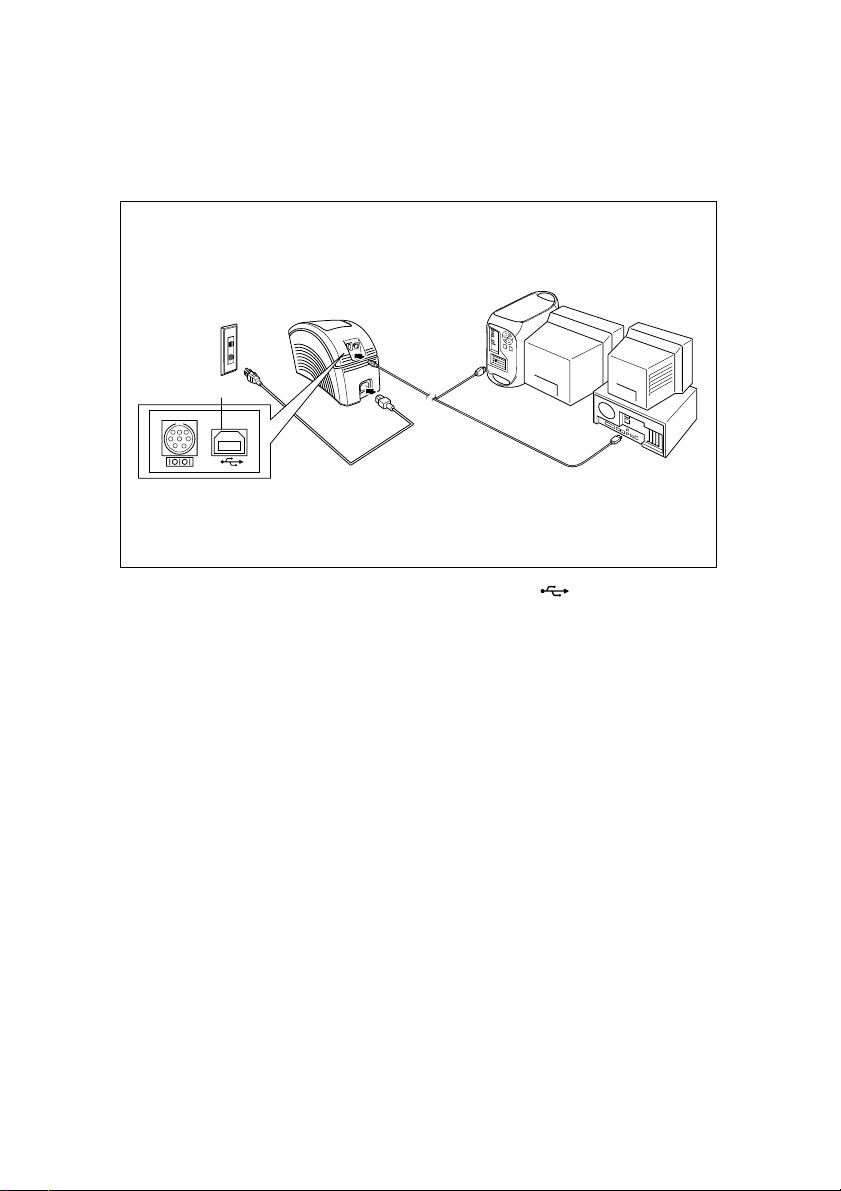
When connecting to the USB port:
You must install the software first before connecting to the USB interface or turning on the power. Please follow the
installation procedures on pages 6 through 12 before connecting up or turning the power on. The Brother P-touch
installation software will instruct you when to do this.
USB
1 Connect one end of the enclosed USB interface cable to the USB connector ( ) of the PT-9200DX and the other
end of the cable to the USB port of the computer.
Do not connect the PT-9200DX to the computer using both the serial and the USB interface cables, otherwise
the PT-9200DX may be damaged.
When making a USB connection through a hub, a proper connection may not be possible due to the type of
hub used. If printing is not possible with a hub connection, try connecting the PT-9200DX directly to the
computer using the USB interface cable.
2 Insert the plug on one end of the power supply cord into the power supply jack on the PT-9200DX.
3 Insert the plug on the other end of the power supply cord into an AC outlet equipped with a grounding terminal.
Some locations may require the use of an adapter provided with a grounding wire. Connect this wire to the ground
terminal.
5
Page 10
Installing P-touch Editor
Before labels can be printed on the PT-9200DX, the P-touch Editor software and the PT-9200DX printer driver must be
For Windows®
installed.
P-touch Editor & Printer Driver Installation (for Windows
Install P-touch Editor Version 3.1 and the printer driver on a PC as described below.
Check that your system configuration meets the following requirements.
Computer: IBM PC or compatible
Operating system:
Serial interface: PC equipped with an x86 processor and a serial (RS-232C) port, and running Microsoft
USB interface: PC equipped with a USB port, and pre-installed with Microsoft
Some PCs pre-installed with Microsoft® Windows® 95/NT 4.0 do not support all USB hardware features.
Hard disk free space: At least 20 MB
A few hundred megabytes of additional free space may be needed when printing long labels or large amounts of
data.
Monitor: VGA or higher graphics card
Port: Serial or USB
Available memory: Minimum 32 MB
CD-ROM drive
Installing P-touch Editor Version 3.1
For a serial connection: Before installing the P-touch Editor software and the printer driver, connect the PT9200DX to the computer as described on page 4, and then turn them on.
For a USB connection: Do not connect the PT-9200DX to the computer before installing the P-touch Editor
software, otherwise it may not be installed correctly. Be sure not to connect the PT-9200DX until you are
instructed to do so.
®
Windows
Professional/XP
95/98/Me/2000 Professional/XP or Windows® NT 4.0
®
95/98/Me/NT 4.0/2000 Professional/XP)
®
Windows® 98/Me/2000
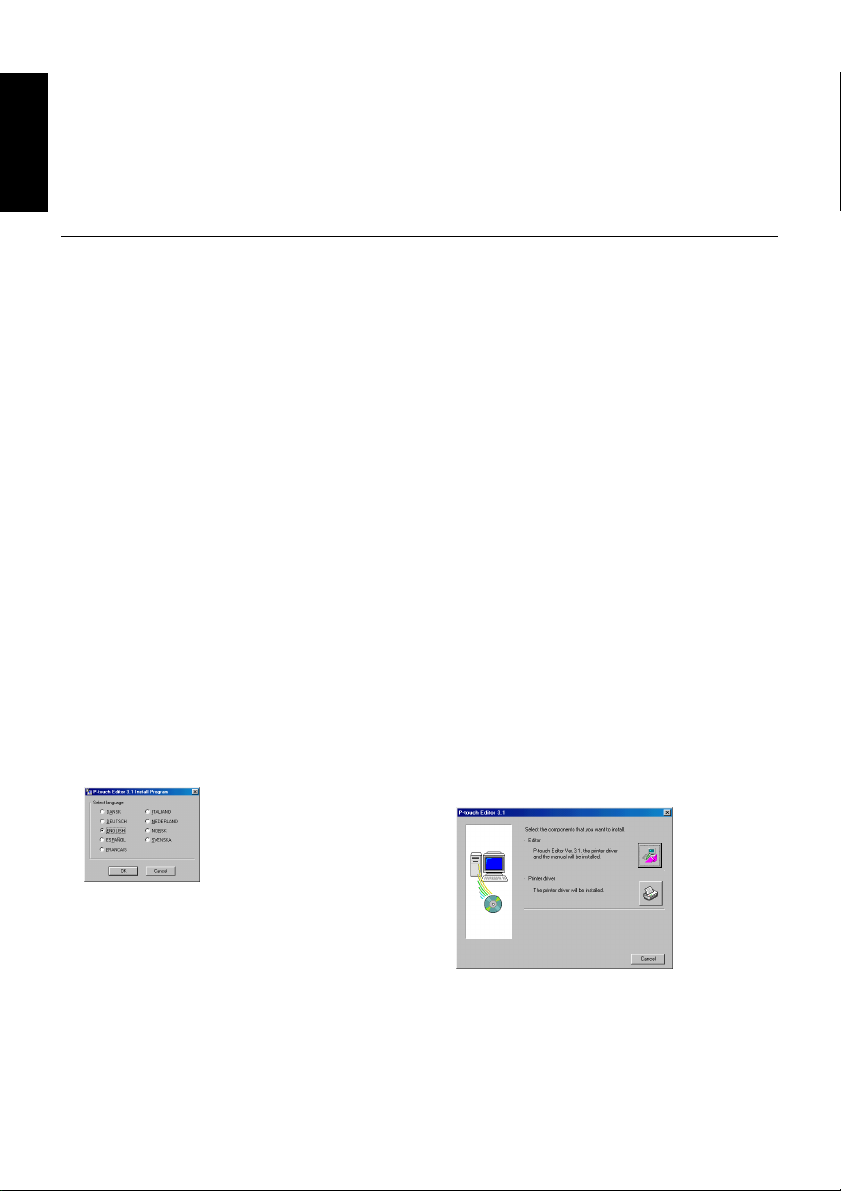
1 Insert the P-touch Editor Version 3.1 CD-ROM into
the computer’s CD-ROM drive. A dialogue box
automatically appears, allowing you to select the
language.
If the dialog box does not automatically appear, click
“My Computer” on the desktop, and then doubleclick the CD-ROM drive containing the CD-ROM.
(For Windows
menu, and then double-click the CD-ROM drive
containing the CD-ROM.)
Next, double-click “Setup.exe” to display the dialog
box.
2 Select the language for the Windows
system that you are using, and then click the OK
button. A dialogue box appears, allowing you to
select what to install.
®
XP, click “My Computer” in the Start
®
operating
6
3 Click the top button (Editor). A dialogue box appears,
allowing you to select the model.
To install just the printer driver, click the lower
button (Printer driver).
Page 11
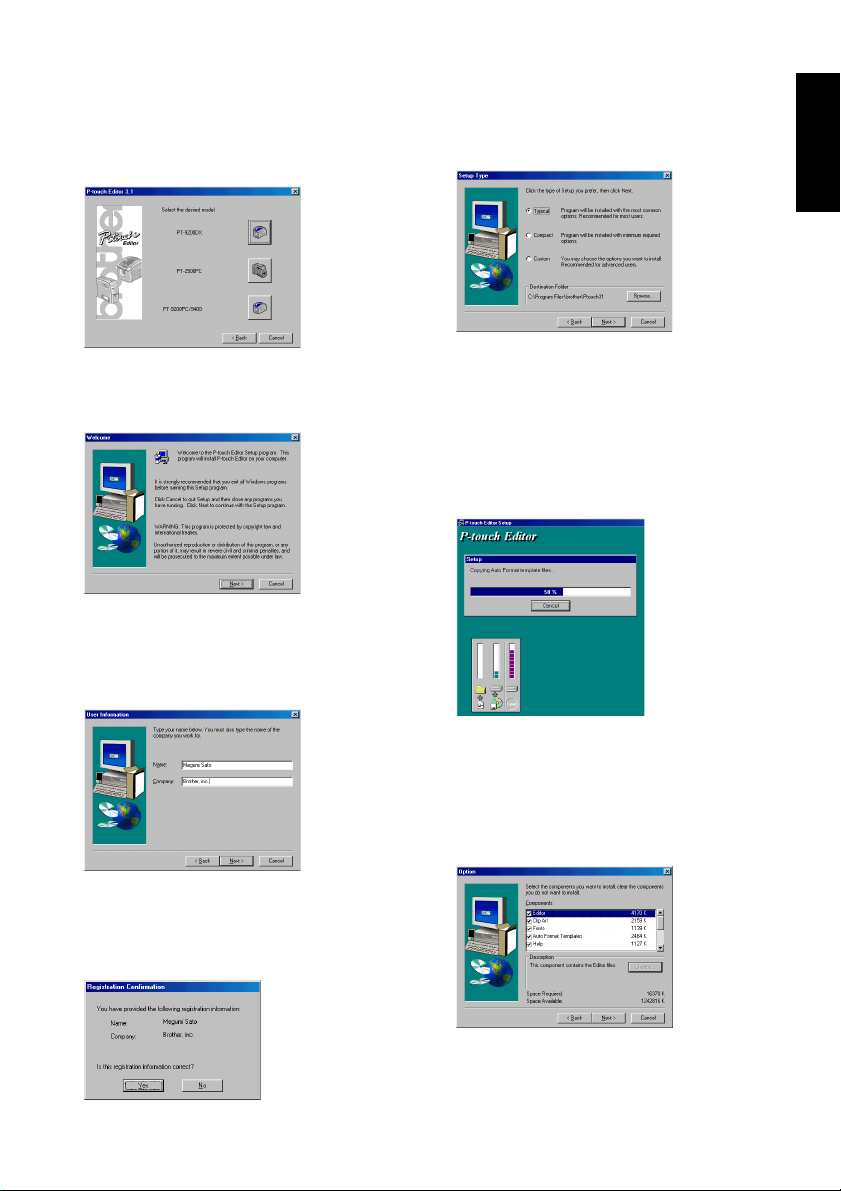
4 Click the icon for the PT-9200DX. The InstallShield
Wizard for installing the P-touch Editor software starts
up, and then the Welcome dialogue box appears.
®
8 Select the installation method, and then click the Next
button.
For Windows®
5 Carefully read the contents of the dialogue box, and
then click the Next button to continue. The User
Information dialogue box appears.
6 Type the necessary information into the appropriate
boxes (If the information has already been registered
in Windows
click the Next button. A dialogue box appears, asking
for confirmation of the entered information.
7 Click the Yes button to register the entered informa-
tion. The Setup Type dialogue box appears.
®
, it will automatically appear.), and then
To change the information, click the No button,
and then return to step 6.
• For a Typical or Compact installation
Selecting “Typical” or “Compact”, then clicking the
Next button immediately starts installation.
Typical: All of the basic options (P-touch Editor
Compact: Only P-touch Editor Version 3.1 is in-
• For a Custom installation
Selecting “Custom”, then clicking the Next button
displays a dialogue box that allows you to select
which options to install. Only the options with a
check mark beside them will be installed. In addition
to the basic options listed for a Typical installation,
the User’s Guide can also be installed.
Version 3.1, Clip Art, Auto Format templates, Help, and 13 fonts) are installed.
stalled.
7
Page 12
1) Select which options to install.
Editor: The P-touch Editor Version 3.1
For Windows®
Clip Art: The illustrations for the P-touch
Fonts: The 13 fonts
Auto Format
Templates: The templates for the Auto Format
User’s Guide:
Help: The help files for P-touch Editor
If the Change button can be clicked while an option is
selected, sub-components can be selected. Click the Change
button to display the Select Sub-components dialogue box,
and then select the sub-components that you wish to install
by putting a check mark beside them. If certain options or
sub-components are not installed, some P-touch Editor
functions may not be available. After selecting the desired
sub-components, click the Continue button.
2) Click the Next button to begin installation.
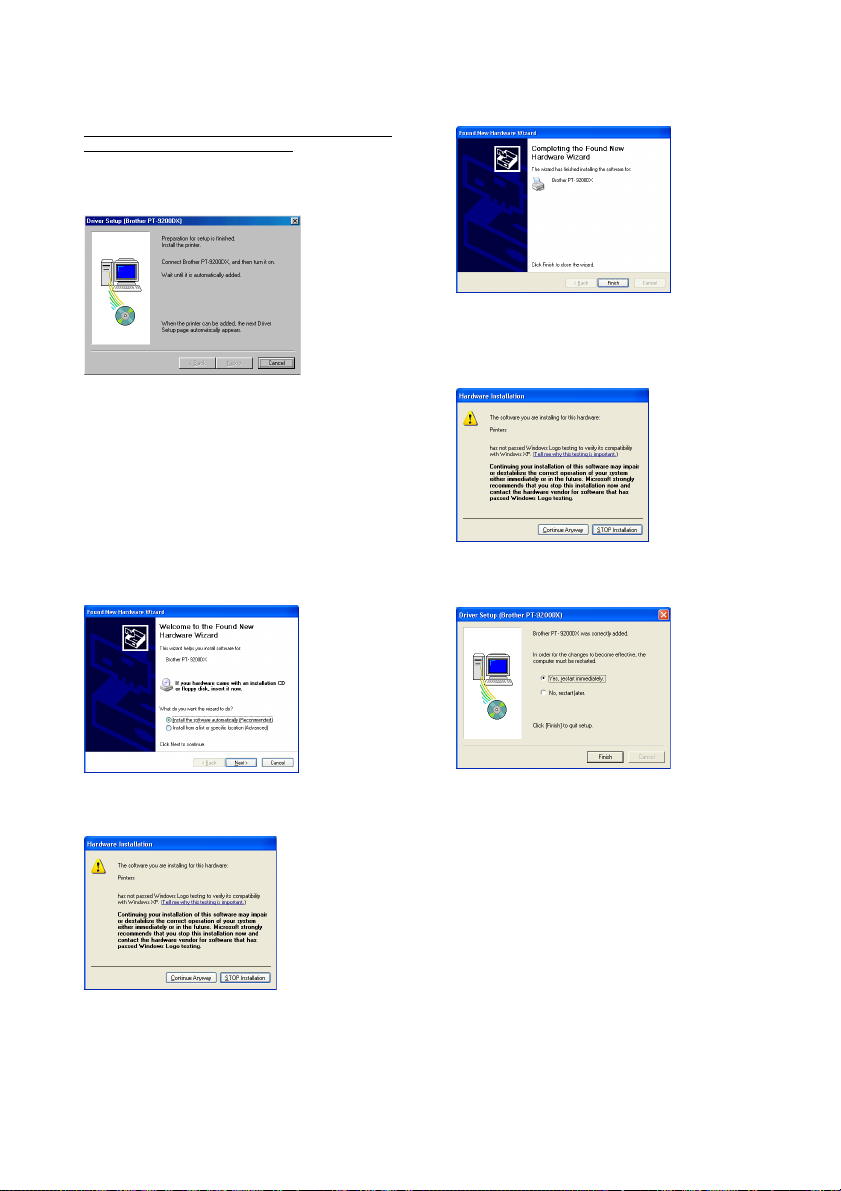
9 After P-touch Editor is installed, a dialogue box
appears, allowing you to select whether or not to
install the printer driver.
To install the printer driver, click the Yes button. The
first Driver Setup dialogue box appears. Continue
with the section
If the printer driver is already installed, click the No
button, restart the computer, and then remove the
CD-ROM from the CD-ROM drive.
software
Editor Version 3.1 Clip Art
function
function
The User’s Guide (HTML) for the Ptouch Editor Version 3.1 (The User’s
Guide can also be viewed from the
CD-ROM.)
Version 3.1
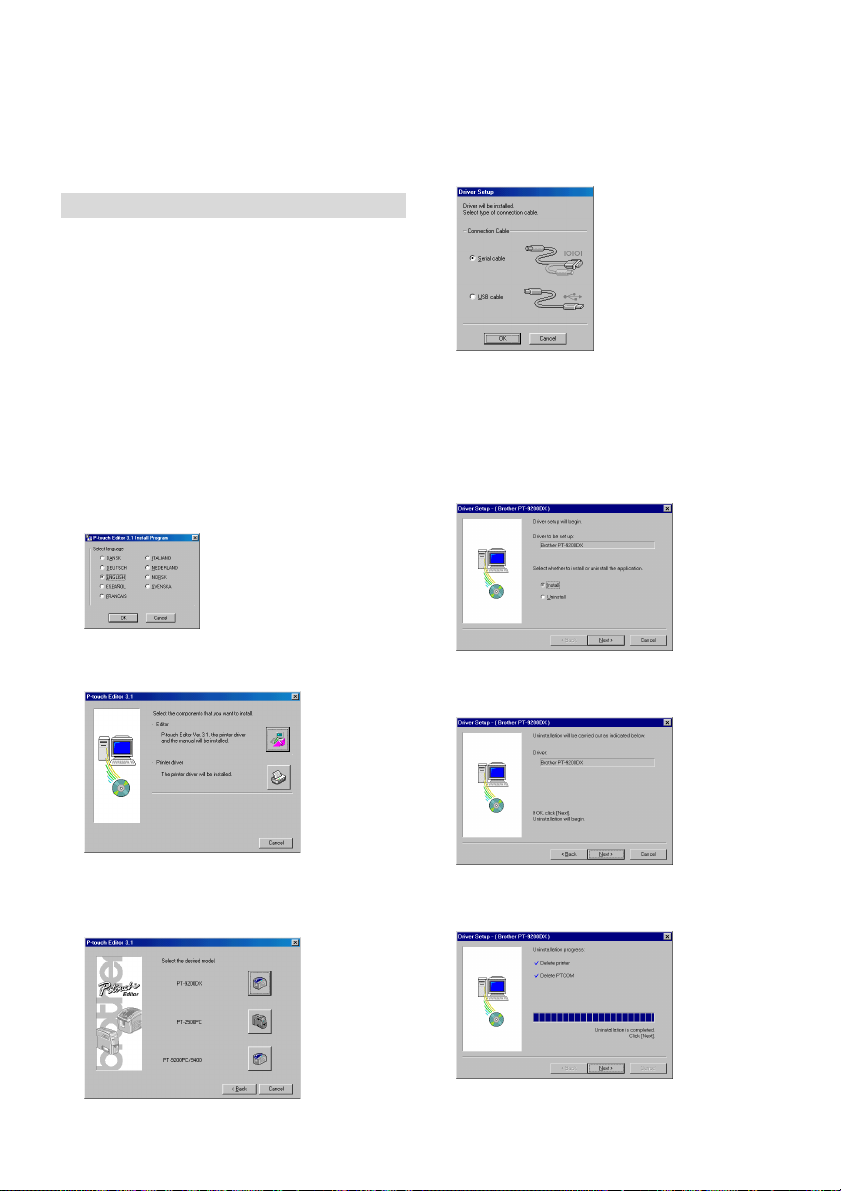
Installing the printer driver
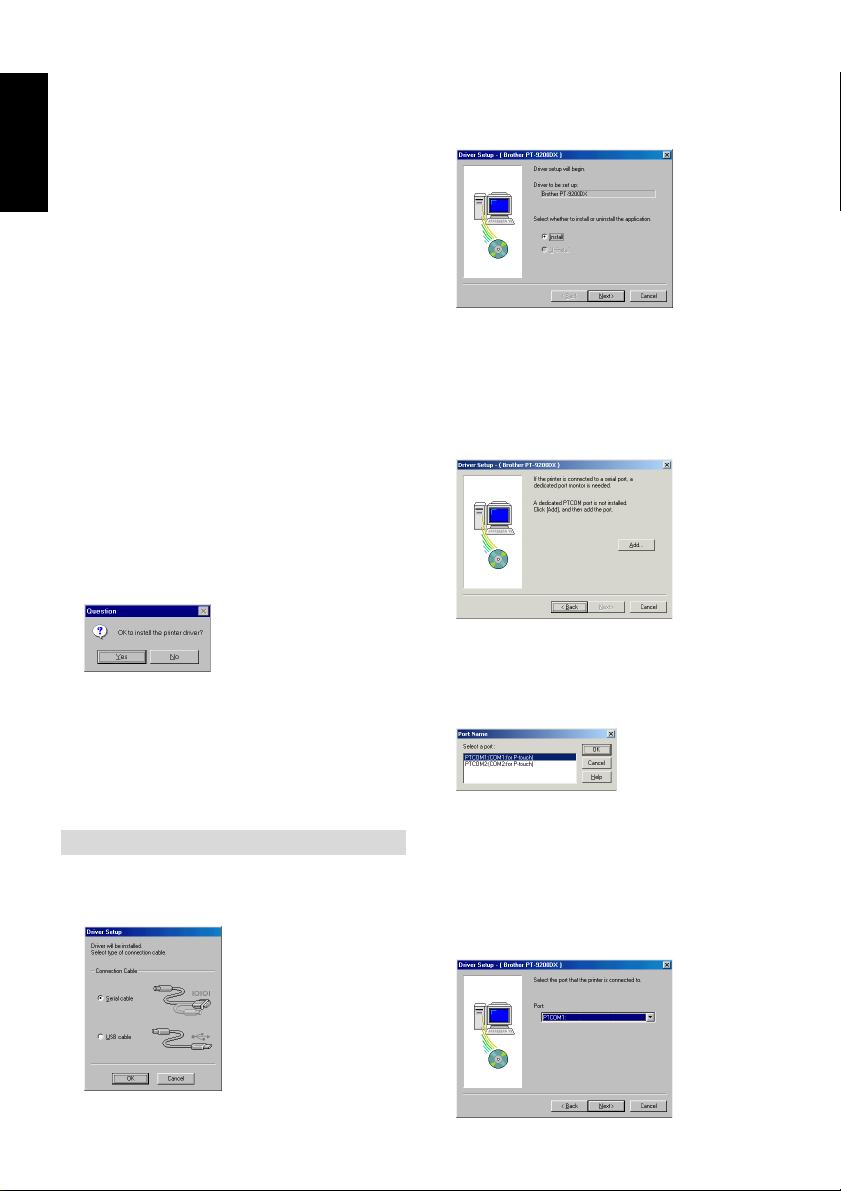
2 Select “Install”, and then click the Next button.
3
For Windows® 95/98/Me users: Skip to step 4.
For Windows
dialogue box appears, allowing you to add a P-touch
(PTCOM) port.
If a P-touch (PTCOM) port is already installed, click the
Next button and continue with step 4 below.
If a P-touch (PTCOM) port is not already installed, click
the Add button. The Port Name dialogue box appears.
From the list of PTCOM ports, select the port where
the PT-9200DX is connected (“PTCOM1:” if the PT9200DX is connected to the COM1 port, or
“PTCOM2:” if the PT-9200DX is connected to the
COM2 port), and then click the OK button. In the
.
Driver Setup dialogue box, click the Next button.
®
NT 4.0/2000 Professional/XP users: A
Installing the printer driver
For a serial connection
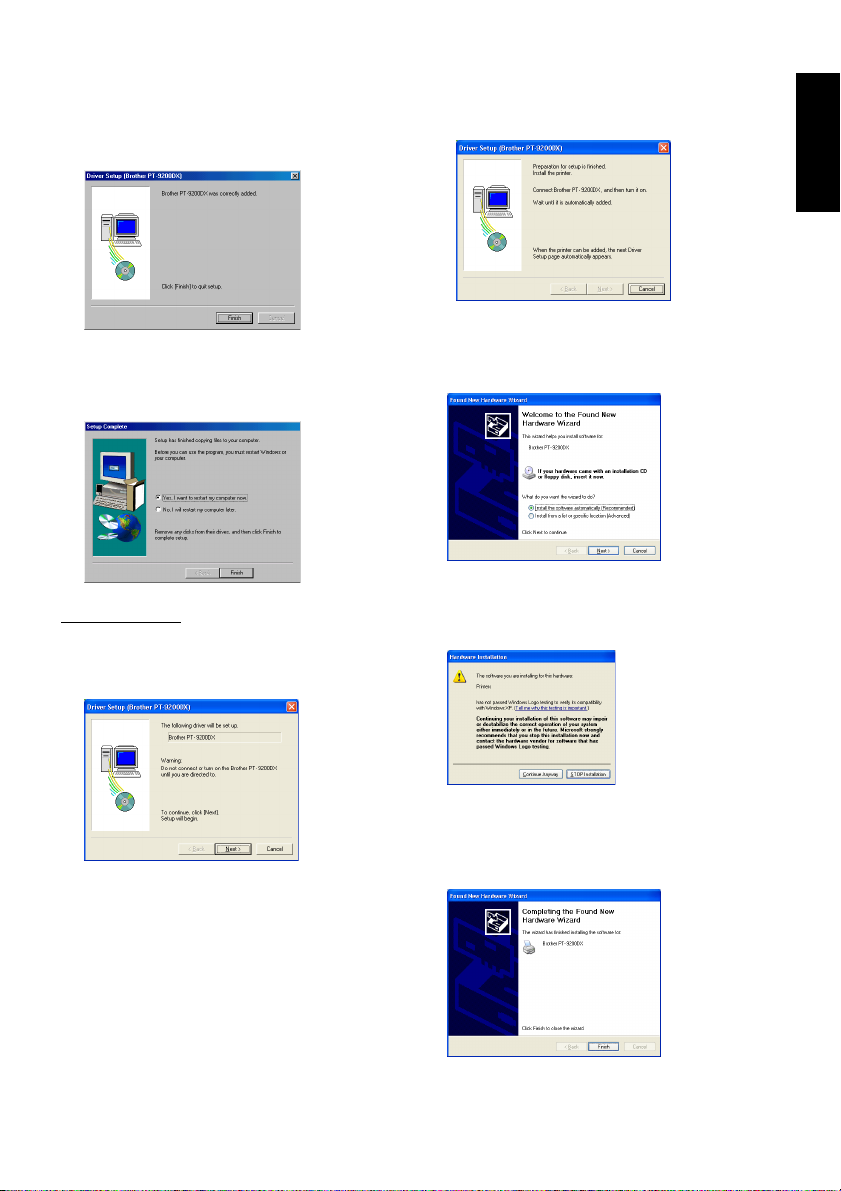
1 Select “Serial cable”, and then click the OK button. A
dialogue box appears, allowing you to select whether
to install or uninstall the printer driver.
8
4 A dialogue box appears, allowing you to select the
PTCOM port where the PT-9200DX is connected.
Select “PTCOM1:” if the PT-9200DX is connected to the
COM1 port, or “PTCOM2:” if the PT-9200DX is
connected to the COM2 port, and then click the Next
button. (On Windows
select the port added in step 3.) A dialogue box appears,
asking for confirmation on how the installation will be
carried out.
®
NT 4.0/2000 Professional/XP,
Page 13
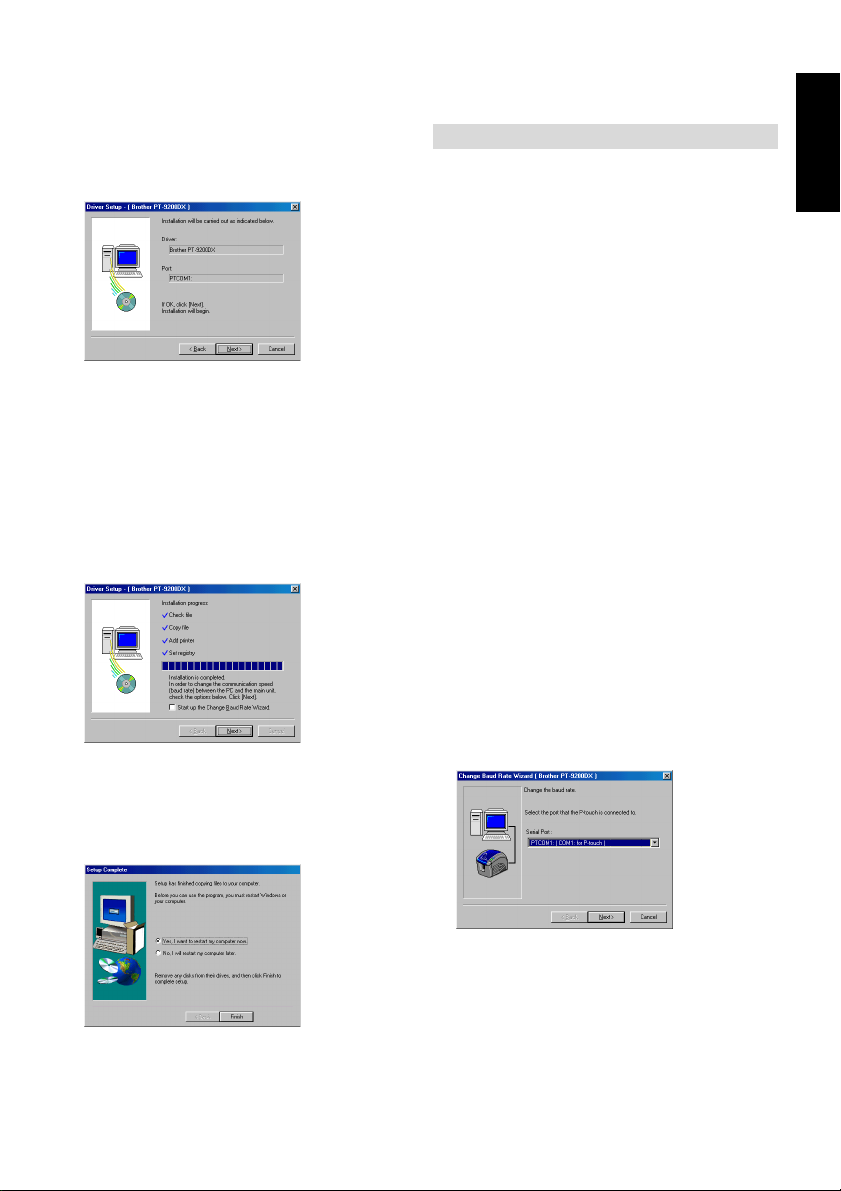
5 Check that the installation will be carried out as
desired, and then click the Next button. A dialogue
box appears, showing that the printer driver has been
installed.
6 If the port where the PT-9200DX is connected
supports a baud rate of 115,200 bps, click the Next
button.
If the port where the PT-9200DX is connected does
not support a baud rate of 115,200 bps, or if you wish
to check the connection between the PT-9200DX and
the computer, select “Start up the Change Baud Rate
Wizard”, and then click the Next button to start up
the Change Baud Rate Wizard. After changing the
baud rate as described by steps 3 through 6 in the
Using the Change Baud Rate Wizard
section
9, continue with step 7 below.
7 A dialogue box appears, showing that installation is
finished.
Select “Yes, I want to restart my computer now.”,
click the Finish button to restart the computer, and
then remove the CD-ROM from the computer.
on page
Using the Change Baud Rate Wizard
If the PT-9200DX is connected to a port that does not support a baud rate of 115,200 bps, or if you wish to check the
connection between the PT-9200DX and the computer, start
up the Change Baud Rate Wizard and select the desired
settings as described below.
1 From the Start menu, point to “Settings”, and then
click “Printers” to open the Printers folder.
(For Windows
Start menu to open the Printers and Faxes folder.)
With Windows® 95, 98, 98SE and Me:
2
Right-click the Brother PT-9200DX icon, and then
click “Properties” in the pop-up menu that appears.
On the Advanced tab of the dialog box that appears,
click the Baudrate button to start up the Change Baud
Rate Wizard.
With Windows® NT 4.0:
Right-click the Brother PT-9200DX icon, and then
click “Properties” in the pop-up menu that appears.
On the Device Settings tab of the dialog box that
appears, click “Baud Rate...” in the tree view to
display the Change ‘Baud Rate’ Setting section at the
bottom of the dialog box. Click the Baud Rate...
button to start up the Change Baud Rate Wizard.
With Windows® 2000 and XP:
Right-click the Brother PT-9200DX icon, and then
click “Properties” in the pop-up menu that appears.
On the Device Settings tab of the dialog box that
appears, click “Baud Rate...” in the tree view, and
then click the Properties... button that appears on the
right side to start up the Change Baud Rate Wizard.
3 A dialogue box appears, allowing you to select the
serial port where the PT-9200DX is connected.
Select the appropriate serial port, and then click the
Next button. A dialogue box appears, allowing you to
select the desired baud rate.
®
XP, click “Printers and Faxes” in the
For Windows®
9
Page 14
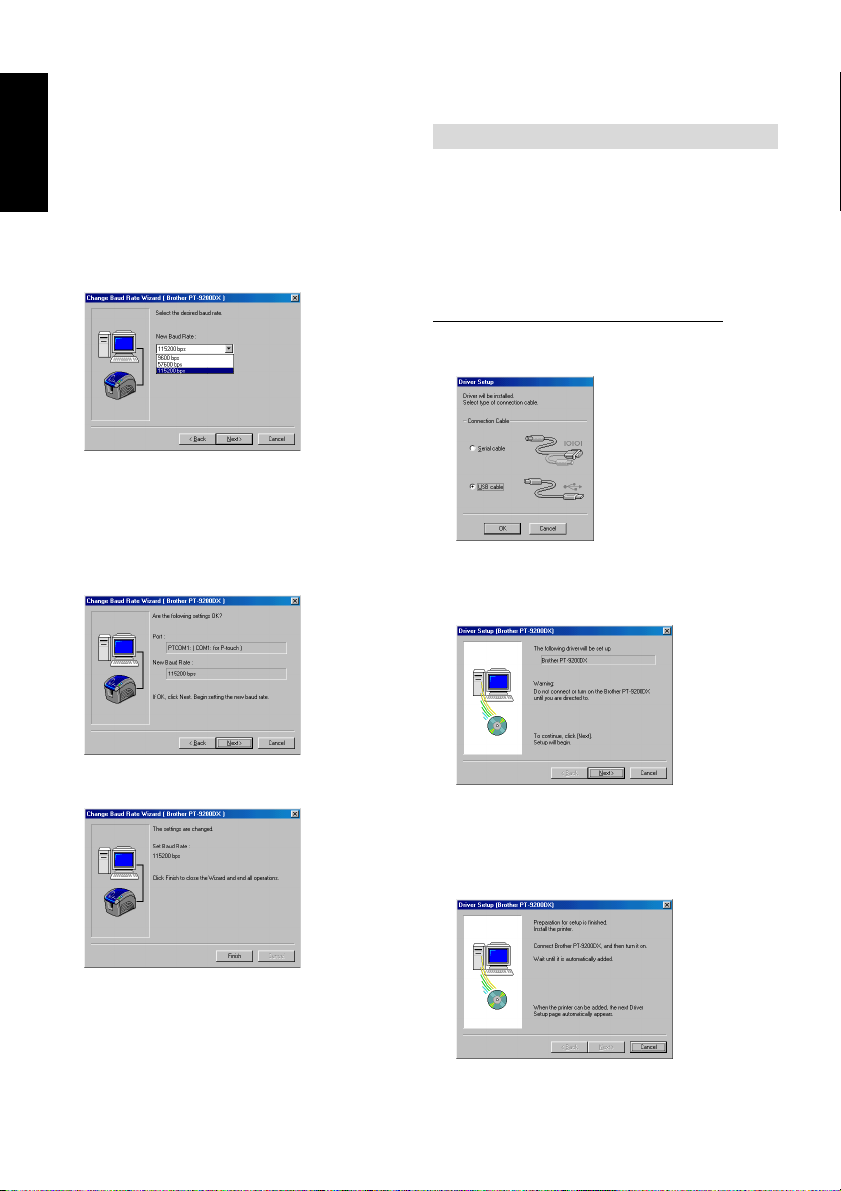
4 Select the desired baud rate, and then click the Next
button.
Normally “115,200 bps” is selected; however,
For Windows®
your computer may not be able to support a baud
rate of 115,200 bps. If this is the case, refer to the
your computer’s instruction manual and select the
maximum possible baud rate.
A dialogue box appears, asking for confirmation of
the selected baud rate settings.
5 Check that the baud rate will be changed as desired,
and then click the Next button.
To change the settings, click the Back button, and
return to step 4.
A dialogue box appears, showing that the baud rate
has been set as specified.
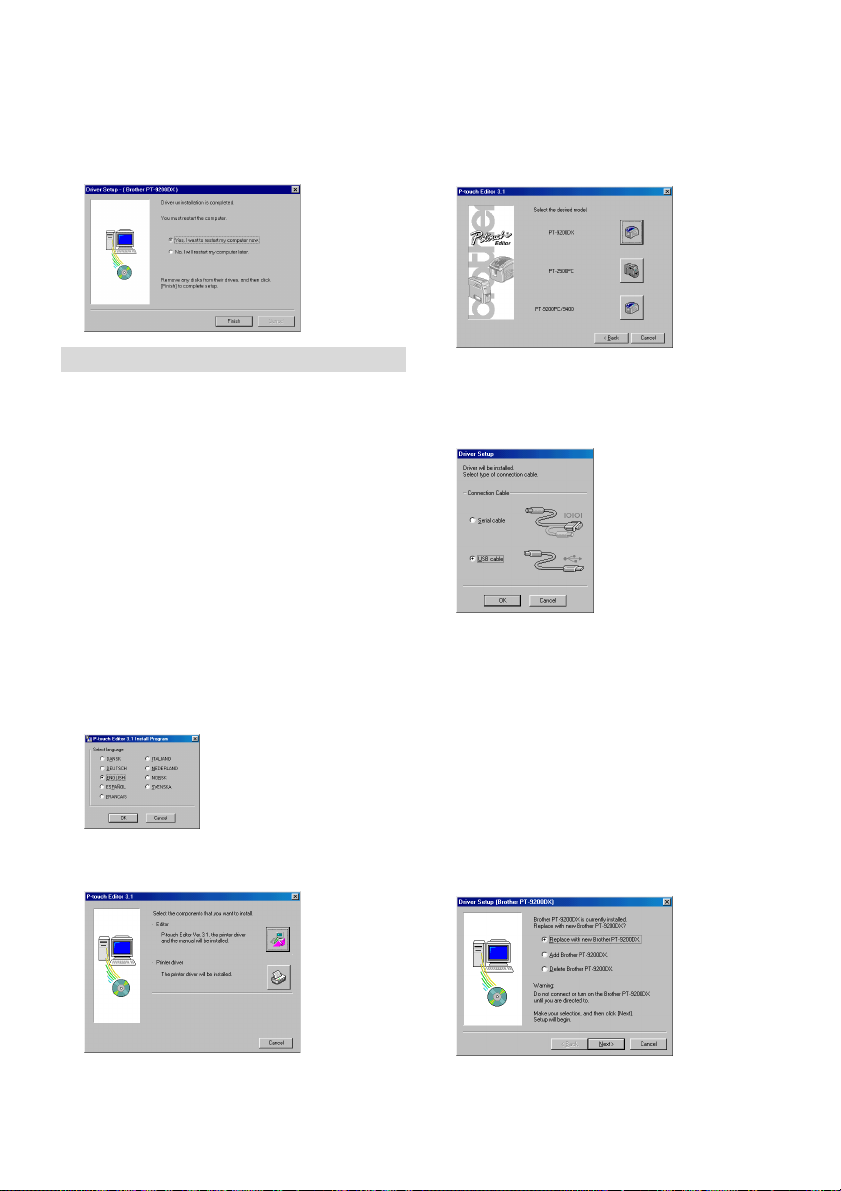
For a USB connection (Windows® 98/Me/2000 Professional/XP only)
With Plug-and-Play, new devices connected to the system
are detected, and their drivers are automatically installed. If
the PT-9200DX is to be connected through the USB port, its
driver will be installed with Plug-and-Play. Be sure to read
the installation instructions described below before installing the file supplied on the CD-ROM.
Do not connect the P-touch 9200DX to the computer
until you are instructed to do so, otherwise the PT9200DX printer driver may not be installed correctly.
With Windows® 98/98SE/Me/2000 Professional:
1 Select “USB cable”, and then click the OK button.
The USB message dialogue box appears.
2 Click the Next button. A dialogue box appears,
instructing you to connect the PT-9200DX to the
computer.
6 Click the Finish button.
10
3 Connect the PT-9200DX to the computer using the
enclosed USB interface cable as described on page 5,
and then turn on the PT-9200DX. A dialogue box
appears, showing that the printer driver has been
installed.
Page 15
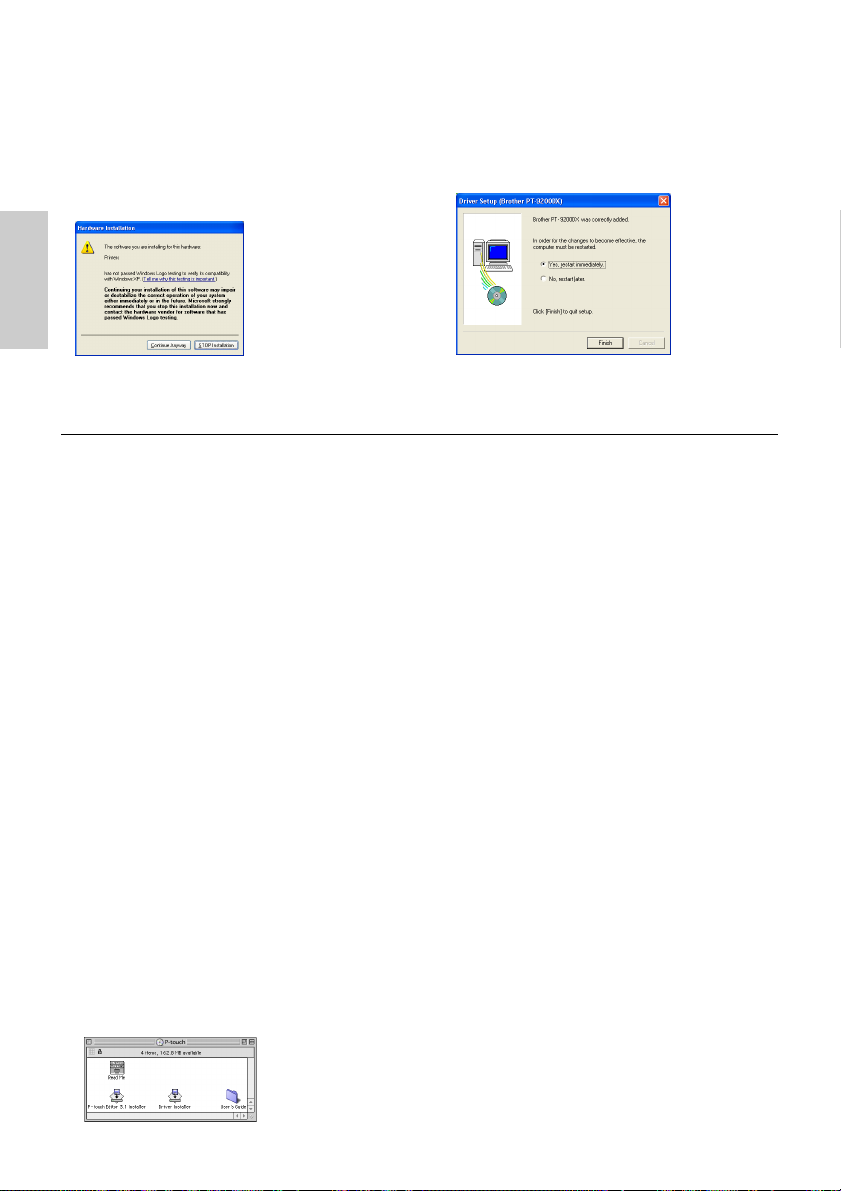
4 Click the Finish button. A dialogue box appears,
showing that installation is finished.
5 Select “Yes, I want to restart my computer now.”,
click the Finish button to restart the computer, and
then remove the CD-ROM from the computer.
With Windows® XP:
1 In the dialog box that appears, informing you that the
PT-9200DX printer driver will be installed, click the
Next button.
3 In the first Found New Hardware Wizard dialog box
that appears, select “Install the software automatically
(Recommended)”, and then click the Next button.
4 If the dialog box warning appears indicating the
software has not passed Windows Logo testing,
simply continue with the installation.
For Windows®
2 After the dialog box appears, instructing you to
connect the P-touch 9200DX and turn it on, connect
the P-touch 9200DX to the computer using the
enclosed USB interface cable as described on page 5,
and then turn on the P-touch 9200DX.
5 In the Found New Hardware Wizard dialog box that
appears, indicating that installation of the PT-9200DX
and the Found New Hardware Wizard are finished,
click the Finish button.
11
Page 16
6 If the dialog box warning that the software has not
passed Windows Logo testing appears again, click the
Continue Anyway button to continue with the
installation (since this printer driver has already
cleared strict product quality standards of our testing).
For Macintosh
7 In the dialog box that appears, indicating that installa-
tion is finished, select “Yes, restart immediately.”, and
then click the Finish button. After the computer is
restarted, the installation is fully completed.
8 Remove the CD-ROM from the computer.
P-touch Editor Version 3.1 Installation (for Macintosh)
Follow the procedure below to install the P-touch Editor software on the Mac.
The Mac version of the software is for a Mac with an English operating system. If the software is installed on a Mac with an
operating system in a different language, the software may not run properly.
Check that your system configuration meets the following requirements.
Computer: Macintosh or Power Macintosh
Operating system:
Serial interface: Macintosh equipped with a PowerPC processor and a serial port (modem or printer), and
USB interface: Macintosh equipped with a USB port and running Mac OS 8.5.1 or later
Hard disk free space: At least 20 MB
A few hundred megabytes of additional free space may be needed when printing long labels or large amounts of data.
Port: Serial or USB
Available memory free space: Minimum 24 MB
CD-ROM drive
With the enclosed CD-ROM, the following can be installed:
• P-touch Editor Version 3.1
• PT-9200DX printer driver
running Mac OS 8.1 or later
* For previous Mac OS versions, refer to the Apple Web site for information about USB.
* This software can only run on Mac OS X in the Classic environment.
However, the Mac OS X v10.2 Classic environment is not supported.
* The application is supplied on a CD-ROM; therefore, the computer should be equipped with
a CD-ROM drive.
Installing P-touch Editor Version 3.1
1 Connect the PT-9200DX to the Macintosh using the
enclosed interface cable. Be sure to leave the PT9200DX turned off.
2 Turn on the Macintosh.
3 Insert the P-touch Editor CD-ROM into the computer’s
CD-ROM drive.
4 Double-click the P-touch Editor 3.1 Installer icon in
the folder that appears.
12
5 After the installer starts up, select the installation
method.
Clicking the Install button immediately starts installing
the most basic options. (Some clip art illustrations are
not installed.)
About 20 MB of available hard-disk space is needed
to begin installation. In order to install all options,
about 120 MB of available hard-disk space is needed.
If enough hard-disk space is available, click the Install
button.
Page 17
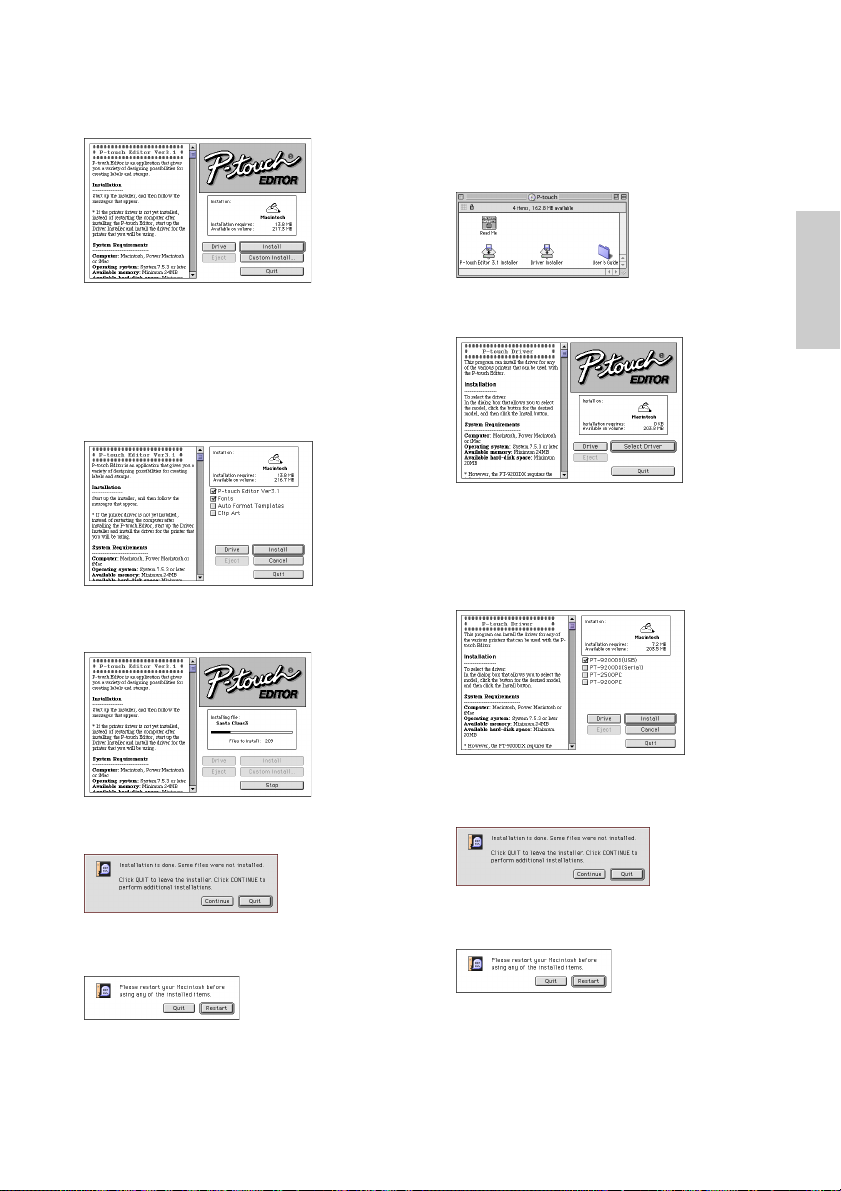
Installing the PT-9200DX printer driver
1 Double-click the Driver Installer icon in the P-touch
folder.
Clicking the Custom Install button displays a dialogue
box that allows you to select which options to install.
Only the options with a check mark beside them are
installed.
Select the options that you wish to install, and then
click the Install button.
Dialogue box that appears if the Custom Install button
is clicked:
6 Installation begins.
7 When the installation is finished and the following
dialogue box appears, click the Quit button.
2 After the installer starts up, click the Select Driver
button.
3 In the dialogue box that appears, select “PT-
9200DX(USB)” (for a USB port connection) or “PT9200DX(Serial)” (for a modem or printer port connection). The printer drivers with a check mark beside
them are installed.
Then, click the Install button.
4 Installation begins. When the installation is finished
and the following dialogue box appears, click the
Quit button.
For Macintosh
8 When the dialogue box appears, asking if you wish to
restart the computer, click the Quit button to continue
and install the printer driver.
5 When the dialogue box appears, asking if you wish to
restart the computer, click the Restart button to restart
the computer.
6 After the computer is restarted, turn on the P-touch.
13
Page 18
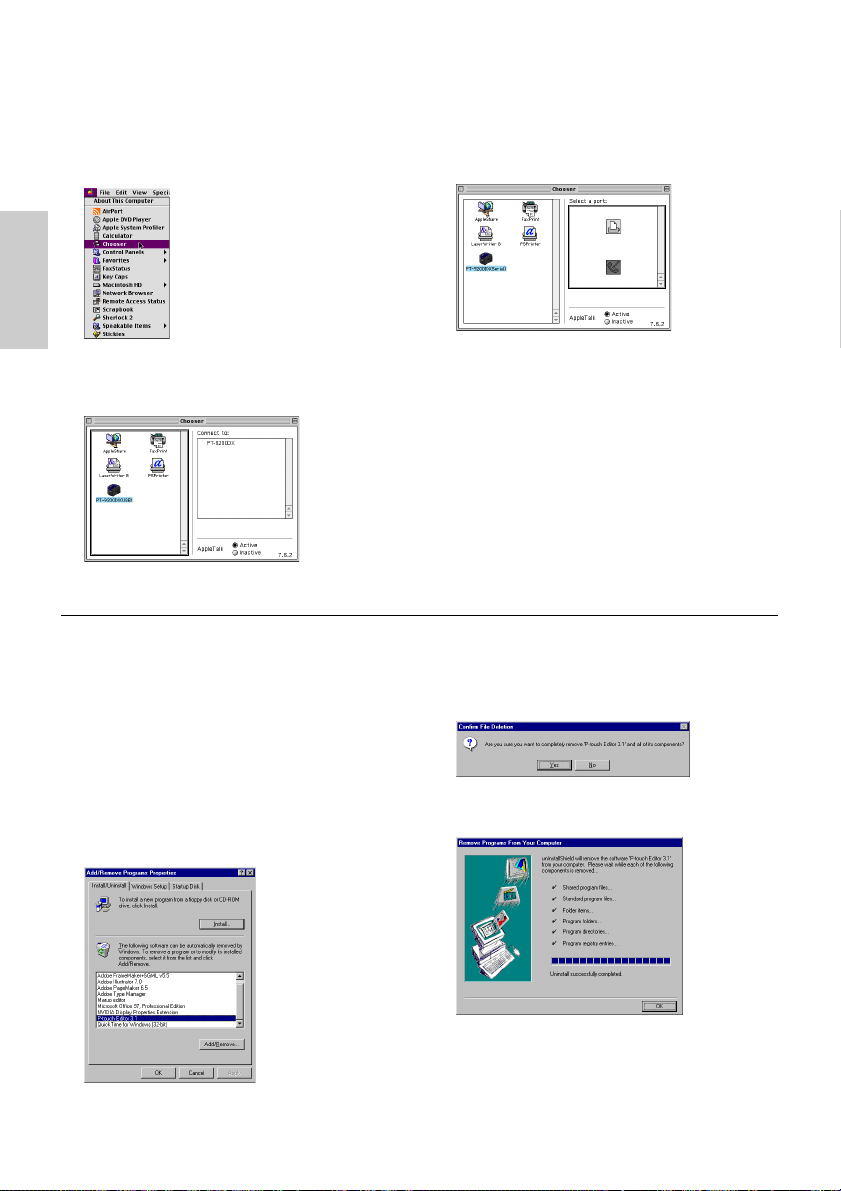
Selecting the printer
1 Pull down the Apple menu and select “Chooser” to
display the Chooser window.
For Macintosh
3 If the PT-9200DX(Serial) icon was selected, click the
icon for the port linked with PT-9200DX(Serial) from
the list on the right.
2 In the list on the left, click the PT-9200DX(USB) icon
(for a USB port connection) or the PT-9200DX(Serial)
icon (for a modem or printer port connection). Then,
select the appropriate printer driver.
4 Close the Chooser window to confirm your settings.
Uninstalling P-touch Software and Printer Driver
Uninstall P-touch Editor Version 3.1 and the printer driver using the steps below:
Uninstalling P-touch Editor Version 3.1 (for
Windows
1
2 Click the Start button in the taskbar, select “Settings”,
3 In the Control Panel window, double-click “Add/
4
®
95/98/Me/NT 4.0/2000 Professional/XP)
Start up Windows® 95/98/Me/NT 4.0/2000 Professional/XP.
and then click “Control Panel”.
With Windows
taskbar, and then click “Control Panel”.
Remove Programs”.
In the Add/Remove Programs Properties dialogue box, select
“P-touch Editor 3.1”, and then click the Add/Remove button.
®
XP, click the Start button in the
5 A message appears, asking if you wish to delete the
selected application. Click the Yes button to delete
the application. If you do not wish to delete the
application, click the No button.
6 In the dialogue box that appears, indicating that the
application is deleted, click the OK button.
* The dialog box that appears may differ depending
on the operating system being used.
14
Page 19
Replacing, installing or deleting the
printer driver (for Windows
®
95/98/Me/NT
4.0/2000 Professional/XP)
For a serial connection
1 Connect the PT-9200DX to the computer using the
enclosed serial interface cable as described on page
4, and then turn on the PT-9200DX.
2 Insert the P-touch Editor Version 3.1 CD-ROM into
the computer’s CD-ROM drive. A dialogue box
automatically appears, allowing you to select the
language.
If the dialog box does not automatically appear,
double-click “My Computer” on the desktop, and
then double-click the CD-ROM drive containing the
CD-ROM. (For Windows
the Start menu, and then double-click the CD-ROM
drive containing the CD-ROM.) Next, double-click
“Setup.exe” to display the dialog box.
3 Select the language for the Windows
system that you are using, and then click the OK
button. A dialogue box appears, allowing you to
select what to install.
4 Click the bottom button (Printer driver). A dialogue
box appears, allowing you to select the model.
®
XP, click “My Computer” in
®
operating
6 Select “Serial cable”, and then click the OK button. A
dialogue box appears, allowing you to select whether
to install or uninstall the printer driver.
7 Select the desired operation, and then click the Next
button.
8 If “Install” was selected: Perform steps 3 through 7 in
the section
If “Uninstall” was selected: A dialogue box appears,
asking for confirmation to uninstall the PT-9200DX
printer driver.
Click the Next button. A dialogue box appears,
showing that the printer driver has been deleted.
For a Serial Connection
on page 8.
5 Click the icon for the PT-9200DX. The first Driver
Setup dialogue box appears, allowing you to select
whether a serial or a USB connection is used.
Click the Next button. A dialogue box appears,
showing that uninstallation is finished.
15
Page 20
Select “Yes, I want to restart my computer now.”,
click the Finish button to restart the computer, and
then remove the CD-ROM from the computer.
5 Click the icon for the PT-9200DX. The first Driver
Setup dialogue box appears, allowing you to select
whether a serial or a USB connection is used.
For a USB connection (Windows® 98/Me/2000 Professional/XP only)
A PT-9200DX printer driver can be replaced, added or deleted by following the procedure below.
1 Turn off the PT-9200DX, and then disconnect it from
the computer.
2 Insert the P-touch Editor Version 3.1 CD-ROM into
the computer’s CD-ROM drive. A dialogue box
automatically appears, allowing you to select the
language.
If the dialog box does not automatically appear, click
“My Computer” on the desktop, and then doubleclick the CD-ROM drive containing the CD-ROM.
(For Windows
menu, and then double-click the CD-ROM drive
containing the CD-ROM.)
Next, double-click “Setup.exe” to display the dialog
box.
3 Select the language for the Windows
system that you are using, and then click the OK
button. A dialogue box appears, allowing you to
select what to install.
4 Click the bottom button (Printer driver). A dialogue
box appears, allowing you to select the model.
®
XP, click “My Computer” in the Start
®
operating
6 Select “USB cable”, and then click the OK button. A
Driver Setup dialogue box appears, allowing you to
select whether to replace, add or delete the PT9200DX printer driver.
7 Select the desired operation, and then click the Next
button.
If “Replace with new Brother PT-9200DX” is
selected, the previously installed printer driver is
deleted, and replaced with a new one. Select this
option when upgrading the printer driver, or when
running Windows
changing to a PT-9200DX with a different serial
number.
If “Add Brother PT-9200DX” is selected, a new
printer driver is added. With a USB connection on
Windows
adding it as a new printer. Select this option when
connecting and using multiple PT-9200DXs with
the same computer.
®
2000 Professional/XP and
®
98/Me, only a port is added without
16
Page 21
8 If “Replace with new Brother PT-9200DX” or “Add
Brother PT-9200DX” was selected:
With Windows® 98/98SE/Me/2000 Professional
A dialogue box appears, instructing you to connect
the PT-9200DX to the computer.
Connect the PT-9200DX to the computer using the
enclosed USB interface cable as described on page 5,
and then turn on the PT-9200DX. A dialogue box
appears, showing that the printer driver has been
installed.
Select “Yes, restart immediately.”, and then click the
Finish button to restart the computer.
:
If the dialog box warning that the software has not
passed Windows Logo testing appears again, click the
Continue Anyway button to continue with the
installation (since this printer driver has already
cleared strict product quality standards of our testing).
With Windows® XP:
In the first Found New Hardware Wizard dialog box
that appears, select “Install the software automatically
(Recommended)”, and then click the Next button.
If the dialog box warning appears indicating the
software has not passed Windows Logo testing,
simply continue with the installation.
In the Found New Hardware Wizard dialog box that
appears, indicating that installation of the PT-9200DX
and the Found New Hardware Wizard are finished,
click the Finish button.
In the dialog box that appears, indicating that installation is finished, select “Yes, restart immediately.”, and
then click the Finish button. The computer is restarted.
Remove the CD-ROM from the computer.
17
Page 22
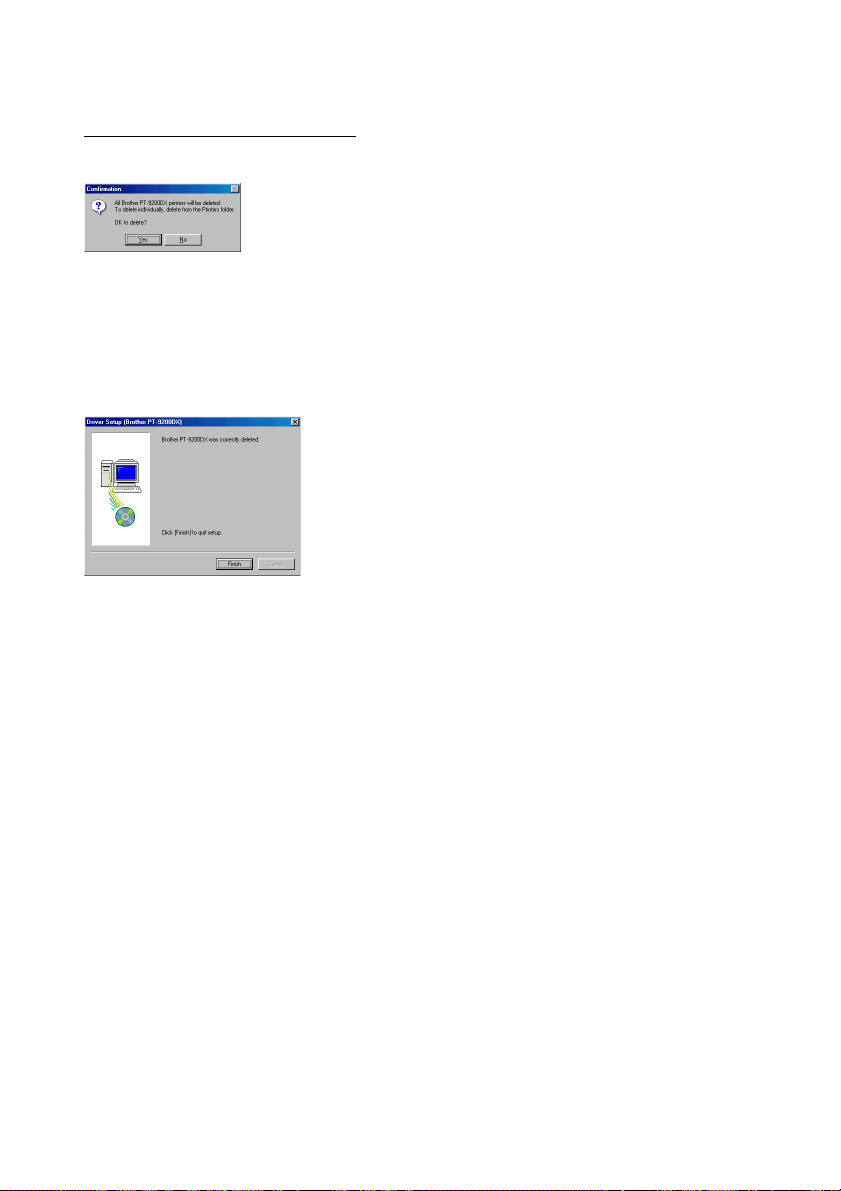
If “Delete Brother PT-9200DX” was selected:
A dialogue box appears, asking for confirmation to
delete all PT-9200DX printer drivers.
Click the Yes button. A dialogue box appears,
showing that the printer drivers have been deleted.
Click the Finish button.
If a dialogue box appears, explaining that the
computer should be restarted, select the option for
restarting the computer, and then click the Finish
.
button
Deleting P-touch Editor Version 3.1 and
the printer driver (for Macintosh)
Delete P-touch Editor Version 3.1 and the printer driver as
described below.
When deleting the printer driver, be sure that the P-
touch is turned off and unplugged.
1 Drag the P-touch Editor Ver3.1 folder to the Trash
icon.
2 In the System Folder, open the Extensions folder.
3 Drag the PT-9200DX(USB) icon and the USB PT-
9200PC Extension icon (for a USB port connection) or
the PT-9200DX(Serial) icon (for a modem or printer
port connection) to the Trash icon.
4 In the System Folder, open the Preferences folder.
5 Drag the P-touch Editor 3.1 Prefs icon and either the
PT-9200DX(USB) Prefs icon (for a USB port connection) or the PT-9200DX(Serial) Prefs icon (for a
modem or printer port connection) to the Trash icon.
The P-touch Editor Version 3.1 and the printer driver
are now deleted.
18
Page 23
Using P-touch Editor
The P-touch Editor application makes it easy for anyone to design and print labels for almost any need imaginable.
Starting up P-touch Editor
On an IBM PC-compatible computer:
• By clicking the P-touch Editor icon:
Double-click the “P-touch Editor 3.1” icon in the “P-touch Editor 3.1” group window.
• With the Start button:
1 Click the Start button in the taskbar to display the Start menu.
2 Select “programmes”.
3 Select “P-touch Editor 3.1”.
4 Click “P-touch Editor 3.1”.
• With Windows
1 Start up Windows
2 Select the drive and directory where P-touch Editor is installed.
3 Double-click “Ptedit3.exe”.
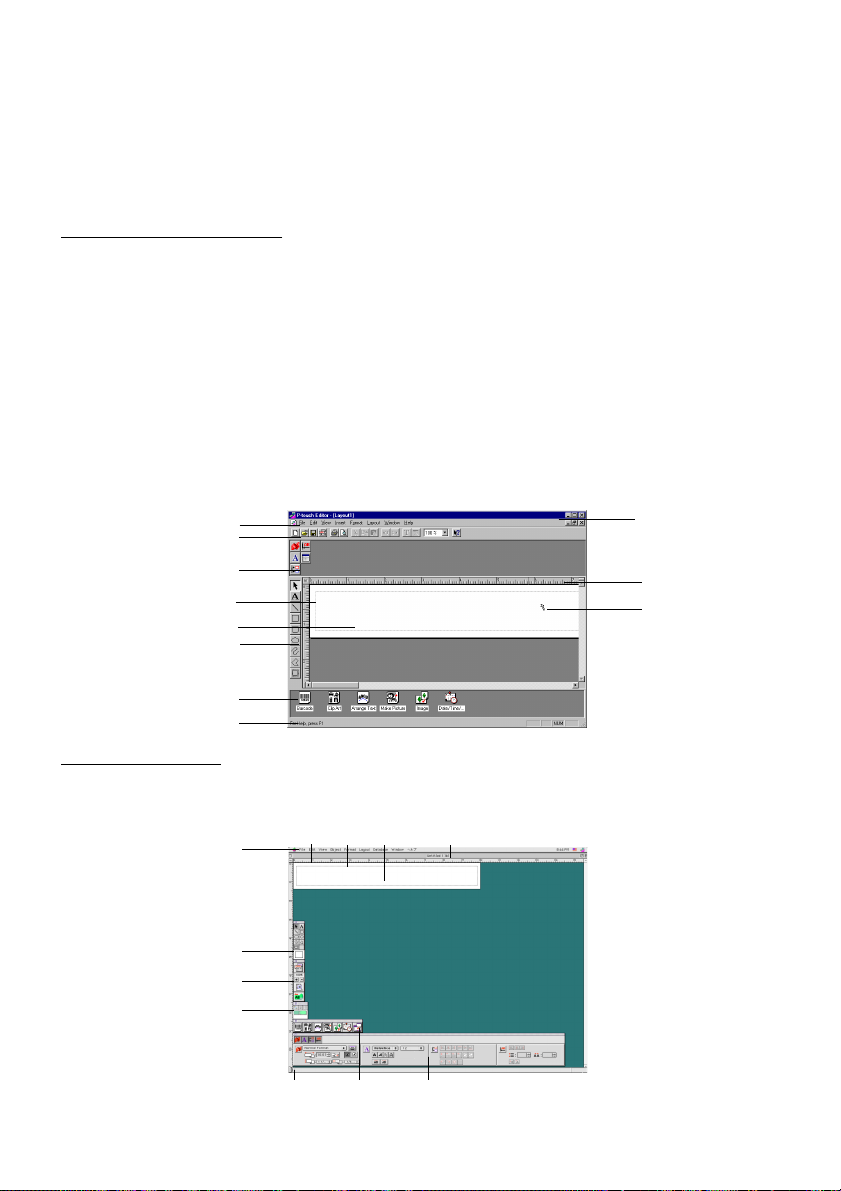
After P-touch Editor is started, the following window is displayed.
®
Explorer:
®
Menu bar
Standard toolbar
Property dock
Layout area
Print area
Draw toolbar
Object dock
Status bar
Explorer.
Title bar
Rulers
Cursor
On a Macintosh computer:
• Double-click the “P-touch Editor Ver3.1” icon in the “P-touch Editor Ver3.1” folder installed on the computer.
After P-touch Editor is started, the following window is displayed.
Layout
Print
area
Menu bar
Draw toolbar
Print toolbar
Database toolbar
Rulers
Status bar
area
Title bar
Object dock Property dock
19
Page 24

Displaying the Properties
Although the screens shown in the following explanations are for Windows® 95/98/98SE/Me, the operations for Windows
NT4.0/2000 Professional/XP and Macintosh are the same unless specifically mentioned.
The desired Properties can be displayed by clicking the icon in the property dock.
Page Properties icon Text Properties icon
®
Font Properties icon Database Properties
Layout Properties icon
icon (not available on
the Macintosh version
of the software)
Click an icon to display its Properties.
• Page Properties (
Click this button to hide the Properties.
)
When using the P-touch 9200DX
Creating a new layout
Although the screens shown in the following explanations are for Windows® 95/98/98SE/Me, the operations for Windows
NT4.0/2000 Professional/XP and Macintosh are the same unless specifically mentioned.
• Entering text
1 Click
2 Move the I-beam pointer to the position in the layout area where you
3 The cursor flashes in the layout area to indicate that you can now type
(Text button) on the draw toolbar.
Text can be typed in, and the pointer changes from
pointer) to
(I-beam pointer).
(selection
wish to type in text, and then click the left mouse button.
in text.
®
4 Use the computer keyboard to type in the text.
5 To create a new line of text, press the keyboard’s Enter key.
With P-touch Editor version 3.1, text is always typed in using the
insert mode. The overwrite mode cannot be used to type in text.
T
o change the font and text size, click the appropriate icon in the property
dock, and then select the desired settings from the Properties that appear.
For details, refer to
Reading the User’s Guide
on page 24.
20
Page 25
Designing a layout from an Auto Format template
In addition to allowing you to draw pictures and arrange text using any of the available fonts, sizes, and styles, P-touch
Editor comes with a variety of pre-formatted templates, which make creating label layouts quick and easy. Now let’s see
how simple it is to create a label layout with the [Auto Format] command.
On an IBM PC-compatible computer:
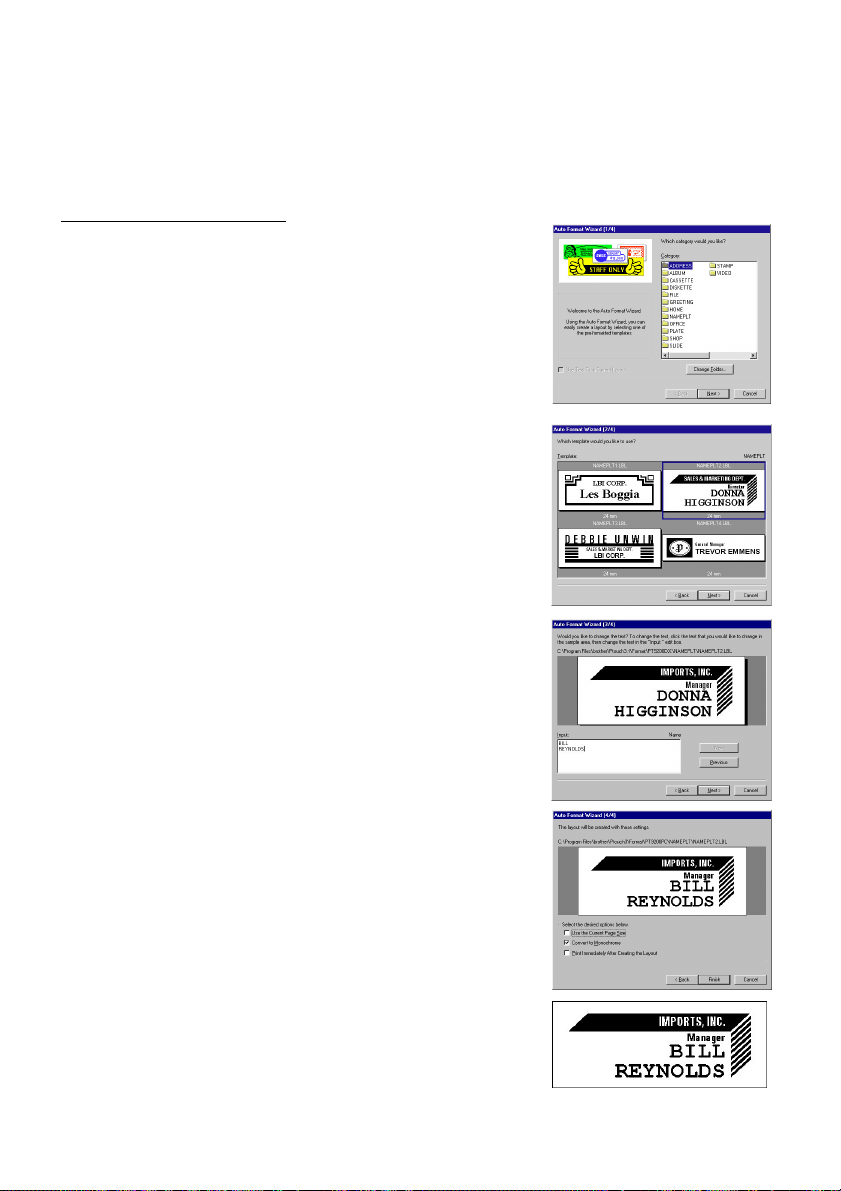
1 Select the [Auto Format] command in the [File] menu to start up the
Auto Format Wizard.
2 In the “Category:” box, select the category containing the Auto Format
template that you wish to use. As an example, let’s select “NAMEPLT”.
3 Click the Next button.
4 In the “Template:” list view, select the template that you wish to use.
Here, let’s select the one named NAMEPLT2.LBL.
5 Click the Next button.
6 Click the Next or the Previous buttons until the text that you wish to
change appears in the “Input:” edit box.
7 Change the text so that the desired text is entered.
8 Repeat steps 6 and 7 until all of the text is entered in the way that
you want, and then click the Next button. For this example, let’s
change the department name to “IMPORTS, INC.”, the title to “Man-
ager” and the name to “BILL REYNOLDS”.
9 Check that the layout contains the text that you want to use.
0 Click the Finish button. A new layout document containing the pre-
formatted text is created.
21
Page 26
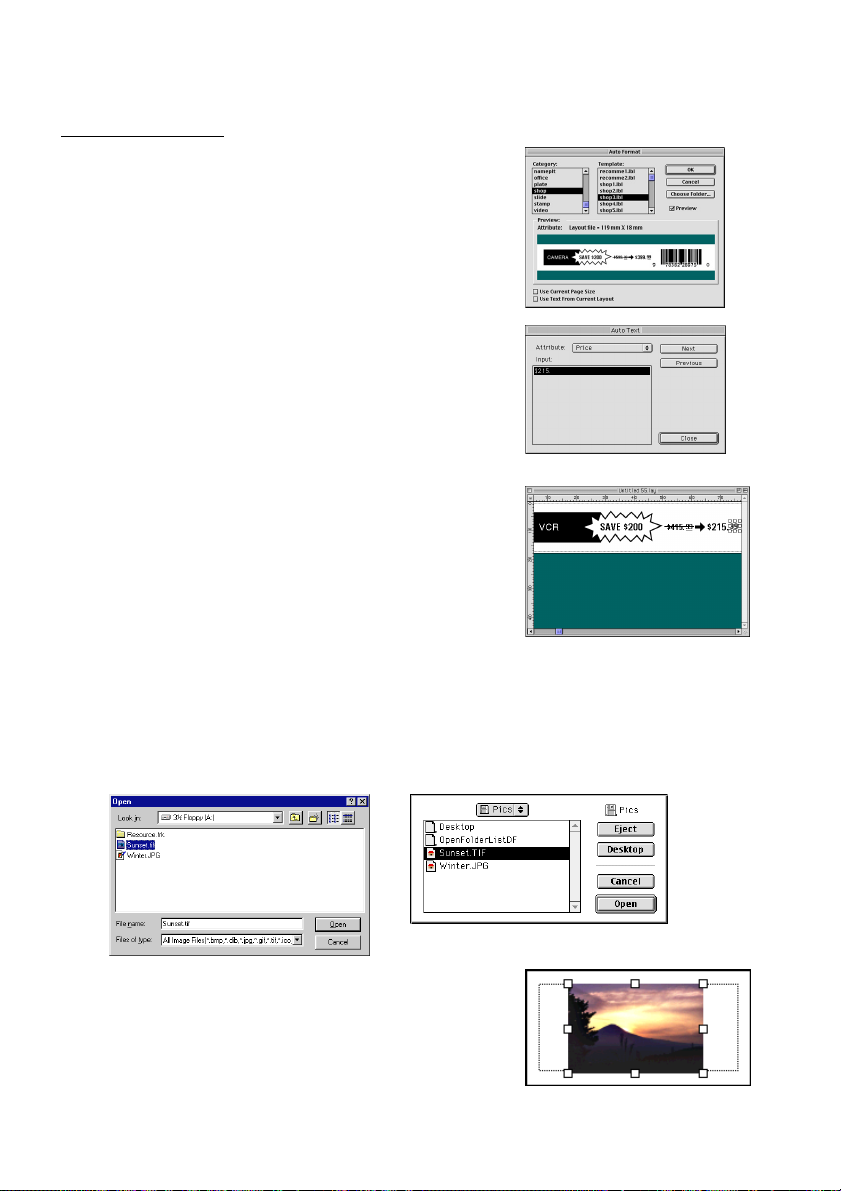
On a Macintosh computer:
1 Select the [Auto Format] command in the [File] menu to display the
Auto Format dialogue box.
2 In the “Category:” list box, select the category containing the template that
you wish to use. For this example, let’s select “shop”.
3 In the “Template:” list box, select the template that you wish to use.
Let’s select the one named shop3.lbl.
4 Click the OK button. A new layout containing the selected pre-
formatted text is created and the Auto Text dialogue box is displayed.
5 Click the Next or the Previous buttons until the text that you wish to
change appears in the “Input:” edit box. Here, the first line of text that
we wish to change, “CAMERA”, is already displayed.
6 Change the text so that the desired text is entered. We can start by
changing the product name to “VCR”.
7 Repeat steps 5 and 6 until all of the text is entered in the way that
you want, and then click the Next button. Let’s finish editing the text
by changing the original price to “$415.” and the sale price to “$215.”
8 Click the Close button. The text in the layout is replaced by the newly
entered text.
!!AutoFormat!!
Importing a graphics file
With the P-touch Editor application, you can also import images files in a variety of formats (.bmp, .dib, .jpg, .tif, .ico, and .wmf
on the PC or PICT, JPEG, TIFF and BMP on the Mac) into your layout.
1 With a layout document displayed, select the [Image] command in the [Insert] menu (in the PC software) or the
[Object] menu (in the Mac software). A dialogue box that allows you to select the image file appears.
When using the P-touch Editor for the PC: When using the P-touch Editor for the Mac:
2 Select the graphic file that you wish to add to the layout and double-click
it. The image appears in the layout.
22
Page 27

Barcode
Keep the following points in mind when using P-touch Editor Version 3.1 to print barcodes.
• Barcodes should be printed on white tape. If other colours of tape are used, the barcode reader may not be able to
read the barcode correctly.
• Be sure to test the barcode reader to make sure that it can read printed barcodes in the environment where you plan
to use them. In some cases, the barcodes are not read correctly.
• The QR Code protocol can only be used with English. If data in any other language is entered, the barcode may not be
read correctly.
Databases
• For general details, refer to the User’s Guide supplied on the P-touch Editor Version 3.1 CD-ROM.
Keep the following points in mind when using the database functions of P-touch Editor Version 3.1.
• The database function of P-touch Editor Version 3.1 (Windows
Microsoft Access 97. By upgrading P-touch Editor Version 3.1 using a program available on the CD-ROM, P-touch
Editor will become compatible with Access 2000. Refer to the Readme file located at English\Ptouch\Editor\Ac2k
on the CD-ROM (the folder name for French is “Francais”), and start up the program.
• P-touch Editor Version 3.1 can import files other than mdb files, such as csv files. Files saved as csv files with an
application such as Microsoft
touch Editor Version 3.1 CD-ROM for more details.
• Using a function available with Microsoft
changed in Excel is automatically updated with the P-touch Editor.
®
Excel can be used with P-touch Editor. Refer to the User’s Guide supplied on the P-
®
Access 97, Excel files can be linked to mdb files. With this function, data
®
version) uses database files that are compatible with
23
Page 28

Reading the User’s Guide
The P-touch Editor User’s Guide can be read either by inserting the CD-ROM into the drive each time you wish to refer to
it or by installing it onto your hard disk so that it is quickly available at any time. Since the User’s Guide is an HTML
document, a browser is needed to read it. If Internet Explorer is not installed, it can be installed by downloading it from the
Internet.
The P-touch Editor User’s Guide can be read using other browsers; however, some pages may not be displayed
correctly.
Reading the P-touch Editor User’s Guide
1 If the User’s Guide was not installed onto the computer’s hard disk, insert the P-touch Editor CD-ROM into the CD-
ROM drive.
2 Start up the User’s Guide.
On an IBM PC-compatible computer:
• By clicking the P-touch Editor icon:
Double-click “The User’s Guide PT-9200DX” icon in the “P-touch Editor 3.1” group window.
• With the Start button:
(a) Click the Start button in the taskbar to display the Start menu.
(b) Select “programmes”.
(c) Select “P-touch Editor 3.1”.
(d) Click “The User’s Guide PT-9200DX”.
• With Windows
(a) Start up Windows
(b) Select the CD-ROM drive (if the User’s Guide is not installed on the hard disk), or select the drive and directory
where P-touch Editor is installed (if the User’s Guide is installed on the hard disk).
(c) Double-click “Main.htm” in the “Manual” folder.
On a Macintosh computer:
• Double-click “Main.htm” in the “User’s Guide” folder of the CD-ROM’s “P-touch” folder (if the User’s Guide is not
installed on the hard disk), or of the installed “P-touch Editor Ver3.1” folder (if the User’s Guide is installed on the
hard disk).
®
Explorer:
®
Explorer.
24
Page 29
Using the PT-9200DX
After you have designed a label layout using the P-touch Editor application, you can print it out to make a label.
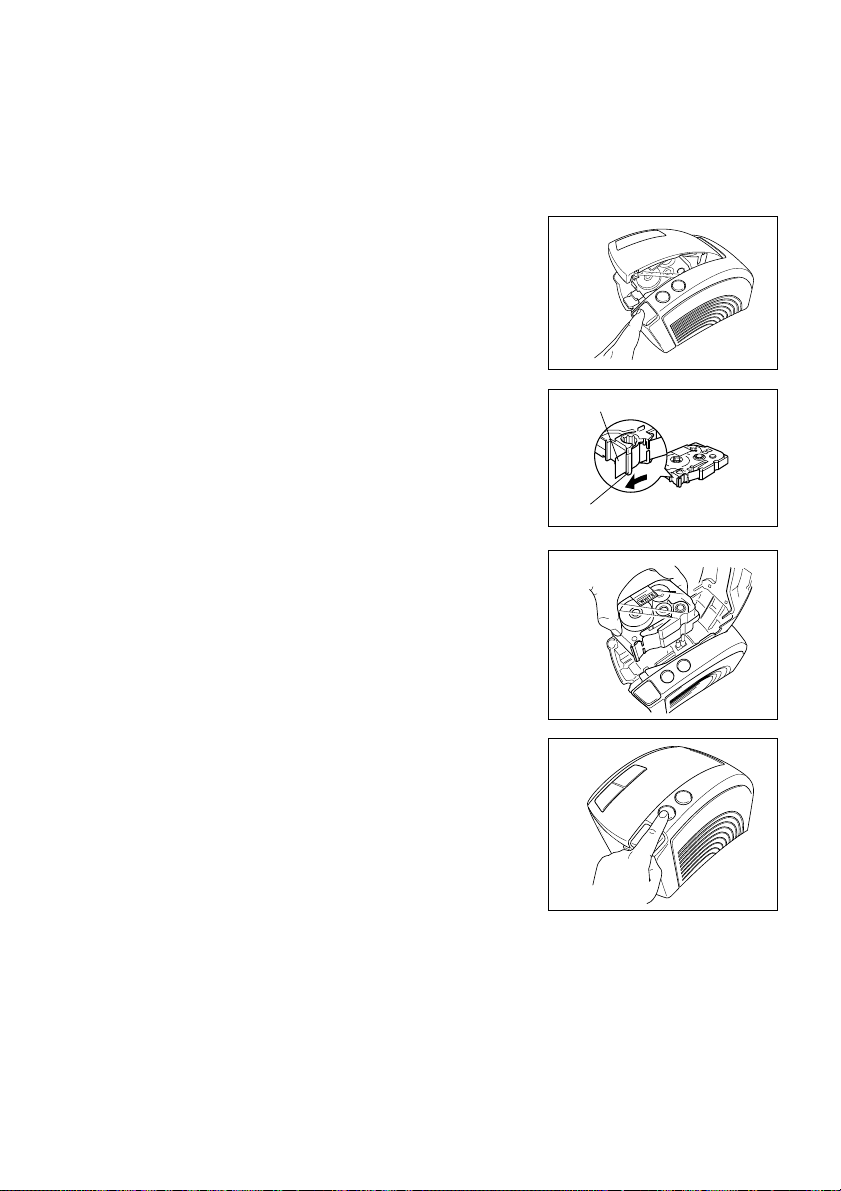
Installing the tape cassette
1 Press down on the cover release button and lift open the tape compart-
ment cover.
2 If you are using a new tape cassette, first remove the stopper. (Some
tape cassettes may not be installed with a stopper.) Make sure that the
end of the tape feeds under the tape guides.
3 Insert the tape cassette firmly into the compartment, making sure that
the entire back of the cassette touches the bottom of the compartment.
When inserting the tape cassette, make sure that the ink ribbon
does not catch on the corner of the metal guide.
Be sure not to touch the print head.
4 Close the compartment cover, and then press the on/off button to turn
on the PT-9200DX .
End of the tape
Tape guide
25
Page 30
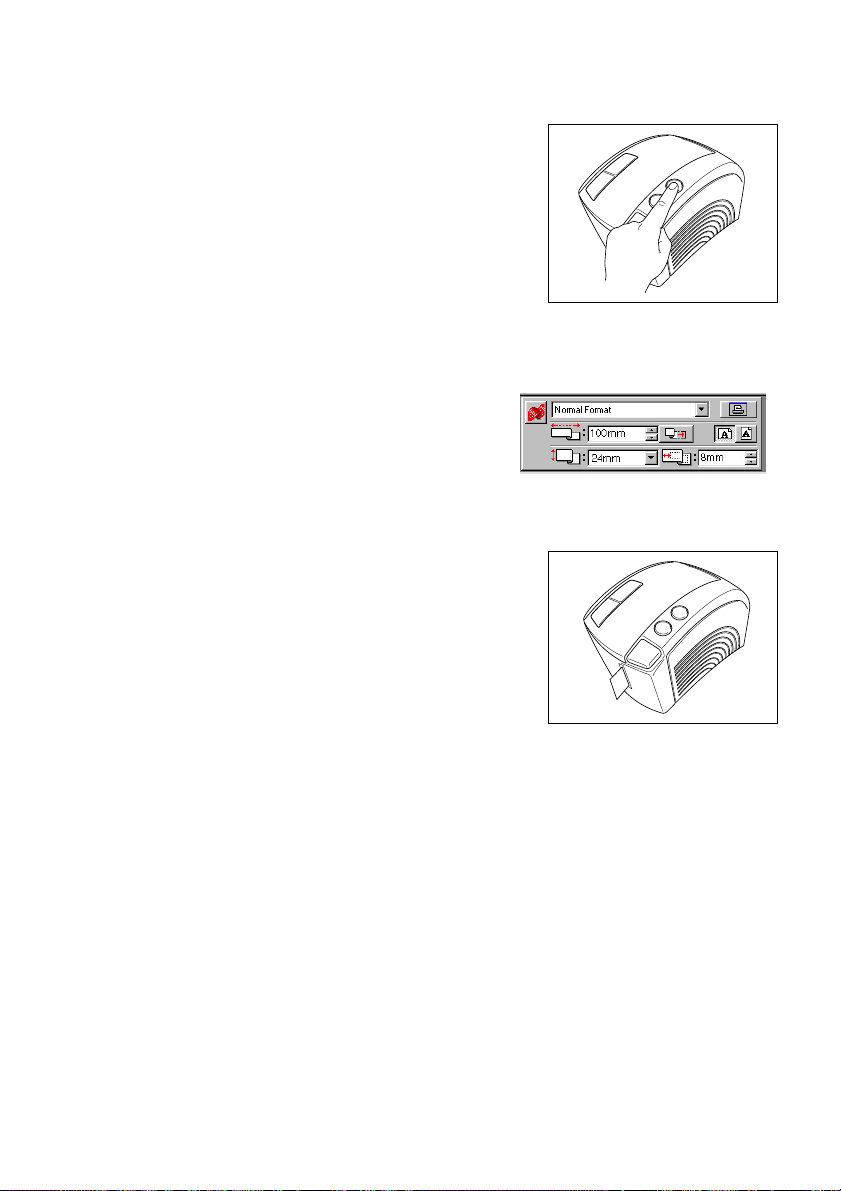
5 After the on/off button lights up in green, press the feed/cut button
once to remove any slack in the tape and cut off the excess.
Printing a label
1 Turn on the PT-9200DX and start up the computer.
2 Start up P-touch Editor and make sure that “PT-9200DX ” is selected as the printer in the Print Setup dialogue box ([Print
Setup] command in the [File] menu of the PC software) or in the Chooser (when using the Mac software).
3 In the Size setting of the Page Properties, select the desired label size,
and then design your label layout.
4 Click the [Print] command in the [File] menu, select the desired settings in the Print dialogue box, and then click the OK
button. The on/off button on the PT-9200DX flashes in green while it is receiving the data. After the label is printed, it is
fed from the tape exit slot and automatically cut off if the “Auto Cut” option was selected.
If the “Half Cut” option was selected, press the feed/cut button
once to cut off the label.
While printing multiple copies of labels, the printing speed may be
decreased so that a high resolution can be maintained.
26
Page 31

Maintenance
Cleaning the Print Head and Roller
A blank horizontal line appearing through the printed label indicates that the print head and roller are dirty. Clean the print
head and roller according to the following procedure.
1 Turn off the PT-9200DX.
2 Open the tape compartment cover.
3 Remove the tape cassette if one is installed.
4 Use a dry cotton swab to gently wipe up and down along the print head and roller.
Cotton swab
Print head (area to
be cleaned)
5 Insert the tape cassette, and then close the tape compartment cover.
Caution: Be careful not to touch the cutter near the print head and roller while cleaning them.
* Cleaning can also be done by using the optional print head cleaning cassette (TZ-CL6).
In addition, do not try to clean the print head immediately after printing, otherwise you may be burned.
Cotton swab
Roller (area to be
cleaned)
27
Page 32

Monitoring the P-touch Status
You can determine the status of the PT-9200DX from the power button light.
PT-9200DX status
Power button light
Lights up in green
Flashes in green
Lights up in orange
Flashes in orange
Flashes in red
(Correct the problem, and then try printing
again.)
Lights up in red
(Correct the problem, and then try printing
again.)
• The P-touch is operating normally and is in stand-by.
• The P-touch is receiving data from the computer correctly.
• While in stand-by, the P-touch detected that the tape cassette was not
inserted correctly. Correctly insert the tape cassette. Printing will begin
when the tape cassette is correctly inserted.
• The tape compartment cover is not completely closed. Close the tape
compartment cover.
• While receiving data, the P-touch detected that the tape compartment
cover was not completely closed or that the cover was opened. Close
the tape compartment cover. Printing will begin when the tape compartment cover is closed.
• While printing, the P-touch detected that a tape cassette was not inserted or that the tape cassette ran out of tape. Insert a tape cassette or
replace it.
• Before or during printing, the tape compartment cover was opened.
Close the tape compartment cover.
• A data transmission error occurred. After about five seconds, the P-touch
will return to stand-by (the power button will light up in green).
• Turn off the P-touch, and then turn it on again.
If the power button continues to light up in red, contact your service
representative.
Description/Remedy
28
Page 33

Troubleshooting
If you think the P-touch is not printing correctly, but you cannot determine the problem with the power button light, refer to
the following list of possible problems and perform the necessary operations.
Problem
The P-touch does not
print.
A printing error is
indicated.
While printing, striped
tape appears.
The power button does
not light up or flash.
A blank horizontal line
appears through the
printed label.
A data transmission error
appears on the computer.
®
(Windows
The baud rate cannot be
set using the Change
Baud Rate Wizard.
* If two or more of the same P-touch models are connected through their USB ports, select “PTUSB (PT-9200DX-
* The serial number is written above the barcode on the silver label attached to the bottom of the P-touch.
only)
XXXXXXXXX):” (where XXXXXXXXX is the serial number) instead of “PTUSB:”.
• The interface cable is loose.
• The tape cassette is not in-
serted correctly.
• The tape compartment cover
is open.
There is no tape in the tape cassette.
The power supply cable is
loose.
The print head and roller are
dirty.
The wrong port is selected.
The baud rates of the computer
and the P-touch are not the
same. (Only for a serial connection)
The computer does not support
the P-touch’s default baud rate
of 115,200 bps.
Error 99
The computer cannot detect
the P-touch.
Error 1,5
The computer’s serial port cannot be used.
Cause
Check that the interface cable is correctly connected, the tape
cassette is correctly installed, and that the tape compartment
cover is closed.
Insert a new tape cassette, and then either press the feed/cut
button or turn the P-touch off, then on again.
Check that the power supply cable is correctly connected. If the
power button still does not light up or flash, contact your service representative.
Clean the print head and roller according to the procedure in
Cleaning the Print Head and Roller
®
Windows
Under “Print to the following port” in the printer Properties dialogue box, select “PTUSB:” for a USB connection or select
“PTCOMn:” (where “n” is 1 if the P-touch is connected to the
computer’s COM1 port or 2 if the P-touch is connected to the
computer’s COM2 port) for a serial connection.*
Mac
For a serial connection, select in the Chooser the port where
the P-touch is connected.
®
Windows
Start up the Change Baud Rate Wizard, and then select the same
baud rate as the P-touch.
Mac
The Macintosh may not support the P-touch’s default baud rate of
115,200 bps. After changing the baud rate of the P-touch accord-
Changing the P-touch’s Baud Rate
ing to
baud rate of 57,600 bps in the Print dialogue box.
The P-touch’s default baud rate of 115,200 bps is not supported
by some computers.
After changing the baud rate of the P-touch according to
ing the P-touch’s Baud Rate
Baud Rate Wizard, and select a baud rate of 57,600 or 9,600
bps.
Check the following:
• Is the P-touch turned on?
• Is the interface cable correctly connected?
• Has the COM port where the P-touch is connected been
selected with the Change Baud Rate Wizard? (Many PCs
have more than one COM port.)
The COM ports on some PCs are turned off as a default. Check
the computer’s manual or ask the computer manufacturer, and
then turn on the COM port.
<Checking the COM port (Windows
Double-click “System” in the Control Panel window. Click
the Device Manager tab, and then click the plus sign next to
“Ports (COM & LPT)”. Check that COM1 and COM2 are listed
and that there is no error symbol displayed.
Solution
on page 27.
on page 31, select a
on page 31, start up the Change
®
95/98)>
Chang-
29
Page 34

Problem Remedy
• The tape is not ejected correctly after being automatically cut.
• Turn off the machine, open the tape compartment
cover, and remove the tape cassette if one is installed.
Using a cotton swab dipped in isopropyl (rubbing)
alcohol, clean off the metal piece in the exit slot to
the left of the cutter.
30
Cutter
Cotton swab
Metal piece (Area to be cleaned)
Page 35

Changing the P-touch’s Baud Rate
The PT-9200DX’s default baud rate for a serial connection is 115,200 bps. Some computers may not support a serial port
baud rate of 115,200 bps. If so, follow the procedure below to change the P-touch’s baud rate to 9,600 bps. In addition, the
baud rate for the port must also be set to 9,600 bps.
1 Turn off the PT-9200DX.
2 Hold down the power button for about five seconds.
3 Release the power button when it begins flashing in red and green.
4 The baud rate of the PT-9200DX has been set to the slower baud rate of 9,600 bps.
Power button
31
Page 36

Machine Specification
Power supply: Input AC 230 V 50Hz
Print tape: 6 widths available:
Print head: 384 dots
Tape cutter: Auto full cutter
Port: Serial, USB
Dimensions: 120 × 150 × 250 mm
Weight: 1.5 kg
6 mm
9 mm
12 mm
18 mm
24 mm
36 mm
360 dpi
Auto half cutter
32
Page 37

Accessories
• Supplies
Obtain tape cassettes from your nearest authorised dealer.
the use of unauthorised supplies.
Use only Brother TZ tapes with this machine. Do not use tapes that do not have the
Stock No. Description
36 mm laminated tapes
TZ-161 Black characters on clear adhesive
TZ-261 Black characters on white adhesive
TZ-461 Black characters on red adhesive
TZ-561 Black characters on blue adhesive
TZ-661 Black characters on yellow adhesive
TZ-M961 Black characters on silver (matt) adhesive
TZ-262 Red characters on white adhesive
TZ-263 Blue characters on white adhesive
TZ-364 Gold characters on black adhesive
TZ-365 White characters on black adhesive
24 mm laminated tapes
TZ-151 Black characters on clear adhesive
TZ-M51 Black characters on clear (matt) adhesive
TZ-M951 Black characters on silver (matt) adhesive
TZ-251 Black characters on white adhesive
TZ-451 Black characters on red adhesive
TZ-551 Black characters on blue adhesive
TZ-651 Black characters on yellow adhesive
TZ-751 Black characters on green adhesive
TZ-951 Black characters on silver adhesive
TZ-C51 Black characters on fluorescent yellow adhesive
TZ-B51 Black characters on fluorescent orange adhesive
TZ-D51 Black characters on fluorescent green adhesive
TZ-152 Red characters on clear adhesive
TZ-252 Red characters on white adhesive
TZ-153 Blue characters on clear adhesive
TZ-253 Blue characters on white adhesive
TZ-354 Gold characters on black adhesive
TZ-155 White characters on clear adhesive
TZ-355 White characters on black adhesive
TZ-455 White characters on red adhesive
TZ-555 White characters on blue adhesive
TZ-655 White characters on orange fluorescent adhesive
TZ-755 White characters on green adhesive
18 mm laminated tapes
TZ-141 Black characters on clear adhesive
TZ-241 Black characters on white adhesive
TZ-242 Red characters on white adhesive
TZ-243 Blue characters on white adhesive
TZ-344 Gold characters on black adhesive
TZ-345 White characters on black adhesive
TZ-441 Black characters on red adhesive
TZ-541 Black characters on blue adhesive
TZ-641 Black characters on yellow adhesive
TZ-741 Black characters on green adhesive
Brother cannot be held responsible for trouble caused by
mark.
33
Page 38

Stock No. Description
12 mm laminated tapes
TZ-131 Black characters on clear adhesive
TZ-132 Red characters on clear adhesive
TZ-133 Blue characters on clear adhesive
TZ-135 White characters on clear adhesive
TZ-231 Black characters on white adhesive
TZ-232 Red characters on white adhesive
TZ-233 Blue characters on white adhesive
TZ-334 Gold characters on black adhesive
TZ-335 White characters on black adhesive
TZ-431 Black characters on red adhesive
TZ-435 White characters on red adhesive
TZ-531 Black characters on blue adhesive
TZ-535 White characters on blue adhesive
TZ-631 Black characters on yellow adhesive
TZ-635 White characters on orange adhesive
TZ-731 Black characters on green adhesive
TZ-735 White characters on green adhesive
TZ-931 Black characters on silver adhesive
TZ-B31 Black characters on fluorescent orange adhesive
TZ-C31 Black characters on fluorescent yellow adhesive
TZ-D31 Black characters on fluorescent green adhesive
TZ-M31 Black characters on clear (matt) adhesive
TZ-M931 Black characters on silver (matt) adhesive
9 mm laminated tapes
TZ-121 Black characters on clear adhesive
TZ-122 Red characters on clear adhesive
TZ-123 Blue characters on clear adhesive
TZ-221 Black characters on white adhesive
TZ-222 Red characters on white adhesive
TZ-223 Blue characters on white adhesive
TZ-324 Gold characters on black adhesive
TZ-325 White characters on black adhesive
TZ-421 Black characters on red adhesive
TZ-521 Black characters on blue adhesive
TZ-621 Black characters on yellow adhesive
TZ-721 Black characters on green adhesive
TZ-A25 White characters on grey adhesive
TZ-M21 Black characters on clear (matt) adhesive
6 mm laminated tapes
TZ-111 Black characters on clear adhesive
TZ-211 Black characters on white adhesive
TZ-315 White characters on black adhesive
TZ-611 Black characters on yellow adhesive
24 mm non-laminated tapes
TZ-N251 Black characters on white adhesive
34
Page 39

Stock No. Description
18 mm non-laminated tapes
TZ-N241 Black characters on white adhesive
TZ-N242 Red characters on white adhesive
TZ-N243 Blue characters on white adhesive
TZ-N541 Black characters on blue adhesive
TZ-N641 Black characters on yellow adhesive
TZ-N741 Black characters on green adhesive
TZ-NF41 Black characters on purpul adhesive
TZ-PH41 Black characters on adhesive with a heart design
TZ-PF41 Black characters on adhesive with a fruit design
TZ-PM41 Black characters on adhesive with a marine design
TZ-N841 Black characters on gold adhesive
12 mm non-laminated tapes
TZ-N231 Black characters on white adhesive
TZ-N232 Red characters on white adhesive
TZ-N233 Blue characters on white adhesive
TZ-N531 Black characters on blue adhesive
TZ-N631 Black characters on yellow adhesive
TZ-N731 Black characters on green adhesive
TZ-NF31 Black characters on purple adhesive
9 mm non-laminated tapes
TZ-N221 Black characters on white adhesive
6 mm laminated tapes
TZ-N211 Black characters on white adhesive
Strong adhesive tapes
Stock No. Description
TZ-S251 24 mm strong adhesive tape (black characters on white adhesive)
TZ-S241 18 mm strong adhesive tape (black characters on white adhesive)
TZ-S231 12 mm strong adhesive tape (black characters on white adhesive)
TZ-S221 9 mm strong adhesive tape (black characters on white adhesive)
TZ-S211 6 mm strong adhesive tape (black characters on white adhesive)
Special tapes
Stock No. Description
TZ-IY41 18 mm iron-on transfer tape (black characters)
TZ-SE4 18 mm security tape (black characters on white adhesive)
TZ-FA4 18 mm fabric tape (blue characters on white fabric)
TZ-FA3 12 mm fabric tape (blue characters on white fabric)
Options
Stock No. Description
TZ-CL6 Print head cleaning cassette
35
Page 40

Page 41

Guide de référence rapide
FRANÇAIS
Page 42

Merci d’avoir acheté la PT-9200DX!
Avec votre nouvelle imprimante d’étiquettes Brother, vous pourrez imprimer des étiquettes personnalisées pour n’importe
quelle utilisation. Insérez simplement une cassette pour étiquettes dans la PT-9200DX, créez votre étiquette avec le logiciel Ptouch Editor fourni, puis imprimez-la. Votre étiquette personnalisée est imprimée en quelques secondes. Les étiquettes sont
disponibles dans une variété de tailles et de couleurs - une solution idéale pour le codage couleur et pour répondre à tous vos
besoins en matière d’étiquetage.
Les nombreuses caractéristiques du logiciel P-touch Editor facilitent et rendent plus rapide la création d’étiquettes magnifiques. Le logiciel automatise non seulement les fonctions de mise en page les plus compliquées mais inclue aussi une variété
de modèles pré-formatés pour une utilisation immédiate.
Déclaration de conformité
Nous, Brother Industries Ltd.
déclarons que ce produit est conforme aux documents normatifs suivants:
Sécurité: EN 60950
EMC: EN 55022 1998 Class B
et suit les dispositions de Directive sur les basses tensions 73/23/EEC et Directive sur la compatibilité électromagnétique
89/336/EEC (amendée par 91/263/EEC et 92/31/EEC).
Publié par: Brother Industries Ltd.
Les câbles d’interface inclus doivent être utilisés pour assurer la conformités aux tolérances de EMC.
15-1, Naeshiro-cho, Mizuho-ku,
Nagoya 467-8561, Japan
EN 55024 1998
EN 61000-3-2 1995
EN 61000-3-3 1995
PRÉCAUTIONS GÉNÉRALES
• Utilisez seulement des cassettes TZ Brother avec cette imprimante. N’utilisez pas de cassettes ne portant pas la marque .
• Ne tirez pas sur le ruban sortant de la P-touch. Vous risqueriez ainsi d’endommager la cassette.
• Évitez d’utiliser l’imprimante dans des endroits extrêmement poussiéreux. Ne laissez pas l’imprimante en plein soleil ou
sous la pluie.
• N’exposez pas l’imprimante à des températures extrêmement élevées ou à l’humidité.
• Ne laissez pas d’objets en caoutchouc ou vinyle sur l’imprimante pendant longtemps. Elle pourrait être tachée.
• Ne nettoyez pas l’imprimante avec de l’alcool ou d’autres solvants organiques. Utilisez seulement un chiffon doux et sec.
• Ne mettez pas d’objets étrangers dans l’imprimante ou d’objets lourds dessus.
• Pour éviter les blessures, ne touchez pas le bord de la coupeuse.
• Ne touchez pas la tête d’impression, qui devient très chaude quand la P-touch est utilisée. Même après la mise hors tension
de l’imprimante, la tête d’impression reste chaude pendant un certain temps.
• Utilisez seulement le cordon d’alimentation conçu spécialement pour cette imprimante. L’utilisation de tout autre cordon
annulera la garantie.
• Utilisez seulement les câbles fournis avec cette imprimante. L’utilisation de tout autre câble annulera la garantie.
• Si vous n’avez pas l’intention d’utiliser la machine pendant longtemps, débranchez le cordon d’alimentation.
• N’essayez pas de démonter la P-touch.
®
• IBM
est une marque de International Business Machines, Inc.
• Microsoft
• Macintosh et Power Macintosh sont des marques déposées de Apple Computer, Inc.
• Tous les autres noms de logiciels et produits mentionnés sont des marques de fabrique ou des marques déposées de leurs
®
et Windows® sont des marques déposées de Microsoft Corp. aux états-Unis et dans les autres pays.
compagnies respectives.
Page 43

Table des matières
Précautions Générales
Déballage ......................................................................................................................................... 2
Raccordement du câble d’interface et du cordon d’alimentation ..................................................... 4
Installation de P-touch Editor ........................................................................................................... 6
Installation de P-touch Editor et du pilote d’imprimante (pour Windows® 95/98/Me/NT 4.0/2000 Professional/XP) ..
Installation de P-touch Editor Version 3.1 ..................................................................................... 6
Installation du pilote d’imprimante .............................................................................................. 8
Pour une liaison série.............................................................................................................. 8
Utilisation de Assistant pour le changement de la vitesse de transmission ............................... 9
Pour une liaison USB (Windows
®
98/Me/2000 Professional/XP seulement) ............................. 10
Installation de P-touch Editor Version 3.1 (pour Macintosh) ............................................................. 12
Installation de P-touch Editor Version 3.1.................................................................................... 12
Installation du pilote d’imprimante PT-9200DX............................................................................ 13
Sélection de l’imprimante ............................................................................................................ 14
Désinstallation du logiciel P-touch et du pilote d’imprimante ........................................................... 14
Désinstallation de P-touch Editor Version 3.1 (pour Windows® 95/98/Me/NT 4.0/2000 Professional/XP) ...
Remplacement, installation ou suppression du pilote d’imprimante
(pour Windows
®
95/98/Me/NT 4.0/2000 Professional/XP) ............................................................ 15
Pour une liaison série.............................................................................................................. 15
®
Pour une liaison USB (Windows
98/Me/2000 Professional/XP seulement) ............................. 16
Suppression de P-touch Editor Version 3.1 et du pilote d’imprimante (pour Macintosh) ............... 18
Utilisation de P-touch Editor ............................................................................................................ 19
Lancement de P-touch Editor ............................................................................................................ 19
Affichage des propriétés .................................................................................................................... 20
Création d’une nouvelle mise en page .............................................................................................. 20
Création d’une mise en page à partir d’un modèle Format automatique ............................................ 21
Importation d’un fichier graphique .................................................................................................... 22
Code barres....................................................................................................................................... 23
Bases de données .............................................................................................................................. 23
Lecture du mode d’emploi ................................................................................................................ 24
Lecture du mode d’emploi de P-touch Editor .................................................................................... 24
Utilisation de la PT-9200DX ............................................................................................................. 25
Mise en place de la cassette .............................................................................................................. 25
Impression d’une étiquette ................................................................................................................ 26
Entretien ........................................................................................................................................... 27
Nettoyage de la tête d’impression et du cabestan .............................................................................. 27
Contrôle du statut de la P-touch ....................................................................................................... 28
Guide de dépannage ......................................................................................................................... 29
Changement de la vitesse de transmission de la P-touch .................................................................. 31
Spécifications de l’imprimante ......................................................................................................... 32
Accessoires ....................................................................................................................................... 33
6
14
1
Page 44

Déballage
PT-9200DX Cassette à ruban TZ de 24 mm
Couvercle du logement
de la cassette
Touche Avance/coupe
Touche On/off
Touche de libération du
couvercle
Cordon d’alimentation secteur (pour le raccordement de la PT-9200DX à une prise secteur)
Pour la Belgique Pour la Suisse
Câbles d’interface (2)
CD-ROM contenant les logiciels PC et Mac et leurs manuels.
Série: Pour un ordinateur compatible IBM
PC ou Macintosh
(caractères noirs sur fond blanc)
USB: Pour un ordinateur compatible
IBM PC ou Macintosh
Seul le cordon d’alimen-
tation correspondant au
pays de vente est inclus.
Précautions:
• Faites attention à ne pas
rayer le CD-ROM.
2
• Ne pas soumettre le CD-
ROM à des températures
extrêmement élevées ou
basses.
• Ne pas poser d’objets lourds
sur le CD-ROM.
Page 45

Les cassettes d’étiquettes
• Ne tirez pas sur le ruban ; vous risqueriez d’endommager la cassette.
• Si vous collez l’étiquette sur un endroit humide ou sale, elle risque de se décoller facilement. Avant de coller
l’étiquette, nettoyez la surface où vous allez la coller.
• Selon les conditions d’environnement et le matériau, l’état, la rugosité et la forme de la surface de collage, il est
possible que l’étiquette se déplace ou se décolle.
• Pour vérifier la force d’adhérence de l’étiquette ou avant d’utiliser l’étiquette sur un endroit particulièrement
sensible, faites un essai en collant un petit morceau d’étiquette sur une section dissimulée de la surface de collage
prévue.
• Le soleil, le vent et la pluie risquent de provoquer une perte de couleur de l’étiquette ou de la décoller.
• Les inscriptions effectuées avec une encre à base d’huile ou à base d’eau risquent d’être visibles même si l’étiquette
est collée dessus. Pour les dissimuler, collez deux étiquettes l’une sur l’autre, ou utilisez un autocollant à base
sombre.
• Ce ruban peut ne pas convenir dans les cas où des dommages ou des blessures risquent d’entraîner des obligations
contractuelles.
Brother Co, Ltd. et ses fournisseurs possèdent tous les droits pour ce logiciel (y compris, mais non limités à, la programmation, les images, les cliparts, les modèles et le texte faisant partie du logiciel), les textes compris dans les manuels
fournis et les copies du logiciel. Ce logiciel, dans sa totalité ou en partie, ne peut pas être reproduit, modifié, analysé,
désassemblé ou décompilé sans permission.
3
Page 46

Raccordement du câble d’interface et du cordon
d’alimentation
Raccordez la PT-9200DX à l’ordinateur en suivant les instructions ci-dessous.
Pour le raccordement au port série:
Série
1 Assurez-vous que la PT-9200DX et l’ordinateur sont hors tension.
2 Branchez une extrémité du câble d’interface série fourni sur le port série (IOIOI) de la PT-9200DX et l’autre extrémité
du câble sur le port série de l’ordinateur. Pour une liaison avec Macintosh, raccordez la PT-9200DX au port modem
ou imprimante (de préférence le port modem).
Les ports série (RS-232C) de certains ordinateurs sont conçus de telle façon que le câble d’interface série ne
peut pas être raccordé. Dans ce cas, utilisez un adaptateur disponible dans le commerce.
3 Insérez la fiche de l’une des extrémités du cordon d’alimentation dans la prise d’alimentation de la PT-9200DX.
4 Insérez la fiche de l’autre extrémité du cordon d’alimentation dans une prise secteur munie d’une borne de mise à la
terre.
Certains endroits peuvent nécessiter l’utilisation d’un adaptateur muni d’un conducteur de mise à la terre. Raccordez
ce conducteur à la borne de mise à la terre.
5 Mettez la PT-9200DX sous tension, puis mettez l’ordinateur sous tension.
4
Page 47

Pour le raccordement au port USB:
Vous devez installer le logiciel avant d’effectuer le raccordement à l’interface USB ou de mettre sous tension.
Veuillez suivre la procédure d’installation des pages 6 à 12 avant d’effectuer le raccordement ou de mettre sous
tension. Le logiciel d’installation de P-touch Brother vous expliquera comment procéder.
USB
1 Branchez une extrémité du câble d’interface USB fourni sur le port USB ( ) de la PT-9200DX et l’autre extrémité
du câble sur le port USB de l’ordinateur.
Ne raccordez pas la PT-9200DX à l’ordinateur en utilisant en même temps les câbles d’interface série et USB,
autrement la PT-9200DX risque d’être endommagée.
Lorsque vous effectuez une liaison USB par l’intermédiaire d’un Hub USB, un raccordement correct peut ne
pas être possible suivant le type de Hub USB utilisé. Si l’impression est impossible avec une liaison avec HUB,
essayez de raccorder la PT-9200DX directement à l’ordinateur à l’aide du câble d’interface USB.
2 Insérez la fiche de l’une des extrémités du cordon d’alimentation dans la prise d’alimentation de la PT-9200DX.
3 Insérez la fiche de l’autre extrémité du cordon d’alimentation dans une prise secteur munie d’une borne de mise à la
terre.
Certains endroits peuvent nécessiter l’utilisation d’un adaptateur muni d’un conducteur de mise à la terre. Raccordez
ce conducteur à la borne de mise à la terre.
5
Page 48

Installation de P-touch Editor
Le logiciel P-touch Editor et le pilote d’imprimante PT-9200DX doivent être installés pour que des étiquettes puissent être
Pour Windows®
imprimées sur la PT-9200DX.
Installation de P-touch Editor et du pilote d’imprimante
(pour Windows® 95/98/Me/NT 4.0/2000 Professional/XP)
Installez P-touch Editor Version 3.1 et le pilote d’imprimante dans l’ordinateur de la façon décrite ci-dessous.
Vérifiez que la configuration de votre système remplit les conditions suivantes.
Ordinateur : IBM PC ou compatible
Système d’exploitation :
Interface série : PC avec processeur x86 et port série (RS-232C) et fonctionnant sous Microsoft
Interface USB : PC avec port USB et Microsoft
Certains PC fonctionnant sous Microsoft® Windows® 95/NT 4.0 préinstallé ne supportent pas toutes les
fonctions du matériel USB.
Espace libre sur le disque dur : Au moins 20 Mo
Quelques centaines de Mo d’espace libre supplémentaires peuvent être nécessaires pour l’impression d’étiquet-
tes longues ou l’impression d’un volume important de données.
Moniteur : VGA ou carte graphique plus puissante
Port : Série ou USB
Mémoire disponible : Au moins 32 Mo
Lecteur de CD-ROM
98/Me/2000 ou Windows
®
NT 4.0/2000 Professional/XP.
®
Windows® 98/Me/2000 Professional/XP préinstallé.
Installation de P-touch Editor Version 3.1
Pour une liaison série : Avant d’installer le logiciel P-touch Editor et le pilote d’imprimante, raccordez la PT-
9200DX à l’ordinateur comme indiqué à la page 4, puis mettez-les sous tension.
Pour une liaison USB : Ne raccordez pas la PT-9200DX à l’ordinateur avant d’avoir installé le logiciel P-touch
Editor, car l’installation risque de ne pas s’effectuer correctement. Ne raccordez pas la PT-9200DX avant d’y
avoir été invité.
®
Windows® 95/
1 Insérez le CD-ROM P-touch Editor Version 3.1 dans
le lecteur de CD-ROM de l’ordinateur. Une boîte de
dialogue s’affiche automatiquement pour vous
permettre de sélectionner la langue.
Si la boîte de dialogue n’apparaît pas automatiquement, cliquez sur “Poste de travail” dans le bureau,
puis double-cliquez sur le lecteur de CD-ROM qui
renferme le CD-ROM.
(Avec Windows
dans le menu Démarrer, puis double-cliquez sur le
lecteur de CD-ROM qui renferme le CD-ROM.
Ensuite, double-cliquez sur “Setup.exe” pour afficher
la boîte de dialogue.
2 Sélectionnez la langue de votre système d’exploita-
tion Windows
boîte de dialogue s’affiche pour vous permettre de
sélectionner quoi installer.
®
XP, cliquez sur “Poste de travail”
®
, puis cliquez sur le bouton OK. Une
6
3 Cliquez sur le bouton supérieur (Editeur). Une boîte
de dialogue s’affiche pour vous permettre de sélectionner le modèle.
Si vous ne souhaitez installer que le pilote
d’imprimante, cliquez sur le bouton inférieur
(Pilote d’imprimante).
Page 49

4
Cliquez sur l’icône de la PT-9200DX. L’assistant
InstallShield
est lancé, puis la boîte de dialogue Bienvenue s’affiche.
®
pour l’installation du logiciel P-touch Editor
8 Sélectionnez la méthode d’installation, puis cliquez
sur le bouton Suivant.
Pour Windows®
5
Lisez attentivement le contenu de la boîte de dialogue,
puis cliquez sur le bouton Suivant pour continuer. La
boîte de dialogue Informations utilisateur s’affiche.
6 Entrez les informations nécessaires dans les cases
appropriées (si les informations ont déjà été enregistrées dans Windows
ment), puis cliquez sur le bouton Suivant. Une boîte
de dialogue s’affiche vous demandant de confirmer
les informations entrées.
7 Cliquez sur le bouton Oui pour enregistrer les
informations entrées. La boîte de dialogue Type
d’installation s’affiche.
Pour modifier les informations, cliquez sur le
bouton Non, puis revenez à l’étape 6.
®
, elles s’affichent automatique-
• Pour une installation Typique ou Compacte
Lorsque vous sélectionnez “Typique” ou “Compacte”,
puis que vous cliquez sur le bouton Suivant, l’installa-
tion commence immédiatement.
Typique : Toutes les options de base (P-touch Editor
Compacte : Seul P-touch Editor Version 3.1 est
• Pour une installation Personnalisée
Si vous sélectionnez “Personnalisée” puis que vous
cliquez sur le bouton Suivant, une boîte de dialogue
s’affiche pour vous permettre de sélectionner les
options à installer. Seules les options cochées seront
installées. Outre les options de base listées pour une
installation typique, vous pouvez installer le mode
d’emploi.
Version 3.1, les clips arts, les Modèles
auto formatés, l’Aide et 13 polices) sont
installées.
installé.
7
Page 50

1) Sélectionnez les options à installer.
Editeur : Le logiciel P-touch Editor
Pour Windows®
Clip Art : Les illustrations de la fonction
Polices :
Modèles auto
formatés :
Mode d’emploi : Le mode d’emploi (HTML) de
Aide : Les fichiers d’aide de P-touch
Si vous cliquez sur le bouton Changer alors qu’une option est
sélectionnée, vous pourrez sélectionner des sous-éléments.
Cliquez sur le bouton Changer pour afficher la boîte de
dialogue Sélectionner sous-éléments, puis sélectionnez les
sous-éléments que vous souhaitez installer en les cochant. Si
certaines options ou certains sous-éléments ne sont pas
installés, certaines fonctions de P-touch Editor ne seront peut-
être pas disponibles. Après avoir sélectionné les sous-
éléments souhaités, cliquez sur le bouton Continuer.
2)
Cliquez sur le bouton Suivant pour commencer l’installation.
9
Lorsque P-touch Editor est installé, une boîte de dialogue
s’affiche pour vous permettre de sélectionner si vous
souhaitez installer le pilote d’imprimante ou non.
Pour installer le pilote d’imprimante, cliquez sur le
bouton Oui. La première boîte de dialogue Configuration du pilote s’affiche. Continuez en allant à la
section sur l’installation du pilote d’imprimante.
Si le pilote d’imprimante est déjà installé, cliquez sur
le bouton Non, redémarrez l’ordinateur, puis enlevez
le CD-ROM du lecteur de CD-ROM.
Version 3.1
Clip Art de P-touch Editor
Version 3.1
Les 13 polices de caractères
Les modèles de la fonction
Format automatique
P-touch Editor Version 3.1 (Le
mode d’emploi peut aussi être
consulté à partir du CD-ROM.)
Editor Version 3.1
Installation du pilote d’imprimante
Pour une liaison série
1 Sélectionnez “Câble série”, puis cliquez sur le bouton
OK. Une boîte de dialogue s’affiche pour vous
permettre de sélectionner si vous souhaitez installer
ou désinstaller le pilote d’imprimante.
2
Sélectionnez “Installez”, puis cliquez sur le bouton Suivant.
3
Pour les utilisateurs de Windows® 95/98/Me : Allez à l’étape 4.
Pour les utilisateurs de Windows® NT 4.0/2000
Professional/XP : Une boîte de dialogue s’affiche pour
vous permettre d’ajouter un port P-touch (PTCOM).
Si le port P-touch (PTCOM) est déjà installé, cliquez sur
le bouton Suivant et continuez à l’étape 4 ci-dessous.
Si le port P-touch (PTCOM) n’est pas installé, cliquez sur le
bouton Ajouter. La boîte de dialogue Nom du port s’affiche.
Dans la liste des ports PTCOM, sélectionnez le port
auquel la PT-9200DX est raccordée (“PTCOM1:” si la PT9200DX est raccordée au port COM1, ou “PTCOM2:” si
la PT-9200DX est raccordée au port COM2), puis cliquez
sur le bouton OK. Dans la boîte de dialogue Réglage du
pilote, cliquez sur le bouton Suivant.
4
Une boîte de dialogue s’affiche pour vous permettre de
sélectionner le port PTCOM auquel la PT-9200DX est raccordée.
Sélectionnez “PTCOM1:” si la PT-9200DX est raccordée au
port COM1, ou “PTCOM2:” si la PT-9200DX est raccordée
au port COM2, puis cliquez sur le bouton Suivant. (Avec
®
NT 4.0/2000 Professional/XP, sélectionnez le
Windows
port ajouté à l’étape 3.) Une boîte de dialogue s’affiche
pour vous demander de confirmer les modalités d’installa-
tion.
8
Page 51

5 Vérifiez que l’installation va s’effectuer comme vous
le souhaitez, puis cliquez sur le bouton Suivant. Une
boîte de dialogue s’affiche pour vous indiquer que le
pilote d’imprimante est installé.
6 Si le port auquel la PT-9200DX est raccordée
supporte la vitesse de transmission de 115200 bps,
cliquez sur le bouton Suivant.
Si le port auquel la PT-9200DX est raccordée ne
supporte pas la vitesse de transmission de 115200
bps, ou si vous souhaitez vérifier la liaison entre la
PT-9200DX et l’ordinateur, sélectionnez “Lancez
l’assistant pour le changement de la vitesse de
transmission”, puis cliquez sur le bouton Suivant pour
lancer l’Assistant pour le changement de la vitesse de
transmission. Après avoir changé la vitesse de
transmission de la façon décrite aux étapes 3 à 6 de la
Utilisation de Assistant pour le changement de
section
la vitesse de transmission
7 ci-dessous.
7 Une boîte de dialogue s’affiche pour vous indiquer
que l’installation est terminée.
Sélectionnez “Oui, je veux redémarrer mon ordinateur maintenant”, cliquez sur le bouton Terminer pour
redémarrer l’ordinateur, et enlevez le CD-ROM de
l’ordinateur.
, page 9, continuez à l’étape
Utilisation de Assistant pour le changement
de la vitesse de transmission
Si le port auquel la PT-9200DX est raccordée ne supporte pas
la vitesse de transmission de 115200 bps, ou si vous souhaitez
vérifier la liaison entre la PT-9200DX et l’ordinateur, lancez le
Changement de vitesse de transmission automatique et sélec-
tionnez les paramètres de la façon décrite ci-dessous.
1 Dans le menu Démarrer, pointez sur “Paramètres”,
puis cliquez sur “Imprimantes” pour ouvrir le dossier
Imprimantes.
(Avec Windows
télécopieurs” dans le menu Démarrer pour ouvrir le
dossier Imprimantes et télécopieurs.)
Avec Windows® 95, 98, 98SE et Me :
2
Double-cliquez sur l’icône Brother PT-9200DX, puis
cliquez sur “Propriétés” dans le menu déroulant qui
apparaît. Sur l’intercalaire Avancé de la boîte de
dialogue qui apparaît, cliquez sur le bouton Vitesse de
transmission pour lancer l’Assistant Changement de
vitesse de transmission.
Avec Windows® NT 4.0 :
Double-cliquez sur l’icône Brother PT-9200DX, puis
cliquez sur “Propriétés” dans le menu déroulant qui
apparaît. Sur l’intercalaire Paramètres de périphérique
de la boîte de dialogue qui apparaît, cliquez sur
“Vitesse de transmission...” dans l’arborescence pour
afficher la section de réglage de la ‘Vitesse de
transmission’ en bas de la boîte de dialogue. Cliquez
sur le bouton Vitesse de transmission... pour lancer
l’Assistant Changement de vitesse de transmission.
Avec Windows® 2000 et XP :
Double-cliquez sur l’icône Brother PT-9200DX, puis
cliquez sur "Propriétés" dans le menu déroulant qui
apparaît. Sur l’intercalaire Paramètres de périphérique
de la boîte de dialogue qui apparaît, cliquez sur
“Vitesse de transmission...” dans l’arborescence, puis
cliquez sur le bouton Propriétés ... qui apparaît à
droite pour lancer l’Assistant Changement de vitesse
de transmission.
3 Une boîte de dialogue s’affiche pour vous permettre
de sélectionner le port série auquel la PT-9200DX est
raccordée.
Sélectionnez le port série approprié, puis cliquez sur
le bouton Suivant. Une boîte de dialogue s’affiche
pour vous permettre de sélectionner la vitesse de
transmission.
®
XP, cliquez sur “Imprimantes et
Pour Windows®
9
Page 52

4 Sélectionnez la vitesse de transmission, puis cliquez
sur le bouton Suivant.
Normalement, “115200 bps” est sélectionné ;
Pour Windows®
néanmoins, votre ordinateur peut ne pas supporter la
vitesse de transmission de 115200 bps. Dans ce cas,
reportez-vous au mode d’emploi de votre ordinateur
et sélectionnez la vitesse de transmission maximale.
Une boîte de dialogue s’affiche pour vous demander
de confirmer les paramètres de vitesse de transmission
sélectionnés.
5 Vérifiez que la vitesse de transmission a changé, puis
cliquez sur le bouton Suivant.
Pour modifier les paramètres, cliquez sur le
bouton Précédent puis revenez à l’étape 4.
Une boîte de dialogue s’affiche pour indiquer que la
vitesse de transmission a été réglée comme spécifié.
Pour une liaison USB
(Windows® 98/Me/2000 Professional/XP seulement)
Avec la fonction Plug-and-Play, les nouveaux périphériques
raccordés au système sont détectés, et leur pilote est automatiquement installé. Si vous souhaitez raccorder la PT9200DX via le port USB, son pilote sera installé avec la
fonction Plug-and-Play. Lisez attentivement les instructions
d’installation décrites ci-dessous avant d’installer le fichier
fourni sur le CD-ROM.
Ne raccordez pas la P-touch 9200DX à l’ordinateur
tant que vous n’y êtes pas invité, sinon le pilote
d’imprimante PT-9200DX risque de ne pas être
installé correctement.
Avec Windows® 98/98SE/Me/2000 Professional :
1 Sélectionnez “Câble USB”, puis cliquez sur le bouton
OK. La boîte de dialogue Message USB s’affiche.
2 Cliquez sur le bouton Suivant. Une boîte de dialogue
s’affiche pour vous demander de raccorder la PT9200DX à l’ordinateur.
6 Cliquez sur le bouton Fin.
10
3 Raccordez la PT-9200DX à l’ordinateur à l’aide du
câble d’interface USB fourni comme décrit à la page
5, puis mettez la PT-9200DX sous tension. Une boîte
de dialogue s’affiche pour vous indiquer que le pilote
d’imprimante est installé.
Page 53

4 Cliquez sur le bouton Terminer. Une boîte de
dialogue s’affiche pour vous indiquer que l’installa-
tion est terminée.
5 Sélectionnez “Oui, redémarrer immédiatement”,
cliquez sur le bouton Terminer pour redémarrer
l’ordinateur, et enlevez le CD-ROM de l’ordinateur.
3 Dans la première boîte de dialogue Assistant Matériel
détecté qui apparaît, sélectionnez “Installer le logiciel
automatiquement (recommandé)”, puis cliquez sur le
bouton Suivant.
Pour Windows®
Avec Windows® XP :
1 Dans la boîte de dialogue qui apparaît pour vous
informer que le pilote d’imprimante PT-9200DX va
être installé, cliquez sur le bouton Suivant.
2 Quand la boîte de dialogue apparaît pour vous
demander de raccorder la P-touch 9200DX et de la
mettre sous tension, raccordez la P-touch 9200DX à
l’ordinateur à l’aide du câble d’interface USB fourni,
comme décrit à la page 5, puis mettez la P-touch
9200DX sous tension.
4 Si une boîte de dialogue apparaît pour vous avertir
que le logiciel n’a pas réussi l’essai Windows Logo,
continuez simplement l’installation.
5 Dans la boîte de dialogue Assistant Matériel détecté
qui apparaît pour vous indiquer que l’installation du
PT-9200DX et de l’ Assistant Matériel détecté sont
terminées, cliquez sur le bouton Terminer.
11
Page 54

Si la boîte de dialogue qui vous avertit que le logiciel n’a
6
pas passé avec succès l’essai de logo Windows apparaît
encore, cliquez sur le bouton Continuer pour poursuivre
l’installation (puisque le pilote d’imprimante a déjà satisfait
aux normes sévères de qualité des produits de nos essays).
Pour Macintosh
7
Dans la boîte de dialogue qui apparaît pour vous indiquer que
l’installation est terminée, sélectionnez "Oui, redémarrer
immédiatement.", puis cliquez sur le bouton Terminer. Quand
l’ordinateur a redémarré, l’installation est complètement terminée.
8 Sortez le CD-ROM de l’ordinateur.
Installation de P-touch Editor Version 3.1 (pour Macintosh)
Suivez la procédure ci-dessous pour installer le logiciel P-touch Editor sur votre Macintosh.
La version Mac de ce logiciel est destinée à un Mac avec système d’exploitation anglais. Si le logiciel est installé sur un Mac
avec un système d’exploitation dans une langue différente, il est possible que le logiciel ne fonctionne pas correctement.
Vérifiez que la configuration de votre système remplit les conditions suivantes.
Ordinateur : Macintosh ou Power Macintosh
Système d’exploitation :
Interface série : Macintosh avec processeur PowerPC et port série (modem ou imprimante), fonctionnant sous
Interface USB : Macintosh avec port USB, fonctionnant sous Mac OS 8.5.1 ou plus récent
Espace libre sur le disque dur : Au moins 20 Mo
Quelques centaines de Mo d’espace libre supplémentaires peuvent être nécessaires pour l’impression d’étiquet-
tes longues ou l’impression d’un volume important de données.
Port : Série ou USB
Mémoire vive disponible : Au moins 24 Mo
Lecteur de CD-ROM
Avec le CD-ROM fourni, les éléments suivants peuvent être installés:
• P-touch Editor Version 3.1
• Pilote d’imprimante PT-9200DX
Installation de P-touch Editor Version 3.1
1 Raccordez la PT-9200DX au Macintosh en utilisant le
câble d’interface fourni. Veillez à laisser la PT9200DX hors tension.
2 Mettez le Macintosh sous tension.
3 Insérez le CD-ROM P-touch Editor dans le lecteur de
CD-ROM de l’ordinateur
4 Double-cliquez sur l’icône “P-touch Editor 3.1
Installer” du dossier qui apparaît.
Mac OS 8.1 ou plus récent
* Pour les versions précédentes de Mac OS, reportez-vous au site Web Apple pour des informa-
tions sur USB.
* Ce logiciel ne peut fonctionner sous Mac OS X que dans un environnement classique.
Toutefois, l’environnement classique de Mac OS X v10.2 n’est pas supporté.
*L’application est fournie sur CD-ROM ; par conséquent, l’ordinateur doit être équipé d’un
lecteur de CD-ROM.
5 Après le lancement de l’installateur, sélectionnez la
méthode d’installation.
Cliquez sur le bouton “Install” pour commencer
immédiatement l’installation des options de base.
(Certains cliparts ne seront pas installés.)
Environ 20 Mo d’espace libre sont nécessaires sur le
disque dur pour commencer l’installation. Pour
installer toutes les options, environ 120 Mo d’espace
libre sont nécessaires sur le disque dur. Si l’espace
libre disponible est suffisant, cliquez sur le bouton
“Install”.
12
Page 55

Installation du pilote d’imprimante PT-9200DX
1 Double-cliquez sur l’icône “Driver Installer” du
dossier P-touch.
Quand vous cliquez sur le bouton “Custom Install”,
une boîte de dialogue est affichée pour vous permettre de sélectionner quelles options seront installées.
Seules les options cochées seront installées.
Sélectionnez les options que vous souhaitez installer,
puis cliquez sur le bouton “Install”.
Boîte de dialogue affichée si vous appuyez sur le
bouton “Custom Install” :
6 L’installation commence.
7 Quand l’installation est terminée et la boîte de
dialogue suivante est affichée, cliquez sur le bouton
“Quit”.
2 Après le lancement de l’installateur, cliquez sur le
bouton “Select Driver”.
3 Dans la boîte de dialogue qui est affichée, sélection-
nez “PT-9200DX(USB)” (pour un raccordement au
port USB) ou “PT-9200DX(Serial)” (pour un raccordement au port modem ou imprimante). Les pilotes
d’imprimante cochés seront installés.
Puis, cliquez sur le bouton “Install”.
4 L’installation commence. Quand l’installation est
terminée et la boîte de dialogue suivante est affichée,
cliquez sur le bouton “Quit”.
Pour Macintosh
8 Dans la boîte de dialogue affichée vous demandant si
vous souhaitez redémarrer l’ordinateur, cliquez sur le
bouton “Quit” pour continuer et installer le pilote
d’imprimante.
5 Quand la boîte de dialogue suivante est affichée, vous
demandant si vous souhaitez redémarrer l’ordinateur,
cliquez sur le bouton “Restart” pour redémarrer
l’ordinateur.
6 Après le redémarrage de l’ordinateur, mettez la P-
touch sous tension.
13
Page 56

Sélection de l’imprimante
1 Déroulez le menu Pomme et sélectionnez “Chooser”
pour afficher la fenêtre Chooser.
3 Si l’icône PT-9200DX(Serial) a été sélectionnée,
Pour Macintosh
2 Dans la liste à gauche, cliquez sur l’icône PT-
9200DX(USB) (pour un raccordement au port USB)
ou sur l’icône PT-9200DX(Serial) (pour un raccordement au port modem ou imprimante). Puis, sélection-
nez le pilote d’imprimante approprié.
cliquez sur l’icône du port auquel la PT9200DX(Serial) est reliée dans la liste à droite.
4 Refermez la fenêtre “Chooser” pour valider vos
réglages.
Désinstallation du logiciel P-touch et du pilote d’imprimante
Désinstallez P-touch Editor Version 3.1 et le pilote d’imprimante en suivant la procédure ci-dessous :
Désinstallation de P-touch Editor Version 3.1 (pour
®
Windows
1 Lancez Windows® 95/98/Me/NT 4.0/2000
2 Cliquez sur le bouton Démarrer de la barre des
3 Dans la fenêtre “Panneau de configuration”, double-
4
95/98/Me/NT 4.0/2000 Professional/XP)
Professional/XP.
tâches, sélectionnez “Paramètres”, puis cliquez sur
“Panneau de configuration”.
Avec Windows
dans la barre de tâches, puis cliquez sur “Panneau de
configuration”.
cliquez sur “Ajout/Suppression de programmes”.
Dans la boîte de dialogue Propriétés de Ajout/Suppression de programmes, sélectionnez “P-touch Editor 3.1”,
puis cliquez sur le bouton Ajouter/Supprimer.
®
XP, cliquez sur bouton Démarrer
5 Un message apparaît, vous demandant si vous
souhaitez supprimer l’application sélectionnée.
Cliquez sur le bouton Oui pour supprimer l’applica-
tion. Si vous ne souhaitez pas supprimer l’application, cliquez sur le bouton Non.
6 Dans la boîte de dialogue affichée, indiquant que
l’application est supprimée, cliquez sur le bouton
OK.
* La boîte de dialogue peut être légèrement différente
selon le système d’exploitation utilisé.
14
Page 57

Remplacement, installation ou suppression du pilote d’imprimante
(pour Windows
®
95/98/Me/NT 4.0/
6
2000 Professional/XP)
Pour une liaison série
1 Raccordez la PT-9200DX à l’ordinateur à l’aide du
câble d’interface série fourni comme décrit à la page
4, puis mettez la PT-9200DX sous tension.
2 Insérez le CD-ROM P-touch Editor Version 3.1 dans
le lecteur de CD-ROM de l’ordinateur. Une boîte de
dialogue s’affiche automatiquement pour vous
permettre de sélectionner la langue.
Si la boîte de dialogue n’apparaît pas automatiquement, double-cliquez sur “Poste de travail” dans le
bureau, puis double-cliquez sur le lecteur de CDROM qui renferme le CD-ROM.
(Avec Windows
dans le menu Démarrer, puis double-cliquez sur le
lecteur de CD-ROM qui renferme le CD-ROM.
Ensuite, double-cliquez sur “Setup.exe” pour afficher
la boîte de dialogue.
3 Sélectionnez la langue de votre système d’exploita-
tion Windows
boîte de dialogue s’affiche pour vous permettre de
sélectionner quoi installer.
®
XP, cliquez sur “Poste de travail”
®
, puis cliquez sur le bouton OK. Une
7 Sélectionnez l’opération souhaitée, puis cliquez sur le
8
Sélectionnez “Câble série”, puis cliquez sur le bouton OK. Une
boîte de dialogue s’affiche pour vous permettre de sélectionner
l’installation ou la désinstallation du pilote d’imprimante.
bouton Suivant.
Si vous avez sélectionné “Installez” : Effectuez les
étapes 3 à 7 de la section
Si vous avez sélectionné “Désinstallez” : Une boîte de
dialogue s’affiche pour vous demander de confirmer la
désinstallation du pilote d’imprimante de la PT-9200DX.
Pour une liaison série
, page 8.
4 Cliquez sur le bouton inférieur (Pilote d’imprimante).
Une boîte de dialogue s’affiche pour vous permettre
de sélectionner le modèle.
5 Cliquez sur l’icône de la PT-9200DX. La première
boîte de dialogue Configuration du pilote s’affiche
pour vous permettre de sélectionner la liaison série ou
la liaison USB.
Cliquez sur le bouton Suivant. Une boîte de dialogue s’affiche
pour vous indiquer que la désinstallation est terminée.
Cliquez sur le bouton Suivant. Une boîte de dialogue s’affiche
pour vous indiquer que le pilote d’imprimante a été supprimé.
15
Page 58

Sélectionnez “Oui, je veux redémarrer mon ordinateur maintenant”, cliquez sur le bouton Terminer pour
redémarrer l’ordinateur, et enlevez le CD-ROM de
l’ordinateur.
5 Cliquez sur l’icône de la PT-9200DX. La première
boîte de dialogue Configuration du pilote s’affiche
pour vous permettre de sélectionner la liaison série ou
la liaison USB.
Pour une liaison USB (Windows® 98/Me/
2000 Professional/XP seulement)
Vous pouvez remplacer, ajouter ou supprimer le pilote d’imprimante de la PT-9200DX de la façon décrite ci-dessous.
1 Mettez la PT-9200DX hors tension puis débranchez-la
de l’ordinateur.
2 Insérez le CD-ROM P-touch Editor Version 3.1 dans
le lecteur de CD-ROM de l’ordinateur. Une boîte de
dialogue s’affiche automatiquement pour vous
permettre de sélectionner la langue.
Si la boîte de dialogue n’apparaît pas automatiquement, cliquez sur “Poste de travail” dans le bureau,
puis double-cliquez sur le lecteur de CD-ROM qui
renferme le CD-ROM.
(Avec Windows
dans le menu Démarrer, puis double-cliquez sur le
lecteur de CD-ROM qui renferme le CD-ROM.
Ensuite, double-cliquez sur “Setup.exe” pour afficher
la boîte de dialogue.
3 Sélectionnez la langue de votre système d’exploita-
tion Windows
boîte de dialogue s’affiche pour vous permettre de
sélectionner quoi installer.
4 Cliquez sur le bouton inférieur (Pilote d’imprimante).
Une boîte de dialogue s’affiche pour vous permettre
de sélectionner le modèle.
®
XP, cliquez sur “Poste de travail”
®
, puis cliquez sur le bouton OK. Une
6 Sélectionnez “Câble USB”, puis cliquez sur le bouton
OK. Une boîte de dialogue Configuration du pilote
s’affiche pour vous permettre de sélectionner le
remplacement, l’ajout ou la suppression du pilote
d’imprimante de la PT-9200DX.
7 Sélectionnez l’opération souhaitée, puis cliquez sur le
bouton Suivant.
Si vous avez sélectionné “Remplacer par une
nouvelle Brother PT-9200DX”, le pilote d’impri-
mante préalablement installé est supprimé, et il
est remplacé par un nouveau. Sélectionnez cette
option pour effectuer une mise à niveau du pilote
d’imprimante, ou lors d’un fonctionnement sous
®
Windows
PT-9200DX d’un autre numéro de série.
Si vous avez sélectionné “Ajouter une Brother PT9200DX”, un nouveau pilote d’imprimante est
ajouté. Si vous avez une liaison USB sur
Windows
ajout d’une nouvelle imprimante. Sélectionnez
cette option pour raccorder et utiliser plusieurs
PT-9200DX avec le même ordinateur.
2000 Professional/XP, pour passer à une
®
98/Me, seul un port s’ajoute, sans
16
Page 59

8 Si vous avez sélectionné “Remplacer par une
nouvelle Brother PT-9200DX” ou “Ajouter une
Brother PT-9200DX” :
Avec Windows® 98/98SE/ Me/2000 Professional :
Une boîte de dialogue s’affiche pour vous inviter à
raccorder la PT-9200DX à l’ordinateur.
Dans la boîte de dialogue Assistant Matériel détecté
qui apparaît pour vous indiquer que l’installation du
PT-9200DX et de l’Assistant Matériel détecté sont
terminées, cliquez sur le bouton Terminer.
Raccordez la PT-9200DX à l’ordinateur à l’aide du
câble d’interface USB fourni comme décrit à la page
5, puis mettez la PT-9200DX sous tension. Une boîte
de dialogue s’affiche pour vous indiquer que le pilote
d’imprimante est installé.
Sélectionnez “Oui, redémarrer immédiatement”, puis
cliquez sur le bouton Terminer pour redémarrer
l’ordinateur.
Avec Windows® XP :
Dans la première boîte de dialogue Assistant Matériel
détecté qui apparaît, sélectionnez “Installer le logiciel
automatiquement (recommandé)”, puis cliquez sur le
bouton Suivant.
Si une boîte de dialogue apparaît pour vous avertir
que le logiciel n’a pas réussi l’essai Windows Logo,
continuez simplement l’installation.
Si la boîte de dialogue qui vous avertit que le logiciel
n’a pas passé avec succès l’essai de logo Windows
apparaît encore, cliquez sur le bouton Continuer pour
poursuivre l’installation (puisque le pilote d’impri-
mante a déjà satisfait aux normes sévères de qualité
des produits de nos essais).
Dans la boîte de dialogue qui apparaît pour vous
indiquer que l’installation est terminée, sélectionnez
“Oui, redémarrer immédiatement.”, puis cliquez sur
le bouton Terminer. L’ordinateur redémarre.
Sortez le CD-ROM de l’ordinateur.
17
Page 60

Si vous avez sélectionné “Supprimer une Brother
PT-9200DX” :
Une boîte de dialogue s’affiche pour vous demander
de confirmer la suppression de tous les pilotes
d’imprimante de la PT-9200DX.
Cliquez sur le bouton Oui. Une boîte de dialogue
s’affiche pour vous indiquer que les pilotes d’imprimante ont été supprimés.
Cliquez sur le bouton Terminer.
Si une boîte de dialogue s’affiche pour vous
expliquer que vous devez redémarrer l’ordinateur,
sélectionnez l’option de redémarrage de l’ordinateur, puis cliquez sur le bouton Terminer.
Suppression de P-touch Editor Version 3.1
et du pilote d’imprimante
(pour Macintosh)
Effacez P-touch Editor Version 3.1 et le pilote d’imprimante
en suivant la procédure ci-dessous :
Quand vous effacez le pilote d’imprimante, assurez-vous
que la P-touch est hors tension et débranchée.
1 Faites glisser le dossier P-touch Editor Ver3.1 vers la
corbeille.
2 Ouvrez le dossier “Extensions” du dossier système.
3 Faites glisser l’icône PT-9200DX(USB) et l’icône
d’extension USB PT-9200DX (pour un raccordement
au port USB) ou l’icône PT-9200DX(Serial) (pour un
raccordement au port modem ou imprimante) vers la
corbeille.
4 Dans le dossier système, ouvrez le dossier
“Preferences”.
5 Faites glisser l’icône de préférences P-touch Editor 3.1
et l’icône de préférences PT-9200DX(USB) (pour un
raccordement au port USB) ou l’icône de préférences
PT-9200DX(Serial) (pour un raccordement au port
modem ou imprimante) vers la corbeille. P-touch
Editor Version 3.1 et le pilote d’imprimante sont
maintenant supprimés.
18
Page 61

Utilisation de P-touch Editor
L’application P-touch Editor permet à tout le monde de créer et imprimer facilement des étiquettes pour toute utilisation
imaginable.
Lancement de P-touch Editor
Sur un ordinateur compatible IBM PC:
• En cliquant sur l’icône P-touch Editor:
Double-cliquez sur l’icône “P-touch Editor 3.1” de la fenêtre de choix “P-touch Editor 3.1”.
• Avec le bouton Démarrer:
1 Cliquez sur le bouton Démarrer de la barre des tâches pour afficher le menu Démarrer.
2 Sélectionnez “Programmes”.
3 Sélectionnez “P-touch Editor 3.1”.
4 Cliquez sur “P-touch Editor 3.1”.
• Avec Windows
1 Lancez Windows
2 Sélectionnez le lecteur de CD-ROM et le répertoire où est installé P-touch Editor.
3 Double-cliquez sur “Ptedit3.exe”.
Quand P-touch Editor est lancé, la fenêtre suivante est affichée.
Sur un ordinateur Macintosh:
• Double-cliquez sur l’icône “P-touch Editor Ver3.1” du dossier “P-touch Editor Ver3.1” installé dans votre ordinateur.
Quand P-touch Editor est lancé, la fenêtre suivante est affichée.
®
Explorer (Explorateur Windows®):
®
Explorer (Explorateur Windows®).
Barre de menus
Barre d’outils standard
Barre des propriétés
Zone de mise en page
Zone d’impression
Barre d’outils de dessin
Barre des objets
Barre d’état
Barre de menus
Règles
Zone de mise
en page
Zone
d’impression
Barre de titre
Règles
Curseur
Barre de titre
Barre d’outils de dessin
Barre d’outils d’impression
Barre d’outils de basse
de données
Barre d’état
Barre des
objets
Barre des
propriétés
19
Page 62

Affichage des propriétés
Bien que les écrans des explications ci-dessous s’appliquent à Windows® 95/98/98SE/Me, les opérations sont les mêmes
pour Windows
Vous pouvez afficher les propriétés voulues en cliquant sur l’icône dans la station de propriétés.
®
NT4.0/2000 Professional/XP et pour Macintosh, sauf mention contraire.
Icône des propriétés
de la page
Icône des propriétés
de la police
Icône des propriétés de
la mise en page
Icône des propriétés
du texte
Icône des propriétés de
la base de données
(non disponible sur la
version Macintosh du
logiciel)
Cliquez sur une icône pour afficher les propriétés.
• Propriétés de la page (
Cliquez sur ce bouton pour
dissimuler les propriétés.
)
Lors de l’utilisation de la P-touch 9200DX
Création d’une nouvelle mise en page
Bien que les écrans des explications ci-dessous s’appliquent à Windows® 95/98/98SE/Me, les opérations sont les mêmes
pour Windows
• Entrée de texte
1 Cliquez sur (bouton Texte) de la barre d’outils de dessin.
Vous pouvez entrer le texte, et le pointeur passe de
sélection) à
2
Amenez le pointeur d’insertion à l’endroit de la zone de mise en page où vous
souhaitez taper le texte, puis cliquez sur le bouton gauche de la souris.
3 Le curseur clignote dans la zone de mise en page pour indiquer que
vous pouvez taper le texte.
®
NT4.0/2000 Professional/XP et pour Macintosh, sauf mention contraire.
(pointeur d’insertion).
(pointeur de
4 Tapez le texte au clavier de l’ordinateur.
Pour créer une nouvelle ligne de texte, appuyez sur la touche Entrée du clavier.
5
Avec P-touch Editor version 3.1, le texte est toujours tapé en mode insertion.
Vous ne pouvez pas utiliser le mode écrasement pour taper le texte.
Pour changer de police et modifier la taille du texte, cliquez sur
l’icône voulue de la station des propriétés, puis sélectionnez les
paramètres parmi les Propriétés qui apparaissent
Pour les détails, voyez Lecture du guide de l’utilisateur, à la page 24.
20
Page 63

Création d’une mise en page à partir d’un modèle Format automatique
Non seulement P-touch Editor vous permet de dessiner des images et disposer le texte en utilisant un des nombreux styles,
polices et tailles disponibles, mais il est aussi fourni avec des modèles pré-formatés variés qui facilitent et rendent plus
rapide la création d’étiquettes. Voyons ici à quel point la création d’une mise en page d’étiquette est facile avec la commande [Format automatique].
Sur un ordinateur compatible IBM PC:
1 Sélectionnez la commande [Format automatique] dans le menu
[Fichier] pour lancer Format automatique.
2 Dans la fenêtre de choix “Catégorie:”, sélectionnez la catégorie conte-
nant le modèle Format automatique que vous souhaitez utiliser. Pour
notre exemple, nous sélectionnerons “NOM”.
3 Cliquez sur le bouton Suivant.
4 Dans la fenêtre de choix “Modèle:”, sélectionnez le modèle que vous
souhaitez utiliser. Nous sélectionnerons le modèle intitulé
NOM2.LBL.
5 Cliquez sur le bouton Suivant.
6 Cliquez sur le bouton Suivant ou Précédent jusqu’à ce que le texte
que vous souhaitez changer apparaisse dans la case d’édition
“Entrée:”.
7 Changez le texte en entrant le texte souhaité.
8 Répétez les étapes 6 et 7 jusqu’à ce que le texte apparaisse comme
vous le souhaitez, puis cliquez sur le bouton Suivant. Pour cet
exemple, nous remplacerons le nom de la section par “SÉCURTOUT
S.A.”, le titre par “PDG” et le nom par “HÉLÈNE HUPPERT”.
9 Vérifiez si la mise en page contient le texte que vous souhaitez
utiliser.
0 Cliquez sur le bouton Terminer. Une nouvelle mise en page contenant
le texte pré-formaté est créée.
21
Page 64

Sur un ordinateur Macintosh:
1 Sélectionnez la commande [Auto Format] dans le menu [File] pour
afficher la boîte de dialogue Auto Format.
2 Dans la fenêtre de choix “Category:”, sélectionnez la catégorie conte-
nant le modèle que vous souhaitez utiliser. Pour notre exemple, nous
sélectionnerons “shop”.
3 Dans la fenêtre de choix “Template:”, sélectionnez le modèle que
vous souhaitez utiliser. Sélectionnons le modèle intitulé shop3.lbl.
4 Cliquez sur le bouton OK. Un nouveau modèle contenant le texte pré-
formaté sélectionné est créé et la boîte de dialogue Auto Text est
affichée.
5 Cliquez sur le bouton Next ou Previous jusqu’à ce que le texte que
vous souhaitez changer apparaisse dans la case d’édition “Input:”. Ici,
la première ligne du texte que nous souhaitons changer, “CAMERA”
est déjà affichée.
6 Changez le texte en entrant le texte souhaité. Nous pouvons commen-
cer en remplaçant le nom du produit par “VCR”.
7 Répétez les étapes 5 et 6 jusqu’à ce que le texte apparaisse comme
vous le souhaitez, puis cliquez sur le bouton Next. Finissons d’éditer
le texte en remplaçant le prix original par “$415.” et le prix en solde
par “$215.”.
8 Cliquez sur le bouton Close. Le texte de la mise en page est remplacé
par le texte nouvellement entré.
!!AutoFormat!!
Importation d’un fichier graphique
Avec l’application P-touch Editor, vous pouvez aussi importer des fichiers d’images dans des formats variés (.bmp, .dib,
.jpg, .tif .ico et .wmf sur un PC ou PICT, JPEG, TIFF et BMP sur un Mac) dans votre mise en page.
1 Une mise en page étant affichée, sélectionnez la commande [Image] du menu [Insérer] (dans le logiciel pour PC)
ou du menu [Object] (dans le logiciel pour Mac). Une boîte de dialogue vous permettant de sélectionner le fichier
graphique apparaît.
Quand vous utilisez P-touch Editor pour PC: Quand vous utilisez P-touch Editor pour Macintosh:
2 Sélectionnez le fichier graphique que vous souhaitez ajouter à la mise
en page et double-cliquez dessus. L’image apparaît dans la mise en page.
22
Page 65

Code barres
Gardez les points suivants à l’esprit quand vous utilisez P-touch Editor Version 3.1 pour imprimer des codes à barres.
• Les codes à barres doivent être imprimés sur un ruban blanc. Si des rubans d’une autre couleur sont utilisés, le
lecteur de code à barres risque de ne pas lire le code à barres correctement.
• Veillez à essayer le lecteur de code à barres pour vous assurer qu’il peut lire les codes à barres imprimés dans
l’environnement dans lequel vous avez l’intention de les utiliser. Dans certains cas, les codes à barres ne sont pas lus
correctement.
• Le protocole du Code QR peut être utilisé seulement avec l’anglais. Si des données dans une autre langue sont
entrées, il est possible que le code à barres ne soit pas lu correctement.
Bases de données
• Pour les détails généraux, reportez-vous au mode d’emploi fourni avec le CD-ROM P-touch Editor Version 3.1.
Gardez les points suivants à l’esprit lorsque vous utilisez les fonctions base de données de P-touch Editor Version 3.1.
• La fonction base de données de P-touch Editor Version 3.1 (Version Windows
données qui sont compatibles avec Microsoft Access 97. Si vous effectuez une mise à niveau de P-touch Editor
Version 3.1 avec un programme enregistré sur le CD-ROM, P-touch Editor deviendra compatible avec Access 2000.
Reportez-vous au fichier Readme qui se trouve sous Français\Editor\Ac2k sur le CD-ROM (le nom du dossier pour le
français est “Français”), et démarrez le programme.
• P-touch Editor Version 3.1 est capable d’importer des fichiers autres que les fichiers mdb, par exemple les fichiers
csv. Les fichiers sauvegardés au format csv avec une application comme Microsoft
P-touch Editor. Pour les détails, reportez-vous au mode d’emploi fourni avec le CD-ROM P-touch Editor Version 3.1.
• En utilisant une fonction disponible dans Windows
Cette fonction vous permettra de mettre à jour automatiquement avec P-touch Editor les données modifiées avec
Excel.
®
Access 97, vous pourrez lier les fichiers Excel aux fichiers mdb.
®
) utilise des fichiers de base de
®
Excel pourront être utilisés avec
23
Page 66

Lecture du mode d’emploi
Le mode d’emploi de P-touch Editor peut être lu en insérant le CD-ROM dans le lecteur chaque fois que vous souhaitez
vous y reporter ou en l’installant dans votre disque dur de telle façon qu’il puisse être rapidement disponible à n’importe
quel moment. Le mode d’emploi étant un document HTML, un navigateur Web est nécessaire pour le lire. Si Internet
Explorer n’est pas installé, vous pouvez l’installer après l’avoir téléchargé sur Internet.
Le mode d’emploi de P-touch Editor peut être lu avec d’autres navigateurs : néanmoins, il est possible que
certaines pages ne soient pas affichées correctement.
Lecture du mode d’emploi de P-touch Editor
1 Si le mode d’emploi n’avait pas été installé dans le disque dur de l’ordinateur, insérez le CD-ROM P-touch Editor
dans le lecteur de CD-ROM.
2 Lancez le mode d’emploi.
Sur un ordinateur compatible IBM PC:
• En cliquant sur l’icône P-touch Editor:
Double-cliquez sur l’icône “Le manuel d’utilisation P-touch Editor Ver.3.1.” de la fenêtre de choix “P-touch
Editor 3.1”.
• Avec le bouton Démarrer:
(a) Cliquez sur le bouton Démarrer de la barre des tâches pour afficher le menu Démarrer.
(b) Sélectionnez “Programmes”.
(c) Sélectionnez “P-touch Editor 3.1”.
(d) Cliquez sur “Le manuel d’utilisation P-touch Editor Ver.3.1.” de la fenêtre de choix “P-touch Editor 3.1”
• Avec Windows
(a) Lancez Windows
(b) Sélectionnez le lecteur de CD-ROM (si le mode d’emploi n’est pas installé dans le disque dur), ou sélection-
nez le disque et le répertoire où est installé P-touch Editor (si le mode d’emploi est installé dans le disque dur).
(c) Double-cliquez sur “Main.htm” du dossier “Manual” (Mode d’emploi).
Sur un ordinateur Macintosh:
• Double-cliquez sur l’icône “Main.htm” du dossier “User’s Guide” contenu dans le dossier “P-touch” du CD-
ROM (si le mode d’emploi n’est pas installé dans le disque dur), ou le dossier “P-touch Editor Ver3.1” (si le mode
d’emploi est installé dans le disque dur).
®
Explorer (Explorateur Windows®):
®
Explorer (Explorateur Windows®).
24
Page 67

Utilisation de la PT-9200DX
Après avoir créé une mise en page d’étiquette à l’aide de l’application P-touch Editor, vous pourrez l’imprimer pour fabriquer une étiquette.
Mise en place de la cassette
1 Appuyez sur la touche de libération du couvercle et soulevez le
couvercle du logement de la cassette.
2 Si vous utilisez une cassette neuve, commencez par enlever le
système de blocage. (Certaines cassettes ne sont pas munies de ce
système.) Assurez-vous que l’extrémité du ruban passe bien sous les
guides de ruban.
3 Insérez la cassette fermement dans le logement en vous assurant que
tout l’arrière de la cassette touche le fond du logement.
Quand vous insérez la cassette, assurez-vous que le ruban encreur
ne s’accroche pas au coin du guide métallique.
Faites attention à ne pas toucher la tête d’impression.
4 Refermez le couvercle du logement, puis appuyez sur la touche on/off
pour mettre la PT-9200DX sous tension.
Extrémité du ruban
Guide de ruban
25
Page 68

5 Quand la touche on/off s’allume en vert, appuyez une fois sur la
touche avance/coupe pour tendre complètement le ruban et couper
tout excédent.
Impression d’une étiquette
1 Mettez la PT-9200DX sous tension et démarrez l’ordinateur.
2 Lancez P-touch Editor et assurez-vous que “PT-9200DX” est sélectionné comme imprimante dans la boîte de dialo-
gue Configuration imprimante (commande [Configuration imprimante] du menu [Fichier] du logiciel pour PC) ou
dans le Chooser (quand vous utilisez le logiciel pour Macintosh).
3 Dans les réglages taille des Propriétés de la page, sélectionnez le
réglage de taille d’étiquette souhaité, puis créez votre mise en page
d’étiquette.
4 Cliquez sur la commande [Imprimer] du menu [Fichier], sélectionnez les réglages souhaités dans la boîte de dialogue
Imprimer, puis cliquez sur le bouton OK. La touche on/off de la PT-9200DX clignote en vert pendant la réception des
données. Après l’impression de l’étiquette, cette dernière est expulsée de la fente de sortie de ruban et coupée
automatiquement si l’option “Coupure auto” a été sélectionnée.
Si l’option “1/2 coupe” a été sélectionnée, appuyez une fois sur la
touche avance/coupe pour couper l’étiquette.
Pendant l’impression de plusieurs copies d’étiquette, il est possible
que la vitesse d’impression diminue de telle façon qu’une
résolution élevée puisse être maintenue.
26
Page 69

Entretien
Nettoyage de la tête d’impression et du cabestan
Une ligne blanche horizontale apparaissant sur l’étiquette imprimée est un signe d’encrassement de la tête d’impression et
du cabestan. Nettoyez la tête d’impression et le cabestan en suivant la procédure ci-dessous.
1 Mettez la PT-9200DX hors tension.
2 Ouvrez le couvercle du logement de la cassette.
3 Si une cassette est en place, enlevez-la.
4 Utilisez un coton-tige sec pour essuyer délicatement vers le haut et le bas la tête d’impression et le cabestan.
Coton-tige
Tête d’impression
(partie à nettoyer)
5 Insérez la cassette, puis refermez le couvercle du logement de la cassette.
Attention: Faites attention à ne pas toucher la coupeuse située à côté de la tête d’impression et du cabestan pendant
* Le nettoyage peut aussi être effectué en utilisant la cassette de nettoyage de tête d’impression (TZ-CL6) disponible en
leur nettoyage. N’essayez pas non plus de nettoyer la tête d’impression immédiatement après un travail
d’impression car vous pourriez vous brûler.
option.
Coton-tige
Cabestan (partie à
nettoyer)
27
Page 70

Contrôle du statut de la P-touch
Vous pouvez déterminer le statut de la PT-9200DX en observant la couleur de l’éclairage de la touche on/off.
Statut de la PT-9200DX
Couleur de touche on/off
S’allume en vert
Clignote en vert
S’allume en orange
Clignote en orange
Clignote en rouge
(Corrigez le problème, puis essayez d’impri-
mer de nouveau.)
S’allume en rouge
(Corrigez le problème, puis essayez d’impri-
mer de nouveau.)
• La P-touch fonctionne normalement et est en mode d’attente.
• La P-touch est en train de recevoir normalement des données de l’or-
dinateur.
• En mode d’attente, la P-touch a détecté une insertion incorrecte de la
cassette. Insérez correctement la cassette. L’impression commencera
quand la cassette sera insérée correctement.
• Le couvercle du logement de la cassette n’est pas complètement fermé.
Refermez le couvercle du logement de la cassette.
• Pendant la réception des données, la P-touch a détecté la fermeture
incorrecte ou l’ouverture du couvercle du logement de la cassette.
Refermez le couvercle du logement de la cassette. L’impression commencera quand le couvercle du logement de la cassette sera fermé.
• Pendant l’impression, la P-touch a détecté l’absence de cassette ou
l’épuisement du ruban de la cassette. Insérez une cassette ou remplacez-la.
• Avant ou pendant l’impression, le couvercle du logement de la cas-
sette a été ouvert. Refermez le couvercle du logement de la cassette.
• Une erreur de transmission de données est survenue. Après environ
cinq secondes, la P-touch reviendra au mode d’attente (la touche on/off
s’allumera en vert).
• Mettez la P-touch hors tension, puis remettez-la sous tension.
Si la touche on/off reste allumée en rouge, contactez votre représen-
tant de service après-vente.
Description/Solution
28
Page 71

Guide de dépannage
Si vous pensez que la P-touch n’imprime pas correctement mais n’arrivez pas à déterminer l’origine du problème à l’aide de
l’éclairage de la touche on/off, reportez-vous à la liste suivante de problèmes possibles et effectuez les opérations nécessaires.
Problème
La P-touch n’imprime
pas.
Une erreur d’impression
est indiquée.
Pendant l’impression, une
bande rayée apparaît.
La touche on/off ne s’allume pas et ne clignote pas.
Une ligne blanche horizontale traverse l’éti-
quette imprimée.
Une erreur de transmission de données est affichée sur l’ordinateur.
®
(Windows
La vitesse de transmission
ne peut pas être réglée à
l’aide de Changement de
vitesse de transmission
automatique.
* Si deux P-touch ou plus du même modèle sont raccordées via leurs ports USB, sélectionnez “PTUSB (PT-9200DX-
* Le numéro de série est inscrit au-dessus du code à barres sur l’étiquette argentée attachée au bas de la P-touch.
seulement)
XXXXXXXXX):” (où XXXXXXXXX est le numéro de série) au lieu de “PTSUB:”.
• Le câble d’interface n’est pas
branché correctement.
• La cassette n’est pas insérée
correctement.
• Le couvercle du logement de
la cassette est ouvert.
Il n’y a pas de cassette dans le
logement de la cassette.
Le cordon d’alimentation n’est
pas branché correctement.
La tête d’impression et le cabestan sont encrassés.
Le mauvais port est sélectionné.
La vitesse de transmission de
l’ordinateur et celle de la Ptouch sont différentes. (Seulement pour une liaison série.)
L’ordinateur ne supporte pas la
vitesse de transmission par dé-
faut de 115 200 bps de la Ptouch.
Erreur 99
L’ordinateur ne peut pas détecter la P-touch.
Erreur 1,5
Le port série de l’ordinateur ne
peut pas être utilisé.
Cause
Solution
Vérifiez que le câble d’interface est raccordé correctement, que
la cassette est installée correctement et que le couvercle du logement de la cassette est fermé.
Insérez une nouvelle cassette, puis appuyez sur la touche
d’avance/coupe ou mettez la P-touche hors tension, puis de
nouveau sous tension.
Vérifiez que le cordon d’alimentation est raccordé correctement. Si la touche on/off ne
s’allume pas et ne clignote pas, contactez votre représentant de service après-vente.
Nettoyez la tête d’impression et le cabestan en suivant la procé-
dure décrite dans
à la page 27.
tan
Windows
Sous “Imprimer vers le port suivant” de la boîte de dialogue Propriétés de l’imprimante, sélectionnez “PTUSB:” pour une liaison
USB ou sélectionnez “PTCOMn:” (où “n” est 1 si la P-touch est
raccordée au port COM1 de l’ordinateur ou 2 si la P-touch est
raccordée au port COM2 de l’ordinateur) pour une liaison série.*
Mac
Pour une liaison série, sélectionnez dans le Chooser le port
auquel la P-touch est raccordée.
Windows
Lancez Changement de vitesse de transmission automatique, puis
sélectionnez la même vitesse de transmission que pour la P-touch.
Mac
Le Macintosh peut ne pas supporter la vitesse de transmission par défaut de
115 200 bps de la P-touch. Après avoir changé la vitesse de transmission de
la P-touch suivant les directives de
sion de la P-touch
57 600 bps dans la boîte de dialogue Impression.
La vitesse de transmission par défaut de 115 200 bps de la P-touch n’est pas
supportée par certains ordinateurs.
Après avoir changé la vitesse de transmission de la P-touch suivant les direc-
Changement de la vitesse de transmission de la P-touch
tives de
lancez Changement de vitesse de transmission automatique, puis sélectionnez une vitesse de transmission de 57 600 bps ou 9 600 bps.
Vérifiez les points suivants:
• Est-ce que la P-touch est sous tension ?
• Est-ce que le câble d’interface est raccordé correctement ?
• Est-ce que le port COM auquel est raccordé la P-touch a été
sélectionné avec Changement de vitesse de transmission automatique? (De nombreux PC sont munis de plus d’un port COM.)
Les ports COM de certains PC sont désactivés par défaut. Vérifiez le mode d’em-
ploi de l’ordinateur ou consultez le fabricant de l’ordinateur, puis activez le port
COM.
<Vérification du port COM (Windows
Double-cliquez sur “Système” dans la fenêtre Panneau de configuration.
Cliquez sur l’intercalaire Gestionnaire de périphériques, puis cliquez sur le
signe plus à côté de “Ports (COM & LPT)” . Vérifiez que COM1 et COM2
sont listés et qu’aucun symbole d’erreur n’est affiché.
Nettoyage de la tête d’impression et du cabes-
®
®
à la page 31, sélectionnez une vitesse de transmission de
Changement de la vitesse de transmis-
à la page 31,
®
95/98)>
29
Page 72

Problème
• Le ruban n’est pas éjecté correctement après avoir
été coupé automatiquement.
Solution
• Mettez l’imprimante hors tension, ouvrez le couvercle du logement de la cassette, et enlevez la cassette
si une cassette est en place.
Utilisez un coton-tige trempé dans de l’alcool à brû-
ler, nettoyez la pièce métallique se trouvant dans la
fente de sortie du ruban, à gauche de la coupeuse.
30
Coupeuse
Coton-tige
Pièce métallique (partie à nettoyer)
Page 73

Changement de la vitesse de transmission de la P-touch
La vitesse de transmission par défaut de la P-9200DX pour une liaison série est de 115200 bps. Certains ordinateurs ne
supportent pas une vitesse de transmission de 115200 bps. Dans ce cas, suivez la procédure ci-dessous pour changer la
vitesse de transmission de la P-touch à 9600 bps. La vitesse de transmission du port doit aussi être réglée sur 9600 bps.
1 Mettez la PT-9200DX hors tension.
2 Appuyez sur la touche on/off et maintenez-la enfoncée pendant environ cinq secondes.
3 Relâchez la touche quand elle commence à clignoter en rouge et vert.
4 La vitesse de transmission de la la PT-9200DX est ainsi réglée sur la vitesse de transmission plus lente de 9600 bps.
Touche on/off
31
Page 74

Spécifications de l’imprimante
Alimentation: CA 230 V 50 Hz
Ruban d’impression: 6 largeurs disponibles:
Tête d’impression: 384 points
Coupeuse: Coupeuse entièrement automatique
Port: Série, USB
Dimensions: 120 × 150 × 250 mm
Poids: 1,5 kg
6 mm
9 mm
12 mm
18 mm
24 mm
36 mm
360 points
Précoupeuse entièrement automatique
32
Page 75

Accessoires
• Tournitures
Vous pouvez obtenir des cassettes chez votre revendeur Brother le plus proche.
ponsable pour tout dommage causé par l’utilisation de fournitures non-agréées.
Iisez que des rubans Brother TZ. N’utilisez jamais de rubans ne portant pas la marque
pays.
No. de stock Description
Rubans laminés de 36 mm
TZ-161 Caractères noirs sur fond transparent
TZ-261 Caractères noirs sur fond blanc
TZ-461 Caractères noirs sur fond rouge
TZ-561 Caractères noirs sur fond bleu
TZ-661 Caractères noirs sur fond jaune
TZ-M961 Caractères noirs sur ruban argent (mat)
TZ-262 Caractères rouges sur fond blanc
TZ-263 Caractères bleus sur fond blanc
TZ-364 Caractères or sur fond noir
TZ-365 Caractères blancs sur fond noir
Rubans laminés de 24 mm
TZ-151 Caractères noirs sur fond transparent
TZ-M51 Caractères noirs sur fond transparent (mat)
TZ-M951 Caractères noirs sur ruban argent (mat)
TZ-251 Caractères noirs sur fond blanc
TZ-451 Caractères noirs sur fond rouge
TZ-551 Caractères noirs sur fond bleu
TZ-651 Caractères noirs sur fond jaune
TZ-751 Caractères noirs sur fond vert
TZ-951 Caractères noirs sur ruban argent
TZ-C51 Caractères noirs sur fond jaune fluorescent
TZ-B51 Caractères noirs sur fond orange fluorescent
TZ-D51 Caractères noirs sur fond vert fluorescent
TZ-152 Caractères rouges sur fond transparent
TZ-252 Caractères rouges sur fond blanc
TZ-153 Caractères bleus sur fond transparent
TZ-253 Caractères bleus sur fond blanc
TZ-354 Caractères or sur fond noir
TZ-155 Caractères blancs sur fond transparent
TZ-355 Caractères blancs sur fond noir
TZ-455 Caractères blancs sur fond rouge
TZ-555 Caractères blancs sur fond bleu
TZ-655 Caractères blancs sur fond orange
TZ-755 Caractères blancs sur fond vert
Rubans laminés de 18 mm
TZ-141 Caractères noirs sur fond transparent
TZ-241 Caractères noirs sur fond blanc
TZ-242 Caractères rouges sur fond blanc
TZ-243 Caractères bleus sur fond blanc
TZ-344 Caractères or sur fond noir
TZ-345 Caractères blancs sur fond noir
TZ-441 Caractères noirs sur fond rouge
TZ-541 Caractères noirs sur fond bleu
TZ-641 Caractères noirs sur fond jaune
TZ-741 Caractères noirs sur fond vert
Brother ne peut être rendu res-
. Disponibilité selon les
33
Page 76

No. de stock Description
Rubans laminés de 12 mm
TZ-131 Caractères noirs sur fond transparent
TZ-132 Caractères rouges sur fond transparent
TZ-133 Caractères bleus sur fond transparent
TZ-135 Caractères blancs sur fond transparent
TZ-231 Caractères noirs sur fond blanc
TZ-232 Caractères rouges sur fond blanc
TZ-233 Caractères bleus sur fond blanc
TZ-334 Caractères or sur fond noir
TZ-335 Caractères blancs sur fond noir
TZ-431 Caractères noirs sur fond rouge
TZ-435 Caractères blancs sur fond rouge
TZ-531 Caractères noirs sur fond bleu
TZ-535 Caractères blancs sur fond bleu
TZ-631 Caractères noirs sur fond jaune
TZ-635 Caractères blancs sur fond orange
TZ-731 Caractères noirs sur fond vert
TZ-735 Caractères blancs sur fond vert
TZ-931 Caractères noirs sur ruban argent
TZ-B31 Caractères noirs sur fond orange fluorescent
TZ-C31 Caractères noirs sur fond jaune fluorescent
TZ-D31 Caractères noirs sur fond vert fluorescent
TZ-M31 Caractères noirs sur fond transparent (mat)
TZ-M931 Caractères noirs sur ruban argent (mat)
Rubans laminés de 9 mm
TZ-121 Caractères noirs sur fond transparent
TZ-122 Caractères rouges sur fond transparent
TZ-123 Caractères bleus sur fond transparent
TZ-221 Caractères noirs sur fond blanc
TZ-222 Caractères rouges sur fond blanc
TZ-223 Caractères bleus sur fond blanc
TZ-324 Caractères or sur fond noir
TZ-325 Caractères blancs sur fond noir
TZ-421 Caractères noirs sur fond rouge
TZ-521 Caractères noirs sur fond bleu
TZ-621 Caractères noirs sur fond jaune
TZ-721 Caractères noirs sur fond vert
TZ-A25 Caractères blancs sur fond grey
TZ-M21 Caractères noirs sur fond transparent (mat)
Rubans laminés de 6mm
TZ-111 Caractères noirs sur fond transparent
TZ-211 Caractères noirs sur fond blanc
TZ-315 Caractères blancs sur fond noir
TZ-611 Caractères noirs sur fond jaune
Rubans non laminés de 24 mm
TZ-N251 Caractères noirs sur fond blanc
34
Page 77

No. de stock Description
Rubans non laminés de 18 mm
TZ-N241 Caractères noirs sur fond blanc
TZ-N242 Caractères rouges sur fond blanc
TZ-N243 Caractères bleus sur fond blanc
TZ-N541 Caractères noirs sur fond bleu
TZ-N641 Caractères noirs sur fond jaune
TZ-N741 Caractères noirs sur fond vert
TZ-NF41 Caractères noirs sur fond violet
TZ-PH41 Caractères noirs sur fond à motifs de coeur
TZ-PF41 Caractères noirs sur fond à motifs de fruits
TZ-PM41 Caractères noirs sur fond à motifs marins
TZ-N841 Caractères noirs sur fond or
Rubans non laminés de 12 mm
TZ-N231 Caractères noirs sur fond blanc
TZ-N232 Caractères rouges sur fond blanc
TZ-N233 Caractères bleus sur fond blanc
TZ-N531 Caractères noirs sur fond bleu
TZ-N631 Caractères noirs sur fond janue
TZ-N731 Caractères noirs sur fond vert
TZ-NF31 Caractères noirs sur fond violet
Rubans non laminés de 9 mm
TZ-N221 Caractères noirs sur fond blanc
Rubans non laminés de 6 mm
TZ-N211 Caractères noirs sur fond blanc
Rubans à adhérence spéciale
No. de stock Description
TZ-S251 Ruban de 24 mm à adhérence spéciale (caractères noirs sur fond blanc)
TZ-S241 Ruban de 18 mm à adhérence spéciale (caractères noirs sur fond blanc)
TZ-S231 Ruban de 12 mm à adhérence spéciale (caractères noirs sur fond blanc)
TZ-S221 Ruban de 9 mm à adhérence spéciale (caractères noirs sur fond blanc)
TZ-S211 Ruban de 6 mm à adhérence spéciale (caractères noirs sur fond blanc)
Rubans spéciaux
No. de stock Description
TZ-IY41 Rubans de 18 mm pour décalque à chaud (caractères noirs)
TZ-SE4 Ruban de sécurité de 18 mm (caractères noirs sur fond blanc)
TZ-FA4 Ruban en tissu de 18 mm (caractères bleus sur fond blanc)
TZ-FA3 Ruban en tissu de 12 mm (caractères bleus sur fond blanc)
Options
No. de stock Description
TZ-CL6 Cassette de nettoyage de tête d’impression
35
Page 78

Page 79

Kurzanleitung
DEUTSCH
Page 80

Mit dem Brother P-touch können Sie Etiketten und Beschriftungen für die verschiedensten Zwecke schnell und einfach mit
der P-touch Editor Software erstellen. Mit den AutoFormat-Vorlagen des P-touch Editors lassen sich bequem und komfortabel Etiketten und Beschriftungen für Videobänder, Dias, Akten, Disketten sowie Namensschilder anfertigen. Die so am
Bildschirm entworfenen Beschriftungen werden einfach und sekundenschnell mit dem P-touch ausgedruckt. Es ist eine
große Auswahl an verschiedenfarbigen Schriftbändern mit unterschiedlichen Schriftfarben und Bandbreiten erhältlich ideal für die Systematisierung Ihrer Beschriftungen und für weitere Anwendungen aller Art.
Obwohl der P-touch leicht zu bedienen ist, sollten Sie dieses Benutzerhandbuch aufmerksam lesen, um alle Funktionen
des Gerätes optimal nutzen zu können.
Bewahren Sie das Handbuch zum späteren Nachschlagen sorgfältig auf.
Bescheinigung des Herstellers/Importeurs
Hersteller Brother Industries Ltd.
bestätigt, dass dieses Produkt den folgenden Bestimmungen entspricht:
Sicherheit: EN 60950
EMC: EN 55022 1998 Klasse B
und mit den Richtlinien 73/23/EEC und 89/336/EEC (entsprechend der Änderung 91/263/EEC und 92/31/EEC) übereinstimmt.
Herausgegeben von: Brother Industries Ltd.
Um die Übereinstimmung mit den EMC-Richtlinien zu gewährleisten, muss das mitgelieferte Datenkabel verwendet
werden.
15-1, Naeshiro-cho, Mizuho-ku,
Nagoya 467-8561, Japan
EN 55024 1998
EN 61000-3-2 1995
EN 61000-3-3 1995
Allgemeine Hinweise
• Verwenden Sie mit diesem Gerät nur die originalen Brother TZ-Schriftbänder. Benutzen Sie keine Bänder, die nicht mit dem
Zeichen
• Ziehen Sie niemals am Schriftband, weil dadurch die Bandkassette beschädigt werden kann.
• Vergewissern Sie sich vor dem Einlegen einer Schriftbandkassette, dass das Band richtig unter den Bandführungen hindurchgeführt wird.
• Benutzen Sie das Gerät nicht an extrem staubigen Plätzen. Schützen Sie das Gerät vor direktem Sonnenlicht und vor Nässe.
• Setzen Sie das Gerät keinen hohen Temperaturen und keiner hohen Luftfeuchtigkeit aus.
• Lassen Sie keine Gummi- oder Kunststoffgegenstände auf dem Gerät liegen, weil dadurch Flecken entstehen können.
• Reinigen Sie das Gerät nicht mit Alkohol oder anderen organischen Lösungsmitteln. Verwenden Sie zur Reinigung nur ein
weiches, trockenes Tuch.
• Legen Sie keine Gegenstände auf das Gerät. Achten Sie auch darauf, dass keine Fremdkörper in das Gerät gelangen.
• Um Verletzungen zu vermeiden, sollten Sie die Klinge der Schneidevorrichtung nicht berühren.
• Beim Drucken erhitzt sich der Druckkopf stark. Bitte berühren Sie ihn nicht um Verletzungen zu vermeiden. Selbst nachdem der P-touch abgeschaltet wurde, dauert es eine Weile bis der Druckkopf abgekühlt ist.
• Verwenden Sie nur die im Lieferumfang enthaltenen Netz- und Schnittstellenkabel. Die Verwendung anderer Adapter führt
zum Verlust des Garantieanspruches.
• Ziehen Sie das Netzkabel ab, wenn das Gerät längere Zeit nicht benutzt werden soll.
• Führen Sie nur die in diesem Handbuch beschriebenen Wartungsarbeiten durch. Versuchen Sie nicht, den P-touch auseinanderzubauen.
• IBM
•
Microsoft® und Windows® sind eingetragene Warenzeichen der Microsoft Corporation in den USA und in anderen Ländern.
• Macintosh und Power Macintosh sind eingetragene Warenzeichen von Apple Computer, Inc.
• Etwaige bestehende Warenzeichen oder sonstige gewerbliche Schutzrechte an den in diesem Handbuch zitierten Bezeichnungen erkennen wir an.
gekennzeichnet sind.
®
sind Warenzeichen der International Business Machines Corporation.
Page 81

Inhaltsverzeichnis
Allgemeine Hinweise
Packungsinhalt.................................................................................................................................. 2
Daten- und Netzkabel anschließen ................................................................................................... 4
Installation des P-touch Editor und der Druckertreiber .................................................................... 6
P-touch Editor und Druckertreiberinstallation (für Windows® 95/98/Me/NT 4.0/2000 Professional/XP) .......
P-touch Editor Version 3.1 installieren.......................................................................................... 6
Druckertreiberinstallation ............................................................................................................ 8
Seriellen Anschluss ................................................................................................................. 8
Baudraten-Assistenten verwenden........................................................................................... 9
USB-Anschluss (nur Windows
P-touch Editor Version 3.1 Installation (für Macintosh) ...................................................................... 12
P-touch Editor Version 3.1 installieren.......................................................................................... 12
PT-9200DX Druckertreiberinstallation.......................................................................................... 13
Druckerauswahl ........................................................................................................................... 14
Deinstallation der P-touch Software und Druckertreiber.................................................................... 14
Deinstallation des P-touch Editor Version 3.1 (Windows® 95/98/Me/NT 4.0/2000 Professional/XP)
Druckertreiber ersetzen, installieren oder löschen (für Windows® 95/98/Me/NT 4.0/2000 Professional/XP) ......
Für einen seriellen Anschluss .................................................................................................. 15
Für einen USB-Anschluss ( nur Windows
Deinstallation der P-touch Software und Druckertreiber (Macintosh) ........................................... 18
Verwenden des P-touch Editor.......................................................................................................... 19
Starten des P-touch Editor ............................................................................................................... 19
Anzeigen der Eigenschaften ............................................................................................................ 20
Erzeugen eines neuen Layouts......................................................................................................... 20
Layout mit einer Autoformat-Vorlage erstellen................................................................................. 21
Bilder importieren ............................................................................................................................. 22
Barcode ............................................................................................................................................ 23
Databases ......................................................................................................................................... 23
Online-Benutzerhandbuch ............................................................................................................. 24
P-touch Editor Online-Benutzerhandbuch lesen ................................................................................ 24
Verwenden des PT-9200DX .............................................................................................................. 25
Bandkassette einlegen ....................................................................................................................... 25
Etikett drucken .................................................................................................................................. 26
Wartung und Pflege .......................................................................................................................... 27
Reinigen des Druckkopfes und der Transportrolle.............................................................................. 27
Statusanzeigen des P-touch 9200DX ................................................................................................ 28
Was tun bei Störungen? .................................................................................................................... 29
Ändern der P-touch-Baudrate ........................................................................................................... 31
Technische Daten ............................................................................................................................. 32
Zubehör ............................................................................................................................................ 33
®
98/Me/2000 Professional/XP) ................................................. 10
®
98/Me/2000 Professional/XP) ................................. 16
6
....... 14
15
1
Page 82

Packungsinhalt
PT-9200DX TZ-Bandkassette (24 mm)
Bandfach-Abdeckung
Bandvorschub/
Abschneiden
Ein/Aus-Taste
Bandfach öffnen
Netzkabel (zum Anschluss des P-touch 9200DX an eine Netzsteckdose)
Für die Schweiz:
Datenkabel (2)
CD-ROM mit Software für PC sowie Mac und den jeweiligen Online-Handbüchern
Seriell: Für IBM-kompatible PCs oder
Macintosh Computer
USB: Für IBM-kompatible PCs (Windows® 98/
(schwarze Schrift auf weißem Band)
Es wird jeweils nur das
für das jeweilige Land
notwendige Netzkabel
mitgeliefert.
Me/2000) oder Macintosh Computer
Vorsichtsmaßnahmen:
• Achten Sie darauf, dass die
CD-ROM nicht verkratzt
wird.
2
• Setzen Sie die CD-ROM
keinen extrem hohen oder
extrem niedrigen
Temperaturen aus.
• Stellen Sie keine
Gegenstände auf die CDROM.
Page 83

Bandkassetten
• Ziehen Sie niemals am Schriftband, weil dadurch die Bandkassette beschädigt werden kann.
• Falls das Band auf einem nassen oder schmutzigen Untergrund angebracht wird, kann es sich leicht ablösen.
Reinigen Sie daher vor dem Befestigen des Bandes den Untergrund.
• In Abhängigkeit von Umgebungsbedingungen und Material, Zustand, Oberflächengüte und Form des Untergrundes
kann das Band verrutschen oder sich ablösen.
• Um die Haftstärke des Bandes zu testen oder wenn Sicherheit von besonderer Bedeutung ist, testen Sie zuvor das
Band indem Sie einen kleinen Bandabschnitt an einem nicht sichtbaren Bereich des Untergrundes anbringen.
• Sonnenlicht, Wind und Regen können zum Verblassen der Bandfarbe oder zum Ablösen des Bandes führen.
• Beschriftungen mit Ölfarbe oder auf Wasser basierenden Farben können durch das Band hindurch sichtbar bleiben.
Um diese vollständig abzudecken kleben Sie zwei Schriftbänder übereinander oder verwenden Sie dunkle Bandfarbe.
• Das Band ist nicht geeignet für Verwendungen, in denen eine Haftung aufgrund von Sach- oder Personenschäden
entstehen kann.
Brother Co., Ltd. und seine Lieferanten besitzen alle Rechte und das Copyright an dieser Software (einschließlich, aber
nicht begrenzt auf die Programmierung, Bilder, ClipArts, Vorlagen und Texte in dieser Software), den Texten in den
Handbüchern und an Duplikaten dieser Software. Diese Software darf ohne Erlaubnis weder in Teilen noch im Ganzen
dupliziert, modifiziert, rückentwickelt, rückübersetzt oder dekompiliert werden.
3
Page 84

Daten- und Netzkabel anschließen
Schließen Sie den P-touch 9200DX wie folgt an den Computer an.
Serieller Anschluss:
Seriell
1 Vergewissern Sie sich, dass der P-touch 9200DX und der Computer ausgeschaltet sind.
2 Schließen Sie das eine Ende des seriellen Datenkabels (IOIOI) an den P-touch 9200DX und das andere Ende an die
serielle Schnittstelle des Computers an. Beim Anschluss an einen Macintosh schließen Sie den P-touch 9200DX
entweder am Modem- oder Druckeranschluss an (Modemanschluss wird empfohlen).
Falls die serielle Schnittstelle des Computers nicht über den passenden Stecker verfügt, verwenden Sie bitte
einen handelsüblichen Adapter.
3 Schließen Sie den Gerätestecker des Netzkabels am PT-9200DX an.
4 Stecken Sie den Netzstecker des Netzkabels in eine geerdete Netzsteckdose.
5 Schalten Sie nun den PT-9200DX ein, und erst danach den Computer.
4
Page 85

USB-Anschluss:
Sie müssen die Software installieren, bevor Sie den P-touch mit dem USB-Kabel anschließen oder einschalten. Folgen Sie zur Installation der Software den Anweisungen auf den Seiten 6 bis 12 und schließen Sie erst danach den
P-touch 9200DX an den Computer an.
USB
1 Schließen Sie ein Ende des USB-Kabels an den USB-Anschluss ( ) des P-touch 9200DX und das andere Ende am
USB-Anschluss des Computers an.
Schließen Sie den P-touch 9200DX nicht über beide Kabel, das serielle und das USB-Kabel, an den PC an,
weil dadurch der P-touch 9200DX beschädigt werden kann.
Falls Sie die USB-Verbindung über ein Hub herstellen, kann es sein, dass aufgrund des verwendeten Hub-Typ
skeine funktionsfähige Verbindung aufgebaut werden kann. Wenn das Drucken über eine Verbindung mit Hub
nicht möglich sein sollte, schließen Sie bitte den P-touch 9200DX direkt über das USB-Kabel an den Computer
an.
2 Schließen Sie den Gerätestecker des Netzkabels am PT-9200DX an.
3 Stecken Sie den Netzstecker des Netzkabels in eine geerdete Netzsteckdose.
5
Page 86

Installation des P-touch Editor und der Druckertreiber
Bevor Sie mit dem P-touch 9200DX Etiketten drucken können, müssen Sie das P-touch Editor-Programm und die
Für Windows®
Druckertreiber auf Ihrem Computer installieren.
P-touch Editor und Druckertreiberinstallation
(für Windows® 95/98/Me/NT 4.0/2000 Professional/XP)
Installieren Sie den P-touch Editor Version 3.1 und den Druckertreiber auf Ihrem PC wie folgt.
Vergewissern Sie sich, dass Ihre Systemkonfiguration die folgenden Anforderungen erfüllt:
Computer: IBM PC oder kompatible
Betriebssystem:
Serieller Anschluss: PC mit einem x86-Prozessor, einer seriellen Schnittstelle (RS-232C), Microsoft
USB-Anschluss: PC mit einem USB-Anschluss und vorinstalliert mit Microsoft
Manche PCs, bei denen Windows® 95/NT 4.0 vorinstalliert ist, unterstützen nicht alle USB-Hardware-Merkmale.
Freier Festplatten-Speicherplatz: mindestens 20 MB
Wenn Sie lange Etiketten oder sehr viele Daten drucken möchten, benötigen Sie gegebenenfalls einige hundert
MB zusätzlichen freien Speicherplatz auf Ihrer Festplatte.
Monitor: VGA-Grafikkarte oder besser
Schnittstelle: Seriell oder USB
Hauptspeicher: Mindestens 32 MB
CD-ROM-Laufwerk
P-touch Editor Version 3.1 installieren
Serieller Anschluss: Bevor Sie die P-touch Editor Software und den Druckertreiber installieren, schließen Sie den
PT-9200DX wie auf Seite 4 beschrieben an den Computer an. Schalten Sie die Geräte in der dort beschriebenen
Reihenfolge ein.
USB-Anschluss: Schließen Sie den PT-9200DX nicht an den Computer an, bevor Sie die P-touch Editor Software
installiert haben, andernfalls kann die Software nicht richtig installiert werden. Schließen Sie den PT-9200DX erst
an, wenn Sie dazu aufgefordert werden.
1 Legen Sie die P-touch Editor Version 3.1 CD-ROM in
das CD-ROM-Laufwerk des Computer ein. Es
erscheint ein Dialogfeld in dem Sie die Sprache
auswählen können.
®
Windows
Professional/XP
95/98/Me/2000 Professional/XP oder Windows® NT 4.0
®
Windows® 98/Me/2000
3 Klicken Sie auf die obere Schaltfläche (Editor). Es
erscheint ein Dialogfeld, in dem Sie das Modell
auswählen können.
Um nur die Druckertreiber zu installieren, klicken
Sie auf die untere Schaltfläche (Druckertreiber).
Fahren Sie mit dem Abschnitt “Druckertreiber-
installation” auf Seite 8 fort.
Wenn das Dialogfeld nicht automatisch erscheint,
klicken Sie auf “Arbeitsplatz” auf dem Desktop und
doppelklicken Sie dann auf das CD-ROM-Laufwerk,
das die CD-ROM enthält. (Unter Windows
klicken Sie auf “Arbeitsplatz” im Start-Menü und dann
doppelklicken Sie auf das CD-ROM-Laufwerk, das die
CD-ROM enthält.)
Klicken Sie nun auf “Setup.exe”, um das Dialogfeld
öffnen.
2 Wählen Sie die Sprache entsprechend Ihrer
®
Windows
können nun wählen, ob der P-touch Editor oder die
Druckertreiber installiert werden sollen.
-Version aus und klicken Sie auf “OK”. Sie
®
XP
6
Page 87

4 Klicken Sie auf das Symbol für den P-touch 9200DX.
Der InstallShield
touch Editor startet und das “Willkommen”- Fenster
erscheint.
5 Lesen Sie den Text aufmerksam durch und klicken Sie
dann auf “Weiter”.
6 Geben Sie die Benutzerinformationen (Name und
Firma) ein und klicken Sie auf “Weiter”. (Falls die
gesuchten Informationen schon in Windows
vorhanden sind, werden die Eingabefelder automatisch entsprechend ausgefüllt.)
®
-Assistent für die Installation des P-
®
8 Wählen Sie nun eine der drei Installationsmethoden
aus und klicken Sie danach auf “Weiter”.
• Minimal- oder Normalinstallation
Wenn Sie eine dieser Optionen gewählt haben,
startet die Installation nun automatisch.
Normal: Alle Standardoptionen (P-touch Editor
Minimal: Es wird nur der P-touch Editor Version 3.1
Version 3.1, Cliparts, Autoformat-Vorlagen,
Hilfe und 13 Schriftarten) werden installiert.
installiert.
Für Windows®
7 Überprüfen Sie die Informationen. Klicken Sie auf
“Ja”, wenn die Informationen korrekt sind, oder
klicken Sie auf “Nein” und korrigieren Sie die
Angaben.
• Benutzerdefinierte Installation
Hier können Sie den Installationsumfang frei wählen,
indem Sie die einzelnen Kontrollkästchen aktivieren
oder deaktivieren. Sie können zusätzlich zu den in
der Normalinstallation enthaltenen Programmteilen
auch das Benutzerhandbuch installieren.
7
Page 88

a) Wählen Sie die gewünschte Option aus und klicken
Sie auf “Weiter”.
Editor: P-touch Editor Version 3.1
Für Windows®
Clipart: Bilder für die ClipArt-Funktion des
Schriftarten: 13 Schriftarten
Autoformat-Vorlagen:
Hilfe: Hilfe-Dateien für den P-touch Edi-
Benutzerhandbuch: Online-Handbuch (HTML-Format)
Wenn die “Ändern”-Schaltfläche nach Auswahl einzelner
Optionen angewählt werden kann, können Sie Unterkomponenten auswählen. Klicken Sie auf “Ändern” um diese Optionen anzuzeigen. Wählen Sie die gewünschten
Komponenten wie zuvor aus. Bitte beachten Sie: Falls Sie
einige Optionen nicht installieren, können gewisse Funktionen des P-touch Editor nicht genutzt werden. Sobald Sie
Ihre Auswahl getroffen haben, klicken Sie auf “Weiter”.
b) Klicken Sie auf “Weiter”, um die Installation zu
starten.
9 Sobald die Installation des P-touch Editor 3.1abge-
schlossen ist, erscheint die Frage, ob Sie nun den
Druckertreiber installieren möchten.
P-touch Editor Version 3.1
Die Vorlagen für die AutoformatFunktion
tor Version 3.1
für den P-touch Editor Version 3.1.
(Dieses kann auch direkt von der
CD-ROM geöffnet werden.)
2 Wählen Sie “Installieren” und klicken Sie auf “Wei-
ter”.
3
Unter Windows® 95/98/Me: Gehen Sie zu Schritt 4.
Unter Windows
Dialogfeld erscheint, in dem Sie einen P-touchAnschluss (PTCOM) hinzufügen können.
Falls schon ein P-touch-Anschluss (PTCOM) installiert
ist, klicken Sie auf “Weiter” und gehen zu Schritt 4.
Falls noch kein P-touch-Anschluss (PTCOM) installiert
ist, klicken Sie auf die Schaltfläche “Hinzufügen”.
®
NT 4.0/2000 Professional/XP: Ein
Klicken Sie auf “Ja”, um den Druckertreiber zu
installieren. Das erste Dialogfeld der Druckertreiberinstallation erscheint. Fahren Sie mit dem Abschnitt
Druckertreiberinstallation
Falls der Treiber bereits installiert wurde, klicken Sie
auf “Nein”. Nehmen Sie die CD-ROM aus dem
Laufwerk und starten Sie den Computer neu.
fort.
Druckertreiberinstallation
Serieller Anschluss
1 Wählen Sie “Serielles Kabel” und klicken Sie auf
“OK”. Danach erscheint ein Dialogfeld, indem Sie
wählen können, ob die Treiber installiert oder
deinstalliert werden sollen.
8
Wählen Sie nun den PTCOM-Anschluss aus, an dem
der PT-9200DX angeschlossen ist (“PTCOM1:”, wenn
der P-touch an COM1 angeschlossen ist, oder
“PTCOM2:”, falls der P-touch an COM2 angeschlossen ist). Klicken Sie dann auf “OK”. Klicken Sie im
Dialogfeld zur Treiber-Einrichtung auf “Weiter”.
4 Wählen Sie in der Liste der PTCOM-Anschlüsse den
Anschluss aus, an dem der PT-9200DX angeschlossen
ist (“PTCOM1:” wenn der P-touch an COM1 oder
“PTCOM2:”, wenn der P-touch an COM2 angeschlossen ist). Klicken Sie dann auf “Weiter”.
unter Windows
Schritt 3 hinzugefügten PTCOM-Anschluss).
®
NT 4.0/2000 Professional/XP den in
(Wählen Sie
Page 89

5 Überprüfen Sie die gewählten Installationsoptionen
und klicken Sie dann auf “Weiter”. Es wird nun ein
Dialogfeld angezeigt, in dem bestätigt wird, dass die
Drucker installiert wurden.
6 Falls der Anschluss, an dem der PT-9200DX ange-
schlossen ist, eine Baudrate von 115.200 bps unterstützt, klicken Sie auf “Weiter”.
Wenn der Anschluss, an dem der PT-9200DX
angeschlossen ist, keine Baudrate von 115.200 bps
unterstützt oder wenn Sie die Verbindung zwischen
Computer und P-touch überprüfen wollen, wählen Sie
“Den Assistenten zur Baudraten-Änderung starten”.
Klicken Sie auf “Weiter”. Nachdem Sie die Baudrate
wie in den Schritten 3 bis 6 im Abschnitt
Baudraten-Assistenten verwenden
haben, fahren Sie mit Schritt 7 fort.
7 Die Installation ist nun abgeschlossen. Nehmen Sie
die CD-ROM aus dem CD-ROM-Laufwerk. Wählen
Sie “Ja, den Computer jetzt neu starten” und klicken
Sie dann auf “Fertigstellen”, um den Computer neu zu
starten.
Den
auf Seite 9 geändert
Baudraten-Assistenten verwenden
Wenn der Anschluss, an dem der PT-9200DX angeschlossen ist, keine Baudrate von 115.200 bps unterstützt oder
wenn Sie die Verbindung zwischen Computer und P-touch
prüfen wollen, sollten Sie den Assistenten zur BaudratenÄnderung starten und gegebenfalls die gewünschten Einstellungen vornehmen.
1 Wählen Sie im Start-Menü “Einstellungen” und
klicken Sie dann auf “Drucker”, um den DruckerOrdner zu öffnen.
(Unter Windows
“Drucker und Faxgeräte”, um den Ordner “Drucker
und Faxgeräte” zu öffnen.)
Windows® 95, 98, 98SE und Me:
2
Klicken Sie mit der rechten Maustaste auf das Brother
PT-9200DX-Symbol und klicken Sie dann auf
“Eigenschaften”.
Klicken Sie dann in der Registerkarte “Erweitert” auf
die Schaltfläche “Baudrate”, um den Assistenten zur
Baudratenänderung zu starten.
Windows® NT 4.0:
Klicken Sie mit der rechten Maustaste auf das Brother
PT-9200DX Symbol und klicken Sie dann auf
“Eigenschaften”.
Klicken Sie in der Registerkarte “Geräteeinstellungen”
auf “Baudrate...”. Es erscheint nun im unteren Teil des
Fensters die Schaltfläche “Baudrate...”. Klicken Sie auf
diese Schaltfläche, um den Assistenten zur Baudratenänderung zu starten.
Windows® 2000 und XP:
Klicken Sie mit der rechten Maustaste auf das Brother
PT-9200DX Symbol und klicken Sie dann auf
“Eigenschaften”.
Klicken Sie in der Registerkarte “Geräteeinstellungen”
auf “Baudrate...”. Es erscheint nun im rechten Teil des
Fensters die Schaltfläche “Eigenschaften...”. Klicken
Sie auf die Schaltfläche “Eigenschaften...”, um den
Assistenten zur Baudratenänderung zu starten.
3 Wählen Sie den seriellen Anschluss, an dem der PT-
9200DX angeschlossen ist und klicken Sie auf
“Weiter”.
®
XP klicken Sie im Start-Menü auf
Für Windows®
9
Page 90

4 Wählen Sie die gewünschte Baudrate und klicken Sie
auf “Weiter”.
Normalerweise ist “115.200 bps” ausgewählt. Wenn
Für Windows®
Ihr Computer diese Baudrate nicht unterstützt, sehen
Sie im Handbuch des Computers nach, welche
Baudrate maximal möglich ist, und wählen diese hier
aus.
Ein Dialogfeld zur Bestätigung der Baudrate erscheint.
5 Vergewissern Sie sich, dass die richtige Baudrate
angezeigt wird und klicken Sie auf “Weiter”.
(Um Änderungen vorzunehmen, klicken Sie auf
“Zurück”.)
Wenn das Dialogfeld mit der Meldung, dass die
angegebene Baudrate eingestellt wurde, erscheint,
klicken Sie auf “Weiter”.
USB-Anschluss (nur Windows® 98/Me/2000 Professional/XP)
Mit der “Plug-and-Play”-Funktion werden neu angeschlossene Geräte von Windows
installiert. Wenn Sie den PT-9200DX mittels USB-Datenkabel anschließen möchten, werden die Druckertreiber
durch “Plug-and-Play” installiert. Lesen Sie bitte hierzu die
folgenden Installationsanweisungen bevor Sie die Dateien
von der mitgelieferten CD-ROM installieren.
Schließen Sie nicht den P-touch 9200DX an den
Computer an, bevor Sie dazu aufgefordert werden,
andernfalls kann es sein, dass der PT-9200DX
Druckertreiber nicht richtig installiert wird.
Bei Windows® 98/98SE/Me/2000 Professional:
1 Wählen Sie “USB-Kabel”, und klicken Sie auf “OK”.
2 Klicken Sie auf “Weiter”. Ein Dialogfeld erscheint,
indem Sie aufgefordert werden, den PT-9200DX an
den Computer anzuschließen.
®
selbst erkannt und automatisch
6 Klicken Sie nun auf “Weiter”, um die Installation
abzuschließen.
10
3 Schließen Sie den PT-9200DX mit dem mitgelieferten
USB-Datenkabel wie auf Seite 5 beschrieben an den
Computer an. Schalten Sie nun den PT-9200DX ein.
Ein Dialogfeld erscheint, das anzeigt, dass der
Druckertreiber erfolgreich hinzugefügt wurde.
Page 91

4 Klicken Sie auf “Fertig”.
Für Windows®
5 Nehmen Sie die CD-ROM aus dem CD-ROM-
Laufwerk. Wählen Sie “Ja, sofort neu starten.” und
klicken Sie dann auf “Fertigstellen”, um den Computer neu zu starten.
Mit Windows® XP:
1 Es erscheint ein Dialogfeld mit dem Hinweis, dass
nun die PT-9200DX Druckertreiber installiert werden.
Klicken Sie auf “Weiter”.
2 Es erscheint ein Dialogfeld, in dem Sie aufgefordert
werden, den P-touch 9200DX an den Computer
anzuschließen und einzuschalten. Schließen Sie den
P-touch 9200DX mit dem mitgelieferten USBDatenkabel an, wie auf Seite 5 beschrieben, und
schalten Sie dann den P-touch 9200DX ein.
3 Wenn das erste Dialogfeld “Assistent für das Suchen
neuer Hardware” erscheint, wählen Sie “Software
automatisch installieren (empfohlen)” und klicken
dann auf die Schaltfläche “Weiter”.
4 Wenn eine Warnung erscheint, dass die Software den
Windows-Logo-Test nicht bestanden hat, fahren Sie
einfach mit der Installation fort. Die Software wurde
von Brother sorgfältig getestet und kann problemlos
verwendet werden.
5 Ein Fenster erscheint, in dem angezeigt wird, dass die
Software für den P-touch 9200DX installiert wurde.
Klicken Sie nun auf die Schaltfläche “Fertig stellen”.
11
Page 92

6 Wenn die Warnung, dass die Software den Windows-
Logo-Test nicht bestanden hat, erneut erscheint,
klicken Sie auf die Schaltfläche “Installation fortsetzen”, um mit der Installation fortzufahren. Die
Software wurde von Brother sorgfältig getestet und
kann problemlos verwendet werden.
Für Macintosh
7 Wenn ein Bildschirm erscheint, der anzeigt, dass das
Gerät korrekt hinzugefügt wurde, wählen Sie “Ja,
sofort neu starten.” und klicken Sie dann auf die
Schaltfläche “Fertig stellen”. Nachdem der Computer
neu gestartet hat, ist die Installation abgeschlossen.
8 Nehmen Sie die CD-ROM aus dem Computer.
P-touch Editor Version 3.1 Installation (für Macintosh)
Folgen Sie den Anweisungen unten, um den P-touch auf einem Mac zu installieren.
Die Mac-Version der Software ist für Macintosh-Computer mit englischem Betriebssystem. Wenn diese Software auf einem
anderen als einem englischen Betriebssystem installiert wird, kann dies zu Problemen führen.
Systemvorraussetzungen:
Computer: Macintosh oder Power Macintosh
Betriebssystem:
Serieller Anschluss:
Macintosh mit einem PowerPC-Prozessor und seriellem Anschluss (Modem oder Drucker), und der
Betriebssystemversion Mac OS 8.1 oder höher
USB-Anschluss:
Macintosh mit USB-Anschluss und der Betriebssystemversion Mac OS 8.5.1 oder höher
* Für vorherige Mac OS-Betriebssystemversionen:
Lesen Sie auf der Apple Web Site die Informationen über USB.
* Die Programme laufen nur unter Mac OS X Classic. Mac OS X v10.2 Classic wird jedoch nicht unterstützt.
* Die Software wird auf einer CD-ROM geliefert. Sie benötigen daher einen Computer mit einem CD-ROM-
Laufwerk.
Freier Festplattenplatz: mindestens 20 MB
Sie benötigen einige hundert Megabyte zusätzlichen freien Speicherplatz, wenn Sie lange Etiketten oder große
Datenmengen drucken möchten.
Anschluss: Seriell oder USB
Arbeitsspeicher: Mindestens 24 MB
CD-ROM -Laufwerk
Von der mitgelieferten CD-ROM kann die folgende Software installiert werden:
• P-touch Editor Version 3.1
• PT-9200DX-Druckertreiber
P-touch Editor Version 3.1 installieren
1 Schließen Sie den PT-9200DX mit dem mitgelieferten
Kabel an den Macintosh an. Vergewissern Sie sich,
dass der PT-9200DX ausgeschaltet ist.
2 Schalten Sie den Macintosh ein.
3 Legen Sie die P-touch Editor CD-ROM in das CD-
ROM-Laufwerk ein.
4 Doppelklicken Sie auf das Symbol P-touch Editor 3.1
Installer.
12
Page 93

5 Nach Starten des Installers wählen Sie die
Installationsmethode.
Wenn Sie auf die Schaltfläche “Install” klicken, wird
die Software mit den gängigsten Optionen installiert.
(Einige ClipArt-Grafiken werden nicht installiert.)
Sie benötigen 20 MB freien Festplattenplatz zur
Installation. Wenn Sie alle Optionen installieren
wollen, dann benötigen Sie ungefähr 120 MB freien
Festplattenplatz. Wenn genügend freier Festplattenplatz zur Verfügung steht, klicken Sie auf “Install”.
Wenn Sie auf die Schaltfläche “Custom Install”
klicken, erscheint ein Dialogfeld, in dem Sie auswäh-
len können, mit welchen Komponenten der
P-touch Editor installiert wird. Es werden nur die
Optionen intalliert, die markiert sind.
Wählen Sie die Optionen, die Sie installieren
möchten und klicken Sie anschließend auf die
Schaltfläche “Install”.
8 Wenn das Dialogfeld mit der Aufforderung zum
Neustarten erscheint, klicken Sie auf die Schaltfläche
“Quit”, um mit der Installation des Druckertreibers
fortzufahren.
PT-9200DX Druckertreiberinstallation
1 Doppelklicken Sie auf das Symbol “Driver Installer”
im P-touch-Ordner.
2 Nach Starten der Installation klicken Sie auf “Select
Driver”.
3 Wählen Sie den Treiber “PT-9200DX(USB)” (für USB-
Anschluss) oder “PT-9200DX(Serial)” (für Modemoder Drucker-Anschluss ).
Klicken Sie dann auf “Install”, um die gewählten
Treiber zu installieren.
Für Macintosh
6 Die Installation beginnt.
7 Wenn die Installation abgeschlossen ist, erscheint das
folgende Dialogfeld. Klicken Sie auf die Schaltfläche
“Quit”.
4 Die Installation beginnt. Wenn die Installation
beendet ist und folgendes Dialogfeld erscheint,
klicken Sie auf die Schaltfläche “Quit”.
5 Wenn das Dialogfeld mit der Aufforderung zum
Neustarten erscheint, klicken Sie auf die Schaltfläche
“Restart”, um den Computer neu zu starten.
6 Nach dem Neustart des Computers schalten Sie den
P-touch ein.
13
Page 94

Druckerauswahl
1 Öffnen Sie das Apple-Menü und wählen Sie
“Chooser”, um das Chooser-Fenster zu öffnen.
Für Macintosh
2
Klicken Sie in der Liste auf der linken Seite auf PT9200DX(USB) (für USB-Anschluss) oder auf PT9200DX(Serial) (für Modem- oder Drucker-Anschluss).
Wählen Sie dann den gewünschten Druckertreiber aus.
3 Wenn “PT-9200DX(Serial)” gewählt wurde, wählen
Sie in der rechten Liste den Anschluss, mit dem der
P-touch verbunden ist, aus.
4 Schließen Sie den “Chooser”, um die Einstellungen zu
übernehmen.
Deinstallation der P-touch Software und Druckertreiber
Zur Deinstallation des P-touch Editor Version 3.1 und der Druckertreiber gehen Sie wie folgt vor:
Deinstallation des P-touch Editor Version 3.1
(Windows
1 Starten Sie Windows® 95/98/Me/NT 4.0/2000
2 Klicken Sie auf “Start” in der Taskleiste, wählen Sie
3
4 Wählen Sie “P-touch Editor 3.1” und klicken Sie dann
®
95/98/Me/NT 4.0/2000 Professional/XP)
Professional/XP.
“Einstellungen” und klicken Sie dann auf “Systemsteuerung”.
Unter Windows
Taskleiste und klicken dann auf “Systemsteuerung”.
Doppelklicken Sie in der Systemsteuerung auf “Software”.
auf Hinzufügen/Entfernen.
®
XP klicken Sie auf “Start” in der
5 Es erscheint ein Dialogfeld, in dem Sie das Löschen
des P-touch Editor bestätigen müssen. Klicken Sie auf
“Ja”, wenn die Software entfernt werden soll. Klicken
Sie auf “Nein”, wenn die Software nicht entfernt
werden soll.
6 Klicken Sie im folgenden Dialogfeld auf “OK”. Der
P-touch Editor Version 3.1 ist nun deinstalliert.
* Das Dialogfeld kann sich je nach verwendetem
Betriebssystem anders aussehen.
14
Page 95

Druckertreiber ersetzen, installieren oder
löschen (für Windows
®
95/98/Me/NT 4.0/
2000 Professional/XP)
6 Wählen Sie “Serielles Datenkabel” und klicken Sie
dann auf “OK”. Es erscheint nun ein Dialogfeld, in
dem Sie zwischen Installation und Deinstallation des
Treibers wählen können.
Für einen seriellen Anschluss
1 Schließen Sie den PT-9200DX wie auf Seite 4
beschrieben mit dem mitgelieferten seriellen Datenkabel an den Computer an. Schalten Sie dann den PT9200DX ein.
2 Legen Sie die P-touch Editor Version 3.1 CD-ROM in
das CD-ROM-Laufwerk des Computers ein. Es
erscheint ein Fenster, in dem Sie die Sprache für das
Programm auswählen können.
Wenn das Dialogfeld nicht automatisch erscheint,
klicken Sie auf “Arbeitsplatz” auf dem Desktop und
doppelklicken dann auf das CD-ROM-Laufwerk, das
die CD-ROM enthält. (Unter Windows
Sie auf “Arbeitsplatz” im Start-Menü. Doppelklicken
Sie dann auf das CD-ROM-Laufwerk, das die CDROM enthält.)
Doppelklicken Sie danach auf "Ptsetup.exe", um das
Dialogfeld aufzurufen.
3 Wählen Sie die Sprache entsprechend Ihrer
Windows
®
-Version aus und klicken Sie auf “OK”.
®
XP klicken
7 Wählen Sie die gewünschte Option aus, und klicken
Sie auf “Weiter”.
8 Falls “Installieren” ausgewählt wurde: Führen Sie die
Schritte 3 bis 7 im Abschnitt
Anschluss
Falls “Deinstallieren” ausgewählt wurde: Ein
Dialogfeld erscheint, in dem Sie das Löschen bestäti-
gen müssen.
auf Seite 8 aus.
Für einen seriellen
4 Klicken Sie auf die untere Schaltfläche (Druckertrei-
ber). Ein Dialogfeld erscheint, in dem Sie das Modell
auswählen können.
5 Klicken Sie auf die Schaltfläche für den P-touch
9200DX. Das erste Treiber-Setup-Dialogfeld erscheint.
Klicken Sie auf “Weiter”.
Klicken Sie auf “Weiter”. Ein Fenster erscheint, das
anzeigt, dass die Deinstallation abgeschlossen ist.
15
Page 96

Nehmen Sie die CD-ROM aus dem CD-ROMLaufwerk. Wählen Sie “Ja, den Computer jetzt neu
starten” und klicken Sie dann auf “Fertigstellen”, um
den Computer neu zu starten.
5 Klicken Sie auf die obere Schaltfläche (P-touch
9200DX). Ein Fenster erscheint, in dem Sie zwischen
dem Anschluss mit seriellem oder USB-Datenkabel
wählen können.
Für einen USB-Anschluss ( nur Windows® 98/Me/2000 Professional/XP)
Ein PT-9200DX Druckertreiber kann ersetzt, hinzugefügt oder
gelöscht werden, indem Sie folgende Schritte durchführen.
1 Schalten Sie den PT-9200DX aus und ziehen Sie das
USB-Datenkabel vom Computer ab.
2 Legen Sie die P-touch Editor Version 3.1 CD-ROM in
das CD-ROM-Laufwerk des Computers ein. Es
erscheint ein Fenster, in dem Sie die Sprache für das
Programm auswählen können.
Wenn das Dialogfeld nicht automatisch erscheint,
klicken Sie auf “Arbeitsplatz” auf dem Desktop und
doppelklicken dann auf das CD-ROM-Laufwerk, das
die CD-ROM enthält. (Unter Windows
auf “Arbeitsplatz” im Start-Menü. Doppelklicken Sie
dann auf das CD-ROM-Laufwerk, das die CD-ROM
enthält.)
Doppelklicken Sie danach auf "Setup.exe", um das
Dialogfeld aufzurufen.
3 Wählen Sie die Sprache entsprechend Ihrer
4 Klicken Sie auf die untere Schaltfläche (Druckertrei-
®
Windows
ber). Ein Dialogfeld erscheint, in dem Sie das Modell
auswählen können.
-Version aus und klicken Sie auf “OK”.
®
XP klicken Sie
6 Wählen Sie “USB-Kabel”, und klicken Sie auf “OK”. Ein
Dialogfeld erscheint, in dem Sie auswählen können ob
Sie den Druckertreiber ersetzen, hinzufügen oder
löschen möchten.
7 Wählen Sie die gewünschte Option und klicken Sie auf
“Weiter”.
Falls “Durch neuen Brother PT-9200DX ersetzen”
gewählt wurde, wird der bisherige Druckertreiber
gelöscht und durch den neuen Druckertreiber
ersetzt. Wählen Sie diese Option aus, um den
Druckertreiber zu aktualisieren oder um unter
Windows
mit einer anderen Seriennummer zu verwenden.
Falls “Brother PT-9200DX neu hinzufügen” gewählt
wurde, wird ein neuer Druckertreiber installiert.
Unter Windows
Anschluss jedoch nur ein neuer Anschluss, kein
neuer Drucker, hinzugefügt. Wählen Sie diese
Option, wenn mehrere P-touch 9200DX an einem
Computer angeschlossen und von diesem aus
genutzt werden sollen.
®
2000 Professional/XP einen PT-9200DX
®
98/Me wird für den USB-
16
Page 97

8 Falls “Durch neuen Brother PT-9200DX ersetzen”
oder “Brother PT-9200DX neu hinzufügen” gewählt
wurde:
Bei Windows® 98/98SE/Me/2000 Professional:
Ein Dialogfeld erscheint, in dem Sie aufgefordert
werden, den PT-9200DX an den Computer anzuschließen.
Schließen Sie den PT-9200DX wie auf Seite 5
beschrieben mit dem mitgelieferten USB-Kabel an
den Computer an. Schalten Sie nun den PT-9200DX
ein. Ein Fenster erscheint, das die erfolgreiche
Installation des Druckertreibers mitteilt.
Wählen Sie “Ja, sofort neu starten.”, und klicken Sie
auf “Fertigstellen”, um den Computer neu zu starten.
Mit Windows® XP:
Wenn das erste Dialogfeld “Assistent für das Suchen
neuer Hardware” erscheint, wählen Sie “Software
automatisch installieren (empfohlen)” und klicken
dann auf die Schaltfläche “Weiter”.
Ein Fenster erscheint, in dem angezeigt wird, dass die
Software für den P-touch 9200DX installiert wurde.
Klicken Sie nun auf die Schaltfläche “Fertig stellen”.
Wenn die Warnung, dass die Software den WindowsLogo-Test nicht bestanden hat, erneut erscheint,
klicken Sie auf die Schaltfläche “Installation fortsetzen”, um mit der Installation fortzufahren. Die
Software wurde von Brother sorgfältig getestet und
kann problemlos verwendet werden.
Wenn ein Bildschirm erscheint, der anzeigt, dass das
Gerät korrekt hinzugefügt wurde, wählen Sie “Ja,
sofort neu starten.” und klicken Sie dann auf die
Schaltfläche “Fertig stellen”. Nachdem der Computer
neu gestartet hat, ist die Installation abgeschlossen.
Wenn eine Warnung erscheint, dass die Software den
Windows-Logo-Test nicht bestanden hat, fahren Sie
einfach mit der Installation fort. Die Software wurde
von Brother sorgfältig getestet und kann problemlos
verwendet werden.
Nehmen Sie die CD-ROM aus dem Computer.
17
Page 98

Falls “Brother PT-9200DX löschen” gewählt wurde:
Ein Dialogfeld erscheint, in dem Sie das Löschen aller
Druckertreiber bestätigen müssen.
Klicken Sie auf “Ja”. Ein Fenster erscheint, dass das
Löschen des Druckertreibers bestätigt.
Klicken Sie auf “Fertigstellen”.
Falls ein Dialogfeld erscheint, das zum Neustart
des Computers auffordert, wählen Sie “Ja, den
Computer jetzt neu starten.” und klicken Sie auf
“Fertigstellen”.
Deinstallation der P-touch Software und
Druckertreiber (Macintosh)
Entfernen Sie die P-touch Editor Version 3.1 und die Druckertreiber wie im Folgenden beschrieben:
Vergewissern Sie sich, dass der P-touch ausgeschaltet
ist, bevor Sie den Druckertreiber entfernen.
1 Ziehen Sie den P-touch Editor ver3.1-Ordner in den
Abfalleimer.
2 Öffnen Sie im Systemordner den Extensions-Ordner.
3 Ziehen Sie das Symbol PT-9200DX(USB) und USB PT-
9200PC Extension (für USB-Anschluss) oder das
Symbol PT-9200DX(Serial) (für Modem- oder Druckeranschluss) auf das Abfalleimer-Symbol.
4 Öffnen Sie im Systemordner den Preferences-Ordner.
5 Ziehen Sie das Symbol P-touch Editor 3.1 Prefs und
entweder das Symbol PT-9200DX(USB) Prefs (für
USB-Anschluss) oder das Symbol PT-9200DX(Serial)
Prefs (für Modem-oder Druckeranschluss) auf das
Abfalleimer-Symbol. Der P-touch Editor Version 3.1
und der Druckertreiber sind nun gelöscht.
18
Page 99

Verwenden des P-touch Editor
Mit dem P-touch Editor können Sie einfach und schnell Etiketten und Beschriftungen für die verschiedensten Zwecke
erstellen.
Starten des P-touch Editor
Mit einem IBM PC-kompatiblen Computer:
• Durch Anklicken des P-touch Editor Symbols:
Doppelklicken Sie auf das Symbol “P-touch Editor 3.1” in der Programmgruppe “P-touch Editor 3.1”.
• Über die Schaltfläche Start:
1 Klicken Sie auf Start in der Taskleiste, um das Startmenü zu öffnen.
2 Wählen Sie “Programme”.
3 Wählen Sie “P-touch Editor 3.1”.
4 Klicken Sie im angezeigten Menü auf “P-touch Editor 3.1”.
• Im Windows
1 Starten Sie den Windows
2 Wählen Sie das Laufwerk und den Ordner, in dem der P-touch Editor installiert wurde.
3 Doppelklicken Sie auf “Ptedit3.exe”.
Nachdem der P-touch Editor gestartet wurde, wird der folgende Bildschirm angezeigt:
Mit einem Macintosh-Computer:
• Doppelklicken Sie auf das “P-touch Editor Ver3.1”-Symbol im Ordner “P-touch Editor Ver3.1”.
Der P-touch Editor wird dadurch gestartet und es erscheint das folgende Bild:
®
Explorer:
Menüleiste
Standard-Symbolleiste
Eigenschaften-
Palette
Layoutbereich
Druckbereich
Zeichnen-Symbol-
leiste
Objektpallette
Status-
leiste
Menüleiste
®
Explorer.
Lineale
Layout bereich
Druck-
bereich
Titleleiste
Lineale
Cursor
Titelleiste
Zeichnen-Symbolleiste
Druckwerkzeuge
Datenbank-Werkzeuge
Statusleiste
Objektpalette Eigenschaften-
palette
19
Page 100

Anzeigen der Eigenschaften
Obwohl das in den folgenden Erklärungen gezeigte Bildschirmbild sich auf Windows® 95/98/98SE/Me bezieht, ist die
Bedienung für Windows
Die gewünschten Eigenschaften können angezeigt werden, indem auf das Symbol im Eigenschaften-Dock geklickt wird.
®
NT4.0/2000 Professional/XP und Macintosh gleich, wenn nicht ausdrücklich anders angegeben.
Seiteneigenschaften
Schrifteigenschaften
Layouteigenschaften
Texteigenschaften
Datenbankeigenschaften
(nicht bei der MacintoshVersion der Software)
Klicken Sie auf ein Symbol, um die Eigenschaften anzuzeigen.
• Seiteneigenschaften (
Eigenschaften zu verstecken.
)
Klicken Sie auf diese
Schaltfläche, um die
Bei Verwendung des P-touch 9200DX
Erzeugen eines neuen Layouts
Obwohl die in den folgenden Erklärungen gezeigten Bildschirmbilder sich auf Windows® 95/98/98SE/Me beziehen, ist die
Bedienung für Windows
• Texteingabe
1 Klicken Sie auf
Text kann eingegeben werden, und der Cursor wechselt von
cursor) auf
2 Bewegen Sie den Textcursor in die Position im Layout-Bereich, wo Sie
den Text eintippen wollen, und klicken Sie auf die linke Maustaste.
3 Der Cursor blinkt in dem Layout-Bereich, um anzuzeigen, dass Sie
nun den Text eintippen können.
®
NT4.0/2000 Professional/XP und Macintosh gleich, wenn nicht ausdrücklich anders angegeben.
(Text-Schaltfläche) in der Zeichnen-Symbolleiste.
(Textcursor) um.
(Pfeil-
4 Geben Sie den Text mit der Tastatur ein.
5 Um eine neue Textzeile zu erzeugen, drücken Sie die Enter-Taste an
der Tastatur.
Mit P-touch Editor Version 3.1, wird Text immer im Einfügen-Modus eingege-
ben. Der Überschreiben-Modus kann nicht zur Texteingabe verwendet werden.
Um Schriftart und Textgröße zu ändern, klicken Sie auf das ent-
sprechende Symbol im Eigenschaften-Dock und wählen dann die
gewünschten Einstellungen in den erscheinenden Eigenschaften.
Einzelheiten siehe Lesen der Bedienungsanleitung auf Seite 24.
20
 Loading...