

Page 1
Page 2

Thank you for purchasing the P-touch 530/550!
With your new P-touch, you can create labels and stamps for any need. Select from the many
frames, character sizes and styles to design beautiful custom labels and stamps. In a addition,
the variety of tape and ink colors available allow you to print personalized labels, useful for
color-coding.
You no longer have to worry about urgent tasks that require professional printing. In the
office, the factory, the lab or the home, the quality and performance of the P-touch 530/550
makes it an extremely practical machine.
Finally, as you may want to refer to this User’s Guide occasionally, we suggest that you keep
it in a handy place.
FCC NOTICE
This equipment has been tested and found to comply with the limits foe a Class B digital
device, pursuant to 15 of the FCC Rules. These limits are designed to provide reasonable
protection against harmful interference in a residential installation. This equipment
generates, uses, and can radiate radio frequency energy and, if not installed and used in
accordance with the instructions, may cause harmful interference to radio communications.
However, there is no guarantee that interference will not occur in a particular installation.
If this equipment does cause harmful interference to radio or television reception, which
can be determined by turning the equipment off and on, the user is encouraged to try to
correct the interference by one or more of the following measures:
Reorient or relocate the receiving antenna.
Increase the separation between the equipment and receiver.
Connect the equipment into an outlet on a circuit different from that to which the receiver
is connected.
Consult the dealer or an experienced radio/TV technician for help.
The enclosed interface cable should be used in order to ensure compliance with the limits
for a Class B digital device.
Changes or modifications not expressly approved by Brother Industries, Ltd. Could void
the user’s authority to operate the equipment.
This product is covered by one or more of the following patents.
USP4839742 USP4983058 EP315369 GB2223740
USP4922063 USP5009530 EP322918
USP4927278 USP5069557 EP322919
USP4966476 USP5120147
USP4976558
Page 3

ABOUT THIS MANUAL..................................................................................1
QUICK REFERENCE GUIDE
BEFORE YOU START
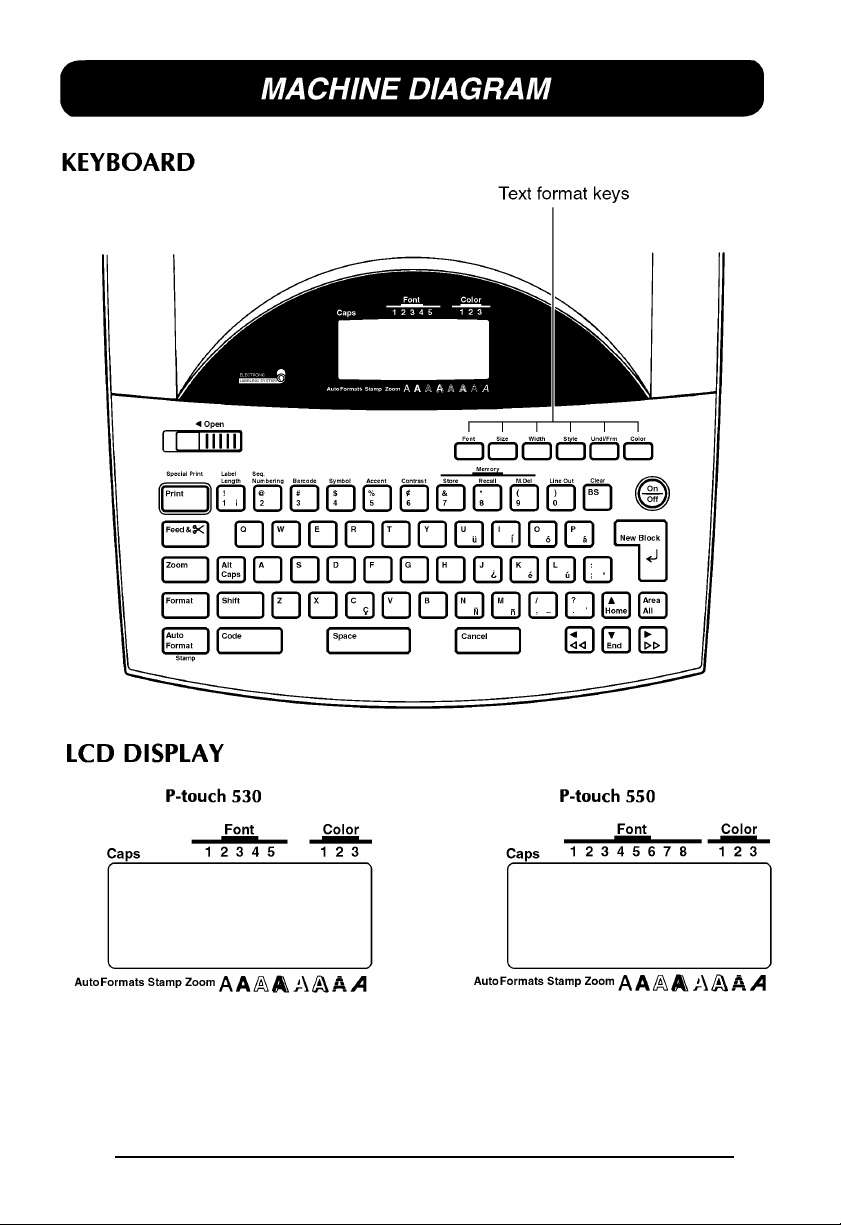
MACHINE DIAGRAM...................................................................................8
GENERAL PRECAUTIONS.......................................................................10
BATTERIS.................................................................................................11
OPTIONAL AC ADAPTOR.........................................................................12
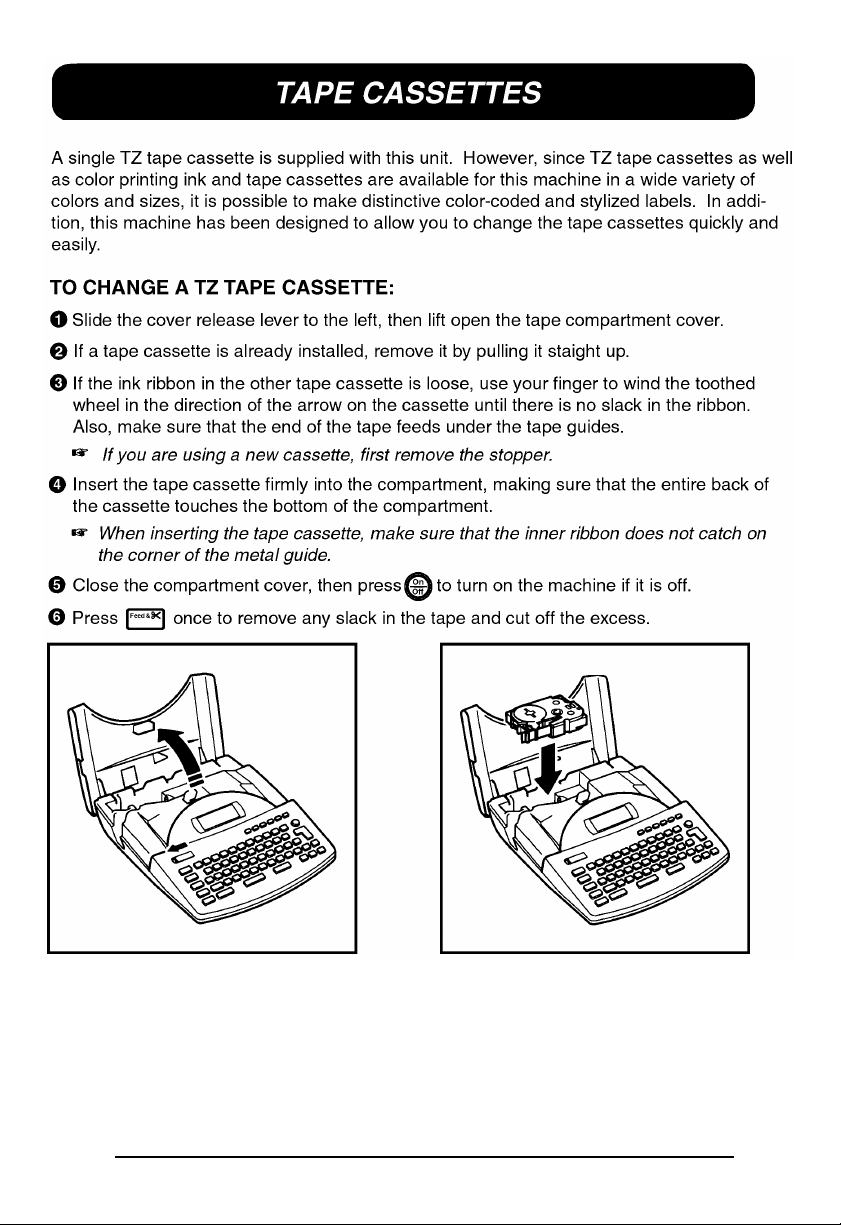
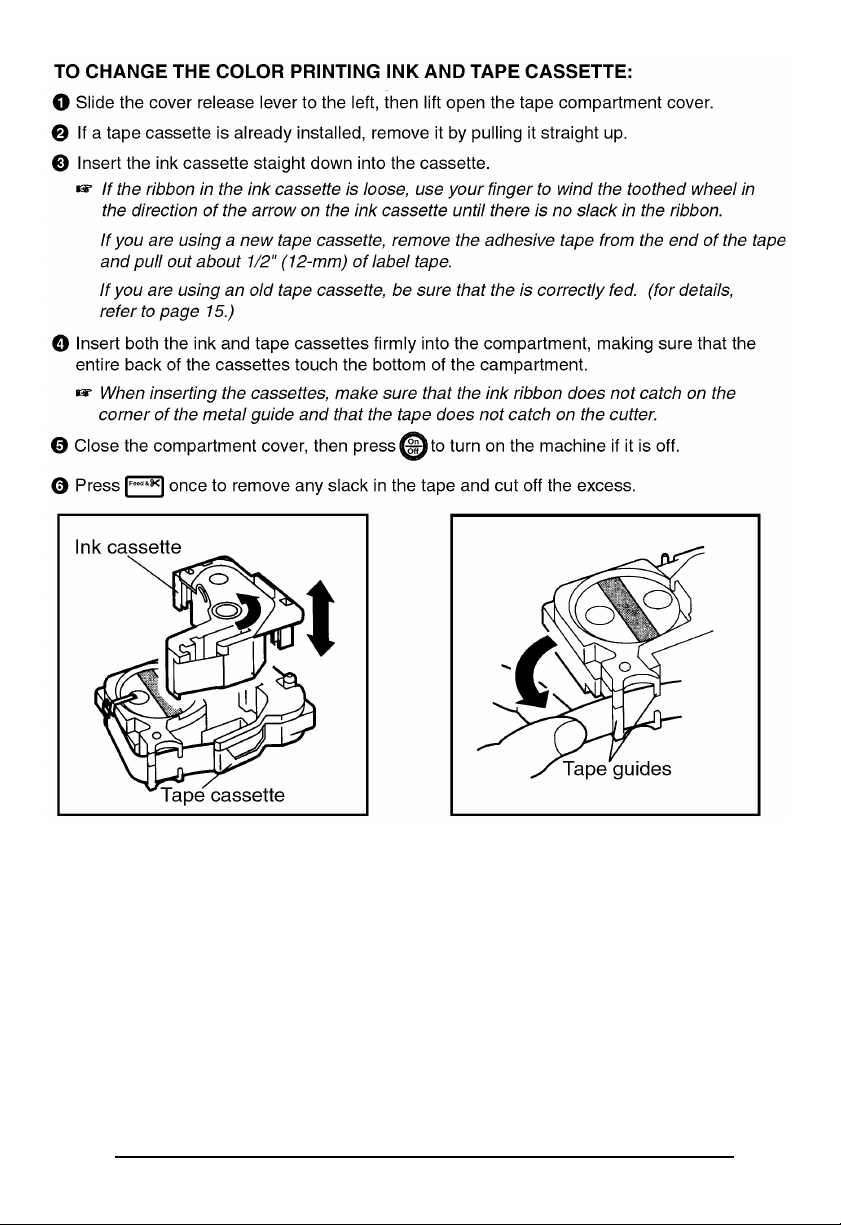
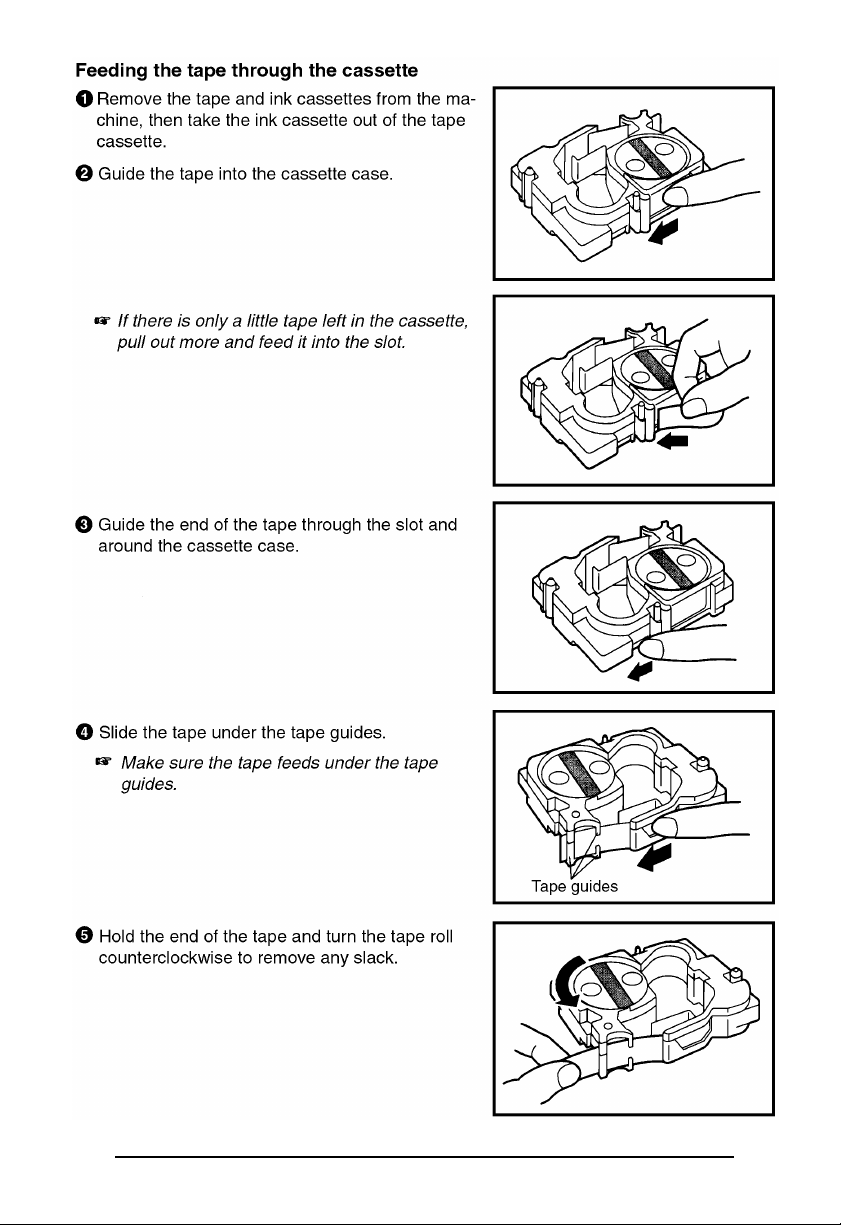
TAPE CASSETTE.....................................................................................13
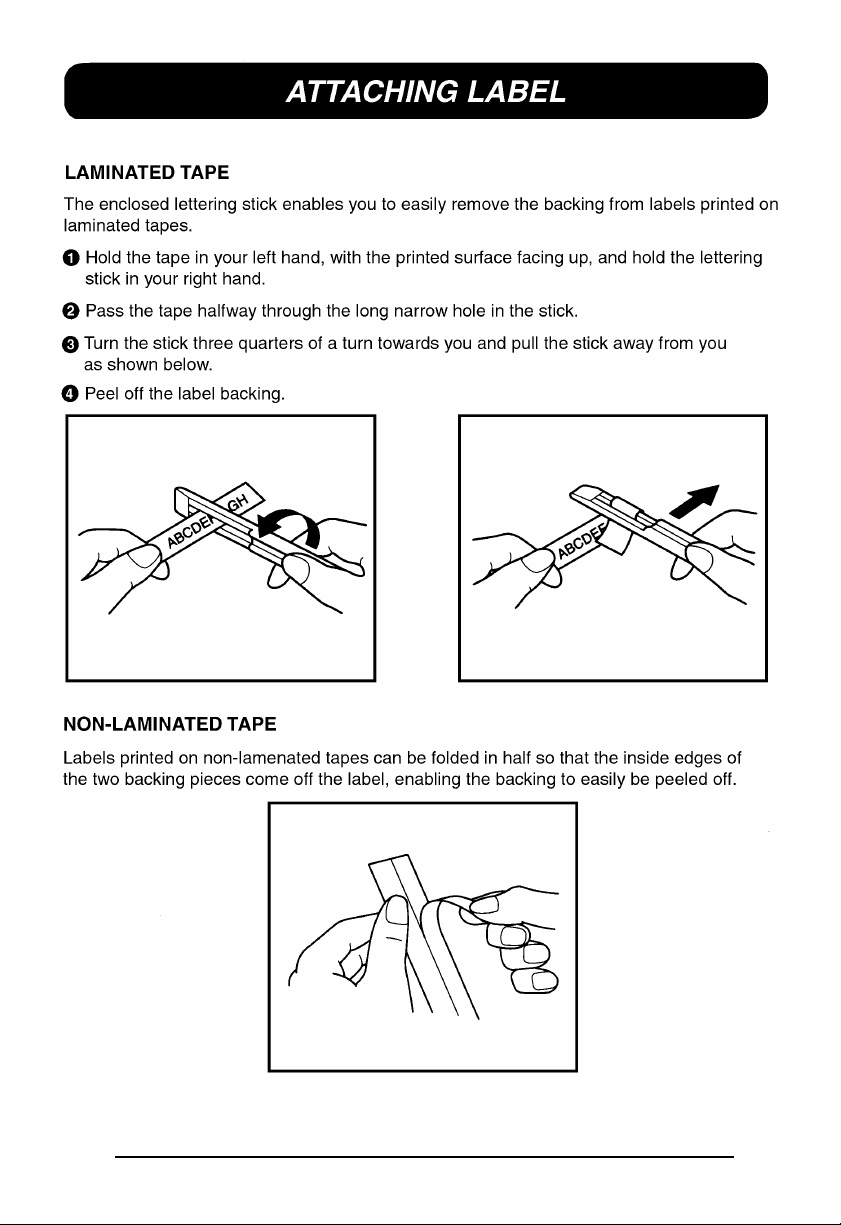
ATTACHING LABELS................................................................................16
PRINT HEAD AND ROLLERS....................................................................19
LEARNING THE ROPES
INTRODUCTION.......................................................................................22
NAME TAG EXAMPLE..............................................................................23
EQUIPMENT LABEL EXAMPLE................................................................30
ADDRESS LABEL EXAMPLE....................................................................36
STORAGE SHELF LABEL EXAMPLE........................................................45
FOR YOUR INFORMATION
INTRODUCTION.......................................................................................54
FINDING YOUR WAY................................................................................55
On/Off KEY...............................................................................................56
CURSOR KEYS........................................................................................57
Code/Alt/Shift KEYS AND Caps MODE......................................................59
Space KEY................................................................................................62
RETURN KEY...........................................................................................63
New Block FUNCTION...............................................................................66
Cancel KEY...............................................................................................68
BS (BACKSPACE) KEY.............................................................................71
Line Out FUNCTION..................................................................................72
Clear FUNCTION.......................................................................................73
Symbol FUNCTION...................................................................................75
Accent FUNCTION....................................................................................78
i
Page 4

Barcode FUNCTION..................................................................................80
Zoom KEY.................................................................................................85
Contrast KEY.............................................................................................86
Label length FUNCTION............................................................................87
Auto Formats Key......................................................................................88
Area KEY AND ALL FUNCTION.................................................................97
Font KEY.................................................................................................100
Size AND Width KEYS.............................................................................102
Style KEY................................................................................................104
Undl/Frm (UNDERLINE/FRAME) KEY......................................................107
Color KEY...............................................................................................109
Format KEY.............................................................................................110
GLOBAL FRAME FUNCTION..................................................................112
FRAME COLOR FUNCTION....................................................................113
STYLE COLOR FUNCTION.....................................................................114
LENGTH FUNCTION...............................................................................116
FEED (TAPE FEED) FUNCTION..............................................................117
H.ALI (HORIZONTAL ALIGNMENT) FUNCTION......................................118
VERT (VERTICAL PRINTING) FUNCTION...............................................119
MIRROR (MIRROR PRINTING) FUNCTION.............................................120
UNIT FUNCTION.....................................................................................121
Print KEY AND Tape Cut KEY..................................................................122
COLOR PRINT FUNCTION.....................................................................123
Stamp FUNCTION...................................................................................125
Special Print FUNCTION..........................................................................128
Seq. Numbering FUNCTION....................................................................130
Store, Recall AND M.Del KEYS................................................................134
ERROR MESSAGE LIST............................................................................139
TROUBLESHOOTING................................................................................146
MACHINE SPECIFICATIONS......................................................................147
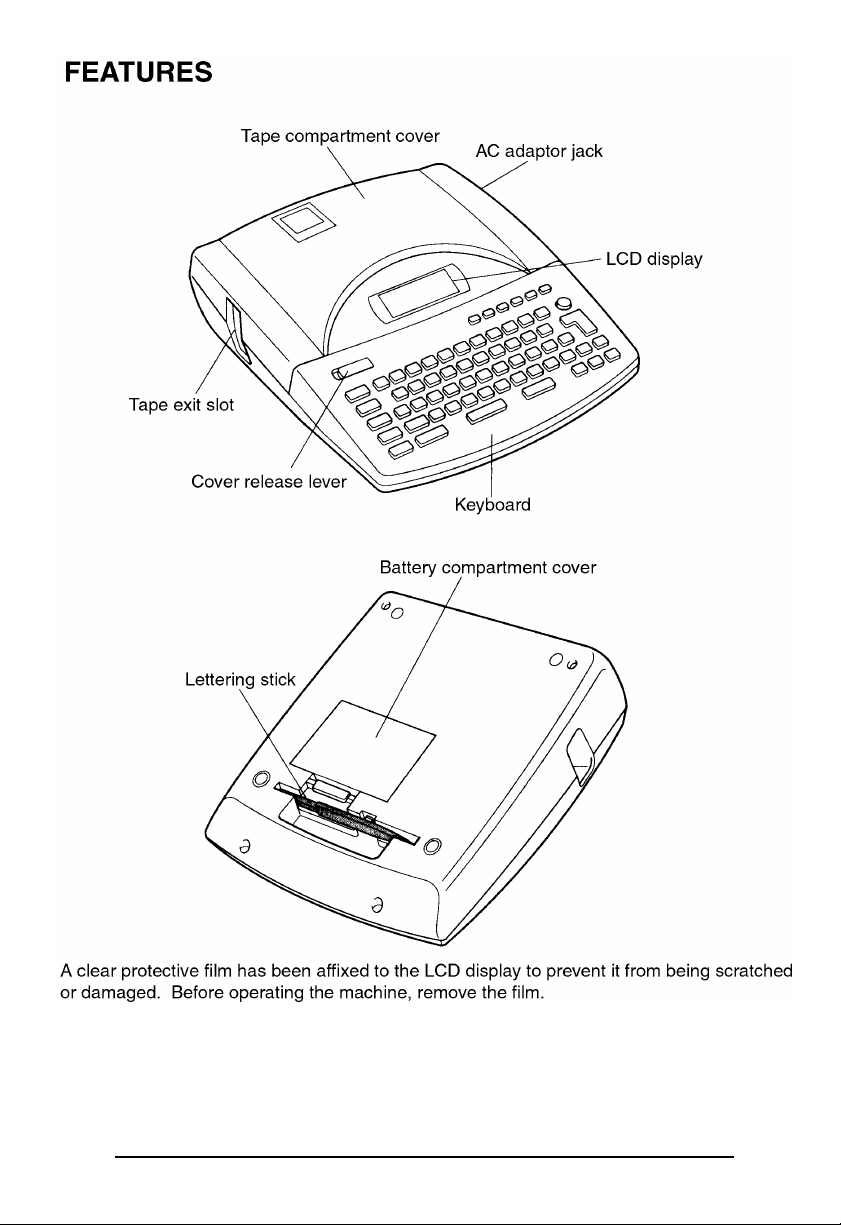
FEATURES.................................................................................................148
INDEX.........................................................................................................149
ACCESSORIES...........................................................................................152
ii
Page 5

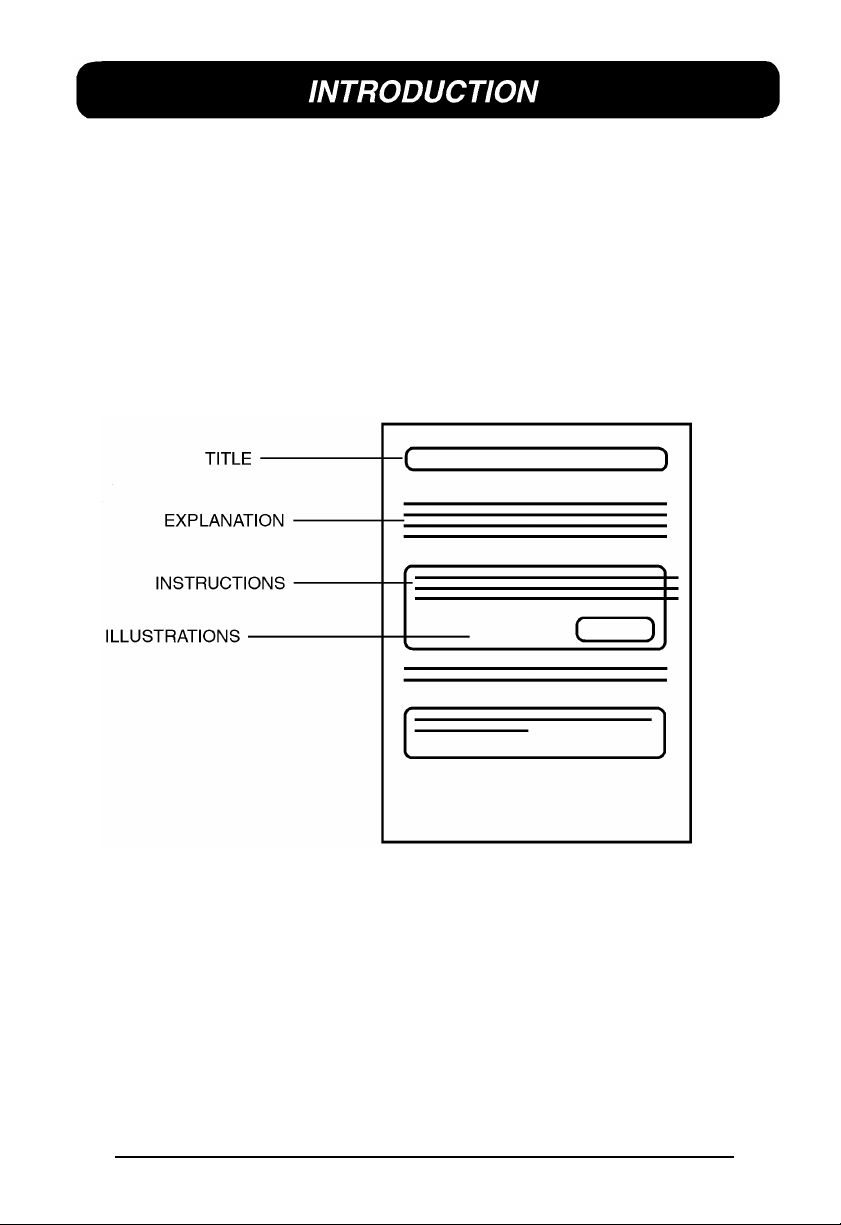
Although the P-touch 530/550 is easy to use, we suggest that you read this manual carefully
before starting. This manual consists of a reference guide and three chapter:
QUICK REFERENCE GUIDE This guide provides quick and simple instructions on set-
ting up and using the machine.
BEFORE YOU START This chapter provides basic information concerning the tape
cassettes, power supplies, and labels.
LEARNING THE ROPES The easy-to-follow practice sessions in this chapter are de-
signed to help you become familiar with the machine’s
operations.
FOR YOUR INFORMATION This handy reference chapter contains detailed explanations
of all the machine’s features.
The Quick Reference Guide contains all the information you need to immediately begin
using this machine for making simple labels. Please read the brief Before You Start chapter
for more details on the setup and care of the machine.
If this is your first time using a P-touch or if you would like to brush up on some techniques,
we suggest you work through the exercises in Learning the Ropes. If you have detailed questions about specific features, the For Your Information chapter will provide you with the
answers.
We hope you enjoy using your P-touch 530/550.
1
Page 6

23456
Page 7
Page 8

Page 9
Page 10

Page 11
Page 12
8910
Page 13
Page 14

* Use only Brother TZ tapes with this machine. Do not use tapes that do not have the
mark.
* Do not pull on the tape being fed from the P-touch. Doing so may damage the tape
cassette.
* Avoid using the machine in extremely dusty place. Keep in out of both direct sunlight and
rain.
* When printing a label, a horizontal line appears on your label, this may be an indication
that dust is on the print head. To clean the print head, gently rub a cotton swab over the
print head to remove dust. (See page 19.)
* Be sure tape is properly fed through tape guidelines before installing a tape into the ma chine. (See page 15.)
* Do not expose the machine to high temperatures or high humidity. Never leave it on the
dashboard or in the back of your car.
* Do not leave any rubber or vinyl on the machine foe an extended period of time. Doing so
may cause staining.
* Do not put any foreign objects onto or into the machine.
* To avoid injuries, do not touch the cutter’s edge.
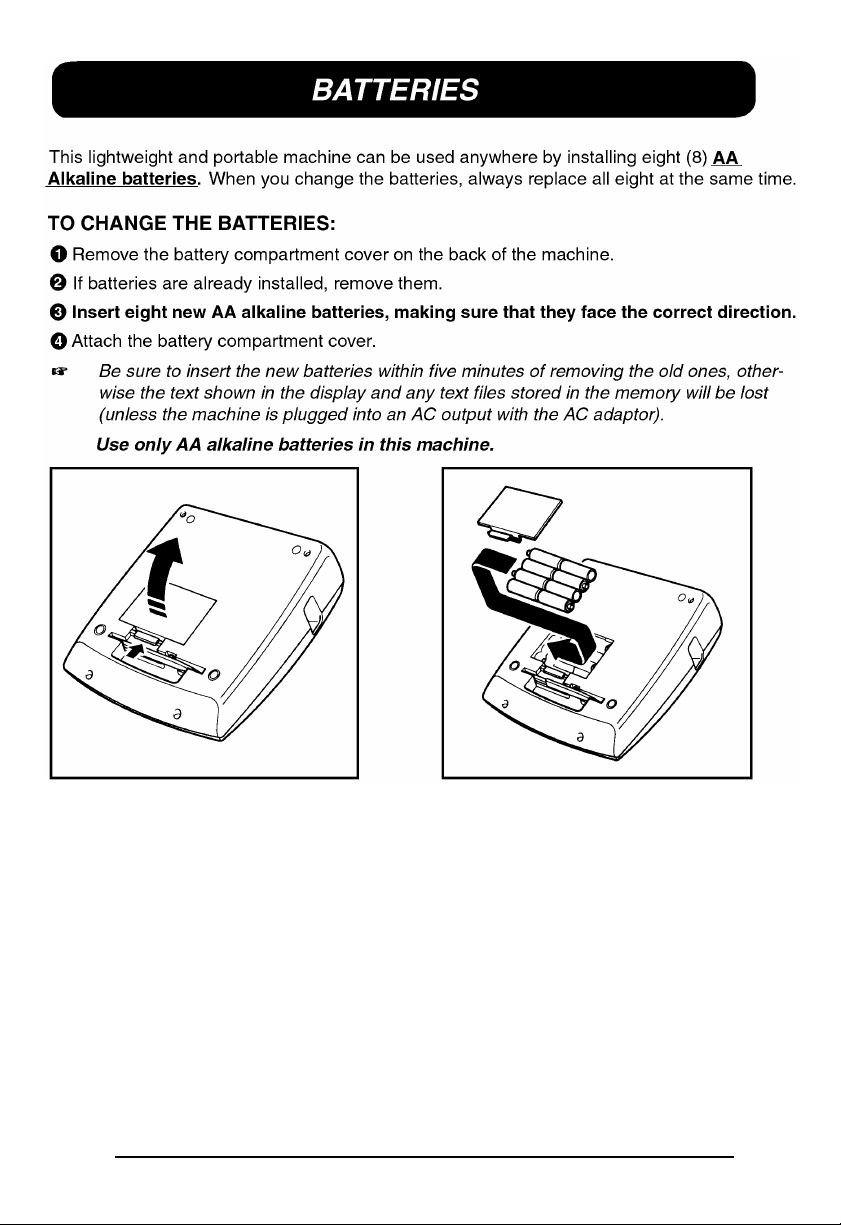
* When inserting new batteries, be sure to do so within five minutes of removing the old
ones, otherwise all text files will be lost (unless the machine is plugged into an AC outlet
with the AC adapter).
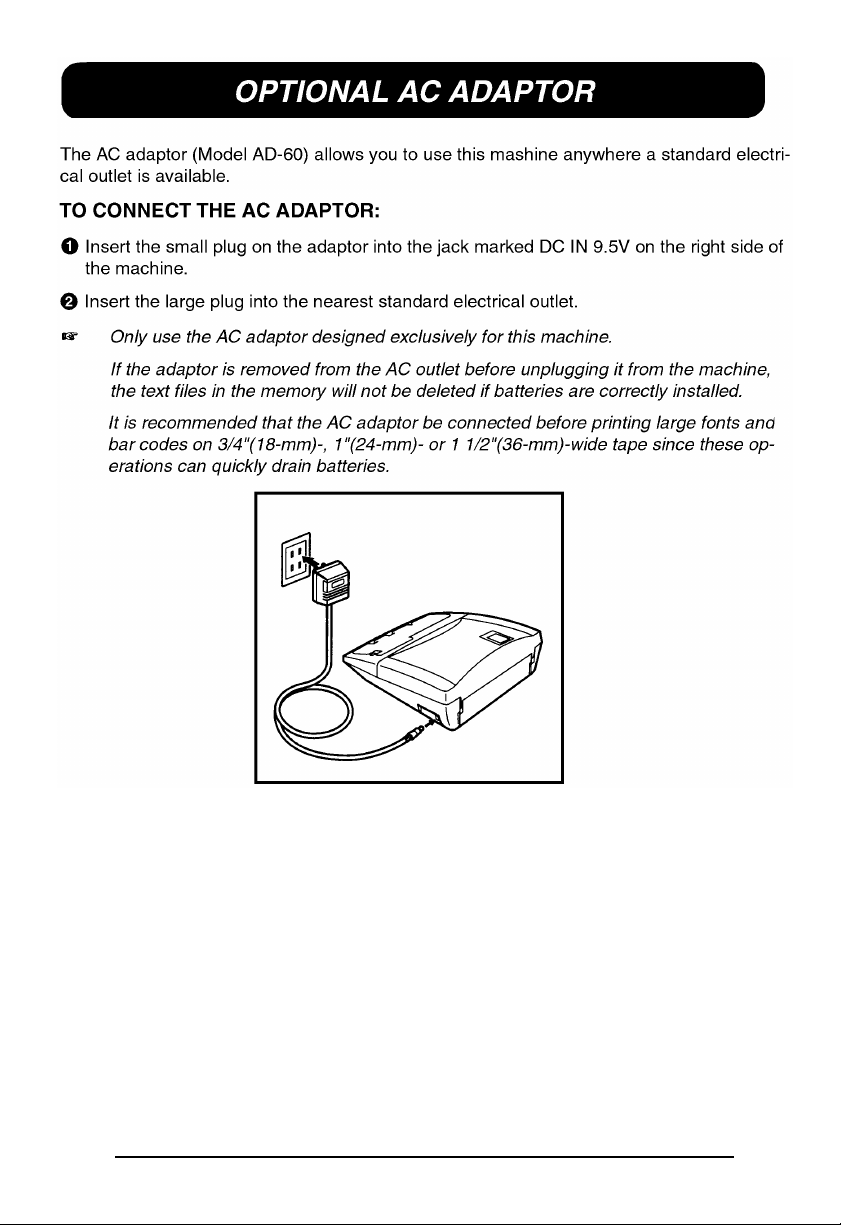
* Use only the AC adapter (model AD-60) designed exclusively for this machine. Use of any
other adapter will void the warranty.
* When the machine is not being used for a long period of time and it is not necessary to
keep the text files stored in the memory, disconnect the AC adapter, and remove the
batteries to prevent them from leaking and damaging the machine.
* If the adapter is removed from the AC outlet before unplugging in from the machine, the
text files in the memory will not be deleted if the batteries are correctly installed.
* Use only AA alkaline batteries in this machine.
Page 15
11121314151617
Page 16
Page 17
Page 18
Page 19
Page 20
Page 21
Page 22

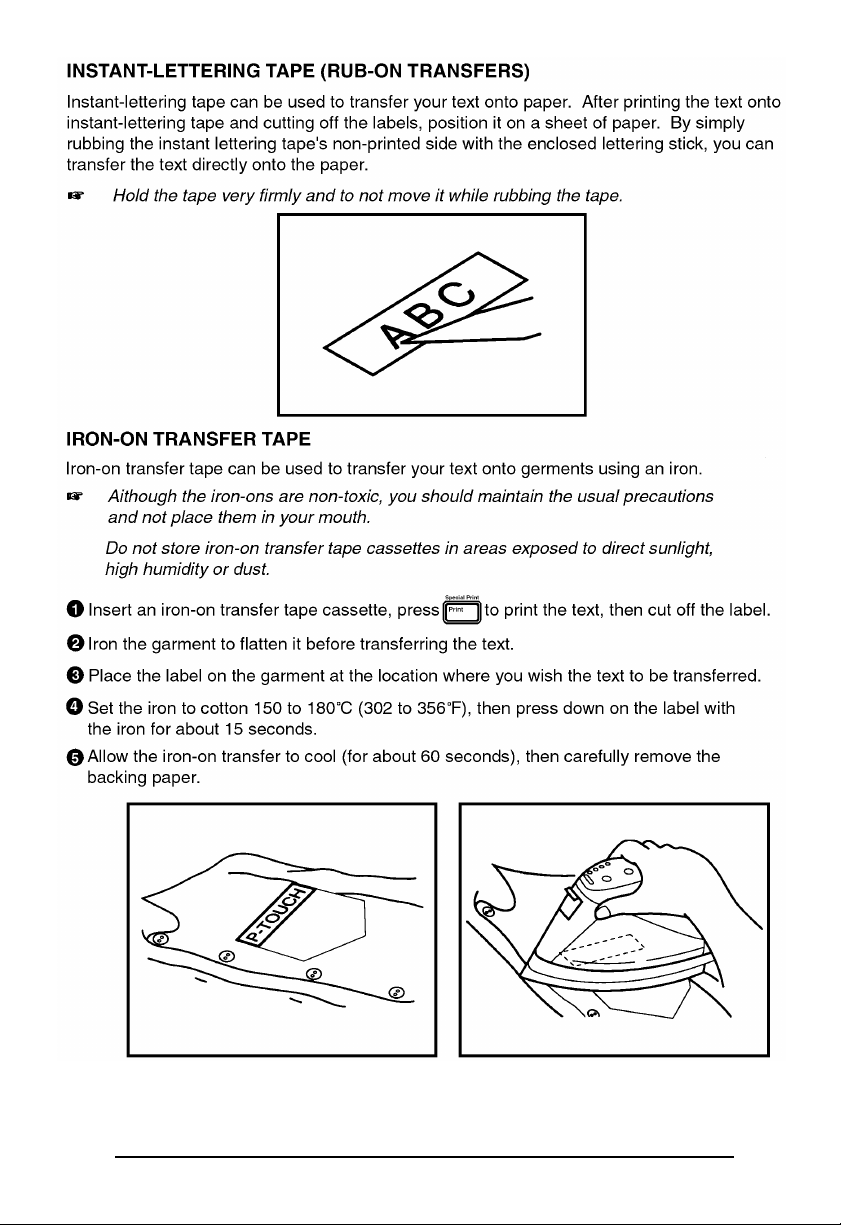
+ White garments made from 100% cotton with a plain (smooth) surface are best for
making iron-on transfers.
You can also make transfers to garments made from 100% linen or cotton/polyester
blends as long as they have a plain (smooth) surface.
The iron-on will not adhere properly to any cloth with a rough surface, such as pile or
denim, or with a waterproof surface. Hart- sensitive materials, such as nylon, acetate
or other similar fibers, are unsuitable as they may be damaged when they are pressed
with an iron at a high temperature.
Press the iron straight down onto the cloth. Do not move the iron while pressing,
otherwise the label may move out of place.
After the backing tape has been removed, the transferred iron-on may appear glossy.
In addition, some white spots may have appeared on the label if it was touched while
the backing tape was peeled off. These can be removed by ironing over the iron-on
transfer with a piece of cloth placed between it and the iron.
The iron-on transfer will have a white background on colored cloth.
Since the transferred iron-on cannot be removed once it is applied, make all transfers
with care.
Washing
Garments with iron-on transfers can be washed over 20 times if the iron-on has been transferred correctly. Normal biological and non-biological household detergents may be used.
The iron-on may become discolored if the garment is placed in bleach for an extended
length of time.
Be careful that hard objects such as buckles or buttons do not come into contact with the
iron-on in the wash.
Do not dry clean garments which have had iron-on transfers applied.
Drying
Garments with iron-on transfers may be dried either inside or outside out.
Do not tumble dry. The transfers will come off and may stick to other items of clothing.
Ironing
Iron garments with transfers using normal temperature settings.
Be sure to place a piece of cloth between the iron and label when you iron over it to
prevent the label from sticking to the iron.
18
Page 23
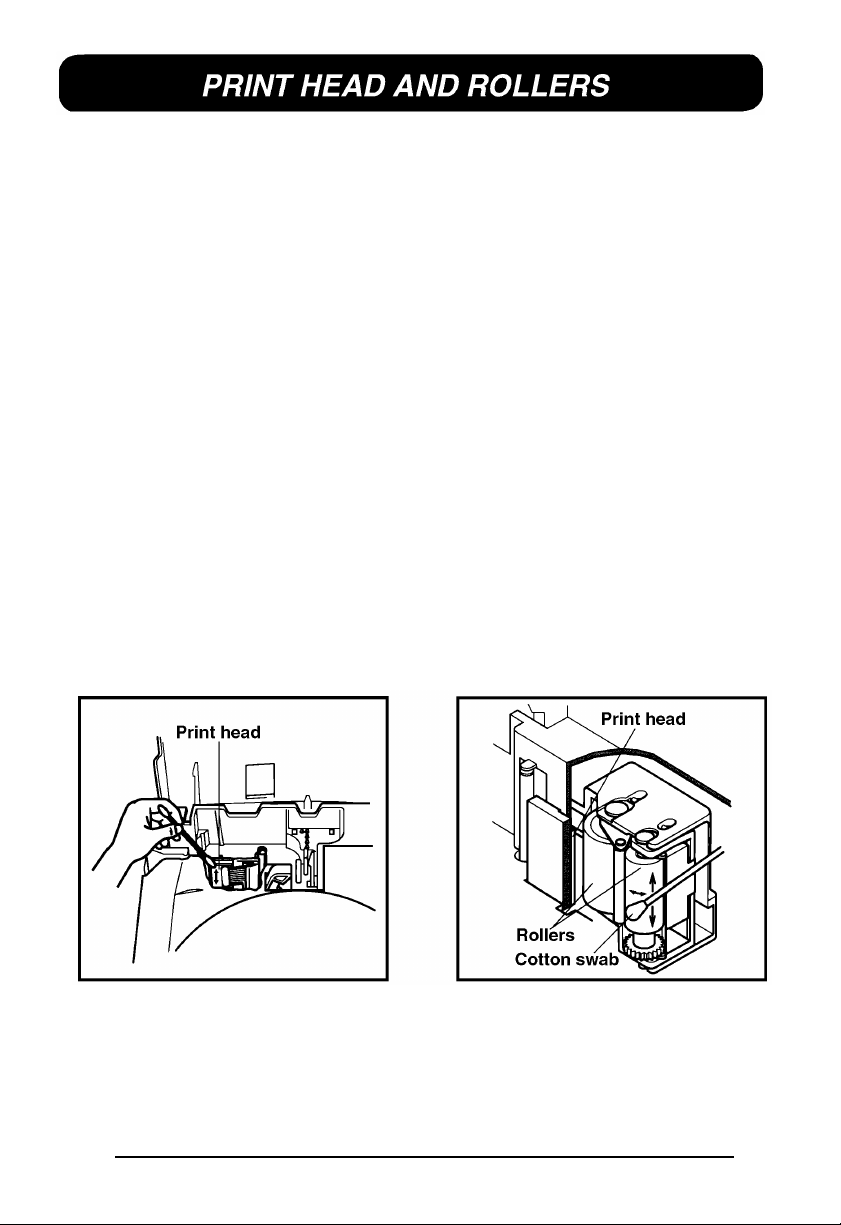
Occasionally, specks of dust or dirt become attached to the machine’s print head and rollers.
This is particularly likely when you are using the unit outdoors or in a very dusty environment.
If a section of the print head is covered with dust, a blank horizontal streak may
appear through the text in the printed label.
Therefore, as with a tape recorder, the machine’s head may need to be cleaned from time to
time.
TO CLEAN THE PRINT HEAD
Ê Turn off the machine.
Ë Open the tape compartment cover, then remove the tape cassette if one is installed.
The print head and rollers are located in the tape compartment.
Ì Print head: Use a dry cotton swab to gently wipe the print head with an up-and - down
motion.
Rollers: Use a dry cotton swab to wipe each roller with an up-and-down motion while
rotating them with your finger.
Í Try printing again.
If dust still remains:
Î Repeat step Ì using a cotton swab dipped in isopropyl (rubbing) alcohol.
If none of the above works, contact your service representative.
19
Page 24

20
Page 25

Page 26
In Learning the Ropes, you will find a series of label-making examples. As the example labels
become increasingly more complex, you will learn how to use the more advanced features
of the machine. The first exercise consists of creating a simple one-line name tag. The second,
an equipment instruction label, takes advantage of several additional machine capabilities.
The third is a four-line address label. Finally, the storage shelf label shows you how to use
the unit’s more expert functions.
If you are a first-time user, we suggest that you work through these exercises to become
acquainted with the various features of this machine. Since they do not require much time,
they can be done in four separate practice sessions or all at once.
The Learning the Ropes examples is constructed as shown below:
+ Although the P-touch 530 display is shown in the examples, the operation does not
change for the P-touch 550.
To best use this training section, simply follow the flow of the practice sessions. Read the
background explanations, then follow the instructions, checking that your results match the
illustrations provided. If you would like more detailed information about a particular point,
simply check in the For Your Information chapter.
Now, let’s see how easy it is to make beautiful labels with the P-touch 530/550!
22
Page 27
After you have inserted the batteries and the enclosed tape cassette as explained in the Before
You Start chapter, we can practice using some of the basic functions of your P-touch 530/550.
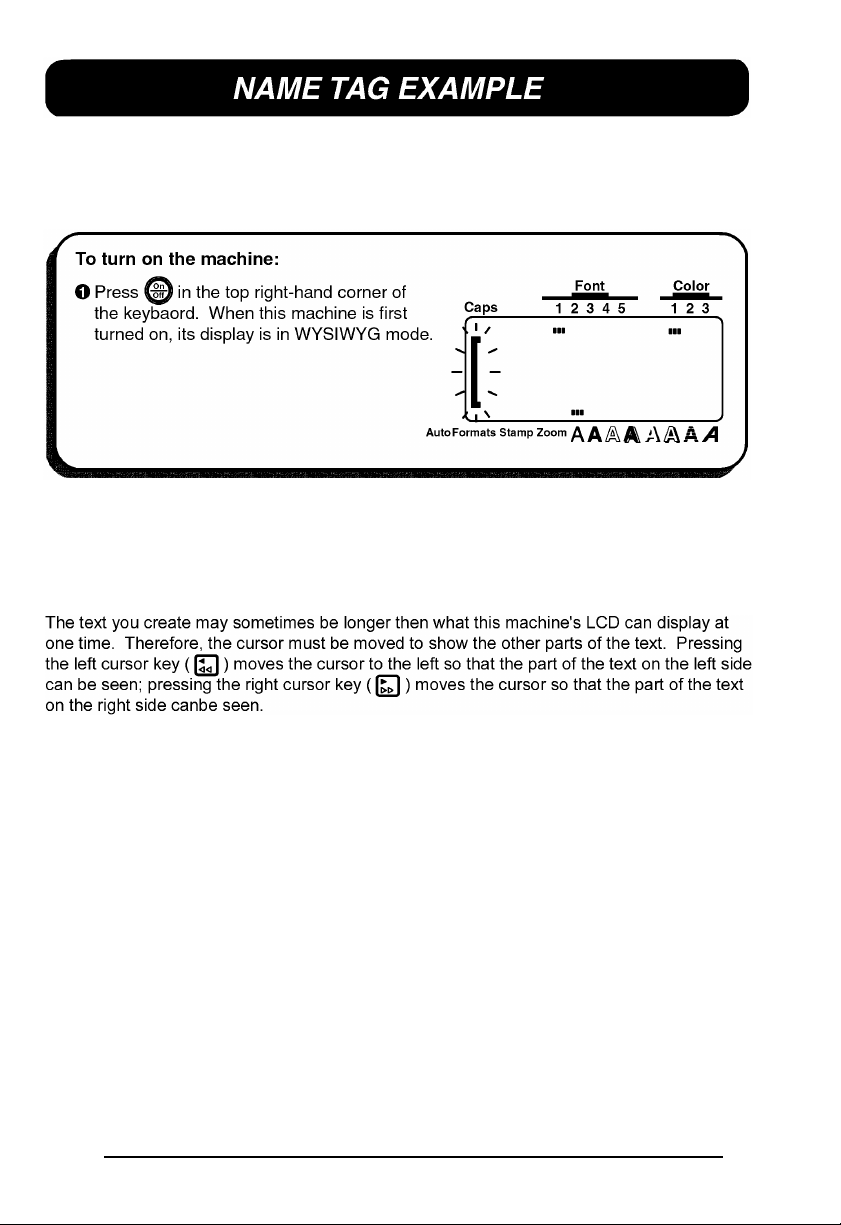
We must first begin by turning on the power to the machine.
The WYSIWYG (what-you-see-is-what-you-get) mode allows you to see exactly how the
label would appear if it were printed. The flashing bracket that appears on the display is
called the “cursor”. Its is like a pointer which shows your current position and lets you select
characters in your text.
Some format settings are indicated by the rectangles which appear at the top and bottom of
the display. The default settings (the settings when the machines is turned on for the very first
time) have been pre-programmed into the machine and represent the most common settings
for labels. However, you can design your own label to have any format that you wish.
Detailed explanations of the formats can be found on page 97 to 120 of For Your Information.
Your P-touch 530/550 is also equipped with an Auto Formats function, which allows you to
make labels more quickly and easily then if you formatted the text yourself. With this function,
simply, select from the many preset label templates that are available and enter the text
to create labels which are already formatted with certain fonts, styles and other layout settings.
For more details on this function, refer to the Auto Formats KEY section on pages 88 to 96.
23
Page 28
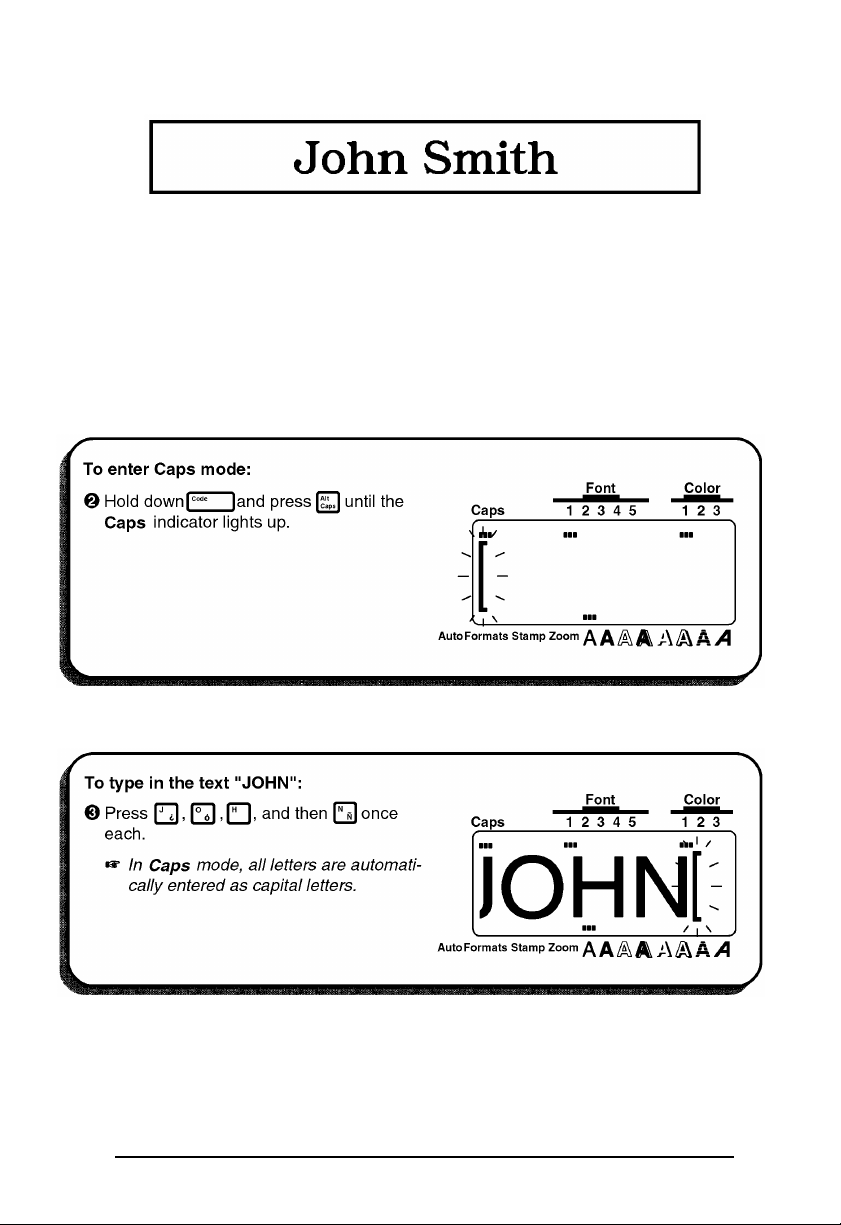
In this first example, we will use the most basic functions of your P-touch to print simple
name tag shown below.
+ The label in this example was made using a ½” (12-mm)-wide tape cassette.
ENTER THE TEXT
For this label, we will begin by typing “JOHN SMITH”, then later we will edit the text and
change its format. Typing on the P-touch is just like typing on a typewriter or a computer.
Since, at first, we want all of the text to be in capital letters, we will use the Caps mode, which
Allows us to enter many capital letters quickly. The Caps indication in the top left-hand corner
of the display lights up when the machine is in Caps mode.
Now, we can type in the first name.
24
Page 29

2526272829
Page 30
Page 31

Page 32

Page 33

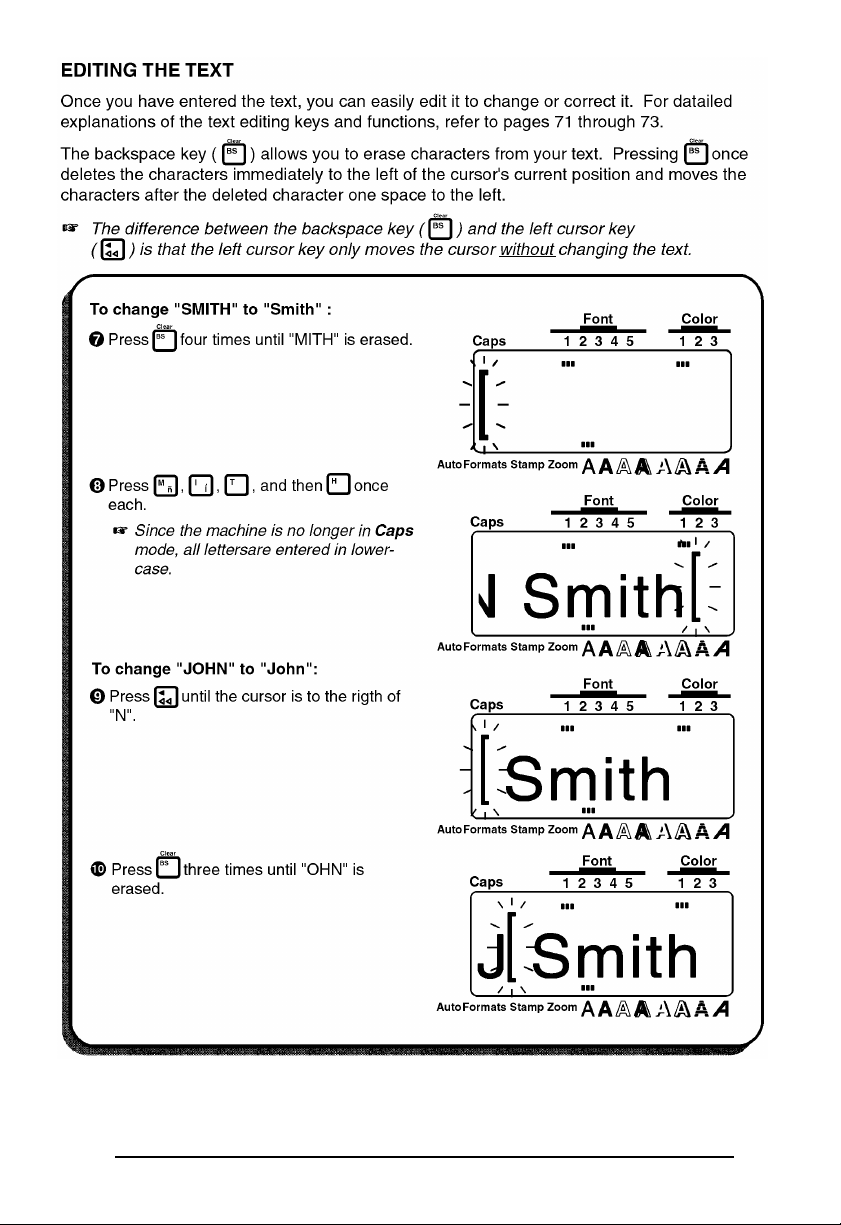
PRINT THE TEXT
Since our text is finished, we can print it. If we used the default settings pre-programmed into
the P-touch for the Special Print function, we could print one whole copy of the label, which
would automatically be cut after printing is finished.
Page 34

Now that we know how to enter, edit and print text, we can practice creating a multi-line
label. In this example, we will also learn how to use the Special Print and the Format key
functions to print three copies of the copier label shown below.
+ The label in this example was made using a ½” (12-mm)-wide tape cassette.
CLEARING THE DISPLAY
Before entering our new text, we must first erase the text that is shown in the display from the
previous time that the machine was used. When we clear the display, all of the text formats
(font, size, width, style, underline/framing and color) and the Format key functions return to
their default settings.
30
Page 35

313233
Page 36

Page 37

Page 38

PRINT THE TEXT
Suppose we wish to print three copies this label. To do this, we would use the COPIES
parameter of the Special Print function. For more details on the Special Print function parameters, refer to pages 128 and 129.
34
Page 39

35
Page 40

In this example, we will recall our name tag text file, change it into a multi-line address label,
then print using the color printing functions. We will also use some of the other text format
keys to emphasize part of the text.
+ The label in this example can be printed on 3/4”(18-mm)-, 1”(24-mm)- or 1-1/2”
(36mm)-wide tape.
RECALLING TEXT
Since we saved the name tag text in the memory, we can recall it to edit it. If we had not
saved the text, it would be lost and we would have to type it in again. When we recall test
from the memory, any text that was shown in the display is deleted.
36
Page 41

ENTERING THE TEXT
Now, we can type in the address and telephone number for our label.
37
Page 42

Since the text is displayed in the WYSIWYG mode, it starts to become small and difficult to
read when too many lines are entered. Therefore, we will use the zoom function so that we
can see the text more clearly.
38
Page 43

39
Page 44

The text format settings could also have been chosen before the text was entered. In this way,
the selected settings would remain until they are changed again.
Next, we can use the Format key to add a frame all around our address label text.
40
Page 45

41
Page 46

PRINTING THE TEXT
Now, let’s assume we wish to print a copy of this label in color. Therefore, we must decide
which ink colors will be used for COLOR1, COLOR2 and COLOR3. For this example, let’s
fill in the name with red (COLOR2) and print the frame in blue (COLOR3). We will print the
rest of the text, which has default setting (COLOR1), in black. For more details on color
printing, refer to pages 123 to 124.
42
Page 47

434445
Page 48

Page 49

In this final example, we will practice using the New Block function as will as more specialized
features, such as the Barcode and Seq. Numbering (sequential numbering) functions, in order
to make the following two labels which could be used to describe objects stored on a shelf.
+ The label in this example can be printed on ¾”(18-mm)-, 1”(24-mm)- or 1-1/2”
(36-mm)-wide tape.
Each time the number of lines changes, a new block of text must be created. Therefore, the
text for our label must be entered in three separate blocks as shown below. With the WYSIWYG
mode, making complex multi-block labels is easier since you can see exactly how the label
would appear if it were printed.
Page 50

CLEARING THE DISPLAY
Again, we must first erase the text that is shown in the display from the previous time that the
machine was used.
ENTERING THE TEXT
Now, we can begin entering the storage shelf label text. Since we know that we want to use
a different font for the first block, we can select the new font before entering the text.
46
Page 51

Since we now want to change from a one-line to a four-line block, we will use the New
Block function. A detailed explanation of multi-block labeling can be found in New Block
FUNCTION on pages 66 and 67.
47
Page 52

Now, we must enter the last part of the text, the bar code. Although there are many settings
for bar codes, let’s use protocol CODE 39, which has an unspecified (free) number of digits.
More details on the Barcode function can be found on pages 80 to 84.
48
Page 53

PRINTING THE TEXT
Finally, let’s assume that we want to put labels on two different shelves (B1 and B2) while
keeping the same bar code. To do this, we can use the Seq. Numbering (sequential numbering) function to print two copies of our label while automatically increasing the shelf number
after each label is printed. More details can be found in Seq. Numbering FUNCTION on
pages 130 to 133.
49
Page 54

50
Page 55

With these four examples, we have covered most of the basic features of your P-touch 530/
550 so that you can begin creating your own customized labels. If you have questions about
any of the functions, refer to the appropriate explanation in the For Your Information chapter.
51
Page 56

52
Page 57

Page 58

In this chapter, you will find detailed explanations for all of the machine’s features. Each
topic is given its own section, making this reference chapter easy to use.
Operational examples of most features can also be found in the Learning the Ropes practice
sessions. If you are a first-time P-touch user, we suggest that you work through those exercises before starting to make labels on your own.
This For Your Information chapter provides supplementary information. When you have a
question about a particular key or function, locate that topic in the FINDING YOUR WAY
contents list and turn to the page indicated.
+ Although the P-touch 530 display is shown in the examples, the operation does not
change for the P-touch 550.
54
Page 59

This For Your Information chapter gives detailed explanations of all of this machine’s features. The following list shows which topics are covered and on which page an explanation
of their operation can be found.
PAGE
On/Off key 56
INPUTTING AND EDITING
Cursor key 57
Code/Alt/Shift keys
and Caps mode 59
Space key 62
(return) key
New Block function 66
Cancel key 68
BS (backspace) key 71
Line Out function 72
Clear function 73
Symbol function 75
Accent function 78
Barcode function 80
DISPLAYING
Zoom key 85
Contrast function 86
Label Length function 87
FORMATTING
Auto Format key 88
Area key and All function 97
Text Formats:
Font key 100
Size and Width keys 102
Style key 104
Undl/Frm (underline/frame) key 107
Color key 109
PAGE
Format key 110
Label Formats:
GROBAL FRAME function 112
FRAME COLOR function 113
STYLE COLOR function 114
LENGTH function 116
FEED (tape feed) function 117
H.ALI (horizontal
alignment) function 118
VERT (vertical printing) function 119
MIRROR (mirror printing)
function 120
UNIT function 121
PRINTING
Print key and Feed &
(tape cut) key
COLOR PRINT function 123
Stamp function 125
Special Print function 128
Seq. Numbering
(sequential numbering) function 130
MEMORY FUNCTIONS
Store, Recall and M.Del keys 134
55
Page 60

batteries have been installed or the machine has been plugged in using the optional AC
adaptor, the previous session’s information is displayed when the machine is turned on. This
feature allows you to stop work on a label, turn off the machine, and return to it later without
having to re-enter the text.
+ When changing the batteries, be sure to insert the new ones within five minutes of
removing the old batteries, otherwise the text shown in the display and any text files
stored in the memory will be lost (unless the machine is plugged into an AC outlet with
the AC adaptor.
If the adaptor is removed from the AC outlet before unplugging it from the machine,
the text files in the memory will not be deleted if batteries are correctly installed.
The machine will automatically turn off if no key is pressed within 5 minutes. The machine’s
Internal memory stores the current session’s information and displays it when you turn on the
machine again.
56
Page 61

57585960616263646566676869707172737475767778798081
Page 62

Page 63

Page 64

Page 65

Page 66

Page 67

Page 68

Page 69

Page 70

Page 71

Page 72

Page 73

Page 74

Page 75

Page 76

Page 77

Page 78

Page 79

Page 80

Page 81

Page 82

Page 83

Page 84

Page 85

The following symbols can only be entered when using protocols EAN 128 or CODE 128.
VALUE CHARACTER VALUE CHARACTER VALUE CHARACTER
3 # 69 ENQ 87 ETB
4 $ 70 ACK 88 CAN
11 + 71 BEL 89 EM
28 < 72 BS 90 SUB
29 = 73 HT 91 ESC
30 > 74 LF 91 {
32 @ 75 VT 92 FS
59 [ 76 FF 92 |
60 \ 77 CR 93 GS
61 ] 78 SO 93 }
62 ~ 79 SI 94 RS
63 _ 80 DLE 94 ~
64 NUL 81 DC1 95 US
64 ` 82 DC2 95 DEL
65 SOH 83 DC3 96 FNC3
66 STX 84 DC4 97 FNC2
67 ETX 85 NAK 100 FNC4
68 EOT 86 SYN 102 FNC1
Page 86

828384858687888990
Page 87

Page 88

Page 89

Page 90

Page 91

Page 92

Page 93

Page 94

Preset Label Templates Entries
1. SYMBOL? 4. DURATION
A. VCR VHS (3/4” (18mm))
2. TITLE? 5. REC. MODE?
3. SNB-TITLE? 6. DATE?
1. SYMBOL? 4. DATA?
B. VCR 8mm-1 (3/8” (9mm))
2. TITLE? 5. REC. MODE?
3. SUB-TITLE?
1. SYMBOL? 4. DURATION?
C. VCR 8mm-2 (1.2” (12mm))
2. TITLE? 5. REC. MODE?
3. SUB-TITLE? 6. DATE?
D. VCR VHSC-1 (1/2” (12mm)) 1. TITLE? 2. SUB-TITLE?
1. SYMBOL? 4. DURATION?
E. VCR VHSC-2 (3/4” (18mm))
2. TITLE? 5. REC. MODE?
3. SUB-TITLE? 6. DATE?
F. AUDIO-1 (1/4” (6mm))
G. AUDIO-2 (3/8” (9mm), 1/2” (12mm))
1. SYMBOL? 3. SUB-TITLE?
2. TITLE?
1. SYMBOL? 3. SUB-TITLE?
2. TITLE?
H. AUDIO-3 (3/8” (9mm), 1/2” (12mm)) 1. SYMBOL? 2. TITLE?
I. NAME PLATE (3/4” (18mm), 11/2” (36mm)) 1. NAME? 2. COMPANY?
J. ADDRESS (3/4” (18mm),1” (24mm), 11/2” (36mm))
K. EQUIPMENT (3/4” (18mm), 1” (24mm), 11/2” (36mm))
L. EQUIPMENT (1/2” (12mm))
M.SLIDE (1/2” (12mm))
1. NAME? 3. ADDRESS2?
2. ADDRESS1? 4. ADD.3/TEL?
1. TITLE? 3. NUMBER?
2. NAME?
1. TITLE? 3. NAME?
2. SUB-TITLE? 4. NUMBER?
1. TITLE? 3. SUB-TITLE?
2. DATE?
N. PRICE (3/4” (18mm), 1” (24mm),11/2” (36mm)) 1. NAME? 2. PRICE?
O. SALE PRICE (3/4” (18mm), 1” (24mm), 11/2” (36mm))
1. NAME? 3. NEW PRICE?
2. OLD PRICE?
P. FILE LONG (3/4” (18mm), 1” (24mm), 11/2” (36mm)) 1. TITLE?
Q. FILE LONGV (3/4” (18mm), 1” (24mm), 11/2” (36mm)) 1. TITLE?
R. FILE SHORT (3/8” (9mm), 1/2” (12mm), 3/4” (18mm),
1” (24mm), 11/2” (36mm))
S. FLOPPY 3.5” (3/4” (18mm), 1” (24mm), 11/2”(36mm))
T. FLOPPY 5” (3/4” (18mm), 1” (24mm), 11/2”(36mm))
1. TITLE?
1. TITLE? 3. NAME?
2. SUB-TITLE?
1. TITLE? 3. NAME?
2. SUB-TITLE?
Page 95

919293949596979899
Page 96

Page 97

Page 98

Page 99

Page 100

 Loading...