

Page 1
Quick Reference
Guide de référence rapide
Kurzanleitung
Beknopte bedieningsgids
Snabbguide
Hurtigreferense
Guida di riferimento rapido
Referencia rápida
Hurtig reference
2420PC
Page 2

Page 3
Quick Reference
Quick Reference
IMPORTANT
The correct procedure for installing your PT-2420PC is as follows:
1. Start label editing software installation.
2. When prompted, connect the P-touch to the USB port of the PC.
Under no circumstances connect the P-touch to the PC before installing the software.
ENGLISH
Page 4

Thank you for purchasing the P-touch 2420PC!
With your new Brother label printer, you can print personalised labels for any purpose. Simply insert a
label cassette into the PT-2420PC, design your label with the enclosed P-touch label-designing software,
and then print it out. Your customised label prints out in seconds. Label tape cassettes are available in
various sizes and colours—ideal for colour-coded labelling or any other special labelling needs.
Two label-designing applications are available on the enclosed CD-ROM. The easy-to-use P-touch Quick
Editor software allows text to be entered and formatted quickly so that simple labels can be printed
instantly. The more advanced P-touch Editor Ver. 3.1 application not only automates complex layout
functions, but it also includes a variety of pre-formatted templates for immediate use.
Declaration of Conformity
We, Brother Industries Ltd.
15-1, Naeshiro-cho, Mizuho-ku,
Nagoya 467-8561, Japan
declare that this product conforms with the following normative documents:
Safety: EN 60950 (AC adapter)
EMC: EN 55022 1998 Class B
EN 55024 1998
EN 61000-3-2 1995
EN 61000-3-3 1995
following the provisions of the Electromagnetic Compatibility Directive 89/336/EEC (as amended
by 91/263/EEC and 91/31/EEC).
This system also follows the provisions of the Low Voltage Directive 73/23/EEC.
Issued by: Brother Industries Ltd.
The enclosed interface cables should be used in order to ensure compliance with the limits for
EMC.
Page 5

Table of contents
Unpacking ............................................................................................................................. 2
General description ............................................................................................................... 2
General precautions .............................................................................................................. 2
Tape cassettes ........................................................................................................................ 3
Changing the tape caessette .................................................................................................. 4
Connecting the AC adapter ................................................................................................... 4
Power/Feed key ..................................................................................................................... 5
Connecting the USB interface cable ...................................................................................... 5
Software and printer driver ................................................................................................... 5
For PC-compatible users (Windows
Before installation .......................................................................................................... 6
Installing P-touch Quick Editor ....................................................................................... 6
Installing P-touch Editor Ver. 3.1 .................................................................................... 8
Installing the printer driver ............................................................................................. 9
Reading the User’s Guide ............................................................................................. 10
Uninstalling the software and printer driver .................................................................. 11
Replacing, deleting or adding another printer driver ..................................................... 11
For Macintosh users .............................................................................................................14
Before installation ........................................................................................................ 14
Installing P-touch Quick Editor ..................................................................................... 14
Installing P-touch Editor Ver. 3.1 ................................................................................... 15
Selecting the driver ...................................................................................................... 16
Reading the User’s Guide ............................................................................................. 16
Uninstalling the software and printer driver .................................................................. 16
Using P-touch Quick Editor .......................................................................................17
Starting up P-touch Quick Editor ......................................................................... 17
Specifying a label size ........................................................................................ 17
Entering text ........................................................................................................ 17
Importing text ..................................................................................................... 18
Using the Text History list ................................................................................... 18
Adding a symbol .................................................................................................18
Changing the background color ..........................................................................18
Viewing the text .................................................................................................. 18
Printing ............................................................................................................... 19
Hiding/displaying P-touch Quick Editor (Windows
Quitting P-touch Quick Editor ............................................................................ 19
Using P-touch Editor Ver. 3.1 ..................................................................................... 20
Starting up P-touch Editor Ver. 3.1....................................................................... 20
Displaying the Properties .................................................................................... 20
Creating a new layout .........................................................................................21
Printing a label .................................................................................................................... 22
Removing the label backing ................................................................................................. 22
Maintenance ........................................................................................................................ 23
Cleaning the print head and roller ................................................................................ 23
Cleaning the tape cutter ............................................................................................... 23
Troubleshooting ................................................................................................................... 24
Monitoring the P-touch status ....................................................................................... 24
Problem-solving ........................................................................................................... 25
Machine specifications ........................................................................................................ 25
Accessories .......................................................................................................................... 26
®
98/98SE/Me/2000/XP) ................................................... 6
®
only) ................................... 19
1
Page 6
Unpacking
• PT-2420PC
• 24 mm Direct Thermal Paper tape cassette (black characters on white tape; 7 meters)
• AC adapter (Model J; for plugging the PT-2420PC into the AC outlet)
USB Interface cable (for connecting the PT-2420PC to either an IBM PC-compatible or Macintosh computer)
•
• Quick Reference
• CD-ROM containing the PC and Mac software and their manuals
• Tape separator
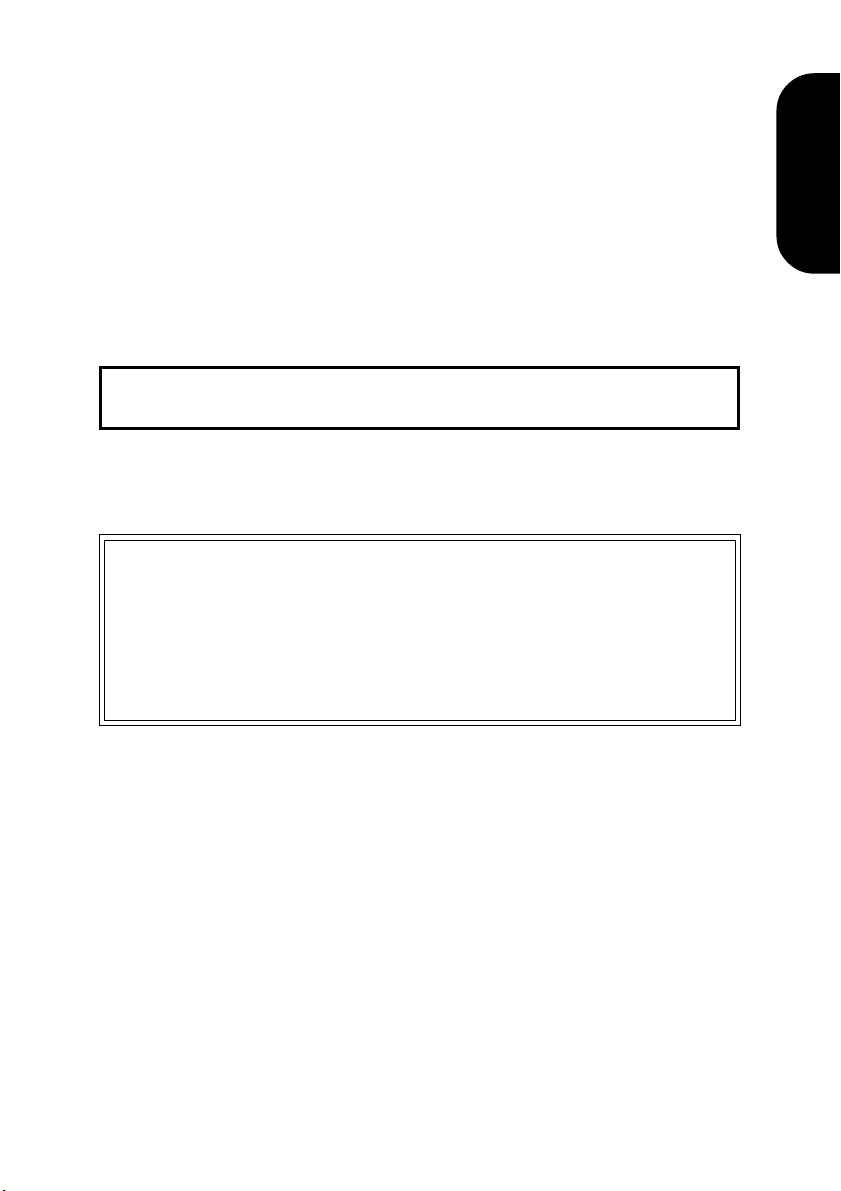
General description
Tape cutter button
Status indicator
Tape exit slot
Power/Feed key
Tape compartment cover
USB port
D
C
I
N
9
AC adapter connector
.
5
V
Release lever
Print head
Cutter
General precautions
• Use only Brother TZ tapes and AL tapes with this machine. Do not use tapes that do not have the and mark.
• Do not pull on the tape being fed from the P-touch. Otherwise, the tape cassette may be damaged.
• Avoid using the machine in extremely dusty places, and keep it out of both direct sunlight and rain.
• Do not expose the machine to high temperatures or high humidity.
•
Do not leave any rubber or vinyl objects on the machine for an extended period of time. Doing so may cause staining.
• Do not clean the machine with alcohol or other organic solvents. Use a soft, dry cloth only.
• Do not put any foreign objects into or anything on the machine.
• To avoid injures, do not touch the cutter’s edge.
• Do not touch the print head, which becomes very hot when the P-touch is used. Even after the machine is turned off, the
print head remains hot for some time.
• Use only the enclosed AC adapter (Model J) designed exclusively for this machine. Use of any other adapter will void the
warranty.
• Use only the enclosed USB interface cable. Use of any other cable will void the warranty.
• When the machine is not being used for a long period of time, disconnect the AC adapter.
• Do not try to disassemble the P-touch.
®
is a trademark of International Business Machines, Inc.
• IBM
•
Microsoft® and Microsoft Windows® are registered trademarks of Microsoft Corp. in the US and other countries.
• Macintosh and Power Macintosh are registered trademarks of Apple Computer, Inc.
•
All other software and product names mentioned are trademarks or registered trademarks of their respective companies.
2
Page 7

Tape cassettes
• Do not pull on the tape being fed from the machine, otherwise the tape cassette may be damaged.
• If the label is attached to a wet or dirty surface, it may easily peel off. Before affixing the label, clean
the surface where it will be attached.
• Depending on the environmental conditions and the material, condition, roughness, and shape of
the affixing surface, the label may move out of place or peel off. In order to test the label’s adhesive
strength or before using this label where safety is a particular concern, test the label by affixing a
small piece of it to a hidden area of the intended surface.
• Sunlight, wind and rain may cause the colour of the label to fade or the label to peel off.
• Markings made with oil-based or water-based ink may be visible through a label affixed over them.
To hide the markings, use two labels layered on top of each other, or use tape with a dark background.
• This tape may not be adequate in cases where liabilities may result due to damage or injuries.
• AL tape is a thermal tape that is not suitable for use outside or for an extended period of time since it
may become discolored. In addition, depending on the environmental conditions and the material of
the surface where this tape is attached, the tape may peel or fall off.
3
Page 8
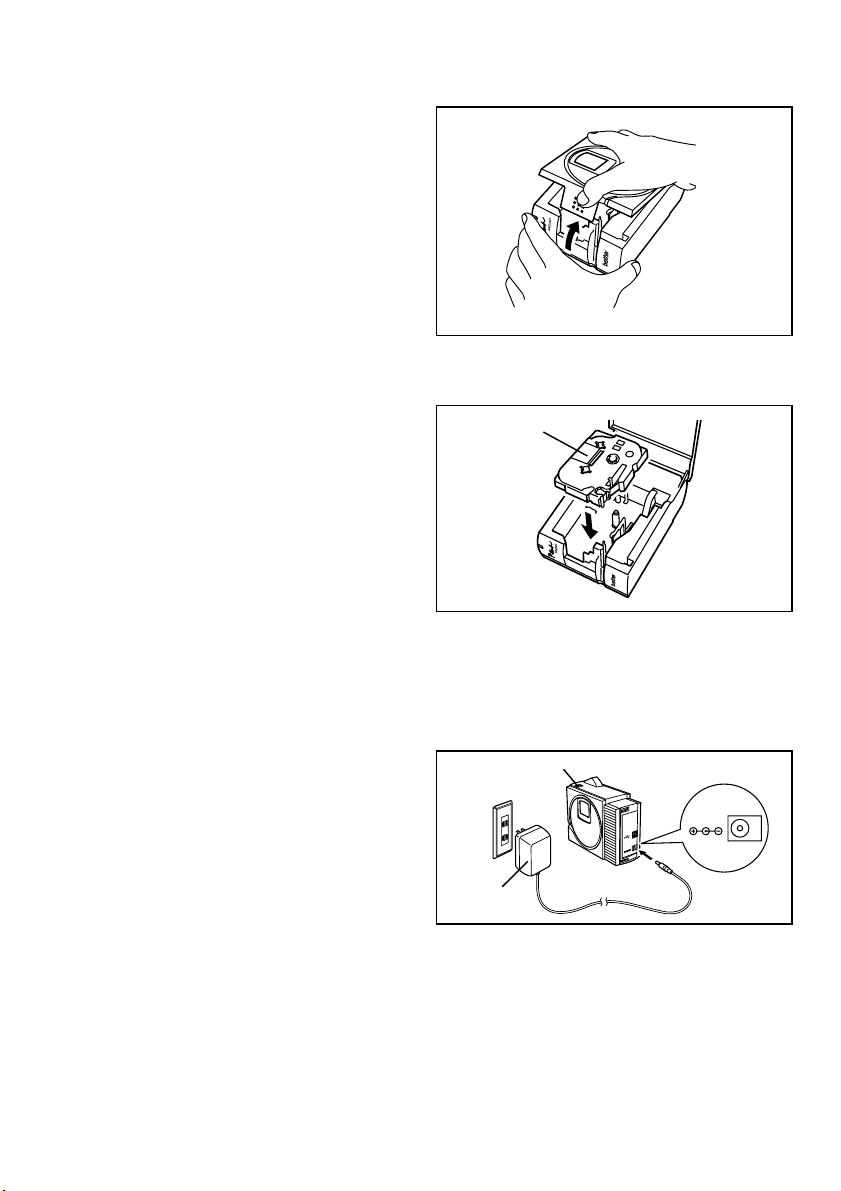
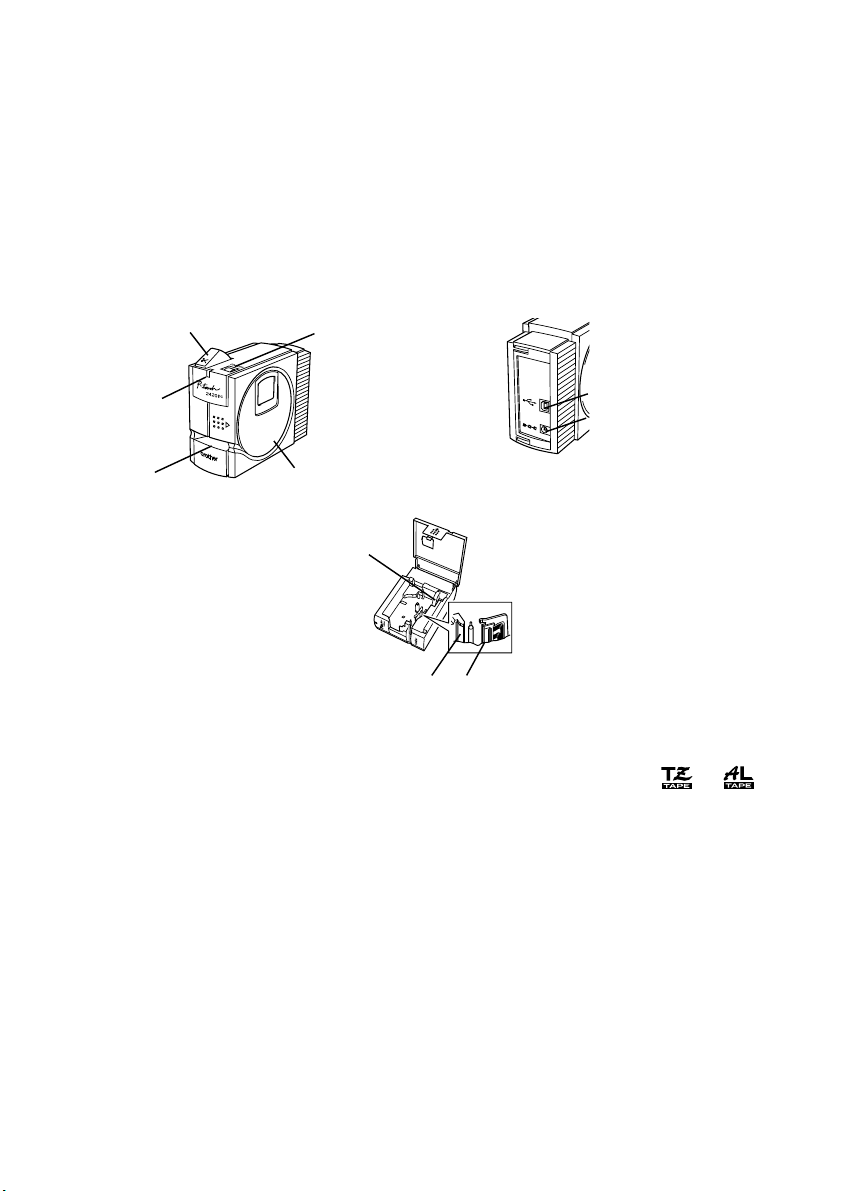
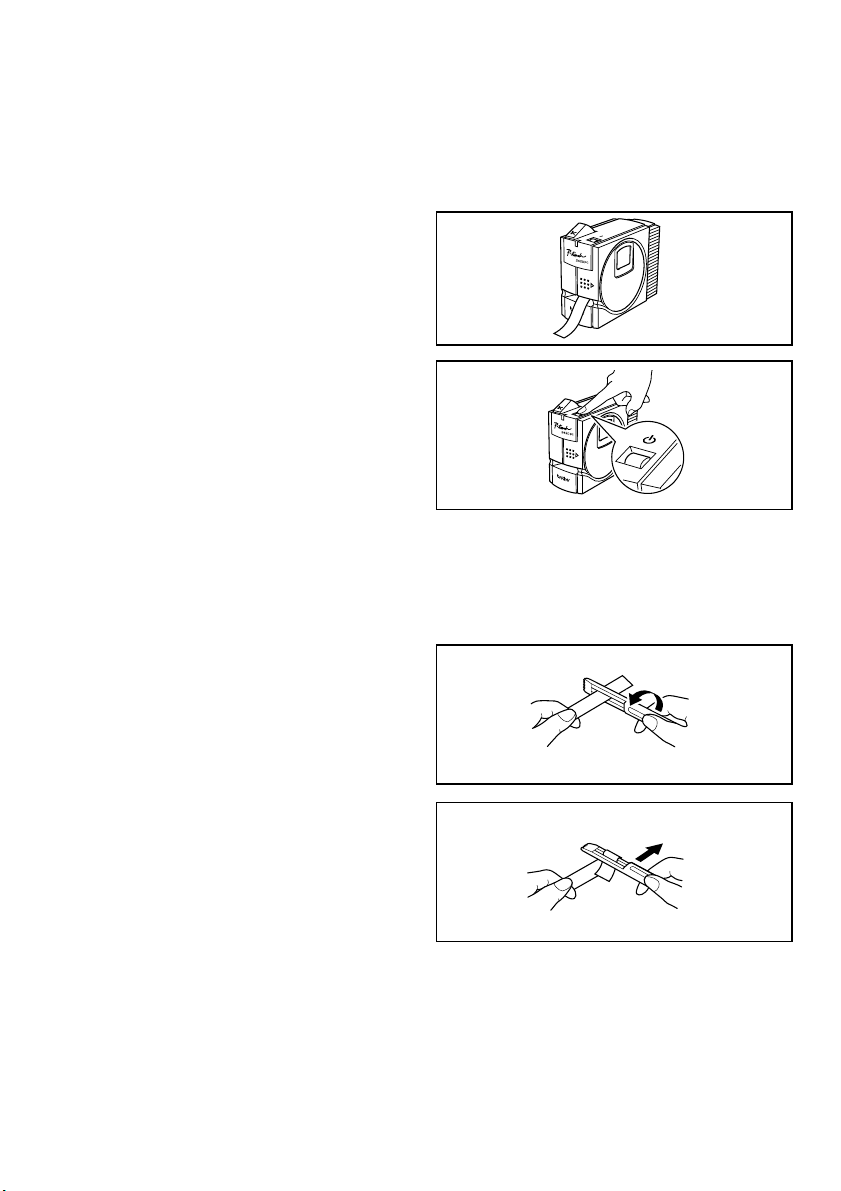
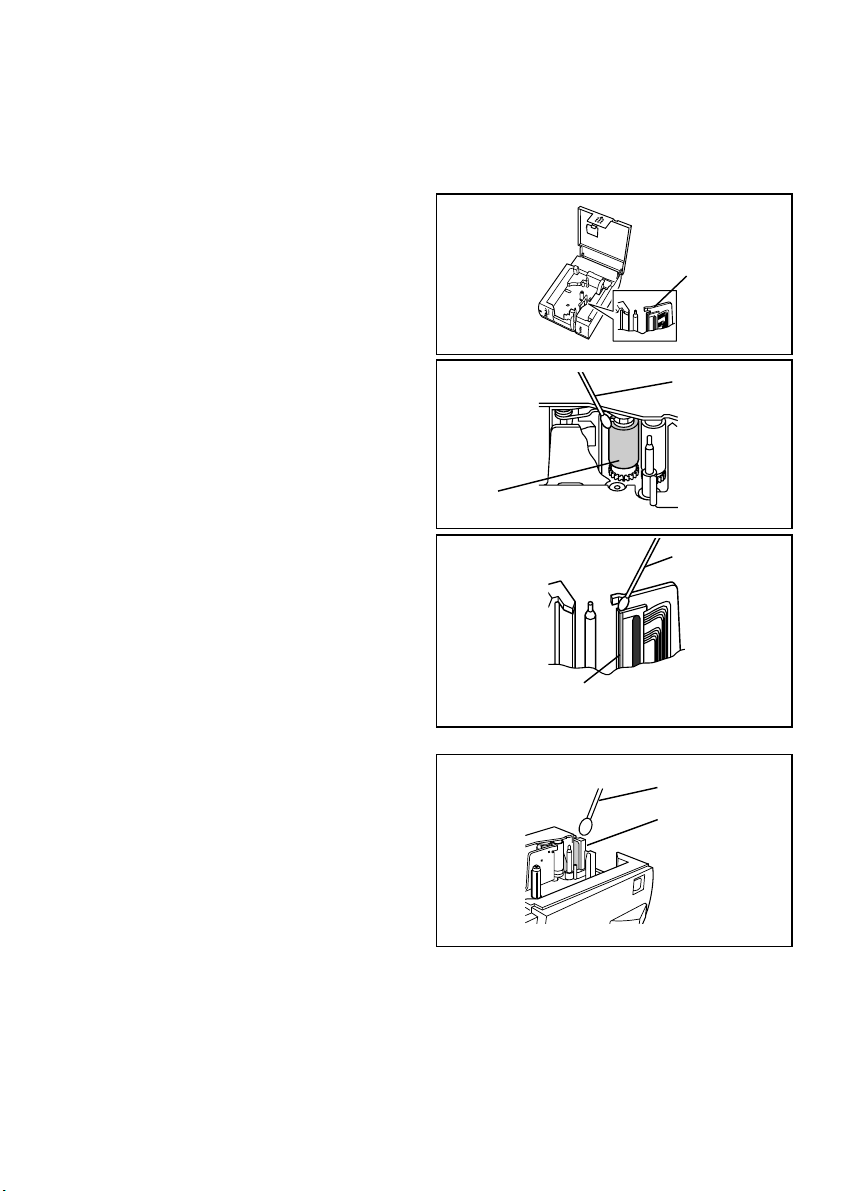
Changing the tape cassette
1 Lift open the tape compartment cover. The
installed cassette is also released.
2 If a tape cassette is already installed, remove
it by pulling it straight up.
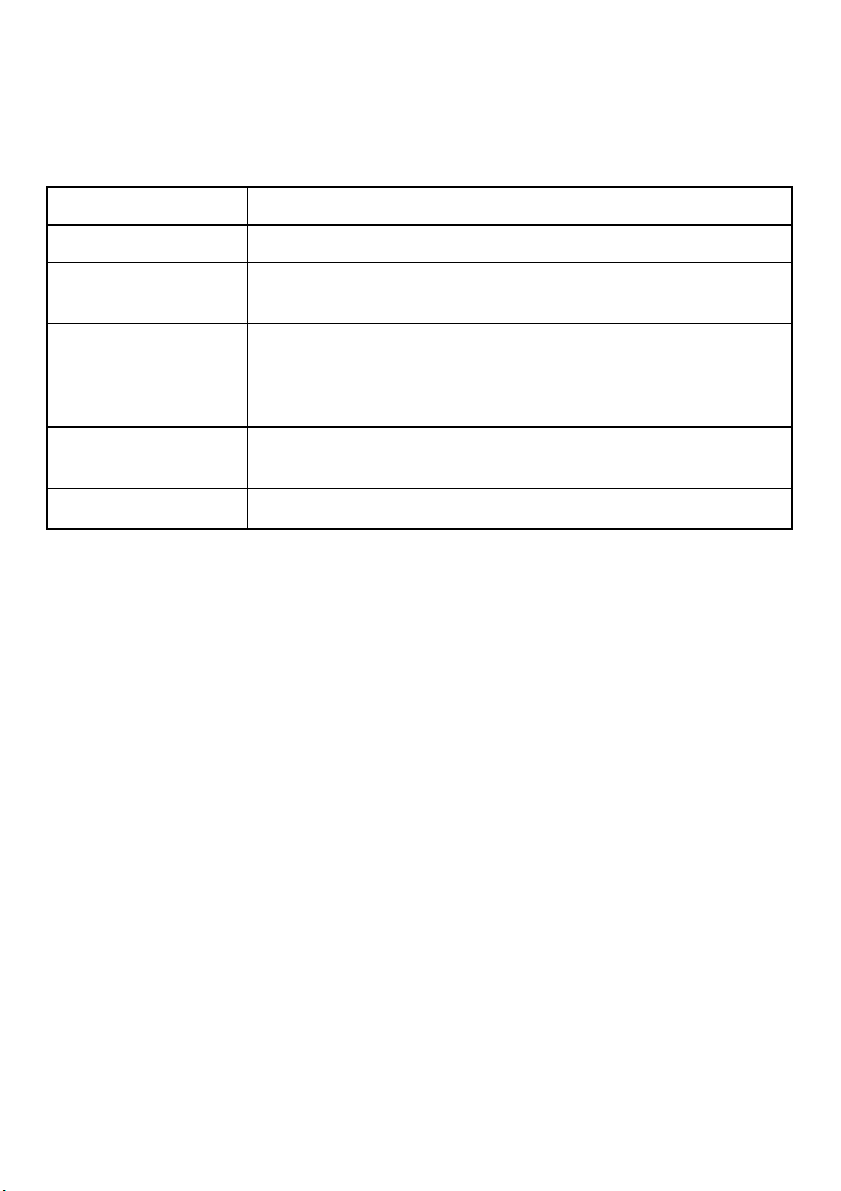
3 If the ink ribbon in the tape cassette to be
installed is loose, use your finger to wind the
toothed wheel in the direction of the arrow
on the cassette until there is no slack in the
ribbon. Also, make sure that the end of the
tape feeds under the tape guide.
If you are inserting a new tape cassette
provided with a stopper, be sure to
remove the stopper.
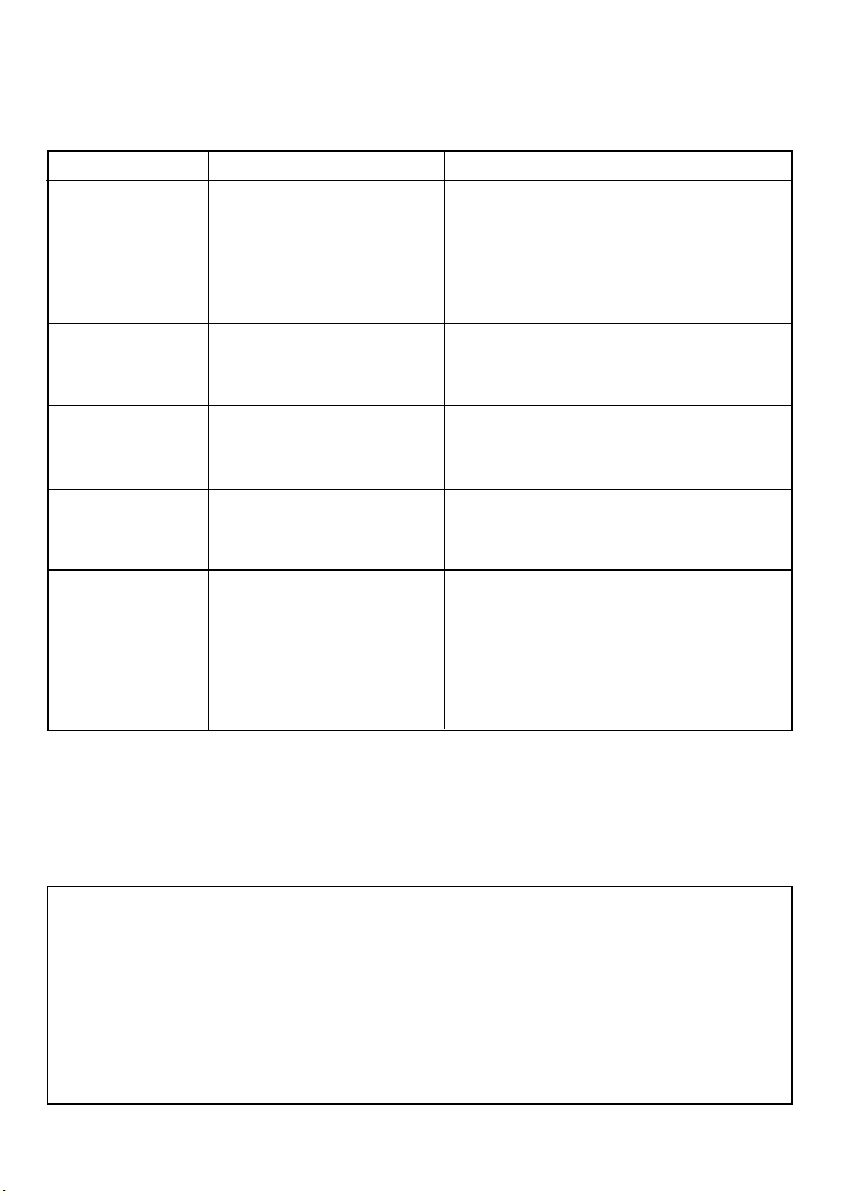
4 Insert the tape cassette firmly into the tape
compartment, making sure that the entire
back of the cassette touches the bottom of
the compartment.
When inserting the tape cassette, make
sure that the ink ribbon does not catch on
the corner of the metal guide.
5 Securely close the tape compartment cover.
Tape cassette
Connecting the AC adapter
Connect the AC adapter to the PT-2420PC as described below.
1 Insert the plug on the adapter cord into the
connector marked DC IN 9.5V on the PT2420PC.
2 Insert the plug on the adapter into the nearest
standard electrical outlet. The status indicator
lights up in green to indicate that the
machine is on.
To turn off the PT-2420PC, press the
Power/Feed key so that the status
indicator goes off.
4
Status indicator
AC adapter
DC IN 9.5V
V
5
.
9
N
I
C
D
Page 9
Power/Feed key
The power/feed key ( ) can be used both for turning on and off the PT-2420PC and for feeding out tape.
• To turn the PT-2420PC on or off:
Press
once.
• To feed out some tape:
Hold down
for at least two seconds.
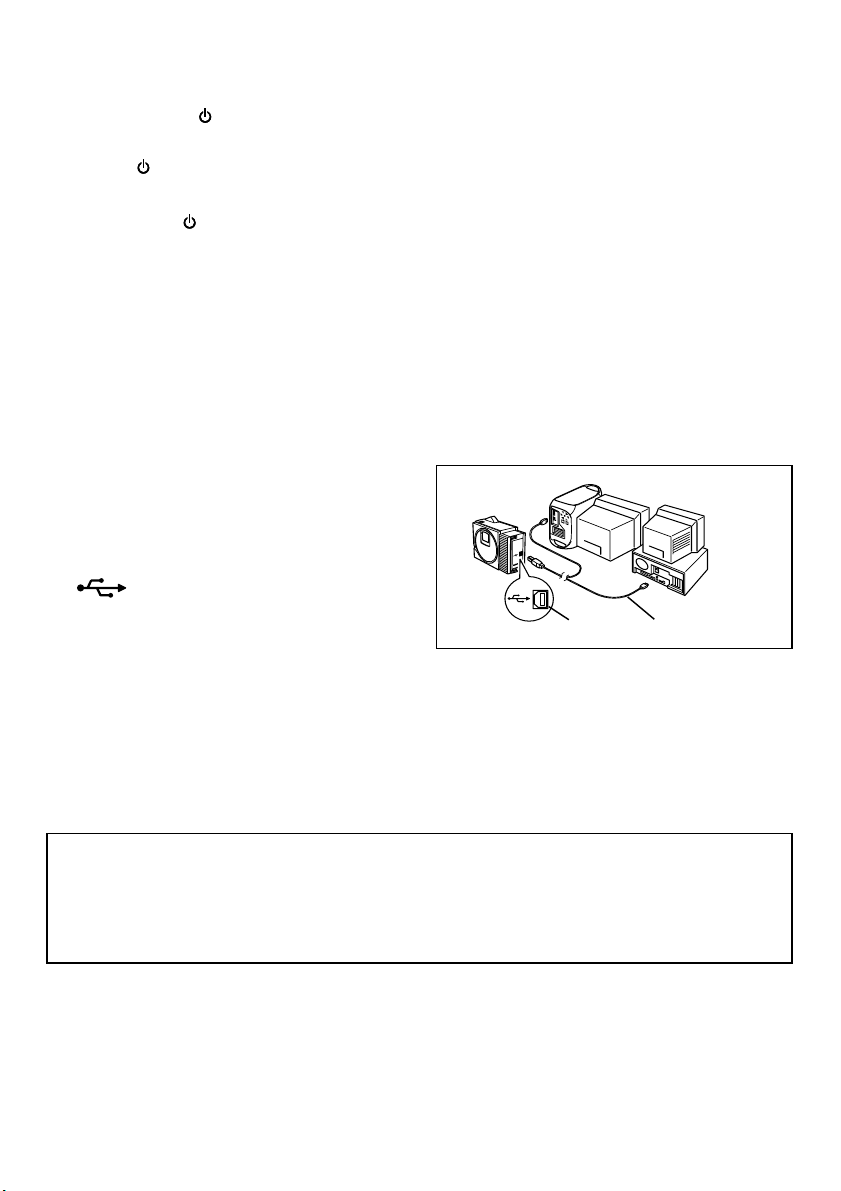
Connecting the USB interface cable
Connect the PT-2420PC to the computer as described below.
When connecting the PT-2420PC to an IBM PC-compatible computer, label-designing software and
the printer driver must be installed before the PT-2420PC is connected to the computer and
plugged in using the AC adapter. Follow the installation procedures on pages 6 through 11 to
install the software and the printer driver, and then connect the PT-2420PC to the computer when
you are instructed to do so.
1 Insert the flat connector on the enclosed USB
interface cable into the USB port on the
computer.
2 Insert the square connector on the enclosed
USB interface cable into the USB port
(
) on the PT-2420PC.
When making a USB connection through
a hub, a proper connection may not be
possible due to the type of hub used. If
printing is not possible with a hub
connection, try connecting the PT2420PC directly to the computer using
the USB interface cable.
V
5
.
9
N
I
C
D
USB port
USB interface cable
Software and printer driver
Brother Co., Ltd. and its suppliers possess all rights and copyrights to this software (including, but
not limited to, the programming, images, clip art, templates, and text incorporated into the software), the text in the enclosed manuals, and duplicates of the software. This software, either in
part or in whole, may not be duplicated, modified, reverse-engineered, disassembled or decompiled
without permission.
With the enclosed CD-ROM, the following can be installed:
• P-touch Quick Editor
• P-touch Editor Ver. 3.1
• PT-2420PC printer driver
5
Page 10
For PC-compatible users (Windows® 98/98SE/Me/2000/XP)
Before labels can be printed on the PT-2420PC, label-designing software and the PT-2420PC printer
driver must be installed. In order to design labels that can be printed on the PT-2420PC, two applications
are available on the enclosed CD-ROM: P-touch Quick Editor and P-touch Editor Ver. 3.1
Before installation
Check that your system configuration meets the following requirements.
Computer: IBM PC or compatible
For Windows®
Operating system:
Hard disk free space: At least 20 MB
Available memory: Minimum 32 MB
Monitor: VGA or higher graphics card
USB port (installed as standard equipment)
CD-ROM drive
Do not connect the PT-2420PC to the computer before installing the label-designing software,
otherwise it may not be installed correctly. Be sure not to connect the PT-2420PC until you
are instructed to do so.
For installation on Windows® 2000, administrator privileges are required.
In addition, printing requires power user or administrator privileges.
This software cannot be operated in Users groups.
This software is not compatible with the Windows
With Windows® XP, printing and installation is only possible from an account with administrator
privileges. These operations cannot be performed from an account with limited privileges.
Installing P-touch Quick Editor
Pre-installed with Microsoft® Windows® 98, 98SE, Me, 2000 Professional or XP
®
2000 Server operating system.
The P-touch Quick Editor software provides quick access to the more simple label-designing features for easy
text input and instant printing of labels. Install the P-touch Quick Editor software on a PC as described below.
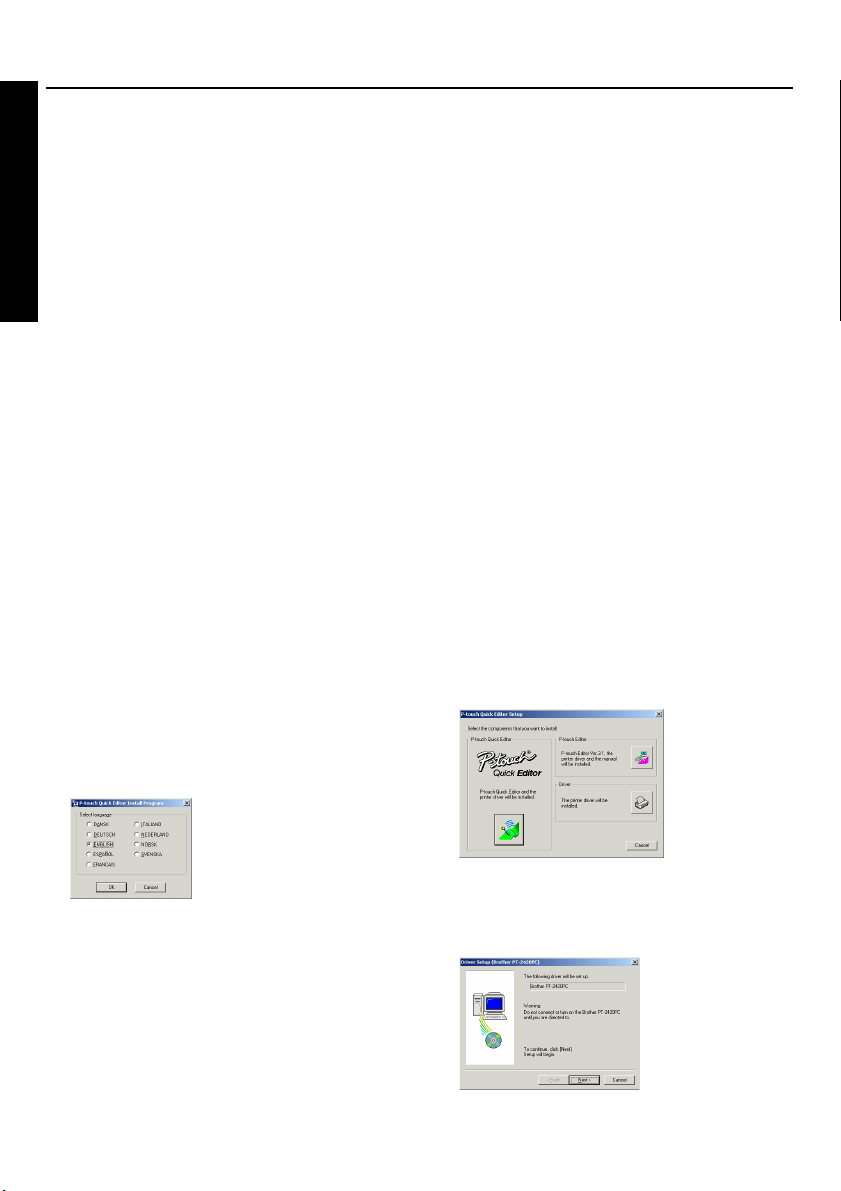
1
Insert the enclosed CD-ROM into the
computer’s CD-ROM drive. A dialogue box
automatically appears, allowing you to select
the language.
T
o install just the printer driver, click the bottom
button (Driver) on the right side. The first Driver
If the dialog box does not automatically appear, click
“My Computer” on the desktop, and then double-click
the CD-ROM drive containing the CD-ROM.
(For Windows
menu, and then double-click the CD-ROM drive
containing the CD-ROM.)
Next, double-click “Setup.exe” to display the dialog box.
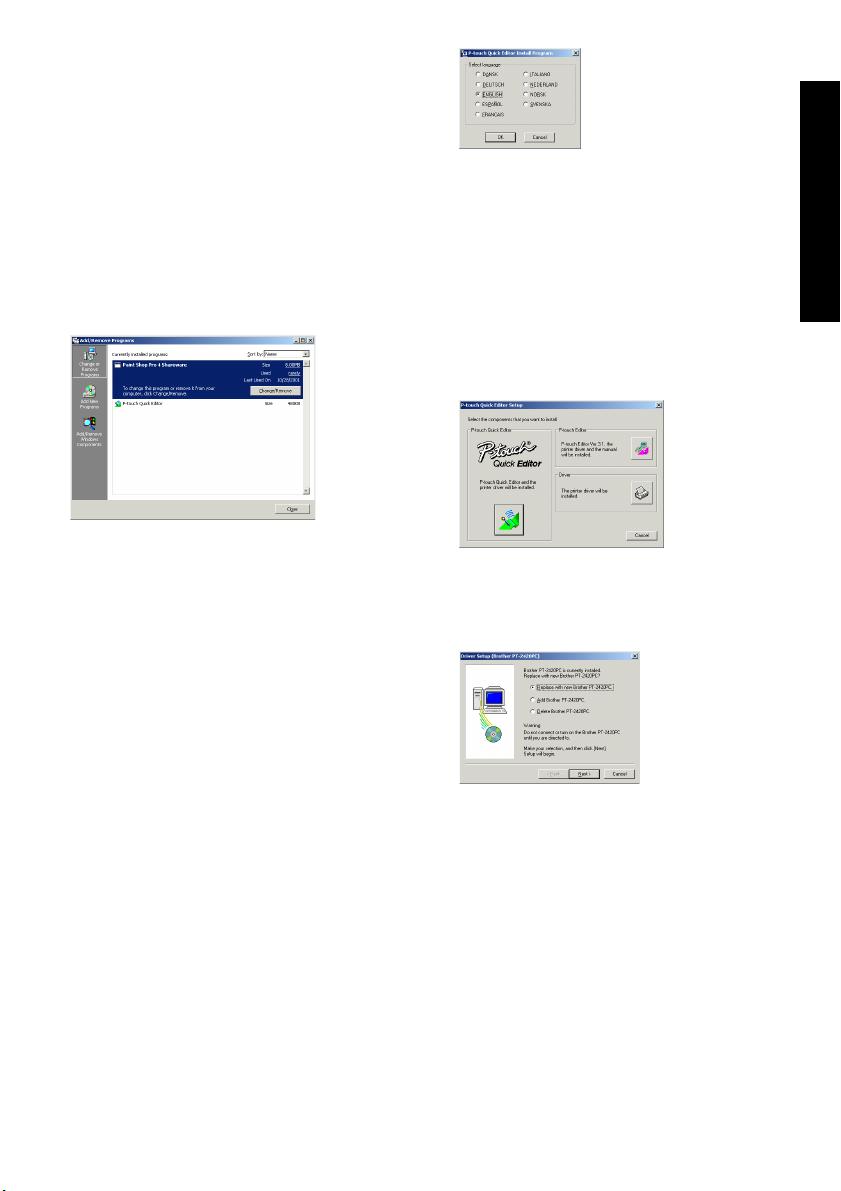
2 Select the language for the Windows
operating system that you are using, and then
click the OK button. A dialogue box appears,
allowing you to select what to install.
®
XP, click “My Computer” in the Start
®
Setup dialogue box appears, informing you that
the PT-2420PC printer driver will be installed.
Continue with the procedure in
the printer driver
on page 9.
Installing
6
Page 11
To install the P-touch Editor Ver. 3.1 software,
click the top button (P-touch Editor) on the
right side. Then, continue with the procedure
in
Installing P-touch Editor Ver. 3.1
3
Click the left button (P-touch Quick Editor). The
InstallShield
®
Wizard for installing the P-touch
on page 8.
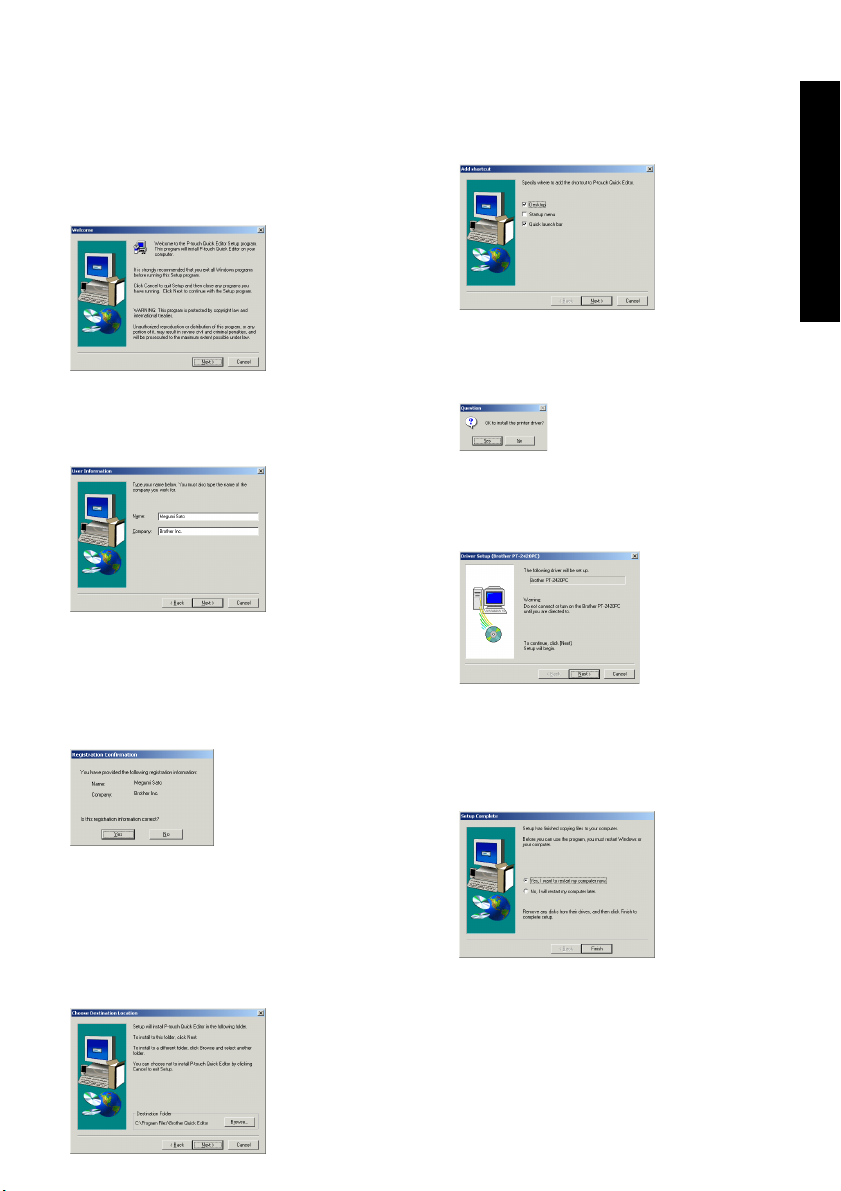
Quick Editor software starts up, and then the
Welcome dialogue box appears.
4 Carefully read the contents of the dialogue
box, and then click the Next button to
continue. The User Information dialogue box
appears.
5 Type the necessary information into the
appropriate boxes (If the information has
already been registered in Windows
®
, it will
automatically appear.), and then click the
Next button. A dialogue box appears, asking
for confirmation of the entered information.
7 Click the Next button to begin installation.
8 After P-touch Quick Editor is installed, a
dialogue box appears, allowing you to select
where the shortcut to P-touch Quick Editor
will be added (page 17).
9 Select the desired location for the shortcut,
and then click the Next button. A dialogue
box appears, allowing you to select whether
or not to install the printer driver.
To install the printer driver, click the Yes
button. The first Driver Setup dialogue box
appears, informing you that the PT-2420PC
printer driver will be installed.
Continue with the procedure in
printer driver
on page 9.
Installing the
If the printer driver is already installed, click
the No button. A dialogue box appears,
showing that installation is finished.
For Windows®
6 Click the Yes button to register the entered
information.
To change the information, click the No
4
button, and then return to step
.
The Choose Destination Location dialogue
box appears.
Select “Yes, I want to restart may computer
now.”, click the Finish button to restart the
computer, and then remove the CD-ROM
from the CD-ROM drive.
7
Page 12

Installing P-touch Editor Ver. 3.1
The P-touch Editor Ver. 3.1 software includes a variety of more complex functions for printing barcodes
and images, enabling you to design just about any
label that you can imagine. Install the P-touch Editor Ver. 3.1 software on a PC as described below.
1 Insert the enclosed CD-ROM into the
computer’s CD-ROM drive. A dialogue box
automatically appears, allowing you to select
For Windows®
the language.
If the dialog box does not automatically appear, click
“My Computer” on the desktop, and then double-click
the CD-ROM drive containing the CD-ROM.
(For Windows
menu, and then double-click the CD-ROM drive
containing the CD-ROM.)
Next, double-click “Setup.exe” to display the dialog box.
2 Select the language for the Windows
operating system that you are using, and then
click the OK button. A dialogue box appears,
allowing you to select what to install.
3 Click the top button (P-touch Editor) on the
right side. The InstallShield
installing the P-touch Editor Ver. 3.1 software
starts up, and then the Welcome dialogue
box appears.
8
®
XP, click “My Computer” in the Start
®
To install just the printer driver, click the
bottom button (Driver) on the right side.
The first Driver Setup dialogue box
appears, informing you that the PT2420PC printer driver will be installed.
Continue with the procedure in
the printer driver
on page 9.
Installing
To install the P-touch Quick Editor
software, click the left button (P-touch
Quick Editor). Then, continue with the
procedure in
Editor
Installing P-touch Quick
on page 6.
®
Wizard for
4 Follow the instructions that appear and
continue with the installation. During
installation, the following installation
methods will be available.
Typical
All of the basic options (P-touch Editor Ver.
3.1, Clip art, Auto Format templates, Help,
and 13 fonts) are installed.
Compact
Only P-touch Editor Ver. 3.1 is installed.
Custom
Editor: P-touch Editor Ver. 3.1
Clip Art: Illustrations for the P-touch
Editor Ver. 3.1 Clip Art function
Fonts: 13 fonts
Auto Format Templates: Templates for
the Auto Format function
User’s Guide: User’s Guide (HTML) for
the P-touch Editor Ver. 3.1
The User’s Guide can also be viewed
from the CD-ROM without installing it
onto the computer.
Help: Help files for P-touch Editor Ver. 3.1
If the Change button can be clicked while
an option is selected, sub-components
can be selected. Click the Change button
to display the Select Sub-components
dialogue box, and then select the subcomponents that you wish to install by
putting a check mark beside them. If
certain options or sub-components are
not installed, some P-touch Editor Ver. 3.1
functions may not be available. After
selecting the desired sub-components,
click the Continue button.
5 After P-touch Editor Ver. 3.1 is installed, a
dialogue box appears, allowing you to select
whether or not to install the printer driver.
To install the printer driver, click the Yes
button. The first Driver Setup dialogue box
appears, informing you that the PT-2420PC
printer driver will be installed.
Page 13

Continue with the procedure in
printer driver
If the printer driver is already installed, click
the No button. A dialogue box appears,
showing that installation is finished.
Select “Yes, I want to restart may computer
now.”, click the Finish button to restart the
computer, and then remove the CD-ROM
from the CD-ROM drive.
below.
Installing the
3 Click the Finish button. A dialogue box
appears, showing that installation is finished.
For Windows®
Installing the printer driver
With Plug-and-Play, new devices connected to the
system are detected, and their drivers are automatically installed. Since the PT-2420PC will be
connected through the USB port, its driver will be
installed with Plug-and-Play. Be sure to read the
installation instructions described below before
installing the printer driver supplied on the CDROM.
Do not connect the P-touch 2420PC to
the computer until you are instructed to
do so, otherwise the PT-2420PC printer
driver may not be installed correctly.
With Windows® 98/98SE/Me/2000:
1 Click the Next button. A dialogue box
appears, instructing you to connect the PT2420PC to the computer.
2 Connect the PT-2420PC to the computer
using the enclosed USB interface cable as
described on page 5, and then turn on the
PT-2420PC. A dialogue box appears,
showing that the printer driver has been
installed.
4 Select “Yes, I want to restart my computer
now.”, click the Finish button to restart the
computer, and then remove the CD-ROM
from the computer.
With Windows® XP:
1 In the dialog box that appears, informing you
that the PT-2420PC printer driver will be
installed, click the Next button.
2 After the dialog box appears, instructing you
to connect the P-touch 2420PC and turn it
on, connect the P-touch 2420PC to the
computer using the enclosed USB interface
cable as described on page 5, and then turn
on the P-touch 2420PC.
9
Page 14
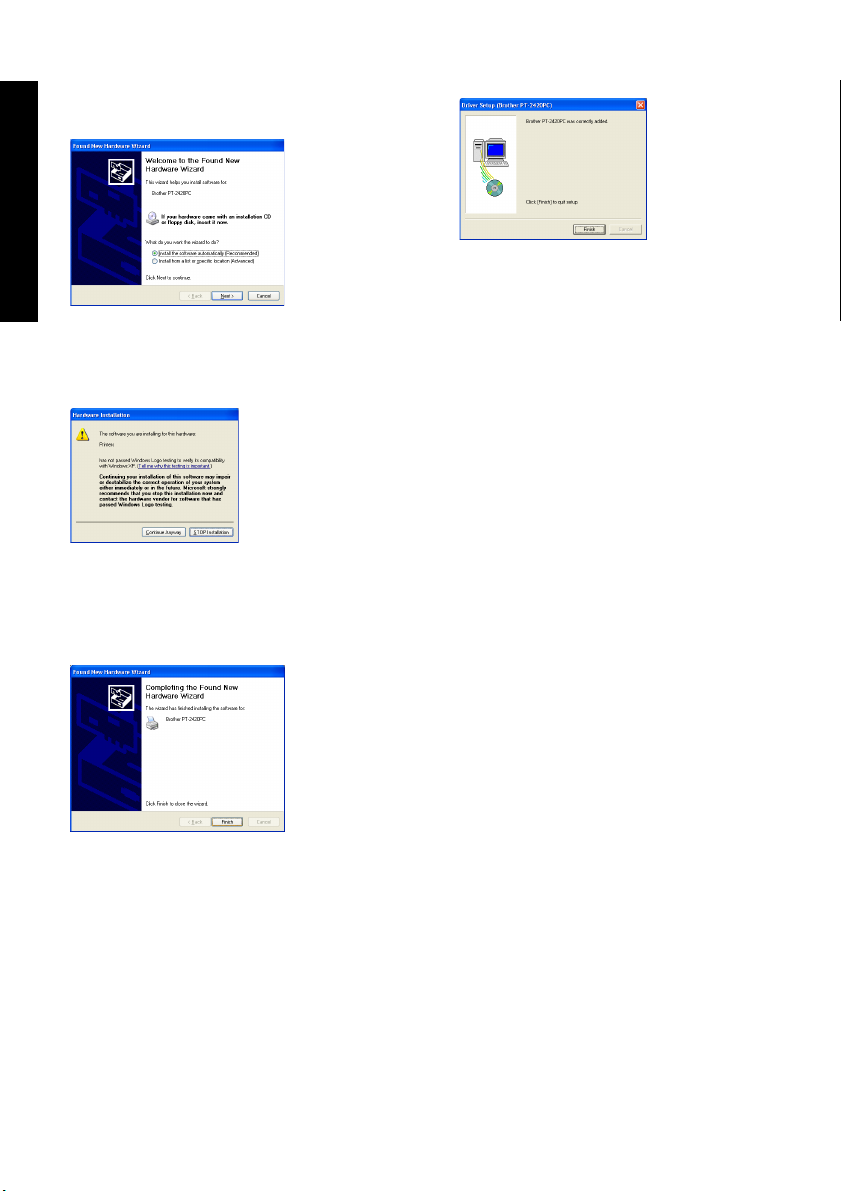
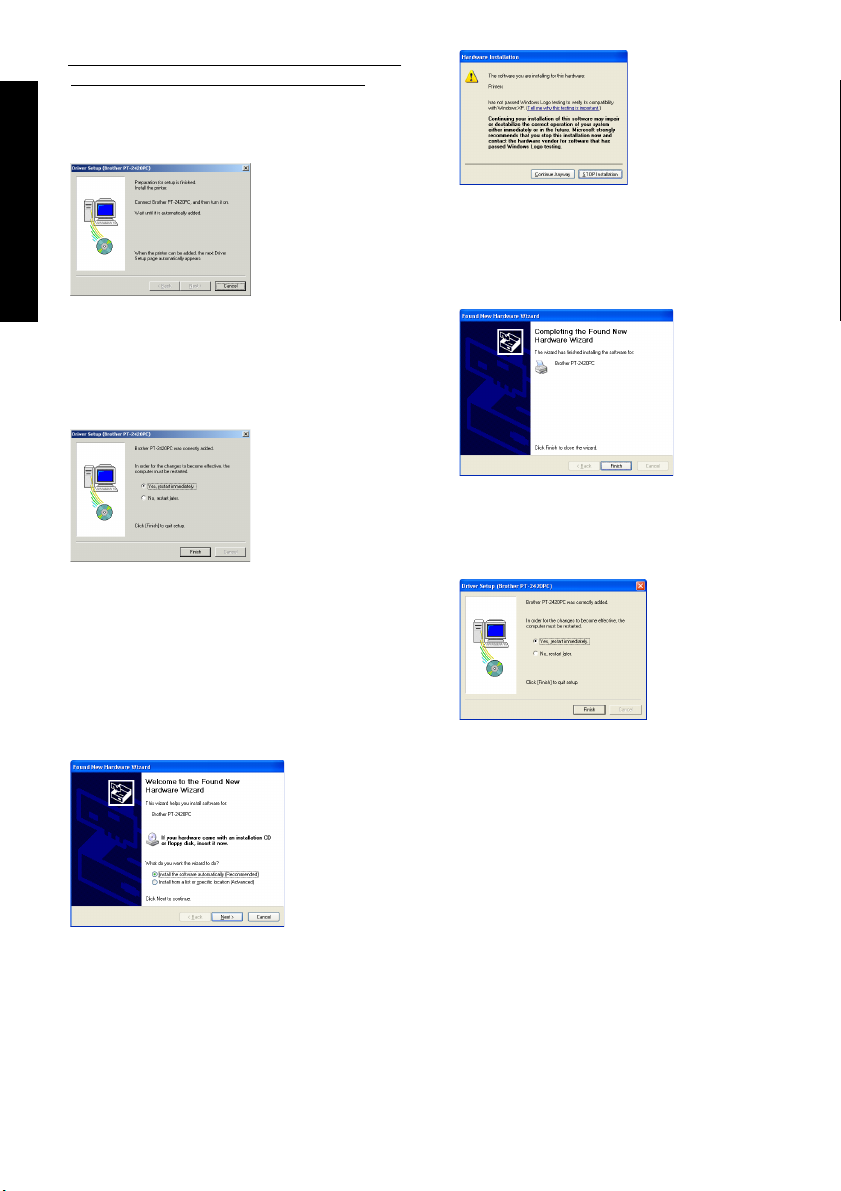
3 In the first Found New Hardware Wizard
dialog box that appears, select “Install the
software automatically (Recommended)”,
and then click the Next button.
6 Click the Finish button. A dialog box
appears, showing that installation is finished.
For Windows®
4 If a dialog box warning appears indicating
that the software has not passed Windows
Logo testing, simply continue with the
installation.
5 In the Found New Hardware Wizard dialog
box that appears, indicating that installation
of the PT-2420PC and the Found New
Hardware Wizard are finished, click the
Finish button.
7 Remove the CD-ROM from the computer.
Reading the User’s Guide
The P-touch Editor User’s Guide can be viewed
either by inserting the CD-ROM into the drive each
time you wish to refer to it or by installing it onto
your hard disk so that it is quickly available at any
time. Since the User’s Guide is an HTML document, a browser is needed to read it.
• From the CD-ROM:
1 Start up Windows
2 Select the CD-ROM drive.
3 Double-click “Main.htm” in the Manual
folder within the Ptouch folder on the
CD-ROM.
• From the P-touch Editor 3.1 group window:
Double-click The User’s Guide P-touch
Editor Ver3.1 icon.
• With the Start button:
1 Click the Start button in the taskbar to
display the Start menu.
2 Select “Programs”.
3 Select “P-touch Editor 3.1”.
4 Click “The User’s Guide P-touch Editor
Ver3.1”.
®
Explorer.
10
Page 15
Uninstalling the software and
printer driver
Uninstall the P-touch Editor Ver. 3.1/P-touch Quick
Editor software from a PC as described below.
®
1 Start up Windows
98/98SE/Me/2000/XP.
2 Click the Start button in the taskbar, select
“Settings”, and then click “Control Panel”.
With Windows
®
XP, click the Start button in
the taskbar, and then click “Control Panel”.
3 In the Control Panel window, double-click
“Add/Remove Programs”.
* The dialog box that appears may differ
depending on the operating system being
used.
4 In the Add/Remove Programs Properties
dialogue box, select "P-touch Quick Editor"
(to delete the P-touch Quick Editor software)
or “P-touch Editor 3.1” (to delete the P-touch
Editor Ver. 3.1 software), and then click the
Add/Remove button.
5 A message appears, asking if you wish to
delete the selected application. Click the Yes
button to delete the application.
If you do not wish to delete the
application, click the No button.
6 In the dialogue box that appears, indicating
that the application is deleted, click the OK
button.
Replacing, deleting or adding
another printer driver
1 Turn off the PT-2420PC, and then disconnect
it from the computer.
Insert the enclosed CD-ROM into the
2
computer’s CD-ROM drive. A dialogue box
automatically appears, allowing you to select
the language.
If the dialog box does not automatically appear, click
“My Computer” on the desktop, and then double-click
the CD-ROM drive containing the CD-ROM.
(For Windows
®
XP, click “My Computer” in the Start
menu, and then double-click the CD-ROM drive
containing the CD-ROM.)
Next, double-click “Setup.exe” to display the dialog box.
3 Select the language for the Windows
®
operating system that you are using, and then
click the OK button. A dialogue box appears,
allowing you to select what to install.
4
Click the bottom button (Driver) on the right
side. The first Driver Setup dialogue box appears,
allowing you to select whether to replace, delete
or add another PT-2420PC printer driver.
5 Select the desired operation, and then click
the Next button.
If “Replace with new Brother PT-2420PC”
is selected, the previously installed printer
driver is deleted, and replaced with a new
one. Select this option when upgrading
the printer driver, or when running
Windows
®
2000/XP and changing to a
PT-2420PC with a different serial number.
If “Add Brother PT-2420PC” is selected, a
new printer driver is added. With USB on
Windows
®
98/Me, only a port is added
without adding the PT-2420PC as a new
printer. Select this option when connecting
and using multiple PT-2420PCs with the
same computer.
For Windows®
11
Page 16
6 If “Replace with new Brother PT-2420PC” or
“Add Brother PT-2420PC” was selected:
With Windows® 98/98SE/Me/2000
A dialogue box appears, instructing you to
connect the PT-2420PC to the computer.
:
For Windows®
Connect the PT-2420PC to the computer
using the enclosed USB interface cable as
described on page 5, and then turn on the
PT-2420PC. A dialogue box appears,
showing that the printer driver has been
installed.
Select “Yes, restart immediately.”, and then
click the Finish button to restart the
computer.
In the Found New Hardware Wizard dialog
box that appears, indicating that installation
of the PT-2420PC and the Found New
Hardware Wizard are finished, click the
Finish button.
In the dialog box that appears, indicating that
installation is finished, select “Yes, restart
immediately.”, and then click the Finish
button. The computer is restarted.
With Windows® XP:
In the first Found New Hardware Wizard
dialog box that appears, select “Install the
software automatically (Recommended)”,
and then click the Next button.
If a dialog box warning appears indicating
that the software has not passed Windows
Logo testing, simply continue with the
installation.
12
Remove the CD-ROM from the computer.
Page 17
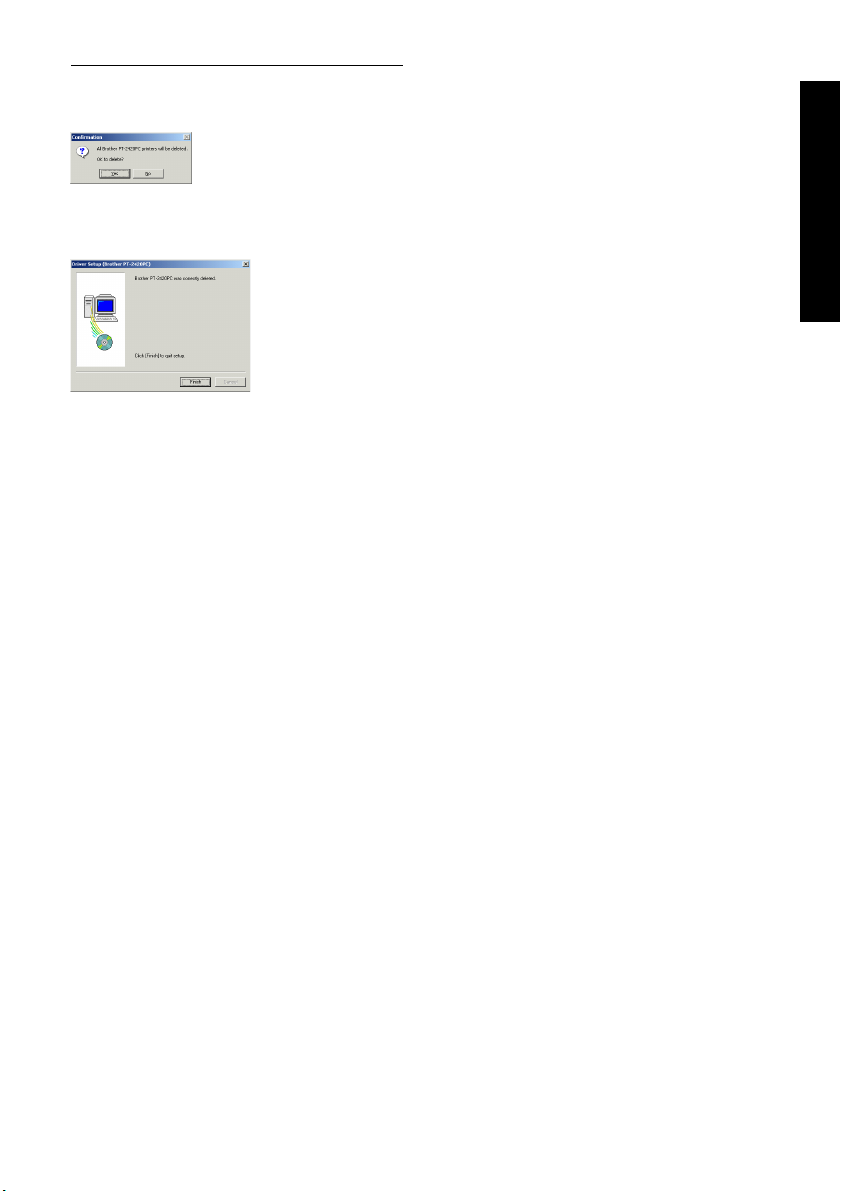
If “Delete Brother PT-2420PC” was selected:
A dialogue box appears, asking for
confirmation to delete all PT-2420PC printer
drivers.
Click the Yes button. A dialogue box appears,
showing that the printer drivers have been
deleted.
Click the Finish button. If a dialogue box
appears, explaining that the computer should
be restarted, select the option for restarting
the computer, and then click the Finish
button.
For Windows®
13
Page 18
For Macintosh users
Before labels can be printed on the PT-2420PC, label-designing software and the PT-2420PC printer
driver must be installed. In order to design labels that can be printed on the PT-2420PC, two applications
are available on the enclosed CD-ROM: P-touch Quick Editor and P-touch Editor Ver. 3.1
Before installation
Check that your system configuration meets the following requirements.
Computer: Macintosh
For Macintosh
Operating system: Mac OS 8.6 or later
* This software can only run on Mac OS X in the Classic environment.
However, the Mac OS X v10.2 Classic environment is not supported.
The Mac version of the software is for a Mac with an English operating system. If the software is installed
on a Mac with an operating system in a different language, the software may not run properly.
Hard disk free space: At least 30 MB
A few hundred megabytes of additional free space may be needed when printing long labels or
large amounts of data.
Available memory free space: Minimum 24 MB
USB port (installed as standard equipment)
CD-ROM drive
Installing P-touch Quick Editor
The P-touch Quick Editor software provides quick
access to the more simple label-designing features
for easy text input and instant printing of labels.
Install the P-touch Quick Editor software on a Mac
as described below.
1 With the PT-2420PC and computer turned
off, connect the PT-2420PC to the Macintosh
using the enclosed USB interface cable. Be
sure to leave the PT-2420PC off.
2 Turn on the Macintosh.
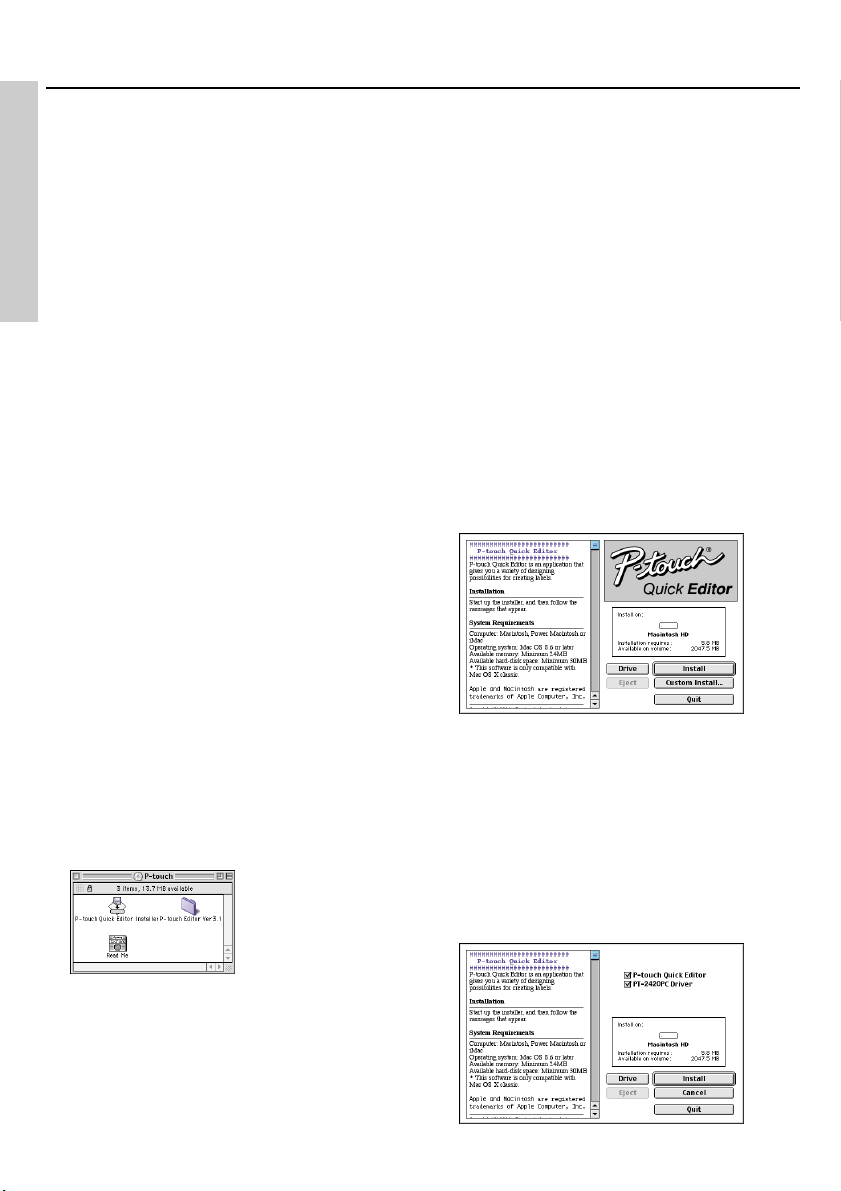
3
Insert the enclosed CD-ROM into the computer’s
CD-ROM drive. A folder opens, allowing you to
view the contents of the CD-ROM.
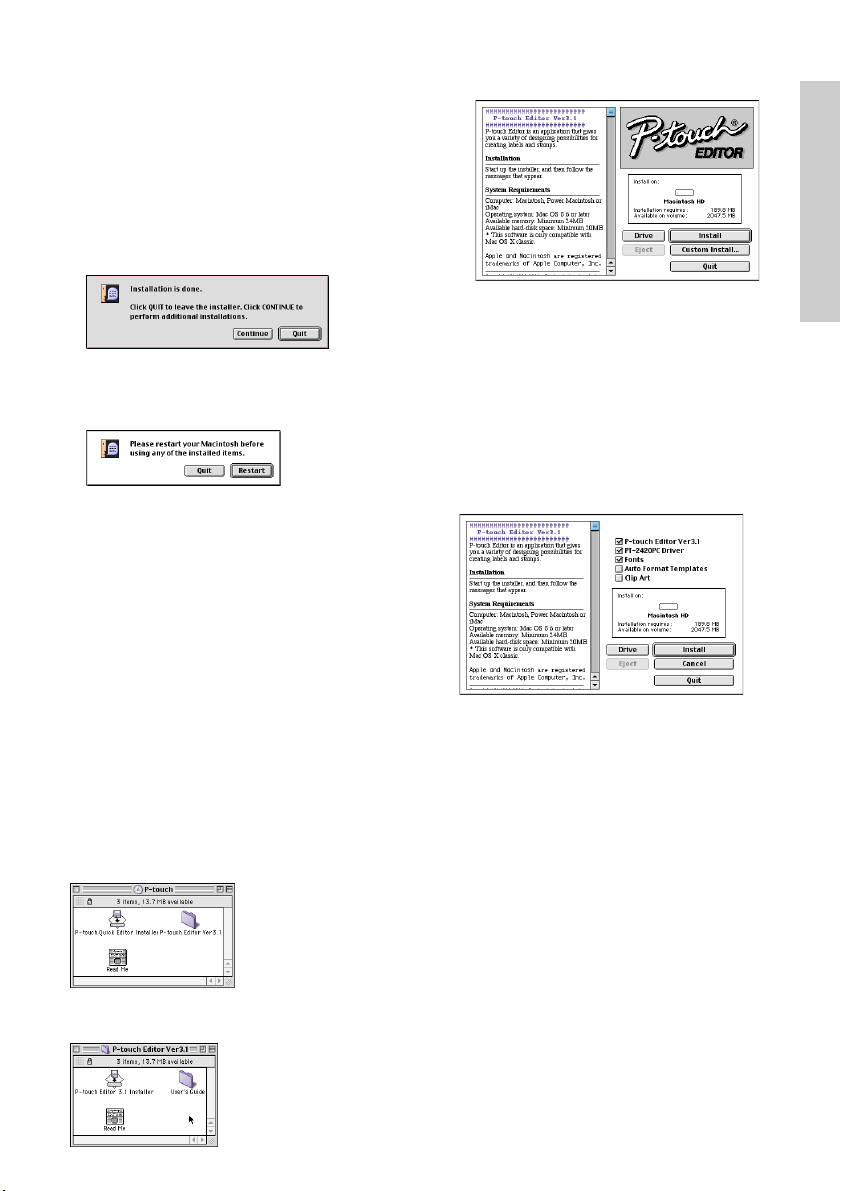
5 Select the installation method.
Clicking the Install button immediately starts
installing the most basic options.
About 30 MB of available hard-disk space is
needed to begin installation. If enough harddisk space is available, click the Install
button.
Clicking the Custom Install button displays a
dialogue box that allows you to select which
options to install.
4 Double-click the P-touch Quick Editor
Installer icon in the folder that appears. The
installer starts up.
14
Page 19
Only the options with a check mark beside
them are installed. Select the options that
you wish to install, and then click the Install
button to begin installation.
In order to print from the PT-2420PC,
“PT-2420PC Driver” must be selected for
installation.
6 When the installation is finished and the
following dialogue box appears, click the
Quit button.
7 When the dialogue box appears asking if you
wish to restart the computer, click the Restart
button to restart the computer.
Installing P-touch Editor Ver. 3.1
The P-touch Editor Ver. 3.1 software includes a
variety of more complex functions for printing
barcodes and images, enabling you to design just
about any label that you can imagine. Install the
P-touch Editor Ver. 3.1 software on a PC as described below.
1 With the PT-2420PC and computer turned
off, connect the PT-2420PC to the Macintosh
using the enclosed USB interface cable. Be
sure to leave the PT-2420PC off.
2 Turn on the Macintosh.
3 Insert the enclosed CD-ROM into the
computer’s CD-ROM drive. A folder opens,
allowing you to view the contents of the CDROM.
4 Double-click the P-touch Editor Ver3.1 folder
to open it.
5 Double-click the P-touch Editor 3.1 Installer
icon in the folder. The installer starts up.
6 Select the installation method.
If “Install” is selected, the installation of all
components begins.
About 120 MB of available hard-disk space is
needed to begin installation.
If enough hard-disk space is available, click
the Install button.
Clicking the Custom Install button displays a
dialogue box that allows you to select which
options to install.
Only the options with a check mark beside
them are installed. Select the options that
you wish to install, and then click the Install
button to begin installation.
To install the minimum necessary
components, select only the following
components, and then start the installation.
• P-touch Editor Ver3.1
• PT-2420PC Driver
• Fonts
In this case, about 30 MB of free space on
the hard disk is required.
In order to print from the PT-2420PC,
“PT-2420PC Driver” must be selected for
installation.
For Macintosh
15
Page 20
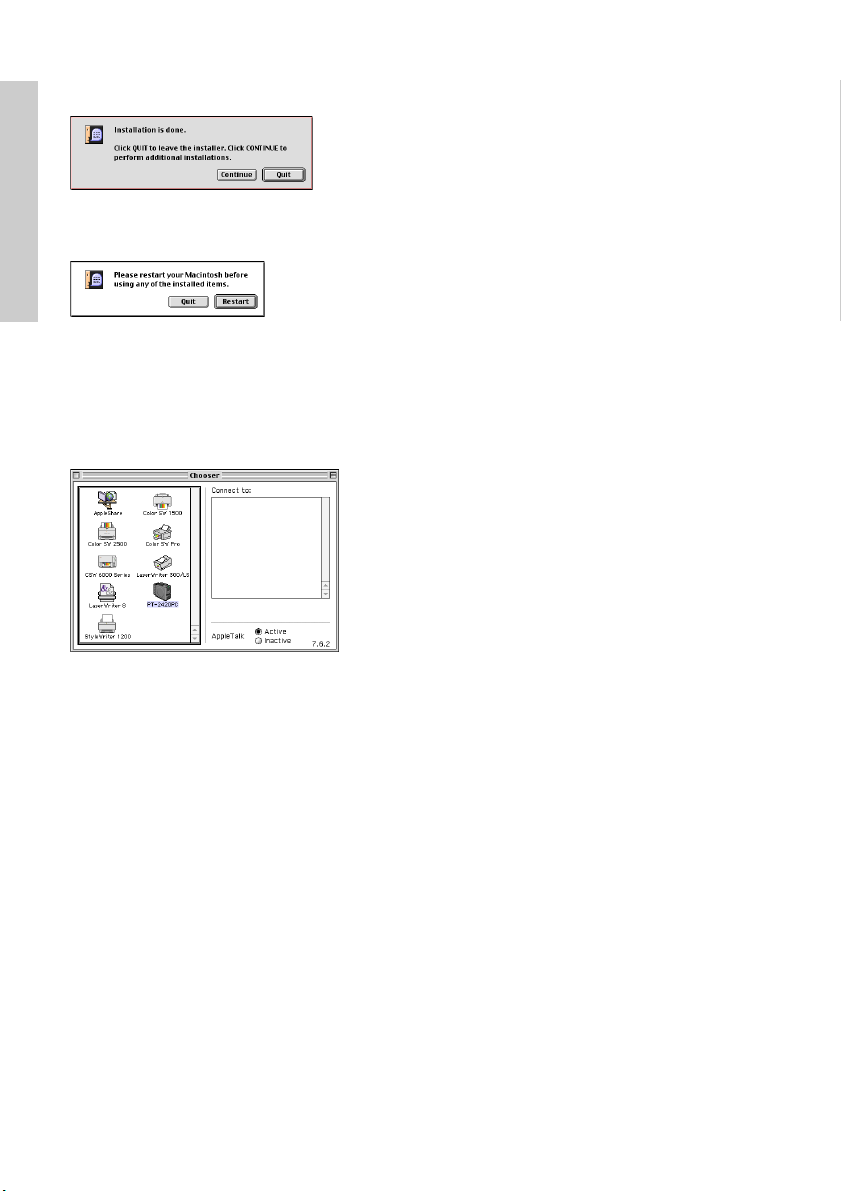
7 When the installation is finished and the
following dialogue box appears, click the
Quit button.
8 When the dialogue box appears asking if you
wish to restart the computer, click the Restart
button to restart the computer.
For Macintosh
Selecting the printer
1 Pull down the Apple menu and select
“Chooser” to display the Chooser window.
2 In the list on the left, click the PT-2420PC
icon.
3 Close the Chooser window to confirm your
settings.
Reading the User’s Guide
The P-touch Editor User’s Guide can be viewed
either by inserting the CD-ROM into the drive each
time you wish to refer to it or by installing it onto
your hard disk so that it is quickly available at any
time. Since the User’s Guide is an HTML document, a browser is needed to read it.
• From the CD-ROM:
Double-click “Main.htm” in the User’s
Guide folder within the P-touch Editor
Ver3.1 folder on the CD-ROM.
• With the Start button:
Double-click “Main.htm” in the User’s
Guide folder within the P-touch Editor
Ver3.1 folder installed on the hard disk.
Uninstalling the software and printer
driver
Uninstall P-touch Quick Editor, P-touch Editor
Ver3.1 and the printer driver as described below.
When deleting the printer driver, be sure that
the P-touch is turned off and unplugged.
1 Drag the following folder to the Trash icon:
• P-touch Quick Editor folder (for the P-
touch Quick Editor software)
• P-touch Editor Ver3.1 folder (for the P-
touch Editor Ver. 3.1 software)
2 In the System Folder, open the Extensions
folder.
3 Drag the following icons to the Trash icon:
• PT-2420PC and USB PT-2420PC
Extension
4 In the System Folder, open the Preferences
folder.
5 Drag the following icons to the Trash icon:
• P-touch Quick Editor Prefs, P-touch Editor
3.1 Prefs, and PT-2420PC Prefs
The software and the printer driver are now
deleted.
16
Page 21
Using P-touch Quick Editor
The P-touch Quick Editor enables you to design a simple label layout quickly and easily. In addition to the
various functions available through the buttons in the toolbar, right-clicking (Windows
Control key and clicking (Macintosh) in the label view displays a pop-up menu containing more commands.
Starting up P-touch Quick Editor
When P-touch Quick Editor is installed on a
PC, you can choose to add shortcuts to the
desktop, the StartUp menu, and to the Quick
Launch toolbar.
On an IBM PC-compatible computer:
•
If a shortcut was added to the StartUp menu:
P-touch Quick Editor automatically starts up
when the computer is started up.
• If a shortcut was added to the desktop:
Double-click the P-touch Quick Editor
icon on the desktop.
•
If a shortcut was added to the Quick Launch toolbar:
Double-click the P-touch Quick Editor
icon in the Quick Launch toolbar.
• If no shortcuts were added:
1 Click the Start button in the taskbar to
display the Start menu.
2 Select “Programs”.
3 Click “P-touch Quick Editor”.
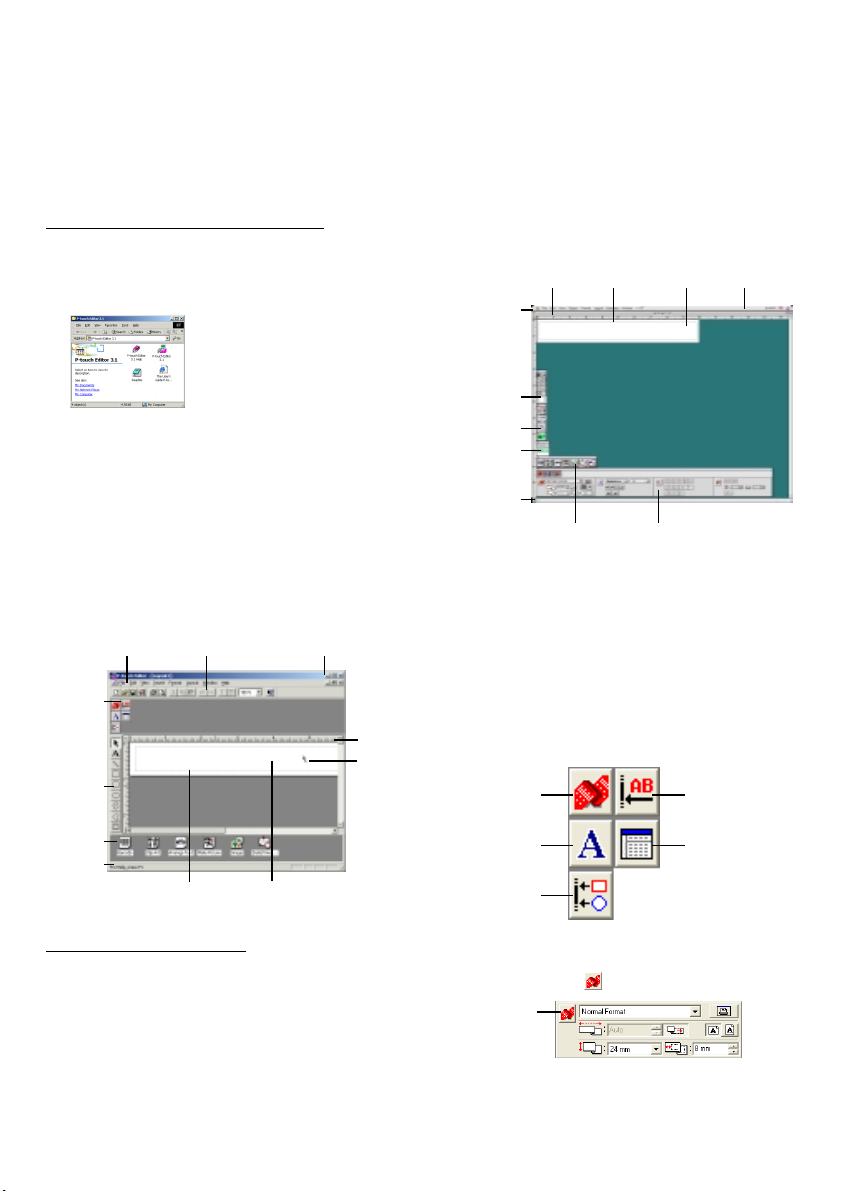
After P-touch Quick Editor is started, the
following window is displayed.
Toolbar
Label view
P-touch Quick Editor can be hidden or
displayed by clicking its icon in the system
tray, at the right of the taskbar.
On a Macintosh computer:
Double-click the P-touch Quick Editor icon in the P-
•
touch Quick Editor folder installed on the computer.
After P-touch Quick Editor is started, the following window is displayed.
Toolbar
Label view
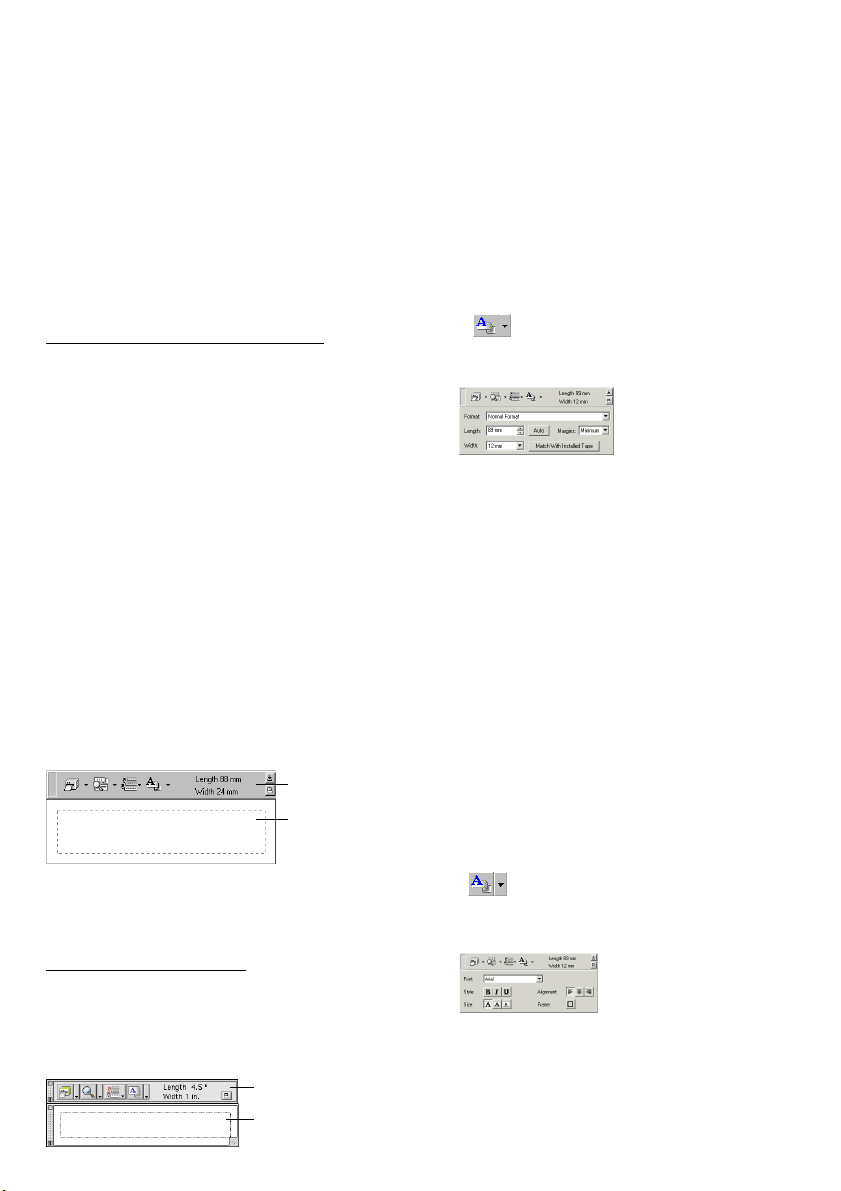
Specifying a label size
Before entering text, the label size must be set. A
selection of preset layout sizes is available for a
variety of needs.
1 Click the arrow beside the Properties button
(
) to display a drop-down menu.
2 Click [Tape Settings] to display various label
format settings.
The Tape Settings can also be displayed by
selecting [View Properties], then clicking
[Tape Settings] in the pop-up menu,
displayed by right-clicking (Windows
holding down the Control key and clicking
(Macintosh) in the label view.
3 In the Format list, click the desired label
format.
The size of the label layout can also be set
by specifying the Length and Width settings
or by dragging the edges of the label view
until the layout is the desired size.
Entering text
The entire text can quickly be formatted by specifying the font, size, style and alignment. In addition, a frame can be drawn around the text.
1 Click the arrow beside the Properties button
) to display a drop-down menu.
(
2 Click [Text Settings] to display various text
format settings.
The Text Settings can also be displayed by
selecting [View Properties], then clicking
[Text Settings] in the pop-up menu,
displayed by right-clicking (Windows
holding down the Control key and
clicking (Macintosh) in the label view.
®
) or holding down the
®
) or
®
) or
17
Page 22
3 In the Text Settings Properties, select the
desired text formats.
4 Click in the label view, and then type or
import the text.
Typing in the label view shows the text as
it will appear when it is printed. However,
by clicking the Change View button
(
), the text is displayed in the text
box, giving you a clearer view of the
entered text.
(Macintosh) Hold down the Control key and
click in the label view (or text box), select
[Symbols] in the menu that appears, and then
click [Insert/Change]. A dialogue box
displaying symbols appears.
Importing text
Text that has already been typed in another application can easily be imported into the label.
Select the desired text in the other application.
1
2 Import the text into the label layout either by
pressing the designated shortcut keys
(Windows
other application.
®
only) or by dragging it from the
(Windows® only) To specify the shortcut
keys used to import text, right-click in the
label view (or text box), and then click
[Options] in the menu that appears. In the
Options dialogue box that appears, select
the desired shortcut keys for importing text.
Depending on the combination of
specified shortcut keys and the application
software being used, this function may not
work properly.
Using the Text History list
The 10 most recently printed texts are automatically stored for future use.
1 Click the Text History button (
display the Text History list.
2 Click the desired text.
Text selected from the Text History list replaces
all text already entered in the layout.
) to
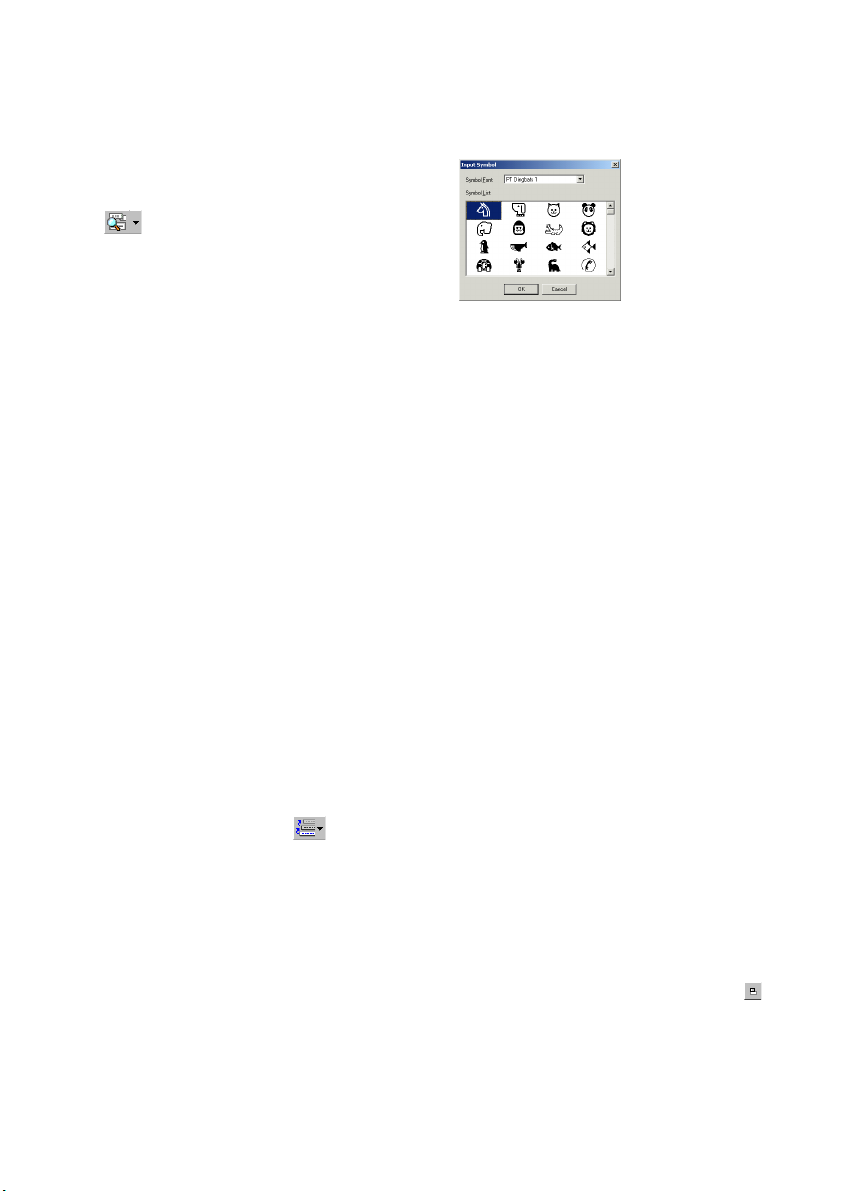
2 In the Symbol Font list, select the desired
symbol font.
In the Symbol List view, select the desired symbol.
3
4 Click the OK button. The selected symbol is
added at the left of the text.
If a symbol has already been added to the
text, it will be replaced by the newly
selected symbol.
Changing the background colour
The background colour of the layout can be
changed to suit your preference.
• (Windows
text box), select [Background Colour] in the
menu that appears, and then click the desired
colour from the list.
(Macintosh) Hold down the Control key and
click in the label view (or text box), select
[Background Color] in the menu that appears,
and then click the desired colour from the list.
®
) Right-click in the label view (or
To select a colour other than those listed,
select [User Settings] (Windows
®
) or [User
Settings] (Macintosh) from the
Background Colour submenu, create the
desired colour in the dialogue box that
appears, and then click the OK button.
Viewing the text
Adding a symbol
A symbol from the various installed symbol fonts
can be added at the left side of the label text.
1 (Windows
text box), select [Symbols] in the menu that appears, and then click [Insert/Change]. The Input Symbol dialogue box appears.
18
®
) Right-click in the label view (or
Layouts that are too long to fit in the screen can be
scrolled by clicking the Arrange button (
view the left, the center, then the right side of the
layout with each click of the button.
If the label view (or text box) has been
) to
moved away from the tool bar, it will be
docked before scrolling.
Page 23
Printing
Quitting P-touch Quick Editor
Before printing labels, certain print options can
be selected.
1 Click the arrow beside the Print button
) to display a drop-down menu.
(
2 Click [Print Options]. The Print dialogue box
appears.
3 Select the desired print settings.
Cut Marks: This option allows you to select
whether or not to print cut marks (:), which
indicate where to cut the label so that the left
and right margins are equal.
Mirror Printing: This option allows you to
print the text in reverse so it’s perfect for
applying to the inside of windows.
Copies: This option allows you to enter the
number of copies to be printed.
4 (Windows
printing.
(Macintosh) Click Print button. The layout is
printed.
®
) Click the OK button to start
If you want to start printing without
changing the print options simply click
the Print button (
arrow beside the Print button and click
[Print].
) or click the
• (Windows®) Do either of the following:
Right-click the P-touch Quick Editor icon
in the system tray, and then click [Exit] in
the menu that appears.
Right-click in the label view (or text box),
and then click [Exit] in the menu that
appears.
(Macintosh) Do either of the following:
Click [Quit] in the [File] menu
Hold down the Control key and click in
the label view (or text box), and then click
[Quit] in the menu that appears.
Hiding/displaying P-touch Quick
®
Editor (Windows
P-touch Quick Editor can be hidden by clicking
the Hide button (
Editor by clicking its icon in the system tray, at the
right of the taskbar.
only)
). Re-display P-touch Quick
19
Page 24
Using the P-touch Editor Ver. 3.1
The P-touch Editor Ver. 3.1 application makes it easy for anyone to design more complex labels and print
them for almost any need imaginable.
Starting up P-touch Editor Ver. 3.1
On an IBM PC-compatible computer:
• By clicking the P-touch Editor icon:
Double-click the P-touch Editor 3.1 icon
in the P-touch Editor 3.1 group window.
• With the Start button:
1 Click the Start button in the taskbar to
display the Start menu.
2 Select “Programs”.
3 Select “P-touch Editor 3.1”.
4 Click “P-touch Editor 3.1”.
After P-touch Editor Ver. 3.1 is started, the following window is displayed.
Menu bar Standard toolbar
Property
dock
Draw
toolbar
Object
dock
Status
bar
Layout area
Print area
On a Macintosh computer:
• Double-click the P-touch Editor Ver3.1.7 icon
in the P-touch Editor Ver3.1 folder installed
on the computer.
After P-touch Editor Ver. 3.1 is started, the following window is displayed.
Title bar
Rulers
Cursor
For more details on the functions of P-touch
Editor Ver. 3.1, refer to the User’s Guide,
which can either be installed on the
computer or viewed from the CD-ROM .
Rulers Layout area Print area Title bar
Menu bar
Draw toolbar
Print toolbar
Database
toolbar
Status bar
Object dock Property dock
Displaying the Properties
Although the screens shown in the following explanations are for Windows
operations for Windows
Macintosh are the same unless specifically mentioned.
The desired Properties can be displayed by clicking the icon in the property dock.
Page Properties
Font Properties
Properties icon
icon
icon
Layout
Click an icon to display its Properties.
• Page Properties (
Click this
button to hide
the Properties.
When using the P-touch 2420PC
®
95/98/98SE/Me, the
®
NT4.0/2000/XP and
Text Properties
icon
Database
Properties icon
(not available on
the Macintosh
version of the
software)
)
20
Page 25
Creating a new layout
Although the screens shown in the following explanations are for Windows
operations for Windows
Macintosh are the same unless specifically mentioned.
• Entering text
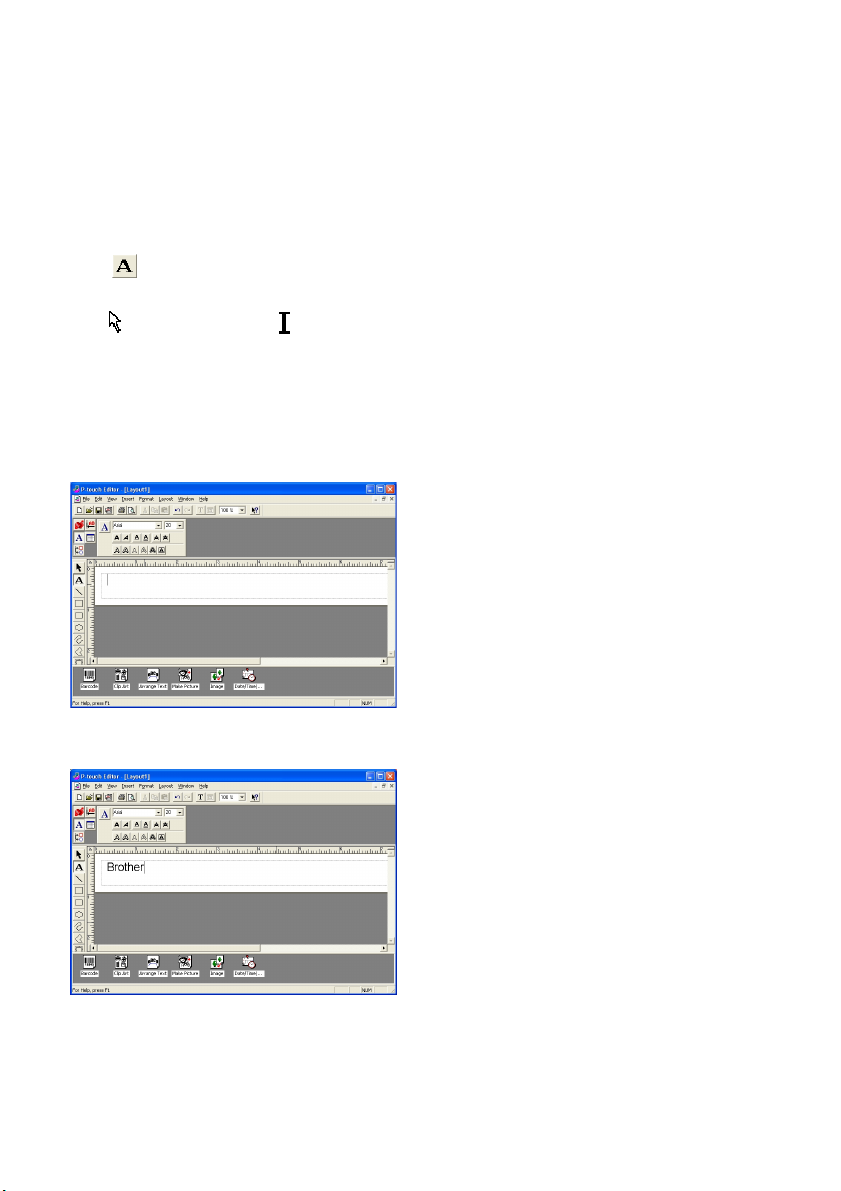
1 Click
(Text button) on the draw toolbar.
Text can be typed in, and the pointer changes
(selection pointer) to (I-beam
from
pointer).
2 Move the I-beam pointer to the position in
the layout area where you wish to type in
text, and then click the left mouse button.
3 The cursor flashes in the layout area to
indicate that you can now type in text.
®
95/98/98SE/Me, the
®
NT4.0/2000/XP and
5 To create a new line of text, press the
keyboard’s Enter key.
With P-touch Editor version 3.1, text is
always typed in using the insert mode.
The overwrite mode cannot be used to
type in text.
To change the font and text size, click the
appropriate icon in the property dock,
and then select the desired settings from
the Properties that appear.
For details, refer to
Guide
on page 10 for Windows® and on
Reading the User’s
page 16 for Macintosh computers.
4 Use the computer keyboard to type in the
text.
21
Page 26
Printing a label
GH
ABCDEF
1 Turn on the PT-2420PC and start up the computer.
2 Start up either P-touch Quick Editor or P-touch Editor Ver. 3.1, and make sure that the PT-2420PC
is selected as the printer.
3 Design your label.
4 Start printing the label. The status indicator of
the PT-2420PC flashes while it is receiving
the data. After the label is printed, press in on
the tape cutter button to cut off the label.
While printing multiple copies, the PT2420PC may stop printing for a short
while in order for the print head to cool
down. Printing will continue once the
print head has sufficiently cooled down.
To feed out extra tape, hold down the
Power/Feed key for a few seconds.
Removing the label backing
The enclosed tape separator enables you to easily remove the backing from labels printed on laminated tape.
1
Hold the tape in your left hand, with the
printed surface facing up, and hold the stick
in your right hand.
2
Pass the tape halfway through the long
narrow hole in the stick.
3
Turn the stick three-quarters of a turn
towards you, and then pull the stick away
from you as shown in the illustration.
4
Peel off the label backing.
22
ABCDEF
Page 27
Maintenance
Cleaning the print head and roller
A blank horizontal line appearing through the printed label indicates that the print head and roller are
dirty. Clean the print head and roller according to the following procedure.
1 Turn off the PT-2420PC.
2 Open the tape compartment cover.
3 Remove the tape cassette if one is installed.
Print head
4 Use a dry cotton swab to gently wipe up and
down along the print head and roller.
Caution:
5 Insert the tape cassette, and then close the
* Cleaning can easily be done using the
Be careful not to touch the cutter near the
print head and roller while cleaning them.
In addition, do not try to clean the
print head immediately after printing,
otherwise you may be burned.
tape compartment cover.
optional print head cleaning cassette
(TZ-CL4).
Cleaning the tape cutter
After a while, adhesive may accumulate on the
cutter, preventing it from cutting or resulting in the
tape being jammed. Once a year, use a cotton swab
dipped in isopropyl (rubbing) alcohol to clean off
the cutter.
Do not touch the cutter’s edge, otherwise
you may be injured.
Cotton swab
Roller
(area to be cleaned)
Cotton swab
Print head
(area to be cleaned)
Cotton swab
Tape cutter
23
Page 28
Troubleshooting
Monitoring the P-touch Status
You can determine the status of the PT-2420PC from the status indicator.
Status Indicator
Lights up
Flashes a few times
Flashes quickly
Flashes, staying off
longer that it is on
Flashes slowly
→ →
Cause
→ Remedy
→ →
• The P-touch is operating normally and is in stand-by.
• The P-touch is receiving data from the computer correctly.
• The cassette is not installed. → Install a cassette.
• A transmission error occurred. → Press the power/feed key to turn
the PT-2420PC off, then on again.
•
The tape cutter button was pressed while printing
• An EEPROM error occurred. → Contact your service representative.
• The print head is cooling down. → Wait until printing continues.
→
Try printing again.
24
Page 29
Problem-solving
If you think the P-touch is not printing correctly, but you cannot determine the problem with the status
indicator, refer to the following list of possible problems, and then perform the necessary operations.
Problem
The P-touch does
not print. A
printing error is
indicated.
While printing,
striped tape appears.
The status indicator does not light
up or flash.
A blank horizontal
line appears through
the printed label.
A data transmission error appears
on the computer.
* If two or more of the same P-touch models are connected through their USB ports, select “PTUSB
(PT-2420PC-XXXXXXXXX):” (where XXXXXXXXX is the serial number) instead of “PTUSB:”. The serial number is written above the barcode on the silver label attached to the bottom of the P-touch.
• The interface cable is not
correctly connected.
• The tape cassette is not inserted correctly.
• The tape compartment
cover is open.
There is no more tape in the
tape cassette.
The AC adapter in not correctly connected.
The print head and roller are
dirty.
The wrong port is selected.
Cause
Check that the interface cable is correctly
connected, the tape cassette is correctly installed, and that the tape compartment cover
is closed.
Insert a new tape cassette, and then either
press the Power/Feed key or turn the P-touch
off, then on again.
Check that the AC adapter is correctly connected. If
the power button still does not light up or flash, contact your service representative.
Clean the print head and roller according to
the procedure in
on page 23.
roller
Windows
Under “Print to the following port” in the
printer Properties dialogue box, select
“PTUSB:” for the USB connection.*
Mac
Select in the Chooser the PT-2420PC where the
P-touch is connected.
®
Solution
Cleaning the print head and
Machine specifications
Power supply: AC 230 V, 50 Hz (AC adapter model J)
Label tape: 5 widths available:
6 mm, 9 mm, 12 mm, 18 mm, 24 mm
Print head: 128 dots
180 dpi
Maximum printing length: 279 mm
Port: USB
Dimensions: 66 × 123 × 145 mm
Weight: 400 g
25
Page 30

Accessories
• Supplies
Obtain tape cassettes from your nearest authorized dealer. Brother cannot be held responsible for
trouble caused by the use of unauthorized supplies.
Use only Brother TZ tapes and AL tapes with this machine. Do not use tapes that do not have the
and mark.
Stock No. Description
24 mm laminated tapes
TZ-151 Black characters on clear adhesive
TZ-251 Black characters on white adhesive
TZ-451 Black characters on red adhesive
TZ-551 Black characters on blue adhesive
TZ-651 Black characters on yellow adhesive
TZ-751 Black characters on green adhesive
TZ-951 Black characters on silver adhesive
TZ-A51 Black characters on grey adhesive
TZ-B51 Black characters on fluorescent orange adhesive
TZ-C51 Black characters on fluorescent yellow adhesive
TZ-D51 Black characters on fluorescent green adhesive
TZ-M51 Black characters on clear (matt) adhesive
TZ-152 Red characters on clear adhesive
TZ-252 Red characters on white adhesive
TZ-153 Blue characters on clear adhesive
TZ-253 Blue characters on white adhesive
TZ-354 Gold characters on black adhesive
TZ-155 White characters on clear adhesive
TZ-355 White characters on black adhesive
TZ-455 White characters on red adhesive
TZ-555 White characters on blue adhesive
TZ-655 White characters on orange adhesive
TZ-755 White characters on green adhesive
TZ-M951 Black characters on silver (matt) adhesive
18 mm laminated tapes
TZ-141 Black characters on clear adhesive
TZ-145 White characters on clear adhesive
TZ-241 Black characters on white adhesive
TZ-242 Red characters on white adhesive
TZ-243 Blue characters on white adhesive
TZ-344 Gold characters on black adhesive
TZ-345 White characters on black adhesive
TZ-441 Black characters on red adhesive
TZ-541 Black characters on blue adhesive
TZ-641 Black characters on yellow adhesive
TZ-741 Black characters on gree adhesive
12 mm laminated tapes
TZ-131 Black characters on clear adhesive
TZ-132 Red characters on clear adhesive
TZ-133 Blue characters on clear adhesive
TZ-135 White characters on clear adhesive
TZ-231 Black characters on white adhesive
TZ-232 Red characters on white adhesive
TZ-233 Blue characters on white adhesive
TZ-334 Gold characters on black adhesive
26
Page 31

Stock No. Description
12 mm laminated tapes
TZ-335 White characters on black adhesive
TZ-431 Black characters on red adhesive
TZ-435 White characters on red adhesive
TZ-531 Black characters on blue adhesive
TZ-535 White characters on blue adhesive
TZ-631 Black characters on yellow adhesive
TZ-635 White characters on orange adhesive
TZ-731 Black characters on green adhesive
TZ-735 White characters on green adhesive
TZ-931 Black characters on silver adhesive
TZ-A31 Black characters on grey adhesive
TZ-B31 Black characters on fluorescent orange adhesive
TZ-C31 Black characters on fluorescent yellow adhesive
TZ-D31 Black characters on fluorescent green adhesive
TZ-M31 Black characters on clear (matt) adhesive
TZ-M931 Black characters on silver (matt) adhesive
9 mm laminated tapes
TZ-121 Black characters on clear adhesive
TZ-122 Red characters on clear adhesive
TZ-123 Blue characters on clear adhesive
TZ-221 Black characters on white adhesive
TZ-222 Red characters on white adhesive
TZ-223 Blue characters on white adhesive
TZ-324 Gold characters on black adhesive
TZ-325 White characters on black adhesive
TZ-421 Black characters on red adhesive
TZ-521 Black characters on blue adhesive
TZ-621 Black characters on yellow adhesive
TZ-721 Black characters on green adhesive
TZ-A25 White characters on grey adhesive
TZ-M21 Black characters on clear (matt) adhesive
6 mm laminated tapes
TZ-111 Black characters on clear adhesive
TZ-211 Black characters on white adhesive
TZ-315 White characters on black adhesive
TZ-611 Black characters on yellow adhesive
24 mm non-laminated tapes
TZ-N251 Black characters on white adhesive
18 mm non-laminated tapes
TZ-N241 Black characters on white adhesive
TZ-N242 Red characters on white adhesive
TZ-N243 Blue characters on white adhesive
TZ-N541 Black characters on blue adhesive
TZ-N641 Black characters on yellow adhesive
TZ-N741 Black characters on green adhesive
TZ-NF41 Black characters on purpul adhesive
TZ-PH41 Black characters on adhesive with a heart design
TZ-PF41 Black characters on adhesive with a fruit design
TZ-PM41 Black characters on adhesive with a marine design
12 mm non-laminated tapes
TZ-N231 Black characters on white adhesive
TZ-N232 Red characters on white adhesive
TZ-N233 Blue characters on white adhesive
TZ-N531 Black characters on blue adhesive
27
Page 32

Stock No. Description
12 mm non-laminated tapes
TZ-N631 Black characters on yellow adhesive
TZ-N731 Black characters on green adhesive
TZ-NF31 Black characters on purple adhesive
9 mm non-laminated tapes
TZ-N221 Black characters on white adhesive
6 mm non-laminated tapes
TZ-N211 Black characters on white adhesive
Strong adhesive tapes
Stock No. Description
TZ-S151 24 mm strong adhesive tape (black characters on clear adhesive)
TZ-S141 18 mm strong adhesive tape (black characters on clear adhesive)
TZ-S131 12 mm strong adhesive tape (black characters on clear adhesive)
TZ-S121 9 mm strong adhesive tape (black characters on clear adhesive)
TZ-S111 6 mm strong adhesive tape (black characters on clear adhesive)
TZ-S251 24 mm strong adhesive tape (black characters on white adhesive)
TZ-S241 18 mm strong adhesive tape (black characters on white adhesive)
TZ-S231 12 mm strong adhesive tape (black characters on white adhesive)
TZ-S221 9 mm strong adhesive tape (black characters on white adhesive)
TZ-S211 6 mm strong adhesive tape (black characters on white adhesive)
TZ-S651 24 mm strong adhesive tape (black characters on yellow adhesive)
TZ-S641 18 mm strong adhesive tape (black characters on yellow adhesive)
TZ-S631 12 mm strong adhesive tape (black characters on yellow adhesive)
TZ-S621 9 mm strong adhesive tape (black characters on yellow adhesive)
TZ-S611 6 mm strong adhesive tape (black characters on yellow adhesive)
Special tapes
Stock No. Description
TZ-IY41 18 mm iron-on transfer tape (black characters)
TZ-SE4 18 mm security tape (black characters on white adhesive)
TZ-FA4 18 mm fabric tape (blue characters on white fabric)
TZ-FA3 12 mm fabric tape (blue characters on white fabric)
Thermal Paper tape
Stock No. Description
AL-K251 24 mm thermal paper tape (black characters on white adhesive)
Options
Stock No. Description
TZ-CL4 Print head cleaning cassette
28
Page 33

Guide de référence rapide
Guide de référence rapide
IMPORTANT
La procédure d’installation correcte pour la PT-2420PC est la suivante :
1. Lancez l’installation du logiciel d’édition d’étiquette.
2. A l’invite, raccordez la P-touch au port USB du PC.
En aucun cas vous ne devrez raccorder la P-touch au PC avant d’avoir installé le
logiciel.
FRANÇAIS
Page 34

Merci d’avoir acheté la P-touch 2420PC !
Avec votre nouvelle imprimante d’étiquette Brother, vous pourrez imprimer des étiquettes personnali-
sées pour n’importe quel usage. Il suffit d’insérer une cassette d’étiquettes dans la PT-2420PC, de concevoir votre étiquette avec le logiciel de conception d’étiquette P-touch fourni, et de l’imprimer. Votre
étiquette personnalisée s’imprime en quelques secondes. Les cassettes de ruban d’étiquettes existent en
différentes tailles et en différentes couleurs - ce qui est idéal pour faire un codage par couleur d’étiquette
ou pour tous vos autres besoins d’étiquetage spéciaux.
Les deux applications de conception d’étiquettes sont enregistrées sur le CD-ROM. Le logiciel P-touch
Quick Editor facile à utiliser vous permet d’écrire un texte et d’effectuer un formatage rapide de façon à
imprimer instantanément des étiquettes simples. L’application P-touch Editor Ver.3.1 plus perfectionnée
permet non seulement d’automatiser les fonctions de page complexes, mais également d’utiliser tout un
choix de modèles préformatés à utiliser immédiatement.
Déclaration de conformité
Nous, Brother Industries Ltd.
15-1, Naeshiro-cho, Mizuho-ku,
Nagoya 467-8561, Japan
déclarons que ce produit est conforme aux documents normatifs suivants:
Sécurité: EN 60950 (Adaptateur secteur)
EMC: EN 55022 1998 Class B
EN 55024 1998
EN 61000-3-2 1995
EN 61000-3-3 1995
conforme à la Directive relative 89/336EEC à la compatibilité électromagnétique (telle qu’amendée par les directives 91/263/EEC et 91/31/EEC).
Ce système est ègalement conforme à la Directive 73/23/EEC sur la basse tension.
Publié par: Brother Industries Ltd.
Les câbles d’interface inclus doivent être utilisés pour assurer la conformités aux tolérances de
EMC.
Page 35

Table des matières
Déballage .......................................................................................................................................... 2
Description générale ......................................................................................................................... 2
Précautions générales ........................................................................................................................ 2
Les cassettes de ruban ....................................................................................................................... 3
Remplacement de la cassette de ruban .............................................................................................. 4
Raccordement de l’adaptateur secteur .............................................................................................. 4
Touche d’alimentation/avance .......................................................................................................... 5
Raccordement du câble d’interface USB ...........................................................................................5
Logiciel et pilote d’imprimante .......................................................................................................... 5
Pour les utilisateurs d’un ordinateur compatible PC (Windows
Avant l’installation ..................................................................................................................... 6
Installation de P-touch Quick Editor .......................................................................................... 6
Installation de P-touch Editor Ver.3.1 ......................................................................................... 8
Installation du pilote d’imprimante ............................................................................................ 9
Consultation du mode d’emploi .............................................................................................. 10
Désinstallation du logiciel et du pilote d’imprimante ............................................................... 11
Remplacement, suppression ou ajout d’un autre pilote d’imprimante ...................................... 11
Pour les utilisateurs d’un Macintosh ................................................................................................. 14
Avant l’installation ................................................................................................................... 14
Installation de P-touch Quick Editor ........................................................................................ 14
Installation de P-touch Editor Ver.3.1 ....................................................................................... 15
Sélection de l’imprimante ........................................................................................................ 16
Consultation du mode d’emploi .............................................................................................. 16
Désinstallation du logiciel et du pilote d’imprimante ............................................................... 16
Utilisation de P-touch Quick Editor ................................................................................................. 17
Lancement de P-touch Quick Editor ........................................................................................ 17
Réglage de la taille de l’étiquette .............................................................................................17
Entrée de texte ......................................................................................................................... 17
Importation de texte ................................................................................................................ 18
Utilisation de la liste d’historique du texte ............................................................................... 18
Ajout d’un symbole ................................................................................................................. 18
Changement de la couleur du fond ......................................................................................... 18
Affichage du texte ................................................................................................................... 18
Impression ............................................................................................................................... 19
Masquage/affichage de P-touch Quick Editor (Windows
Pour quitter P-touch Quick Editor ............................................................................................ 19
Utilisation de P-touch Editor Ver.3.1 ............................................................................................... 20
Lancement de P-touch Editor Ver.3.1 ..........................................................................................
Affichage des propriétés .......................................................................................................... 20
Création d’une nouvelle mise en page ..................................................................................... 21
Impression d’une étiquette .............................................................................................................. 22
Retrait du dos de l’étiquette ............................................................................................................ 22
Entretien .......................................................................................................................................... 23
Nettoyage de la tête d’impression et du rouleau ...................................................................... 23
Nettoyage du couteau du ruban .............................................................................................. 23
Dépannage ...................................................................................................................................... 24
Contrôle de l’état de P-touch ...................................................................................................24
Solution des problèmes ........................................................................................................... 25
Spécifications du matériel ............................................................................................................... 25
Accessoires ...................................................................................................................................... 26
®
98/98SE/Me/2000/XP) ...................... 6
®
seulement) ...................................... 19
20
1
Page 36

Déballage
• PT-2420PC
• Cassette à ruban papier thermique à transfert direct de 24 mm (caractères noirs sur fond blanc ; 7 mètres)
• Adaptateur secteur (modèle J ; pour le branchement de la PT-2420PC dans la prise secteur)
Câble d’interface USB (pour le raccordement de la PT-2420PC à un ordinateur compatible PC ou un Macintosh)
•
• Référence rapide
• CD-ROM contenant le logiciel PC et Mac et leurs manuels
• Séparateur de ruban
Description générale
Touche de couteau
du ruban
Touche
d’alimentation/
avance
Indicateur d’état
Fente de sortie
de ruban
Couvercle du logement
de ruban
Levier de
dégagement
D
C
I
N
9
.
5
Couteau
Port USB
Connecteur d’adaptateur
V
secteur
Tête
d’impression
Précautions générales
•
Utilisez exclusivement des rubans Brother TZ et AL avec cet appareil. N’utilisez pas de rubans ne portant pas le logo et .
• Ne tirez pas sur le ruban qui sort de la P-touch. Vous risqueriez d’endommager le ruban.
• Evitez d’utiliser l’appareil dans des endroits très poussiéreux, et mettez-le à l’abri des rayons du soleil et de la pluie.
• N’exposez pas l’appareil à des températures ou une humidité élevées.
Ne laissez pas d’objets en vinyle ou en caoutchouc en contact avec l’appareil pendant longtemps. Cela pourrait laisser des taches.
•
• Ne nettoyez pas l’appareil avec de l’alcool ou d’autres solvants organiques. Utilisez uniquement un linge doux et sec.
• Ne posez de corps étrangers ni rien d’autre sur l’appareil.
• Pour ne pas vous blesser, ne touchez pas le tranchant du couteau.
• Ne touchez pas la tête d’impression, qui devient très chaude pendant l’utilisation de la P-touch. La tête d’impression
reste encore chaude quelque temps après la mise hors tension.
• Utilisez uniquement l’adaptateur secteur fourni (modèle J), qui a été conçu exclusivement pour l’appareil. L’utilisation
d’un autre adaptateur secteur annulerait la garantie.
• Utilisez uniquement le câble d’interface USB fourni. L’utilisation d’un autre câble annulerait la garantie.
• Si vous ne prévoyez pas d’utiliser l’appareil pendant un certain temps, débranchez l’adaptateur secteur.
• N’essayez pas de démonter la P-touch.
®
est une marque de International Business Machines, Inc.
• IBM
Microsoft® et Microsoft Windows® sont des marques déposées de Microsoft Corp. aux Etats-Unis et dans d’autres pays.
•
• Macintosh et Power Macintosh sont des marques déposées de Apple Computer, Inc.
•
Tous les autres noms de logiciels et de produits sont des marques ou des marques déposées des sociétés respectives.
2
Page 37

Les cassettes de ruban
• Ne tirez pas sur le ruban qui sort de la P-touch. Vous risqueriez d’endommager le ruban.
• Si vous fixez l’étiquette sur une surface humide ou sale, elle risque de se décoller facilement. Avant
de fixer l’étiquette, nettoyez la surface où vous allez la coller.
• Selon les conditions de l’environnement et le matériau, l’état, la rugosité et la forme de la surface de
fixation, il est possible que l’étiquette se déplace ou se décolle. Pour vérifier la force d’adhérence de
l’étiquette ou avant d’utiliser l’étiquette sur un endroit particulièrement sensible, faites un essai en
collant un petit morceau d’étiquette sur une section dissimulée de la surface de collage prévue.
• Le soleil, le vent et la pluie risquent de provoquer une perte de couleur de l’étiquette ou de la
décoller.
• Les inscriptions effectuées avec une encre à base d’huile ou à base d’eau risquent d’être visibles
même si l’étiquette est collée dessus. Pour les dissimuler, collez deux étiquettes l’une sur l’autre, ou
utilisez un autocollant à base sombre.
• Ce ruban peut ne pas convenir dans les cas où des dommages ou des blessures risquent d’entraîner
des obligations contractuelles.
• Le ruban AL est un ruban thermique qui n’est pas adapté à l’emploi en extérieur ou prolongé, car il
peut se décolorer. En outre, selon les conditions ambiantes et la surface sur laquelle ce ruban est
collé, il peut se détacher ou tomber.
3
Page 38

Remplacement de la cassette de ruban
1 Soulevez le couvercle du logement du ruban
pour l’ouvrir. La cassette se dégage
également.
2 S’il y a déjà une cassette de ruban dans
l’appareil, sortez-la en tirant droit dessus.
Si le ruban encreur de la cassette de ruban à
3
installer est distendu, tournez la roue dentée
avec le doigt dans le sens de la flèche sur la
cassette jusqu’à ce que le ruban soit bien
tendu. Par ailleurs, vérifiez que l’extrémité du
ruban avance bien sous le guide de ruban.
Si vous insérez une cassette de ruban
neuve dotée d’une butée, n’oubliez pas
de retirer la butée.
4 Insérez la cassette de ruban à fond dans le
logement de ruban en veillant à ce que tout
le dos de la cassette touche bien le fond du
logement.
Lorsque vous insérez la cassette de ruban,
veillez à ce que le ruban ne soit pas pris
sur le coin du guide métallique.
5
Refermez le couvercle du logement de ruban.
Cassette de
ruban
Raccordement de l’adaptateur secteur
Raccordez l’adaptateur secteur à la PT-2420PC comme indiqué ci-dessous.
1 Insérez la fiche du cordon de l’adaptateur
dans le connecteur marqué DC IN 9.5V sur
la PT-2420PC.
2 Insérez la fiche de l’adaptateur dans la prise
secteur la plus proche. L’indicateur d’état
s’allume en vert pour indiquer que l’appareil
est sous tension.
Pour mettre la PT-2420PC hors tension,
appuyez sur la touche d’alimentation/
avance de façon que l’indicateur d’état
s’éteigne.
4
Indicateur d’état
Adaptateur
secteur
DC IN 9.5V
V
5
.
9
N
I
C
D
Page 39

Touche d’alimentation/avance
D
C
I
N
9
.
5
V
La touche d’alimentation/avance ( ) sert à mettre la PT-2420PC sous et hors tension et à avancer le ruban.
• Pour mettre la PT-2420PC sous et hors tension :
Appuyez une fois sur
.
• Pour avancer le ruban :
Maintenez
enfoncée pendant au moins deux secondes.
Raccordement du câble d’interface USB
Raccordez la PT-2420PC à l’ordinateur comme indiqué ci-dessous.
Lorsque vous raccordez la PT-2420PC à un ordinateur compatible IBM PC, il faut que le logiciel
de conception d’étiquettes et le pilote d’imprimante soient installés avant de raccorder la PT2420PC à l’ordinateur et de la brancher sur l’adaptateur secteur. Effectuez la procédure
d’installation des pages 6 à 11 pour installer le logiciel et le pilote d’imprimante, puis raccordez la
PT-2420PC à l’ordinateur lorsque vous y êtes invité.
1 Insérez le connecteur plat du câble
d’interface USB fourni dans le port USB de
l’ordinateur.
2 Insérez le connecteur carré du câble
d’interface USB fourni dans le port USB
(
) de la PT-2420PC.
Si vous faites le raccordement USB via un
concentrateur, le raccordement peut ne
pas être correct en fonction du type de
concentrateur. Si l’impression n’est pas
possible avec un raccordement par
concentrateur, essayez de raccorder la PT2420PC directement à l’ordinateur avec
le câble d’interface USB.
Port USB
Câble d’interface USB
Logiciel et pilote d’imprimante
Brother Co., Ltd. et ses fournisseurs détiennent tous les droits et les droits d’auteur de ce logiciel
(y compris, mais sans s’y limiter, les programmes, images, clip art, modèles, et textes incorporés
dans le logiciel), le texte des manuels fournis et les copies du logiciel. Ce logiciel, en partie ou en
totalité, ne peut être ni copié, ni modifié, ni désossé, ni démonté ni décompilé sans permission.
Le CD-ROM fourni permet d’installer les programmes suivants :
• P-touch Quick Editor
• P-touch Editor Ver.3.1
• Pilote d’imprimante PT-2420PC
5
Page 40

Pour les utilisateurs d’un ordinateur compatible PC
(Windows® 98/98SE/Me/2000/XP)
Pour pouvoir imprimer des étiquettes sur la PT-2420PC, il faut que le logiciel de conception d’étiquettes et le
pilote d’imprimante de la PT-2420PC soient installés. Pour concevoir les étiquettes à imprimer sur la PT-2420PC,
vous avez deux applications au choix sur le CD-ROM : P-touch Quick Editor, et P-touch Editor Ver.3.1.
Avant l’installation
Vérifiez que la configuration de votre système remplit les conditions suivantes.
Pour Windows®
Ordinateur : IBM PC ou compatible
Système d’exploitation : Préinstallé avec Microsoft
Espace libre sur le disque dur : Au moins 20 Mo
Mémoire disponible : Au moins 32 Mo
Moniteur : Carte graphique VGA ou plus puissante
Port USB (installé comme matériel standard)
Lecteur de CD-ROM
Ne raccordez pas la PT-2420PC à l’ordinateur avant d’avoir installé le logiciel de conception d’étiquettes,
sinon il risque de ne pas être installé correctement. Ne raccordez pas la PT-2420PC avant d’y avoir été invité.
L’installation de Windows® 2000 exige des privilèges d’administrateur.
De plus, l’impression exige des privilèges d’administrateur ou d’utilisateur de puissance.
Ce logiciel ne peut pas fonctionner dans des groupes d’utilisateurs.
Ce logiciel n’est pas compatible avec le système d’exploitation Server de Windows
Avec Windows® XP, l’impression et l’installation ne sont possibles que depuis un compte avec privilèges
d’administrateur. Ces opérations ne sont pas possibles depuis un compte avec privilèges limités.
Installation de P-touch Quick Editor
Le logiciel P-touch Quick Editor assure un accès rapide aux fonctions de conception d’étiquette les plus simples permettant une entrée de
texte et une impression instantanée des étiquettes. Installez le logiciel P-touch Quick Editor sur le PC en procédant de la manière suivante.
1
Insérez le CD-ROM fourni dans le lecteur de
CD-ROM de l’ordinateur. Une boîte de
dialogue s’affiche automatiquement pour vous
permettre de sélectionner la langue.
®
Windows® 98, 98SE, Me, 2000, Professional or XP
®
2000.
Si la boîte de dialogue n’apparaît pas automatiquement,
cliquez sur “Poste de travail” dans le bureau, puis doublecliquez sur le lecteur de CD-ROM qui renferme le CD-ROM.
(Avec Windows® XP, cliquez sur “Poste de travail”
dans le menu Démarrer, puis double-cliquez sur le
lecteur de CD-ROM qui renferme le CD-ROM.)
Ensuite, double-cliquez sur “Setup.exe” pour
afficher la boîte de dialogue.
2
Sélectionnez la langue de votre système
d’exploitation Windows
bouton OK. Une boîte de dialogue s’affiche pour
vous permettre de sélectionner quoi installer.
®
, puis cliquez sur le
6
Si vous ne souhaitez installer que le pilote
d’imprimante, cliquez sur le bouton du bas
(Driver) sur le côté droit. La première boîte de
dialogue Configuration du pilote s’affiche pour
vous informer que le pilote d’imprimante de la
PT-2420PC va être installé.
Continuez avec la procédure de
du pilote d’imprimante”
“Installation
, à la page 9.
Page 41

Pour installer le logiciel P-touch Editor Ver.3.1,
cliquez sur le bouton du haut (P-touch Editor) sur le
côté droit. Ensuite, effectuez la procédure de
“Installation de P-touch Editor Ver.3.1”
3
Cliquez sur le bouton gauche (P-touch Quick
Editor). L’assistant InstallShield
, à la page 8.
®
pour l’installation
du logiciel P-touch Quick Editor est lancé, puis la
boîte de dialogue Bienvenue s’affiche.
4 Lisez attentivement le contenu de la boîte de
dialogue, puis cliquez sur le bouton Suivant
pour continuer. La boîte de dialogue
Informations utilisateur s’affiche.
5
Entrez les informations nécessaires dans les cases
appropriées (si les informations ont déjà été
enregistrées dans Windows
®
, elles s’affichent
automatiquement), puis cliquez sur le bouton
Suivant. Une boîte de dialogue s’affiche vous
demandant de confirmer les informations entrées.
7 Cliquez sur le bouton Suivant pour
commencer l’installation.
8
Lorsque P-touch Quick Editor est installé, une
boîte de dialogue s’affiche pour vous permettre
de sélectionner où ajouter le raccourci d’accès
à P-touch Quick Editor (page 17).
9 Sélectionnez l’emplacement du raccourci et
cliquez sur le bouton Suivant. Une boîte de
dialogue s’affiche pour vous permettre de
sélectionner si vous souhaitez installer le
pilote d’imprimante ou non.
Pour installer le pilote d’imprimante, cliquez
sur le bouton Oui. La première boîte de
dialogue Configuration du pilote s’affiche pour
vous informer que le pilote d’imprimante de la
PT-2420PC va être instµallé.
Pour Windows®
6 Cliquez sur le bouton Oui pour enregistrer
les informations entrées.
Pour modifier les informations, cliquez sur
le bouton Non, puis revenez à l’étape
La boîte de dialogue Sélection du dossier
d’installation s’affiche.
4
Continuez avec la procédure de
“Installation
du pilote d’imprimante”, à la page 9.
Si le pilote d’imprimante est déjà installé,
cliquez sur le bouton Non. Une boîte de
dialogue s’affiche pour vous indiquer que
l’installation est terminée.
.
Sélectionnez “Oui, je veux redémarrer mon
ordinateur maintenant”, cliquez sur le
bouton Terminer pour redémarrer
l’ordinateur, et enlevez le CD-ROM de
l’ordinateur.
7
Page 42

Installation de P-touch Editor Ver.3.1
Le logiciel P-touch Editor Ver.3.1 comprend diverses fonctions
plus complexes pour impression de code à barres et d’images,
ce qui vous permet de dessiner pratiquement n’importe quel
type d’étiquette imaginable. Installez le logiciel P-touch Editor
Ver.3.1 sur le PC en procédant de la façon suivante.
1
Insérez le CD-ROM fourni dans le lecteur de
CD-ROM de l’ordinateur. Une boîte de
dialogue s’affiche automatiquement pour vous
Pour Windows®
permettre de sélectionner la langue.
Si la boîte de dialogue n’apparaît pas
automatiquement, cliquez sur “Poste de travail”
dans le bureau, puis double-cliquez sur le
lecteur de CD-ROM qui renferme le CD-ROM.
(Avec Windows® XP, cliquez sur “Poste de travail”
dans le menu Démarrer, puis double-cliquez sur le
lecteur de CD-ROM qui renferme le CD-ROM.)
Ensuite, double-cliquez sur “Setup.exe” pour
afficher la boîte de dialogue.
2
Sélectionnez la langue de votre système
d’exploitation Windows
bouton OK. Une boîte de dialogue s’affiche pour
vous permettre de sélectionner quoi installer.
Si vous ne souhaitez installer que le pilote
d’imprimante, cliquez sur le bouton du bas
(Driver) sur le côté droit. La première boîte de
dialogue Configuration du pilote s’affiche
pour vous informer que le pilote d’imprimante
de la PT-2420PC va être installé.
Continuez avec la procédure de
du pilote d’imprimante”
Pour installer le logiciel P-touch Quick Editor,
cliquez sur le bouton gauche (P-touch Quick
Editor). Ensuite, effectuez la procédure de
“Installation de P-touch Quick Editor”
3
Cliquez sur le bouton du haut (P-touch Editor).
L’assistant InstallShield
logiciel P-touch Editor Ver.3.1 est lancé, puis
la boîte de dialogue Bienvenue s’affiche.
8
®
, puis cliquez sur le
“Installation
, à la page 9.
de la page 6.
®
pour l’installation du
4 Suivez les instructions qui s’affichent et
continuez l’installation. Pour l’installation,
vous avez plusieurs méthodes au choix.
Typique
Toutes les options de base (P-touch Editor
Ver.3.1, Clip Art, Modèles auto formatés, Aide
et 13 polices de caractères) sont installées.
Compacte
Seul P-touch Editor Ver.3.1 est installé.
Personnalisée
Editeur : P-touch Editor Ver.3.1
Clip Art : Illustrations pour la fonction
Clip Art de P-touch Editor Ver.3.1
Polices : 13 polices de caractères
Modèles auto formatés : Modèles pour la
fonction de formatage automatique
Mode d’emploi : Mode d’emploi (HTML)
de P-touch Editor Ver.3.1
Vous pouvez également consulter le
mode d’emploi sur le CD-ROM sans
l’installer dans l’ordinateur.
Aide :
Fichiers d’aide de P-touch Editor Ver.3.1
Si vous pouvez cliquer sur le bouton Changer
pendant qu’une option est sélectionnée, vous
pourrez sélectionner des sous-composants.
Cliquez sur le bouton Changer pour afficher la
boîte de dialogue Sélectionner les souscomposants, et sélectionnez les sous-composants
que vous souhaitez installer en cochant leur case.
Si vous n’avez pas installé toutes les options ni
tous les sous-composants, certaines fonctions de
P-touch Editor Ver.3.1 ne seront pas disponibles.
Quand vous avez sélectionné les sous-composants
souhaités, cliquez sur le bouton Continuer.
5
Lorsque l’installation de P-touch Editor Ver.3.1
est terminée, une boîte de dialogue s’affiche pour
vous permettre de sélectionner si vous souhaitez
installer le pilote d’imprimante ou non.
Pour installer le pilote d’imprimante, cliquez sur le
bouton Oui. La première boîte de dialogue
Configuration du pilote s’affiche pour vous informer que
le pilote d’imprimante de la PT-2420PC va être installé.
Page 43

Continuez avec la procédure de
“Installation
du pilote d’imprimante” ci-dessous.
Si le pilote d’imprimante est déjà installé,
cliquez sur le bouton Non. Une boîte de
dialogue s’affiche pour vous indiquer que
l’installation est terminée.
Sélectionnez “Oui, je veux redémarrer mon
ordinateur maintenant”, cliquez sur le bouton
Terminer pour redémarrer l’ordinateur, et
enlevez le CD-ROM de l’ordinateur.
Installation du pilote d’imprimante
Avec la fonction Plug-and-Play, les nouveaux
périphériques raccordés au système sont détectés,
et leur pilote est automatiquement installé. Si vous
souhaitez raccorder la PT-2420PC via le port USB,
son pilote sera installé avec la fonction Plug-andPlay. Lisez attentivement les instructions
d’installation décrites ci-dessous avant d’installer
le pilote d’imprimante fourni sur le CD-ROM.
Ne raccordez pas la P-touch 2420PC à
l’ordinateur tant que vous n’y êtes pas
invité, sinon le pilote d’imprimante PT2420PC risque de ne pas être installé
correctement.
3 Cliquez sur le bouton Terminer. Une boîte de
dialogue s’affiche pour vous indiquer que
l’installation est terminée.
4
Sélectionnez “Oui, je veux redémarrer mon
ordinateur maintenant”, cliquez sur le bouton
Terminer pour redémarrer l’ordinateur, et
enlevez le CD-ROM de l’ordinateur.
Avec Windows® XP :
1 Dans la boîte de dialogue qui apparaît pour
vous informer que le pilote d’imprimante PT2420PC va être installé, cliquez sur le
bouton Suivant.
Pour Windows®
Avec Windows® 98/98SE/Me/2000 :
1 Cliquez sur le bouton Suivant. Une boîte de
dialogue s’affiche pour vous inviter à
raccorder la PT-2420PC à l’ordinateur.
2 Raccordez la PT-2420PC à l’ordinateur à
l’aide du câble d’interface USB fourni
comme expliqué à la page 5, puis mettez la
PT-2420PC sous tension. Une boîte de
dialogue s’affiche pour vous informer que le
pilote d’imprimante est installé.
2 Quand la boîte de dialogue apparaît pour
vous demander de raccorder la P-touch
2420PC et de la mettre sous tension,
raccordez la P-touch 2420PC à l’ordinateur à
l’aide du câble d’interface USB fourni,
comme décrit à la page 5, puis mettez la Ptouch 2420PC sous tension.
9
Page 44

3 Dans la première boîte de dialogue Assistant
Matériel détecté qui apparaît, sélectionnez
“Installer le logiciel automatiquement
(recommandé)”, puis cliquez sur le bouton
Suivant.
Pour Windows®
6 Cliquez sur le bouton Terminer. Une boîte de
dialogue s’affiche pour vous indiquer que
l’installation est terminée.
7 Sortez le CD-ROM de l’ordinateur.
Consultation du mode d’emploi
4 Si une boîte de dialogue apparaît pour vous
avertir que le logiciel n
Windows Logo, continuez simplement
l
’
installation.
5 Dans la boîte de dialogue Assistant Matériel
détecté qui apparaît pour vous indiquer que
l
’
installation du PT-2420PC et de l’Assistant
Matériel détecté sont terminées, cliquez sur
le bouton Terminer.
’
a pas réussi l’essai
Vous pouvez consulter le mode d’emploi de P-touch
Editor soit en insérant le CD-ROM dans le lecteur
chaque fois que vous souhaitez vous y reporter, soit
en l’installant sur le disque dur de façon à pouvoir
le consulter à tout moment. Le mode d’emploi étant
un document au format HTML, vous aurez besoin
d’un moteur de recherche pour le lire.
• Sur le CD-ROM :
1 Démarrez Windows
2 Sélectionnez le lecteur de CD-ROM.
3 Double-cliquez sur “Main.htm” dans le
dossier Mode d’emploi à l’intérieur du
dossier Ptouch sur le CD-ROM.
• Dans la fenêtre du groupe P-touch Editor 3.1 :
Double-cliquez sur l’icône “Le manuel
d’utilisation P-touch Editor Ver.3.1”.
• Avec le bouton Démarrer :
1 Cliquez sur le bouton Démarrer dans la
barre de tâches pour afficher le menu
Démarrer.
2 Sélectionnez “Programmes”.
3 Sélectionnez “P-touch Editor 3.1”.
4 Cliquez sur “Le manuel d’utilisation P-
touch Editor Ver.3.1”.
®
Explorer.
10
Page 45

Désinstallation du logiciel et du
pilote d’imprimante
Pour désinstaller le logiciel P-touch Editor Ver.3.1/P-touch
Quick Editor du PC,procédez de la façon suivante.
1 Démarrez Windows® 98/98SE/Me/2000/XP.
2 Cliquez sur le bouton Démarrer dans la barre
de tâches, sélectionnez “Paramètres”, puis
sélectionnez “Panneau de configuration”.
Avec Windows
®
XP, cliquez sur bouton
Démarrer dans la barre de tâches, puis
cliquez sur “Panneau de configuration”.
3
Dans la fenêtre Panneau de configuration, doublecliquez sur “Ajout/Suppression de programmes”.
*
La boîte de dialogue peut être légèrement
différente selon le système d’exploitation utilisé.
4
Dans la boîte de dialogue Propriétés de Ajout/
Suppression de programmes, sélectionnez “P-
touch Quick Editor” (pour supprimer le logiciel Ptouch Quick Editor) ou “P-touch Editor 3.1” (pour
supprimer le logiciel P-touch Editor Ver.3.1), puis
cliquez sur le bouton Ajouter/Supprimer.
5
Un message apparaît pour vous demander si vous
voulez supprimer l’application sélectionnée. Cliquez
sur le bouton Oui pour supprimer l’application.
Si vous ne voulez pas supprimer
l’application, cliquez sur le bouton Non.
6 Dans la boîte de dialogue qui apparaît pour
vous indiquer que l’application est
supprimée, cliquez sur le bouton OK.
Remplacement, suppression ou ajout
d’un autre pilote d’imprimante
1 Mettez la PT-2420PC hors tension, puis
débranchez-la de l’ordinateur.
2 Insérez le CD-ROM fourni dans le lecteur de
CD-ROM de l’ordinateur. Une boîte de
dialogue s’affiche automatiquement pour
vous permettre de sélectionner la langue.
Si la boîte de dialogue n’apparaît pas
automatiquement, cliquez sur “Poste de travail”
dans le bureau, puis double-cliquez sur le
lecteur de CD-ROM qui renferme le CD-ROM.
(Avec Windows
®
XP, cliquez sur “Poste de
travail” dans le menu Démarrer, puis doublecliquez sur le lecteur de CD-ROM qui
renferme le CD-ROM.)
Ensuite, double-cliquez sur “Setup.exe” pour
afficher la boîte de dialogue.
3
Sélectionnez la langue de votre système
d’exploitation Windows
®
, puis cliquez sur le
bouton OK. Une boîte de dialogue s’affiche pour
vous permettre de sélectionner quoi installer.
4
Cliquez sur le bouton du bas (Driver) sur le côté droit.
La première boîte de dialogue Configuration du pilote
s’affiche pour vous permettre de sélectionner si vous
voulez remplacer, supprimer ou ajouter un autre
pilote d’imprimante pour la PT-2420PC.
5 Sélectionnez l’opération souhaitée, puis
cliquez sur le bouton Suivant.
S
i vous sélectionnez “Remplacer par une
nouvelle Brother PT-2420PC”, le pilote
d’imprimante préalablement installé est
supprimé et remplacé par un nouveau.
Sélectionnez cette option pour effectuer une mise
à niveau du pilote d’imprimante, ou si vous
fonctionnez sous Windows
®
2000/XP, pour passer
à une PT-2420PC ayant un autre numéro de série.
Si vous sélectionnez “Ajouter une Brother PT2420PC”, un nouveau pilote d’imprimante
est ajouté. Avec USB sous Windows
®
98/Me,
seul un port est ajouté, sans ajouter la PT2420PC comme nouvelle imprimante.
Sélectionnez cette option si vous raccordez
plusieurs PT-2420PC au même ordinateur.
Pour Windows®
11
Page 46

6 Si vous avez sélectionné “Remplacer par une
nouvelle Brother PT-2420PC” ou “Ajouter
une Brother PT-2420PC” :
Avec Windows® 98/98SE/Me/2000 :
Une boîte de dialogue s’affiche pour vous
inviter à raccorder la PT-2420PC à
l’ordinateur.
Pour Windows®
Raccordez la PT-2420PC à l’ordinateur à l’aide du
câble d’interface USB fourni comme expliqué à la
page 5, puis mettez la PT-2420PC sous tension.
Une boîte de dialogue s’affiche pour vous
informer que le pilote d’imprimante est installé.
Sélectionnez “Oui, redémarrer immédiatement”, et cliquez sur le bouton Terminer
pour redémarrer l’ordinateur.
Dans la boîte de dialogue Assistant Matériel
détecté qui apparaît pour vous indiquer que
l’installation du PT-2420PC et de l’Assistant
Matériel détecté sont terminées, cliquez sur
le bouton Terminer.
Dans la boîte de dialogue qui apparaît pour
vous indiquer que l’installation est terminée,
sélectionnez “Oui, redémarrer
immédiatement.”, puis cliquez sur le bouton
Terminer. L’ordinateur redémarre.
Avec Windows® XP :
Dans la première boîte de dialogue Assistant
Matériel détecté qui apparaît, sélectionnez
“Installer le logiciel automatiquement
(recommandé)”, puis cliquez sur le bouton
Suivant.
Si une boîte de dialogue apparaît pour vous
avertir que le logiciel n’a pas réussi l’essai
Windows Logo, continuez simplement
l’installation.
12
Sortez le CD-ROM de l’ordinateur.
Page 47

Si vous avez sélectionné “Supprimer une
Brother PT-2420PC” :
Une boîte de dialogue s’affiche pour vous
demander de confirmer la suppression de
tous les pilotes d’imprimante de la PT2420PC.
Cliquez sur le bouton Oui. Une boîte de
dialogue s’affiche pour vous indiquer que les
pilotes d’imprimante sont supprimés.
Cliquez sur le bouton Terminer. Si une boîte
de dialogue s’affiche pour vous expliquer
que vous devez redémarrer l’ordinateur,
sélectionnez l’option de redémarrage de
l’ordinateur, puis cliquez sur le bouton
Terminer.
Pour Windows®
13
Page 48

Pour les utilisateurs d’un Macintosh
Pour pouvoir imprimer des étiquettes sur la PT-2420PC, il faut que le logiciel de conception d’étiquettes
et le pilote d’imprimante soient installés. Pour concevoir les étiquettes à imprimer sur la PT-2420PC,
vous avez deux applications au choix sur le CD-ROM : P-touch Quick Editor, et P-touch Editor Ver.3.1.
Avant l’installation
Vérifiez que la configuration de votre système remplit les conditions suivantes.
Ordinateur : Macintosh
Pour Macintosh
Système d’exploitation : Mac OS 8.6 ou ultérieur
* Ce logiciel ne peut fonctionner sous Mac OS X que dans un environnement classique.
Toutefois, l’environnement classique de Mac OS X v10.2 n’est pas supporté.
La version Mac du logiciel est conçue pour un Macintosh avec système d’exploitation anglais. Si vous
installez le logiciel sur un Macintosh avec système d’exploitation dans une autre langue, le logiciel
risque de ne pas fonctionner correctement.
Espace libre sur le disque dur : Au moins 30 Mo
Il faudra au moins quelques centaines de mégaoctets supplémentaires d’espace libre sur le
disque dur pour pouvoir imprimer de longues étiquettes ou une grande quantité de données.
Espace libre de mémoire disponible : Au moins 24 Mo
Port USB (installé comme matériel standard)
Lecteur de CD-ROM
Installation de P-touch Quick Editor
Le logiciel P-touch Quick Editor assure un accès
rapide aux fonctions de conception d’étiquette les
plus simples permettant une entrée de texte et une
impression instantanée des étiquettes. Installez le
logiciel P-touch Quick Editor sur le Mac en procédant de la manière suivante.
1
La PT-2420PC et l’ordinateur étant hors
tension, raccordez la PT-2420PC au Macintosh
à l’aide du câble d’interface USB fourni.
Laissez bien la PT-2420PC hors tension.
2 Mettez le Macintosh sous tension.
Insérez le CD-ROM fourni dans le lecteur de CD-
3
ROM de l’ordinateur. Un dossier s’ouvre pour
vous permettre de voir le contenu du CD-ROM.
4 Double-cliquez sur l’icône “P-touch Quick
Editor Installer” dans le dossier qui s’affiche.
L’installateur démarre.
5 Sélectionnez la méthode d’installation.
Cliquez sur le bouton “Install” pour démarrer
immédiatement l’installation des options les
plus élémentaires.
Il faut environ 30 Mo d’espace libre sur le
disque dur pour commencer l’installation.
Si vous avez suffisamment d’espace sur le
disque dur, cliquez sur le bouton “Install”.
Si vous cliquez sur le bouton “Custom Install”
une boîte de dialogue s’affiche pour vous
permettre de sélectionner quelles options
installer.
14
Page 49

Seules les options dont la case est cochée sont
installées. Sélectionnez les options que vous
souhaitez installer, et cliquez sur le bouton
“Install” pour commencer l’installation.
Pour pouvoir imprimer sur la PT-2420PC,
sélectionnez “PT-2420PC Driver” pour
l’installation.
6 Lorsque l’installation est terminée et que la
boîte de dialogue suivante apparaît, cliquez
sur le bouton “Quit”.
7 Lorsque la boîte de dialogue s’affiche pour
vous demander si vous voulez redémarrer
l’ordinateur, cliquez sur le bouton “Restart”
pour redémarrer l’ordinateur.
Installation de P-touch Editor Ver.3.1
Le logiciel P-touch Editor Ver.3.1 comprend diverses fonctions plus complexes pour impression
à
de code
de dessiner pratiquement n’importe quel type d’éti-
quette imaginable. Installez le logiciel P-touch
Editor Ver.3.1 sur l’ordinateur en procédant de la
façon suivante.
1
2 Mettez le Macintosh sous tension.
3 Insérez le CD-ROM fourni dans le lecteur de
barres et d’images, ce qui vous permet
La PT-2420PC et l’ordinateur étant hors
tension, raccordez la PT-2420PC au Macintosh
à l’aide du câble d’interface USB fourni.
Laissez bien la PT-2420PC hors tension.
CD-ROM de l’ordinateur. Un dossier s’ouvre
pour vous permettre de voir le contenu du
CD-ROM.
4 Double-cliquez sur le dossier “P-touch Editor
Ver3.1” pour l’ouvrir.
5
Double-cliquez sur l’icône “P-touch Editor 3.1
Installer” dans le dossier. L’installateur démarre.
6 Sélectionnez la méthode d’installation.
Si “Install” est sélectionné, l’installation de
tous les éléments commence.
Il faut environ 120 Mo d’espace libre sur le
disque dur pour commencer l’installation.
Si vous avez suffisamment d’espace sur le
disque dur, cliquez sur le bouton “Install”.
Si vous cliquez sur le bouton “Custom
Install”, une boîte de dialogue s’affiche pour
vous permettre de sélectionner quelles
options installer.
Pour Macintosh
15
Page 50

Seules les options dont la case est cochée sont
installées. Sélectionnez les options que vous
souhaitez installer, et cliquez sur le bouton
“Install” pour commencer l’installation.
Pour installer le nombre d’éléments
nécessaires seulement, sélectionnez les
éléments suivants et commencez
l’installation.
• P-touch Editor Ver3.1
Pour Macintosh
• Pilote PT-2420PC
• Polices
Dans ce cas, 30 Mo du disque dur sont
utilisés.
Pour pouvoir imprimer sur la PT-2420PC,
sélectionnez “PT-2420PC Driver” pour
l’installation.
7 Lorsque l’installation est terminée et que la
boîte de dialogue suivante apparaît, cliquez
sur le bouton “Quit”.
8 Lorsque la boîte de dialogue s’affiche pour
vous demander si vous voulez redémarrer
l’ordinateur, cliquez sur le bouton “Restart”
pour redémarrer l’ordinateur.
Sélection de l’imprimante
1
Déroulez le menu Apple et sélectionnez
“Sélecteur” pour afficher la fenêtre “Sélecteur”.
2 Dans la liste de gauche, cliquez sur l’icône
PT-2420PC.
3 Refermez la fenêtre “Sélecteur” pour
confirmer les réglages.
16
Consultation du mode d’emploi
Vous pouvez consulter le mode d’emploi de P-touch
Editor soit en insérant le CD-ROM dans le lecteur
chaque fois que vous souhaitez vous y reporter, soit
en l’installant sur le disque dur de façon à pouvoir
le consulter à tout moment. Le mode d’emploi étant
un document au format HTML, vous aurez besoin
d’un moteur de recherche pour le lire.
• Sur le CD-ROM :
Double-cliquez sur “Main.htm” dans le
dossier Mode d’emploi à l’intérieur du
dossier P-touch Editor Ver.3.1 sur le CDROM.
• Avec le bouton Démarrer :
Double-cliquez sur “Main.htm” dans le
dossier Mode d’emploi à l’intérieur du
dossier P-touch Editor Ver.3.1 sur le
disque dur.
Désinstallation du logiciel et du
pilote d’imprimante
Pour désinstaller P-touch Quick Editor, P-touch
Editor Ver.3.1 et le pilote d’imprimante, procédez
de la façon suivante.
Lorsque vous supprimez le pilote
d’imprimante, assurez-vous que la P-touch
est hors tension et débranchée.
1 Glissez-déplacez le dossier suivant sur
l’icône de la poubelle :
• Dossier P-touch Quick Editor (pour le
logiciel P-touch Quick Editor)
• Dossier P-touch Editor Ver3.1 (pour le
logiciel P-touch Editor Ver.3.1)
2 Dans le dossier Système, ouvrez le dossier
Extensions.
3 Glissez-déplacez les icônes suivantes sur
l’icône de la poubelle :
• PT-2420PC et USB PT-2420PC Extension
4 Dans le dossier Système, ouvrez le dossier
Préférences.
5 Glissez-déplacez les icônes suivantes sur
l’icône de la poubelle :
• P-touch Quick Editor Prefs, P-touch Editor
3.1 Prefs, et PT-2420PC Prefs
Le logiciel et le pilote d’imprimante sont
maintenant supprimés.
Page 51

Utilisation de P-touch Quick Editor
Le P-touch Quick Editor vous permet de créer des étiquettes simples rapidement et en toute facilité. Outre diverses fonctions qui sont
accessibles via les boutons de la barre d’outils, un clic droit de la souris (Windows
et un clic (Macintosh) dans la zone d’affichage de l’étiquette fait apparaître un menu déroulant qui renferme d’autres commandes.
Lancement de P-touch Quick Editor
Si vous avez installé P-touch Quick Editor sur
votre ordinateur, vous pouvez ajouter des
raccourcis vers le poste de travail, le menu
Démarrer et la barre d’outils Quick Launch.
Sur un ordinateur compatible IBM PC :
• Si vous avez ajouté un raccourci vers le
menu Démarrer :
P-touch Quick Editor démarre automatiquement
lorsque vous démarrez votre ordinateur.
• Si vous avez ajouté un raccourci vers le poste
de travail :
Double-cliquez sur l’icône P-touch Quick
Editor dans le poste de travail.
Si vous avez ajouté un raccourci vers la barre d’outils
•
Quick Launch :
Double-cliquez sur l’icône P-touch Quick
Editor dans la barre d’outils Quick Launch.
• Si vous n’avez pas ajouté de raccourci :
Cliquez sur le bouton Démarrer dans la barre
1
de tâches pour afficher le menu Démarrer.
2 Sélectionnez “Programmes”.
3 Cliquez sur “P-touch Quick Editor”.
Quand P-touch Quick Editor a démarré, la fenêtre
suivante s’affiche.
Barre d’outils
Zone d’ffichage
d’étiquette
Vous pouvez masquer ou afficher P-touch
Réglage de la taille de l’étiquette
Avant d’entrer le texte, vous devez régler la taille
de l’étiquette. Vous disposez d’un choix de tailles
de page préréglées adaptées à différents besoins.
1 Cliquez sur la flèche à côté du bouton
2 Cliquez sur [Réglages du ruban] pour afficher
3 Dans la liste Format, cliquez sur le format
Entrée de texte
Le texte entier se formate rapidement en spécifiant
la police, la taille, le style et l’alignement. De plus
vous pouvez tracer un cadre tout autour du texte.
1
Quick Editor en cliquant sur son icône dans le
tiroir système, à droite de la barre de tâches.
Sur un ordinateur Macintosh :
• Double-cliquez sur l’icône P-touch Quick
Editor dans le dossier P-touch Quick Editor
installé dans l’ordinateur.
Quand P-touch Quick Editor a démarré, la fenêtre
suivante s’affiche.
Barre d’outils
Zone d’affichage
d’étiquette
2 Cliquez sur [Réglages du texte] pour afficher
®
) ou une pression maintenue sur la touche Control
Propriétés (
déroulant.
différents réglages de format d’étiquettes.
Vous pouvez également afficher les Réglages du ruban
) pour afficher un menu
en sélectionnant [Afficher propriétés], puis en cliquant
sur [Réglages du ruban] dans le menu déroulant, qui
s’affiche avec un clic droit (Windows
®
) ou en
maintenant la touche Control enfoncée et en cliquant
(Macintosh) dans la zone d’affichage de l’étiquette.
d’étiquette souhaité.
Vous pouvez également régler la taille de page de
l’étiquette en spécifiant les paramètres Longueur
et Largeur ou en glissant-déplaçant les bords de
l’étiquette dans la zone d’affichage jusqu’à ce que
vous obteniez la taille de page voulue.
Cliquez sur la flèche à côté du bouton Propriétés
(
) pour afficher un menu déroulant.
différents paramètres de formatage du texte.
Vous pouvez également afficher les Réglages du texte
en sélectionnant [Afficher propriétés], puis en cliquant
sur [Réglages du texte] dans le menu déroulant, qui
s’affiche avec un clic droit (Windows
®
) ou en
maintenant la touche Control enfoncée et en cliquant
(Macintosh) dans la zone d’affichage de l’étiquette.
17
Page 52

3 Dans Propriétés des Réglages du texte,
cliquez sur les formats de texte souhaités.
4 Cliquez Propriétés des sur la zone
d’affichage de l’étiquette, puis tapez ou
importez le texte.
Quand vous tapez le texte dans la zone
d’affichage de l’étiquette, le texte s’affiche tel
qu’il apparaîtra quand il sera imprimé. Mais si
vous cliquez sur le bouton Changer vue (
le texte s’affiche dans la boîte de texte, ce qui
vous permet de mieux voir le texte entré.
),
Importation de texte
Vous pouvez importer en toute facilité dans l’étiquette
un texte qui a déjà été entré dans une autre application.
1 Sélectionnez le texte dans l’autre application.
2
Importez le texte dans la page de l’étiquette soit
en appuyant sur les touches de raccourci
spécifiées (Windows
glissant-déplaçant depuis l’autre application.
(Windows® seulement) Pour spécifier les
touches de raccourci à utiliser pour importer le
texte, effectuez un clic droit dans la zone
d’affichage de l’étiquette (ou dans la boîte de
texte), puis cliquez sur [Options] dans le menu
qui apparaît. Dans la boîte de dialogue Options
qui s’affiche, sélectionnez les touches de
raccourci souhaitées pour importer le texte.
Selon la combinaison des touches de raccourci
spécifiées et l’application utilisée, cette fonction
peut ne pas s’effectuer correctement.
®
seulement), soit en le
Utilisation de la liste d’historique du texte
Les 10 textes imprimés les plus récemment sont
automatiquement enregistrés à des fins d’utilisation ultérieure.
1
Cliquez sur le bouton Historique du texte ( )
pour afficher la liste Historique du texte.
2 Cliquez sur le texte souhaité.
Le texte sélectionné dans la liste Historique du texte
remplace tous les textes déjà entrés dans la page.
(Macintosh) Maintenez la touche Control enfoncée et
cliquez dans la zone d’affichage de l’étiquette (ou la
boîte de texte), sélectionnez [Symbols] dans le menu
qui apparaît, puis cliquez sur [Insert/Change]. Une
boîte de dialogue affichant les symboles apparaît.
2 Dans la liste Police du Symbole, sélectionnez
la police de symboles.
Dans l’affichage Liste des Symboles, sélectionnez
3
le symbole.
4 Cliquez sur le bouton OK. Le symbole
sélectionné est ajouté à la gauche du texte.
Si un symbole a déjà été ajouté au texte, il sera
remplacé par le nouveau symbole sélectionné.
Changement de la couleur du fond
Vous pouvez changer la couleur du fond de la page
en fonction de vos préférences.
(Windows®) Effectuez un clic droit dans la zone d’affichage
•
de l’étiquette (ou la boîte de texte), sélectionnez [Couleur
arrière-plan] dans le menu qui apparaît, puis cliquez sur
la couleur souhaitée dans la liste.
(Macintosh) Maintenez la touche Control enfoncée
et cliquez dans la zone d’affichage de l’étiquette
(ou la boîte de texte), sélectionnez [Background
Color] dans le menu qui apparaît, puis cliquez sur
la couleur souhaitée dans la liste.
Pour sélectionner une autre couleur que
celles de la liste, sélectionnez [Réglages
personnalisés] (Windows
Settings] (Macintosh) dans le sous-menu
“Background Color”, créez la couleur de
votre choix dans la boîte de dialogue qui
apparaît, et cliquez sur le bouton OK.
®
) ou [User
Ajout d’un symbole
Vous pouvez ajouter un symbole, choisi dans les
différentes polices de symboles installées, sur la
gauche du texte de l’étiquette.
1
(Windows®) Effectuez un clic droit dans la zone
d’affichage de l’étiquette (ou la boîte de texte),
sélectionnez [Symboles] dans le menu qui apparaît,
puis cliquez sur [Insérer/Changer]. La boîte de
dialogue d’entrée de symbole s’affiche.
18
Affichage du texte
Vous pouvez faire défiler les pages qui sont trop longues
pour tenir sur l’écran en cliquant sur le bouton Arranger
(
) pour afficher le côté gauche, le centre puis le côté
droit de la page à chaque clic sur le bouton.
Si vous avez éloigné la zone d’affichage de
l’étiquette (ou la boîte de texte) de la barre
d’outils, elle sera ancrée avant de défiler.
Page 53

Impression
Pour quitter P-touch Quick Editor
Avant d’imprimer une étiquette, vous pouvez sé-
lectionner certaines options d’impression.
Cliquez sur la flèche à côté du bouton Imprimer
1
) pour afficher un menu déroulant.
(
2
Cliquez sur [Options d’impression]. La boîte de
dialogue Imprimer apparaît.
3 Sélectionnez les paramètres d’impression.
Repères de découpage : Cette option vous
permet de sélectionner si vous voulez
imprimer ou non des repères de découpage
(:), qui indiquent l’endroit où couper
l’étiquette pour que les marges gauche et
droite soient égales.
Impression miroir : Cette option vous permet
d’imprimer le texte à l’envers de façon que
vous puissiez l’appliquer à l’intérieur d’une
fenêtre.
Copies : Cette option vous permet de régler
le nombre d’exemplaires à imprimer.
4 (Windows
commencer l’impression.
(Macintosh) Cliquez sur le bouton Imprimer.
La page s’imprime.
®
) Cliquez sur le bouton OK pour
Si vous voulez commencer l’impression
sans modifier les options d’impression,
cliquez simplement sur le bouton
Imprimer (
à côté du bouton Imprimer et cliquez sur
[Imprimer].
), ou cliquez sur la flèche
• (Windows®) Effectuez l’une des deux opérations
suivantes :
Effectuez un clic droit sur l’icône P-touch
Quick Editor dans le tiroir système, puis
cliquez sur [Quitter] dans le menu qui
apparaît.
Effectuez un clic droit dans la zone
d’affichage de l’étiquette (ou la boîte de
texte), puis cliquez sur [Quitter] dans le
menu qui apparaît.
(Macintosh) Effectuez l’une des deux opérations
suivantes :
Cliquez sur [Quit] dans le menu [File].
Maintenez la touche Control enfoncée et
cliquez dans la zone d’affichage de
l’étiquette (ou la boîte de texte), puis
cliquez sur [Quit] dans le menu qui
apparaît.
Masquage/affichage de P-touch
®
Quick Editor (Windows
Vous pouvez masquer P-touch Quick Editor en cliquant sur le bouton Dissimuler (
P-touch Quick Editor, cliquez sur son icône dans le
tiroir système, à droite de la barre de tâches.
seulement)
). Pour réafficher
19
Page 54

Utilisation de P-touch Editor Ver.3.1
Avec l’application P-touch Editor Ver.3.1, n’importe qui pourra créer et imprimer des étiquettes plus
complexes adaptées à pratiquement tous les besoins imaginables.
Lancement de P-touch Editor Ver.3.1
Sur un ordinateur compatible IBM PC :
• En cliquant sur l’icône P-touch Editor :
Double-cliquez sur l’icône P-touch Editor 3.1
dans la fenêtre du groupe P-touch Editor 3.1.
• Avec le bouton Démarrer :
Cliquez sur le bouton Démarrer dans la barre
1
de tâches pour afficher le menu Démarrer.
2 Sélectionnez “Programmes”.
3 Sélectionnez “P-touch Editor 3.1”.
4 Cliquez sur “P-touch Editor 3.1”.
Quand P-touch Editor Ver.3.1 a démarré, la fenê-
tre suivante s’affiche.
Barre de tâches
standard
Zone de page Zone d’impression
Barre de titres
Règles
Curseur
Ancrage de
propriété
Barre de
tâches de
dessin
Ancrage
d’objets
Barre
d’état
Barre de menus
Pour les détails sur les fonctions de P-touch
Editor Ver.3.1, voyez le “User’s Guide”, que
vous pouvez soit installer dans l’ordinateur
soit consulter sur le CD-ROM.
Barre de
menus
Barre d’outils
de dessin
Barre d’outils
d’impression
Barre d’outils
de base de
données
Barre d’état
Règles
Zone de page
Ancrage d’objets Ancrage de propriété
Zone
d’impression
Barre
de titres
Affichage des propriétés
Bien que les écrans des explications ci-dessous
s’appliquent à Windows
opérations sont les mêmes pour Windows
2000/XP et pour Macintosh, sauf mention
contraire.
Vous pouvez afficher les propriétés voulues en
cliquant sur l’icône dans la station de propriétés.
Icône
Propriétés de
page
Icône
Propriétés de
police
Icône
Propriétés de
mise en page
®
95/98/98SE/Me, les
®
NT4.0/
Icône Propriétés
de texte
Icône Propriétés
de base de
données
(non disponible
sur la version
Macintosh du
logiciel)
Sur un ordinateur Macintosh :
• Double-cliquez sur l’icône P-touch Editor
Ver.3.1.7 dans le dossier P-touch Editor
Ver3.1 installé dans l’ordinateur.
Quand P-touch Editor Ver.3.1 a démarré, la fenê-
tre suivante s’affiche.
20
Cliquez sur une icône pour afficher les propriétés.
• Propriétés de page (
Cliquez sur ce
bouton pour
dissimuler les
propriétés.
Lors de l’utilisation de la P-touch
2420PC
)
Page 55

Création d’une nouvelle mise en page
Bien que les écrans des explications ci-dessous
s’appliquent à Windows
opérations sont les mêmes pour Windows
2000/XP et pour Macintosh, sauf mention
contraire.
• Entrée de texte
1 Cliquez sur
d’outils de dessin.
Vous pouvez entrer le texte, et le pointeur
passe de
(pointeur de sélection) à
(pointeur d’insertion).
2 Amenez le pointeur d’insertion à l’endroit de
la zone de mise en page où vous souhaitez
taper le texte, puis cliquez sur le bouton
gauche de la souris.
3 Le curseur clignote dans la zone de mise en
page pour indiquer que vous pouvez taper le
texte.
®
95/98/98SE/Me, les
®
NT4.0/
(bouton Texte) de la barre
5 Pour créer une nouvelle ligne de texte,
appuyez sur la touche Entrée du clavier.
Avec P-touch Editor version 3.1, le texte
est toujours tapé en mode insertion. Vous
ne pouvez pas utiliser le mode
écrasement pour taper le texte.
Pour changer de police et modifier la
taille du texte, cliquez sur l’icône voulue
de la station des propriétés, puis
sélectionnez les paramètres parmi les
Propriétés qui apparaissent.
Pour les détails, voyez “Consultation du
mode d’emploi”, à la page 10 pour un
ordinateur Windows
®
, et à la page 16
pour un ordinateur Macintosh.
4 Tapez le texte au clavier de l’ordinateur.
21
Page 56

GH
ABCDEF
Impression d’une étiquette
1 Mettez la PT-2420PC sous tension et démarrez l’ordinateur.
2 Démarrez P-touch Quick Editor ou P-touch Editor Ver.3.1, et vérifiez que la PT-2420PC est bien
sélectionnée comme imprimante.
3 Concevez l’étiquette.
4 Commencez à imprimer l’étiquette.
L’indicateur d’état de la PT-2420PC clignote
pendant la réception des données. Lorsque
l’impression de l’étiquette est terminée,
appuyez sur la touche de couteau du ruban
pour couper l’étiquette.
Si vous imprimez plusieurs exemplaires de
l’étiquette, la PT-2420PC cesse d’imprimer
pendant quelques instants de façon à laisser la
tête d’impression refroidir. Puis l’impression
reprend quand la tête a suffisamment refroidi.
Pour faire avancer le ruban, maintenez la
touche alimentation/avance enfoncée
pendant quelques secondes.
Retrait du dos de l’étiquette
Le séparateur de ruban fourni vous permet de décoller en toute facilité le dos des étiquettes imprimées sur un
ruban plastifié.
1
Tenez le ruban de la main gauche avec la
surface imprimée dirigée vers le haut, et
tenez le bâtonnet de la main droite.
2
Faites passer le ruban à mi-chemin dans le
long orifice étroit du bâtonnet.
3
Tournez le bâtonnet de trois-quarts de tour
vers vous, puis éloignez le bâtonnet de vous
comme indiqué sur le schéma.
4
Décollez le dos de l’étiquette.
ABCDEF
22
Page 57

Entretien
Nettoyage de la tête d’impression et du rouleau
Une ligne horizontale blanche qui apparaît sur l’étiquette imprimée signifie que la tête d’impression et
le rouleau sont sales. Nettoyez la tête d’impression et le rouleau en procédant de la façon suivante.
1 Mettez la PT-2420PC hors tension.
2 Ouvrez le couvercle du logement du ruban.
3 Retirez la cassette de ruban s’il y en a une.
Tête
d’impression
4 Utilisez un coton-tige sec pour essuyer
délicatement et de haut en bas la tête
d’impression et le rouleau.
Attention:
5 Insérez la cassette de ruban, puis refermez le
* Le nettoyage s’effectuera en toute facilité
Faites attention à ne pas toucher le
couteau près de la tête d’impression et
du rouleau lorsque vous les nettoyez.
Par ailleurs, n’essayez pas de
nettoyer la tête d’impression tout de
suite après l’impression, car vous
risqueriez de vous brûler.
couvercle du logement du ruban.
avec la cassette de nettoyage pour tête
d’impression en option (TZ-CL4).
Nettoyage du couteau du ruban
Au bout d’un certain temps, des matières adhé-
sives risquent de s’accumuler sur le couteau,
l’empêchant de couper et provoquant des bourrages du ruban. Une fois par an, nettoyez le couteau avec un coton-tige trempé dans de l’alcool
isopropyle (alcool à brûler).
Ne touchez pas le tranchant du couteau,
car vous pourriez vous blesser.
Coton-tige
Rouleau
(section à nettoyer)
Coton-tige
Tête d’impression
(section à nettoyer)
Coton-tige
Couteau du ruban
23
Page 58

Dépannage
Contrôle de l’état de P-touch
Vous pouvez déterminer l’état de la PT-2420PC avec l’indicateur d’état.
Indicateur d’état
Cause possible
→ →
→ Correction
→ →
Allumé
Clignote un petit nombre
de fois
Clignote rapidement
Clignote, l’intervalle éteint étant
plus long que l’intervalle allumé
Clignote lentement
• La P-touch fonctionne normalement et elle est en état de veille.
• La P-touch est train de recevoir les données de l’ordinateur, et la
réception s’effectue correctement.
• Il n’y a pas de cassette. → Insérez une cassette.
• Il s’est produit une erreur de transmission. → Cliquez sur la touche
d’alimentation/avance pour mettre la PT-2420PC hors tension, puis
à nouveau sous tension.
•
Vous avez appuyé sur la touche de couteau du ruban pendant
l’impression.
•
Il s’est produit une erreur EEPROM. → Contactez votre service après-vente.
• La tête d’impression est en train de refroidir. → Attendez que
l’impression reprenne.
→
Recommencez l’impression.
24
Page 59

Solution des problèmes
Si vous pensez que la P-touch ne fonctionne pas correctement mais que vous n’arrivez pas à déterminer
la cause du problème avec l’indicateur d’état, consultez la liste des problèmes possibles ci-dessous, puis
effectuez les corrections nécessaires.
Problème
Cause possible
Correction
La P-touch
n’imprime pas.
Une erreur
d’impression est
indiquée.
Pendant l’impression,
des bandes apparaissent
sur le ruban.
L’indicateur d’état
ne s’allume pas ou
ne clignote pas.
Une ligne horizontale
blanche apparaît sur
l’étiquette imprimée.
Une erreur de
transmission des
données s’affiche
sur l’ordinateur.
* Si vous raccordez plusieurs modèles de P-touch similaires via leur port USB, sélectionnez “PTUSB
(PT-2420PC-XXXXXXXXX):”, (où XXXXXXXXX est le numéro de série) à la place de “PTUSB:”. Le
numéro de série se trouve au-dessus du code barres, sur le fond de la P-touch.
•
Le câble d’interface n’est
pas raccordé correctement.
• La cassette de ruban n’est
pas insérée correctement.
• Le couvercle du logement
de ruban est ouvert.
Il n’y a pas de ruban dans la
cassette.
L’adaptateur secteur n’est
pas raccordé correctement.
La tête d’impression et le
rouleau sont sales.
Vous avez sélectionné le
mauvais port.
Vérifiez que le câble d’interface est raccordé
correctement, que la cassette de ruban est
insérée correctement, et que le couvercle du
logement de ruban est fermé.
Insérez une cassette neuve, et cliquez sur la touche d’alimentation/avance ou mettez la P-touch
hors tension puis à nouveau sous tension.
Vérifiez si l’adaptateur secteur est raccordé
correctement. Si la touche d’alimentation ne s’allume
toujours pas, contactez votre service après-vente.
Nettoyez la tête d’impression et le rouleau en
procédant comme indiqué dans
la tête d’impression et du rouleau”
Windows
Sous “Imprimer par le port suivant” de la boîte de
dialogue Propriétés de l’imprimante, sélectionnez
“PTUSB:” pour le raccordement USB.
Mac
Sélectionnez dans le “Sélecteur” la PT-2420PC
à laquelle la P-touch est raccordée.
®
“Nettoyage de
, à la page 23.
Spécifications du matériel
Alimentation : CA 230 V, 50 Hz (adaptateur secteur modèle J)
Ruban d’étiquette : 5 largeurs au choix:
6 mm, 9 mm, 12 mm, 18 mm, 24 mm
Tête d’impression : 128 points
180 dpi
Longueur d’impression maximum : 279 mm
Port : USB
Dimensions : 66 × 123 × 145 mm
Poids : 400 g
25
Page 60

Accessoires
• Fournitures
Vous pouvez vous procurer des cassettes de ruban auprès de votre revendeur. Brother ne saurait être
responsable des anomalies provoquées par l’utilisation de fournitures non agréées.
Avec cet appareil, utilisez exclusivement des rubans TZ et AL. N’utilisez pas de rubans ne portant
pas le logo
et .
No. de stock
Rubans laminés de 24 mm
TZ-151 Caractères noirs sur fond transparent
TZ-251 Caractères noirs sur fond blanc
TZ-451 Caractères noirs sur fond rouge
TZ-551 Caractères noirs sur fond bleu
TZ-651 Caractères noirs sur fond jaune
TZ-751 Caractères noirs sur fond vert
TZ-951 Caractères noirs sur fond argent
TZ-A51 Caractères noirs sur fond grey
TZ-B51 Caractères noirs sur fond orange fluorescent
TZ-C51 Caractères noirs sur fond jaune fluorescent
TZ-D51 Caractères noirs sur fond vert fluorescent
TZ-M51 Caractères noirs sur fond transparent (mat)
TZ-152 Caractères rouges sur fond transparent
TZ-252 Caractères rouges sur fond blanc
TZ-153 Caractères bleus sur fond transparent
TZ-253 Caractères bleus sur fond blanc
TZ-354 Caractères or sur fond noir
TZ-155 Caractères blancs sur fond transparent
TZ-355 Caractères blancs sur fond noir
TZ-455 Caractères blancs sur fond rouge
TZ-555 Caractères blancs sur fond bleu
TZ-655 Caractères blancs sur fond orange
TZ-755 Caractères blancs sur fond vert
TZ-M951 Caractères noirs sur fond argent (mat)
Rubans laminés de 18 mm
TZ-141 Caractères noirs sur fond transparent
TZ-145 Caractères blancs sur fond transparent
TZ-241 Caractères noirs sur fond blanc
TZ-242 Caractères rouges sur fond blanc
TZ-243 Caractères bleus sur fond blanc
TZ-344 Caractères or sur fond noir
TZ-345 Caractères blancs sur fond noir
TZ-441 Caractères noirs sur fond rouge
TZ-541 Caractères noirs sur fond bleu
TZ-641 Caractères noirs sur fond jaune
TZ-741 Caractères noirs sur fond vert
Rubans laminés de 12 mm
TZ-131 Caractères noirs sur fond transparent
TZ-132 Caractères rouges sur fond transparent
TZ-133 Caractères bleus sur fond transparent
TZ-135 Caractères blancs sur fond transparent
TZ-231 Caractères noirs sur fond blanc
TZ-232 Caractères rouges sur fond blanc
TZ-233 Caractères bleus sur fond blanc
TZ-334 Caractères or sur fond noir
Description
26
Page 61

No. de stock
Rubans laminés de 12 mm
TZ-335 Caractères blancs sur fond noir
TZ-431 Caractères noirs sur fond rouge
TZ-435 Caractères blancs sur fond rouge
TZ-531 Caractères noirs sur fond bleu
TZ-535 Caractères blancs sur fond bleu
TZ-631 Caractères noirs sur fond jaune
TZ-635 Caractères blancs sur fond orange
TZ-731 Caractères noirs sur fond vert
TZ-735 Caractères blancs sur fond vert
TZ-931 Caractères noirs sur fond argent
TZ-A31 Caractères noirs sur fond grey
TZ-B31 Caractères noirs sur fond orange fluorescent
TZ-C31 Caractères noirs sur fond jaune fluorescent
TZ-D31 Caractères noirs sur fond vert fluorescent
TZ-M31 Caractères noirs sur fond transparent (mat)
TZ-M931 Caractères noirs sur fond argent (mat)
Rubans laminés de 9 mm
TZ-121 Caractères noirs sur fond transparent
TZ-122 Caractères rouges sur fond transparent
TZ-123 Caractères bleus sur fond transparent
TZ-221 Caractères noirs sur fond blanc
TZ-222 Caractères rouges sur fond blanc
TZ-223 Caractères bleus sur fond blanc
TZ-324 Caractères or sur fond noir
TZ-325 Caractères blancs sur fond noir
TZ-421 Caractères noirs sur fond rouge
TZ-521 Caractères noirs sur fond bleu
TZ-621 Caractères noirs sur fond jaune
TZ-721 Caractères noirs sur fond vert
TZ-A25 Caractères blancs sur fond grey
TZ-M21 Caractères noirs sur fond transparent (mat)
Rubans laminés de 6mm
TZ-111 Caractères noirs sur fond transparent
TZ-211 Caractères noirs sur fond blanc
TZ-315 Caractères blancs sur fond noir
TZ-611 Caractères noirs sur fond jaune
Rubans non laminés de 24 mm
TZ-N251 Caractères noirs sur fond blanc
Rubans non laminés de 18 mm
TZ-N241 Caractères noirs sur fond blanc
TZ-N242 Caractères rouges sur fond blanc
TZ-N243 Caractères bleus sur fond blanc
TZ-N541 Caractères noirs sur fond bleu
TZ-N641 Caractères noirs sur fond jaune
TZ-N741 Caractères noirs sur fond vert
TZ-NF41 Caractères noirs sur fond violet
TZ-PH41 Caractères noirs sur fond à motifs de coeur
TZ-PF41 Caractères noirs sur fond à motifs de fruits
TZ-PM41 Caractères noirs sur fond à motifs marins
Rubans non laminés de 12 mm
TZ-N231 Caractères noirs sur fond blanc
TZ-N232 Caractères rouges sur fond blanc
TZ-N233 Caractères bleus sur fond blanc
TZ-N531 Caractères noirs sur fond bleu
Description
27
Page 62

No. de stock
Rubans non laminés de 12 mm
TZ-N631 Caractères noirs sur fond janue
TZ-N731 Caractères noirs sur fond vert
TZ-NF31 Caractères noirs sur fond violet
Rubans non laminés de 9 mm
TZ-N221 Caractères noirs sur fond blanc
Rubans non laminés de 6 mm
TZ-N211 Caractères noirs sur fond blanc
Description
Rubans à adhérence spéciale
No. de stock
TZ-S151 Ruban de 24 mm à adhérence spéciale (caractères noirs sur fond blanc)
TZ-S141 Ruban de 18 mm à adhérence spéciale (caractères noirs sur fond blanc)
TZ-S131 Ruban de 12 mm à adhérence spéciale (caractères noirs sur fond blanc)
TZ-S121 Ruban de 9 mm à adhérence spéciale (caractères noirs sur fond blanc)
TZ-S111 Ruban de 6 mm à adhérence spéciale (caractères noirs sur fond blanc)
TZ-S251 Ruban de 24 mm à adhérence spéciale (caractères noirs sur fond blanc)
TZ-S241 Ruban de 18 mm à adhérence spéciale (caractères noirs sur fond blanc)
TZ-S231 Ruban de 12 mm à adhérence spéciale (caractères noirs sur fond blanc)
TZ-S221 Ruban de 9 mm à adhérence spéciale (caractères noirs sur fond blanc)
TZ-S211 Ruban de 6 mm à adhérence spéciale (caractères noirs sur fond blanc)
TZ-S651 Ruban de 24 mm à adhérence spéciale (caractères noirs sur fond blanc)
TZ-S641 Ruban de 18 mm à adhérence spéciale (caractères noirs sur fond blanc)
TZ-S631 Ruban de 12 mm à adhérence spéciale (caractères noirs sur fond blanc)
TZ-S621 Ruban de 9 mm à adhérence spéciale (caractères noirs sur fond blanc)
TZ-S611 Ruban de 6 mm à adhérence spéciale (caractères noirs sur fond blanc)
Description
Rubans spéciaux
No. de stock
TZ-IY41 Rubans de 18 mm pour décalque à chaud (caractères noirs)
TZ-SE4 Ruban de sécurité de 18 mm (caractères noirs sur fond blanc)
TZ-FA4 Ruban en tissu de 18 mm (caractères bleus sur fond blanc)
TZ-FA3 Ruban en tissu de 12 mm (caractères bleus sur fond blanc)
Description
Ruban de papier thermique
No. de stock
AL-K251 Ruban de papier thermique de 24 mm (caractères noirs sur fond blanc)
Description
Options
No. de stock
TZ-CL4 Cassette de nettoyage de tête d’impression
Description
28
Page 63

Kurzanleitung
WICHTIG!
Die Inbetriebnahme des P-touch 2420PC muss in der unten angegebenen
Reihenfolge durchgeführt werden:
1. Starten Sie die Installation des Editor-Programmes.
2. Schließen Sie den P-touch 2420PC erst mit dem USB-Kabel an den
Computer an, wenn Sie vom Installationsprogramm dazu aufgefordert
werden.
Schließen Sie den P-touch NICHT an den Computer an, bevor das EditorProgramm installiert wurde.
DEUTSCH
Page 64

Mit dem Brother P-touch können Sie Etiketten und Beschriftungen für die verschiedensten Zwecke erstellen.
Legen Sie einfach eine Bandkassette in ihren P-touch 2420PC ein, erstellen Sie eine Beschriftung mit der
beigefügten Software, und drucken Sie sie aus. Die Beschriftungen werden sekundenschnell ausgedruckt. Es
ist eine große Auswahl an verschiedenfarbigen Schriftbändern mit unterschiedlichen Schriftfarben und
Bandbreiten erhältlich - ideal für die Systematisierung Ihrer Beschriftungen und für weitere Anwendungen
aller Art.
Auf der mitgelieferten CD-ROM sind zwei Programme zur Erstellung von Etiketten und Beschriftungen enthalten.
Der einfach zu bedienende P-touch Quick Editor erlaubt Ihnen, Texte schnell einzugeben und zu formatieren,
um so einfache Etiketten schnell auszudrucken. Der umfangreichere P-touch Editor Ver. 3.1 automatisiert und
vereinfacht nicht nur komplexe Layoutfunktionen, sondern enthält auch eine Vielzahl von vorformatierten
Autoformatvorlagen, mit denen Sie schnell anspruchsvolle Etiketten für die verschiedensten Anwendungen
erstellen können.
Bescheinigung des Herstellers/Importeurs
Hersteller Brother Industries Ltd.
15-1, Naeshiro-cho, Mizuho-ku,
Nagoya 467-8561, Japan
bestätigt, dass dieses Produkt den folgenden Bestimmungen entspricht:
Sicherheit: EN 60950 (Netzadapter)
EMC: EN 55022 1998 Klasse B
EN 55024 1998
EN 61000-3-2 1995
EN 61000-3-3 1995
und mit den Richtlinien 73/23/EEC und 89/336/EEC (entsprechend der Änderung 91/263/EEC und
92/31/EEC) übereinstimmt.
Herausgegeben von: Brother Industries Ltd.
Um die Übereinstimmung mit den EMC-Richtlinien zu gewährleisten, muss zum Anschluss des Gerätes
der mitgelieferte speziell für dieses Gerät entwickelte Netzadapter (Modell J) verwendet werden.
Page 65

Inhaltsverzeichnis
Lieferumfang .............................................................................................................. 3
Allgemeine Beschreibung .......................................................................................... 3
Allgemeine Hinweise ................................................................................................. 3
Bandkassetten ............................................................................................................ 4
Bandkassette einlegen ............................................................................................... 5
Netzadapter anschließen ........................................................................................... 5
Ein/Aus- und Bandvorschub-Taste .............................................................................. 6
USB-Anschluss ............................................................................................................ 6
Software und Druckertreiber .................................................................................... 6
Für IBM-kompatible PCs (Windows
Vor der Installation ............................................................................................. 7
P-touch Quick Editor installieren ....................................................................... 7
P-touch Editor Ver. 3.1 installieren .................................................................... 9
Druckertreiber installieren ............................................................................... 10
Benutzerhandbuch anzeigen ............................................................................. 12
Programme und des Druckertreiber deinstallieren ............................................ 12
Druckertreiber ersetzen, löschen oder neu hinzufügen .................................... 12
Für Macintosh-Computer .......................................................................................... 15
Vor der Installation ........................................................................................... 15
P-touch Quick Editor installieren ..................................................................... 15
P-touch Editor Ver. 3.1 installieren .................................................................. 16
Drucker auswählen ........................................................................................... 17
Benutzerhandbuch anzeigen ............................................................................. 17
Programme und Druckertreiber deinstallieren .................................................. 17
P-touch Editor Ver. 3.1 starten ................................................................................ 18
P-touch Editor Ver. 3.1 starten .......................................................................... 18
P-touch Quick Editor starten ................................................................................... 19
P-touch Quick Editor starten ............................................................................. 19
P-touch Quick Editor verwenden ............................................................................. 19
Für IBM-kompatible PCs (Windows
Etikettengröße festlegen ................................................................................... 19
Text eingeben ................................................................................................... 20
Text importieren ................................................................................................ 20
Zuletzt gedruckte Texte .................................................................................... 20
Einfügen/Ändern eines Symbols ........................................................................ 20
Hintergrundfarbe ändern ................................................................................... 21
Lange Texte ansehen ........................................................................................ 21
Drucken ............................................................................................................ 21
P-touch Quick Editor ein-/ausblenden .............................................................. 21
P-touch Quick Editor beenden .......................................................................... 21
®
98/98SE/Me/2000/XP) ....................................... 7
®
98/98SE/Me/2000/XP) ..................................... 19
1
Page 66

P-touch Quick Editor verwenden ............................................................................. 22
Für Macintosh-Computer .......................................................................................... 22
Etikettengröße festlegen ................................................................................... 22
Text eingeben ................................................................................................... 22
Text importieren ................................................................................................ 22
Zuletzt gedruckte Texte .................................................................................... 22
Einfügen/Ändern eines Symbols ........................................................................ 23
Hintergrundfarbe ändern ................................................................................... 23
Lange Texte ansehen ........................................................................................ 23
Drucken ............................................................................................................ 23
P-touch Quick Editor beenden .......................................................................... 23
Etikett drucken und Band abschneiden ................................................................... 24
Laminierte Schriftbänder ......................................................................................... 24
Schneideeinheit reinigen .................................................................................. 25
Wartung und Pflege ................................................................................................. 25
Druckkopf und Transportrollen reinigen ........................................................... 25
Was tun bei Störungen ............................................................................................ 26
Statusanzeige des P-touch 2420PC ................................................................... 26
Problemlösungen ............................................................................................... 27
Technische Daten .................................................................................................... 27
Zubehör .................................................................................................................... 28
Stichwortverzeichnis ............................................................................................... 31
2
Page 67

Lieferumfang
• P-touch 2420PC
• 24 mm Thermopapierband-Kassette (AL-K251,schwarze Schrift auf weißem Band; 7 Meter lang)
• Netzadapter (Modell J; zum Anschluss des P-touch 2420PC an eine Netzsteckdose)
USB-Kabel (zum Anschluss des P-touch 2420PC an einen IBM-kompatiblen PC oder Macintosh)
•
• Kurzanleitung
• CD-ROM mit Software für PC und Mac und die dazugehörigen Anleitungen
• Trenn- und Anreibestift
(Macintosh-Software in Englisch)
Allgemeine Beschreibung
Bandabschneider
Statusanzeige
Bandausgabe
Bandlösehebel
Ein/Aus- und
BandvorschubTaste
Bandfachabdeckung
Schneideeinheit
Druckkopf
USB-
DC IN 9.5V
Anschluss
Netzadapteranschluss
Allgemeine Hinweise
• Verwenden Sie mit diesem Gerät nur die originalen Brother TZ- oder AL-Schriftbänder. Benutzen Sie keine
Bänder, die nicht mit dem Zeichen
• Ziehen Sie niemals am Schriftband, weil dadurch die Bandkassette beschädigt werden kann.
• Benutzen Sie das Gerät nicht an extrem staubigen Plätzen. Schützen Sie das Gerät vor direktem Sonnenlicht und vor Nässe.
• Setzen Sie das Gerät keinen hohen Temperaturen und keiner hohen Luftfeuchtigkeit aus.
• Lassen Sie keine Gummi- oder Kunststoffgegenstände auf dem Gerät liegen, weil dadurch Flecken entstehen können.
• Reinigen Sie das Gerät nicht mit Alkohol oder anderen organischen Lösungsmitteln. Verwenden Sie zur
Reinigung nur ein weiches, trockenes Tuch.
• Legen Sie keine Gegenstände auf das Gerät. Achten Sie auch darauf, dass keine Fremdkörper in das Gerät
gelangen.
• Um Verletzungen zu vermeiden, sollten Sie die Klinge der Schneideeinheit nicht berühren.
• Beim Drucken erhitzt sich der Druckkopf stark. Bitte berühren Sie ihn nicht, um Verletzungen zu vermeiden. Selbst nachdem der P-touch abgeschaltet wurde, dauert es eine Weile bis der Druckkopf abgekühlt
ist.
• Benutzen Sie nur den mitgelieferten Netzadapter (Modell J), der speziell für dieses Gerät entwickelt wurde.
Durch die Verwendung eines anderen Adapters verfällt der Garantieanspruch.
• Benutzen Sie nur das mitgelieferte USB-Kabel. Durch die Verwendung eines anderen Kabels verfällt der Garantieanspruch.
• Ziehen Sie den Netzadapter ab, wenn das Gerät längere Zeit nicht benutzt werden soll.
• Versuchen Sie nicht, den P-touch auseinanderzubauen.
oder gekennzeichnet sind.
3
Page 68

®
• IBM
ist ein Warenzeichen der International Business Machines, Inc.
•
Microsoft® und Microsoft Windows® sind eingetragene Warenzeichen der Microsoft Corp. in den USA und weiteren
Ländern.
• Macintosh und Power Macintosh sind eingetragene Warenzeichen der Apple Computer, Inc.
Alle weiteren Produkte und Programme sowie Produktnamen sind Warenzeichen oder eingetragene Warenzeichen der
•
entsprechenden Firmen.
Warenzeichen
Bandkassetten
• Ziehen Sie niemals am Schriftband, weil dadurch die Bandkassette beschädigt werden kann.
• Falls das Band auf einem nassen oder schmutzigen Untergrund angebracht wird, kann es sich leicht
ablösen. Trocknen bzw. reinigen Sie daher vor dem Befestigen des Bandes den Untergrund.
• In Abhängigkeit von Umgebungsbedingungen und Material, Zustand, Oberflächengüte und Form des
Untergrundes kann das Band verrutschen oder sich ablösen.
• Bevor Sie ein Band auf einer empfindlichen Oberfläche befestigen, sollten Sie zuerst einen kleinen Bandabschnitt an einem nicht sichtbaren Bereich des Gegenstandes anbringen und prüfen, ob das Band richtig
haftet und problemlos wieder entfernt werden kann.
• Beschriftungen mit Ölfarbe oder auf Wasser basierenden Farben können durch das Band hindurch sichtbar
bleiben. Um solche Beschriftungen vollständig zu überdecken, sollten Sie zwei Schriftbänder übereinanderkleben oder eine dunkle Bandfarbe verwenden.
• Das Band ist nicht geeignet für Verwendungen, aus denen eine Haftung aufgrund von Sach- oder Personenschäden entstehen könnte.
• Mit dem AL-Thermopapierband können Sie Papieretiketten herstellen. Diese sind nicht für die Beschriftung
von Gegenständen im Freien oder für langlebige Beschriftungen zu empfehlen.
• Ideal zur Beschriftung im Außenbereich sind die laminierten TZ-Bänder, die durch den patentierten Brother
Hinter-Band-Druck wisch-, kratz- und wetterfest sind.
4
Page 69

Bandkassette einlegen
1 Drücken Sie auf die strukturierte Fläche und
klappen Sie die Bandfachabdeckung hoch. Die
eingelegte Bandkassette wird dabei gelöst.
2 Falls bereits eine Kassette eingelegt ist, entfer-
nen Sie diese, indem Sie sie gerade nach oben
heraus nehmen.
3 Falls sich das Farbband in der Kassette gelo-
ckert hat straffen Sie es, indem Sie das Zahnrad
in Richtung des Pfeiles auf der Kassette drehen.
Vergewissern Sie sich, dass sich das Ende des
Bandes unter der Bandführung befindet.
!
Wenn Sie eine neue Bandkassette einlegen,
auf der sich ein Bandschutz aus Pappe
befindet, entfernen Sie diesen vor dem
Einlegen der Kassette.
4 Legen Sie die Bandkassette in das Bandfach ein
und drücken Sie die Kassette nach unten, damit
die Unterseite der Kassette ganz auf dem
Boden des Bandfaches aufliegt.
!
Achten Sie beim Einlegen der Bandkassette
darauf, dass sich das Farbband nicht an der
Kante der metallenen Führung verhakt.
5 Schließen Sie die Bandfachabdeckung.
Bandkassette
Netzadapter anschließen
Schließen Sie den mitgelieferten Netzadapter wie folgt an den P-touch 2420PC und die Netzsteckdose an.
1 Stecken Sie den kleinen Stecker des Netz-
adapterkabels in den mit DC IN 9.5V gekennzeichneten Anschluss des P-touch 2420PC.
2 Stecken Sie den Netzstecker in die nächstgele-
gene Netzsteckdose. Die Statusanzeige leuchtet nun grün, um anzuzeigen, dass das Gerät
eingeschaltet ist.
!
Um den P-touch 2420PC auszuschalten,
drücken Sie die Taste
, so dass die Status-
anzeige erlischt.
!
Verwenden Sie nur den mitgelieferten
speziell für dieses Gerät entwickelten
Netzadapter (Modell J). Durch die Verwendung eines anderen Adapters verfällt der
Garantieanspruch.
Statusanzeige
Netzadapter
DC IN 9.5V
IN 9.5V
C
D
5
Page 70

Ein/Aus- und Bandvorschub-Taste
Mit der Taste kann der P-touch 2420PC ein- und ausgeschaltet oder das Schriftband vorgeschoben werden.
• Um den P-touch 2420PC ein- oder auszuschalten:
" Drücken Sie einmal
.
• Um das Schriftband vorzuschieben:
" Halten Sie die Taste
mindestens 2 Sekunden gedrückt.
USB-Anschluss
Schließen Sie den P-touch 2420PC wie folgt an den Computer an.
!
Sie müssen eines der auf der CD-ROM enthaltenen Editorprogramme und den Druckertreiber installieren, bevor Sie den P-touch 2420PC an den Computer anschließen und einschalten. Folgen Sie den
Anweisungen auf den Seiten 7 bis 11, um das Editor-Programm und den Druckertreiber zu installieren,
und schließen Sie den P-touch 2420PC erst an den Computer an, wenn Sie dazu aufgefordert werden.
1 Stecken Sie den flachen USB-Stecker in den
USB-Anschluss Ihres Computers.
2 Stecken Sie den eckigen Stecker des USB-
Kabels in den USB-Anschluss (
touch 2420PC.
!
Falls Sie die USB-Verbindung über ein Hub
herstellen, kann es sein, dass aufgrund des
verwendeten Hub-Typs keine funktionsfähige Verbindung aufgebaut werden kann.
Wenn das Drucken über eine Verbindung
mit Hub nicht möglich sein sollte, schließen
Sie bitte den P-touch 2420PC direkt über das
USB-Kabel an den Computer an.
) des P-
V
5
.
9
N
I
C
D
USBAnschluss
USB-Kabel
Software und Druckertreiber
Brother Co., Ltd. und seine Lieferanten besitzen alle Rechte und das Copyright an dieser Software (einschließlich, aber nicht begrenzt auf die Programmierung, Bilder, ClipArts, Vorlagen und Texte in dieser
Software), den Texten in den Handbüchern und an Duplikaten dieser Software. Diese Software darf ohne
Erlaubnis weder in Teilen noch im Ganzen dupliziert, modifiziert, rückentwickelt, rückübersetzt oder
dekompiliert werden.
Mit Hilfe der CD-ROM, die mit dem P-touch 2420PC geliefert wird, können die folgenden Anwendungen
installiert werden:
• P-touch Quick Editor
• P-touch Editor Ver. 3.1
• P-touch 2420PC Druckertreiber
6
Page 71

Für IBM-kompatible PCs (Windows® 98/98SE/Me/2000/XP)
Bevor Sie mit dem P-touch 2420PC Etiketten drucken können, müssen Sie eines der auf der CD-ROM enthaltenen Editor-Programme und den PT-2420PC- Druckertreiber auf Ihrem Computer installieren. Es stehen zwei
Editor-Programme zum Erstellen und Ausdrucken von Etiketten mit dem P-touch 2420PC zur Verfügung:
•P-touch Quick Editor
Mit dem P-touch Quick Editor können Sie schnell Etiketten mit einfachem Layout erstellen und ausdrucken.
• P-touch Editor Ver. 3.1
Der P-touch Editor stellt viele zusätzliche Funktionen zum Erstellen und Drucken von anspruchsvollen Etiketten-
layouts zur Verfügung.
Vor der Installation
Vergewissern Sie sich, dass Ihre Systemkonfiguration die folgenden Anforderungen erfüllt:
Computer: IBM PC oder Kompatible
Betriebssystem:
Freier Festplatten-Speicherplatz: Mindestens 20 MB
Hauptspeicher: Mindestens 32 MB
Monitor: VGA-Grafikkarte oder besser
USB-Anschluss
CD-ROM-Laufwerk
!
Schließen Sie den P-touch 2420PC nicht an den PC an, bevor Sie das Editor-Programm installiert
haben. Andernfalls wird das Programm unter Umständen nicht richtig installiert. Schließen Sie
das Gerät nicht an, bevor Sie vom Installationsprogramm dazu aufgefordert werden.
!
Zur Installation unter Windows® 2000 benötigen Sie Administratorrechte. Zum Drucken sind
Hauptbenutzer- oder Administratorrechte erforderlich. Diese Anwendung kann nicht in Benutzergruppen verwendet werden. Sie ist nicht mit dem Windows
tibel.
!
Zur Installation unter Windows® XP benötigen Sie Administratorrechte. Zum Drucken sind ebenfalls Administratorrechte erforderlich. Installation und Drucken sind nicht mit eingeschränkten
Rechten möglich.
P-touch Quick Editor installieren
Mit dem P-touch Quick Editor können schnell einfache Etiketten erstellt und ausgedruckt werden. Installieren Sie den P-touch Quick Editor wie folgt.
1 Legen Sie die mitgelieferte CD-ROM in das
CD-ROM-Laufwerk Ihres Computers. Es erscheint ein Dialogfeld, in dem Sie die Sprache
für das Programm auswählen können.
Microsoft® Windows® 98/98SE/Me/2000 oder XP
dann auf das Symbol für das CD-ROM-Laufwerk, in das die CD eingelegt ist. (Unter
Windows
Arbeitsplatz und doppelklicken Sie dann auf
das Symbol des CD-ROM-Laufwerks.)
Doppelklicken Sie nun auf "Setup.exe." , um
das Dialogfeld zu öffnen.
2 Wählen Sie die Sprache entsprechend Ihrer
Windows
"OK". Ein Fenster erscheint, in dem Sie auswählen können, was Sie installieren möchten.
®
2000® Server-Betriebssystem kompa-
®
XP klicken Sie im Start-Menü auf
®
-Version aus und klicken Sie auf
Für Windows®
Falls sich das Sprachauswahlfenster nicht
automatisch öffnet, doppelklicken Sie auf das
"Arbeitsplatz"-Symbol auf dem Desktop und
7
Page 72

!
Wenn Sie nur den Druckertreiber installieren möchten, klicken Sie auf die Schaltfläche unten rechts (Druckertreiber). Es
erscheint dann das erste Dialogfeld des
Treiber-Setups.
Lesen Sie in diesem Fall unter "Druckertrei-
ber installieren" auf Seite 10 weiter.
Wenn Sie den P-touch Editor Ver. 3.1 installieren möchten, klicken Sie auf die Schalt-
Für Windows®
fläche oben rechts (P-touch Editor). Fahren
Sie dann mit den Anweisungen in "P-touch
Editor Ver. 3.1 installieren" auf Seite 9 fort.
3 Zur Installation des P-touch Quick Editor kli-
cken Sie auf die linke Schaltfläche (P-touch
Quick Editor). Der InstallShield
®
Assistent für
die Installation des P-touch Quick Editor startet,
und das "Willkommen"-Fenster erscheint.
4 Lesen Sie den Text sorgfältig durch und klicken
Sie dann auf "Weiter", um fortzufahren. Das
"Benutzerinformationen"-Dialogfeld erscheint.
!
Um die angezeigten Informationen zu
ändern, klicken Sie auf "Nein" und gehen zu
Schritt 4.
7 Klicken Sie auf "Weiter", um die Installation zu
starten.
8 Sobald die Installation des P-touch Quick
Editor abgeschlossen ist, erscheint ein Dialogfeld, in dem Sie auswählen können, an welchen
Stellen Verknüpfungen mit dem P-touch Quick
Editor hinzugefügt werden sollen (siehe Seite
19).
9 Treffen Sie Ihre Auswahl und klicken Sie auf
"Weiter". Es erscheint eine Abfrage, ob Sie nun
den Druckertreiber installieren möchten.
5 Geben Sie Ihre Benutzerinformationen ein
(falls die gesuchten Informationen schon in
Windows
®
vorhanden sind, werden die Eingabefelder automatisch entsprechend ausgefüllt) und klicken Sie auf "Weiter".
6 Überprüfen Sie die angezeigten Informationen
und klicken Sie auf "Ja", um sie zu bestätigen.
8
Klicken Sie auf "Ja" um den Treiber zu installieren. Es erscheint das erste Dialogfeld der Druckerinstallation.
Fahren Sie mit den Anweisungen in "Drucker-
treiber installieren" auf Seite 10 fort.
Falls der Druckertreiber schon installiert wurde, klicken Sie auf "Nein". Es erscheint ein
Dialogfeld, das anzeigt, dass die Installation
abgeschlossen ist.
Page 73

Wählen Sie “Ja, Computer jetzt neu starten.”,
klicken Sie auf "Beenden", um den Computer
neu zu starten, und nehmen Sie die CD-ROM
aus dem CD-ROM-Laufwerk.
P-touch Editor Ver. 3.1 installieren
Der P-touch Editor Ver. 3.1 enthält zahlreiche Funktionen, mit denen Sie anspruchsvolle Etiketten mit
Barcodes, Grafiken und verschiedenen Symbolen auf
dem Bildschirm erstellen und anschließend einfach
ausdrucken können. So können Sie Beschriftungen je
nach Breite des Schriftbandes frei gestalten und selbst
eingescannte Logos integrieren. Installieren Sie den
P-touch Editor Ver. 3.1wie folgt auf Ihrem PC.
1 Legen Sie die mitgelieferte CD-ROM in das
CD-ROM-Laufwerk Ihres Computers ein. Es
erscheint ein Fenster, in dem Sie die Sprache
für das Programm auswählen können.
Falls sich das Sprachauswahlfenster nicht
automatisch öffnet, doppelklicken Sie auf das
"Arbeitsplatz"-Symbol auf dem Desktop und
doppelklicken dann auf das Symbol für das CDROM-Laufwerk, in das die CD eingelegt ist.
(Unter Windows
Menü auf Arbeitsplatz und doppelklicken Sie
dann auf das Symbol des CD-ROM-Laufwerks,
indem sich die CD-ROM befindet.)
Doppelklicken Sie nun auf "Setup.exe." , um
das Dialogfeld zu öffnen.
2 Wählen Sie die Sprache entsprechend Ihrer
Windowsversion aus und klicken Sie auf "OK".
Ein Fenster erscheint, in dem Sie auswählen
können, was Sie installieren möchten.
®
XP klicken Sie im Start-
!
Wenn Sie nur den Druckertreiber installieren möchten, klicken Sie auf die Schaltfläche unten rechts (Druckertreiber). Es
erscheint dann das erste Dialogfeld des
Treiber-Setups. Lesen Sie in diesem Fall
"Drucktertreiber installieren" auf Seite 10
weiter.
Um den P-touch Quick Editor zu installieren, klicken Sie auf die Schaltfläche links (Ptouch Quick Editor). Folgen Sie den Anweisungen in "P-touch Quick Editor installie-
ren" auf Seite 7.
3 Klicken Sie auf die Schaltfläche oben rechts (P-
touch Editor). Der InstallShield® Assistent für
die Installation des P-touch Editors startet und
das "Willkommen"- Fenster erscheint.
4 Folgen Sie den Anweisungen zur Installation.
Sie können zwischen den folgenden Installationsoptionen wählen.
Normal
Es werden der P-touch Editor Ver. 3.1, ClipartBilder, Autoformatvorlagen, Hilfe-Dateien und
13 Schriftarten installiert.
Minimal
Es wird nur der P-touch Editor Ver. 3.1 installiert.
Benutzerdefiniert
Editor: P-touch Editor Ver. 3.1
Clipart: Bilder für die ClipArt-Funktion des
P-touch Editor Ver. 3.1
Schriftarten: 13 Schriftarten
Autoformatvorlagen: Die Vorlagen für die
Autoformatfunktion
Benutzerhandbuch: Online-Handbuch
(HTML-Format) für den P-touch Editor Ver.
3.1
!
Das Benutzerhandbuch kann auch direkt
von der CD-ROM geöffnet werden. Es
muss nicht auf dem PC installiert werden.
Hilfe: Hilfe-Dateien für den P-touch Editor
Ver. 3.1
Für Windows®
9
Page 74

Wenn die "Ändern"-Schaltfläche nach Auswahl
einer Option angewählt werden kann, können
Sie Unterkomponenten auswählen. Klicken Sie
auf "Ändern", um diese Optionen anzuzeigen.
Wählen Sie dann die gewünschten Komponenten durch Aktivieren des entsprechenden
Kontrollkästchens aus. Bitte beachten Sie: Falls
Sie einige Optionen nicht installieren, können
gewisse Funktionen des P-touch Editor Ver.3.1
nicht genutzt werden. Sobald Sie Ihre Auswahl
getroffen haben, klicken Sie auf "Weiter".
Für Windows®
5 Nachdem die Installation des P-touch Editor
Ver. 3.1 abgeschlossen ist, erscheint ein
Dialogfeld, in dem Sie auswählen können, ob
nun der Druckertreiber installiert werden soll.
Klicken Sie auf "Ja", um den Druckertreiber zu
installieren.
Das erste Dialogfeld der Druckertreiberinstallation erscheint.
Fahren Sie wie unten unter "Druckertreiber
installieren" beschrieben fort.
Falls der Druckertreiber bereits installiert ist,
klicken Sie auf "Nein". Die Installation ist dann
abgeschlossen.
Druckertreiber installieren
Mit Plug-and-Play werden neue Geräte automatisch
erkannt und die benötigten Treiber installiert. Da der
P-touch 2420PC über die USB-Schnittstelle angeschlossen wird, werden die Treiber von Plug-andPlay installiert. Lesen Sie die nachfolgenden Anweisungen sorgfältig durch, bevor Sie den auf der mitgelieferten CD-ROM enthaltenen Druckertreiber installieren.
!
Verbinden Sie den P-touch 2420PC erst mit
dem Computer, wenn Sie dazu aufgefordert
werden.
Mit Windows
1 Klicken Sie auf "Weiter". Es erscheint ein Fens-
ter, in dem Sie aufgefordert werden, den Ptouch 2420PC an den Computer anzuschließen.
2 Schließen Sie den P-touch 2420PC wie auf Seite
6 beschrieben über das mitgelieferte USBKabel an den Computer an und schalten Sie
dann den P-touch 2420PC ein. Nachdem der
Treiber installiert wurde, erscheint das folgende
Fenster.
®
98/98SE/Me/2000:
Wählen Sie “Ja, Computer jetzt neu starten.”,
klicken Sie auf "Beenden", um den Computer
neu zu starten und nehmen Sie die CD-ROM
aus dem CD-ROM-Laufwerk.
10
3 Klicken Sie auf "Fertigstellen".
Page 75

4 Wählen Sie “Ja, Computer jetzt neu starten.”
klicken Sie auf "Beenden", um den Computer
neu zu starten, und nehmen Sie die CD-ROM
aus dem CD-ROM-Laufwerk.
Mit Windows
®
XP:
1 Es erscheint ein Dialogfeld mit dem Hinweis,
dass nun die PT-2420PC-Treiber eingerichtet
werden. Klicken Sie auf "Weiter".
2 Es erscheint ein Dialogfeld, in dem Sie aufge-
fordert werden, den P-touch 2420PC an den
Computer anzuschließen und einzuschalten.
Schließen Sie den P-touch wie auf Seite 6
beschrieben mit dem mitgelieferten USBDatenkabel an und schalten Sie ihn danach ein.
4 Falls eine Warnung erscheint, dass die Soft-
ware den Windows-Logo-Test nicht bestanden
hat, setzen Sie die Installation einfach fort.
Dieser Treiber wurde von Brother sorgfältig
getestet und kann problemlos verwendet werden.
Für Windows®
5 Ein Fenster erscheint, in dem angezeigt wird
dass die Software für den P-touch 2420PC
installiert wurde. Klicken Sie auf "Fertig stellen".
6 Wählen Sie “Ja, Computer jetzt neu starten.”
und klicken Sie auf "Beenden", um den Computer neu zu starten. Die Installation ist danach
abgeschlossen.
3 Wenn der Assistent für das Suchen neuer Hard-
ware erscheint, wählen Sie “Software automatisch installieren (empfohlen)” und klicken Sie
auf "Weiter".
7 Nehmen Sie die CD-ROM aus dem CD-ROM-
Laufwerk.
11
Page 76

Benutzerhandbuch anzeigen
Sie können das P-touch Editor Benutzerhandbuch
entweder von der CD-ROM oder, wenn Sie es installiert haben, von der Festplatte ansehen. Sie benötigen
einen Browser, um das Benutzerhandbuch zu lesen,
da es im HTML-Format vorliegt.
• Von der CD-ROM:
1 Starten Sie den Windows Explorer.
2 Wählen Sie das CD-ROM-Laufwerk.
Für Windows®
3 Doppelklicken Sie auf “Main.htm” im
"Manual"-Ordner. Dieser befindet sich im
"Ptouch"-Ordner auf der CD-ROM.
• Aus der P-touch Editor 3.1 Programmgruppe:
" Doppelklicken Sie auf das Symbol für das
Benutzerhandbuch.
• Mit der "Start"-Schaltfläche:
1 Klicken Sie auf "Start" in der Taskleiste.
2 Wählen Sie “Programme”.
3 Wählen Sie “P-touch Editor 3.1”.
4 Klicken Sie auf das Symbol für das
Benutzerhandbuch.
Programme und des Druckertreiber deinstallieren
4 Wählen Sie "P-touch Quick Editor" (um den P-
touch Quick Editor zu deinstallieren) oder “Ptouch Editor 3.1” (um den P-touch Editor Ver.
3.1 zu deinstallieren) im "Software"-Dialogfeld
aus und klicken Sie auf "Ändern/Entfernen"
(Windows
nen" (Windows
®
2000/XP) bzw. "Hinzufügen/Entfer-
®
98).
5 Sie werden gefragt, ob das Programm und alle
Komponenten gelöscht werden soll. Klicken Sie
auf "Ja".
!
Wenn Sie den Editor nicht entfernen möchten, klicken Sie auf "Nein", um die Deinstallation abzubrechen.
6 Ein Dialogfeld zeigt nun an, dass die Deinstal-
lation erfolgreich beendet wurde. Klicken Sie
auf "OK".
Druckertreiber ersetzen, löschen
oder neu hinzufügen
1 Schalten Sie den P-touch 2420PC aus und
ziehen Sie das USB-Kabel ab.
2 Legen Sie die mitgelieferte CD-ROM in das
CD-ROM-Laufwerk Ihres PCs ein. Es erscheint
ein Fenster, in dem Sie die Sprache für das
Programm auswählen können.
Deinstallieren Sie den P-touch Editor Ver. 3.1/P-touch
Quick Editor wie folgt:
®
1 Starten Sie Windows
98/98SE/Me/2000/XP.
2 Klicken Sie auf die "Start"-Schaltfläche in der
Taskleiste, wählen Sie “Einstellungen”, und
klicken Sie auf “Systemsteuerung”. Unter
Windows
®
XP klicken Sie auf "Start" und dann
auf "Systemsteuerung".
3 Doppelklicken Sie auf “Software”.
12
Falls sich das Sprachauswahlfenster nicht
automatisch öffnet, doppelklicken Sie auf das
"Arbeitsplatz"-Symbol auf dem Desktop und
dann auf das Symbol für das CD-ROM-Laufwerk, in das die CD eingelegt ist. (Unter
Windows
®
XP klicken Sie im Start-Menü auf
Arbeitsplatz und doppelklicken Sie dann auf das
Symbol des CD-ROM-Laufwerks, indem sich
die CD-ROM befindet.)
Doppelklicken Sie nun auf "Setup.exe.", um das
Dialogfeld zu öffnen.
3 Wählen Sie die Sprache entsprechend Ihrer
Windowsversion aus und klicken Sie auf "OK".
Ein Fenster erscheint, in dem Sie auswählen
können, was Sie installieren möchten.
Page 77

4 Klicken Sie auf die rechte untere Schaltfläche
(Druckertreiber). Es erscheint ein Dialogfeld, in
dem Sie wählen können, ob Sie den Druckertreiber ersetzen, löschen oder ein weiteres Ptouch 2420PC-Gerät hinzufügen möchten.
5 Wählen Sie die gewünschte Option und klicken
Sie auf "Weiter".
!
Wenn “Durch neuen Brother PT-2420PC
ersetzen” gewählt wurde, wird der bisherige Treiber gelöscht und durch einen neuen
ersetzt. Wählen Sie diese Option, wenn Sie
den Drucktertreiber aktualisieren möchten
oder wenn Sie unter Windows
®
2000/XP
einen anderen P-touch 2420PC mit unterschiedlicher Seriennummer verwenden
möchten.
Wenn “Brother PT-2420PC neu hinzufügen”
gewählt wird, wird ein neuer Druckertreiber hinzugefügt. Unter Windows
®
98/Me wird nur ein neuer Anschluss, aber
kein neues Gerät hinzugefügt. Wählen Sie
diese Option, wenn Sie an einen Computer
mehrere PT-2420PC anschließen möchten.
6 Wenn “Brother P-touch 2420PC neu hinzu-
fügen” oder “Durch neuen Brother P-touch
2420PC ersetzen” gewählt wurde:
Mit Windows 98/98SE/Me/2000
Ein Fenster erscheint, das Sie auffordert, den Ptouch an den Computer anzuschließen und
einzuschalten.
Schließen Sie den P-touch 2420PC mit dem
mitgelieferten USB-Kabel wie auf Seite 6 beschrieben an Ihren Computer an und schalten Sie
dann den P-touch 2420PC ein. Ein Fenster zeigt
an, dass die Installation abgeschlossen ist.
Wählen Sie “Ja, Computer neu starten.”, und
klicken Sie auf "Beenden" um den Computer neu
zu starten.
Mit Windows
®
XP:
Wenn der Assistent für das Suchen neuer Hardware erscheint, wählen Sie “Software automatisch installieren (empfohlen)” und klicken Sie auf
"Weiter".
Für Windows®
Falls eine Warnung erscheint, dass die Software
den Windows-Logo-Test nicht bestanden hat,
setzen Sie die Installation einfach fort. Dieser
Treiber wurde von Brother sorgfältig getestet und
kann problemlos verwendet werden.
13
Page 78

Wenn “Brother P-touch 2420PC löschen”
ausgewählt wurde:
Es erscheint eine Abfrage, ob alle P-touch
2420PC Druckertreiber gelöscht werden sollen.
Ein Fenster erscheint, in dem angezeigt wird,
dass die Software für den P-touch 2420PC
installiert wurde. Klicken Sie auf "Fertig stel-
Für Windows®
len".
Das "Setup abgeschlossen"-Dialogfeld erscheint. Wählen Sie "Ja, Computer jetzt neu
starten” und klicken Sie auf "Beenden". Der
Computer startet neu.
Nehmen Sie die CD-ROM aus dem CD-ROMLaufwerk.
Klicken Sie auf "Ja". Das folgende Dialogfeld
erscheint:
! Klicken Sie auf "Fertigstellen". Wenn ein
Dialogfeld mit dem Hinweis, dass der Computer
neu gestartet werden muss, erscheint, wählen Sie
die Option zum Neustarten des Computers und
klicken auf "Beenden".
14
Page 79

Für Macintosh-Computer
Bevor Sie mit dem P-touch 2420PC Etiketten drucken können, müssen Sie eines der auf der CD-ROM enthaltenen Editor-Programme und den PT-2420PC-Druckertreiber auf Ihrem Computer installieren. Es stehen zwei
Editor-Programme zum Erstellen und Ausdrucken von Etiketten mit dem P-touch 2420PC zur Verfügung:
•P-touch Quick Editor
Mit dem P-touch Quick Editor können Sie schnell Etiketten mit einfachem Layout erstellen und ausdrucken.
• P-touch Editor Ver. 3.1
Der P-touch Editor stellt viele zusätzlich Funktionen zum Erstellen und Drucken von anspruchsvollen Etiketten-
layouts zur Verfügung.
Vor der Installation
Vergewissern Sie sich, dass Ihre Systemkonfiguration die folgenden Anforderungen erfüllt:
Computer: Macintosh
Betriebssystem: Mac OS 8.6 oder höher
!
Die Programme laufen nur unter Mac OS X Classic. Mac OS X v10.2 Classic wird jedoch nicht
unterstützt.
!
Die Mac-Versionen der Programme werden nur in englischer Sprache geliefert. Sie wurden für ein
englischsprachiges Betriebssystem entwickelt. Falls sie auf einem anderssprachigen Betriebssystem
installiert werden, können die Programme eventuell nicht richtig ausgeführt werden.
Freier Festplatten-Speicherplatz:
Mindestens 30 MB
!
Sie benötigen möglicherweise zusätzlichen freien Festplattenspeicherplatz, wenn Sie besonders
umfangreiche oder lange Etiketten drucken möchten.
Hauptspeicher: Mindestens 24 MB
USB-Anschluss
CD-ROM-Laufwerk
P-touch Quick Editor installieren
Mit dem P-touch Quick Editor können schnell einfache Etiketten erstellt und ausgedruckt werden. Installieren Sie den P-touch Quick Editor auf einem
Macintosh-Computer wie folgt.
1 Vergewissern Sie sich, dass der P-touch
2420PC und der Macintosh ausgeschaltet sind
und verbinden Sie dann beide Geräte mit dem
mitgelieferten USB-Kabel.
2 Schalten Sie den Macintosh ein.
3 Legen Sie die mitgelieferte CD-ROM in das
CD-ROM-Laufwerk. Ein Ordner öffnet sich,
der den Inhalt derCD-ROM anzeigt.
4 Doppelklicken Sie auf das "P-touch Quick
Editor Installer"-Symbol. Das Installationsprogramm wird dadurch gestartet.
5 Wählen Sie die Art der Installation.
Klicken Sie auf die "Install"-Schaltfläche, um
sofort die Installation des P-touch Quick Editors
mit den gängigen Optionen zu starten.
Es werden ungefähr 30 MB freier Festplattenspeicherplatz für diese Installation benötigt.
Klicken Sie auf die "Custom"-Schaltfläche, um
die Optionen, die installiert werden sollen,
selbst auszuwählen.
Für Macintosh
15
Page 80

Nur die markierten Optionen werden dann
installiert. Wählen Sie die gewünschten Optio-
Für Macintosh
nen aus und klicken Sie auf "Install".
!
Um mit dem P-touch 2420PC drucken zu
können, muss “PT-2420PC Driver” ausgewählt werden.
6 Wenn die Installation abgeschlossen ist und das
folgende Fenster erscheint, klicken Sie auf
"Quit".
7 Klicken Sie auf "Restart", um den Computer
neu zu starten.
P-touch Editor Ver. 3.1 installieren
4 Doppelklicken Sie auf den "P-touch Editor
Ver3.1"-Ordner, um ihn zu öffnen.
5 Doppelklicken Sie auf das "P-touch Editor 3.1
Installer"-Symbol. Das Installationsprogramm
wird dadurch gestartet.
6 Wählen Sie die Art der Installation.
Klicken Sie auf "Install", um sofort die Installation aller Optionen zu starten. Es werden ungefähr 120 MB freier Festplattenspeicherplatz für
diesen Installationstyp benötigt.
Klicken Sie auf die "Custom"-Schaltfläche, um
die Optionen, die installiert werden sollen,
selbst auszuwählen.
Der P-touch Editor Ver. 3.1 enthält zahlreiche Funktionen, mit denen Sie anspruchsvolle Etiketten mit
Barcodes, Grafiken und verschiedenen Symbolen auf
dem Bildschirm erstellen und anschließend einfach
ausdrucken können. So können Sie Beschriftungen je
nach Breite des Schriftbandes frei gestalten und selbst
eingescannte Logos integrieren. Installieren Sie den
P-touch Editor Ver. 3.1 wie folgt.
1 Vergewissern Sie sich, dass der P-touch
2420PC und der Macintosh ausgeschaltet sind
und verbinden Sie dann beide Geräte mit dem
mitgelieferten USB-Kabel.
2 Schalten Sie den Macintosh ein.
3
L
egen Sie die mitgelieferte CD-ROM in das
CD-ROM-Laufwerk. Ein Ordner öffnet sich,
der den Inhalt der CD-ROM anzeigt.
16
Nur die markierten Optionen werden installiert. Wählen Sie die gewünschten Optionen
aus und klicken Sie auf "Install".
Für eine Minimalinstallation wählen Sie die
folgenden Optionen, und starten dann die
Installation.
• P-touch Editor Ver3.1
• PT-2420PC Driver
• Fonts
Es werden ungefähr 30 MB freier Festplattenspeicherplatz für diesen Installationstyp benötigt
!
Um mit dem P-touch 2420PC drucken zu
können, muss “PT-2420PC Driver” gewählt
werden.
.
Page 81

7 Wenn die Installation abgeschlossen ist, er-
scheint folgendes Fenster. Klicken Sie auf
"Quit".
8 Klicken Sie auf "Restart", um den Computer
neu zu starten.
Drucker auswählen
1 Wählen Sie “Chooser” im Apple-Menü, um
das Chooser -Fenster anzuzeigen.
2 Klicken Sie auf das P-touch 2420PC-Symbol auf
der linken Seite des Fensters.
3 Schließen Sie den Chooser um die Einstellun-
gen zu bestätigen.
Benutzerhandbuch anzeigen
Programme und Druckertreiber
deinstallieren
Deinstallieren Sie den P-touch Quick Editor, den Ptouch Editor Ver3.1 und den Druckertreiber wie folgt.
!
Stellen Sie sicher, dass der P-touch ausgeschaltet und vom Computer abgezogen ist, bevor Sie
den Druckertreiber deinstallieren.
1 Ziehen Sie die folgenden Ordner auf das
"Trash"-Symbol:
• P-touch Quick Editor (für den P-touch
Quick Editor)
• P-touch Editor Ver3.1 (für den P-touch Editor
Ver. 3.1)
2 Öffnen Sie im "System"-Ordner den
"Extensions"-Ordner.
3 Ziehen Sie die folgenden Symbole auf das
"Trash"-Symbol:
• "PT-2420PC" und "USB PT-2420PC Extension"
4 Öffnen Sie im "System"-Ordner den
"Preferences"-Ordner.
5 Ziehen Sie die folgenden Symbole auf das
"Trash"-Symbol:
• P-touch Quick Editor Prefs, P-touch Editor
3.1 Prefs,und P-touch 2420PC Prefs
Programme und Druckertreiber sind nun
deinstalliert.
Für Macintosh
Sie können das P-touch Editor Benutzerhandbuch
entweder von der CD-ROM oder, wenn Sie es installiert haben, von der Festplatte ansehen. Sie benötigen
einen Browser, um das Benutzerhandbuch zu lesen,
da es im HTML-Format vorliegt.
• Von der CD-ROM:
" Doppelklicken Sie auf “Main.htm” im
"User’s Guide"-Ordner. Dieser befindet
sich im "Ptouch"-Ordner auf der CDROM.
• Von der Festplatte:
" Doppelklicken Sie auf “Main.htm” im
"User’s Guide"-Ordner. Dieser befindet
sich im "P-touch Editor Ver3.1"-Ordner auf
der Festplatte.
17
Page 82

P-touch Editor Ver. 3.1 starten
P-touch Editor Ver. 3.1 starten
Der P-touch Editor Ver. 3.1 stellt viele Funktionen
zum Erstellen anspruchsvoller Beschriftungen für die
unterschiedlichsten Anwendungsbereiche zur Verfügung.
Mit einem IBM-kompatiblen PC:
• Über das "P-touch Editor"-Symbol:
" Doppelklicken Sie auf das "P-touch Editor
3.1"-Symbol in der Programmgruppe.
• Über die "Start"-Schaltfläche:
1 Klicken Sie auf "Start" in der Taskleiste.
2 Wählen Sie “Programme”.
3 Wählen Sie “P-touch Editor 3.1”.
4 Klicken Sie auf “P-touch Editor 3.1”.
Es erscheint das Programmfenster des P-touch Editor
Ver. 3.1.
!
Mehr Informationen über die Funktionen des Ptouch Editor Ver. 3.1 finden Sie im Benutzerhandbuch, das auf dem Computer installiert
oder von CD-ROM gelesen werden kann.
Mit einem Macintosh-Computer:
• Doppelklicken Sie im P-touch Editor Ver3.1.
Ordner auf das P-touch Editor Ver3.1 Symbol.
Der P-touch Editor wird dadurch gestartet und es
erscheint das folgende Bild:.
!
Weitere Informationen zur Verwendung des Ptouch Editor Ver. 3.1 finden Sie im Benutzerhandbuch auf der CD-ROM, das entweder auf
dem Computer installiert oder von der CD
gelesen werden kann .
Lineale
Menü-
leiste
Zeichnen-
Symbol-
leiste
Druckwerk-
zeuge
Datenbank-
werkzeuge
Status-
leiste
Objektpalette
Layoutbereich
Druckbereich
Eigenschaftenpalette
Titelleiste
Eigen-
schaften
palette
Zeichnen-
Symbol-
leiste
Objekt-
palette
Status-
leiste
18
Menüleiste
Layoutbereich
StandardSymbolleiste
Druckbereich
Titelleiste
Lineale
Cursor
Page 83

P-touch Quick Editor starten
P-touch Quick Editor starten
Mit einem IBM-kompatiblen PC:
! Während der Installation des P-touch Quick
Editor können Sie Programmverknüpfungen
zum Desktop, dem Autostartmenü und der
Schnellstartleiste hinzufügen.
•
Autostartmenü:
"
Der P-touch Quick Editor wird automatisch mit
dem Computer gestartet.
• Desktop:
" Doppelklicken Sie auf das "P-touch Quick
Editor"-Symbol auf dem Desktop.
• Schnellstartleiste:
" Doppelklicken Sie auf das "P-touch Quick
Editor"-Symbol in der Schnellstartleiste.
• Falls keine Verknüpfungen erstellt wurden:
1 Klicken Sie auf "Start" in der Taskleiste
2 Klicken Sie auf “Programme”.
3 Klicken Sie auf “P-touch Quick Editor”.
P-touch Quick Editor verwenden
Nachdem P-touch Quick Editor gestartet wurde erscheint folgendes Fenster.
Werkzeugleiste
Layoutbereich
!
Der P-touch Quick Editor kann versteckt oder
angezeigt werden, in dem Sie auf sein Symbol
in der Symbolgruppe rechts in der Taskleiste
klicken.
Mit einem Macintosh Computer:
Doppelklicken Sie auf das "P-touch Quick Editor"-
•
Symbol im "P-touch Quick Editor"-Ordner.
Nachdem der P-touch Quick Editor gestartet
wurde, erscheint folgendes Fenster.
Werkzeugleiste
Layoutbereich
Für IBM-kompatible PCs (Windows® 98/98SE/Me/2000/XP)
Mit dem P-touch Quick Editor können Sie Beschriftungen einfach und schnell erstellen. Viele Funktionen
können direkt durch Klicken auf die Schaltflächen in der Symbolleiste aufgerufen werden. Weitere Funktionen
können im Pop-Up-Menü angewählt werden, das auf dem Bildschirm erscheint, wenn Sie mit der rechten
Maustaste in die Etikettenansicht des P-touch-Editor klicken.
Etikettengröße festlegen
Bevor Sie einen Text eingeben, können Sie die Größe
des Etikettes festlegen. Der P-touch Quick Editor bietet viele vordefinierte Standardformate für verschiedene Anwendungen zur Auswahl an.
1 Klicken Sie auf den Pfeil neben dem Eigen-
schaften-Symbol (
ten-Menü aufzurufen.
), um das Eigenschaf-
2 Klicken Sie auf "Etiketteneinstellungen".
!
Sie können die Etiketteneinstellungen auch
aufrufen, indem Sie mit der rechten Maustaste in die Etikettenansicht klicken, im dann
angezeigten Menü "Eigenschaften anzeigen"
wählen und anschließend auf "Etiketteneinstellungen" klicken.
3 Klicken Sie in der Liste der Standardformate
auf das gewünschte Format.
19
Page 84

!
Die Etikettengröße kann auch durch Eingabe der Länge und Breite oder durch Ziehen
mit der Maus an den Kanten des in der
Etikettenansicht gezeigten Etiketts geändert
werden.
Dazu müssen die Etiketteneinstellung en"Auto" und "Auf verwendetes
Band abstimmen" ausgeschaltet sein.
Text eingeben
Für Windows®
Sie können den gesamten Text einfach formatieren,
indem Sie die Schriftart, die Schriftgröße, den Stil und
die Ausrichtung ändern. Zusätzlich können Sie einen
Rahmen um den gesamten Text ziehen.
1 Klicken Sie auf den Pfeil neben dem Eigen-
schaften-Symbol (
ten-Menü aufzurufen.
2 Klicken Sie auf "Texteinstellungen" , um die
folgende Symbolleiste anzuzeigen:
!
S
ie können die Texteinstellungen auch
aufrufen, indem Sie mit der rechten Maustaste in die Etikettenansicht klicken, im dann
angezeigten Menü "Eigenschaften anzeigen"
wählen und anschließend auf "Texteinstellungen" klicken.
3 Sie können nun die gewünschten Texteinstel-
lungen wählen.
4 KlickenSie dann in die Etikettenansicht, um den
Text zu schreiben oder einen Text aus einer
anderen Anwendung zu importieren.
!
Wenn Sie den Text in der Etikettenansicht
schreiben, wird er so angezeigt, wie er
später auch gedruckt wird. Kleine Schriften
können jedoch besser auf dem Bildschirm
gelesen werden, wenn durch Klicken auf
das "Ansicht ändern"-Symbol (
Textfeld umgeschaltet wird.
), um das Eigenschaf-
Text importieren
Es kann auch in einer anderen Anwendung eingegebener Text schnell in das Etikett importiert werden.
1 Wählen Sie den Text in der anderen Anwen-
dung aus.
) zum
2 Importieren Sie den Text, indem Sie ihn in die
Etikettenansicht ziehen (Drag&Drop) oder
indem Sie die im Optionen-Menü festgelegte
Tastenkombination verwenden.
!
Um einzustellen, welche Tastenkombination zum Importieren von Text verwendet
werden soll, klicken Sie mit der rechten
Maustaste in die Etikettenansicht (oder das
Textfeld), wählen dann "Optionen..." und
klicken anschließend auf die gewünschte
Importmethode.
!
Durch das Importieren eines Textes wird
der eventuell zuvor im Etikett angezeigte
Text gelöscht. Um einen Text aus einer
anderen Anwendung zum Text im Etikett
hinzuzufügen, kopieren Sie zuerst den Text
in der Anwendung. Klicken Sie dann mit der
rechten Maustaste in die Etikettenansicht
und im nun angezeigten Menü auf "Einfügen" .
Zuletzt gedruckte Texte
Die 10 zuletzt gedruckten Texte werden automatisch
gespeichert und können so auch später für eine weitere Verwendung wieder aufgerufen werden.
1 Klicken Sie auf das Symbol
der zuletzt gedruckten Texte anzuzeigen.
2 Klicken Sie dann auf den gewünschten Text.
!
Durch das Aufrufen eines Textes aus der
Liste der zuletzt gedruckten Texte wird der
gesamte aktuell im Etikett angezeigte Text
ersetzt.
, um die Liste
Einfügen/Ändern eines Symbols
Es kann ein Symbol aus den verschiedenen installierten Symbolschriftarten am Anfang des Etikettes eingefügt werden.
1 Klicken Sie mit der rechten Maustaste in die
Etikettenansicht, wählen Sie dann "Symbol" im
angezeigten Menü und klicken Sie auf "Einfügen/
Ändern" . Es wird nun das Dialogfeld "Symbol
einfügen" angezeigt:
20
Page 85

2 Wählen Sie die gewünschte Symbolschriftart in
der Liste aus.
3 Wählen Sie dann in der Symbolliste das ge-
wünschte Symbol.
4 Klicken Sie auf "OK". Das gewählte Symbol ist
nun links vom Textanfang eingefügt.
!
Wenn zuvor bereits ein Symbol im Text
vorhanden war, wird dieses durch das neu
ausgewählte Symbol ersetzt.
!
Um ein Symbol wieder aus dem Text zu
löschen, klicken Sie mit der rechten Maustaste in die Etikettenansicht. Wählen Sie im
nun angezeigten Menü "Symbol" und klicken Sie dann auf "Löschen".
Hintergrundfarbe ändern
Sie können die Hintergrundfarbe des auf dem Bildschirm angezeigten Etiketts ändern.
• Klicken Sie mit der rechten Maustaste in die
Etikettenansicht, wählen Sie dann "Hintergrundfarbe" im angezeigten Menü und klicken Sie anschließend auf die gewünschte Farbe.
!
Falls Sie eine andere als die zur Auswahl
stehenden Farben verwenden möchten,
klicken Sie auf "Benutzereinstellungen..."
und erstellen die gewünschte Farbe im nun
angezeigten Dialogfeld. Klicken Sie dann
auf "OK".
Lange Texte ansehen
3 Wählen Sie die gewünschten Druckoptionen.
Schneidmarkierungen: Hier können Sie wählen, ob Schneidmarkierungen (:) gedruckt
werden sollen, mit deren Hilfe Sie z. B. beim
Drucken mehrerer Kopien die Etiketten so
abschneiden können, dass die Ränder gleich
groß sind.
Spiegeldruck: Wenn Sie ein Etikett im Spiegeldruck auf ein durchsichtiges Band drucken,
kann es von innen auf eine Fensterscheibe
geklebt und von außen gelesen werden.
Kopien: Hier können Sie festlegen, wie oft das
Etikett ausgedruckt werden soll.
4 Klicken Sie auf "OK", um den Ausdruck zu
starten.
!
Sie können den Ausdruck auch starten ohne
die Druckoptionen zu ändern, indem Sie
einfach auf die Drucken-Schaltfläche
(
) klicken oder indem Sie auf den Pfeil
neben dieser Schaltfläche und dann auf
"Drucken" klicken.
P-touch Quick Editor ein-/ausblenden
Sie können den P-touch Quick Editor ausblenden,
indem Sie auf die Schaltfläche
ßend kann der P-touch Quick Editor wieder eingeblendet werden, indem Sie auf sein Symbol in der
Symbolgruppe rechts auf der Taskleiste klicken.
klicken. Anschlie-
Für Windows®
Besonders lange Etiketten, die nicht vollständig in der
Eitkettenansicht auf dem Bildschirm dargestellt werden können, werden durch wiederholtes Klicken auf
das Anordnen-Symbol (
Mitte, Ende) auf dem Bildschirm angezeigt.
!
Wurde das Etikett zuvor von der Symbolleiste weggezogen, wird es beim Anordnen
wieder mit der Symbolleiste verbunden.
) Stück für Stück (Anfang,
Drucken
Vor dem Ausdruck des Etikettes können verschiedene Druckoptionen gewählt werden.
1 Klicken Sie auf den Pfeil neben der Drucken-
Schaltfläche (
optionen..." . Es erscheint nun das Dialogfeld
"Drucken".
) und dann auf "Druck-
P-touch Quick Editor beenden
• Der P-touch Quick Editor kann auf eine der folgenden Weisen beendet werden:
" Klicken Sie mit der rechten Maustaste auf
das P-touch Quick Editor-Symbol in der
Taskleiste und klicken Sie im nun angezeigten Menü auf "Schließen".
" Klicken Sie mit der rechten Maustaste in die
Etikettenansicht (oder in das Textfeld) und
klicken Sie im nun angezeigten Menü auf
"Beenden".
21
Page 86

P-touch Quick Editor verwenden
Für Macintosh-Computer
Mit dem P-touch Quick Editor können Sie Beschriftungen einfach und schnell erstellen. Viele Funktionen können direkt
durch Klicken auf die Schaltflächen in der Symbolleiste aufgerufen werden. Weitere Funktionen können im Pop-Up-Menü
angewählt werden, das auf dem Bildschirm erscheint, wenn Sie bei gedrückter Ctrl-Taste in die Etikettenansicht des P-touchEditor klicken.
Für Macintosh
Etikettengröße festlegen
Bevor Sie einen Text eingeben, können Sie die Größe
des Etikettes festlegen. Der P-touch Quick Editor bietet
viele vordefinierte Standardformate für verschiedene
Anwendungen zur Auswahl an.
1 Klicken Sie auf den Pfeil neben dem Eigenschaf-
ten-Symbol (
aufzurufen.
2 Klicken Sie auf "Tape Settings", um die Etiketten-
eigenschaften zu ändern.
!
Sie können die Etiketteneinstellungen auch
aufrufen, indem Sie mit gedrückter Crtl-Taste
in die Etikettenansicht klicken, im dann angezeigten Menü "View Properties" wählen und
anschließend auf "Tape Settings" klicken.
3 Klicken Sie in der Liste der Standardformate auf
das gewünschte Format.
!
Die Etikettengröße kann auch durch Eingabe
der Länge und Breite oder durch Ziehen mit der
Maus an den Kanten des in der Etikettenansicht
gezeigten Etiketts geändert werden.
), um das Eigenschaften-Menü
Text eingeben
Sie können den gesamten Text einfach formatieren,
indem Sie die Schriftart, die Schriftgröße, den Stil und
die Ausrichtung ändern. Zusätzlich können Sie einen
Rahmen um den gesamten Text ziehen.
1 Klicken Sie auf den Pfeil neben dem Properties-
Symbol (
aufzurufen.
2 Klicken Sie auf "Text Settings" , um die folgende
Symbolleiste anzuzeigen:
), um das Eigenschaften-Menü
!
S
ie können die Symbolleiste zum Ändern
der Texteinstellungen auch aufrufen, indem
Sie bei gedrückter Crtl-Taste in die
Etikettenansicht klicken, im dann angezeigten Menü "View Properties" wählen und
anschließend auf "Text Settings" klicken.
3 Sie können nun die gewünschten Texteinstel-
lungen wählen.
4 Klicken Sie dann in die Etikettenansicht, um
den Text zu schreiben oder einen Text aus
einer anderen Anwendung zu importieren.
!
Wenn Sie den Text in der Etikettenansicht
schreiben, wird er so angezeigt, wie er
später auch gedruckt wird. Kleine Schriften
können jedoch besser auf dem Bildschirm
gelesen werden, wenn durch Klicken auf
das "Change View"-Symbol (
Textfeld umgeschaltet wird.
) zum
Text importieren
Es kann auch in einer anderen Anwendung eingegebener Text schnell in das Etikett importiert werden.
1 Wählen Sie den Text in der anderen Anwen-
dung aus.
2 Importieren Sie den Text, indem Sie ihn in die
Etikettenansicht ziehen (Drag&Drop).
Zuletzt gedruckte Texte
Die 10 zuletzt gedruckten Texte werden automatisch
gespeichert und können so auch später für eine weitere Verwendung wieder aufgerufen werden.
1 Klicken Sie auf das Symbol
der zuletzt gedruckten Texte anzuzeigen.
, um die Liste
22
Page 87

2 Klicken Sie dann auf den gewünschten Text.
!
Durch das Aufrufen eines Textes aus der
Liste der zuletzt gedruckten Texte wird der
gesamte aktuell im Etikett angezeigte Text
ersetzt.
Einfügen/Ändern eines Symbols
Es kann ein Symbol aus den verschiedenen installierten Symbolschriftarten am Anfang des Etikettes eingefügt werden.
1 Halten Sie die Crtl-Taste gedrückt und klicken Sie
in die Etikettenansicht (oder in das Textfeld), wählen Sie dann "Symbol" im angezeigten Menü und
klicken Sie auf "Insert/Change" . Es wird nun das
folgende Dialogfeld angezeigt:
2 Wählen Sie die gewünschte Symbolschriftart in
der Liste aus.
3 Wählen Sie dann in der Symbolliste das ge-
wünschte Symbol.
4 Klicken Sie auf "OK". Das gewählte Symbol ist
nun links vom Textanfang eingefügt.
!
Wenn zuvor bereits ein Symbol im Text
vorhanden war, wird dieses durch das neu
ausgewählte Symbol ersetzt.
Hintergrundfarbe ändern
Sie können die Hintergrundfarbe des auf dem Bildschirm angezeigten Etiketts ändern.
• Halten Sie die Crtl-Taste gedrückt und klicken Sie
in die Etikettenansicht, wählen Sie dann "Background Colour" im angezeigten Menü und klicken Sie anschließend auf die gewünschte Farbe.
!
Falls Sie eine andere als die zur Auswahl
stehenden Farben verwenden möchten,
klicken Sie auf "User Setting..." und erstellen die gewünschte Farbe im nun angezeigten Dialogfeld. Klicken Sie dann auf "OK".
Lange Texte ansehen
Besonders lange Etiketten, die nicht vollständig in der
Etikettenansicht auf dem Bildschirm dargestellt werden können, werden durch wiederholtes Klicken auf
das Arrange-Symbol (
Mitte, Ende) auf dem Bildschirm angezeigt.
!
Wurde das Etikett zuvor von der Symbolleiste weggezogen, wird es beim Anordnen
wieder mit der Symbolleiste verbunden.
) Stück für Stück (Anfang,
Drucken
Vor dem Ausdruck des Etikettes können verschiedene Druckoptionen gewählt werden.
1 Klicken Sie auf den Pfeil neben der Print-
Schaltfläche (
erscheint nun das Dialogfeld "Print" zum Einstellen der Druckoptionen.
3 Wählen Sie die gewünschten Druckoptionen.
Cut Marks: Hier können Sie wählen, ob
Schneidmarkierungen (:) gedruckt werden
sollen, mit deren Hilfe Sie z. B. beim Drucken
mehrerer Kopien die Etiketten so abschneiden
können, dass die Ränder gleich groß sind.
Mirror Printing: Wenn Sie ein Etikett im
Spiegeldruck auf ein durchsichtiges Band
drucken, kann es von innen auf eine Fensterscheibe geklebt und von außen gelesen werden.
Copies: Hier können Sie festlegen, wie oft das
Etikett ausgedruckt werden soll.
4 Klicken Sie auf "Print", um den Ausdruck zu
starten.
!
Sie können den Ausdruck auch starten, ohne
die Druckoptionen zu ändern, indem Sie
einfach auf die Print-Schaltfläche (
klicken oder indem Sie auf den Pfeil neben
dieser Schaltfläche und dann auf "Print"
klicken.
) und dann auf "Print" . Es
)
P-touch Quick Editor beenden
• Der P-touch Quick Editor kann auf eine der folgenden Weisen beendet werden:
" Klicken Sie im Menü "File" auf "Quit".
" Oder klicken Sie auf die "Quit"-Schalt-
fläche in der oberen linken Ecke des Ptouch Editor-Fensters.
Für Macintosh
23
Page 88

Etikett drucken und Band abschneiden
GH
ABCDEF
1 Schalten Sie den P-touch 2420PC ein und starten Sie den Computer.
2 Starten Sie entweder den P-touch Quick Editor oder den P-touch Editor Ver. 3.1 und überprüfen Sie, ob
der P-touch 2420PC als Drucker ausgewählt ist.
3 Erstellen Sie ein Etikett.
4 Starten Sie den Ausdruck des Etiketts. Die
Statusanzeige des P-touch 2420PC blinkt während das Gerät die Druckdaten empfängt.
Drücken Sie dann auf den Bandabschneidehebel um das Etikett abzuschneiden.
!
Wenn Sie mehrere Kopien drucken, ist es
möglich, dass der P-touch 2420PC den
Druckvorgang für einen Moment unterbricht, um den Druckkopf abzukühlen.
Der Ausdruck wird automatisch fortgesetzt,
sobald sich der Druckkopf ausreichend
abgekühlt hat.
!
Um das Band ein Stück vorwärts zu transportieren, halten Sie die Taste
Sekunden lang gedrückt.
einige
Laminierte Schriftbänder
Nachdem ein Etikett auf ein laminiertes Schriftband gedruckt wurde, kann das Schutzpapier mit Hilfe des
mitgelieferten Trenn- und Anreibestiftes einfach abgezogen werden
1
Halten Sie das Band mit der bedruckten Seite
nach oben in der linken und den Trenn- und
Anreibestift in der rechten Hand.
2
Schieben Sie das Band halb durch den Schlitz im
Trenn- und Anreibestift.
3
Drehen Sie nun den Stift, wie in der Abbildung
gezeigt, zu sich und ziehen Sie ihn dann in die
entgegengesetzte Richtung weg.
4
Anschließend kann das Schutzpapier leicht
abgezogen werden.
.
ABCDEF
24
Page 89

Wartung und Pflege
Druckkopf und Transportrollen reinigen
Sind auf den gedruckten Etiketten horizontale Linien zu sehen, deutet dies auf eine Verschmutzung des
Druckkopfes und der Transportrolle hin. Reinigen Sie dann den Druckkopf und die Transportrolle wie folgt:
1 Schalten Sie den P-touch 2420PC aus.
2 Öffnen Sie die Bandfachabdeckung.
3 Entfernen Sie die Bandkassette, falls vorhanden.
4 Reinigen Sie den Druckkopf und die Transport-
rollen vorsichtig mit einem trockenen Wattestäbchen.
Vorsicht:
5 Legen Sie die Bandkassette wieder ein und
! Der P-touch kann auch einfach und schnell mit
Berühren Sie nicht die Schneideeinheit,
während Sie den Druckkopf und die
Transportrollen reinigen.
Reinigen Sie den Druckkopf nicht kurz
nachdem Sie mit dem Gerät gedruckt
haben. Der Druckkopf ist dann heiß
und es besteht Verbrennungsgefahr!
schließen Sie die Bandfachabdeckung.
der als Zubehör erhältlichen Reinigungskassette (TZ-CL4) gereinigt werden.
Transportrolle
Druckkopf
Wattestäbchen
Wattestäbchen
Schneideeinheit reinigen
Mit der Zeit können sich auf der Schneideeinheit
Klebereste absetzen. Dies kann dazu führen, dass die
Schriftbänder nicht mehr sauber abgeschnitten werden oder sich das Band im Gerät staut. Einmal pro
Jahr sollten Sie daher die Schneideeinheit mit einem
in Isopropylalkohol angefeuchteten Wattestäbchen
reinigen.
! Berühren Sie nicht die Schneideeinheit -
Verletzungsgefahr!
Druckkopf
Wattestäbchen
Schneideeinheit
25
Page 90

Was tun bei Störungen
Statusanzeige des P-touch 2420PC
Die Statusanzeige des P-touch 2420PC zeigt den jeweiligen Status wie folgt an:
Statusanzeige
Leuchtet
Blinkt einige Male
Blinkt schnell
Blinkt, die Anzeige ist
länger an als aus
Blinkt langsam
Bedeutung
• Der P-touch arbeitet normal und ist betriebsbereit.
• Der P-touch empfängt Daten vom PC.
• Die Bandkassette ist nicht richtig eingelegt.
Legen Sie die Kassette richtig ein.
• Es ist ein Übertragungsfehler aufgetreten.
Schalten Sie den P-touch 2420PC aus und wieder ein.
• Während des Ausdrucks wurde der Bandabschneider gedrückt.
Wiederholen Sie den Druckvorgang.
• Im EEPROM ist ein Fehler aufgetreten.
Wenden Sie sich an Ihren Brother Vertriebspartner.
• Der Druckkopf kühlt ab.
Warten Sie, bis der Druckvorgang fortgesetzt wird.
26
Page 91

Problemlösungen
Falls einmal Probleme auftreten sollten, versuchen Sie die Ursache mit Hilfe der folgenden Tabelle zu finden
und den Fehler zu beheben.
Problem
Der P-touch druckt
nicht und ein
Fehler wird angezeigt.
Das bedruckte
Schriftband ist
vertikal gestreift.
Die Statusanzeige
leuchtet bzw.
blinkt nicht.
Im ausgedruckten
Etikett ist eine
horizontale Linie
zu sehen.
Der Computer
zeigt einen Fehler
bei der Datenübertragung an.
Ursache
• Das USB-Kabel ist nicht
richtig angeschlossen.
• Die Bandkassette ist nicht
richtig eingelegt.
• Das Bandfach ist offen.
Das Band ist zu Ende.
Der Netzadapter ist nicht
richtig angeschlossen.
Der Druckkopf und die
Transportrolle sind wahrscheinlich verschmutzt.
Es ist der falsche Anschluss
gewählt.
Mögliche Abhilfe
Schließen Sie das USB-Kabel richtig an,
legen Sie die Bandkassette richtig ein bzw.
schließen Sie das Bandfach.
Legen Sie eine neue Bandkassette ein und
drücken Sie dann die Taste
touch aus und wieder einzuschalten.
Vergewissern Sie sich, dass der Netzadapter
richtig angeschlossen ist. Wenn die Statusanzeige anschließend nicht leuchtet oder blinkt,
wenden Sie sich bitte an Ihren Brother Vertriebspartner.
Reinigen Sie Druckkopf und Transportrolle
wie auf Wartung und Pflege auf Seite 25
beschrieben.
Windows
Wählen in den Druckereigenschaften als
Anschluss “PTUSB:”.*
Mac
Wählen Sie im Chooser den PT-2420PCAnschluss, mit dem der P-touch verbunden ist.
, um den P-
* Wenn mehrere P-touch-Modelle über die USB-Schnittstelle angeschlossen sind, wählen Sie anstelle von
“PTUSB:” den Anschluss “PTUSB (P-touch 2420PC-XXXXXXXXX):” (wobei XXXXXXXXX die Seriennummer des P-touch ist) . Die Seriennummer finden Sie auf dem Aufkleber an der Unterseite des Gerätes.
Technische Daten
Netzanschluss: 220-240 V, 50 Hz (Netzadapter Modell J)
Schriftbänder: in 5 Bandbreiten: 6 mm, 9 mm, 12 mm, 18 mm und 24 mm
Laminierte und unlaminierte TZ-Bänder (
verschiedenen Schrift- und Bandfarben
AL-Thermopapierband (
Druckkopf: 128 Druckpunkte
180 dpi
Anschluss: USB
Abmessungen: 66 x 123 x 145 mm
Gewicht: 400 g
)
) in
27
Page 92

Zubehör
Verwenden Sie mit diesem Gerät bitte nur die original Brother TZ- oder AL-Bänder und Verbrauchsmaterialien.
Die Verwendung von Verbrauchsmaterial, das nicht den Spezifikationen von Brother entspricht und/oder von
gleicher Qualität wie das von Brother gelieferte oder freigegebene ist, kann zu Schäden am Gerät und zum
Verlust von Garantieansprüchen führen.
Verwenden Sie nur Bänder mit dem
Bezeichung Beschreibung
24 mm breite laminierte Bänder
TZ-151 Schwarze Schrift auf farblosem Band
TZ-M51 Schwarze Schrift auf farblosem mattem Band
TZ-251 Schwarze Schrift auf weißem Band
TZ-451 Schwarze Schrift auf rotem Band
TZ-551 Schwarze Schrift auf blauem Band
TZ-651 Schwarze Schrift auf gelbem Band
TZ-751 Schwarze Schrift auf grünem Band
TZ-C51 Schwarze Schrift auf gelbem Signalband
TZ-B51 Schwarze Schrift auf orangem Signalband
TZ-D51 Schwarze Schrift auf grünem Signalband
TZ-152 Rote Schrift auf farblosem Band
TZ-252 Rote Schrift auf weißem Band
TZ-153 Blaue Schrift auf farblosem Band
TZ-253 Blaue Schrift auf weißem Band
TZ-354 Goldene Schrift auf schwarzem Band
TZ-155 Weiße Schrift auf farblosem Band
TZ-355 Weiße Schrift auf schwarzem Band
TZ-455 Weiße Schrift auf rotem Band
TZ-555 Weiße Schrift auf blauem Band
TZ-655 Weiße Schrift auf orangem Band
TZ-755 Weiße Schrift auf grünem Band
18 mm breite laminierte Bänder
TZ-141 Schwarze Schrift auf farblosem Band
TZ-145 Weiße Schrift auf farblosem Band
TZ-241 Schwarze Schrift auf weißem Band
TZ-242 Rote Schrift auf weißem Band
TZ-243 Blaue Schrift auf weißem Band
TZ-344 Goldene Schrift auf schwarzem Band
TZ-345 Weiße Schrift auf schwarzem Band
TZ-441 Schwarze Schrift auf rotem Band
TZ-541 Schwarze Schrift auf blauem Band
TZ-641 Schwarze Schrift auf gelbem Band
TZ-741 Schwarze Schrift auf grünem Band
12 mm breite laminierte Bänder
TZ-131 Schwarze Schrift auf farblosem Band
TZ-132 Rote Schrift auf farblosem Band
TZ-133 Blaue Schrift auf farblosem Band
TZ-135 Weiße Schrift auf farblosem Band
TZ-231 Schwarze Schrift auf weißem Band
TZ-232 Rote Schrift auf weißem Band
TZ-233 Blaue Schrift auf weißem Band
TZ-334 Goldene Schrift auf schwarzem Band
TZ-335 Weiße Schrift auf schwarzem Band
- oder -Zeichen.
28
Page 93

Bezeichung Beschreibung
12 mm breite laminierte Bänder (Fortsetzung)
TZ-431 Schwarze Schrift auf rotem Band
TZ-435 Weiße Schrift auf rotem Band
TZ-531 Schwarze Schrift auf blauem Band
TZ-535 Weiße Schrift auf blauem Band
TZ-631 Schwarze Schrift auf gelbem Band
TZ-635 Weiße Schrift auf orangem Band
TZ-731 Schwarze Schrift auf grünem Band
TZ-735 Weiße Schrift auf grünem Band
TZ-B31 Schwarze Schrift auf orangem Signalband
TZ-C31 Schwarze Schrift auf gelbem Signalband
TZ-D31 Schwarze Schrift auf grünem Signalband
TZ-M31 Schwarze Schrift auf farblosem mattem Band
9 mm breite laminierte Bänder
TZ-121 Schwarze Schrift auf farblosem Band
TZ-122 Rote Schrift auf farblosem Band
TZ-123 Blaue Schrift auf farblosem Band
TZ-221 Schwarze Schrift auf weißem Band
TZ-222 Rote Schrift auf weißem Band
TZ-223 Blaue Schrift auf weißem Band
TZ-324 Goldene Schrift auf schwarzem Band
TZ-325 Weiße Schrift auf schwarzem Band
TZ-421 Schwarze Schrift auf rotem Band
TZ-521 Schwarze Schrift auf blauem Band
TZ-621 Schwarze Schrift auf gelbem Band
TZ-721 Schwarze Schrift auf grünem Band
TZ-A25 Weiße Schrift auf grauem Band
TZ-M21 Schwarze Schrift auf farblosem mattem Band
6 mm breite laminierte Bänder
TZ-111 Schwarze Schrift auf farblosem Band
TZ-211 Schwarze Schrift auf weißem Band
TZ-315 Weiße Schrift auf schwarzem Band
TZ-611 Schwarze Schrift auf gelbem Band
24 mm nicht laminierte Bänder
TZ-N251 Schwarze Schrift auf weißem Band
18 mm nicht laminierte Bänder
TZ-N241 Schwarze Schrift auf weißem Band
TZ-N242 Rote Schrift auf weißem Band
TZ-N243 Blaue Schrift auf weißem Band
TZ-N541 Schwarze Schrift auf blauem Band
TZ-N641 Schwarze Schrift auf gelbem Band
TZ-N741 Schwarze Schrift auf grünem Band
TZ-NF41 Schwarze Schrift auf purpurfarbenem Band
12 mm nicht laminierte Bänder
TZ-N231 Schwarze Schrift auf weißem Band
TZ-N232 Rote Schrift auf weißem Band
TZ-N233 Blaue Schrift auf weißem Band
TZ-N531 Schwarze Schrift auf blauem Band
TZ-N631 Schwarze Schrift auf gelbem Band
TZ-N731 Schwarze Schrift auf grünem Band
TZ-NF31 Schwarze Schrift auf purpurfarbenem Band
9 mm nicht laminierte Bänder
TZ-N221 Schwarze Schrift auf weißem Band
6 mm nicht laminierte Bänder
TZ-N211 Schwarze Schrift auf weißem Band
29
Page 94

Schriftbänder Extrastark
Bezeichung Beschreibung
TZ-S251 24 mm breites extrastarkes Band (Schwarze Schrift auf weißem Band)
TZ-S241 18 mm breites extrastarkes Band (Schwarze Schrift auf weißem Band)
TZ-S231 12 mm breites extrastarkes Band (Schwarze Schrift auf weißem Band)
TZ-S221 9 mm breites extrastarkes Band (Schwarze Schrift auf weißem Band)
TZ-S211 6 mm breites extrastarkes Band (Schwarze Schrift auf weißem Band)
Spezialbänder
Bezeichung Beschreibung
TZ-IY41 Schwarze Aufbügelschrift auf 18 mm breitem Band
TZ-SE4 Schwarze Schrift auf 18 mm breitem weißem Sicherheitsband
TZ-FA3 Blaue Schrift auf 12 mm breitem, weißem Textilband
TZ-CL4 Druckkopf-Reinigungskassette
Thermopapierband
Bezeichung Beschreibung
AL-K251 24 mm Schwarze Schrift auf weißem Thermopapier)
30
Page 95

Stichwortverzeichnis
A
Abschneiden, Schriftband .............................. 24
Anschließen
Netzadapter ............................................. 5
USB-Kabel ............................................... 6
B
Band abschneiden ......................................... 24
Bandabschneider ............................................ 3
Bandfachabdeckung ....................................... 3
Bandkassetten
Allgemeines ............................................. 4
einlegen ................................................... 5
lieferbare ............................................... 28
Bandlösehebel ................................................ 3
Bandvorschub-Taste ............................ 3, 6, 24
Benutzerhandbuch anzeigen
Macintosh .............................................. 17
Windows® ............................................. 12
D
Deinstallieren der Software
Macintosh .............................................. 17
Windows® ............................................. 12
Drucken ....................................................... 24
Macintosh .............................................. 23
Windows® ............................................. 21
Drucker auswählen
Macintosh .............................................. 17
Druckertreiber ersetzen/löschen/neu hinzufügen
Windows® ............................................. 12
Druckertreiber installieren
Macintosh .............................................. 15
Windows® ............................................. 10
Druckkopf ................................................ 3, 25
Druckkopf reinigen ....................................... 25
Druckkopf-Reinigungskassette ...................... 30
E
Editor Ver. 3.1 installieren
Macintosh .............................................. 16
Windows® ............................................... 9
Editor Ver. 3.1 starten .................................... 18
Ein/Aus-Taste ....................................... 3, 6, 24
Etikettengröße festlegen
Macintosh .............................................. 22
Windows® ............................................. 19
H
Hintergrundfarbe ändern
Macintosh .............................................. 23
Windows® ............................................. 21
I
Installieren
Druckertreiber (Macintosh) ..................... 16
Druckertreiber (Windows®) .............. 10, 12
P-touch Editor Ver 3.1 (Macintosh) ........... 16
P-touch Editor Ver. 3.1 (Windows®) ........... 9
P-touch Quick Editor (Windows®) ............ 7
P-touch Quick Editor (Macintosh) ............ 15
Quick Editor (Macintosh) ......................... 15
K
Kopienanzahl
Macintosh .............................................. 23
Windows® ............................................. 21
L
Lieferumfang .................................................. 3
N
Netzadapter anschließen ................................. 5
Netzadapteranschluss ..................................... 3
P
P-touch Editor Ver. 3.1 installieren
Macintosh .............................................. 16
Windows® ............................................... 9
P-touch Editor Ver. 3.1 starten ....................... 18
P-touch Quick Editor beenden
Macintosh .............................................. 23
Windows® ............................................. 21
Page 96

P-touch Quick Editor ein-/ausblenden
Windows® ............................................. 21
P-touch Quick Editor installieren
Macintosh .............................................. 15
Windows® ............................................... 7
P-touch Quick Editor starten .......................... 19
P-touch Quick Editor verwenden
Macintosh .............................................. 22
Windows® ............................................. 19
Problemlösungen .......................................... 27
Q
Quick Editor beenden
Macintosh .............................................. 23
Windows® ............................................. 21
Quick Editor ein-/ausblenden
Windows® ............................................. 21
Quick Editor installieren
Macintosh .............................................. 15
Windows® ............................................... 7
Quick Editor starten ...................................... 19
Quick Editor verwenden
Macintosh .............................................. 22
Windows® ............................................. 19
R
Reinigen des Gerätes .................................... 25
S
T
Technische Daten ......................................... 27
Text eingeben
Macintosh .............................................. 22
Windows® ............................................. 20
Text importieren
Macintosh .............................................. 22
Windows® ............................................. 20
Texte ansehen
Macintosh .............................................. 23
Windows® ............................................. 21
Transportrollen reinigen ................................ 25
Trenn- und Anreibestiftes ............................... 24
U
USB-Anschluss .......................................... 3, 6
W
Warenzeichen ................................................ 4
Wartung ....................................................... 25
Z
Zubehör ....................................................... 28
Zuletzt gedruckte Texte
Macintosh .............................................. 22
Windows® ............................................. 20
Schneideeinheit .............................................. 3
Schneideeinheit reinigen ............................... 25
Schneidmarkierungen
Macintosh .............................................. 23
Windows® ............................................. 21
Schriftbänder ............... 28. Siehe Bandkassetten
Schutzfolie abziehen ..................................... 24
Software-Installation
Macintosh .............................................. 15
Windows® 98/98SE/Me/2000 .................... 7
Spiegeldruck
Macintosh .............................................. 23
Windows® ............................................. 21
Statusanzeige ........................................... 3, 26
Störungen ..................................................... 26
Symbol einfügen/ändern
Macintosh .............................................. 23
Windows® ............................................. 20
Systemvoraussetzungen
(Windows®) ............................................. 7
Macintosh .............................................. 15
Page 97

Beknopte bedieningsgids
Beknopte bedieningsgids
BELANGRIJK
De juiste procedure voor het installeren van de PT-2420PC is als volgt:
1. Begin met de installatie van de etiket-bewerkingssoftware.
2. Sluit de P-touch op de USB poort van de PC aan wanneer u hiertoe de opdracht
krijgt.
Onder geen enkele omstandigheid mag de P-touch op de PC worden aangesloten
voordat de software geïnstalleerd is.
NEDERLANDS
Page 98

Hartelijk dank voor de aanschaf van de P-touch 2420PC!
Met uw nieuwe Brother etiketten-printer kunt u etiketten maken voor allerlei toepassingen. U plaatst een
tapecassette in de PT-2420PC, ontwerpt het gewenste etiket met de bijgeleverde P-touch software, waarna
u klaar bent om het etiket af te drukken. De vervaardiging van een etiket gebeurt nu in een handomdraai.
Bovendien heeft u de keuze uit meerdere tapebreedten en tapekleuren, om de etiketten optimaal aan
uw wensen aan te passen.
Op de bijgeleverde CD-ROM staan twee applicaties voor het ontwerpen van etiketten. Met de gemakkelijk
te gebruiken P-touch Quick Editor software kunt u snel tekst invoeren en opmaken, om vlug een eenvoudig
etiket te maken. De meer geavanceerde P-touch Editor Versie 3.1 applicatie vereenvoudigt niet alleen
ingewikkelde lay-out functies, maar bevat tevens een aantal pasklare sjablonen voor onmiddellijk gebruik.
Verklaring van Overeenkomst
Wij, Brother Industries Ltd.
15-1, Naeshiro-cho, Mizuho-ku,
Nagoya 467-8561, Japan
verklaren hierbij dat dit product voldoet aan de normen vastgelegd in de volgende documenten:
Veiligheid: EN 60950 (Netspanningsadapter)
EMC: EN 55022 1998 Klasse B
EN 55024 1998
EN 61000-3-2 1995
EN 61000-3-3 1995
volgens de voorschriften van de Richtlijn betreffende Elektromagnetische Overeenstemming 89/
336/EEC (en uitgebreid per 91/263/EEC en 91/31/EEC).
Dit systeem is tevens in overeenstemming met de voorschriften van de Richtlijn voor Lage Voltages
72/23/EEC.
Verspreid door: Brother Industries Ltd.
Om te voldoen aan de EMC normen moeten de bijgeleverde interfacekabels worden gebruikt.
Page 99

Inhoudsopgave
Uitpakken .............................................................................................................................. 2
Algemene beschrijving .......................................................................................................... 2
Algemene voorzorgsmaatregelen .......................................................................................... 2
Tapecassettes ......................................................................................................................... 3
Verwisselen van de tapecassette ............................................................................................ 4
Aansluiten van de netspanningsadapter ................................................................................. 4
Stroom/tapedoorvoertoets .................................................................................................... 5
Aansluiten van de USB interfacekabel ................................................................................... 5
Software en printerdriver ...................................................................................................... 5
Voor PC-compatibele computers (Windows
Alvorens te beginnen met de installatie .......................................................................... 6
Installeren van de P-touch Quick Editor ......................................................................... 6
Installeren van de P-touch Editor Versie 3.1 ................................................................... 8
Installeren van de printerdriver ....................................................................................... 9
Lezen in de gebruikershandleiding ............................................................................... 10
Verwijderen van de software en de printerdriver .......................................................... 11
Vervangen, verwijderen of toevoegen van een andere printerdriver ............................. 11
Voor Macintosh computers .................................................................................................. 14
Alvorens te beginnen met de installatie ........................................................................ 14
Installeren van de P-touch Quick Editor ....................................................................... 14
Installeren van de P-touch Editor Versie 3.1 .................................................................. 15
Selecteren van de printerdriver ..................................................................................... 16
Lezen in de gebruikershandleiding ............................................................................... 16
Verwijderen van de software en de printerdriver .......................................................... 16
Gebruik van de P-touch Quick Editor .................................................................................. 17
Opstarten van de P-touch Quick Editor ........................................................................ 17
Instellen van de etiketgrootte ........................................................................................ 17
Invoeren van tekst ........................................................................................................ 17
Importeren van tekst ..................................................................................................... 18
Gebruik van de tekst-geschiedenis lijst ......................................................................... 18
Invoegen van een symbool .......................................................................................... 18
Wijzigen van de achtergrondkleur................................................................................ 18
Schuiven van de tekst over het scherm ......................................................................... 18
Afdrukken .................................................................................................................... 19
Verbergen/weergeven van de P-touch Quick Editor (alleen voor Windows
Afsluiten van de P-touch Quick Editor .......................................................................... 19
Gebruik van de P-touch Editor Ver. 3.1 ............................................................................... 20
Opstarten van de P-touch Editor Versie 3.1 .................................................................. 20
Weergeven van de Eigenschappen ............................................................................... 20
Een nieuwe lay-out maken ........................................................................................... 21
Afdrukken van een etiket ..................................................................................................... 22
Verwijderen van de beschermlaag van het etiket ................................................................ 22
Onderhoud .......................................................................................................................... 23
Reinigen van de afdrukkop en de rol ............................................................................ 23
Reinigen van het snijmes .............................................................................................. 23
In geval van storingen ......................................................................................................... 24
Statusindicator van de P-touch ..................................................................................... 24
Verhelpen van storingen............................................................................................... 25
Technische gegevens ........................................................................................................... 25
Accessoires .......................................................................................................................... 26
®
98/98SE/Me/2000/XP) ...................................... 6
®
) ................ 19
1
Page 100

Uitpakken
• PT-2420PC
• Tapecassette met 24 mm direct thermisch papier (zwarte tekens op witte tape; 7 meter)
• Netspanningsadapter (model J; voor aansluiten van de PT-2420PC op een stopcontact)
USB interfacekabel (voor aansluiten van de PT-2420PC op een PC-compatibele of Macintosh computer)
•
• Beknopte bedieningsgids
• CD-ROM met PC en Mac software plus de bijbehorende handleidingen
• Tapescheidingsstaafje
Algemene beschrijving
Tape-afsnijknop
Statusindicator
Tape-uitgang
Stroom/tapedoorvoertoets
Venster
Deksel van
tapecassettehouder
Vrijzethendel
Afdrukkop
D
C
IN
Snijmes
USB poort
9.5V
Aansluiting voor
netspanningsadapter
Algemene voorzorgsmaatregelen
• Gebruik in dit apparaat uitsluitend Brother TZ en AL tapecassettes. Gebruik geen andere soorten tape, die niet zijn
voorzien van het
• Trek niet aan de tape wanneer deze uit de P-touch komt. Hierdoor kan de tapecassette beschadigd raken.
• Gebruik het apparaat niet in stoffige ruimtes. Zorg tevens dat het apparaat niet in de felle zon of in de regen staat.
• Stel het apparaat niet bloot aan vochtige lucht of hoge temperaturen.
Laat geen rubber, plastic of vinyl voorwerpen langdurig op het apparaat liggen; dit kan vlekken veroorzaken.
•
•
Gebruik voor het reinigen van het apparaat geen alcohol of andere organische oplossingen. Gebruik hiervoor uitsluitend een zachte, droge doek.
• Zorg dat er geen vloeistof of voorwerp in het apparaat terechtkomt.
• Raak, om ongevallen te voorkomen, het snijmes van het apparaat niet aan.
• Raak de afdrukkop niet aan; de afdrukkop wordt zeer heet tijdens het gebruik van de P-touch. Zelfs nadat het apparaat is
uitgeschakeld, zal de afdrukkop nog een tijdje warm zijn.
• Gebruik met dit apparaat uitsluitend de bijgeleverde netspanningsadapter (model J) die speciaal voor dit apparaat is
ontworpen. Bij gebruik van een andere adapter vervalt de garantie.
• Gebruik alleen de bijgeleverde USB interfacekabel. Bij gebruik van een andere kabel vervalt de garantie.
• Maak de netspanningsadapter los wanneer u het apparaat geruime tijd niet denkt te gebruiken.
• Probeer de P-touch niet te demonteren.
®
is een handelsmerk van International Business Machines, Inc.
• IBM
Microsoft® en Microsoft Windows® zijn wettig gedeponeerde handelsmerken van Microsoft Corp. in de Verenigde Staten en in andere landen.
•
• Macintosh en Power Macintosh zijn wettig gedeponeerde handelsmerken van Apple Computer, Inc.
Alle andere software- en productnamen zijn de handelsmerken of de wettig gedeponeerde handelsmerken van de betreffende ondernemingen.
•
2
en merkteken.
 Loading...