

• Read this User’s Guide before you start using your P-touch.
• Keep this User’s Guide in a handy place for future reference.
USER’S GUIDE
2350

INTRODUCTION
Thank you for purchasing the P-touch 2350!
Your new P-touch will allow you to create labels and stamps for any need. Its versatility
enables you to design custom labels by choosing from a variety of frame designs and from
many characters sizes and styles. In addition, the five tape widths (1/4” (6 mm), 3/8” (9 mm),
1/2” (12 mm), 3/4” (18 mm), and 1” (24 mm)) and variety of tape colors allow you to print
personalized labels, useful for color-coded filing. With the Stamp function, you can quickly
and easily make stamps for reusable pre-inked stamp holders.
You no longer have to worry about urgent tasks that require professional printing. In the office,
the factory, the lab, and the home, the quality and performance of the P-touch 2350 make it an
extremely practical machine.)
Use only the adaptor designed exclusively for this machine. See GENERAL PRECAUTIONS on
page 4.
Canadian Department of Communications Compliance Statement
This digital apparatus does not exceed the Class B limits for radio noise emissions from digital apparatus as set out in the interference-causing equipment standard entitled “Digital Apparatus”, ICES-003 of the Department of Communications.
Switching the language of the messages between English and French
1. Erase all of the text in the display either with or by holding down and
pressing .
2. Hold down and press to display the current language setting (“ENGLISH”
or “FRANÇAIS”).
3. Keep held down and press again until the desired setting appears in the
display, then release the keys.
☞
The default setting is English.
Turning off the machine does not change the language setting.
The language cannot be changed if some text remains in the display.
Clear
Del
Clear
Del
CodeCode
Clear
Del
Clear
Del
CodeCode
FF
CodeCode
FF

I
CONTENTS
Getting Started
GENERAL DESCRIPTION .................................................................................... 2
GENERAL PRECAUTIONS................................................................................... 4
BATTERIES .......................................................................................................... 5
OPTIONAL AC ADAPTOR.................................................................................. 6
TAPE CASSETTE .................................................................................................. 7
ATTACHING LABELS .......................................................................................... 8
PRINT HEAD & ROLLERS ................................................................................. 12
Learning the Ropes
DOOR LABEL EXAMPLE ................................................................................... 14
ADDRESS LABEL EXAMPLE............................................................................... 18
STORAGE SHELF LABEL EXAMPLE ................................................................... 24
For Your Information
POWER KEY...................................................................................................... 32
CURSOR KEYS .................................................................................................. 33
CODE, ALT & SHIFT KEYS ................................................................................ 35
SPACE KEY........................................................................................................ 38
RETURN KEY .................................................................................................... 39
NEW BLOCK FUNCTION ................................................................................. 40
TAB FUNCTION ............................................................................................... 41
DELETE KEY ...................................................................................................... 43
LINE OUT FUNCTION...................................................................................... 44
CLEAR FUNCTION ........................................................................................... 45
ACCENT FUNCTION ........................................................................................ 48
SYMBOL FUNCTION........................................................................................ 50
AUTO FORMAT FUNCTION ............................................................................ 52
STAMP FUNCTION .......................................................................................... 62
LOCAL FORMAT FUNCTION........................................................................... 65
FONT FUNCTION ............................................................................................ 66
SIZE & WIDTH FUNCTIONS ............................................................................ 68
STYLE FUNCTION ............................................................................................ 72

II
UNDERLINE FUNCTION .................................................................................. 75
FRAME FUNCTION .......................................................................................... 76
TAPE MARGIN FUNCTION .............................................................................. 78
HORIZONTAL ALIGNMENT FUNCTION ......................................................... 79
MIRROR PRINTING FUNCTION ...................................................................... 80
LENGTH FUNCTION........................................................................................ 81
BARCODE FUNCTION ..................................................................................... 83
AUTO CUT FUNCTION ................................................................................... 87
PRINT KEY AND FEED & CUT FUNCTION....................................................... 88
NUMBERING FUNCTION ................................................................................ 89
REPEAT PRINTING FUNCTION ........................................................................ 92
MEMORY FUNCTIONS .................................................................................... 94
TROUBLESHOOTING ...................................................................................... 98
ERROR MESSAGE LIST...................................................................................... 99
SPECIFICATIONS ............................................................................................ 104
ACCESSORIES ................................................................................................. 105

1
Getting Started
2
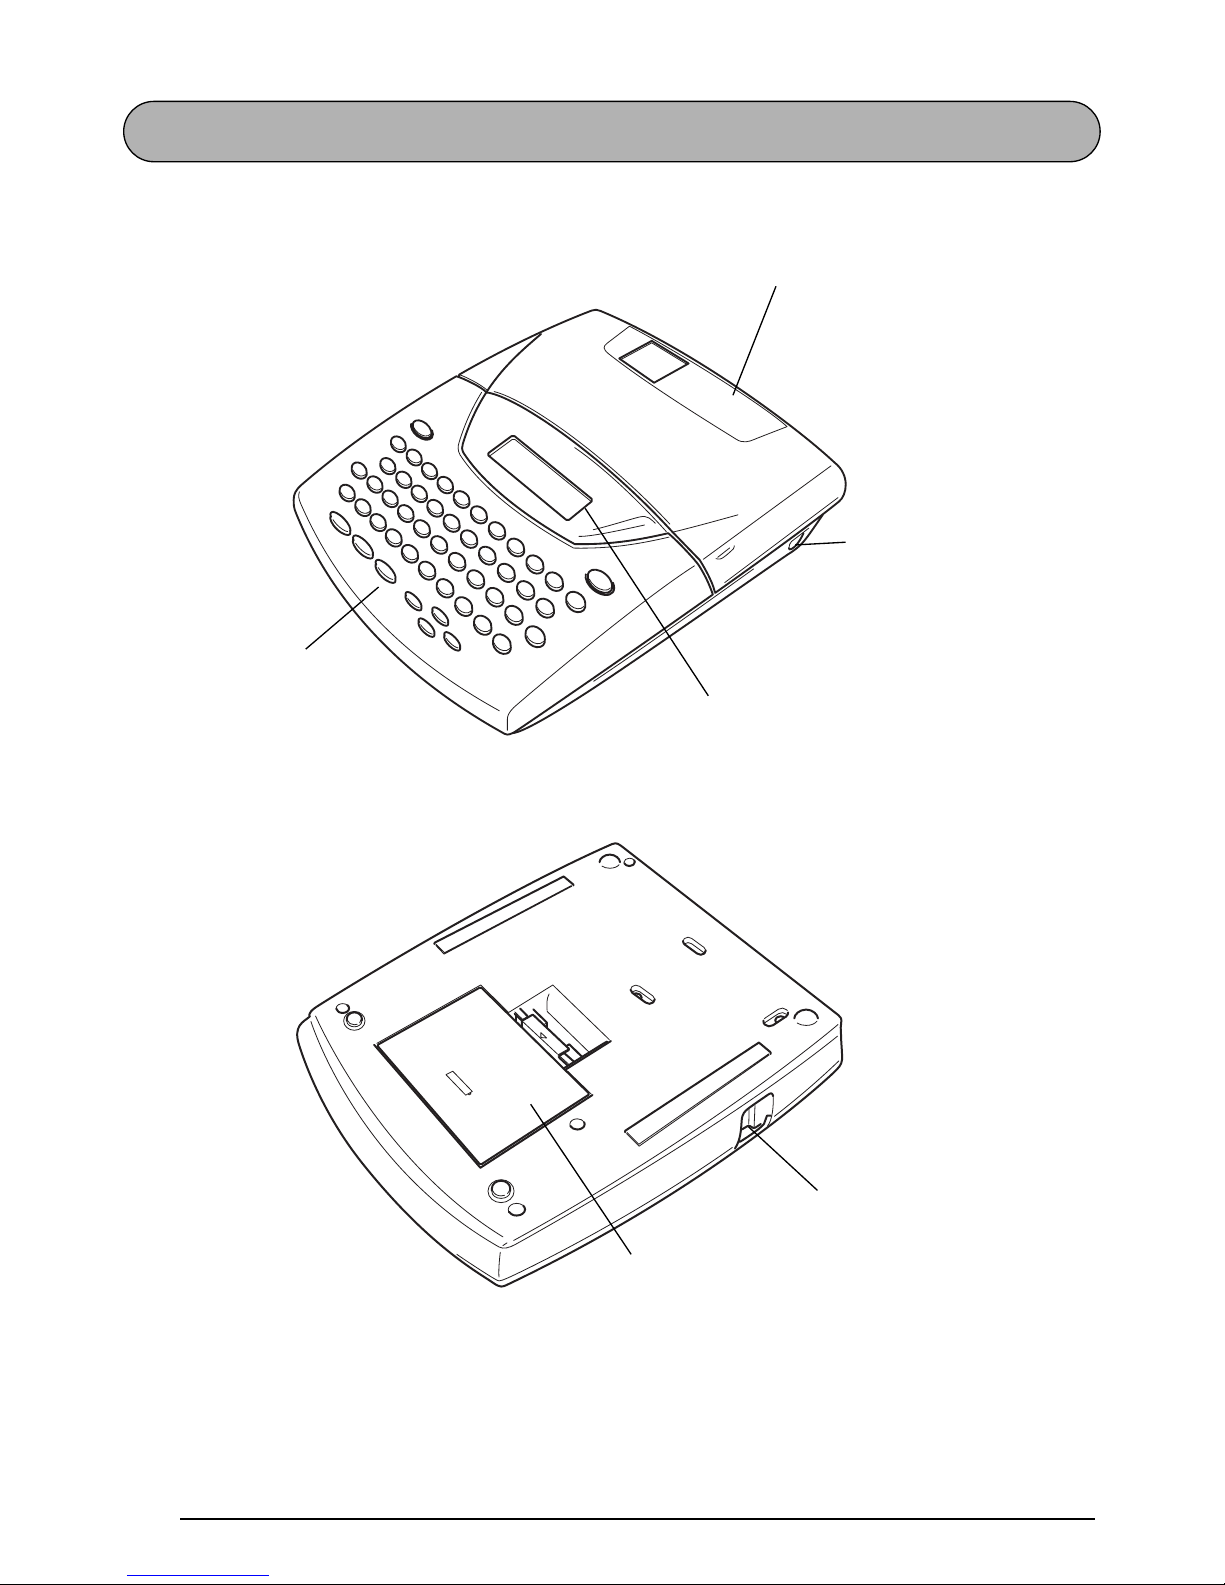
GENERAL DESCRIPTION
TOP VIEW
BOTTOM VIEW
Tape compartment
cover
LCD display
Keyboard
AC adaptor
connector
Tape exit slot
Battery compartment cover

3
KEYBOARD & LCD DISPLAY
¡
¿
éú
"
Ç
ç
Ñ
ñ
-
üí
ó
á
Alt
Tab
Caps
Font Size Width Style Underline Frame Line out Clear
Symbol Accent
Tab Length
Tape
Align
Length
A.Format
Stamp
Home
End
Store Recall M.Del
Mirror
Memory
Off
Space
ASDFGHJKL
:
;
ZX
C
VBNM
Shift
/
,
QWERTYUI OP
!
12
@
#
$
%
¢
3456
&
*
()
7890
Del
Print
On
Code
¡
¿
éú
"
Ç
ç
Ñ
ñ
-
üí
ó
á
Alt
Feed&Cut New Block
Tab
Caps A.Cut
Font Size Width Style Underline Frame
Memory
Line out Clear
Symbol Accent Local
Tab Length
Tape
Align
Length
A.Format
Stamp
Home
End
Store Recall M.Del
Off
Space
ASDFGHJKL
:
;
ZX
C
VBNM
Shift
/
,
QWERTYUI OP
!
12
@
#
$
%
¢
3456
&
*
()
7890
Del
Print
On
Code
Length
Width
A.Format
Undl/Frm
RepeatBarcode
Number
Power key
Return key
Cursor keys
Delete key

4
GENERAL PRECAUTIONS
• Use only Brother TZ tapes with this machine. Do not use tapes that do not have the
mark.
• Do not pull on the tape being fed from the P-touch. This may damage the tape cassette.
• Do not use the machine in dusty places, and keep it out of both direct sunlight and rain.
• Do not expose the machine to high temperatures or high humidity. Never leave it on the
dashboard or in the back of your car.
• Do not leave any rubber or vinyl on the machine for an extended period of time. Doing so
may cause staining.
• Do not clean the machine with alcohol or other organic solvents. Use a soft, dry cloth only.
• Do not put any foreign objects into or anything on the machine.
• To avoid injuries, do not touch the cutter’s edge.
• Use only the AC adaptor (model AD-60) designed exclusively for this machine. Use of any
other adaptor will void the warranty.
• Do not try to disassemble the AC adaptor.
• When the machine is not being used for a long period of time and it is not necessary to
keep the text files stored in the memory, disconnect the AC adaptor, and remove the batteries to prevent them from leaking and damaging the machine.
• If the AC adaptor is unplugged and no batteries are installed, all text files in the memory
may be deleted.
• Use eight AA alkaline batteries in this machine.
5
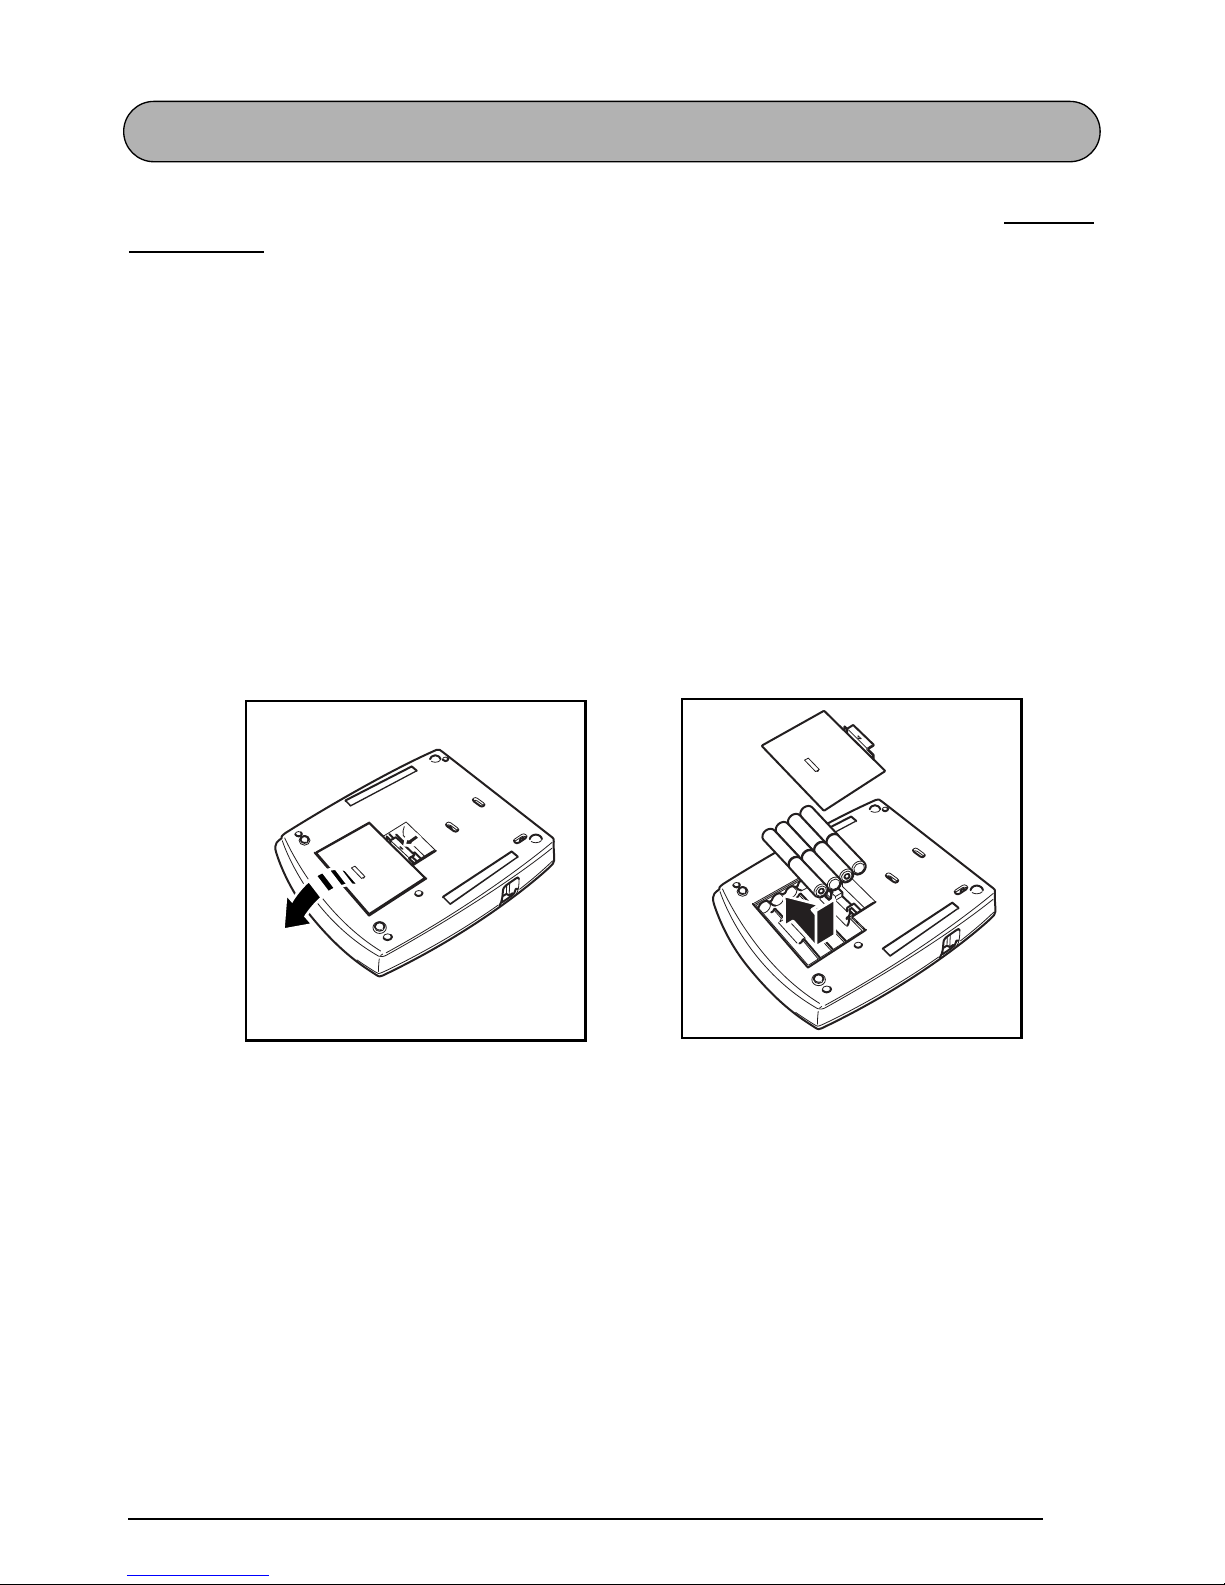
BATTERIES
This lightweight and portable machine can be used anywhere by installing eight (8) AA alka-
line batteries . When you change the batteries, always replace all eight at the same time.
To change the batteries:
1
Remove the battery compartment cover on the back of the machine.
2
If batteries are already installed, remove them.
3
Insert eight new AA alkaline batteries, making sure that they face the correct direction.
4
Attach the battery compartment cover.
☞
If alkaline batteries are not used, large fonts cannot be printed.
Be sure to insert the new batteries within five minutes of removing the old ones,
otherwise the text shown in the display and any text files stored in the memory will
be lost (unless the machine is plugged into an AC outlet with the AC adaptor).
Remove the batteries and disconnect the AC adaptor if you do not intend to use this
machine for an extended period of time. When the power is disconnected, all text
shown in the display and stored in the memory will be lost.

6
OPTIONAL AC ADAPTOR
The AC adaptor (model AD-60) allows you to use this machine wherever there is an electrical
outlet.
To connect the optional AC adaptor:
1
Insert the plug on the adaptor cord into the connector marked DC IN 9.5V on the right
side of the machine.
2
Insert the plug on the adaptor into the nearest standard electrical outlet.
☞
Remove the batteries and disconnect the AC adaptor if you do not intend to use this
machine for an extended period of time. When the power is disconnected, all text
shown in the display and stored in the memory will be lost.
If the AC adaptor is unplugged and no batteries are installed, all text files in the
memory may be deleted.
Only use the AC adaptor designed exclusively for this machine.
It is recommended that you use the AC adaptor when printing large fonts or bar-
codes on 3/4” (18-mm)- or 1” (24-mm)-wide tape since these operations can
quickly drain the batteries.
7
TAPE CASSETTE
A single TZ tape cassette is supplied with this unit. However, since TZ tape cassettes are available for this machine in a wide variety of colors and sizes, it is possible to make distinctive
color-coded and stylized labels.
In addition, this machine has been designed to allow you to change the tape cassettes quickly
and easily.
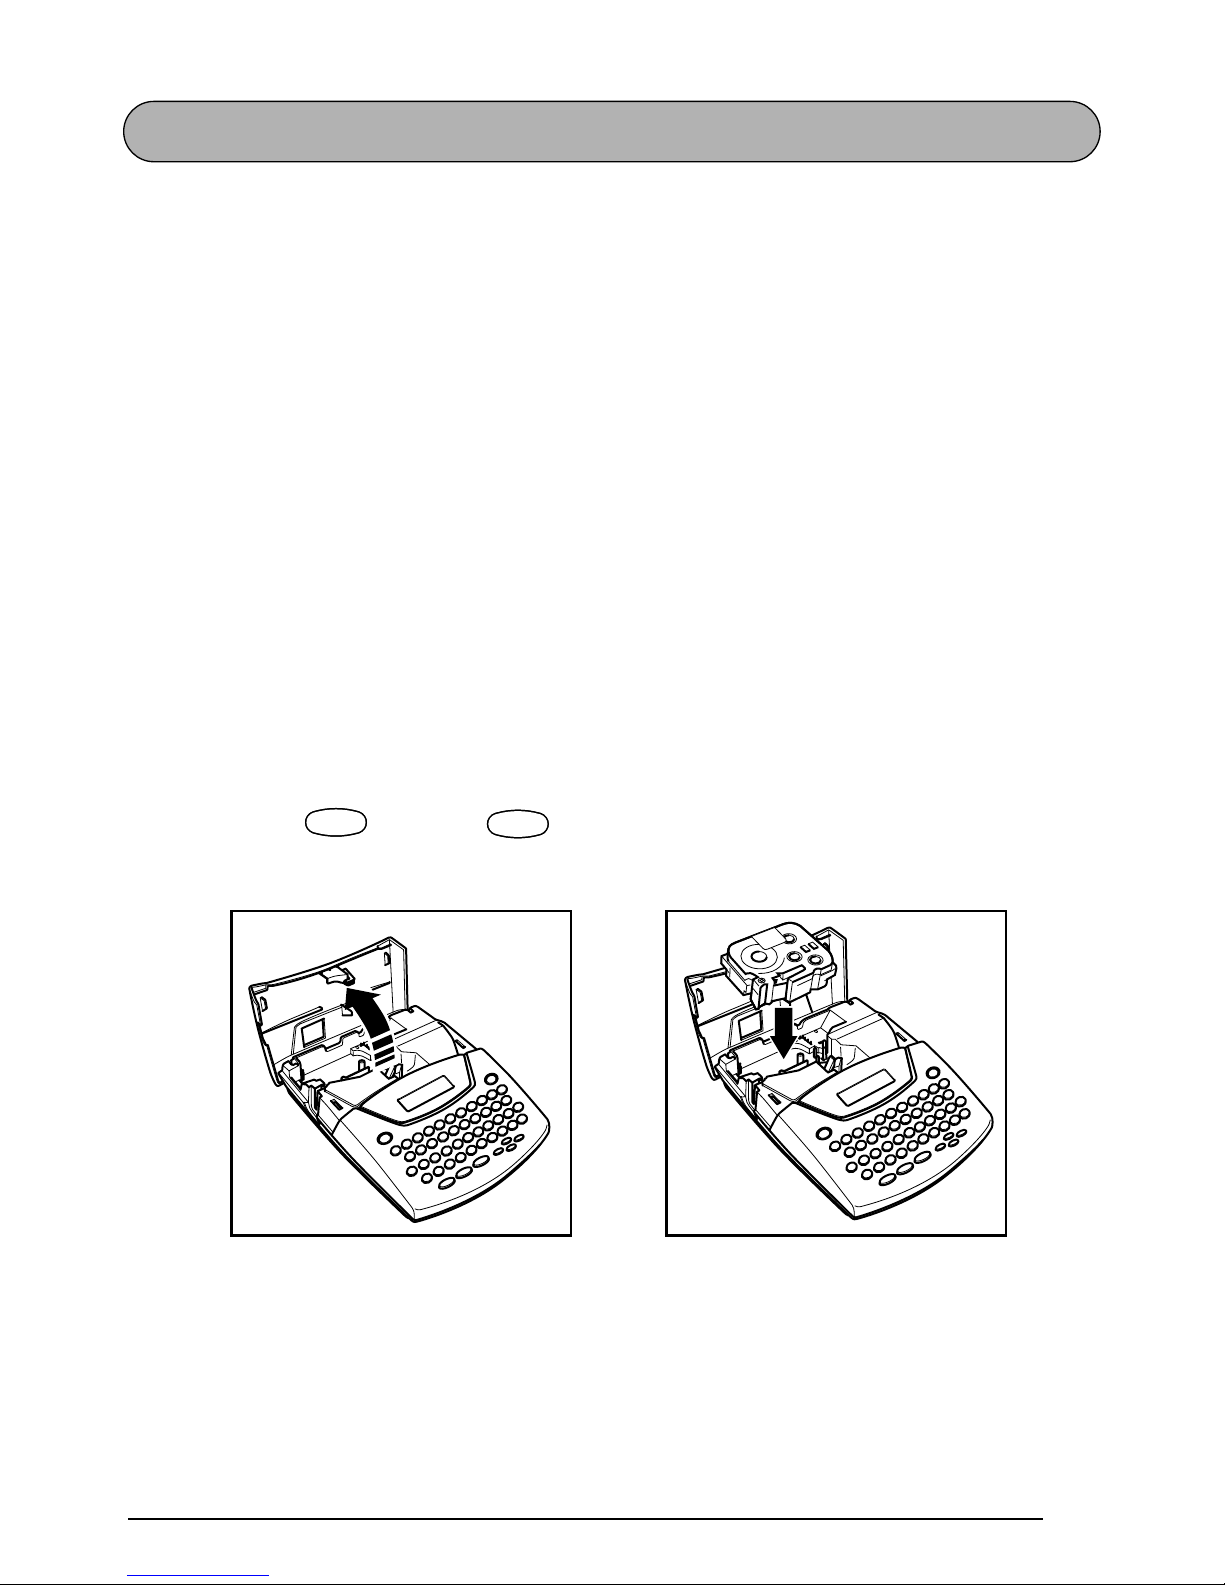
To change the tape cassette:
1
Lift open the tape compartment cover. The installed cassette is also released.
2
If a tape cassette is already installed, remove it by pulling it straight up.
3
If the ink ribbon in the other tape cassette is loose, use your finger to wind the toothed
wheel in the direction of the arrow on the cassette until there is no slack in the ribbon.
Also, make sure that the end of the tape feeds under the tape guides.
☞
If you are using a new tape cassette provided with a stopper, be sure to remove the
stopper.
4
Insert the tape cassette firmly into the tape compartment, making sure that the entire back
of the cassette touches the bottom of the compartment.
☞
When inserting the tape cassette, make sure that the inner ribbon does not catch on
the corner of the metal guide.
5
Close the compartment cover, then turn on the machine if it is off.
6
Hold down and press once to remove any slack in the tape and cut off the
excess.
CodeCode
Space
Feed&Cut
Space
8
ATTACHING LABELS
LAMINATED TAPE
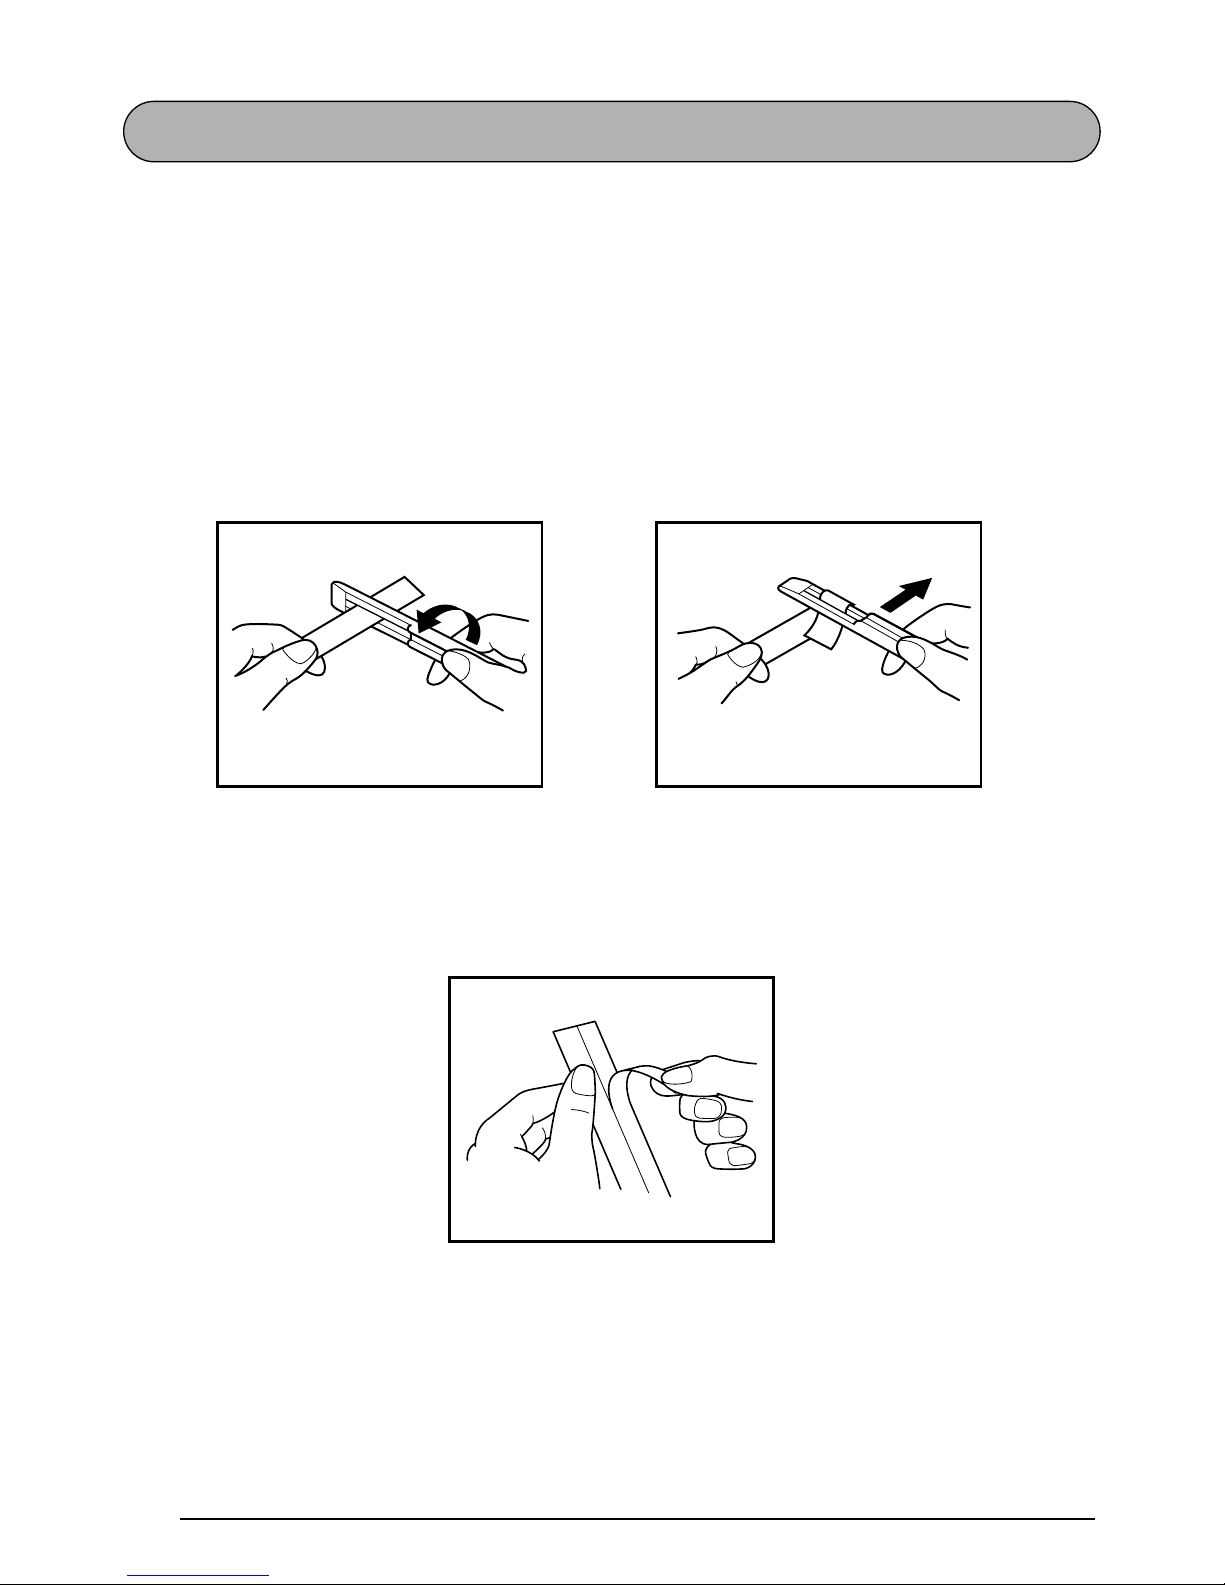
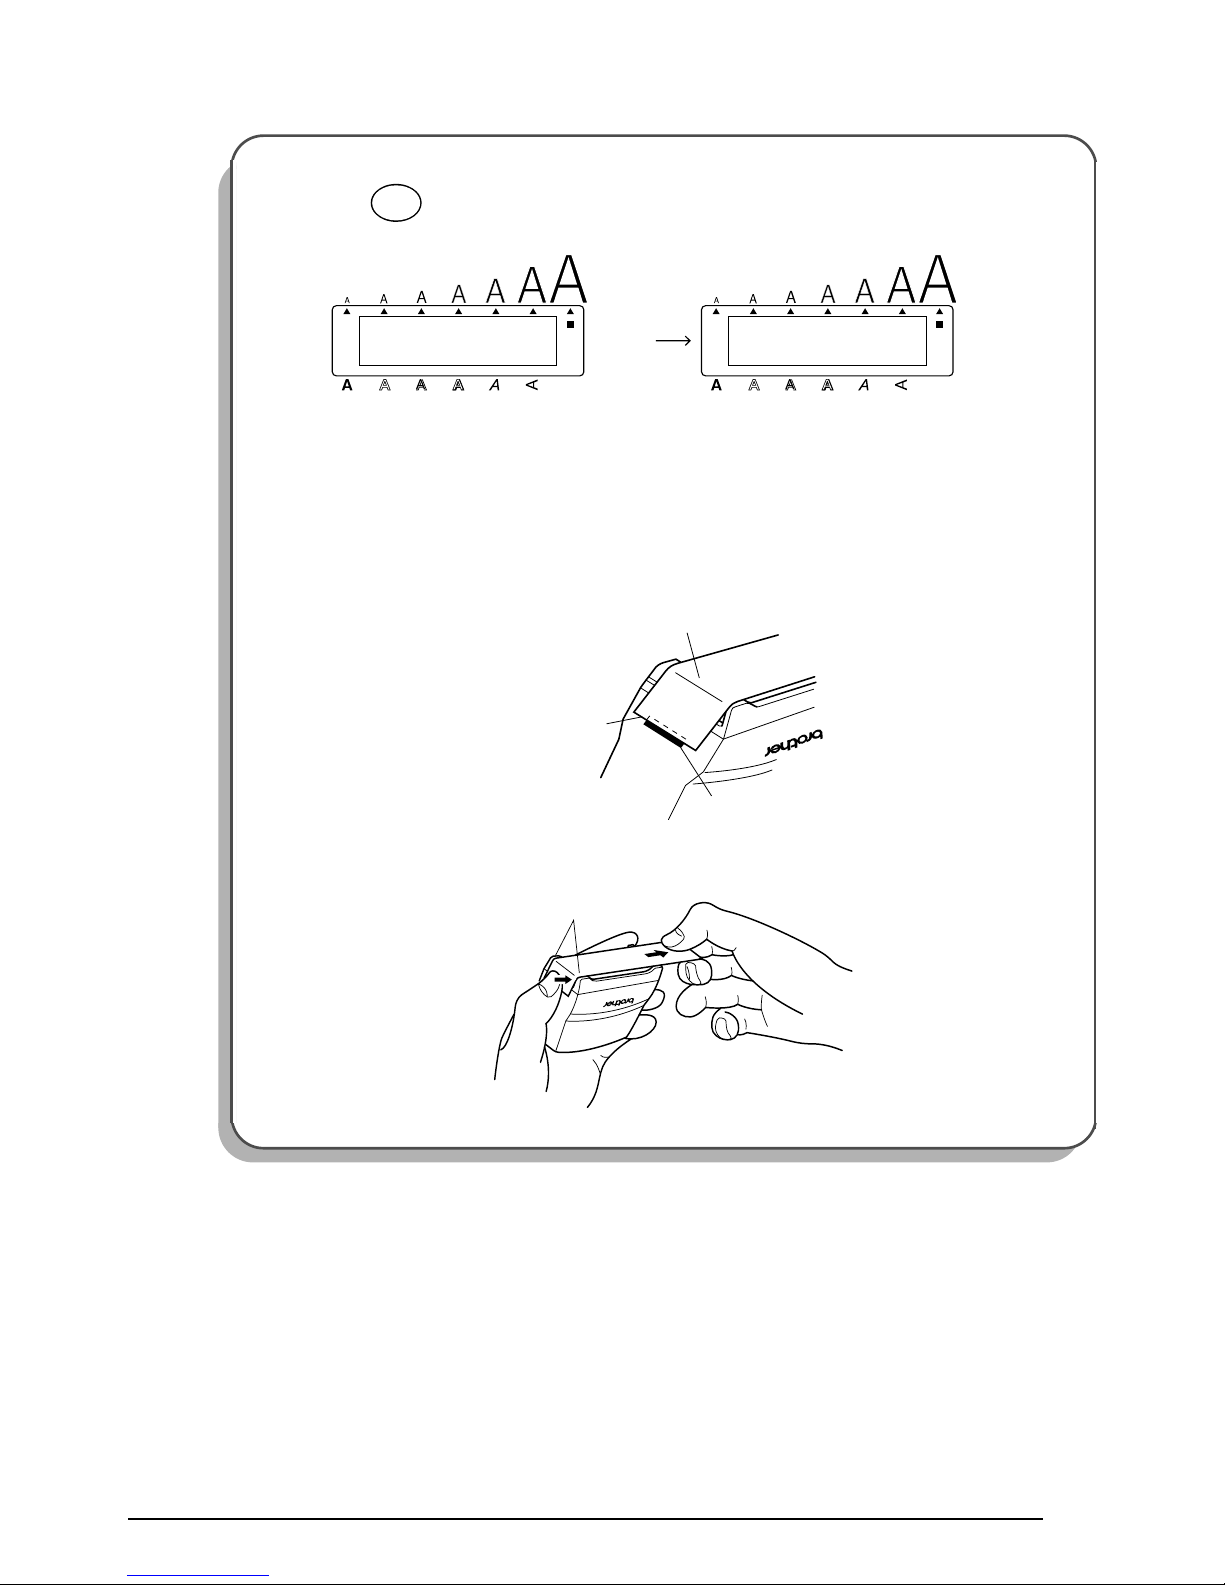
The enclosed stick enables you to easily remove the backing from labels printed on laminated
tapes.
1
Hold the tape in your left hand, with the printed surface facing up, and hold the stick in
your right hand.
2
Pass the tape halfway through the long narrow hole in the stick.
3
Turn the stick three-quarters of a turn towards you and pull the stick away from you as
shown below.
4
Peel off the label backing.
NON-LAMINATED TAPE
Labels printed on non-laminated tapes can be folded in half so that the inside edges of the two
backing pieces come off the label, enabling the backing to easily be peeled off.
GH
ABCDEF
ABCDEF

9
INSTANT-LETTERING TAPE (RUB-ON TRANSFERS)
Instant-lettering tape is used to transfer your text onto paper. After printing the text onto
instant-lettering tape and cutting off the label, position the label with its non-printed side facing up on a sheet of paper. By simply rubbing the instant lettering tape’s non-printed side with
the enclosed stick, you can transfer the text directly onto the paper.
☞
Hold the tape very firmly and do not move it while rubbing the tape.
IRON-ON TRANSFER TAPE
Iron-on transfer tape is used to transfer your text onto garments using an iron.
1 Insert an iron-on transfer tape cassette, press to print the text, then push down on
the tape cutter lever to cut off the label.
2 Iron the garment to flatten it before transferring the text.
3 Place the label on the garment at the location where you wish the text to be transferred.
4 Set the iron to cotton (302 to 356 ˚F (150 to 180 ˚C)), then press down on the label with
the iron for about 15 seconds.
5 Allow the iron-on transfer to cool (for about 60 seconds), and then carefully remove the
backing paper.
ABC
Mirror
Print
P-TOUCH

10
☞
White garments made from 100% cotton with a plain (smooth) surface are best for ironon transfers.
You can also make transfers to garments made from 100% linen or cotton/polyester
blends as long as they have a plain (smooth) surface.
The label will not adhere properly to any cloth with a rough surface, such as pile or
denim, or with a waterproof surface. Heat-sensitive materials, such as nylon, acetate or
other similar fibres, are also unsuitable as they may be damaged when pressing with an
iron at a high temperature.
Do not move the iron while pressing, otherwise the label may move out of the desired
position. Press the iron straight down onto the cloth.
After the backing tape has been removed, the transferred label may appear glossy. In
addition, some white spots may have appeared on the label if it was touched while the
backing tape was peeled off. These can be removed by ironing over the label with a
piece of cloth placed between the label and the iron.
Since the transferred label cannot be removed once it is applied, make all transfers with
care.
Washing:
Garments with transfer labels can be washed over 20 times if the label has been transferred
correctly. Normal biological and non-biological household detergents may be used.
The label may become discolored if the garment is placed in bleach for an extended length of
time.
Be careful that hard objects such as buckles or buttons do not come into contact with the label
during the wash.
Do not dry clean garments which have had transfer labels applied.
Drying:
Garments with transfer labels may be dried either inside or outside out.
Do not tumble dry. The transfers will come off and may stick to other items of clothing.

11
Ironing:
Iron garments with transfers using normal temperature settings.
Be sure to place a piece of cloth between the iron and the label when you iron over it to pre-
vent the label from sticking to the iron.
The labels are non-toxic, however, please maintain the usual precautions, such as not placing
them in your mouth, etc.
Do not store the tape cassette in areas exposed to direct sunlight, high humidity or dust.
FABRIC TAPE
Fabric tape is used to attach a piece of fabric printed with your text onto garments using an
iron. After printing the text onto fabric tape and cutting off the label using scissors
, place the
label on an ironed garment at the location where you wish to attach it in such a way that the
printed text can be read correctly. Cover the label with another piece of cloth and use an iron
set to a medium-high temperature (320 to 356 ˚F (160 to 180 ˚C)) to press down firmly for 10
to 15 seconds. For more details, refer to the instructions included with the fabric tape cassette.
☞
The label will have a white background on colored cloth.
STAMP TAPE
Refer to pages 62 through 64 for a detailed explanation on using the stamp tape to make
stamps.
P-TOUCH
12
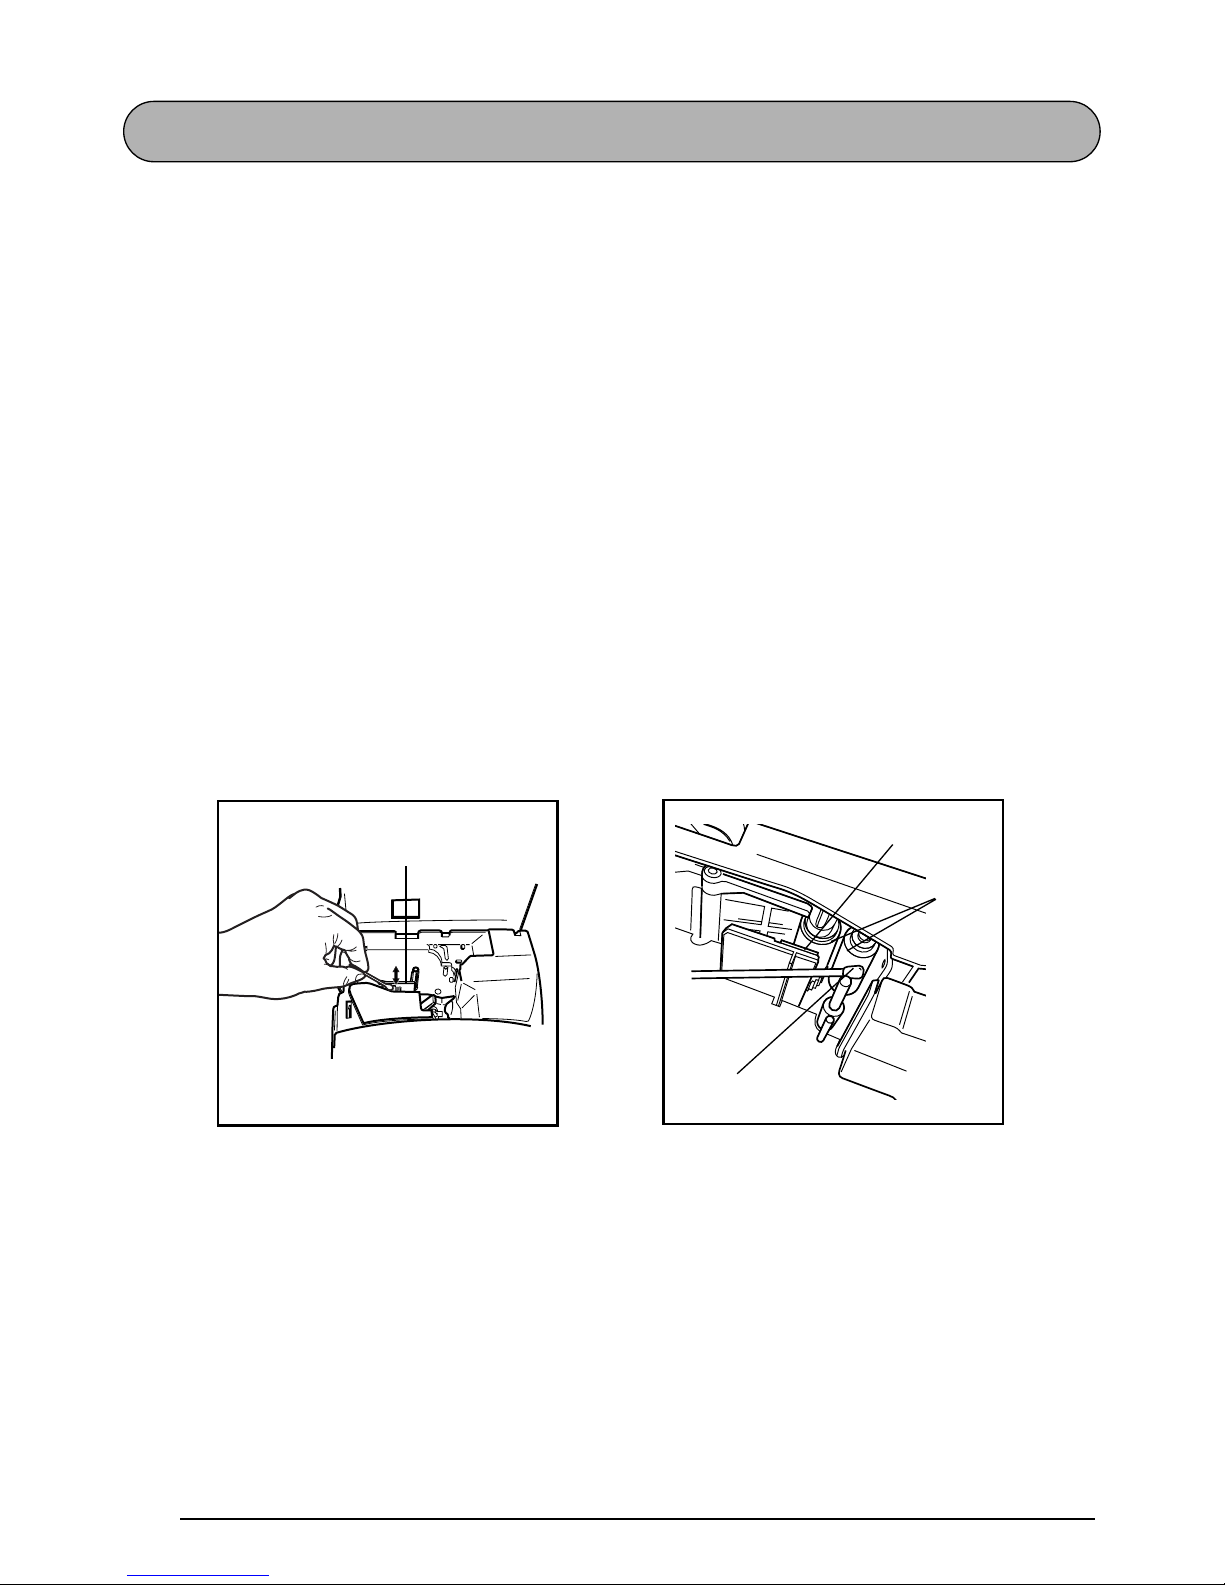
PRINT HEAD & ROLLERS
Occasionally, specks of dust or dirt become attached to the machine’s print head and rollers.
This is particularly likely when you are using the unit outdoors or in a very dusty environment.
If a section of the print head is covered with dust, a blank horizontal streak may appear
through the label text. Therefore, as with a tape recorder, the machine’s head may need to be
cleaned from time to time.
To clean the print head and rollers:
1 Turn off the machine.
2 Open the tape compartment cover, then remove the tape cassette if one is installed. The
print head and rollers are located in the tape compartment.
3 Print head: Use a dry cotton swab to gently wipe the print head with an up-and-down
motion.
Rollers: Use a dry cotton swab to wipe each roller with an up-and-down motion while
rotating them with your finger.
4 Install a tape cassette, close the tape compartment cover, and then try printing again.
5 If dust still remains, repeat steps 3 and 4 using a cotton swab dipped in isopropyl (rub-
bing) alcohol.
If none of the above works, contact your service representative.
Print head
Print head
Rollers
Cotton swab
13
Learning
the Ropes
14
DOOR LABEL EXAMPLE
After you have inserted the batteries and the enclosed tape cassette as explained in the
Getting
Started
chapter, let’s practice using some of the basic functions of your P-touch. We must first
begin by turning on the power to the machine.
The underline in the LCD display is called the “cursor”. It is like a pointer which shows your
current position and lets you select characters in your text.
The text you create may sometimes be longer than the 11 characters that the LCD display can
show at one time. Therefore, the cursor can be moved to show other parts of the text. Pressing
the left cursor key ( ) moves the cursor to the left so that the left side of the text can be
seen and pressing the right cursor key ( ) moves the cursor to the right so that the right
side of the text can be seen.
Some format settings are shown by the triangular and square indicators around the edge of the
display. The default settings (the selected settings when the power is turned on for the very first
time) have been pre-programmed into the machine and represent the most common settings
for labels. However, you can design your own label to have any format that you wish. Detailed
explanations of the formats can be found on pages 68 through 82.
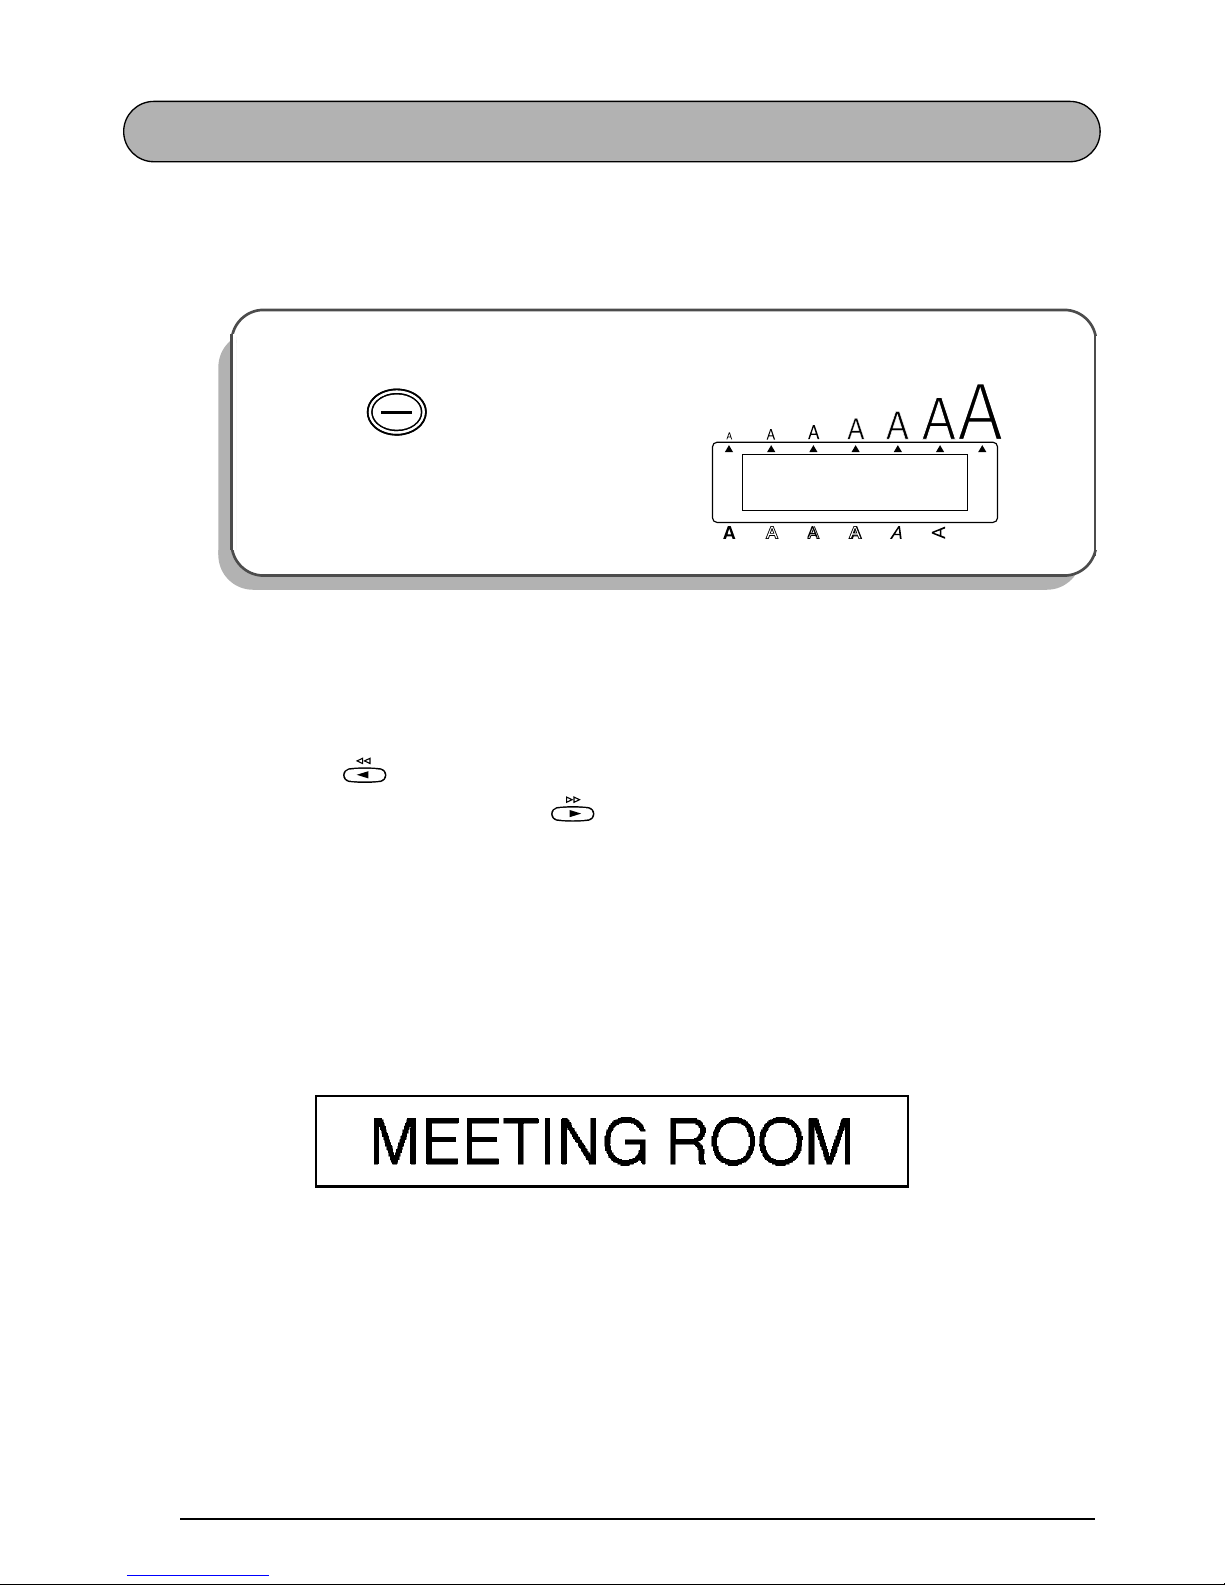
Now, let’s enter the text for our first example, the simple door label shown below.
☞
The label in this example was made using the enclosed 1/2” (12-mm)-wide tape.
To turn on the machine:
1
Press in the top right-hand corner
of the keyboard.
1: _
ABCDEFGHIJKL
Alt
Caps
Length
A.Format
Undl/Frm
Length
Width
OffOnOff
On
15
ENTERING THE TEXT
Since all of the text will be in capital letters, we will use the Caps mode, which allows us to
type capital letters continuously without holding down .
Then, let’s type in the text in the same way that you would type on a typewriter or a computer
keyboard.
Also like on a typewriter or computer keyboard, the Space key ( ) allows you to add
blank spaces to the text.
☞
The Space key ( ) is different from the right cursor key ( ), which moves the
cursor through the entered text without
adding blank spaces.
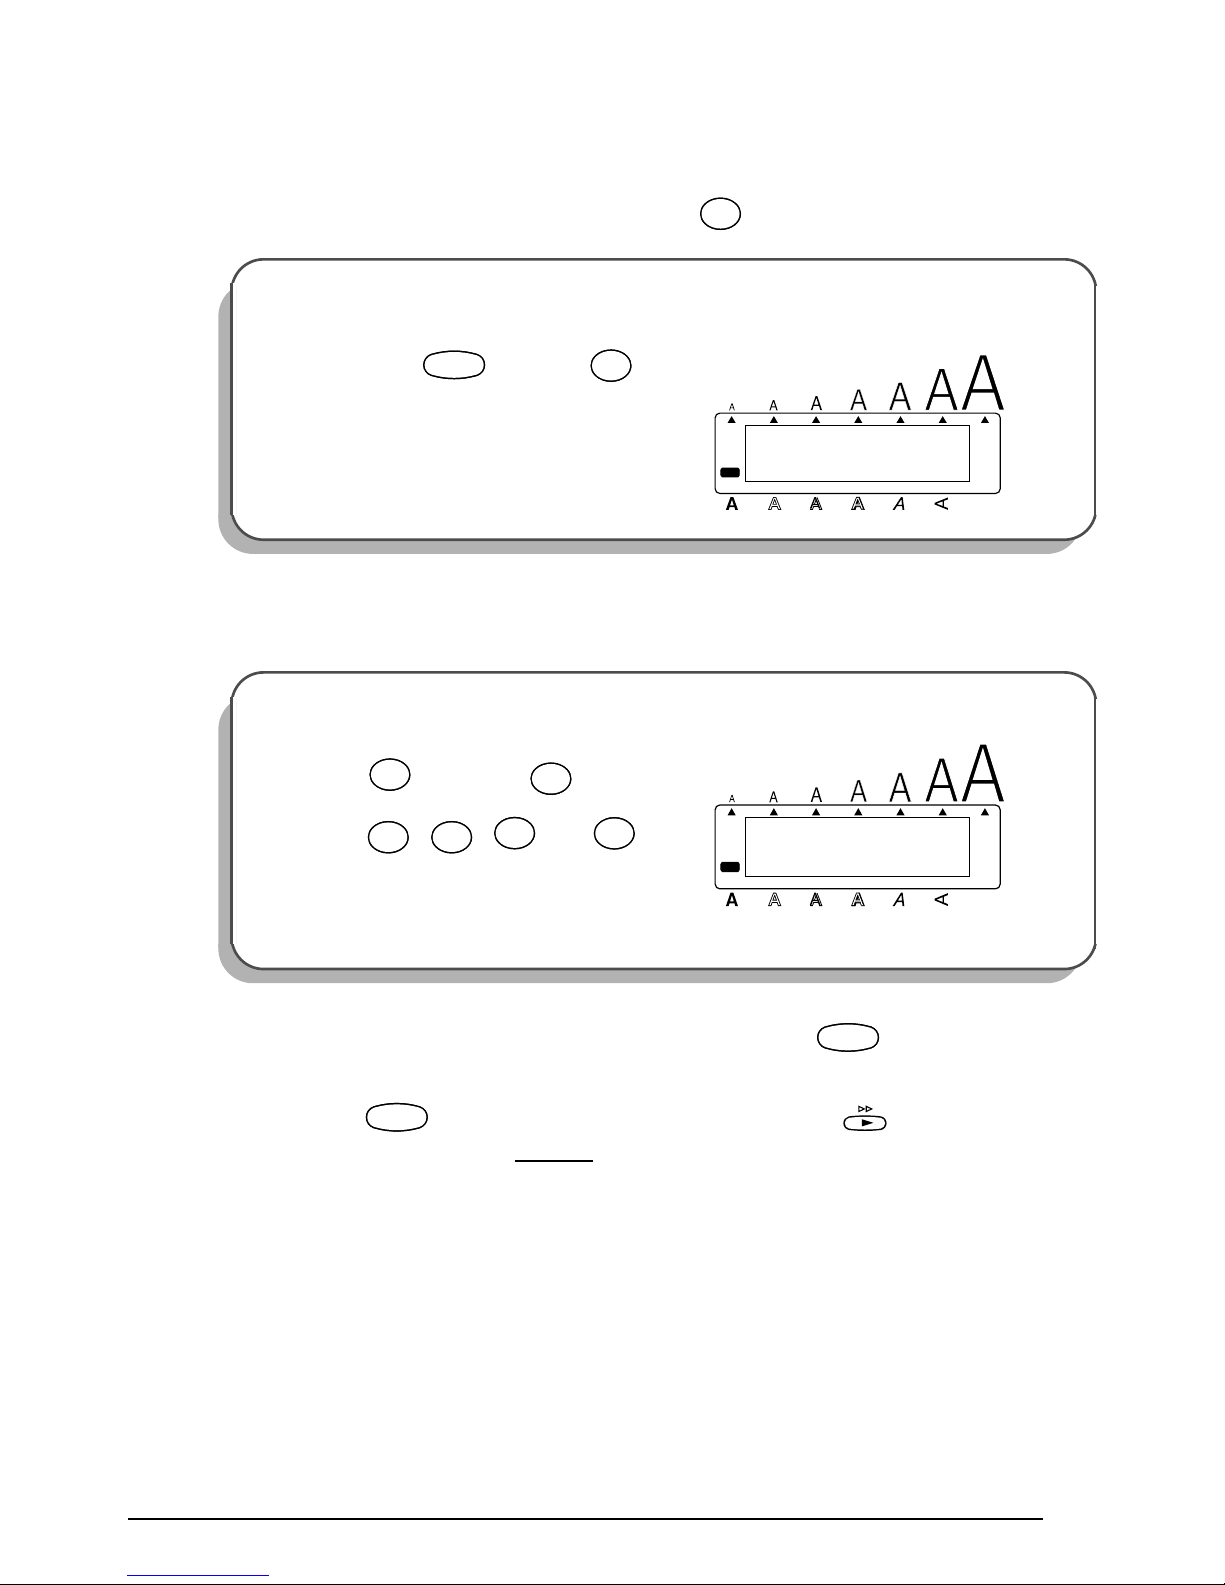
To enter Caps mode:
2 Hold down and press once.
The Caps indicator on the left side of the
display lights up.
To type in “MEETING”:
3 Press once and twice, then
press , , and once
each.
☞
All letters are automatically entered as
capital letters.
Caps
Shift
Caps
Shift
1: _
ABCDEFGHIJKL
Alt
Caps
Width
Length
A.Format
Undl/Frm
Length
CodeCode
Caps
Shift
Caps
Shift
ñ Mñ
M
TapeETape
E
LengthTLength
T
íIí
I
Barcode
ÑNÑ
N
GG
1: MEETING_
ABCDEFGHIJKL
Alt
Caps
Width
Length
A.Format
Undl/Frm
Length
Space
Feed&Cut
Space
Space
Feed&Cut
Space
16
Type the second word, “ROOM”, to finish the text.
Now that we are finished entering capital letters, we can exit Caps mode.
Once you have entered the text, you can easily edit it by correcting mistakes or simply adjusting it or its format. For more detailed explanations of text editing methods, see pages 43 and
44.
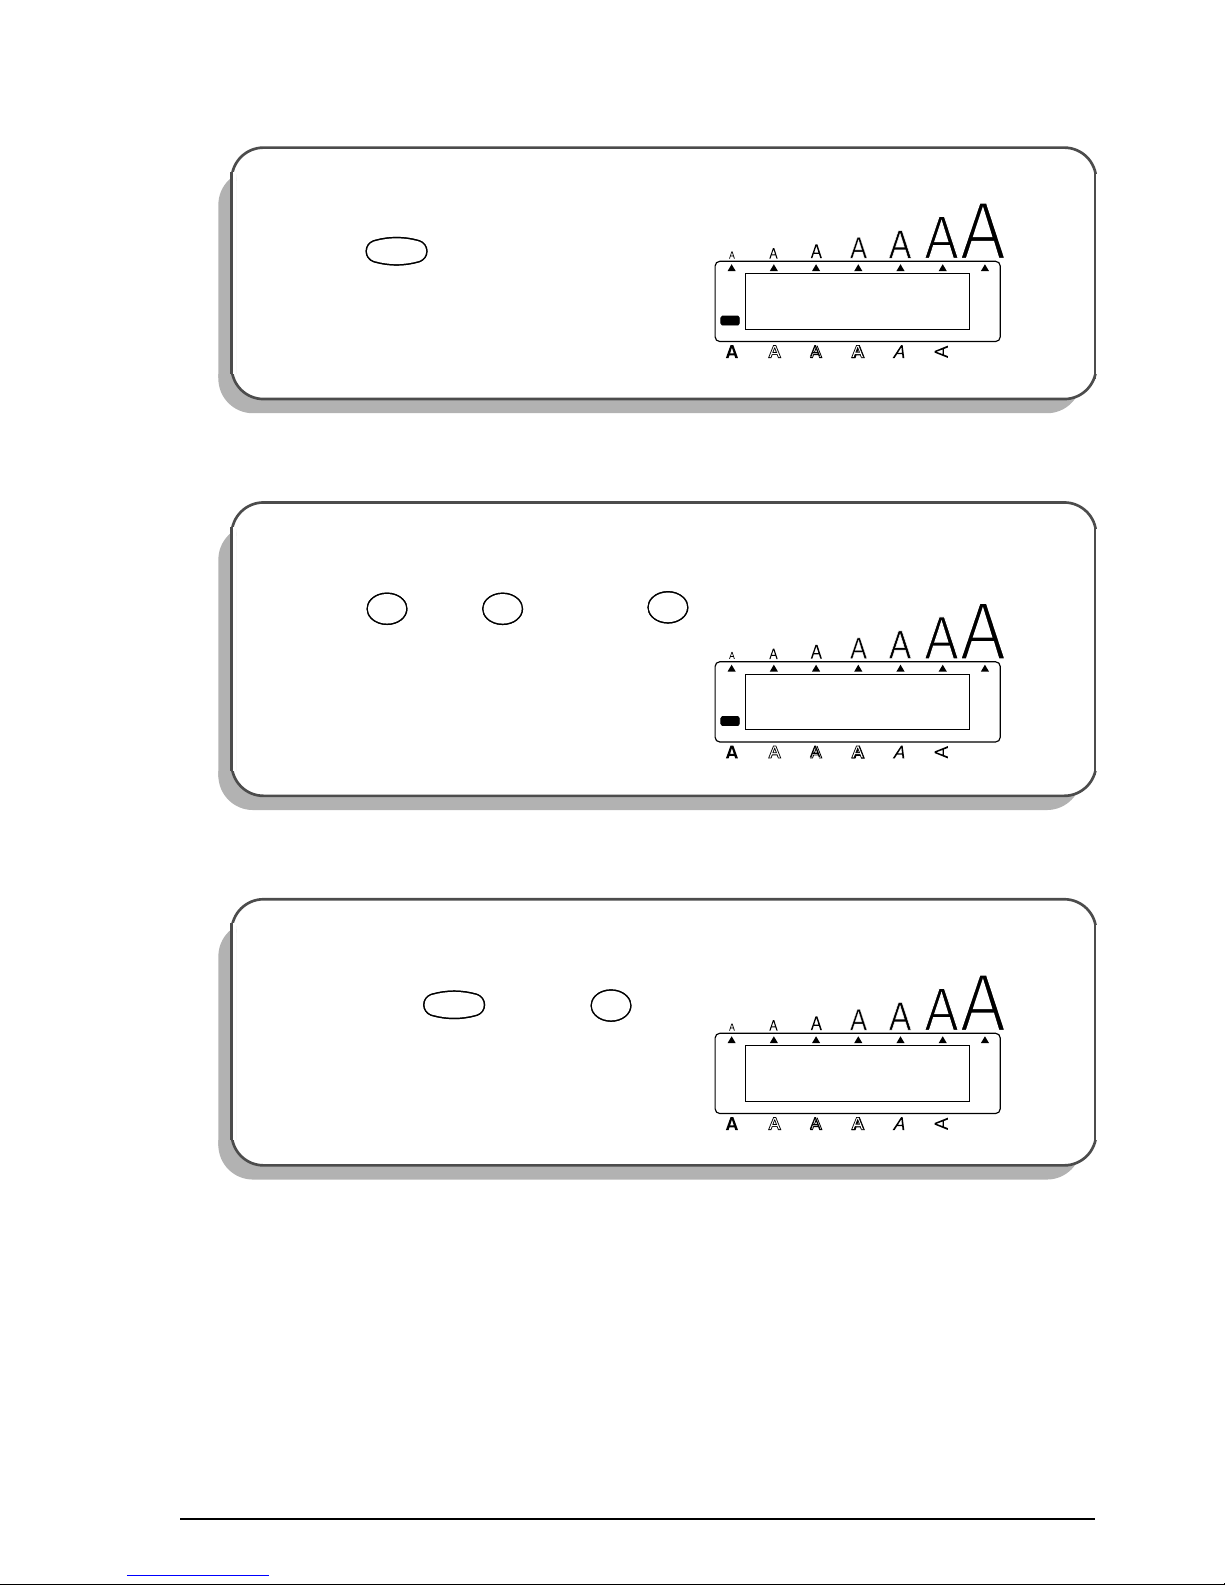
To add a space:
4
Press .
To type in “ROOM”:
5
Press once, twice, then
once.
☞
Since the text is longer than the LCD
display, “ME” moves off the display to
the left.
To exit Caps mode:
6 Hold down and press once.
The Caps indicator goes off.
1: MEETING _
ABCDEFGHIJKL
Alt
Caps
Width
Length
A.Format
Undl/Frm
Length
Space
Feed&Cut
Space
1: ETING ROOM_
ABCDEFGHIJKL
Alt
Caps
Width
Length
A.Format
Undl/Frm
Length
AlignRAlign
R
óOó
O
Repeat
ñ Mñ
M
1: ETING ROOM_
ABCDEFGHIJKL
Alt
Caps
Width
Length
A.Format
Undl/Frm
Length
CodeCode
Caps
Shift
Caps
Shift
17
PRINTING THE TEXT
Several format settings are available, however, in this example we will use the default settings
pre-programmed into the machine and print out our label, which is then automatically cut off
after printing is finished.
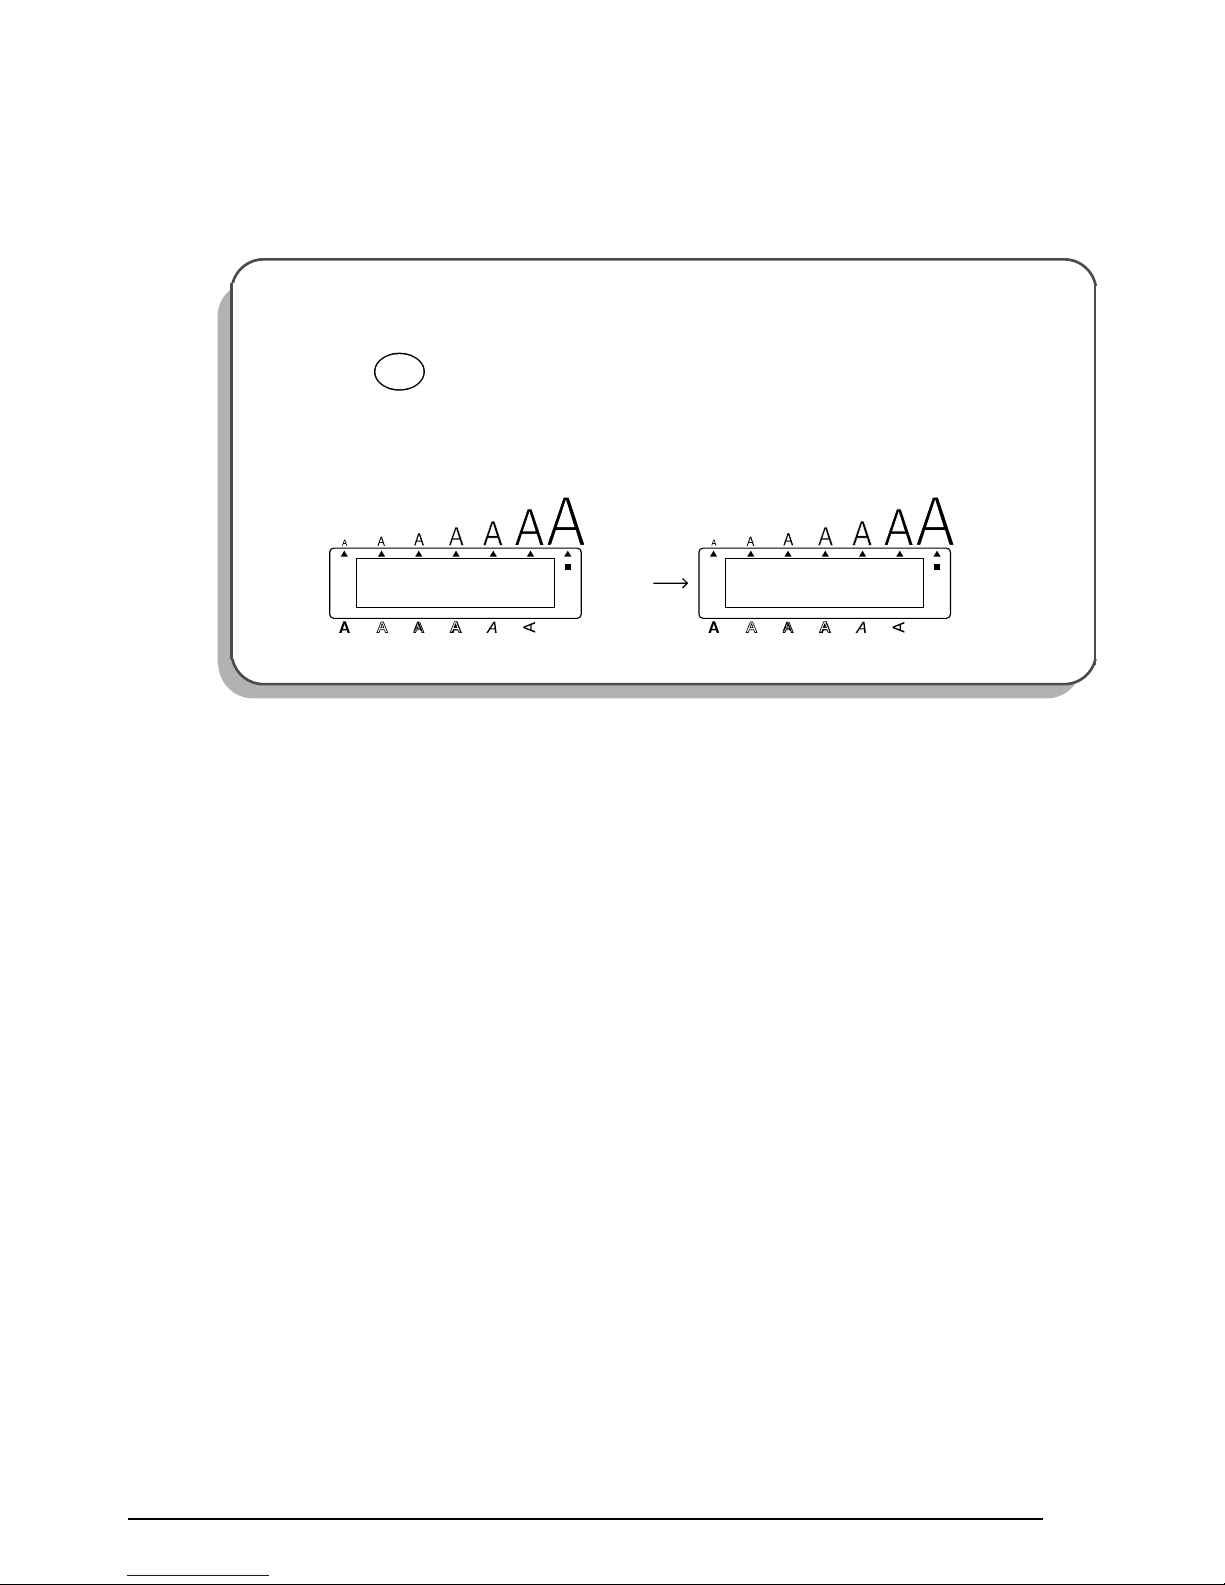
To print the door label:
7
Press once. The message “WORKING” appears just before printing, and
then “COPIES 1/ 1” is displayed while the label is being printed.
☞
If the A.Cut function is set to ON, the label is automatically cut off after it is
printed.
Mirror
Print
1/ 1
COPIES
Alt
Caps
Width
WORKING
Alt
Caps
Width
Length
A.Format
Undl/Frm
Length Length
A.Format
Undl/Frm
Length
18
ADDRESS LABEL EXAMPLE
While making the multi-line address label in this example, we will learn how to create more
decorative labels using the various format settings.
☞
Five-line labels, such as this address label, can only be printed on either 3/4” (18-mm)or 1” (24-mm)-wide tape.
Before entering the new text, we must first erase the text shown in the display from the previous time that the machine was used. When clearing the display, we can choose whether to
erase all of the text and return all format functions (Font, Size, Width, Style, Underline, Frame,
Tape margin, Horizontal alignment, Tab Length, Mirror printing and Length) to their default
settings or just to erase the text.
To erase all of the text and reset the format functions:
1
Hold down and press once.
2 Since TEXT&FORMATS is already
selected, press .
☞
If TEXT&FORMATS was not already
selected, it could be selected by pressing or .
Alt
Caps
TEXT&FORMATS
TEXT ONLY
Width
Length
A.Format
Undl/Frm
Length
CodeCode
Clear
Del
Clear
Del
1: _
ABCDEFGHIJKL
Alt
Caps
Length
A.Format
Undl/Frm
Length
Width
New Block
Home
End
19
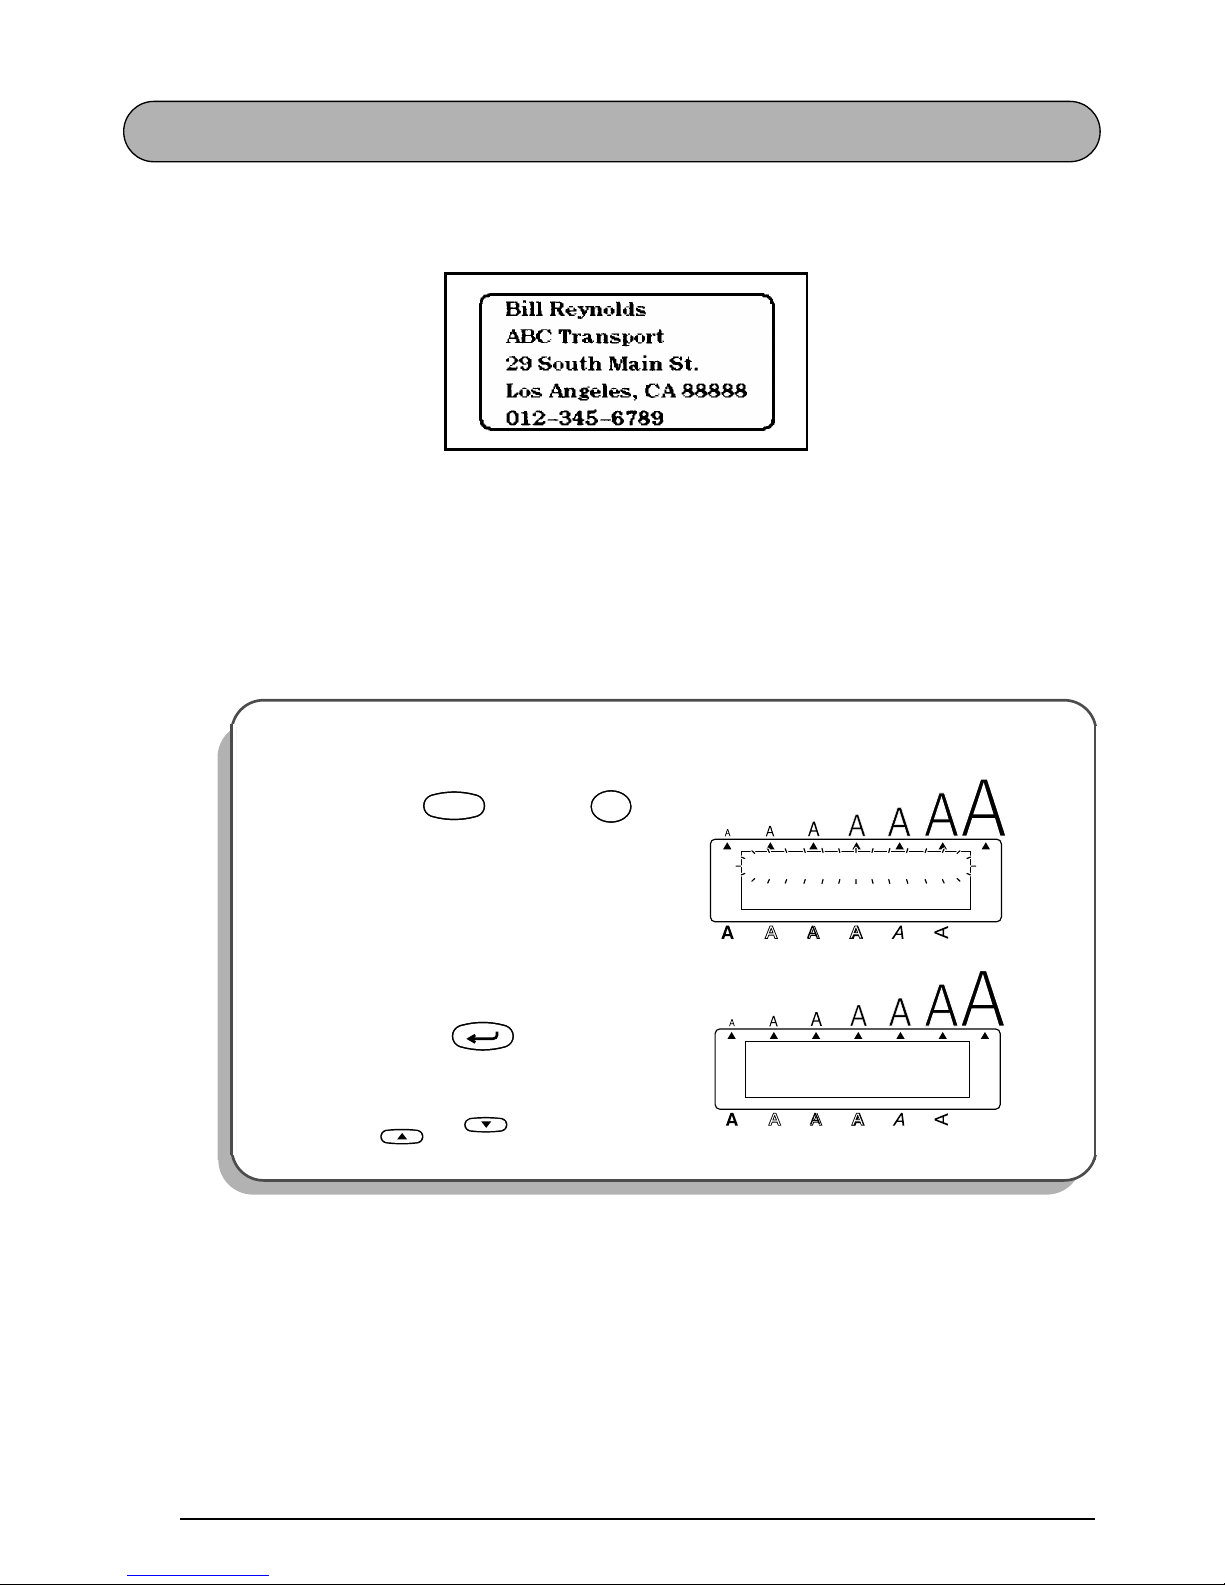
ENTERING THE TEXT
Let’s begin by typing in the first row of text, the name “Bill Reynolds”.
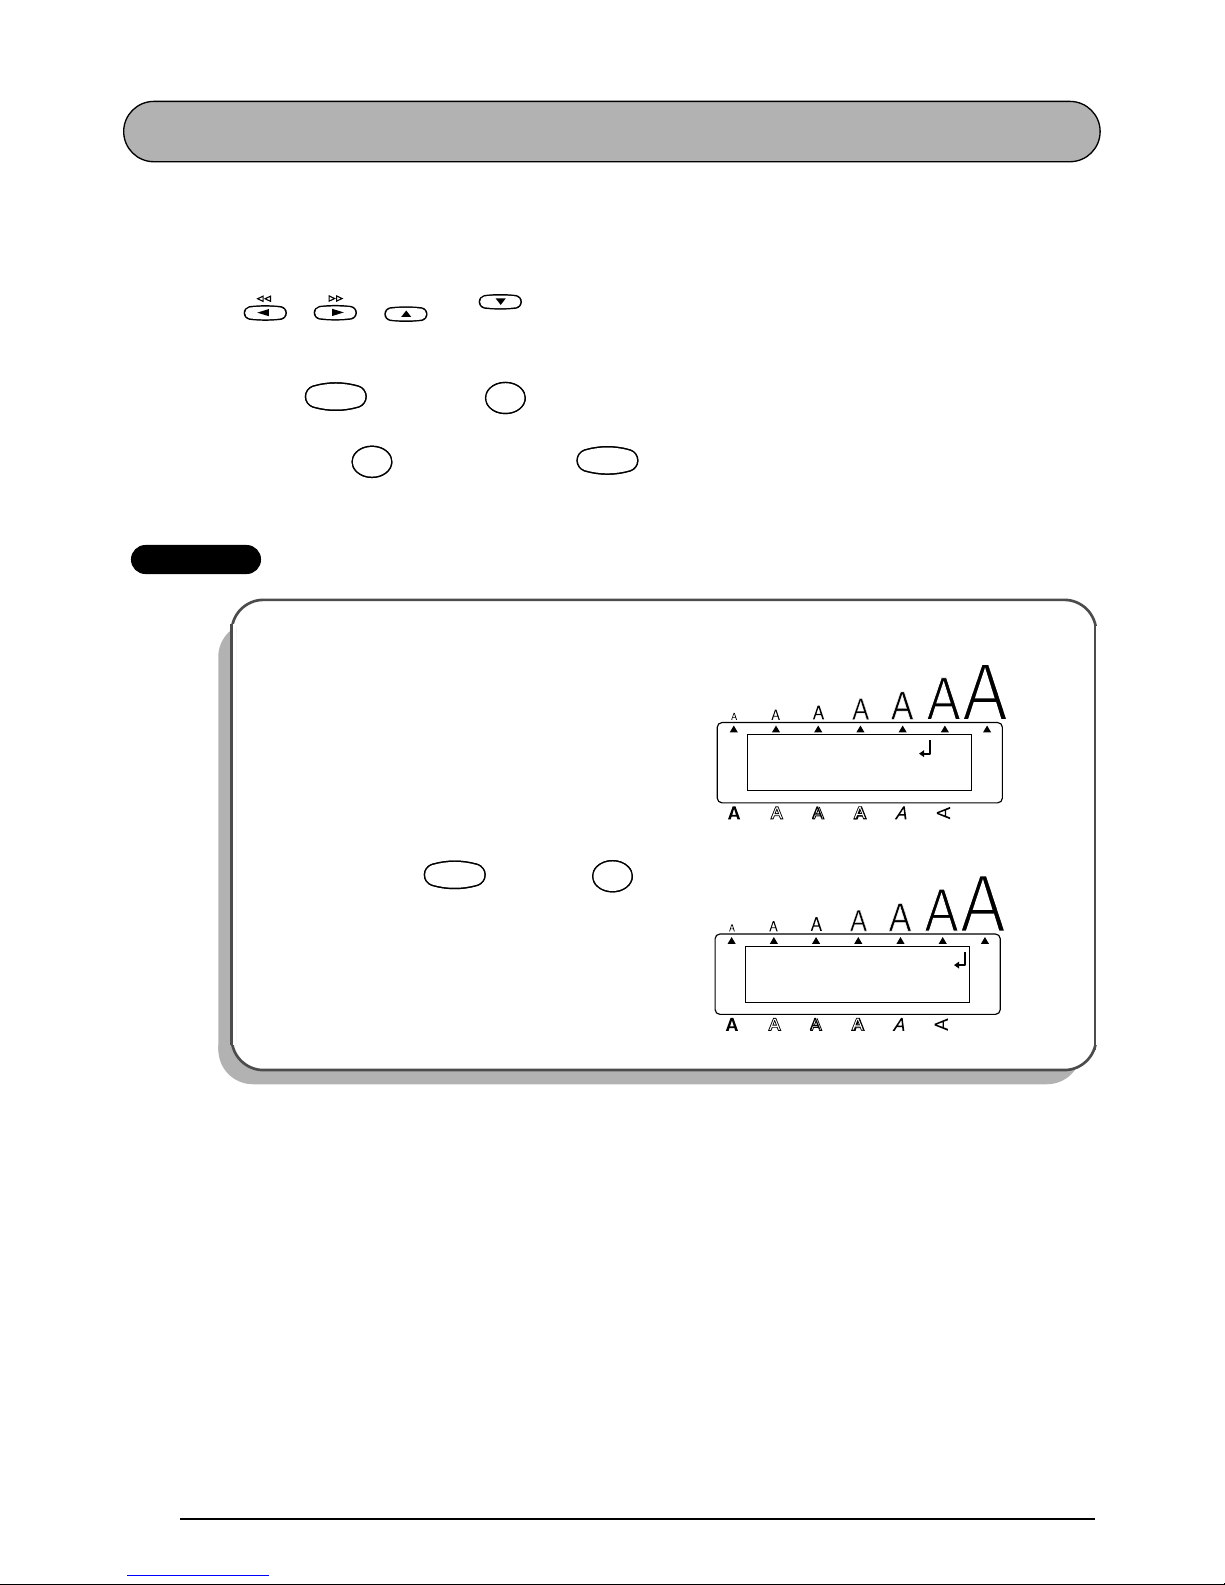
In a multi-line label, the return key ( ) is used to end one line and start the next one.
The return mark ( ) indicates the end of the line.
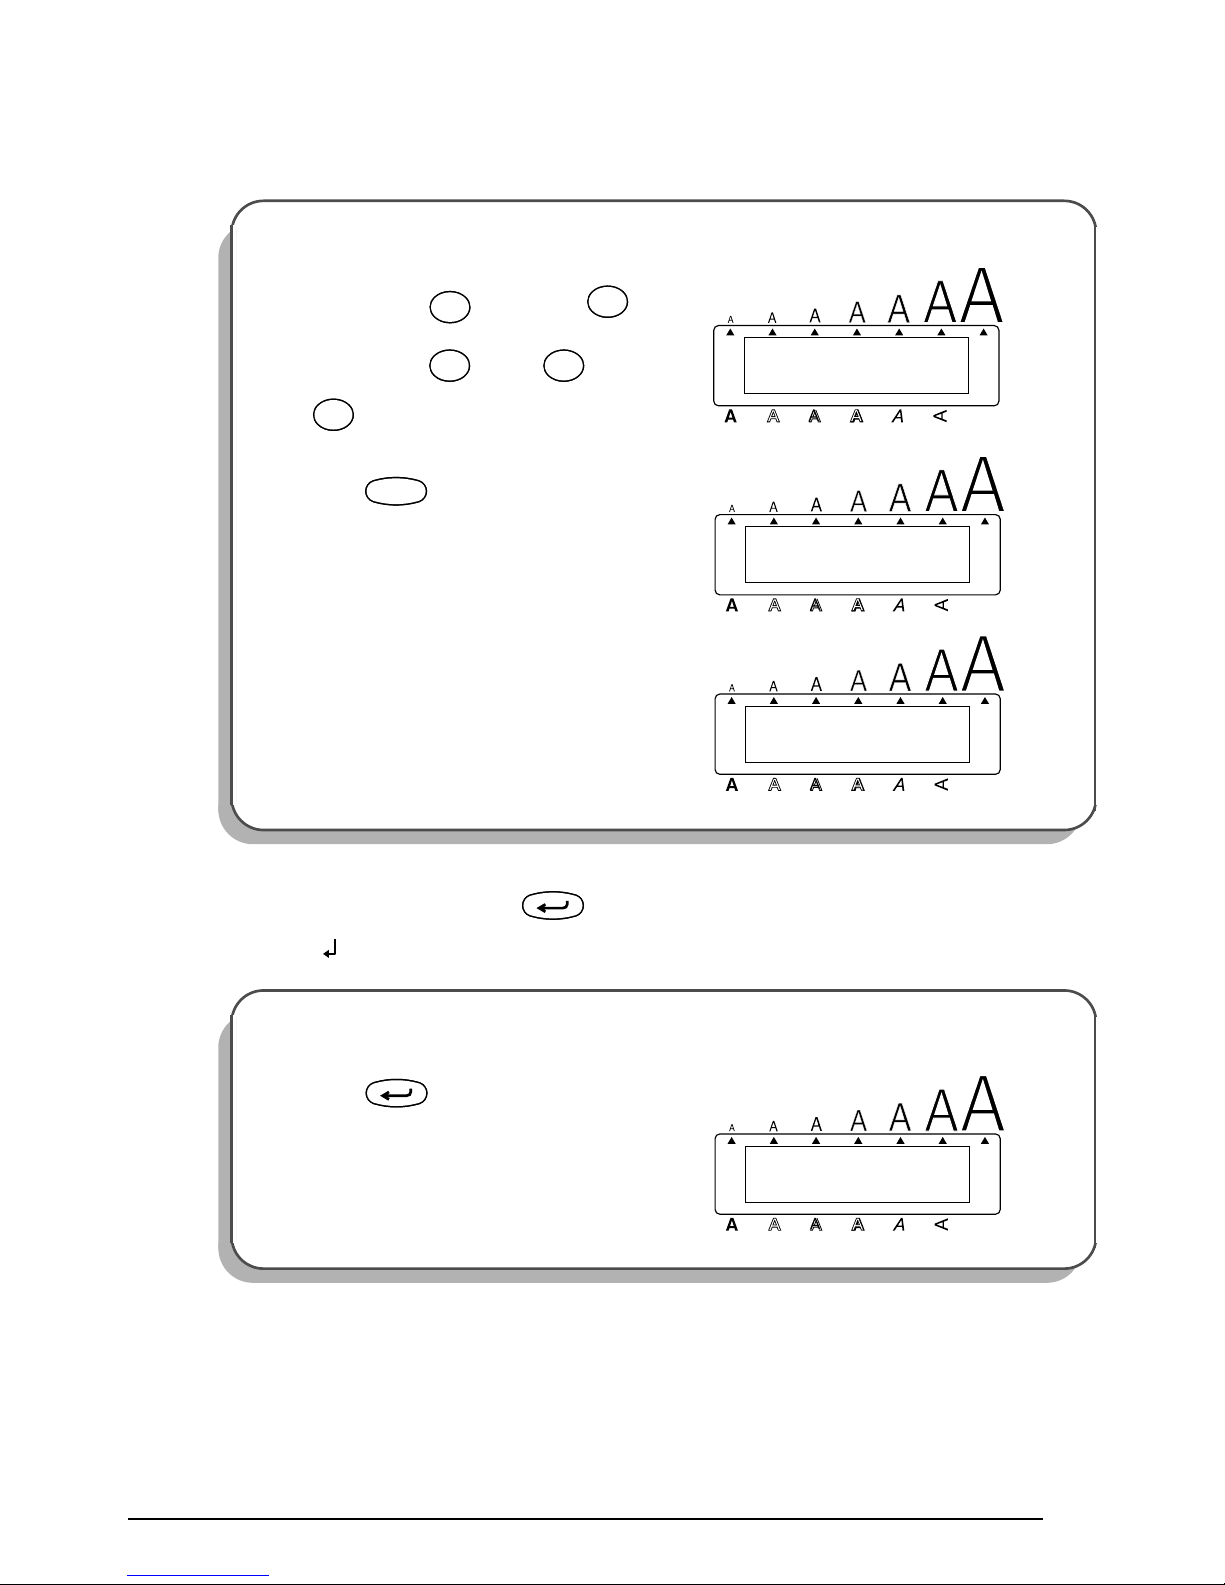
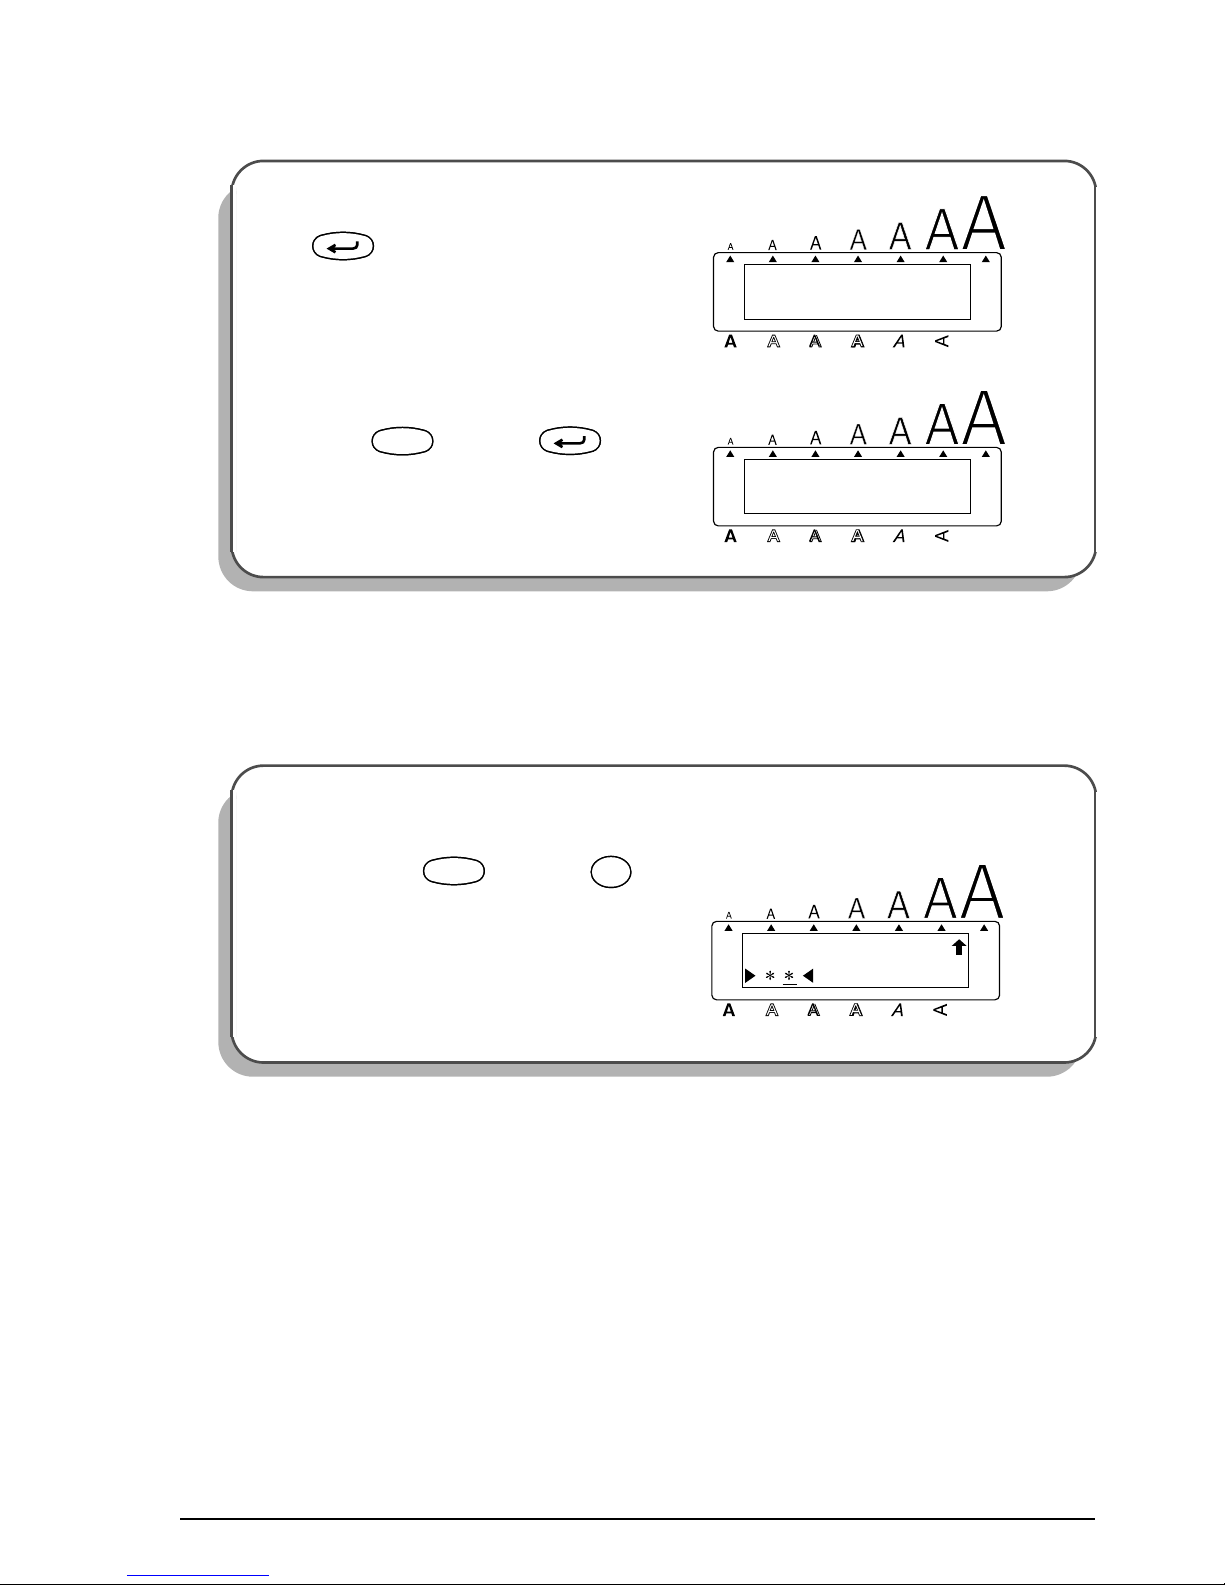
To type in “Bill Reynolds”:
3
Hold down and press once,
then release . Press once, then
twice.
4 Press .
5 Type in “Reynolds”.
☞
Again, the text is longer than the LCD
display. So “Bil” moves off the display
to the left.
To end the first line and begin another one:
6
Press .
1: Bill_
OK TO
Alt
Caps
Width
Length
A.Format
Undl/Frm
Length
Caps
Shift
Caps
Shift
BB
Caps
Shift
Caps
Shift
íIí
I
Barcode
úLú
L
1: Bill _
OK TO
Alt
Caps
Width
Length
A.Format
Undl/Frm
Length
Space
Feed&Cut
Space
1: l Reynolds_
OK TO
Alt
Caps
Width
Length
A.Format
Undl/Frm
Length
New Block
2: _
1: Bill Reynol
Alt
Caps
Width
Length
A.Format
Undl/Frm
Length
New Block
20
Now, we can enter the company name, address, and telephone number: ABC Transport; 29
South Main St.; Los Angeles, CA 88888; 012-345-6789.
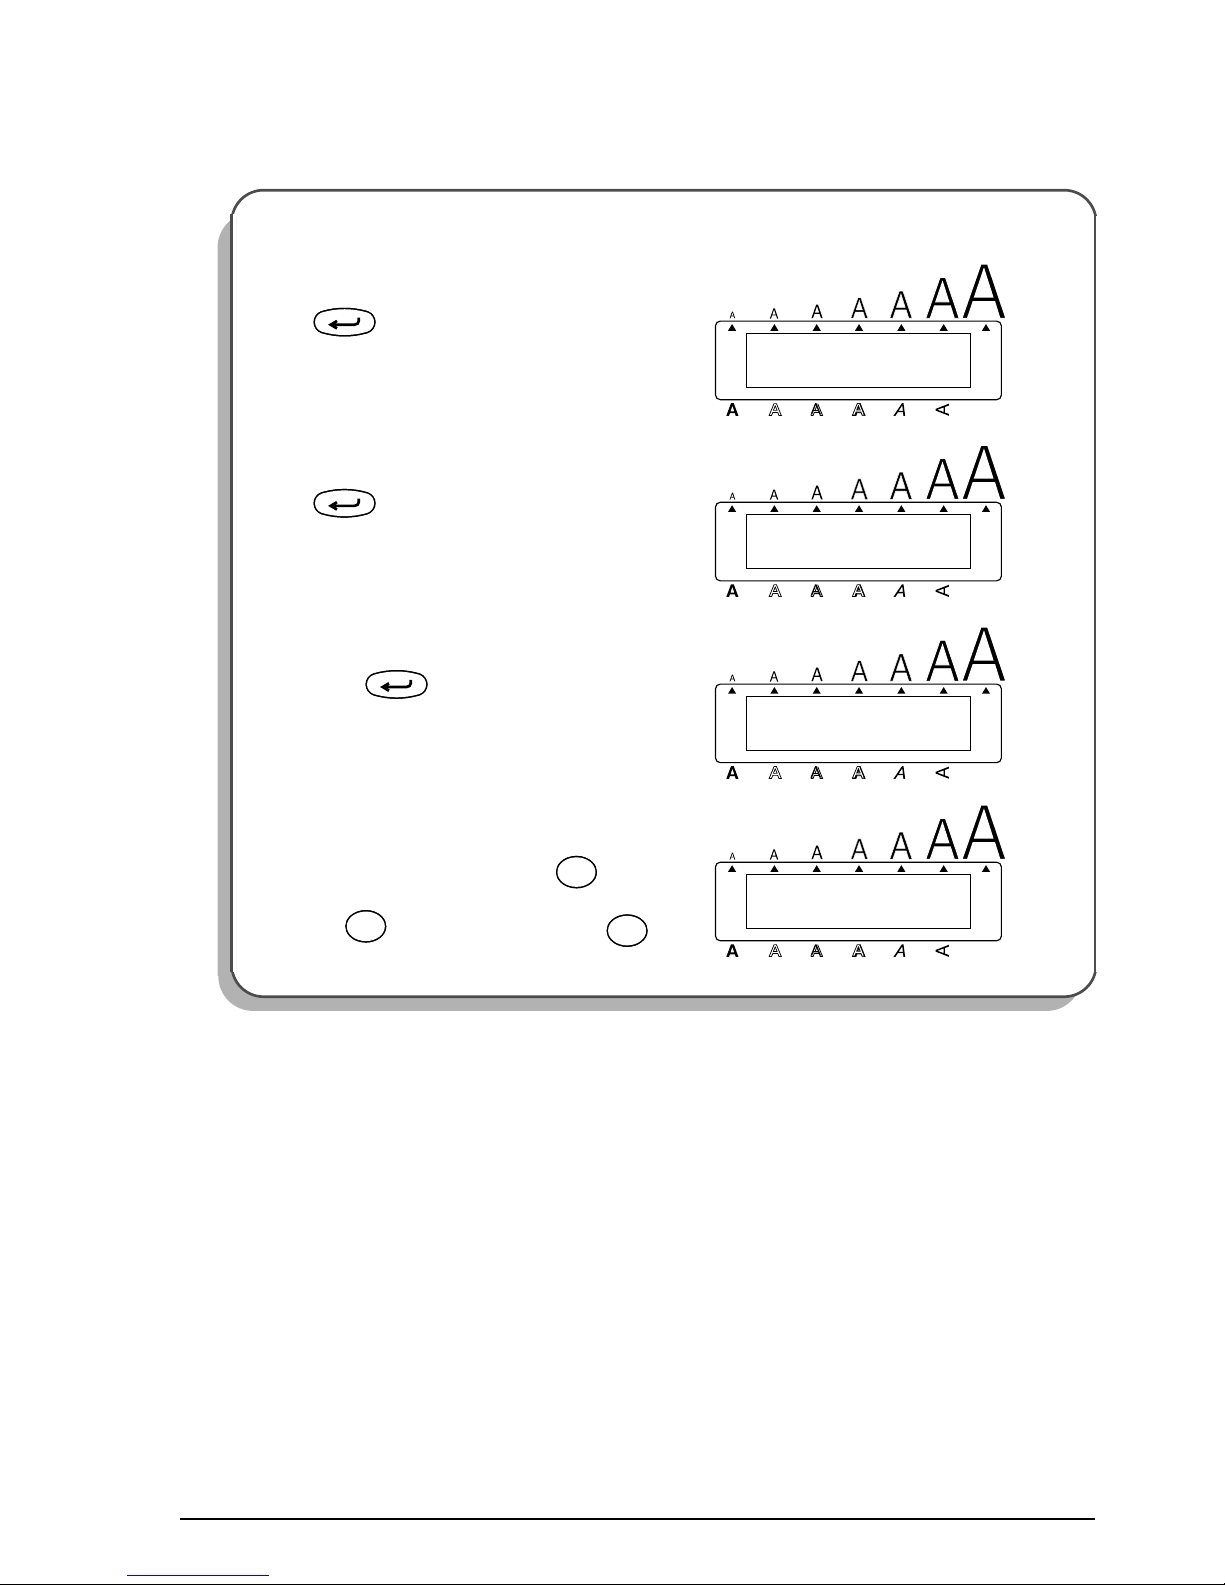
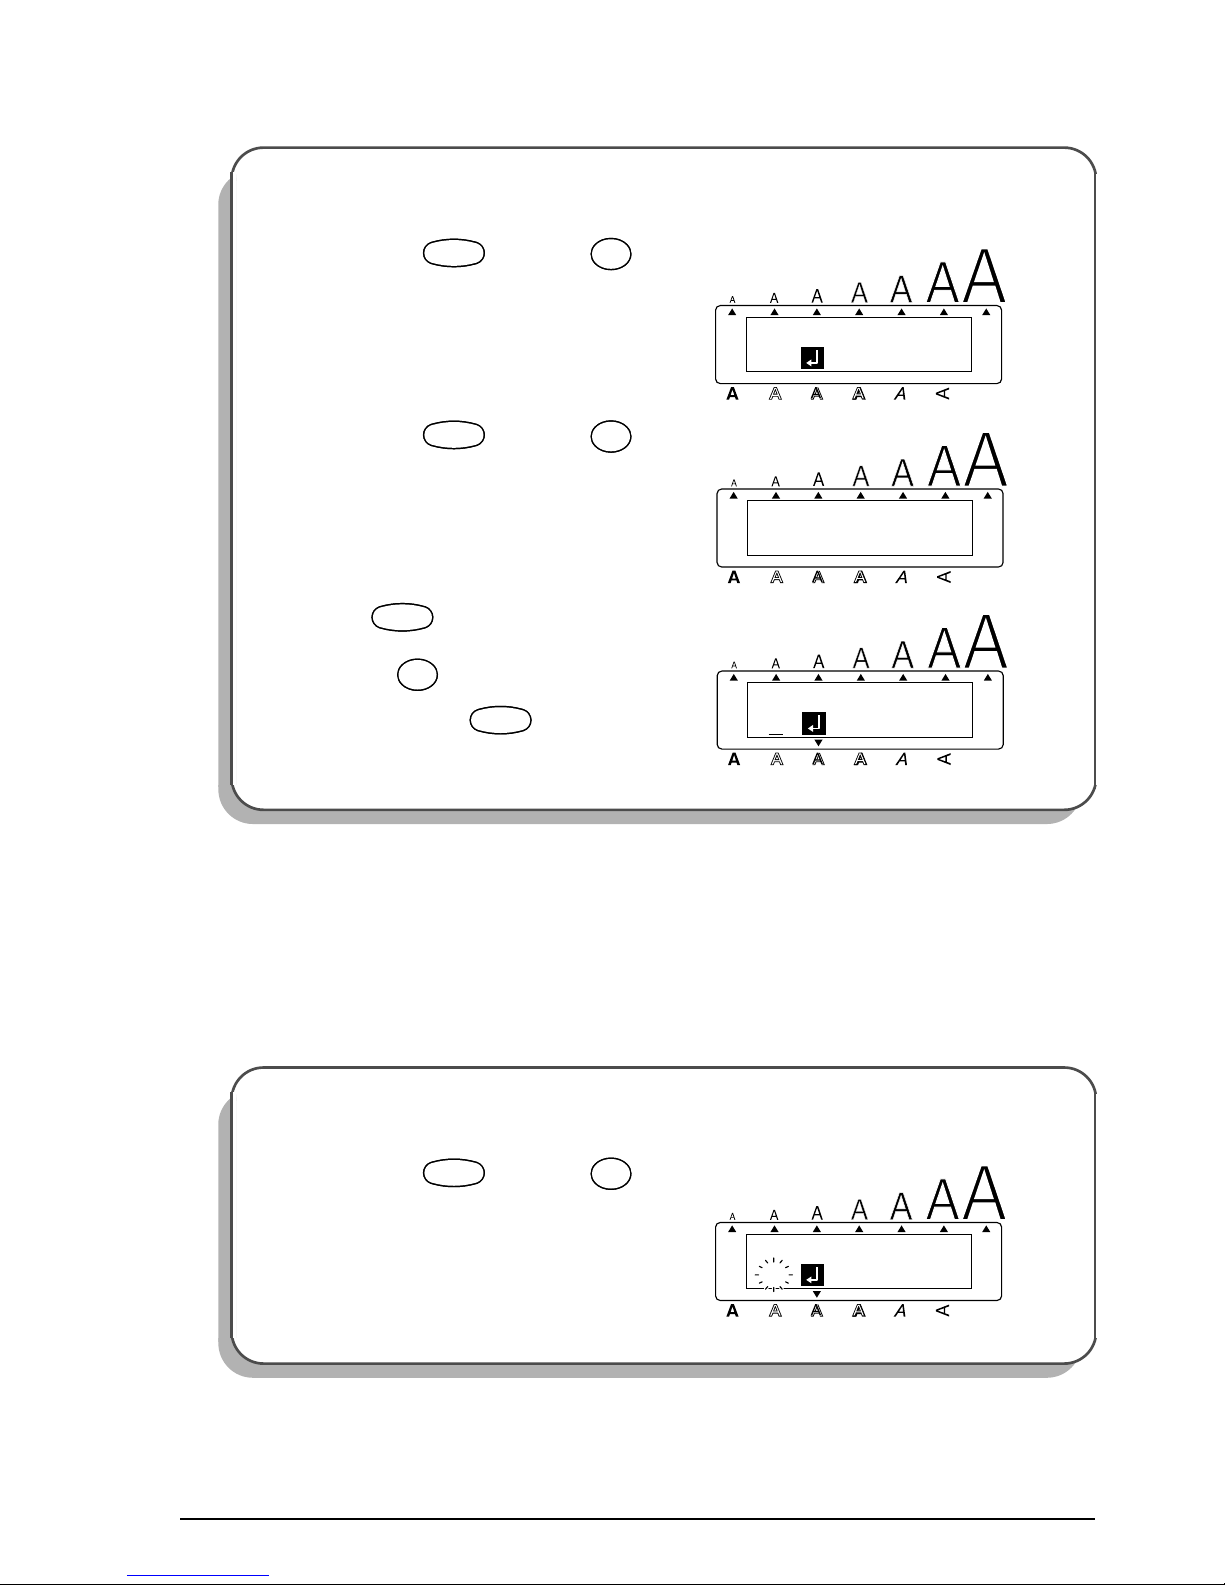
To type in the company name, address, and telephone number:
7
Type “ABC Transport”, and then press
.
8 Type “29 South Main St.”, and then press
.
9 Type “Los Angeles, CA 88888”, and then
press .
0 Type “012-345-6789”.
☞
To type “-”, hold down and press
once, and then release .
Alt
Caps
3: _
2: ABC Transpo
Width
Length
A.Format
Undl/Frm
Length
New Block
Alt
Caps
4: _
3: 29 South Ma
Width
Length
A.Format
Undl/Frm
Length
New Block
Alt
Caps
Length
A.Format
Undl/Frm
Length
5: _
4: Los Angeles
Width
New Block
Alt
Caps
5: 2-345-6789_
4: s Angeles,
Width
Length
A.Format
Undl/Frm
Length
Alt
Symbol
Alt
Symbol
-
/
,
-
/
,
Alt
Symbol
Alt
Symbol

21
FORMATTING THE TEXT
Now the text is entered as we wish. If it were printed, the standard default settings would be
used. The text would be aligned on the left side with 1 1/24” (25 mm) margins and would not
be framed or underlined. In addition, the characters would be auto-sized (AUTO) and printed
using the HELSINKI font and NORMAL style settings. For more details concerning format set-
tings, please see pages 68 through 82.
For this label, though, let’s assume we want a different style of text: BRUSSELS font, framed,
and printed with 1/6” (4 mm) margins (NONE). Therefore, we must change the format.
To select the BRUSSELS font setting:
A
While holding down , press
once, and keep held down to display the current font setting.
B While still holding down , con-
tinue pressing until BRUSSELS is
displayed, and then release .
To select the ROUND frame setting:
C
While holding down , press
once, and keep held down to display the current frame setting.
D While still holding down , continue
pressing until ROUND is displayed,
and then release .
HELSINKI
FONT
Alt
Caps
Width
Length
A.Format
Undl/Frm
Length
CodeCode
¡
Font
!
1
¡
Font
!
1
CodeCode
BRUSSELS
FONT
Alt
Caps
Width
Length
A.Format
Undl/Frm
Length
CodeCode
¡
Font
!
1
¡
Font
!
1
CodeCode
OFF
FRAME
Alt
Caps
Width
Length
A.Format
Undl/Frm
Length
CodeCode
Frame
¢
6
Frame
¢
6
CodeCode
ROUND
FRAME
Alt
Caps
Width
Length
A.Format
Undl/Frm
Length
CodeCode
Frame
¢
6
Frame
¢
6
CodeCode

22
Different format settings can be chosen either before or after the text is entered. The procedure
shown above can also be used to change the other format settings.
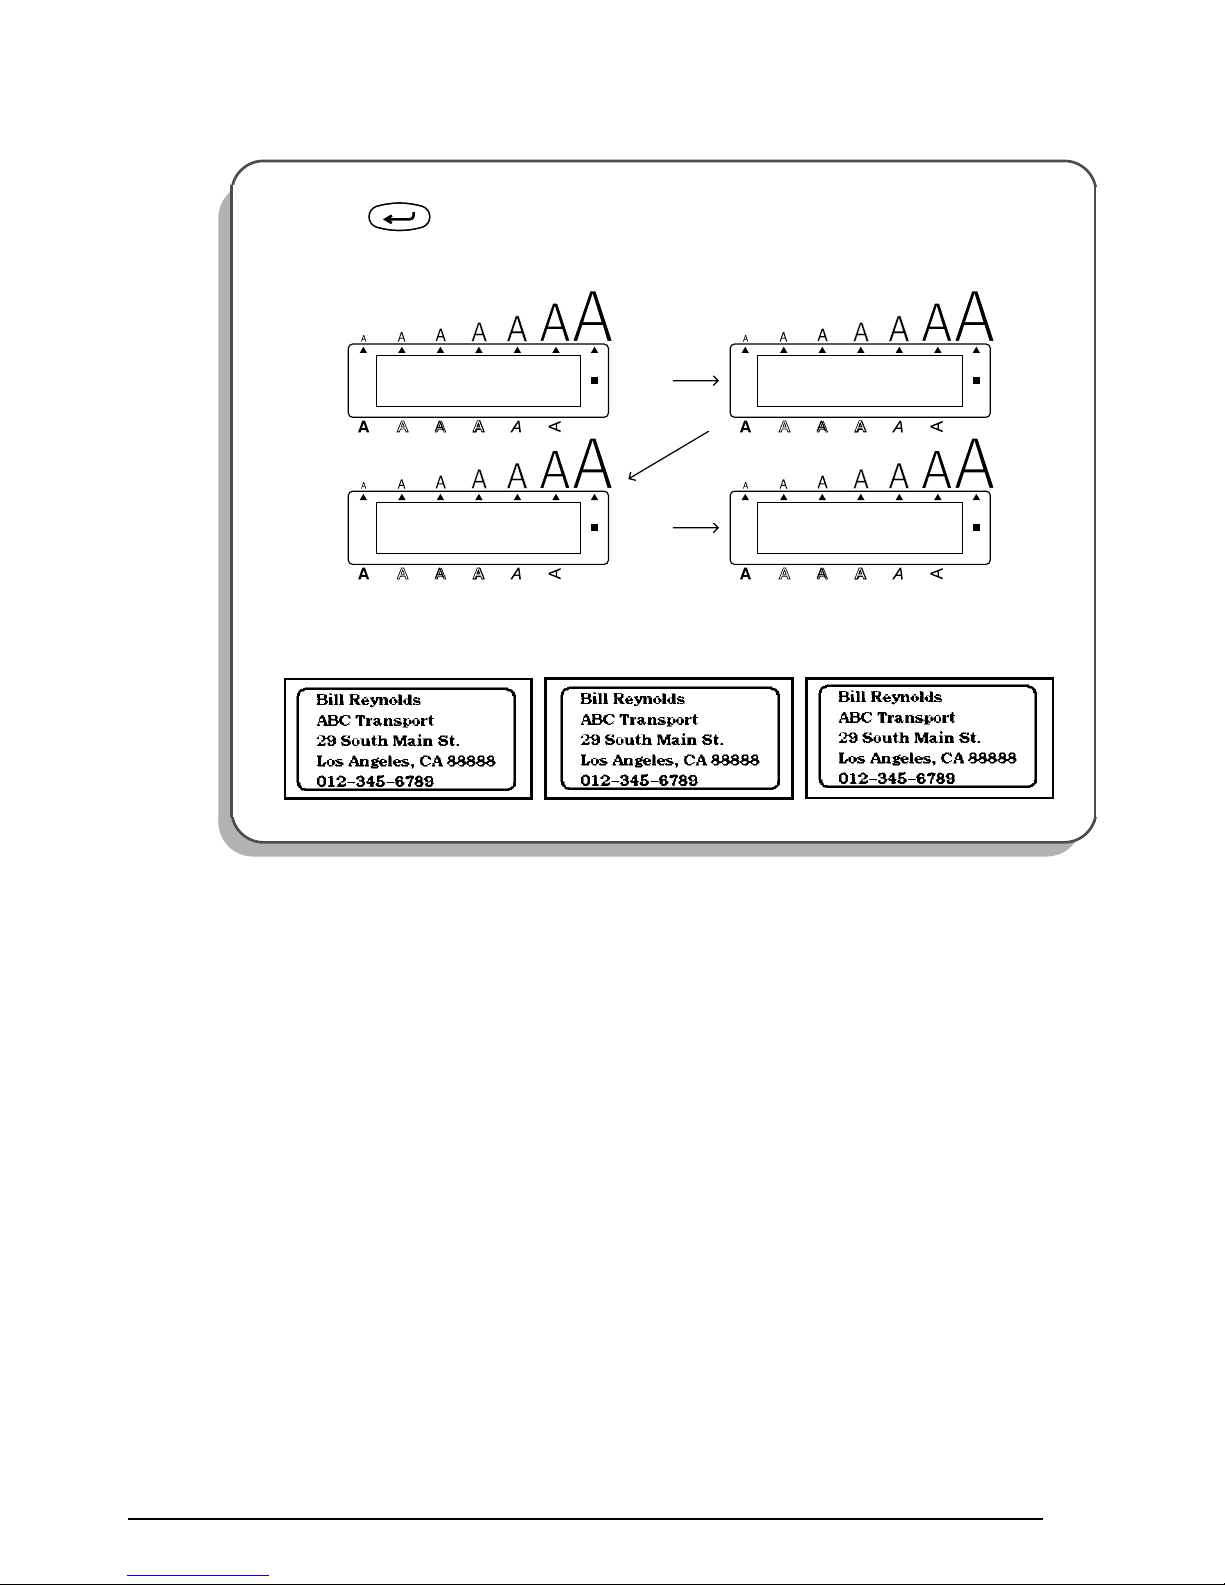
PRINTING THE TEXT
If we want only one copy of the text, we could just press to print it. However, let’s
assume that we have three letters onto which we wish to attach address labels. Therefore, we
need to print three copies of the same text.
To select the NONE tape margin setting:
E
While holding down , press
once, and keep held down to display the current tape margin setting.
F While still holding down , con-
tinue pressing until NONE is dis-
played, and then release .
To print three copies of the label:
G Hold down and press once.
H Press once.
☞
The number can be entered either by
typing it in using the number keys or
by selecting it using and .
FEED
FULL
Alt
Caps
Width
Length
A.Format
Undl/Frm
Length
CodeCode
TapeETape
E
CodeCode
FEED
NONE
Alt
Caps
Width
Length
A.Format
Undl/Frm
Length
CodeCode
TapeETape
E
CodeCode
Mirror
Print
1
COPIES
Alt
Caps
Width
Length
A.Format
Undl/Frm
Length
CodeCode
óOó
O
Repeat
3
COPIES
Alt
Caps
Width
Length
A.Format
Undl/Frm
Length
Width
#
3
Width
#
3
Home
End
23
I Press to begin printing. The message “WORKING” appears just before
printing, and then the number of each copy being printed is displayed.
☞
If the A.Cut function is set to ON, each label is automatically cut off after it is
printed.
New Block
1/ 3
COPIES
2/ 3
COPIES
3/ 3
COPIES
Alt
Caps
Alt
Caps
Alt
Caps
Width Width
Width
WORKING
Alt
Caps
Width
Length
A.Format
Undl/Frm
Length Length
A.Format
Undl/Frm
Length
Length
A.Format
Undl/Frm
Length Length
A.Format
Undl/Frm
Length
24
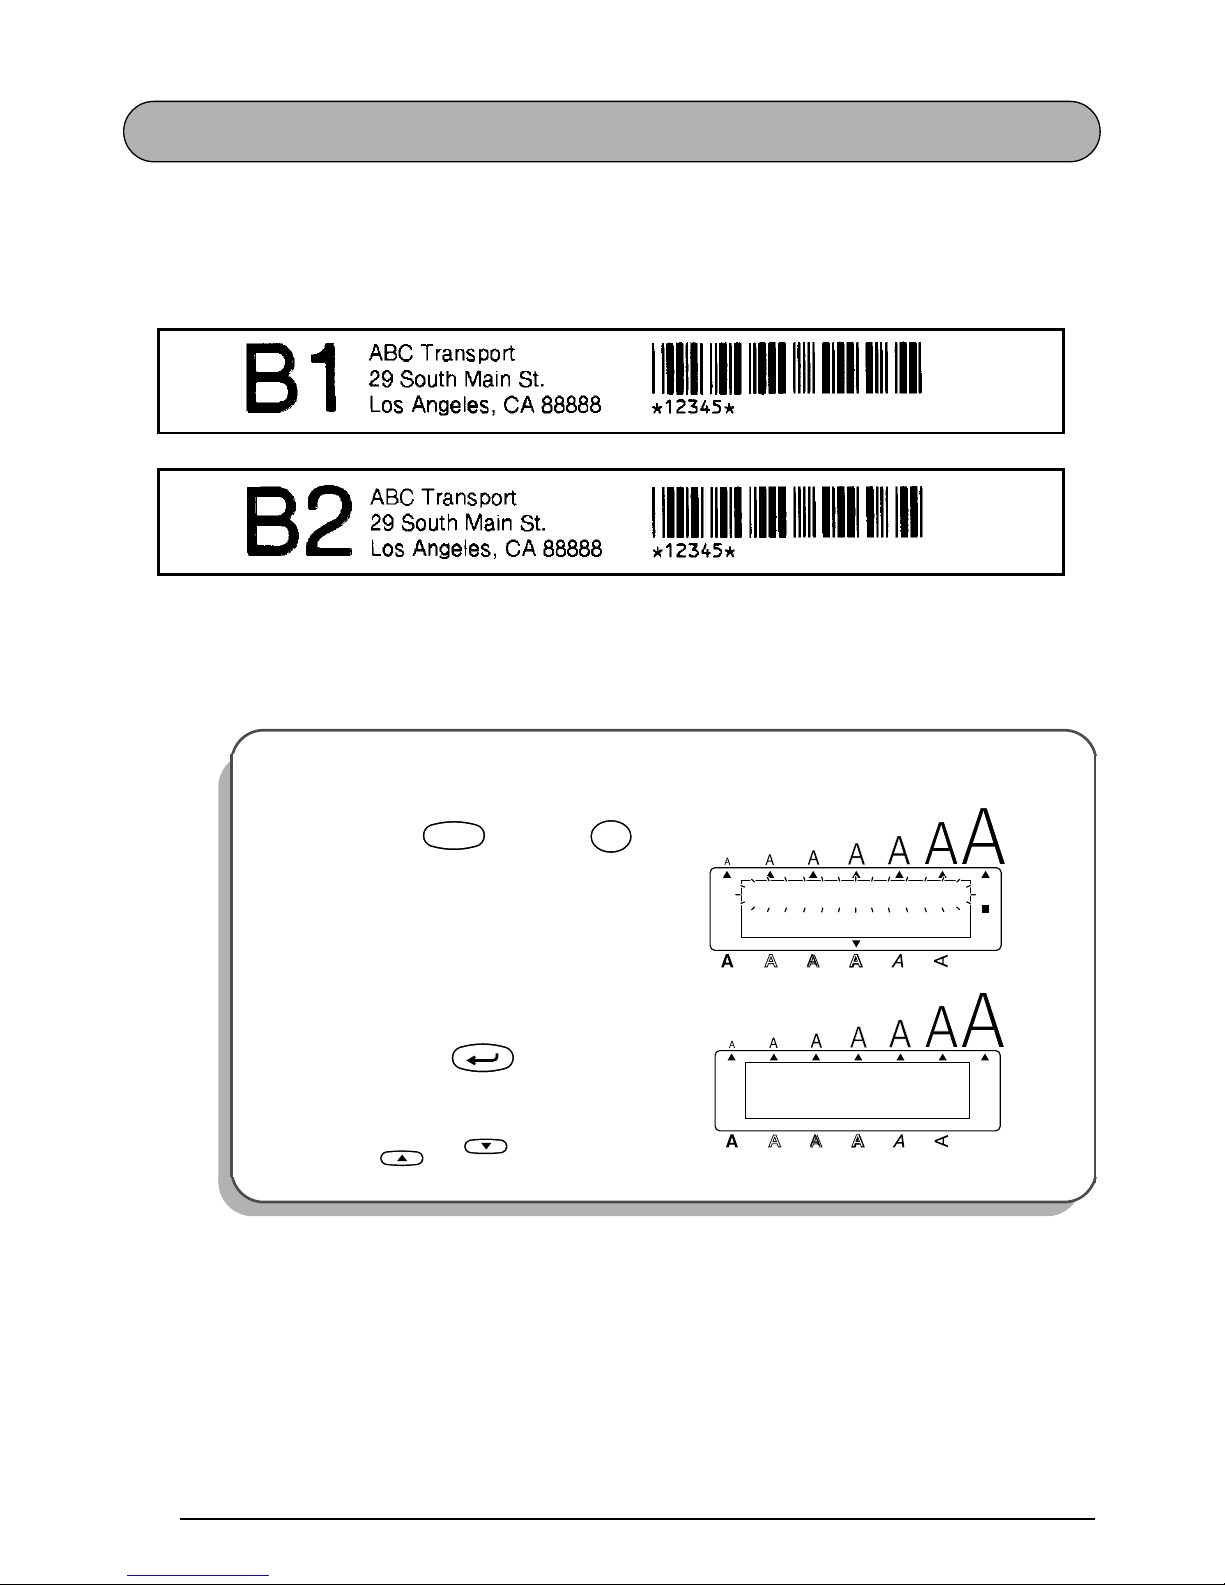
STORAGE SHELF LABEL EXAMPLE
In this final example, we will practice using the New block function and the Local format
function as well as more specialized features such as the Barcode and Numbering functions.
The following labels, which could be used to describe objects stored on a shelf, contain multiple blocks and mixed formatting.
☞
The labels in this example were made using 3/4” (18-mm)-wide tape.
Before entering our new text, we must first erase the text from the previous time that the
P-touch was used.
To clear the working area for a new label:
1
Hold down and press once.
2 Since TEXT&FORMATS is already
selected, press .
☞
If TEXT&FORMATS was not already
selected, it could be selected by pressing or .
Alt
Caps
TEXT&FORMATS
TEXT ONLY
Width
Length
A.Format
Undl/Frm
Length
CodeCode
Clear
Del
Clear
Del
1: _
ABCDEFGHIJKL
Alt
Caps
Length
A.Format
Undl/Frm
Length
Width
New Block
Home
End

25
ENTERING THE TEXT
Now, we can begin entering the text for our storage shelf label.
Each time the number of lines in a section of the text changes, a new block of text must be created. Therefore, the text for our label must be entered in three separate blocks.
Since we will now change from a one-line to a three-line block, we will use the New block
function instead of a normal return. The new block mark ( ) indicates the end of a block.
For more details on the New block function, refer to
NEW BLOCK FUNCTION
on page 40.
To input the shelf number (the first block of text):
3
Type in “B1”.
To create a new block of text:
4
Hold down and press
once.
To enter the company address (the second block of text):
5
Type “ABC Transport”, and then press
.
1: B1_
Alt
Caps
Width
Length
A.Format
Undl/Frm
Length
1: _
1: B1
Alt
Caps
Width
Length
A.Format
Undl/Frm
Length
CodeCode
New Block
2: _
1: ABC Transpo
Alt
Caps
Width
Length
A.Format
Undl/Frm
Length
New Block
26
Now, we must enter the third block of the text: the barcode. Although there are many barcode
types available, let’s use CODE 39, which can use an unrestricted number of digits. More
details on the Barcode function can be found on pages 83 through 86.
6
Type “29 South Main St.”, then press
.
7 Type “Los Angeles, CA 88888”, hold
down and press once.
To add the barcode for the part code (the third block):
8 Hold down and press once.
3: _
2: 29 South Ma
Alt
Caps
Width
Length
A.Format
Undl/Frm
Length
New Block
1: _
3: Los Angeles
Alt
Caps
Width
Length
A.Format
Undl/Frm
Length
CodeCode
New Block
CODE 39
Alt
Caps
Width
Length
A.Format
Undl/Frm
Length
CodeCode
íIí
I
Barcode

27
If we wished to use a different type or change any of the default barcode settings, we could
press , and then use the cursor keys to change the parameter settings. However, since we
will use the default settings for this example, we can immediately input our barcode data.
FORMATTING THE TEXT
Now that we’ve entered all of the text, we can start formatting it. Next, let’s use the Local format function to change the style of the shelf number (B1) in order to emphasize it. The Local
format function is used to select a part of the text so that it can be formatted with a font, size,
width, style, underline or frame setting that is different from the rest of the text. Since only the
characters in the text block containing the cursor will have a different format, we must first
move the cursor to the first block.
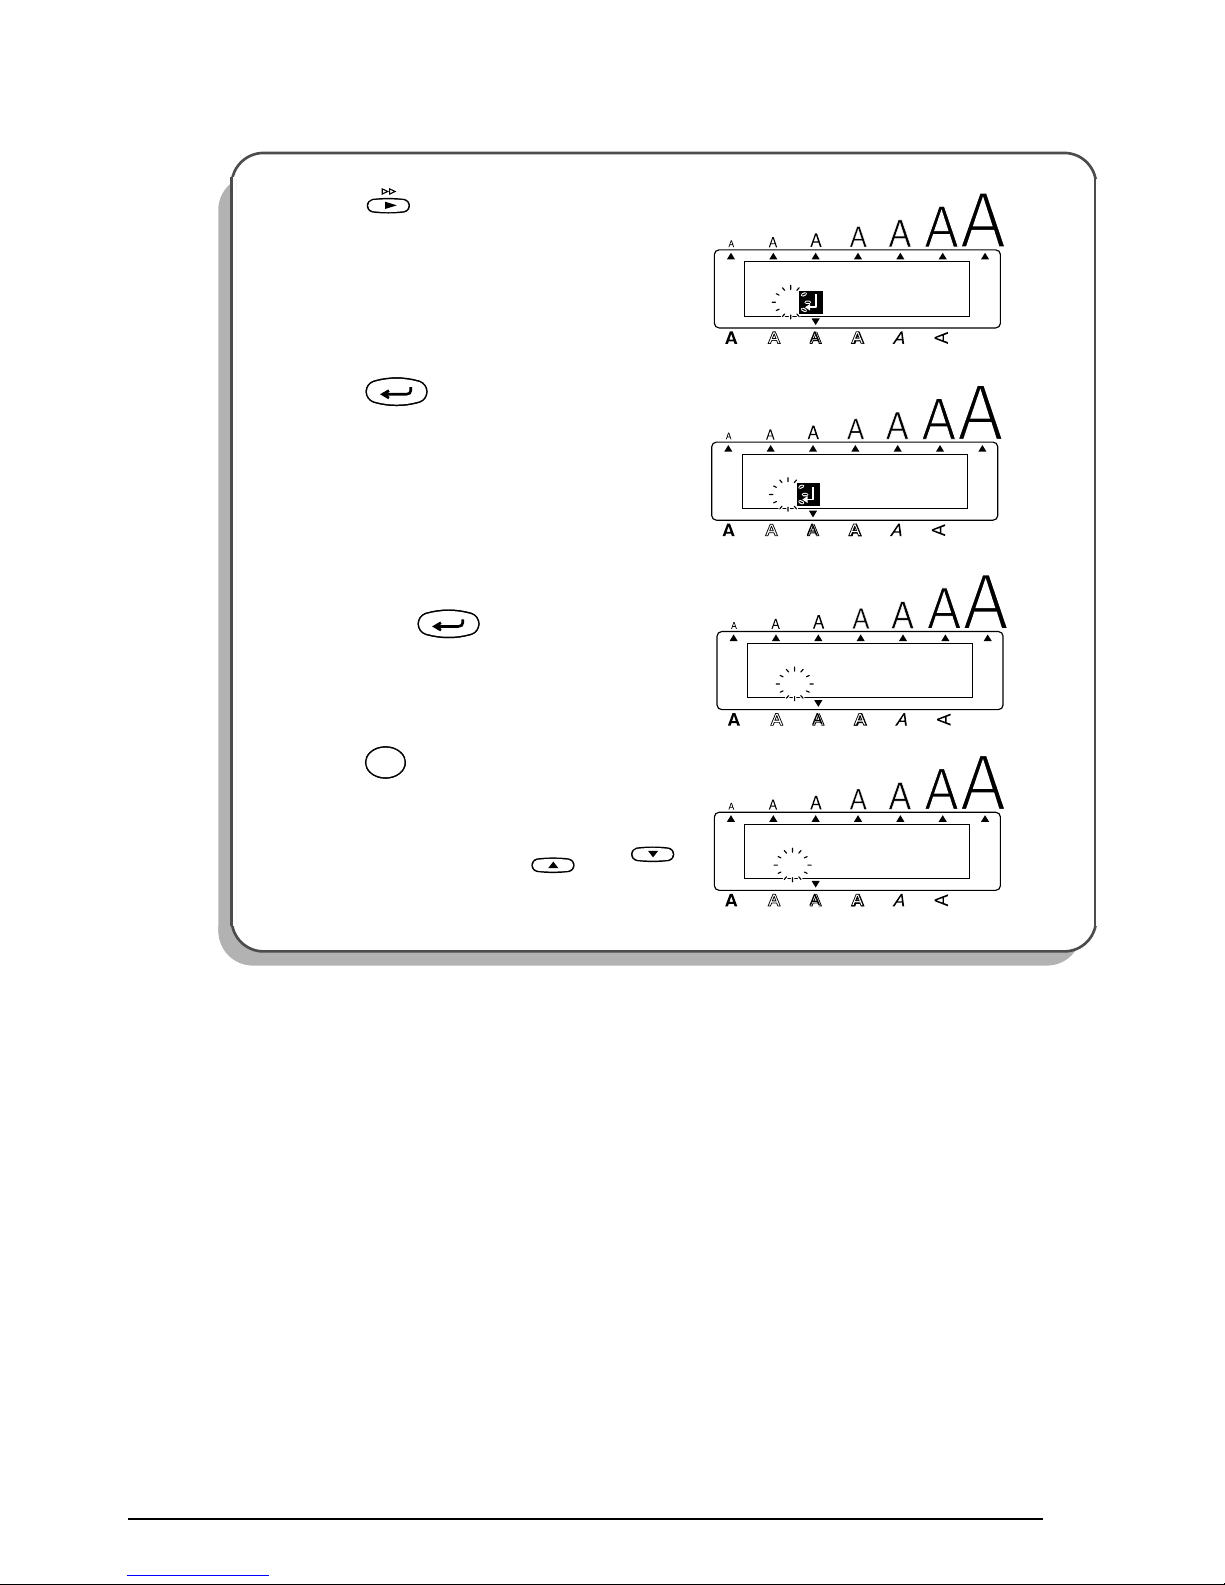
To enter the barcode data:
9
Type in “12345”.
0 Press .
To move the cursor to the first block:
A
Hold down and press .
☞
The cursor can be moved quickly
from block to block by holding down
and pressing or .
Home
12345
CODE 39
Alt
Caps
Width
Length
A.Format
Undl/Frm
Length
1: _
3: Los Angeles
Alt
Caps
Width
Length
A.Format
Undl/Frm
Length
New Block
1: B1
Alt
Caps
Width
Length
A.Format
Undl/Frm
Length
CodeCode
Home
Caps
Shift
Caps
Shift
28
PRINTING THE TEXT
Finally, let’s assume that we want to put labels on two different shelves (B1 and B2) while
keeping the same barcode. To do this, we can use the Numbering function to print two copies
of our text while automatically increasing the shelf number after each label is printed. For
more details on the Numbering function, refer to
NUMBERING FUNCTION
on pages 89
through 91.
To select the SOLID style setting for the first block:
B
Hold down and press once.
C Hold down and press once.
D Keep held down and continue
pressing until SOLID is displayed,
and then release .
To use the Numbering function:
E
Hold down and press once.
1: B1
BLOCK FORMAT
Alt
Caps
Width
Length
A.Format
Undl/Frm
Length
CodeCode
S
Local
S
NORMAL
STYLE
Alt
Caps
Width
Length
A.Format
Undl/Frm
Length
CodeCode
Style
$
4
Style
$
4
1: B1
Alt
Caps
Width
Length
A.Format
Undl/Frm
Length
CodeCode
Style
$
4
Style
$
4
CodeCode
1: B1
SET START PT
Alt
Caps
Width
Length
A.Format
Undl/Frm
Length
CodeCode
áPá
P
Number
29
F
Press until “1” is flashing.
G Press .
H Since we only want “1” in the numbering
field, press again.
I Press once.
☞
The number can be entered either by
typing it in using the number keys or
by selecting it using and .
1: B1
SET START PT
Alt
Caps
Width
Length
A.Format
Undl/Frm
Length
1: B1
SET END PT
Alt
Caps
Width
Length
A.Format
Undl/Frm
Length
New Block
1
# INCREASES
Alt
Caps
Width
Length
A.Format
Undl/Frm
Length
New Block
2
# INCREASES
Alt
Caps
Width
Length
A.Format
Undl/Frm
Length
Size
2
@
Size
2
@
Home
End
30
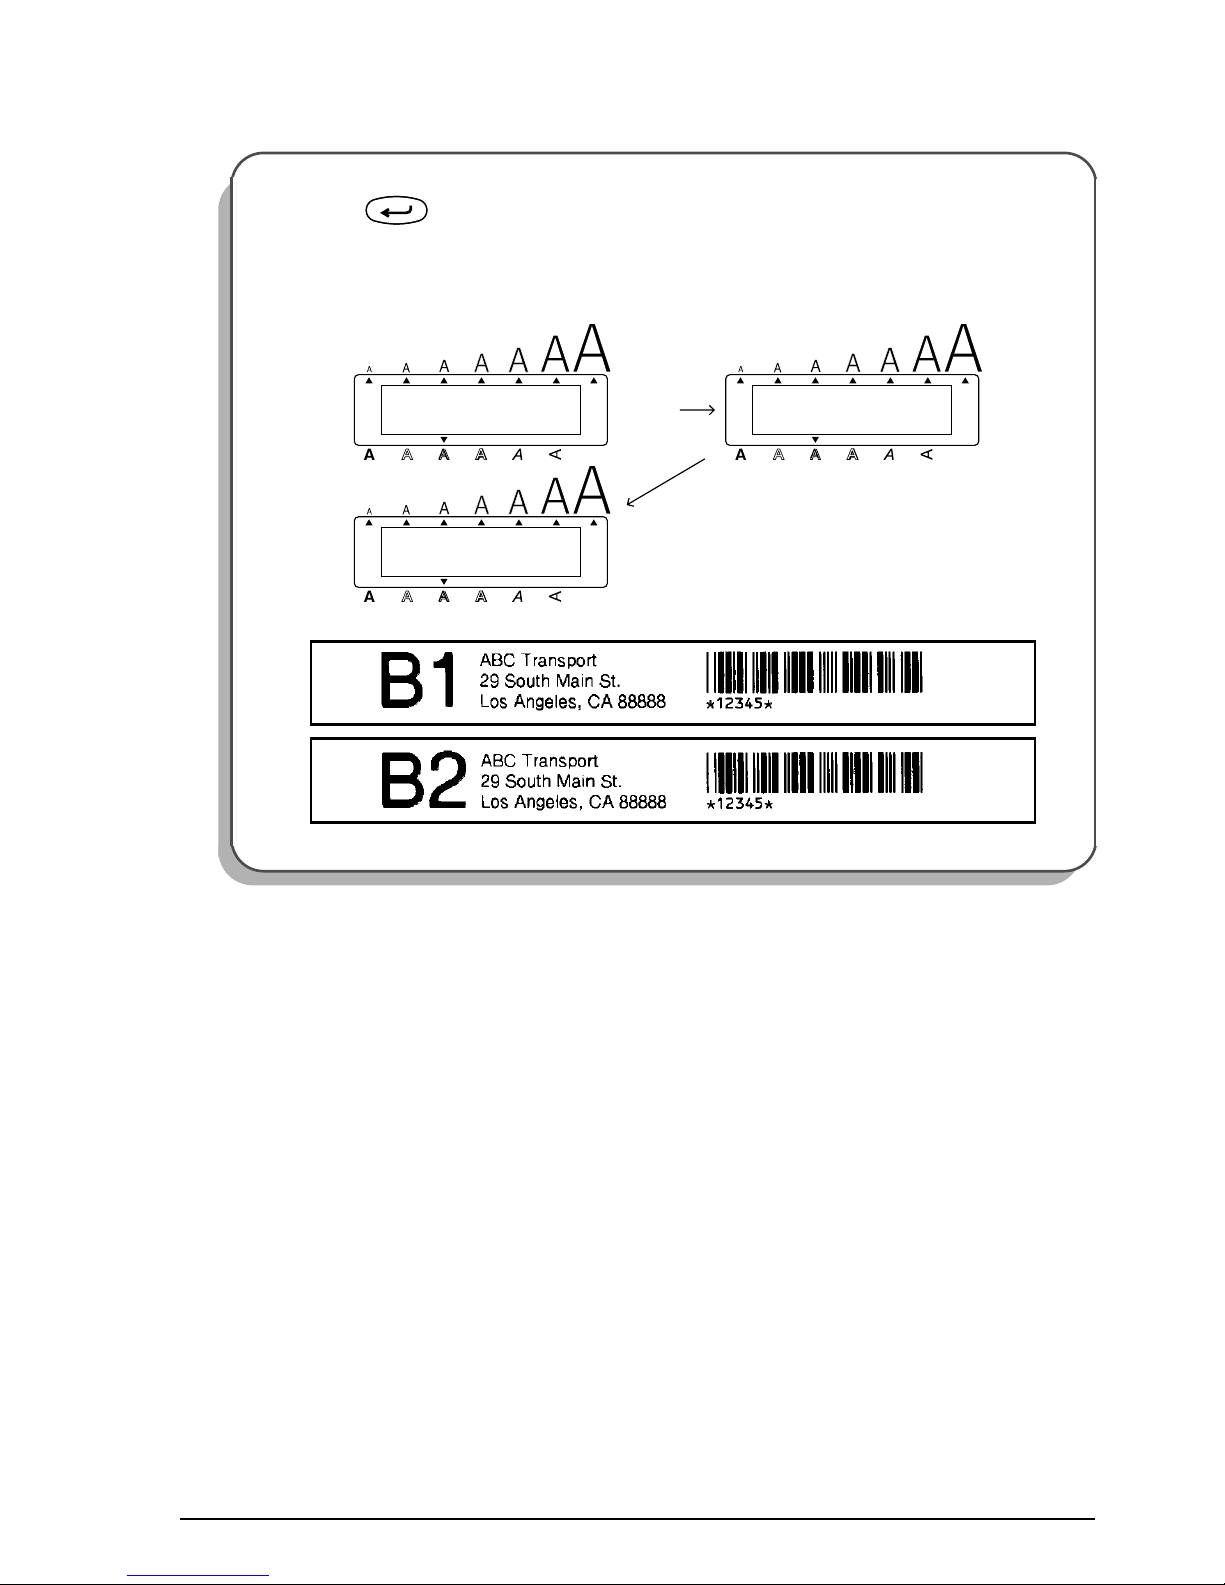
With these examples, we have covered many of the basic features of your P-touch so that you
can begin creating your own customized labels. If you have any questions about any of the
functions or keys, refer to the appropriate explanation in the following section.
J
Press to begin printing the labels.
☞
If the A.Cut function is set to ON, each label is automatically cut off after it is
printed.
New Block
1/ 2
COPIES
2/ 2
COPIES
Alt
Caps
Alt
Caps
Width
Width
WORKING
Alt
Caps
Width
Length
A.Format
Undl/Frm
Length Length
A.Format
Undl/Frm
Length
Length
A.Format
Undl/Frm
Length

31
For Your
Information

32
POWER KEY
The power key ( ) is located in the top right-hand corner of the keyboard. If batteries
have been installed or the machine has been plugged in using the optional AC adaptor, the
previous session’s information is displayed when the machine is turned on. This feature allows
you to stop work on a label, turn off the machine, and return to it later without having to reenter the text.
The machine will automatically turn off if no key is pressed within 5 minutes. The machine’s
internal memory stores the current session’s information and displays it when you turn on the
machine again.
To turn on the machine:
● Press . The previous session’s information appears in the LCD display.
To turn off the machine:
● Press . The current session’s information is stored in the internal memory.
OffOnOff
On
OffOnOff
On
OffOnOff
On

33
CURSOR KEYS
The machine’s LCD display shows two rows of 11 characters; however, the text that you enter
can be up to 255 characters long. You can review and edit your text by using the cursor keys
to move the cursor so that different parts are shown in the display.
LEFT CURSOR KEY
To move the cursor one character to the left:
● Press once.
☞
If the cursor is at the beginning of a line when this key is pressed, the cursor moves
to the end of the previous line.
To move the cursor several characters to the left:
● Hold down until the cursor moves to the desired position.
To move the cursor to the beginning of the current line:
● Hold down and press .
To move the cursor to the beginning of the current text block:
● Hold down and press .
☞
If the cursor is already at the beginning of a text block when these keys are pressed,
the cursor moves to the beginning of the previous block.
RIGHT CURSOR KEY
To move the cursor one character to the right:
● Press once.
☞
If the cursor is at the end of a line when this key is pressed, the cursor moves to the
beginning of the next line.
To move the cursor several characters to the right:
● Hold down until the cursor moves to the desired position.
To move the cursor to the end of the current line:
● Hold down and press .
To move the cursor to the beginning of the next text block:
● Hold down and press .
☞
If the cursor is already at the beginning of the last text block when these keys are
pressed, the cursor moves to the end of the text.
CodeCode
Caps
Shift
Caps
Shift
CodeCode
Caps
Shift
Caps
Shift
34
UP CURSOR KEY
To move the cursor up to the previous line:
● Press once.
☞
If the cursor is in the first line of text, it will move to the beginning of the line.
To move the cursor up several lines:
● Hold down until the cursor moves to the desired position.
To move the cursor to the beginning of the entire text:
● Hold down and press .
DOWN CURSOR KEY
To move the cursor down to the following line:
● Press once.
☞
If the cursor is in the last line of text, it will move to the end of the line.
To move the cursor down several lines:
● Hold down until the cursor moves to the desired position.
To move the cursor to the end of the entire text:
● Hold down and press .
Home
Home
CodeCode
Home
End
End
CodeCode
End

35
CODE, ALT & SHIFT KEYS
Most characters can be entered simply by pressing their keys. However, to use special functions or to enter capital letters, accented characters and some symbols, the following special
keys are necessary.
CODE KEY
To use a function printed above a key:
● Hold down and press the key immediately below the desired function.
EXAMPLE
To start the Symbol function:
● Hold down and press
once.
CodeCode
1: ABC_
ABCDEFGHIJKL
Alt
Caps
Width
Length
A.Format
Undl/Frm
Length
1: ABC_
Alt
Caps
Width
Length
A.Format
Undl/Frm
Length
T
M
CodeCode
Alt
Symbol
Alt
Symbol
36
ALT KEY
To type in characters printed in color on the right-hand side of the keys:
● Hold down and press the key of the desired character. The Alt indicator on the left
side of the display lights up while is held down.
☞
To type in the capital letter of a character written in color, hold down (or hold
down and press once to enter Caps mode) before pressing the key of
the desired character.
EXAMPLE
To type in “–”:
1
Hold down .
2 Press once.
3 Release .
Alt
Symbol
Alt
Symbol
Alt
Symbol
Alt
Symbol
Caps
Shift
Caps
Shift
CodeCode
Caps
Shift
Caps
Shift
1: 012_
ABCDEFGHIJKL
Caps
Width
Alt
Length
A.Format
Undl/Frm
Length
Alt
Symbol
Alt
Symbol
1: 012-_
ABCDEFGHIJKL
Alt
Caps
Width
Length
A.Format
Undl/Frm
Length
-
/
,
-
/
,
1: 012-_
ABCDEFGHIJKL
Alt
Caps
Width
Length
A.Format
Undl/Frm
Length
Alt
Symbol
Alt
Symbol

37
SHIFT KEY
To type in a capital letter or a symbol printed in the upper-left corner of a key:
● Hold down and press the key of the desired letter or symbol.
EXAMPLE
CAPS MODE
The Caps mode allows you to type capital letters continuously without holding down .
To type in many capital letters:
1 Hold down and press . The Caps indicator on the left side of the display lights
up.
2 Press the keys of the desired letters or symbols.
3 To exit Caps mode, hold down and press . The Caps indicator goes off.
To type in “%”:
● Hold down and press .
Caps
Shift
Caps
Shift
1: 5_
ABCDEFGHIJKL
Alt
Caps
Width
Length
A.Format
Undl/Frm
Length
1: 5%_
ABCDEFGHIJKL
Alt
Caps
Width
Length
A.Format
Undl/Frm
Length
Caps
Shift
Caps
Shift
Underline
%
5
Underline
%
5
Caps
Shift
Caps
Shift
CodeCode
Caps
Shift
Caps
Shift
1: _
ABCDEFGHIJKL
Alt
Width
Caps
Length
A.Format
Undl/Frm
Length
CodeCode
Caps
Shift
Caps
Shift

38
SPACE KEY
The Space key ( ) lets you add blank spaces between characters in your text. It is different from the right cursor key ( ), which just moves the cursor without adding blank
spaces.
To add a space:
● Press .
EXAMPLE
To add a space:
● Press .
Space
Feed&Cut
Space
Space
Feed&Cut
Space
1: J._
ABCDEFGHIJKL
Alt
Caps
Width
Length
A.Format
Undl/Frm
Length
1: J. _
ABCDEFGHIJKL
Alt
Caps
Width
Length
A.Format
Undl/Frm
Length
Space
Feed&Cut
Space

39
RETURN KEY
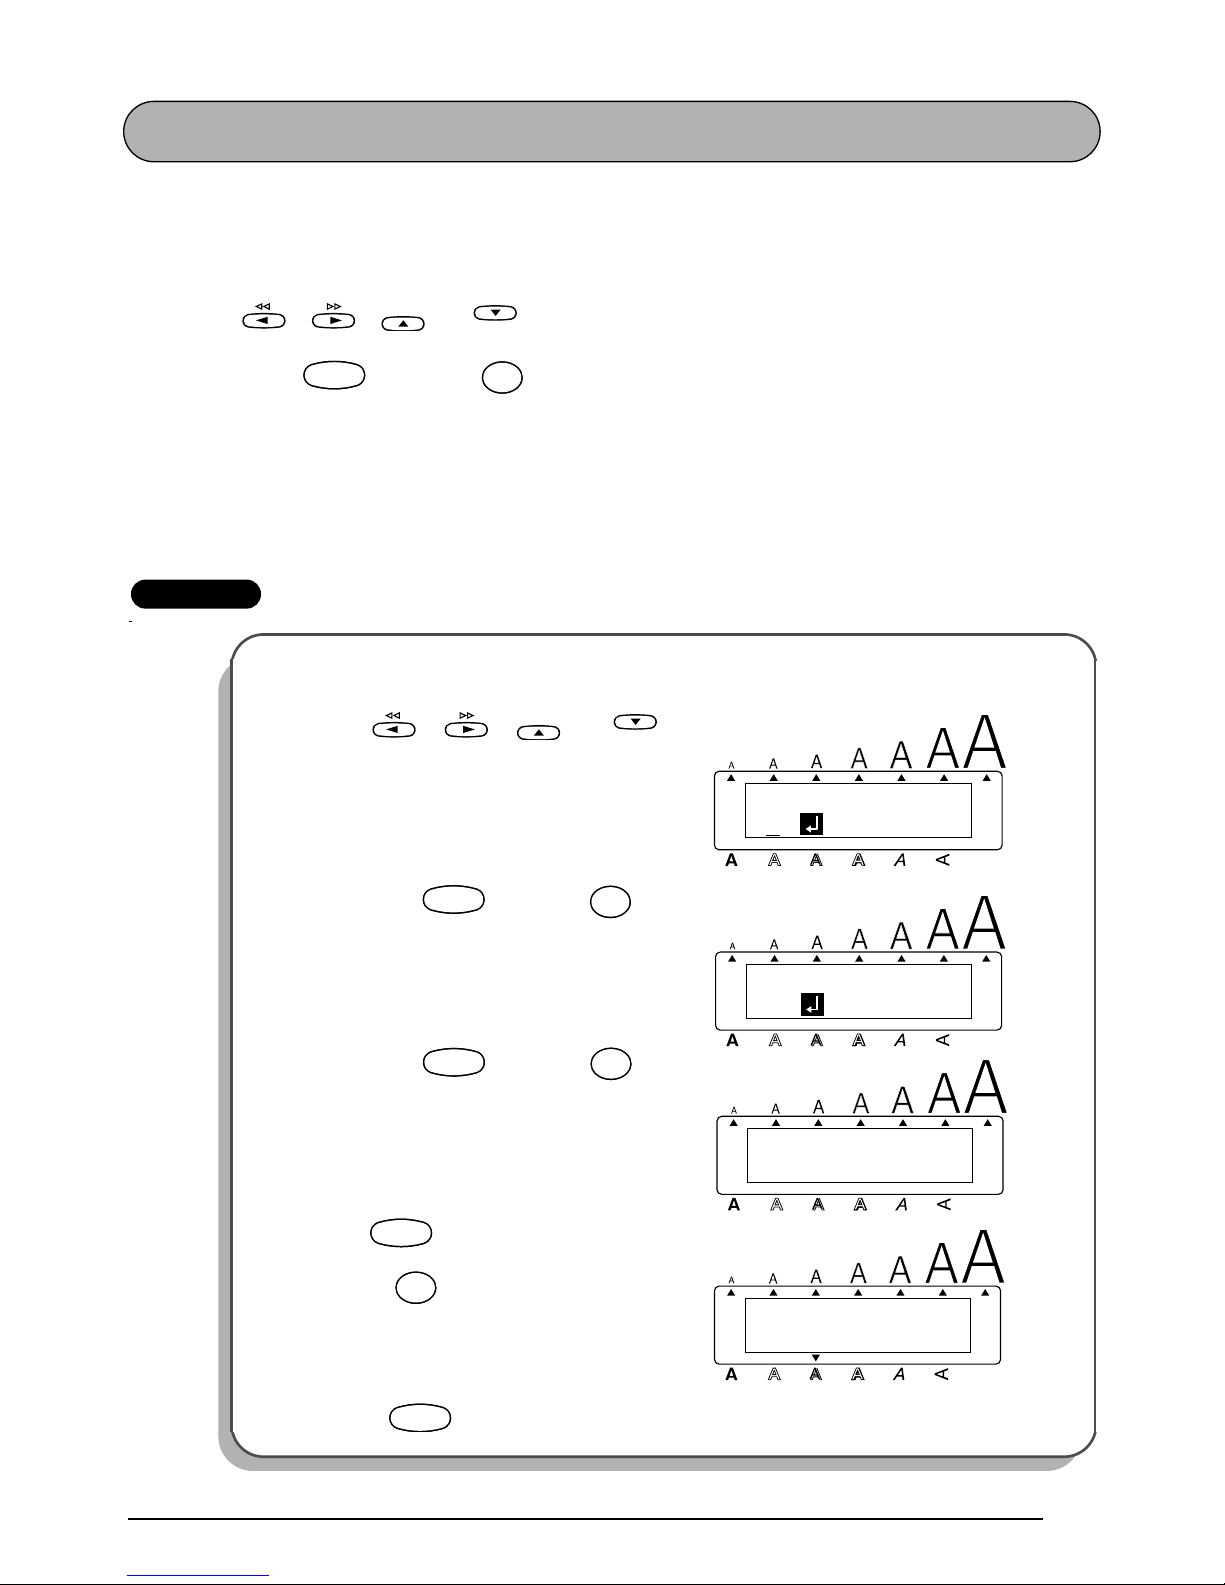
Like on a typewriter or word processor, this machine’s return key ( ) is used to end a
line of text and start another one. When you have finished entering one line, press the return
key to make a new line and move the cursor to it.
☞
Each block can only contain a maximum of seven text lines. If you press when
the cursor is located in the seventh line, the error message “7 LINE LIMIT!” will appear.
The return key can also be used to select an item from a list (e.g., add a symbol or accented
character to the text) or to apply a selected setting.
Some questions asking you to confirm a command may appear on the LCD display, especially
when the function that you have chosen will delete or affect files. In these cases, pressing
is like answering “yes”.
☞
To answer “no”, press . Refer to
DELETE KEY
on page 43.
To add a new line:
● Press . The return mark ( ) appears in the text to indicate the end of the line.
To select an item from a list:
● Press .
To answer “yes”:
● Press .
Tape widths
Maximum number of
lines that can be printed
1/4
”
(6 mm) 1
3/8” (9 mm) 2
1/2” (12 mm) 3
3/4” (18 mm) 5
1” (24 mm) 7
New Block
New Block
New Block
Clear
Del
Clear
Del
New Block
New Block
New Block
40
NEW BLOCK FUNCTION
Whenever the number of lines in a section of the text changes, a new block must be created.
☞
A single label can only contain a maximum of five blocks. If the cursor is located in the
fifth block when is held down and
is pressed, the error message “5
BLOCK LIMIT!” appears.
If the cursor is positioned in the middle of a text block when
is held down and
is pressed, the block splits into two and the character to the left of the cursor’s
current position becomes the end of the block.
To add a new block:
● Hold down and press once. The new block mark ( ) appears in the text
to indicate the end of the block.
EXAMPLE
To add a new block:
● Hold down and press
once.
CodeCode
New Block
CodeCode
New Block
CodeCode
New Block
1: K’s Garden_
Alt
Caps
Width
Length
A.Format
Undl/Frm
Length
1: _
1: K’s Garden
Alt
Caps
Width
Length
A.Format
Undl/Frm
Length
CodeCode
New Block
41
TAB FUNCTION
This function allows you to separate sections of a line of text by adding tabs. This enables you
to create perfectly aligned columns without having to type in several spaces. All tabs have the
same length and are measured from either the beginning of the line or the previous tab if there
is more than one. The tab length can be set between 0.0 and 11.8 inches (0.0 and 30.0 centimeters).
☞
The text can contain no more than 50 tabs. If 50 tabs have already been added to the
text when is pressed, the error message “TAB LIMIT!” appears.
To set the tab length:
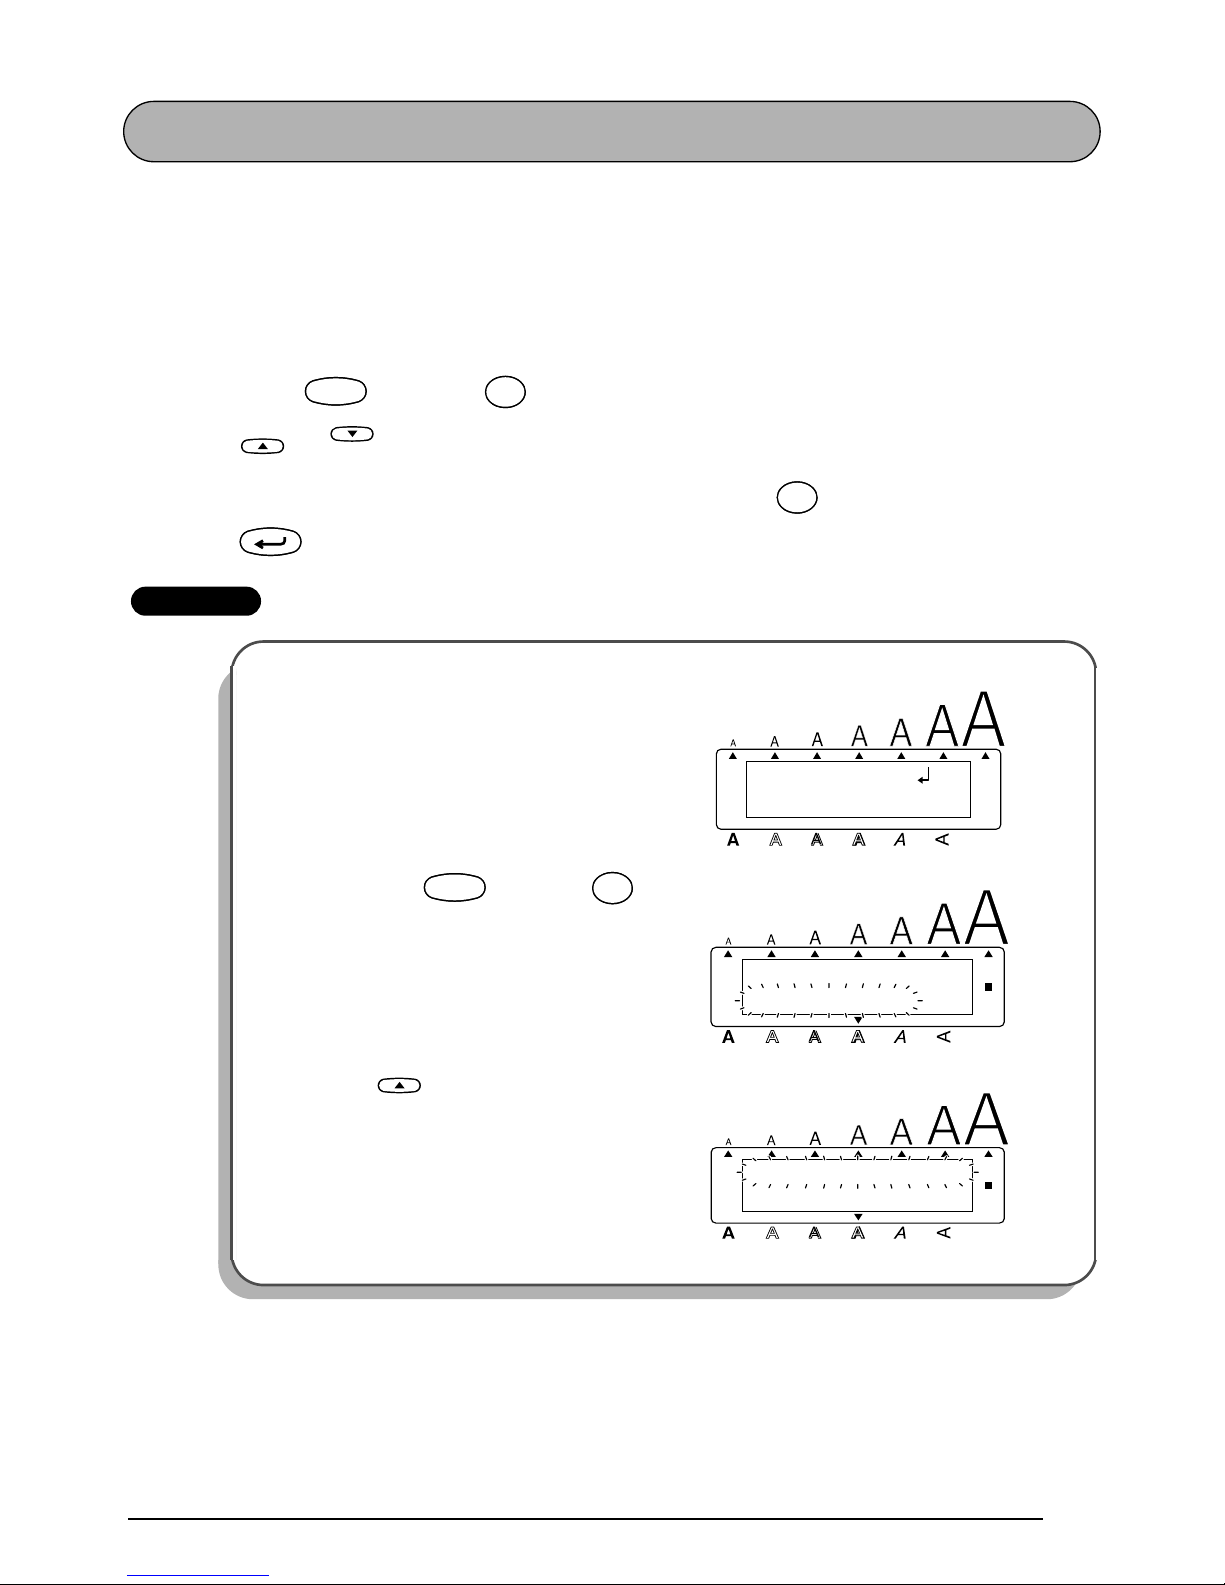
1 Hold down and press once. The current tab length is displayed.
2 Press or until the desired length is displayed or use the number keys to type in
the length.
☞
To switch the unit of measurement between inches and centimeters, press
until the measurement is displayed in the desired unit.
The default setting (2” (5.0 cm)) can be selected by pressing .
3 Press .
To add a tab:
● Hold down and press once. The tab mark ( ) appears in the text to indi-
cate the position of the tab.
☞
If the text in front of a tab extends past the point where the next section of text
should start, the text will instead start at the following tab position.
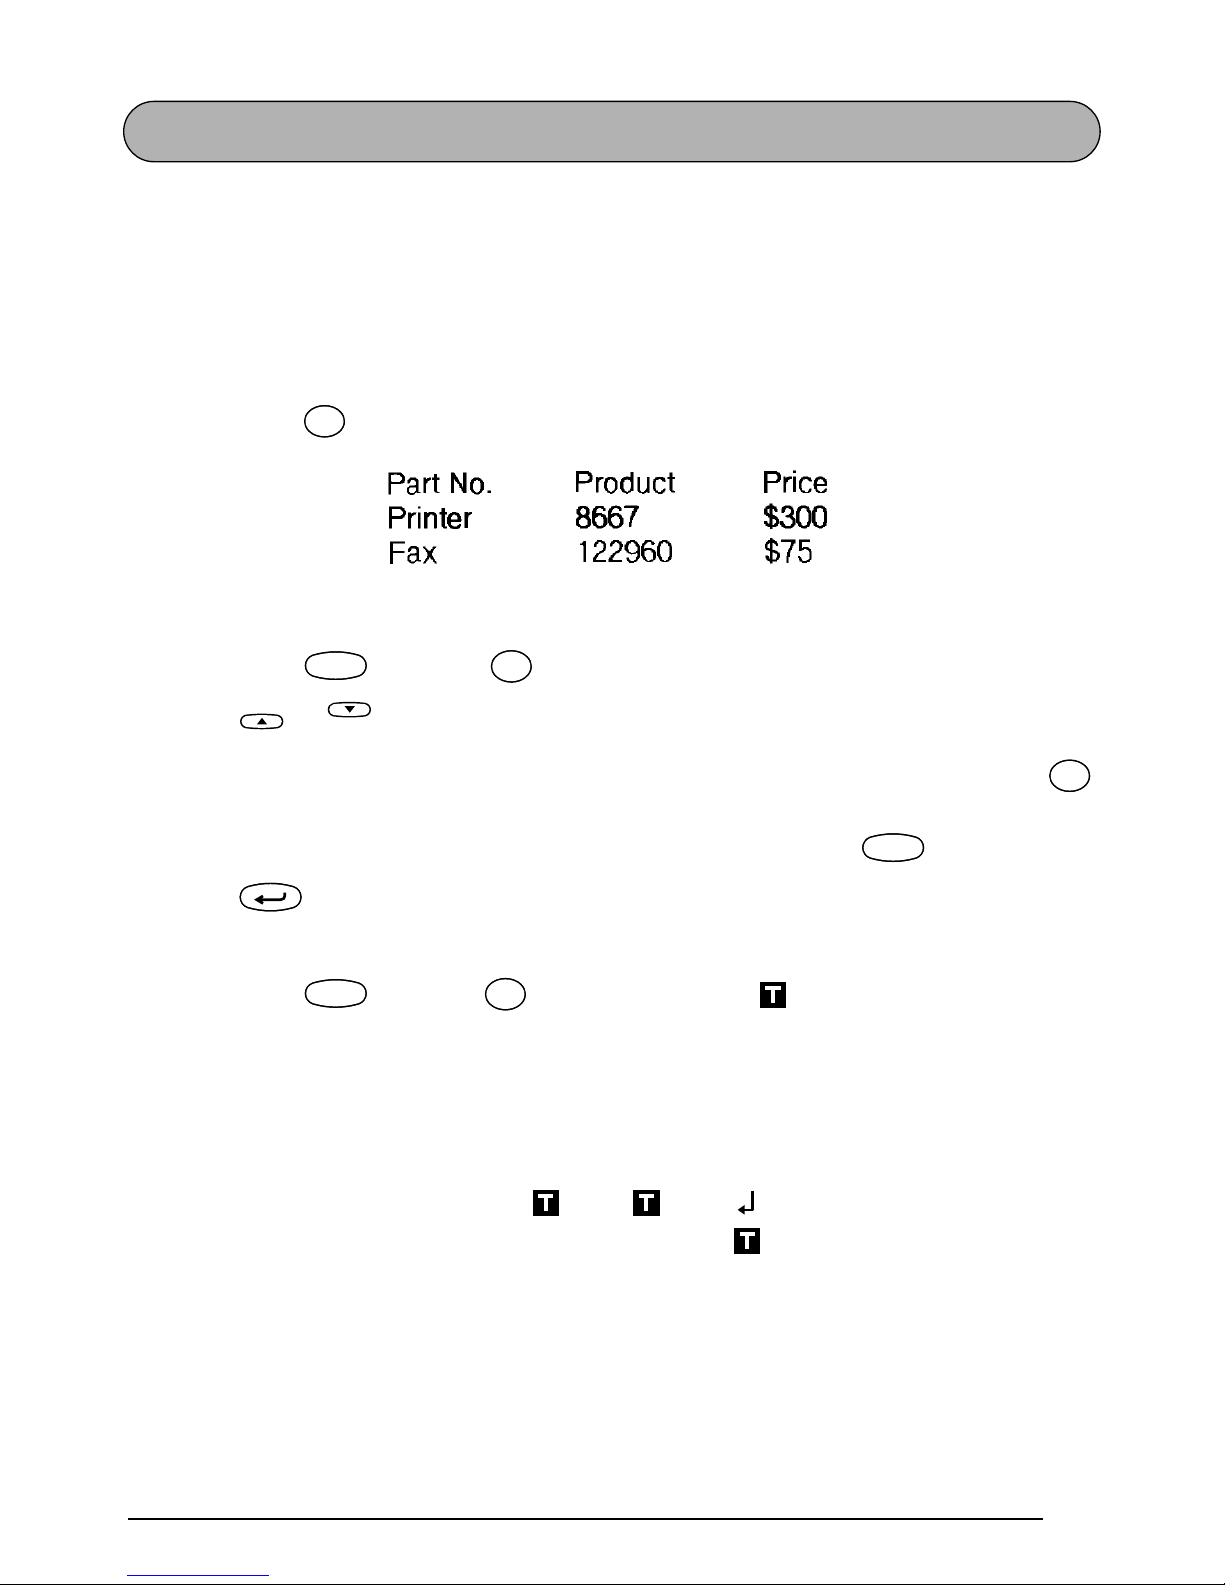
For example, if the tab length is set to 2.0 inches (5.0 cm) and the following text is
typed in:
TabQTab
Q
CodeCode
Tab Length
W
Tab Length
W
Home
End
ñ Mñ
M
Space
Feed&Cut
Space
New Block
CodeCode
TabQTab
Q
2:
JKLMNOPQRST U
1:
ABC DEF GHI

42
the label shown below will be printed.
EXAMPLE
To set the tab length:
1
Hold down and press
once.
2 Press until 1.0inch is displayed.
3 Press .
To add a tab:
● Hold down and press
once.
JKLMNOPQRST U
ABC DEF GHI
Margin Tab (2” (5 cm)) Tab (2” (5 cm)) Margin
Alt
Caps
TAB LENGTH
2.0inch
Width
Length
A.Format
Undl/Frm
Length
CodeCode
Tab Length
W
Tab Length
W
Alt
Caps
TAB LENGTH
1.0inch
Width
Length
A.Format
Undl/Frm
Length
End
New Block
Alt
Caps
1: Part No.
ABCDEFGHIJKL
Width
Length
A.Format
Undl/Frm
Length
CodeCode
TabQTab
Q

43
DELETE KEY
The delete key ( ) allows you to remove characters to the left of the cursor’s current position. It differs from the left cursor key ( ), which only moves the cursor without deleting
any characters.
The delete key can also be used to quit most functions and return to the previous display with-
out changing the text.
Some questions asking you to confirm a command may appear on the LCD display, especially
when the function that you have chosen will delete or affect files. In these cases, pressing
is like answering “no”.
☞
To answer “yes”, press . Refer to
RETURN KEY
on page 39.
To delete one character:
1 Press , , or to position the cursor below the character immediately
to the right of the character that you wish to delete.
2 Press once.
To delete a sequence of characters:
1 Press , , or to position the cursor below the character immediately
to the right of the last character that you wish to delete.
2 Hold down until all of the characters that you wish to delete are deleted.
To quit a function without changing your text:
● Press to return to your text.
To answer “no”:
● Press .
Clear
Del
Clear
Del
Clear
Del
Clear
Del
New Block
Home
End
Clear
Del
Clear
Del
Home
End
Clear
Del
Clear
Del
Clear
Del
Clear
Del
Clear
Del
Clear
Del
44
LINE OUT FUNCTION
With the Line Out function, you can easily remove an entire line of text.
To delete a line of text:
1 Press , , or to position the cursor within the line of text that you
wish to delete.
2 Hold down and press once.
☞
Each time
is pressed while is held down, the line of text containing the
cursor is deleted.
EXAMPLE
To delete “012-345-6789”:
● Hold down and press
once.
Home
End
CodeCode
Line out
)
0
Line out
)
0
Line out
)
0
Line out
)
0
CodeCode
Alt
Caps
2: 2-345-6789_
1: s Garden
Width
Length
A.Format
Undl/Frm
Length
CodeCode
Line out
)
0
Line out
)
0
2: _
1: K’s Garden
Alt
Caps
Width
Length
A.Format
Undl/Frm
Length
45
CLEAR FUNCTION
When clearing the display before entering new text, the Clear function can be used to choose
whether all of the text is erased and all format functions (Font, Size, Width, Style, Underline,
Frame, Tape margin, Alignment, Tab length, Mirror printing, and Length) are returned to their
default settings, or whether just the text is erased.
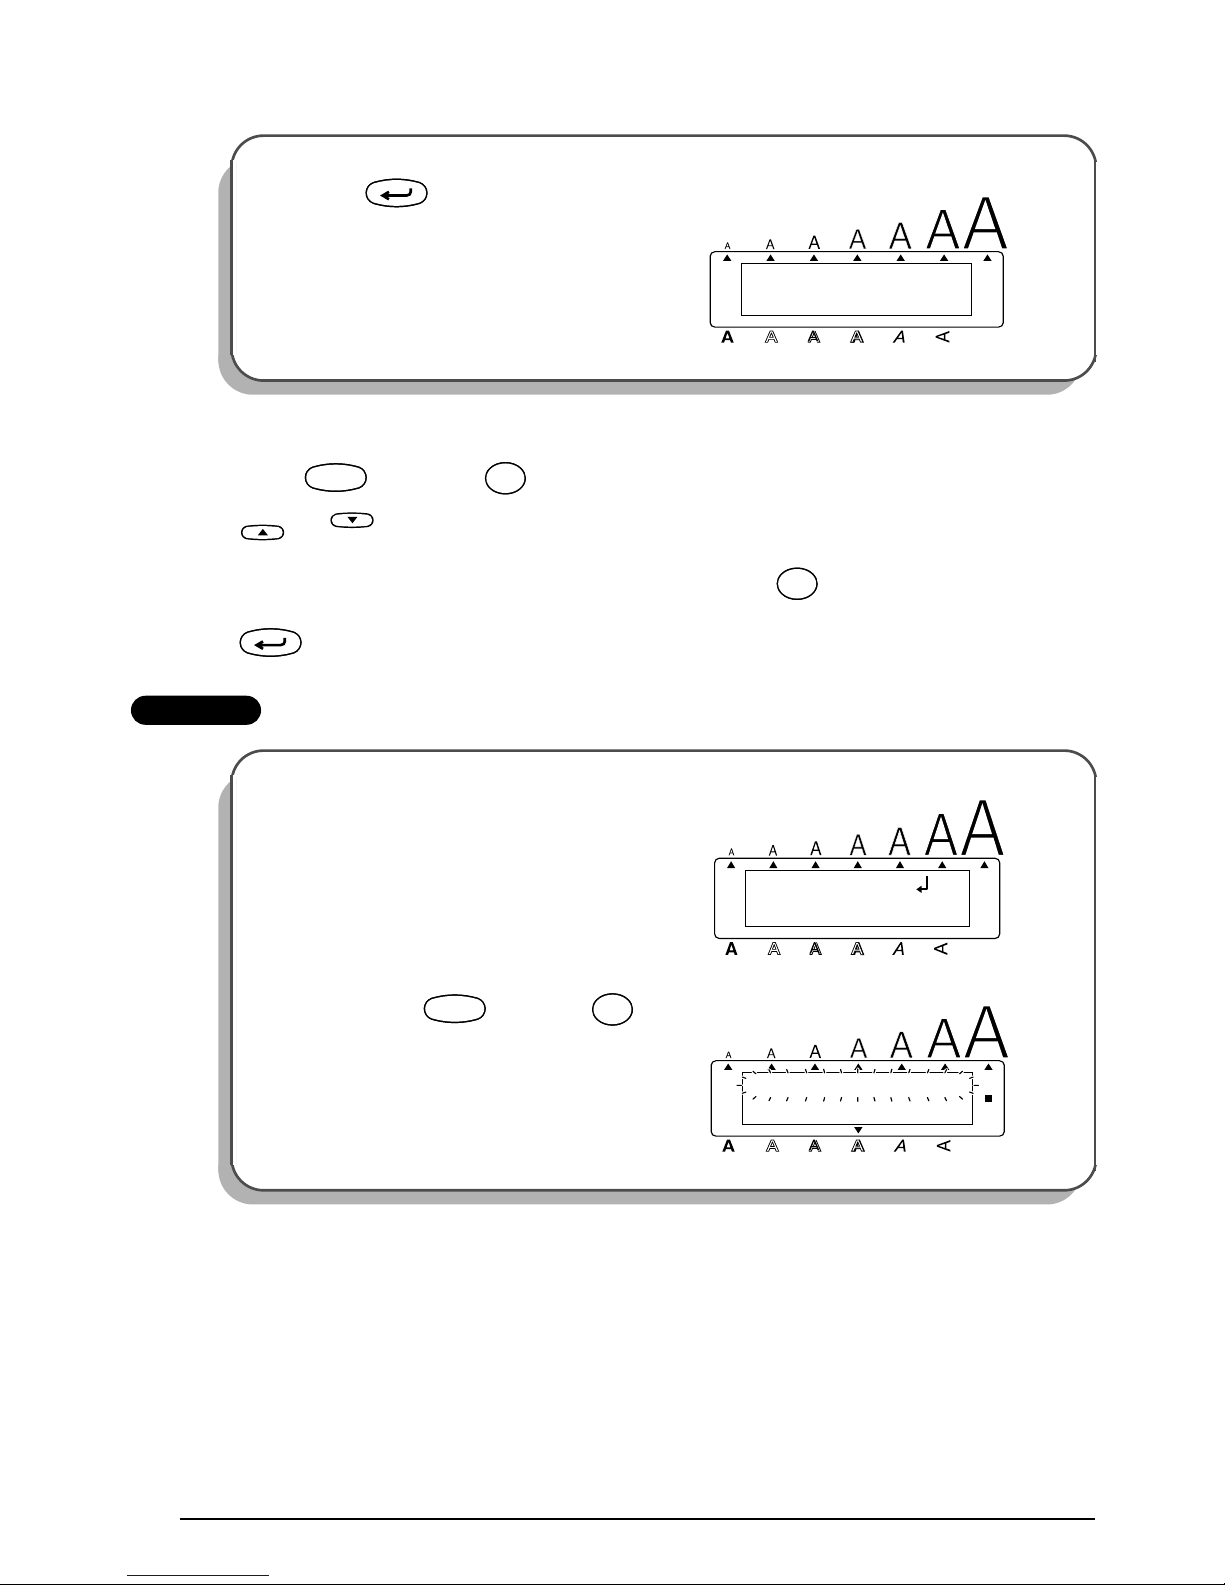
To delete all of the text and return all formats to their default settings:
1 Hold down and press .
2 Press or until TEXT&FORMATS is selected (flashing).
☞
To return to the text without erasing anything, press .
3 Press .
EXAMPLE
To clear the text and formats:
1
Hold down and press .
2 Press until TEXT&FORMATS is
flashing.
CodeCode
Clear
Del
Clear
Del
Home
End
Clear
Del
Clear
Del
New Block
Alt
Caps
2: 2-345-6789_
1: s Garden
Width
Length
A.Format
Undl/Frm
Length
Alt
Caps
TEXT&FORMATS
TEXT ONLY
Width
Length
A.Format
Undl/Frm
Length
CodeCode
Clear
Del
Clear
Del
Alt
Caps
TEXT&FORMATS
TEXT ONLY
Width
Length
A.Format
Undl/Frm
Length
Home
46
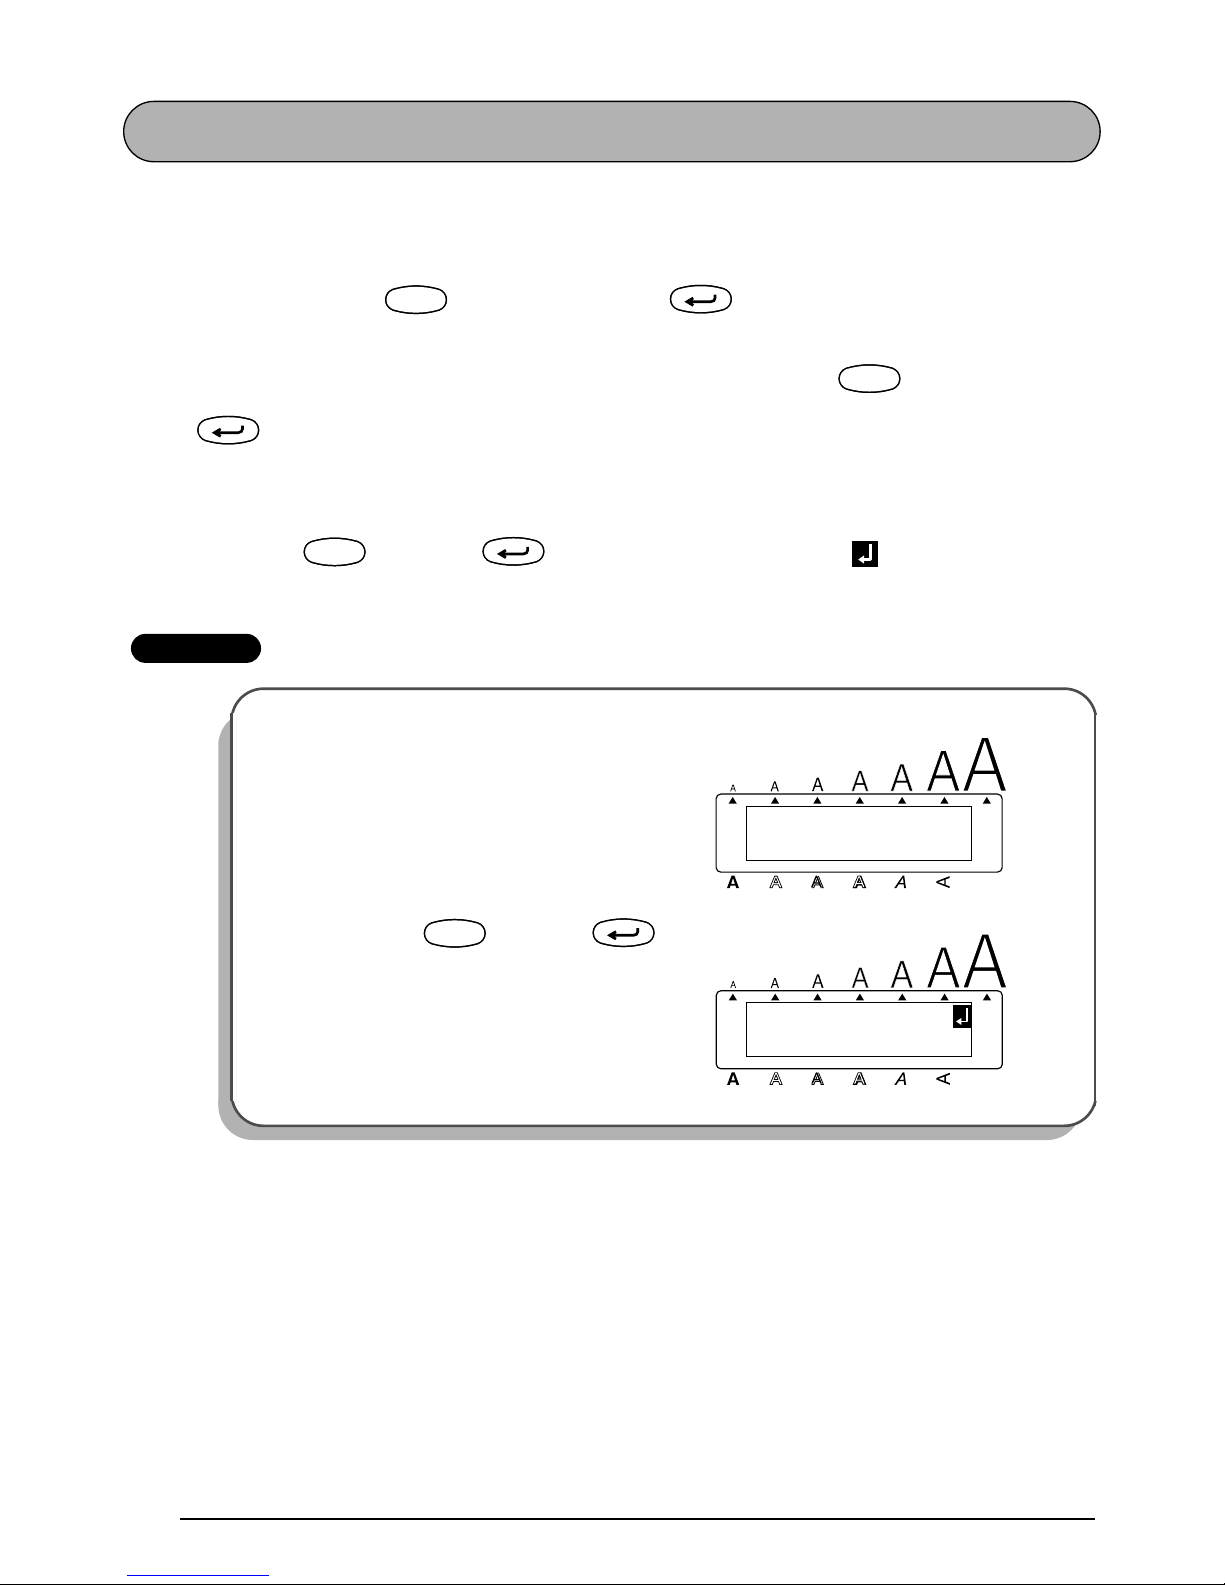
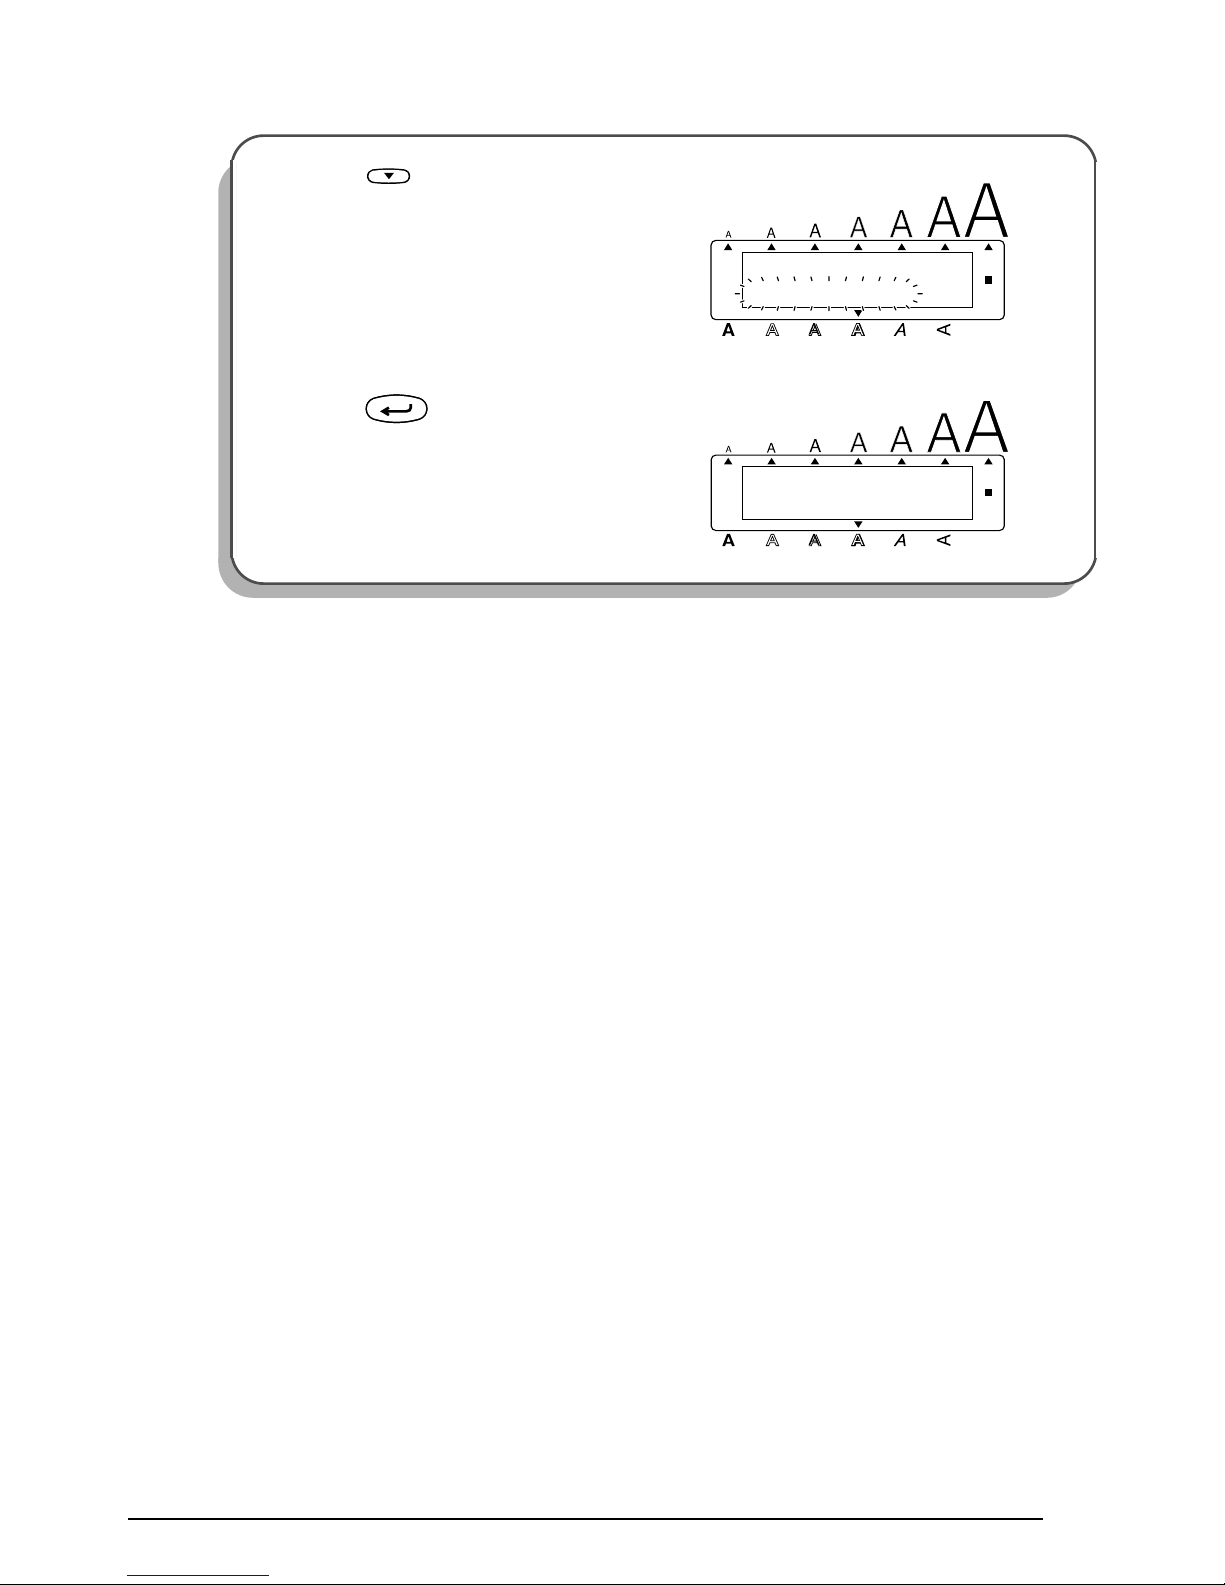
To delete just the text:
1 Hold down and press .
2 Press or until TEXT ONLY is selected (flashing).
☞
To return to the text without erasing anything, press .
3 Press .
EXAMPLE
3
Press .
To clear just the text:
1
Hold down and press .
Alt
Caps
1: _
Width
Length
A.Format
Undl/Frm
Length
New Block
CodeCode
Clear
Del
Clear
Del
Home
End
Clear
Del
Clear
Del
New Block
Alt
Caps
2: 2-345-6789_
1: s Garden
Width
Length
A.Format
Undl/Frm
Length
Alt
Caps
TEXT&FORMATS
TEXT ONLY
Width
Length
A.Format
Undl/Frm
Length
CodeCode
Clear
Del
Clear
Del
47
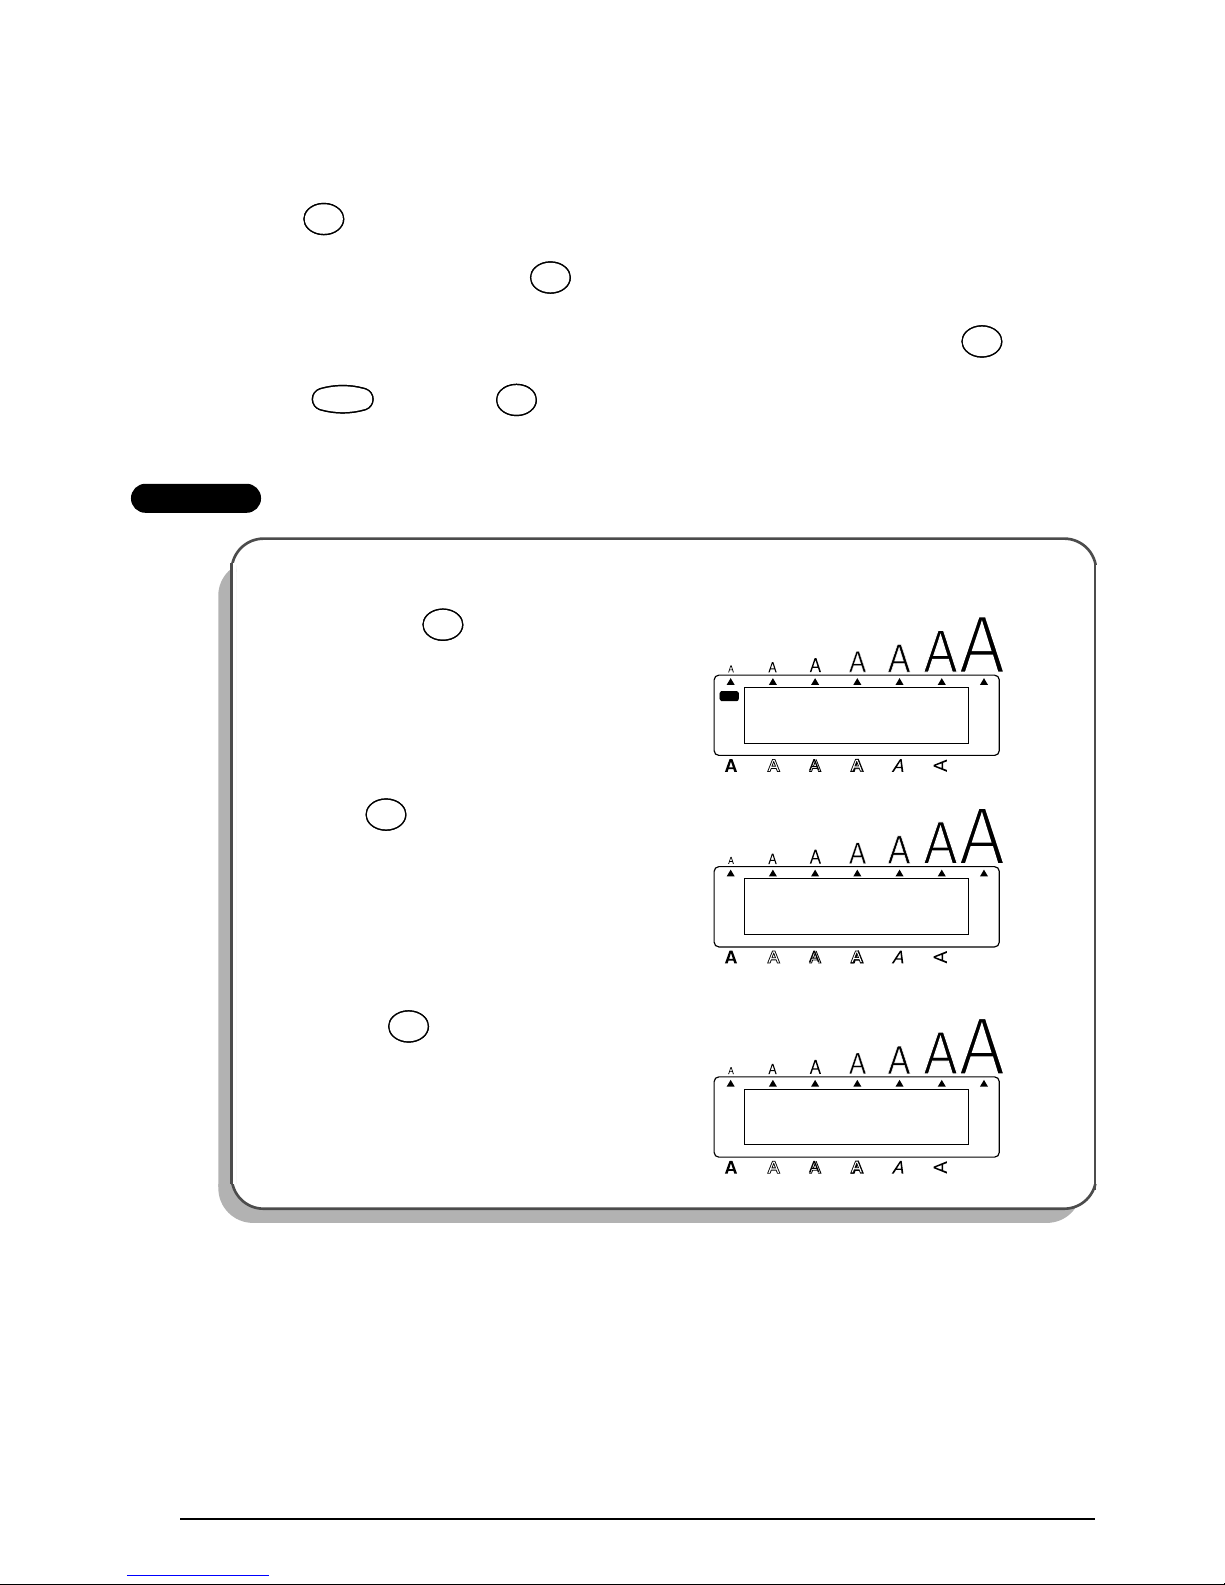
2 Press until TEXT ONLY is flashing.
3 Press .
End
Alt
Caps
TEXT&FORMATS
TEXT ONLY
Width
Length
A.Format
Undl/Frm
Length
Alt
Caps
1: _
Width
Length
A.Format
Undl/Frm
Length
New Block

48
ACCENT FUNCTION
The Accent function can also be used to add accented characters to your text. Many of these
characters can also be found on the keys and typed in using (refer to page 36) or they can
be entered using the Symbol function (refer to pages 50 and 51).
The accented characters are grouped according to the capital or lowercase letter that they are
combined with. The following accented characters are available:
To type in an accented character:
1 Hold down and press . The message “ACCENT a – u / A – U?” appears on the
display.
2 Press the key of the letter in the desired accented character.
☞
To type a capital letter, hold down (or hold down and press to
turn on Caps mode) before pressing the letter key.
3 Press or until the desired accented character flashes.
4 Press . The accented character is added to the text.
☞
To type in a series of accented characters, hold down before pressing
. Then, continue adding accented characters by selecting them as explained
in steps
2
and 3, and holding down while pressing . Press just
after selecting the last character in the series.
Letters Accented characters Letters Accented characters
a à á ä â ã æ I Í Ï Î
A À Á Ä Â Ã Æ n ñ
cçNÑ
C Ç o ó ö ô õ
e è é ë ê e˜ O Ó Ö Ô Õ
E È É Ë Ê E u ù ú ü û
i í ï î U Ù Ú Ü Û
Alt
Symbol
Alt
Symbol
˜
CodeCode
AccentAAccent
A
Caps
Shift
Caps
Shift
CodeCode
Caps
Shift
Caps
Shift
New Block
CodeCode
New Block
CodeCode
New Block
New Block

49
EXAMPLE
To add the accented character “É”:
1
Hold down and press .
2 Hold down and press .
3 Press until É flashes.
4 Press .
a-y/A-U?
ACCENT
Alt
Caps
Width
Length
A.Format
Undl/Frm
Length
CodeCode
AccentAAccent
A
1: RESUM_
Alt
Caps
Width
Length
A.Format
Undl/Frm
Length
ÈÉËÊ
Caps
Shift
Caps
Shift
TapeETape
E
1: RESUM_
Alt
Caps
Width
Length
A.Format
Undl/Frm
Length
ÈÉËÊ
1: RESUMÉ_
Alt
Caps
Width
Length
A.Format
Undl/Frm
Length
New Block
50
SYMBOL FUNCTION
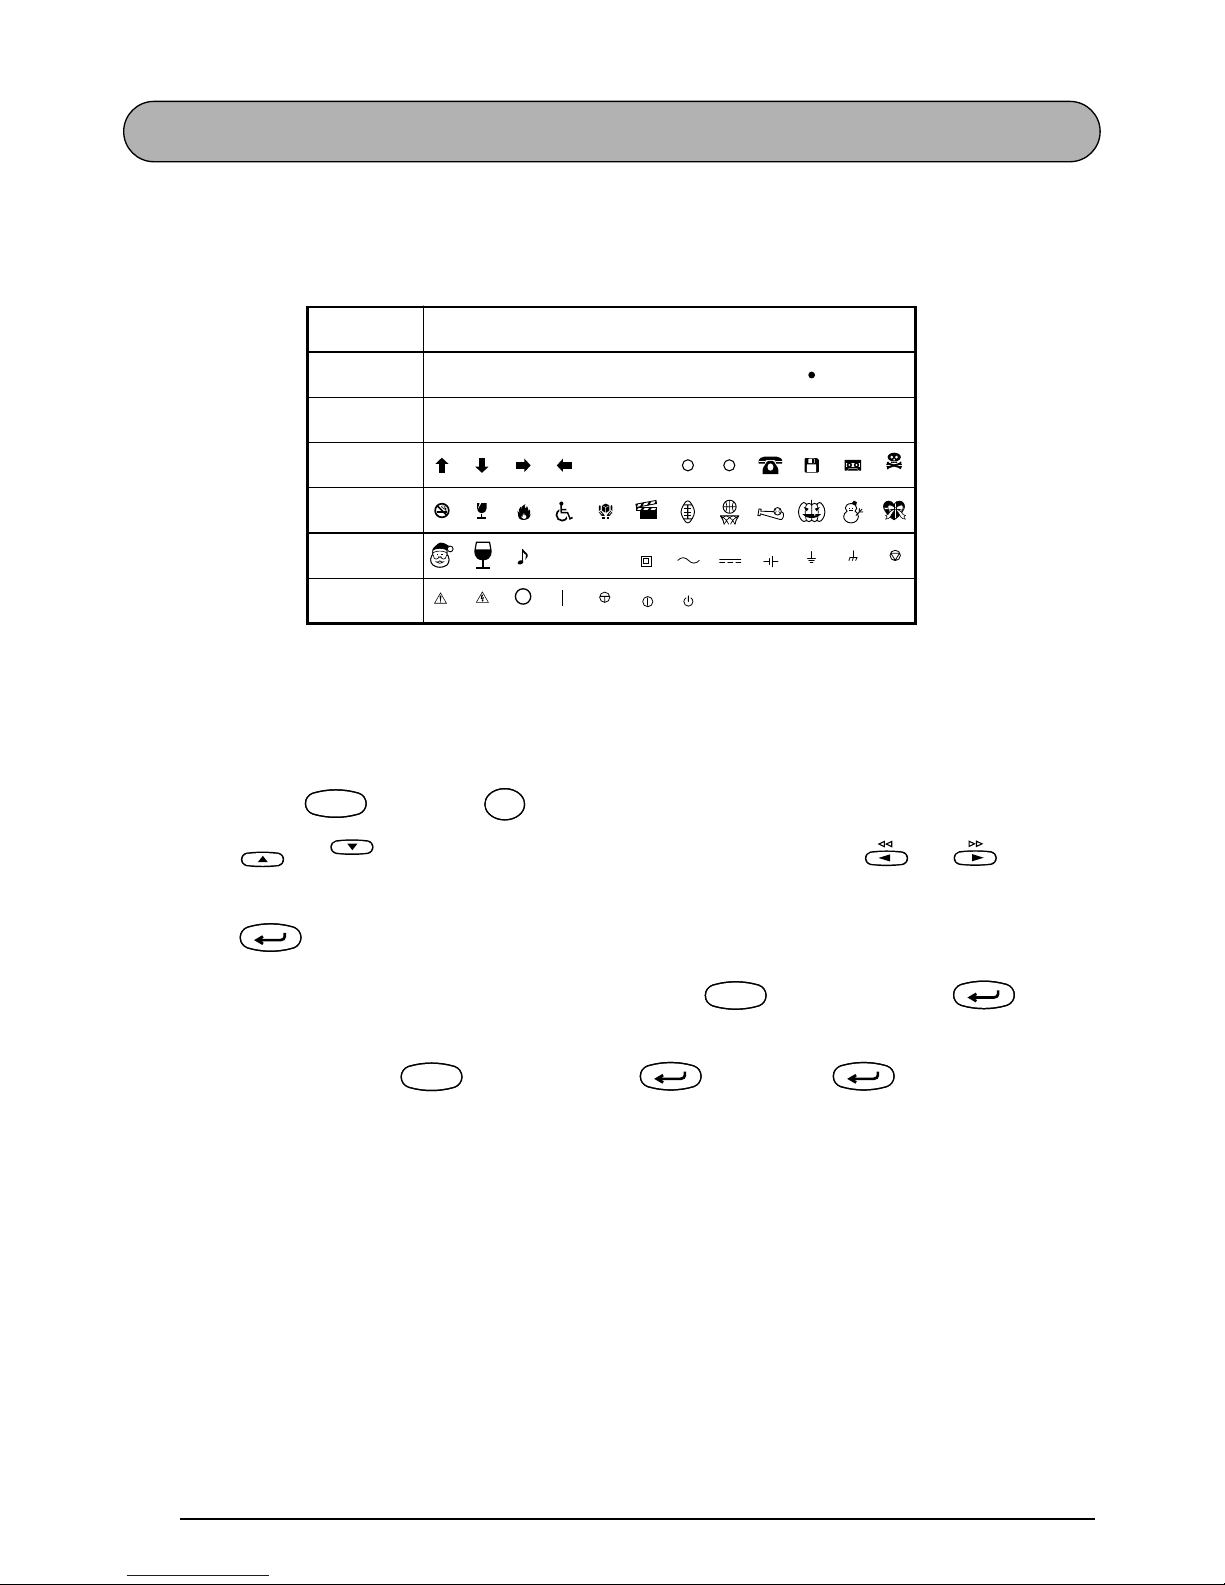
In addition to the letters, symbols and numerals on the key tops, there are 67 additional marks
available with the Symbol function.
The following symbols are available:
☞
The use of certain symbols contained within this labelling machine may be governed by
local, national or European regulation. Therefore, the user should check that any symbol
printed conforms to these regulations before application.
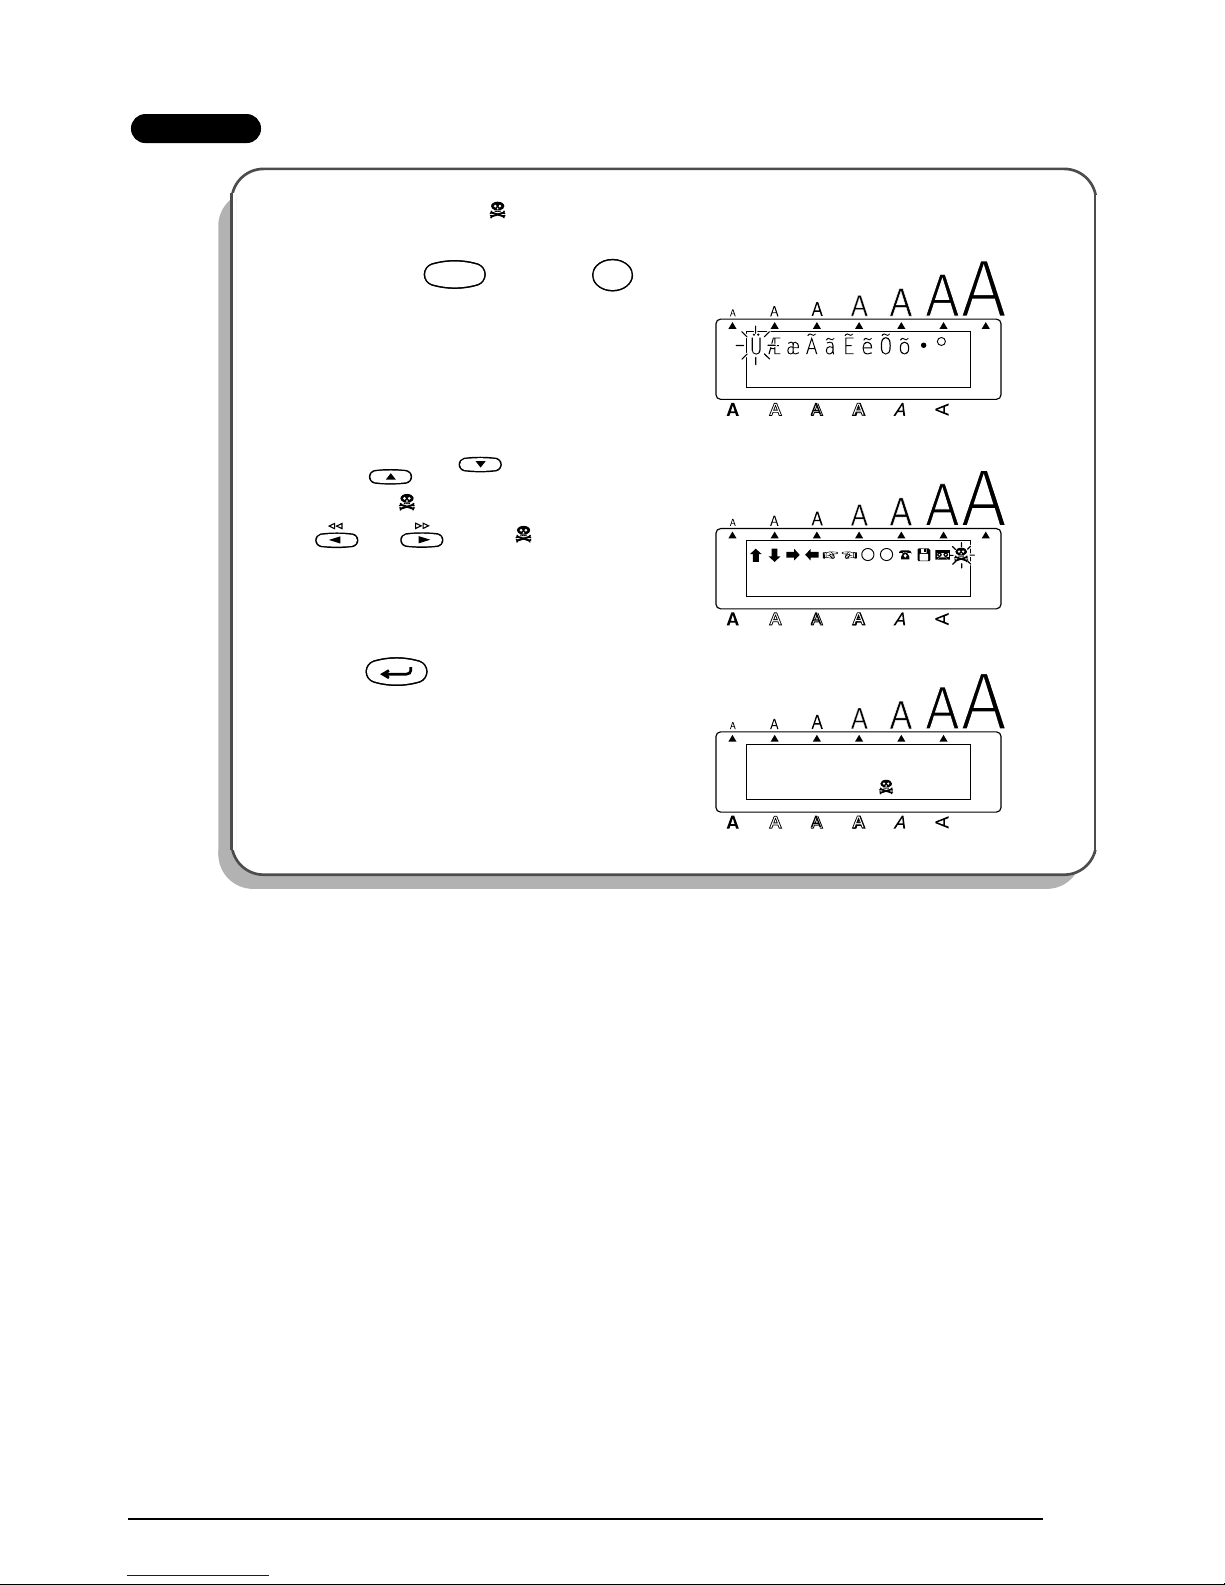
To type in a symbol:
1 Hold down and press . A row of symbols appear in the display.
2 Press or to display different rows of symbols and press or until the
desired symbol flashes.
3 Press . The symbol appears in the text.
☞
To type in a series of symbols, hold down before pressing . Then,
continue adding symbols by selecting them as explained in steps
2
and 3, and
holding down while pressing . Press just after selecting the
last symbol in the series.
Group Symbol
1ÜÆæÃã e˜Õõ °
2 +×÷=§
23
234
[]
3
4
5
♥
6
˜
E
TM
☞
☞
R C
★
CodeCode
Alt
Symbol
Alt
Symbol
Home
End
New Block
CodeCode
New Block
CodeCode
New Block
New Block
51
EXAMPLE
To add the symbol “ ”:
1
Hold down and press .
2 Press or until the row con-
taining “ ” appears, and then press
or until “ ” flashes.
3 Press .
Alt
Caps
1: DANGER_
Width
Length
A.Format
Undl/Frm
Length
T
M
CodeCode
Alt
Symbol
Alt
Symbol
Alt
Caps
1: DANGER_
R C
Length
A.Format
Undl/Frm
Length
Width
Home
End
Alt
Caps
1: DANGER _
Length
A.Format
Undl/Frm
Length
Width
New Block
52
AUTO FORMAT FUNCTION
The Auto format function makes creating labels quick and easy. After simply selecting one of
the various pre-formatted layouts and typing text into each of its fields, the overall style of the
label can easily be changed by selecting one of the seven available style formats, and then the
label is ready to be printed. The many layouts available allow you to create labels for a variety
of needs—from addressing envelopes to identifying floppy disks or audio and video cassettes.
Refer to
Reference at
the end of this section for a list and samples of the available layouts.
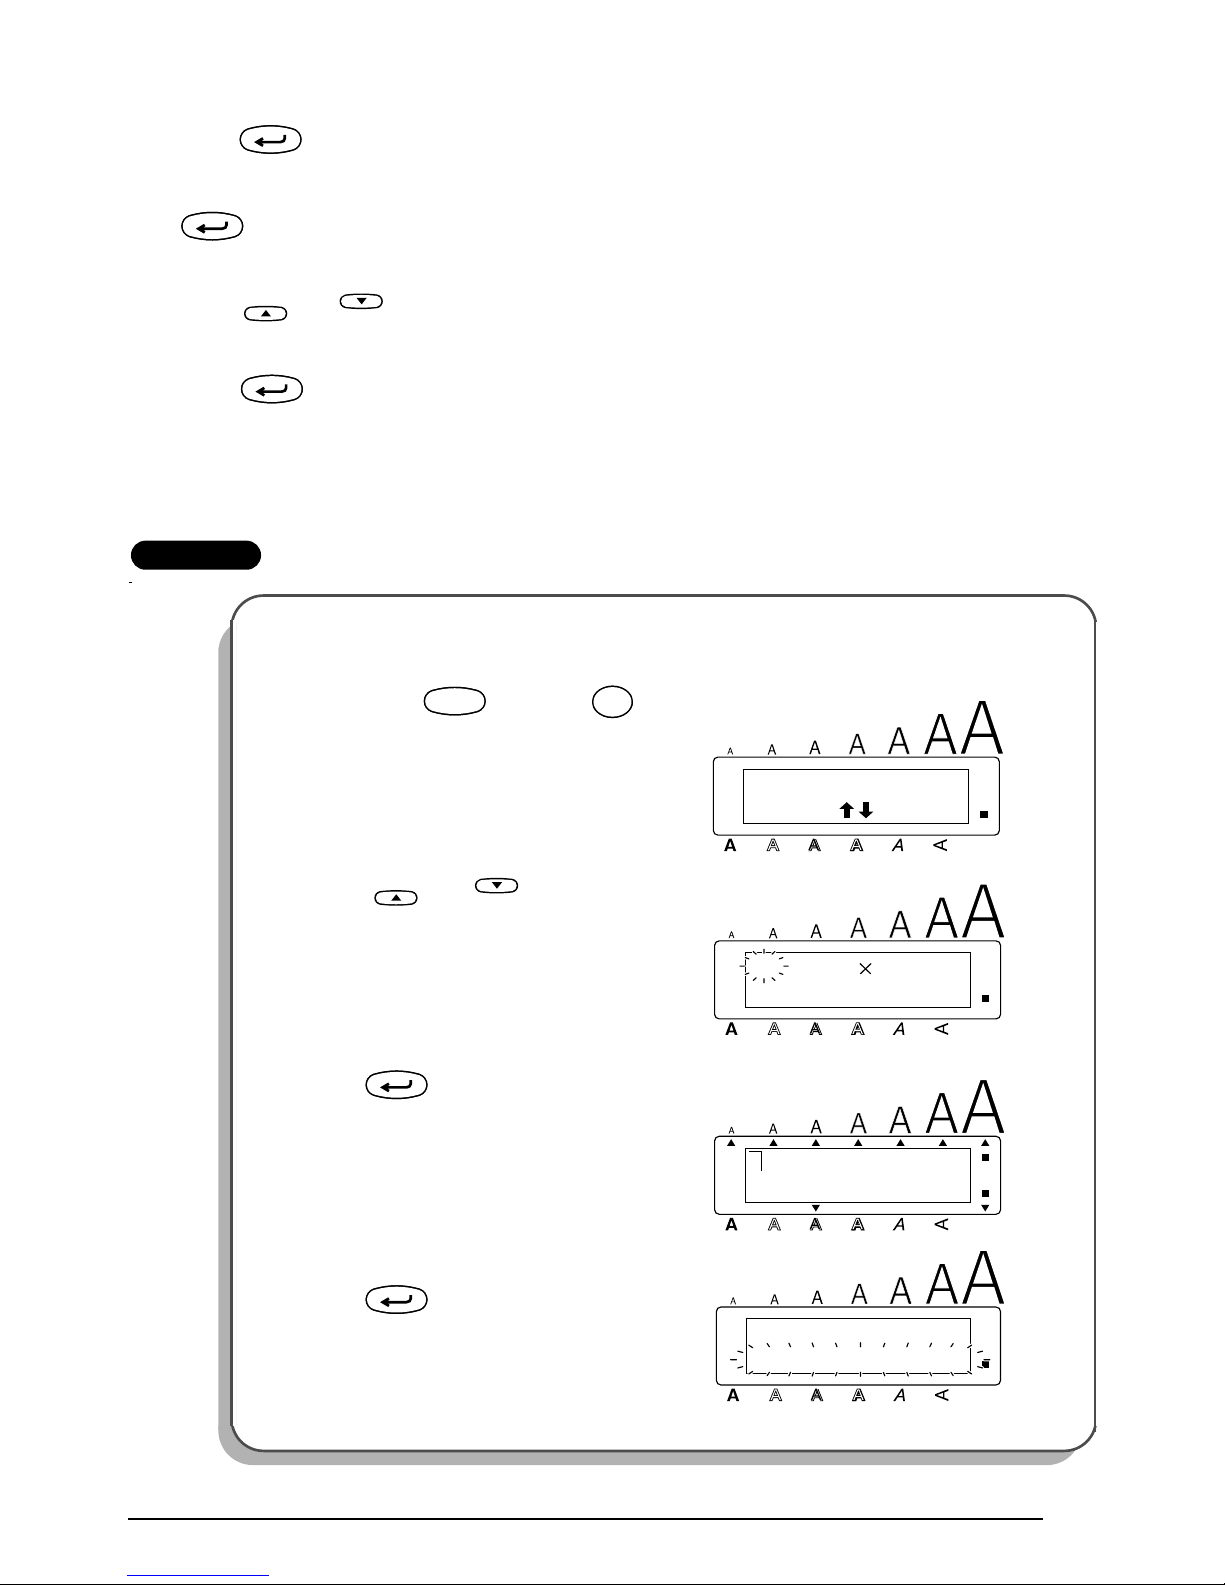
To select a pre-formatted layout:
1 Hold down and press once. The A.Format indicator lights up and the mes-
sage “FORMAT TYPE PRESS ” appears in the display.
2 Press or to select the desired layout.
☞
The default setting (VCR VHS-1) can be selected by pressing .
The number of the layout that was last used appears underlined. Selecting this lay-
out displays the text that was entered in it at that time.
The label sizes are displayed in the currently selected unit of measurement (inches
or millimeters). The unit of measurement can be changed with the Tab length or
Length functions.
3 Press . The first field for the selected layout appears in the display.
To enter text in the layout:
4 For each field, type in the text, and then press . When is pressed after typing
in the text for the last field, the SELECT MENU appears in the display.
To change the style of the text:
5 Press or until the CHANGE STYLE command is displayed.
6 Press .
7 Press or to select the desired character style.
☞
The default setting (ORIGINAL) can be selected by pressing .
8 Press . The SELECT MENU appears in the display.
To print a label using the selected layout:
9 Press or until the PRINT command is displayed.
0 Press to print the label, and have machine automatically cut it off. The message
“WORKING” appears in the display just before printing begins, and then “COPIES 1/ 1” is
displayed while the label is being printed.
To change the text entered in the layout:
A Press or until the EDIT MORE command is displayed.
CodeCode
A.Format
Y
A.Format
Y
Home
End
Space
Feed&Cut
Space
New Block
New Block
New Block
Home
End
New Block
Home
End
Space
Feed&Cut
Space
New Block
Home
End
New Block
Home
End
53
B Press . The first field for the selected layout appears in the display.
C Repeat step 4 until the text is edited as you wish. The SELECT MENU appears again when
is pressed after editing the last field in the layout.
To finish using the Auto format function:
D Press or until the EXIT command is displayed. The message “OK TO EXIT
AUTO FORMAT?” appears in the display.
E Press . Any text displayed before the Auto format function was used reappears in
the display.
☞
The text entered in the selected layout is stored and is available if the same layout is
selected the next time that the Auto format function is used.
EXAMPLE
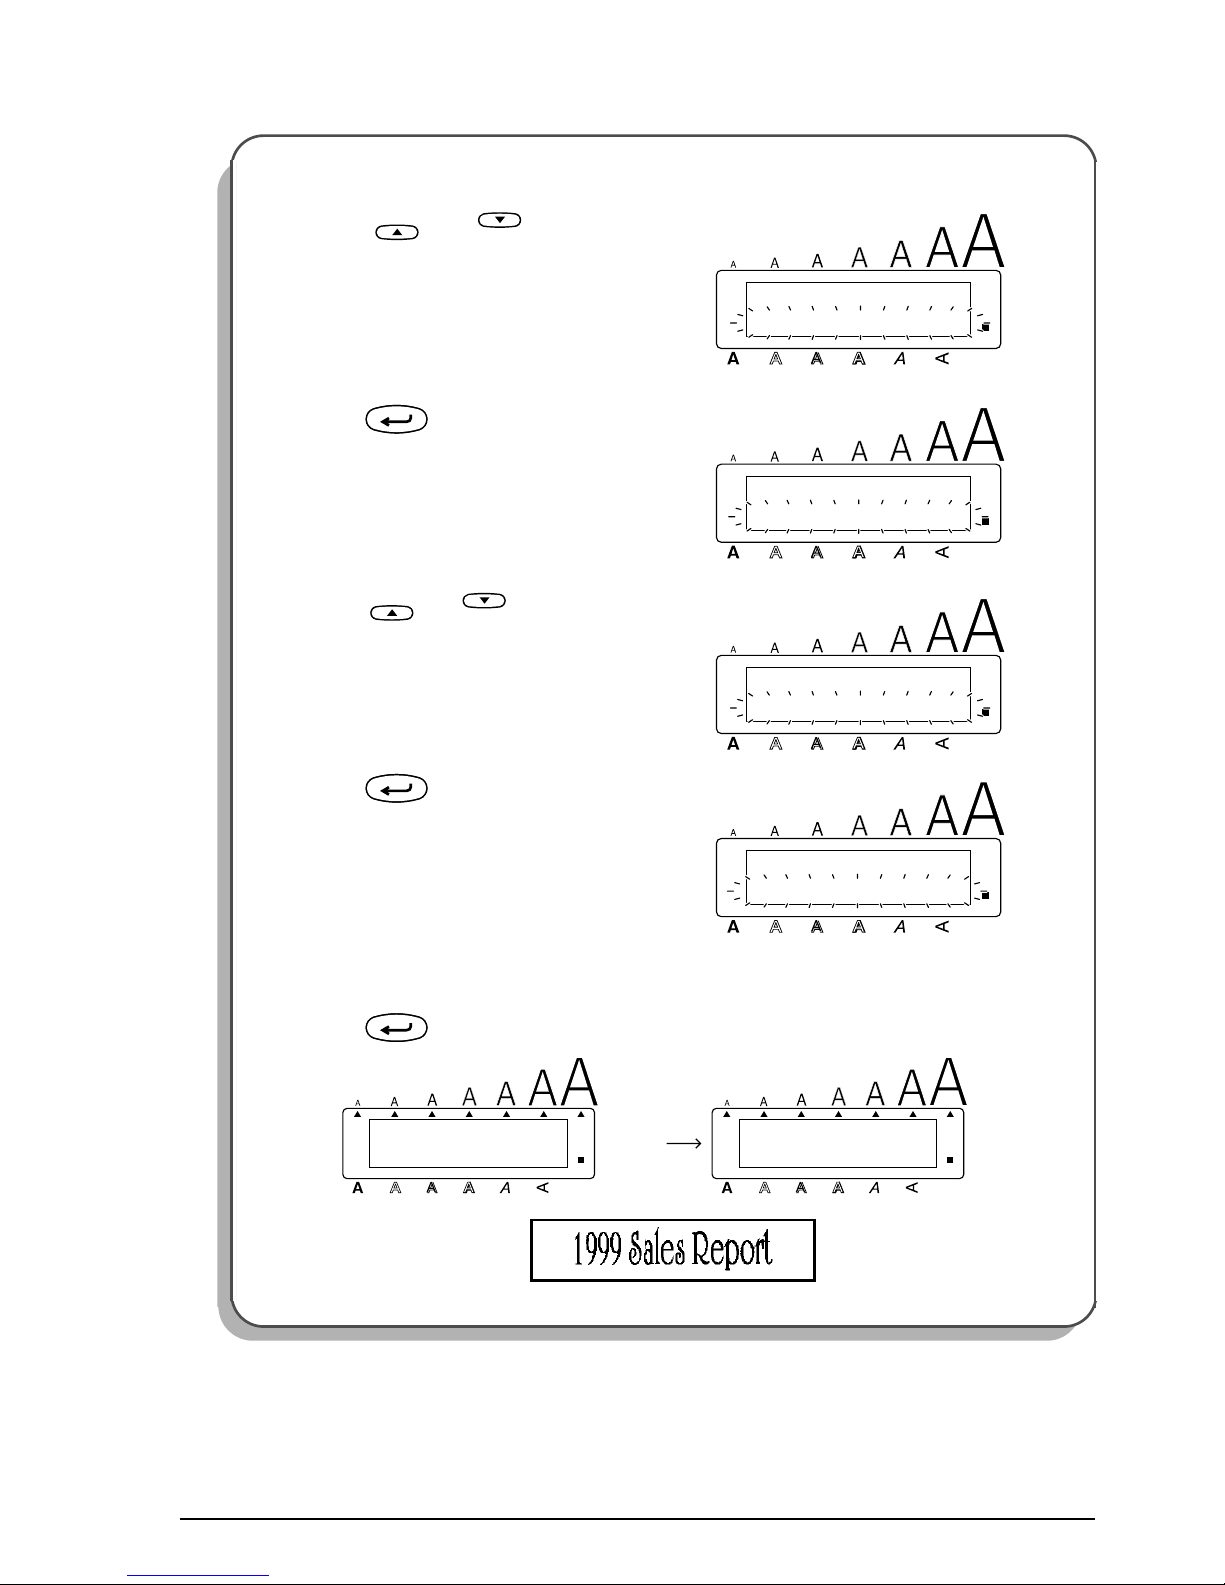
To create a short label for a file folder:
1 Hold down and press .
2 Press or until layout 35
(FILE SHORT) is displayed.
3 Press .
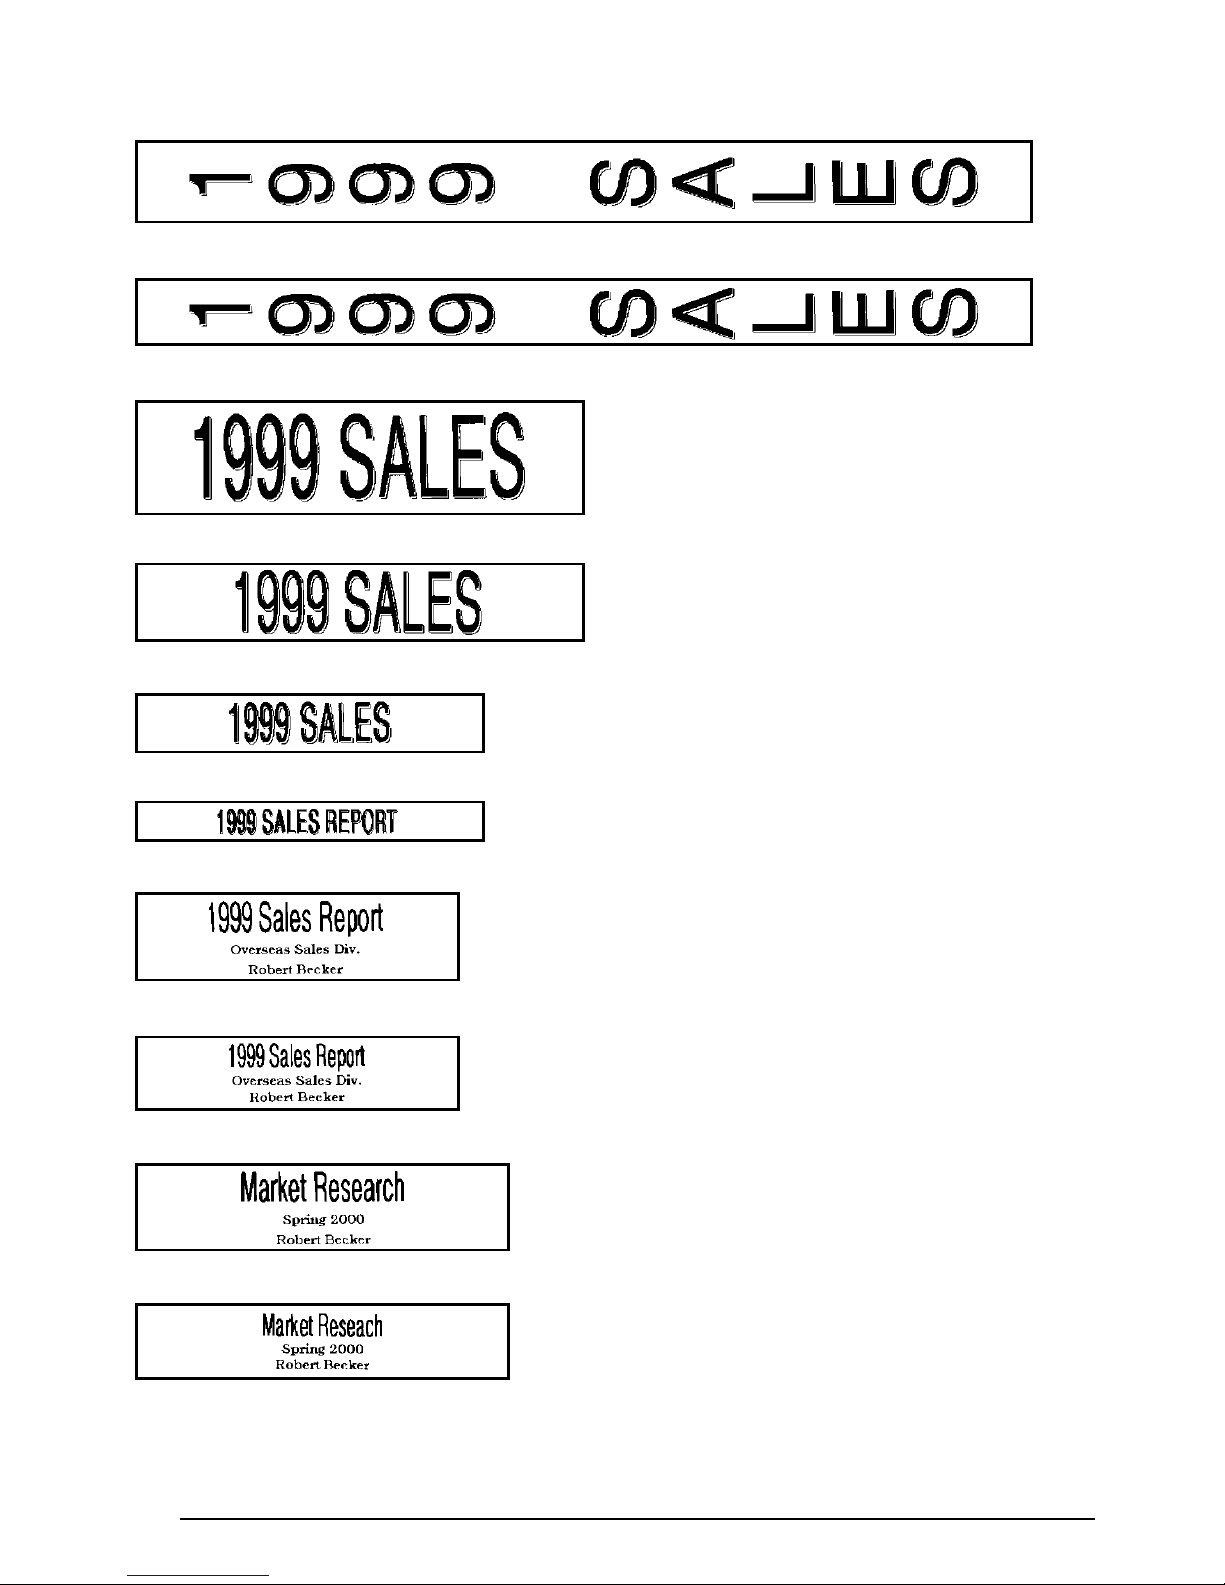
4 Type in “1999 Sales Report”, and then
press .
New Block
New Block
Home
End
New Block
PRESS
FORMAT TYPE
Alt
Caps
Width
Length
A.Format
Undl/Frm
Length
CodeCode
A.Format
Y
A.Format
Y
FILE SHORT
35:1/2 2.9”
Alt
Caps
Width
Length
A.Format
Undl/Frm
Length
Home
End
_
1TITLE?
Alt
Caps
Width
Length
A.Format
Undl/Frm
Length
New Block
Alt
Caps
SELECT MENU
PRINT
Width
Length
A.Format
Undl/Frm
Length
New Block
54
To change the character style of the label:
5
Press or until CHANGE
STYLE is displayed.
6 Press .
7 Press or until ELEGANT is
displayed.
8 Press .
To print the label:
9
Press .
Alt
Caps
SELECT MENU
CHNAGE STYLE
Width
Length
A.Format
Undl/Frm
Length
Home
End
Alt
Caps
CHAR. STYLE
ORIGINAL
Width
Length
A.Format
Undl/Frm
Length
New Block
Alt
Caps
CHAR. STYLE
ELEGANT
Width
Length
A.Format
Undl/Frm
Length
Home
End
Alt
Caps
MENU
PRINT
Width
Length
A.Format
Undl/Frm
Length
New Block
New Block
1/ 1
COPIES
Alt
Caps
Width
WORKING
Alt
Caps
Width
Length
A.Format
Undl/Frm
Length Length
A.Format
Undl/Frm
Length

55
REFERENCE
No. Layout name
Tape width ×
label length
Layout fields
1 VCR VHS-1
3/4” × 5.5”
(18 mm × 140 mm)
11 SYMBOL? 44 DURATION?
22 TITLE? 55 REC.MODE?
33 SUBTITLE? 66 DATE?
2 VCR VHS-2
1” × 3.0”
(24 mm × 77 mm)
11 TITLE? 33 DATE?
22 SUBTITLE?
3 VCR 8mm-1
3/8” × 2.9”
(9 mm × 73 mm)
11 SYMBOL? 44 DATE?
22 TITLE? 55 REC.MODE?
33 SUBTITLE?
4 VCR 8mm-2
1/2” × 3.6”
(12 mm × 92 mm)
11 SYMBOL? 44 DURATION?
22 TITLE? 55 REC.MODE?
33 SUBTITLE? 66 DATE?
5 VCR VHSC-1
1/2” × 1.7”
(12 mm × 42 mm)
11 TITLE? 22 SUBTITLE?
6 VCR VHSC-2
3/4” × 3.2”
(18 mm × 81 mm)
11 SYMBOL? 44 DURATION?
22 TITLE? 55 REC.MODE?
33 SUBTITLE? 66 DATE?
7 AUDIO-1
1/4” × 3.1”
(6 mm × 80 mm)
11 SYMBOL? 33 SUBTITLE?
22 TITLE?
8
AUDIO-2
1/2” × 3.5”
(12 mm × 89 mm)
11 SYMBOL? 33 SUBTITLE?
22 TITLE?
9
3/8” × 3.5”
(9 mm × 89 mm)
10
AUDIO-3
1/2” × 3.5”
(12 mm × 89 mm)
11 SYMBOL? 22 TITLE?
11
3/8” × 3.5”
(9 mm × 89 mm)
12 DAT-1
1/4” × 2.2”
(6 mm × 56 mm)
11 TITLE? 22 SUBTITLE?
13 DAT-2
3/8” × 3.3”
(9 mm × 85 mm)
11 SYMBOL? 33 SUBTITLE?
22 TITLE?
14 MINI DISK-1
1/4” × 2.3”
(6 mm × 59 mm)
11 TITLE? 22 SUBTITLE?
15 MINI DISK-2
1” × 2.0”
(24 mm × 52 mm)
11 TITLE? 33 DURATION?
22 SUBTITLE? 44 DATE?
16
NAME PLATE
1” × 3.0”
(24 mm × 76 mm)
11 NAME? 22 COMPANY?
17
3/4” × 3.0”
(18 mm × 76 mm)

56
18
ADDRESS
1” × 3.1”
(24 mm × 80 mm)
11 NAME? 33 ADDRESS2?
22 ADDRESS1? 44 ADD.3/TEL?
19
3/4” × 3.1”
(18 mm × 80 mm)
20
EQUIPMENT
1” × 3.1”
(24 mm × 79 mm)
11 TITLE? 33 NUMBER?
22 NAME?
21
3/4” × 3.1”
(18 mm × 79 mm)
22 SLIDE
1/2” × 1.7”
(12 mm × 42 mm)
11 TITLE? 33 SUBTITLE?
22 DATE?
23
PRICE
1” × 2.2”
(24 mm × 57 mm)
11 NAME? 22 PRICE?
24
3/4” × 2.2”
(18 mm × 57 mm)
25
SALE PRICE
1” × 3.6”
(24 mm × 92 mm)
11 NAME? 33 NEW PRICE?
22 OLD PRICE?
26
3/4” × 3.6”
(18 mm × 92 mm)
27 ORGANIZER L
1” × 3.2”
(24 mm × 82 mm)
11 NAME? 44 ADDRESS2?
22 COMPANY? 55 ADD.3/TEL?
33 ADDRESS1?
28 ORGANIZER S
1” × 2.6”
(24 mm × 65 mm)
11 NAME? 44 ADDRESS2?
22 COMPANY? 55 ADD.3/TEL?
33 ADDRESS1?
29
FILE LONG
1” × 7.2”
(24 mm × 183 mm)
11 TITLE?
30
3/4” × 7.2”
(18 mm × 183 mm)
31
FILE LONGV
1” × 7.2”
(24 mm × 183 mm)
11 TITLE?
32
3/4” × 7.2”
(18 mm × 183 mm)
33
FILE SHORT
1” × 3.7”
(24 mm × 94 mm)
11 TITLE?
34
3/4” × 3.7”
(18 mm × 94 mm)
35
1/2” × 2.9”
(12 mm × 74 mm)
36
3/8” × 2.9”
(9 mm × 74 mm)
No. Layout name
Tape width ×
label length
Layout fields

57
1 VCR VHS-1
2 VCR VHS-2
3 VCR 8mm-1
4 VCR 8mm-2
5 VCR VHSC-1
6 VCR VHSC-2
7 AUDIO-1
8 AUDIO-2
37
3.5” FLOPPY
1” × 2.7”
(24 mm × 69 mm)
11 TITLE? 33 NAME?
22 SUBTITLE?
38
3/4” × 2.7”
(18 mm × 69 mm)
39
5” FLO PPY
1” × 3.1”
(24 mm × 79 mm)
11 TITLE? 33 NAME?
22 SUBTITLE?
40
3/4” × 3.1”
(18 mm × 79 mm)
No. Layout name
Tape width ×
label length
Layout fields

58
9 AUDIO-2
10 AUDIO-3
11 AUDIO-3
12 DAT-1
13 DAT-2
14 MINI DISK-1
15 MINI DISK-2
16 NAME PLATE
17 NAME PLATE
18 ADDRESS
19 ADDRESS
20 EQUIPMENT

59
21 EQUIPMENT
22 SLIDE
23 PRICE
24 PRICE
25 SALE PRICE
26 SALE PRICE
27 ORGANIZER L
28 ORGANIZER S
29 FILE LONG
30 FILE LONG
60
31 FILE LONGV
32 FILE LONGV
33 FILE SHORT
34 FILE SHORT
35 FILE SHORT
36 FILE SHORT
37 3.5” FLOPPY
38 3.5” FLOPPY
39 5” FLOPPY
40 5” FLOPPY
61
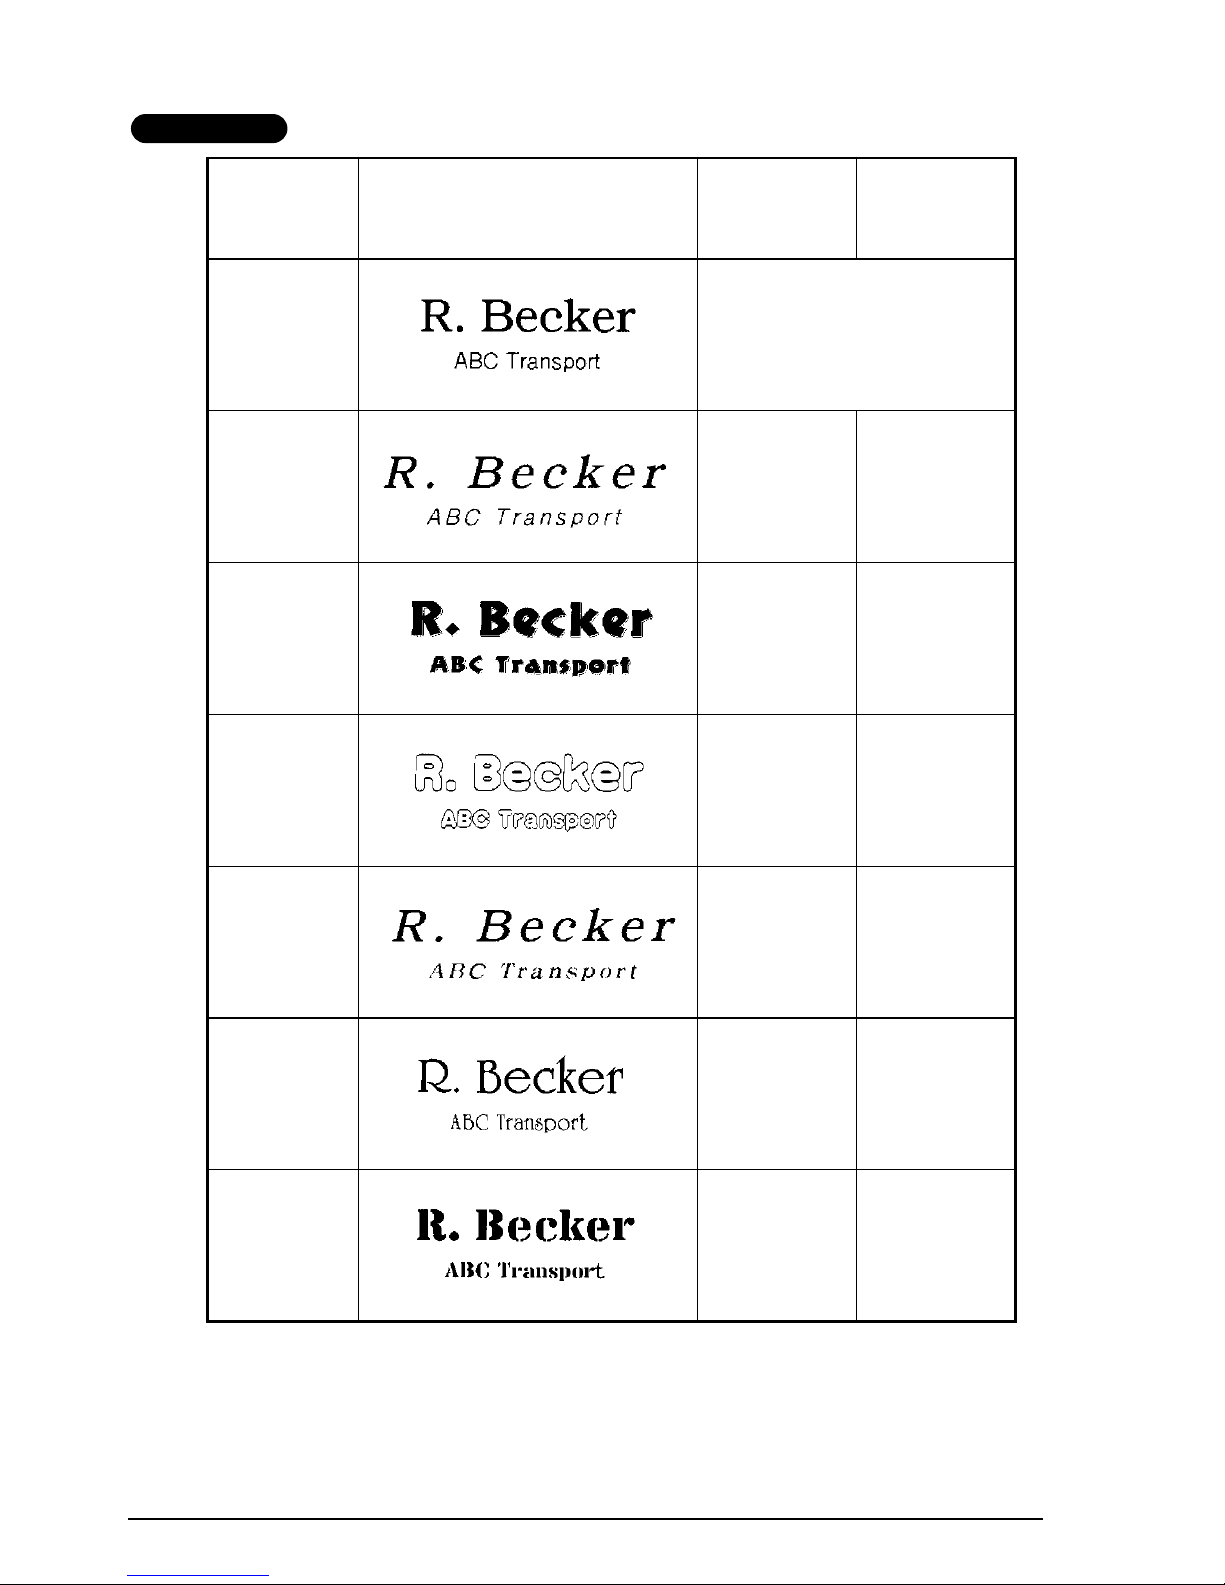
REFERENCE
CHAR.
STYLE
Setting
Sample Font Setting Style Setting
ORIGINAL Layout default
ITALIC Layout default ITALIC
DYNAMIC ISTANBUL SOLID
CUTE FLORIDA OUTLINE
FORMAL BRUSSELS ITALIC
ELEGANT US NORMAL
NATURAL SAN DIEGO NORMAL
62
STAMP FUNCTION
The Stamp function allows you to quickly and easily create your own stamp stencil films for
customized stamps. Select this function to automatically center the text and adjust the tape
length and margins to a perfect format for the pre-inked stamp film holders. Since the stamp
holder is reusable, just make a new stamp stencil film and replace the one in the holder.
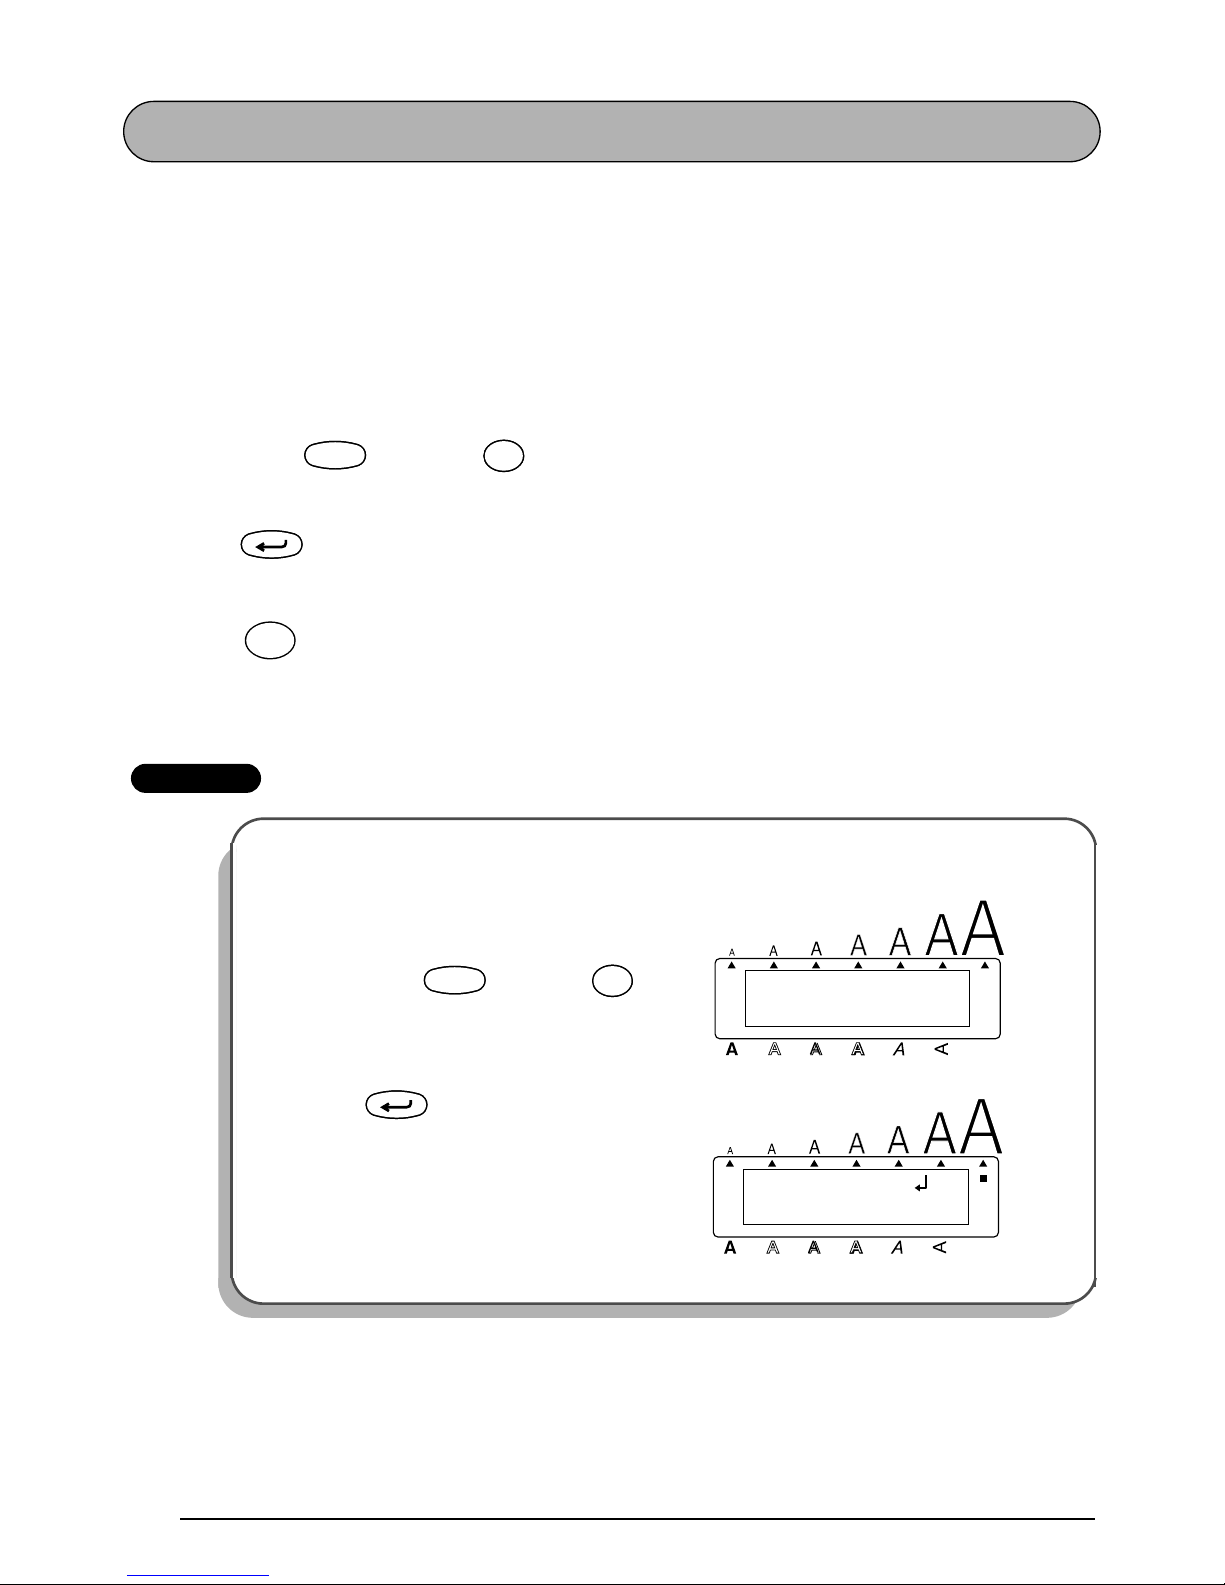
To make a stamp:
1 Type in the text, and then insert a medium (3/4” (18-mm)-wide) or large (1” (24-mm)-
wide) stamp film cassette.
2 Hold down and press once. The message “STAMP FORMAT?” appears in the
display.
3 Press . The text is automatically formatted for the installed stamp: centered within
the preset message area with the tape length and margins automatically adjusted.
4 Press to engrave the stamp stencil film and automatically cut it off.
5 After the stamp stencil film is cut off, remove the backing paper from the stamp stencil
film and affix it to the ink pad of a stamp film holder.
EXAMPLE
To cut a stamp:
1
Enter the text and insert a stamp film
cassette in the tape compartment.
2 Hold down and press .
3 Press .
CodeCode
ü
Stamp
U
ü
Stamp
U
New Block
Mirror
Print
FORMAT?
STAMP
Alt
Caps
Width
Length
A.Format
Undl/Frm
Length
CodeCode
ü
Stamp
U
ü
Stamp
U
2: 1234 Main S _
1: J. Smith
Alt
Caps
Width
Length
A.Format
Undl/Frm
Length
New Block
63
4 Press to engrave the stamp stencil film, and then automatically cut off.
To affix a stamp:
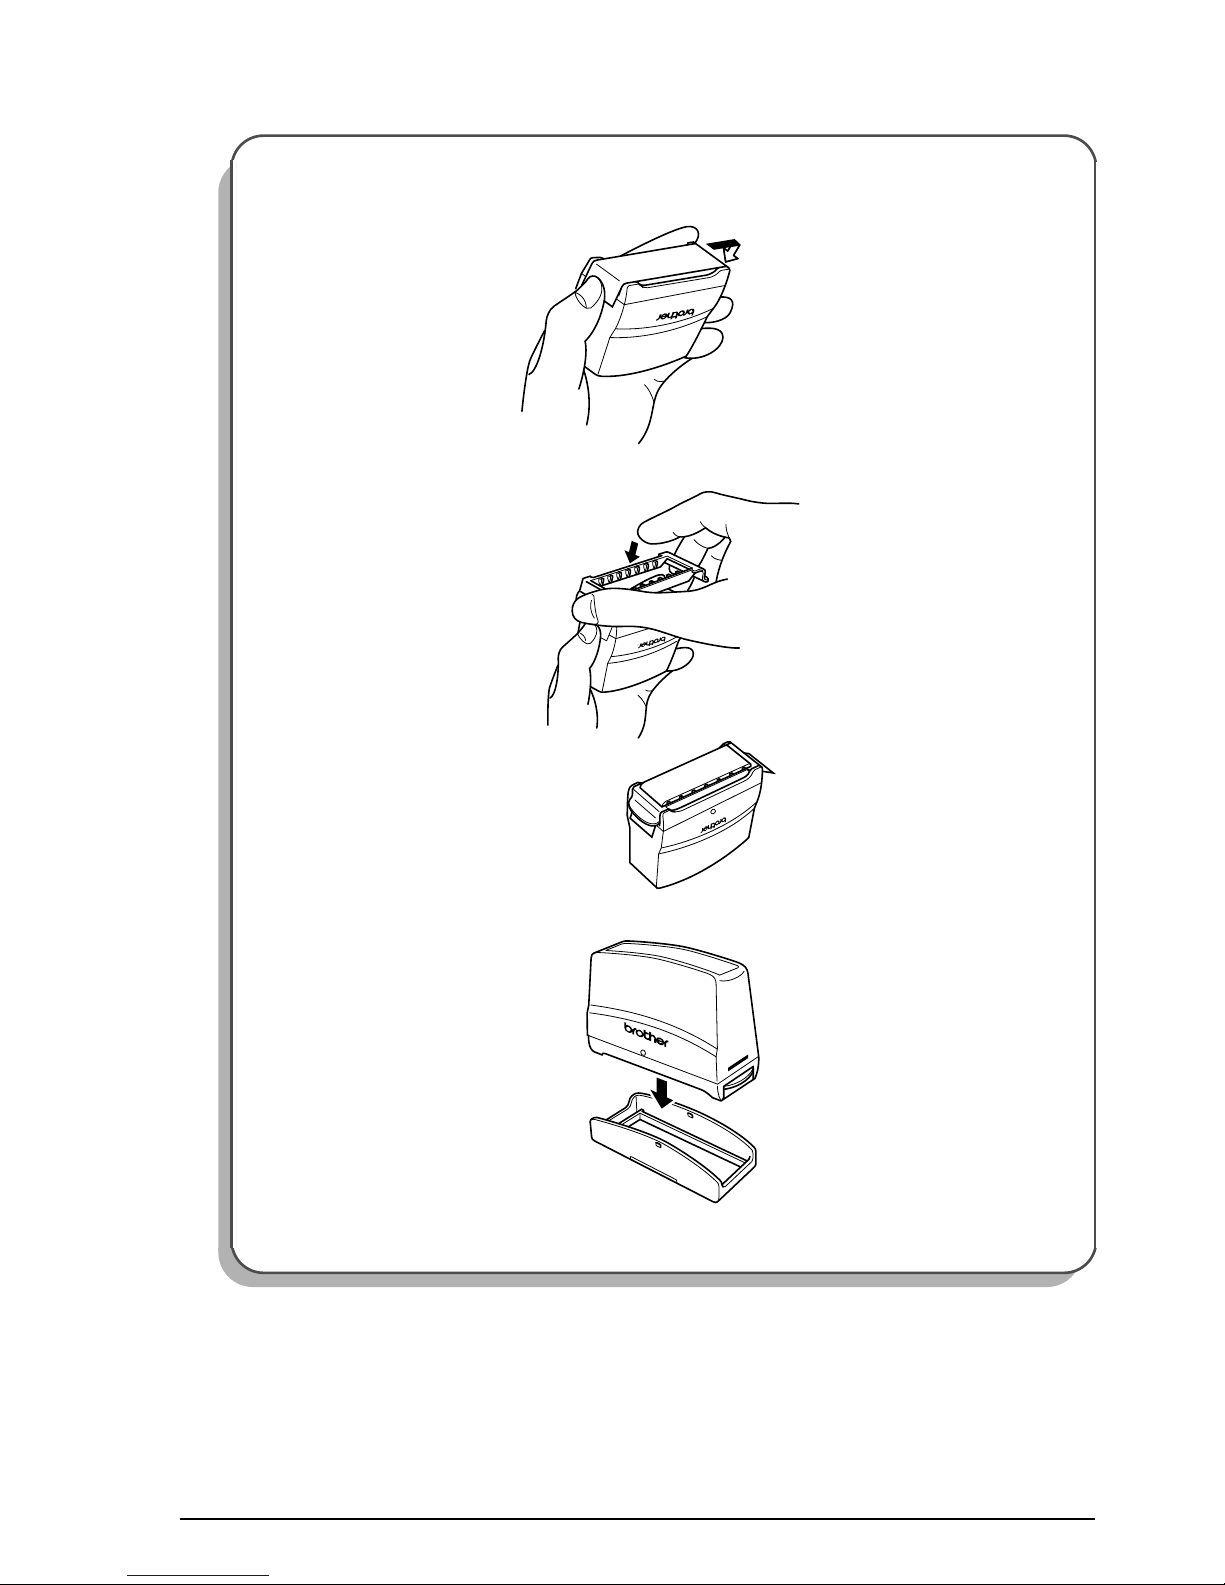
5
Remove the stamp frame from around the stamp film holder ink pad, one side at a
time, then remove the protective seal covering the ink pad and the backing paper
from the stamp stencil film.
6 With the glossy side of the stamp stencil film upward, align one of its ends with the
slit on the side of the stamp film holder.
7 Hold the end of the stamp stencil film in place with your thumb, then pass the tape
through the guides while pulling it tight.
Mirror
Print
1/ 1
COPIES
Alt
Caps
Width
WORKING
Alt
Caps
Width
Length
A.Format
Undl/Frm
Length Length
A.Format
Undl/Frm
Length
Tape end
Glossy side
Slit
Guides
64
8 Fold the other end of the stamp stencil film over the other side of the stamp film
holder and hold it in place with your finger.
9 Fit the stamp frame over the stamp stencil film and push it into place.
0 Insert the stamp film holder straight into its cap.
☞
Be sure that the stamp is correctly covered in order to prevent ink spills.
Fold over
65
LOCAL FORMAT FUNCTION
The Local format function allows you to emphasize a block of the text by printing it with a
font, size, width, style, underline or frame setting that is different from the rest of the text.
To use the Local format function:
1 Press , , or to position the cursor in the block that will be given a
different format.
2 Hold down and press once. “BLOCK FORMAT” appears in the top row of the
display to indicate that the current text block will have the local format.
3 Select the desired font, size, width, style, underline or frame setting as described on
pages 68 to 77. The selected setting will only be applied to the text block containing the
cursor.
☞
Only the SQUARE and ROUND frame settings can be selected.
EXAMPLE
To select the SOLID style setting for part of the text:
1
Press , , or to
position the cursor in the shelf number
block.
2 Hold down and press once.
3
Hold down and press once.
4 Keep held down and continue
pressing until the SOLID style setting is displayed.
5 Release .
Home
En
CodeCode
S
Local
S
1: B1
Alt
Caps
Width
Length
A.Format
Undl/Frm
Length
Home
En
1: B1
BLOCK FORMAT
Alt
Caps
Width
Length
A.Format
Undl/Frm
Length
CodeCode
S
Local
S
NORMAL
STYLE
Alt
Caps
Width
Length
A.Format
Undl/Frm
Length
CodeCode
Style
$
4
Style
$
4
SOLID
STYLE
Alt
Caps
Width
Length
A.Format
Undl/Frm
Length
CodeCode
Style
$
4
Style
$
4
CodeCode
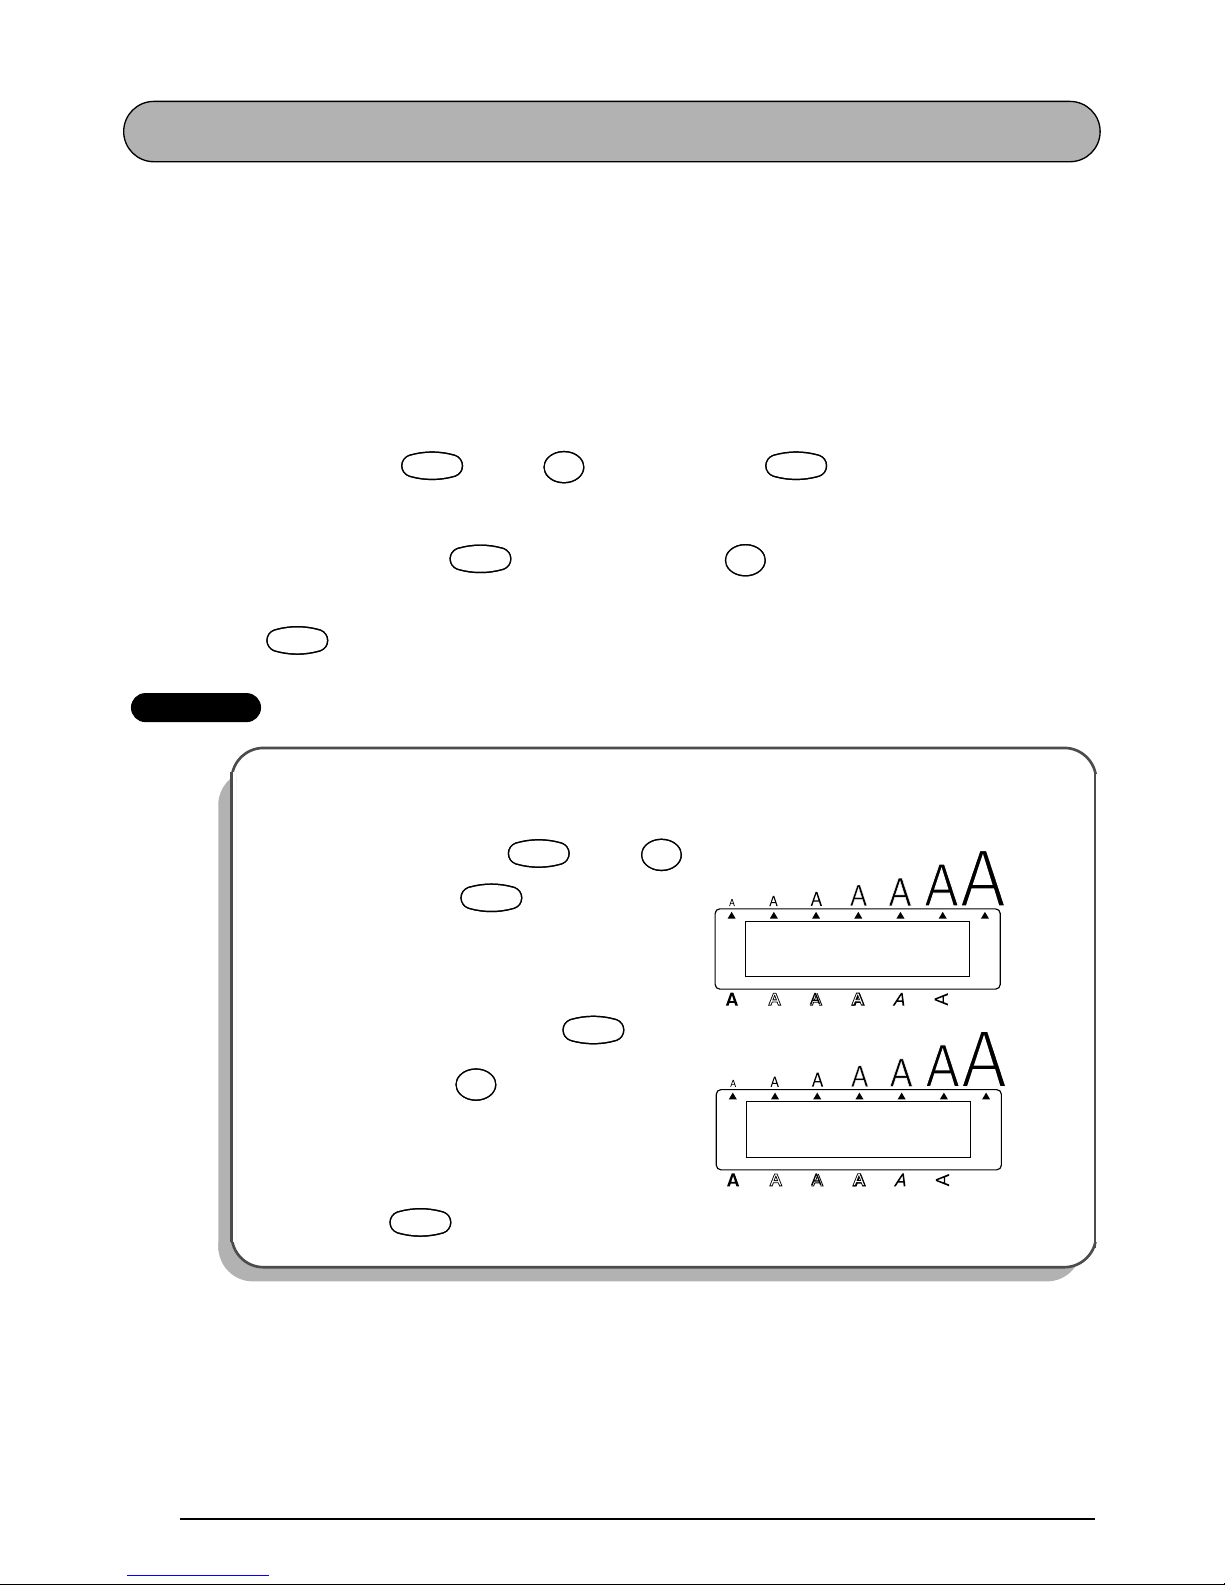
66
FONT FUNCTION
With the Font function, you can choose one of eight fonts for your text.
The following font settings are available:
HELSINKI, BRUSSELS, BELGIUM, US, SAN DIEGO, FLORIDA, LOS ANGELES, and ISTANBUL
The default font setting is HELSINKI.
Refer to
Reference at
the end of this section for samples of the available settings.
To change the font setting:
1 While holding down , press once, and keep held down to display the
current font setting.
2 While still holding down , continue pressing until the desired font setting is
displayed.
3 Release to apply the selected font setting to the text.
EXAMPLE
To select the BRUSSELS font setting:
1
While holding down , press
once, and keep held down.
2 While still holding down , con-
tinue pressing until BRUSSELS is
displayed.
3 Release .
CodeCode
¡
Font
!
1
¡
Font
!
1
CodeCode
CodeCode
¡
Font
!
1
¡
Font
!
1
CodeCode
HELSINKI
FONT
Alt
Caps
Width
Length
A.Format
Undl/Frm
Length
CodeCode
¡
Font
!
1
¡
Font
!
1
CodeCode
BRUSSELS
FONT
Alt
Caps
Width
Length
A.Format
Undl/Frm
Length
CodeCode
¡
Font
!
1
¡
Font
!
1
CodeCode
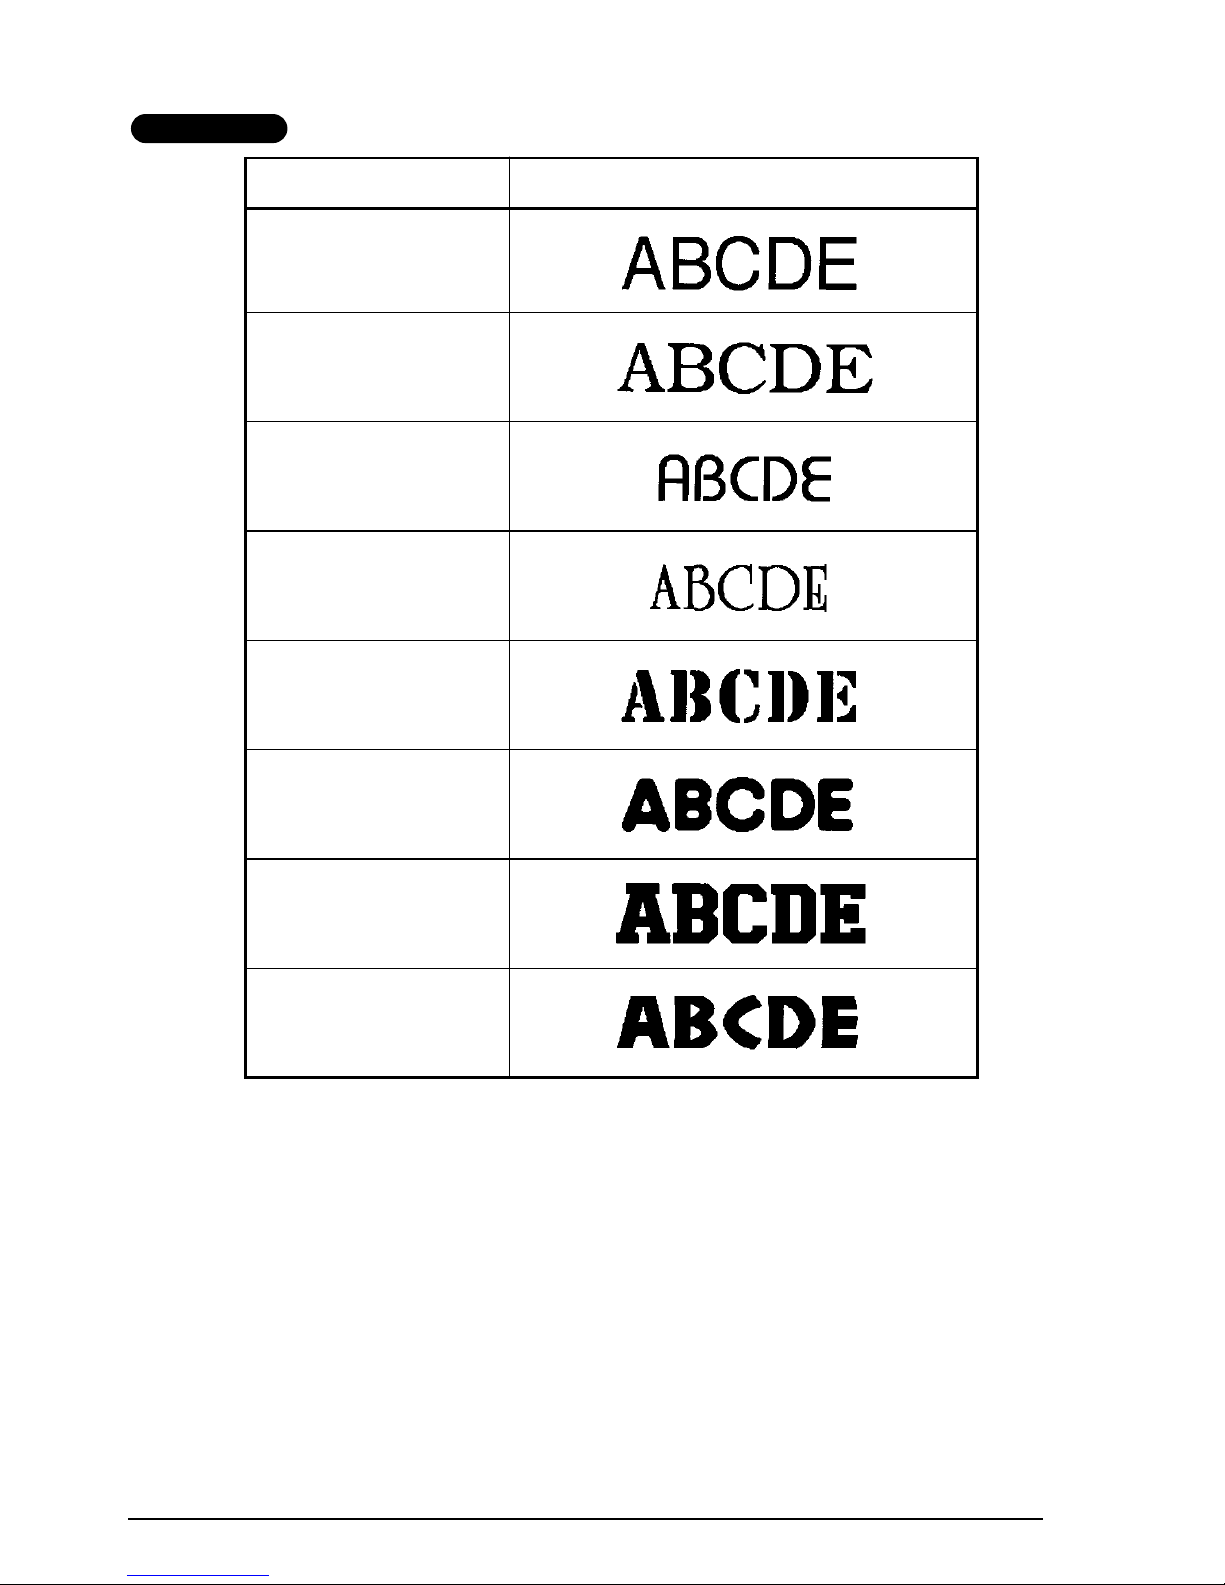
67
REFERENCE
Font setting Font sample
HELSINKI
BRUSSELS
BELGIUM
US
SAN DIEGO
FLORIDA
LOS ANGELES
ISTANBUL
68
SIZE & WIDTH FUNCTIONS
The character size can be adjusted using both the Size and Width functions. Since the charac-
ter size that can be used depends on the width of the tape, the following table shows the character sizes that can be used with each tape width.
The default size setting is AUTO and the default width setting is MEDIUM. The currently
selected size setting is always shown by the indicator above the display. In addition, all of the
size indicators light up when the AUTO setting is selected. When either the NARROW or
WIDE width setting is selected, the Width indicator lights up.
With the AUTO size setting, the machine compares your text with the width of the installed
tape and automatically adjusts the characters to the largest possible size. However, seven
other point sizes are also available and each can be printed in narrow or wide characters.
Refer to
Reference at
the end of this section for samples of the available settings.
☞
With the AUTO setting selected and 1” (24-mm)-wide tape installed, text consisting of
only capital letters will be printed with a character size of 60 point.
Tape widths Sizes (in points)
1/4
”
(6 mm) 6, 9, 12
3/8” (9 mm) 6, 9, 12, 18
1/2
”
(12 mm) 6, 9, 12, 18, 24
3/4” (18 mm) 6, 9, 12, 18, 24, 36
1” (24 mm) 6, 9, 12, 18, 24, 36, 48
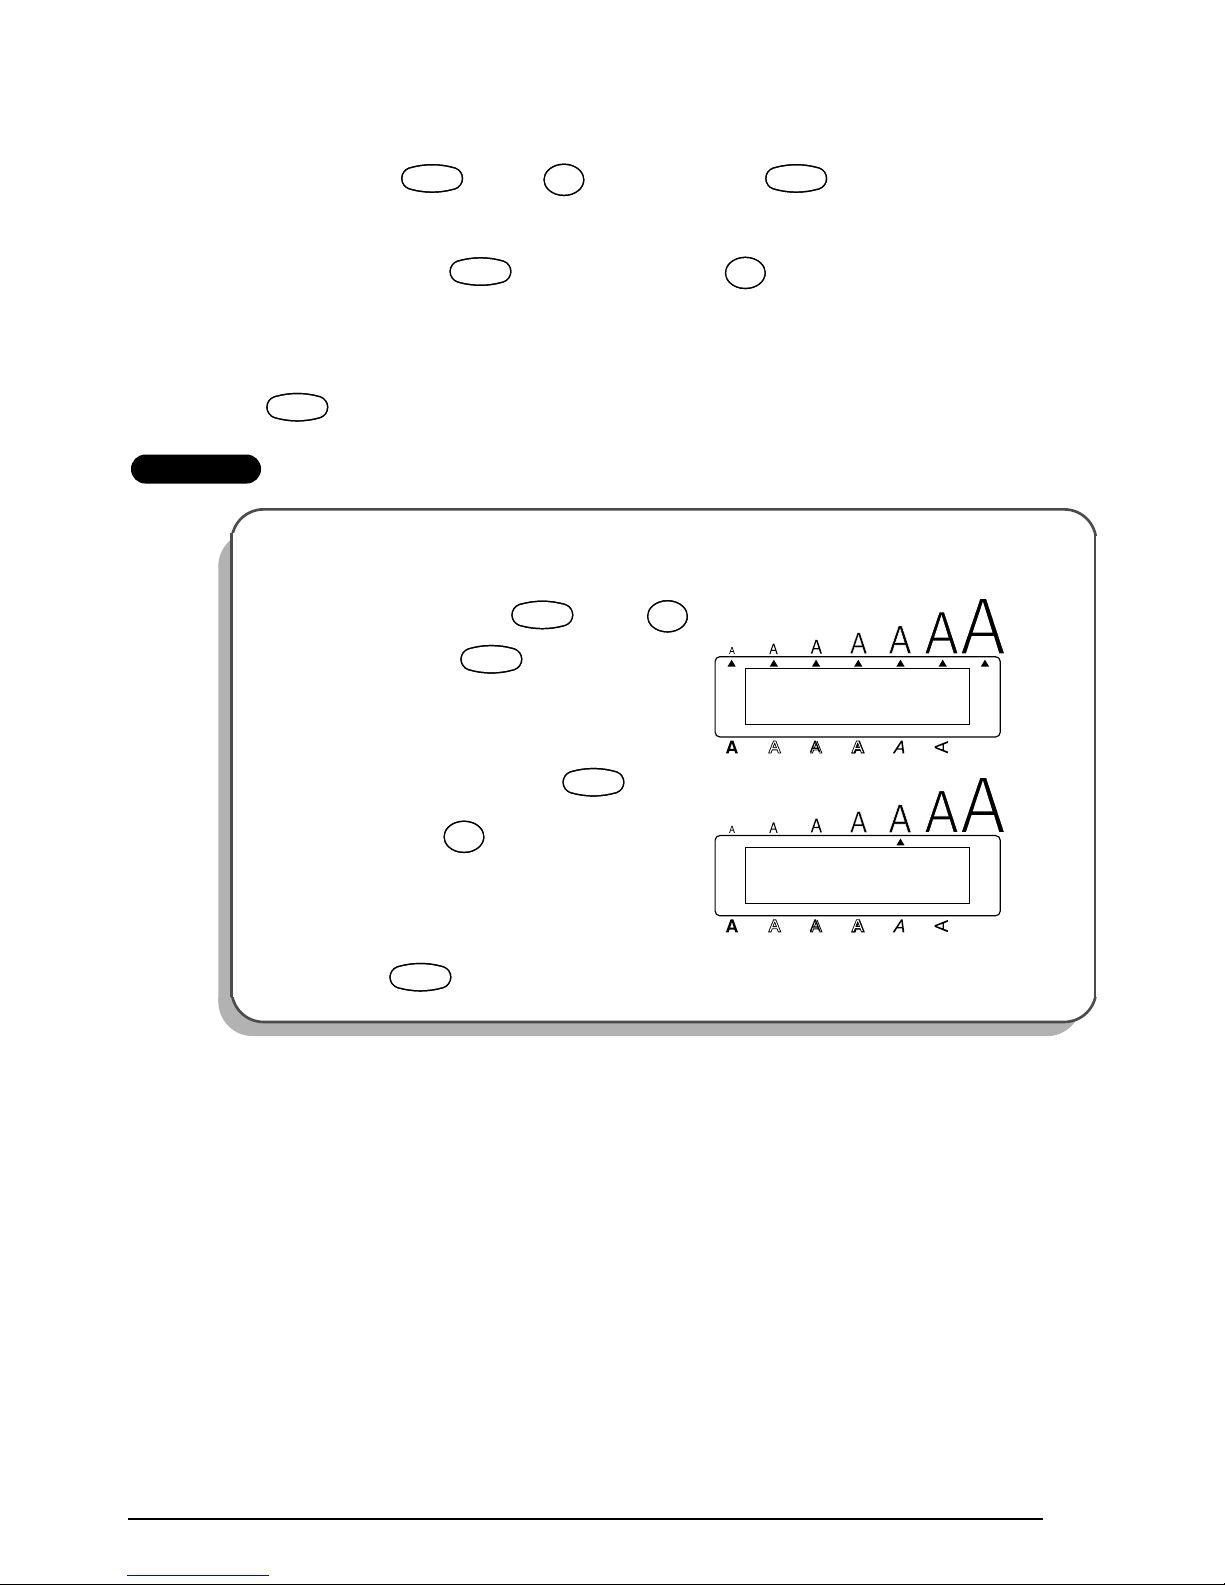
69
To change the size setting:
1 While holding down , press once, and keep held down to display the
current size setting.
2 While still holding down , continue pressing until the desired size setting is
displayed and is shown by the size indicator.
☞
The current character size setting is also shown by the size indicators above the display.
3 Release to apply the selected size setting to the text.
EXAMPLE
To select the 24 point size setting:
1 While holding down , press
once, and keep held down.
2 While still holding down , con-
tinue pressing until 24 is displayed.
3 Release .
CodeCode
Size
2
@
Size
2
@
CodeCode
CodeCode
Size
2
@
Size
2
@
CodeCode
AUTO
SIZE
Alt
Caps
Width
Length
A.Format
Undl/Frm
Length
CodeCode
Size
2
@
Size
2
@
CodeCode
24
SIZE
Alt
Caps
Width
Length
A.Format
Undl/Frm
Length
CodeCode
Size
2
@
Size
2
@
CodeCode

70
To change the width setting:
1 While holding down , press once, and keep held down to display the
current width setting.
2 While still holding down , continue pressing until the desired width setting is
displayed.
☞
The Width indicator lights up when either the NARROW or WIDE setting is
selected.
3 Release to apply the selected width setting to the text.
EXAMPLE
To select the WIDE width setting:
1
While holding down , press
once, and keep held
down.
2 While still holding down , con-
tinue pressing until WIDE is displayed.
3 Release .
CodeCode
Width
#
3
Width
#
3
CodeCode
CodeCode
Width
#
3
Width
#
3
CodeCode
MEDIUM
WIDTH
Alt
Caps
Width
Length
A.Format
Undl/Frm
Length
CodeCode
Width
#
3
Width
#
3
CodeCode
WIDE
WIDTH
Alt
Caps
Width
Length
A.Format
Undl/Frm
Length
CodeCode
Width
#
3
Width
#
3
CodeCode

71
REFERENCE
Size setting
(in pts)
Width
function
NARROW
Width function
MEDIUM
Width function WIDE
6
9
12
18
24
36
48
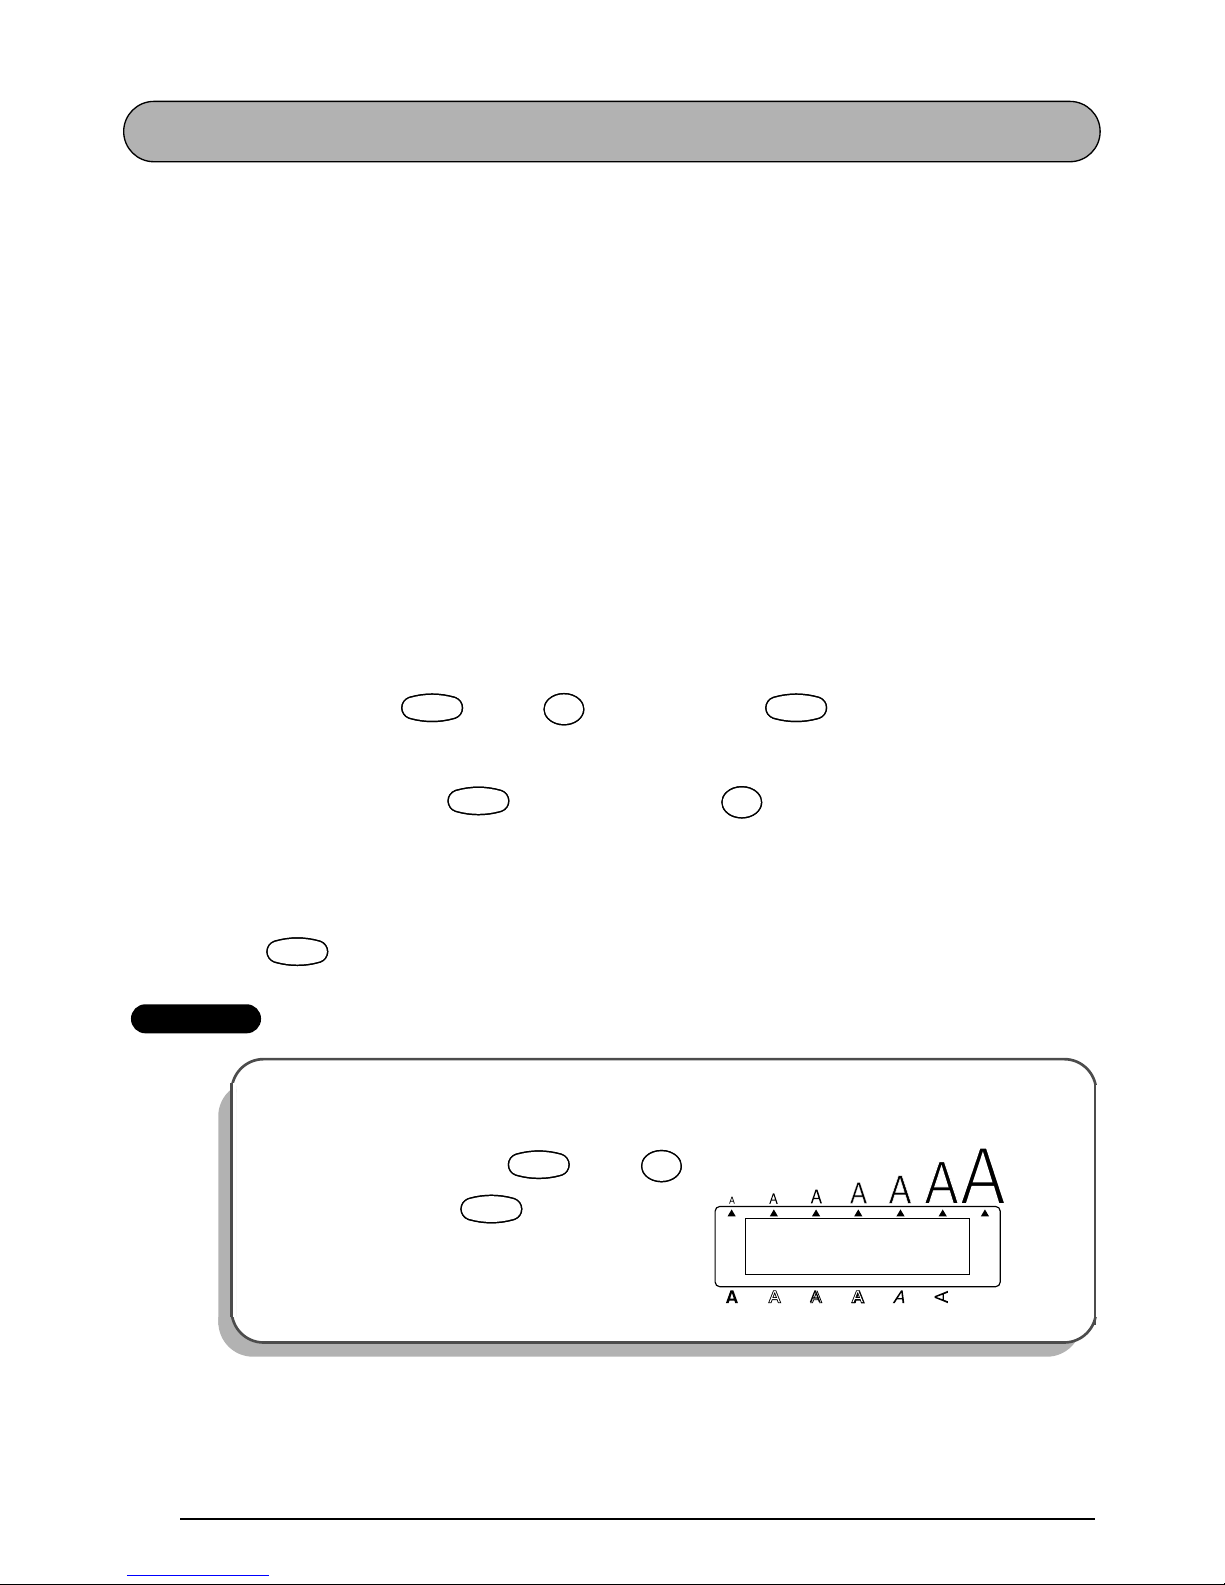
72
STYLE FUNCTION
You can choose from eleven different character styles to apply to your text.
☞
Characters printed using the smaller sizes may be difficult to read if certain style settings
(e.g., I+SHADOW) are selected.
The following style settings are available:
NORMAL I+BOLD (italic & bold)
BOLD I+OUTLINE (italic & outline)
OUTLINE I+SOLID (italic & solid)
SOLID I+SHADOW (italic & shadow)
SHADOW VERTICAL
ITALIC
The default style setting is NORMAL. The style indicators at the bottom of the display shows
the current style setting when any setting other than NORMAL is selected.
Refer to
Reference
at the end of this section for samples of the available settings.
To change the style setting:
1 While holding down , press once, and keep held down to display the
current style setting.
2 While still holding down , continue pressing until the desired style setting is
displayed.
☞
The current style setting is shown by the style indicators at the bottom of the display.
3 Release to apply the selected style setting to the text.
EXAMPLE
To select the I+SHADOW style setting:
1
While holding down , press
once, and keep held down.
CodeCode
Style
$
4
Style
$
4
CodeCode
CodeCode
Style
$
4
Style
$
4
CodeCode
NORMAL
STYLE
Alt
Caps
Width
Length
A.Format
Undl/Frm
Length
CodeCode
Style
$
4
Style
$
4
CodeCode
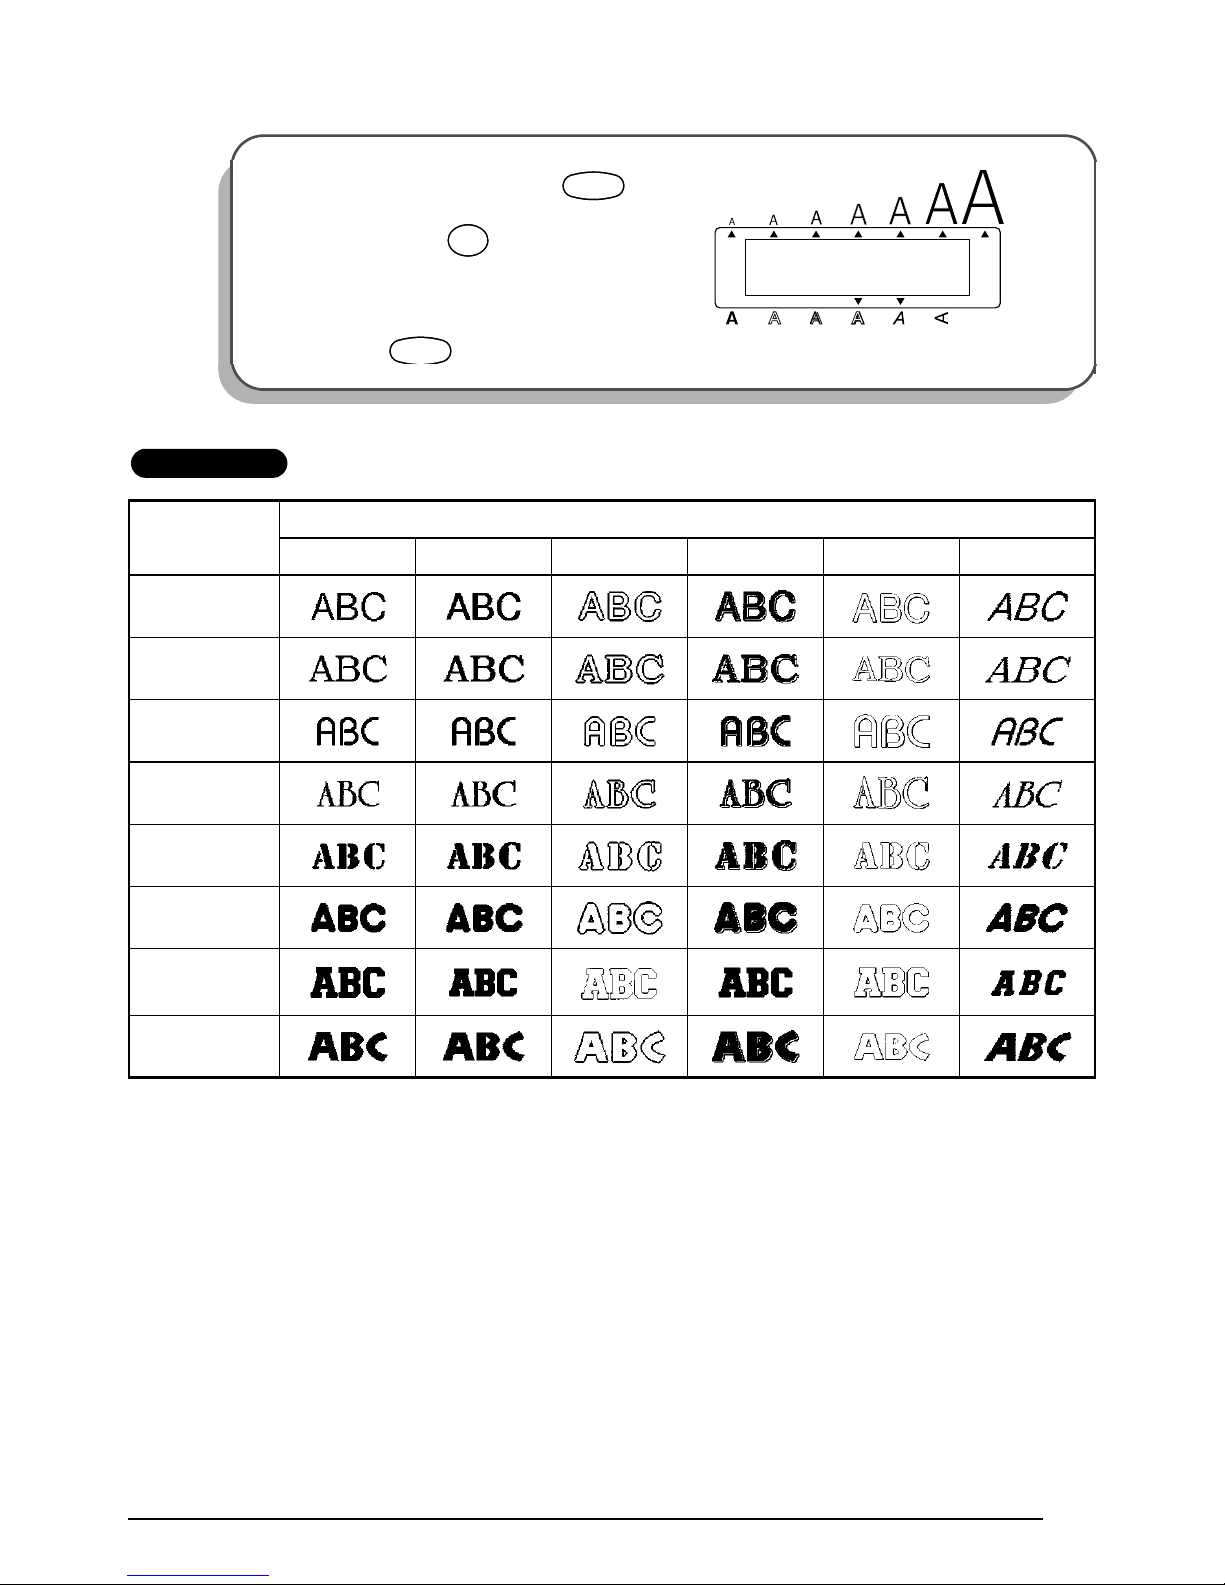
73
REFERENCE
2 While still holding down , con-
tinue pressing until I+SHADOW is
displayed.
3 Release .
Font
setting
Style setting
NORMAL BOLD OUTLINE SOLID SHADOW ITALIC
HELSINKI
BRUSSELS
BELGIUM
US
SAN DIEGO
FLORIDA
LOS
ANGELES
ISTANBUL
I+SHADOW
STYLE
Alt
Caps
Width
Length
A.Format
Undl/Frm
Length
CodeCode
Style
$
4
Style
$
4
CodeCode
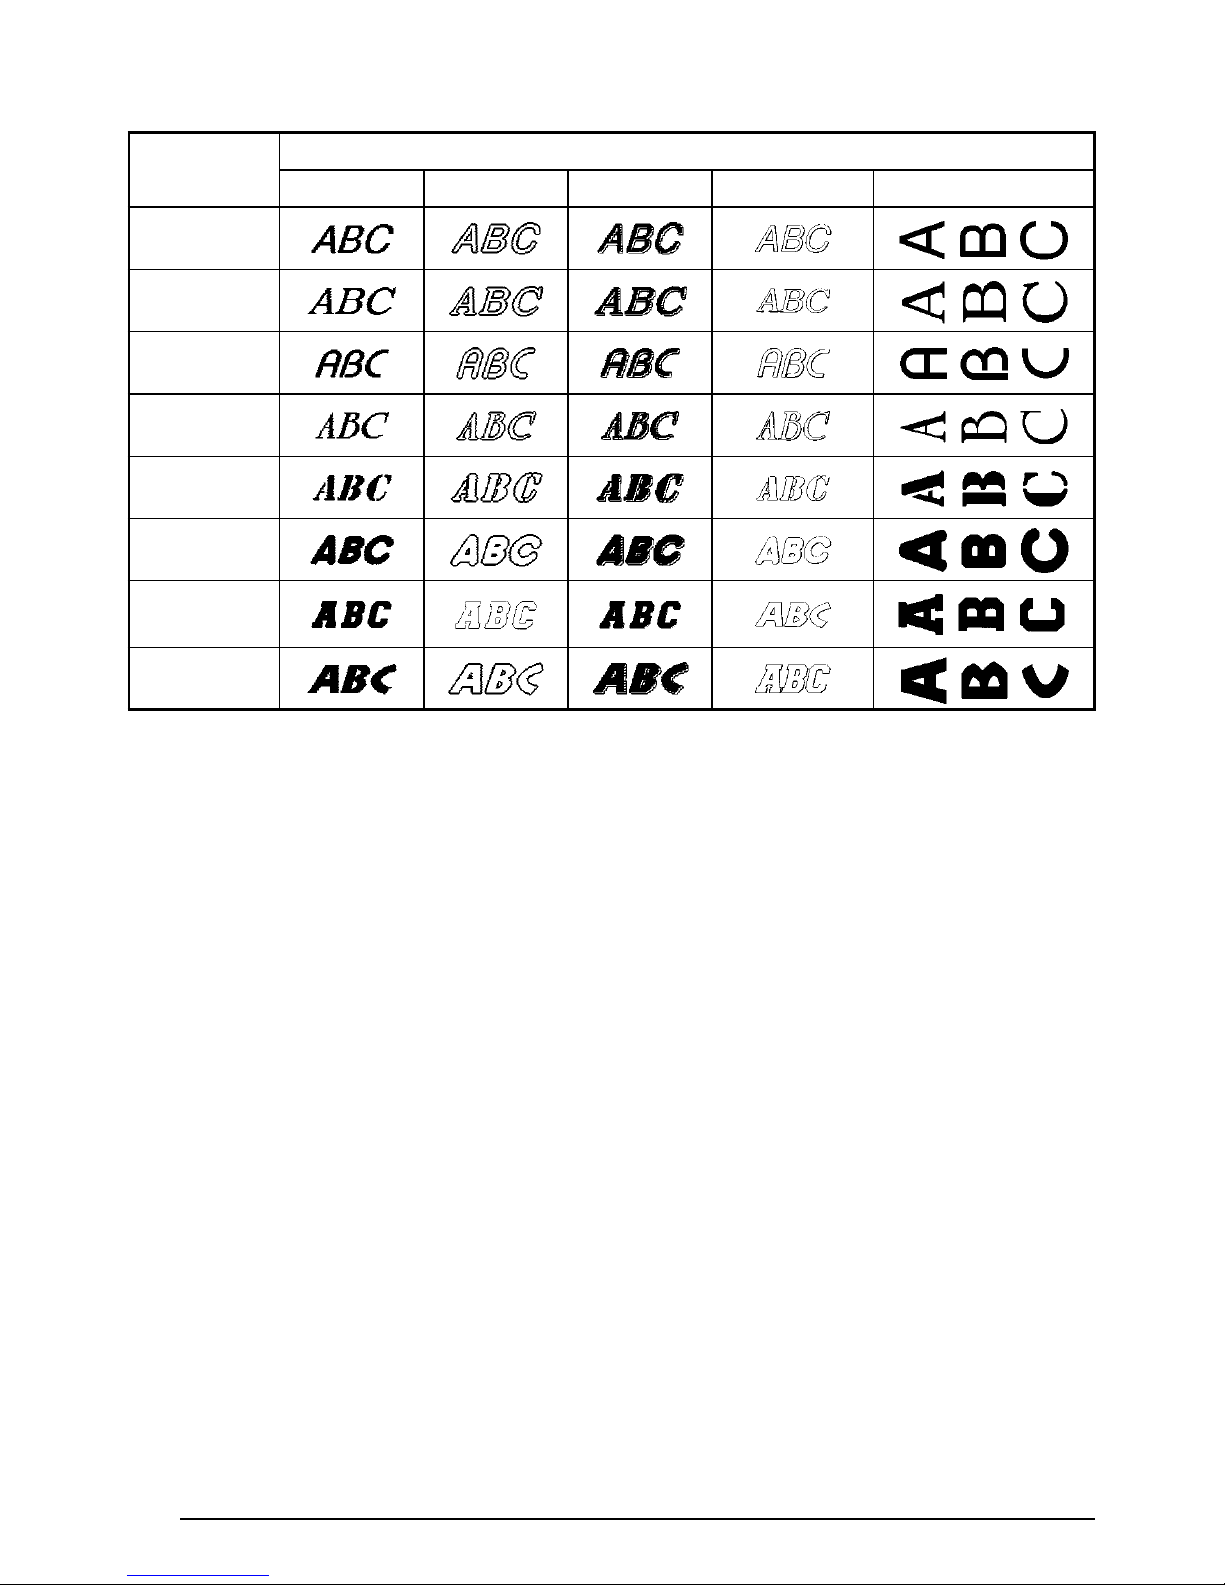
74
Font
setting
Style setting
I+BOLD I+OUTLINE I+SOLID I+SHADOW VERTICAL
HELSINKI
BRUSSELS
BELGIUM
US
SAN DIEGO
FLORIDA
LOS
ANGELES
ISTANBUL
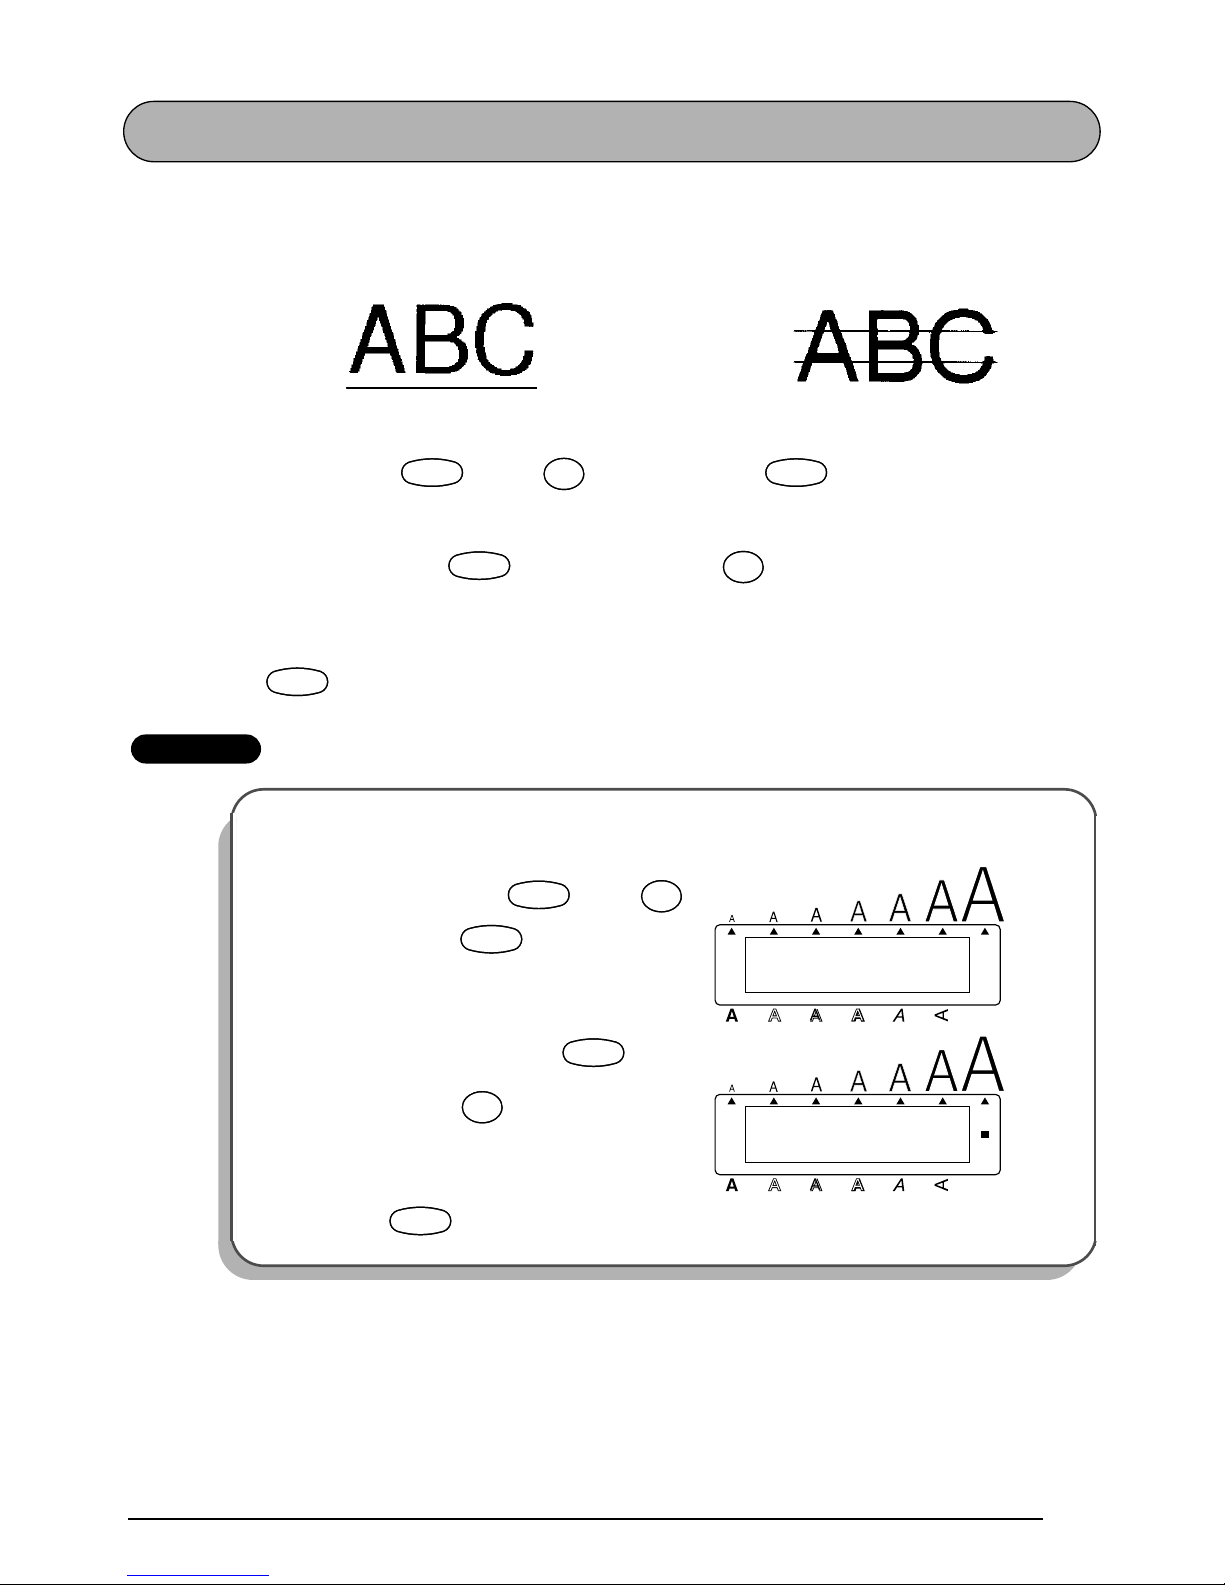
75
UNDERLINE FUNCTION
You can add emphasis to your text by underlining it or striking it out.
The default underline setting is OFF. When the Underline function is set to ON or STRIKE-
OUT, the Undl/Frm indicator on the right side of the display lights up.
To change the underline setting:
1 While holding down , press once, and keep held down to display the
current underline setting.
2 While still holding down , continue pressing until the desired underline set-
ting is displayed.
☞
The Undl/Frm indicator lights up when the ON or STRIKEOUT setting is selected.
3 Release to apply the selected underline setting to the text.
EXAMPLE
ON STRIKEOUT
To select the ON underline setting:
1 While holding down , press
once, and keep held down.
2 While still holding down , con-
tinue pressing until ON is displayed.
3 Release .
CodeCode
Underline
%
5
Underline
%
5
CodeCode
CodeCode
Underline
%
5
Underline
%
5
CodeCode
OFF
UNDERLINE
Alt
Caps
Width
Length
A.Format
Undl/Frm
Length
CodeCode
Underline
%
5
Underline
%
5
CodeCode
ON
UNDERLINE
Alt
Caps
Width
Length
A.Format
Undl/Frm
Length
CodeCode
Underline
%
5
Underline
%
5
CodeCode
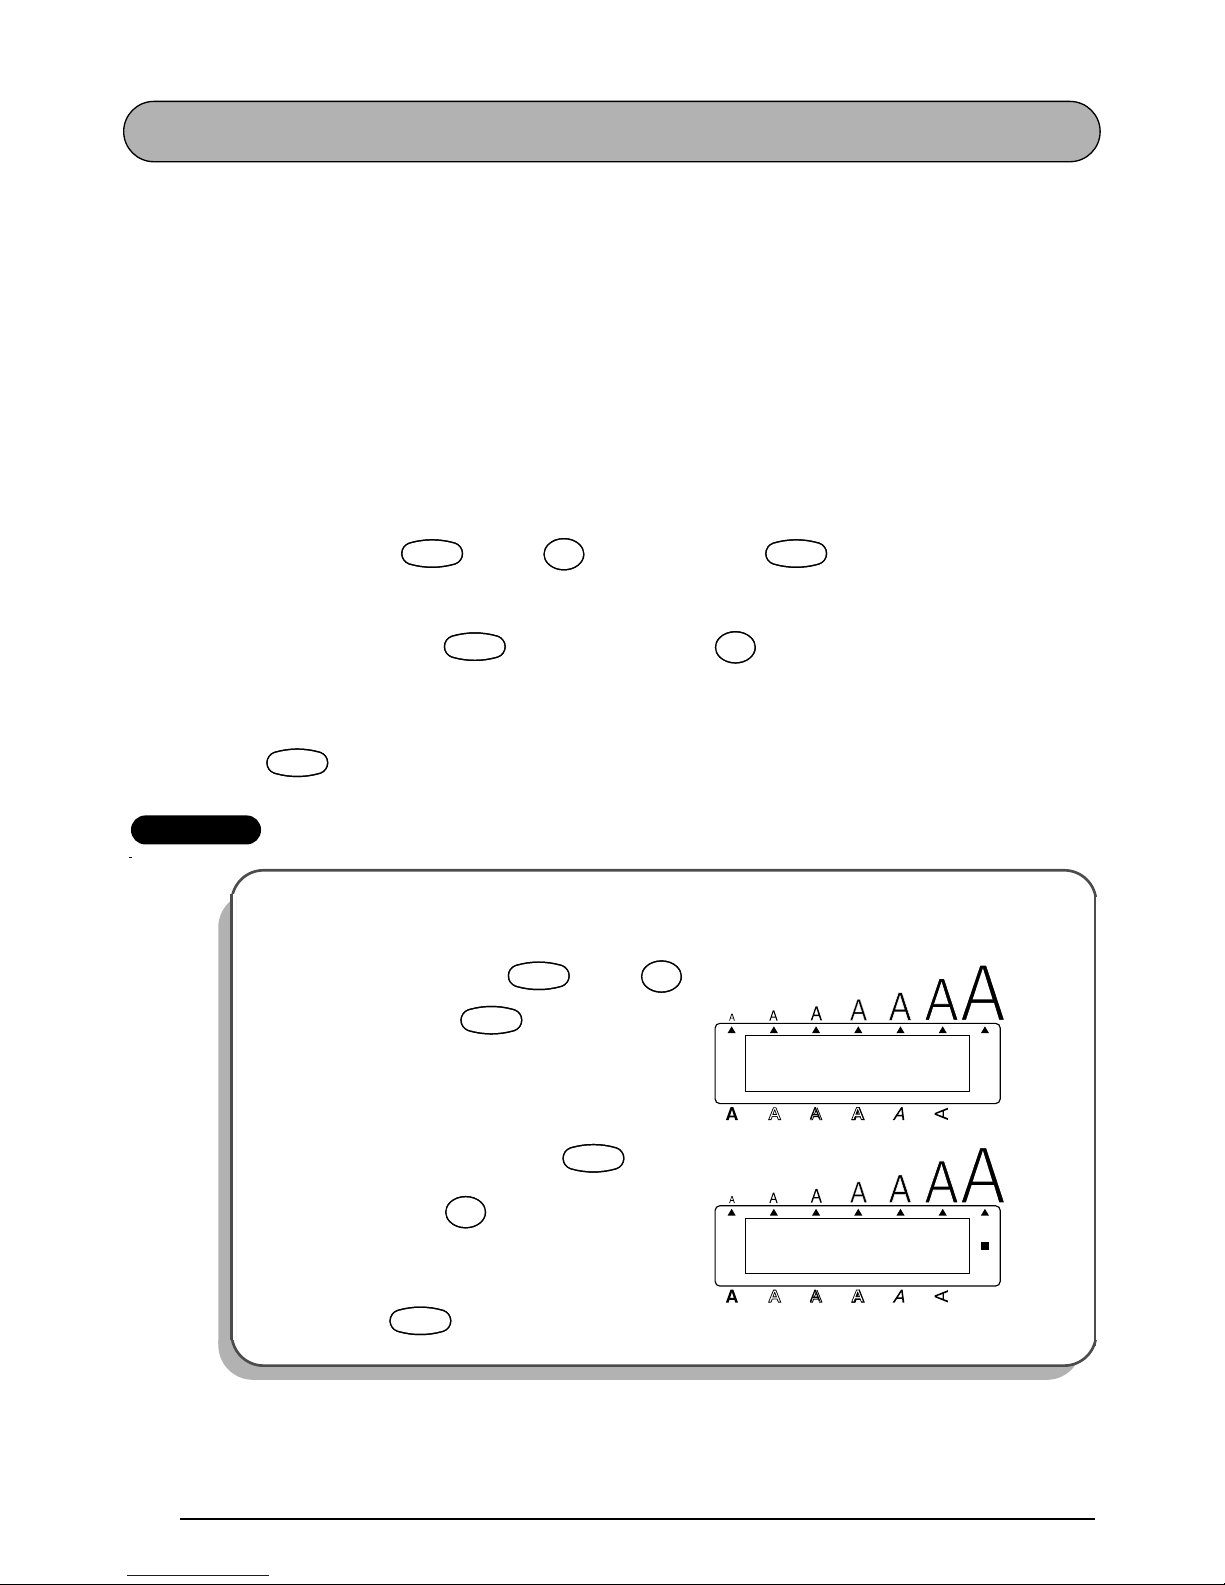
76
FRAME FUNCTION
With the Frame function, you can choose from various frames and highlights to make more
decorative or emphasized text.
The following frame settings are available:
OFF, SQUARE, ROUND, CANDY, POINTING, NAMEPLATE, DOG, MOVIE FILM, DINOSAUR, TELEPHONE, HANDS, WINDOW, BANNER, DOT, DIAMOND, and SLANT
The default frame setting is OFF; however, 15 other settings are also available. When any set-
ting other than OFF is selected, the Undl/Frm indicator on the right side of the display lights
up.
Refer to
Reference
at the end of this section for samples of the available settings.
To change the frame setting:
1 While holding down , press once, and keep held down to display the
current frame setting.
2 While still holding down , continue pressing until the desired frame setting is
displayed.
☞
The Undl/Frm indicator lights up when any setting other than OFF is selected.
3 Release to apply the selected frame setting to the text.
EXAMPLE
To select the BANNER frame setting:
1
While holding down , press
once, and keep held down.
2 While still holding down , con-
tinue pressing until BANNER is displayed.
3 Release .
CodeCode
Frame
¢
6
Frame
¢
6
CodeCode
CodeCode
Frame
¢
6
Frame
¢
6
CodeCode
OFF
FRAME
Alt
Caps
Width
Length
A.Format
Undl/Frm
Length
CodeCode
Frame
¢
6
Frame
¢
6
CodeCode
BANNER
FRAME
Alt
Caps
Width
Length
A.Format
Undl/Frm
Length
CodeCode
Frame
¢
6
Frame
¢
6
CodeCode
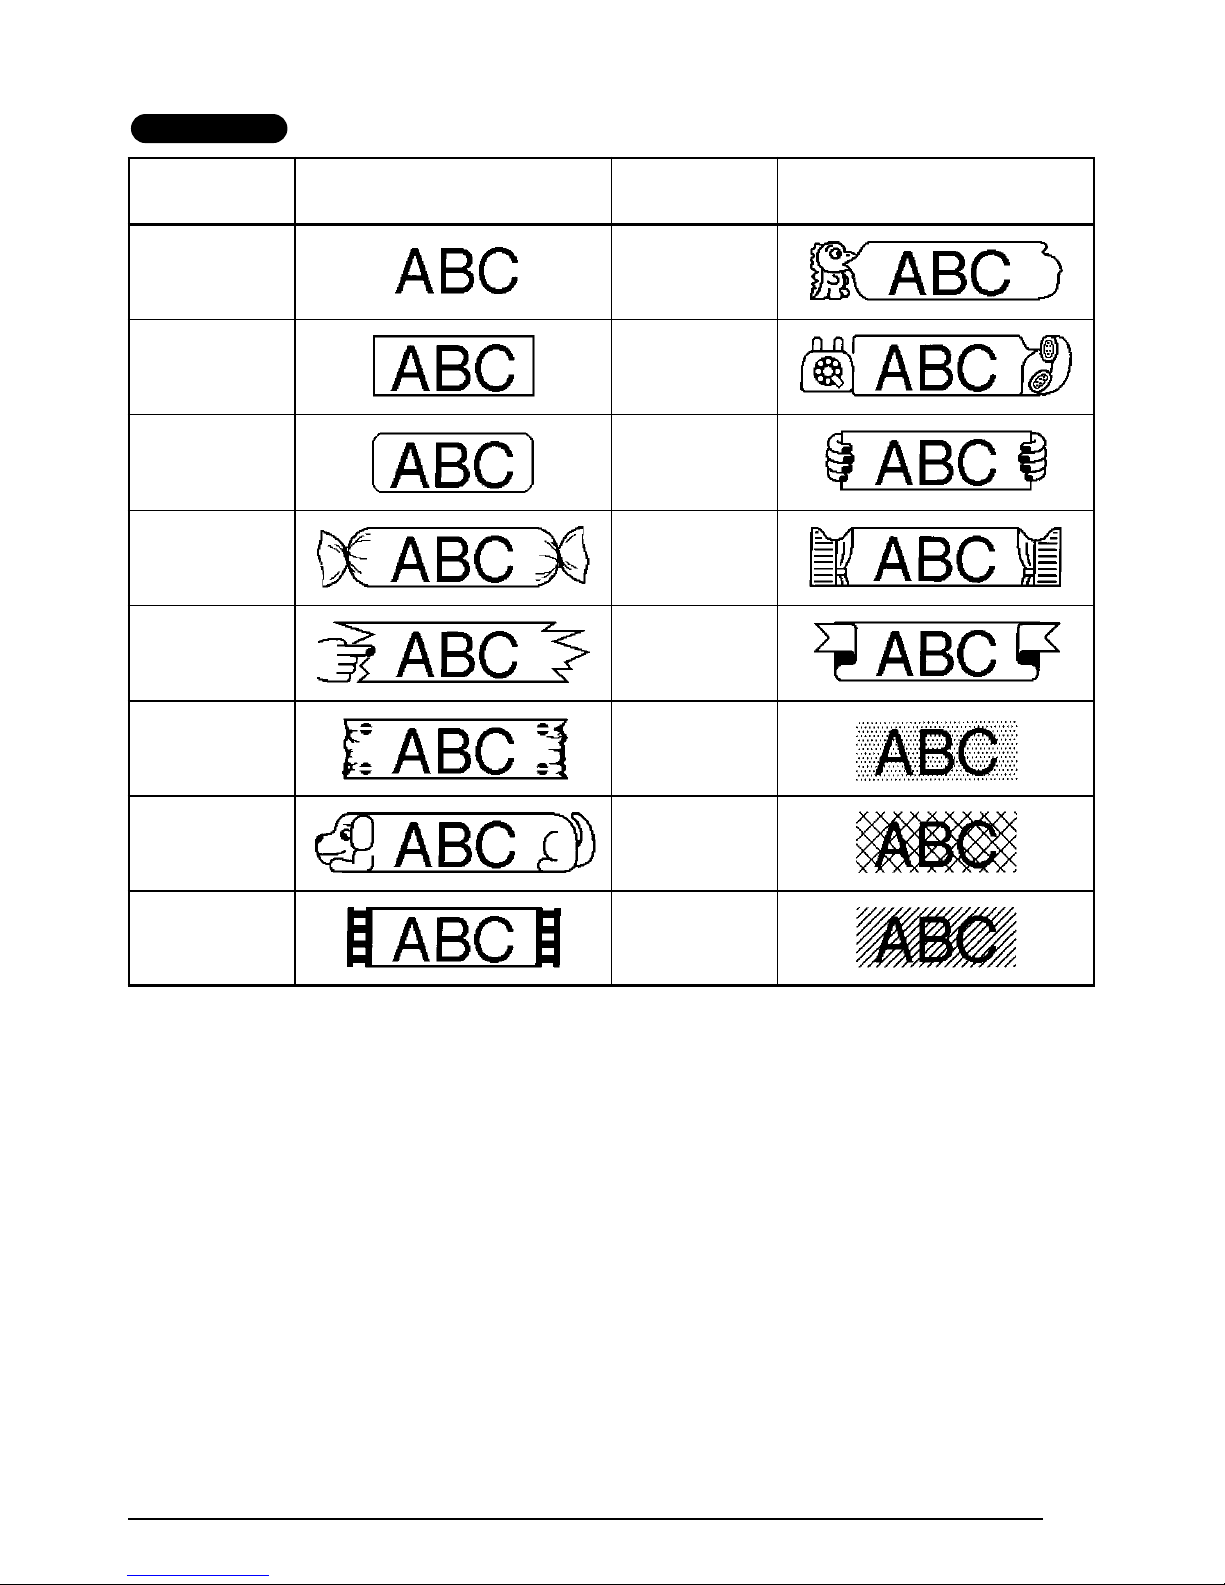
77
REFERENCE
Frame
setting
Frame sample
Frame
setting
Frame sample
OFF DINOSAUR
SQUARE TELEPHONE
ROUND HANDS
CANDY WINDOW
POINTING BANNER
NAMEPLATE DOT
DOG DIAMOND
MOVIE FILM SLANT

78
TAPE MARGIN FUNCTION
The Tape margin function allows you to adjust the size of the margins on the left and right
sides of your text.
The default tape margin setting is FULL; however, three other settings are also available.
FULL (1 1/24” (25 mm) margins)
NONE (1/6” (4 mm) margins)
NARROW (1/3” (8 mm) margins)
MEDIUM (1/2” (12 mm) margins)
☞
When a setting other than FULL is selected, extra tape is fed out before printing starts.
The extra tape is cut off if the Auto cut function is set to ON so that the margins on each
side of the text are equal.
To change the tape margin setting:
1 While holding down , press once, and keep held down to display the
current tape margin setting.
2 While still holding down , continue pressing until the desired tape margin set-
ting is displayed.
3 Release to apply the selected tape margin setting to the entire text.
EXAMPLE
To select the MEDIUM tape margin setting:
1
While holding down , press
once, and keep held down.
2 While still holding down , con-
tinue pressing until MEDIUM is displayed.
3 Release .
CodeCode
TapeETape
E
CodeCode
CodeCode
TapeETape
E
CodeCode
FEED
Alt
Caps
FULL
Width
Length
A.Format
Undl/Frm
Length
CodeCode
TapeETape
E
CodeCode
FEED
Alt
Caps
MEDIUM
Width
Length
A.Format
Undl/Frm
Length
CodeCode
TapeETape
E
CodeCode
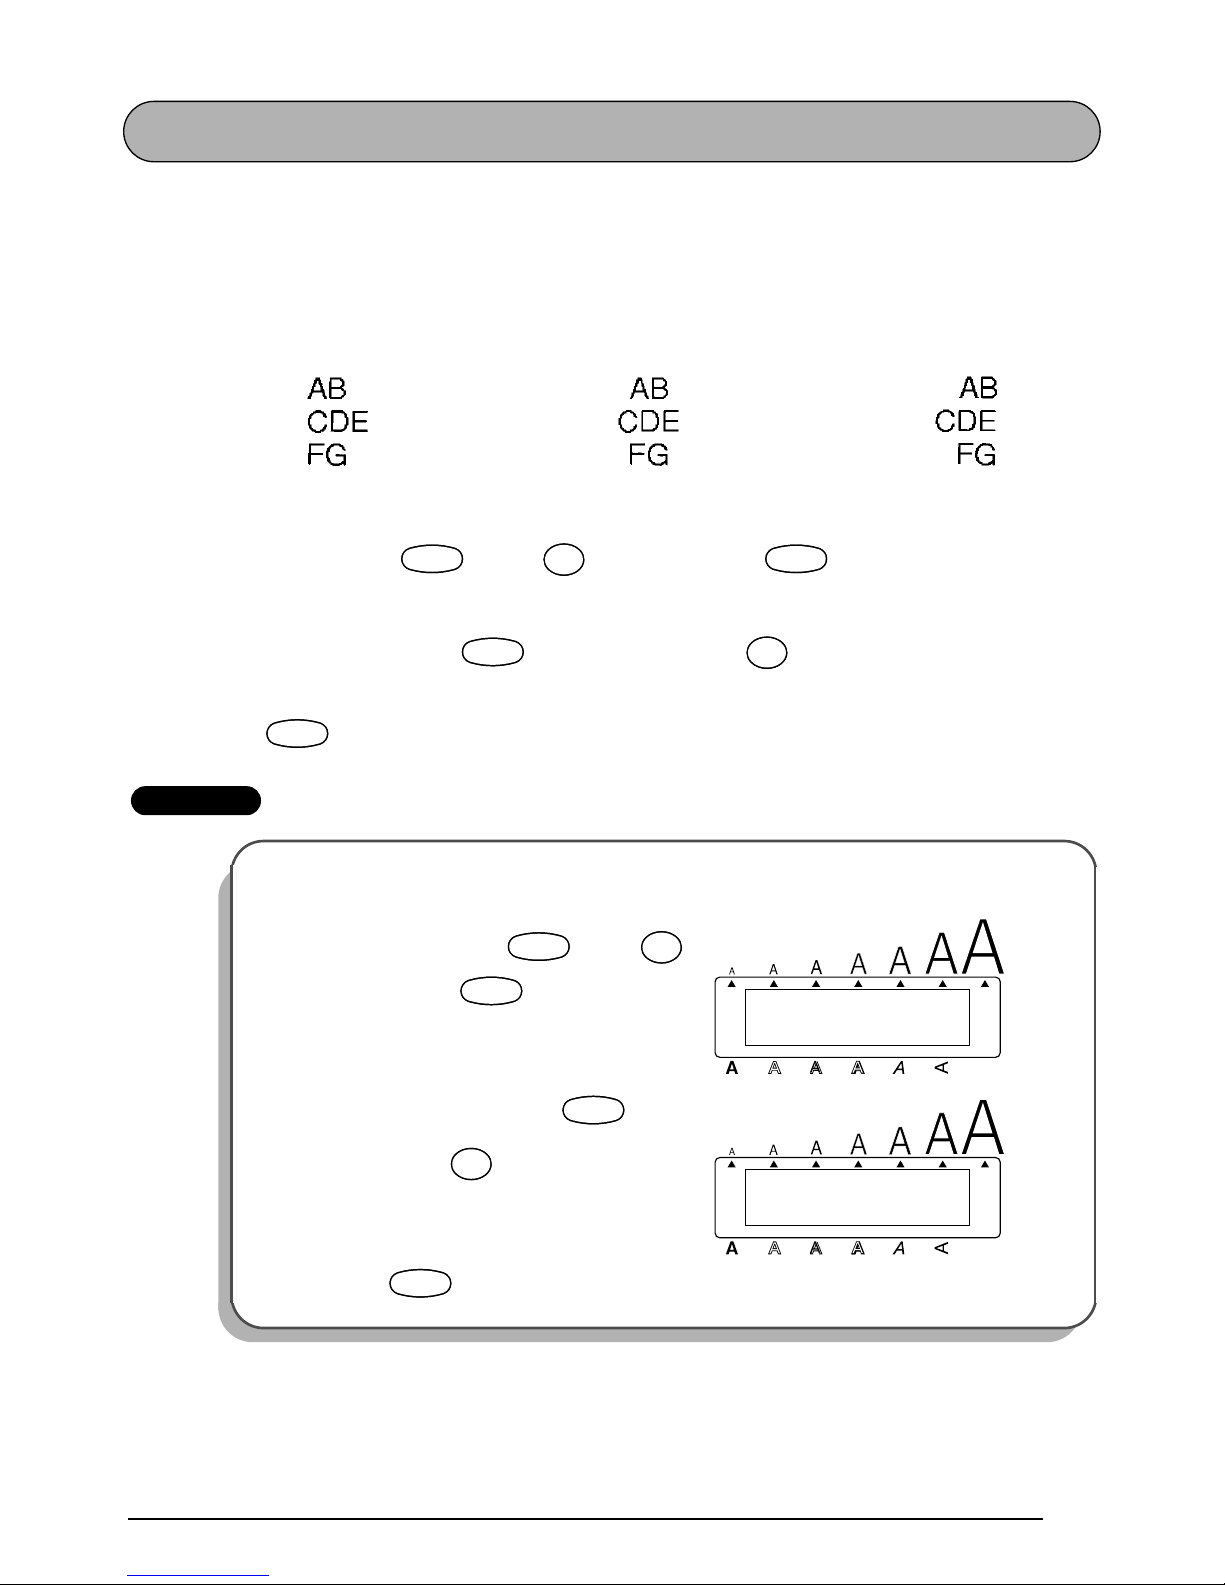
79
HORIZONTAL ALIGNMENT FUNCTION
You can choose to align lines of text in one of three ways. In addition, if the Length function
was used to set the length of the label, the text will align within the label according to the
selected horizontal alignment setting.
The default horizontal alignment setting is LEFT; however, two other settings are also avail-
able.
To change the horizontal alignment setting:
1 While holding down , press once, and keep held down to display the
current horizontal alignment setting.
2 While still holding down , continue pressing until the desired horizontal
alignment setting is displayed.
3 Release to apply the selected horizontal alignment setting to the entire text.
EXAMPLE
LEFT CENTER RIGHT
To select the RIGHT horizontal alignment setting:
1
While holding down , press
once, and keep held down.
2 While still holding down , con-
tinue pressing until RIGHT is displayed.
3 Release .
CodeCode
AlignRAlign
R
CodeCode
CodeCode
AlignRAlign
R
CodeCode
LEFT
H.ALIGNMENT
Alt
Caps
Width
Length
A.Format
Undl/Frm
Length
CodeCode
AlignRAlign
R
CodeCode
RIGHT
H.ALIGNMENT
Alt
Caps
Width
Length
A.Format
Undl/Frm
Length
CodeCode
AlignRAlign
R
CodeCode
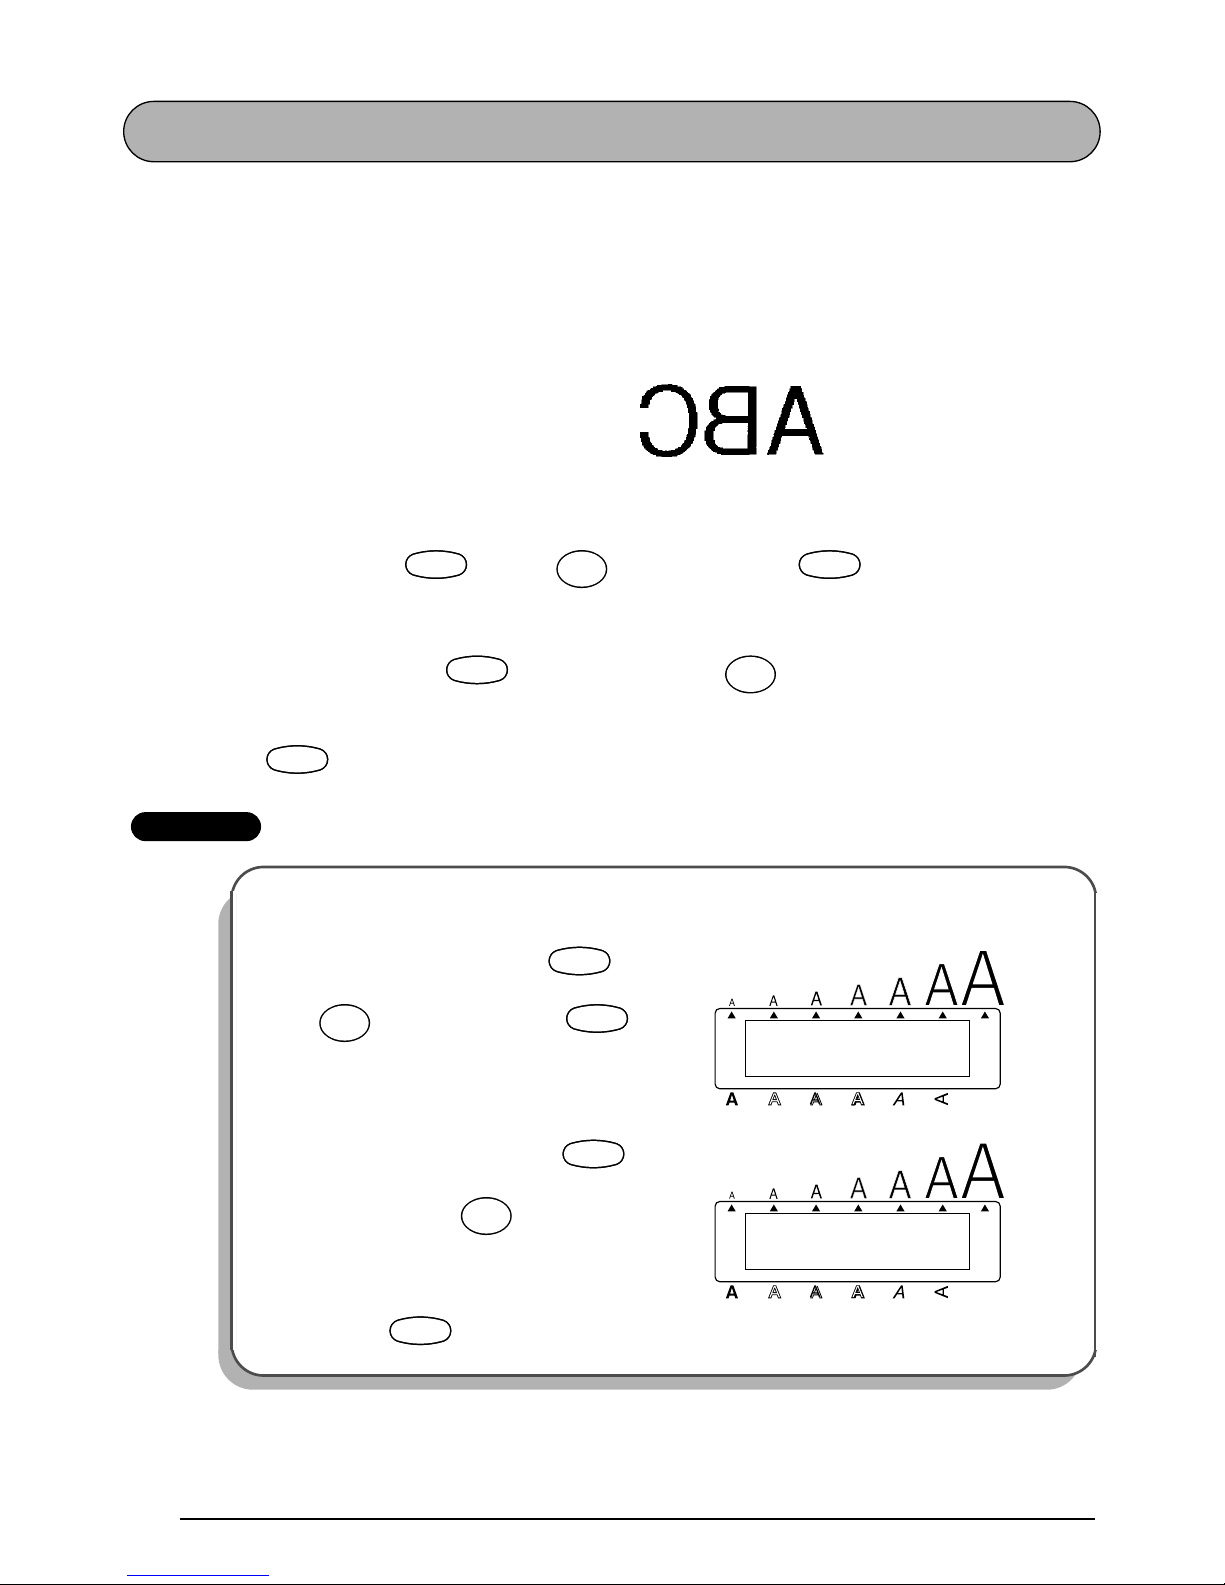
80
MIRROR PRINTING FUNCTION
With this function, you can print your text so that the characters can be read from the adhesive
side of the tape. If mirror-printed labels are attached to glass or some other clear material, they
can be read correctly from the opposite side.
☞
When using the Mirror printing function, the text should be printed on clear tape.
The default mirror printing setting is OFF.
To turn on or off the mirror printing setting:
1 While holding down , press once, and keep held down to display
the current mirror printing setting.
2 While still holding down , continue pressing until the desired mirror print-
ing setting is displayed.
3 Release to apply the selected mirror printing setting to the entire text.
EXAMPLE
ON
To select the ON mirror printing setting:
1
While holding down , press
once, and keep held
down.
2 While still holding down , con-
tinue pressing until ON is dis-
played.
3 Release .
CodeCode
Mirror
Print
CodeCode
CodeCode
Mirror
Print
CodeCode
OFF
MIRROR
Alt
Caps
Width
Length
A.Format
Undl/Frm
Length
CodeCode
Mirror
Print
CodeCode
ON
MIRROR
Alt
Caps
Width
Length
A.Format
Undl/Frm
Length
CodeCode
Mirror
Print
CodeCode
81
LENGTH FUNCTION
Although the length of the printed label automatically adjusts to fit the length of the entered
text, there may be times when you will want to make a label with a specific length. The Length
function allows you to set the label length between 1.6 and 11.8 inches (4.0 and 30.0 centimeters).
The default length setting is OFF. When the Length function is set to ON, the Length indicator
on the right side of the display lights up.
☞
Turning off the machine and turning it on again changes the length setting back to OFF.
To turn on or off the Length function:
1 While holding down , press once, and keep held down to display the
current length of the label (the text and both margins) briefly, and then display the current
label length setting (ON or OFF).
2 While still holding down , continue pressing until the desired label length set-
ting is displayed.
☞
The Length indicator lights up when ON is selected.
3 Release . If ON was selected, the current label length setting is displayed.
4 Press or to select the desired length or use the number keys to enter the
length.
☞
To change the length in 1” (1.0-cm) steps, hold down either
or
, and
then release the key when the desired setting is displayed.
The default setting (4” (10.0 cm)) can be selected by pressing .
To switch the unit of measurement between inches and centimeters, press
until the measurement is displayed in the desired unit.
5 Press .
CodeCode
LengthTLength
T
CodeCode
CodeCode
LengthTLength
T
CodeCode
Home
End
Home
End
Space
Feed&Cut
Space
ñ Mñ
M
New Block
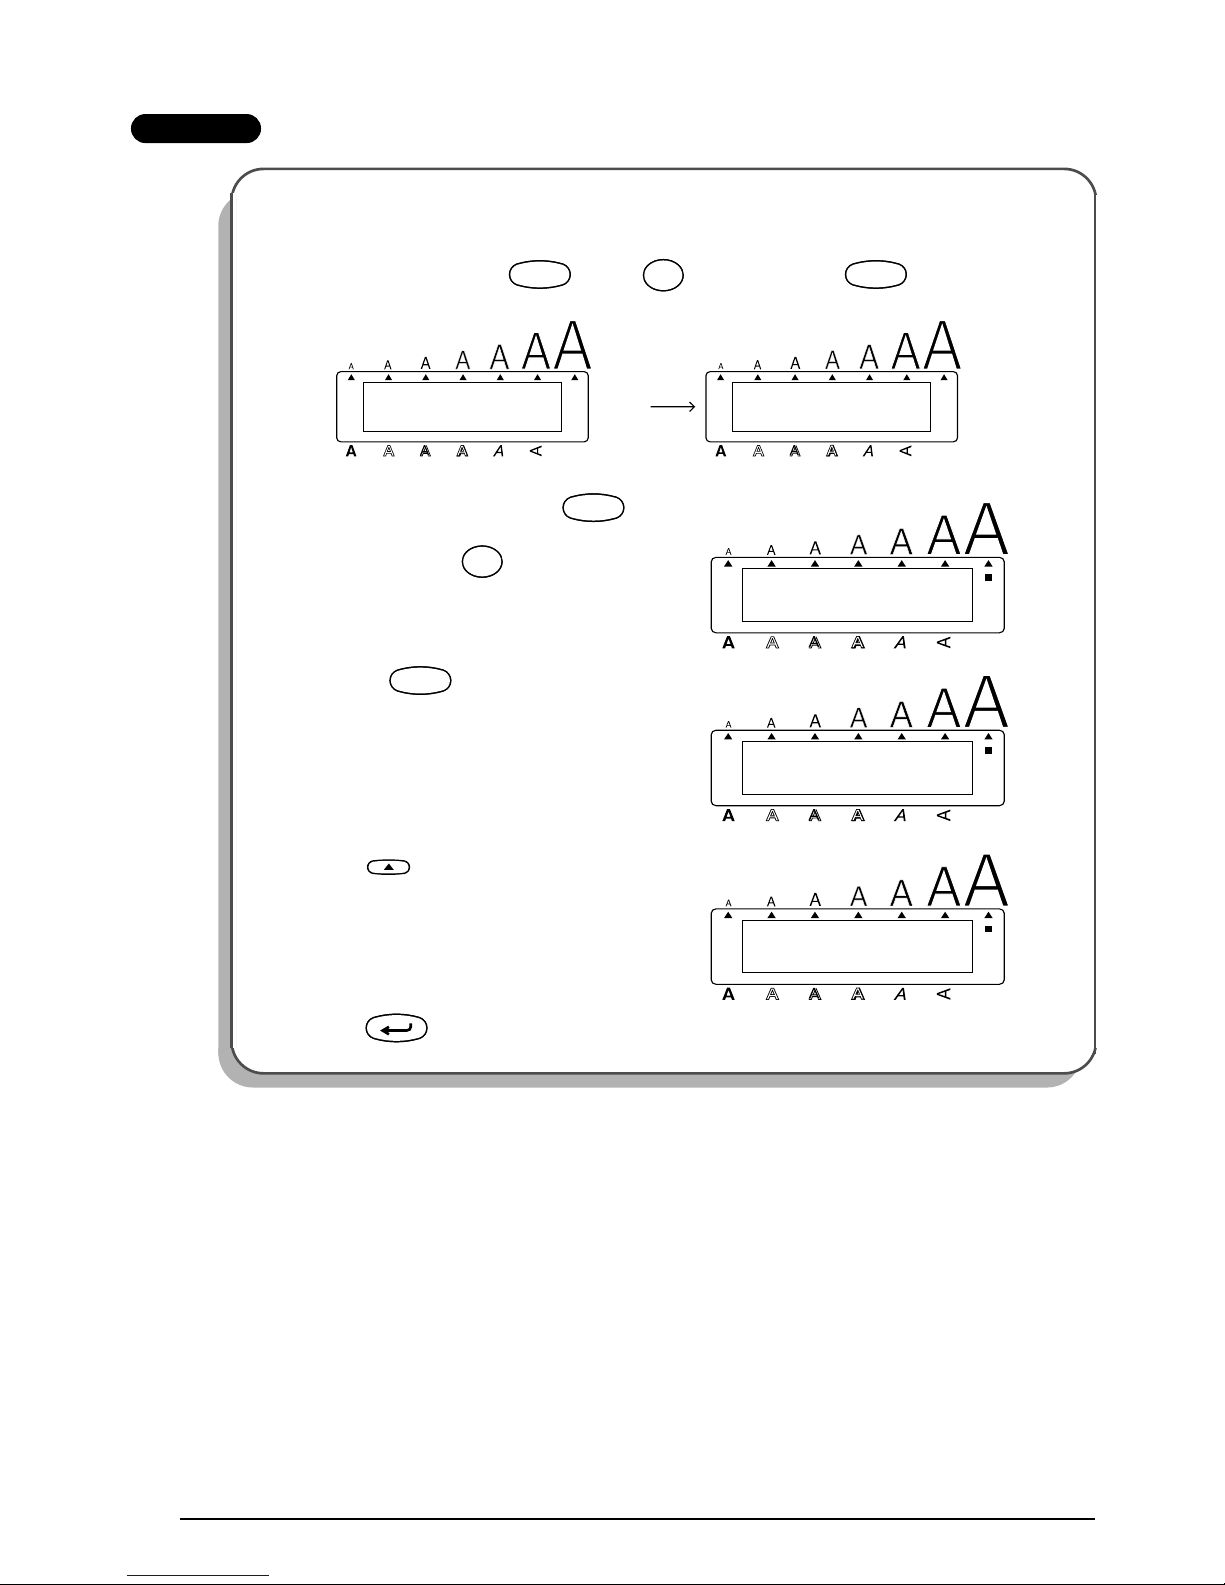
82
EXAMPLE
To select a label length of 6.0 inches:
1
While holding down , press once, and keep held down.
2 While still holding down , con-
tinue pressing until ON is displayed.
3 Release .
4 Press until 6.0 is displayed.
5 Press .
CodeCode
LengthTLength
T
CodeCode
3.1inch
LENGTH
OFF
LENGTH
Alt
Caps
Alt
Caps
Width
Width
Length
A.Format
Undl/Frm
Length
Length
A.Format
Undl/Frm
Length
Alt
Caps
LENGTH
ON
Width
Length
A.Format
Undl/Frm
Length
CodeCode
LengthTLength
T
Alt
Caps
LENGTH
4.0inch
Width
Length
A.Format
Undl/Frm
Length
CodeCode
Alt
Caps
LENGTH
6.0inch
Width
Length
A.Format
Undl/Frm
Length
Home
New Block
83
BARCODE FUNCTION
The Barcode function, which enables barcodes to be printed as part of labels, is one of this
machine’s most advanced features.
☞
This section will explain how to enter a barcode into your text. It is not intended as a
comprehensive introduction to the concept of barcoding. For more detailed information,
please consult one of the many reference books available.
Since this machine is not specifically designed for special barcode label-making, some
barcode readers may not be able to read the labels.
Print barcodes with black ink on a white background.
Four different parameters enable you to create custom barcodes.
PARAMETER SETTINGS
PROTOCOL CODE 39, I-2/5, EAN13, EAN8,
UPC-A, UPC-E, EAN128
WIDTH (barcode width) LARGE, SMALL
UNDER#S (characters printed below barcode) ON, OFF
CHECK DIG. (check digit) OFF, ON
The default settings are CODE 39 PROTOCOL, LARGE WIDTH, UNDER#S set to ON, and
CHECK DIG. set to OFF.
☞
It is recommended that barcodes be printed with the Tape margin function set to FULL
and the barcode WIDTH parameter set to LARGE; otherwise, the barcodes may be diffi-
cult to read.
To use the Barcode function:
1 Hold down and press once.
☞
To change the data or parameters of a barcode that has already been created, position the cursor below the right half of the barcode mark ( ) before holding down
and pressing .
A block can only contain one barcode. If a barcode has already been entered in the
block when is held down and is pressed, the error message “1 BARCODE PER BLOCK!” appears.
To quit the Barcode function without making any changes, hold down and
press .
2 Type in the new barcode data or edit the old data.
CodeCode
íIí
I
Barcode
CodeCode
íIí
I
Barcode
CodeCode
íIí
I
Barcode
CodeCode
íIí
I
Barcode

84
To change the barcode parameter settings:
3 Press .
☞
To return to the barcode data without changing any parameter settings, press .
4 Press or until the parameter that you wish to change appears.
5 Press or until the desired setting is displayed.
6 Repeat steps 4 and 5 until all parameters are set as you wish.
7 Press .
To add a special character to the barcode data:
8 Press or until the cursor is below the character immediately to the right of
where you wish to add the special character.
9 Hold down and press .
0 Press or until the desired special character is displayed.
☞
The following special characters can only be entered when using protocol CODE
39.
The following special characters can only be entered when using protocol EAN
128.
SYMBOL
SPECIAL
CHARACTER
1+
2$
VALUE
SPECIAL
CHARACTER
VALUE
SPECIAL
CHARACTER
VALUE
SPECIAL
CHARACTER
3 # 69 ENQ 87 ETB
4 $ 70 ACK 88 CAN
11 + 71 BEL 89 EM
28 < 72 BS 90 SUB
29 = 73 HT 91 ESC
30>74LF91{
32 @ 75VT92FS
Home
Clear
Del
Clear
Del
Home
End
New Block
CodeCode
Alt
Symbol
Alt
Symbol
Home
End
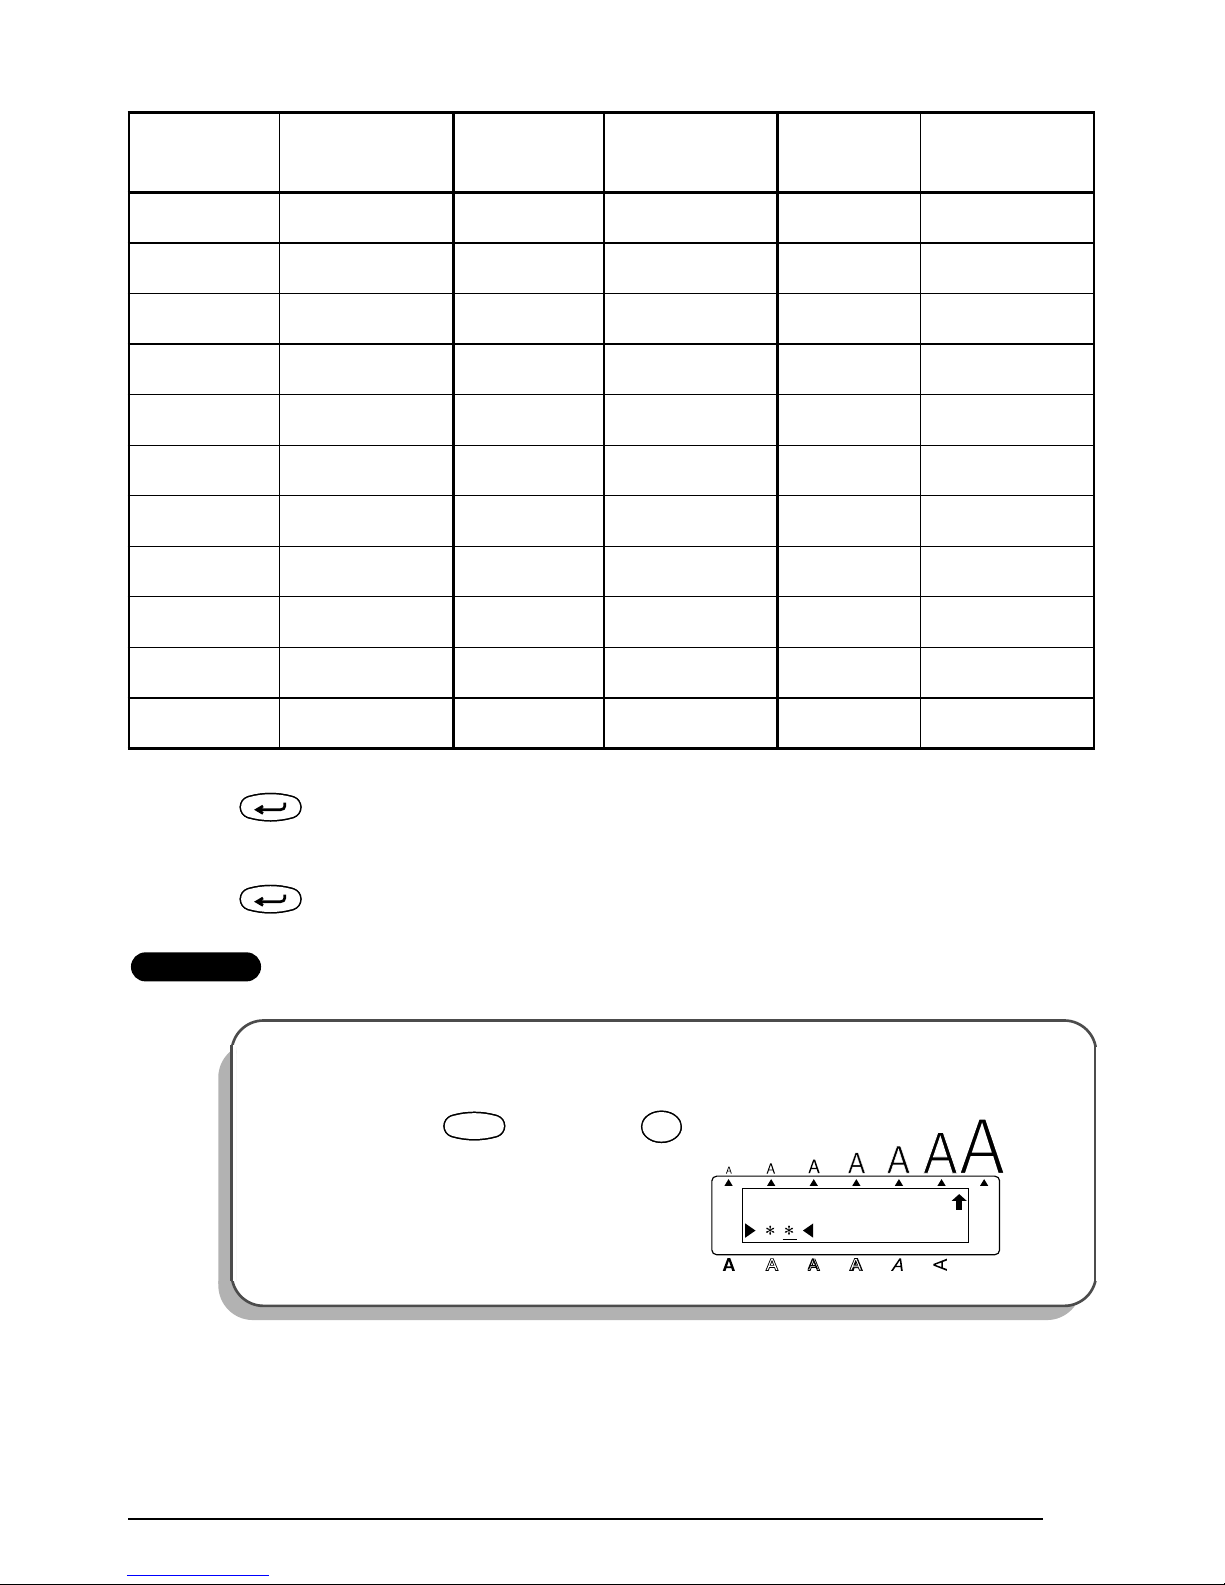
85
A Press to add the selected special character to the barcode data.
To add the barcode to your text:
B Press .
EXAMPLE
59[76FF92|
60 \ 77CR93GS
61]78SO93}
62^79SI94RS
63 _ 80 DLE 94 ~
64 NUL 81 DC1 95 US
64 ` 82 DC2 95 DEL
65 SOH 83 DC3 96 FNC 3
66 STX 84 DC4 97 FNC 2
67 ETX 85 NAK 100 FNC 4
68 EOT 86 SYN 102 FNC1
To add a barcode to the label:
1
Hold down and press
once.
VALUE
SPECIAL
CHARACTER
VALUE
SPECIAL
CHARACTER
VALUE
SPECIAL
CHARACTER
New Block
New Block
CODE 39
Alt
Caps
Width
Length
A.Format
Undl/Frm
Length
CodeCode
íIí
I
Barcode
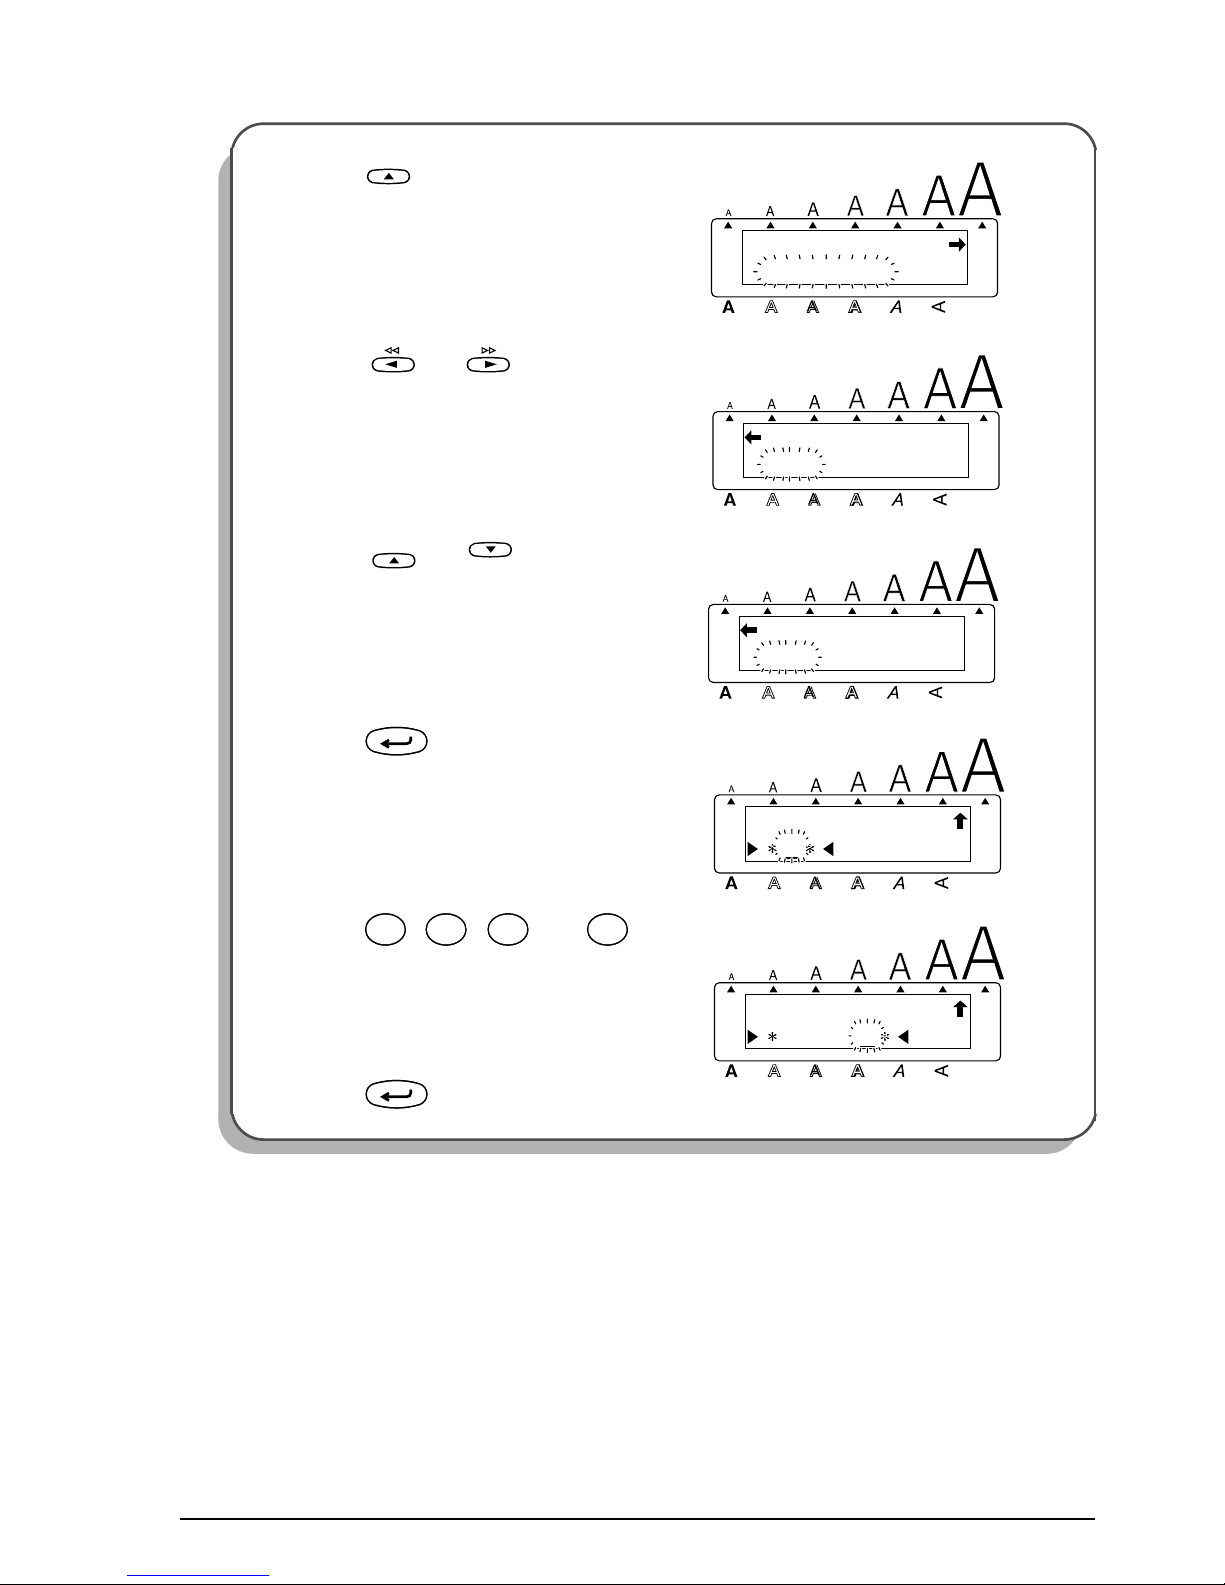
86
2 Press .
3 Press or until the CHECK
DIG. parameter is displayed.
4 Press or until ON is dis-
played.
5 Press .
6 Press , , then .
7 Press .
CODE 39
PROTOCOL
Alt
Caps
Width
Length
A.Format
Undl/Frm
Length
Home
OFF
CHECK DIG.
Alt
Caps
Width
Length
A.Format
Undl/Frm
Length
ON
CHECK DIG.
Alt
Caps
Width
Length
A.Format
Undl/Frm
Length
Home
End
CODE 39
Alt
Caps
Width
Length
A.Format
Undl/Frm
Length
New Block
1234A
CODE 39
Alt
Caps
Width
Length
A.Format
Undl/Frm
Length
¡
Font
!
1
¡
Font
!
1
Size
2
@
Size
2
@
Width
#
3
Width
#
3
Style
$
4
Style
$
4
New Block
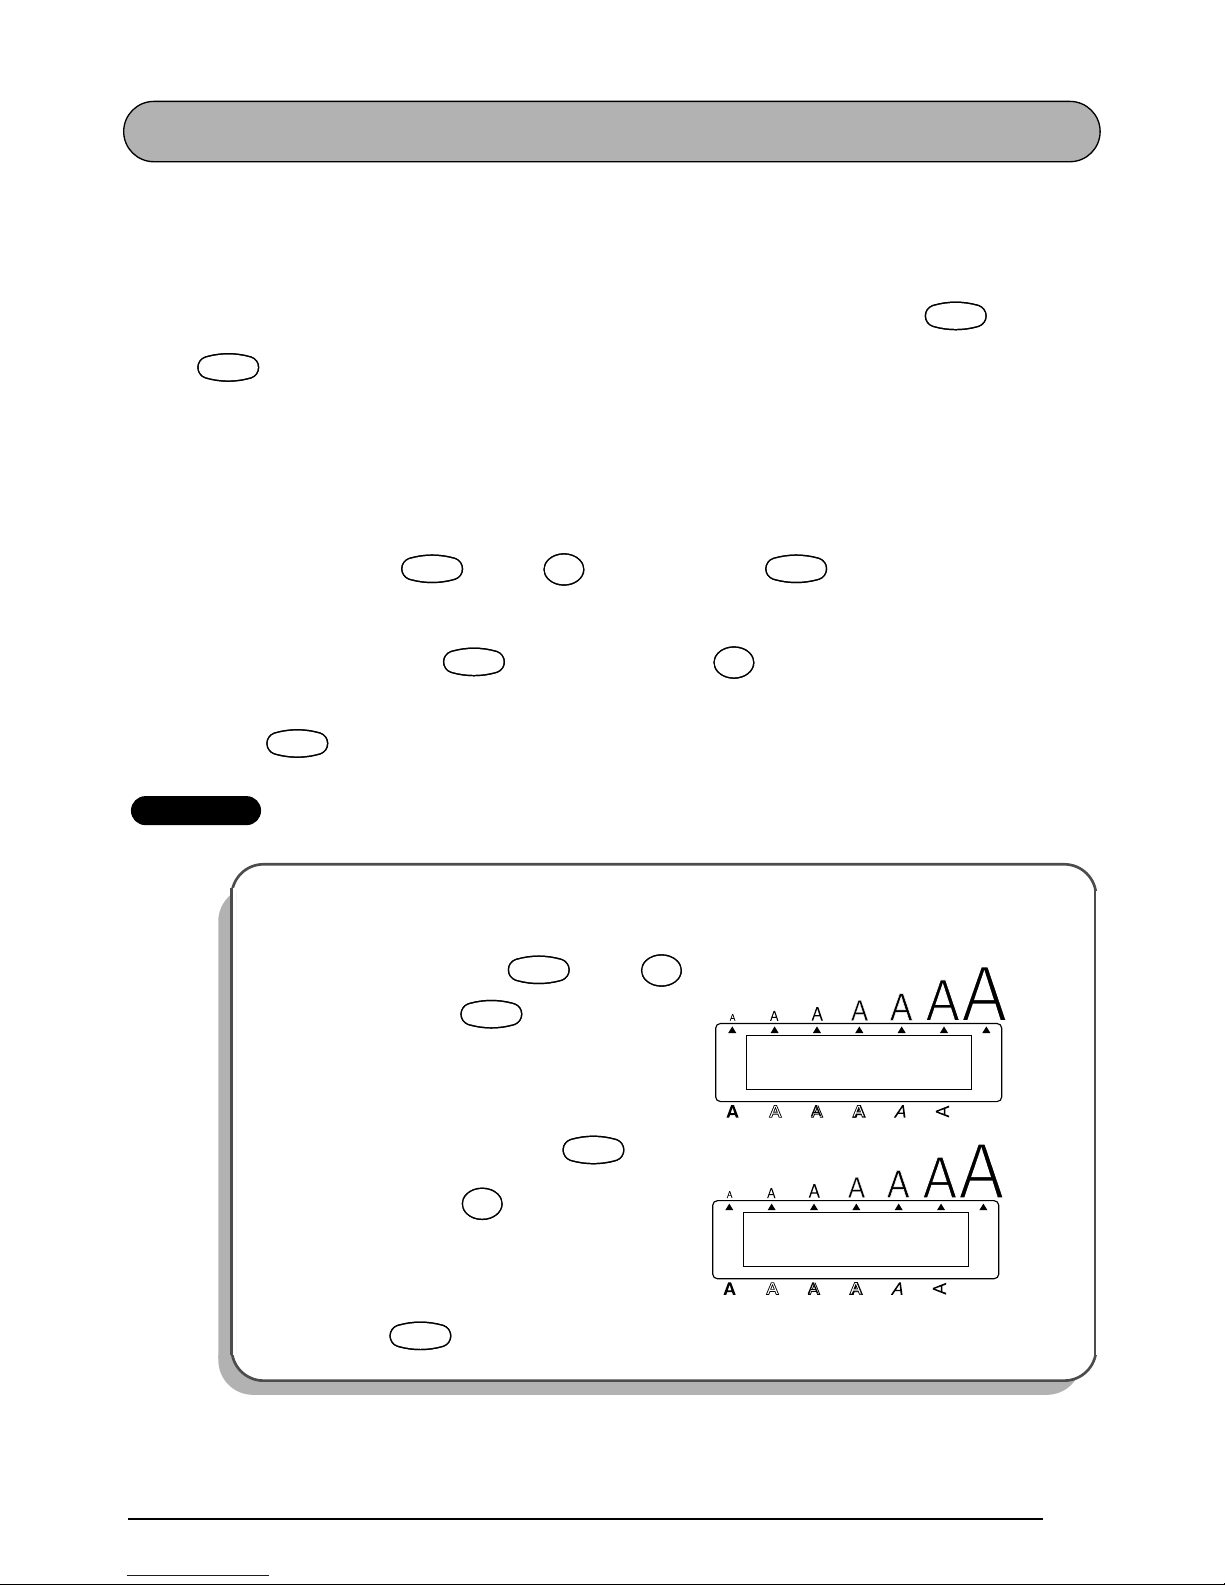
87
AUTO CUT FUNCTION
The Auto cut function allows you to set whether or not the machine will automatically cut off
each label after it is printed. Turn on the Auto cut function before starting to print in order to
cut off the labels automatically after printing them.
☞
After printing a label with the Auto cut function set to OFF, hold down and press
once to feed the tape and cut it.
When a tape margin setting other than FULL is selected, extra tape is fed out before
printing starts. The extra tape is cut off if the Auto cut function is set to ON so that the
margins on each side of the text are equal.
To turn on or off the Auto cut function:
1 While holding down , press once, and keep held down to display the
current auto cut setting.
2 While still holding down , continue pressing until the desired auto cut setting
is displayed.
3 Release to apply the selected auto cut setting.
EXAMPLE
To turn on the Auto cut function:
1
While holding down , press
once, and keep held down.
2 While still holding down , con-
tinue pressing until ON is displayed.
3 Release .
CodeCode
Space
Feed&Cut
Space
CodeCode
Z
A.Cut
Z
CodeCode
CodeCode
Z
A.Cut
Z
CodeCode
OFF
AUTO CUT
Alt
Caps
Width
Length
A.Format
Undl/Frm
Length
CodeCode
Z
A.Cut
Z
CodeCode
ON
AUTO CUT
Alt
Caps
Width
Length
A.Format
Undl/Frm
Length
CodeCode
Z
A.Cut
Z
CodeCode
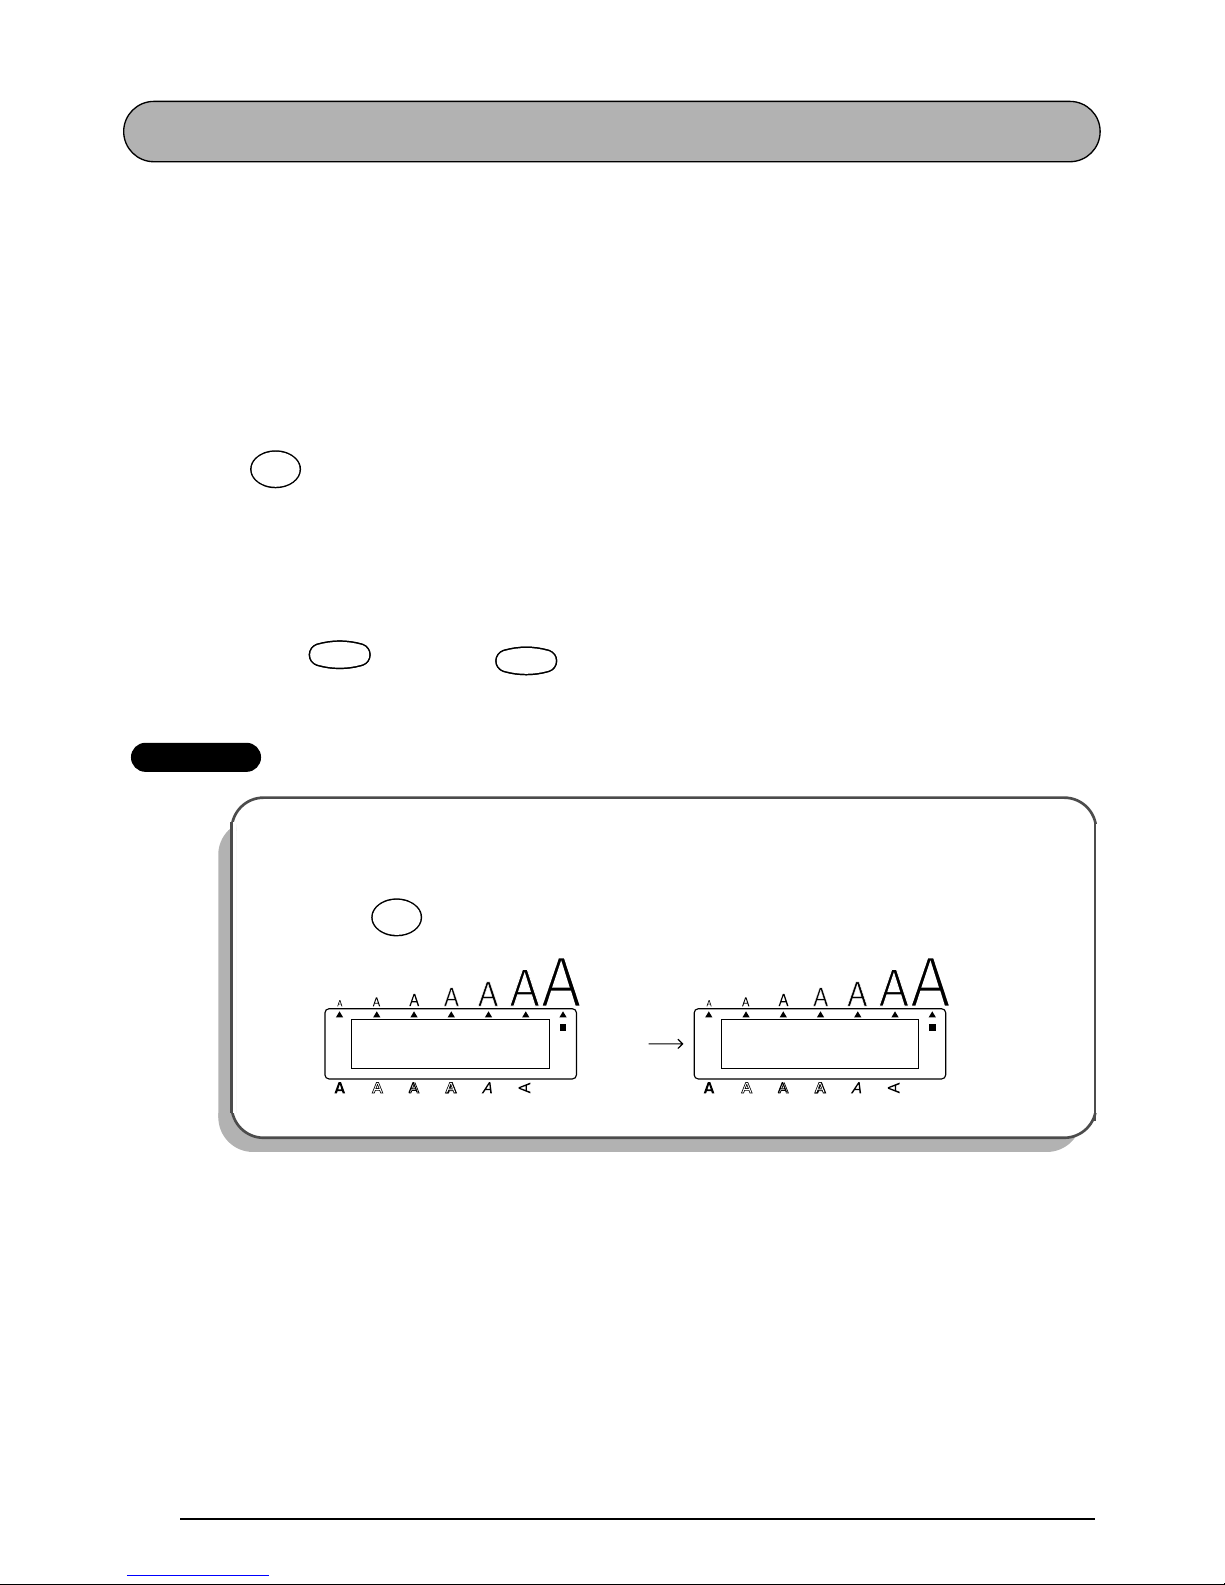
88
PRINT KEY AND FEED & CUT FUNCTION
After you have entered your text and chosen the desired format settings, you are ready to print
the label.
The Feed & Cut function is used to feed out 1 1/24” (25 mm) of tape and automatically cut it
off, for example after printing with the Auto cut function set to OFF or when printing has been
interrupted.
To print a label:
● Press once. The message “WORKING” appears just before printing, and then
“COPIES 1/ 1” is displayed while the label is being printed.
☞
If the Auto cut function is set to ON, the label will automatically be cut off after it is
printed.
To feed and cut off 1 1/24” (25 mm) of tape:
● Hold down and press once. The message “FEED” appears while 1 1/24”
(25 mm) of tape is fed out, then automatically cut off.
EXAMPLE
To print a label and cut it off:
● Press once.
Mirror
Print
CodeCode
Space
Feed&Cut
Space
1/ 1
COPIES
Alt
Caps
Width
WORKING
Alt
Caps
Width
Length
A.Format
Undl/Frm
Length Length
A.Format
Undl/Frm
Length
Mirror
Print

89
NUMBERING FUNCTION
This function can be used to print many copies of the same text while increasing certain characters (letters, numbers or barcode data) after each label is printed. This type of automatic
incrementation is very useful when printing serial number labels, production control labels or
other labels requiring ascending codes.
Letters and numbers increase as shown below:
0 ➔ 1 ➔ ...9 ➔ 0 ➔ ...
A ➔ B ➔ ...Z ➔ A ➔ ...
a ➔ b ➔ ...z ➔ a ➔ ...
A0 ➔ A1 ➔ ...A9 ➔ B0 ➔ ...
Spaces (shown as underlines “_” in the examples below) can be used to adjust the space
between characters or to control the number of digits that are printed:
_9 ➔ 10 ➔ ...99 ➔ _0 ➔ ...
_Z ➔ AA ➔ ...ZZ ➔ _A ➔ ...
1_9 ➔ 2_0 ➔ ...9_9 ➔ __0 ➔ ...
☞
Only one numbering field can be selected from any text.
If you include a non-alphanumeric character such as a symbol in the numbering field,
only the letters and numbers in the numbering field will be increased when the labels
are printed, or just one label will be printed if the field only contains a non-alphanumeric character.
To use the Numbering function:
1 Hold down and press . The message “SET START PT” appears in the display.
☞
To quit the Numbering function without printing, hold down and press
.
To return to the previous screen, press .
2 Press , , or until the first character that you wish to select for the
numbering field is flashing.
3 Press . The message “SET END PT” appears in the display.
☞
If a barcode was selected, “# INCREASES” appears in the display instead. Skip to
step
6
to continue printing with the Numbering function.
4 Press or until all of the characters that you wish to select for the numbering
field are flashing.
☞
A barcode cannot be selected together with other characters.
5 Press . “# INCREASES” appears in the display.
6 Type in the desired number or press or until the desired number of copies is
displayed.
CodeCode
áPá
P
Number
CodeCode
áPá
P
Number
Clear
Del
Clear
Del
Home
End
New Block
New Block
Home
End

90
7 Press (or ) to begin printing. The message “WORKING” appears just before
printing, and then “COPIES” followed by the number of the label being printed is displayed.
☞
If the Auto cut function is set to ON, the labels will automatically be cut off after
they are printed.
EXAMPLE
To print three door labels for studios 1, 2 and 3:
1
Hold down and press .
2 Press until “1” is flashing.
3 Press .
4 Press .
5 Press .
Mirror
Print
New Block
Alt
Caps
1: STUDIO 1
SET START PT
Width
Length
A.Format
Undl/Frm
Length
CodeCode
áPá
P
Number
Alt
Caps
1: STUDIO 1
SET START PT
Width
Length
A.Format
Undl/Frm
Length
Alt
Caps
1: STUDIO 1
SET END PT
Width
Length
A.Format
Undl/Frm
Length
New Block
Alt
Caps
Length
A.Format
Undl/Frm
Length
1
# INCREASES
Width
New Block
Alt
Caps
3
# INCREASES
Width
Length
A.Format
Undl/Frm
Length
Width
#
3
Width
#
3

91
6 Press (or ).
Mirror
Print
New Block
2/ 3
COPIES
3/ 3
COPIES
WORKING
Alt
Caps
Alt
Caps
Alt
Caps
Width
Width
1/ 3
COPIES
Alt
Caps
Width
Width
Length
A.Format
Undl/Frm
Length
Length
A.Format
Undl/Frm
Length
Length
A.Format
Undl/Frm
Length
Length
A.Format
Undl/Frm
Length
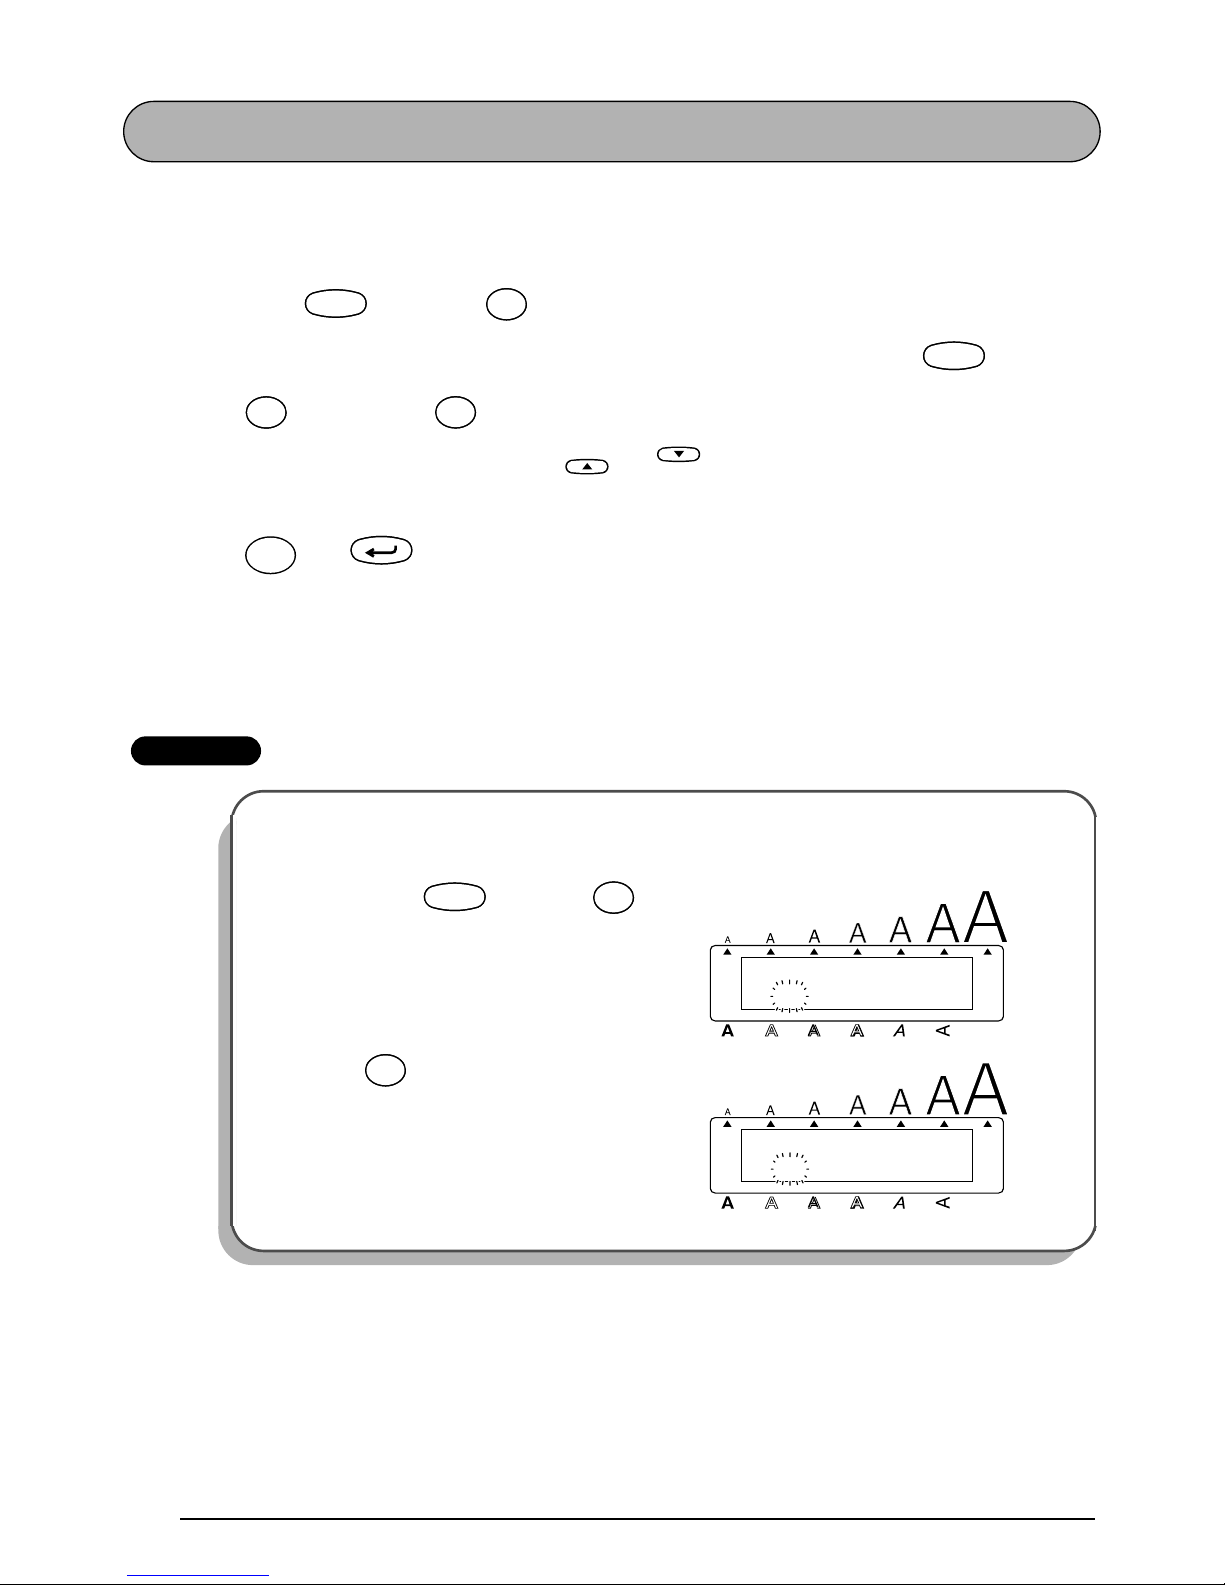
92
REPEAT PRINTING FUNCTION
This function allows you to print multiple copies of the same text.
To use the Repeat printing function:
1 Hold down and press . “COPIES” appears in the display.
☞
To quit the Repeat printing function without printing, hold down and press
(or press just ).
2 Type in the desired number or press or until the desired number of copies is
displayed.
3 Press (or ) to begin printing. The message “WORKING” appears just before
printing, and then “COPIES” followed by the number of the label being printed is displayed.
☞
If the Auto cut function is set to ON, the labels will automatically be cut off after
they are printed.
EXAMPLE
To print three copies of a label:
1
Hold down and press .
2 Press .
CodeCode
óOó
O
Repeat
CodeCode
óOó
O
Repeat
Clear
Del
Clear
Del
Home
End
Mirror
Print
New Block
1
COPIES
Alt
Caps
Width
Length
A.Format
Undl/Frm
Length
CodeCode
óOó
O
Repeat
3
COPIES
Alt
Caps
Width
Length
A.Format
Undl/Frm
Length
Width
#
3
Width
#
3
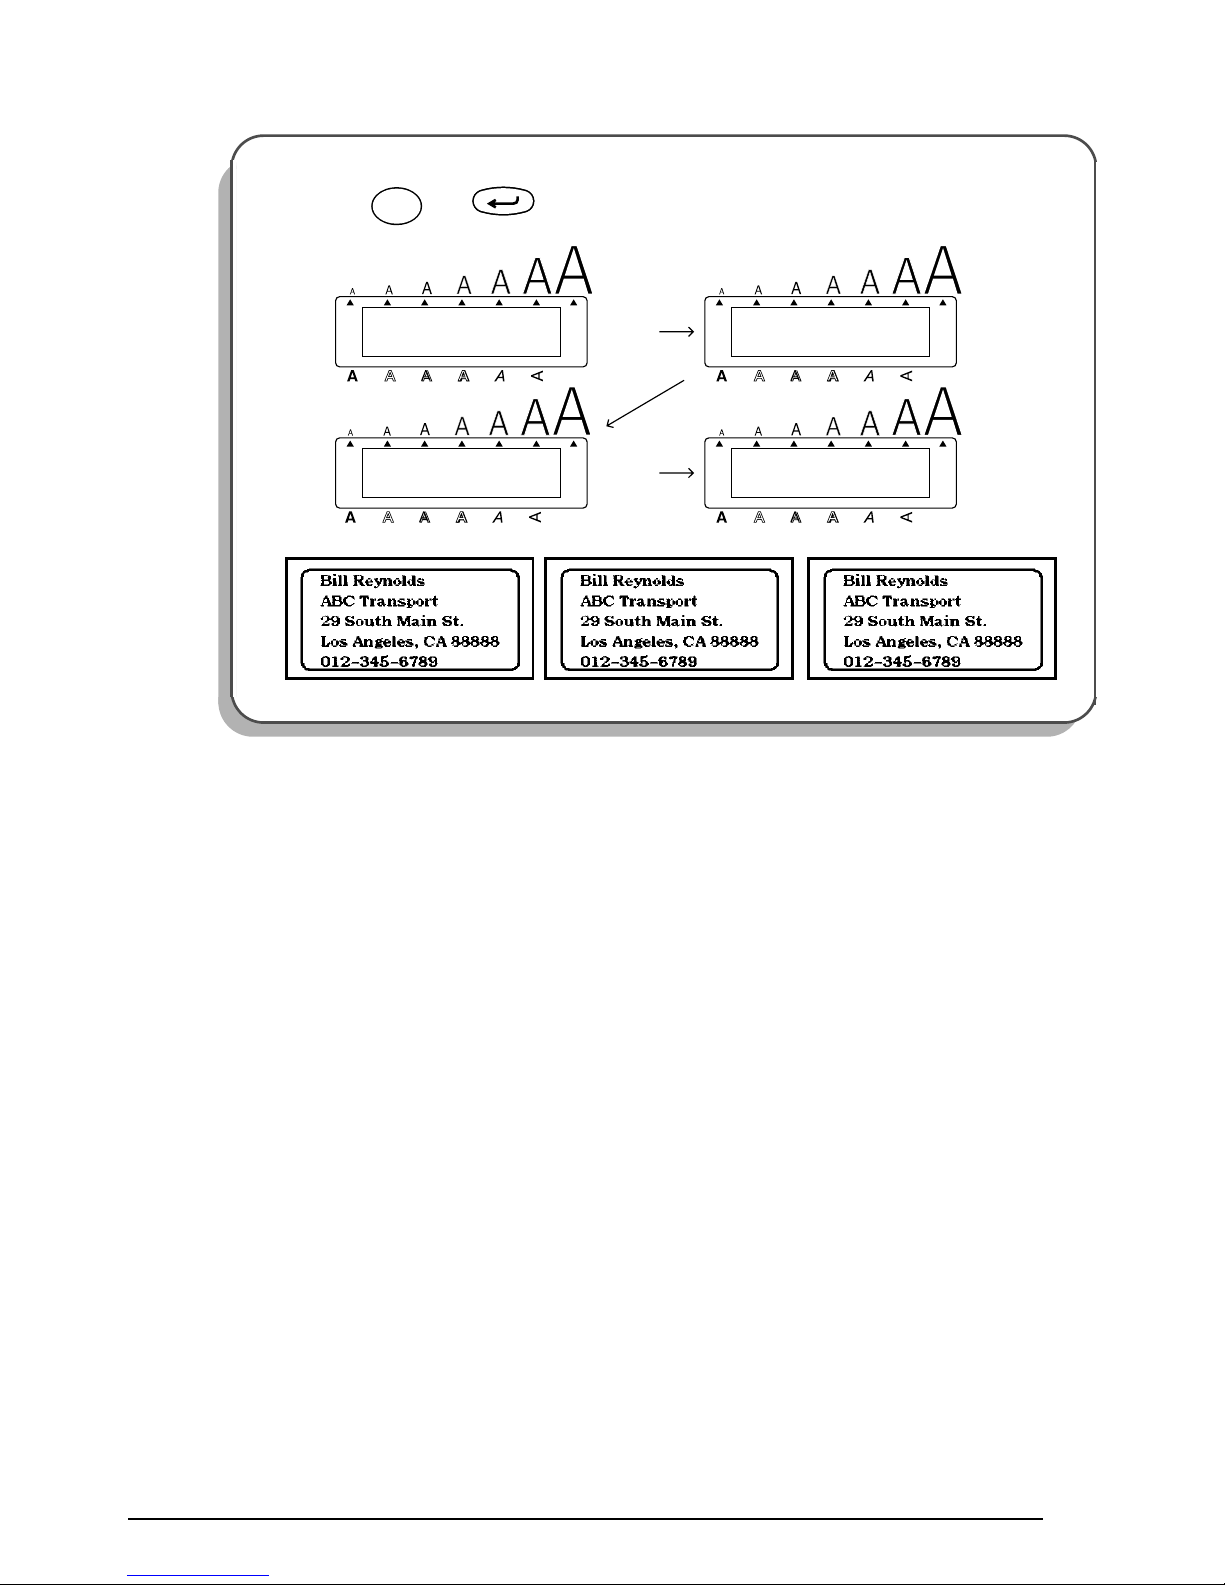
93
3 Press (or ).
Mirror
Print
New Block
2/ 3
COPIES
3/ 3
COPIES
WORKING
Alt
Caps
Alt
Caps
Alt
Caps
Width
Width
1/ 3
COPIES
Alt
Caps
Width
Width
Length
A.Format
Undl/Frm
Length
Length
A.Format
Undl/Frm
Length
Length
A.Format
Undl/Frm
Length
Length
A.Format
Undl/Frm
Length
94
MEMORY FUNCTIONS
You can use the memory to store your most frequently used text files. The text remains in the
memory, even after all characters are removed from the display using the Clear function (see
page 45).
When each file is stored, it is given a number to make recalling it easier. Up to 100 text files or
about 2500 characters can be stored in the memory.
Since a copy of the stored text file is recalled when the Recall function is used, the text can be
edited or printed without changing the originally stored file. When a file is no longer needed or
more space is necessary, the Memory delete function can be used to delete it.
☞
When inserting new batteries, be sure to insert the new ones within five minutes of
removing the old ones, otherwise any text files stored in the memory will be lost (unless
the machine is plugged into an electrical outlet with the AC adaptor).
STORING TEXT
To store a text file:
1 Hold down and press . “STORE” appears in the display.
☞
If 2500 characters have already been stored, the error message “MEMORY FULL!”
appears in the display. If this occurs, an existing text file must be deleted before the
new one can be stored.
To quit the Store function without storing the text, hold down and press
(or press just ).
2 Press or until the file number where you wish to store the text is displayed.
3 Press . The text is stored under the selected file number and the text previously
shown in the display re-appears.
☞
If a file is already stored under the selected file number, the message “OVERWRITE?” appears in the display and you must decide whether or not to overwrite it
(delete it from the memory and store the new one).
To overwrite the stored file with the new one:
4 Press to delete the previously stored file and store the new one under the selected
number.
☞
To go back and choose another file number without overwriting the text file, press
, and then select a different file number.
CodeCode
Store
&
7
Store
&
7
CodeCode
Store
&
7
Store
&
7
Clear
Del
Clear
Del
Home
End
New Block
New Block
Clear
Del
Clear
Del
95
RECALLING TEXT
To recall a text file:
1 Hold down and press . The file number and the beginning of the most
recently stored or recalled text are displayed.
☞
To quit the Recall function without recalling text, hold down and press
(or press just ).
2 Press or until the file number and text that you wish to recall are displayed.
☞
To see other parts of the displayed text file, press or .
3 Press . Any text previously entered in the display is erased and the text stored under
the selected file number is recalled into the display.
DELETING A FILE
To delete a text file:
1 Hold down and press . The file number and the beginning of the most
recently stored or recalled text are displayed.
☞
To quit the Memory delete function without deleting the text file, hold down
and press (or press just ).
2 Press or until the file number and text that you wish to delete are displayed.
☞
To see other parts of the selected text file, press or .
3 Press . The message “OK TO CLEAR?” is displayed.
4 Press to delete the selected text file.
CodeCode
Recall
*
8
Recall
*
8
CodeCode
Recall
*
8
Recall
*
8
Clear
Del
Clear
Del
Home
End
New Block
CodeCode
M.Del
(
9
M.Del
(
9
CodeCode
M.Del
(
9
M.Del
(
9
Clear
Del
Clear
Del
Home
End
New Block
New Block

96
EXAMPLE
To store text under file number 8:
1
Hold down and press .
2 Press or until 8 is displayed.
3 Press .
To recall the text from file number 4:
1 Hold down and press .
2 Press or until 4 is displayed.
3 Press .
Alt
Caps
[0]
STORE
Width
Length
A.Format
Undl/Frm
Length
CodeCode
Store
&
7
Store
&
7
Alt
Caps
[8]
STORE
Width
Length
A.Format
Undl/Frm
Length
Home
End
New Block
Alt
Caps
[8]J. Smith
RECALL
Width
Length
A.Format
Undl/Frm
Length
CodeCode
Recall
*
8
Recall
*
8
Alt
Caps
[4]NO SMOKIN
RECALL
Width
Length
A.Format
Undl/Frm
Length
Home
End
Alt
Caps
1: NO SMOKING
_
Width
Length
A.Format
Undl/Frm
Length
New Block
 Loading...