

Page 1

1950/1960
USER’S GUIDE
GUÍA DE USUARIO
• Read this User’s Guide before you start using your P-touch.
• Keep this User’s Guide in a handy place for future reference.
• Antes de usar su equipo por primera vez, lea cuidadosamente esta Guía de Usuario.
• Guarde esta Guía de Usuario para futuras referencias.
Page 2
INTRODUCTION
Thank you for purchasing the P-touch 1950/1960!
Your new P-touch will allow you to create labels for any need. Its versatility enables you
to design custom labels by choosing from a variety of frame designs and from many character
sizes and styles. In addition, the four tape widths (1/4” (6 mm), 3/8” (9 mm), 1/2” (12 mm) and
3/4” (18 mm)) and variety of tape colors allow you to print personalized labels, useful for
color-coded filing.
Finally, as you may want to occasionally refer to this User’s Guide, we suggest that you keep it
in a handy place.
Federal Communications Commission (FCC) Declaration of Conformity (For USA Only)
Responsible Party : Brother International Corporation
declares that the product
Product Name : Brother P-touch Electronic Labeling System
Model Number : PT-1950/1960
complies with Part 15 of the FCC Rules. Operation is subject to the following two conditions: (1) this device may not
cause harmful interference, and (2) this device must accept any interference received,including interference that may
cause undesired operation.
This equipment has been tested and found to comply with the limits for a Class B digital device, pursuant to
Part 15 of the FCC Rules. These limits are designed to provide reasonable protection against harmful interference in a residential installation. This equipment generates, uses, and can radiate radio frequency energy and,
if not installed and used in accordance with the instructions, may cause harmful interference to radio communications. However, there is no guarantee that interference will not occur in a particular installation. If this
equipment does cause harmful interference to radio or television reception, which can be determined by turning the equipment off and on, the user is encouraged to try to correct the interference by one or more of the following measures:
- Reorient or relocate the receiving antenna
- Increase the separation between the equipment and receiver.
- Connect the equipment into an outlet on a circuit different from that to which the receiver is connected.
- Consult the dealer or an experienced radio/TV technician for help.
- The enclosed interface cable should be used in order to ensure compliance with the limits for a Class B digital
device.
- Changes or modifications not expressly approved by Brother Industries, Ltd. could void the user’s authority
to operate the equipment.
Tested to Comply with FCC Standards for Home or Office Use
This Class B digital apparatus complies with Canadian ICES-003.
Cet appareil numérique de la classe B est conforme à la norme NMB-003 du Canada.
Patent numbers and patent publication numbers which are related to this product are as below:
USP4839742 USP4976558 USP5009530 USP5120147
USP4927278 USP4983058 USP5069557
100 Somerset Corporate Boulevard
Bridgewater, NJ 08807-0911 USA
TEL : (908) 704-1700
IBM is a trademark of International Business Machines, Inc.
Microsoft and Windows are registered trademarks of Microsoft Corporation, USA.
The names of other software or products used in this document are trademarks or registered
trademarks of the respective companies that developed them.
Page 3

®
Brother
90 Days/One Year Limited Warranty and Replacement Service
(For USA Only)
Who is covered:
• This limited warranty (“warranty”) is
given only to the original end-use/retail
purchaser (referred to in this warranty
as “Original Purchaser”) of the
accompanying product, consumables
and accessories (collectively referred
to in this warranty as “this Product”).
• If you purchased a product from someone
other than an authorized Brother reseller
in the United States or if the product was
used (including but not limited to floor
models or refurbished product), prior to
your purchase you are not the Original
Purchaser and the product that you
purchased is not covered by this warranty.
What is covered:
• This Product includes a Machine and
Consumable and Accessory Items.
Consumable and Accessory Items
include but are not limited to label
cassettes, cutters, stamps, power
adapters, cases and batteries.
• Except as otherwise provided herein,
Brother warrants that the Machine and
the accompanying Consumable and
Accessory Items will be free from
defects in materials and workmanship,
when used under normal conditions.
• This warranty applies only to products
purchased and used in the United States.
For products purchased in, but used
outside, the United States, this warranty
covers only warranty service within the
United States (and does not include
shipping outside the United States).
What is the length of the Warranty
Period(s):
• Machines have a two-stage warranty:
90 days from the original purchase date
and an additional warranty up to one
year from the original purchase date.
• Consumable and Accessories Items
accompanying the Machine have a
one-stage warranty: 90 Days from the
original purchase date.
What is NOT covered:
This warranty does not cover:
(1)Physical damage to this Product;
(2) Damage caused by improper installation,
improper or abnormal use, misuse,
neglect or accident (including but not
limited to transporting this Product without
the proper preparation and/or packaging);
(3) Damage caused by another device or
software used with this Product (including
but not limited to damage resulting from
use of non Brother
®
-brand parts and
Consumable and Accessory Items);
(4) Consumable and Accessory Items that
expired in accordance with a rated life; and,
(5)Problems arising from other than
defects in materials or workmanship.
This limited warranty is VOID if this
Product has been altered or modified in
any way (including but not limited to
attempted warranty repair without
authorization from Brother and/or
alteration/removal of the serial number).
What to do if you think your Product is
eligible for warranty service:
Report your issue to either our Customer
Service Hotline at 1-877-478-6824
Brother Authorized Service Center
the applicable warranty period . Supply
Brother or the Brother Authorized Service
Center with a copy of your dated bill of
sale showing that this Product was
purchased within the U.S. For the name of
local Brother Authorized Service
Center(s), call 1-800-521-2846.
What Brother will ask you to do:
After contacting Brother or a Brother
Authorized Service Center, you may be
required to deliver (by hand if you prefer) or
send the Product properly packaged, freight
prepaid, to the Authorized Service Center
together with a photocopy of your bill of sale.
You are responsible for the cost of shipping,
packing product, and insurance (if you
desire). You are also responsible for loss or
damage to this Product in shipping.
What Brother will do:
First 90 Days: If the problem reported concerning
your Machine and/or accompanying Consumable
and Accessory Item(s) is covered by this warranty
and
if you first reported the problem to Brother or
an Authorized Service Center within 90 days from
the date of original purchase, Brother or its
Authorized Service Center will repair or replace the
Machine and/ or accompanying Consumable and
Accessory Item(s) at no charge to you for parts or
labor. The decision as to whether to repair or
replace the Machine and/or accompanying
Consumable and Accessory Item(s) is made by
Brother in its sole discretion. Brother reserves the
right to supply a refurbished or remanufactured
replacement Machine and/or accompanying
Consumable and Accessory Item(s) and use
refurbished parts provided such replacement
products conform to the manufacturer’s
specifications for new product/parts. The repaired
or replacement Machine and/or accompanying
Consumable and Accessory Item(s) will be
returned to you freight prepaid or made available
for you to pick up at a conveniently located
Authorized Service Center.
or a
within
i
Page 4

Brother
91
If the problem reported concerning your Machine is covered by this warranty and if you
first reported the problem after 90 days, but
before 1 year from the date
of original purchase, Brother will furnish, free
of charge (excluding labor charges), replacement part(s) for those part(s) of the Machine determined by Brother or its
Authorized Service Center to be defective.
You will be responsible for all labor
charges associated with repairs made after the first 90 days from original purchase. After 90 days from the original
purchase date, accompanying Consumable
and Accessory Items are no longer covered
by this warranty. If the Machine and/or accompanying Consumable and Accessory
Item(s) are not covered by this warranty (either stage), you will be charged for shipping
the Machine and/or accompanying Consumable and Accessory Item(s) back to you
The foregoing are your sole (i.e., only)
and exclusive remedies under this
warranty.
What happens when Brother elects to
replace your Machine:
If you have delivered the Machine to an
Authorized Service Center, the Authorized
Service Center will provide you with a
replacement Machine after receiving one from
Brother. If you are dealing directly with Brother,
Brother will send to you a replacement Machine
with the understanding that you will, after receipt
of the replacement Machine, supply the required
proof of purchase information, together with the
Machine that Brother agreed to replace. You are
then expected to pack the Machine that Brother
agreed to replace in the package from the
replacement Machine and return it to Brother
using the air bill supplied by Brother in
accordance with the instructions provided by
Brother. Since you will be in possession of two
machines, Brother will require that you provide a
valid major credit card number. Brother will
issue a hold against the credit card account
number that you provide until Brother receives
your original Product and determines that your
original Product is entitled to warranty coverage.
Your credit card will be charged up to the cost of
a new Product only if: (i) you do not return your
original Product to Brother within five (5)
business days; (ii) the problems of your original
Product are not covered by the limited warranty;
(iii) the proper packaging instructions are not
followed and has caused damage to the
product; or (iv) the warranty period on your
original Product has expired or has not been
®
90 Days/One Year Limited Warranty and Replacement Service
st
day to 1 year:
(For USA Only)
.
sufficiently validated with a copy of the proof of
purchase (bill of sale). The replacement
Machine you receive (even if refurbished or
remanufactured) will be covered by the balance
of the limited warranty period remaining on the
original Product, plus an additional thirty (30)
days. You will keep the replacement Machine
that is sent to you and your original Machine
shall become the property of Brother. Retain
your original accessory items and a copy of
the return air bill, signed by the courier.
Limitations:
Brother is not responsible for damage to or
loss of any equipment, media, programs or
data related to the use of this Product.
Except for that repair or replacement as
described above, Brother shall not be liable
for any direct, indirect, incidental or
consequential damages or specific relief.
Because some states do not allow the
exclusion or limitation of consequential or
incidental damages, the above limitation
may not apply to you.
THIS WARRANTY IS GIVEN IN LIEU OF
ALL OTHER WARRANTIES, WRITTEN OR
ORAL, WHETHER EXPRESSED BY
AFFIRMATION, PROMISE, DESCRIPTION,
DRAWING, MODEL OR SAMPLE. ANY AND
ALL WARRANTIES OTHER THAN THIS
ONE, WHETHER EXPRESS OR IMPLIED,
INCLUDING IMPLIED WARRANTIES OF
MERCHANTABILITY AND FITNESS FOR A
PARTICULAR PURPOSE, ARE HEREBY
DISCLAIMED.
• This Limited Warranty is the only warranty
that Brother is giving for this Product. It is
final expression and the exclusive and
the
only statement
you. It replaces all other agreements and
understandings that you may have with
Brother or its representatives.
• This warranty gives you certain rights
and you may also have other rights that
may vary from state to state.
• This Limited Warranty (and Brother’s
obligation to you) may not be changed in
any way unless you and Brother sign the
same piece of paper in which we (1) refer
to this Product and your bill of sale date,
(2) describe the change to this warranty
and (3) agree to make that change.
Important:
We recommend that you keep all original
packing materials, in the event that you ship
this product.
of Brother’s obligations to
ii
Page 5

Important Information
Should you have questions, or need information about your Brother Product, we have a variety
of support options for you to choose from:
USA-Customer Service:
Customer Service
877-478-6824 (voice)
Customer Service
901-379-1210 (fax)
Automated Faxback
800-521-2846
World Wide Web
www.brother.com
Supplies / Accessories
www.brothermall.com
or 888-879-3232
BROTHER INTERNATIONAL CORPORATION
100 SOMERSET CORPORATE BLVD.
BRIDGEWATER, NEW JERSEY 08807-0911
Please record your model and serial number and your date and location of Purchase below for
your records. Keep this information with your proof of purchase (bill of sale) in case your
Product requires service.
Model #
Serial #
Date of purchase:
Store where purchased:
Location of store:
Important: We recommend that you keep all original packing materials, in the event you ship
this product.
Don't stand in line at the post office or worry about lost mail. Visit us on-line at
Save Time - Register On-Line!
www.registermybrother.com
Your product will immediately be registered in our database and you can be on your way!
Also, while you're there, look for contests and other exciting information!
iii
Page 6

CONTENTS
Getting Started
GENERAL DESCRIPTION ....................................................................................1
GENERAL PRECAUTIONS................................................................................... 3
BATTERIES ..........................................................................................................3
AC ADAPTOR ..................................................................................................... 4
TAPE CASSETTE ..................................................................................................5
ATTACHING LABELS .......................................................................................... 6
PRINT HEAD & ROLLERS.................................................................................... 7
USING WITH A PERSONAL COMPUTER ...........................................................8
For Your Information
POWER KEY...................................................................................................... 10
CURSOR KEYS ..................................................................................................10
CODE, ALT & SHIFT KEYS ................................................................................11
SPACE KEY ........................................................................................................ 14
RETURN KEY..................................................................................................... 14
TAB FUNCTION ...............................................................................................15
DELETE KEY ......................................................................................................17
LINE OUT FUNCTION...................................................................................... 18
CLEAR FUNCTION ...........................................................................................19
ACCENT FUNCTION ........................................................................................ 21
SYMBOL FUNCTION........................................................................................ 22
AUTO FORMAT FUNCTION ............................................................................24
FONT FUNCTION ............................................................................................26
SIZE & WIDTH FUNCTIONS............................................................................. 27
STYLE FUNCTION ............................................................................................29
UNDERLINE FUNCTION ..................................................................................31
FRAME FUNCTION........................................................................................... 32
TAPE MARGIN FUNCTION ..............................................................................33
HORIZONTAL ALIGNMENT FUNCTION .........................................................34
MIRROR PRINTING FUNCTION....................................................................... 35
LENGTH FUNCTION ........................................................................................ 36
AUTO CUT FUNCTION.................................................................................... 38
iv
Page 7

PRINT KEY ........................................................................................................39
FEED & CUT FUNCTION .................................................................................. 40
NUMBERING FUNCTION ................................................................................40
REPEAT PRINTING FUNCTION ........................................................................42
MEMORY FUNCTIONS..................................................................................... 43
TROUBLESHOOTING....................................................................................... 47
ERROR MESSAGE LIST ...................................................................................... 48
SPECIFICATIONS ..............................................................................................51
ACCESSORIES (For USA Only) ..........................................................................52
INDEX ............................................................................................................... 54
PT-1950/1960 CONTACT INFORMATION (For USA Only) ..............................56
v
Page 8

vi
Page 9
Getting Started
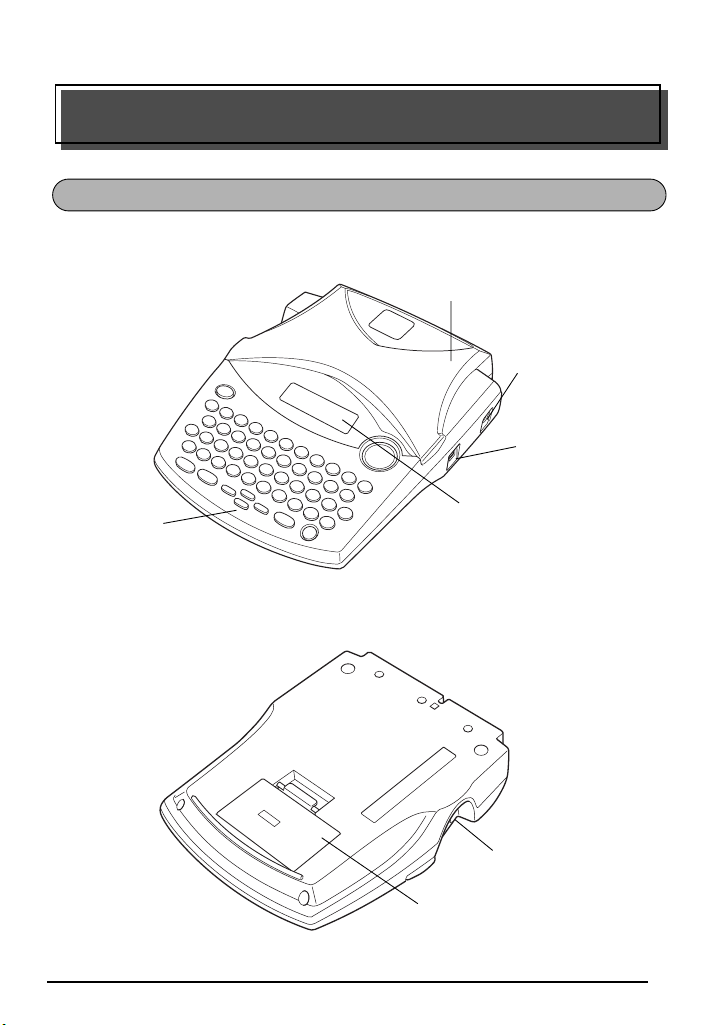
GENERAL DESCRIPTION
TOP VIEW
Keyboard
Tape compartment
cover
AC adaptor
connector
USB port
LCD display
BOTTOM VIEW
Tape exit slot
Battery compartment cover
1
Page 10
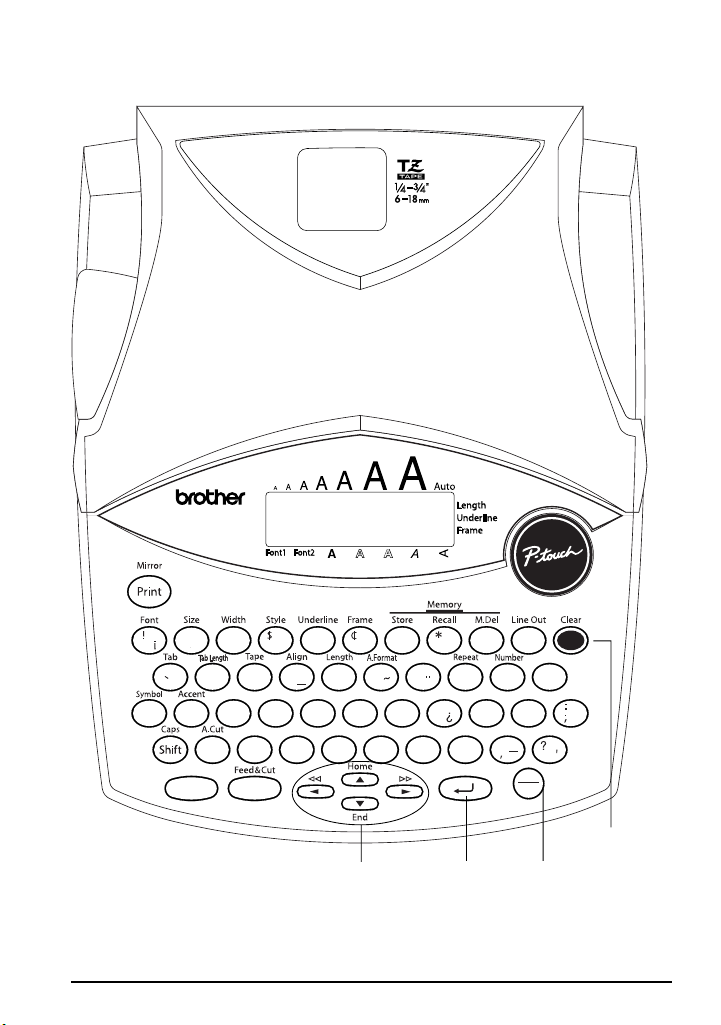
KEYBOARD & LCD DISPLAY
(
#
@
134567890
2
W
O
Alt
Code Space
A
E
S
Z
XC V BNM
%
R
T
DFGHJ KL
Ç
&
UI P
Y
/
ç
u
Ñ
(
BS
O
í
é
ñ
á
ó
ú
"
/
.
On
Off
Delete key
Return key
Power keyCursor keys
2
Page 11

1
2
3
4
GENERAL PRECAUTIONS
To avoid injuries, do not touch the cutter’s edge.
●
●
Use only Brother TZ tapes with this machine to avoid damage. Do not use tapes that do
not have the mark. Brother cannot be held responsible for trouble or damage by the
use of unauthorized supplies.
●
Do not pull on the tape being fed from the P-touch. This may damage the tape cassette.
●
Do not use the machine in dusty places, and keep it out of both direct sunlight and rain.
Do not expose the machine to high temperatures or high humidity. Never leave it on the
●
dashboard or in the back of your car.
●
Do not leave any rubber or vinyl on the machine for an extended period of time. Doing
so may cause staining.
●
Do not clean the machine with alcohol or other organic solvents. Use a soft, dry cloth only.
●
Do not put any foreign objects into or anything on the machine.
●
Use only the AC adaptor (model AD-60) designed exclusively for this machine. Use of
any other adaptor may void the warranty.
Do not try to disassemble the AC adaptor.
●
●
When the machine is not being used for a long period of time and it is not necessary to
keep the text files stored in the memory, disconnect the AC adaptor, and remove the batteries to prevent them from leaking and damaging the machine.
●
When the AC adaptor is connected, unplugging the adaptor from the electrical outlet
before unplugging it from the machine can delete all text files in the memory, even if batteries are installed.
●
Use six AA alkaline batteries in this machine.
●
If the batteries are not installed with their positive and negative poles pointing in the correct direction, the batteries may leak, overheat or burst, or the print head may overheat.
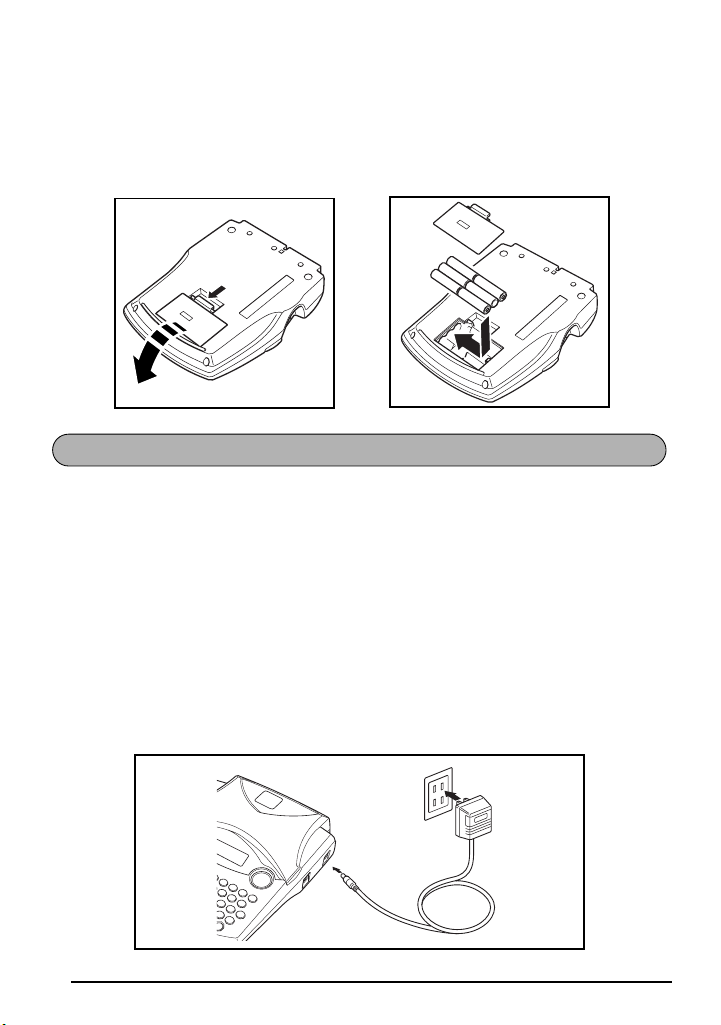
BATTERIES
This portable machine can be used anywhere by installing six (6) AA alkaline batteries .
you change the batteries, always replace all six at the same time.
To change the batteries:
Remove the battery compartment cover on the back of the machine.
If batteries are already installed, remove them.
Insert six new AA alkaline batteries, making sure that their poles point in the correct direction.
Attach the battery compartment cover.
☞
Be sure to insert the new batteries within five minutes of removing the old ones,
otherwise the text shown in the display and any text files stored in the memory will
be lost (unless the machine is plugged into an AC outlet with the AC adaptor).
When
3
Page 12
4
1
2
Remove the batteries and disconnect the AC adaptor if you do not intend to use this
machine for an extended period of time. When the power is disconnected, all text
shown in the display and stored in the memory will be lost.
If the batteries are not installed with their positive and negative poles pointing in
the correct direction, the batteries may leak, overheat or burst, or the print head
may overheat.
AC ADAPTOR
The AC adaptor (model AD-60) allows you to use this machine wherever there is an electrical outlet.
To connect the AC adaptor:
Insert the plug on the adaptor cord into the connector marked DC IN 9.5V on the right
side of the machine.
Insert the plug on the adaptor into the nearest standard electrical outlet.
☞
Only use the AC adaptor designed exclusively for this machine.
Remove the batteries and disconnect the AC adaptor if you do not intend to use this
machine for an extended period of time. When the power is disconnected, all text
shown in the display and stored in the memory will be lost.
When the AC adaptor is connected, unplugging the adaptor from the electrical outlet before unplugging it from the machine can delete all text files in the memory,
even if batteries are installed.
Page 13
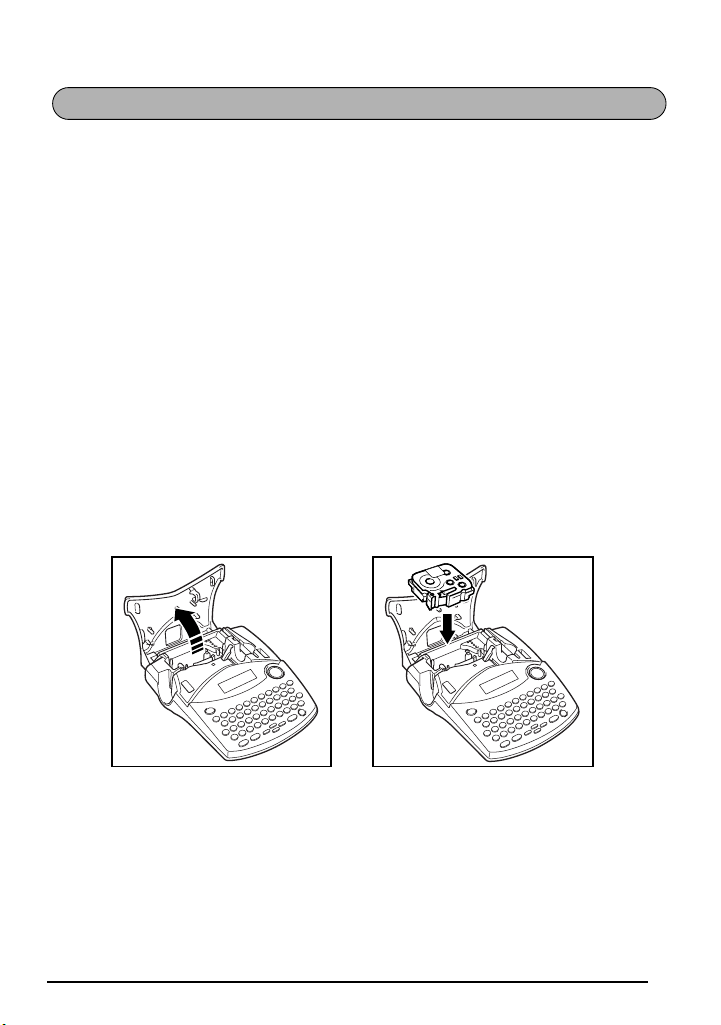
TAPE CASSETTE
TZ tape cassettes are available for this machine in a wide variety of colors and sizes. It is possible to make distinctive color-coded and stylized labels.
In addition, this machine has been designed to allow you to change the tape cassettes quickly
and easily.
To change the tape cassette:
Lift open the tape compartment cover. The installed cassette is also released.
If a tape cassette is already installed, remove it by pulling it straight up.
If the ink ribbon in the tape cassette to be installed is loose, use your finger to wind the
toothed wheel in the direction of the arrow on the cassette until there is no slack in the
ribbon. Also, make sure that the end of the tape feeds under the tape guides.
☞ If you are using a new tape cassette provided with a stopper, be sure to remove the
stopper.
4 Insert the tape cassette firmly into the tape compartment, making sure that the entire back
of the cassette touches the bottom of the compartment.
☞ When inserting the tape cassette, make sure that the inner ribbon does not catch on
the corner of the metal guide.
5 Close the compartment cover, and then turn on the machine, if it is off.
6 Hold down c and press _ once to advance the tape and remove any slack.
1
2
3
☞ This machine does not support stamp tapes (SK-MB/SH-MB).
5
Page 14
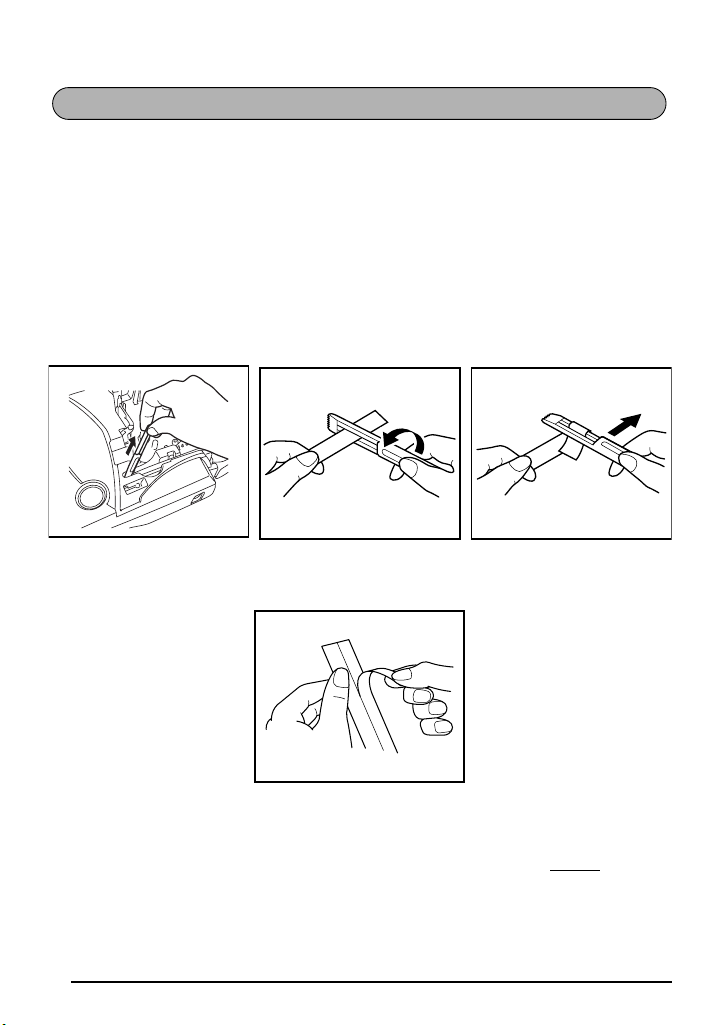
ATTACHING LABELS
ABCDEF
LAMINATED TAPE
When you open the tape compartment cover of the machine, you will find a lettering stick in
the upper right hand corner. This stick enables you to easily remove the backing from labels
printed on laminated tapes, as shown below.
1 Hold the tape in your left hand, with the printed surface facing up, and hold the stick in
your right hand.
2 Pass the tape halfway through the long narrow hole in the stick.
3 Turn the stick three-quarters of a turn towards you and pull the stick away from you as
shown below.
4 Peel off the label backing.
GH
ABCDEF
Some tapes can be folded in half so that the inside edges of the two backing pieces come off
the label, enabling the backing to be peeled off easily.
FABRIC TAPE
Fabric tape is used to attach a piece of fabric printed with your text onto garments using an
iron. After printing the text onto fabric tape and cutting off the label using scissors
label on an ironed garment at the location where you wish to attach it in such a way that the
printed text can be read correctly. Cover the label with another piece of cloth and use an iron
set to a medium-high temperature (320 to 356 ˚F (160 to 180 ˚C)) and press down firmly for 15
to 30 seconds. For more details, refer to the instructions included with the fabric tape cassette.
6
, place the
Page 15
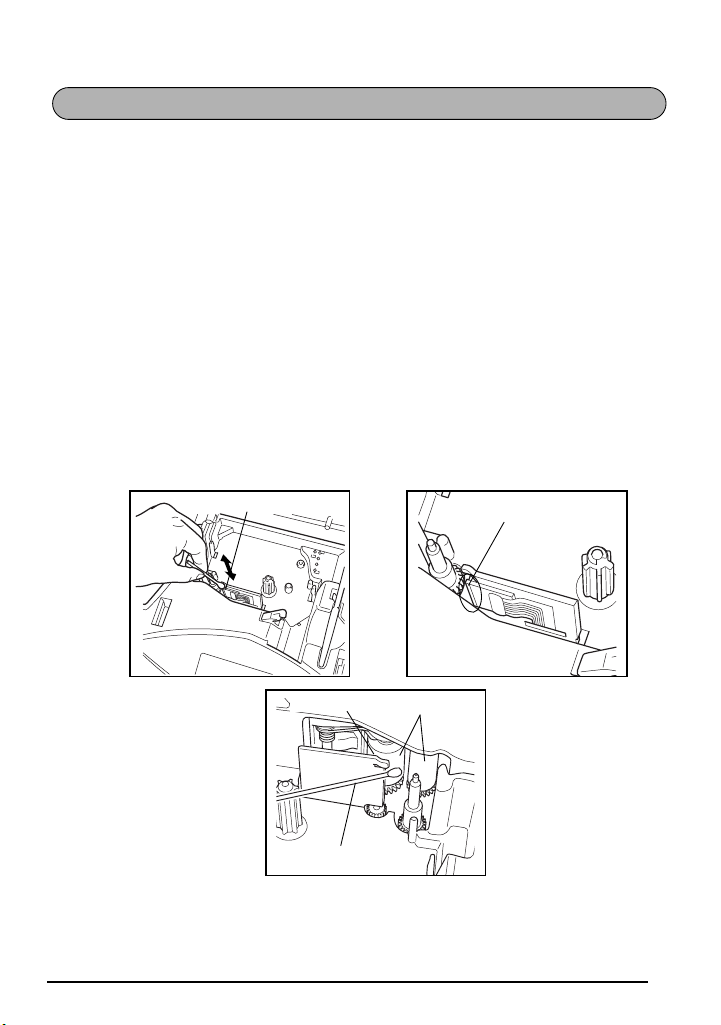
PRINT HEAD & ROLLERS
Print head
Occasionally, specks of dust or dirt become attached to the machine’s print head and rollers.
This is particularly likely when you are using the unit outdoors or in a very dusty environment.
If a section of the print head is covered with dust, a black horizontal streak may appear
through the label text. Therefore, as with a tape recorder, the machine’s head may need to be
cleaned from time to time.
To clean the print head and rollers:
1 Turn off the machine. Remove the batteries and disconnect the AC adaptor.
2 Open the tape compartment cover, and then remove the tape cassette if one is installed.
The print head and rollers are located in the tape compartment.
3 Print head: Use a dry cotton swab to gently wipe the print head with an up-and-down
motion.
Rollers: Use a dry cotton swab to wipe each roller with an up-and-down motion while
rotating them with your finger.
4 Install a tape cassette, close the tape compartment cover, and then try printing again.
5 If a blank streak still appears in the label, repeat steps 3 and 4.
If none of the above works, contact your service representative.
Print head
Print head
☞ The print head can be cleaned more easily if the optional print head cleaning cassette
(TZ-CL4) is used.
Cotton swab
Rollers
7
Page 16
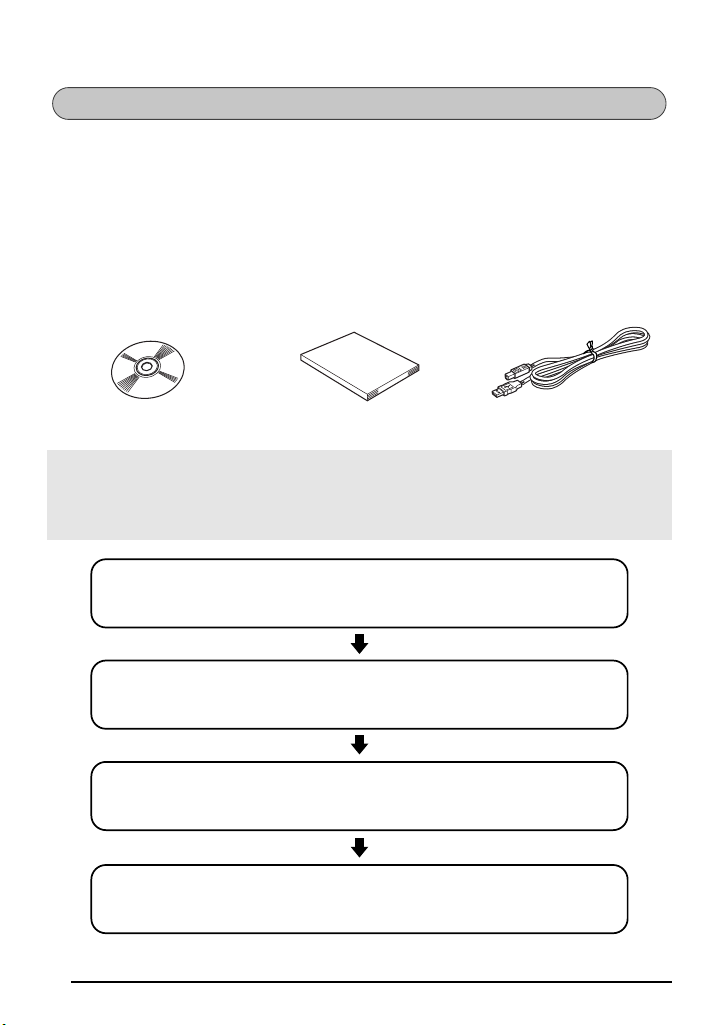
USING WITH A PERSONAL COMPUTER
By installing the P-touch Editor, Quick Editor and Printer driver, you can easily print labels
from your personal computer. Various auto format templates are available in the software
for easy label making.
What you’ll need:
■ CD-ROM
The CD-ROM contains software, etc., to install on a
personal computer.
Procedure :
NOTE :
• Do not connect the USB interface cable to a personal computer until the software has
been installed.
• Be sure to refer to the “Software Installation Guide” to install the software properly.
1 Start the personal computer, and then insert the CD-ROM into the CD-
ROM drive.
2 Install the software by following the instructions that appear on PC dis-
play. Refer to “Software Installation Guide” for detail.
■ Software Installation Guide
Keep for future reference.
■ USB interface cable
(not included)
Make sure that your USB
cable is of high quality construction.
3 When P-touch Editor and P-touch Quick Editor is installed, connect the
P-touch to your personal computer by using the USB cable and then
turn on the P-touch.
4 The Printer Driver will be installed automatically after you have con-
nected the P-touch to your personal computer.
8
Page 17

Notes on using with a personal computer
● When connected to the personal computer, the machine will automatically turn off if no
operation is performed within 60 minutes.
● The label length can be set up to 12.2” (310 mm) long.
About CHAIN print mode :
When printing labels continuously, you can reduce the margin size by selecting the “Chain
Printing” option on the computer. The Auto cut function will be off in Chain printing, so you
will need to press c + _ when finally cutting the tape.
☞ Please use scissors to cut off Fabric Tapes or Strong Adhesive Tapes.
System Requirements :
Check that your system configuration meets the following requirements.
● Operating system : Pre-installed with Microsoft
XP Pro or XP Home
●
Memory : 64MB or more
● Hard disk free space: 50MB or more
● Interface : USB 1.1 or later specification
● Monitor : 800 x 600 dot (SVGA / Higher color or higher graphics card)
● Other : CD-ROM drive for installation
®
Windows® 98, 98SE, Me, 2000
Pro
,
9
Page 18
For Your Information
POWER KEY
The Power key ( o ) is located in the lower-right corner of the keyboard. If batteries have
been installed or the machine has been plugged in using the AC adaptor, the previous session’s information is displayed when the machine is turned on.
The machine will automatically turn off if no operation is performed within the selected time.
See below chart for detail.
Power Supply Non-PC use PC use
Six AA batteries 5 minutes 60 minutes
AC adaptor 5 minutes 60 minutes
To turn on the machine:
● Press o. The previous session’s information appears in the LCD display.
To turn off the machine:
● Press o. The current session’s information is stored in the internal memory.
CURSOR KEYS
The machine’s LCD display shows two rows of 9 characters; however, the text that you create
can be up to 99 characters long. You can review and edit different parts of the text by moving
the cursor backward and forward.
LEFT CURSOR KEY
To move the cursor one character to the left:
● Press f once.
☞ If this key is pressed when the cursor is at the beginning of a line following another
line, the cursor moves to the end of the previous line.
To move the cursor several characters to the left:
● Hold down f until the cursor moves to the desired position.
To move the cursor to the beginning of the current line:
● Hold down c and press f.
10
Page 19

RIGHT CURSOR KEY
To move the cursor one character to the right:
● Press w once.
☞ If this key is pressed when the cursor is at the end of a line followed by another
line, the cursor moves to the beginning of the next line.
To move the cursor several characters to the right:
● Hold down w until the cursor moves to the desired position.
To move the cursor to the end of the current line:
● Hold down c and press w.
UP CURSOR KEY
To move the cursor up to the previous line:
● Press h once.
☞ If the cursor is in the first line of text, it will move to the beginning of the line.
To move the cursor up several lines:
● Hold down h until the cursor moves to the desired line.
To move the cursor to the beginning of the entire text:
● Hold down c and press h.
DOWN CURSOR KEY
To move the cursor down to the following line:
● Press e once.
☞ If the cursor is in the last line of text, it will move to the end of the line.
To move the cursor down several lines:
● Hold down e until the cursor moves to the desired line.
To move the cursor to the end of the entire text:
● Hold down c and press e.
CODE, ALT & SHIFT KEYS
Most characters can be entered simply by pressing their keys. However, to use special functions or to enter capital letters, accented characters and some symbols, the following special
keys are necessary.
CODE KEY
To use a function printed above a key:
● Hold down c and press the key immediately below the desired function.
11
Page 20

EXAMPLE
1:
DANGER_
ÆæÃã
Ü
1:
012_
1:
012–_
Alt
To start the Symbol function:
● Hold down c and press a once.
ALT KEY
To type in characters printed in color on the right-hand side of the keys:
● Hold down a and press the key of the desired character written in color. The Alt indi-
cator on the left side of the display comes on while a is held down.
EXAMPLE
To type in “–”:
● Hold down a and press / once. The Alt indicator comes on while a is held
down.
12
Page 21
SHIFT KEY
1:
5 _
1:
5%_
To type in an uppercase letter or a symbol printed in the top left-hand corner of a key:
● Hold down s and press the key of the desired letter or symbol.
EXAMPLE
To type in “%”:
● Hold down s and press 5.
The Caps mode is similar to holding down s. It allows you to type capital letters continu-
ously.
To type in many capital letters:
1 Hold down c and press s. The Caps indicator on the left side of the display
comes on.
Caps
1:
_
2 Press the keys of the desired letters or symbols.
3 To exit Caps mode, hold down c and press s. The Caps indicator goes off.
13
Page 22
SPACE KEY
1:
J._
1:
J. _
The Space key ( _ ) lets you add blank spaces between characters in your text. It is different from the right cursor key ( w ), which just moves the cursor without adding blank
spaces.
To add a space:
● Press _.
EXAMPLE
To add a space:
● Press _.
RETURN KEY
As on a typewriter or word processor, this machine’s Return key ( r ) is used to end a line
of text and start another one. When you have finished entering one line, press the return key to
make a new line and move the cursor to it.
☞ The text can only contain a maximum of five lines. If you press r when five text
lines already exist, the error message “5 LINE LIMIT!” will appear.
14
Page 23
Tape widths Maximum number of lines that can be printed
1/4" (6 mm) 2
3/8" (9 mm) 2
1/2" (12 mm) 3
3/4" (18 mm) 5
The return key can also be used to select an item from a list (e.g., add a symbol or accented
character to the text) or to apply a selected setting.
Some questions asking you to confirm a command may appear on the LCD display, especially
when the function that you have chosen will delete or affect files. In these cases, pressing
r is like answering “yes”.
☞ To answer “no”, press *. Refer to DELETE KEY on page 17.
To add a new line:
● Press r. The return mark ( ) appears to indicate the end of the line.
To select an item from a list:
● Press r.
To answer “yes”:
● Press r.
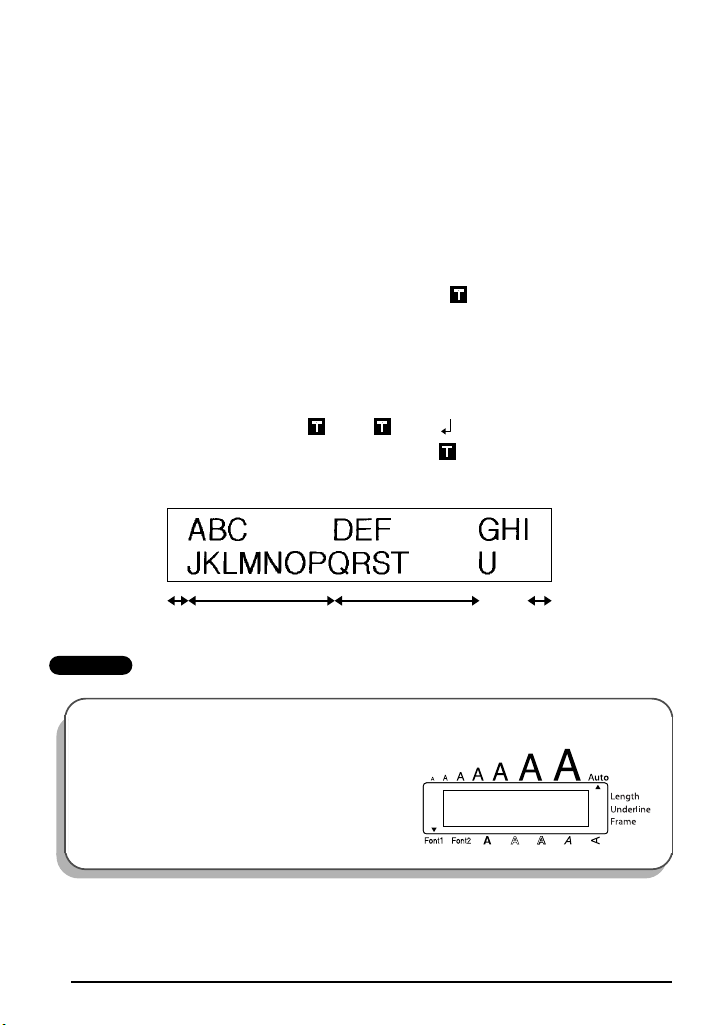
TAB FUNCTION
This function allows you to separate sections of a line of text by adding tabs. This enables you
to create perfectly aligned columns without having to type in several spaces. All tabs have the
same length and are measured from either the beginning of the line or the previous tab, if there
is more than one. The tab length can be set between 0.0” and 11.8” (0.0 and 30.0 cm).
☞ The text cannot contain more than 50 tabs. If the maximum number of tabs has already
been added to the text when c is held down and Q is pressed, the error message
“TAB LIMIT!” appears.
15
Page 24
To set the tab length:
2.0inch
TAB LENGTH
1 Hold down c and press W once. The current tab length is displayed.
2 Press h or e until the desired length is displayed or use the number keys to type in
the length.
☞ To change the units (inches or centimeters) used to display the tab lengths, press
M until the desired units are displayed.
3 Press r.
To add a tab:
● Hold down c and press Q once. The tab mark ( ) appears in the text to indi-
cate the position of the tab.
☞ If the text in front of a tab extends past the point where the next section of text
should start, the text will instead start at the following tab position.
For example, if the tab length is set to 1.2” (3.0 cm) and the following text is typed
in:
1:
ABC DEF GHI
2:
JKLMNOPQRST U
the label shown below will be printed.
Margin Tab (1.2” (3.0 cm)) Tab (1.2” (3.0 cm)) Margin
EXAMPLE
To set the tab length to 1”:
Hold down c and press W once.
1
16
Page 25

Press e until 1.0 is displayed.
1.Oinch
TAB LENGTH
1:
art NO. _
2
3 Press r.
To add a tab:
● Hold down c and press Q once.
DELETE KEY
The Delete (backspace) key ( * ) allows you to remove characters to the left of the cursor’s
current position. It differs from the left cursor key ( f ), which only moves the cursor with-
out deleting any characters.
The delete key can also be used to quit most functions and return to the previous display without changing the text.
Some questions asking you to confirm a command may appear on the LCD display, especially
when the function that you have chosen will delete or affect files. In these cases, pressing *
is like answering “no”.
☞ To answer “yes”, press r. Refer to RETURN KEY on page 14.
To delete one character:
1 Press f, w, h or e to position the cursor below the character immediately to
the right of the character that you wish to delete.
2 Press * once.
17
Page 26
To delete a sequence of characters:
2:
345–6789_
1:
Garden
2:
_
1:
K’s Garde
1 Press f, w, h or e to position the cursor below the character immediately to
the right of the last character that you wish to delete.
2 Hold down * until all of the characters that you wish to delete are deleted.
To quit a function without changing your text:
● Press * to return to your text.
To answer “no”:
● Press *.
LINE OUT FUNCTION
With the Line Out function, you can easily remove an entire line of text.
To delete a line of text:
1 Press f, w, h or e to position the cursor within the line of text that you wish
to delete.
2 Hold down c and press 0 once.
☞ Each time 0 is pressed while c is held down, one line of text is deleted.
EXAMPLE
To delete “012-345-6789”:
● Hold down c and press 0 once.
18
Page 27
CLEAR FUNCTION
2:
345–6789_
1:
Garden
TEXT ONLY
TXT&FORMAT
TEXT ONLY
TXT&FORMAT
1:
_
When clearing the display before entering new text, the Clear function can be used to choose
whether all of the text is erased and all format functions (Font, Size, Width, Style, Underline,
Frame, Tape margin, Alignment, Tab length, Mirror printing, and Length) are returned to their
default settings, or whether just the text is erased.
To delete all of the text and return all formats to their default settings:
1 Hold down c and press *.
2 Press h or e until TXT&FORMAT is selected (flashing).
☞ To return to the text without erasing anything, press *.
3 Press r.
EXAMPLE
To clear the text and formats:
Hold down c and press *.
1
2 Press h until TXT&FORMAT is flashing.
3 Press r.
19
Page 28
To delete just the text:
TEXT ONLY
TXT&FORMAT
TEXT ONLY
TXT&FORMAT
1:
_
1 Hold down c and press *.
2 Press h or e until TEXT ONLY is selected (flashing).
☞ To return to the text without erasing anything, press *.
3 Press r.
EXAMPLE
To clear just the text:
Hold down c and press *.
1
2 Press e until TEXT ONLY is flashing.
1:
Garden
2:
345–6789_
3 Press r.
20
Page 29
ACCENT FUNCTION
The Accent function can also be used to add accented characters to your text. Many of these
characters can also be typed in using the Symbol function.
The accented characters are grouped according to the capital or small letter that they are combined with. The following accented characters are available:
Letters Accented characters Letters Accented characters
A À Á Ä Â Ã Æ i í ï î
a à á ä â ã æ N Ñ
C Ç n ñ
c ç O Ó Ö Ô Õ
E È É Ë Ê Eo ó ö ô õ
e è é ë ê e˜ U Ù Ú Ü Û
I Í Ï Î u ù ú ü û
To type in an accented character:
1 Hold down c and press A. The message “ACCENT a – u / A – U?” appears on the
display.
2 Press the key of the letter in the desired accented character.
☞ To type a capital letter, hold down s (or hold down c and press s to turn
on Caps mode) before pressing the letter key.
3 Press f or w until the desired accented character appears enlarged within the frame
in the middle of the display.
4 Press r. The accented character is added to the text.
☞ To type in a series of accented characters, hold down c before pressing r.
Then, continue adding accented characters by selecting them as explained in steps
2
and
3
, and holding down c while pressing r. Press just r after
selecting the last character in the series.
˜
21
Page 30
EXAMPLE
a–u/A–U?
ACCENT
ÉËÊE
È
˜
È ËÊE
É
˜
1:
RESUMÉ_
To add the accented character “É”:
1
Hold down c and press A.
2 Hold down s and press E.
3 Press w until É appears in the frame.
4 Press r.
SYMBOL FUNCTION
In addition to the letters, symbols and numerals on the key tops, there are 53 additional marks
available with the Symbol function.
The following symbols are available:
22
Page 31

☞
ÆæÃã
Ü
Group Symbol
☞
˜
E
23
R C
234
1 ÜÆæà ã e˜Õõ °
2+×÷= §
3
TM
[]
4
5
♥ ★
To type in a symbol:
1 Hold down c and press a. A row of symbols appears in the display.
2 Press h or e to display different rows of symbols and press f or w until the
desired symbol appears enlarged within the frame in the middle of the display.
3 Press r. The symbol is added to the text.
☞ To type in a series of symbols, hold down c before pressing r. Then, con-
2
tinue adding symbols by selecting them as explained in steps
ing down c while pressing r. Press just r after selecting the last
symbol in the series.
EXAMPLE
To add the symbol “ ”:
1
Hold down c and press a.
and 3, and hold-
2 Press h or e until the row containing
“ ” appears, and then press
“ ” appears in the frame.
f or w until
23
Page 32

3
1:
DANGER _
Press r.
AUTO FORMAT FUNCTION
With the Auto Format function, you can select from a variety of preset formats perfect for your
specific need. This function automatically adjusts the label length, tape margins and horizontal alignment without changing the text or any other formats, allowing you to create labels
faster and easier.
The following preset formats are available:
Auto Format Setting
DEFAULT OFF FULL LEFT
3.5" FLOPPY 2.8" (7.0 cm) NARROW CENTER
miniDV 1.7" (4.3 cm) NARROW CENTER
VHS SPINE 5.5" (14.0 cm) NARROW CENTER
VHS 3.0" (7.7 cm) NARROW CENTER
VCR8mm CASE 3.6" (9.2 cm) NARROW CENTER
VCR8mm 2.9" (7.3 cm) NARROW CENTER
VHS-C SPINE 1.8" (4.5 cm) NARROW CENTER
VHS-C 2.3" (5.8 cm) NARROW CENTER
AUDIO CASSETTE 3.5" (8.9 cm) NARROW CENTER
DAT CASSETTE 2.2" (5.6 cm) NARROW CENTER
MINI DISK 2.0" (5.2 cm) NARROW CENTER
ORGANIZER L 3.2" (8.2 cm) NARROW CENTER
ORGANIZER S 2.6" (6.5 cm) NARROW CENTER
FILE LONG 7.2" (18.3 cm) NARROW CENTER
FILE SHORT 3.7" (9.4 cm) NARROW CENTER
Label Length
Setting
Tape Margin
Setting
Horizontal
Alignment Setting
24
Page 33

To select a preset format:
DEFAULT
CASSETTE
AUDIO
1 Hold down c and press Y once. The currently selected setting appears in the dis-
play.
2 Press h or e to select the desired setting.
☞ To return to default settings, press _.
3 Press r to apply the selected setting.
☞ The Length indicator comes on if any setting other than DEFAULT is selected.
EXAMPLE
To select the AUDIO CASSETTE setting:
Hold down c and press Y.
1
2 Press h or e until the AUDIO CASSETTE
setting is displayed.
3 Press r.
25
Page 34

FONT FUNCTION
1
FONT
2
FONT
A
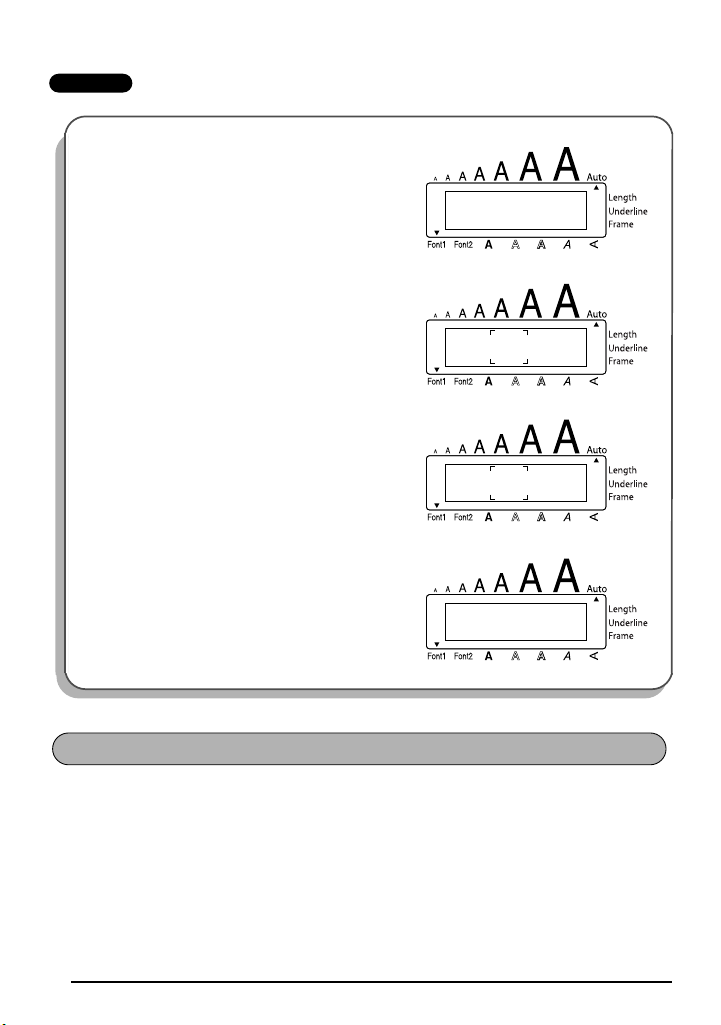
With the Font function, you can choose one of two fonts for your text.
The following font settings are available:
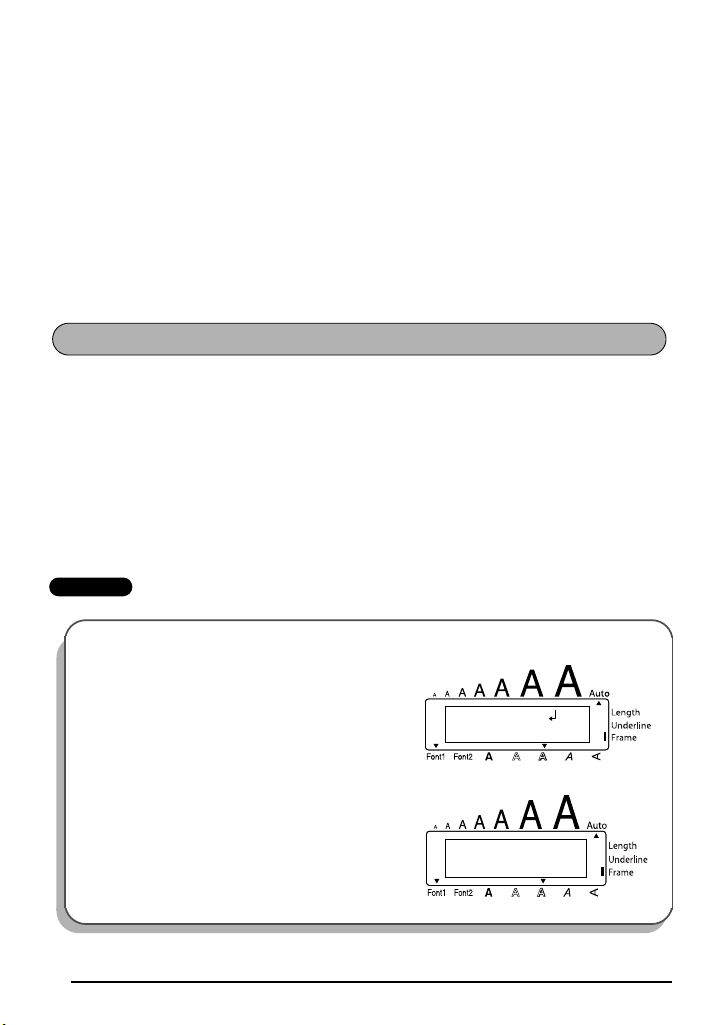
The default font setting is FONT 1. The font indicator at the bottom left of the display shows
the currently selected font setting.
To change the font setting:
1 While holding down c, press 1 once, and keep c held down to display the
current font setting.
2 While still holding down c, continue pressing 1 until the desired font setting is
displayed.
☞ The current font setting is shown by the font indicator at the bottom left of the dis-
play.
3 Release c to apply the selected font setting to the entire text.
EXAMPLE
To select the FONT 2 font setting:
1
While holding down c, press 1 once,
and keep c held down.
26
2 While still holding down c, continue pressing
1 until FONT 2 is displayed.
3 Release c.
Page 35

SIZE & WIDTH FUNCTIONS
The character size can be adjusted using both the Size and Width functions. Since the character size that can be used depends on the width of the tape, the following table shows the character sizes that can be used with each tape width.
Tape Widths Sizes (in points)
1/4" (6 mm) 6, 9, 12
3/8" (9 mm) 6, 9, 12, 18
1/2" (12 mm) 6, 9, 12, 18, 24
3/4" (18 mm) 6, 9, 12, 18, 24, 36, 42
The default size setting is AUTO and the default width setting is OFF. The currently selected
size setting is always shown by the indicator above the display.
With the AUTO size setting, the machine compares your text with the width of the installed
tape and automatically adjusts the characters to the largest possible size. However, seven other
point sizes are also available, and each can be printed with either of the two width settings.
☞
With the AUTO setting selected and 1/2" (12-mm) or 3/4" (18-mm) wide tape installed,
text consisting of just one line of only uppercase letters (and no accented characters)
will be printed with a character size slightly larger than a similar sentence also containing lowercase letters (i.e., 29 points for 1/2" (12-mm) wide tape and 52 points for 3/4"
(18-mm) wide tape).
Size Setting
(in points)
6
9
12
Width Setting
Off
Width Setting
On
18
24
36
42
27
Page 36

To change the size setting:
AUTO
SIZE
24
SIZE
1 While holding down c, press 2 once, and keep c held down to display the
current size setting.
2 While still holding down c, continue pressing 2 until the desired size setting is
displayed.
☞ The current size setting is shown by the size indicator at the top of the display.
3 Release c to apply the selected size setting to the entire text.
EXAMPLE
To select the 24 point size setting:
While holding down c, press 2 once,
1
and keep c held down.
2 While still holding down c, continue pressing
2 until 24 is displayed.
3 Release c.
To change the width setting:
1 While holding down c, press 3 once, and keep c held down to display the
current width setting.
2 While still holding down c, continue pressing 3 until the desired width setting is displayed.
3 Release c to apply the selected width setting to the entire text.
28
Page 37

EXAMPLE
OFF
WIDE
ON
WIDE
To select the ON width setting:
While holding down c, press 3 once,
1
and keep c held down.
2 While still holding down c, continue pressing
3 until ON is displayed.
3 Release c.
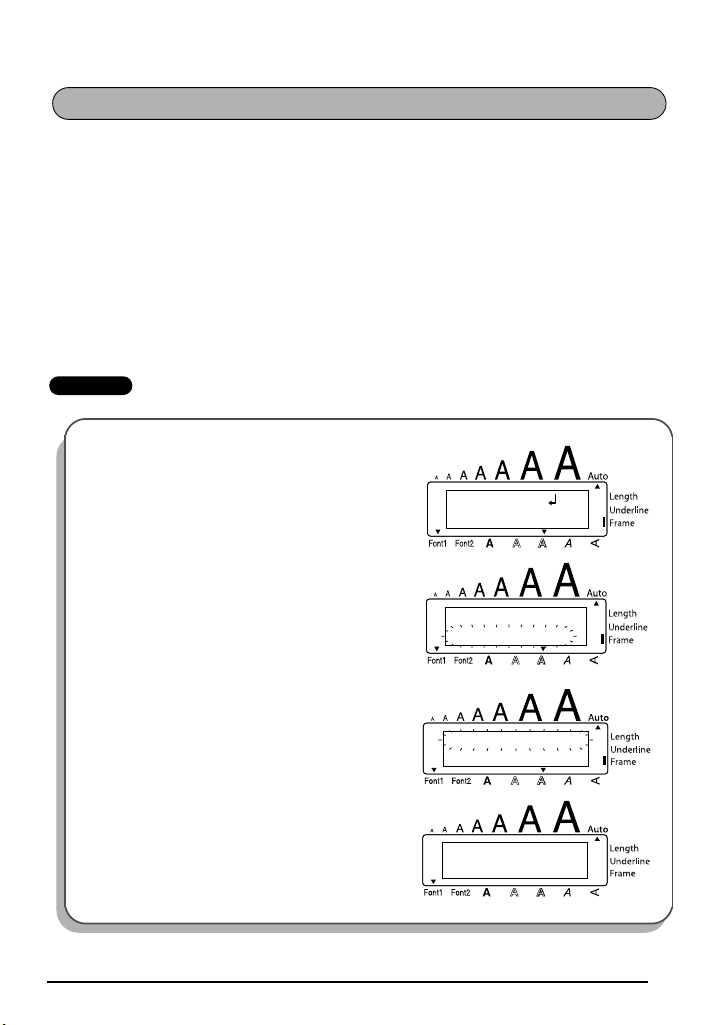
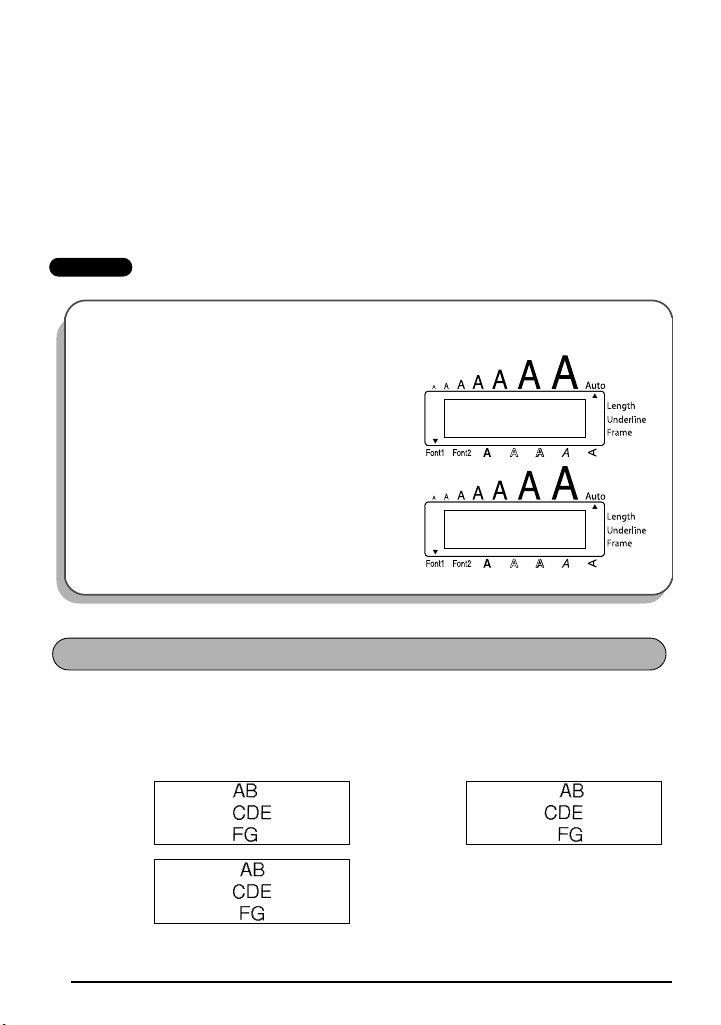
STYLE FUNCTION
You can choose from nine different character styles to apply to your text.
☞ Characters printed using the smaller sizes may be difficult to read if certain style settings
(e.g., I+SHAD) are selected.
The following style settings are available:
NORMAL, BOLD, OUTLINE, SHADOW, ITALIC, I+BOLD (italic & bold), I+OUTL (italic
& outline), I+SHAD (italic & shadow), VERT (vertical)
The default style setting is NORMAL. The style indicator at the bottom of the display shows the
current style setting when any setting other than NORMAL is selected.
Refer to Reference at the end of this section for samples of the available settings.
To change the style setting:
1 While holding down c, press 4 once, and keep c held down to display the
current style setting.
2 While still holding down c, continue pressing 4 until the desired style setting is
displayed.
☞ The current style setting is shown by the style indicator at the bottom of the display.
3 Release c to apply the selected style setting to the entire text.
29
Page 38

EXAMPLE
NORMAL
STYLE
I+SHAD
STYLE
To select the I+SHAD style setting:
While holding down c, press 4 once,
1
and keep c held down.
2 While still holding down c, continue pressing
4 until I+SHAD is displayed.
3 Release c.
REFERENCE
REFERENCE
Font
Setting
FONT 1
FONT 2
Font
Setting
FONT 1
FONT 2
30
Style Setting
NORMAL BOLD OUTLINE SHADOW ITALIC
Style Setting
I+BOLD I+OUTL I+SHAD
VERT
Page 39

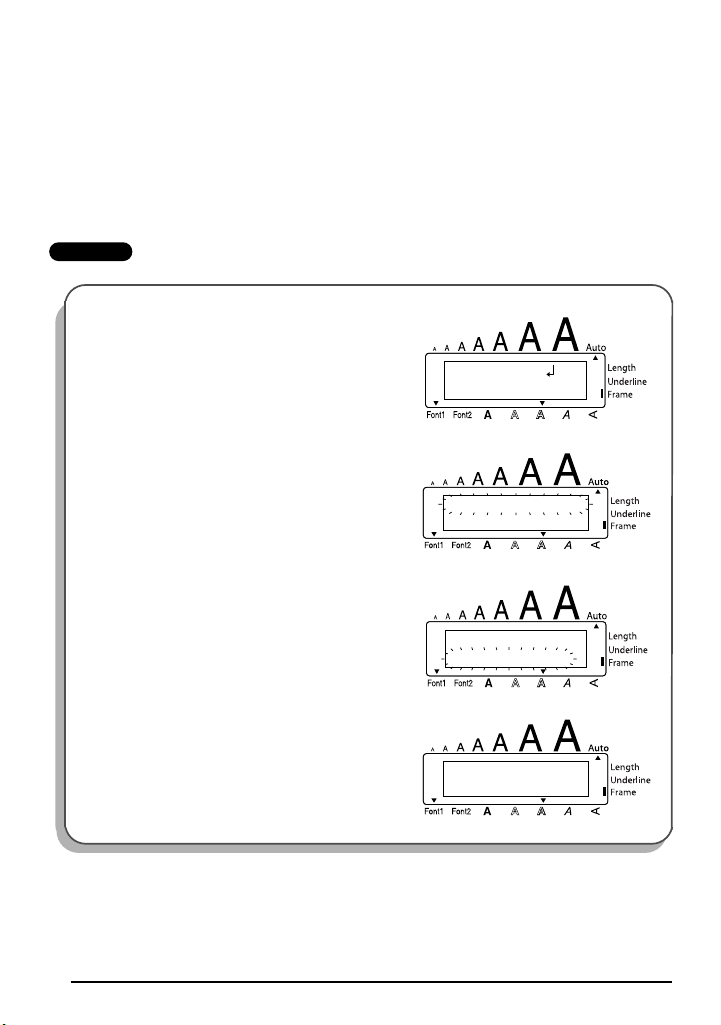
UNDERLINE FUNCTION
OFF
UNDL
ON
UNDL
You can emphasize your text by underlining it.
The default underline setting is OFF. When the Underline function is set to ON, the Underline
indicator on the right side of the display comes on.
UNDL
ON
To turn the Underline function on or off:
1 While holding down c, press 5 once, and keep c held down to display the
current underline setting.
2 While still holding down c, continue pressing 5 until the desired underline set-
ting is displayed.
☞ The Underline indicator comes on when the ON setting is selected.
3 Release c to apply the selected underline setting to the entire text.
EXAMPLE
To select the ON underline setting:
While holding down c, press 5 once,
1
and keep c held down.
(Sample)
2 While still holding down c, continue pressing
5 until ON is displayed.
3 Release c.
31
Page 40

FRAME FUNCTION
OFF
FRAME
With the Frame function, you can choose from various frames and highlights to design a more
decorative or emphasized label.
The default setting is OFF; however, the following five settings are also available.
When any setting other than OFF is selected, the Frame indicator on the right side of the display comes on.
To change the frame setting:
1 While holding down c, press 6 once, and keep c held down to display the
current frame setting.
2 While still holding down c, continue pressing 6 until the desired frame setting is
displayed.
☞ The Frame indicator comes on when any setting other than OFF is selected.
3 Release c to apply the selected frame setting to the entire text.
EXAMPLE
32
To select the candy frame setting:
While holding down c, press 6 once,
1
and keep c held down.
Page 41

EXAMPLE
2
While still holding down c, continue pressing 6 until the candy frame is displayed.
3 Release c.
TAPE MARGIN FUNCTION
The Tape margin function allows you to adjust the size of the margins on the left and right
sides of your text.
The default tape margin setting is FULL; however, three other settings are also available.
FULL
(1" (24 mm) margins)
NONE
(5/64" (2 mm) margins)
NARROW
(1/6" (4 mm) margins)
HALF
(1/2" (12 mm) margins)
☞ When a setting other than FULL is selected, extra tape is fed out before printing starts.
☞ After printing using the NARROW and HALF tape margin settings, use scissors to cut
along the cutting guide (:) to center the text within the label.
33
Page 42
To change the tape margin setting:
FULL
MARGIN
HALF
MARGIN
1 While holding down c, press E once, and keep c held down to display the
current tape margin setting.
2 While still holding down c, continue pressing E until the desired tape margin set-
ting is displayed.
3 Release c to apply the selected tape margin setting to the entire text.
EXAMPLE
To select the HALF tape margin setting:
1
While holding down c, press E once,
and keep c held down.
2 While still holding down c, continue press-
ing E until HALF is displayed.
3 Release c.
HORIZONTAL ALIGNMENT FUNCTION
You can choose to align the text in one of three ways. In addition, if the Length function was
used to set the length of the label, the text will align within the label according to the selected
horizontal alignment setting.
The default setting is LEFT; however, two other settings are also available.
LEFT RIGHT
CENTER
34
Page 43

To change the horizontal alignment setting:
LEFT
ALIGN
RIGHT
ALIGN
1 While holding down c, press R once, and keep c held down to display the
current horizontal alignment setting.
2 While still holding down c, continue pressing R until the desired horizontal align-
ment setting is displayed.
3 Release c to apply the selected horizontal alignment setting to the entire text.
EXAMPLE
To select the RIGHT horizontal alignment setting:
1
While holding down c, press R once,
and keep c held down.
2 While still holding down c, continue press-
ing R until RIGHT is displayed.
3 Release c.
MIRROR PRINTING FUNCTION
This function prints your label so that the text can be read from the adhesive side of the tape. If
mirror-printed labels are attached to glass or some other transparent material, they can be read
correctly from the opposite side.
☞ When using the Mirror printing function, the text should be printed on clear tape.
The default mirror printing setting is OFF.
ON
35
Page 44

To turn the mirror printing setting on or off:
OFF
MIRROR
ABC
ON
MIRROR
ABC
1 While holding down c, press p once, and keep c held down to display the
current mirror printing setting.
2 While still holding down c, continue pressing p until the desired mirror printing
setting is displayed.
3 Release c to apply the selected mirror printing setting to the entire text.
EXAMPLE
To select the ON mirror printing setting:
1
While holding down c, press p once,
and keep c held down.
2 While still holding down c, continue press-
ing p until ON is displayed.
3 Release c.
LENGTH FUNCTION
Although the length of the printed label automatically adjusts to fit the length of the entered
text, there may be times when you will want to make a label with a specific length. The
Length function allows you to set the label length between 1.6” and 11.8” (4.0 cm and 30.0
cm).
The default length setting is OFF. When the Length function is set to ON, the Length indicator
on the right side of the display comes on.
36
Page 45

To turn the Length function on or off:
ON
LENGTH
4.0inch
LENGTH
1 While holding down c, press T once, and keep c held down to display the
current length of the label (the text and both margins). Then the display will show the current label length setting (ON or OFF).
2 While still holding down c, continue pressing T until the desired label length set-
ting is displayed.
☞ The Length indicator comes on when ON is selected.
3 Release c. If ON was selected, the current label length setting is displayed.
4 Press h or e to select the desired length or use the number keys to enter a length.
☞ To change the units (inches or centimeters) used to display the label length, press
M until the desired units are displayed.
To change the length in 1” (1.0-cm) steps, hold down either h or e, and then
release the key when the desired setting is displayed.
5 Press r.
EXAMPLE
To select a label length of 5”:
While holding down c, press T once, and keep c held down.
1
2 While still holding down c, continue press-
ing
3 Release c.
LENGTH
5.3inch
T until ON is displayed.
LENGTH
OFF
37
Page 46

Press h until 5.0 inch is displayed.
5.0inch
LENGTH
OFF
AUTO CUT
4
5 Press r.
AUTO CUT FUNCTION
The Auto cut function allows you to set whether or not the machine will automatically cut
each label after it is printed. Turn on the Auto cut function before starting to print in order to
cut the labels automatically after printing them.
☞ After printing a label with the Auto cut function set to OFF, hold down c and press
_ once to feed the tape, then cut it.
☞ Please use scissors to cut off Fabric Tapes or Strong Adhesive Tapes.
To turn the Auto cut function on or off:
1 While holding down c, press Z once, and keep c held down to display the
current auto cut setting.
2 While still holding down c, continue pressing Z until the desired auto cut setting
is displayed.
3 Release c to apply the selected auto cut setting.
EXAMPLE
To turn the Auto cut function on:
While holding down c, press Z once,
1
and keep
38
c held down.
Page 47

2
1/ 1
COPIES
While still holding down c, continue pressing
Z until ON is displayed.
3 Release c.
AUTO CUT
ON
PRINT KEY
After you have entered your text and chosen the desired format settings, you are ready to print.
☞ If the Auto cut function is set to ON, the label will automatically be cut after it is
printed.
To print a label:
● Press p once. The message “COPIES” followed by the number of the label being
printed is displayed.
☞ If the selected character size is too large for the width of the installed tape cassette,
the message “CHR SIZE AUTO?” appears. To allow the text size to automatically be
adjusted, press p or r. To stop the text size from being changed, press *.
EXAMPLE
To print and cut a label:
● Press p once.
39
Page 48

FEED & CUT FUNCTION
The Feed & Cut function is used to feed out 1” (24 mm) of tape and automatically cut it off.
For example, after printing with the Auto cut function set to OFF or when printing has been
interrupted.
To feed and cut off 1” (24 mm) of tape:
● Hold down c and press _ once. 1” (24 mm) of tape is fed out and cut off.
☞ Please use scissors to cut off Fabric Tapes or Strong Adhesive Tapes.
NUMBERING FUNCTION
This function can be used to print many copies of the same text while increasing a certain
number in the text by 1 after each label is printed.
To use the Numbering function:
1 Press f, w, h or e to position the cursor below the number that you wish to
increase.
2 Hold down c and press O. The message “NUMBER UNTIL” appears in the display
with the current setting.
☞ To cancel the Numbering function at any time, hold down c and press O (or
press just * ).
3 Use the number keys to type in the last number to be printed.
☞ The last number to be printed can also be selected by pressing h or e.
A number lower than the one that was selected cannot be entered.
4 Press p (or r) to begin printing the labels. The number of each copy is displayed
while it is being printed.
☞ If the Tape margin function is set to any setting other than NONE, a cutting guide (:)
is printed between each label so the tape can be cut to the correct size.
40
Page 49

EXAMPLE
UNTIL
1
NUMBER
UNTIL
3
NUMBER
To print three labels with numbers 1, 2 and 3:
Position the cursor below “1”.
1
1:
STUDIO _
1
2 Hold down c and press O.
3 Press 3.
4 Press p (or r ).
COPIES
1/ 3
COPIES
3/ 3
COPIES
2/ 3
☞ If the Tape margin function is set to any setting other than NONE, a cut-
ting guide (:) is printed between each label so the tape can be cut to the
correct size.
✂
✂
41
Page 50

REPEAT PRINTING FUNCTION
1
COPIES
3
COPIES
This function allows you to print up to 9 copies of the same text.
To use the Repeat printing function:
1 Hold down c and press I. The message
default setting 1, which will need to be changed, as necessary.
☞ To cancel the Repeat printing function at any time, hold down c and press I
(or press just * ).
2 Press h or e until the desired number of copies is displayed, or use the number
keys to type in the number.
3 Press p (or r ) to begin printing the labels. The number of each copy is displayed,
while it is being printed.
☞ If the Tape margin function is set to any setting other than NONE, a cutting guide (:)
is printed between each label so the tape can be cut to the correct size.
EXAMPLE
To print three copies of a label:
Hold down c and press I.
1
“COPIES” appears in the display with the
2 Press 3.
42
Page 51

Press p (or r ).
3
COPIES
1/ 3
COPIES
3/ 3
COPIES
2/ 3
☞ If the Tape margin function is set to any setting other than NONE, a cut-
ting guide (:) is printed between each label so the tape can be cut to the
correct size.
✂
✂
MEMORY FUNCTIONS
You can use the Memory to store your most frequently used text files. The text remains in the
memory, along with its formatting, even after all characters are removed from the display
using the Clear function (holding down c and pressing * ).
When each file is stored, it is given a number to make recalling it easier. Up to 10 text files or
approximately 300 characters can be stored in the memory. (A single text file can have a maximum of 91 characters.)
Since a copy of the stored text file is recalled when the Recall function is used, the text can be
edited or printed without changing the originally stored file. When a file is no longer needed
or more space is necessary, the Memory delete function can be used to delete it.
☞ When inserting new batteries, be sure to insert the new ones within five minutes of
removing the old ones, otherwise any text files stored in the memory will be lost (unless
the machine is plugged into an electrical outlet with the AC adaptor).
STORING TEXT
To store a text file:
1 Hold down c and press 7. The message “STORE” appears on the display with the
currently selected file number.
43
Page 52

☞ To quit the Store function without storing the text, hold down c and press 7
(or press just * ).
2 Press a number key (or press h or e) to select the file number where you wish to
store the text.
3 Press r. The text is stored under the selected file number and the text previously
shown in the display reappears.
☞ If a file is already stored under the selected file number, the message “OVER-
WRITE?” appears in the display and you must decide whether or not to overwrite it
(delete it from the memory and store the new one).
If the maximum number of characters has already been stored, the error message
“MEMORY FULL!” appears in the display. If this occurs, an existing text file must be
deleted before the new one can be stored.
To overwrite the stored file with the new one:
● Press r to delete the previously stored file and store the new one under the selected
number.
☞ To go back and choose another file number without overwriting the text file, press
*, and then select a different file number.
RECALLING TEXT
To recall a text file:
1 Hold down c and press 8. The message “RECALL” appears on the display with
the file number and beginning of the most recently stored or recalled text.
☞ To quit the Recall function without recalling text, hold down c and press 8
(or press just * ).
2 Press a number key (or press h or e) to select the file number containing the text
that you wish to recall. The text stored under the selected file number is shown.
☞ To see other parts of the selected text file, press f or w.
To display the text stored under other file numbers, press h or e, or the key of
a different file number.
3 Press r. Any text previously entered in the display is erased and the text stored under
the selected file number is recalled into the display.
DELETING A FILE
To delete a text file:
1 Hold down c and press 9. The message “CLEAR” appears on the display with the
file number and beginning of the most recently stored or recalled text.
44
Page 53

☞ To cancel the Memory delete function without deleting the text file, hold down
STORE
[1]
STORE
[4]
1:
J. Smith_
c and press 9 (or press just * ).
2 Press a number key (or press h or e) to select the file number containing the text
that you wish to delete. The text stored under the selected file number is shown.
☞ To see other parts of the selected text file, press f or w.
To display the text stored under other file numbers, press h or e, or the key of
a different file number.
3 Press r. The message “OK TO CLEAR?” appears.
☞ To go back and select a different text file, press *.
4 Press r to delete the text file that was selected.
EXAMPLE
To store text under file number 4:
1 Hold down c and press 7.
2 Press 4.
3 Press r.
45
Page 54

To recall the text from file number 1:
RECALL
[4]J. Smit
RECALL
[1]Bill Re
1:
_ill Reyn
B
CLEAR
[1]Bill Re
CLEAR
[4]J. Smit
OK TO
CLEAR?
1:
_ill Reyn
B
1
Hold down c and press 8.
2 Press 1.
3 Press r.
To delete the text stored under file number 4:
1
Hold down c and press 9.
2 Press 4.
3 Press r.
4 Press r.
46
Page 55

TROUBLESHOOTING
Problem Remedy
1. The display stays blank after you have
turned on the machine.
2. The machine does not print or the
printed characters are blurred.
3. The text files that you stored in the memory are no longer there.
4. The printed characters are not formed
properly.
5. A blank horizontal line appears through
the printed label.
6. Striped tape appears. • You have reached the end of the tape.
7. The machine has “locked up” (i.e., nothing happens when a key is pressed).
• Check that the AC adaptor is connected
correctly.
• If you are using alkaline batteries, check
that they are correctly inserted.
• If the batteries are low, replace them
with new ones.
• Check that the tape cassette has been
inserted properly.
• If the tape cassette is empty, replace it
with a new one.
• Make sure that the tape compartment
cover has been closed.
• If the batteries are low, replace them
with new ones.
• If you are using alkaline batteries, they
may be low. Try using the AC adaptor or
replace the batteries with new ones.
• Clean the print head as explained on
page 7.
Replace the tape cassette with a new
one.
• Turn off the machine, and then while
holding down c and R, turn the
machine back on.
The text and formats in the display and
all text files stored in the memory are
erased.
47
Page 56

ERROR MESSAGE LIST
Error Message Cause Remedy
5 LINE
LIMIT!
BATTERIES
WEAK!
BUFFER
EMPTY!
BUFFER
FULL!
CAN’T
HERE!
CASSETTE
CHANGED!
CHANGE
ADAPTOR!
CUTTER
ERROR!
This message appears if five lines
already exist when you press r.
This message appears when the
installed alkaline batteries become
weak.
• This message appears if you hold
down c and press T, but
no text has been entered in the display.
• This message appears if you try to
print, but no text has been entered
in the display.
This message appears if you try to
enter a character, symbol, return or
space after the maximum number of
characters has already been entered.
This message appears if the cursor is
at the end of the text when you hold
down c and press O.
This message appears if the tape cassette is changed while the P-touch is
receiving data from the computer.
This message appears if a high-voltage adaptor is being used.
This message appears if the tape cutter is closed when you try to print or
feed the tape.
Limit the number of lines to five.
Replace the batteries or use the
AC adaptor.
• Enter some text before starting
this function.
• Enter text before printing.
Delete some existing text so that
more text can be entered.
Move the cursor below a
number before holding down
c and pressing O.
Cancel the print job, install the
correct tape cassette, and then
try printing again.
Remove the high-voltage adaptor and connect the adaptor
designed exclusively for this
machine.
Turn the P-touch off, then on
again.
48
Page 57

Error Message Cause Remedy
EEPROM
ERROR!
INTERFACE
ERROR!
INVAL.
CHRS!
LENGTH
LIMIT!
LINE
LIMIT!
MEMORY
FULL!
NO
FILES!
NO
TAPE!
This message appears if a checksum
error occurred when the P-touch was
turned on or if the keyword was damaged and it failed to initialize.
This message appears if an error
occurs while data is being sent from
the computer to the P-touch.
This message appears if the cursor is
not below a number when you hold
down c and press O.
• This message appears if the text is
longer than 3’ 3 1/3” (1 meter) when
you try to print.
• This message appears if the Length
function is used to set a label
length that is less than 1.6” (4.0
cm) or more than 11.8” (30.0 cm).
• This message appears if the Tab
Length function is used to set a tab
length that is more than 11.8”
(30.0 cm).
This message appears if the number
of lines in the text is greater than the
maximum number of lines possible
for the installed tape.
This message appears if you try to
store a text file after the maximum
number of characters has already
been stored in the memory.
This message appears if you try to
recall or delete a text file from the
memory when none are stored.
This message appears if you try to print
a label or feed the tape when no tape
cassette is installed.
Contact your service representative.
Cancel the print job, and then
try printing again.
Move the cursor below a number before holding down
c and pressing O.
• Shorten the text to less than 3’
3 1/3” (1 meter) before trying
to print.
• Set the label length between
1.6” (4.0 cm) and 11.8” (30.0
cm).
• Set the tab length so that it is
less than 11.8” (30.0 cm).
Reduce the number of lines or
install a tape of greater width.
Delete an unwanted file to make
room for the new one.
Store a text file first.
Install a tape cassette and try
again.
49
Page 58

Error Message Cause Remedy
REPLACE
BATTERIES!
ROM
PROBLEM!
TAB
LIMIT!
TEXT
TOO HIGH!
TEXT
TOO LONG!
This message appears if the installed
alkaline batteries are about to run
out.
This message appears if there is a
problem with the machine’s read
only memory.
This message appears if the maximum
number of tabs has already been added
to the text when you hold down c
and press Q.
This message appears if the size of
the text is larger than the width of the
installed tape.
This message appears if the length of
the text is longer than the label length
that has been set using the Length
function.
Replace the batteries or use the
AC adaptor.
Turn off the machine, and then
while holding down c and
R, turn the machine back on.
Contact your service representative.
Limit the number of tabs in the
text to 50.
Reduce the size of the characters
or install a wider tape.
Delete some of the text, reduce
the character width or increase
the set label length.
SHOULD YOU ENCOUNTER ANY PROBLEMS WITH YOUR PRODUCT,
PLEASE DO NOT RETURN YOUR
PRODUCT TO THE STORE!
After referring to this User’s Guide, if you still need assistance, refer to the Brother Contact
information in this guide.
50
Page 59

SPECIFICATIONS
HARDWARE
Input Device: Keyboard - 51 keys
LCD: 10 characters × 2 lines
20 indicators (including Alt and Caps)
Print Tape: Pressure-sensitive, Adhesive-based
26’ 3” (8 m) long
Four widths available:
1/4” (6 mm)
3/8” (9 mm)
1/2” (12 mm)
3/4” (18 mm)
Power Supply: Six AA alkaline batteries (AM3, LR6) or AC adaptor
(model AD-60)
Print Head: 112 dot / 180 dpi
Dimensions: 7.1” (W) × 9.2” (D) × 2.4” (H)
(181.4 × 232.5 × 61.4 mm)
Weight: 1.68 lbs (760 g) (without a tape cassette and batteries installed)
SOFTWARE
Buffer Size: Maximum 99 characters
Maximum five lines
Memory Size: Approx. 300 characters
Character Size: Seven sizes (6, 9, 12, 18, 24, 36 and 42 points) + 52 point (one line of
capital letters only on 3/4" (18-mm) wide tape)
All are available in normal and wide widths
Availability depends on tape width.
Print Styles: Normal, Bold, Outline, Shadow
(each can be combined with Italic), and Vertical
IMPORTANT WARRANTY IMFORMATION
Thank you for purchasing this Brother product.
We hope that you will enjoy using it. We suggest you keep all packing and other materials.
Consult your product’s warranty for details.
51
Page 60

ACCESSORIES (For USA Only)
Supplies
Obtain tape cassettes from your nearest authorized dealer.
Use only Brother TZ tapes with this machine. Brother cannot be held responsible for trouble
caused by the use of unauthorized supplies. Do not use tapes that do not have the mark.
*all tapes are 26.2’ long unless otherwise noted
Stock No. Description
Extra Strength Adhesive Tapes:
Super Adhesive Strength: laminated tapes with twice the adhesive strength
Ideal for textured surfaces and harsh environmants
TZ-S111
TZ-S121
TZ-S131
TZ-S135
TZ-S141
TZ-S145
TZ-S211
TZ-S221
TZ-S231
TZ-S241
TZ-S611
TZ-S621
TZ-S631
TZ-S641
TZ-S941
Flexible ID Tapes:
Special Adhesive for Bending, Wrapping & Flagging
TZ-FX231
TZ-FX241
Tamper Evident Tapes:
Security Pattern Appears If Removed
TZ-SE4 Black characters on 3/4” (18 mm) security adhesive 1 $29.99
Fabric Iron-On Tapes:
TZ-FA3
Print Head Cleaning Cassette:
TZ-CL4 Print Head Cleaning Cassette approx. 100uses 1 $20.99
Standard Laminated Tapes:
Stock No. Description
3/4” (18-mm) wide laminated tapes
TZ-141 Black characters on clear adhesive 1 $18.99
TZ-145 White characters on clear adhesive 1 $20.99
TZ-241 Black characters on white adhesive 1 $20.99
52
1/4” (6 mm) strong adhesive black characters on clear adhesive
3/8” (9 mm) strong adhesive black characters on clear adhesive
1/2” (12 mm) strong adhesive black characters on clear adhesive
1/2” (12 mm) strong adhesive white characters on clear adhesive
3/4” (18 mm) strong adhesive black characters on clear adhesive
3/4” (18 mm) strong adhesive white characters on clear adhesive
1/4” (6 mm) strong adhesive black characters on white adhesive
3/8” (9 mm) strong adhesive black characters on white adhesive
1/2” (12 mm) strong adhesive black characters on white adhesive
3/4” (18 mm) strong adhesive black characters on white adhesive
1/4” (6 mm) strong adhesive black characters on yellow adhesive
3/8” (9 mm) strong adhesive black characters on yellow adhesive
1/2” (12 mm) strong adhesive black characters on yellow adhesive
3/4” (18 mm) strong adhesive black characters on yellow adhesive
3/4” (18 mm) strong adhesive black characters on silver (matte) adhesive
1/2” (12 mm) flexible ID tape (black characters on white adhesive)
3/4” (18 mm) flexible ID tape (black characters on white adhesive)
Blue characters on 1/2” (12 mm) white fabric adhesive 9.8’ tape length
QTY/PACKAGE
1 $15.99
1 $17.99
1 $18.99
1 $18.99
1 $21.99
1 $21.99
1 $15.99
1 $17.99
1 $18.99
1 $21.99
1 $15.99
1 $17.99
1 $18.99
1 $21.99
1 $25.99
1 $18.99
1 $21.99
1 $24.99
QTY/PACKAGE
PRICE**
PRICE**
Page 61

Stock No. Description
QTY/PACKAGE
PRICE**
TZ-242 Red characters on white adhesive 1 $20.99
TZ-243 Blue characters on white adhesive 1 $20.99
TZ-344 Gold characters on black adhesive 1 $23.99
TZ-345 White characters on black adhesive 1 $23.99
TZ-441 Black characters on red adhesive 1 $20.99
TZ-541 Black characters on blue adhesive 1 $20.99
TZ-545 White characters on blue adhesive 1 $23.99
TZ-641 Black characters on yellow adhesive 1 $20.99
TZ-741 Black characters on green adhesive 1 $20.99
TZ-B41
Black characters on fluorescent orange adhesive 16.4’ tape length
1 $24.99
TZ-M41 Black characters on clear (matte) adhesive 1 $20.99
TZ-WB41 Black characters on Bugs Bunny adhesive 1 $23.99
TZ-WT41 Black characters on Taz adhesive 1 $23.99
TZ-WS41 Black characters on Tweety & Sylvester adhesive 1 $23.99
1/2” (12-mm) wide laminated tapes
TZ-131 Black characters on clear adhesive 1 $16.99
TZ-135 White characters on clear adhesive 1 $17.99
TZ-231 Black characters on white adhesive 1 $17.99
TZ-232 Red characters on white adhesive 1 $17.99
TZ-334 Gold characters on black adhesive 1 $20.99
TZ-335 White characters on black adhesive 1 $20.99
TZ-631 Black characters on yellow adhesive 1 $17.99
3/8” (9-mm) wide laminated tapes
TZ-121 Black characters on clear adhesive 1 $14.99
TZ-221 Black characters on white adhesive 1 $16.99
TZ-325 White characters on black adhesive 1 $18.99
TZ-421 Black characters on red adhesive 1 $16.99
1/4” (6-mm) wide laminated tapes
TZ-111 Black characters on clear adhesive 1 $12.99
TZ-211 Black characters on white adhesive 1 $14.99
TZ-315 White characters on black adhesive 1 $17.99
Options
Stock No. Description
QTY/PACKAGE
PRICE**
AD-60 AC Adaptor 1 $24.99
6994 Protective carrying case 1 $29.99
● For purchasing accessories on the Internet, please visit our website:
http: //www.brothermall.com
** Prices and availability of accessories subject to change without notice.
53
Page 62

INDEX
A
AC adaptor............................................... 4
Accented characters............................... 21
Adding
spaces ................................................ 14
tabs .................................................... 16
Aligning ................................................. 34
Alt key ................................................... 12
Automatic formatting ............................. 24
Automatic tape-cutting........................... 38
B
Backspace key ....................................... 17
Batteries ................................................... 3
C
Capital letters ......................................... 13
Caps mode............................................. 13
Cleaning
machine ............................................... 3
print head............................................. 7
rollers................................................... 7
Clearing
text and formats.................................. 19
text only ............................................. 20
Code key................................................ 11
Confirming............................................. 15
Cursor keys ............................................ 10
D
Deleting
characters........................................... 17
text and formats.................................. 19
text lines............................................. 18
text only ............................................. 20
Deleting stored files ............................... 44
E
Entering
accented characters...................... 12, 21
capital letters...................................... 13
spaces ................................................ 14
symbols.................................. 12, 13, 22
tabs .................................................... 16
Error messages ....................................... 48
F
Fabric tape ............................................... 6
Feeding & cutting................................... 40
Fonts ...................................................... 26
Frames ................................................... 32
I
Incrementing.......................................... 40
K
Keyboard ................................................. 2
L
Label length ........................................... 36
Laminated tape ........................................ 6
M
Margins.................................................. 33
Memory ................................................. 43
Mirror printing ....................................... 35
Multiple copies ...................................... 42
N
New lines............................................... 14
Numbering function............................... 40
O
Overwriting stored files .......................... 44
54
Page 63

P
Power .................................................... 10
Preset formatting .................................... 24
Print head ................................................ 7
Printing .................................................. 39
R
Recalling stored files .............................. 44
Repeat printing function......................... 42
Return key.............................................. 14
S
Shift key ................................................. 13
Size........................................................ 28
Spaces.................................................... 14
Specifications......................................... 51
Storing files ............................................ 43
Style....................................................... 29
Symbols ................................................. 22
T
Tab length.............................................. 16
Tabs ....................................................... 15
Tape cassettes .......................................... 5
Tape length ............................................ 36
Text
alignment ........................................... 34
framing............................................... 32
margins .............................................. 33
size .................................................... 28
style ................................................... 29
underlining......................................... 31
width.................................................. 28
Text lines ............................................... 14
Troubleshooting ..................................... 47
U
Underlining............................................ 31
Uppercase letters ................................... 13
W
Width..................................................... 28
55
Page 64

PT-1950/1960 CONTACT INFORMATION (For USA Only)
Service Center Locations
If you need a local service center, please call 1-800-284-HELP (4357)
to locate the authorized service center closest to you.
Service centers do not provide operational assistance. See “Operational Assistance”.
Note: Be sure to call the Service Center before your visit.
Operational Assistance
For technical and operational assistance you may call Brother Customer Service at:
Voice 1-877-4-PTouch, or Fax 1-901-379-1210
Assistance on the Internet
For product information and downloading the latest drivers: http://www.brother.com
For purchasing accessories and certain Brother products: http://www.brothermall.com
Accessories and Supplies
To order Brother accessories or supplies by Visa, MasterCard, Discover or American Express,
you may call toll tree 1-888-879-3232, or complete the order form in your user’s guide and
For purchasing accessories on the Internet: http://www.brothermall.com
To order by mail or pay by check, please complete the accessory order form and mail it along
fax both sides of the form to 1-800-947-1445.
with payment to:
Brother International Corporation
Attn: Consumer Accessory Division
P.O. Box 341332
Bartlett, TN 38133-1332
Fax-Back System
Brother Customer Service has installed an easy-to-use Fax-Back System so you can get
instant answers to common technical questions and product information for all Brother products.
This system is available 24 hours a day, 7 days a week. You can use the system to send the
Please call 1-800-521-2846 and follow the voice prompts to receive faxed instructions on how
information to any fax machine, not just the one you are calling from.
to use the system and an index of Fax-Back subjects.
Save Time - Register On-Line!
Don't stand in line at the post office or worry about lost mail. Visit us on-line at
www.registermybrother.com
Your product will immediately be registered in our database and you can be on your way!
Also, while you're there, look for contests and other exciting information!
56
Page 65

P-TOUCH ACCESSORY ORDER FORM (For USA Only)
Dear Customer:
This order form is provided for your convenience should your retailer not stock the item(s)
needed. To order by mail, send this completed form along with proper payment to the address
below OR credit card holders: call toll-free 1-888-879-3232, fax completed order form to
1-800-947-1445, or visit our web site at http://www
Accessories listing in your User’s Guide for stock no. and price.
Stock # Description Quantity Price
.brothermall.com. Please refer to the
To complete the Order Form:
1. Select the desired items. (See ACCESSORIES.)
2. Complete the form above, indicating the
quantity of each item.
3. Total the columns and enter the total on the
“Supply/Accessory Subtotal” line.
4. Add the appropriate Sales Tax and Shipping/
Handling Charge.
5. Clearly print your name and address in the
space below.
6. Place your order
a. Call toll free anytime 1-888-879-3232
b. Order on line at www.brothermall.com
c. Fax completed form to 1-800-947-1445
d. Mail completed form along with proper
payment to
BROTHER INTERNATIONAL CORP.
Attn: Consumer Accessory Div.
P.O.Box 341332
Bartlett, TN 38184-1332
Name: ( ) Visa ( ) Master Card ( ) Discover
Address: ( ) Check/Money Order ( ) American Express
City:
State: Account Number
Zip: Expiration Date
Daytime Phone #: Signature
Daytime Fax #:
Email:
Your Model Number:
✂
Prices subject to change without notice.All prices quoted in US Dollars.
Supply / Accessory Subtotal: $
AZ, CA, CO, CT, FL, GA, IL, LA,
MA, MD,MI, MN, MO, NC, NJ, NV,
NY, OH, PA, TN, TX, VA, WA, WI
residents add applicable sales tax:
Shipping and Handling Options $
Please choose one:
•Standard Freight:
•Continental U.S. ($5.75)
Alaska and Hawaii ($8.75)
GU, PR, VI ($15.75)
•2nd Day Air Freight
(Continental U.S. only): $8.75
•Overnight Delivery
(Continental U.S. only): $14.75
TOTAL DUE $
No C.O.D. orders
Method of Payment (check one)
Billing Address (if different from shipping address at left)
$
Page 66

P-TOUCH ACCESSORY ORDER FORM (For USA Only)
✂
Dear Customer:
This order form is provided for your convenience should your retailer not stock the item(s)
needed. To order by mail, send this completed form along with proper payment to the address
below OR credit card holders: call toll-free 1-888-879-3232, fax completed order form to
1-800-947-1445, or visit our web site at http://www
Accessories listing in your User’s Guide for stock no. and price.
Stock # Description Quantity Price
.brothermall.com. Please refer to the
To complete the Order Form:
1. Select the desired items. (See ACCESSORIES.)
2. Complete the form above, indicating the
quantity of each item.
3. Total the columns and enter the total on the
“Supply/Accessory Subtotal” line.
4. Add the appropriate Sales Tax and Shipping/
Handling Charge.
5. Clearly print your name and address in the
space below.
6. Place your order
a. Call toll free anytime 1-888-879-3232
b. Order on line at www.brothermall.com
c. Fax completed form to 1-800-947-1445
d. Mail completed form along with proper
payment to
BROTHER INTERNATIONAL CORP.
Attn: Consumer Accessory Div.
P.O.Box 341332
Bartlett, TN 38184-1332
Name: ( ) Visa ( ) Master Card ( ) Discover
Address: ( ) Check/Money Order ( ) American Express
City:
State: Account Number
Zip: Expiration Date
Daytime Phone #: Signature
Daytime Fax #:
Email:
Your Model Number:
Prices subject to change without notice.All prices quoted in US Dollars.
Supply / Accessory Subtotal: $
AZ, CA, CO, CT, FL, GA, IL, LA,
MA, MD,MI, MN, MO, NC, NJ, NV,
NY, OH, PA, TN, TX, VA, WA, WI
residents add applicable sales tax: $
Shipping and Handling Options $
Please choose one:
•Standard Freight:
•Continental U.S. ($5.75)
Alaska and Hawaii ($8.75)
GU, PR, VI ($15.75)
•2nd Day Air Freight
(Continental U.S. only): $8.75
•Overnight Delivery
(Continental U.S. only): $14.75
TOTAL DUE $
No C.O.D. orders
Method of Payment (check one)
Billing Address (if different from shipping address at left)
Page 67

GUÍA DE
USUARIO
Page 68

INTRODUCCIÓN
Gracias por adquirir el P-touch 1950/1960!
El nuevo P-touch le permitirá diseñar y crear etiquetas para cualquier tipo de aplicación.
Su versatilidad le permitirá crear etiquetas personales seleccionando distintos diseños de
marcos, muchos tamaños y estilos de caracteres. Además, los cinco diferentes anchos de
cinta (1/4 ″ (6 mm), 3/8 ″ (9 mm), 1/2 ″ (12 mm) y 3/4 ″ (18 mm) y la variedad de los colores
de la cintas le hará posible imprimir etiquetas personales.
Ya no hay por qué preocuparse por tareas urgentes que requieren impresión profesional. En la
oficina, fábrica, laboratorio, o en casa, la calidad y el rendimiento del P-touch 1950/1960 la
convierten en una máquina muy práctica.
Para terminar, puesto que esta guía de usuario le será de gran utilidad, le aconsejamos que la
guarde en un lugar accesible para poder consultar en cualquier momento.
Federal Communications Commission (FCC) Declaration of Conformity (For USA Only)
Responsible Party : Brother International Corporation
declares that the product
Product Name : Sistema de etiquetado electronico P-touch de Brother
Model Number : PT-1950/1960
complies with Part 15 of the FCC Rules. Operation is subject to the following two conditions: (1) this device may not
cause harmful interference, and (2) this device must accept any interference received,including interference that may
cause undesired operation.
This equipment has been tested and found to comply with the limits for a Class B digital device, pursuant to
Part 15 of the FCC Rules. These limits are designed to provide reasonable protection against harmful interference in a residential installation. This equipment generates, uses, and can radiate radio frequency energy and,
if not installed and used in accordance with the instructions, may cause harmful interference to radio communications. However, there is no guarantee that interference will not occur in a particular installation. If this
equipment does cause harmful interference to radio or television reception, which can be determined by turning the equipment off and on, the user is encouraged to try to correct the interference by one or more of the following measures:
- Reorient or relocate the receiving antenna
- Increase the separation between the equipment and receiver.
- Connect the equipment into an outlet on a circuit different from that to which the receiver is connected.
- Consult the dealer or an experienced radio/TV technician for help.
- The enclosed interface cable should be used in order to ensure compliance with the limits for a Class B digital
device.
- Changes or modifications not expressly approved by Brother Industries, Ltd. could void the user’s authority
to operate the equipment.
Patent numbers and patent publication numbers which are related to this product are as below:
USP4839742 USP4976558 USP5009530 USP5120147
USP4927278 USP4983058 USP5069557
100 Somerset Corporate Boulevard
Bridgewater, NJ 08807-0911 USA
TEL : (908) 704-1700
IBM es una marca commercial de International Business Machines, Inc.
Microsoft y Windows son marcas comerciales registradas de Microsoft Corporation, EE.UU.
Los nombres de otros software o productos utilizados en este documento son marcas comerciales
o marcas comerciales registradas de las compañías respectivas que los han desarrollado.
Page 69

ÍNDICE
CUIDADOS Y PRECAUCIONES GENERALES...................................................... 1
PILAS...................................................................................................................2
ADAPTADOR DE CA (ca)....................................................................................3
CARTUCHOS DE CINTA.....................................................................................4
COLOCACIÓN DE ETIQUETAS ..........................................................................5
CABEZA DE IMPRESIÓN Y RODILLOS ...............................................................6
UTILIZACIÓN CON COMPUTADORA............................................................... 7
TECLA DE CURSOR ............................................................................................9
TECLAS CODE, ALT Y SHIFT.............................................................................10
TECLA DE RETORNO........................................................................................11
TABULACIÓN................................................................................................... 12
TECLA DE BORRADO (DEL) .............................................................................13
FUNCIÓN DE BORRADO DE LÍNEA (LINE OUT).............................................14
FUNCIÓN DE REPOSICIÓN (CLEAR)................................................................ 14
FUNCIÓN DE ACENTOS ..................................................................................15
FUNCIÓN DE SÍMBOLOS.................................................................................16
FUNCIÓN DE FORMATO AUTOMÁTICO........................................................17
FUNCIÓN DE TIPO DE CARACTERES ..............................................................18
FUNCIONES DE TAMAÑO Y DE ANCHO........................................................ 18
FUNCIÓN DE ESTILO.......................................................................................20
FUNCIÓN DE SUBRAYADO.............................................................................20
FUNCIÓN DE MARCOS ...................................................................................21
FUNCIÓN DE CINTA........................................................................................ 22
FUNCIÓN DE LA ALINEACIÓN HORIZONTAL................................................22
FUNCIÓN DE IMPRESIÓN EN MODO ESPEJO.................................................23
FUNCIÓN DE LONGITUD ...............................................................................24
FUNCIÓN DE CORTE AUTOMÁTICO.............................................................. 25
TECLA DE IMPRESIÓN...................................................................................... 25
FUNCIÓN DE AVANCE Y CORTE.....................................................................25
FUNCIÓN DE NUMERACIÓN..........................................................................26
FUNCIÓN DE IMPRESIÓN REPETIDA...............................................................26
FUNCIONES DE LA MEMORIA......................................................................... 27
SOLUCIÓN DE PROBLEMAS............................................................................29
LISTA DE MENSAJES DE ERROR .......................................................................30
i
Page 70

ESPECIFICACIONES ..........................................................................................33
ACCESORIOS (Sólo para EE.UU.)......................................................................34
ÍNDICE ALFABÉTICO........................................................................................37
INFORMACIÓN PARA CONTACTAR CON PT-1950/1960 (Sólo para EE.UU.)
...40
ii
Page 71

CUIDADOS Y PRECAUCIONES GENERALES
Para evitar daños, no toque el borde de la cuchilla.
●
●
Con esta máquina emplee sólo cintas Brother TZ para evitar daños. No emplee cintas que
no tengan la marca . Brother no se hará responsable de problemas o daños
ocasionados por el uso de suministros no autorizados.
●
No tire de la cinta que se alimenta desde la P-touch. Podría dañar el cartucho de cinta.
●
No utilice la máquina en lugares polvorientos, y manténgala alejada de la luz solar
directa y la lluvia.
●
No exponga la máquina a altas temperaturas ni humedad. No la deje nunca en el tablero
de instrumentos ni en la parte trasera de su automóvil.
No deje nada que sea de goma o vinyl encima de la máquina durante períodos
●
prolongados. Podría producir manchas.
●
No limpie la máquina con alcohol ni con otros solventes orgánicos. Emplee solamente un
paño suave y seco.
●
No ponga ningún objeto encima ni dentro de la máquina.
●
Utilice sólo el adaptador de CA (ca) (modelo AD-60) exclusivamente diseñado para esta
máquina. El empleo de otro cancelaría la garantía.
●
No intente desmontar el adaptador de CA (ca).
●
Cuando el equipo no se utilice durante períodos prolongados de tiempo y no sea
necesario conservar los archivos de texto en la memoria, desenchufe el adaptador de CA
(ca), y saque las pilas para evitar fugas de las mismas que podrían ser causa de daños en
la máquina.
Cuando el adaptador de CA (ca) esté enchufado en el equipo, si se desenchufa el
●
adaptador de la toma de CA (ca) se correrá el riesgo de perder todos los archivos de texto
de la memoria, aunque las pilas estén insertadas.
●
Este equipo utiliza, utilice seis pilas alcalinas o de manganeso de tamaño AA.
●
Si las pilas no estan instaladas con sus polos positivo y negativo orientados en la
dirección correcta, podran producirse fugas en ellas, recalentarse o reventar, o la cabeza
de impresion podrá recalentarse.
1
Page 72

1
2
3
4
PILAS
Esta máquina portátil puede utilizarse en cualquier lugar instalando seis (6) pilas alcalinas AA
Cuando cambie las pilas, reemplace siempre las seis pilas al mismo tiempo.
Para cambiar las pilas:
Extraiga la cubierta del compartimiento de las pilas de la parte posterior de la máquina.
Si ya hay pilas instaladas, extráigalas.
Inserte seis pilas alcalinas AA nuevas, asegurándose de que sus polos queden orientados
en la dirección correcta.
Coloque la cubierta del compartimiento de las pilas.
☞
Asegúrese de insertar las pilas nuevas antes de que transcurran cinco minutos
desde que se extraen las pilas gastadas, porque de lo contrario el texto que se
visualiza en la pantalla y los archivos de texto almacenados en la memoria se
perderían (a menos que la máquina esté enchufada a una toma de CA (ca) con el
adaptador de CA (ca)).
Si las pilas no están instaladas con sus polos positivo y negativo orientados en la
dirección correcta, podrán producirse fugas en ellas, recalentarse o reventar, o la
cabeza de impresión podrá recalentarse.
.
2
Page 73

1
2
ADAPTADOR DE CA (ca)
El adaptador de CA (ca) (modelo AD-60) le permite emplear esta máquina siempre que
disponga de una toma de corriente eléctrica.
Para conectar el adaptador de CA (ca):
Inserte el conector del adaptador que tiene la marca DC IN 9,5V al lado derecho de la
máquina.
Inserte la clavija del adaptador de CA (ca) en la toma de corriente más cercana.
☞
Emplee sólo el adaptador de CA (ca) diseñado exclusivamente para esta máquina.
Extraiga las pilas y desconecte el adaptador de CA (ca) si no se propone utilizar el
equipo durante períodos de tiempo prolongados. Cuando se desconecta la
alimentación, se pierden el texto que se muestra en la pantalla y el que está
almacenado en la memoria.
Cuando el adaptador de CA (ca) esté enchufado en la máquina, si se desenchufa el
adaptador de la toma de CA (ca) se correrá el riesgo de perder todos los archivos de
texto de la memoria, aunque las pilas estén insertadas.
3
Page 74

1
2
3
4
5
6
CARTUCHOS DE CINTA
Sin embargo, para esta máquina hay disponible una amplia gama de cintas TZ de distintos
colores y tamaños. Es posible crear etiquetas diferentes codificadas por colores o tamaños.
Además, este equipo ha sido diseñado para permitirle cambiar los cartuchos de cinta rápida y
fácilmente.
Para cambiar el cartucho de cinta:
Levante la cubierta del compartimiento de la cinta para abrirla. Se libera también
entonces el cartucho instalado.
Si ya hay un cartucho instalado, extráigalo tirando del mismo recto hacia arriba.
Si la cinta entintada del cartucho que quiere instalar está floja, bobine la rueda dentada
en el sentido de la flecha indicada en el cartucho utilizando su dedo hasta tensar la cinta.
Además, cerciórese de que el extremo de la cinta esté debajo de las guías de la misma.
☞
Si está utilizando un cartucho de cinta nuevo provisto de retén, cerciórese de
extraer éste.
Inserte firmemente el cartucho de cinta en el compartimiento de la cinta asegurándose de
que toda la parte posterior del cartucho está en contacto con la inferior del
compartimiento.
☞
Cuando inserte el cartucho de cinta, asegúrese de que la cinta interior no esté
enganchada en la esquina de la guía metálica.
Cierre la cubierta del compartimiento y conecte la alimentación de la máquina si estaba
desconectada.
Mantenga pulsada
con la tensión óptima.
c
y presione
_
una vez para que la cinta avance y así quede
☞
Esta máquina no es compatible con cintas de sellos (SK-MB/SH-MB).
4
Page 75

1
ABCDEF
2
3
COLOCACIÓN DE ETIQUETAS
CINTA LAMINADA
Cuando abra la tapa del compartimiento de la cinta de la máquina, encontrará una varilla con
letras en la esquina superior derecha. Esta varilla le permite quitar fácilmente el papel del
dorso de las etiquetas impresas en cintas laminadas, como se muestra abajo.
Tome la cinta con la mano izquierda, con la superficie impresa arriba, y tome la varilla
con la mano derecha.
Pase la mitad de la cinta por el orificio estrecho largo de la varilla.
Gire tres cuartos de vuelta la varilla hacia usted y separe la varilla de usted como se
muestra abajo.
Quite el papel del dorso de la etiqueta.
GH
ABCDEF
Algunas cintas pueden plegarse por la mitad con lo que los bordes interiores de las dos piezas
de papel del dorso se separan de la etiqueta, pudiéndolas sacar con facilidad.
4
CINTAS DE TELA
La cinta de tela se emplea para adherir un trozo de tela impresa con el texto en la prendar de
vestir empleando una plancha. Después de imprimir el texto en la cinta de tela y de haber
cortado la etiqueta empleando unas tijeras
en la posición el la que desee ponerla de modo que el texto impreso pueda leerse
correctamente. Cubra la etiqueta con otra tela y emplee un ajuste de la plancha de
temperatura medio-alta (320 a 356˚F (160 a 180 ˚C)) para presionar con firmeza durante 15 a
30 segundos. Para más detalles, consulte las instrucciones suministradas con el cartucho de
cinta de tela.
, coloque la etiqueta sobre una prenda planchada
5
Page 76

CABEZA DE IMPRESIÓN Y RODILLOS
Cabeza de impresión
De vez en cuando, el polvo se adhieren a la cabeza de impresión y a los rodillos del el
equipo. Suele suceder cuando se emplea la unidad en exteriores o en lugares con mucho
polvo. Si alguna parte de la cabeza térmica de impresión está cubierta de polvo, es posible
que aparezca una franja horizontal negra por el texto de la etiqueta.
Por lo tanto, al igual que con las grabadoras de cintas, la cabeza del equipo deberá limpiarse
de vez en cuando.
Para limpiar la cabeza de impresión y los rodillos:
1 Abra la cubierta del compartimiento de la cinta, extraiga el cartucho, si está dentro.
Extraiga las pilas y desconecte el adaptador de CA (ca).
2 Abra la cubierta del compartimiento de la cinta, extraiga el cartucho, si está dentro. La
cabeza de impresión y los rodillos están situados dentro del compartimiento de la cinta.
3 Cabeza de impresión: Emplee un palillo con punta de algodón seco para frotar con
cuidado la cabeza de impresión con movimiento hacia arriba y abajo.
Rodillos: Emplee un palillo con punta de algodón seco para frotar cada rodillo con
movimiento hacia arriba y abajo mientras los gira con el dedo.
4 Instale un cartucho de cinta, cierre la cubierta del compartimiento de la cinta, y después
pruebe de nuevo la impresión.
5 Si todavía aparece una franja blanco en la etiqueta, repita los pasos 3 y 4.
Si no funciona nada de lo de arriba, póngase en contacto con el representante de servicio.
Cabeza de impresión
Cabeza de impresión
☞ La cabeza de impresión se podrá limpiar más fácilmente empleando el cartucho de
limpieza de la cabezas de impresión opcional (TZ-CL4).
6
Palillo de cabeza
de algodón
Rodillos
Page 77

UTILIZACIÓN CON COMPUTADORA
Instalando el P-touch Editor, Quick Editor y controlador de impresora, podrá imprimir
etiquetas fácilmente desde su computadora. En el software hay disponibles varias plantillas de
formato automático para que pueda crear etiquetas fácilmente.
Qué necesitará:
■ CD-ROM
El CD-ROM contiene
software, etc., para instalar
en computadora.
Procedimiento:
NOTA:
• No conecte el cable de interface USB a computadora hasta después de haber instalado
el software.
• Asegúrese de consultar la “Guía de instalación del software” para instalar el software
debidamente.
1 Encienda la computadora, y después inserte el CD-ROM en la unidad
de CD-ROM.
2 Instale el software siguiendo las instrucciones que aparecen en la
pantalla de la computadora. Consulte la “Guía de instalación del
software” para ver detalles.
■ Guía de instalación del
software
Guárdela para futuras
referencias.
■ Cable de interface USB
(no incluido)
Asegúrese de que su cable
USB sea de buena calidad.
3 Cuando estén instalados el P-touch Editor y el P-touch Quick Editor,
conecte la P-touch a su computadora utilizando el cable USB y
después encienda la P-touch.
4 El controlador de impresora se instalará automáticamente después de
que haya conectado la P-touch a su computadora.
7
Page 78

Notas sobre la utilización con computadora
● Cuando esté conectada a computadora, la máquina se apagará automáticamente si no se
realiza ninguna operación durante 60 minutos.
● La longitud de la etiqueta puede ajustarse hasta 12,2” (310 mm) de largo.
Acerca del modo de impresión CHAIN:
Cuando desee imprimir etiquetas continuamente, podrá reducir el tamaño de los márgenes
entre ellas seleccionando la opción “Chain Printing” en la computadora. La función de corte
automático se desactivará en el modo de impresión en cadena, por lo que necesitará pulsar
c + _ cuando quiera cortar la cinta al final.
☞ Para cortar cintas de tela o cintas de adhesivo fuerte utilice unas tijeras.
Requisitos del sistema:
Compruebe que la configuración de su sistema cumple los siguientes requisitos.
● Sistema operativo: Preinstalado con Microsoft
XP Pro o XP Home
● Memoria: 64 MB o más
● Espacio libre en disco duro: 50 MB o más
● Interface: USB 1.1 o especificación posterior
● Pantalla: 800 × 600 puntos (SVGA / Mayor resolución o tarjeta de gráficos con mayor
resolución)
● Otros: Unidad de CD-ROM para la instalación
®
Windows® 98, 98SE, Me, 2000 Pro,
8
Page 79

TECLA DE CURSOR
La pantalla de LCD de esta máquina muestra dos líneas de 9 caracteres; sin embargo, el texto
que usted diseñe puede tener hasta 99 caracteres de longitud. Podrá revisar y editar diferentes
partes de la izquierda moviendo el cursor hacia atrás y hacia adelante.
TECLA DE CURSOR IZQUIERDA
Para mover el cursor un carácter hacia la izquierda:
● Presione f una vez.
☞ Si se presiona esta tecla cuando el cursor esté al comienzo de una línea que sigue a
otra línea, el cursor se moverá hasta el final de la línea anterior.
Para mover el cursor varios caracteres hacia la izquierda:
● Mantenga presionado f hasta que el cursor se mueva a la posición deseada.
Para mover el cursor al principio de la línea actual:
● Mantenga presionado c y presione f.
TECLA DE CURSOR DERECHA
Para mover el cursor un carácter hacia la derecha:
● Presione w una vez.
☞ Si se presiona esta tecla cuando el cursor esté al final de una línea a la que sigue
otra línea, el cursor se moverá hasta el principio de la línea siguiente.
Para mover el cursor varios caracteres hacia la derecha:
● Mantenga presionado w hasta que el cursor se mueva a la posición deseada.
Para mover el cursor al final de la línea actual:
● Mantenga presionado c y presione w.
TECLA DE CURSOR HACIA ARRIBA
Para mover el cursor a la línea anterior:
● Presione h una vez.
☞ Si el cursor está en la primera línea del texto, se moverá al principio de la línea.
Para mover el cursor varias líneas hacia arriba:
● Mantenga presionado
Para mover el cursor al principio de todo el texto:
● Mantenga presionado c y presione h.
TECLA DE CURSOR HACIA ABAJO
Para mover el cursor a la línea siguiente:
● Presione e una vez.
☞ Si el cursor está en la última línea del texto, se moverá al final de la línea.
h
hasta que el cursor se mueva a la línea deseada.
9
Page 80

Para mover el cursor varias líneas hacia abajo:
● Mantenga presionado
Para mover el cursor al final de todo el texto:
● Mantenga presionado c y presione e.
e
hasta que el cursor se mueva a la línea deseada.
TECLAS CODE, ALT Y SHIFT
La mayoría de los caracteres pueden introducirse simplemente presionando sus teclas. Sin
embargo, para emplear funciones especiales o para introducir letras en mayúsculas,
caracteres acentuados y algunos símbolos, se requieren las siguientes teclas especiales.
TECLA CODE
Para emplear una función impresa encima de la tecla:
● Mantenga presionado c y presione la tecla que está inmediatamente debajo de la
función deseada.
TECLA ALT
Para escribir los caracteres impresos en color del lado derecho de las teclas:
● Mantenga presionado a y presione la tecla del carácter deseado escrita en color. El
indicador Alt, de la izquierda del visualizador, se encenderá mientras se tiene presionado
a.
TECLA SHIFT
Para escribir una letra mayúscula o un símbolo impreso en la esquina superior izquierda de
la tecla:
● Mantenga presionado s y presione la tecla de la letra o símbolo deseado.
El modo de Mayúsculas funciona de forma similar que manteniendo pulsada s. Le permite
teclear letras mayúsculas continuamente.
Para escribir muchas letras mayúsculas:
1 Mantenga presionado c y presione s. El indicador de Caps, de la izquierda del
visualizador, se encenderá.
2 Presione las teclas de las letras o símbolos.
3 Para salir del modo Caps, mantenga presionado c y presione s. Se apagará el
indicador de Caps.
10
Page 81

TECLA DE RETORNO
Al igual que en una máquina de escribir o procesador de texto, la tecla de Retorno ( r )
de esta máquina se emplea para poner fin a una línea de texto y empezar otra. Cuando haya
terminado de introducir una línea, presione la tecla de retorno para hacer una línea nueva y
mover al cursor a la misma.
☞ El texto solamente puede contener un máximo de cinco líneas. Si presiona r
cuando ya existan cinco líneas, aparecerá el mensaje de error “5 LINE LIMIT!”.
Anchos de cinta Número máximo de líneas que pueden imprimirse
1/4” (6 mm) 2
3/8” (9 mm) 2
1/2” (12 mm) 3
3/4” (18 mm) 5
La tecla de retorno también podrá utilizarse para seleccionar un objeto de una lista (p. ej.,
añadir un símbolo o un carácter acentuado al texto) o para aplicar un ajuste seleccionado.
Es posible que aparezcan en el visualizador de LCD algunas preguntas para que confirme un
comando, especialmente cuando la función que usted ha seleccionado es para borrar o
afectar archivos. En estos casos, si presiona r es como si respondiera “sí”.
☞ Para contestar “no”, presione *. Consulte la descripción de la TECLA DE BORRADO
(DEL) de la página 13.
11
Page 82

TABULACIÓN
Esta función le permitirá separar secciones de una línea de texto añadiendo tabulaciones.
Esto le permitirá crear columnas perfectamente alineadas sin tener que introducir varios
espacios. Todas las tabulaciones tendrán la misma longitud y se medirán desde el comienzo
de la línea, o de la tabulación anterior, si es que existe. La longitud de las tabulaciones podrá
ajustarse entre 0,0” y 11,8” (0,0 y 30,0 cm).
☞ El texto no podrá contener más de 50 tabulaciones. Si ya se ha añadido el número
máximo de tabulaciones al texto, cuando se mantenga presionada c y se presione
Q, aparecerá el mensaje de error “TAB LIMIT!”
Para ajustar la longitud de las tabulaciones:
1 Mantenga pulsada c y presione W una vez. Se visualizará la longitud de
tabulación actual.
2 Presione h o e hasta que se visualice la longitud deseada, o utilice las teclas
numéricas para introducir la longitud.
☞ Para cambiar las unidades (pulgadas o centímetros) utilizadas para la indicación de
la longitud de las tabulaciones, presione M hasta que se visualicen las unidades
deseadas.
3 Presione r.
Para añadir una tabulación:
● Mantenga pulsada c y presione una vezQ La marca de tabulación ( ) aparecerá
en el texto para indicar la posición de la tabulación.
☞ Si el texto delante de una tabulación sobrepasa el punto en el que tiene que
comenzar la sección siguiente de texto, tal texto comenzará en la siguiente
posición de tabulación.
Por ejemplo, si la longitud está ajustada a 1,2” (3,0 cm) y escribe el texto siguiente:
12
1:
ABC DEF GHI
2:
JKLMNOPQRST U
Page 83

Se imprimirá la etiqueta mostrada a continuación.
Margen
Tabulación
(1,2” (3,0 cm))
Tabulación
(1,2” (3,0 cm))
Margen
TECLA DE BORRADO (DEL)
La tecla de Borrado ( * ) le permite eliminar caracteres situados a la izquierda de la
posición actual del cursor. Se diferencia de la tecla del cursor izquierda ( f ) que sólo
mueve el cursor sin borrar ningún carácter.
La tecla de borrado también puede utilizarse para abandonar la mayor parte de funciones y
volver a la visualización anterior sin cambiar el texto.
Es posible que aparezcan en el visualizador de LCD algunas preguntas para que confirme un
comando, especialmente cuando la función que usted ha seleccionado es para borrar o
afectar archivos. En estos casos, si presiona * es como si respondiera “sí”.
☞ Para contestar “no”, presione r. Consulte la descripción de la TECLA DE
RETORNO de la página 11.
Para borrar un carácter:
1 Presione f, w, h o e para situar el cursor debajo del carácter que está
inmediatamente a la derecha del carácter que usted desea borrar.
2 Presione * una vez.
Para borrar una secuencia de caracteres:
1 Presione f, w, h o e para situar el cursor debajo del carácter que está
inmediatamente a la derecha del último carácter que usted desea borrar.
2 Mantenga presionado * hasta que se hayan borrado todos los caracteres que usted
deseaba borrar.
13
Page 84

FUNCIÓN DE BORRADO DE LÍNEA (LINE OUT)
Con la función de borrado de línea, podrá sacar con facilidad una línea entera de texto.
Para borrar una línea de texto:
1 Presione f, w, h o e para situar el cursor dentro de la línea del texto que
usted desee borrar.
2 Mantenga presionado c y presione 0 una vez.
☞ Cada vez que se presione 0 mientras se tiene presionado c, se borrará una
línea de texto.
FUNCIÓN DE REPOSICIÓN (CLEAR)
Si borra la visualización antes de introducir nuevo texto, la función de reposición podrá
utilizarse para elegir si se desea borrar todo el texto, y todas las funciones de formato (tipo de
caracteres, tamaño, ancho, estilo, subrayado, marco, margen de la cinta, alineación,
longitud de la tabulación, impresión en modo espejo y longitud) volverán a sus ajustes
iniciales, o borrar solamente texto.
Para borrar todo el texto y reponer todos los formatos a sus ajustes iniciales:
1 Mantenga presionado c y presione *.
2 Presione h o e hasta que se seleccione TXT&FORMAT (parpadeando).
☞ Para volver al texto sin borrar nada, presione *.
3 Presione r.
14
Page 85

FUNCIÓN DE ACENTOS
La función de Acentos también se puede utilizar para añadir caracteres acentuados a su texto.
Muchos de estos caracteres también se pueden escribir utilizando la función de Símbolos.
Los caracteres acentuados se agrupan de acuerdo con la letra mayúscula o minúscula con la
que se combinan. Hay disponibles los siguientes caracteres acentuados:
Letras Caracteres acentuados Letras Caracteres acentuados
a à á ä â ã æ I Í Ï Î
A À Á Ä Â Ã Æ n ñ
c ç N Ñ
C Ç o ó ö ô õ
e è é ë ê e˜ O Ó Ö Ô Õ
E È É Ë Ê Eu ù ú ü û
i í ï î U Ù Ú Ü Û
Para escribir un carácter acentuado:
1 Mantenga presionado c y presione A. Aparecerá el mensaje “ACCENT a - u / A -
U?” en el visualizador.
2 Presione la tecla de la letra acentuada deseada.
☞ Para escribir una letra mayúscula, mantenga pulsada s (o mantenga pulsada
c y presione s para pasar al modo de mayúsculas) antes de pulsar la tecla
de la letra.
3 Presione f o w hasta que aparezca el carácter acentuado deseado ampliado dentro
del recuadro en el centro del visualizador.
4 Presione r. El carácter acentuado será añadido al texto.
☞ Para escribir una secuencia de caracteres acentuados, mantenga presionada c
antes de pulsar r. Después continúe añadiendo caracteres acentuados
seleccionándolos como se ha explicado en los pasos
c y presionandor. Después de haber seleccionado el último carácter de la
serie, presione simplemente r.
˜
2
y 3, manteniendo pulsada
15
Page 86

FUNCIÓN DE SÍMBOLOS
☞
Además de letras, de los símbolos y los números de las teclas, hay 53 marcas adicionales con
la función de símbolos.
Los siguientes símbolos están disponibles:
Grupo Símbolos
☞
˜
E
23
R C
234
1 ÜÆæà ã e˜Õõ °
2+×÷= §
3
4
5
♥ ★
Para escribir un símbolo:
1 Mantenga presionado c y presione a. Aparecerá una fila símbolos en el
visualizador.
2 Presione h o e para visualizar diferentes filas de símbolos y presione f o w
hasta que aparezca el símbolo deseado ampliado en el recuadro en el centro del
visualizador.
3 Presione r. El símbolo será añadido al texto.
☞ Para escribir una secuencia de símbolos, mantenga presionada c antes de
pulsar r. Después continúe añadiendo símbolos seleccionándolos como se ha
2
y
3
explicado en los pasos
Después de haber seleccionado el último símbolo de la serie, presione
simplemente r.
, manteniendo pulsada c y presionando r.
TM
[]
16
Page 87

FUNCIÓN DE FORMATO AUTOMÁTICO
Con la función de formato automático, podrá seleccionar gran variedad de formatos
preajustados adecuados para su necesidad específica. Esta función ajustará automáticamente
la longitud de la etiqueta y los márgenes de la cinta sin cambiar el texto ni ningún otro
formato, permitiéndole crear etiquetas con mayor rapidez y facilidad.
Los formatos preajustados son los siguientes:
Ajuste de formato
automático
DEFAULT OFF FULL LEFT
3,5"FLOPPY 2,8" (7,0 cm) NARROW CENTER
miniDV 1,7" (4,3 cm) NARROW CENTER
VHS SPINE 5,5" (14,0 cm) NARROW CENTER
VHS 3,0" (7,7 cm) NARROW CENTER
VCR8mm CASE 3,6" (9,2 cm) NARROW CENTER
VCR8mm 2,9" (7,3 cm) NARROW CENTER
VHS-C SPINE 1,8" (4,5 cm) NARROW CENTER
VHS-C 2,3" (5,8 cm) NARROW CENTER
AUDIO CASSETTE 3,5" (8,9 cm) NARROW CENTER
DAT CASSETTE 2,2" (5,6 cm) NARROW CENTER
MINI DISK 2,0" (5,2 cm) NARROW CENTER
ORGANISER L 3,2" (8,2 cm) NARROW CENTER
ORGANISER S 2,6" (6,5 cm) NARROW CENTER
FILE LONG 7,2" (18,3 cm) NARROW CENTER
FILE SHORT 3,7" (9,4 cm) NARROW CENTER
Para seleccionar un formato preajustado:
1 Mantenga pulsada c y presione una vez Y. El ajuste actualmente seleccionado
aparecerá en el visualizador.
2 Pulse h o e para seleccionar el ajuste deseado.
☞ El ajuste predeterminado (DEFAULT) podrá seleccionarse presionando _.
3 Presione r para aplicar el ajuste seleccionado.
☞ El indicador de longitud se encenderá cuando seleccione un ajuste que no sea
DEFAULT.
Ajuste de longitud
de la etiqueta
Ajuste del margen
de la cinta
Ajuste de la alineación
horizontal
17
Page 88

FUNCIÓN DE TIPO DE CARACTERES
Con la función del tipo de caracteres podrá seleccionar uno de cuatro de tipos de caracteres
para su texto.
Los ajustes de tipos de caracteres siguientes están disponibles:
El ajuste inicial del tipo de caracteres es FONT 1. El indicador de tipo de caracteres de la parte
inferior izquierda del visualizador muestra el tipo de caracteres seleccionado actualmente.
Consulte el apartado de Referencia, al final de esta sección, para ver muestras de los ajustes
disponibles.
Para cambiar el ajuste del tipo de caracteres:
1 Manteniendo presionada c, pulse una vez 1, y mantenga presionada c para
hacer que se visualice el tipo de caracteres actualmente ajustado.
2 Manteniendo presionada c, continúe presionando 1 hasta que se visualice el tipo de
caracteres actualmente ajustado.
☞ El ajuste de tipo actual se mostrará en el indicador de estilo de la esquina inferior
derecha del visualizador.
3 Para aplicar el ajuste de tipo de caracteres seleccionado a todo el texto, suelte c.
FUNCIONES DE TAMAÑO Y DE ANCHO
El tamaño de los caracteres puede ajustarse empleando las funciones de tamaño (Size) y de
ancho (Wide). Puesto que el tamaño de los caracteres que puede utilizarse depende del ancho
de la cinta, la tabla siguiente indica los tamaños de caracteres que pueden utilizarse con cada
ancho de cinta.
18
Anchos de cinta Tamaños (en puntos)
1/4" (6 mm) 6, 9, 12
3/8" (9 mm) 6, 9, 12, 18
1/2" (12 mm) 6, 9, 12, 18, 24
3/4" (18 mm) 6, 9, 12, 18, 24, 36, 42
Page 89

El ajuste de tamaño inicial es AUTO y el ajuste de ancho inicial es OFF. El ajuste de tamaño
seleccionado actualmente se indica siempre mediante los indicadores de encima del
visualizador.
Con el ajuste de tamaño AUTO, la máquina compara el texto ajustado con el ancho de la cinta
instalada y ajusta automáticamente los caracteres al tamaño más grande posible. Sin embargo,
también hay disponibles otros siete tamaños, y cada uno puede imprimirse con cualquiera de
los dos ajustes de ancho.
☞ Con el ajuste AUTO seleccionado y una cinta de 1/2" (12 mm) o, 3/4" (18 mm) de
ancho instalada, el texto que consista en una sola línea de letras mayúsculas
solamente (y sin caracteres acentuados) será impreso con un tamaño de carácter
ligeramente más grande que el máximo posible (29 puntos para cinta de 1/2" (12
mm) de ancho, y 52 puntos para cinta de 3/4" (18 mm) de ancho).
Para cambiar el ajuste del tamaño:
1 Manteniendo presionada c, pulse una vez 2, y mantenga presionada c para
hacer que se visualice el tamaño actualmente ajustado.
2 Manteniendo presionada c, continúe presionando 2 hasta que se visualice el
tamaño actualmente ajustado mediante el indicador del mismo.
☞ El ajuste de tamaño actual se muestra mediante los indicadores de tamaño en la
parte superior del visualizador.
3 Para aplicar el ajuste de tamaño seleccionado a todo el texto, suelte c.
Para cambiar el ajuste de ancho:
1 Manteniendo presionada c, pulse una vez 3, y mantenga presionada c para
hacer que se visualice el ancho actualmente ajustado.
2
Manteniendo presionada c, continúe presionando 3 hasta que se visualice el
ancho actualmente ajustado.
3 Para aplicar el ajuste de ancho seleccionado a todo el texto, suelte c.
19
Page 90

FUNCIÓN DE ESTILO
Podrá seleccionar entre nueve estilos de caracteres distintos que podrá aplicar a su texto.
☞ Los caracteres que se imprimen utilizando los tamaños más pequeños pueden resultar
difíciles de leer si se seleccionan ciertos ajustes de estilos (por ejemplo, (I+SHAD).
Hay disponibles los siguientes ajustes de estilos:
NORMAL, BOLD (negrilla), OUTLINE (perfilado), SHADOW (sombreado),
ITALIC (cursiva), I+BOLD (cursiva y negrilla), I+OUTL (cursiva y perfilado),
I+SHAD (cursiva y sombreado), VERT (vertical),
El ajuste de estilo inicial es NORMAL. El indicador de estilo de la parte inferior del
visualizador muestra el ajuste de estilo actual cuando se selecciona cualquier ajuste diferente
a NORMAL.
Consulte el apartado de Referencia, al final de esta sección, para ver muestras de los ajustes
disponibles.
Para cambiar el ajuste del estilo:
1 Manteniendo presionada c, pulse una vez 4, y mantenga presionada c para
hacer que se visualice el estilo actualmente ajustado.
2 Manteniendo presionada c, continúe presionando 4 hasta que se visualice el
estilo actualmente ajustado mediante el indicador del mismo.
☞ El ajuste de estilo actual se mostrará en el indicador de estilo de la esquina inferior
derecha del visualizador.
3 Para aplicar el ajuste de estilo seleccionado a todo el texto, suelte c.
FUNCIÓN DE SUBRAYADO
Podrá acentuar el texto subrayándolo.
El ajuste de subrayado predeterminado es OFF. Cuando la función de Subrayado sea ajustada
en ON, se encenderá el indicador de subrayado Underline en la parte inferior derecha del
visualizador.
UNDL
ON
20
(Ejemplo)
Page 91

Para cambiar el ajuste del subrayado:
1 Manteniendo presionada c, pulse una vez 5, y mantenga presionada c para
hacer que se visualice el subrayado actualmente ajustado.
2 Manteniendo presionada c, continúe presionando 5 hasta que se visualice el
subrayado actualmente ajustado mediante el indicador del mismo.
☞ Cuando seleccione el ajuste ON, el indicador de Underline se en encenderá.
3 Para aplicar el ajuste de subrayado seleccionado a todo el texto, suelte c.
FUNCIÓN DE MARCOS
Con la función de marcos, podrá seleccionar diversos marcos y funciones destacadas para
hacer un diseño más decorativo o una etiqueta con más énfasis
El ajuste inicial es OFF; sin embargo, también hay disponibles los siguientes seis ajustes.
Si se selecciona cualquier ajuste que no sea OFF, se encenderá el indicador de Frame, situado
a la derecha del visualizador.
Para cambiar el ajuste del marco:
1 Manteniendo presionada c, pulse una vez 6, y mantenga presionada c para
hacer que se visualice el marco actualmente ajustado.
2 Manteniendo presionada c, continúe presionando 6 hasta que se visualice el marco
actualmente ajustado mediante el indicador del mismo.
☞ El indicador de Frame se enciende si se selectiona un ajuste que no sea OFF.
3 Para aplicar el ajuste de marco seleccionado a todo el texto, suelte c.
21
Page 92
FUNCIÓN DE CINTA
La función de margen cinta le permite ajustar el tamaño de los márgenes de los lados
izquierdo y derecho del texto.
El ajuste inicial de margen cinta es FULL, aunque hay también disponibles otros tres ajustes.
FULL (márgenes de 1" (24 mm)) NARROW (márgenes de 1/6" (4 mm))
NONE (márgenes de 5/64" (2 mm)) HALF (márgenes de 1/2" (12 mm))
☞ Cuando seleccione otro ajuste diferente a FULL, avanzará cinta extra antes de iniciarse
la impresión.
☞ Después de imprimir utilizando los ajustes de margen de cinta NARROW y HALF,
utilice unas tijeras para cortar a lo largo de la guía de corte (:) para centrar el texto en la
etiqueta.
Para cambiar el ajuste de la cinta:
1 Manteniendo presionada c, pulse una vez E, y mantenga presionada c para
hacer que se visualice la cinta actualmente ajustada.
2 Manteniendo presionada c, continúe presionando E hasta que se visualice la cinta
actualmente ajustada.
3 Para aplicar el ajuste de la cinta seleccionado a todo el texto, suelte c.
FUNCIÓN DE LA ALINEACIÓN HORIZONTAL
Podrá elegir alinear texto en una de las tres formas disponibles. Además, si utilizó la función
de longitud para ajustar la longitud de la etiqueta, los texto se alinearán dentro de la etiqueta
de acuerdo con el ajuste de alineación horizontal seleccionado.
El ajuste inicial es LEFT; sin embargo, también hay disponibles otros dos ajustes.
LEFT RIGHT
CENTER
22
Page 93

Para cambiar el ajuste de la alineación horizontal:
1 Manteniendo presionada c, pulse una vez R, y mantenga presionada c para
hacer que se visualice la alineación horizontal actualmente ajustada.
2 Manteniendo presionada c, continúe presionando R hasta que se visualice la
alineación horizontal actualmente ajustada.
3 Para aplicar el ajuste de la alineación seleccionado a todo el texto, suelte c.
FUNCIÓN DE IMPRESIÓN EN MODO ESPEJO
Esta función imprime su etiqueta de modo que el texto de la misma puede leerse desde el lado
adhesivo de la cinta. Si se adhieren etiquetas con impresión en modo espejo a un vidrio, o en
otro material transparente, podrán leerse correctamente desde el lado opuesto.
☞ Cuando emplee la función de impresión en modo espejo, el texto se imprimirá en cinta
transparente.
El ajuste inicial para la impresión en mode espejo es OFF.
ON
Para activar o desactivar la impresión en mode espejo:
1 Manteniendo presionada c, pulse una vez p, y mantenga presionada c para
hacer que se visualice la impresión en modo espejo actualmente ajustada.
2 Manteniendo presionada c, continúe presionando p hasta que se visualice la
impresión en modo espejo actualmente ajustada.
3 Para aplicar el ajuste de la impresión en modo espejo seleccionado a todo el texto, suelte
c.
23
Page 94

FUNCIÓN DE LONGITUD
Aunque la longitud de la etiqueta impresa ajusta automáticamente dicha longitud de acuerdo
con el texto introducido, es posible que usted desee hacer una etiqueta con una longitud
específica. La función de longitud le permitirá ajustar la longitud de la etiqueta entre 1,6” y
11,8” (4,0 cm y 30,0 cm).
El ajuste predeterminado de longitud es OFF. Cuando ponga la función de longitud en ON, se
encenderá el indicador de longitud de la parte derecha del visualizador.
Para activar y desactivar la función de longitud:
1 Manteniendo presionada c, presione una vez T, y mantenga presionada c
hasta que se visualice brevemente la longitud actual de la etiqueta (texto y ambos
márgenes). Después el visualizador mostrará el ajuste de longitud de etiqueta actual (ON
u OFF).
2 Manteniendo presionada c, continúe presionando T hasta que se visualice el
ajuste de longitud de etiqueta deseado.
☞ Cuando seleccione ON, se encenderá el indicador de longitud.
3 Suelte c. Si había seleccionado ON, se visualizará la longitud actual de la etiqueta.
4 Presione h o e para seleccionar la longitud deseada, o utilice las teclas numéricas
para introducir la longitud.
☞ Para cambiar las unidades (pulgadas o centímetros), presione M hasta que
aparezcan las unidades deseadas.
Para cambiar la longitud en pasos de 1” (1,0 cm), mantenga pulsada h o e, y
después presione la tecla cuando se visualice el ajuste deseado.
5 Presione r.
24
Page 95

FUNCIÓN DE CORTE AUTOMÁTICO
La función de Corte automático le permite ajustar si la máquina va a cortar automáticamente
o no cada etiqueta después de imprimirla. Active la función de corte automático antes de
empezar a imprimir para cortar automáticamente las etiquetas después de imprimirlas.
☞ Después de imprimir una etiqueta con la función de Corte automático ajustada en OFF,
mantenga presionada c y presione _ una vez para avanzar la cinta, y después
córtela.
☞ Para cortar cintas de tela o cintas de adhesivo fuerte utilice unas tijeras.
Para activar o desactivar la función de corte automático:
1 Mientras mantiene presionada c, presione una vez Z y mantenga presionada
c para visualizar al ajuste de corte automático actual.
2 Mientras mantiene presionada c, continúe presionando Z hasta que se visualice
el ajuste de corte automático deseado.
3 Suelte c para aplicar el ajuste de corte automático seleccionado.
TECLA DE IMPRESIÓN
Después de haber introducido su texto y de haber elegidos los ajustes de formato deseados,
podrá imprimir.
☞ Si la función de corte automático está activada (ON), la etiqueta se cortará
automáticamente después de haberse impreso.
Para imprimir una etiqueta:
● Presione p una vez. Se visualizarán “COPIES” y el número de la etiqueta que esté
imprimiéndose.
☞ Si el tamaño de caracteres seleccionado es demasiado grande para el ancho del
cartucho de cinta instalado, aparecerá el mensaje “CHR SIZE AUTO?”. Para
permitir que el tamaño de texto se ajuste automáticamente, presione p o r.
Para impedir que el tamaño de texto sea cambiado, presione *.
FUNCIÓN DE AVANCE Y CORTE
La función de avance y corte se utiliza para hacer que la cinta avance 1” (24 mm) y se corte
automáticamente, por ejemplo después de haber impreso con la función de corte automático
desactivada (OFF) o cuando se haya interrumpido la impresión.
Para hacer que la cinta avance 1” (24 mm):
● Mantenga pulsada c y presione _ una vez. La cinta avanzará 1” (24 mm) y se
cortará.
☞ Para cortar cintas de tela o cintas de adhesivo fuerte utilice unas tijeras.
25
Page 96

FUNCIÓN DE NUMERACIÓN
Esta función podrá utilizarse para imprimir muchas copias del mismo texto aumentando en
cierto número en el texto después de haber impreso cada etiqueta.
Para utilizar la función de numeración:
1 Presione f, w, h, o e para colocar el cursor debajo del número que desee
aumentar.
2 Mantenga presionada c y presione O. En el visualizador aparecerá el mensaje
“NUMBER UNTIL” con el ajuste actual.
☞ Para cancelar la función de Numeración en cualquier momento, mantenga
presionada c y presione O (O simplemente presione * ).
3 Utilice estas teclas numéricas para escribir el último número a imprimir.
☞ El último número a imprimir también puede seleccionarse presionando h o e.
No podrá introducirse un número inferior al que haya sido seleccionado.
4 Para comenzar la impresión de etiquetas, presione p (o r ). El número de cada
copia se visualizará mientras esté copiándose.
☞ Si la función Margen de cinta está puesta en cualquier otro ajuste diferente a
NONE, se imprimirá una guía de corte (:) entre cada etiqueta para poder cortar la
cinta al tamaño correcto.
FUNCIÓN DE IMPRESIÓN REPETIDA
Esta función le permite imprimir hasta 9 copias del mismo texto.
Para emplear la función de impresión repetida:
1 Mantenga presionada c y presione I. En el visualizador aparecerá el mensaje
“COPIES” con el ajuste por defecto 1, que habrá que cambiar según sea necesario.
☞ Para cancelar la función de impresión repetida en cualquier momento, mantenga
presionada c y presione I (o simplemente presione *).
2 Presione h o e hasta que se muestre el número deseado de copias, o utilice las teclas
numéricas para escribir el número.
3 Presione p (o r ) para empezar a imprimir las etiquetas. Se visualizará el número
de cada copia mientras se imprime.
☞ Si la función Margen de cinta está puesta en cuanquier otro ajuste diferente a
NONE, se imprimirá una guía de corte (:) entre cada etiqueta para poder cortar la
cinta al tamaño correcto.
26
Page 97

FUNCIONES DE LA MEMORIA
Usted podrá utilizar la memoria para almacenar los archivos de texto que utilice con más
frecuencia. El texto permanecerá en la memoria, junto con su formato, incluso después de
haber quitado todos los caracteres del visualizador utilizando la función de Borrado
(manteniendo presionada c y presionando *).
Cuando se almacena un archivo, se le asigna un número para poder invocarlo fácilmente. En
la memoria se pueden almacenar hasta 10 archivos de texto o aproximadamente 300
caracteres. (Un solo archivo de texto podrá contener un máximo de 91 caracteres.)
Cuando se desee un archivo de texto con la función de memoria, se aparecera archivo
almacenado, el texto podrá editar o imprimirse sin cambiar el archivo originalmente almacenado.
Cuando ya no necesite un archivo podrá utilizar la función de borrado de la memoria.
☞ Cuando tenga que insertar nuevas pilas, hágalo antes de cinco minutos de haber
extraído las viejas, ya que de lo contrario los archivos de texto almacenados en la
memoria se perderían (a menos que la máquina esté enchufada en un tomacorriente de
la red con el adaptador de alimentación de CA (ca)).
ALMACENAMIENTO DE TEXTO
Para almacenar un archivo de texto:
1 Mantenga presionada c y presione 7. En el visualizador aparecerá el mensaje
“STORE” con el número de archivo seleccionado actualmente.
☞ Para abandonar la función de almacenamiento del texto, mantenga pulsada c
y presione 7 (o simplemente presione *).
2 Presione una tecla numérica (o presione h o e) para seleccionar el número de
archivo donde quiera almacenar el texto.
3 Presione r. El texto se almacenará en el número de archivo seleccionado y volverá a
aparecer en el visualizador el texto previamente mostrado.
☞ Si ya hay un archivo almacenado con el número de archivo seleccionado, en el
visualizador aparecerá el mensaje “OVERWRITE?”, y usted tendrá que decidir
entre reescribir o borrar tal archivo.
☞ Si ya se ha almacenado el número máximo de caracteres, aparecerá el mensaje
“MEMORY FULL!” en el visualizador. Cuando ocurra esto, tendrá que borrar un
mensaje existente antes de poder almacenar otro nuevo.
Par reescribir un archivo almacenado con otro nuevo:
● Presione r para borrar el archivo previamente almacenado y almacenar el nuevo
con el número seleccionado.
☞ Para retroceder y elegir otro número de archivo sin perder el archivo de texto,
presione *, y después seleccione un número de archivo diferente.
27
Page 98

INVOCACIÓN DE TEXTO
Para invocar un archivo de texto:
1 Mantenga presionada c y presione 8. En el visualizador aparecerá el mensaje
“RECALL” con el número de archivo y el principio del texto almacenado o invocado más
recientemente.
☞ Para abandonar la función de memoria sin solicitar texto, mantenga pulsada c
y presione 8 (o presione simplemente *).
2 Presione una tecla numérica (o presione h o e) para seleccionar el número de
archivo que contenga el texto que quiera invocar. Se mostrará el texto almacenado en el
número de archivo seleccionado.
☞ Para ver otras partes del archivo de texto seleccionado, presione f o w.
☞ Para hacer que se visualice el texto almacenado en otros números de archivos,
presione h o e, o la tecla correspondiente a otro número de archivo.
3 Presione r. Cualquier texto previamente introducido se borrará y el texto introducido
en el número de archivo seleccionado se vera en la pantalla.
BORRADO DE UN ARCHIVO
Para borrar un archivo de texto:
1 Mantenga presionada c y presione 9. En el visualizador aparecerá el mensaje
“CLEAR” con el número de archivo y el principio del texto almacenado o invocado más
recientemente.
☞ Para abandonar la función de borrado de la memoria sin borrar el archivo de texto,
mantenga pulsada c y presione 9 (o presione simplemente *).
2 Presione una tecla numérica (o presione h o e) para seleccionar el número de
archivo que contenga el texto que quiera borrar. Se mostrará el texto almacenado en el
número de archivo seleccionado.
☞ Para ver otras partes del archivo de texto seleccionado, presione f o w.
Para hacer que se visualice el texto almacenado en otros números de archivos,
presione h o e, o la tecla correspondiente a otro número de archivo.
3 Presione r. Aparecerá el mensaje “OK TO CLEAR?”.
☞ Para retroceder y seleccionar un archivo de texto diferente, presione *.
4 Para borrar el archivo de texto seleccionado, presione r.
28
Page 99

SOLUCIÓN DE PROBLEMAS
Problema Remedio
1. La pantalla se queda en blanco después
de haber conectado la alimentación de
la máquina.
2. La máquina no imprime o los caracteres
impresos quedan borrosos.
3. Los archivos de texto almacenados en la
memoria ya no están ella.
4. Los caracteres impresos no se forman
correctamente.
5. Aparece una línea horizontal en blanco a
través de la etiqueta impresa.
6. Aparecen franjas. • Se ha terminado la cinta. Reemplace el
7. La máquina se ha “bloqueado” (es decir,
no responde cuando se presiona una
tecla).
• Compruebe que el adaptador de CA (ca)
esté correctamente enchufado.
• Si está empleando pilas alcalinas,
compruebe que estén correctamente
insertadas.
• Si las pilas están gastadas, reemplácelas
por otras nuevas.
• Compruebe que el cartucho de cinta se
haya insertado correctamente.
• Si el cartucho de cinta está vacío,
reemplácelo por otro nuevo.
• Asegúrese de que la cubierta del
cartucho de cinta se haya cerrado.
• Si las pilas están gastadas, reemplácelas
por otras nuevas.
• Si está empleando pilas alcalinas, quizás
estén gastadas. Pruebe utilizando el
adaptador de CA (ca) o reemplace las
pilas por otras nuevas.
• Limpie la cabeza de impresión como se
ha explicado en la página 6.
cartucho de cinta por otras nuevas.
• Desconecte la alimentación de la
máquina, y entonces, mientras mantiene
presionado c y R, vuelva a
conectar la alimentación.
El texto y los formatos del visualizador y
todos los archivos de texto almacenados
en la memoria quedan borrados.
29
Page 100
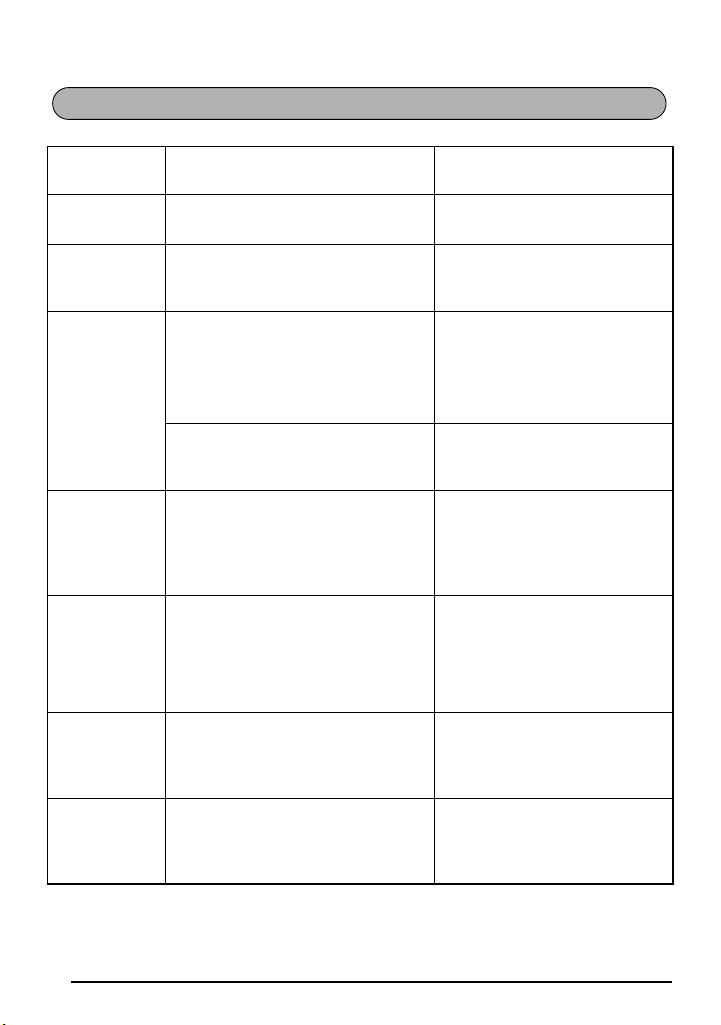
LISTA DE MENSAJES DE ERROR
Mensaje de
error
5 LINE
LIMIT!
BATTERIES
WEAK!
BUFFER
EMPTY!
BUFFER
FULL!
CAN’T
HERE
CASSETTE
CHANGED!
CHANGE
ADAPTOR!
Causa Remedio
Este mensaje aparecerá si ya existen
cinco líneas cuando presione r.
Este mensaje aparece cuando las
pilas alcalinas instaladas están
gastadas.
• Este mensaje aparece si mantiene
pulsada c y presiona T,
pero sin haber introducido texto
en el visualizador.
• Este mensaje aparecerá si intenta
imprimir sin haber introducido
texto en el visualizador.
Este mensaje aparecerá si intenta
introducir un carácter, símbolo,
espacio o cambiar de línea cuando
ya haya sido introducido el número
máximo de caracteres.
Este mensaje aparecerá cuando
mantenga presionada c y
presione O si el cursor está al final
del texto.
Este mensaje aparecerá si cambia el
cartucho de cinta mientras la P-touch
está recibiendo datos procedentes de
la computadora.
Este mensaje aparece si se está
empleando un adaptador de alta
tensión.
Limite el número de líneas a
cinco.
Reemplace las pilas o emplee el
adaptador de CA (ca).
• Introduzca algo de texto antes
de iniciar la función.
• Introduzca texto antes de
imprimir.
Borre algo del texto existente
para poder introducir más texto.
Ponga el cursor debajo de un
número antes de mantener
presionada c y presionar
O.
Cancele la tarea de impresión,
instale el cartucho de cinta
correcto, y después intente
imprimir de nuevo.
Desconecte el adaptador de alta
tensión y conecte el adaptador
diseñado exclusivamente para
esta máquina.
30
 Loading...